
Precautions
Location
Using the unit in the following locations can result in a malfunction.
• In direct sunlight
• Locations of extreme temperature or humidity
• Excessively dusty or dirty locations
• Locations of excessive vibration
•Closetomagneticelds
Power supply
Be sure to turn the power switch to OFF when the unit is not in use. Remove the bat-
tery in order to prevent it from leaking when the unit is not in use for extended periods.
Interference with other electrical devices
Radios and televisions placed nearby may experience reception interference. Oper-
ate this unit at a suitable distance from radios and televisions.
Handling
To avoid breakage, do not apply excessive force to the switches or controls.
Care
If the exterior becomes dirty, wipe it with a clean, dry cloth. Do not use liquid clean
-
ers
suchasbenzeneorthinner,orcleaningcompoundsorammablepolishes.
Keep this manual
After reading this manual, please keep it for later reference.
Keeping foreign matter out of your equipment
Never set any container with liquid in it near this equipment. If liquid gets into the
equipment,itcouldcauseabreakdown,re,orelectricalshock.Becarefulnottolet
metal objects get into the equipment.
THE FCC REGULATION WARNING (for USA)
NOTE: This equipment has been tested and found to comply with the limits for
a Class B digital device, pursuant to Part 15 of the FCC Rules. These limits
are designed to provide reasonable protection against harmful interference in a
residential installation. This equipment generates, uses, and can radiate radio
frequency energy and, if not installed and used in accordance with the instruc-
tions, may cause harmful interference to radio communications. However, there
is no guarantee that interference will not occur in a particular installation. If this
equipment does cause harmful interference to radio or television reception, which
can be determined by turning the equipment off and on, the user is encouraged
to try to correct the interference by one or more of the following measures:
• Reorient or relocate the receiving antenna.
• Increase the separation between the equipment and receiver.
• Connect the equipment into an outlet on a circuit different from that to which
the receiver is connected.
• Consult the dealer or an experienced radio/TV technician for help.
If items such as cables are included with this equipment, you must use those
included items.
Unaut
horizedchangesormodicationtothissystemcanvoidtheuser’sauthority
to operate this equipment.
This device complies with Part 15 of the FCC Rules. Operation is subject to the
following two conditions: (1) This device may not cause harmful interference, and
(2) this device must accept any interference received, including interference that
may cause undesired operation.
Complies with Canadian ICES-003 Class B.
Conforme au Reglement Canadian NMB-003 classe B.
Notice regarding disposal (EU only)
When this “crossed-out wheeled bin” symbol is displayed on the product,
owner’smanual,battery,orbatterypackage,itsigniesthatwhenyouwish
to dispose of this product, manual, package or battery you must do so in an
approved manner. Do not discard this product, manual, package or battery
along with ordinary household waste. Disposing in the correct manner will
prevent harm to human health and potential damage to the environment.
Since the correct method of disposal will depend on the applicable laws
and regulations in your locality, please contact your local administrative
body for details. If the battery contains heavy metals in excess of the regulated
amount, a chemical symbol is displayed below the “crossed-out wheeled bin”
symbol on the battery or battery package.
IMPORTANT NOTICE TO CONSUMERS
Thisproducthasbeenmanufacturedaccordingtostrictspecicationsandvoltage
requirements that are applicable in the country in which it is intended that this prod-
uct should be used. If you have purchased this product via the internet, through mail
order, and/or via a telephone sale, you must verify that this product is intended to be
used in the country in which you reside.
WARNING: Use of this product in any country other than that for which it is intended
could
bedangerousandcouldinvalidatethemanufacturer’sordistributor’swar-
ranty. Please also retain your receipt as proof of purchase otherwise your product
may
bedisqualiedfromthemanufacturer’sordistributor’swarranty
.
CALIFORNIA USA ONLY
This Perchlorate warning applies only to primary CR (Manganese Dioxide)
Lithium coin cells sold or distributed ONLY in California USA.
“Perchlorate Material–special handling may apply, See www.dtsc.ca.gov/hazard-
ouswaste/perchlorate.”
Thank you for purchasing the Korg headtune Clip-on Tuner.
Nous vous remercions d’avoir choisi l’accordeur à pince headtune
de Korg.
Vielen Dank für Ihre Entscheidung zu einem headtune Clip-
Stimmgerät von Korg.
Gracias por comprar el Anador de Clip Korg headtune.
このたびはコルグ・クリップオン・チューナー headtuneをお買い上げい
ただきまして、まことにありがとうございます。
OWNER’S MANUAL
MANUEL D’UTILISATION
BEDIENUNGSANLEITUNG
MANUAL DE USUARIO
取扱説明書
4015-2 Yanokuchi, Inagi-city, Tokyo 206-0812 Japan
©
2012 KORG INC.
Précautions
Emplacement
L’utilisationdecetinstrumentdanslesendroitssuivantspeutenentraînerlemauvais
fonctionnement.
• En plein soleil
• Endroits très chauds ou très humides
• Endroits sales ou fort poussiéreux
• Endroits soumis à de fortes vibrations
• A proximité de champs magnétiques
Alimentation
Lorsquevousn’utilisezpasl’appareil,n’oubliezpasdelemettrehorstension.Retirez
lespilespourévitertoutefuitelorsquel’appareilneserapasutilisépendantdelongues
périodes de temps.
Interférences avec d’autres appareils électriques
Les postes de radio et de télévision situés à proximité peuvent par conséquent souffrir
d’interférencesàlaréception.Veuillezdèslorsfairefonctionnercetappareilàune
distance raisonnable de postes de radio et de télévision.
Maniement
Pour éviter de les endommager, manipulez les commandes et les boutons de cet instru
-
ment avec soin.
Entretien
Lo
rsquel’instrumentsesalit,nettoyez-leavecunchiffonpropreetsec.Nevousservez
pasd’agentsdenettoyageliquidestelsquedubenzèneoududiluant,voiredesproduits
inflammables.
Conservez ce manuel
Après avoir lu ce manuel, veuillez le conserver soigneusement pour toute référence
ultérieure.
Evitez toute intrusion d’objets ou de liquide
Neplacezjamaisderécipientcontenantduliquideprèsdel’instrument.Sileliquide
se renverse ou coule, il risque de provoquer des dommages, un court-circuit ou une
électrocution.Veillezànepaslaissertomberdesobjetsmétalliquesdansleboîtier
(trombones, par ex.).
Note concernant les dispositions (Seulement EU)
Quandunsymboleavecunepoubellebarréed’unecroixapparaitsurle
produit,lemoded’emploi,lespilesoulepackdepiles,celasignieque
ce produit, manuel ou piles doit être déposé chez un représentant
compétent, et non pas dans une poubelle ou toute autre déchetterie
conventionnelle. Disposer de cette manière, de prévenir les dommages
pourlasantéhumaineetlesdommagespotentielspourl’environne
-
ment.
Labonneméthoded’éliminationdépendradesloisetrèglements
applicablesdansvotrelocalité,s’ilvousplaît,contactezvotreorganisme
administratif pour plus de détails. Si la pile contient des métaux lourds au-delà
duseuilréglementé,unsymbolechimiqueestafchéendessousdusymbolede
lapoubellebarréed’unecroixsurlapileoulepackdepiles.
REMARQUE IMPORTANTE POUR LES CLIENTS
Ceproduitaétéfabriquésuivantdesspécicationssévèresetdesbesoinsen
tension applicables dans le pays où ce produit doit être utilisé. Si vous avez
achetéceproduitvial’internet,parventeparcorrespondanceou/etventepar
téléphone,vousdevezvérierqueceproduitestbienutilisabledanslepays
où vous résidez.
ATTENTION:L’utilisationdeceproduitdansunpaysautrequeceluipour
lequel il a été conçu peut être dangereuse et annulera la garantie du fabricant
ou du distributeur. Conservez bien votre récépissé qui est la preuve de votre
achat, faute de quoi votre produit ne risque de ne plus être couvert par la
garantie du fabricant ou du distributeur.
Vorsichtsmaßnahmen
Aufstellungsort
Vermeiden Sie das Aufstellen des Geräts an Orten, an denen.
• es direkter Sonneneinstrahlung ausgesetzt ist;
• hohe Feuchtigkeit oder Extremtemperaturen auftreten können;
• Staub oder Schmutz in großen Mengen vorhanden sind;
• das Gerät Erschütterungen ausgesetzt sein kann.
• in der Nähe eines Magnetfeldes.
Stromversorgung
Stellen Sie den Netzschalter auf OFF, wenn das Gerät nicht benutzt wird. Wenn Sie
das Gerät über einen längeren Zeitraum nicht benutzen, nehmen Sie die Batterien
heraus, damit sie nicht auslaufen.
Störeinüsse auf andere Elektrogeräte
Dieser kann bei in der Nähe aufgestellten Rund-funkempfängern oder Fernsehge
-
räten Empfangsstörungen hervorrufen. Betreiben Sie solche Geräte nur in einem
geeigneten Abstand von diesem Erzeugnis.
Bedienung
Vermeiden Sie bei der Bedienung von Schaltern und Reglern unangemessenen
Kraftaufwand.
Reinigung
Bei auftretender Verschmutzung können Sie das Gehäuse mit einem trockenen,
sauberen Tuch abwischen. Verwenden Sie keinerlei Flüssigreiniger wie beispiels-
weise Reinigungsbenzin, Verdünnungs- oder Spülmittel. Verwenden Sie niemals
brennbare Reiniger.
Bedienungsanleitung
Bewahren Sie diese Bedienungsanleitung gut auf, falls Sie sie später noch einmal
benötigen.
Flüssigkeiten und Fremdkörper
Stellen Sie niemals Behältnisse mit Flüssigkeiten in der Nähe des Geräts auf. Wenn
Flüssigkeit in das Gerät gelangt, können Beschädigung des Geräts, Feuer oder ein
elek-t
rischer Schlag die Folge sein. Beachten Sie, daß keinerlei Fremdkörper in das
Gerät gelangen.
Hinweis zur Entsorgung (Nur EU)
Wenn Sie das Symbol mit der „durchgekreuzten Mülltonne“ auf Ihrem
Produkt, der dazugehörigen Bedienungsanleitung, der Batterie oder
dem Batteriefach sehen, müssen Sie das Produkt in der vorgeschriebe-
nen Art und Weise entsorgen. Dies bedeutet, dass dieses Produkt mit
elektrischen und elektronischen Komponenten nicht mit dem normalen
Hausmüll entsorgt werden darf. Für Produkte dieser Art existiert ein
separates, gesetzlich festgelegtes Entsorgungssystem. Gebrauchte
elektrische und elektronische Geräte müssen separat entsorgt werden,
um ein umweltgerechtes Recycling sicherzustellen. Diese Produkte müssen bei
benannten Sammelstellen abgegeben werden. Die Entsorgung ist für den
Endverbraucher kostenfrei! Bitte erkundigen sie sich bei ihrer zuständigen
Behörde, wo si
e diese Produkte zur fachgerechten Entsorgung abgeben können.
Falls ihr Produkt mit Batterien oder Akkumulatoren ausgerüstet ist, müssen sie
diese vor Abgabe des Produktes entfernen und separat entsorgen (siehe oben).
Die Abgabe dieses Produktes bei einer zuständigen Stelle hilft ihnen, dass das
Produkt umweltgerecht entsorgt wird. Damit leisten sie persönlich einen nicht
unerheblichen Beitrag zum Schutz der Umwelt und der menschlichen
Gesundheit vor möglichen negativen Effekten durch unsachgemäße Entsorgung
von Müll. Batterien oder Akkus, die Schadstoffe enthalten, sind auch mit dem
Symbol einer durchgekreuzten Mülltonne gekennzeichnet. In der Nähe zum
MülltonnensymbolbendetsichdiechemischeBezeichnungdesSchadstoffes.
Cd oder NiCd steht für Cadmium, Pb für Blei und Hg für Quecksilber
.
WICHTIGER HINWEIS FÜR KUNDEN
DiesesProduktwurdeunterstrengerBeachtungvonSpezikationenund
Spannungsanforderungen hergestellt, die im Bestimmungsland gelten. Wenn
Sie dieses Produkt über das Internet, per Postversand und/oder mit telefoni-
scher Bestellung gekauft haben, müssen Sie bestätigen, dass dieses Produkt
für Ihr Wohngebiet ausgelegt ist.
WARNUNG: Verwendung dieses Produkts in einem anderen Land als dem, für
das es bestimmt ist, verwendet wird, kann gefährlich sein und die Garantie des
Herstellers oder Importeurs hinfällig lassen werden. Bitte bewahren Sie diese
Quittung als Kaufbeleg auf, da andernfalls das Produkt von der Garantie des
Herstellers oder Importeurs ausgeschlossen werden kann.
Precauciones
Ubicación
El uso de la unidad en las siguientes ubicaciones puede dar como resultado un mal
funcionamiento:
• Expuesto a la luz directa del sol
• Zonas de extremada temperatura o humedad
• Zonas con exceso de suciedad o polvo
• Zonas con excesiva vibración
• Cercano a campos magnéticos
Fuente de alimentación
Apague la unidad cuando no la use la batería. Retire las baterías si no va a usar la
unidad durante un tiempo largo.
Interferencias con otros aparatos
Las radios y televisores situados cerca pueden experimentar interferencias en la
recepción. Opere este dispositivo a una distancia prudencial de radios y televisores.
Manejo
Para evitar una rotura, no aplique excesiva fuerza a los conmutadores o controles.
Cuidado
Si exterior se ensucia, límpiese con un trapo seco. No use líquidos limpiadores
comodisolvente,nicompuestosinamables.
Guarde este manual
Después de leer este manual, guárdelo para futuras consultas.
Mantenga los elementos externos alejados del equipo
Nunca coloque ningún recipiente con líquido cerca de este equipo, podría causar
un cortocircuito, fuero o descarga eléctrica. Cuide de que no caiga ningún objeto
metálico dentro del equipo.
保証規定(必ずお読みください)
本保証書は、保証期間中に本製品を保証するもので、付属品類(ヘッドホンなど)は保
証の対象になりません。保証期間内に本製品が故障した場合は、保証規定によって無
償修理いたします。
1.
本保証書の有効期間はお買い上げ日より1ケ年です。
2.
次の修理等は保証期間内であっても有償となります。
•
消耗部品(電池、スピーカーなど)の交換。
•
お取扱い方法が不適当のために生じた故障。
•
天災(火災、浸水等)によって生じた故障。
•
故障の原因が本製品以外の他の機器にある場合。
•
不当な改造、調整、部品交換などにより生じた故障または損傷。
•
保証書にお買い上げ日、販売店名が未記入の場合、または字句が書き替えられ
ている場合。
•
本保証書の提示がない場合。
尚、当社が修理した部分が再度故障した場合は、保証期間外であっても、修理した
日より3ケ月以内に限り無償修理いたします。
3.
本保証書は日本国内においてのみ有効です。ThiswarrantyisvalidonlyinJapan.
4.
お客様が保証期間中に移転された場合でも、保証は引き続きお使いいただけま
す。詳しくは、お客様相談窓口までお問い合わせください。
5.
修理、運送費用が製品の価格より高くなることがありますので、あらかじめお客様
相談窓口へご相談ください。発送にかかる費用は、お客様の負担とさせていただき
ます。
6.
修理中の代替品、商品の貸し出し等は、いかなる場合においても一切行っておりま
せん。
本製品の故障、または使用上生じたお客様の直接、間接の損害につきましては、弊社
は一切の責任を負いかねますのでご了承ください。
本保証書は、保証規定により無償修理をお約束するためのもので、これよりお客様の
法律上の権利を制限するものではありません。
■お願い
1.
保証書に販売年月日等の記入がない場合は無効となります。記入できないときは、
お買い上げ年月日を証明できる領収書等と一緒に保管してください。
2.
保証書は再発行致しませんので、紛失しないように大切に保管してください。
コルグheadtune保証書
本保証書は、保証規定により無償修理をお約束するものです。
お買い上げ日 年 月 日
販売店名
Nota respecto a residuos y deshechos (solo UE)
Cuando aparezca el símbolo del cubo de basura tachado sobre un
producto, su manual de usuario, la batería, o el embalaje de
cualquieradeéstos,signicaquecuandoquieretiredichosartículos
a la basura, ha de hacerlo en acuerdo con la normativa vigente de la
Unión Europea. No debe verter dichos artículos junto con la basura
de casa. Verter este producto de manera adecuada ayudará a evitar
daños a su salud pública y posibles daños al medioambiente. Cada
paístieneunanormativaespecícaacercadecómoverterproductos
potencialmente tóxicos, por tanto le rogamos que se ponga en contacto con
suocinaoministeriodemedioambienteparamásdetalles.Silabatería
contiene metales pesados por encima del límite permitido, habrá un símbolo
de un material químico, debajo del símbolo del cubo de basura tachado.
NOTA IMPORTANTE PARA EL CONSUMIDORE
Esteproductohasidofabricadodeacuerdoaestrictasespecicacionesy
requerimientos de voltaje aplicables en el país para el cual está destinado. Si
ha comprado este producto por internet, a través de correo, y/o venta telefóni-
ca,
debeustedvericarqueelusodeesteproductoestádestinadoalpaísen
el cual reside.
AVISO: El uso de este producto en un país distinto al cual está destinado po-
dría resultar peligroso y podría invalidar la garantía del fabricante o distribui-
dor. Por favor guarde su recibo como prueba de compra ya que de otro modo
el producto puede verse privado de la garantía del fabricante o distribuidor.
安全上のご注意
火災・感電・人身傷害の危険を防止するには
以下の指示を守ってください
警告
この注意事項を無視した取り扱いをすると、死亡や重傷を負う可能性があります。
・次のような場合には、直ちに電源を切る。
○異物が内部に入ったとき
○製品に異常や故障が生じたとき
修理が必要なときは、お客様相談窓口へ依頼してください。
・本製品を分解したり改造したりしない。
・
修理、部品の交換などで、取扱説明書に書かれていること以外は絶対にしない。
・大音量や不快な程度の音量で長時間使用しない。
大音量で長時間使用すると、難聴になる可能性があります。万一、聴力低下や
耳鳴りを感じたら、専門の医師に相談してください。
・本製品に異物(燃えやすいもの、硬貨、針金など)を入れない。
・温度が極端に高い場所(直射日光の当たる場所、暖房機器の近く、発熱する機
器の上など)での使用や保管はしない。
・振動の多い場所で使用や保管はしない。
・ホコリの多い場所で使用や保管はしない。
・風呂場、シャワー室で使用や保管はしない。
・雨天時の野外のように、湿気の多い場所や水滴のかかる場所で、使用や保管は
しない。
・本製品の上に、花瓶のような液体が入ったものを置かない。
・本製品に液体をこぼさない。
・濡れた手で本製品を使用しない。
注意
この注意事項を無視した取り扱いをすると、傷害を負うまたは物理的損害が発生する可能性があります。
・正常な通気が妨げられない所に設置して使用する。
・ラジオ、テレビ、電子機器などから十分に離して使用する。
ラジオやテレビ等に接近して使用すると、本製品が雑音を受けて誤動作する場
合があります。また、ラジオ、テレビ等に雑音が入ることがあります。
本製品をテレビ等の横に設置すると、本製品の磁場によってテレビ等の故障の
原因になることがあります。
・外装のお手入れは、乾いた柔らかい布を使って軽く拭く。
・長時間使用しないときは、電池の液漏れを防ぐために電池を抜く。
・電池は幼児の手の届かないところへ保管する。
・電池を過度の熱源(日光、火など)にさらさない。
・スイッチやツマミなどに必要以上の力を加えない。
故障の原因になります。
・外装のお手入れに、ベンジンやシンナー系の液体、コンパウンド質、強燃性のポ
リッシャーは使用しない。
・不安定な場所に置かない。
アフターサービス
修理または商品のお取り扱いについてのご質問、ご相談は、お客様相談窓口へお問い
合わせください。
お客様相談窓口
PHS等一部の電話ではご利用できません。固定電話または携帯電話
からおかけください。
受付時間月曜~金曜10:00 ~ 17:00(祝祭日、窓口休業日を除く)
●サービス・センター:〒168-0073東京都杉並区下高井戸1-15-12
Guitar
Bass
Ukulele
HT-G1
HT-G2HT-B1 HT-U1

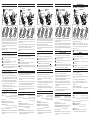
Installing the battery
The display may differ depending on which model you have purchased.
Power button
Battery
cover
Clip
Installing the
battery
Guitar
Bass
Display
LED meter
String name indicator LED
Ukulele
LED meter
Battery
cover
Lever
Range of
movement
120°
Open the baery cover by sliding it o. Place the baery into the com-
partment with the “+” side facing up, and then replace the baery cover.
When the remaining baery power becomes low, the string name in-
dicator LEDs will ash, and the LED meter will not function smoothly.
When this happens, it’s time to replace the baery with a new ones as
soon as possible.
Before you replace the baery, turn o the power and detach the head-
tune from your instrument.
Attaching the headtune
Aach the headtune to the headstock of your guitar, bass or ukulele.
Adjust the display to the angle that provides the best visibility.
When the headtune is aached to an instrument, hold it by the
lever on the clip, not the display.
Do not open the headtune farther than 120 degrees. Applying
excessive force will damage the unit.
Do not leave the headtune aached to your instrument for extend-
ed periods of time. Leaving the headtune aached for long periods
of time may damage the nish of your instrument.
Tuning procedure
1.
Press the power buon to turn on the power.
2.
Play a single tone with the string that you want to tune.
3.
Roughly tune the string until the string name indicator LED for the
string you’re playing lights up. The positions of the string name indica-
tor LEDs may dier depending on the model that you have purchased.
4.
Tune the instrument until the center of the LED meter lights up.
The left side of the LED meter will light up if your instrument is at,
and the right side will light up if your instrument is sharp.
5.
To turn o the power, press the power buon.
If approximately ten minutes pass without the headtune detecting
any sound, the power will turn o automatically.
Specications
Scale: 12 equal tempered chromatic steps (A4=440Hz)
Detection range: guitar E2 (82.41 Hz)—E7 (2637.02 Hz)
(sine wave) bass E1 (41.20 Hz)—G6 (1567.98 Hz)
Ukulele
(compatible with standard G, C, E and A tuning)
G3 (196.00 Hz)—A7 (3520.00 Hz)
Precision: +/-1 cent
Power supply: coin-type lithium baery (CR2032) x 1
Baery life: approximately 35 hours (continuous A4 input)
Dimensions (W x D x H):
54 x 26 x 35 mm / 2.13 x 1.02 x 1.38 inches [HT-G1/B1]
54 x 24 x 35 mm / 2.13 x 0.94 x 1.38 inches [HT-G2/U1]
Weight: 18g / 0.63oz. (including baery)
Included items: Owner’s manual, coin-type lithium baery (CR2032) x 1
* Specications and appearance are subject to change without notice for
improvement.
各部の名称と電池の入れ方
お買い上げの機種により、ディスプレイ面は異なります。
初めに、電池カバーをスライドさせて開けます。次に、+の極性を上にして
電池を入れ、最後に電池カバーを閉じます。
電池の残量が少なくなると、弦表示LEDが点滅し、LEDメーターがスムー
ズに動作しなくなります。このときは、早めに新しい電池と交換してくだ
さい。
また、電池を交換するときは、電源を切り、本機を楽器から取り外し
た状態で行ってください。
付属の電池は動作確認用のため、通常より寿命が短い場合があります。
取り付け方
本機をギター、ベースやウクレレのヘッドに取り付けます。開く角度を調整
して、ディスプレイ面が見やすい位置にしてください。
楽器に取り付けるときは、ディスプレイ面ではなくクリップのレバー
部分を持ってください。
本機を120度以上開かないでください。無理に力を加えると、故障の
原因となります。
ヘッドに長時間取り付けたままにしないでください。長時間取り付け
たままにすると、ヘッドに取り付け跡が残る場合があります。
チューニング方法
1.
電源ボタンを押して電源を入れます。
2.
チューニングをしたい弦を単音で鳴らします。
3.
鳴らした弦と同じ位置の弦表示LEDが点灯するように大まかにチューニン
グをします。
お買い上げの機種により、弦表示LEDの位置は異なります。
4.
LEDメーターの中央が点灯するように、楽器をチューニングします。
音が低いときはLEDメーターの左側が、音が高いときはLEDメーターの右
側が点灯します。
5.
電源を切るときは、電源ボタンを押します。
電源が入ったまま、音を約10分間認識しなかったときは、自動的に電源が切
れます。
仕 様
音 律:12平均律(A4=440Hz) 測定精度:±1セント
測定範囲: ギター E2(82.41Hz)~E7(2637.02Hz)
(サイン波) ベース E1(41.20Hz)~G6(1567.98Hz)
ウクレレ
(標準的なG、C、E、Aのチューニングに対応)
G3(196.00Hz)~A7(3520.00Hz)
電 源:コイン型リチウム電池(CR2032)x1
電池寿命:約35時間(A4連続入力時)
外形寸法(幅 x 奥行 x 高さ): 54x26x35mm[HT-G1/B1]
54x24x35mm[HT-G2/U1]
質 量:18g(電池含む)
付属品:取扱説明書、動作確認用コイン型リチウム電池(CR2032)x1
*仕様および外観は、改良のため予告なく変更する場合があります。
Installation de la pile
L’écran peut différer en fonction du modèle acheté.
Interrupteur
d’alimentation
Pince
Installation
de la pile
guitare
basse
Ecran
Indicateur à diodes
Indicateur LED du nom de la corde
Ukulele
Indicateur à diodes
Levier
Plage de
mouvement
120°
Couvercle du
compartiment
à pile
Couvercle du
compartiment
à pile
Ouvrez le couvercle du compartiment à pile en le faisant coulisser. Placez la pile
dans le compartiment en orientant sa face “+” vers le haut puis refermez le cou-
vercle du compartiment.
Si la puissance de la pile est faible, les indicateurs LED du nom de la corde cligno-
teront et l’indicateur à diode ne fonctionnera pas correctement.
Dans ce cas, vous
devez remplacer la pile et installer une pile neuve dès que possible.
Avant de remplacer la pile, meez le headtune hors tension et détachez-le de
l’instrument.
Attacher le headtune
Aachez le headtune à la tête de votre guitare, basse ou ukulele.
Ajustez l’angle de l’écran pour obtenir une lisibilité optimale.
Une fois le headtune aaché à l’instrument, maintenez-le par le levier de la
pince et non par l’écran.
N’ouvrez pas le headtune de plus de 120 degrés. N’exercez pas de force
excessive car cela endommagerait le produit.
Ne laissez pas le headtune trop longtemps sur l’instrument. Si vous laissez le
headtune xé trop longtemps à l’instrument, la nition de ce dernier risque
d’en sourir.
Accorder un instrument
1.
Appuyez sur l’interrupteur d’alimentation pour mere l’appareil sous tension.
2.
Jouez une note avec la corde que vous désirez accorder.
3. Accordez la corde jusqu’à ce que l’indicateur LED du nom de la corde jouée s’allume.
Les positions des indicateurs LED du nom de la corde peuvent diérer en fonc-
tion du modèle.
4.
Accordez l’instrument jusqu’à ce que le centre de l’indicateur à diode s’allume.
Si la note est trop basse, le côté gauche de l’indicateur à diodes s’allume et si la
note est trop haute, le côté droit de l’indicateur à diodes s’allume.
5.
Appuyez sur l’interrupteur d’alimentation pour mere l’appareil hors tension.
Si après environ dix minutes, le headtune n’a détecté aucun son, il se met auto-
matiquement hors tension.
Fiche technique
Gamme: Tempérament égal à 12 pas chromatiques (A4=440Hz)
Plage de détection: Guitare E2 (82,41 Hz)—E7 (2 637,02 Hz)
(sinusoïde)
Basse E1 (41,20 Hz)—G6 (1 567,98 Hz)
Ukulele
(compatible avec les accords G, C, E, et A – Sol, Mi, Do, La)
G3 (196 Hz)—A7 (3 520 Hz)
Précision: ±1 cent
Alimentation: Pile bouton au lithium CR2032 x 1
Autonomie de la pile: Environ 35 heures (entrée continue de la note A4)
Dimensions (L x P x H): 54 x 26 x 35 mm [HT-G1/B1]
54 x 24 x 35 mm [HT-G2/U1]
Poids: 18g (pile comprise)
Accessoires fournis: Manuel d’utilisation, Pile bouton au lithium CR2032 x 1
*Les caractéristiques et l’aspect du produit sont susceptibles d’être modiés
sans avis préalable en vue d’une amélioration.
Instalación de la Batería
La pantalla puede variar en función del modelo que haya adquirido.
guitarra
bajo
Pantalla
Medidor LED
Indicador LED de nombre de la cuerda
Ukulele
Medidor LED
Palanca
Range de
movieimento
120°
Botón de
encendido
Clip
Instalación
de la Batería
Tapa de
Batería
Tapa de
Batería
Abra la cubierta de la batería deslizándola. Coloque la batería en el
compartimiento con la cara de “+” hacia arriba y, a continuación, vuelva a
colocar la cubierta de batería.
Cuando la energía restante de la batería esté baja, los indicadores LED de
nombre de la cuerda parpadearán y el medidor LED no funcionará correc-
tamente.Si esto sucede, es hora de reemplazar la batería por una nueva lo
antes posible.Antes de reemplazar la batería, apague la unidad y suelte el
headtune de su instrumento.
Sujeción de headtune
Sujete headtune al mástil de su guitarra, bajo o ukulele.
Ajuste la pantalla con el ángulo que proporcione la mejor visibilidad.
Cuando headtune esté acoplado a un instrumento, sosténgalo por la
palanca del clip, no por la pantalla.
No abra el headtune más de 120 grados. Si aplica una fuerza excesiva
producirá daños en la unidad.
No deje el headtune conectado a su instrumento durante un largo pe-
ríodo de tiempo. Si deja headtune conectado durante largos períodos
de tiempo, podría dañar el acabado de su instrumento.
Procedimiento de Anación
1.
Pulse el botón de encendido para encender la unidad.
2.
Toque un solo tono con la cuerda que desee anar.
3.
Ane la cuerda de manera aproximada hasta que el indicador LED de
nombre de la cuerda que está tocando se ilumine.
Las posiciones de los indicadores LED de nombre de la cuerda pueden
variar en función del modelo que haya adquirido.
4.
Ane el instrumento hasta que el centro del medidor LED se ilumine.
El lado izquierdo del medidor LED se iluminará si su instrumento es
demasiado grave, y el lado derecho se iluminará si su instrumento es
demasiado agudo.
5.
Para apagar la unidad, presione el botón de encendido.
Si pasan aproximadamente diez minutos sin que headtune detecte soni-
do, la unidad se apagará automáticamente.
Especicaciones
Escala: 12 pasos cromáticos de temperamento igual (A4=440Hz)
Rango de detección: Guitarra E2 (82,41 Hz)—E7 (2637,02 Hz)
(onda sinusoidal) Bajo E1 (41,20 Hz)—G6 (1567,98 Hz)
Ukulele (compatible con anación G, C, E y A estándar)
G3 (196,00 Hz)—A7 (3520,00 Hz)
Precisión: +/-1 centésimas
Alimentación: Batería de litio tipo botón (CR2032) x 1
Duración de la Batería:
aproximadamente 35 horas (entrada continua nota A4)
Dimensiones (Anch. x Prof. x Alt.): 54 x 26 x 35 mm [HT-G1/B1]
54 x 24 x 35 mm [HT-G2/U1]
Peso: 18g (incluyendo batería)
Elementos incluidos: Manual de usuario, Batería de litio tipo botón (CR2032) x 1
*Las especicaciones y el aspecto están sujetas a cambios sin previo aviso
por mejora.
Einlegen der Batterie
Das Display kann je nach gekauftem Modell abweichen.
Netzschalter
Clip
Einlegen der
Batterie
Batteriefa
chblende
Gitarre
Basses
Display
LED-Messanzeige
Anzeige-LEDs der Saitennamen
Ukulele
LED-Messanzeige
Hebel
Schwenkbereich
120°
Batteriefa
chblende
Önen Sie Baeriefach durch Verschieben der Blende. Legen Sie die Baerie
mit dem „+“-Pol nach oben in das Fach und bringen Sie die Blende wieder an.
Bei schwacher Baerieleistung beginnen die Anzeige-LEDs zu blinken und
die LED-Messanzeige funktioniert nicht einwandfrei.
In diesem Fall sollten Sie die alte Baerie schnellstmöglich durch eine neue erseen.
Vor Auswechseln der Baerie müssen Sie den headtune ausschalten und vom
Instrument entfernen.
Anbringen des headtune
Befestigen Sie den headtune an der Kopfplae Ihrer Gitarre, Basses bzw. Ihres
Ukulele.
Drehen Sie das Display so, dass es komfortabel abgelesen werden kann.
Wenn der headtune an einem Instrument befestigt ist, halten Sie ihn am
Hebel am Clip und nicht am Display fest.
Önen Sie den headtune niemals weiter als 120°. Eine zu forsche
Handhabung könnte das Gerät nämlich beschädigen.
Lassen Sie den headtune niemals über längere Zeiträume am Inst-
rument. Wenn Sie den headtune lange auf dem Instrument lassen,
könnte die Lackschicht des Instruments beschädigt werden.
Arbeitsweise für das Stimmen
1.
Drücken Sie den Neschalter, um das Gerät einzuschalten.
2.
Spielen Sie einen Ton mit der Saite, die Sie stimmen wollen.
3.
Stimmen Sie die Saite grob, bis die Anzeige-LED für die gespielte Saite aueuchtet.
Die Positionen der Anzeige-LEDs für die Saitennamen können je nach
Modell abweichen.
4. Stimmen Sie das Instrument, bis die LED-Messanzeige in der Mie aueuchtet.
Wenn die linke Seite des LED-Meters leuchtet, ist die Note zu tief. Leuchtet
die rechte Seite, so ist die Note zu hoch gestimmt.
5.
Drücken Sie den Neschalter, um das Gerät wieder auszuschalten.
Wenn der headtune länger als 10 Minuten kein Signal erkennt, schaltet er
sich automatisch aus.
Technische Daten
Skala: 12 gleichschwebende chromatische Schrie (A4=440Hz)
Erkennungsbereich: Gitarre E2 (82,41 Hz)—E7 (2637,02 Hz)
(Sinuswelle) Bass E1 (41,20 Hz)—G6 (1567,98 Hz)
Ukulele
(mit der Standard-Stimmung G-C-E-A identisch)
G3 (196,00 Hz)—A7 (3520,00 Hz)
Genauigkeit: ±1 cent
Stromversorgung: CR2032 Lithium-Knopaerie x 1
Baerielaufzeit: ±35 Stunden (konstante A4-Eingabe)
Abmessungen (B x T x H): 54 x 26 x 35mm [HT-G1/B1]
54 x 24 x 35 mm [HT-G2/U1]
Gewicht: 18g (inklusive Baerie)
Lieferumfang: Bedienungsanleitung, CR2032 Lithium-Knopaerie x 1
*Änderungen der technischen Daten und des Designs ohne vorherige
Ankündigung vorbehalten.
Transcripción de documentos
OWNER’S MANUAL MANUEL D’UTILISATION BEDIENUNGSANLEITUNG MANUAL DE USUARIO Guitar HT-G1 HT-G2 HT-B1 取扱説明書 Ukulele Bass HT-U1 4015-2 Yanokuchi, Inagi-city, Tokyo 206-0812 Japan © 2012 KORG INC. Thank you for purchasing the Korg headtune Clip-on Tuner. Nous vous remercions d’avoir choisi l’accordeur à pince headtune de Korg. Vielen Dank für Ihre Entscheidung zu einem headtune ClipStimmgerät von Korg. Gracias por comprar el Afinador de Clip Korg headtune. このたびはコルグ・クリップオン・チューナー headtuneをお買い上げい ただきまして、まことにありがとうございます。 保証規定(必ずお読みください) 本保証書は、保証期間中に本製品を保証するもので、付属品類(ヘッドホンなど)は保 証の対象になりません。保証期間内に本製品が故障した場合は、保証規定によって無 償修理いたします。 1. 本保証書の有効期間はお買い上げ日より1ケ年です。 2. 次の修理等は保証期間内であっても有償となります。 • 消耗部品(電池、スピーカーなど)の交換。 • お取扱い方法が不適当のために生じた故障。 • 天災(火災、浸水等)によって生じた故障。 • 故障の原因が本製品以外の他の機器にある場合。 • 不当な改造、調整、部品交換などにより生じた故障または損傷。 • 保証書にお買い上げ日、販売店名が未記入の場合、または字句が書き替えられ ている場合。 • 本保証書の提示がない場合。 尚、当社が修理した部分が再度故障した場合は、保証期間外であっても、修理した 日より3ケ月以内に限り無償修理いたします。 3. 本保証書は日本国内においてのみ有効です。This warranty is valid only in Japan. 4. お客様が保証期間中に移転された場合でも、保証は引き続きお使いいただけま す。詳しくは、お客様相談窓口までお問い合わせください。 5. 修理、運送費用が製品の価格より高くなることがありますので、あらかじめお客様 相談窓口へご相談ください。発送にかかる費用は、お客様の負担とさせていただき ます。 6. 修理中の代替品、商品の貸し出し等は、いかなる場合においても一切行っておりま せん。 本製品の故障、または使用上生じたお客様の直接、間接の損害につきましては、弊社 は一切の責任を負いかねますのでご了承ください。 本保証書は、保証規定により無償修理をお約束するためのもので、これよりお客様の 法律上の権利を制限するものではありません。 ■お願い 1. 保証書に販売年月日等の記入がない場合は無効となります。記入できないときは、 お買い上げ年月日を証明できる領収書等と一緒に保管してください。 2. 保証書は再発行致しませんので、紛失しないように大切に保管してください。 コルグ headtune 保証書 本保証書は、保証規定により無償修理をお約束するものです。 お買い上げ日 販売店名 年 月 日 Precautions Précautions Location Using the unit in the following locations can result in a malfunction. • In direct sunlight • Locations of extreme temperature or humidity • Excessively dusty or dirty locations • Locations of excessive vibration • Close to magnetic fields Power supply Be sure to turn the power switch to OFF when the unit is not in use. Remove the battery in order to prevent it from leaking when the unit is not in use for extended periods. Interference with other electrical devices Radios and televisions placed nearby may experience reception interference. Operate this unit at a suitable distance from radios and televisions. Handling To avoid breakage, do not apply excessive force to the switches or controls. Care If the exterior becomes dirty, wipe it with a clean, dry cloth. Do not use liquid cleaners such as benzene or thinner, or cleaning compounds or flammable polishes. Keep this manual After reading this manual, please keep it for later reference. Keeping foreign matter out of your equipment Never set any container with liquid in it near this equipment. If liquid gets into the equipment, it could cause a breakdown, fire, or electrical shock. Be careful not to let metal objects get into the equipment. Emplacement L’utilisation de cet instrument dans les endroits suivants peut en entraîner le mauvais fonctionnement. • En plein soleil • Endroits très chauds ou très humides • Endroits sales ou fort poussiéreux • Endroits soumis à de fortes vibrations • A proximité de champs magnétiques Alimentation Lorsque vous n’utilisez pas l’appareil, n’oubliez pas de le mettre hors tension. Retirez les piles pour éviter toute fuite lorsque l’appareil ne sera pas utilisé pendant de longues périodes de temps. Interférences avec d’autres appareils électriques Les postes de radio et de télévision situés à proximité peuvent par conséquent souffrir d’interférences à la réception. Veuillez dès lors faire fonctionner cet appareil à une distance raisonnable de postes de radio et de télévision. Maniement Pour éviter de les endommager, manipulez les commandes et les boutons de cet instrument avec soin. Entretien Lorsque l’instrument se salit, nettoyez-le avec un chiffon propre et sec. Ne vous servez pas d’agents de nettoyage liquides tels que du benzène ou du diluant, voire des produits inflammables. Conservez ce manuel Après avoir lu ce manuel, veuillez le conserver soigneusement pour toute référence ultérieure. Evitez toute intrusion d’objets ou de liquide Ne placez jamais de récipient contenant du liquide près de l’instrument. Si le liquide se renverse ou coule, il risque de provoquer des dommages, un court-circuit ou une électrocution. Veillez à ne pas laisser tomber des objets métalliques dans le boîtier (trombones, par ex.). THE FCC REGULATION WARNING (for USA) NOTE: This equipment has been tested and found to comply with the limits for a Class B digital device, pursuant to Part 15 of the FCC Rules. These limits are designed to provide reasonable protection against harmful interference in a residential installation. This equipment generates, uses, and can radiate radio frequency energy and, if not installed and used in accordance with the instructions, may cause harmful interference to radio communications. However, there is no guarantee that interference will not occur in a particular installation. If this equipment does cause harmful interference to radio or television reception, which can be determined by turning the equipment off and on, the user is encouraged to try to correct the interference by one or more of the following measures: • Reorient or relocate the receiving antenna. • Increase the separation between the equipment and receiver. • Connect the equipment into an outlet on a circuit different from that to which the receiver is connected. • Consult the dealer or an experienced radio/TV technician for help. If items such as cables are included with this equipment, you must use those included items. Unauthorized changes or modification to this system can void the user’s authority to operate this equipment. This device complies with Part 15 of the FCC Rules. Operation is subject to the following two conditions: (1) This device may not cause harmful interference, and (2) this device must accept any interference received, including interference that may cause undesired operation. Complies with Canadian ICES-003 Class B. Conforme au Reglement Canadian NMB-003 classe B. Notice regarding disposal (EU only) When this “crossed-out wheeled bin” symbol is displayed on the product, owner’s manual, battery, or battery package, it signifies that when you wish to dispose of this product, manual, package or battery you must do so in an approved manner. Do not discard this product, manual, package or battery along with ordinary household waste. Disposing in the correct manner will prevent harm to human health and potential damage to the environment. Since the correct method of disposal will depend on the applicable laws and regulations in your locality, please contact your local administrative body for details. If the battery contains heavy metals in excess of the regulated amount, a chemical symbol is displayed below the “crossed-out wheeled bin” symbol on the battery or battery package. IMPORTANT NOTICE TO CONSUMERS This product has been manufactured according to strict specifications and voltage requirements that are applicable in the country in which it is intended that this product should be used. If you have purchased this product via the internet, through mail order, and/or via a telephone sale, you must verify that this product is intended to be used in the country in which you reside. WARNING: Use of this product in any country other than that for which it is intended could be dangerous and could invalidate the manufacturer’s or distributor’s warranty. Please also retain your receipt as proof of purchase otherwise your product may be disqualified from the manufacturer’s or distributor’s warranty. CALIFORNIA USA ONLY This Perchlorate warning applies only to primary CR (Manganese Dioxide) Lithium coin cells sold or distributed ONLY in California USA. “Perchlorate Material–special handling may apply, See www.dtsc.ca.gov/hazardouswaste/perchlorate.” Note concernant les dispositions (Seulement EU) Quand un symbole avec une poubelle barrée d’une croix apparait sur le produit, le mode d’emploi, les piles ou le pack de piles, cela signifie que ce produit, manuel ou piles doit être déposé chez un représentant compétent, et non pas dans une poubelle ou toute autre déchetterie conventionnelle. Disposer de cette manière, de prévenir les dommages pour la santé humaine et les dommages potentiels pour l’environnement. La bonne méthode d’élimination dépendra des lois et règlements applicables dans votre localité, s’il vous plaît, contactez votre organisme administratif pour plus de détails. Si la pile contient des métaux lourds au-delà du seuil réglementé, un symbole chimique est affiché en dessous du symbole de la poubelle barrée d’une croix sur la pile ou le pack de piles. REMARQUE IMPORTANTE POUR LES CLIENTS Ce produit a été fabriqué suivant des spécifications sévères et des besoins en tension applicables dans le pays où ce produit doit être utilisé. Si vous avez acheté ce produit via l’internet, par vente par correspondance ou/et vente par téléphone, vous devez vérifier que ce produit est bien utilisable dans le pays où vous résidez. ATTENTION: L’utilisation de ce produit dans un pays autre que celui pour lequel il a été conçu peut être dangereuse et annulera la garantie du fabricant ou du distributeur. Conservez bien votre récépissé qui est la preuve de votre achat, faute de quoi votre produit ne risque de ne plus être couvert par la garantie du fabricant ou du distributeur. Vorsichtsmaßnahmen Aufstellungsort Vermeiden Sie das Aufstellen des Geräts an Orten, an denen. • es direkter Sonneneinstrahlung ausgesetzt ist; • hohe Feuchtigkeit oder Extremtemperaturen auftreten können; • Staub oder Schmutz in großen Mengen vorhanden sind; • das Gerät Erschütterungen ausgesetzt sein kann. • in der Nähe eines Magnetfeldes. Stromversorgung Stellen Sie den Netzschalter auf OFF, wenn das Gerät nicht benutzt wird. Wenn Sie das Gerät über einen längeren Zeitraum nicht benutzen, nehmen Sie die Batterien heraus, damit sie nicht auslaufen. Störeinflüsse auf andere Elektrogeräte Dieser kann bei in der Nähe aufgestellten Rund-funkempfängern oder Fernsehgeräten Empfangsstörungen hervorrufen. Betreiben Sie solche Geräte nur in einem geeigneten Abstand von diesem Erzeugnis. Bedienung Vermeiden Sie bei der Bedienung von Schaltern und Reglern unangemessenen Kraftaufwand. Reinigung Bei auftretender Verschmutzung können Sie das Gehäuse mit einem trockenen, sauberen Tuch abwischen. Verwenden Sie keinerlei Flüssigreiniger wie beispielsweise Reinigungsbenzin, Verdünnungs- oder Spülmittel. Verwenden Sie niemals brennbare Reiniger. Bedienungsanleitung Bewahren Sie diese Bedienungsanleitung gut auf, falls Sie sie später noch einmal benötigen. Flüssigkeiten und Fremdkörper Stellen Sie niemals Behältnisse mit Flüssigkeiten in der Nähe des Geräts auf. Wenn Flüssigkeit in das Gerät gelangt, können Beschädigung des Geräts, Feuer oder ein elek-trischer Schlag die Folge sein. Beachten Sie, daß keinerlei Fremdkörper in das Gerät gelangen. Hinweis zur Entsorgung (Nur EU) Wenn Sie das Symbol mit der „durchgekreuzten Mülltonne“ auf Ihrem Produkt, der dazugehörigen Bedienungsanleitung, der Batterie oder dem Batteriefach sehen, müssen Sie das Produkt in der vorgeschriebenen Art und Weise entsorgen. Dies bedeutet, dass dieses Produkt mit elektrischen und elektronischen Komponenten nicht mit dem normalen Hausmüll entsorgt werden darf. Für Produkte dieser Art existiert ein separates, gesetzlich festgelegtes Entsorgungssystem. Gebrauchte elektrische und elektronische Geräte müssen separat entsorgt werden, um ein umweltgerechtes Recycling sicherzustellen. Diese Produkte müssen bei benannten Sammelstellen abgegeben werden. Die Entsorgung ist für den Endverbraucher kostenfrei! Bitte erkundigen sie sich bei ihrer zuständigen Behörde, wo sie diese Produkte zur fachgerechten Entsorgung abgeben können. Falls ihr Produkt mit Batterien oder Akkumulatoren ausgerüstet ist, müssen sie diese vor Abgabe des Produktes entfernen und separat entsorgen (siehe oben). Die Abgabe dieses Produktes bei einer zuständigen Stelle hilft ihnen, dass das Produkt umweltgerecht entsorgt wird. Damit leisten sie persönlich einen nicht unerheblichen Beitrag zum Schutz der Umwelt und der menschlichen Gesundheit vor möglichen negativen Effekten durch unsachgemäße Entsorgung von Müll. Batterien oder Akkus, die Schadstoffe enthalten, sind auch mit dem Symbol einer durchgekreuzten Mülltonne gekennzeichnet. In der Nähe zum Mülltonnensymbol befindet sich die chemische Bezeichnung des Schadstoffes. Cd oder NiCd steht für Cadmium, Pb für Blei und Hg für Quecksilber. WICHTIGER HINWEIS FÜR KUNDEN Dieses Produkt wurde unter strenger Beachtung von Spezifikationen und Spannungsanforderungen hergestellt, die im Bestimmungsland gelten. Wenn Sie dieses Produkt über das Internet, per Postversand und/oder mit telefonischer Bestellung gekauft haben, müssen Sie bestätigen, dass dieses Produkt für Ihr Wohngebiet ausgelegt ist. WARNUNG: Verwendung dieses Produkts in einem anderen Land als dem, für das es bestimmt ist, verwendet wird, kann gefährlich sein und die Garantie des Herstellers oder Importeurs hinfällig lassen werden. Bitte bewahren Sie diese Quittung als Kaufbeleg auf, da andernfalls das Produkt von der Garantie des Herstellers oder Importeurs ausgeschlossen werden kann. Precauciones Ubicación El uso de la unidad en las siguientes ubicaciones puede dar como resultado un mal funcionamiento: • Expuesto a la luz directa del sol • Zonas de extremada temperatura o humedad • Zonas con exceso de suciedad o polvo • Zonas con excesiva vibración • Cercano a campos magnéticos Fuente de alimentación Apague la unidad cuando no la use la batería. Retire las baterías si no va a usar la unidad durante un tiempo largo. Interferencias con otros aparatos Las radios y televisores situados cerca pueden experimentar interferencias en la recepción. Opere este dispositivo a una distancia prudencial de radios y televisores. Manejo Para evitar una rotura, no aplique excesiva fuerza a los conmutadores o controles. Cuidado Si exterior se ensucia, límpiese con un trapo seco. No use líquidos limpiadores como disolvente, ni compuestos inflamables. Guarde este manual Después de leer este manual, guárdelo para futuras consultas. Mantenga los elementos externos alejados del equipo Nunca coloque ningún recipiente con líquido cerca de este equipo, podría causar un cortocircuito, fuero o descarga eléctrica. Cuide de que no caiga ningún objeto metálico dentro del equipo. Nota respecto a residuos y deshechos (solo UE) Cuando aparezca el símbolo del cubo de basura tachado sobre un producto, su manual de usuario, la batería, o el embalaje de cualquiera de éstos, significa que cuando quiere tire dichos artículos a la basura, ha de hacerlo en acuerdo con la normativa vigente de la Unión Europea. No debe verter dichos artículos junto con la basura de casa. Verter este producto de manera adecuada ayudará a evitar daños a su salud pública y posibles daños al medioambiente. Cada país tiene una normativa específica acerca de cómo verter productos potencialmente tóxicos, por tanto le rogamos que se ponga en contacto con su oficina o ministerio de medioambiente para más detalles. Si la batería contiene metales pesados por encima del límite permitido, habrá un símbolo de un material químico, debajo del símbolo del cubo de basura tachado. NOTA IMPORTANTE PARA EL CONSUMIDORE Este producto ha sido fabricado de acuerdo a estrictas especificaciones y requerimientos de voltaje aplicables en el país para el cual está destinado. Si ha comprado este producto por internet, a través de correo, y/o venta telefónica, debe usted verificar que el uso de este producto está destinado al país en el cual reside. AVISO: El uso de este producto en un país distinto al cual está destinado podría resultar peligroso y podría invalidar la garantía del fabricante o distribuidor. Por favor guarde su recibo como prueba de compra ya que de otro modo el producto puede verse privado de la garantía del fabricante o distribuidor. 安全上のご注意 火災・感電・人身傷害の危険を防止するには 以下の指示を守ってください 警告 この注意事項を無視した取り扱いをすると、死亡や重傷を負う可能性があります。 ・次のような場合には、直ちに電源を切る。 ○ 異物が内部に入ったとき ○ 製品に異常や故障が生じたとき 修理が必要なときは、お客様相談窓口へ依頼してください。 ・本製品を分解したり改造したりしない。 ・修理、部品の交換などで、取扱説明書に書かれていること以外は絶対にしない。 ・大音量や不快な程度の音量で長時間使用しない。 大音量で長時間使用すると、難聴になる可能性があります。万一、聴力低下や 耳鳴りを感じたら、専門の医師に相談してください。 ・本製品に異物(燃えやすいもの、硬貨、針金など)を入れない。 ・温度が極端に高い場所(直射日光の当たる場所、暖房機器の近く、発熱する機 器の上など)での使用や保管はしない。 ・振動の多い場所で使用や保管はしない。 ・ホコリの多い場所で使用や保管はしない。 ・風呂場、シャワー室で使用や保管はしない。 ・雨天時の野外のように、湿気の多い場所や水滴のかかる場所で、使用や保管は しない。 ・本製品の上に、花瓶のような液体が入ったものを置かない。 ・本製品に液体をこぼさない。 ・濡れた手で本製品を使用しない。 注意 この注意事項を無視した取り扱いをすると、傷害を負うまたは物理的損害が発生する可能性があります。 ・正常な通気が妨げられない所に設置して使用する。 ・ラジオ、テレビ、電子機器などから十分に離して使用する。 ラジオやテレビ等に接近して使用すると、本製品が雑音を受けて誤動作する場 合があります。また、ラジオ、テレビ等に雑音が入ることがあります。 本製品をテレビ等の横に設置すると、本製品の磁場によってテレビ等の故障の 原因になることがあります。 ・外装のお手入れは、乾いた柔らかい布を使って軽く拭く。 ・長時間使用しないときは、電池の液漏れを防ぐために電池を抜く。 ・電池は幼児の手の届かないところへ保管する。 ・電池を過度の熱源(日光、火など)にさらさない。 ・スイッチやツマミなどに必要以上の力を加えない。 故障の原因になります。 ・外装のお手入れに、ベンジンやシンナー系の液体、コンパウンド質、強燃性のポ リッシャーは使用しない。 ・不安定な場所に置かない。 アフターサービス 修理または商品のお取り扱いについてのご質問、ご相談は、お客様相談窓口へお問い 合わせください。 お客様相談窓口 PHS等一部の電話ではご利用できません。固定電話または携帯電話 からおかけください。 受付時間 月曜~金曜 10:00 ~ 17:00(祝祭日、窓口休業日を除く) ●サービス・センター: 〒168-0073 東京都杉並区下高井戸1-15-12 Installing the battery Installation de la pile The display may differ depending on which model you have purchased. Power button Installing the battery Range of movement 120° Battery cover Clip Pince Lever Display Ecran String name indicator LED Guitar Plage de mouvement 120° Couvercle du compartiment à pile Battery cover guitare Ukulele Bass LED meter LED meter Open the battery cover by sliding it off. Place the battery into the compartment with the “+” side facing up, and then replace the battery cover. When the remaining battery power becomes low, the string name indicator LEDs will flash, and the LED meter will not function smoothly. When this happens, it’s time to replace the battery with a new ones as soon as possible. Before you replace the battery, turn off the power and detach the headtune from your instrument. Attaching the headtune Attach the headtune to the headstock of your guitar, bass or ukulele. Adjust the display to the angle that provides the best visibility. When the headtune is attached to an instrument, hold it by the lever on the clip, not the display. Do not open the headtune farther than 120 degrees. Applying excessive force will damage the unit. Do not leave the headtune attached to your instrument for extended periods of time. Leaving the headtune attached for long periods of time may damage the finish of your instrument. Tuning procedure 1. Press the power button to turn on the power. 2. Play a single tone with the string that you want to tune. 3. Roughly tune the string until the string name indicator LED for the string you’re playing lights up. The positions of the string name indicator LEDs may differ depending on the model that you have purchased. 4. Tune the instrument until the center of the LED meter lights up. The left side of the LED meter will light up if your instrument is flat, and the right side will light up if your instrument is sharp. 5. To turn off the power, press the power button. If approximately ten minutes pass without the headtune detecting any sound, the power will turn off automatically. Specifications Scale: 12 equal tempered chromatic steps (A4=440Hz) Detection range: guitar E2 (82.41 Hz)—E7 (2637.02 Hz) (sine wave) bass E1 (41.20 Hz)—G6 (1567.98 Hz) Ukulele (compatible with standard G, C, E and A tuning) G3 (196.00 Hz)—A7 (3520.00 Hz) Precision: +/-1 cent Power supply: coin-type lithium battery (CR2032) x 1 Battery life: approximately 35 hours (continuous A4 input) Dimensions (W x D x H): 54 x 26 x 35 mm / 2.13 x 1.02 x 1.38 inches [HT-G1/B1] 54 x 24 x 35 mm / 2.13 x 0.94 x 1.38 inches [HT-G2/U1] Weight: 18g / 0.63oz. (including battery) Included items: Owner’s manual, coin-type lithium battery (CR2032) x 1 * Specifications and appearance are subject to change without notice for improvement. La pantalla puede variar en función del modelo que haya adquirido. Einlegen der Batterie Netzschalter Botón de encendido Batteriefa chblende Couvercle du compartiment à pile Hebel Levier Display Ukulele Indicateur à diodes Ouvrez le couvercle du compartiment à pile en le faisant coulisser. Placez la pile dans le compartiment en orientant sa face “+” vers le haut puis refermez le couvercle du compartiment. Si la puissance de la pile est faible, les indicateurs LED du nom de la corde clignoteront et l’indicateur à diode ne fonctionnera pas correctement. Dans ce cas, vous devez remplacer la pile et installer une pile neuve dès que possible. Avant de remplacer la pile, mettez le headtune hors tension et détachez-le de l’instrument. Attacher le headtune Attachez le headtune à la tête de votre guitare, basse ou ukulele. Ajustez l’angle de l’écran pour obtenir une lisibilité optimale. Une fois le headtune attaché à l’instrument, maintenez-le par le levier de la pince et non par l’écran. N’ouvrez pas le headtune de plus de 120 degrés. N’exercez pas de force excessive car cela endommagerait le produit. Ne laissez pas le headtune trop longtemps sur l’instrument. Si vous laissez le headtune fixé trop longtemps à l’instrument, la finition de ce dernier risque d’en souffrir. Accorder un instrument 1. Appuyez sur l’interrupteur d’alimentation pour mettre l’appareil sous tension. 2. Jouez une note avec la corde que vous désirez accorder. 3. Accordez la corde jusqu’à ce que l’indicateur LED du nom de la corde jouée s’allume. Les positions des indicateurs LED du nom de la corde peuvent différer en fonction du modèle. 4. Accordez l’instrument jusqu’à ce que le centre de l’indicateur à diode s’allume. Si la note est trop basse, le côté gauche de l’indicateur à diodes s’allume et si la note est trop haute, le côté droit de l’indicateur à diodes s’allume. 5. Appuyez sur l’interrupteur d’alimentation pour mettre l’appareil hors tension. Si après environ dix minutes, le headtune n’a détecté aucun son, il se met automatiquement hors tension. Fiche technique Gamme: Tempérament égal à 12 pas chromatiques (A4=440Hz) Plage de détection: Guitare E2 (82,41 Hz)—E7 (2 637,02 Hz) Basse E1 (41,20 Hz)—G6 (1 567,98 Hz) (sinusoïde) Ukulele (compatible avec les accords G, C, E, et A – Sol, Mi, Do, La) G3 (196 Hz)—A7 (3 520 Hz) Précision: ±1 cent Alimentation: Pile bouton au lithium CR2032 x 1 Autonomie de la pile: Environ 35 heures (entrée continue de la note A4) Dimensions (L x P x H): 54 x 26 x 35 mm [HT-G1/B1] 54 x 24 x 35 mm [HT-G2/U1] Poids: 18g (pile comprise) Accessoires fournis: Manuel d’utilisation, Pile bouton au lithium CR2032 x 1 *Les caractéristiques et l’aspect du produit sont susceptibles d’être modifiés sans avis préalable en vue d’une amélioration. Pantalla Gitarre Basses LED-Messanzeige Ukulele LED-Messanzeige Öffnen Sie Batteriefach durch Verschieben der Blende. Legen Sie die Batterie mit dem „+“-Pol nach oben in das Fach und bringen Sie die Blende wieder an. Bei schwacher Batterieleistung beginnen die Anzeige-LEDs zu blinken und die LED-Messanzeige funktioniert nicht einwandfrei. In diesem Fall sollten Sie die alte Batterie schnellstmöglich durch eine neue ersetzen. Vor Auswechseln der Batterie müssen Sie den headtune ausschalten und vom Instrument entfernen. Anbringen des headtune Befestigen Sie den headtune an der Kopfplatte Ihrer Gitarre, Basses bzw. Ihres Ukulele. Drehen Sie das Display so, dass es komfortabel abgelesen werden kann. Wenn der headtune an einem Instrument befestigt ist, halten Sie ihn am Hebel am Clip und nicht am Display fest. Öffnen Sie den headtune niemals weiter als 120°. Eine zu forsche Handhabung könnte das Gerät nämlich beschädigen. Lassen Sie den headtune niemals über längere Zeiträume am Instrument. Wenn Sie den headtune lange auf dem Instrument lassen, könnte die Lackschicht des Instruments beschädigt werden. Arbeitsweise für das Stimmen 1. Drücken Sie den Netzschalter, um das Gerät einzuschalten. 2. Spielen Sie einen Ton mit der Saite, die Sie stimmen wollen. 3. Stimmen Sie die Saite grob, bis die Anzeige-LED für die gespielte Saite aufleuchtet. Die Positionen der Anzeige-LEDs für die Saitennamen können je nach Modell abweichen. 4. Stimmen Sie das Instrument, bis die LED-Messanzeige in der Mitte aufleuchtet. Wenn die linke Seite des LED-Meters leuchtet, ist die Note zu tief. Leuchtet die rechte Seite, so ist die Note zu hoch gestimmt. 5. Drücken Sie den Netzschalter, um das Gerät wieder auszuschalten. Wenn der headtune länger als 10 Minuten kein Signal erkennt, schaltet er sich automatisch aus. Technische Daten Skala: 12 gleichschwebende chromatische Schritte (A4=440Hz) Erkennungsbereich: Gitarre E2 (82,41 Hz)—E7 (2637,02 Hz) (Sinuswelle) Bass E1 (41,20 Hz)—G6 (1567,98 Hz) Ukulele (mit der Standard-Stimmung G-C-E-A identisch) G3 (196,00 Hz)—A7 (3520,00 Hz) Genauigkeit: ±1 cent Stromversorgung: CR2032 Lithium-Knopfbatterie x 1 Batterielaufzeit: ±35 Stunden (konstante A4-Eingabe) Abmessungen (B x T x H): 54 x 26 x 35mm [HT-G1/B1] 54 x 24 x 35 mm [HT-G2/U1] Gewicht: 18g (inklusive Batterie) Lieferumfang: Bedienungsanleitung, CR2032 Lithium-Knopfbatterie x 1 *Änderungen der technischen Daten und des Designs ohne vorherige Ankündigung vorbehalten. 可動範囲120° Medidor LED 電池カバー Tapa de Batería 電池 カバー クリップ レバー Indicador LED de nombre de la cuerda guitarra 電池の入れ方 電源ボタン Palanca Anzeige-LEDs der Saitennamen Indicateur LED du nom de la corde Instalación de la Batería Tapa de Batería Batteriefa chblende Clip Clip お買い上げの機種により、ディスプレイ面は異なります。 Range de movieimento 120° Schwenkbereich 120° basse Indicateur à diodes Das Display kann je nach gekauftem Modell abweichen. Installation de la pile Interrupteur d’alimentation 各部の名称と電池の入れ方 Instalación de la Batería Einlegen der Batterie L’écran peut différer en fonction du modèle acheté. bajo Ukulele Medidor LED Abra la cubierta de la batería deslizándola. Coloque la batería en el compartimiento con la cara de “+” hacia arriba y, a continuación, vuelva a colocar la cubierta de batería. Cuando la energía restante de la batería esté baja, los indicadores LED de nombre de la cuerda parpadearán y el medidor LED no funcionará correctamente.Si esto sucede, es hora de reemplazar la batería por una nueva lo antes posible.Antes de reemplazar la batería, apague la unidad y suelte el headtune de su instrumento. Sujeción de headtune Sujete headtune al mástil de su guitarra, bajo o ukulele. Ajuste la pantalla con el ángulo que proporcione la mejor visibilidad. Cuando headtune esté acoplado a un instrumento, sosténgalo por la palanca del clip, no por la pantalla. No abra el headtune más de 120 grados. Si aplica una fuerza excesiva producirá daños en la unidad. No deje el headtune conectado a su instrumento durante un largo período de tiempo. Si deja headtune conectado durante largos períodos de tiempo, podría dañar el acabado de su instrumento. Procedimiento de Afinación 1. Pulse el botón de encendido para encender la unidad. 2. Toque un solo tono con la cuerda que desee afinar. 3. Afine la cuerda de manera aproximada hasta que el indicador LED de nombre de la cuerda que está tocando se ilumine. Las posiciones de los indicadores LED de nombre de la cuerda pueden variar en función del modelo que haya adquirido. 4. Afine el instrumento hasta que el centro del medidor LED se ilumine. El lado izquierdo del medidor LED se iluminará si su instrumento es demasiado grave, y el lado derecho se iluminará si su instrumento es demasiado agudo. 5. Para apagar la unidad, presione el botón de encendido. Si pasan aproximadamente diez minutos sin que headtune detecte sonido, la unidad se apagará automáticamente. Especificaciones Escala: 12 pasos cromáticos de temperamento igual (A4=440Hz) Rango de detección: Guitarra E2 (82,41 Hz)—E7 (2637,02 Hz) (onda sinusoidal) Bajo E1 (41,20 Hz)—G6 (1567,98 Hz) Ukulele (compatible con afinación G, C, E y A estándar) G3 (196,00 Hz)—A7 (3520,00 Hz) Precisión: +/-1 centésimas Alimentación: Batería de litio tipo botón (CR2032) x 1 Duración de la Batería: aproximadamente 35 horas (entrada continua nota A4) Dimensiones (Anch. x Prof. x Alt.): 54 x 26 x 35 mm [HT-G1/B1] 54 x 24 x 35 mm [HT-G2/U1] Peso: 18g (incluyendo batería) Elementos incluidos: Manual de usuario, Batería de litio tipo botón (CR2032) x 1 *Las especificaciones y el aspecto están sujetas a cambios sin previo aviso por mejora. ディスプレイ面 ギター 弦表示 LED ベース 弦表示 LED LEDメーター ウクレレ 弦表示 LED LEDメーター 初めに、電池カバーをスライドさせて開けます。次に、+の極性を上にして 電池を入れ、最後に電池カバーを閉じます。 電池の残量が少なくなると、弦表示LEDが点滅し、LEDメーターがスムー ズに動作しなくなります。このときは、早めに新しい電池と交換してくだ さい。また、電池を交換するときは、電源を切り、本機を楽器から取り外し た状態で行ってください。 付属の電池は動作確認用のため、通常より寿命が短い場合があります。 取り付け方 本機をギター、ベースやウクレレのヘッドに取り付けます。開く角度を調整 して、ディスプレイ面が見やすい位置にしてください。 楽器に取り付けるときは、ディスプレイ面ではなくクリップのレバー 部分を持ってください。 本機を120度以上開かないでください。無理に力を加えると、故障の 原因となります。 ヘッドに長時間取り付けたままにしないでください。長時間取り付け たままにすると、ヘッドに取り付け跡が残る場合があります。 チューニング方法 1. 電源ボタンを押して電源を入れます。 2. チューニングをしたい弦を単音で鳴らします。 3. 鳴らした弦と同じ位置の弦表示LEDが点灯するように大まかにチューニン グをします。 お買い上げの機種により、弦表示LEDの位置は異なります。 4. LEDメーターの中央が点灯するように、楽器をチューニングします。 音が低いときはLEDメーターの左側が、音が高いときはLEDメーターの右 側が点灯します。 5. 電源を切るときは、電源ボタンを押します。 電源が入ったまま、音を約10分間認識しなかったときは、自動的に電源が切 れます。 仕様 音律:12平均律(A4=440Hz) 測定精度:±1セント 測定範囲: ギター E2(82.41Hz) ~ E7(2637.02Hz) (サイン波) ベース E1(41.20Hz) ~ G6(1567.98Hz) ウクレレ(標準的なG、C、E、A のチューニングに対応) G3(196.00Hz) ~ A7(3520.00Hz) 電源:コイン型リチウム電池(CR2032)x 1 電池寿命:約35時間(A4連続入力時) 外形寸法(幅 x 奥行 x 高さ): 54 x 26 x 35 mm [HT-G1/B1] 54 x 24 x 35 mm [HT-G2/U1] 質量:18g(電池含む) 付属品:取扱説明書、動作確認用コイン型リチウム電池(CR2032)x 1 *仕様および外観は、改良のため予告なく変更する場合があります。-
 1
1
-
 2
2


En otros idiomas
- français: Korg Headtune Le manuel du propriétaire
- English: Korg Headtune Owner's manual
- Deutsch: Korg Headtune Bedienungsanleitung
- 日本語: Korg Headtune 取扱説明書
Documentos relacionados
-
Korg SQ-64 El manual del propietario
-
Korg MA-1 El manual del propietario
-
-
-
-
-
Korg Magnetune El manual del propietario
-
-
-