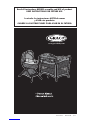
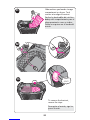
Graco PD257081D El manual del propietario
- Categoría
- Muebles de bebe
- Tipo
- El manual del propietario


2
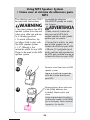
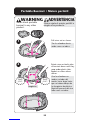
Failure to follow these warnings and the
instructions could result in serious injury or death.
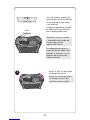
Setting Up the Playard
• THIS PRODUCT REQUIRES ADULT ASSEMBLY.
• Keep fingers clear of top corners during setup. Be sure playard
is completely set up before use. Check that the four top rails are
completely latched, the center of the floor is pushed down, the
mattress/pad is flat, and the straps are securely fastened to the
bottom of the unit. Always follow the instructions in the
owner’s manual to set up the playard.
• Never use this product if there are any loose or missing
fasteners, loose joints, broken parts or torn mesh. Check before
assembly and periodically during use. Contact Graco at
1-800-345-4109 (Canada 1-800-667-8184) for replacement
parts and instructions if needed. Never substitute parts.
Using the Playard
• Never use playard with more than one child at a time.
• The playard is for playing or sleeping. When used for playing,
never leave child unattended and always keep child in view.
When used for sleeping, you must still provide the supervision
necessary for the continued safety of your child.
• Always keep the playard away from hazards in the area that
may injure your child.
• When child is able to pull to standing position, remove large
toys and other objects that could serve as steps for climbing
out.
• Stop using this product when your child reaches 35 inches
(89 cm) in height, weighs more than 30 pounds (14 kg), or is
able to climb out.
• Do not modify playard or add any attachments that are not
listed in the owner’s manual, including an add-on bassinet.
• Child can become entrapped and die when improvised netting
or covers are placed on top of a playard. Never add such items
to confine child in playard.
• NEVER leave child in product with side lowered. Be sure side is
in raised and locked position whenever child is in product.

3
• If refinishing, use a nontoxic finish specified for children’s
products.
Avoiding Suffocation Hazards
• Unlike cribs that have rigid sides, the playard has flexible sides.
As a result, the playard mattress/pad is specially designed to
prevent suffocation. The playard mattress/pad has a solid base,
a certain length and width, and is less than one inch thick in
order to meet safety standards. Using a thicker or a different
sized mattress/pad may allow a child’s head to get between
mattress/pad and the side of the playard causing suffocation.
• Infants can suffocate
• In gaps between a mattress too small or too thick and
products sides
• On soft bedding.
NEVER add a mattress, pillow, comforter or padding. Use ONLY
mattress pad provided by Graco.
• To reduce the risk of SIDS, pediatricians recommend healthy
infants be placed on their backs to sleep, unless otherwise
advised by your physician.
• Never use plastic shipping bags or other plastic film as mattress
covers not sold and intended for that purpose. They can cause
suffocation.
• Never use a water mattress with the playard.
Avoiding Strangulation Hazards
• Strings and cords can cause strangulation. Keep strings and
cords away from child.
• NEVER place the playard near a window where cords from
blinds or drapes can strangle a child.
• NEVER hang strings on or over the playard.
• NEVER place items with a string around a child’s neck, such as
hood strings, pacifier cords, etc.
• NEVER attach strings to toys.
This product is not intended for commercial use.

4
Si no se obedecen estas advertencias y las instrucciones de
montaje, podría resultar en lesiones graves o la muerte.
Al instalar el corralito
• ESTE PRODUCTO REQUIERE SER ARMADO POR UN ADULTO.
• Mantenga cuidado con sus dedos mientras dure la instalación.
Asegúrese que el corralito esté completamente instalado antes
de usarlo. Verifique que los cuatro rieles de arriba estén
completamente trabados, el centro del piso esté abajo, el colchón/
almohadilla estén planos y las correas estén sujetadas apretada-
mente al fondo de la unidad. Siempre siga las instrucciones del
manual del usario para instalar el corralito.
• Nunca use este producto si hay sujetadores sueltos o que faltan,
uniones flojas, piezas o rejillas rotas. Verifique antes del armado y
periódicamente durante el uso. De ser necesario, comuníquese con
Graco al 1-800-345-4109 (Canadá 1-800-667-8184) para obtener
piezas de repuesto e instrucciones. Nunca sustituya las piezas.
Al usar el corralito
• Nunca use el corralito con más de un niño por vez.
• El corralito es para jugar o dormir. Cuando se lo usa para jugar,
nunca deje al niño sin atención y mantenga siempre a su niño a la
vista. Cuando se lo usa para dormir, debe proporcionar la super-
visión necesaria para mantener la continua seguridad de su niño.
• Siempre mantenga el corralito lejos de peligros que pudieran
dañar a su bebé.
• Cuando el niño pueda ponerse de pie, quite los juguetes grandes y
otros objetos que pueden servir de escalones para salir.
• Deje de usar el producto cuando su niño alcance los 35 pulgadas
(89 cm) de altura, pesa más de 30 libras (14 kg), o en cualquier
momento si el niño es capaz de salir.
• No modifique el corralito ni agregue otra pieza que no se
mencione en el manual del usario, incluyendo un moisés
adicional.
• El niño puede quedar atrapado y morir cuando se ponen fundas
o redes improvisadas arriba del corralito. Nunca agregue dichos
artículos para encerrar al niño en el corralito.
• NUNCA deje al niño en el producto cuando el lado esté bajado.
Asegúrese que el lado esté cerrado y subido cuando el niño esté en
el producto.

5
• Si va a renovar el acabado del producto, elija un acabado no
tóxico especificado para productos de niños.
Para evitar el riesgo de sofocación
• Al contrario de las cunas que poseen costados rígidos, el cor-
ralito posee costados flexibles. Debido a esto, el colchón del cor-
ralito está especialmente diseñado para prevenir la sofocación.
El colchón del corralito posee una base sólida, un cierto largo y
ancho, y tiene menos de un inch de espesor precisamente para
mantener los
stándares de seguridad apropiados. El usar un colchón más del-
gado o de una medida diferente puede permitir que la cabeza
del bebé quede atrapada entre el colchón y el costado del cor-
ralito, causando la sofocación.
• Los niños pequeños pueden asfixiarse
• En los espacios entre el colchón demasiado pequeños o
demasiado espesos y los costados del producto
• En ropa de cama blanda.
NUNCA agregue un colchón, almohada, edredón o almohadillas.
Use SOLAMENTE el colchón proporcionado por Graco.
• Para reducir el riesgo del SMIS, los pediatras recomiendan que
los bebés con buena salud sean puestos a dormir a boca arriba, a
menos que su médico le indique lo contrario.
• Nunca use bolsas plásticas u otras películas de plástico como
cubre colchón, que no sea vendida y diseñada especialmente
para este propósito, ya que puede provocar sofocación.
• Nunca use un colchón de agua con el corralito.
Para evitar el riesgo de estrangulación
• Cuerdas y cordones pueden provocar estrangulación. Mantenga
cuerdas y cordones lejos de su hijo.
• NUNCA ubique el corralito cerca de ventanas donde
cordones o cortinas puedan estrangular a su bebé.
• NUNCA cuelgue cuerdas sobre el corralito.
• NUNCA ponga objetos con cuerda alrededor del cuello de su
hijo, como gorros con cordón, sujeta chupetes,etc.
• NUNCA amarre cuerdas a los juguetes.
Este producto no está diseñado para uso comercial.

6
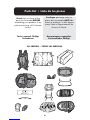
Parts list • Lista de las piezas
Check that you have all the
parts for this model BEFORE
assembling your product. If any
parts are missing, call Customer
Service.
Tools required: Phillips
Screwdriver
Verifique que tenga todas las
piezas de este modelo ANTES de
armar su producto. Si falta alguna
pieza, llame al Departamento de
Servicio al Cliente.
Herramientas requeridas:
Destornillador Phillips
ALL MODELS • TODOS LOS MODELOS
UP • VERS LE HAUT • HACIA ARRIBA
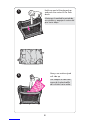
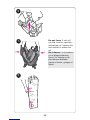
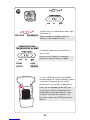
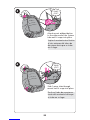
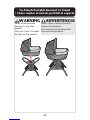
NEVER USE bassinet without this board in place.
WARNING
MISE EN GARDE
ADVERTENCIA
NE JAMAIS utiliser la couchette sans que ce
panneau ne soit en place.
NUNCA USE la cuna sin esta tabla instalada.
LAPP0161A
2X


8
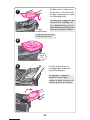
DO NOT push center
down yet.
NO empuje todavía el
centro hacia abajo.
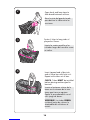
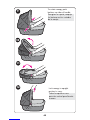
• When setting up, lock rails before lowering center.
Be sure top rails have become rigid. If not, pull up again until they
are rigid. If top rails do not latch, lift the center of the floor higher.
• Cuando instale, estire y enganche los costados antes de
bajar el centro. Asegúrese que los laterales superiores hayan
quedado rígidos. Si no es así, estírelos nuevamente hasta que estén
bien rígidos. Si los laterales superiores no han enganchado, levante
el centro del pisa hacia arriba.
3
4
SNAP!
¡CLIC!


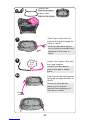
10
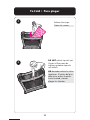
7
Pase las dos lengüetas debajo de
la almohadilla del colchón por los
ojales y sujételas en la parte
inferior de la unidad.
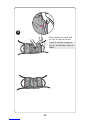
Put two tabs under mattress/pad
through button holes and fasten
securely on bottom of unit.
8
Tire la correa a través
del fondo del
corralito, pásela
alrededor del tubo
y vuelva a trabarla.
Repita el
procedimiento en las
otras esquinas.
Pull strap through
bottom of playard
and wrap around
tube and refasten
snap. Repeat on
other corners.
SNAP!
¡CLIC!


12
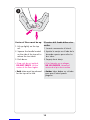
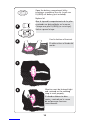
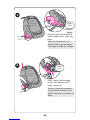
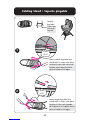
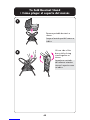
Center of floor must be up.
1. Lift up slightly on the top
rail.
2. Squeeze the handle located
on the side of the top rail to
release the two tubes.
3. Push down.
• If top rails do not unlatch,
DO NOT FORCE. Lift the
center of the floor higher.
• Both tubes must be released
for the top rail to fold.
El centro del fondo debe estar
arriba.
1. Levante suavemente el lateral.
2. Apriete la manija en el lado de la
baranda superior para soltar los
dos tubos.
3. Empuje hacia abajo.
• Si los laterales no se pliegan,
NO LOS FUERCE. Levante el
centro de el piso hacia arriba.
• Ambos tubos deben ser soltados
para que el lateral pueda
plegarse.
3


15
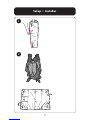
Bassinet • Moisés
WARNING
SUFFOCATION HAZARD Infants have suffocated:
• In gaps between extra padding and side of the bassinet, and
• On soft bedding.
Use ONLY mattress/pad provided by Graco. NEVER add a pillow,
comforter or another mattress for padding.
• FALL HAZARD: To help prevent falls, do not use this product when
the infant begins to push up on hands and knees or weighs over
15 lbs (6.8 kg), whichever comes first.
• Never place a child under the bassinet.
• Use bassinet with only one child at a time.
• Never use bassinet without board in place.
• The bassinet must be fully assembled and installed, including four
metal tubes, eight clips, board and mattress/pad, before using. Do
not modify bassinet or add any attachments that are not listed in the
owner’s manual.
• Always keep objects out of child’s reach.
• DO NOT place more than 7 lbs (3.2 kg) in each storage section.
• DO NOT store the bassinet in the playard while in use.
• To help prevent heat build-up inside the playard and to avoid over
heating your child, when using the bassinet DO NOT use an outdoor
canopy.
• To reduce the risk of SIDS, pediatricians recommend healthy infants
be placed on their backs to sleep, unless otherwise advised by your
physician.
• If a sheet is used with the pad use only the one provided by Graco
or one specifically designed to fit the dimensions of the bassinet.

16
ADVERTENCIA
PELIGRO DE ASFIXIA Bebés se han asfixiado:
• En los espacios entre el acolchado adicional y el costado del
moisés, y
• En ropa de cama blanda.
Use SOLAMENTE el colchón proporcionado por Graco. NUNCA agreg-
ue una almohada, edredón u otro colchón como acolchado.
• PELIGRO DE CAÍDAS: Pare ayudar a prevenir caídas, no use este
producto cuando el niño comienza a levantarse en sus manos y
rodillas o pese más de 15 libras (6,8 kg), el que ocurra primero.
• Nunca coloque a un niño debajo del moisés.
• Use el moisés solamente con un niño por vez.
• Nunca use la cuna sin la tabla instalada.
• El moisés debe estar completamente montado e instalado, incluidos
los cuatro tubos metálicos, la tabla, los ocho ganchos y la
almohadilla del colchón, antes de usarlo. No modifique el moisés ni
añada ningún accesorio que no se indique en el manual del usario.
• Guarde siempre los objetos lejos del alcance del niño.
• NO ponga más de 7 libras (3.2 kg) en cada sección de
almacenamiento.
• NO almacene el moisés en el corralito mientras el mismo se esté
usando.
• Para ayudar a evitar la acumulación de calor dentro del corralito
y para evitar el recalentamiento de su niño, al usar el moisés, NO
USE una capota exterior.
• Para reducir el riesgo del SMIS, los pediatras recomiendan que los
bebés con buena salud sean puestos a dormir sobre la espalda, a
menos que su médico le indique lo contrario.
• Si usa una sábana con la almohadilla, use solamente la provista
por Graco o una específicamente diseñada según la dimensión
de la cuna.

17
Storage compartment should
be attached at the end with
the changing table holes.
Agujeros
El compartimiento para el
almacenamiento debe estar
sujetado al extremo con los
agujeros de la mesa para
cambiar al bebé.
UP • VERS LE HAUT • HACIA ARRIBA
NEVER USE bassinet without this board in place.
WARNING
MISE EN GARDE
ADVERTENCIA
NE JAMAIS utiliser la couchette sans que ce
panneau ne soit en place.
NUNCA USE la cuna sin esta tabla instalada.
LAPP0161A
Holes
You will need to remove the
mattress/pad from the bottom
of the playard to use inside
your bassinet.
Necesitará sacar el colchón
/ almohadilla del fondo del
corralito para usarlo
adentro del moisés.
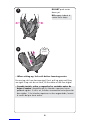
1Attach 4 clips to short ends
of playard as shown.
Inserte las cuatro presillas a
los extremos cortos del
corralito como se indica.

18
3Fasten 4 clips to long sides of
playard as shown.
2Open hook and loop tape to
slide board between sections.
Abra la cinta del gancho/nudo
para deslizar la tabla entre las
secciones.
Sujete las cuatro presillas a los
costados largos del corralito como
se indica.
4Insert tapered end of bar into
end of other bar with hole in it.
Repeat with other set of bars.
CHECK: Tubes MUST be installed
before placing mattress/pad in
bassinet.
Inserte el extremo cónico de la
barra en el extremo de la otra
barra que tiene un agujero.
Repita el procedimiento con el
otro juego de barras.
VERIFIQUE: Los tubos DEBEN
instalarse antes de colocar la
almohadilla del colchón en el
moisés.

19
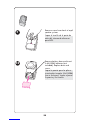
Open the battery compartment lid by
inserting a screwdriver the slot. Insert one
D-(LR20) cell battery (not included).
Replace lid.
Abra la tapa del compartimiento de las pilas
insertando un destornillador en la ranura.
Coloque una pila D-(LR20) (no se incluye).
Vuelva a poner la tapa.
5
Cord in bottom of bassinet.
El cable está en el fondo del
moisés.
Vibration must be fastened tight
and centered on the webbing
strap to work properly.
El vibrador debe estar bien
sujeto y centrado en la correa
de red para que funcione
correctamente.
8
7
6

20
Remove screw from back of mp3
speaker system.
Saque el tornillo de la parte de
atrás del sistema de altavoces
para MP3.
Remove battery door and insert
2-AA (LR06) batteries (not
included). Replace door and
screw.
Saque la puerta para las pilas e
inserte pilas tamaño 2-AA (LR06)
(no se incluyen). Vuelva a poner
la puerta y los tornillo.
9
10

21
To remove the bassinet,
reverse the steps.
Para quitar el moisés, siga los
pasos al revés.
Slide mattress pad under storage
compartment as shown. Tuck
corners into edge of bassinet.
13
SNAP!
¡CLIC!
12
11
Deslice la almohadilla del colchón
debajo del compartimiento para el
almacenamiento como se indica.
Doble las esquinas en el borde del
moisés.

22
Keep the batteries out of children’s reach.
Any battery may leak battery acid if mixed with a different battery
type, if inserted incorrectly (put in backwards) or if all batteries are
not replaced or recharged at the same time. Do not mix old and new
batteries. Do not mix alkaline, standard (carbon-zinc) or rechargeable
(nickel-cadmium) batteries.
Any battery may leak battery acid or explode if disposed of in
fire or an attempt is made to charge a battery not intended to be
recharged. Never recharge a cell of one type in a recharger made for
a cell of another type.
Discard leaky batteries immediately. Leaky batteries can cause
skin burns or other personal injury. When discarding batteries, be sure
to dispose of them in the proper manner, according to your state and
local regulations.
Always remove batteries if the product is not going to be used
for a month or more. Batteries left in the unit may leak and cause
damage.
Recommended type batteries—alkaline disposables. NEVER mix
battery types. Change batteries when product ceases to operate
satisfactorily.
TROUBLESHOOTING: If your device is not functioning
properly, check for the following problems:
1. No batteries in electronics module.
2. Batteries dead.
3. Batteries in backwards—check “+” and “-”.
4. Corrosion on battery terminals. Rotate batteries in place
against terminals, or clean with sandpaper or steel wool if
corrosion is severe.
5. Batteries too weak.
If you still have problems, call our toll-free number,
USA 1-800-345-4109.
For user information, see page 50.
For Safe Battery Use
• Para el uso seguro de las pilas

23
Mantenga las pilas fuera del alcance de los niños.
Cualquier pila puede sufrir una fuga de electrolito si se combina
con otro tipo de pila, si se coloca incorrectamente (al revés) o si todas
las pilas no se remplazan o recargan al mismo tiempo. No mezcle
pilas viejas con nuevas. No mezcle pilas alcalinas, estándar
(carbono-cinc) o recargables (níquel-cadmio).
Cualquier pila puede sufrir una fuga de electrolito o explotar
si se echa en un fuego o si se intenta cargar una pila que no sea
recargable. Nunca recargue una pila en una clase de cargador
diseñado para otro tipo de pila.
Deseche inmediatamente pilas con fugas. Pilas con fugas
pueden causar quemaduras en la piel u otras lesiones personales.
Al desechar pilas, asegúrese de deshacerse de ellas de manera
apropiada, de acuerdo con las regulaciones locales y estatales.
Quite siempre las pilas si el producto no se va a utilizar durante
un mes o más. Las pilas que se dejen en la unidad pueden causar una
fuga o daño.
Tipo de pilas recomendado: alcalinas desechables. NUNCA mezcle
diferentes tipos de pilas. Cambie las pilas cuando el producto deje de
operar de manera correcta.
PROBLEMAS Y SOLUCIONES: Si el dispositivo no funciona
correctamente, investigue estos posibles problemas:
1. El módulo electrónico no tiene pilas.
2. La pilas están agotados.
3. La pilas están instalados al revés (examine los terminales "+" y "-").
4. Vea si hay corrosión en los terminales de la pila. Haga girar las pilas
colocada sobre los terminales, o, si hay mucha corrosión, limpie los
terminales con papel de lija o viruta de acero.
5. Las pilas no tiene carga suficiente.
Si sigue teniendo problemas, llame a nuestro teléfono gratuito: en los
Estados Unidos, 1-800-345-4109.
Para información de usario, véase la página 50.

24
The vibration unit may ONLY
be used with the bassinet.
WARNING
• You must remove the MP3
speaker system from the unit
when your child can pull up
to a standing position.
• To avoid suffocation, do
not allow child to play with
the MP3 speaker system.
• 1.5” [38mm] is the
minimum width for any MP3
Player to be used in the MP3
speaker system.
La unidad de vibración
SOLAMENTE puede ser usada
con la cuna.
ADVERTENCIA
• Debe sacar el sistema de
altavoces para MP3 de la
unidad cuando el niño pueda
pararse por su cuenta.
• Para evitar la asfixia, no deje
que el niño juegue con el
sistema de altavoces para MP3.
• 38 mm [1.5 pulgadas] es el
ancho mínimo del reproductor
de MP3 que se debe usar en el
sistema de altavoces para MP3.
Using MP3 Speaker System
• Cómo usar el sistema de altavoces para
MP3
Remove screw from back of MP3
speaker system.
Saque el tornillo de la parte de
atrás del sistema de altavoces
para MP3.
14
Remove battery door and insert
2-AA (LR06) batteries (not
included). Replace door and
screw.
Saque la puerta para las pilas e
inserte pilas tamaño 2-AA (LR06)
(no se incluyen). Vuelva a poner
la puerta y los tornillo.
15

25
To turn unit on, slide button and a light
will come on.
Para encender la unidad, deslice el
botón y se encenderá una luz.
16
SLOW
LENTO
APAGADO
FAST
RÁPIDO
ENCENDIDO
VIBRACIÓN PARA
TRANQUILIZAR AL BEBÉ
To use an MP3 player (not included),
connect player to cord in speaker system
as shown. To operate music, follow
instructions in your MP3 to play music.
Para usar un reproductor de MP3 (no
se incluye), conecte el reproductor al
cordón del sistema de altavoces como
se indica. Para activar la música, use
las instrucciones de su MP3 para tocar
música.
To operate vibration, push button to
slow or fast.
Para activar la vibración, empuje el
botón a la posición lento o rápido.

26
Changing Table • Mudador
WARNING
FALL HAZARD- To prevent death or serious injury,
• Always stay within arm’s reach of your child when using the
changing table. Never leave child unattended.
• The changing table is designed for use only with this Graco
playard. Do not use on the floor, bed, counter or other
surfaces. Before each use make sure the changing table is
properly secured to the playard by pushing down firmly in
the middle of the changing table.
• Do not use changing table as a sleeping or play area.
• Weight limit for the changing table is 25 lbs (11.3 kg). Do
not use the changing table as extra storage. Always remove
the changing table when your child is in the playard.
• Use only the pad provided by Graco.
• Do not use changing table if it is damaged or broken.
• Strangulation Hazard: Child can lift changing table and get
neck trapped between changing table and playard frame.
Always remove the changing table when your child is in the
playard.
ADVERTENCIA
PELIGRO DE CAÍDA - Para prevenir una lesión seria o la muerte,
• Siempre permanezca cerca del alcance de su bebé cuando
esté usando el mudador. Jamas deje a su hijo solo.
• El mudador ha sido diseñado para usarlo con solamente esta
el corralito Graco. No úselo en el piso, la cama, el tablero o
otro superficie. Antes de cada uso, asegúrese que el muda-
dor esté bien firme sobre el corralito, empujando hacia abajo
desde el centro del mudador.
• No use el mudador como colchón para jugar o para hacer
dormir a su bebé.
• El peso máximo para el mudador es de 25 libras (11.3 kg).
No use el mudador como un espacio más para almacenar
cosas. Siempre retire el mudador cuando su bebé permanezca
en el corralito.
• Use solamente el colchón proporcionado por Graco.
• No use la mesa para cambiar al bebé si está dañada o rota.
• Peligro de estrangulamiento: El niño puede levantar la mesa
para cambiar al bebé y el cuello se puede quedar apretado
entre la mesa y el armazón del corralito. Siempre retire el
mudador cuando su bebé permanezca en el corralito.

27
2a
Slide 1-piece tube with the
buttons facing up through the
fabric as shown.
Slide 2-piece tube with buttons
facing up through the fabric as
shown.
Deslice el tubo de una pieza
con los botones mirando hacia
arriba por la tela como se
indica.
Deslice los tubos de dos
piezas con los botones
mirando hacia arriba por la
tela como se indica.
1
2
SNAP!
¡CLIC!
1-piece tube
tubo de una pieza
2-piece tubes
tubos de dos piezas
Connect the 2-piece tubes until
they snap together.
Conecte los tubos de dos
piezas hasta que se traben
juntos.

28
4
Slide 1-piece tube through
mount with button until it
snaps into place.
3
SNAP!
¡CLIC!
SNAP!
¡CLIC!
Attach mount with button to
2-piece tube until it snaps into
place.
Button
Botón
Sujete el montante con el
botón al tubos de dos piezas
hasta que se trabe en su lugar.
Deslice el tubo de una pieza
a través del montante con el
botón hasta que se trabe en su
lugar.

29
5
6
Attach mount without button
to the other end of the 2-piece
tube until it snaps into place.
Slide 1-piece tube through
mount until it snaps into place.
SNAP!
¡CLIC!
SNAP!
¡CLIC!
Sujete el montante sin el botón
al otro extremo del tubos de
dos piezas hasta que se trabe
en su lugar.
Deslice el tubo de una pieza a
través del montante hasta que
se trabe en su lugar.

30
7
8
9
SNAP!
¡CLIC!
To fold, push button on
changing table and rotate
away from playard.
Double check to make sure
the bassinet is attached with
storage compartments under
the changing table.
Verifique para asegurarse que
el moisés esté sujetado con
los compartimientos para el
almacenamiento debajo de la
mesa para cambiar al bebé.
Para plegarlo, empuje el
botón en la mesa para
cambiar al bebé y gírela en el
sentido opuesto al corralito.
Storage
compartment
Compartimientos para
el almacenamiento

31
Folding Stand • Soporte plegable
2
1
SNAP!
¡CLIC!
SNAP!
¡CLIC!
Insert smaller leg tube into
stand until it snaps into place.
Insert larger leg tube into
stand until it snaps into place.
Smaller
leg tube
Tubo más
chico de
la pata
Inserte el tubo más chico de
la pata en el soporte hasta
que se trabe en su lugar.
Inserte el tubo más grande
de la pata en el soporte hasta
que se trabe en su lugar.


33
5
SNAP!
¡CLIC!
4
Snap one side of the brace onto
center tube as shown.
WARNING
To avoid collapse, never attach
brace upside-down. Always
make sure brace is securely
attached to stand. Do not sit or
stand on product.
ADVERTENCIA
Para evitar que se desarme, nunca
sujete el refuerzo al revés. Asegúrese
siempre de que el refuerzo esté
sujetado apretadamente al soporte.
No se siente ni se pare sobre
el producto.
Trabe un costado del refuerzo
en el tubo central como se
indica.


35
Portable Bassinet • Moisés Portatil
WARNING
SUFFOCATION HAZARD Infants have suffocated:
• In gaps between extra padding and side of the bassinet, and
• On soft bedding.
Use ONLY mattress/pad provided by Graco. NEVER add a
pillow, comforter or another mattress for padding.
• Product can roll over on soft surfaces and suffocate child.
Never place product on beds, sofas, cushions or other soft
surfaces.
• FALL HAZARD: To help prevent falls, do not use this
product when the infant begins to push up on hands and
knees, weighs over 15 lbs (6.8 kg), or reaches 3 months,
whichever comes first.
• The bassinet must be fully assembled and installed,
including two metal wires, hook and loop tape, liner and
mattress/pad, before using. Always follow the instructions in
the owner’s manual to set up the portable bassinet.
• Always keep objects out of child’s reach.
• Do not use portable bassinet in an automobile.
• Do not use portable bassinet as a car bed.
• Never leave child unattended
• Do not place portable bassinet on an elevated surface.
• Never place a child under the bassinet.
• Do not store the bassinet in the playard.
• To reduce the risk of SIDS, pediatricians recommend healthy
infants be placed on their backs to sleep, unless otherwise
advised by your physician.
• If a sheet is used with the pad use only the one provided by
Graco or one specifically designed to fit the dimensions of
the bassinet.

WARNING
FALL HAZARD:
• Child’s movement can slide product. Use only on floor.
Never use on any elevated surface.
• NEVER use this product as a means to transport an infant in
a motor vehicle.
• NEVER place baby face down in product.
• Use product with only one child at a time.
STRANGULATION HAZARD:
• Do not use this product if it is damaged or broken.
• Strings and cords can cause strangulation. Keep strings and
cords away from child.
• NEVER place the product near a window where cords from
blinds or drapes can strangle a child.
• NEVER hang strings on or over the product.
• NEVER place items with a string around a child’s neck, such
as hood strings, pacifier cords, etc.
• NEVER attach strings to toys.
• Never place any objects in product while child is in it.
37

37
ADVERTENCIA
PELIGRO DE ASFIXIA Bebés se han asfixiado:
• En los espacios entre el acolchado adicional y el costado del
moisés, y
• En ropa de cama blanda.
Use SOLAMENTE el colchón proporcionado por Graco. NUNCA
agregue una almohada, edredón u otro colchón como
acolchado.
• El producto puede darse vuelva sobre superficies suaves y
el niño puede asfixiarse. Nunca ponga el producto sobre una
cama, sofá, almohadones u otras superficies blandas.
• PELIGRO DE CAÍDAS: Pare ayudar a prevenir caídas, no use
este producto cuando el niño comienza a levantarse en sus
manos y rodillas, pese más de 15 libras (6,8 kg), o tenga 3
meses, el que ocurra primero.
• El moisés debe estar completamente armado e instalado,
incluyendo los dos alambres de metal, cinta de gancho y
nudo,revestimiento y almohadilla o colchón, antes de usarlo.
Observe
siempre las instrucciones en el manual del usario para instalar
el moisés portátil.
• Guarde siempre los objetos lejos del alcance del niño.
• No use el moisés portátil en un automóvil.
• No use el moisés portátil como una cama para automóvil.
• Nunca deje al niño solo
• No ponga el moisés portátil sobre una superficie elevada.
• Nunca ponga a un niño debajo del moisés.
• No guarde el moisés en el corralito.
• Para ayudar a evitar la acumulación de calor dentro del
corralito y para evitar el recalentamiento de su niño, al usar el
moisés, NO USE una capota exterior.
• Para reducir el riesgo del SMIS, los pediatras recomiendan
que los bebés con buena salud sean puestos a dormir a boca
arriba, a menos que su médico le indique lo contrario.
• Si usa una sábana con la almohadilla, use solamente la
provista por Graco o una específicamente diseñada según la
dimensión de la cuna.

38
ADVERTENCIA
PELIGRO DE CAÍDA:
• Los movimientos del niño pueden mover el producto. Úselo
solamente en el piso. Nunca lo use sobre una superficie
elevada.
• Nunca use este producto como manera de transportar al
bebé en un vehículo automotor.
• Nunca ponga al bebé en el producto con la cara hacia
abajo.
• Use el producto solamente con un niño por vez.
PELIGRO DE ESTRANGULAMIENTO:
• No use este producto si está dañado o roto.
• Cuerdas y cordones pueden causar la estrangulación.
Mantenga los cordones y cuerdas fuera del alcance del
niño.
• NUNCA coloque el producto cerca de una ventana donde
los cordones de las cortinas o persianas puedan
estrangular al niño.
• NUNCA cuelgue cordones encima o sobre el producto.
• NUNCA coloque artículos con un cordón alrededor del
cuello del niño, tales como cordones de capucha, cordón
del chupete, etc.
• NUNCA ponga cordones a los juguetes.
• Nunca ponga ningún objeto en el producto mientras el niño
esté en él.

39
SNAP!
¡CLIC!
SNAP!
¡CLIC!
1
2
Pull wires out as shown.
Rotate wires on both sides
of bassinet down until they
snap under plastic tabs.
Repeat on other side as
shown.
Portable Bassinet • Moisés portátil
ADVERTENCIA
Nunca sujete el moisés portátil a
ningún otro producto.
Tire los alambres hacia
arriba como se indica.
Gire los alambres en
ambos costados del
moisés hacia abajo hasta
que se traben debajo de
las lengüetas de plástico.
Repita el proceso del otro
lado como se indica.
WARNING
Never attach portable
bassinet to any other
product.
Tabs
Lengüetas

40
5
4
3Insert liner into portable
bassinet making sure the
hook and loop squares are on
the canopy end of bassinet as
shown.
Push buttons in on both sides
of bassinet to rotate handle
up.
Fasten hook and loop tape to
each other on canopy end.
Canopy hook and loop
squares
Cuadrados de cinta de
gancho y nudo para
sujetar la capota
Sujete ambas partes de la
cinta de gancho y nudo
entre ellas en el extremo de
la capota.
Empuje los botones en
ambos costados del moisés
para que la manija gire hacia
arriba.
Inserte el revestimiento en el
moisés portátil asegurándose
de que los cuadrados de
cinta de gancho y nudo para
sujetarlo se encuentren en
el extremo de la capota del
moisés como se indica.

41
8
6
7
Fasten hook and loop on the
opposite end of canopy.
Fasten hook and loop on
both sides of portable
bassinet as shown.
Fasten hook and loop at back
of canopy as shown.
Sujete la cinta de gancho y
nudo en el otro lado de la
capota.
Sujete la cinta de gancho y
nudo en ambos costados del
moisés como se indica.
Sujete la cinta en la parte de
atrás de la capota como se
indica.


43
To Attach Portable Bassinet to Stand
• Cómo sujetar el moisés portátil al soporte
ADVERTENCIA
Nunca sujete el moisés portátil a
ningún otro producto.
Use solamente el moisés portátil
Graco en este producto.
WARNING
Never attach portable
bassinet to any other
product.
Only use Graco’s Portable
Bassinet on this product.

44
1
To Attach Portable Bassinet to Playard
• Cómo sujetar el moisés
portátil al corralito
2
Never place portable
bassinet in the changing table or
inside the playard.
Place portable bassinet inside the
playard bassinet opposite end of
the changing table as shown.
3
Ponga el moisés portátil en el
interior del moisés del corralito en
el lado opuesto de la mesa para
cambiar al bebé como se indica.
Nunca ponga el moisés portátil
en la mesa para cambiar al bebé
o en el interior del corralito.


46
Cuidado y mantenimiento
DE VEZ EN CUANDO REVISE SU PRODUCTO por si existieran partes
gastadas, material roto o descosido. Reemplace o repare las partes que
lo necesiten. Use sólo repuestos Graco®.
SI SU PRODUCTO ES USADO EN LA PLAYA, DEBE limpiarlo y sacarle
muy bien la arena, incluyendo las patas, antes de meterlo en el bolso
cobertor. La arena en el seguro para plegar los costados puede dañarlo.
PARA LIMPIAR EL PRODUCTO, use sólo un jabón de uso
doméstico o detergente suave y agua tibia.
PARA LAVAR EL BOLSO PARA TRANSPORTAR, puede ponerlo
en la lavadora con agua fría, en ciclo ropa delicada y colgarlo para
secarlo. NO USE CLORO.
PARA LAVAR EL MOISÉS: Saque el sistema MP3 y la unidad de
vibración. NUNCA saque el cordón del moisés. Lávelo a mano con agua
tibia y jabón doméstico. Escúrralo al aire.
Care and Maintenance
FROM TIME TO TIME CHECK YOUR PRODUCT for worn parts, torn
material or stitching. Replace or repair the parts as needed. Use only
Graco® replacement parts.
IF THE PRODUCT IS USED AT THE BEACH, you MUST clean sand
off your product, including the feet, before packing it into cover. Sand
in top rail lock may damage it.
TO CLEAN THE PRODUCT, use only household soap or detergent and
warm water.
TO WASH CARRY BAG, machine wash in cold water on delicate cycle
and drip-dry. NO BLEACH.
TO WASH BASSINET: Remove MP3 system and vibration unit.
NEVER remove cord from bassinet. Hand wash with warm water and
household soap. Drip dry.

47
Note: This equipment has been tested and found to comply with the
limits for a Class B digital device, pursuant to part 15 of the FCC Rules.
These limits are designed to provide reasonable protection against
harmful interference in a residential installation. This equipment
generates, uses and can radiate radio frequency energy and, if not
installed and used in accordance with the instructions, may cause
harmful interference to radio communications.
However, there is no guarantee that interference will not occur in a
particular installation. If this equipment does cause harmful interference
to radio or television reception, which can be determined by turning
the equipment off and on, the user is encouraged to try to correct the
interference by one or more of the following measures:
• Reorient or relocate the receiving antenna.
• Increase the separation between the equipment and receiver.
• Connect the equipment into an outlet on a circuit different from that
to which the receiver is connected.
• Consult the dealer or an experienced radio/TV technician for help.
NOTA: Este equipo ha sido probado y se ha determinado que cumple
con los límites de un dispositivo digital Clase B, según la Parte 15 de las
Normas de la Comisión Federal de Comunicaciones. Estos límites han
sido determinados para proporcionar una protección razonable contra
la interferencia peligrosa en una instalación residencial. Este equipo
genera, usa y puede emitir energía de radiofrecuencia y, si no se instala
y se usa de acuerdo a las instrucciones, podría causar interferencias
peligrosas a las comunicaciones por radio.
Sin embargo, no existe garantía que la interferencia no ocurrirá en una
instalación particular. Si este equipo causa interferencia peligrosa a la
recepción de radio o televisión, lo cual puede determinarse
encendiendo y apagando el equipo, se sugiere al usuario que trate de
corregir la interferencia usando una o más de las siguientes medidas:
• Vuelva a orientar o a colocar la antena de recepción.
• Aumente la separación entre el equipo y el receptor.
• Conecte el equipo en un tomacorriente en un circuito eléctrico
diferente al que necesita el receptor.
• Consulte al comerciante o a un técnico de radio y televisión con
experiencia para recibir ayuda.

48
In
Replacement Parts • Warranty Information (USA)
Información sobre la garantía y las piezas de repuesto
(EE.UU.)
www.gracobaby.com
or/o
1-800-345-4109
To register your Graco product from within the U.S.A. visit us
online at www.gracobaby.com/productregistration or return
registration card provided with your product. We currently do not
accept product registrations from those living outside the United
States of America.
Para registrar su producto Graco desde dentro de los EE.UU., visítenos
en línea en www.gracobaby.com/productregistration o envíe la tarjeta
de registro provista con su producto. Actualmente no aceptamos
registros de los productos de los que viven fuera de los Estados
Unidos de América.
Product Registration (USA)
Registro del producto (EE.UU.)
To purchase parts or
accessories or for warranty
information in the United
States, please contact us at
the following:
Para comprar piezas o
accesorios o para obtener
información sobre la garantía
en los Estados Unidos, por favor
comuníquese con nosotros en:

WARNING: Changes or modifications to this unit not expressly approved by
the party responsible for compliance could void the user authority to operate
the equipment.
NOTE: This equipment has been tested and found to comply with the limits for
a Class B digital device, pursuant to Part 15 of the FCC Rules. These limits are
designed to provide reasonable protection against harmful interference in a
residential installation. This equipment generates, uses and can radiate radio
frequency energy and, if not installed and used in accordance with the
instructions, may cause harmful interference to radio communications.
However, there is no guarantee that interference will not occur in a particular
installation. If this equipment does cause harmful interference to radio or
television reception, which can be determined by turning the equipment off
and on, the user is encouraged to try to correct the interference by one or
more of the following measures:
• Reorient or relocate the receiving antenna.
• Increase the separation between the equipment and receiver.
• Connect the equipment into an outlet on a circuit different from that to
which the receiver is needed.
• Consult the dealer or an experienced radio/TV technician for help.
MISE EN GARDE: Des changements ou modifications faits à cette unité qui
ne sont pas expressément approuvés par la personne responsable pour la
conformité pourrait annuler l'autorité de l'utilisateur à utiliser l'équipement.
NOTE: Cet équipement a été examiné et s'est avéré être conforme aux limites
pour un dispositif numérique de
classe B, conformément à la partie 15 des règles du FCC. Ces limites sont
conçues pour assurer une protection raisonnable contre l'interférence nocive
lors d'une installation résidentielle. Cet équipement produit, utilise peut émettre
des émissions radioélectriques et si il n'est pas installé et utilisé selon les
instructions, peut causer de l'interférence nocive aux radiocommunications.
Cependant, il n'y a aucune garantie que l'interférence ne se produira pas lors
d'une installation particulière. Si cet équipement cause de l'interférence nocive
de la réception radio ou du téléviseur, qui peut être déterminée en mettant
l'équipement hors et sous tension, l'utilisateur est encouragé à essayer de
corriger l'interférence par une ou plusieurs des mesures suivantes:
• Réorientez ou replacez l'antenne de réception.
• Augmentez la séparation entre l'équipement et le récepteur.
• Branchez l'équipement dans une prise sur un circuit différent de celui
du récepteur.
• Consultez le fournisseur ou un technicien avec expérience en radio et
téléviseur pour assistance.
ISPZ002AA 08/03

ADVERTENCIA: Los cambios o modificaciones a esta unidad que no hayan
sido expresamente aprobados por la parte responsable por el cumplimiento
de las normas podría cancelar el derecho del usuario a usar el equipo.
NOTA: Este equipo ha sido probado y se ha determinado que cumple con los
límites de un dispositivo digital Clase B, según la Parte 15 de las Normas de
la Comisión Federal de Comunicaciones. Estos límites han sido determinados
para proporcionar una protección razonable contra la interferencia peligrosa en
una instalación residencial. Este equipo genera, usa y puede emitir energía de
radiofrecuencia y, si no se instala y se usa de acuerdo a las instrucciones,
podría causar interferencias peligrosas a las comunicaciones por radio.
Sin embargo, no existe garantía que la interferencia no ocurrirá en una
instalación particular. Si este equipo causa interferencia peligrosa a la recepción
de radio o televisión, lo cual puede determinarse encendiendo y apagando el
equipo, se sugiere al usuario que trate de corregir la interferencia usando una
o más de las siguientes medidas:
• Vuelva a orientar o a colocar la antena de recepción.
• Aumente la separación entre el equipo y el receptor.
• Conecte el equipo en un tomacorriente en un circuito eléctrico diferente al
que necesita el receptor.
• Consulte al comerciante o a un técnico de radio y televisión con experiencia
para recibir ayuda.
-
 1
1
-
 2
2
-
 3
3
-
 4
4
-
 5
5
-
 6
6
-
 7
7
-
 8
8
-
 9
9
-
 10
10
-
 11
11
-
 12
12
-
 13
13
-
 14
14
-
 15
15
-
 16
16
-
 17
17
-
 18
18
-
 19
19
-
 20
20
-
 21
21
-
 22
22
-
 23
23
-
 24
24
-
 25
25
-
 26
26
-
 27
27
-
 28
28
-
 29
29
-
 30
30
-
 31
31
-
 32
32
-
 33
33
-
 34
34
-
 35
35
-
 36
36
-
 37
37
-
 38
38
-
 39
39
-
 40
40
-
 41
41
-
 42
42
-
 43
43
-
 44
44
-
 45
45
-
 46
46
-
 47
47
-
 48
48
-
 49
49
-
 50
50


Graco PD257081D El manual del propietario
- Categoría
- Muebles de bebe
- Tipo
- El manual del propietario
en otros idiomas
- English: Graco PD257081D Owner's manual
Artículos relacionados
-
Graco Crib PD147439C Manual de usuario
-
-
-
-
-
-
-
-
-

