Canon PIXMA MX860 El manual del propietario
- Categoría
- Multifuncionales
- Tipo
- El manual del propietario

ENGLISH
ESPAÑOL
series
Asegúrese de leer este manual antes de usar el equipo. Consérvelo a mano para utilizarlo como referencia en el futuro.
Guía de inicio
=Léame en primer lugar=
Todo en uno para ocina
Make sure to read this manual before using the machine. Please keep it in hand for future reference.
Getting Started
=Read Me First=
Ofce All-In-One

Símbolos
■
Explicaciones adicionales.
Instrucciones que deben seguirse por motivos de seguridad.
Los siguientes símbolos se utilizan para señalar las instrucciones importantes. Preste atención
a estas instrucciones.
Descripciones de operaciones que llevan cierto tiempo en completarse.
Número de modelo: K10333 (MX860)
Instrucciones que, si no se tienen en cuenta, podrían producir daños personales
o daños materiales.
Precaución
Microsoft es una marca comercial registrada de Microsoft Corporation.•
Windows es una marca comercial o una marca comercial registrada de Microsoft Corporation en
EE UU y/u otros países.
•
Windows Vista es una marca comercial o una marca comercial registrada de Microsoft Corporation en
EE UU y/u otros países.
•
Macintosh, Mac y AirPort son marcas comerciales de Apple Inc., registradas en EE UU y en otros
países.
•
Wi-Fi es una marca comercial registrada de Wi-Fi Alliance.
El logotipo Wi-Fi CERTIFIED es una marca de certicación de Wi-Fi Alliance.
•
Symbols
■
Additional explanations.
Instructions that must be observed for safe operation.
The following symbols are used to mark important instructions. Observe these instructions.
Descriptions for operations that take some time to complete.
Model Number: K10333 (MX860)
Instructions that, if ignored, could result in personal injury or material damage.
Caution
Microsoft is a registered trademark of Microsoft Corporation.•
Windows is a trademark or registered trademark of Microsoft Corporation in the U.S. and/or other
countries.
•
Windows Vista is a trademark or registered trademark of Microsoft Corporation in the U.S. and/or other
countries.
•
Macintosh, Mac, and AirPort are trademarks of Apple Inc., registered in the U.S. and other countries.•
Wi-Fi is a registered trademark of the Wi-Fi Alliance.
The Wi-Fi CERTIFIED logo is a certication mark of the Wi-Fi Alliance.
•

1
Preparación
Conexión de la línea telefónica
Encendido del equipo
Instalación del cabezal de impresión
Instalación de los depósitos de tinta
Configuración del equipo para la recepción de fax
Después de instalar el equipo
Confirmación del tipo de conexión
Carga de papel
Configuración del equipo y del ordenador
Selección del método de conexión
Contenido
After Installing the Machine
Confirming Your Connection Type
Install the Print Head
Turn the Power On
Preparation
Loading Paper
Connect the Telephone Line
Set Up for Fax Reception
Install the Ink Tanks
Setup the Machine and the Computer
Select the Connection Method
Contents

2
1
A
1
Preparación
Compruebe los elementos que se incluyen
■
Antes de encender el equipo, retire todas las cintas naranjas y las láminas protectoras.
El cabezal de impresión se encuentra dentro de la bandeja de salida del papel (A).
Abra la bandeja de salida del papel con las manos y extraiga el cabezal de impresión.
Elección del emplazamiento
□
No instale el equipo donde le pueda caer algún objeto. El objeto podría caer
dentro del equipo y provocar fallos en el funcionamiento.
•
No coloque ningún objeto sobre el equipo. Podría caer dentro del equipo al
abrir la cubierta y provocar fallos en el funcionamiento.
•
Preparation
Check the Included Items
■
Before turning on the machine, remove all the orange tapes and the protective sheets.
The Print Head is placed inside of the Paper Output Tray (A).
Open the Paper Output Tray with your hands, and take out the Print Head.
Do not install the machine where an object may fall on it. The object may fall
inside the machine, resulting in malfunction.
•
Do not place any object on top of the machine. It may fall into the machine when
opening covers, resulting in malfunction.
•
Choosing a Location
□

3
Manuales•
CD-ROM de instalación (que contiene los controladores, las aplicaciones y los manuales en pantalla)•
Cable USB•
Garantía•
El cable USB se utiliza durante el procedimiento de conguración
de la red.
The USB cable is used during the network setup procedure.
Manuals•
Setup CD-ROM (containing the drivers, applications and on-screen manuals)•
USB cable•
Warranty•

4
22
1
A
Conexión de la línea telefónica
En esta sección se describe el método básico para conectar la línea telefónica.
Para utilizar el equipo como fax, se debe conectar una línea telefónica.
Para obtener información sobre otros métodos, consulte el manual en pantalla:
Guía básica (Basic Guide).
Si no utiliza el equipo como fax:
Si utiliza el equipo como fax y teléfono:
Si utiliza el equipo como fax exclusivamente:
Vaya a "3 Encendido del equipo"
en la página 6.
Sólo
Si no logra enviar faxes tras instalar el equipo, compruebe el tipo de línea telefónica. Para obtener
más información, consulte "Comprobación de la conexión de la línea telefónica" en el manual en
pantalla: Guía básica (Basic Guide).
•
Conecte el equipo con una línea telefónica mediante el cable de línea telefónica
suministrado (A).
Vaya a "3 Encendido del equipo" en la página 6.
Si utiliza el equipo como fax exclusivamente:
Connect the Telephone Line
This section describes the basic method of telephone line connection.
To use the machine as a fax, a telephone line needs to be connected.
For other connection methods, refer to the on-screen manual: Basic Guide.
When not using as a fax:
When using as both a fax and telephone:
When using as a fax only:
Go to "3 Turn the Power On" on page 6.
only
If you cannot send faxes after installing the machine, check the telephone line type. For details, refer
to "Conrming the Telephone Line Connection" in the on-screen manual: Basic Guide.
•
Connect the machine with a telephone line using the supplied telephone line
cable (A).
Go to "3 Turn the Power On" on page 6.
When using as a fax only:

5
2
B
Retire la tapa del conector del teléfono (B) y conecte un teléfono mediante el cable de línea telefónica.
No conecte el equipo y el teléfono en paralelo a la misma línea telefónica mediante un adaptador de distribución. De lo contrario, puede que el equipo no funcione correctamente.•
Sólo al conectar un teléfono:
Do not connect the machine and a telephone in parallel to the same telephone line using a distribution adapter. The machine may not operate properly.•
Remove the telephone connector cap (B), then connect a telephone with the telephone line cable.
Only when connecting a telephone:

6
33
1
2
1
2
B
A
3
4
D
C
Encendido del equipo
Enchufe el cable de alimentación en la parte
posterior izquierda del equipo y conecte el
otro extremo a la toma de corriente.
Encienda el equipo (A).
NO conecte el cable USB en este punto.•
Asegúrese de que la cubierta de
documentos (B) esté cerrada.
•
El equipo podría emitir ruidos de
funcionamiento. Esto es normal.
•
Utilice el botón
{
o
}
(C) en el panel de control
para seleccionar el idioma de la pantalla LCD
y pulse el botón
OK.
Si el idioma de la pantalla LCD no es el deseado, pulse el botón Atrás (Back) (D) para volver
a la pantalla
Selección idioma (Language selection).
•
Aparecerá la pantalla de
espera.
Turn the Power On
Do NOT connect the USB cable at this stage.•
Plug the power cord into the back left of the
machine, then connect the other end to the
wall outlet.
Turn on the machine (A).
Make sure that the Document Cover (B) is
closed.
•
The machine may make some operating
noises. This is normal operation.
•
Use the
{
or
}
button (C) on the Operation Panel
to select the language for the LCD, then press the
OK button.
If an unintended language is displayed on the LCD, press the Back button (D) to return to the
Language selection screen.
•
The standby screen is
displayed.

7
1
A
B
C
E
D
4
Instalación del cabezal de impresión
Abra la bandeja de salida del papel (A) y, a continuación, levante la unidad del escáner (cubierta)
(B) hasta que se bloquee en su posición.
Manipule el cabezal de impresión con cuidado.
No lo deje caer ni lo presione con demasiada fuerza.
•
Si el soporte del cabezal de impresión no se mueve, compruebe que el equipo está encendido.•
El soporte del cabezal de impresión hace ruido cuando se desplaza. Esto es normal.•
Cierre la cubierta de documentos (C) y levántela con la unidad del escáner (cubierta).
El soporte de la unidad del escáner (D) se ajusta de forma automática.
Saldrá el contenedor del cabezal de impresión (E). (Aquí se instala el cabezal de impresión.)
Install the Print Head
Handle the Print Head carefully. Do not drop or apply
excessive pressure to it.
•
Open the Paper Output Tray (A), then lift the Scanning Unit (Cover) (B) until it locks into place.
The Print Head Holder makes a noise as it moves. This is normal operation.•
If the Print Head Holder does not move, make sure that the machine is turned on.•
Close the Document Cover (C) and lift it with the Scanning Unit (Cover).
The Scanning Unit Support (D) is fixed automatically.
The Print Head Holder (E) comes out. (This is where you install the Print Head.)

8
4
3
2
4
F
Levante firmemente la palanca de bloqueo del cabezal de impresión
(F) hasta que se detenga.
Quite la tapa protectora de color naranja.
Puede haber un poco de tinta transparente o de color azul claro dentro de la bolsa en la que viene el cabezal
de impresión o dentro de la tapa protectora: esto no afecta a la calidad de impresión. Tenga cuidado para no
mancharse de tinta al manipular estos componentes. Tenga cuidado de no mancharse las manos.
•
Retire el cabezal de impresión del
embalaje plateado.
La palanca de bloqueo del cabezal de impresión (F) puede ofrecer cierta resistencia.•
Firmly raise the Print Head Lock Lever (F) until it stops. Remove the orange protective cap.
There may be some transparent or light blue ink on the inside of the bag the Print Head comes in, or the inside of
the protective cap - this has no effect on print quality. Be careful not to get ink on yourself when handling these items.
Be careful not to stain your hands.
•
Remove the Print Head from the silver
package.
The Print Head Lock Lever (F) may feel heavy.•

9
5
6
F
Procure que el cabezal de impresión no golpee los lados del soporte.•
Instálelo en un ambiente bien iluminado.•
Sujete rmemente la palanca de bloqueo del cabezal de impresión y bájela
con cuidado.
•
Después de instalar el cabezal de impresión, no lo retire salvo que sea
totalmente necesario.
•
Incline el cabezal de impresión hacia delante y colóquelo en su lugar. Baje completamente la palanca de bloqueo del
cabezal de impresión (F).
Do not knock the Print Head against the sides of the holder.•
Install in a well-lit environment.•
Pinch the Print Head Lock Lever rmly and lower it gently.•
Once you have installed the Print Head, do not remove it unnecessarily.•
Tilt the Print Head forward and set it in place. Lower the Print Head Lock Lever (F) completely.

10
5
A
1
1
2
2
3
Manipule los depósitos de tinta con cuidado. No los
deje caer ni los presione con demasiada fuerza.
•
Asegúrese de usar los depósitos de tinta suministrados.•
Si el contenedor de cabezal de impresión se desplaza hacia la derecha, cierre
y vuelva a abrir la unidad del escáner (cubierta).
•
Tire de la cinta naranja (1) en el sentido de
la flecha para extraer la película protectora
y retírela (2) por completo.
Mientras presiona hacia abajo con el pulgar izquierdo,
gire la tapa protectora naranja (A) que se encuentra
en la parte inferior del depósito de tinta.
No sujete los laterales del depósito de tinta; podría salpicar.•
Instalación de los depósitos de tinta
Instale el depósito de tinta
Inserte el depósito de tinta completamente
en el cabezalde impresión.
Install the Ink Tanks
Handle the ink tanks carefully. Do not drop or apply
excessive pressure to them.
•
Be sure to use the supplied ink tanks.•
Pull the orange tape (1) in the direction of
the arrow to peel off the protective film and
remove the film (2) completely.
While pressing down with your left thumb, twist off the
orange protective cap (A) located on the bottom of the
ink tank.
Do not hold the sides of the ink tank; ink may splash.•
Insert the ink tank fully into the Print Head.
Install the ink tank
If the Print Head Holder moves to the right, close and reopen the Scanning Unit
(Cover).
•

11
5
B
C
6
4
Instale los demás depósitos de tinta del
mismo modo.
Asegúrese de que todas las lámparas de tinta están
encendidas de color rojo.
Instale todos los depósitos de tinta.
Instálelo en un ambiente bien iluminado.•
Haga que coincidan las etiquetas durante la instalación.
•
Cuando haya instalado los depósitos de tinta, no los
retire innecesariamente.
•
Levante la unidad del escáner (cubierta) (B) ligeramente y pliegue el soporte
de la unidad del escáner (C) para luego cerrar con cuidado la unidad del
escáner (cubierta) (B).
Espere a que aparezca la pantalla mostrada más arriba (alrededor de cuatro minutos)
y continúe con el paso siguiente.
•
El equipo podría emitir ruidos de funcionamiento mientras se prepara para imprimir. Esto es normal.•
Pulse la marca PUSH del depósito de
tinta hasta que haga clic en su lugar.
Asegúrese de que la lámpara de tinta esté
encendida de color rojo.
Si aparece un mensaje de error en la pantalla LCD, compruebe que el cabezal de impresión
y los depósitos de tinta están instalados correctamente.
•
Install all the other ink tanks in the same
way.
Install in a well-lit environment.•
Match the labels when installing.•
Once you have installed the ink tanks, do not remove
them unnecessarily.
•
Make sure all the Ink lamps light red.
Install all the ink tanks.
Lift the Scanning Unit (Cover) (B) slightly and fold the Scanning Unit Support
(C), then gently close the Scanning Unit (Cover) (B).
Wait until the screen above appears (about 4 minutes) and go to the next step.•
The machine may make some operating noises when preparing to print. This is normal operation.•
Press the PUSH mark on the ink tank
until it clicks into place.
Make sure the Ink lamp lights red.
If an error message is displayed on the LCD, make sure that the Print Head and the ink tanks
are correctly installed.
•

12
5
7
D
8
Cargue tres hojas o más de papel normal de tamaño A4 o Carta
en la bandeja (D) y, a continuación, pulse el botón OK.
Para obtener más información, consulte "24 Carga de papel" en la página
73.•
Cierre la bandeja de salida del papel para facilitar la extracción de la bandeja.
•
Pulse el botón OK.
Aparecerá la pantalla de espera.
Para obtener mejores resultados de impresión, se recomienda alinear el cabezal de impresión antes de imprimir fotografías. Para
alinear el cabezal de impresión, utilice el botón
{
o
}
para seleccionar Alinear los cabezales (Perform head align) y pulse el
botón OK. Para realizar la alineación, siga los pasos indicados en la sección "Alineación del cabezal de impresión" en la página 86.
•
La alineación del cabezal de impresión se puede realizar en cualquier momento. Para obtener más información, consulte el manual
en pantalla: Guía básica (Basic Guide).
•
Load three or more sheets of A4 or Letter-sized plain paper
into the Cassette (D), then press the OK button.
For details, refer to "24 Loading Paper" on page 73.•
Close the Paper Output Tray to make it easier to pull out the Cassette.•
Press the OK button.
For better print results, it is recommended that you align the Print Head before printing photos. To align the Print Head, use the
{
or
}
button to select Perform head align and press the OK button. Follow the steps in "Align the Print Head" on page 86 for alignment.
•
You can perform Print Head Alignment at any time. For details, refer to the on-screen manual: Basic Guide.•
The standby screen is displayed.

13
6
Configuración del equipo para la recepción de fax
Si no va a utilizar el equipo como fax, vaya al capítulo "7 Conrmación del tipo de
conexión" en la página 16.
Seleccione el modo de recepción según sus necesidades para recibir faxes
fácilmente.
Si sólo desea recibir faxes (modo sólo FAX)
Si recibe una llamada:
Llamada de fax:
Llamada de voz:
No puede responder a la llamada.
El equipo no suena.
Los faxes se reciben automáticamente.
Si utiliza el equipo como fax exclusivamente:
Cuando hay un teléfono conectado al equipo, el teléfono suena para las llamadas entrantes dependiendo
del modo seleccionado.
•
Puede cambiar el modo de recepción en cualquier momento. Para obtener más información,
consulte el manual en pantalla: Guía básica (Basic Guide).
Set Up for Fax Reception
When you want to receive only faxes (FAX only mode)
When a call arrives:
Fax call:
Voice call:
You cannot answer the call.
The machine does not ring.
Faxes are received automatically.
If you are not using the machine as a fax, go to "7 Conrming Your Connection Type"
on page 16.
Select a receive mode according to your needs to receive faxes easily.
When using as a fax only:
When a telephone is connected to the machine, the telephone rings for incoming calls depending on the
selected mode.
•
You can change the receive mode any time. For details, refer to the on-screen manual: Basic Guide.

14
6
Si va a recibir más llamadas de voz que faxes (TEL como modo
prioritario)
Si recibe una llamada:
Llamada de fax:
Si descuelga el auricular y escucha el tono de fax, el equipo
cambiará a fax automáticamente para recibir el fax.
Llamada de voz:
Llamada de fax:
Se reciben los faxes automáticamente cuando el equipo detecta
el patrón de sonido de fax.
El teléfono suena.
Descuelgue el auricular para responder a la llamada.
Si utiliza un servicio DRPD (detección de patrón del tono
distintivo)
El equipo no suena.
Los faxes se reciben automáticamente.
Llamada de voz: Llamada de voz:
Descuelgue el auricular para responder a la llamada.El equipo suena.
Descuelgue el auricular para responder a la llamada.
Puede que el tono de llamada tarde unos instantes en sonar.
Llamada de fax:
Si recibe una llamada:
Si utiliza el equipo como fax y teléfono:
Si desea alternar la línea entre el modo fax y teléfono
automáticamente (FAX como modo prioritario)
Si recibe una llamada:
When you receive more voice calls than faxes (TEL priority mode)
When a call arrives:
Fax call:
If you pick up the handset and hear the fax tone, the machine
will witch to the fax automatically and receive the fax.
Voice call:
Fax call:
Faxes are received automatically when the machine detects the
fax ring pattern.
The telephone continues to ring.
Pick up the handset to answer the call.
If you use Distinctive Ring Pattern Detection (DRPD) service
The machine does not ring.
Faxes are received automatically.
Voice call: Voice call:
Pick up the handset to answer the call.
The machine rings.
Pick up the handset to answer the call.
It may take a while before the ringtone sounds.
Fax call:
When a call arrives:
When using as both a fax and telephone:
When you want to switch the line between fax and telephone
automatically (FAX priority mode)
When a call arrives:

15
32
1
B
A
C
D
Pulse el botón FAX (A) y, a continuación, Menú (Menu) (B).
Aparecerá la pantalla Menú FAX (FAX menu).
Pulse el botón OK.
Se abrirá la pantalla Recibir config. modo
(Receive mode settings).
Utilice el botón
{
o
}
(C) para seleccionar
el modo de recepción y, a continuación, pulse
el botón OK. Cuando vuelva a aparecer el
menú FAX, pulse el botón Atrás (Back) (D).
Se mostrará el modo de recepción seleccionado.
Press the FAX button (A), then press the Menu button (B).
The FAX menu screen is displayed.
Press the OK button.
The Receive mode settings screen is displayed.
Use the
{
or
}
button (C) to select
a receive mode, then press the
OK button.
When the FAX menu returns, press the
Back button (D).
The selected receive mode is displayed.

16
7
Confirmación del tipo de conexión
Antes de congurar el equipo, seleccione el método de conexión más adecuado. Se puede utilizar el equipo a través de una conexión USB, LAN por cable
o LAN inalámbrica.
USB
Cable USB
LAN inalámbrica
LAN por cable
Punto de acceso Router
Cable LAN
Antes de conectar el equipo a la red, asegúrese de que
la conguración del ordenador y de los dispositivos de
red (router, punto de acceso, etc.) se ha completado, y el
ordenador se puede conectar a la red. Para conocer los
procedimientos necesarios para conectar un dispositivo
de red al ordenador y después congurarlos, consulte el
manual del dispositivo de red o póngase en contacto con
el fabricante.
•
El equipo no se puede utilizar con una LAN por cable
e inalámbrica al mismo tiempo.
•
Confirming Your Connection Type
Before setting up the machine, select the most suitable connection method. You can use the machine over a USB, wireless LAN or wired LAN connection.
Wired LAN
Wireless LAN
USB
LAN cable
RouterAccess point
USB cable
Before connecting the machine to the network, conrm
that conguration of the computer and network devices
(router, access point, etc.) is complete, and that the
computer can connect to the network. For the procedures
to connect a network device to the computer and set them
up, refer to the manual of your network device or contact
its manufacturer.
•
The machine cannot be used over a wireless and wired
LAN at the same time.
•

17
Preparation for Setup
■
To use the machine by connecting it to a computer, software including the
drivers needs to be copied (installed) to the computer's hard disk, and setting
congured according to the connection method. In addition, congure the
machine's LAN settings to connect to the network. Read the following carefully
before starting setup.
The screens below are based on Windows Vista operating system Ultimate
Edition (hereafter referred to as "Windows Vista") and Mac OS X v.10.5.x.
Notes on Setup
□
Notes on Network Connection
□
Before connecting the machine to the network, conrm that conguration of the computer and
network devices (router, access point, etc.) is complete, and that the computer can connect to
the network.
•
For information on how to conrm the settings of the access point, refer to your access point's
instruction manual or contact its manufacturer. For example,
•
Disable Stealth (closed network) function−
Conrm MAC address−
Disable the access point's IP address−
The conguration, router functions, setup procedures and security functions of the network
device vary depending on your environment. For details, refer to your device's instruction
manual or contact its manufacturer.
•
If the rewall function of your security software is turned on, a warning message may appear
that Canon software is attempting to access the network.
If such a warning message appears, set the security software to always allow access.
•
In an ofce setup, consult your network administrator.•
If a screen not specied in the procedure or an error message appears during setup, refer
to "5 The following screen is displayed during setup" in the printed manual: Network Setup
Troubleshooting.
•
Quit all running applications before installation.•
You need to log on as the administrator (or a member of the Administrators group).•
Do not switch users during the installation process.•
It may be necessary to restart your computer during the installation process. Follow
the on-screen instructions and do not remove the Setup CD-ROM during restarting.
The installation resumes from where it left off when your computer has been restarted.
•
Mac OS 9, Mac OS X Classic environments, or Mac OS X v.10.3.8 or earlier are not supported.•
Notes on Wireless LAN Connection
□
Ad-hoc mode is not supported.•
If you connect to a network that is not protected with security measures, there is a risk
of disclosing data such as your personal information to a third party.
•
The machine may communicate with other access points used in the vicinity.•
The machine supports WPS (Wi-Fi Protected Setup) and WCN (Windows Connect Now)
in addition to the conventional wireless LAN settings. As for WCN, "WCN-UFD" that requires
a USB ash drive is supported.
•
Note on Wired LAN Connection
□
A router and LAN cable are required to connect the machine to a wired LAN.
These must be purchased separately.
•

18
7
Notas acerca de la conexión de LAN inalámbrica
□
El modo ad-hoc no se admite.•
Si se conecta a una red que no está protegida con medidas de seguridad, existe el riesgo
de divulgar a terceros información como, por ejemplo, sus datos personales.
•
El equipo puede comunicar con otros puntos de acceso cercanos.•
El equipo admite WPS (Wi-Fi Protected Setup) y WCN (Windows Connect Now), además
de la conguración de LAN inalámbrica convencional. Respecto a WCN, se admite el uso
de "WCN-UFD" que requiere una unidad USB ash.
•
Nota acerca de la conexión de LAN por cable
□
Se necesita un router y un cable LAN para conectar el equipo a una LAN por cable.
Deberán adquirirse aparte.
•
Para obtener información sobre cómo conrmar la conguración del punto de acceso, consulte
el manual de instrucciones del punto de acceso o póngase en contacto con el fabricante. Por
ejemplo,
•
Desactive el modo invisible (red cerrada)−
Conrme la dirección MAC−
Desactive la dirección IP de los puntos de acceso−
La conguración, las funciones del router, los procedimientos de instalación y las funciones de
seguridad del dispositivo de red varían en función del entorno utilizado. Si desea obtener más
información, consulte el manual de instrucciones del dispositivo o póngase en contacto con el
fabricante.
•
Si está activada la función de cortafuegos del software de seguridad, puede que aparezca un
mensaje de advertencia indicando que el software de Canon está intentado acceder a la red.
En tal caso, congure el software de seguridad para que permita siempre el acceso.
•
En una instalación corporativa, consulte con el administrador de red.•
Si durante la instalación aparece una pantalla no especicada en el procedimiento o un
mensaje de error, consulte "5 Aparece la siguiente pantalla durante la conguración" en
el manual impreso: Solución de problemas de conguración de red (Network Setup
Troubleshooting).
•
Preparación de la instalación
■
Notas acerca de la instalación
□
Cierre las aplicaciones que se estén ejecutando antes de la instalación.•
Debe iniciar la sesión como administrador (o miembro del grupo de administradores).•
Notas acerca de la conexión en red
□
Antes de conectar el equipo a la red, asegúrese de que la conguración del ordenador y de los
dispositivos de red (router, punto de acceso, etc.) se ha completado, y el ordenador se puede
conectar a la red.
•
No cambie de usuario durante el proceso de instalación.•
Es posible que deba reiniciar el ordenador durante el proceso de instalación. Siga las
instrucciones en pantalla y no retire el CD-ROM de instalación (Setup CD-ROM) mientras
se reinicia el equipo. La instalación continuará desde el punto en el que se detuvo durante
el reinicio del ordenador.
•
Los entornos Mac OS 9, Mac OS X Classic o Mac OS X v.10.3.8 o anteriores no son
compatibles.
•
Para utilizar el equipo conectándolo a un ordenador, deberá copiar (instalar) el
software y los controladores necesarios en el disco duro del ordenador y luego
congurar los ajustes correspondientes al método de conexión. Además,
deberá congurar los ajustes de LAN del equipo para la conexión a la red.
Lea lo siguiente con atención antes de empezar la instalación.
Las pantallas que se muestran a continuación se basan en el sistema
operativo Windows Vista Ultimate Edition (en adelante, "Windows Vista")
y Mac OS X v.10.5.x.

19
8
P.29 P.34 P.50
P.53 P.60
P.20 P.29 P.35 P.50
P.20 P.53 P.61 P.70
P.21 P.29 P.50P.47
P.21 P.53 P.70P.69
P.24 P.29 P.50
P.20 P.29 P.42 P.50
P.20 P.53 P.66 P.70
P.29 P.47 P.50
P.53 P.69 P.70
P.47
F
E
D
K
J
I
H
G
C
B
A
Selección del método de conexión
Selección del método de conexión
¿Qué método de conexión
tiene previsto utilizar?
Red
¿Es la primera vez que
conecta el equipo a la red?
Sí
LAN inalámbrica
LAN por cable
USB
USB
No
Para utilizar el equipo en otros ordenadores
Flujo de la instalación (orden de lectura)
WPS
WCN
Which connection method do
you intend to use?
USB
Is this your rst time onnecting
the machine to the network?
Network
Yes
No
Wired LAN
Wireless LAN
To use the machine on other computers
USB
WPS
WCN
Select the Connection Method
Connection Method Selection Setup Flow (Reading Order)

20
D
I
H
C
9
4
5
63
1
A
B
2
Windows Macintosh
Windows
Macintosh
P.29
P.53
Configuración de LAN del equipo
Utilice el botón
{
o
}
(B) para seleccionar
Ajustes de LAN
(LAN settings) y,
a continuación, pulse
el botón
OK.
Asegúrese de que
está seleccionado
Cambiar inalám./alám.
(Change WLAN/LAN) y,
a continuación, pulse el
botón OK.
Seleccione el método
de conexión deseado
y pulse el botón
OK.
A continuación, lea la sección "Instalación del software".
Seleccione Config.
de dispositivo
(Device settings) y,
a continuación, pulse
el botón
OK.
Pulse el botón
Menú (Menu) (A).
Utilice el botón
[
o
]
(B) para
seleccionar Configuración (Settings)
y, a continuación, pulse el botón OK.
Machine's LAN Setting
Use the
{
or
}
button
(B) to select LAN
settings, then press the
OK button.
Make sure that Change
WLAN/LAN is selected
and press the OK
button.
Select the desired
connection method,
then press the OK
button.
Next, read "Install the Software" !
Select Device settings,
then press the OK
button.
Press the Menu
button (A).
Use the
[
or
]
button (B) to select
Settings, then press the OK button.

21
E
F
B
3
A
4
1
2
10
Windows Macintosh
Si el punto de acceso admite WPS (Wi-Fi Protected Setup), podrá congurar fácilmente la seguridad de LAN inalámbrica.•
Pulse el botón Menú (Menu) (A).
Utilice el botón
[
o
]
(B) para seleccionar
Configuración (Settings) y, a continuación,
pulse el botón OK.
Seleccione Config. de
dispositivo (Device
settings) y, a continuación,
pulse el botón OK.
Utilice el botón
{
o
}
(B)
para seleccionar Ajustes
de LAN (LAN settings)
y, a continuación, pulse
el botón
OK.
Conexión WPS
If your access point supports WPS (Wi-Fi Protected Setup), you can set the wireless LAN security easily.•
Press the Menu button (A). Use the
[
or
]
button (B) to select Settings,
then press the OK button.
Select Device settings,
then press the
OK button.
Use the
{
or
}
button (B)
to select
LAN settings,
then press the
OK button.
WPS Connection

22
E
F
10
5
6
7
8 9
Windows Macintosh
Asegúrese de que está
seleccionado LAN inalám.
activa (Wireless LAN active)
y, a continuación, pulse el
botón OK.
Seleccione Config. LAN
inalámbr. (WLAN settings)
y, a continuación, pulse
el botón
OK.
Asegúrese de que está
seleccionado Configuración
de WPS (WPS setting) y,
a continuación, pulse el
botón
OK.
Asegúrese de que está
seleccionado Cambiar
inalám./alám. (Change
WLAN/LAN) y, a continuación,
pulse el botón OK.
Asegúrese de que está
seleccionado Método de
pulsador (Push button
method) y, a continuación,
pulse el botón OK.
Para utilizar el método de código PIN en la instalación, seleccione Método de código PIN (PIN code method) en el paso y, a continuación, pulse el botón OK. Siga las instrucciones en pantalla para activar el
equipo y el punto de acceso. Una vez completada la instalación, aparecerá la pantalla de instalación nalizada. Pulse el botón OK; aparecerá de nuevo la pantalla Ajustes de LAN (LAN settings). Aparecerá un
error de tiempo de espera agotado si el proceso de instalación no se completa al cabo de 10 minutos. En caso de que aparezca dicho error, consulte "5.12 La pantalla de error de tiempo de espera aparece durante
la conguración de WPS" en el manual en pantalla: Solución de problemas de conguración de red (Network Setup Troubleshooting).
•
Make sure that Change
WLAN/LAN is selected
and press the
OK button.
Make sure that Wireless LAN
active is selected and press
the OK button.
Select WLAN settings,
then press the
OK button.
Make sure that WPS setting
is selected and press the OK
button.
To use the PIN code method for setup, select PIN code method on step , then press the OK button. Follow the on-screen is instructions to operate the machine and access point. When the setup is complete,
the completion screen appears. Press the OK button, then the LAN settings screen returns. A timeout error occurs if setup is not completed within 10 minutes. If the timeout error screen appears, refer to
"5.12 The Timeout error screen is displayed during WPS setup" in the printed manual:
Network Setup Troubleshooting.
•
Make sure that Push button
method is selected and press
the OK button.

23
E
F
11
10
Windows Macintosh
Windows
Macintosh
P.29
P.53
Pulse el botón OK.
Cuando el punto de acceso esté preparado, pulse el botón OK en el equipo y, a continuación, pulse el botón WPS en el punto
de acceso en menos de dos minutos.
Cuando aparezca la pantalla de finalización, pulse el botón OK. Volverá a aparecer la pantalla Ajustes de LAN (LAN settings).
Aparecerá un error de tiempo de espera agotado si el proceso de instalación no se completa al cabo de dos minutos. En caso de que aparezca dicho error,
consulte "5.12 La pantalla de error de tiempo de espera aparece durante la conguración de WPS" en el manual en pantalla: Solución de problemas de
conguración de red (Network Setup Troubleshooting).
•
Puede que el botón WPS tenga otro nombre, dependiendo del punto de acceso. Para obtener más información, consulte el manual del punto de acceso.•
A continuación, lea la sección "Instalación del software".
Paso
Press the OK button.
When the access point is ready, press the OK button on the machine, then press the WPS button on the access point within
two minutes.
The WPS button may be named differently depending on your access point. For details, refer to the manual of your access point.•
Step
Next, read "Install the Software" !
When the completion screen appears, press the OK button. The LAN settings screen returns.
A timeout error occurs if setup is not completed within two minutes. When the timeout error screen appears, refer to "5.12 The Timeout error screen is displayed
during WPS setup" in the printed manual: Network Setup Troubleshooting.
•

24
G
11
Windows Macintosh
Conexión WCN
No se pueden utilizar unidades USB ash con la función de seguridad ya habilitada.•
Puede congurar fácilmente la seguridad de LAN inalámbrica en el equipo si utiliza la función WCN (Windows Connect Now) de Windows Vista junto con una
unidad USB ash.
No se garantiza el funcionamiento, dependiendo de la unidad USB ash utilizada.•
Si la unidad USB ash no se puede conectar al puerto de impresión directa del equipo, puede que necesite un alargador para unidades USB ash. Podrá adquirir un alargador
en cualquier tienda de electrónica.
•
Canon no se hace responsable por cualquier daño o pérdida de los datos almacenados, independientemente del motivo.•
Antes de congurarla mediante la función WCN, establezca una comunicación inalámbrica entre el ordenador y el punto de acceso.•
El equipo es compatible con "WCN-UFD".•
WCN Connection
Before setting up by using the WCN, establish wireless communication between the computer and the access point.•
Canon assumes no responsibility for any damage or loss of stored data regardless of the cause.•
You can set the wireless LAN security on the machine easily by using the WCN (Windows Connect Now) function of Windows Vista together with a USB ash drive.
If your USB ash drive cannot be attached to the direct print port of the machine, an extension cord for USB ash drives may be required. Purchase one at an electronics shop.•
Operation may not be guaranteed depending on your USB ash drive.•
USB ash drives with security enabled may not be used.•
The machine supports "WCN-UFD".•

25
G
3
1
2
4
Windows Macintosh
En el menú Inicio (Start)
de Windows, haga clic en
Red (Network)
.
Se abrirá la carpeta Red (Network).
Aparecerá la pantalla Agregar un
dispositivo inalámbrico a la red
(Add a wireless device to the
network).
Haga clic en Agregar un
dispositivo inalámbrico (Add
a wireless device)
en el menú.
Haga clic en Deseo agregar un dispositivo
inalámbrico o equipo que no está en la lista
mediante el uso de una unidad USB ash
(I want to add a wireless device or computer
that is not on the list, using a USB ash drive).
Haga clic en Agregar el dispositivo o equipo
usando una unidad USB ash (Add the device
or computer using a USB ash drive).
From the Start menu of the
Windows side, click Network.
The Add a wireless device to the
network screen will be displayed.
The Network folder opens.
Click Add a wireless device
on the menu.
Click I want to add a wireless device or
computer that is not on the list, using
a USB flash drive
.
Click Add the device or computer using
a USB flash drive
.

26
G
11
5
6
7
8
A
Windows Macintosh
Si aparece el cuadro de diálogo Control de
cuentas de usuario (User Account Control),
haga clic en Continuar (Continue). Si vuelve
a aparecer el mismo cuadro de diálogo en
pasos posteriores, haga clic en Continuar
(Continue).
•
En la lista seleccione el nombre de la
red (SSID) y, a continuación, haga clic
en Siguiente (Next).
Conecte la unidad USB flash al
ordenador, confirme que aparece
el nombre de la unidad y luego
haga clic en
Siguiente (Next).
Cuando aparezca la pantalla indicada
arriba, extraiga la unidad USB flash
del ordenador y, a continuación, haga
clic en Cerrar (Close).
Pulse el botón Menú (Menu) (A).
If the User Account Control dialog box
appears, click Continue. If the same dialog
box reappears in subsequent steps, click
Continue.
•
From the list, select the network name
(SSID), then click Next.
Connect the USB flash drive to the
computer, confirm that the drive
name is displayed, then click
Next.
When the above screen appears,
remove the USB flash drive from
the computer, then click
Close.
Press the Menu button (A).

27
B
G
11
10 129
Windows Macintosh
Seleccione Config. de dispositivo
(Device settings) y, a continuación,
pulse el botón OK.
Asegúrese de que está seleccionado
Cambiar inalám./alám. (Change
WLAN/LAN) y, a continuación, pulse
el botón OK.
Utilice el botón
{
o
}
(B) para
seleccionar Ajustes de LAN (LAN
settings) y, a continuación, pulse
el botón
OK.
Utilice el botón
[
o
]
(B) para seleccionar
Configuración (Settings) y, a continuación,
pulse el botón OK.
Select Device settings, then press
the OK button.
Make sure that Change WLAN/LAN
is selected and press the OK button.
Use the
{
or
}
button (B) to select
LAN settings, then press the OK
button.
Use the
[
or
]
button (B) to select Settings,
then press the OK button.

28
G
11
13 14 16
15
C
Windows Macintosh
Asegúrese de que está
seleccionado LAN inalám.
activa (Wireless LAN
active) y, a continuación,
pulse el botón OK.
A continuación, lea la sección "12 Instalación del software"
en la página 29.
Seleccione Config. LAN
inalámbr. (WLAN settings)
y, a continuación, pulse el
botón OK.
Seleccione Configuración
de WCN (WCN setting)
y, a continuación, pulse
el botón
OK.
Conecte la unidad USB ash al puerto de impresión directa (conector USB)
(C) en la parte frontal del equipo y, a continuación, pulse el botón
OK.
Cuando aparezca la pantalla de finalización, pulse el botón OK. Volverá a aparecer la
pantalla Ajustes de LAN (LAN settings). Extraiga la unidad USB flash del equipo.
Make sure that Wireless
LAN active is selected and
press the OK button.
Next, read "12 Install the Software" on page 29!
Select WLAN settings, then
press the OK button.
Select WCN setting, then
press the OK button.
Connect the USB flash drive to the Direct Print Port (USB connector)
(C) on the front of the machine, then press the
OK button.
When the completion screen appears, press the OK button. The LAN settings screen
returns. Remove the USB flash drive from the machine.

29
E
J
G
C
A
H
1
A B
12
MacintoshWindows
1
2
3
Instalación del software
Si aparece el cuadro de diálogo Nuevo hardware encontrado
(Found New Hardware) o Asistente para nuevo hardware
encontrado (Found New Hardware Wizard):
Desconecte del ordenador el cable USB.
Puede que se cierre el cuadro de diálogo. En ese caso,
siga desde el paso .
Haga clic en Cancelar (Cancel) para salir del cuadro
de diálogo.
Siga desde el paso .
APAGUE EL EQUIPO (A).
Hasta que el equipo se apaga (unos 30 segundos) se sigue
escuchando el ruido de funcionamiento. Asegúrese de que el
botón de modo (B) deja de parpadear.
•
Consulte la "Información adicional para usuarios
españoles" para instalar la versión en español.
The dialog box may close. In this case, proceed from
step
.
Click Cancel to quit the dialog box.
Proceed from step .
TURN OFF THE MACHINE (A).
Operating noise continues for about 30 seconds until the
machine turns off. Make sure that the mode button (B) stops
ashing.
•
Install the Software
If the Found New Hardware or Found New Hardware Wizard
dialog box appears:
Remove the USB cable connected to your computer.
Refer to the "Additional Information for Spanish
Users " sheet to install the Spanish version of
the software.

30
E
J
G
C
A
H
12
2
3
Windows Macintosh
Windows Vista
Windows Vista
Windows XP/2000
Encienda el ordenador y, a continuación, introduzca el CD-ROM de instalación
(Setup CD-ROM)
en la unidad de CD-ROM.
El programa de instalación deberá iniciarse de forma automática.
Vaya al paso .
Vaya al paso .
Si el programa no se inicia automáticamente, haga doble clic en el icono del CD-ROM del ordenador.
Cuando aparezca el contenido del CD-ROM, haga doble clic en
MSETUP4.EXE.
•
Aparece la pantalla Reproducción automática (AutoPlay). Haga clic en
Ejecutar Msetup4.exe (Run Msetup4.exe).
Turn on the computer, then insert the Setup CD-ROM into the CD-ROM drive.
The setup program should start automatically.
If the program does not start automatically, double-click the CD-ROM icon on the computer.
When the CD-ROM contents appear, double-click MSETUP4.EXE.
•
AutoPlay screen appears, click Run Msetup4.exe.
Go to Step .
Go to Step .

31
E
J
G
C
A
H
5
4
MacintoshWindows
Windows Vista
Haga clic en Instalación simple (Easy Install).
Los controladores, las aplicaciones de software y los manuales en pantalla se instalan
automáticamente.
Si desea seleccionar los elementos que quiere instalar, haga clic en Instalación personalizada
(Custom Install) y siga las instrucciones en pantalla para continuar con la instalación.
•
Aparece el cuadro de diálogo Control de cuentas de usuario (User Account
Control). Haga clic en Continuar (Continue).
Si vuelve a aparecer el mismo cuadro de diálogo en pasos posteriores, haga clic en Continuar
(Continue).
Click Easy Install.
Drivers, application software, and on-screen manuals are installed automatically.
If you want to select particular items to install, click Custom Install and follow the on-screen instructions
to proceed with the installation.
•
User Account Control dialog box appears, click Continue.
If the same dialog box reappears in subsequent steps, click Continue.

32
E
J
G
C
A
H
12
6
7
Windows Macintosh
Haga clic en Instalar (Install).
Desplace el cursor sobre los elementos para visualizar explicaciones.•
Seleccione un método de conexión y haga clic en Siguiente (Next).
Click Install.
Move the cursor over items to display explanations.•
Select a connection method and click Next.

33
E
J
G
C
A
H
J
H
C
G
E
A
98
MacintoshWindows
P.47
P.34
P.35
P.42
P.47
P.47
Cuando aparezca la pantalla Permita todos los
procesos del asistente de instalación (Please
Allow All Install Wizard Processes)
haga clic
en
Siguiente (Next).
Se inicia la instalación.
Vaya a cualquiera de los siguientes
procedimientos, dependiendo del método
de conexión.
USB
LAN inalámbrica
LAN por cable
Otro ordenador
WPS
WCN
Durante la instalación, siga todas las instrucciones en pantalla para instalar el software.•
Lea detenidamente la pantalla Contrato de licencia
(License Agreement) y haga clic en Sí (Yes).
USB
Wireless LAN
Wired LAN
WPS
Additional Computer
Go to either of the following procedures
according to your connection method!
WCN
When the Please Allow All Install Wizard Processes
screen appears, click Next.
Installation starts.
During installation, follow any on-screen instructions to install the software.•
Read the License Agreement screen carefully and
click Yes.

34
A
13
1
A
2
Windows Macintosh
El puerto USB se encuentra en el lado derecho de la parte posterior del equipo.•
Cuando aparezca la pantalla Conexión de impresora (Printer Connection), conecte el equipo al
ordenador mediante un cable USB.
Conexión USB
Utilice el cable USB suministrado.•
Cuando el ordenador reconozca al equipo, aparecerá un mensaje en
la pantalla.
Encienda el equipo (A).
Si no prosigue la instalación al cabo de 10 minutos, haga clic en
Ayuda (Help) en la pantalla del paso y conrme el mensaje.
•
A continuación, lea la sección "17 Información" en la
página 50.
The USB port is located on the right side at the back of the machine.•
When the Printer Connection screen appears, connect the machine to the computer with a USB cable.
USB Connection
Use the supplied USB cable.•
When the machine is recognized by the computer, a message appears
on the screen.
Turn on the machine (A).
If installation does not continue after 10 minutes, click Help on the
screen in step , then conrm the message.
•
Next, read "17 Information" on page 50!

35
C
1
14
Windows Macintosh
Utilice el cable USB suministrado.•
En la pantalla Método de configuración (Setup Method), seleccione Conecte la impresora a la red por
primera vez. (Connect printer to the network for the first time) y, a continuación, haga clic en Siguiente (Next).
Configuración inicial para una LAN inalámbrica
Primero, establezca la conguración LAN del equipo a LAN inalám. activa (Wireless LAN active). Para obtener más detalles, consulte el capítulo "9 Conguración LAN del equipo" en la página 20.•
Cuando aparezca la pantalla de confirmación de la configuración de LAN del equipo, haga clic en Aceptar (OK).
Use the supplied USB cable.•
On the Setup Method screen, select Connect printer to the network for the first time, then click Next.
First-time Setup for Use over Wireless
Set the machine's LAN setting to Wireless LAN active beforehand. For details, refer to "9 Machine's LAN Setting" on page 20.•
When a confirmation screen for the machine's LAN setting appears, click OK.

36
C
14
2 3
A
Windows Macintosh
Configure el equipo para que utilice una conexión USB hasta que la conexión de red esté completa.
Cuando aparezca la pantalla Conexión de impresora (Printer Connection), conecte el equipo al
ordenador con un cable USB.
El puerto USB se encuentra en el lado derecho de la parte posterior del equipo.•
Encienda el equipo (A).
Cuando el ordenador reconozca al equipo, aparecerá un mensaje en
la pantalla.
Si no prosigue la instalación al cabo de 10 minutos, haga clic en
Ayuda (Help)
en la pantalla del paso y conrme el mensaje.
•
Set up the machine over a USB connection until the network connection is complete.
When the Printer Connection screen appears, connect the machine to the computer with a USB cable.
The USB port is located on the right side at the back of the machine.•
Turn on the machine (A).
When the machine is recognized by the computer, a message appears
on the screen.
If installation does not continue after 10 minutes, click Help on
the screen in step
, then conrm the message.
•

37
C
4
Windows Macintosh
Si aparece el siguiente cuadro de diálogo
Cuando aparezca el cuadro de diálogo Puntos de acceso (Access Points), seleccione el punto de acceso
que utilizará y luego haga clic en
Conectar (Connect).
Si se detecta automáticamente un punto de acceso, el cuadro de diálogo Puntos de acceso (Access Points) no aparece.
Para conectarse al punto de acceso, con el valor WEP, WPA o WPA2 en la columna Encriptación (Encryption), introduzca la clave de
red y luego haga clic en Conectar (Connect). Para obtener detalles sobre las contraseñas de red, consulte "3.1 Acerca de la Clave de red
(Windows) y la Contraseña de la red (Macintosh)" en el manual impreso: Solución de problemas de conguración de red (Network Setup
Troubleshooting).
•
Si desea seleccionar un punto de acceso de forma manual, o si el punto de acceso de destino no aparece en la lista, o si aparece un mensaje
de error, consulte "5 Aparece la siguiente pantalla durante la conguración" en el manual impreso: Solución de problemas de conguración
de red (Network Setup Troubleshooting).
•
Cuando aparezca el cuadro de diálogo
Preparaciones de configuración
(Setup Preparations), confirme que la
preparación ha finalizado y luego haga
clic en
Siguiente (Next).
La clave de red se puede recuperar mediante el asistente de conguración
inalámbrica de Canon PIXMA o siguiendo las instrucciones que se pueden
descargar desde la página de soporte de Canon (www.usa.canon.com/
downloadlibrary).
Si no consigue recuperar la clave de red u otro ajuste, consulte el manual
del punto de acceso o router, o póngase en contacto con el fabricante.
If the following dialog box appears
When the Access Points dialog box appears, select an access point to use, then click Connect.
When an access point is detected automatically, the Access Points dialog box does not appear.
To connect to the access point with WEP, WPA or WPA2 displayed in the Encryption column, enter the network key, then click Connect.
For details on network keys, refer to "3.1 About Network Key (Windows)/Network Password (Macintosh)" in the printed manual:
Network
Setup Troubleshooting.
•
If you want to select an access point manually, or if the target access point is not displayed in the list, or if an error message appears, refer to
"5 The following screen is displayed during setup" in the printed manual: Network Setup Troubleshooting.
•
When the Setup Preparations dialog
box appears, confirm that preparation
is complete, then click
Next.
You can retrieve your network key by using the Canon PIXMA Wireless
Setup Assistant or the instructions which can be downloaded from the
Canon support webpage (www.usa.canon.com/downloadlibrary).
If you are unable to retrieve the network key or other settings refer to the manual
of your access point or router, or contact its manufacturer.

38
C
14
Windows Macintosh
Windows Vista
Windows XP/2000
Si aparece el siguiente cuadro de diálogo
Cuando aparezca el cuadro de diálogo Establecer dirección IP de impresora (Set Printer IP Address),
haga clic en Conectar (Connect).
Si se detecta el equipo automáticamente, el cuadro de diálogo Set Printer IP Address no aparece.
Si no se establece una conexión incluso después de hacer clic en Conectar (Connect), consulte "5.6 La pantalla Establecer
dirección IP de impresora (Set Printer IP Address) aparece durante la conguración" en el manual impreso: Solución de problemas
de conguración de red (Network Setup Troubleshooting).
•
Vaya al paso .
Vaya al paso .
If the following dialog box appears
When the Set Printer IP Address dialog box appears, click Connect.
If the machine is detected automatically, the Set Printer IP Address dialog box does not appear.
If no connection is established even after Connect is clicked, refer to "5.6 The Set Printer IP Address screen is displayed during
setup" in the printed manual: Network Setup Troubleshooting.
•
Go to Step .
Go to Step .

39
C
5
6
Windows Macintosh
Windows XP/2000
Cuando aparezca el cuadro de diálogo Configuración en red de la ranura para
tarjetas (Network Setup of the Card Slot), introduzca la letra de la unidad y haga
clic en Siguiente (Next).
Si aparece un mensaje de error, consulte "5 Aparece la siguiente pantalla durante la conguración"
en el manual en pantalla: Solución de problemas de conguración de red (Network Setup
Troubleshooting).
•
Cuando aparezca el cuadro de diálogo Finalización de la configuración
(Setup Completion)
, retire el cable USB y luego haga clic en Siguiente (Next).
Para cambiar el nombre del puerto, haga clic en Ver resultados de conguración (View Setup
Results) y, a continuación, haga clic en Establecer nombre del puerto (Set Port Name). Para
obtener detalles, consulte "8 Cambiar el nombre del puerto" en el manual impreso: Solución de
problemas de conguración de red (Network Setup Troubleshooting).
•
Si aparece el mensaje Extracción no segura de dispositivo (Unsafe Removal of Device),
haga clic en Aceptar (OK).
•
When the Network Setup of the Card Slot dialog box appears, specify the drive
letter, then click Next.
If an error message appears, refer to "5 The following screen is displayed during setup" in the printed
manual: Network Setup Troubleshooting.
•
When the Setup Completion dialog box appears, remove the USB cable, then
click Next.
To change the port name, click View Setup Results, then click Set Port Name. For details,
refer to "8 Changing the port name" in the printed manual: Network Setup Troubleshooting.
•
If Unsafe Removal of Device is displayed, click OK.•

40
C
14
A
7
8
Windows Macintosh
APAGUE EL EQUIPO (A), colóquelo en el lugar donde se utilizará y luego
enciéndalo.
En el cuadro de diálogo Medición del desempeño de la conexión
(Connection Performance Measurement)
haga clic en Siguiente (Next).
Se inicia la evaluación del estado de la comunicación, y se muestran los resultados de la misma.
La evaluación tarda unos minutos. Puede cancelar el proceso de evaluación haciendo clic en Cancelar (Cancel).
También se puede analizar el estado detallado del enlace de comunicaciones después de la conguración
mediante el uso de la herramienta Canon IJ Network Tool. Para obtener más detalles, consulte el manual en
pantalla: Guía avanzada (Advanced Guide).
•
TURN OFF THE MACHINE (A), then place the machine in the location where
you will use it, and turn on it.
On the Connection Performance Measurement dialog box, click Next.
Measuring of the communication status starts, and the results are displayed.
Measuring takes a few minutes. You can cancel measuring by clicking Cancel. You also examine the
detailed status of the communication link after setup by using the Canon IJ Network Tool. For details,
refer to the on-screen manual: Advanced Guide.
•

41
C
9
Windows Macintosh
Confirme los resultados de la evaluación y luego haga clic en Finalizar (Finish).
Asegúrese de que aparece el símbolo en Rendimiento de la conexión entre la impresora y el punto de acceso (Connection Performance between the Printer and the Access Point).
Si aparece cualquier símbolo que no sea , consulte los comentarios que aparecen así como la Ayuda para mejorar el estado del enlace de comunicaciones.•
Cuando aparezca un mensaje de Rendimiento general de la red (Overall network performance) en los resultados de la evaluación, vuelva a colocar el equipo y los demás dispositivos de acuerdo
con las instrucciones indicadas en la pantalla.
•
Para comprobar si la nueva ubicación ofrece mejores resultados, haga clic en Remedición (Remeasurement). Se realiza de nuevo una evaluación del estado de las comunicaciones.•
A continuación, lea la sección "17 Información" en la
página 50.
Confirm the measurement results, then click Finish.
Ensure that is displayed in Connection Performance between the Printer and the Access Point.
If any symbol other than is displayed, refer to displayed comments and Help for improving the status of communication link.•
When any message on Overall network performance appears in the measurement results, rearrange the machine and other network devices following the instructions on the screen.•
To check whether the new location is better, click Remeasurement. Measurement of the communication status is performed again.•
Next, read "17 Information" on page 50!

42
H
15
1
2
Windows Macintosh
Utilice el cable USB suministrado.•
En la pantalla Método de configuración (Setup Method), seleccione Conecte la impresora
a la red por primera vez. (Connect printer to the network for the first time)
y, a continuación,
haga clic en Siguiente (Next).
Configuración inicial para una LAN por cable
Tenga a mano un cable USB y un cable LAN.
Primero, establezca la conguración de LAN del equipo a LAN alámbr. activa (Wired LAN active). Para obtener
más detalles, consulte el capítulo "9 Conguración de LAN del equipo" en la página 20.
•
Cuando aparezca la pantalla de confirmación de la configuración de LAN del equipo, haga clic en Aceptar (OK).
Para la conexión de LAN por cable, prepare un cable LAN por separado.•
Cable USB Cable LAN
Prepare los cables
Use the supplied USB cable.•
On the Setup Method screen, select Connect printer to the network for the first time,
then click
Next.
First-time Setup for Use over Wired LAN
Have a USB and LAN cable ready.
Set the machine's LAN setting to Wired LAN active beforehand. For details, refer to "9 Machine's LAN Setting"
on page 20.
•
When a confirmation screen for the machine's LAN setting appears, click OK.
For a wired LAN connection, prepare a LAN cable separately.•
USB cable LAN cable
Prepare Cables

43
H
3 4
A
Windows Macintosh
Configure el equipo para que utilice una conexión USB hasta que la conexión de red esté completa.
Cuando aparezca la pantalla Conexión de impresora (Printer Connection), conecte el
equipo l ordenador mediante un cable USB.
El puerto USB se encuentra en el lado derecho de la parte posterior del equipo.•
Encienda el equipo (A).
Si no prosigue la instalación al cabo de 10 minutos, haga clic en Ayuda (Help) en la
pantalla del paso y conrme el mensaje.
•
Cuando el ordenador reconozca al equipo, aparecerá un mensaje en la pantalla.
Set up the machine over a USB connection until the network connection is complete.
When the Printer Connection screen appears, connect the machine to the computer with
a USB cable.
The USB port is located on the right side at the back of the machine.•
Turn on the machine (A).
If installation does not continue after 10 minutes, click Help on the screen in step ,
then conrm the message.
•
When the machine is recognized by the computer, a message appears on the screen.

44
H
15
5 6
C
B
Windows Macintosh
Cuando aparezca el cuadro de diálogo Preparaciones
de configuración (Setup Preparations), confirme
que la preparación ha finalizado y luego haga clic en
Siguiente (Next)
.
Retire la tapa del conector LAN (B) en el equipo, conecte un dispositivo de red mediante un cable
LAN (C) y, a continuación, haga clic en Sí (Yes).
When the Setup Preparations dialog box appears,
confirm that preparation is complete, then click
Next.
Remove the LAN connector cap (B) of the machine, connect a network device with a LAN cable (C),
then click Yes.

45
H
Windows Macintosh
Windows Vista
Windows XP/2000
Si aparece el siguiente cuadro de diálogo
Cuando aparezca el cuadro de diálogo Establecer dirección IP de impresora
(Set Printer IP Address), haga clic en Conectar (Connect).
Si se detecta el equipo automáticamente, el cuadro de diálogo Set Printer IP Address no aparece.
Si no se establece una conexión incluso después de hacer clic en Conectar (Connect), consulte "5.6 La pantalla Establecer
dirección IP de impresora (Set Printer IP Address) aparece durante la conguración" en el manual impreso: Solución de
problemas de conguración de red (Network Setup Troubleshooting).
•
Vaya al paso .
Vaya al paso .
If the following dialog box appears
When the Set Printer IP Address dialog box appears, click Connect.
If the machine is detected automatically, the Set Printer IP Address dialog box does not appear.
If no connection is established even after Connect is clicked, refer to "5.6 The Set Printer IP Address screen is displayed during
setup" in the printed manual: Network Setup Troubleshooting.
•
Go to Step .
Go to Step .

46
H
15
7 8
Windows Macintosh
Windows XP/2000
Cuando aparezca el cuadro de diálogo Configuración en red de la ranura para
tarjetas (Network Setup of the Card Slot), introduzca la letra de la unidad y haga
clic en Siguiente (Next).
Si aparece un mensaje de error, consulte "5 Aparece la siguiente pantalla durante la conguración"
en el manual en pantalla: Solución de problemas de conguración de red (Network Setup
Troubleshooting).
•
Cuando aparezca el cuadro de diálogo Finalización de la configuración
(Setup Completion)
, retire el cable USB y luego haga clic en Finalizar (Finish).
Para cambiar el nombre del puerto, haga clic en Ver resultados de conguración (View Setup
Results) y, a continuación, haga clic en Establecer nombre del puerto (Set Port Name). Para
obtener detalles, consulte "8 Cambiar el nombre del puerto" en el manual impreso: Solución de
problemas de conguración de red (Network Setup Troubleshooting).
•
Si aparece el mensaje Extracción no segura de dispositivo (Unsafe Removal of Device),
haga clic en Aceptar (OK).
•
A continuación, lea la sección "17 Información" en la
página 50.
When the Network Setup of the Card Slot dialog box appears, specify the drive
letter, then click Next.
If an error message appears, refer to "5 The following screen is displayed during setup" in the printed
manual: Network Setup Troubleshooting.
•
When the Setup Completion dialog box appears, remove the USB cable, then
click Finish.
To change the port name, click View Setup Results, then click Set Port Name. For details,
refer to "8 Changing the port name" in the printed manual: Network Setup Troubleshooting.
•
If Unsafe Removal of Device is displayed, click OK.•
Next, read "17 Information" on page 50!

47
J
G
E
1 2
A
16
Windows Macintosh
Asegúrese de que el ordenador que está congurando no está conectado al equipo mediante un cable USB.•
Conexión de la LAN por cable e inalámbrica
ENCIENDA EL EQUIPO (A).
Para las conexiones de LAN por cable, conrme que el equipo está conectado a la red mediante un cable LAN.•
En la pantalla Método de configuración (Setup Method), seleccione
La impresora ya está conectada a la red. (Printer is already connected
to the network)
y luego haga clic en Siguiente (Next).
Make sure that the computer you are setting up is not connected to the machine with a USB cable.•
Connect the Wireless LAN / Wired LAN
TURN ON THE MACHINE (A).
For wired LAN connections, conrm that the machine is connected to the network with a LAN cable.•
On the Setup Method screen, select Printer is already connected to the
network, then click Next.

48
J
G
E
16
3
Windows Macintosh
Windows Vista
Windows XP/2000
Cuando aparezca el cuadro de diálogo Impresoras (Printers), seleccione el equipo y luego haga clic en Siguiente (Next).
Vaya al paso .
Vaya al paso .
Si no se detecta el equipo, compruebe lo siguiente y luego haga clic en Actualizar (Update).•
El equipo está encendido.−
Conexión de LAN inalámbrica: el ordenador está conectado al punto de acceso.−
Conexión de LAN por cable: el equipo está conectado al dispositivo de red mediante el cable LAN.−
Algunos programas que cambian el entorno de red dependiendo del entorno utilizado activan un cortafuegos de manera predeterminada. Compruebe los ajustes de cualquier software de este tipo.•
When the Printers dialog box appears, select the machine, then click Next.
When the machine is not detected, make sure of the following, click Update.•
Go to Step .
Go to Step .
The machine is turned on.−
Wireless LAN Connection: The computer is connected to the access point.−
Wired LAN Connection: The machine is connected to the network device with the LAN cable.−
Some programs that switch the network environment depending on your environment will enable a rewall by default. Check the settings of any such software.•

49
J
G
E
4 5
Windows Macintosh
Windows XP/2000
Si aparece un mensaje de error, consulte "5 Aparece la siguiente pantalla durante la conguración"
en el manual en pantalla: Solución de problemas de conguración de red (Network Setup
Troubleshooting).
•
Cuando aparezca el cuadro de diálogo Configuración en red de la ranura para
tarjetas (Network Setup of the Card Slot), introduzca la letra de la unidad y haga
clic en Siguiente (Next).
Cuando aparezca el cuadro de diálogo Finalización de la configuración
(Setup Completion), haga clic en Finalizar (Finish).
Para cambiar el nombre del puerto, haga clic en Ver resultados de conguración (View Setup
Results) y, a continuación, haga clic en Establecer nombre del puerto (Set Port Name). Para
obtener detalles, consulte "8 Cambiar el nombre del puerto" en el manual impreso:
Solución de
problemas de conguración de red (Network Setup Troubleshooting).
•
A continuación, lea la sección "17 Información" en la
página 50.
If an error message appears, refer to "5 The following screen is displayed during setup" in the printed
manual: Network Setup Troubleshooting.
•
When the Network Setup of the Card Slot dialog box appears, specify the drive
letter, then click Next.
When the Setup Completion dialog box appears, click Finish.
To change the port name, click View Setup Results, then click Set Port Name. For details,
refer to "8 Changing the port name" in the printed manual: Network Setup Troubleshooting.
•
Next, read "17 Information" on page 50!

50
J
G
E
H
C
A
17
1 2
A
Windows Macintosh
Para obtener más información, consulte "24 Carga de papel" en la página 73.•
Información
Haga clic en Siguiente (Next).
Cuando aparezca la pantalla Cargar papel normal en el cassette (Load plain paper into the
cassette), cargue papel normal en el cassette (A) y haga clic en Siguiente (Next).
Puede que la siguiente pantalla tarde un momento en aparecer.
Haga clic en Siguiente (Next) sólo una vez.
For details, refer to "24 Loading Paper" on page 73.•
Information
Click Next.
When the Load plain paper into the cassette screen appears, load plain paper in the Cassette
(A) and click Next.
It may take a while for the next screen to appear. Click Next only once.

51
J
G
E
H
C
A
3
Windows Macintosh
Haga clic en Siguiente (Next).
Para registrarse más tarde, haga clic en Cancelar (Cancel). Se puede acceder a la pantalla Registro de usuario desde el icono Canon Solution Menu. Para obtener más detalles,
consulte la sección "Solution Menu" en la página 78.
•
Si ya se ha registrado, aparecerá la pantalla Registro del producto (Product Registration).•
Se requiere una conexión a Internet. (Se aplican tasas de conexión).•
Si está conectado a Internet, aparecerá la página de registro de usuario. Siga las instrucciones en pantalla para registrar su equipo. Necesitará el número de serie de su producto ubicado
en el interior del equipo.
Click Next.
To register later, click Cancel. User registration can be started from the Canon Solution Menu icon. For details, refer to "Solution Menu" on page 78.•
If you are already registered, the Product Registration screen appears.•
If connected to the Internet, the user registration page appears. Follow the on-screen instructions to register your machine. You will need your product serial number, which is located on the
inside of the machine.
Internet connection is required. (Connection fees apply.)•

52
J
G
E
H
C
A
17
4 5
Windows Macintosh
Cuando aparezca la pantalla Extended Survey Program,
confirme el mensaje.
Haga clic en Salir (Exit).
A continuación, lea la sección "24 Carga de papel" en la
página 73.
Si acepta, haga clic en Aceptar (Agree). Si hace clic en No aceptar
(Do not agree), no se instalará Extended Survey Program.
(Esto no afecta al funcionamiento del equipo).
Si aparece Reiniciar (Restart), asegúrese de que esté activada la casilla de verificación Reiniciar el sistema ahora
(recomendado) (Restart the system now (recommended)) y, a continuación, haga clic en Reiniciar (Restart).
Después de reiniciarlo, extraiga el CD-ROM de instalación (Setup CD-ROM) y guárdelo en un lugar seguro.
When the Extended Survey Program screen appears, confirm
the message.
Click Exit.
Next, read "24 Loading Paper" on page 73!
If you can agree, click Agree. If you click Do not agree, the Extended Survey
Program will not be installed.
(This has no effect on the machine's functionality.)
If Restart is displayed, make sure that the Restart the system now (recommended) check box is selected,
then click
Restart.
After restarting the computer, remove the Setup CD-ROM and keep it in a safe place.

53
K
F
I
D
B
1 2
18
Windows Macintosh
El puerto USB se encuentra en el lado derecho de la parte posterior del equipo.•
Instalación del software
Cuando utilice WPS (Wi-Fi Protected Setup) o conecte un ordenador adicional,
asegúrese de que el equipo está encendido y luego vaya al paso . No es
necesario conectar el equipo al ordenador mediante un cable USB.
•
Encienda el ordenador y, a continuación,
introduzca el CD-ROM de instalación
(Setup CD-ROM) en la unidad de CD-ROM.
Conecte el equipo al ordenador con un cable USB.
Compruebe que el equipo está encendido.
Utilice el cable USB suministrado.•
Consulte la "Información adicional para usuarios
españoles" para instalar la versión en español.
The USB port is located on the right side at the back of the machine.•
Install the Software
When using WPS (Wi-Fi Protected Setup) or connecting an additional computer,
make sure that the machine is turned on, then go to step . It is not necessary
to connect the machine to the computer with a USB cable.
•
Turn on the computer, then insert the
Setup CD-ROM into the CD-ROM drive.
Connect the machine to the computer with a USB cable.
Make sure the machine is turned on.
Use the supplied USB cable.•
Refer to the "Additional Information for Spanish
Users " sheet to install the Spanish version of
the software.

54
K
F
I
D
B
18
54
3
Windows Macintosh
Haga clic en Instalación simple (Easy Install).
Los controladores, las aplicaciones de software y los manuales
en pantalla se instalan automáticamente.
Si desea seleccionar los elementos que quiere instalar, haga clic en
Instalación personalizada (Custom Install) y siga las instrucciones
en pantalla para continuar con la instalación.
•
Escriba su nombre y contraseña de administrador.
Haga clic en OK.
Si no conoce su nombre o contraseña de administrador,
haga clic en Ayuda (Help) y, a continuación, siga las
instrucciones que aparecen en pantalla.
Haga doble clic en el icono Configuración (Setup).
Si la carpeta del CD-ROM no se abre automáticamente,
haga doble clic en el icono CANON_IJ del escritorio.
Click Easy Install.
Drivers, application software, and on-screen manuals are installed
automatically.
If you want to select particular items to install, click Custom Install
and follow the on-screen instructions to proceed with the installation.
•
Enter your administrator name and password.
Click OK.
If you do not know your administrator name or password,
click Help, then follow the on-screen instructions.
Double-click the Setup icon.
If the CD-ROM folder does not open automatically, double-click
the CANON_IJ icon on the desktop.

55
K
F
I
D
B
76
Windows Macintosh
Haga clic en Instalar (Install).
Desplace el cursor sobre los elementos para visualizar explicaciones.•
Se inicia la instalación.
Lea detenidamente la pantalla Contrato de licencia (License Agreement)
y haga clic en
Sí (Yes).
Durante la instalación, siga todas las instrucciones en pantalla para instalar el software.•
Click Install.
Move the cursor over items to display explanations.•
Installation starts.
Read the License Agreement screen carefully and click Yes.
During installation, follow any on-screen instructions to install the software.•

56
K
F
I
D
B
18
A
8 9
Windows Macintosh
Cuando aparezca la pantalla Cargar papel normal en el cassette (Load plain paper into the cassette), cargue
papel normal en el cassette (A) y haga clic en Siguiente (Next).
Para obtener más información, consulte "24 Carga de papel" en la página 73.•
Haga clic en Siguiente (Next).
When the Load plain paper into the cassette screen appears, load plain paper in the Cassette (A) and click Next.
For details, refer to "24 Loading Paper" on page 73.•
Click Next.

57
K
F
I
D
B
10
Windows Macintosh
Haga clic en Siguiente (Next).
Si está conectado a Internet, aparecerá la página de registro de usuario. Siga las instrucciones en pantalla para registrar su equipo. Necesitará el número de serie de su producto ubicado
en el interior del equipo.
Se requiere una conexión a Internet. (Se aplican tasas de conexión).•
Para registrarse más tarde, haga clic en Cancelar (Cancel). Se puede acceder a la pantalla Registro de usuario desde el icono Solution Menu. Para obtener más detalles,
consulte la sección "Solution Menu" en la página 78.
•
Si ya se ha registrado, aparecerá la pantalla Registro del producto (Product Registration).•
Click Next.
If connected to the Internet, the user registration page appears. Follow the on-screen instructions to register your machine. You will need your product serial number, which is located on the
inside of the machine.
Internet connection is required. (Connection fees apply.)•
If you are already registered, the Product Registration screen appears.•
To register later, click Cancel. User registration can be started from the Solution Menu icon. For details, refer to "Solution Menu" on page 78.•

58
K
F
I
D
B
18
11
Windows Macintosh
Cuando aparezca la pantalla Extended Survey Program, confirme el mensaje.
Si acepta, haga clic en Aceptar (Agree). Si hace clic en No aceptar (Do not agree), no se instalará Extended Survey Program.
(Esto no afecta al funcionamiento del equipo).
No aparece esta pantalla en Mac OS X v.10.3.9.•
When the Extended Survey Program screen appears, confirm the message.
If you can agree, click Agree. If you click Do not agree, the Extended Survey Program will not be installed.
(This has no effect on the machine's functionality.)
The screen does not appear on Mac OS X v.10.3.9.•

59
K
F
I
D
B
12
Windows Macintosh
Haga clic en Reiniciar (Restart).
Cuando el ordenador se reinicia, Canon IJ Network Tool se inicia automáticamente.
Después de reiniciarlo, extraiga el CD-ROM de instalación (Setup CD-ROM) y guárdelo en un lugar seguro.
Si utiliza Mac OS X v.10.3.9, antes de usar el panel de control del equipo para guardar los originales escaneados en el
ordenador, se tiene que seleccionar MP Navigator EX como aplicación de inicio en Captura de Imagen (Image Capture)
de
Aplicaciones (Applications). Para obtener más información, consulte "Almacenamiento de datos escaneados" en el
manual en pantalla: Guía básica (Basic Guide).
•
Vaya a cualquiera de los siguientes procedimientos,
dependiendo del método de conexión.
USB
LAN inalámbrica
WPS
LAN por cable
Otro ordenador
Click Restart.
When the computer restarts, Canon IJ Network Tool starts automatically.
After restarting the computer, remove the Setup CD-ROM and keep it in a safe place.
When using Mac OS X v.10.3.9, before using the Operation Panel on the machine to save scanned originals to the computer,
it is necessary to select MP Navigator EX as the launch application on
Image Capture under Applications. For details,
refer to "Saving Scanned Data" in the on-screen manual:
Basic Guide.
•
Go to either of the following procedures according to
your connection method!
D
P.69
F
USB
B
I
K
Wireless LAN
WPS
Wired LAN
Additional Computer
P.66
P.69
P.61
P.60

60
B
19
1
Windows Macintosh
Conexión USB
En la pantalla Canon IJ Network Tool seleccione Conexión USB (USB connection)
y luego haga clic en OK.
A continuación, lea la sección "24 Carga de papel" en la página 73.
USB Connection
On the Canon IJ Network Tool screen, select USB connection, then click OK.
Next, read "24 Loading Paper" on page 73!

61
D
1 2
3
20
Windows Macintosh
Configuración inicial para una LAN inalámbrica
Si aparece la pantalla Preparaciones
de conguración (Setup Preparations)
,
conrme que la preparación ha nalizado
y luego haga clic en OK.
En la pantalla Canon IJ Network Tool seleccione Conexión LAN
(LAN connection) y luego haga clic en OK.
Primero, establezca la conguración de LAN del equipo a LAN inalám. activa
(Wireless LAN active)
. Para obtener más detalles, consulte el capítulo
"9 Conguración LAN del equipo" en la página 20.
•
Seleccione Configuración (Setup) en el menú
emergente, seleccione MX860 series en Impresoras
(Printers) y luego haga clic en OK.
Si no se detecta ningún equipo, consulte "4.1 El equipo no se
detecta" en el manual impreso: Solución de problemas de
conguración de red (Network Setup Troubleshooting).
Asegúrese de que no exista ningún problema y luego haga
clic en
Actualizar (Update).
•
First-time Setup for Use over Wireless LAN
If the Setup Preparations screen
appears, confirm that preparation
is complete, then click
OK.
On the Canon IJ Network Tool screen, select LAN connection,
then click OK.
Set the machine's LAN setting to Wireless LAN active beforehand. For details,
refer to "9 Machine's LAN Setting" on page 20.
•
Select Setup in the pop-up menu, select MX860 series
in Printers, then click OK.
If no machine is detected, refer to "4.1 The machine is not detected"
in the printed manual: Network Setup Troubleshooting. Make sure
there is no problem, then click Update.
•

62
D
20
Windows Macintosh
Si aparece la siguiente pantalla
Cuando aparezca la pantalla Puntos de acceso (Access Points), seleccione el punto de acceso que utilizará y luego haga clic en Conectar (Connect).
Si se detecta automáticamente un punto de acceso, la pantalla Puntos de acceso (Access Points) no aparece.
Para conectarse al punto de acceso, con el valor WEP, WPA o WPA2 en la columna Encriptación (Encryption), introduzca la contraseña de red y luego haga clic en Conectar (Connect). Para obtener
detalles sobre las contraseñas de red, consulte "3.1 Acerca de la Clave de red (Windows) y la Contraseña de red (Macintosh)" en el manual impreso: Solución de problemas de conguración de red
(Network Setup Troubleshooting)
.
•
Si desea seleccionar un punto de acceso de forma manual, o si el punto de acceso de destino no aparece en la lista, o si aparece un mensaje de error, consulte "5 Aparece la siguiente pantalla durante la
conguración" en el manual impreso: Solución de problemas de conguración de red (Network Setup Troubleshooting).
•
La clave de red se puede recuperar mediante el asistente de conguración
inalámbrica de Canon PIXMA o siguiendo las instrucciones que se pueden
descargar desde la página de soporte de Canon (www.usa.canon.com/
downloadlibrary).
Si no consigue recuperar la clave de red u otro ajuste, consulte el manual
del punto de acceso o router, o póngase en contacto con el fabricante.
If the following screen appears
When the Access Points screen appears, select an access point to use, then click Connect.
When an access point is detected automatically, the Access Points screen does not appear.
To connect to the access point with WEP, WPA or WPA2 displayed in the Encryption column, enter the network password, then click Connect. For details on network passwords, refer to "3.1 About Network
Key (Windows)/Network Password (Macintosh)" in the printed manual: Network Setup Troubleshooting.
•
If you want to select an access point manually, or if the target access point is not displayed in the list, or if an error message appears, refer to "5 The following screen is displayed during setup" in the printed
manual: Network Setup Troubleshooting.
•
You can retrieve your network key by using the Canon PIXMA Wireless
Setup Assistant or the instructions which can be downloaded from the
Canon support webpage (www.usa.canon.com/downloadlibrary).
If you are unable to retrieve the network key or other settings refer to the manual
of your access point or router, or contact its manufacturer.

63
D
4
Windows Macintosh
Si aparece la siguiente pantalla
Cuando aparezca la pantalla Establecer dirección IP de impresora
(Set Printer IP Address), haga clic en Conectar (Connect).
Si se detecta el equipo automáticamente, la pantalla Establecer dirección IP de impresora
(Set Printer IP Address) no aparece.
Si no se establece una conexión incluso después de hacer clic en Conectar (Connect), consulte "5.6 La pantalla
Establecer direccion IP de impresora (Set Printer IP Address) aparece durante la conguración" en el manual
impreso: Solución de problemas de conguración de red (Network Setup Troubleshooting).
•
Cuando aparezca la pantalla Finalización de la configuración (Setup
Completion), retire el cable USB y luego haga clic en Siguiente (Next).
If the following screen appears
When the Set Printer IP Address screen appears, click Connect.
If the machine is detected automatically, the Set Printer IP Address screen does not appear.
If no connection is established even after Connect is clicked, refer to "5.6 The Set Printer IP Address screen is
displayed during setup" in the printed manual: Network Setup Troubleshooting.
•
When the Setup Completion screen appears, remove the USB cable,
then click Next.

64
D
20
5 6
A
Windows Macintosh
En la pantalla Medición del desempeño de la conexión (Connection Performance
Measurement) haga clic en Siguiente (Next).
Se inicia la evaluación del estado de la comunicación, y se muestran los resultados de la misma.
APAGUE EL EQUIPO (A), colóquelo en el lugar donde se utilizará y luego
enciéndalo.
La evaluación tarda unos minutos. Puede cancelar el proceso de evaluación haciendo clic en Cancelar
(Cancel). También se puede analizar el estado detallado del enlace de comunicaciones después de
la conguración mediante el uso de la herramienta Canon IJ Network Tool. Para obtener más detalles,
consulte el manual en pantalla:
Guía avanzada (Advanced Guide).
•
On the Connection Performance Measurement screen, click Next.
Measuring of the communication status starts, and the results are displayed.
TURN OFF THE MACHINE (A), then place the machine in the location where
you will use it, and turn on it.
Measuring takes a few minutes. You can cancel measuring by clicking Cancel. You also examine the
detailed status of the communication link after setup by using the Canon IJ Network Tool. For details,
refer to the on-screen manual:
Advanced Guide.
•

65
D
7
Windows Macintosh
Mac OS X v.10.5.x
Mac OS X v.10.4.x/
v.10.3.9
A continuación, lea la sección "23 Añadir el equipo" en la
página 70.
Si aparece cualquier símbolo que no sea , consulte los comentarios que aparecen así como la Ayuda para mejorar el estado
del enlace de comunicaciones.
•
Para comprobar si la nueva ubicación ofrece mejores resultados, haga clic en Remedición (Remeasurement). Se realiza de
nuevo una evaluación del estado de las comunicaciones.
•
Cuando aparezca un mensaje de Rendimiento general de la red (Overall network performance) en los resultados de la
evaluación, vuelva a colocar el equipo y los demás dispositivos de acuerdo con las instrucciones indicadas en la pantalla.
•
Vaya al paso .
Vaya al paso .
Confirme los resultados de la evaluación y luego haga clic en Finalizar (Finish).
Asegúrese de que aparece el símbolo en Rendimiento de la conexión entre la impresora
y el punto de acceso (Connection Performance between the Printer and the Access Point).
Se iniciarán la Utilidad Configuración Impresoras y Canon IJ Network Scanner Selector.
Next, read "23 Add the Machine" on page 70!
If any symbol other than is displayed, refer to displayed comments and Help for improving the status of communication link.•
To check whether the new location is better, click Remeasurement. Measurement of the communication status is performed
again.
•
When any message on Overall network performance appears in the measurement results, rearrange the machine and other
network devices following the instructions on the screen.
•
Go to Step .
Go to Step .
Confirm the measurement results, then click Finish.
Ensure that is displayed in Connection performance between the printer and the access point.
The Printer Setup Utility and Canon IJ Network Scanner Selector will start up.

66
I
21
1 2
3
Windows Macintosh
Configuración inicial para una LAN por cable
Si aparece la pantalla
Preparaciones de
configuración (Setup
Preparations), confirme que
la preparación ha finalizado
y luego haga clic en
OK.
En la pantalla Canon IJ Network Tool seleccione Conexión
LAN (LAN connection) y luego haga clic en OK.
Primero, establezca la conguración LAN del equipo a LAN alámbr.
activa (Wired LAN active)
. Para obtener más detalles, consulte el
capítulo "9 Conguración de LAN del equipo" en la página 20.
•
Seleccione Configuración (Setup) en el menú emergente, seleccione
MX860 series en Impresoras (Printers) y luego haga clic en OK.
Para configurar un equipo que aún no está conectado a una LAN, conéctese al
mismo mediante USB.
Si no se detecta ninguna impresora, haga clic en OK. Compruebe lo siguiente
y luego haga clic en Actualizar (Update).
•
El equipo está conectado al ordenador mediante un cable USB. −
El equipo está encendido.−
First-time Setup for Use over Wired LAN
If the Setup Preparations
screen appears, confirm that
preparation is complete, then
click OK.
On the Canon IJ Network Tool screen, select LAN
connection, then click OK.
Set the machine's LAN setting to Wired LAN active beforehand.
For details, refer to "9 Machine's LAN Setting" on page 20.
•
Select Setup in the pop-up menu, select MX860 series in Printers,
then click OK.
To set up a machine that is not yet connected to a LAN, connect to it by USB.
If no printer is detected, click OK. Make sure of the following, then click Update. •
The machine is connected to the computer with a USB cable. −
The machine is turned on.−

67
I
4
B
A
Windows Macintosh
Si aparece la siguiente pantalla
Cuando aparezca la pantalla Establecer direccion IP
de impresora (Set Printer IP Address)
, haga clic en
Conectar (Connect).
Si se detecta el equipo automáticamente, la pantalla Establecer
dirección IP de impresora (Set Printer IP Address) no aparece.
Si no se establece una conexión incluso después de hacer clic en
Conectar (Connect), consulte "5.6 La pantalla Establecer direccion IP
de impresora (Set Printer IP Address) aparece durante la conguración"
en el manual impreso: Solución de problemas de conguración de
red (Network Setup Troubleshooting)
.
•
Retire la tapa del conector LAN (A) en el equipo, conecte un dispositivo de red mediante
un cable LAN (B) y, a continuación, haga clic en
Sí (Yes).
If the following screen appears
When the Set Printer IP Address screen appears, click
Connect.
If the machine is detected automatically, the Set Printer IP Address
screen does not appear.
If no connection is established even after Connect is clicked, refer
to "5.6 The Set Printer IP Address screen is displayed during setup"
in the printed manual:
Network Setup Troubleshooting.
•
Remove the LAN connector cap (A) of the machine, connect a network device with a LAN
cable (B), then click Yes.

68
I
21
5
Windows Macintosh
Mac OS X v.10.5.x
Mac OS X v.10.4.x/v.10.3.9
Cuando aparezca la pantalla Finalización de la configuración
(Setup Completion)
, retire el cable USB y luego haga clic en OK.
A continuación, lea la sección "23 Añadir el equipo" en la página 70.
Se iniciarán la Utilidad Configuración Impresoras y Canon IJ Network Scanner Selector.
Vaya al paso .
Vaya al paso .
When the Setup Completion screen appears, remove the USB cable,
then click
OK.
Next, read "23 Add the Machine" on page 70!
The Printer Setup Utility and Canon IJ Network Scanner Selector will start up.
Go to Step .
Go to Step .

69
F
K
1 2
3
4
22
Windows Macintosh
Mac OS X v.10.5.x
Mac OS X v.10.4.x/
v.10.3.9
Conexión de la LAN por cable e inalámbrica
Si aparece la pantalla
Preparaciones de
configuración (Setup
Preparations), confirme
que la preparación ha
finalizado y luego haga
clic en OK.
En la pantalla Canon IJ Network
Tool seleccione Conexión LAN
(LAN connection) y luego haga
clic en
OK.
Seleccione Configurar (Setup)
en el menú emergente y luego
haga clic en Registrar impresora
(Register Printer).
A continuación, lea la sección "23 Añadir el equipo" en la
página 70.
Vaya al paso .
Vaya al paso .
Cuando aparezca la pantalla No hay ninguna impresora disponible. (You have no printers available.),
haga clic en Cancelar (Cancel).
•
Cuando aparezca la pantalla Cancelar instalación
(Cancel Setup)
, haga clic en Cancelar (Cancel).
Se iniciarán la Utilidad Configuración Impresoras y Canon IJ Network
Scanner Selector.
Connect the Wireless LAN / Wired LAN
If the Setup Preparations
screen appears, confirm
that preparation is
complete, then click OK.
On the Canon IJ Network Tool
screen, select LAN connection,
then click OK.
Select Setup in the pop-up menu,
then click Register Printer.
Next, read "23 Add the Machine" on page 70!
Go to Step .
Go to Step .
When the You have no printers available. screen appears, click Cancel.•
When the Cancel Setup screen appears, then click Cancel.
The Printer Setup Utility and Canon IJ Network Scanner Selector will start up.

70
F
K
D
I
23
1 2
Windows Macintosh
Mac OS X v.10.4.x/v.10.3.9 Mac OS X v.10.5.x/v.10.4.x
Mac OS X v.10.4.x
Mac OS X v.10.3.9
Mac OS X v.10.5.x
Mac OS X v.10.4.x
Añadir el equipo
Cuando aparezca la ventana Lista de impresoras
(Printer List), haga clic en Añadir (Add).
Vaya al paso .
Vaya al paso .
Espere unos instantes y, a continuación,
seleccione Canon MX860 series y haga
clic en Añadir (Add).
Vaya al paso .
Vaya al paso .
En Mac OS X v.10.4.x, haga clic en Más impresoras
(More Printers)
en la ventana Navegador de impresora
(Printer Browser).
La cadena alfanumérica que aparece después de Canon MX860 series es
la dirección MAC del equipo.
•
Si no se detecta el equipo, compruebe lo siguiente.•
El equipo está encendido.−
La función cortafuegos de cualquier software de seguridad está desactivada.−
Conexión de LAN inalámbrica: el ordenador está conectado al punto de
acceso.
−
Conexión de LAN por cable: el equipo está conectado al dispositivo de red
mediante el cable LAN.
−
El equipo no se ha congurado para utilizar el control de acceso (ltro de
direcciones MAC).
−
Add the Machine
When the Printer List window appears, click Add.
Go to Step .
Go to Step .
Wait for a while, then select Canon MX860 series
and click Add.
Go to Step .
Go to Step .
In Mac OS X v.10.4.x, click More Printers in the Printer
Browser window.
The alphanumeric string after Canon MX860 series is the machine's MAC
address.
•
If the machine has not been detected, make sure of the following.•
The machine is turned on.−
The rewall function of any security software is turned off.−
Wireless LAN Connection: The computer is connected to the access point.−
Wired LAN Connection: The machine is connected to the network device
with the LAN cable.
−
The machine is not set to use access control (MAC address ltering).−

71
F
K
D
I
3 4
Windows Macintosh
Mac OS X v.10.4.x/v.10.3.9 Mac OS X v.10.4.x/v.10.3.9
Seleccione Canon IJ Network en el menú emergente, seleccione MX860 series en la lista de impresoras
y luego haga clic en Añadir (Add).
Confirme que se ha añadido la impresora
MX860 series a la lista de impresoras.
La cadena alfanumérica que aparece después de MX860 series es la dirección MAC del equipo.•
Si no se detecta el equipo, compruebe lo siguiente.•
El equipo está encendido.−
La función cortafuegos de cualquier software de seguridad está desactivada.−
Conexión de LAN inalámbrica: el ordenador está conectado al punto de acceso.−
Conexión de LAN por cable: el equipo está conectado al dispositivo de red mediante el cable LAN.−
El equipo no se ha congurado para utilizar el control de acceso (ltro de direcciones MAC).−
Select Canon IJ Network in the pop-up menu, select MX860 series in the list of printers, then click Add. Confirm that MX860 series is added to the
list of printers.
The alphanumeric string after MX860 series is the machine's MAC address.•
If the machine has not been detected, make sure of the following.•
The machine is turned on.−
The rewall function of any security software is turned off.−
Wireless LAN Connection: The computer is connected to the access point.−
Wired LAN Connection: The machine is connected to the network device with the LAN cable.−
The machine is not set to use access control (MAC address ltering).−

72
F
K
D
I
23
5 6
Windows Macintosh
A continuación, lea la sección "24 Carga de papel" en la página 73.
En la pantalla del Canon IJ Network Scanner Selector seleccione Canon MX860 series Network en Nombre de origen
de datos TWAIN (TWAIN Data Source Name) y la dirección MAC del equipo en la Lista de dispositivos de red (Network
Device List) y, a continuación, haga clic en Aplicar (Apply) para utilizar el equipo como escáner.
Confirme que aparece una marca de
verificación y luego haga clic en Salir
(Exit) para cerrar la pantalla.
Para conrmar la dirección MAC del equipo, pulse el botón Menú (Menu) y luego mediante los botones
[
,
]
,
{
,
}
y OK, seleccione Conguración
(Settings) > Cong. de dispositivo (Device settings) > Ajustes de LAN (LAN settings) > Lista conf. LAN inal. (WLAN setting list) o Lista cong.
LAN (LAN setting list)
.
•
En Mac OS X v.10.5.x la ranura para tarjetas no está disponible si se utiliza el equipo en una red.•
Next, read "24 Loading Paper" on page 73!
On the Canon IJ Network Scanner Selector screen, select Canon MX860 series Network in TWAIN Data Source Name
and the MAC address of the machine in Network Device List, then click Apply to use the machine as a scanner.
Confirm that a check mark is displayed,
then click Exit to close the screen.
To conrm the machine's MAC address, press the Menu button, then using the
[
,
]
,
{
,
}
and OK buttons, select Settings > Device settings > LAN
settings > WLAN setting list or LAN setting list.
•
With Mac OS X v.10.5.x, the Card Slot is not available when using the machine over a network.•

73
1 2
24
A
B
C
D
F
E
A
Carga de papel
Extraiga la bandeja (A).
En esta sección se explica cómo se carga el papel
en el cassette (A) y en la bandeja posterior (B).
El cassette (A) sólo admite papel normal (C). Para imprimir
en papel fotográfico/Hagaki (D), asegúrese de cargarlo en la
bandeja posterior (B).
Carga de papel en la bandeja
Desplace las guías de papel (E) y (F) hacia ambos
extremos.
Loading Paper
Pull out the Cassette (A).
This section explains how to load paper in the
Cassette (A) and the Rear Tray (B).
The Cassette (A) supports plain paper (C) only. To print photo
paper / Hagaki (D), be sure to load it in the Rear Tray (B).
Load in the Cassette
Move the Paper Guides (E) and (F) to both edges.

74
24
3 4 5
E
F
G
Cargue el papel.
Cargue el papel con el lado de impresión hacia abajo.
Desplace la guía de papel (E) para alinearla con la
marca del tamaño de papel.
La guía de papel (E) se detendrá cuando esté alineada con la
marca de tamaño de papel correspondiente.
Podría haber un pequeño espacio entre la guía de papel (E) y la
pila de papel.
•
Para imprimir en un papel especial, asegúrese de cargarlo en
la bandeja posterior.
•
Deslice la guía de papel (F) hacia el límite izquierdo
del papel.
Compruebe que el papel cargado no supera la línea (G).
Load paper.
Load paper with the printing side facing down.
Slide the Paper Guide (E) to align with the mark of
paper size.
The Paper Guide (E) will stop when it aligns with the
corresponding mark of paper size.
There may be a little space between the Paper Guide (E) and the
paper stack.
•
To print on specialty paper, be sure to load it in the Rear Tray.•
Slide the Paper Guide (F) against left edge of the paper.
Confirm that the loaded paper does not exceed the line (G).

75
6
7
8
H
I I
A
Introduzca el cassette (A) en el equipo hasta que
haga clic en su lugar.
Abra el soporte del papel (H) y tire de él. Desplace las guías de papel (I) hacia ambos límites.
Carga de papel en la bandeja posterior
Insert the Cassette (A) into the machine until it clicks
into place.
Open the Paper Support (H) and pull it out. Move the Paper Guides (I) to both edges.
Load paper in the Rear Tray

76
24
109
I
J
I
¡La instalación del equipo ha nalizado!
Cargue el papel en el centro de la bandeja posterior.
Cargue el papel con orientación vertical con la superficie de
impresión hacia arriba.
Deslice las guías de papel izquierda y derecha (I)
hacia ambos bordes del papel.
Compruebe que el papel cargado no supera la línea (J).
Para conocer los detalles sobre los tamaños y tipos de papel
que se puede utilizar, consulte "Carga de papel" en el manual
en pantalla:
Guía básica (Basic Guide).
•
Machine installation is now complete!
Load paper in the center of the Rear Tray.
Load paper in portrait orientation with the printing side facing up.
Slide the left and right Paper Guides (I) against both
edges of the paper.
Confirm that the loaded paper does not exceed the line (J).
For details on media sizes and types you can use, refer to
"Loading Paper" in the on-screen manual: Basic Guide.
•

77
Manuales en pantalla
Guía básica
(Basic Guide)
Después de instalar el equipo
Precauciones de seguridad
Manuales
■
Para utilizar el equipo de forma correcta, lea
las precauciones de seguridad antes de usar
el equipo.
Información
de seguridad
y de medioambiente
(Safety and Environment
Information)
Describe cómo congurar y usar el equipo.
Presenta el equipo y sus funciones, los manuales
incluidos y las aplicaciones de software.
Guía de inicio
(Getting Started)
(este manual)
Solución de problemas
de configuración de
red (Network Setup
Troubleshooting)
Describe las operaciones básicas y presenta otras
funciones disponibles.
Guía avanzada
(Advanced Guide)
Describe distintos procedimientos de funcionamiento
para aprovechar al máximo todas las funciones del
equipo. También incluye información sobre "solución
de problemas" del equipo.
Para obtener más información sobre cómo abrir manuales en pantalla, consulte
la página 78.
on-screen manuals
After Installing the Machine
Safety Precautions
For proper use, read safety precautions
before using the machine.
Manuals
■
Safety and Environment
Information
Describes how to set up and use your machine.
Introduces the machine and its functions, the included
manuals and application software.
Getting Started
(this manual)
Describes the basic operations and gives an
introduction to other functions available.
Basic Guide
Describes various operating procedures to make
full use of machine. Also includes "Troubleshooting"
information for your machine.
Advanced Guide
Network Setup
Troubleshooting
For details on opening the on-screen manuals, refer to page 78.

78
Solution Menu
■
Puede abrir varias aplicaciones y manuales en pantalla con un solo clic.
Puede iniciar Solution Menu desde el icono Canon Solution Menu del escritorio (Windows) o del Dock (Macintosh).
Mediante Solution Menu se puede acceder a funciones e información que le permiten aprovechar al máximo todas las funciones del equipo.
*Los botones que aparecen pueden variar según el país
o región de adquisición.
Ejemplo: Windows Vista
Para abrir el manual en pantalla, haga clic en el botón que aparece a la izquierda en Solution Menu.
Si tiene algún problema con la configuración del equipo, haga clic en el icono Cambiar configuración o buscar
soluciones para los problemas. (Change settings or find solutions to problems.)
de Solution Menu para abrir
My Printer (sólo en Windows).
Solution Menu
■
Solution Menu is a gateway to functions and information that allow you to make full use of the machine!
Open various applications and on-screen manuals with a single click.
You can start Solution Menu from the Canon Solution Menu icon on the desktop (Windows) or on the Dock (Macintosh).
If you have a problem with machine settings, click the Change settings or find solutions to problems. in Solution Menu to
open My Printer (Windows only).
*The buttons displayed vary depending on the country or
region of purchase.
Example: Windows Vista
To open the on-screen manual, click the button shown to the left in Solution Menu.

79
Intente utilizar el equipo.
Además de los controladores, en el ordenador se instala el software de
varias aplicaciones.
Con las aplicaciones, podrá imprimir elementos creativos corrigiendo
o mejorando las fotografías.
Si lo preere, utilice el panel de control del equipo para imprimir fácilmente
sus propios elementos.
Para conocer los detalles sobre cómo utilizar el software de las
aplicaciones y el equipo, consulte los manuales en pantalla: Guía
básica (Basic Guide)" y Guía avanzada (Advanced Guide).
Try Using the Machine!
Various application software are installed on the computer along with
the drivers.
You can print creative items by correcting/enhancing photos using the
applications.
Alternatively, use the Operation Panel on the machine to print your own
items easily.
For details on how to use the application software and the machine,
refer to the on-screen manuals: Basic Guide and Advanced Guide.

80
2
1
3
A
C
B
Realice una prueba de copia
En esta sección se explica el procedimiento con papel normal. Para conocer los distintos procedimientos de copia, consulte "Realización de copias" en el manual en pantalla Guía básica (Basic Guide).
Para copiar un documento sólo tiene que colocarlo en la bandeja de cristal y pulsar el botón Iniciar (Start).
Cargue papel normal de tamaño A4 o Carta
en el cassette.
Abra la cubierta de
documentos (A).
Es posible que el equipo haga ruido al cargar el papel.
Esto es normal.
•
Coloque el documento boca abajo y alinéelo con la marca de alineación (B).
No coloque objetos que pesen más de 4,4 lb / 2,0 kg en la bandeja de cristal (C).•
No coloque un peso mayor de 4,4 lb / 2 kg sobre el original, ni ejerza una presión que supere
ese peso. Si lo hace, puede causar una avería en el escáner o romper la bandeja de cristal.
•
Para obtener más información, consulte "24 Carga de papel"
en la página 73.
•
Try Copying
This section explains with plain paper. For various copying procedures, refer to "Copying" in the on-screen manual: Basic Guide.
The machine may make operating noise when feeding paper.
This is normal operation.
•
You can copy a document by simply placing it on the Platen Glass and pressing the Start button.
Load A4 or Letter-sized plain paper into the
Cassette.
Open the Document Cover (A).
Place the document face-down and align it with the Alignment Mark (B).
Do not place any objects weighing more than 4.4 lb / 2.0 kg on the Platen Glass (C).•
Do not press or put weight on the original with pressure exceeding 4.4 lb / 2.0 kg. Doing so
may cause the scanner to malfunction or the Platen Glass to break.
•
For details, refer to "24 Loading Paper" on page 73.•

81
4
G
A
D
F
E
Cierre la cubierta de documentos (A), pulse el botón COPIA (COPY) (D) y, a continuación, Negro (Black) (E) o Color (F).
Asegúrese de que está desplegada la extensión de bandeja de salida (G).•No abra la cubierta de documentos (A) hasta que nalice la copia.•
La copia se iniciará.
Retire el documento cuando se haya imprimido.
Close the Document Cover (A), press the COPY button (D), then press the Black button (E) or the Color button (F).
Copying will start.
Remove the document after printing.
Do not open the Document Cover (A) until copying is complete.• Make sure that the Output Tray Extension (G) is extended.•

82
2
1
Impresión de fotografías desde un ordenador
En esta sección se explica cómo imprimir fotos sin bordes con Papel Fotográfico Brillo II (Photo Paper Plus Glossy II) de tamaño 4" x 6" (10 x 15 cm).
Las pantallas que aparecen se basan en Windows Vista.
Easy-PhotoPrint EX le permite imprimir fotografías fácilmente.
En Solution Menu, haga clic en Imprimir fotografías con un clic
(One-Click to Photo Print).
Para obtener detalles sobre cómo iniciar Solution Menu, consulte "Solution Menu" en la página 78.•
Para obtener más información, consulte el manual en pantalla: Guía avanzada (Advanced Guide).•
Se inicia Easy-PhotoPrint EX.
Seleccione la imagen que desea imprimir y, a continuación, haga clic en Diseño/
Imprimir (Layout/Print).
Cuando se selecciona una fotografía, el número de copias se establece en "1 ".
Print Photos from a Computer
This section explains how to print borderless photos using 4" x 6" size Photo Paper Plus Glossy II. The screens are based on Windows Vista.
For details on starting Solution Menu, refer to "Solution Menu" on page 78.•
Easy-PhotoPrint EX allows you to print photos easily.
In Solution Menu, click One-Click to Photo Print.
For more information, refer to the on-screen manual: Advanced Guide.•
Easy-PhotoPrint EX starts.
Select the image you want to print, then click Layout/Print.
When a photo is selected, the number of copies is set to "1".

83
4
3
A
Cargue una hoja de papel fotográfico en vertical en la bandeja posterior (A).
Para obtener más información, consulte "24 Carga de papel" en la página 73.•
Cargue el papel con la cara de impresión boca arriba.
Haga clic en Imprimir (Print).
La impresión se iniciará.
En Macintosh, si aparece la pantalla Imprimir (Print), haga clic en Imprimir (Print) para
empezar a imprimir.
Load a sheet of photo paper in the Rear Tray (A) in portrait orientation.
Load paper with the printing side facing up.
For details, refer to "24 Loading Paper" on page 73.•
Click Print.
Printing will start.
On Macintosh, if the Print screen is displayed, click Print to start printing.

84
1
2
B
A
C
D
Envío de faxes
Esta sección explica cómo enviar un fax en
blanco y negro desde el AAD (Alimentador
automático de documentos) (A).
Pulse el botón FAX (B).
Compruebe que se abre la pantalla de fax en espera.
Para conocer otros procedimientos de envío de fax,
consulte "Envío por fax" en el manual en pantalla:
Guía básica (Basic Guide)
.
Asegúrese de que el tipo de línea telefónica está
configurado correctamente. Para conocer el procedimiento
de configuración, consulte "Configuración del equipo" en el
manual en pantalla: Guía básica (Basic Guide).
Puede que la configuración no se encuentre disponible en
función del país o región de residencia.
Abra la bandeja de documentos (C) y desplace
las guías de papel (D) hacia ambos bordes.
Para obtener información sobre los documentos admitidos y la
conguración de la calidad de imagen, la densidad (brillo), etc.,
consulte el manual en pantalla: Guía básica (Basic Guide).
•
Send Faxes
This section explains how to send a fax in black and
white from the ADF (Auto Document Feeder) (A).
Press the FAX button (B).
Confirm that the fax standby screen is displayed.
For other procedures to send faxes, refer to "Faxing" in the
on-screen manual: Basic Guide.
Make sure that the telephone line type is set correctly. For
the setting procedure, refer to "Setting Up the Machine" in
the on-screen manual: Basic Guide.
The setting may not be available depending on the country
or region of your residence.
Open the Document Tray (C), then move the
Paper Guides (D) to both edges.
For details on supported documents and settings for image
quality, density (brightness), etc., refer to the on-screen manual:
Basic Guide.
•

85
3
F
E
D
4
5
Inserte el documento hasta que suene un pitido y deslice las
guías de papel izquierda y derecha (D) hacia ambos extremos
del documento.
Coloque el documento boca arriba.•
Utilice el teclado numérico (E) para introducir
el número de fax.
Para conocer los detalles sobre la información del remitente, consulte "Especicación de la conguración básica del equipo"
en el manual en pantalla:
Guía básica (Basic Guide).
•
Pulse el botón Negro (Black) (F).
Se envía el fax.
Insert the document until a beep sounds, then slide the left and
right Paper Guides (D) against both ends of the document.
Place the document face-up.•
Use the Numeric buttons (E) to enter the fax
number.
For details on sender information, refer to "Specifying the Basic Settings for the Machine" in the on-screen manual: Basic Guide.•
Press the Black button (F).
The fax is sent.

86
1
B
A
C
2
Alineación del cabezal de impresión
Confirme que ha cargado tres hojas o más de papel
normal de tamaño A4 o Carta en el cassette (B).
Para obtener más información, consulte "24 Carga de papel"
en la página 73.
•
Para cancelar la impresión del patrón de alineación, pulse el botón Parar (Stop) (A).
Alinee el cabezal de impresión para obtener los mejores resultados de impresión.
Utilice tres hojas de papel normal de tamaño A4
o Carta para realizar la alineación.
Seleccione Sí (Yes) y luego pulse el botón OK.
Se inicia la impresión del primer patrón.
Asegúrese de que está desplegada la extensión de bandeja de salida (C).•
Align the Print Head
Confirm that three or more sheets of A4 or Letter-
sized plain paper are loaded into the Cassette (B).
For details, refer to "24 Loading Paper" on page 73.•
To cancel printing the alignment pattern, press the Stop button (A).
Align the Print Head for better print results.
Use three sheets of A4 or Letter-sized plain paper
for alignment.
Select Yes, then press OK button.
Printing of the first pattern starts.
Make sure that the Output Tray Extension (C) is extended.•

87
4
3
Examine la primera copia impresa y utilice los botones
[
]
{
}
para introducir en las
columnas A a G el número del patrón cuyas rayas blancas verticales u horizontales sean
las menos perceptibles y, a continuación, pulse el botón
OK.
Si le resulta difícil seleccionar el mejor patrón, elija el valor en el que las rayas blancas sean menos perceptibles. •
Una vez impreso el patrón que aparece arriba, seleccione
Sí (Yes)
y luego pulse el botón OK.
El patrón se imprime en negro y azul.•
Menos perceptibles Más perceptibles
Look at the first printout, and use the
[
]
{
}
buttons to enter the number of the pattern
that has the least noticeable vertical or horizontal streaks for columns
A to G, then press the
OK button.
If it is difcult to pick the best pattern, pick the setting that produces the least noticeable white streaks. •
When the above pattern is printed, select Yes and press
the
OK button.
The pattern is printed in black and blue.•
Less noticeable More noticeable

88
5
6
Confirme el mensaje que aparece arriba y luego
pulse el botón OK.
Se inicia la impresión del segundo patrón.
Siga el mismo procedimiento que en el paso para introducir el número del patrón cuyas rayas blancas verticales
u horizontales sean las menos perceptibles en las columnas
H a Q y, a continuación, pulse el botón OK.
Menos perceptibles Más perceptibles
Confirm the above message, then press the OK
button.
Printing of the second pattern starts.
Follow the same procedure as step to enter the number of the pattern that has the least noticeable vertical streaks
for columns H to Q, then press the OK button.
Less noticeable More noticeable

89
7
8
Confirme el mensaje que aparece arriba y luego
pulse el botón OK.
Se inicia la impresión del tercer patrón.
Introduzca en las columnas a a j el número del patrón que tenga las rayas blancas horizontales menos perceptibles y,
a continuación, pulse el botón OK.
Si le resulta difícil seleccionar el mejor patrón, elija el valor en el que las rayas blancas sean menos perceptibles.•
Menos perceptibles Más perceptibles
Confirm the above message, then press the OK
button.
Printing of the third pattern starts.
Enter the number of the pattern that has the least noticeable horizontal stripes for columns a to j, then press OK
button.
If it is difcult to pick the best pattern, pick the setting that produces the least noticeable white stripes.•
Less noticeable More noticeable

90
9
Aparecerá la pantalla de espera.
La alineación del cabezal de impresión ha finalizado.
La alineación del cabezal de impresión ha nalizado.
A continuación, lea la sección "6 Conguración del equipo para la recepción
de fax" en la página 13.
The standby screen is displayed.
Print Head Alignment is now complete.
Print Head Alignment is now complete.
Next, read "6 Set Up for Fax Reception" on page 13.

QT5-2552-V01 XXXXXXXX ©CANON INC.2009 PRINTED IN THAILAND
CANON U.S.A. INC.
One Canon Plaza, Lake Success, NY 11042 U.S.A.
www.usa.canon.com
Dirección de correo electrónico de la asistencia
técnica — www.canontechsupport.com
Los siguientes depósitos de tinta son compatibles con este dispositivo.
Asistencia de Canon
Mediante esta opción se proporciona asistencia técnica telefónica, sin
cargo alguno, de lunes a viernes (excluidos festivos) durante el periodo
de garantía.
Asistencia por teléfono para personas con discapacidades auditivas (TDD)
disponible en (1-866-251-3752).
Asistencia técnica telefónica gratuita —
(1-800-828-4040) durante el periodo de garantía
Información de pedidos
Llame al 1-800-OK-CANON para saber cuál es el distribuidor más cercano
o acceda a Canon eStore en www.canonestore.com
CLI-221 negro
CLI-221 magenta
CLI-221 amarillo
PGI-220 negro
CLI-221 cian
2946B001
2948B001
2949B001
2945B001
2947B001
N.º de referencia
Email Tech Support — www.canontechsupport.com
Getting Help from Canon
This option provides live telephone technical support, free of service
charges, Monday-Friday (excluding holidays), during the warranty period.
Telephone Device for the Deaf (TDD) support is available at
(1-866-251-3752).
Toll-Free Live Tech Support — (1-800-828-4040)
under warranty
The following ink tanks are compatible with this machine.
Ordering Information
Call 1-800-OK-CANON to locate a dealer near you, or visit the Canon
eStore at www.canonestore.com
CLI-221 Black
CLI-221 Magenta
CLI-221 Yellow
PGI-220 Black
CLI-221 Cyan
2946B001
2948B001
2949B001
2945B001
2947B001
Order #
-
 1
1
-
 2
2
-
 3
3
-
 4
4
-
 5
5
-
 6
6
-
 7
7
-
 8
8
-
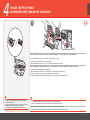 9
9
-
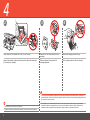 10
10
-
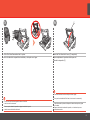 11
11
-
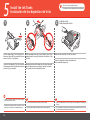 12
12
-
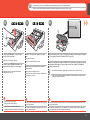 13
13
-
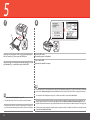 14
14
-
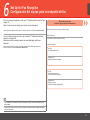 15
15
-
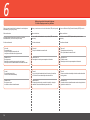 16
16
-
 17
17
-
 18
18
-
 19
19
-
 20
20
-
 21
21
-
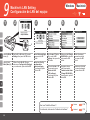 22
22
-
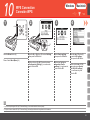 23
23
-
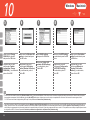 24
24
-
 25
25
-
 26
26
-
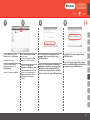 27
27
-
 28
28
-
 29
29
-
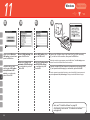 30
30
-
 31
31
-
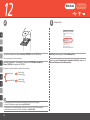 32
32
-
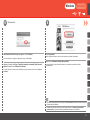 33
33
-
 34
34
-
 35
35
-
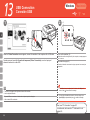 36
36
-
 37
37
-
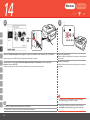 38
38
-
 39
39
-
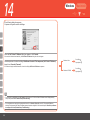 40
40
-
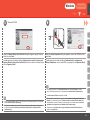 41
41
-
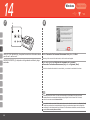 42
42
-
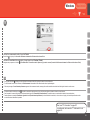 43
43
-
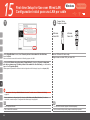 44
44
-
 45
45
-
 46
46
-
 47
47
-
 48
48
-
 49
49
-
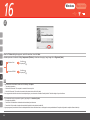 50
50
-
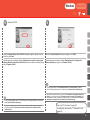 51
51
-
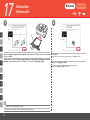 52
52
-
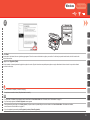 53
53
-
 54
54
-
 55
55
-
 56
56
-
 57
57
-
 58
58
-
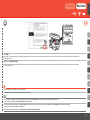 59
59
-
 60
60
-
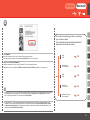 61
61
-
 62
62
-
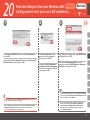 63
63
-
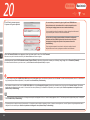 64
64
-
 65
65
-
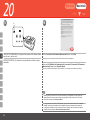 66
66
-
 67
67
-
 68
68
-
 69
69
-
 70
70
-
 71
71
-
 72
72
-
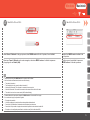 73
73
-
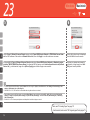 74
74
-
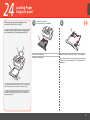 75
75
-
 76
76
-
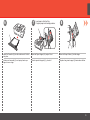 77
77
-
 78
78
-
 79
79
-
 80
80
-
 81
81
-
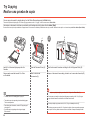 82
82
-
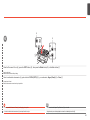 83
83
-
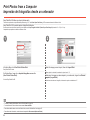 84
84
-
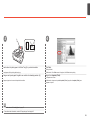 85
85
-
 86
86
-
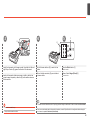 87
87
-
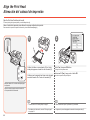 88
88
-
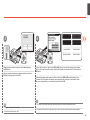 89
89
-
 90
90
-
 91
91
-
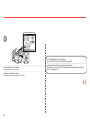 92
92
-
 93
93


Canon PIXMA MX860 El manual del propietario
- Categoría
- Multifuncionales
- Tipo
- El manual del propietario
en otros idiomas
- English: Canon PIXMA MX860 Owner's manual
Artículos relacionados
-
Canon PIXMA MG6120 Serie El manual del propietario
-
Canon MX882 Manual de usuario
-
Canon MX350 Manual de usuario
-
Canon PIXMA MX340 Manual de usuario
-
Canon PIXMA MG5220 Manual de usuario
-
Canon PIXMA MX420 El manual del propietario
-
Canon 4788B018 Manual de usuario
-
Canon PIXMA MG5520 (MG5500 Series) Manual de usuario
-
-
Canon PIXMA MG5620 El manual del propietario