
1
Important Customer Information
Please be advised that many services and applications offered through
this unique device are provided by various device, operating system,
software and application developers (e.g. Google
TM
, LG, Microsoft). If you
use, link to or download a service, an application, chat room, marketplace
or social network from this device, you should carefully review the terms
of such service or application. If you USE ANY of these Wireless services
or applications, personal information you submit may be read, collected,
or used by the service or application provider and/or other users of those
forums.
Specific terms and conditions, terms of use, and privacy polices apply to
those applications and services. Please review carefully any and all terms
and conditions applicable to those applications and services including those
related to any location-based services for any particular privacy policies, risks
or waivers.
NOTE:
The user interface of Google applications (Google Search, Google
Maps, Navigation, etc.) can vary depending on its software version.
Locations are inaccurate when GPS and Wi-Fi are not set.
WARNING:
With the Android operating system, some available Google
Play applications only operate correctly with phones that have a specific
screen resolution. Please be advised that some of the applications on
Google Play may not be available for your phone due to LCD resolution
requirements that do not match your phone. In addition, please be aware
that 3rd party applications with programming defects may cause issues
with your phone, including lock ups and resets.
WARNING:
This product contains chemicals known to the State of
California to cause cancer and birth defects or other reproductive harm.
Wash hands after handling.

2
Important Safety Precautions
1. Do not expose the battery charger or adapter to direct
sunlight or use it in places with high humidity, such as a
bathroom.
2. Do not use harsh chemicals (such as alcohol, benzene,
thinners, etc.) or detergents to clean your phone. This
could cause a fire.
3. Do not drop, strike, or shake your phone severely. It may
harm the internal circuit boards of the phone.
4. Do not use your phone in high explosive areas as the
phone may generate sparks.
5. Do not damage the power cord by bending, twisting,
pulling, or heating. Do not use the plug if it is loose as it
may cause a fire or electric shock.
6. Do not place any heavy items on the power cord. Do
not allow the power cord to be crimped as it may cause
electric shock or fire.
7. Do not handle the phone with wet hands while it is being
charged. It may cause an electric shock or seriously
damage your phone.
8. Do not disassemble the phone.
9. Do not place or answer calls while charging the phone as
it may short-circuit the phone and/or cause electric shock
or fire.
10. Do not hold or let the antenna come in contact with your
body during a call.

3
11. Make sure that no sharp-edged items such as animal’s
teeth or nails, come into contact with the battery. This
could cause a fire.
12. Store the battery out of reach of children.
13.
Be careful that children do not swallow any parts (such as rubber,
plugs, earphone, connection parts of the phone, etc.).
This could
cause asphyxiation or suffocation resulting in serious injury
or death.
14. Unplug the power cord and charger during lightning
storms to avoid electric shock or fire.
15. Only use the batteries and chargers provided by LG. The
warranty will not be applied to products provided by other
suppliers.
16. Only authorized personnel should service the phone and
its accessories. Faulty installation or service may result in
accidents and consequently invalidate the warranty.
17. Your service provider programs one or more emergency
phone numbers, such as 911, that you can call under any
circumstances, even when your phone is locked. Your
phone’s preprogrammed emergency number(s) may
not work in all locations, and sometimes an emergency
call cannot be placed due to network, environmental, or
interference issues.
18.
Your phone is an electronic device that generates heat during
normal operation. Extremely prolonged, direct skin contact in
the absence of adequate ventilation may result in discomfort
or minor burns. Therefore, use care when handling your
phone during or immediately after operation.

4
Contents
Getting to know your phone ........... 5
Google Account Setup .................... 9
Setting up
your Google Account .................... 9
Your Google Account .................... 9
Your Home screen ......................... 11
Touchscreen tips ............................11
Home screen panels .....................11
Applications: How to View,
Open and Switch ...........................12
Calls/Contacts ................................14
To open the Phone application .14
To place a call by dialing .............14
Answering and rejecting a call ..14
Messaging .......................................15
Messaging .......................................15
To send a text message ..............15
The Web ..........................................16
Browser ............................................. 16
Email ................................................17
Opening Email and the Accounts
Screen...............................................17
Camera ........................................... 18
Getting to know the viewfinder .18
Bluetooth .........................................19
How to send data from your
phone via Bluetooth .....................19
Settings ...........................................21

5
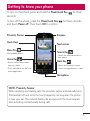
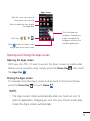
Getting to know your phone
To turn on the phone, press and hold the Power/Lock Key for three
seconds.
To turn off the phone, press the Power/Lock Key
for three seconds
and touch Power off. Then touch OK to confirm.
NOTE: Proximity Sensor
When receiving and making calls, the proximity sensor automatically turns
the backlight off and locks the touch keypad by sensing when the phone
is near your ear. This extends battery life and prevents the touch keypad
from activating unintentionally during calls.
Menu Key
View available options.
Home Key
ţ3FUVSOTUPUIF)PNFTDSFFO
from any screen.
ţ1SFTTBOEIPMEUPTFFUIFMJTUPG
recent applications.
Quick Keys
Proximity Sensor
Search Key
ţSearch the web and contents in
your phone.
Back Key
ţ3FUVSOUPUIFQSFWJPVTTDSFFO
ţ$MPTFTUIFLFZQBEXIFOJUJTPQFO
Microphone
Earpiece
Touchscreen

6
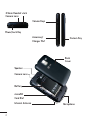
Accessory/
Charger Port
Volume Keys
3.5mm Headset Jack
Camera Lens
Power/Lock Key
Camera Key
Battery
microSD
Card Slot
Camera Lens
Internal Antenna
Microphone
Speaker
Back
Cover

7
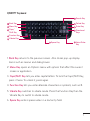
1. Back Key returns to the previous screen. Also closes pop-up display
items such as menus and dialog boxes.
2.
Menu Key opens an Options menu with options that affect the current
screen or application.
3.
Caps/Shift Key lets you enter capital letters. To lock the Caps/Shift Key,
press it twice. To unlock it, press again.
4.
Function Key lets you enter alternate characters or symbols, such as @.
5.
Vibrate Key switches to vibrate mode. Press the Function Key then the
Vibrate Key to switch to vibrate mode.
6.
Space Key enters spaces when in a text entry field.
QWERTY Keyboard
Back Key
Menu Key
Caps/
Shift Key
Function Key
Vibrate Key
Search Key
Delete Key
Enter Key
Directional
Keys
Voice Dialer
Key
Space Key

8
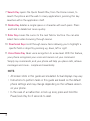
7. Search Key opens the Quick Search Box, from the Home screen, to
search the phone and the web. In many applications, pressing this key
searches within the application itself.
8.
Delete Key deletes a single space or character with each press. Press
and hold to delete text more quickly.
9. Enter Key moves the cursor to the next field or text line. You can also
select items when browsing through menus.
10.
Directional Keys scroll through menu items allowing you to highlight a
specific field or object by pressing up, down, left or right.
11.
Voice Dialer Key takes voice recognition to a new level. With this feature,
your phone recognizes your voice and carries out your command.
Simply say commands, and your phone will help you place calls, retrieve
messages and more - simple and seamlessly.
NOTE:
ţ All screen shots in this guide are simulated. Actual displays may vary.
ţ Instructions to perform tasks in this guide are based on the default
phone settings and may change depending on the software version
on your phone.
ţ In the case of a malfunction or lock up error, press and hold the
Power/Lock Key for 8 seconds to reset.

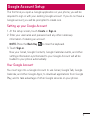
9
The first time you open a Google application on your phone, you will be
required to sign in with your existing Google account. If you do not have a
Google account, you will be prompted to create one.
Setting up your Google Account
1. At the setup screen, touch Create or Sign in.
2. Enter your username and password and any other necessary
information if creating an account.
NOTE: Press the Back Key
to close the keyboard.
3. Touch Sign in.
Now your Gmail, Google Contacts, Google Calendar events, and other
settings information synchronized to your Google Account will all be
loaded to your phone automatically.
Your Google Account
You must sign into a Google Account to use Gmail, Google Talk, Google
Calendar, and other Google Apps; to download applications from Google
Play; and to take advantage of other Google services on your phone.
Google Account Setup

10
NOTE:
ţ If you don’t have a Google Account, you’re prompted to create one.
ţ If you have an enterprise account through your company or other
organization, your IT department may have special instructions on
how to sign into that account.
ţ When you sign in, your contacts, Gmail messages, Calendar events,
and other information from these applications and services on the
web are synchronized with your phone.
ţ If you don’t sign into a Google Account during setup, you are
prompted to sign in or to create a Google Account the first time you
start an application that requires one, such as Gmail or Play Store.
ţ When you sign in, you’re prompted to enter your username and
password, using the on-screen keyboard or physical keyboard.

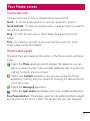
11
Touchscreen tips
Here are some tips on how to navigate around your phone.
Touch - To choose a menu/option or open an application, touch it.
Touch and hold - To open an Context menu or grab an object you want to
move, touch and hold it.
Drag - To scroll through a list or move slowly, drag across the touch
screen.
Flick - To scroll through a list or move quickly, flick across the touch
screen (drag quickly and release).
Home screen panels
The Quick Keys are located at the bottom of the Home screen and Apps
screen.
Opens the Phone application which displays the dialpad so you can
dial an unsaved number. It also provides additional tabs to access the
Call log, Contacts, and your Groups.
Opens your Contacts application. You can also access the Phone
application, Call log, and your Groups by touching the tabs across the
top of the screen.
Opens the Messaging application.
Opens the Apps screen and displays all of your installed applications.
Easy Personalization - Personalize your phone by adding multiple widgets
and shortcuts to the Home screen. You can also set your own wallpaper.
Your Home screen

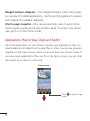
12
Navigate between categories - The categorized Apps screen menu gives
an overview of installed applications. Use the pinching gesture to expand
and collapse the available categories.
Intuitive page navigation - Mini canvas view helps users to jump Home
screen panels quicker and re-align screens easily. To access mini canvas
view, pinch in on the Home screen.
Applications: How to View, Open and Switch
All of the applications on your phone, including any applications that you
downloaded and installed from Google Play or other sources, are grouped
together on the Apps screen, which you access from your Home screen. If
you have more applications than can fit on the Apps screen, you can slide
the screen up or down to view more.
Home screen
Touch to open the Apps
screen.

13
Opening and Closing the Apps screen
Opening the Apps screen
With your LG L75C, it’s easy to access the Apps screen no matter what
feature you’re currently using. Simply press the Home Key
, then touch
the Apps Key
.
Closing the Apps screen
To manually close the Apps screen and go back to the Home Screen,
press the Home Key
or touch Home .
NOTE:
ţ The Apps screen closes automatically when you touch an icon to
open its application. Dragging an icon onto your Home screen also
closes the Apps screen automatically.
Apps screen
Pinch to collapse all
categories. Expand your
fingers to expand the
categories and view the
available applications.
Slide the screen up or down to
bring more icons into view.
Touch an application icon to open
the application.
Quick Keys (
, , , )
Touch to close the Apps screen
and go back to the Home screen

14
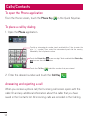
To open the Phone application
From the Home screen, touch the Phone Key in the Quick Keys bar.
To place a call by dialing
1. Open the Phone application.
2. Enter the desired number and touch the Call Key
.
Answering and rejecting a call
When you receive a phone call, the Incoming call screen opens with the
caller ID and any additional information about the caller that you have
saved in the Contacts list. All incoming calls are recorded in the Call log.
Calls/Contacts
To dial an international number, touch and hold the 0 key to enter the
plus ( + ) symbol. Then, enter the international prefix for the country;
followed by the full phone number.
Touch the Delete Key
to erase a digit. Touch and hold the Delete Key
to erase the entire number.
Touch the Call Key
to dial the number that you entered.

15
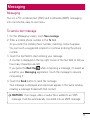
Messaging
Your LG L75C combines text (SMS) and multimedia (MMS) messaging
into one intuitive, easy-to-use menu.
To send a text message
1. On the Messaging screen, touch New message.
2. Enter a mobile phone number in the To field.
As you enter the mobile phone number, matching contacts appear.
You can touch a suggested recipient or continue entering the phone
number.
3. Touch the text field to start entering your message.
A counter is displayed in the top right corner of the text field to tell you
how many characters are left.
If you press the Back Key
while composing a message, it’s saved as
a draft in your Messaging application. Touch the message to resume
composing it.
4. Touch the Send button to send the message.
Your message is displayed and responses appear in the same window,
creating a message thread with that contact.
WARNING: If an image, video or audio file is added to an SMS
message, it will be automatically converted into an MMS message.
Messaging

16
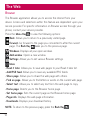
Browser
The Browser application allows you to access the internet from your
device. Access and selections within this feature are dependent upon your
service provider. For specific information on Browser access through your
phone, contact your service provider.
Press the Menu Key
to view the following options:
Back: Allows you to return to a previously visited page.
Forward: Go forward to the page you connected to after the current
page. The Back Key
takes you to the previous page.
Windows: Displays all your open windows.
Add window: Opens a new window.
Settings: Allows you to set various Browser settings.
More
ţ
Read it later:"MMPXTZPVUPTBWFXFCQBHFTUPZPVS3FBEJUMBUFSMJTU
ţ
Add RSS feed:"MMPXTZPVUPTBWFBOZBWBJMBCMF344GFFET
ţ
Share page: Allows you to share the web page with others.
ţ
Find on page: Allows you to find letters or words on the current web page.
ţ
Select text: Allows you to select any text from the web page to copy.
ţ
Home page: Directs you to the Browser home page.
ţ
Set home page: Sets the current page as the Browser home page.
ţ
Page info: Displays the web page information.
ţ
Downloads: Displays your download history.
NOTE: To return to the previous page, press the Back Key
The Web

17
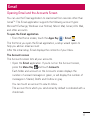
Opening Email and the Accounts Screen
You can use the Email application to read email from services other than
Gmail
TM
. The Email application supports the following account types:
Microsoft Exchange, Windows Live Hotmail, Yahoo! Mail, Gmail, AOL Mail,
and other accounts.
To open the Email application:
ţ From the Home screen, touch the Apps Key
> Email
.
The first time you open the Email application, a setup wizard opens to
help you add an email account.
After the initial setup, Email displays the contents of your Inbox.
The Accounts screen
The Accounts screen lists all your accounts.
ţ Open the Email application. If you’re not on the Account screen,
press the Menu Key
and touch Accounts.
Each folder and account on the Accounts screen displays the
number of unread messages in green, or will display the number of
messages in Starred, Drafts and Outbox in gray.
You can touch an account to view its Inbox.
The account from which you send email by default is indicated with a
checkmark.
Email

18
Camera
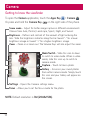
Getting to know the viewfinder
To open the Camera application, touch the Apps Key > Camera .
Or press and hold the Camera Key
on the right side of the phone.
NOTE: Default resolution is 3M (2048x1536).
Mode Switch - Slide this icon to down
to switch to video mode. When in video
mode, slide this icon up to switch to
camera mode.
Capture - Touch to take a photo.
Gallery - Accesses your saved photos
from within camera mode. Simply touch
this icon and your Gallery will appear on
the screen.
Zoom – Zoom in or zoom out. The Volume Keys will also adjust the zoom.
Settings - Opens the Camera settings menu.
Focus - Allows you to set the focus mode for the photo.
Scene mode – Adjust for better image capture in different environments.
Choose from Auto, Portrait, Landscape, Sports, Night, and Sunset.
Brightness – Defines and controls of the amount of light entering the
lens. Slide the brightness indicator along the bar toward “-” for a lower
brightness image or toward “+” for a higher brightness image.

19
How to send data from your phone via Bluetooth
You can send data via Bluetooth by running a corresponding application,
rather than from the Bluetooth menu as with feature phones.
ţ Sending pictures: Open the Gallery application and select a picture.
Then touch Menu > Share > Bluetooth. If Bluetooth is off, touch
Bluetooth to turn it on. A checkmark indicates the function is active.
Then touch Scan for devices and choose the device you want to
send data from the list.
ţ Exporting contacts: Open the Contacts application. Touch the
contact you want to share. Touch the Menu Key
> Share >
Bluetooth. If Bluetooth is off, touch Bluetooth to turn it on. A
checkmark indicates the function is active. Then touch Scan for
devices and choose the device you want to send data from the list.
ţ Connecting to FTP (Only the FTP server is supported on this
handset): From the Home screen, touch the Apps Key
>
Settings > Wireless & networks > Bluetooth settings. Then select
the Discoverable check box and search for other devices. Find the
service you want and connect to the FTP server.
TIP! 5IFWFSTJPOPG#MVFUPPUIVTFECZUIJTEFWJDFJT#MVFUPPUI&%3
and certified by Bluetooth SIG. It is compatible with other Bluetooth
SIG certified devices.
Bluetooth

20
NOTE: If you want to search for this phone from other devices, touch the
Apps Key
> Settings > Wireless & networks > Bluetooth settings.
Then select the Discoverable check box. Your device will now be
detectable for 120 seconds.
NOTE: The supported Bluetooth profiles are HFP, HSP, OPP, PBAP
TFSWFS'51TFSWFS"%1."1BOE"73$1

21
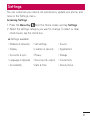
You can customize your device, set permissions, update your phone, and
more in the Settings menu.
Accessing Settings
1. Press the Menu Key
from the Home screen and tap Settings.
2. Select the settings category you want to change. To select or clear
check
boxes, tap the check box.
Settings available:
ţ8JSFMFTTOFUXPSLT ţ$BMMTFUUJOHT ţ4PVOE
ţ%JTQMBZ ţ-PDBUJPOTFDVSJUZ ţ"QQMJDBUJPOT
ţ"DDPVOUTTZOD ţ1SJWBDZ
ţ
Storage
ţ-BOHVBHFLFZCPBSE
ţ7PJDFJOQVUPVUQVU ţ$POOFDUJWJUZ
ţ"DDFTTJCJMJUZ ţ%BUFUJNF ţ"CPVUQIPOF
Settings


1
Información importante para el cliente
Tenga en cuenta que muchos de los servicios y las aplicaciones que este
teléfono exclusivo ofrece se proporcionan en varios aparatos, sistemas
operativos y desarrolladores de aplicaciones (por ejemplo, Google
TM
, LG,
Microsoft). Si usa dicho servicio o aplicación, sala de charla, mercado o red
social, usa un enlace a ellos o los descarga desde este teléfono, debe leer los
términos de dicho servicio o aplicación con atención.
4J64"$6"-26*&3TFSWJDJPPBQMJDBDJ²OJOBMNCSJDBFMQSPWFFEPSEFM
servicio o de la aplicación u otros usuarios de estos foros pueden leer,
recopilar o usar la información personal que usted envíe. Los términos y
condiciones, los términos de uso y las políticas de privacidad específicos son
QBSBEJDIBTBQMJDBDJPOFTZTFSWJDJPT3FWJTFDPOBUFODJ²OUPEPTMPTU¨SNJOPT
y condiciones en relación con esas aplicaciones y servicios, incluidos los que
posean cualquier política de privacidad en particular, riesgo o exención de
responsabilidad para los servicios basados en ubicaciones.
NOTA: El interfaz de usuario de las aplicaciones de Google (Google Search, Google
Maps, Navigation, etc.) puede variar dependiendo en la versión del software.
-BTVCJDBDJPOFTTPOJODPSSFDUBTDVBOEP(14Z8J'JOPFTUOBDUJWBEPT
ADVERTENCIA: Con el sistema operativo Android, algunas aplicaciones
disponibles en Google Play sólo funcionan correctamente con los teléfonos que
tienen una resolución de pantalla específica. Tenga en cuenta que algunas de las
aplicaciones en Google Play pueden no estar disponibles para su teléfono por
un requisito de resolución de la pantalla LCD que no coincide con el teléfono.
"EFNTUFOHBFODVFOUBRVFMBBQMJDBDJPOFTEFUFSDFSPTDPOEFGFDUPTEF
programación pueden causar problemas con el teléfono, incluidos los bloqueos de
teléfono y reinicios.
ADVERTENCIA: Este producto contiene químicos conocidos por el Estado de
$BMJGPSOJBEFDBVTBSDODFSZEFGFDUPTEFOBDJNJFOUPVPUSPTEB°PTSFQSPEVDUJWPT
Lávese las manos después de manipular.

2
Información importante para el cliente
1.
No exponga cargador de baterías o el adaptador a la luz directa
del sol, ni lo utilice en sitios con elevada humedad, como por
FKFNQMPFMCB°P
2.
No use sustancias químicas corrosivas (como alcohol, bencina,
solventes, etc.) ni detergentes para limpiar el teléfono. Existe
riesgo de causar un incendio.
3.
No deje caer el teléfono, ni lo golpee o agite fuertemente. Tales
BDDJPOFTQVFEFOEB°BSMBTUBSKFUBTEFDJSDVJUPTJOUFSOBTEFMUFM¨GPOP
4.
/PVTFFMUFM¨GPOPFOSFBTBMUBNFOUFFYQMPTJWBTZBRVFQVFEF
generar chispas.
5. /PEB°FFMDBCMFEFDPSSJFOUFEPCMOEPMPSFUPSDJ¨OEPMPUJSBOEP
EF¨MPDBMFOUOEPMP/PVTFMBDMBWJKBTJFTUTVFMUBZBRVFFTUP
puede ocasionar incendios o descargas eléctricas.
6.
No coloque objetos pesados sobre el cable de corriente. No
permita que el cable de corriente se doble, ya que esto puede
ocasionar incendios o descargas eléctricas.
7. No manipule el teléfono con las manos húmedas cuando se esté
DBSHBOEP1VFEFDBVTBSVODIPRVFFM¨DUSJDPPEB°BSHSBWFNFOUF
el teléfono.
8.
No desarme el teléfono.
9. No haga ni conteste llamadas mientras esté cargando el teléfono,
ya que puede causar un corto circuito en éste o provocar
descargas eléctricas o incendios.
10.
No sostenga la antena ni permita que entre en contacto con su
cuerpo durante las llamadas.

3
11. Asegúrese de que no entren en contacto con la batería objetos
DPOCPSEFTDPSUBOUFDPNPEJFOUFTEFBOJNBMFTPV°BT)BZ
riesgo de causar un incendio.
12. A
MNBDFOFMBCBUFS¬BFOVOTJUJPBMFKBEPEFMBMDBODFEFMPTOJ°PT
13.
C
VJEFRVFMPTOJ°PTOPTFUSBHVFOQBSUFTEFMUFM¨GPOPDPNPMPT
tapones de hule (del auricular, partes conectoras del teléfono,
etc.) Esto podría causar asfixia o sofocación, dando como
resultado lesiones graves o la muerte.
14. D
esconecte el enchufe de la toma de corriente y el cargador
cuando se ilumina porque puede provocar unchoque electrico o
peligro de incendio.
15. Sólo use baterías, antenas y cargadores proporcionados por LG.
-BHBSBOU¬BOPTFBQMJDBSBQSPEVDUPTQSPQPSDJPOBEPTQPSPUSPT
proveedores.
16. S
ólo personal autorizado debe darle servicio al teléfono y a sus
accesorios. La instalación o servicio incorrectos pueden dar como
resultado accidentes y por tanto invalidar la garantía.
17. S
VQSPWFFEPSEFTFSWJDJPTQSPQPSDJPOBVOPPNTO¹NFSPT
de emergencia, tal como 911, a los cuales usted puede llamar
FODVBMRVJFSDJSDVOTUBODJBJODMVTPDVBOEPTVUFM¨GPOPFTU
bloqueado. Es posible que los números de emergencia
preprogramados de su teléfono no funcionen en todo lugar, y a
veces una llamada de emergencia no puede colocarse debido a
problemas de la red, ambientales o de interferencia.
18.
No utilice su teléfono por largos periodos de tiempo mientras
VOBQBSUFEFTVDVFSQPFTUEJSFDUBNFOUFFODPOUBDUPDPOFM-B
UFNQFSBUVSBEFMQSPEVDUPQPESBVNFOUBSEVSBOUFFMVTPOPSNBMZ
QPESSFTVMUBSFOEB°PTPRVFNBEVSBTBMBQJFM

4
Contenido
Características del teléfono ........ 5
Configuración de la cuenta de
Google .......................................... 9
Crear una cuenta de Google ...... 9
Cuenta de Google ......................... 9
La Pantalla principal ...................11
Sugerencias sobre
MBQBOUBMMBUDUJM ............................... 11
Paneles de la Pantalla principal .11
Aplicaciones: cómo ver, abrir y
alternar ..............................................12
Abrir y cerrar la pantalla de
aplicaciones ....................................13
Llamadas/Contactos ..................14
Para abrir la aplicación Teléfono 14
Llamar a los contactos ................14
3FTQPOEFSZSFDIB[BSVOB
llamada ............................................. 14
Mensajería ...................................15
Mensajería .......................................15
Para enviar un mensaje
de texto ............................................15
La Web .........................................16
Navegador .......................................16
Correo Electrónico ...................... 17
Abrir Email y
la Pantalla Cuentas ....................... 17
Cámera ........................................18
Uso del visor ...................................18
Bluetooth ..................................... 19
Cómo enviar datos desde el
teléfono mediante Bluetooth .....19
Configuración .............................21

5
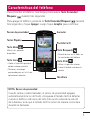
Características del teléfono
Para encender el teléfono, mantenga presionada la Tecla Encender/
Bloquear
durante tres segundos.
Para apagar el teléfono, presione la Tecla Encender/Bloquear
durante
tres segundos y toque Apagar. Luego toque Aceptar para confirmar.
NOTA: Sensor de proximidad
$VBOEPSFDJCBPSFBMJDFMMBNBEBTFMTFOTPSEFQSPYJNJEBEBQBHBS
BVUPNUJDBNFOUFMBMV[EFGPOEPZCMPRVFBSFMUFDMBEPUDUJMBMEFUFDUBS
cuando el teléfono esté cerca del oído. Esta acción extiende la vida útil
EFMBCBUFS¬BZFWJUBRVFFMUFDMBEPUDUJMTFBDUJWFEFNBOFSBJOWPMVOUBSJB
durante las llamadas.
Tecla Menú
Muestra las opciones
disponibles.
Tecla Inicio
ţ7VFMWFBMBQBOUBMMBQSJODJQBM
desde cualquier pantalla.
ţ1SFTJPOFZNBOUFOHB
presionado para ver la lista de
aplicaciones recientes.
Teclas Rápidas
Sensor de proximidad
Tecla Búsqueda
ţPermite buscar en la Web y en
los contenidos del telefono.
Tecla Atrás
ţ7PMWFSBMBQBOUBMMBBOUFSJPS
ţ$JFSSBFMUFDMBEPDVBOEPFTU
abierto.
Micrófono
Auricular
Pantalla táctil

6
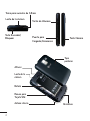
Toma para auricular de 3,5mm
Lente de la cámara
Tecla Encender/
Bloquear
Puerto para
Cargador/Accesorios
Teclas de Volumen
Tecla Cámara
Batería
Ranura para
Tarjeta SIM
Lente de la
cámara
Antena interna
Micrófono
Altavoz
Ta p a
posterior

7
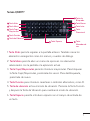
1. Tecla Atrás permite regresar a la pantalla anterior. También cierra los
FMFNFOUPTFNFSHFOUFTDPNPMPTNFO¹TZDVBESPTEFEJMPHP
2.
Tecla Menú permite abrir un menú de opciones con elementos
relacionados con la pantalla o la aplicación actual.
3.
Tecla Caps/Mayúsculas permite introducir mayúsculas. Para bloquear
la Tecla Caps/Mayúsculas, presiónela dos veces. Para desbloquearla,
presiónela de nuevo.
4.
Tecla Función para introducir caracteres o símbolos alternativos, como @.
5.
Tecla de vibración activa el modo de vibración. Presione la Tecla Función
y después la Tecla de Vibración para cambiar al modo de vibración.
6.
Tecla Espacio permite introducir espacios en el campo de entrada de
un texto.
Teclado QWERTY
Tecla Atrás
Tecla Menú
Tecla Caps/
Mayúsculas
Tecla Función
Tecla de Vibración
Tecla de
Búsqueda
Tecla Borrar
Tecla Intro
Tecla
Direccional
Tecla
Marcador de
voz
Tecla Espacio

8
7. Tecla de Búsqueda permite abrir la Quick Search Box
TM
(Cuadro de
C¹TRVFEBSQJEBEFTEFMBQBOUBMMBQSJODJQBMQBSBFYQMPSBSFMUFM¨GPOPZ
la Web. En muchas aplicaciones puede presionar esta tecla para buscar
dentro de la aplicación misma.
8. Tecla Borrar permite borrar un solo espacio o caracter cada vez que se
QSFTJPOB.BOU¨OHBMBQSFTJPOBEBQBSBCPSSBSUFYUPNTSQJEP
9.
Tecla Intro permite mover el cursor al próximo campo o línea de texto.
También puede seleccionar elementos cuando navega por menús.
10.
Tecla Direccional permite desplazarse por los elementos de menú
y resaltar un campo u objeto específico presionando arriba, abajo,
izquierda o derecha.
11.
Tecla Marcador de voz tiene el reconocimiento de voz a un nuevo nivel.
Con esta característica, el teléfono reconoce su voz y lleva a cabo su
comando. Simplemente diga los comandos y su teléfono le ayuda a
SFBMJ[BSMMBNBEBTSFDJCJSNFOTBKFTZNVDIPNTTJNQMFZUSBOTQBSFOUF
NOTAS:
ţ Todas las capturas de pantalla en esta guía son simuladas. Las
pantallas reales pueden variar.
ţ -BTJOTUSVDDJPOFTEFFTUBHV¬BQBSBSFBMJ[BSUBSFBTFTUOCBTBEBTFO
las configuraciones predeterminadas del teléfono y pueden cambiar
según su versión de software.
ţ En el caso de un mal funcionamiento o bloqueo por error, mantenga
oprimida la Tecla Encender/Bloquear por 8 segundos para restablecer.

9
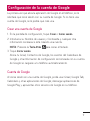
La primera vez que abra la aplicación de Google en el teléfono, se le
TPMJDJUBSRVFJOJDJFTFTJ²ODPOTVDVFOUBEF(PPHMF4JOPUJFOFVOB
DVFOUBEF(PPHMFTFMFQFEJSRVFDSFFVOB
Crear una cuenta de Google
1. En la pantalla de configuración, toque Crear o Iniciar sesión.
2. *OUSPEV[DBTV/PNCSFEFVTVBSJPZ$POUSBTF°BZDVBMRVJFSPUSB
JOGPSNBDJ²OOFDFTBSJBTJFTUDSFBOEPVOBDVFOUB
NOTA
: Presione la Tecla Atrás para cerrar el teclado.
3. Toque Iniciar sesión.
Ahora tu Gmail, Contactos de Google, los eventos del Calendario de
Google y otra información de configuración sincronizada con su cuenta
EF(PPHMFTFDBSHBSOBUVUFM¨GPOPBVUPNUJDBNFOUF
Cuenta de Google
"MJOJDJBSTFTJ²OFOVOBDVFOUBEF(PPHMFQPESVTBS(NBJM(PPHMF5BML
Calendario y otras aplicaciones de Google; descargar aplicaciones de
Google Play; y aprovechar otros servicios de Google en su teléfono.
Configuración de la cuenta de Google

10
IMPORTANTE
ţ 4JOPUJFOFVOBDVFOUBEF(PPHMFTFMFQFEJSRVFDSFFVOB
ţ Si tiene una cuenta corporativa a través de su empresa u otra
PSHBOJ[BDJ²OFMEFQBSUBNFOUPEFUFDOPMPH¬BEFTVFNQSFTBSFDJCJS
instrucciones especiales sobre cómo iniciar sesión en esa cuenta.
ţ Cuando inicia sesión, los contactos, mensajes de Gmail, eventos
del calendario y otra información obtenida de esas aplicaciones y
servicios en la Web se sincronizan con su teléfono.
ţ Si no inicia sesión en una cuenta de Google durante la instalación,
TFMFQFEJSRVFMPIBHBPDSFFVOBMBQSJNFSBWF[RVFJOJDJFVOB
aplicación que requiera una cuenta de Google, como Gmail o Play
Store.
ţ $VBOEPJOJDJBMBTFTJ²OTFMFQFEJSRVFJOUSPEV[DBTVOPNCSFEF
VTVBSJPZDPOUSBTF°BVTBOEPFMUFDMBEPFOQBOUBMMBPUFDMBEPG¬TJDP

11
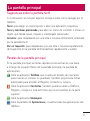
Sugerencias sobre la pantalla táctil
A continuación se incluyen algunos consejos sobre cómo navegar por el
teléfono.
Tocar: para elegir un menú/opción o abrir una aplicación, tóquelo/a.
Tocar y mantener presionado: para abrir un menú de contexto o tomar un
objeto que desea mover, tóquelo y manténgalo presionado.
ArrastrarQBSBEFTQMB[BSTFQPSVOBMJTUBPNPWFSTFMFOUBNFOUFBSSTUSFTF
QPSMBQBOUBMMBUDUJM
Dar un toquecitoQBSBEFTQMB[BSTFQPSVOBMJTUBPNPWFSTFSQJEBNFOUF
E¨UPRVFDJUPTFOMBQBOUBMMBUDUJMBSSTUSFTFSQJEBNFOUFZTVFMUF
Paneles de la pantalla principal
&OMBQBOUBMMBQSJODJQBMMBTUFDMBTSQJEBTTFFODVFOUSBOFOVOBCBSSB
a lo largo de la parte inferior de la pantalla principal y la pantalla de
aplicaciones.
Abre la aplicación Teléfono que muestra el teclado de marcación
para marcar un número no guardado. También proporciona fichas
BEJDJPOBMFTQBSBBDDFEFSFM3FHJTUSP$POUBDUPTZ(SVQPT
Abre la aplicación Contactos. También puede acceder a Teléfono,
3FHJTUSPZ(SVQPTTJUPDBMBTGJDIBTRVFTFFODVFOUSBOFOMBQBSUF
superior.
Abre la aplicación Mensajería.
Abre la pantalla de Aplicaciones y muestra todas las aplicaciones del
teléfono.
La pantalla principal

12
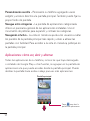
Personalización sencilla - Personalice su teléfono agregando varios
widgets y accesos directos a la pantalla principal. También puede fijar su
propio fondo de pantalla.
Navegue entre categorías - La pantalla de aplicaciones categorizada
ofrece un panorama general de las aplicaciones instaladas. Use el
movimiento de pellizcar para expandir y contraer las categorías.
Navegación intuitiva - La vista en miniatura ayuda a los usuarios a saltar
MPTQBOFMFTEFMBQBOUBMMBQSJODJQBMNTSQJEPZWPMWFSBBMJOFBSMBT
pantallas con facilidad. Para acceder a la vista en miniatura, pellizque en
la pantalla principal.
Aplicaciones: cómo ver, abrir y alternar
Todas las aplicaciones de su teléfono, incluso las que haya descargado
o instalado de Google Play u otras fuentes, se agrupan en la pantalla de
aplicaciones a la que puede acceder desde la pantalla principal. Puede
EFTMJ[BSMBQBOUBMMBIBDJBBSSJCBPBCBKPQBSBWFSNTBQMJDBDJPOFT
Pantalla principal
Toque para abrir la
pantalla de aplicaciones.

13
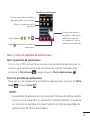
Abrir y cerrar la pantalla de aplicaciones
Abrir la pantalla de aplicaciones
$POTV-(-$FTGDJMUFOFSBDDFTPBMBQBOUBMMBEFBQMJDBDJPOFTOP
JNQPSUBRV¨DBSBDUFS¬TUJDBFTUBDUVBMNFOUFVTBOEP4JNQMFNFOUF
presione la Tecla Inicio
y luego toque la Tecla Aplicaciones .
Cerrar la pantalla de aplicaciones
Para cerrar manualmente la pantalla de aplicaciones, presione la Tecla
Inicio
o toque Inicio .
NOTE:
ţ -BQBOUBMMBEFBQMJDBDJPOFTTFDJFSSBEFGPSNBBVUPNUJDBDVBOEP
toca un icono para abrir su aplicación correspondiente. Si arrastra
un icono en la pantalla principal, también se cierra la pantalla de
BQMJDBDJPOFTEFGPSNBBVUPNUJDB
Pantalla de aplicaciones
Pellizca para cerrar las
categorías. Expanda los
dedos para expandir
las categorías y ver las
aplicaciones disponibles.
Deslice la pantalla hacia arriba o
BCBKPQBSBQPEFSWFSNTJDPOPT
Toque un icono para abrir la
aplicación
5FDMBT3QJEBT
, , , )
Toque para cerrar la pantalla de
aplicaciones.

14
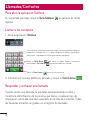
Para abrir la aplicación Teléfono
En la pantalla principal, toque la Tecla Teléfono en la barra de teclas
SQJEBT
Llamar a los contactos
1. Abra la aplicación Teléfono.
Para marcar un número internacional, toque y mantenga presionado para
JOUSPEVDJSFM T¬NCPMP NT -VFHP JOUSPEV[DBFM QSFżKP JOUFSOBDJPOBM
para el país; seguido por el número de teléfono completo.
Toque la Tecla Borrar
para borar un dígito. Toque y mantenga
presionada la Tecla Borrar
para borrar todos los números.
Toque la Tecla Llamar
para marcar el número.
2. Introduzca el número telefónico deseado y toque la Tecla Llamar .
Responder y rechazar una llamada
Cuando recibe una llamada, la pantalla Llamada recibida se abre y
muestra la identificación de la persona que llama y cualquier tipo de
información sobre ella que haya guardado en la lista de contactos. Todas
las llamadas entrantes se graban en el registro de llamadas.
Llamadas/Contactos

15
Mensajería
El teléfono LG L75C combina los mensajes de texto (SMS) y multimedia
..4FOVO¹OJDPNFO¹JOUVJUJWPZGDJMEFVTBS
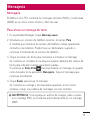
Para enviar un mensaje de texto
1. En la pantalla Mensajes, toque Mensaje nuevo.
2. Introduzca un número de teléfono móvil en el campo Para.
"NFEJEBRVFJOUSPEVDFFMO¹NFSPEFMUFM¨GPOPDFMVMBSBQBSFDFSO
contactos coincidentes. Puede tocar un destinatario sugerido o
continuar introduciendo el número de teléfono.
3. Toque el campo de texto para comenzar a introducir el mensaje.
Se muestra un contador en la esquina superior derecha del campo de
UFYUPQBSBJOEJDBSMFDVOUPTDBSBDUFSFTRVFEBO
Si presiona la Tecla Atrás
mientras redacta un mensaje, se guarda
como borrador en la aplicación Mensajería. Toque el mensaje para
continuar escribiendo.
4. Toque Enviar para enviar el mensaje.
Se muestra su mensaje y las respuestas aparecen en la misma
ventana y crean una cadena de mensajes con ese contacto.
ADVERTENCIA: Si se agrega un archivo de imagen, video o audio
BVONFOTBKF4.4TFDPOWFSUJSBVUPNUJDBNFOUFFOVONFOTBKF
MMS.
Mensajería

16
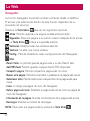
Navegador
La función Navegador le permite acceder a Internet desde su teléfono.
El acceso y las selecciones dentro de esta función dependen de su
proveedor de servicios.
Presione la Tecla Menú
para ver las siguientes opciones.
Atrás1FSNJUFSFHSFTBSBMBQHJOBWJTJUBEBBOUFSJPSNFOUF
Siguiente:1BTBBMBQHJOBBMBDVBMTFDPOFDU²EFTQV¨TEFMBBDUVBM
La Tecla Atrás
lo lleva a la pantalla anterior.
Ventanas: Muestra todas las ventanas abiertas.
Ventana: Se abre una nueva ventana.
Config.: Permite establecer varias configuraciones del Navegador.
Más
ţ Read it later:-FQFSNJUFHVBSEBSQHJOBTXFCBTVMJTUB3FBEJUMBUFS
ţ Add RSS feed:1FSNJUFHVBSEBSDVBMRVJFSGVFOUF344EJTQPOJCMF
ţ Compartir página1FSNJUFDPNQBSUJSMBQHJOBXFCDPOPUSPT
ţ Buscar en la página:1FSNJUFCVTDBSMFUSBTPQBMBCSBTFOMBQHJOBXFCBDUVBM
ţ Seleccionar texto1FSNJUFTFMFDDJPOBSDVBMRVJFSUFYUPEFMBQHJOBXFCQBSB
copiar.
ţ Inicio-PEJSJHFBMBQHJOBEFJOJDJPEFM/BWFHBEPS
ţ Definir página de inicio&TUBCMFDFMBQHJOBXFCBDUVBMDPNPMBQHJOBEF
inicio del Navegador.
ţ Información de la página.VFTUSBMBJOGPSNBDJ²OEFMBQHJOBXFCBDUVBM
ţ Descargas: Muestra su historial de descargas.
NOTA:1BSBWPMWFSBMBQHJOBBOUFSJPSQSFTJPOFMBTecla Atrás
.
La Web

17
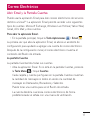
Abrir Email y la Pantalla Cuentas
Puede usar la aplicación Email para leer correos electrónicos de servicios
distintos a Gmail™. La aplicación Email permite acceder a los siguientes
tipos de cuentas: Microsoft Exchange, Windows Live Hotmail, Yahoo! Mail,
Gmail, AOL Mail y otras cuentas.
Para abrir la aplicación Email:
ţ En la pantalla principal, toque la Tecla Aplicaciones
> Email
.
-BQSJNFSBWF[RVFBCSBMBBQMJDBDJ²O&NBJMTFBCSJSVOBTJTUFOUFEF
configuración para ayudarlo a agregar una cuenta de correo electrónico.
Después de la configuración inicial, el correo electrónico muestra el
contenido del Buzón de entrada.
La pantalla Cuentas
La pantalla Cuentas lista todas sus cuentas.
ţ "CSBMBBQMJDBDJ²O&NBJM4JOPFTUFOMBQBOUBMMB$VFOUBTQSFTJPOF
la Tecla Menú y toque Cuentas.
Cada carpeta y cuenta que figuran en la pantalla Cuentas muestran
la cantidad de mensajes no leídos en verde o la cantidad de
mensajes en Destacados, Borradores y Salientes.
Puede tocar una cuenta para ver el Buzón de entrada.
La cuenta desde la cual envía correos electrónicos de forma
QSFEFUFSNJOBEBTFTF°BMBDPOVOBNBSDBEFWFSJGJDBDJ²O
Correo Electrónico

18
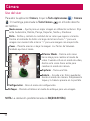
Cámara
Uso del visor
Para abrir la aplicación Cámara, toque la Tecla Aplicaciones > Cámara
. O mantenga presionada la Tecla Cámara en el borde derecho
del teléfono.
Alternar Modo - Deslice este icono
hacia abajo para cambiar al modo de
WJEFP$VBOEPFTUFOFMNPEPEFWJEFP
deslice este icono hacia arriba para
DBNCJBSBMNPEPEFDNBSB
Capturar - Toma una foto.
Galería - Accede a las fotos guardadas
EFTEFFMNPEPEFDNBSB4JNQMFNFOUF
toque y la Galería aparece en la pantalla.
Zoom – Permite acercar o alejar la imagen. Las Teclas de Volumen
también ajustan el zoom.
Configuración - Abre el menú de configuración.
Enfoque - Permite establecer el modo de enfoque para una imagen.
Modo escena – Ajuste para un mejor imagen en diferentes entornos. Elija
FOUSF"VUPNUJDB3FUSBUP1BJTBKF%FQPSUFT/PDIFZ"UBSEFDFS
Brillo – Define y controla la cantidad de luz solar que ingresa a la lente.
Deslice el indicador de brillo a lo largo de la barra hacia “-” para una
imagen con menor brillo o hacia “+” para una imagen con mayor brillo.
NOTA: La resolución predeterminada es 3M(2048X1536).

19
Cómo enviar datos desde el teléfono mediante Bluetooth
Puede enviar datos mediante Bluetooth al ejecutar la aplicación
correspondiente, pero no desde el menú Bluetooth (como se hace en
otros teléfonos celulares).
ţ Envío de imágenes: Abra la aplicación Galería y seleccione una
imagen. A continuación, toque Menú > Comp. > Bluetooth. Si
Bluetooth se encuentra desactivado, toque Bluetooth para activarlo.
6OBNBSDBEFWFSJGJDBDJ²OJOEJDBSRVFMBGVODJ²OFTUBDUJWBEB
Luego toque Buscar dispositivos y seleccione el dispositivo al que
desea enviar datos de la lista.
ţ Exportación de contactos: Ejecute la aplicación Contactos. Toque el
contacto que desea exportar. Toque la Tecla Menú
> Compartir
> Bluetooth. Si #MVFUPPUIFTUEFTBDUJWBEPUPRVFBluetooth para
BDUJWBSMP6OBNBSDBEFWFSJGJDBDJ²OJOEJDBSRVFMBGVODJ²OFTU
activada. Luego toque Buscar dispositivos y seleccione el dispositivo
al que desee enviar los datos de la lista.
ţ Conexión a FTP (este teléfono es compatible solamente con
servidores FTP): En la pantalla principal, toque la Tecla Aplicaciones
> Config. > Conexiones inalámbricas > Config. de Bluetooth.
Luego toque la casilla de verificación Visible y busque otros
dispositivos. Busque el servicio que desea y conéctese al servidor
FTP.
Bluetooth

20
SUGERENCIA La versión de Bluetooth utilizada por este teléfono es
&%3ZFTDFSUJGJDBEPQPS#MVFUPPUI4*(&TDPNQBUJCMFDPOPUSPT
dispositivos certificados por Bluetooth SIG.
NOTA: Si desea buscar este teléfono desde otros dispositivos, toque la
Tecla Aplicaciones
> Config. > Conexiones inalámbricas > Config. de
Bluetooth. A continuación, seleccione la casilla Visible4VUFM¨GPOPQPES
detectarse por 120 segundos.
NOTA: Los perfiles admitidos son HFP, HSP, OPP, PBAP (servidor), FTP
TFSWJEPS"%1."14Z"73$1

21
Puede personalizar su teléfono, configurar permisos, actualizar su teléfono
ZNTFOFMNFO¹$POGJHVSBDJ²O
Acceder a la configuración
1. Presione la Tecla Menú desde la pantalla principal y toque
Configuración.
2. Seleccione la categoría de configuración que desea cambiar. Para
seleccionar o desactivar casillas de verificación, toque la casilla de
verificación.
Ajustes disponibles:
ţ$POFYJPOFTJOBMNCSJDBT ţ$POGJHEFMMBNBEB
ţ4POJEP ţ1BOUBMMB
ţ6CJDBDJ²OZTFHVSJEBE ţ"QMJDBDJPOFT
ţ$VFOUBTZTJODSPOJ[BDJ²O ţ1SJWBDJEBE
ţ&TQBDJPEFBMNBDFOBNJFOUP ţ*EJPNBZUFDMBEP
ţ&OUSBEBZTBMJEBEFWP[ ţ$POFDUJWJEBE
ţ"DDFTJCJMJEBE ţ'FDIBZIPSB
ţ"DFSDBEFMUFM¨GPOP
Configuración


-
 1
1
-
 2
2
-
 3
3
-
 4
4
-
 5
5
-
 6
6
-
 7
7
-
 8
8
-
 9
9
-
 10
10
-
 11
11
-
 12
12
-
 13
13
-
 14
14
-
 15
15
-
 16
16
-
 17
17
-
 18
18
-
 19
19
-
 20
20
-
 21
21
-
 22
22
-
 23
23
-
 24
24
-
 25
25
-
 26
26
-
 27
27
-
 28
28
-
 29
29
-
 30
30
-
 31
31
-
 32
32
-
 33
33
-
 34
34
-
 35
35
-
 36
36
-
 37
37
-
 38
38
-
 39
39
-
 40
40
-
 41
41
-
 42
42
-
 43
43
-
 44
44
-
 45
45
-
 46
46
-
 47
47
-
 48
48


LG L L75C Guía del usuario
- Tipo
- Guía del usuario
- Este manual también es adecuado para
En otros idiomas
- English: LG L L75C User guide
Otros documentos
-
LG Zero Manual de usuario
-
LG K350n Orange Guía del usuario
-
-
Alcatel Conquest Boost Mobile Guía del usuario
-
-
-
-
-
-
LG Lucid VS840 Verizon Wireless Guía del usuario