
2
1
DESKJET 3050 ALL-IN-ONE J610 SERIES
Lea Esto
Guia de instalação
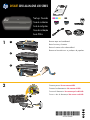
Conecte o cabo de alimentação. Não conecte o cabo USB.
Remova a fita adesiva e os pedaços de papelão.
Guide de configuration
Connectez l’alimentation. Ne connectez pas le câble USB.
Retirez le carton et le ruban adhésif.
Guía de instalación
Conecte la alimentación. No conecte el USB.
Retire la cinta y el cartón.
Setup Guide
Connect power. Do not connect USB.
Remove tape and cardboard.
USB
USB
2
1
3
HP DESKJET 3050 ALL-IN-ONE J610 SERIES
*CB730-90016*
*CB730-90016*
XXXXX-XXXXX
© 2010 Hewlett-Packard Development Company, L.P.
EN
EN
EN
Printed in [Country] Printed in [Country]
Printed in [Country]
Black Cartridge
Tri-color Cartridge
61
61
www.hp.com/support
2
1
*CC200-90045*
*CC200-90045*
CC200-900xx
DESKJET 3050 ALL-IN-ONE J610 SERIES
Setup Guide
Connect power. Do not connect USB.
Remove tape and cardboard.
Setup Guide
Connect power. Do not connect USB.
Remove tape and cardboard.
Setup Guide
Connect power. Do not connect USB.
Remove tape and cardboard.
Setup Guide
Connect power. Do not connect USB.
Remove tape and cardboard.
U
S
B
US
B
2
1
3
1
2
3
Start by following the setup
instructions in the Setup Guide.
English
1
2
3
*CH376-90006*
*CH376-90006*
CH376-90006
EN
ES
FR
PT

2 • HP DESKJET 3050 ALL-IN-ONE J610 SERIES
3
5
4
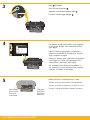
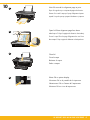
Pressione o botão Liga/Desliga .
Use os botões para selecionar e confirmar o
seu idioma no visor da impressora. Em seguida,
selecione e confirme a sua região.
Verifique se a porta está fechada e a bandeja está aberta.
Bandeja aberta
Porta fechada
Appuyez sur le bouton Marche/arrêt .
Utilisez les boutons pour sélectionner et confirmer
votre langue sur l’écran de l’imprimante. Puis,
sélectionnez et confirmez votre région.
Assurez-vous que la porte est fermée et que le bac est ouvert.
Bac ouvert
Porte fermée
Pulse el botón Encender .
Utilice los botones para elegir y confirmar su
idioma en la pantalla de la impresora. Después,
elija y confirme su región.
Confirme que la puerta está cerrada y la bandeja abierta.
Bandeja abierta
Puerta cerrada
Press On button.
Use buttons to select and conrm your language
on the printer display. Then select and conrm
your region.
Make sure door is closed and tray is open.
Tray open
Door closed
!

6
HP DESKJET 3050 ALL-IN-ONE J610 SERIES • 3
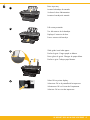
Levante a bandeja de entrada.
Puxe o extensor da bandeja.
Deslize a guia. Coloque papel branco.
Selecione OK no visor da impressora.
Soulevez le bac d’alimentation.
Déployez l’extension du bac.
Faites glisser le guide. Chargez du papier blanc.
Sélectionnez OK sur l’écran de l’imprimante.
Levante la bandeja de entrada.
Tire del extensor de la bandeja.
Deslice la guía. Cargue papel en blanco.
Seleccione OK en la pantalla de la impresora.
Raise input tray.
Pull out tray extender.
Slide guide. Load white paper.
Select OK on printer display.
1
2
3
4
OK

8
7
9
4 • HP DESKJET 3050 ALL-IN-ONE J610 SERIES
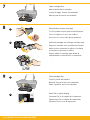
Abra a porta de acesso aos cartuchos.
Puxe a tira rosa e remova a fi ta adesiva transparente.
Empurre ambos os cartuchos para dentro do
compartimento no carro até eles se encaixarem.
Feche a porta de acesso aos cartuchos.
Selecione OK no visor da impressora.
Ouvrez la trappe d’accès à la cartouche.
Tirez sur la languette rose pour retirer l’adhésif.
Mettez les deux cartouches en place sur le chariot
en exerçant une pression sur celles-ci.
Refermez la porte d’accès aux cartouches.
Sélectionnez OK sur l’écran de l’imprimante.
Abra la puerta de los cartuchos.
Tire de la pestaña rosa para quitar la cinta transparente.
Empuje los cartuchos en la guía hasta que encajen.
Cierre la puerta del cartucho.
Seleccione
OK
en la pantalla de la impresora.
Push both cartridges into carriage until they snap.
Pull pink tab to remove clear tape.
Open cartridge door.
Close cartridge door.
Select OK on printer display.
1
2
1
2
OK

10
HP DESKJET 3050 ALL-IN-ONE J610 SERIES • 5
Aguarde 30 segundos para que a página de alinhamento seja impressa.
Abra a tampa. Coloque a página de alinhamento voltada para baixo.
Feche a tampa.
Selecione OK no visor da impressora.
Patientez 30 secondes le temps que la page d’alignement s’imprime.
Ouvrez le capot. Placez la page d’alignement face vers le bas.
Refermez le capot.
Sélectionnez OK sur l’écran de l’imprimante.
Espere 30 segundos a que se imprima la página de alineación.
Abra la tapa. Coloque la página de alineación hacia abajo.
Cierre la tapa.
Seleccione
OK
en la pantalla de la impresora.
Wait 30 seconds for alignment page to print.
Open lid. Place alignment page face down.
Close lid.
Select OK on printer display.
1
2
3
4
OK

11
6 • HP DESKJET 3050 ALL-IN-ONE J610 SERIES
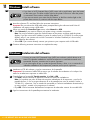
Windows: Instalación del software
•Si tiene un router Wi-Fi Protected Setup (WPS) con un botón, púlselo ahora en el
router. El indicador inalámbrico azul de la impresora se encenderá cuando esté
conectada. Después, continúe con los pasos siguientes.
•Si no está seguro de que su router tenga esta función, o bien, si no se enciende el
indicador inalámbrico de la impresora, continúe con los pasos siguientes.
1
Introduzca el CD del software y siga las instrucciones de la pantalla.
¡Importante! No conecte el cable USB a menos que el software de instalación se lo indique. No
todas las instalaciones requieren un cable USB.
2
Cuando llegue a la pantalla Tipo de conexión, elija Red o USB.
•Elija Red si desea conectar su impresora usando una conexión inalámbrica.
Nota: Se le pedirá que pulse el botón de conexión inalámbrica de la impresora, y que lea la
pantalla de ésta. Si no ve ninguna dirección IP en la pantalla (una serie de números similar a
192.168.0.3), seleccione “Veo un estado No conectado o Conexión inalámbrica desactivada (o
no estoy seguro)”, cuando se le pregunte en el software”.
•Elija USB si desea conectar directamente la impresora al ordenador a través de un cable USB.
3
Siga las instrucciones de la pantalla para terminar la instalación.
Windows: Install software
• If you have a Wi-Fi Protected Setup (WPS) router with a push button, press the button
on the router now. The blue wireless light on the printer will turn on when the printer
is connected. Then continue with the steps below.
• If you are not certain your router has this feature, or the blue wireless light on the
printer does not turn on, continue with the steps below.
When you reach the Connection Type screen, select Network or USB.
• Select Network if you want to connect your printer using a wireless connection.
Note: You may be asked to press the wireless button on the printer, and then read the printer
display. If you do not see an IP address (a series of numbers such as 192.168.0.3) on the printer
display, select “I see a status such as Not Connected or Wireless Disabled (or I am not sure)”
when asked by the software.
• Select USB if you want to directly connect your printer to your computer with a USB cable.
2
Continue following onscreen instructions to complete the setup.
3
Insert the software CD, and then follow the onscreen instructions.
Important! Do not connect the USB cable unless prompted during the software install. Not all
installations will require using a USB cable.
1
EN
ES
La página se está cargando...

www.hp.com/support
HP DESKJET 3050 ALL-IN-ONE J610 SERIES
*CB730-90016*
*CB730-90016*
XXXXX-XXXXX
© 2010 Hewlett-Packard Development Company, L.P.
EN
EN
EN
Printed in [Country] Printed in [Country]
Printed in [Country]
Black Cartridge
Tri-color Cartridge
61
61
www.hp.com/support
2
1
*CC200-90045*
*CC200-90045*
CC200-900xx
DESKJET 3050 ALL-IN-ONE J610 SERIES
Setup Guide
Connect power. Do not connect USB.
Remove tape and cardboard.
Setup Guide
Connect power. Do not connect USB.
Remove tape and cardboard.
Setup Guide
Connect power. Do not connect USB.
Remove tape and cardboard.
Setup Guide
Connect power. Do not connect USB.
Remove tape and cardboard.
USB
2
1
3
1
2
3
Start by following the setup
instructions in the Setup Guide.
English
© 2010 Hewlett-Packard Development Company, L.P.
www.hp.com
11
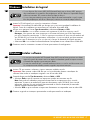
Mac:
Printed in English
Printed in French
Printed in Spanish
Printed in Portuguese
Registre seu HP Deskjet
Obtenha alertas de serviços e suporte mais
rapidamente ao se registrar em
http://www.register.hp.com.
Para computadores sem uma unidade de CD/DVD, acesse www.hp.com/support para baixar e instalar o software da impressora.
Enregistrement de votre imprimante HP Deskjet
Pour obtenir un service plus rapide et des alertes
d’assistance, enregistrez-vous sur le site
http://www.register.hp.com.
Sur les ordinateurs non équipés d’un lecteur de CD/DVD, visitez le site www.hp.com/support pour télécharger et installer le logiciel d’imprimante.
Registre su HP Deskjet
Obtenga servicio técnico y alertas más rápidas,
registrándose en http://www.register.hp.com.
Si no dispone de una unidad de CD/DVD, visite www.hp.com/support para descargar e instalar el software de la impresora.
Register your HP Deskjet
Get quicker service and support alerts by
registering at http://www.register.hp.com.
For computers without a CD/DVD drive, please go to www.hp.com/support to download and install the printer software.
PT
FR
ES
EN
USB
2
3
1
Transcripción de documentos
EN EN sh EN Engli *C *C B73 B7 030 90 -9 01 XXX 00 6* XX-X XXX 16 X * Prin ted Prin in [Co ted © 201 in [Co untry] 0 Hew untr y] lettPrin Pac ted kard in [Co Dev untr elopm y] ent Com pan y, L.P. DESKJET 3050 ALL-IN-ONE J610 SERIES HP DESKJET 3050 ALL-IN-ONE J610 SERIES DESKJET 3050 ALL-IN-ONE J610 SERIES Setup Guide Setup Guide Setup Guide Setup Guide 1 1 2 Remove tape and cardboard. Remove tape and cardboard. Remove tape and cardboard. Remove tape and cardboard. 3 2 USB 1 Start by following the setup instructions in the Setup Guide. Connect power. Do not connect USB. Connect power. Do not connect USB. Connect power. Do not connect USB. Connect power. Do not connect USB. USB 3 2 *CC200-90045* *CC200-90045* CC200-900xx Black Cartridge Tri-color Cartridge 61 www.hp.com/support 61 Setup Guide Guía de instalación Guide de configuration Guia de instalação Lea Esto 1 1 Remove tape and cardboard. Retire la cinta y el cartón. Retirez le carton et le ruban adhésif. Remova a fita adesiva e os pedaços de papelão. 2 3 2 Connect power. Do not connect USB. Conecte la alimentación. No conecte el USB. USB Connectez l’alimentation. Ne connectez pas le câble USB. Conecte o cabo de alimentação. Não conecte o cabo USB. 1 USB 2 3 EN *CH376-90006* *CH376-90006* FR CH376-90006 PT ES 3 Press On button. Pulse el botón Encender . Appuyez sur le bouton Marche/arrêt Pressione o botão Liga/Desliga ! 4 . . Use buttons to select and confirm your language on the printer display. Then select and confirm your region. Utilice los botones para elegir y confirmar su idioma en la pantalla de la impresora. Después, elija y confirme su región. Utilisez les boutons pour sélectionner et confirmer votre langue sur l’écran de l’imprimante. Puis, sélectionnez et confirmez votre région. Use os botões para selecionar e confirmar o seu idioma no visor da impressora. Em seguida, selecione e confirme a sua região. 5 Make sure door is closed and tray is open. Confirme que la puerta está cerrada y la bandeja abierta. Assurez-vous que la porte est fermée et que le bac est ouvert. Door closed Puerta cerrada Porte fermée Porta fechada 2 • HP DESKJET 3050 ALL-IN-ONE J610 SERIES Tray open Bandeja abierta Bac ouvert Bandeja aberta Verifique se a porta está fechada e a bandeja está aberta. 6 Raise input tray. 1 Levante la bandeja de entrada. Soulevez le bac d’alimentation. Levante a bandeja de entrada. Pull out tray extender. 2 Tire del extensor de la bandeja. Déployez l’extension du bac. Puxe o extensor da bandeja. Slide guide. Load white paper. 3 Deslice la guía. Cargue papel en blanco. Faites glisser le guide. Chargez du papier blanc. Deslize a guia. Coloque papel branco. 4 OK Select OK on printer display. Seleccione OK en la pantalla de la impresora. Sélectionnez OK sur l’écran de l’imprimante. Selecione OK no visor da impressora. HP DESKJET 3050 ALL-IN-ONE J610 SERIES • 3 7 Open cartridge door. Abra la puerta de los cartuchos. Ouvrez la trappe d’accès à la cartouche. Abra a porta de acesso aos cartuchos. 8 Pull pink tab to remove clear tape. 1 Tire de la pestaña rosa para quitar la cinta transparente. Tirez sur la languette rose pour retirer l’adhésif. Puxe a tira rosa e remova a fita adesiva transparente. 2 Push both cartridges into carriage until they snap. Empuje los cartuchos en la guía hasta que encajen. Mettez les deux cartouches en place sur le chariot en exerçant une pression sur celles-ci. Empurre ambos os cartuchos para dentro do compartimento no carro até eles se encaixarem. 9 Close cartridge door. 1 Cierre la puerta del cartucho. Refermez la porte d’accès aux cartouches. Feche a porta de acesso aos cartuchos. 2 OK Select OK on printer display. Seleccione OK en la pantalla de la impresora. Sélectionnez OK sur l’écran de l’imprimante. Selecione OK no visor da impressora. 4 • HP DESKJET 3050 ALL-IN-ONE J610 SERIES 10 Wait 30 seconds for alignment page to print. 1 Espere 30 segundos a que se imprima la página de alineación. Patientez 30 secondes le temps que la page d’alignement s’imprime. Aguarde 30 segundos para que a página de alinhamento seja impressa. Open lid. Place alignment page face down. 2 Abra la tapa. Coloque la página de alineación hacia abajo. Ouvrez le capot. Placez la page d’alignement face vers le bas. Abra a tampa. Coloque a página de alinhamento voltada para baixo. 3 Close lid. Cierre la tapa. Refermez le capot. Feche a tampa. 4 OK Select OK on printer display. Seleccione OK en la pantalla de la impresora. Sélectionnez OK sur l’écran de l’imprimante. Selecione OK no visor da impressora. HP DESKJET 3050 ALL-IN-ONE J610 SERIES • 5 11 EN Windows: Install software • If you have a Wi-Fi Protected Setup (WPS) router with a push button, press the button on the router now. The blue wireless light on the printer will turn on when the printer is connected. Then continue with the steps below. • If you are not certain your router has this feature, or the blue wireless light on the printer does not turn on, continue with the steps below. 1 Insert the software CD, and then follow the onscreen instructions. Important! Do not connect the USB cable unless prompted during the software install. Not all installations will require using a USB cable. 2 When you reach the Connection Type screen, select Network or USB. • Select Network if you want to connect your printer using a wireless connection. Note: You may be asked to press the wireless button on the printer, and then read the printer display. If you do not see an IP address (a series of numbers such as 192.168.0.3) on the printer display, select “I see a status such as Not Connected or Wireless Disabled (or I am not sure)” when asked by the software. • Select USB if you want to directly connect your printer to your computer with a USB cable. 3 Continue following onscreen instructions to complete the setup. Windows: Instalación del software ES • Si tiene un router Wi-Fi Protected Setup (WPS) con un botón, púlselo ahora en el router. El indicador inalámbrico azul de la impresora se encenderá cuando esté conectada. Después, continúe con los pasos siguientes. • Si no está seguro de que su router tenga esta función, o bien, si no se enciende el indicador inalámbrico de la impresora, continúe con los pasos siguientes. 1 Introduzca el CD del software y siga las instrucciones de la pantalla. ¡Importante! No conecte el cable USB a menos que el software de instalación se lo indique. No todas las instalaciones requieren un cable USB. 2 Cuando llegue a la pantalla Tipo de conexión, elija Red o USB. • Elija Red si desea conectar su impresora usando una conexión inalámbrica. Nota: Se le pedirá que pulse el botón de conexión inalámbrica de la impresora, y que lea la pantalla de ésta. Si no ve ninguna dirección IP en la pantalla (una serie de números similar a 192.168.0.3), seleccione “Veo un estado No conectado o Conexión inalámbrica desactivada (o no estoy seguro)”, cuando se le pregunte en el software”. • Elija USB si desea conectar directamente la impresora al ordenador a través de un cable USB. 3 Siga las instrucciones de la pantalla para terminar la instalación. 6 • HP DESKJET 3050 ALL-IN-ONE J610 SERIES Mac: USB EN Register your HP Deskjet Get quicker service and support alerts by registering at http://www.register.hp.com. 1 ES Registre su HP Deskjet Obtenga servicio técnico y alertas más rápidas, registrándose en http://www.register.hp.com. FR Enregistrement de votre imprimante HP Deskjet Pour obtenir un service plus rapide et des alertes d’assistance, enregistrez-vous sur le site http://www.register.hp.com. 2 PT Registre seu HP Deskjet Obtenha alertas de serviços e suporte mais rapidamente ao se registrar em http://www.register.hp.com. 3 For computers without a CD/DVD drive, please go to www.hp.com/support to download and install the printer software. Si no dispone de una unidad de CD/DVD, visite www.hp.com/support para descargar e instalar el software de la impresora. Sur les ordinateurs non équipés d’un lecteur de CD/DVD, visitez le site www.hp.com/support pour télécharger et installer le logiciel d’imprimante. Para computadores sem uma unidade de CD/DVD, acesse www.hp.com/support para baixar e instalar o software da impressora. © 2010 Hewlett-Packard Development Company, L.P. EN EN EN English XXXXX-XXXXX *CB730-90016* *CB730-90016* Printed in [Country] Printed in [Country] Printed in [Country] © 2010 Hewlett-Packard Development Company, L.P. 11 HP DESKJET 3050 ALL-IN-ONE J610 SERIES DESKJET 3050 ALL-IN-ONE J610 SERIES Setup Guide Setup Guide Start by following the setup instructions in the Setup Guide. Setup Guide Setup Guide Printed Printed Printed Printed in in in in English Spanish French Portuguese www.hp.com 1 1 Remove tape and cardboard. Remove tape and cardboard. Remove tape and cardboard. Remove tape and cardboard. 2 3 2 Connect power. Do not connect USB. Connect power. Do not connect USB. USB Connect power. Do not connect USB. Connect power. Do not connect USB. 1 2 3 *CC200-90045* *CC200-90045* CC200-900xx Black Cartridge 61 Tri-color Cartridge 61 www.hp.com/support www.hp.com/support-
 1
1
-
 2
2
-
 3
3
-
 4
4
-
 5
5
-
 6
6
-
 7
7
-
 8
8


Compaq Deskjet 3050 All-in-One Printer series - J610 El manual del propietario
- Tipo
- El manual del propietario
- Este manual también es adecuado para
en otros idiomas
Artículos relacionados
Otros documentos
-
HP Deskjet F2400 All-in-One series Guía de instalación
-
-
-
HP Deskjet 3050 All-in-One Printer series - J610 El manual del propietario
-
-
-
HP (Hewlett-Packard) 3000 Manual de usuario
-
HP Deskjet 3070A e-All-in-One Printer series - B611 El manual del propietario
-
HP Deskjet 3050A El manual del propietario
-