Sanyo CLT-1554 El manual del propietario
- Categoría
- Televisores LCD
- Tipo
- El manual del propietario
Este manual también es adecuado para

Stereo LCD TV
Owner's Manual
Manual Del Propietario
Manuel d'instructions
IVIodelNo.:
No. de IViodelo:
CLT1554
CLT2054
"Read this manual before assembling (or
using) this product."
ENGLISH
Table of Contents .............. 3
ESPANOL
Contenido ................... 19
Welcome to the World of Sanyo
Thank yozt for pztrchasing a Sanyo Stereo
LCD Tele_,ision. }?m made a17 e.vce//et_t
choice for Pe_format_ce, So'Ill, g, Re/iabi!iO:
m¢d Value. The TV is desigt¢ed with easy to
use ot_-screet_ set-up instructiot_s at_d operat-
i_gfeatm'es. Need assistance? Visit our
Web site at W_NW.SanyoCtV.COWll
or call toll free 1-800-877-5032.
ENHANCED
DEFINITION
TELEVISION
(EDTV)
"As an ENERGYSTAR@ Partner, Sanyo
Manufacturing Corporation has determined
that this product meets the ENERGYSTAR@
guidelines for energy efficiency"
Importado Por :
Comercializadora Mdxico
Americana, S. DE R.L. DE C.V.
Nextengo NO78
Col. Santa Cruz Acayucan
Del. Azcapotzalco, M_xico D.E C.P.
02770, RFCCMA 910911%0
Telefono: 55-5328-3500
Printed in U.S.A. SMC, March 2004
Impreso enU.S.A. SMC, Marzo 2004
Imprim8 aux E.-U. SMC, mars 2004
Part No. / No. de Parte/
N° de piece : 1 AA6P1 P4426--
Service Code/C6digo de Servicio/
Code de service : 610 312 2397

CAUTION
- - • - ® me • e-
CAUTION: TO PREVENT THE RISK OF ELECTRIC SHOCK, DO NOT REMOVE COVER
(OR BACK). NO USER-SERVICEABLE PARTS fNSIDE. REFER SERVICING TO QUALIFIED
SERVfCE PERSONNEL
THIS SYMBOL INDICATES THAT DANGEROUS VOLTAGE CONSTITUTING A RISK
__NIDM_IANTHISSYMBOL INDICATES THAT THERE ARE IMPORTANT OPERATING AND MAIN I_
WARNING: TO REDUCE THE RISK OF FIRE OR ELECTRIC SHOCK, DO NOT EXPOSE THIS APPARATUS
TO RAIN OR IVIONSTURE.
IMPORTANT SAFETY INSTRUCTIONS
Important Safety instructions for LCD'IV
1. Readthese instructions.
2. Keepthese instructions.
3. Heed all warnings.
4. Follow all instructions.
5. Do not usethis apparatus nearwater.
6. Cleanonly with dry cloth.
7. Do not block any ventilation openings. Install in
accordancewith the manufacturer's instructions.
8. Do not install near any heatsources such as radiators,
heat registers, stoves, or other apparatus (including
amplifiers) that produce heat.
9. Do not defeat the safety purpose of the polarized or
grounding-type plug. A polarized plug has two blades
with one wider than the other.A grounding-type plug has
two bladesand athird grounding prong. The wide blade
or the third prong are provided for your safety. If the
provided plug does not fit fully into your outlet, consult
an electrician for replacement of the obsolete outlet.
10. Protect the power cordfrom beingwalked on or pinched
particularly at plugs, convenience receptacles, and the
point where they exit from the apparatus.
11. 0nly use attachments/accessories specified by the
manufacturer.
12. Use only with the cart, stand, tripod,
bracket, or table specified by the
manufacturer,or sold with the apparatus.
When a cart is used, use caution when
moving the cart/apparatus combination
to avoid injury from tip-over.
13. Unplug this apparatus during lightning storms or when
unused for long periods of time.
14. Referall servicing to qualified service personnel. Servic-
ing is requiredwhen the apparatushas beendamagedin
anyway, such aspower-supply cord or plug is damaged,
liquid has been spilled or objects have fallen into the
apparatus, the apparatus has been exposed to rain or
moisture,does not operatenormally,or hasbeendropped.
15. If an outside antenna is connected to the television
equipment, be sure the antenna system is grounded so
as to provide some protection against voltage surges
and built up static charges. In the U.S.Selection 810-21
of the NationalElectricalCode provides information with
respect to proper grounding of the mast and supporting
structure, grounding of the lead-in wire to an antenna
discharge unit, size of grounding conductors, location
of antenna dischargeunit, connection to grounding elec-
trodes, and requirements for the grounding electrodes.
EXAMPLEOFANTENNAGROUNDINGASPER(NEC)NATIONAL
ELECTRICALCODE
kNTENNA
_--- LEAD IN
WIRE
_ GROUND
_-- -- -- CLAMP
. . - ANTENNA
i _y_,_j../!_ DISCHARGEUNIT
,NEDSECT,ON810-20,
GROUND CLAMPS .... GROUNDING CONDUCTORS
POWER SERVICE GROUNDING _v (NED SECTION 810-21)
ELECTRODE SYSTEM
(NEC ART 258, PART H) NEe - NATIONAL ELECTRICAL CODE
Note to OATV system installer:
This reminder is provided to direct the CATV system installers attention to Article
820-40 of the NEC that provides guidelines for proper grounding and, in particu-
lar, specifies that the cable ground shall be connected to the grounding system of
the building, as dose to the point of cable entry as practJca]
16. An outside antenna system should not be located in the
vicinity of overhead power lines or other electrical light
or power circuits, or where it can fall into such power
lines or circuits. When installing an outside antenna
system, extreme care should be taken to keep from
touching such power lines or circuits as contact with
them might befatal.
2 Important Safety Information

Contents
Important Safety Instructions ............ 2
Care and Cleaning ................... 3
Features ......................... 4
Specifications ...................... 4
Getting Started ................... 5 - 6
Positioning the LCD TV ............... 5
Using the Tilt Stand ................. 5
Removing the TV Tilt Stand ............. 5
Power Connection .................. 5
Installing Batteries in the Remote Control ...... 6
Connecting (;able, RF Antenna, or a Satellite
Receiver to the TV 75-Ohm jack .......... 6
Top & Back Panel ................... 7
Optional Feature - Wall Mounting .......... 7
[sing the Component Video and
Audio Input Jacks ................... 8
Connecting a DVD Player .............. 8
[;sing tlle Audio / Video Input Jacks ......... 9
Connecting a VCR or DVD Player ......... 9
[;sing the Remote Control .............. l0
TV Adjustment and Setup ........... 11 - 13
How to Operate the On-Screen Menu ....... 11
Adjusting Picture: Auto / Game Manual ..... 11
Adjusting Sound: Audio / Bass / Treble / Surround 12
Adjusting the Channel: Antenna / CH. Search
CH. Memory .................... 12
Selecting a Display Language ............ 13
Set Up: Color Enhancer / Aspect Ratio
Backlight ..................... 13
Closed-Captioning .................. 13
V-Guide Operation (Parental Control) ..... 14 - 15
Helpful Hints (Problems / Solutions) ........ 16
Warranty (Mexico) ................. 17
Warranty (U.S.A. and Canada) ........... 18
Child Safety Matters ............ Back cover
Care and Cleaning
The surface of the cabinet call be damaged if not properly maintained. Many connnon household aerosol
sprays, cleaning agents, solvents, and polishes will cause permanent damage to the fine snrIhce.
1. Unplug the power cord before cleaning the television.
2. (?lean the screen and cabinet with a soft dry cloth.
Nolo: _\_ver spray liquids on the screen because it can run down and &ip onto the chassis. This may
cause component _hilure not covered under Whrranty.
Table of Contents / Care & Cleaning 3

Featu res
15 inch & 20 inch fiat-screen
Wide viewing angle horizontal / vertical
Detachable tilt Stand tilts TV down 5° up 10°
Wall Mountable
3-DYiC Digital Comb Filter
AC Adaptor
Power Saving Mode (Back Light function)
V-chip for Movies and TV guidelines rating limits
Closed-Captioning
MTS stereo/SAP decoder
Integrated front speaker 5 x 9 cm (two)
O Surround Sound
Bass / Treble
Picture adjustments Aspect Ratio: 4:3 and 16:9 funnat
Factory preset adjustments hbr Picture
Video Format: Interlaced and Progressive (480i/p)
Automatic Channel Search
Color Enhancer
Receives 18i Channels: VHF 2-- 13;UHF 14-69;
Cable TV 1, 14- 125
Component video input for the best picture signal
from your VCR or DVD
• " Rear AV input (2 sets _L)
S-Video Input
Trilingual Menu Options
Sleep Timer
24-Key Remote Control
Specifications
LeD Panel Size (Measured Diagonally):
CLT1554 15-inch fiat screen EDTV monitor
CLT2054 20-inch fiat screen EDTV monitor
Picture Resolution: CLT1554 1024x768 (XGA)
CLT2054 640x480 (VGA)
Picture Brightness: 450 cdm2
Picture Contrast: CLT1554 300:1
CLT2054 500:1
ResponseTime: CLF1554 23ms, CLF2054 lhns
Jacks and Connectors:
RF Antenna Input (75 ohm)
AV1 Input: S-Video, Composite, Audio LiR
AV2 Input: Composite, Audio LiR
AV3 Input: Component (YiPbiPr), Audio LiR
DC power input
0( )0s
LISTED
Antenna input: UHF_HFiCATV 75 ohm
Power Requirement: Source: AC I20V, 60Hz
Viewing Angle:
CLT1554 Horizontal 120° V_rtical 100°
CLT2054 Horizontal 160°/Vertical i40 °
Size and Weight (approximately):
CLT1554 Horizontal Dim. (Width): 19.7 in. (500mm)
V_rtical Dim. (Height): 12.9 in. (328mm)
Depth Dim. (Thickness): 7.2 in. (184ram)
CLT2054 Horizontal Dim. (Width): 23.8 in. (604mm)
Vertical Dim. (Height): 16.3 in. (413mm)
Depth Dim. (Thickness): 7.2 in. (184ram)
Weight: CLT1554 12.7 (lbs), 5.8 (Kg)
CLT2054 20.3 (lbs), 9.2 (Kg)
CAUTION:FCCRegulations state that impropermodifications or unauthorized
changes to this unit mayvoidthe user's authorityto operatethe unit.
This symbol on the nameplate means the product is Listed by Underwriters' Laboratories Inc. It is designed
and manufactured to meet rigid U.L. safety standards against risk of fire, casualty and electrical hazards.
4 Features & Specifications

Getting Started
Positioning the LCD TV
Always use an appropriate table or stand when position-
ing your TV. Allow enough space to tilt the TV. For best
xiewing, avoid locating the TV where direct sunlight or
indoor lighting will fhll on the screen. (Note," CLT1554
measurements are in the parenthesis.)
603.8 '*'-
(500.2)
co c::_ c4c._
- 1
I -2620- 1 244J
(262.0) (24.4) (184.0)
Using the Detachable TV Tilt Stand
To change the viewing angle of your
LCD TV, position your hand on the
top and hold the stand firmly, then
tilt the LCD screen fk_rward or back-
ward. CAUTION: Do not position
hand under the screen while tilting
the TV forward.
Note; Maximum tilt is 5° to the
front and 10° to the back,
Removing the TV Tilt Stand
Tools Needed: Phillips screwdriver
Important Note: Position TV face down on a padded or
cushioned snrfitce to protect the screen and finish.
1. Remove the screw fi'om the stand back cover.
2. Remove tour (4) screws fi'om the metal bracket.
CAUTION: Hold the stand firmly as you remove the
last screw.
3. Carefully remove the TV stand.
Power Connection
O Insert AC Adaptor into the De input tem_inal on the TV.
Insert AC power cord into Adaptor; then insert the
plug fully into a 120V, 60Hz, AC power outlet.
BACKOFTV
OCPOWER
INPUT
TERMINAL
0
POWEROUTLET
(HOUSEHOLD]
AC
ADAPTOR
t
°l
AC CORD
1111111|11r_--_! IIIIIIIHI
Positioning LCD, Using Tilt, Removing Stand, and Power Connection

Getting Started
Quick Tips
m The TV will automati-
cally select the correct
Antenna mode for the
type of RF signal you
connect.
m TVwill switch off
automatically after 15
minutes if there is no
signal reception (cable
out or station not
broadcasting).
Exception--When
the Video mode is
selected, the TV will
not automatically
switch off when signal
reception has stopped
for 15minutes.
m Ifyou move the TVto
a new location, press
the RESET key twice
after connecting the
signal and turning on
the T_/
Needhelp?
VisiiourWebsiteat
www.sanyocfv.€om
orCall1-800-877-5032
Installing Batteries in the Remote Control
Use 2 "AAA" batteries (,'_)_t supplied).
Be sure batteries are installed correctly.
Note: Do not mix o/d batteries with new ones
or mix different types of batteries togethe_
Connecting Cable service, RF antenna, or Satellite Receiver to the TV
CABLE SATELLITE RECEIVER RF ANTENNA
VCR
TVBACK
TV-75ONN
CONNECTOR
Note: If you do not have
a VCR, connect signal
directly to the TV 75 ohm
jack.
i()p_ra_Lot_al...Tipfo!:A_O Signal Connection.
If the TV is used as a monitor only, with a DVD player or some other type of external equipment, and no cable or
antenna signal is a_ ailable, the fbllowing setup is necessary:
Your TV is designed to automatically search for available channels. Therefore, the initial start up requires that you press
the MENU key, enabling the TV to automatically go through the channel search process befbre you can operate the
TV. After the initial channel search is completed, you nmst press the MENU key again to complete the channel search
process, it will take a few minutes for the TV to complete searching.
After channel search is complete (2 searches), you can press the iNPUT key on the remote control to use the TV as a
monitor.
CATVFRANCHISENOTE: Cablecompanies,likepublic utilities, arefranchisedby localgovernmentauthorities.Toreceivecableprograms,
evenwith equipmentwhich is capableof receivingcablechannels,the consumermustsubscribeto the cablecompany'sservice.
Installing Batteries / Signal Connection: Cable, Antenna, or Satellite Receiver

Top and Back Panel
Top View
NOTE:The Channel A (up) Y (down),
Volume + (up) / - (down), and Power keys
function exactly like the keys on your remote
control.
Back View
S-Video Input Jack
To enhance video detail use the
S-Video AV1 .jack instead of the
Video .jack, if available on your
external equipment.
(S-Video connections will over-
ride connections to the AV1 input
.jacks.) (See page 9.)
Antenna Input Terminal
Connect an RF antenna, cable, or
satellite receiver to this jack as
shown on page 6.
Audio/Video Input Jacks (AV1/AV2)
Connect video equipment here (see
page 9).
Note: S-Video connection overrides
the AV1 video connection.
480i/p Component Video / Audio
Input Jacks (AVJ)
Connect external equipment to the
Y, Pb, Pr and Audio LiR jacks. (See
page 8.)
DC Power Input Jack
Connect AC Adaptor to this terminal.
Optional Accessories:
Extra cables are needed for advance
connections. Reference the connec-
tions accessories list on pages 8_9.
Optional Feature=Wall Mounting
This LCD TV is designed so that it may be mounted on a wall, if desired. Use the slots on
the back of your TV to secure it using a wall mounting kit.
Note; Waft Mounting kit is not supplied, check with your local electronic supp/y store.
Back View
Top and Ba& Views 7

Using the Component Audio/Video input Jacks
i_ Quick Tips
: mA solid Bluescreen
with the word
COMPONENT3
displayed means
that the Videomode
is selected, but
no signal is being
detectedat the
Componentjacks.
Checkconnection,
and turn on external
equipment.
Connecting a DVD Player or other equipment
Switch off TV and external equipment befbre connecting cables. (Cables are not xupp/ied.)
O Connect a DVD Player or other equipment's interlaced Component Video Output to the
TV Component Video Input (Y-Pb-Pr) Jacks.
Connect the DVD Player's Audio Output to the TV Component LiR Jacks.
Press POWER to turn on the TV. Turn on external equipment also.
O Press the INPUT key to select COMPONENT3.
TVBack
DVD _yer O
Tv @
,_"Press iNPUTkey after _' _,
s
_, connecting canes to access _'
n the AN inputs. !
I
Themis NOneed to tune i
_ _ to a blankchannel s _
8 Component Audio/Video In Jacks: Digital connections

Using the Audio/Video input Jacks
Connecting a VCR or DVD Player
Switch off TV and external equipment before connecting cables. (Cables are not sz_pplied.)
O Connect VCR, DVD Player, or other equipment's Audio Video Output to the TV Audio
Video Input.
For Mnno VCR (Single Audio Jack) connect VCR Audio Output to TV Audio (L) Input.
@ @tional
Connect DVD Player or other cqmpment's S-Video Output to the TV S-Video Input Jack.
Using the S-Video jack overrides the Video jack.
Press POWER to mm on the TV. Tuna on external equipment also.
Press the INPUT key to select VIDEOI or VIDEO2.
BackView of VCR
@
TV AV inputJacks DVDPlayer
What you will need for connections:
AV Cable - 1
OPTIONAL CONNECTION
@ S-Video Cable - 1
@ Audio Cable - 1
Quick Tips
[] Makesureaftcable
connectorsarefully
seatedonjacks.
[] AlwaysmatchAV
cablesaccordingto
thecolors;REDfor
rightaudio, WHITEfor
left audioandYELLOW
for video.
[] A solidBluescreen
with the word
VIDE01or VIDE02,
displayedmeans
thatthe Videomode
is selected,but
nosignal is being
detectedat the
Videojacks. Check
connections,turn on
externalequipment.
Needhelp?
VisitourWebsiteat
www.sanyoctv.€om
orCaii1-800-877-5032
Using A/V In Jacks: Connecting a VCR or DVD Player

Using the Remote Control
i_ Ouick Tips
Be sure batteries are
installed correctly.
Point the remote
control toward the
T_ Objects between
the remote control
and the TV may
cause misoperation
of the remote control
function.
The "C" in front of
the number on your
screen indicates a
cable channel
Adjusting the
volume leve2 Flash-
ing Right _ arrow
indicates volume is
increasing and Flash-
ing Left _ arrow
indicates volume is
decreasing.
Need help?
visitourWebsiteat
wwwosanyoctv.€orn
orCall1-800-877-5032
Point towardsTV
POWER
V-GUIDE
-O
Caption Key--See page 13.
@V-Guide Key--See pages 14 --15.
Reset Key--Press this key twice to restore
facto W settings. The TV will automatically start
Channel Search and clear all customized settings.
These features will automatically reset:
° Picture Controls: Auto, Game, and Manual:
Color, Tint, Contrast, Brightness and
Sharpness
. Sound Controls: Audio, Bass, Treble, and
Sun'ound
° Channel Controls: Antenna, CH. Search and
CH. Memory
° Set Up Controls: Color Enhancer, Aspect
Ratio, and Backlight
* Caption to OFF
° V-Guide to OFF
° Language to English
° Sleep Timer (if previously set)
° Video to TV (if previously set)
If desired, personal settings can be made
again using the menu options.
Input Key--Press to select the program source to
watch: TV signal or signal from DVD or other equip-
anent you have connected to the AiV jacks.
@Menu Key--Use this key with the A/Y and -/+ keys
to navigate and adjust features of the on-screen menu
system (see pages 11 -- 13).
Channel Scanning (CH A/V) and Volume (VOL
-/+) Keys--Press to scan through the channels in
memory and to adjust the xolume.
@Mute Key--Press once to turn down the volume.
Press again to restore volume to previous level.
Number Keys--Two keys must pressed to select a
be
channel. Example: Press 0 then 6 to select channel 6. For
cable channels 100 tln'ough 125, press and hold the 1 key
until C 1 appears. Then press the other two nnmbers.
@Power Key--Press to tuna TV on or
of[..
Recall Key--Select a channel;
select another
channel using the number keys. Press
RECALL to switch between the channels.
Display Key--Press once to display the
Channel number. Press twice to display the
channel number continuously. Press again to
remove the display.
Sleep Key--Press this key then press the "0"
key to set the Sleep Timer. The desired time
can be set from 30 minutes tap to 3 hours.
Sleep Timer will switch off the TV
antomatically.
Note: The Sleep Timer cancels when the
TV is turned off or if a power failure occurs.
0 Remote Control

TV Adjustment and Setup
The on-screen menu provides the xiewer with easy access to adjustments and settings. The
LCD menu is displayed in colorful screen icons that identifies each adjustable option. Just use
the keys on the remote control and fbllow the on-screen instructions.
How to operate the On-Screen Menu
1. Press MENU key to display main menu
options.
2. Use the -/+ keys to choose desired option.
(Se/ected item is/_@/_lighted in YELLOI!_)
3. Use the V key and to select the desired
option sub-menu feature.
4. Use the AiY and -/+ keys to select and
adjust sub-menu options (Ik red arrow
indicates selected item.)
5. Press the MENU key to select other options
fi'om the main menu or to exit.
?ICTU!_E SOUND CHANNEL
L_NGUAGE SETUP
Select :-/+ Keys
Sub-rnenu:vKey
Adjusting Picture
Selecting Preset Picture Automatically
Choose Auto from the Picture menu options.
For automatic Game Setting
1. Choose Game fi'om the Picture options.
The screen will automatically change
to fhctory preset settings.
2. Press the MENU key to exit.
PICTURE
Select :AT Keys
Note; Select the input ]acks by pressing the INPUT key on the remote control.
Quick Tips
: [] The menu will
display on the
screen for approxi-
mately20 seconds.
Press MENUagain to
redispla_
: [] Use the Channel
A iv keys and the
Volume -/+ keys to
navigate through the
menus and to make
selections from the
menus.
Need help ?
VisitoarWebsite at
www.sanyedv.cem
orCall1-800-877-5032
Adjust Picture Manually
1. Choose Manual ii'om the Picture menu options.
2. Press + key to access the sub-menu options.
3. Use the AiV keys to select the picture setting
you want to change.
4. Use the -/+ keys to adjust settings.
PI_URN
Tint
Contrast
Brightness
Sharpness
Select :AvKeys
Adjust :-/+Keys
(Continued on page 12.)
TVAdjustment/Setup: Menu operation, Picture Adjustment _

TV Adjustment and Setup {Continued}
............................. : Adjusting Sound
OuickTips :: Select desired soundsetting: Audio, Bass, Trebleor Surround.
[] Under weak stereo
signal conditions,
you may receive
better quality sound
in the "Mono"
position.
[] Surround sound
expands the sound
effect while receiv-
ing MTS stereo
signals.
[] Pressing the
RESET key will
clear all customized
settings. The TV will
automatically staff
Channel Search and
clear settings.
m Channels deleted
from scan memory
can be selected with
the number keys.
[] Restoring deleted
channels, use the
on-screen menu
to manually add
channels or staff
CH. Search from
the menu. It make
take a few minutes
to search thru the
available channels.
or press the RESET
key.
Need help ?
visitearweb siteat
www.sanyodv.¢o.t
orCall1-800-877-5032
1. Choose Audio fl'om the Sound menu options.
2. Use the AiV keys to select the sound setting you want to
change. (Red an'ow indicates selected highlighted option.)
3. Use the - 1+ keys to adjust settings: Stereo, Mono or SAP.
Notes: Stereo and SAP must be part of the broadcast
signal.
The TV will automatically reset to stereo if
unplugged or a power failure occurs,
4. To adjust the other sound features: Bass, Treble, or
Sun'ound, simply follow steps 2 3 above.
Adjusting the Channel Tuning
Resetting the Antenna Mode and Channel Search
Resetting the Antenna or CH. (Channel) Search is required
only if additional channels become available, such as moving
to another city or having a cable service installed.
1. Choose Antenna or CH. Search from the Channel menu
options. (Red an'ow indicates selected menu option.)
2. Use the -/+ keys to change Antenna settings: (;able or
UHF'VHF. For CH. Search, press the + key. The TV will
automatically start searching for your channels. It will take
the TV several minutes to complete the search.
Adding or deleting Channels
1. Choose CH. Memory fl'om the Channel menu options.
(Red arrow indicates selected highlighted option.)
2. Press the + key to select the channel mnnber entry area.
3. Enter the channel number you want to add or delete
(example): C34. For cable channels above 99, press and
hold the 1 key until Cl- - appears. Then enter the other
tWO nu1111oers.
4. Press the + key to change the present setting. Example:
Added will change to Deleted. This takes about three
seconds. During that time, the word "Added" or "Deleted"
will become white.
5. Use the 0~9 or keys to chose other channels to
delete or add, or press Menu key to exit.
SOUND
Bass
Treble
Surround
Select : ,_vKeys
Set :-/+Keys
SOUND
Audio
Bass
Treble
Select : Av Keys
Set :-/+Keys
Antenna
OH. Memory
Select : Av Keys
Start : + Key
C_NBL
Antenna
CH. Search +
Select CH:A% 0-9 Keys
Sat:+Kay Back:-Key
CltNNL
Antenna
CH. Search +
Select CH:.v, 0-9 Keys
Sat:+Kay Back:-Key
1 2 Adjusting Sound / Channel Tuning

Selecting the Display Language
1. Choose English, Francais (French), or Espanol (Spanish) fi'om the Language
menu options.
2. Use the Ai'_' keys to select the desired language.
TV Set-up
Use the fbllowing features to customize your LCD according to your personal preference:
MENU ITEM FL_'CTION
Color Enhancer Normal highlights the picture flesh tones and color highlights.
Warm deepens the picture red tints.
Coo_highlights the picture blue tints.
I,_GUAG_.
t-rancals
Espanol
Select :Av Keys
Aspect Ratio Use this feature when equipment is connected to the component input jacks.
The 4:3 setting is fbr normal viewing. The 16:9 setting changes the picture
image to wide-screen viewing with minimal portion of top and bottom
compressed.
Back Light Power (energy) saving fi.mction The picture image and background
automatically changes as fbllows:
Brigh_High Power (defhult setting)
Middle Mid Power
Dark Lower Power
Adjusting the Set Up Features
1. Choose Color Enhancer, Aspect Ratio, or Back Light menu options.
2. Use the AiY keys to select the setting you want to change.
3. Use the -/+ keys to adjust settings.
16:9 ScreenFormat
SETUP
Color Eehoncer
Select :Av Keys
Sot :-/+Key_
Closed-Captioning
Captioning is text infbnnation transmitted along with the picture and sound so it can be displayed on the TV screen.
Because different types of captions can be transmitted with the TV signal, separate captioning modes are provided. The
captioning modes recognized by this model are: Captionl and Caption2. Local broadcasters decide which caption signals
to transmit.
CAPTIONI: This is the main mode used fbr program captioning (words match the program you
are watching). These captions are generally one or two lines.
CAPTION2: This is an alternati_ e mode fbr program captioning. Caption2 may be used by the
broadcaster to provide captions in another language, such as, Spanish or French.
QUIKCAP: Quikcap allows captions to toggle on and off with the Mute function. Press the
MOTE key on the remote control to block the TV sound; the captions display automatically. Press
the MOTE key again to restore the sound, the captions will disappear. Quikcap displays program
captions in the Captionl mode.
Setting Captions
1. Press the CAPTION key on the remote control.
2. Press the 0 key to select options: OFF, CAPTION1, CAPTION2, or QUIKCAR
Note: Channel number will not display continuously when captioning is on.
Caption1/2
Language/TV Setup / Closed Captioning "13

V=Guide (Parental Control) information
QuickTips
= When in the V-Guide:
menu system, the
-/÷ keys allow you
to navigate between
the ratings and the
options menu.
:= BlockingTVY7does
notblockhigher
ratings.
:= Youcanblocka
contentratingsuch
asTVPG-Vandstill
beableto watch
TVPGprogramswith
ratingsof S-L-D
providedTVPGis
unblocked(U).
! Totemporarily
unblockor view
Blocked(B)
programs,set
V-GUIDEto OFEor
presstheRESET
keytwicetoclearall
Blocked(B)ratings
andothercustomized
settings.
VisitourWebsiteat
www.sanyoctv.com
orCan1-800-877-5032
NOTE: THIS FEATURE IS DESIGNED TO COMPLY WITH THE UNITED STATES OF
AMERICA'S FCC V-CHIP REGULATIONS. THEREFORE, IT MAY NOT FUNCTION
WITH BROADCASTS THAT ORIGINATE IN OTHER COUNTRIES.
This Sanyo television is equipped with an electronic V-Chip to intelpret MPAA and TV Parental
Guidelines rating codes. When these codes are detected, the TV will automatically display or block
the program, depending upon choices you make when setting up the V-Guide system.
The V-Guide system contain both age-based and content-based settings. This gives parents
discretionary ways of choosing appropriate material for their children to view.
Content ratings are represented by the initials D (Suggestive Dialog), L (Aduh Language),
S (Sexual Situations), V (Violence), and FV (Fantasy Violence). When programming contains any
or all of these conditions, these letters become part of the icon that is displayed on the TV screen.
A rating icon will generally appear in the upper left hand comer of the TV screen for
about fifteen seconds.
V-Guide Operation
Use this f?ature to supervise television viewing for young chii&en. This television can be set to
automatically block programs with content you deem as inappropriate for your chil&en to view.
The ability of the television to block the reception of specific programming content depends
upon several conditions: 1) The program nmst be rated, 2) Networks must broadcast the rating
code data, 3) (?able companies must transmit the rating code signal, and 4) The TV must be
properly setup to decode the signal.
Setting a Rating
1. Press the V-GUIDE key on the remote control
to display menu.
2. Press the -/+ keys to switch V-Guide ON.
3. Press the ÷ key to access Ratings: MPAA
Ratings or TV Ratings. (_' Arrow indicates
selection.)
V-Gulds System
V=Gulds
NPAA Ratings +
Select:,_Keys
Set :+ Key_
Setting a MPAA Movie Rating
4. Use the A / Y keys to block ratings: G, PG,
PG-13, R, NC-17, and X.
5. Press the ÷ key to set the BLOCKED rating.
(# Check mark indicates Blocked rating.)
Note: The TV will automaffcally block (B) ratings
above or unblock (U) ratings below selection.
For example, if you Mock rating/7, NC17 and X
will be Mocked as well
MPAA Ratings
[] Cl®ar
FIG
[] PG
[] PG-13
i_'N©o12
Select :AvKeys
Set : + Key
14 V-Guide (Parental Control)

To clear MPAA Movie Ratings
(Repeat Steps 1 and 3 to display V-Guide menu, if needed.)
6. Use the & V keys to highlight (?lear.
7. Press the ÷ key to clear a//blocked ratings.
Setting TV Ratings
(Repeat Steps 1 and 3 to display V-Guide menu, if needed.)
8. Use the A / Y keys to block TV ratings: TV-Y, TV-YT, TV-G,
TV-PG, TV-14, TV-MA, or Content.
9. Press the + key to set the BLOCKED rating. (_ Check mark indicates
Blocked rating.)
Setting Content-Based Guidelines
(Repeat Steps 1 and 3 to display V-Guide menu, if needed.)
10. Use the A / V keys to highlight Content options.
11. Press the ÷ key to display the TV and Content Rating Options:
Fantasy Violence, Violence, Sexual Situations, Adult Language,
Suggestive Dialog.
12. Use the A / Y keys to highlight the TV Rating (highlighted in yellow).
Then press the + key to block the content category (highlighted in white).
Press + key again to Block or Unblock rating. Use the tk T keys to
highlight another rating.
13. Press the - key to return to the TV and Content Rating to block or unblock
other categories. Repeat step l 1 to change other ratings.
To clear TV/Content-Based Ratings
(Repeat Steps 1 and 3 to display V-Guide menu, if needed.)
14. Use the A / y keys to highlight (?lear.
15. Press the + key to clear a//blocked ratings.
Turning Off the V-Guide
1. Press the V-GUIDE key.
2. Use the lk V keys to select V-Guide. Then press -/÷ keys to select OFF.
MPAA Rat;rigs
DG
[] PG
[] PG-13
DR
[] NC-I?
DX
Selecl :AvKeys
Sel : + Key
V-Gulde System
V-Guide
MPAA Ratings +
Select :AvKeys
Sel :+ Key_
TV Rat;ngs
[]Clear F V S L D
[] TV-Y
[] TV-Y7 []
[] TV-G
[] TV-PG [] [] [] []
[] ]'V=_I [] [] [] []
[]]'V-N_ [] [] []
Coment
Select :AvKeys
Set :+ Ke_
Centent
TV-Y
TV-Y7 Fentaey V
TV-G Violence
TV-PG Sexual S
]'V-I _ Language S
TV-MA Dialog S
Selecl :Av Keys
Set :+Key Back :- Ke_
Note: Networks and local stations
may or may not include the
content ratings pordon of
the TV Parental Guidelines,
TV
[] TV-Y
[] TV-Y7 []
[] TV-G
[] TV-PG [] [] [] []
[] TV-14 [] [] [] []
[] TV-MA [] [] []
Content
Select :AvKeys
Set : ÷ Ke_
V-Guide (Parental Control) 1

Helpful Hints (Problems/Solutions)
Before calling for assistance, please check the condition that most closely resembles your problem in the following
chart, then try the solutions for that condition. Visit our Web site at www.sanyoctv.com or call toll free
1-800-877-5032.
Problem Check these Conditions Trythese Solutions PageNa,
Nopicture,poor
pictureorwavylines
in picture.
• Checkantenna/externalequipmentconnections.
, Maybestationtrouble,NOsignalbroadcast.
, Brightnessor Contrastmisadjusted.
• Possibleinterferencefromhouseholdappliance.
• Adjustantenna.
, Tryadifferentchannel.
, PressRESETkeyorrestartchannelsearch.
• TurnoffMixer,Drill,Blender,etc.
6,11
PicturetooBrightor • Checkbacklight(powerenergysaving)settings. • SelectSet-upMenutosetBackLightoption 113
tooDark. toMiddlesetting.
NoCaptioning. • CheckifstationisbroadcastingaClosed-Caption • PressCAPTIONkeytoselectCaptioning. i 13
signal.Selectanotherchannel.
BlueScreenwith
Video1,Video2,or
Component3
displayed.
• CheckAudio/Videoconnections.
• Checkexternalequipmentconnections.
, Checkexternalequipmentsetting.
• CheckDVDsetting.
• PressiNPUTkey.
• Switchonexternalequipment.
, Setexternalequipmentoutputconnectionsto
matchinputconnections.
8--10
Cannotselectorscan
somechannels.
, Channelmayberemovedfrommemory.
• Checkantennaconnections.
• V-Guideissettoblockprogramming.
, SelectCH.ScanMemoryandmanuallyadd 12
channelsorstartOH.(channel)search.
• TurnV-GuidetoOFForpressRESETkeyto 14-J5
clearallsettings.
Menuwordsseem
misspelled.
, Maybeadifferentlanguageisselected. , Reselectmenulanguagechoiceusingtheon- 13
screenmenu.
1 6 Helpful Hints (Problems/Solutions)

Mexico Guarantee
IMPORTADOR:
COMERCIALIZADORA MEXICO
AMERICANA, S.DE R.L. DE C.V.
AV. NEXTENGO No 78
COL. SANTA CRUZ ACAYUCAN
DEL AZCAPOTZALCO, MISXICO, D.F.C.P. 02770
RFC: CMA9109119LO
DESCRiPTiON:Televisi0n
BRAND:SANY0
MODELS:CLT1554
CLT2054
GUARANTEE
THE APPARATUS THAT YOU HAVE ACQUIRED HAS A ONE YEAR GUARANTEE FOR MANUFACTURING DEFECTS AND
A ONE YEAR SERVICE WARRANTY FROM THE DATE OF PURCHASE GRANTED BY:
COMERCIALIZADORA MEXICO-AMERICANA, S. DE R.L. DE C.V.
UNDER THE FOLLOWING CONDITIONS:
1. TO MAKE THE GUARANTEE EFFECTIVE, SIMPLY SHOW THiS POLICY FILLED OUT BY THE STORE OR SUP-
PLIER UNIT OR THIS SALES INVOICE, WITH THE APPARATUS IN ANY OF THE SERVICE CENTERS INDICATED
ON THIS GUARANTEE.
2. IF THE FAULT IS ATTRIBUTED TO A MANUFACTURING DEFECT, THE APPARATUS WILL BE REPLACED
OR YOUR MONEY REFUNDED. DURING THE 30 DAYS SUBSEQUENT TO THE PURCHASE THE GUARAN-
TEE WILL BE VALID AT THE STORE WERE THE APPARATUS WAS PURCHASED, PRESENTING THE ABOVE
DOCUMENTS.
3. REPAIR TIME WILL NEVER BE MORE THAN 30 DAYS. IF THIS TIME HAS ELAPSED, AND THE PRODUCT ISNT
REPAIRED, COMERCIALIZADORA MEXICO AMERICANA, S. DE R.L DE C.V. WILL PROCEED TO EFFECTUATE THE
EXCHANGE FOR AN EQUIVALENT APPARATUS OR THE RETURN OF THE BUYING-SALE COST RESPECTIVELY.
4. THIS GUARANTEE WILL COVER ITS TOTALITY OF PIECES, COMPONENTS AND SERVICE REPAIR OF PRODUCT,
AND THE RESPECTIVE COST OF TRANSPORTATION.
THIS GUARANTEE WILL BE NULL AND VOID IN THE FOLLOWING CIRCUMSTANCES:
* WHEN PRODUCT HAS BEEN USED IN A DIFFERENT CONDITION THAN ITS NORMAL USE.
* WHEN PRODUCT HASNT BEEN OPERATING CORRECTLYACCORDING TO THE INSTRUCTIONS IN THIS MANUAL.
* WHEN PRODUCT HAS BEEN CHANGED OR REPAIRED BY PERSONS NOT AUTHORIZED FROM THE
MANUFACTURER, IMPORTER, OR MERCHANT RESPONSIBLE RESPECTIVE.
CENTRO DE SERVICIO Y LUGAR DONDE OBTENER PARTES, COMPONENTES, CONSUMIBLES YACCESORIOS:
SUCURSAL VALLEJO
Poniente 126 N° 288 B
Col. Nueva Vallejo
Mexico, D.F.
Tels. 5567-5378
5368-0105, 8589-8033
SUCURSAL MINERVA
Silos N° I35, Col. Minerva
Deteg. Iztapatapa
Mexico, D.F. 09810
Tels. 5646-4551
5646-4550
STAMP, DATE AND SIGNATURE
OF
STORE
BRAND: MODEL:
INTERIOR NUMBER:
STATE/DELEGATION:
DESCRIPTION:
CLIENTS NAME :
ADDRESS:
EXTERIOR NUMBER:
SUB DIVISION:
TELEPHONE:
Mexico Guarantee 17

United States and Canada Warranty
ONE=YEAR LiMiTED WARRANTY
THIS LIMITED WARRANTY IS VALID ONLY ON SANYO TELEVISIONS PURCHASED AND USED IN THE
UNITED STATES OF AMERICA, CANADA, AND PUERTO RICO, EXCLUDING THE UNITED STATES OTHER
TERRITORIES AND PROTECTORATES. THIS LIMITED WARRANTY APPLIES ONLY TO THE ORIGINAL PUR-
CHASER, AND DOES NOTAPPLY TO PRODUCTS USED FOR INDUSTRIAL OR COMMERCIAL PURPOSES.
FOR ONE YEAR from the date of purchase, Sanyo Manufacturing Corporation will replace any defective TV.
To insure proper warranty exchange, keep the original sales receipt for evidence of purchase. Return
the defective TV to the retailer along with the receipt and the included accessories, such as the remote
control. The defective TV will be exchanged for the same model, or a replacement model of equal value,
if necessary. Replacement model will be contingent on availability and at the sole discretion of Sanyo
Manufacturing Corporation.
THE FOREGOING WARRANTY IS EXCLUSIVE AND IN LIEU OF ALL OTHER WARRANTIES OF
MERCHANTABILITY OR FITNESS FOR A PARTICULAR PURPOSE.
OBLIGATIONS
For one year from the date of purchase, Sanyo Manufacturing Corporation warrants this product to be free from
defects in material and workmanship under normal use and conditions. Should replacement be necessary under
this warranty for any reason due to manufacturing defect or malfunction during the first year from date of original
purchase, Sanyo Manufacturing Corporation will provide a new TV via exchange at the retailer.
For customer assistance,
i-800-877-5032.
whether during or out of the warranty period, call toll free
Weekdays 7:30 AM - 7:00 PM Central Time
Saturday 7:30 AM - 4:00 PM Central Time
This warranty expresses specific contractual rights; retail purchasers may have additional statutory rights which
vary from state to state.
(EFFECTIVE: August I, 2002)
For your protection in the event of theft or loss of this product, please fill in the information requested
below and KEEP IN A SAFE PLACE FOR YOUR OWN PERSONAL RECORDS.
Model No. Date of Purchase
Serial No. Purchase Price
(Located on back of unit) Where Purchased
s /lWo
Sanyo Manufacturing Corp.
3333 Sanyo Road, Forrest City, AR 72335
"18 U.S. & Canada Warranty

Espafiol Manual de lnstrucci6nes
Bienvenido al mundo SANYO
Graeias por eomprar un LCD Televisor a Sanyo. Usted hizo una excelente selecci6n por Funcionamiento,
Estilo, Conf!abilidad, y Precio. E1 TV esta disefiado con instrucciones de fiicil ajuste y operaci6n en
pantalla."Lea este manual antes ensamblar (o usar) este producto." g,Necesita ayuda? Visite nuestro
sitio en internet en www.sanyoctv.conl o llame sin eosto al 1-8008775032.
"Como un Asociado de ENERGYSTAR®," Sanyo Manufacturing
Corporation, ha determinado que este producto cumple con
los lineamientos en eficiencia energetica de ENERGYSTAR ®.
Contenido
Importantes Medidas de Seguridad ........... 20
Caracteristicas ............................. 21
Especificaciones ............................ 21
Para empezar .......................... 22-23
Colocando la LCD TV ...................... 22
Pedestal Inclinable y seperable ................ 22
Quitando el soporte inclinable del TV .......... 22
Conexiones de Potencia ..................... 22
Instalaci6n de Baterias ...................... 23
Conectando el Servicio de (?able, Antena RF,
Receptor de Satelite ........................ 23
Panel frontal y Posterior ..................... 24
Caracteristica opcional - Montaje en pared ..... 24
[ sando el Control Remoto ................... 25
[ tilizando Las Entradas de Componente
de Video y Audio ............................ 26
Conectando una Reproductor de DVD .......... 26
Usando las Entradas de Audio/Video .......... 27
Conectando una VCR o Reproductor de DVD .... 27
Ajustes del la TV ........................... 28
Como Operar el Menfi en Pantalla ............. 28
Ajuste de hnagen : Auto / Juego / Manual ....... 28
Ajuste de Sonido :Audio / Bajos / Agudos
Surround ................................. 29
Ajuste de Canales : Antena Loc. Canales
Buscar Canales ............................. 29
Seleccionandonel Desplegado de Lenguaje ...... 30
Ajuste : Resahar Color / Relacidn hnagcn
Luz Trasera ............................... 30
Transmisi6n Captada ........................ 30
Informaeion de Guia-V ...................... 31
Operaeidn de Guia-V (Control Paternal) ... 31 - 32
Sugereneias (Ttiles--problemas / soluciones ..... 33
Cuidados y Limpieza ........................ 34
Garantia (M_xico) .......................... 35
Garantia (Estados [ nidos y Canad_i) ........... 36
ESPAI_!OL Manual de Instruccidnes / Contenido _

ESTE SIMBOLO INDICA QUE VOLTAJES PELIGROSOS QUE CONSTI _,
TUYEN UN RIESGO DETOQUE ELECTRICO ESTAN PRESENTES DENTRO
DE ESTA UNIDAD.
£RECAUC[ON : PARA REDUC[R EL RIESGO DE TOQUE ELECTRICO, NO QUITE LA CUBIERTA ESTE SIMBOLO INDICA QUE HAY INSTRUCCIONES IMPORTANTES DE ,_
(O LA TAPATRASERA). NO HAY PARTES ADENTRO QUE LAS PUEDA REPARAR EL USUAR[O. OPERACION Y MANTENIMIENTO EN LA LITERATURA QUE SE ANEXA
RERERASE A PERSONAL CA UROADO PARA REPARAR EL APARATO. A ESTA UNIDAD.
ADVERTENCIA :PARA REDUCIR EL RIESGO DE FUEGO OTOQUE ELECTRICO, NO EXPONGA ESTE APARATO
A LLUVIA 0 HUIVlEDAD.
liViPORTANTESIViEDIDASDESEGURIDAD
Instrucciones de seguridad importantes para la
TV LCD
1. Leaestas instrucciones.
2. guarde estas instrucciones.
3. Prestoatenci6n a los avisos.
4. Siga todas las instrucciones.
5. Nouse este aparato cercadel agua.
6. Limpie solo con un trapo seco.
7. No obstruya las aperturas para ventilaci6n. Instale de
acuerdo a las instrucciones del fabricante.
8. No se instale cerca de ninguna fuente de calor como
radiadores, registros de calor, estufas, uotros aparatos
(incluyendo amplificadores) que produzcan calor.
9. Por seguridad, no elimine la conexi6n de tierra de la
clavija. Una clavija polarizadatiene una hoja m_.sancha
que la otra. Unaclavija de tipo conexi6n a tierra, tiene
dos hojas y untercer conector mas prolongado. Lahoja
ancha o el conector prolongado est_.nprovistas para
su seguridad. Si la plaga o clavija proveida no asienta
correctamente en el contacto el_ctrico, consulte a un
electricista para queesatoma de acobsoleta searem-
plazada.
10. Proteja el cord6n de potencia de que seapisado o per-
forado, particularmente en las hojas y del punto donde
este sale delaparato.
11. Solo use anexos o accesorios especificados por el
fabricante.
12. Use t_nicamentecon el carro, estante,
triple, soporte o mesa especificada por
el fabricante, o vendida con el aparato.
Cuando se use un carro, tonga precau-
ci6n cuando mueva la combinaci6n de
carro/aparato para evitar lesiones en
caso de que secaiga.
13. Desconecte este aparato en caso de relampagueo o
cuando nose usepor un periododetiempo prolongado.
14. Refieratodas las reparacionesapersonalde servicio cali-
ficado. Se requiere de servicio cuando el aparato se ha
da_adode cualquier forma, como si el cord6n de poten-
cia se da_arade alguna forma, se ha derramado liquido
sobre el aparato o algSn objeto le ha caido encima, el
aparato se ha expuesto a la Iluvia o humedad, que no
opere normalmente o quese haya caido.
15. Si una antena externa se ha conectado al televisor,
asegureseque el sistema de tierra de la antena este de
forma que provea alguna protecciOn contra fugas de
voltaje o cargas electrost_.ticas.En la secci6n 810-21
del c6digo nacional el_ctrico de Io Estados Unidos se
menciona informaci6n con respecto a la manera adec-
uada de instalar el sistema de tierra al m_stil principal,
aterrizaje del cableado para la unidad de descarga de la
antena,tama_o delos conductores de tierra, Iocalizaci6n
de la unidad de descarga de la antena, conexi6n a los
electrodos de tierra, y requerimientos de los electrodos
de tierra.
EJEMPLODEATERRIZAMIENTODEANTENADEACUERDO
ALCODIGONACIONALELECTRICO(National
ElectricalCode,ANSI/NFPA70)
.4_- _ CABLE DE ANTENA
j GRAPA DE T[ENRA
. UNtOADDE
_ _- " DESCARGADE ANTEN,_
GRAPA .... CONDUCTORE$ DE TIERRA
rlERRA DE SERVICIO DE POTENBIA "j'p" {NEC SEBCION 8t0"2t}
ELECTRODODEL StSTEMA
NEB ART 250 PARTE H i COO[GO NACIONAL ELEBTRICO
Nota aIinstalador delaistema de cane CAI_:
Esterecordatorioesdado para Ilamarlaatencidndelinstaladordel sistema de caleCATVal
Articulo820-40del NECque prowe guias parael aterrizamie_ltoadecuado y,en particular,
especifica que la tierra del cable debera de estar conectada al sistema de tierra del edificio,
tancercanoel puntodeentradadelcablecomoseapractico.
16. Un sistema deantenaexterno no debeinstalarse cerca
de lineas de electricidad o circuitos de potenciao alum-
brado, o donde puedancaer sobre lineas de energia
el_ctrica o circuitos cuyo contacto con ellos puede ser
fatal.
20 Importantes Medidas de Seguridad

Caracteristicas
•, 15-pulgadasi20-pulgadas Tamario del Tubo de hnagen
Angulo de Visidn amplia tanto Horizontal
como Verticahnente
Pedestal Inclinable y Seperable 5° 10°
•, Montable en Pared
Filtro Digital de 3-Lineas de tipo Peine
Adaptador de AC
Modo de ahon'o de energia (Funcidn de luz trasera)
•, V-Guide (Control Paternal)
Transmisidn Captada / Quikcap
•, MTS sonido estereofbnicoisonido SAP
•, Bocina Integrada Frontal 5 X 9 cm (dos)
Frontal Ambient Sonido
BajosiAgudos
•, Ajustes de imagen Razdn deAspecto:
formatos 4:3 y 16:9
Controles digitales de hnagen desplegados en Pantalla
Formato de Video: Entrelazado y progresivo (480i/p)
Bflsqueda Automfitica de Canales
• , Resahar Color
• , Sistema de sintonia de 181 canales: VHF Canales 2-13;
UHF Canales 14-69; (:able TV 1, 14-125
• , Entrada de Componente de Video para la mejor serial de
imagen de su VCR o DVD
Entradas postseriores de Audio / Video (2-R/L)
• Entrada de S-Video
• Menfl en Pantalla Trilingttc
Crondmetro para Dormir (3 horas)
24-Teclas de Control Remoto
Especificaciones
Tamafio del panel de LeD
(Medido Diagonalmente):
CLT1554 15-pulgadas Tamafio del Tubo de hnagen
CLT2054 20-pulgadas Tamario del Tubo de hnagen
Resolucidn de Imagen: CLTI554 1024x768 (XGA)
CLT2054 640x480 (VGA)
Brillo Imagen: 500 cdm2
Contraste Imagen: CLT1554 300:1
CLT2054 500:1
Tiempo de respuesta: CLT1554 23ms, CLT2054 llms
Jacks y Conectores:
Entrada de antena de RF (75ohm)
Entrada AV 1: S-Video, Compuesta, Audio I'D
Entrada AV 2: Compuesto, Audio IiD
Entrada AV 3: Componente (YiPbiPr), Audio IiD
Entrada de Potencia de DC
PRECAUCION:
Entrada: UHF_HFiCATV 75 ohm
V~Consumo de Corriente: Source: AC 120V
Frecuencia de Operacion: 60Hz
Angulo de Vision:
CLTI554 Horizontal 120 ° Vertical 100 °
CLT2054 Horizontal 160°/Vertical 140 °
Tubo ¥ Peso (apro×.):
CLT1554
Dimensidn Horizontal (Ancho): 19.7 in. (500mm)
Dimensidn Vertical (Alto): 12.9 in. (328mm)
Dimensidn en Profundidad (Grosor): 7.2 in. (184mm)
CL[2054
Dimensidn Horizontal (Ancho): 23.8 in. (604mm)
Dimensidn Vertical (Alto): 16.3 in. (413 mm)
Dimensidn en Profundidad (Grosor): 7.2 in. (184mm)
Peso: CLT1554 12.7 (lbs), 5.8 (Kg)
CLT2054 20.3 (lbs), 9.2 (Kg)
Las Regulaciones de FCCdeclaran, que las modificaciones no apropiadas o cambios no autorizados a
esta unidad, pueden anular la autoridad del usuario para operar la unidad.
Caracter[sticas / Especificaciones 2"1

Para Empezar
Colocando la TV de LCD
Conexi6n de Potencia
Siempre use un soporte o mesa apropiado cuando coloque O
la TV. Deje espacio suficiente para inclinar la TV. Para
tener una mejor visidn, e_ite colocarla dnnde la luz del sol
o luz interna incidan directamente en la pantalla. (Nota:
Medidas de CET1554 estSn en par4ntesis.)
L
603.8
500.2
Usando el soporte con inclinacidn removible
Para cambiar el 5ngulo de visidn de su
TV de LCD, coloque su mano en la parte
superior y sujete el soporte firmemente,
entonces incline ia TV hacia atrSs o
enfi'ente. PRECA[ CION: No coloque la
mano bajo la pantalla cuando incline la
TV hacia enfrente. "
Nora: La inclinacidn maxima es 5° hacia
e/frente y 10° hacia arras.
Inserte el adaptador de AC a la entrada de DC de la
TV.
Inserte el cable de potencia de AC al adaptador,
entonces inserte la clavija a una toma de con'iente de
120V, 60Hz de AC.
TERMINALDE
ENTRADADE
DCDE LA
POSTERIOR
TV
0
_,DAPTADOR
DEAC
t
_ COR_RIENTEDE 120V
DE AC
(CASA)
Quitando el soporte de la TV
Herramienta necesaria: Desannador para cabeza
Phillips
Nota importante: ('oloqtte la TV con la pantalht hacia
abajo sobre ttna sttperficie aeolchonada para proteger la
panmlht y el aeabado tie la TE
1. Quite el tomillo de la cubierta trasera del soporte.
2. Quite cuatro (4) tornillos del soporte metfilico.
PRE(_AUCION: Sujete firmemente el soporte
al momento que se quita el ultimo tomillo.
3. Con cuidado, remueva el soporte de la TV.
III!111111F
III!1|1111]1/
II1|1|1111_llll[l[lll
II!!l!!!!l] It _2_ l;l/!!H!
Para Empezar
Instalaci6n de Baterias
Use Baterias 2 AAA (11o inchddas)
Aseg£u'ese qua las baterias esten instaladas correctamente.
Notas: No mezc/ar baterias viejas con nuevas o mezc/ar
diferentes tipos de baterias a/a vez,
NOTA IMPORTANTE: Las baterias descargadas @ben de ser recicladas o deshechadas I
adecuadamente, de acuerdo con los reglamentos aplicables. Para m_s informacidn, con-J
tacte a sus Autoridades Locales para el manejo de Deshechos S61idos. I
Conectando el Servicio de Cable, Antena RF, Receptor de Satelite a una TV
Servico de Cable Receptor gntena RF
Posterior
de laVCR
i Consejos
i_ Rapidos
i m El TV seleccionar4
el modo correcto de
Antena, de acuerdo
al tipo de serial que
Ud. conect6.
El TV se apagarb
automMicamente
despu#s de 15
minutos, si no hay
recepcibn de serial
(si la estaci6n de
cable o la estaci6n
de TV no esta trans-
mitiendo).
Excepcionos--Cuando
el modo de Video este
seleccionado, el TV no
: se apagar_ autom4fi-
camente cuando la
: serial de recepci6n ha
sido detenida por 15
minutos.
Conectore
TV 75-ohm
Posterior de la TV
Nora : Si usted notiene un VCR
conecta /a seha/ directa-
manta a/a TV 75 ohm,
Sugerencia de eperacibn para conexi6n sin sehal:
Si la TV es usada como monitor/micamente, con un DVD o algt'm otro equipo extemo, y la
serial de cable o antena no esta disponible, entonces la condici6n siguiente ocurrirfi:
La TV esta diseriada para buscar los canales disponibles automfiticamente. Por lo tanto, al
inicio se requiere clue se presione la tecla MENU, permitiendo que la TV vaya al proceso de
btisqueda antes de clue la TV pueda ser operada. Despu_s de que la b_squeda inicial de canales
temaine, se debe presionar la tecla MFNU nuevanaente para completar el proceso de bt'lsqueda.
Este proceso puede tomar varios nainutos.
Despuds de que el proceso de b£tsqueda de canales tennina (2 b%quedas), se puede
presionar la tecla de INPUT en el control remoto para usar la TV como monitor.
, • Si Ud. mueve el TV
a un nuevo lugar,
presione la tecla de
RESET dos veces
despu4s de haber
conectado el cable
de serial, y encienda
la Tg
Necesita ayuda?
Visitenuestrositio
eninternet
www.sanyoctv.com
o Uame1-800-877-5032
NOTA CONCESIONDE CATV :
Compafiiasde cable,como servi-
cios ptiblicos, son concesionados
de cable,cadaequipodebede set
isumidordebedesuscribirsaauna
compaf_iadecable
Instalacion de Baterlas / Conectando de cable/antena RF/ Receptor de Satelite 23

Panel Superior ¥ Posterior
Vista Superior
NOTA: Los botones de Canal A (arriba)
/ T (abajo), VoMnen + (arriba)- (abajo)
y EncendJdo funcionan exactamente como
las teclas del control remoto.
Vista Posterior
Terminal de Entradas de S-Video
(AV1)
Para realzar los detalles del video, use
el conector de entradas de S-Video
AV1 en lugar de la entradas de AVI.
Siesta disponible en su equipo de
video externo. (La conexidn de
S-Video se sobrepondrfi a la conexidn
de Video. Vca pfigina 27.)
Entradas de Audio y Video
(AV1 / AV2)
Conecte el equipo de video aqui (yea
pfigina 27).
Nora: La conexidn de S-Video
se sobrepondrfi a la conexidn de Video
(AV1).
Entradas Componente 480i/p
Video / Audio (AV3)
Conecte aqui otro equipo extemo de
video (vea pfigina 26).
Terminal de entrada de antena
Conecte la antena de RE, cable o
receptor de satdlite a esta conexidn
como se muestra en pagina 23.
Conector de entrada de DC
Conecte el adaptador de AC a esta
terminal.
Accesorios opcionales:
Se requieren de cables adicionales
para conexiones avanzadas. Para
referencia yea la lista de accesorios
de conexidn en paginas 26_2Z
Caracteristica Opcional- Nlontaje en la Pared
Esta TV de LCD esta disefiada de manera clue puede montarse en la pared si se desea.
Utilice las ranuras en la parte posterior de la TV para asegurarla utilizando el estuche
especial de montaje en pared.
Nota: Este estuche no esta incluido, verifique con la tienda de electrdnica mas
cercana,
POSTERIORLCDTV
24 Vista Superior/ Vista Posterior

Usando el Control Remoto
@ Tecla de INPUT--Presione para seleccionar la
fuente del programa que xa a ser desplegado en la
pantalla: Serial TV o serial del equipo de video que ha
sido conectado alas entradas de AV.
Tecla de MENI[ --Use esta tecla, junto con las teclas
de navegacidn, use A / V y - / + para ajustar las
funciones del sistema de menft en pantalla (vea
pfiginas 32 -- 34).
@TeclasdebusquedadeCanales(& Y) yde
Volumen (- / +)--Presione para buscar a travds de
los canales en memoria y para ajustar el volumen.
Tecla de una xez para apagar
MUTE--Presione el
volumen y presione nuevamente para restaurarlo.
Teclas Numeradas--Dos teclas ser
deben de
presionadas para seleccionar un canal. Ejemplo :
Presione 0 y despuds 6, para seleccionar el canal 6.
Para canales de cable del 100 hasta el 125, presione y
mantenga asl la tecla del nt'maero 1 hasta clue el (;i
aparezca.
®Tecla de CAPTION--Vea pfigina M.
CGuide--Vea pfiginas _> 36.
Tecla de Reajuste (RESET)--Presione esta tecla
dos veces para llamar a los ajustes de f5brica. La TV
inicializarfi automfiticamente la bfisqueda de canales,
y eliminarfi todos los ajustes hechos por el usuario.
Estas fhnciones se reaiustarfin automfiticamente :
" Se reajusta imagen : Auto, Juego, Manual: Color,
Tinte, Contraste, Brillo, y Nitidez
" Controles de Sonido: Audio, Bajos, Agudos y
Sun'ound
• Control de Canales: Antena, Bf_squeda de Canales y
Memoria de Canales
• Controles de Ajuste: Realce de Color, Razdn de
Aspecto y Luz Trasera: Brillo, Medio, Oscuro
° Se desactiva la funcidn Subtitulos
• Se desactiva la funcidn de Guia-V
• Se cmnbia el lenguaje menu a Ingi4s
• Cronometro para Dormir (Si file previamente
ajustado)
• Se Video la TV (Si se ha seleccionado previmnente)
Si quiere personalizar los ajustes, estos pueden ser
hechos nuevmnente usando el men6 de opciones.
Apunte hacia
elTV "
Conseios
R piaos
.• Asegfirese que/as
bater[as esten instala-
das correctamente.
-0
V_UIDE
!m
_m
Apunte el control
remoto hacfa el
equipo que Ud. quiere
operar Objetos entre
el control remoto y
el equipo, pueden
causar un real
funcionamiento del
control remoto.
Ajustando el nivel de
volumen: La flecha
de parpadeante hacia
el lado derecho _,
indica que el volumen
esta aumentando. La
flecha parpadeante
hacia la izquierda .1
indica que el volumen
esta disminuyendo.
Necesita ayuda?
Visitenuestrositio
eninternet
www.sanyodvxom
o Llame1-800-877-5032
Tec|a de POWER--Presione
esta tecla para encender o apagar la TV.
Tecla de RECALL--Seleccione un canal, entonces
seleccione otro usando las teclas numeradas. Presione
Recall para hacer el cambio entre estos canales.
Tec|a una vez para que apa-
de DISPLAY--Presione
rezca el desplegado del canal. Presione dos veces para
que el desplegado aparezca nuevamente. Presione nue-
vamente para eliminarlo.
Tecla de SLEEP--Presione esta tecla posterior-
Y
mente ia tecla de "O" para ajustar el Cronometro para
dormir. E1 lapso de tiempo deseado puede ser ajustado
de 30 minutos a 3 horas. E1 Cronometro para Donnir
apagarfi la TV automfiticamente. Nora: La funcidn
de cronometro para dormir so cancela si la TV es
desconectada, o ocurre una falla en el suministro
electrico.
Control Remoto 2_

Utilizando las Entradas de Componente de Video y
Audio
[] Unapantallade color _
azulcon lapalabra
CONPONENTB
desplegada,significa
queel modo de
Videoestaseleccio-
nado,pero laserial
no ha sido detectada
en elconectorde
Video.
Z Neces#a ayuda?
visitenuestrositio
eninternet
www.sanyocfv.€om
oLlame1-800-877-5032
Lo que necesitas para lasconexiones:
O Cable de componentede video - 1
Cable deAudio - 1
ControlRemote
Conectando una Reproductor de DVD u arras equipos externos a la TV
Apague la TV y los eqnipos externos antes de conectar los cables. (Los ca/)les _o scm
s'_unit_istrados co_ la T_:)
O Conecte el equipo de DVD u otto equipo con salidas de Componente de video alas
entrada de componente de video del TV (Y-Pb-Pr).
Conecte la salida del Audio del DVD alas entradas LR de componente de Audio del TV.
_Presione POWER para encender la TV. Ademfis Encienda el equipo externo.
Presione INPUT para seleccionar de COMPONENTE3.
ParlePosteriordeTV
®®
®
__c_c.__ OI Entrsds_,o
"_ -_ _ componente3de
video del TV
_I _1 I /Y-P,-Pr/
)®
%
%
J m_
S
s Presinneisleclade
s
INPUTdespn_sde hsberhechn _\
/
j, las cnnexiones necessrias pars I
I accesar las enlradas de A/V. s
\ t
Nohaynecesidadde seleccinnars
% uncanalenblanch, s
2_ Entradas de Componente de AV- Reproductor de DVD

Usando los Entradas de Audio/Video
Conectando una VCR o Reproductor de DVD
Apague la TV y los equipos externos antes de conectar los cables. (Los cables t_o _o_
suministrados cot_ la TV)
0 Conecte la salidas de Audio Video de la VCR, DVD, o otros euipos' alas entradas de
la TV Audio Video.
Para VCR monofdnicas (una salida de Audio) conecte la salida de la VCR a la
entrada (L) de la TV.
@ Optative
Conecte las salidas de S-Video del DVD o otros equipos' a las entradas de
S-Video de la TV.
Nora: Usando las entradas de S-Video se cancela las entradas de posterior Video.
Presione POWER para encender la TV. Ademfis Encienda el eqnipo extemo.
Presione iNPUT para seleccionar de VIDEO1 o VIDEO2.
Porte Posterior de VCR Los entrados de audio/ Porte Posterior de DVD
video de JaTV
@
Lo que neoesitas para los cone×Jones:
q[]) Cable deAV - J
CONEXIdN OPCiONAL:
@ Cable S-Video- J
@ Cable de Audio- J
s Presionela teclade _,
S INPUT despu_s de haber hecho ias _.
/
! conexionesnecesariasparaaccesar _,
I losentradaedeA/V. I
/
_%No hay necesidad de seleccionar s
s
%",_, Ull CallaJ ell hJallco. ,,_
Consoles
[] Asegurese que
todos los conec-
tores esten
correctamente
asentados en las
entradas.
[] Siempre combine
los cables de
acuerdo a los
colores: ROJOpara
el audio del lade
derecho,BLANCOpara
el audio del lade
izquierdo,y AMARILLO
para video.
[] Unapantalla de color
azulcon lapalabra
VIDE01oVIDE02
desplegada,significa
queel mode de
Videoestaseleccio-
nado,pete/a serial
no haside detectada
en elconectorde
Video.
Necesita ayuda?
visitenuestrositio
eninternet
www.sanyodv.com
oLlama1-800-877-5032
ControlRemote
MENU
Usando las Entradas A/V : Conoctando una VCR o DVD 2_

Consejos
R_pidos
Ajustes del laTV
E1 menf_ en la pantalla provee un fScil acceso a los ajustes de la TV. E1 Menf_ de LCD es
desplegado de manera colorida de manera qne cada opcidn ajustable sea fScil de identificar.
Simplemente use las teclas de sn control remoto y siga las instrucciones en pantalla.
: [] El monet so
desplegara por 20
segundos aproxima- :
damente. Presione
MENU nuevamente
para desplegarlo.
: [] Use las teclas de
CANALES A/T
y las teclas de
VOLUMEN -/+ para:
navegar a tra@s del
menet y para hacer
las selecciones de
/os toOl?US.
i, Necesita ayuda?
visiienuestrosilio
eniniernet
www.sanyodvxom
o Llame1-800-877-5032
Como operar el men6 en pantalla
1. Presione la tecla MENU para desplegar las
opciones del mend principal.
2. Use las teclas +/- para seleccionar la opcidn
deseada (La opcirh_ ,_e/eccionada esm resalt-
adu et_ Amarillo.)
3. Use la tecla Vpara seleccionar la opcidn del
sub men£t deseada.
4. Use las teclas ,t_/V y -/+ para seleccionar
y ajustar la caractedstica del sub mend (1_ La
flecha roja indica el articulo seleccionado.)
5. Presione la tecla MENUpara seleccionar otras
opciones del men_ principal o para salir.
Ajuste de imagen
Para los ajustes autom:iticos de Imagen
Seleccione Auto de las opciones de Imagen.
Para seleccidn automfitica de Juego
I_GEN $ONIDO C!_fg._
LI]lgGUAJB AJUSTE
$eleccione:=i+
Menu $ecundario:v
IM.I.GIII$
duego
Manual +
Seleccione : AT
1. Seleccione Juego del mend de opciones de hnagen. La imagen cambiarfi automfiticamente
por ajustes previamente establecidos.
2. Use MENU para salirse.
Nora: Seleccione el modo de juego presionando la
tec/a de INPUT en el control remoto.
Para persona|izar manua|mente la Imagen
1. Seleccione Manual de las opciones de hnagen.
2. Presione teclas de + para acceder las opciones
del sub-men_.
3. Use las teclas de A/Y para resaltar el
control que se quiere ajustar.
lg_Gl]Ig
'*(_40D®_' Illllllll .....
Tinte
Contraste
Brillo
Nitidez
Seleccione :.v
Adjuste :=/+
4. Use las teclas de -/+ para hacer los ajustes.
28 Ajustes del la TV

Ajustando el Sonido
Seleccione el aiuste de sonido deseado: Audio, Bajos,
Agudos o Surround.
1. Seleccione Audio de las opciones del men6 de Audio.
2. Use las teclas A/V para seleccionar el ajuste de sonido
que usted quiera cambiar. (la flecha roja indica la opcidn
resaltada seleccionada.)
3. Use las teclas -/+ para modificar los ajustes: Estdreo,
Mono o SAR
Notas : Estereo y SAP deben set parte de/a seha/
transmitida.
La TV regresara automaticamente a modo
Estereo si es desconectada o una fa//a de
energia ocurre.
4. Para ajustar 1as otras caractedsticas de sonido: Bajos,
Agudos o Surround, solo siga los pasos 2--3
mencionados an'iba.
Reajustando el modo de Antena y Busqueda de
Canales
Reaiuste el Modo de Antena Cable o Bt'_squeda de Canales
si es requerido, si tienen canales adicionales, si es que se
cambio a otra ciudad o si se ha instalado el serxicio de cable.
1. Escoja Antena o B£1squeda de canales entre las opciones
del men6 del (?anal. (la flecha roja indica la opcidn resalt-
ada seleccionada.)
2. Use las teclas -/+ para cambiar los ajustes de Antena:
Cable o UHFiVHF. Para Busqueda de canales, presione
la tecla + La TV iniciara automfiticamente la bt'lsqueda de
los canales. Esta operacidn le puede tomar a la TV varios
minutos.
Agregando o Borrando canales
1. Escoja Memoria de Canales de las opciones del men_
de canales. (la flecha roja indica la Opcidn resaltada selec-
cionada.)
2. Presione la tecla de + para iluminar el n6mero del canal en
el 5tea de entrada.
3. De entrada al numero del canal pot ejemplo : ('34. Para
$0NID0
_aios
guoos
Surround
SeJec©ione : Av
Adjuste :-/+
80_IDO
Audio
_aios
gudos _,
SOJ6CClOnO :Av
Adjuste :- /_,,___,__
Ck/_JE
Antena
Buscar Canales
_eJecclono :Av
Iniciar :+
CA_
Antena
Loc, Canales +
34 Agregar?
SoJscclone: _v
Ajuste:+
canales de (?able an'iba de 99, presione y mantenga asi la
tecla del 1, hasta clue CI-- aparezca. Entonces
presione los otros dos n{m_eros.
4. Presione la tecla + para seleccionar la opcidn
(ejemplo) : Anadido cmnbiara a Saltado. Durante ese
tiempo, la palabra "Afiadido" o "Sahado" serfi color ama-
rillo.
5. Use las teclas de AV o 0~9 para eliminar otros canales o
presione la tecla de MENU para salir.
CAI_AL
Antena
Loc. Canales +
S®J_cc]one: _v 00-9
Ajuste:+ Oatras:_
Consejos
_R_pidos
• Bajocondicionesde
serial est_reo debil,
Usted puede recibir
un sonido de mayor
calidad en la
posicidn de
"Mono."
5onido (surround)
envolvente expan-
dirs los efectos de
sonidomientras
se este reciviendo
sofialos ostoroo
MT£
Presione la tecla de
RESET dos veces
para eliminar todos
los ajustes person-
alizados y regresar
a los ajustes de
fbbrica.
: • Canalesborrados
en la memorla de
canales, pueden
ser seleccionados
con las teclas
nOmeradas.
: • PaTa restaurar
canales borrados,
use el menO en pan-
talla, manualmente,
agregue los canales
o inicie la BOsqueda
de Canales en el
menfi. Puede tomar
unos minutos la
bOsqueda a tra@s
de los canales dis-
ponibles o presione
la tecla de RESET
dos veces.
i, Necesita ayuda?
visile nuestrositio
eninternet
www.sonyodv._om
o Liame1-800-877-5032
(Continua en /a siguiente pagina ................................
Ajustando el Sonido /Antena y Bt)squeda de Canales /Agregando o Borrando Canales 2_

Seleccionando el Idioma del Desplegado
1. Escoja English, Francais (Frances), o Espafiol entre las opciones del menfl de Idioma.
2. Use las teclas A/V para seleccionar el idioma deseado.
TV Para Empezar
Ajuste de la TV Utilice las siguientes caracterlsticas para ajustar la TV de LCD a su
preferencia.
ARTICULO DEL MENX,_
Resahor Color
Relacion hnagen
Luz Trasera
FUNCION
Normal Resalta los tonos de la piel y los colores fhertes.
Caliente Resalta ins tonos de rojo de la imagen.
Fresco Resalta ins tonos de azul de la imagen.
Utilice esta caracteristica cuando el equipo es conectado alas
entradas de componente. E1Ajuste 4:3 es para ver el aspecto
original de imagen. E1 ajuste 16:9 camloia de imogen normal
a imagen de pantalla ancha con una minima porcidn de las
partes superior e inferior comprimidas.
Funcidn de ahorro de Energia La imagen y el fbndo de esta
cambian automfiticamente como sigue:
Brillo Aha energia (Ajuste de fabrica)
Medio Energia Media
Oscuro Baja Energia
Opciones de Ajuste de hnagen
1. Escoja Resahar Color, Relacidn de hnagen o Luz trasera dei Menu de opciones.
2. Use las teclas A/T para seleccionar la Opcidn clue se quiere cambiar.
3. Use las tecla -/+ para ajustar la imagen.
LENGU_
English
rancais
Sele¢¢ioris: Av
Imogen de Formato 16:9
AJUSTE
Resaltar Color
Ralacion Imogen
Sel_cc;orl$:=/÷
Ajuste:-i_
Transmisidn Captada [] (Closed-Caption)
La transmisidn captada es infbnnacidn de texto transmitida junto con la imagen y el sonido, y clue puede ser desplegada
en la pantalla de la TV. Debido a los diferentes tipos de subtitulos clue pueden ser transmitidos con la serial de TV, existen
difcrentes modos de transmisidn capatada clue son usados para desplegar subtimlos. Los modos de transmision captada
reconocidos por este modelo son los siguientes : C1 (Captionl) y (?2 (Caption2). Los transmisoras locales deciden que tipo de
serial de transmisidn captada es transmitida.
Captionl : Este es el principal rondo usado para subtltular programas (ias palabras coinciden con el programa que Ud.
esta viendo). Estos subthulos son generahnente una o dos lineas y aparecen el la parte inferior de la pantalla o cerca de la
persona que esta hablando.
Caption2 : Es un rondo aherno para programar subtitulos. Caption2 puede ser usado por las estaciones
transmisoras para proveer subtitulos en otro lenguaje, como puede ser Espafiol o Fran@s.
Quikcap : Quikcap permite activar y desactivar subtitulos con la funcidn de MUTE. Presiona
la tecla de MUTE en el control remoto para desactivar el sonido de la TV, ins subtimlos se desplegarfin
automfiticamente, presione MUTE nuevamente, para restaurar el sonido, los subtltulos desaparecerfin.
Quikcap desplegarfi programas subtimlados en el modo de Caption1.
Ajustando la funcidn de Caption
1. Presione la tecla de CAPTION en el control remoto.
2. Presione la tecla de 0 para seleccionar, NO, C1, C2, o OUIKCAP.
Nora: El ndmero de/canal no puede so ser desplegado cont/nuamente cuanc/o la transm/s/on captada este act/vada,
Caption1/2
30 Idioma /TV Para Empezar /Transmision Captada

lnformacion de Guia-V
NOTA : ESTA FUNCION ESTA DISEI_IADA PAPA CUMPLIR REGULAC/ONES DE LA FCC COnSOjOS
PAPA V-CHIP EN LOS ESTADOS UNIDOS DE AMERICA, ESTA FUNCION NO Rdpidos
PUDIERA ACTIVARSE CON SEI_IALES QUE SE ORIGINEN EN OTROS PAISES.
Este televisor SANYO estfi equipado con un circuits electrdnico V-CHIR para interpre-
tar los cddigos de clasificacidn de la MPAA y Ordenamientos de Control Paternal en TV.
Cuando estos cddigos son detectados, el TV desplegarfi o bloquearfi la serial, dependiendo
de las selecciones hechas en el sistema de V-GUIDE.
MPAA y los ordenamientos de control parental en TV, son sistemas de clasificacidn clue
penniten a los padres tener una infonnacidn avanzada de prevencidn acerca del contenido
de una pel_cula o programa de televisidn.
E1 sistema de V-GUIDE estfi basado en edad y contenido de la marco. Esta informacidn da
a los padres una manera discreta de escoger el material que va a ser visto por sus hijos.
La clasificacidn contenida esta representada pot iniciales : D (Dialogos Sugestivos),
L (Lenguaje para Adultos), S (Contenido Sexual), V (Violencia), y FV (Fantasia Violenta).
Cuando ia programacidn contiene cualquiera de estas condiciones, estas iniciales fonnan
parts del icons que es desplegado en la pantalla de la TV.
Un icons de clasificacidn aparecerfi generahnente en la esquina superior izquierda
en la pantalla de su TV por 15 segundos.
Operacion de Guia-V
Esta es una funcidn que le permits supervisar los programas de televisidn clue son vistos por
los nirios. Este televisor puede ser ajustado para bloquear automfiticamente programas que a
su juicio no son apropiados para ser vistos.
La capacidad de la televisidn para bloquear la recepcidn sobre el contenido de programacidn
especifica, depends de varias condiciones : 1) E1 programa debe de ser clasificado, 2) Las
cadenas transmisoras debe transmitir informacidn sobre el cddigo de clasificacidn, 3) Las
compariias de Cable deben de transmitir la serial con el cddigo de clasificacidn, y 4) La TV
debe de esta ajustada para decodificar la serial.
Ajustes de Codigo
1. Presione la tecla de V-GUIDE en el control remoto para
desplegar el menS.
2. Presione la tecla -/+ para cambiar a V-Guide SI.
3. Presione la tecla + para accesar el cddigo: Cddigos
MPAA o Cddigos de TV. (m La flecha indica el articulo
seleccionado.)
Seleccionando un Cddigo de peliculas MPAA
4. Use las teclas &/V para bloquear cddJgos G, PG, PG-13, R, NC-17 y X.
5. Presione la tecla de + para seleccionar el cddigo bloqueado. (La marca
indJca cddigos bloqueadas.)
Gula=V System
i/AA Codlgo +
TV Codlgo +
SQIOCC;ONS:_T
Aj.ste:-/_._
: [] Use las teclas de
CANALES & / V
y/as teclas de
VOLUMEN I+para
navegar a travds del
menE!y para hacer
/as selecciones de
los menus.
[] La funci6n de V-
Guide es accesible
solamente por el
control remoto.
: [] Un icons con
indicaciones de
clasificaciones apa-
recerd generalmente
la esquina superior
izquierda en la
pantalla de su T_
[] El desplegado de
V-Guide se man-
tendra en pantalla
apmximadamente
por 20 segundos.
Si este desaparece
presione la tecla de
V-GUIDE_
Z Necesita ayuda?
visHemlestrosilo
eninternet
www.sanyod'v.¢om
o Llame1-800-877-5032
MPAACodigq
[] C=n©e,
DG
[] PG
[] PG=13
i_iNQ=17
Selections:AT
Ajusts:_
Nora: La TV bloqueara (B) automaticamente /os cddlgos hacia arrlT_a y desbloqueara (U) /os cddlgos deba]o de/a
seleccidn. Por ejemplo, sl se bloquea el cddl_7os R, entonces NC17 y X tambien estaran bloqueados.
Guida-V 31

Consejos Para lmpiar los c6digos de peliculas MPAA
(Repita los pasos 1 y 3 para mostrar el menfi
R_pidos G,,_.-x¢sise,,ece_it..)
: m Bloqueando TV-Y7no
bloquear& clasificacio-
nes superiores.
: m Ud. puede bloquear
una clasificaci6n
per contenido come
pueden ser programas
TVPG-V y se
mantendr_ asf pare
ver programas
TV-PG con
clasificaci@ S-L-D,
estipulados en
TV-PG come no
bloqueados (U).
m Para verpmgramas
B/oqueados (B),
deshabilite V-Guide o
presione /a tec/a de
RESETdos veces para
e/iminar redes/as
clasificaciones
Bloqueadas (B).
: • Cuando en elsistema
de men(! de V-Guide,
las tec/as de at/Y
le permiten a Ud.
navegar entre/as
clasificaciones y el
men(! de opciones.
Z Necesita ayuda?
Viaitenaestroaitio
eftinternal
www.sanyodv.tom
a Llama1-800-877-5032
6. Utilice las teclaa at/V para resaltar Cancel.
7. Preaione la tecla+ para cancelar todos los cddigos
bloqueados.
Sdeccionando los cddigos de TV
(Repita los pasos 1 y 3 para mostrar el menfi
Guia -_. si se necesita.)
8. Utilice las teclas at/V para bloqnear cddigos de TV;
TV-Y, TV-Y7, TV-G, TV-PG, TV-14, TV-MA, o
Contenido.
9. Presione la tecla+ para seleccionar el cddigo bloqueado.
(La marca 5' indica cddigos bloqueadas)
Seleccionando las guias de contenido
de cddigos de TV
(Repita los pasos 1 y 3 para mostrar el menu
Guia -'_; si se necesita.)
10. Utilice las teclaa at/V para resaltar la Opcidn Content.
11. Presione ia tecla+ para mostrar las opciones de contenido
de cddigo de TV: Fantasia Violenta, Violencia, Simaciones
Sexuales, Lcnguaje Adnlto y Dialogo Sugestivo.
12. Utilice las teclaa at/'_' para resaltar el Cddigo de TV
(resaltado en amarillo). Entonces presione ia tecla+ para
bloqnear la categoria de contenido (resaltada en blanco).
Presione la tecla+ de nuevo para bloquear o desbloquear el
cddigo. Utilice las teclas at/V para resaltar otro cddigo.
13. Presione ia tecla- para regresar a la Opcidn de contenido
de cddigo de TV para bloquear o desbloquear otras
categorias. Repita el paso 1!para hacer camloios.
Para lmpiar las guias de contenido de
cddigos de TV
(Repita los pasos 1 y 3 para mostrar el menfi
Guia -X; si se necesita.)
14. Utilice las teclas at/Y para resaltar la opcidn Cancel.
15. Presione la tecla + para cancelar todos los cddigos
bloqueados.
Para apagar la Guia -V
1. Preaione la tecla V-GUIDE.
2. Utilice las teclas at/Y para seleccionar V-GUIDE.
Entonces presione -/+ para seleccionar OFF.
32 Guido -V
MPAA CedJge
DG
[] PG
[] PG-13
[]R
[] NC-17
[]X
Seisccions:Av
Ajusts:+
Gule-V System
Guia=V
MPAACodlgo ÷
SEflecc;orls: Av
AjUSte:+
TVCod;go
[] Cancel F V $ L D
[] TV-Y
[] TV-Y7 []
[] TV-G
[] TV-PG [] [] [] []
[]Y¥°14 [] [] [] []
Content
Selecclone:Av
_US|S:÷
Centent
TV-Y
TV-Y7 Fantasia V -
TV-G V;oleno;a B
TV-PG Sexusl El
YV°14 Langaaie B
TV-MA Dialogos B
SoJocc;ons: Av
Ajuste:+ Ostrss:=
TV Codlgo
[] ]: r':: I F V $ L D
[] TV-Y
[] TV-Y7 []
[] TV-G
[] TV-PG [] [] [] []
[]TV-14 [] [] [] []
[] TV-MA [] [] []
Content
Seleccione:Av
Ajuste:÷
Note : Las cadenas trans-
misoras y/as estaciones
locales, pueden no inc/uir
/as porciones de contenido
de c/asificacidn de los
Ordenamientos del control
de TV Paternal,

Sugerencias 0tiles= problemas/soluciones
Antes de llamar por asistencia, por favor yea las condiciones que m_s se pueden parecerse a sus problemas
en las siguientes carta, entonces siga las instrucciones para esta condici6n. Visite nuestro lugar en internet en
w_v.sanyoctv.com o llame sin costo 1-800-877-5032.
ProbJema Confirme las Siguientes Condiciones Trate estas Soiuciones Pfigina
No imagen, imagen
pobre, o lineas
ondulantes en la
imagen.
* Chequela conexi6n de antena/equipo externo.
* Ladifusora deTVpuedetener problemas.
Brilloy contraste mal ajustado.
* Posible interferencia pot electro-domdsticos.
* Ajuste la antena,
* Trate uncanal diferente.
Presionela tecla de RESET.
* Apague, el Mezclador de alimentos, Taladro,
Licuadora, etc.
23,28
Imagenmuybrillante
o muyobscura.
N i:im_
No TransmisiOn
Captada.
Chequela LuzTrasera(Modedeahorrodeenerg[a). • Enel menOdeajuste,seleccionela luztraseraa
rangomedio.
* Chequeque la difusora transmita la senalde * Presionela teclade CAPTIONparatransmisi6n
Transmisi6n Captada.Trate un canaldiferente, captada.
3O
3O
Imagen Azul con
funci6n deVideo1.
Video2,o Compo-
nente3 desplegado.
* Chequelas conexiones deAV.
,, Chequeequipo externo.
Verifiquelos ajustesdel equipoexterno.
* Verifiquelos ajustesdel DVD.
* Presione la tecla de INPUT.
Encendiendoel equipoexterno.
* Seleccionelas conexiones de ealidadel equipo
externo que coincidan con las conexiones de
entrada.
26-27
No puederegistrar o
seleccionaralgunos
caoales.
* Elcanal puedeestar eliminado en la memoria.
Cheque la conexi6n de antena,
* V-Guide esta programado para bloquear la
programaciOn.
* Seleccione en lafunci6n de Buscar Canalesen
Memoria y agregar los canales manualmente.
Deshabilitar-Guide,o presione la tecla de
RESET.
29, 31-32
Palabrasmal
deletreadasen
el Sistema deMen0.
* Posiblemente una lenguaje extranjero este
seleccionado.
* Reseleccioneel languajede su men0, usando
el menLien pantalla o presione le tecla de
RESET.
3O
i:ii:ii:ii:ii:ii:ii:ii:ii:ii:ii:ii:ii:ii:ii:ii:ii:ii:i:ii_i_i
i ii ii ii ii ii ii i}ii ii i ii ii ii!ii i ii! i ii! i ii! i ii! i ii! i ii! i ii! i ii! i ii! i ii!ii!i! i!ii!i i !
Sugerencias Otiles-Problemas/Soluciones 33

Cuidados y Limpieza
La superficie del gabinete puede ser datiada si no recibe un apropiado mantenimiento. "¢arios productos usados en el
hogar como aerosoles, agentes de limpieza, solventes y ceras pueden causar datios en el tem_inado de la superficie del
gabinete.
1. Desconecte el corddn de Potencia antes de limpiar el televisor.
2. Limpie la pantalla y gabinete con un patio limpio y suave.
Nora : _\Smca aplique liquidos en aerosol en la pantalla, este puede escurrirse y gotear dentro del
chassis. Este puede causar fhllas en los componentes no cubiertos por la garantla.
Este simbolo impreso, significa el producto esta listado Underwriters' Laboartories
que per
0 [JS Inc. El diseho y manufactura de este producto, ret]ne los rigidos est_ndares de U.L., contra
LISTED riesgos de incendio, accidentes o descargas el6ctricas.
34 Cuidados y Limpieza

Mexico Garantia
IMPORTADOR:
COMERCIALIZADORA MEXICO
AMERICANA, S.DE R.L. DE C.V.
AV. NEXTENGO N° 78
COL. SANTA CRUZ ACAYUCAN
DEL. AZCAPOTZALCO, MEXICO, D.F.C.P. 02770
RFC: CMA9109119L0
GARANTIA
iBESCRIPCION:Televisor
IVlARCA: SANY0
IlVl0DELOS: CLT1554
CLT2854
EL APARATO QUE USTED HA ADQUIRIDO CUENTA CON UNA GARANTIA DE UN ANO DE SERVICIO A PARTIR DE LA
FECHA DE ADQUISICION OTORGADA PeR:
COMERCIALIZADORA MEXICO-AMERICANA, S. DE R.L. DE C.V.
BAJO LAS SIGUJENTES CONDICIONES:
I.- PARA HACER EFECTIVA LA GARANTIA, BASTARA PRESENTAR ESTA POLIZA DEBIDAMENTE SELLADA PeR LA
TIENDA O UNIDAD VENDEDORA, JUNTO CON EL APARATO EN LA TIENDA DONDE FUE COMPRADO ELARTICULO.
2.- SE COMPROMETE A CAMBIAR EL ARTiCULO O A DEVOLVER SU DINERO, Sl LA FALLA ES ATRIBUIBLE A
DEFECTO DE FABRICACION. DURANTE LOS TREINTA DIAS POSTERIORES A LA COMPRA LA GARANTiA
SE HARA V_,LIDA EN LA TIENDA DONDE ADQUIRIO EL PRODUCTO, PRESENTANDO LOS DOCUMENTOS
MENCIONADOS.
3.- EN NINGUN CASe EL TIEMPO DE REPARACION SER_, MAYOR A 30 DIAS; TRANSCURRIDO ESTE TERMINO,
COMERCIALIZADORA MEXICO AMERICANA,, S. DE R.L. DE C.V. PROCEDERA A EFECTUAR EL CAMBIO PeR UN
APARATO EQUIVALENTE O A LA DEVOLUCION DEL IMPORTE DE COMPRA VENTA RESPECTIVe.
4.- ESTA GARANTiAAMPARA LA TOTALIDAD DE LAS PIEZAS Y COMPONENTER DEL PRODUCTO Y MANe DE OBRA
DE LA REPARACION, ASi COMe GASTOS DE TRANSPORTACION RESPECTIVOS.
ESTA GARANTIA SERA NULA EN LOS SIGUIENTES CASES:
* CUANDO EL PRODUCTO SE HUBIESE UTILIZADO EN CONDICIONES DISTINTAS ALAS NORMALES.
* CUANDO EL PRODUCTO NO HUBIESE SIDe OPERADO DE ACUERDO CON EL INSTRUCTIVe DE use QUE SE LE
ACOMPANA.
,k CUANDO EL PRODUCTO HUBIESE SIDe ALTERADO O REPARADO PeR PERSONAS NO AUTORIZADAS PeR EL
FABRICANTE NACIONAL, IMPORTADOR O COMERCIALIZADOR RESPONSABLE RESPECTIVe.
CENTRe DE SERVICiO Y LUGAR DONDE OBTENER PARTES,
COMPONENTES, CONSUMIBLES Y ACCESORIOS:
SUCURSAL VALLEJO
Poniente 126 N° 288 B
Col. Nueva Vatlejo
Mexico, D.F.
Tels. 5567-5378
5368-0105, 8589-8033
DESCRIPCION:
NOMBRE DEL CLIENTE:
DOMICILIO:
Col.
Tel.
SUCURSAL MINERVA
Silos N° I35, Col. Minerva
Deleg. Iztapalapa
Mexico, D.F. 09810
Tels. 5646-4551
5646-4550
MARCA:
Estado/Deleg:
SELLO, FECHA Y FIRMA
DE
TIENDA
MODELO:
N° Ext. N° Int.
Mexico Garantia 35

Garantia, Estados Unidos y Canada
GARANTiA L|iVl|TADA POR UN A_lO
ESTA GARANT[A LIMITADA ES VALIDA UNICAMENTE EN TELEVlSORES SANYO COMPRADOS Y
USADOS EN LOS ESTADOS UNIDOS DE AMERICA, CANADA Y PUERTO RICO, EXCLUYENDO OTROS
TERRITORIOS Y PROTECTORADOS. ESTA GARANTiA LIMITADA APLICA SOLAMENTE AL COMPRA-
DOR ORIGINAL, Y NO APLICA A OTROS PRODUCTOS USADOS CON PROPOSITOS INDUSTRIALES Y
COMERCIALES.
POR UN A_IO, a partir de la fecha de compra, Sanyo Manufacturing Corporation, reemplazara cualquier TV.
Para asegurar et intercambio adecuado pot garant[a, rnantenga el recibo origina_ de la compra como
evidencia de la compra. Regrese la TV defectuosa al vendedor, junto con el recibo de compra y los
accesorios incluidos, como es el control remoto. La TV defectuosa ser& cambiada por una del mismo
modelo, o el reemplazo de un modelo igual valor, s[ es necesario. El modelo de reemplazo depender_ de
la disponibilidad y de la voluntad de Sanyo Manufacturing Corporation.
LA ANTERIOR GARANTJA ES EXCLUSIVA Y EN LUGAR DE OTRAS GARANTiAS DE MERCANCiA O
CONVENIENTE PARA UN PROPOSITO PARTICULAR.
OBLIGACIONES
Por un aifio a partir de la fecha de compra, Sanyo Manufacturing Corporation garantiza que este producto esta
libre de defectos en materiales y mano de obra bajo condiciones normales de uso. El reemplazo solo sera
necesario bajo esta garantia, por cualquier razon debido a defecto de manufactura o mal funcionamiento durante
el primer afio a partir de la fecha de compra original. Sanyo Manufacturing Corporation proveera de una TV
nueva, via intercambio al vendedor.
Para asistencia at cliente o en Iocalizaci6n de centros de servicio m&s cercanos a Ud. Ilame gratis al
1-800-877-5032.
En dias h_biles de 7:30 A.M. - 7:00 P.M. Hora det Centro.
S&bado 7:30 A.M. - 4:00 P.M. Hora del Centro.
Esta garantia le da derechos legales especificos. Usted puede tener otros derechos, los cuales variar de
estado a estado.
(EFECTIVO: Agosto 1, 2002)
Para su protecci6n en caso de robo o perdida de este producto, por favor flene la siguiente
informaci6n requerida y GUARDELA en un lugar seguro en sus registros personales:
Modelo No.
Fecha de compra
Serie No.
(Locatizada en la parte posterior)
Precio de compra
Lugar de compra
Sanyo Manufacturing Corp.
3333 Sanyo Road, Forrest City, AR 72335
36 Garantia, Estados Unidos y Canada

C il afety:
it MakesA DifferenceWhereYourTVStands
Congratulations onyourpurchase!Asyouenjoyyournew product,
please keepthesesafetytips in mind:
The
issue
[]
[]
Ifyou are like mostAmericans, you have a television in your home.
Many homes, in fact, have more than one television.
The home theater entertainment experience is a growing trend, and larger
televisions are popular purchases andare not always supported on the
properTV stands.
Sometimes televisions are improperly secured or inappropriately situated on
dressers, bookcases, shelves, desks, audio speakers, chests, or carts. As a
result, TV sets may fall over and may cause unnecessary injury.
SanyoCares!
[] The industry is committed to making homeentertainment
enjoyable andsafe.
The Consumer ElectronicsAssociation formed the Home
EntertainmentSupport Safety Committee comprised of television and
consumerelectronics furniture manufacturersto advocate children's safety
andeducate customers and their families about television safety.
Tuneinto Safety
1 One size does NOTfit all. Use the appropriate furniture that is
largeenough to support the weight of your television (and other
electronic components).
2 Use appropriate angle braces straps, and anchorsto secure your
furniture to the wall (but never screw anything directly into the TV).
3 Carefully read and understand theother enclosed instructions for proper use
d this product.
4 Don't allow children to climb on or playwith furniture andtelevision sets.
5 Avoid placing any items on topof TVs such as VCRs and remotesthat may
pique the children's curiosity.
6 Remember that children can become excited while watching a program and can
potentially push or pull a TV over.
7 Share our safety message on this hidden hazard of the home with your family and
friends. Thank you!
OEA 2500 Wilson Boulevard Arlil]gton VA22201 Tel703 907 7600 Fax 703 907 7690 v/_,_,OE org
A_/_ o EA CEA is theSponso_ Producer and Manage_of the Iner_lat ona_CES_ and is a 8ecto_of t_e E ect_onic I_ldust_iesAJliance
-
 1
1
-
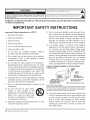 2
2
-
 3
3
-
 4
4
-
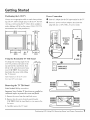 5
5
-
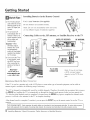 6
6
-
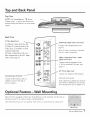 7
7
-
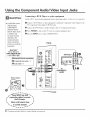 8
8
-
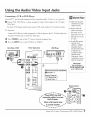 9
9
-
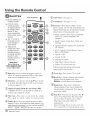 10
10
-
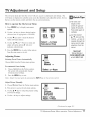 11
11
-
 12
12
-
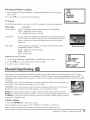 13
13
-
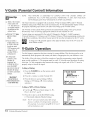 14
14
-
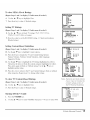 15
15
-
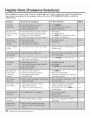 16
16
-
 17
17
-
 18
18
-
 19
19
-
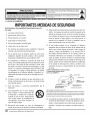 20
20
-
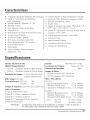 21
21
-
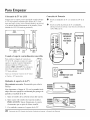 22
22
-
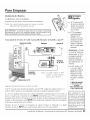 23
23
-
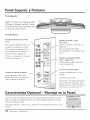 24
24
-
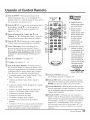 25
25
-
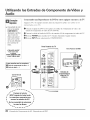 26
26
-
 27
27
-
 28
28
-
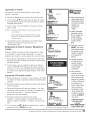 29
29
-
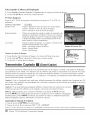 30
30
-
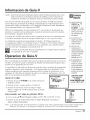 31
31
-
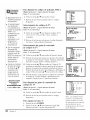 32
32
-
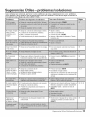 33
33
-
 34
34
-
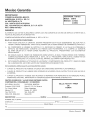 35
35
-
 36
36
-
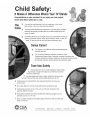 37
37


Sanyo CLT-1554 El manual del propietario
- Categoría
- Televisores LCD
- Tipo
- El manual del propietario
- Este manual también es adecuado para
en otros idiomas
- English: Sanyo CLT-1554 Owner's manual
Artículos relacionados
-
Sanyo CLT-1554 Manual de usuario
-
-
-
-
-
-
-
-
-