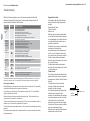
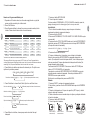
Electrolux EWIE07F5OMG Manual de usuario
- Categoría
- Lavadoras
- Tipo
- Manual de usuario
Este manual también es adecuado para

Lea todas las instrucciones antes de
utilizar el aparato y guardelas para futuras referencias.
140114A
W16(4-6)EM_BILING
MODELOS / MODELS:
EWIE06F3OMW / EWIE06F3OMG / EWIE06F2OMW
EWIE06F2OMG / EWIE06F5OMW / EWIE06F5OMG
EWIE07F3OMW / EWIE07F3OMG / EWIE07F2OMW
EWIE07F2OMG / EWIE07F5OMW / EWIE07F5OMG
EWIE09F3OMW / EWIE09F3OMG / EWIE09F2OMW
EWIE09F2OMG / EWIE09F5OMW / EWIE09F5OMG
MANUAL DE INSTRUCCIONES
LAVADORA DE ROPAS
INSTRUCTIONS MANUAL
WASHING MACHINE
Read all instructions prior to using
appliance and keep this manual for future reference.

ESP
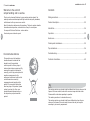
Gracias por elegir Electrolux como marca para su lavadora de ropas.
Las lavadoras de ropas Electrolux han sido concebidas bajo altísimos
estándares técnicos. Poseen características especiales desarrolladas para
ofrecer aun más comodidad al usuario.
Para que usted pueda disfrutar todos los recursos que su nueva lavadora de
ropas ofrece, Electrolux creó este manual. Con orientaciones simples y
prácticas usted conocerá sus funciones y aprenderá la manera de operar este
aparato de modo adecuado y seguro.
Lea las instrucciones sobre instalación y operación antes de utilizar su
lavadora de ropas y guárdelas en un lugar seguro para futuras consultas.
Electrolux una vez más fabrica lo mejor en lo que se refiere a
electrodomésticos.
Bienvenido al mundo del
manejo simple y sin preocupaciones
Consejos ambientales
El material del embalaje es reciclable. Procure separar plásticos, espuma flex,
papel y cartón y enviarlos a las compañias de reciclaje.
De acuerdo con la directriz de la RAEE (Residuos de Aparatos Eléctricos y
Electrónicos), en inglés WEEE (Waste of Electrical and Electronic Equipment),
se debe colectar y disponer de los residuos de aparatos eléctricos y
electrónicos separadamente. Si futuramente usted necesita desechar este
electrodoméstico, NO lo haga echándolo con el resto de la basura doméstica.
Sírvase enviar el aparato a los puntos de colecta de RAEE donde los haya
disponibles.
01 electrolux bienvenido
ESP
ENG
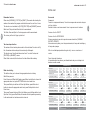
informaciones técnicas / technical informations electrolux 42
MODELO / MODEL: EWIE09F5OM(W,G)
Capacidad / Capacity
Tamaño / Dimensions
Potencia de lavado / Wash power
Voltaje / Voltage
Frecuencia / Frecuency
Peso del producto / Product weight
570 x 592 x 950 mm
400 W
220 V ~
50 Hz
37 Kg
9,0 Kg

ESP
Índice
La lavadora de ropas que usted
ha comprado puede ser ligeramente
diferente de la que se muestra en las
figuras de este manual, la forma en
general deberá ser la misma. Lea la
información referente a su operación.
Esta lavadora debe ser utilizada solo
para uso doméstico.
El aparato que usted ha comprado
puede tener un enchufe diferente del
que se muestra en las figuras de este
manual, siendo que el que viene en el
producto cumple la especificación
eléctrica de su país.
Precauciones de seguridad....................................................................03
Descripción del producto.......................................................................05
Instalación..............................................................................................06
Operación..............................................................................................08
Cómo usar..............................................................................................10
Limpieza y mantenimiento......................................................................15
Sugerencias y consejos..........................................................................16
Solución de problemas...........................................................................19
Informaciones técnicas..........................................................................40
indice electrolux 02
ESP
ENG
41 electrolux informaciones técnicas / technical informations
MODELO / MODEL: EWIE07F2OM(W,G)
Capacidad / Capacity
Capacidad / Capacity
Capacidad / Capacity
570 x 592 x 950 mm
400 W
220 V ~
60 Hz
37 Kg
Capacidad / Capacity
9,0 Kg
MODELO / MODEL: EWIE07F5OM(W,G)
MODELO / MODEL: EWIE09F3OM(W,G)
MODELO / MODEL: EWIE09F2OM(W,G)
540 x 562 x 930 mm
350 W
220 V ~
60 Hz
35 Kg
7,5 Kg
Tamaño / Dimensions
Potencia de lavado / Wash power
Voltaje / Voltage
Frecuencia / Frecuency
Peso del producto / Product weight
Tamaño / Dimensions
Potencia de lavado / Wash power
Voltaje / Voltage
Frecuencia / Frecuency
Peso del producto / Product weight
Tamaño / Dimensions
Potencia de lavado / Wash power
Voltaje / Voltage
Frecuencia / Frecuency
Peso del producto / Product weight
Tamaño / Dimensions
Potencia de lavado / Wash power
Voltaje / Voltage
Frecuencia / Frecuency
Peso del producto / Product weight
540 x 562 x 930 mm
350 W
220 V ~
50 Hz
35 Kg
7,5 Kg
570 x 592 x 950 mm
400 W
120 V ~
60 Hz
37 Kg
9,0 Kg

ESP
Precauciones de seguridad
03 electrolux precauciones de securidad
Para los niños
Mantenga a los niños alejados de la
canasta de la lavadora y no coloque
cajas o estantes al lado de la
lavadora.
Para el usuario / instalador
Sólo los técnicos profesionales deben
realizar alguna modificación,
reparación o desarme.
Esta lavadora está equipada con un
cable de electricidad con un soquete
de bielectrodo a tierra. El protector de
fuga podría usarse.
Se debe desenchufar la fuente
eléctrica con las manos secas.
No se deben usar enchufe o alambre
despuntado o dañado.
No dañe ni altere el cable doblándolo,
jalándolo dos veces o agarrando el
cable con fuerza. Además, por favor,
no coloque peso sobre el cable o
enriede el cable.
No coloque agua en contacto directo
con la unidad durante el
mantenimiento o reparación.
No coloque prendas con gasolina,
benceno o alcohol dentro o cerca de
la lavadora.
Use el tomacorriente simple con
voltaje y corriente especial que
coincida con las especificaciones del
enchufe.
Limpie con cuidado el enchufe
cuando se adhiere suciedad en el
punto o a sus alrededores.
La lavadora no debe instalarse en un
lugar húmedo o lugares expuestos al
viento y la lluvia.
Por favor, cierre el caño cuando no
use la unidad.
Está terminantemente prohibido que
la lavadora esté cerca de lugares
con vela, repelente de mosquitos u
otros tipos de llama abierta.
No meta la mano en la canasta
hasta que se haya detenido por
completo.
No coloque sus manos dentro de la
canasta de la lavadora durante el
proceso de enjuague o lavado.
No jale el cable del soquete al
momento de desenchufar la unidad.
Se debe desenchufar la fuente
eléctrica con las manos secas
durante el mantenimiento y la
reparación.
Si el cable eléctrico está dañado, el
fabricante, su agente de servicio o
cualquier persona calificada debe
reemplazarlo para evitar un peligro.
No lave y enjuague ropa o tela a
prueba de agua.
Mantenga las manos y los pies
alejados de los botones de la
lavadora cuando esté en
movimiento.
La manguera de suministro de agua
debe enroscarse firmemente a la
unidad.
Desconecte el equipo cuando no lo
use por mucho tiempo.
No se debe usarse más de 50°C de
agua para el lavado.
No se pare sobre la lavadora o
coloque peso en la parte superior
de la unidad.
Verifique la conexión de la
manguera de suministro de agua, al
abrir la llave antes de lavar.
informaciones técnicas / technical informations electrolux 40
Informaciones técnicas / Technical informations
Tamaño / Dimensions
Potencia de lavado / Wash power
Voltaje / Voltage
Frecuencia / Frecuency
Peso del producto / Product weight
520 x 545 x 907 mm
330 W
120 V ~
60 Hz
32 Kg
MODELO / MODEL: EWIE06F3OM(W,G)
Capacidad / Capacity
6,5 Kg
520 x 545 x 907 mm
330 W
220 V ~
60 Hz
32 Kg
Capacidad / Capacity
6,5 Kg
520 x 545 x 907 mm
330 W
220 V ~
50 Hz
32 Kg
Capacidad / Capacity
6,5 Kg
540 x 562 x 930 mm
350 W
120 V ~
60 Hz
35 Kg
Capacidad / Capacity
7,5 Kg
MODELO / MODEL: EWIE06F2OM(W,G)
MODELO / MODEL: EWIE06F5OM(W,G)
MODELO / MODEL: EWIE07F3OM(W,G)
ESP
ENG
Tamaño / Dimensions
Potencia de lavado / Wash power
Voltaje / Voltage
Frecuencia / Frecuency
Peso del producto / Product weight
Tamaño / Dimensions
Potencia de lavado / Wash power
Voltaje / Voltage
Frecuencia / Frecuency
Peso del producto / Product weight
Tamaño / Dimensions
Potencia de lavado / Wash power
Voltaje / Voltage
Frecuencia / Frecuency
Peso del producto / Product weight

Troubleshooting
When the following problems occur, the microcomputer will detect the
abnormal condition and an electronic buzzer sounds for approximaly 10
seconds and the indicatos flash as show.
Check the Power On/Off button.
Check the Start/Pause button.
Check whether under Delay start condition.
Check the power cord whether is securely plugged in.
Check whether power failure occurs.
Check whether the fuse or circuit breaker has been activated..
The washer
does not
work.
Water does
not flow into
tub or water
flow is slim.
Turn on the water supply faucet.
Check whether water supply has been cut off.
Check whether the metal filter in water inlet is clogged.
Check whether washer has been freezing.
Check whether water pressure is to low.
The heigh of drain hose is less than 700mm.
PROBLEM
WHERE TO CHECK
39 electrolux troubleshooting
The height of drain hose is more than 1000mm.
Put down the drain hose from the hookhole.
Check the drain hose for any obstructions.
Check whether the drain hose is clogged.
Check whether the drain rises too high of the ground.
Water does
not drain out.
The washer
does not
spin.
Check whether the laundry is clumped on one side of the tub.
Check whether the washer is on the level surface.
Close the washer lid.
ENG
DISPLAY
Check whether the washer is under Child lock.
Check whether the wash lid is open.
Press the Power On/Off button to turn off the power.
Call the service centre for technical assistance.
The trouble indicators can be released by pressing the Start/Pause button once if you want to
release the emergency stop. Then press Start/Pause button againt ot restart the operation.
No trouble conditions
During Washing or Rinsing, water continues to flow into machine. This is possibly
automatic water adding due to water level decrease.
Spin tub turns or stops timely at the beginning of spinning. This is intermittent
spinning for better spin effect.
Water inletting and rinsing sometimes during spinning. This is automatic lean-
correction due to clothes is not balanced.
There is sound like water flow after spinning. This is thesound of balance liquid in
balance ring. It is for reducing vibrations of spinning.
Control panel keeps warm after power off, this is caused by remembering circuitry
working.
Power off during working and the washer could not continue working. Should set
the program again
Does not
wash.
Other
troubles.
E1
E2
E3
E4
E5
EA
EC
ESP
precauciones de seguridad electrolux 04
Seguridad electrica
Los alambres de este cable eléctrico
están coloreados según el siguiente
código:
Verde/amarillo: tierra
Celeste: neutral
Marrón: vivo
Mientras que los colores de alambres
en los cables eléctricos de la máquina
no correspondan con la calificación de
color que identifican los polos en su
enchufe, proceda así:
El cable de color verde y amarillo debe
conectarse al terminal en el
tomacorriente que está marcado con
una E o con el símbolo de tierra o de
color verde o de color verde y amarillo.
El cable celeste debe conectarse al
terminal que está marcado con la letra
N o de color blanco.
El cable marrón debe conectarse al
terminal que está marcado con la letra
L o de color negro.
Cable a tierra
Si el tomacorriente de salida para tres
patas tiene terminal a tierra, enganche
seguramente el final del cable a tierra al
terminal.
Cuando esté en tierra la lavadora,
conecte el cable a tierra antes de
enchufar el cable de poder.
Si el tomacorriente de salida para tres
patas no tiene terminal a tierra,
consulte a su distribuidor más cercano
o de forma segura, conecte el final del
cable a tierra en un punto a tierra
adecuado como una tubería de agua
fría de metal. Nunca conecte el cable a
tierra con una tubería de gas.
Desenchufe el cable eléctrico antes de
desconectar el cable a tierra.
Cable a tierra
Varilla de
puesta a tierra

ESP
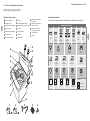
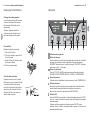
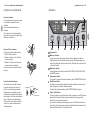
05 electrolux descripción del producto
Descripción del producto
1
2
3
4
5
6
9
Tapa de la lavadora
Entrada de cloro
Dispensador de detergente
Filtro de pelusas
Dispensador de suavizante
Panel de control
Tambor de giro/lavado
Nombres de las partes
10
11
12
13
Armazón
Válvula de entrada de agua
Manguera de suministro de agua
Enchufe
Cable de energía
Pulsador
Pata ajustable
8
7
14
16
17
18
19
Cubierta inferior
Tornillo
15
1
2
3
4
5
6
7
8
9
10
11
12
13
14
15
16 17 18 19
Manguera de drenaje
(solo algunos modelos)
Manguera de suministro
de agua fría
Manguera de suministro
de agua caliente
tips and advices electrolux 38
ENG
International symbols
These symbols are included on clothing labels to help with your washing.
INTERNATIONAL SYMBOLS
Heavy
Delicate
Maximum
Wash
Temperature
60ºC
Maximum
Wash
Temperature
40ºC
Maximum
Wash
Temperature
95ºC
Maximum
Wash
Temperature
30ºC
Hand
Wash
Do not
Wash
Bleach Bleach in
Cold Water
Do not
Bleach
Iron
Maximum
Iron
Temperature
200ºC
Maximum
Iron
Temperature
150ºC
Maximum
Iron
Temperature
110ºC
Do not iron
Professional
Dry
Cleaning
Professional
Dry Cleaning
with Any Solvent
Professional
Dry Cleaning with
Specific Solvent
Professional
Dry Cleaning with
Specific Solvent
Do not
Dry Clean
Dry Dry Flat Drip Dry Hang to Dry Do not
Tumble Dry
High Temperature
Low Temperature
Tumble Dry

ESP
Instalación
instalación electrolux 06
Instalación de la cubierta inferior
1. Desconecte el enchufe de la lavadora
2. Tienda con cuidado la parte posterior
de la lavadora sobre un tapete suave o
un cojín. (Tenga cuidado de no abollar la
cubierta)
3. Inserte la cubierta inferior adjunto
dentro de los ganchos de la pata,
empujándolo hasta que llegue a los
ganchos del frente.
4. Ajuste la cubierta inferior con un tornillo.
5. Ponga en posición recta la lavadora.
Ubicación de la lavadora
1. Escoja un lugar seco fuera de los rayos solares para la lavadora.
2. Instale la lavadora sobre una superficie nivelada y estable.
3. Ajuste la pata ajustable de la lavadora; si es necesario que se vea como se
muestra en la figura.
4. La inclinación máxima permitida para la superficie de soporte es de 2º.
Conectar la manguera de entrada
1. Verifique que la empaquetadura de la
lavadora esté firmemente insertada.
2. Sujete el borde curvado de la manguera
a la válvula interna de la lavadora.
Asegure ambas tuercas firmemente con
la mano.
3. Sujete el borde recto de la manguera a
la válvula de entrada de agua. Asegure
ambas tuercas firmemente con la mano.
4. Abra la válvula y revise alguna fuga.
Asegure ambas tuercas firmemente si
existe alguna fuga. Si la presión del
agua es fuerte, cierre la válvula del agua
por completo, luego ábralo despacio.
No obstaculice las entradas de ventilación sobre el fondo de la lavadora con
la alfombra; esto cuando se instala la lavadora sobre un piso alfombrado.
No use agua más caliente de
60ºC.
Si su llave no es la adecuada, por
favor, consulte con su distribuidor.
Válvula de entrada de agua
Empaquetadura
Enroscar
Final de llave
Manguera de entrada
Cubierta
inferior
Tornillo
Frente
Espalda
Pata
Soltar
Bajar Subir
Tuerca
Asegurar
Cream/Milk/Ice cream: Rinse in cold
water and wash normally. If stain is
still apparent, sponge with white
spirits.
Deodorant: Rub affected area with
white vinegar and then rinse out in
cold water. Sponge with white spirits.
Treat stiffened areas with enzyme
prewash.
Egg: Soak in a cold enzyme prewash,
rinse and wash normally.
Fabric/Softener: Rub affected area
with bar soap and wash normally.
Fruit stains: Treat as soon as possible
by sponging with cold water.
Rub a little detergent on the stain and
wash normally.
Grass: Sponge with white spirits. Rub
in an enzyme prewash and wash as
normally.
Grease and oil: Lay the affected area
face down on an absorbent cloth and
work from the back.
Sponge with white spirits or dry
cleaning fluid. Wash normally..
Iron or rust: Apply lemon juice and
salt and place in the sun. Wash
normally.
Lipstick: Sponge with white
methylated spirits and wash normally.
Mildew: Wash in warm water and
detergent. Moisten area with lemon
juice, dry in the sun and wash
normally. If stain persists and the
fabric allows, use a bleach.
Mud: Brush off any dry mud. Rinse in
cold water. If stain persists rub in a
little detergent and wash normally.
Paint-oil based: Scrape off any fresh
paint and sponge with a non
flammable dry cleaning fluid and
wash normally.
Paint-water based: Treat while still
wet, rinse in warm water and wash
normally.
Scorch marks: Dampen a cloth with
hydrogen peroxide, lay it over the
affected area and press with a fairly
hot iron.
37 electrolux tips and advices
ENG

ESP
07 electrolux instalación
Instalación de la manguera de
suministro de agua a la lavadora
Sosteniendo la manguera, gire la tuerca
en sentido del reloj hasta que la tuerca
se ajuste.
Cuando quiera desconectar la entrada
de válvula de suministro de agua, gire la
tuerca en sentido contrario al reloj,
después de cerrar la llave.
Una la manguera de suministro de agua
caliente con la caída caliente.
Una la manguera de suministro de agua
fría con la caída fría.
Cómo instalar la manguera de drenaje
de descarga
1. Apriete las dos franjas de la
abrazadera de la manguera de
drenaje, conéctelo a la bomba (parte
posterior del gabinete) y fije la franja
de la manguera
2. Jale hacia arriba la manguera de
drenaje y fíjelo al sujetador de la
manguera de la parte trasera del
gabinete.
3. Cuelgue la manguera de drenaje al
agujero al lado derecho de la parte
superior del armazón cuando la
lavadora no está trabajando.
Coloque la manguera de drenaje a la
boca de drenaje para que la lavadora
empiece a trabajar.
Por favor, asegúrese que la altura de la
manguera de drenaje no sea menor a
700mm durante la operación, de lo
contrario, la lavadora no funcionará de
manera óptima o el agua podría salir en
el transcurso del lavado; ni mayor a
1000mm, de lo contrario, la lavadora no
drenará bien el agua.
Nunca eche la manguera de drenaje, ya
que el agua se descargará.
Asegúrese que la manguera de drenaje
esté dirigida adecuadamente y no se
enrolle o se levante.
Tuerca
Tuerca
Manguera
Gancho de
la manguera
Gancho de
la manguera
Franja de
la manguera
tips and advices electrolux 36
ENG
Tips and advices
Advices
White and color clothes must be
washed separately to prevent
transferring dye from one item to
another.
To check if a piece of clothing fades,
soak a small area. Place a white cloth
over it and iron. If the white cloth
stains, the fabric will fade.
Check clothing label to make sure it
can be machine-washed.
Follow instructions on label.
Woolen items must always be washed
separately, in cold water.
Do not use bleach in woolen clothes,
silk, leather and Lycra, spandex.
Wash separately cotton and linen
clothes from synthetic fabric (nylon,
spandex, polyamide, etc…), as they
require different washing process.
Do not use dry cleaning chemical
products in your Washer.
Do not use Washer to starch clothes.
Stained, heavily-soiled, or greasy
items may need to be prewashed or
soaked for best results.
Soaking helps remove protein-type
stains like blood, milk or grass.
Prewashing helps loosen soil before
washing.
Stain removal rules
1. Use warm water for soaking or
prewashing stained laundry. Hot
water can set stains.
2. Most stains are easier to remove
when they are fresh.
3. Before treating any stain, find out
what kind of stain it is, how old the
stain is, what kind of fabric it is,
and whether the fabric is colorfast.
(Check the care label)
4. Washing and drying can set some
stains.
5. Start with cold or warm water. Hot
water can set some stains.
6. When bleach is recommended,
use a bleach that is safe for the
fabric.
7. Put the stained area face down on
a paper towel or white cloth. Apply
the stain remover to the back of
the stain. This forces the stain off
fabric instead of through it.
Stain removal guide
Blood: Rinse immediately in cold
water. If stain remains, soak in cold
water with an enzyme prewash..
Chewing gum: Use ice in plastic bag
to harden the gum. Scrape off what
you can and the sponge with white
spirits.
Cocoa, Chocolate: Sponge with cold
water and soak in an enzyme
prewash. If stains persist, rub in a
little detergent and rinse in cold water.
Coffee: Blot up quickly and rinse out
in cold water. Rub in a little detergent
and wash in the maximum
temperature allowed for the fabric
type.

Cleaning and maintenance
35 electrolux cleaning and maintenance
ENG
Cleaning the washing machine
Use soft clothing to wipe off the water
or dirt on the surface of the washer.
Do not spray water directly on the
washer body.
Detergent, propellant and other
chemicals are not allowed to use to
avoid the damages on the surface.
Clean lint filter
(Suggest cleaning it every week)
1. Take out the lint filter.
2. Pull out the scraps an wash the lint
filter in the water.
3. Install the Filter (aim the frame claw
to the groove below).
Lint filter is easily damaged.
Clean the water inlet valve
(Suggest cleaning it every 6 months)
After long time use, the water inlet filter
may be blocked with crud, please
screw off the water inlet filter from the
water inlet valve, clean the filter, then
assemble the filter in the valve and
load the water inlet hose.
ESP
operación electrolux 08
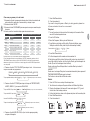
Operación
Indicadores de programas
Botón nivel de agua
Puede seleccionar el nivel de agua apropiado que coincide con la cantidad
de carga. Hay diferentes niveles de agua para la opción de enjuague.
‘EDREDÓN’ solo selecciona el más alto nivel agua, “DELICADO” no puede
seleccionar el nivel 1 y 2 de agua.
Botón ciclo de lavado
El botón CICLO DE LAVADO puede usarse para seleccionar el proceso
ENJUAGUE, INICIO DIFERIDO, REMOJO, LAVADO y CENTRIFUGADO.
Botón temperatura
Si desea elegir la temperatura del agua, presione el botón TEMPERATURA.
Botón inicio/pausa
Este botón se puede usar para iniciar la operación de lavado.Este botón
también puede usarse para detener temporalmente la operación.
Para reiniciar la operación, presione Nuevo INICIO/PAUSA.
Botón On/Off
Presione ON/OFF para encender. Cuando quiera apagar, presione ON/OFF
otra vez. Cuando el lavado ha terminado, luego de 5 segundos se apagará
automáticamente.
Si quiere cambiar el programa de lavado, presione ON/OFF y luego
préndalo otra vez. Si deja la lavadora prendida sin operar, en 10 minutos se
apagará automáticamente.
1
1
3
4
2
2 43
5
6
5
678
9

Child lock function
This function avoids accidental operation of the washer.
Press Power On/Off button to turn on the power and press Programs button
for 4 seconds until a sound from buzzer. To restore it, repeat above.
When Child lock was set, the Child lock on control panel lights, and indicates
E5 and buzzes if washer lid open for 5 seconds during washing.
Press Child lock, except the power button, the other button not response.
Delet the end buzzer
Press On/Off button to switch on the power, and press Start/Pause button for
4 seconds until a sound from buzzer. To restore it, repeat above or pull out the
plug.
how to use electrolux 34
ENG
ESP
09 electrolux operación
Botón programas
Presione el botón PROGRAMAS para elegir el curso del lavado.
“RAPIDO” para el programa de recuperación, antes que el programa inicie
puede seleccionar “NIVEL DE AGUA”, “INICIO/PAUSA”, “ON/OFF”, los
otros botones no responden Puede programar el lavado variable.
Si elige la opción NORMAL, PESADO, CUSTOM, automáticamente la
lavadora iniciará la operación NEURO &FUZZY.
Botón opciones
El botón OPCIONES puede usarse para seleccionar el tiempo de INICIO
DIFERIDO, ENJUAGUE, REMOJO, LAVADO y CENTRIFUGADO.
Presione el botón para ajustes manuales del flujo de agua durante el lavado
o enjuague. El ajuste manual del flujo de agua, el control Fuzzy de la
lavadora no está en el agua. El programa DELICADO, EDREDÓN y el
proceso REMOJO no es ajustable.
Indicadores temporizador y preprogramación
Este indicador muestra:
- El tiempo sobrante durante el lavado.
- El tiempo configurado.
- Cuando termina el lavado durante la preprogramación.
- Cuando ocurren condiciones anormales, el indicador indicará advertencia.
- Presione el botón de nivel de agua para seleccionar el nivel de agua
apropiado.
En el proceso de lavado y enjuague, presione “opciones”y podrá
seleccionar entre las diferentes velocidades agua de lavado: HO H1, H2,
H3, H4, L1, L2, L3, L4
7
9
8

Remember function
When select [NORMAL], [CUSTOM] or [HEAVY], 30 seconds after starting the
washer will remember this program and starts the same the next time it is ran.
This function is not avaliable for [QUICK], [DELICATE] and [BLANKET] courses.
Water level, Delay start and Soak will not be remembered.
The Wash, Rinse and Spin for Custom program could be remembered.
The memory will be lost if plug is pulled out.
Two clean steps function
The washer will start washing when water to the level below 2 levels is set. By
this, the washer starts working with more density of detergent.
This function won't be effected when select level 1 our level 2 water, and
[DELICATE] or [BLANKET] course.
When Soak is selected, this function will not be effected after soaking.
Water level setting
This button allows you to choose the appropriate water level during
Wash/Rinse process.
Press Process until Wash light flashes, press Water Level button to choose the
appropriate water level, press SETTINGS button to set wash time.
Then press Wash cycle button until Rinse light flashes, press Water Level
button to choose the appropriate water level, press Settings button to set
Rinse times.
Then press Process button until Spin light flashes, press Settings button to set
Spin time. Finally press Start/Pause, the washer will start operating according
to the wash water level and rinse water level as set.
33 electrolux how to use
ENG
ESP
cómo usar electrolux 10
Uso normal
Preparación
Conecte la manguera de drenaje. Conecte la manguera de suministro de agua
a la llave y ábralo.
Enchufe el cable en un tomacorriente. Lleve la ropa sucia en la lavadora.
Presione el botón ON/OFF
Presione el botón INICIO/PAUSA
El sensor examina el peso de la ropa de manera automática. (NORMAL/
FAVORITO /PESADO)
Auto selecciona el poder y nivel de agua adecuado, el tiempo de lavado/giro y
el tiempo de enjuague.
Utilice la cantidad apropiada de detergente tal y como se muestra en el
cuadro.
Cierre la tapa de la lavadora.
La lavadora emitirá una alarma y se detendrá antes de girar si la tapa de la
lavadora no está cerrada.
Nivel de agua
Volumen de agua (l aprox.)
Indicador de agua
Vol. “detergente granulado” (g)
1
15 L
2
20 L
3
24 L
4
28 L
5
32 L
6
38 L
7
45 L
8
50 L
12 ~ 20 20 ~ 28 28 ~ 36
36 ~ 45
1
15 L
2
20 L
3
24 L
4
28 L
5
32 L
6
38 L
7
45 L
8
52 L
1
16 L
2
24 L
3
30 L
4
36 L
5
42 L
6
47 L
7
54 L
8
60 L
12 ~ 20 20 ~ 28 28 ~ 36
36 ~ 50
12 ~ 25 25 ~ 35 35 ~ 50
50 ~ 70
Usted puede ajustar el volumen de detergente según el tipo de detergente,
siga las recomendaciones del empaque.
Otro volumen de detergente
Cómo usar
Modelos 6.5 kg
Modelos 7.5 kg
Modelos 9.0 kg
Nivel de agua
Volumen de agua (l aprox.)
Indicador de agua
Vol. “detergente granulado” (g)
Nivel de agua
Volumen de agua (l aprox.)
Indicador de agua
Vol. “detergente granulado” (g)

how to use electrolux 32
Delay start
1. Turn on the water inlet valve and load the laundry into the washer. Make
sure to fit the discharge drain hose.
2. Press On/Off button.
3. Select the Programs, Wash cycle and Water level.
4. Press Wash cycle button untill the light of Delay start flashes, press
Settings to select the Delay start time (the time washing finished).
5. Press Start/Pause button.
6. Put the detergent into the washer and close washer lid.
All the lights except Delay start will be turned off in about one minute later. If
you set the child lock function, child lock lights. Directly put the detergent into
the tub. (Do not let the detergent touch clothes).
Preset confirming: Press Settings button to indicate Wash cycle about 5
seconds.
Preset cancel or change: Delay start is canceled automatically when power off.
Turn power on and set Preset again to change it.
This function is not avaliable for Delicate course.
ENG
7. Press Start/Pause button.
8. Close the washer lid.
If you want to change Programs or Wash cycle during operation, please turn
off power, restart and choose the course needed.
Blanket
1. Press On/Off to turn on and put the drainage hose.
2. Turn the fauet on and press Programs button until Blanket light blinks.
3. Dissolve the detergent with around 5L warm water (aprox. 30ºC), pour it
into the tub of the washing machine.
4. Fold up the blanket as shows in the figures and place into the washing tub.
5. Press Start/Pause button.
6. Close the washer lid.
Preset indication 6 7 8 ........ 24 0 1.....5 Hours
ESP
11 electrolux cómo usar
Cómo usar programas y ciclo de lavado
1. Preparación: Ajuste la manguera de drenaje, abra la llave de suministro de
agua, enchufe el cordón en el tomacorriente y coloque la ropa.
2. Presione el botón ON/OFF.
3. Presione el botón PROGRAMAS para escoger el curso que necesita según
las ropas.
Por favor, consulte el cuadro de abajo para seleccionar el curso.
El tiempo total no es lo mismo debido a la presión de agua diferente.
El curso de prueba eficiente de energía: presione “ON/OFF” para prender, presione el botón
“PROGRAMAS” para continuar y presione “INICIO/PAUSA” por más de 5 segundos hasta la
alarma suene y que la luz de “normal” se encienda, luego presione INICIO/PAUSA para iniciar el
curso de prueba.
4. Presione el botón CICLO DE LAVADO para elegir el ciclo. La luz se mueve
uno por uno cada vez que presione.
5. Presione el botón OPCIONES para elegir el tiempo de CENTRIFUGADO,
LAVADO, REMOJO, y las veces de ENJUAGUE.
.
Tiempo de centrifugado que indica 0 1 2 .........8 9 Minutos (Excepto en curso DELICADO)
0 1 2 3 Minutos (para curso DELICADO)
6. Presione el botón NIVEL DE AGUA, elija el nivel de agua apropiado y
coloque el detergente.
GUÍA DE SELECCIÓN ESTADO DE FUNCIONAMIENTO PARA EL PROGRAMA
Programa
Tipos de ropas
Tiempo de lavado Enjuague Tiempo de centrif.
FAVORITO
NORMAL
PESADO
RAPIDO
EDREDÓN
DELICADO
Tipos de ropa.
Ropa normal.
Ropa sucia como capa de trabajo.
Ropa no muy sucia para lavar todos los días.
Edredón o voluminosos.
Ropa interior, artículos con bordados.
10 min.
5 - 12 min.
7 - 14 min.
5 min.
12 min.
6 min.
2 veces
2 veces
2 veces
1 veces
2 veces
2 veces
5 min.
5 - 6 min.
7 - 8 min.
3 min.
8 min.
2 min.
REMOJO LAVADO ENJUAGUE CENTRIFUGADO INICIO DIF.
Tiempo predeterminado que indica 0 1 2 ........ 5 6........24 Horas (Excepto en curso DELICADO)
Tiempo de REMOJO que indica 0 1 2 .........10 35 40 Minutos (Excepto en curso DELICADO/EDREDÓN)
Tiempo de LAVADO que indica 0 1 2 .........19 20 Minutos.
Veces de ENJUAGUE que indica 0 1 2 3 4 veces.

31 electrolux how to use
ENG
How to use Programs and Wash cycle
1. Preparation: fit the drain hose, turn the water supply faucet on, plug the
power cord into a socket, put clothes inside.
2. Press On/Off button.
3. Press Programs button to choose the course you need according to the
clothes. Please refer to below chart of course choosing.
Total time is not same due to different water pressure.
The energy efficient teste course: press On/Off to turn on. Press Programs button
continuously and press Start/Pause button more then 5 seconds until alarm sounds and
normal light is lit, the press Start/Pause button to start the test course.
4. Press Wash cycle button and choose the desired cycle. The light moves
right one by one when pressed.
5. Press Set button to choose Soak, Wash, Spin time and Rinse times.
.
Spin time indicating 0 1 2 .........8 9 Minutes (except for delicate course)
0 1 2 3 Minutes (for delicate course)
.
6. Press Water Level button, choose proper water level and then put
detergent.
COURSE CHOOSING GUIDE OPERATION STATUS FOR THE PROGRAM
Course
Suitable clothes
Washing time Rinsing type Spin time
CUSTOM
NORMAL
HEAVY
QUICK
BLANKET
DELICATE
Kinds of clothes.
Normal clothes.
Dirty clothes like working coat.
Not very dirty clothes for daily wash.
Blanket or bulky.
Women underwear, articles with embroider.
10 min.
5 - 12 min.
7 - 14 min.
5 min.
12 min.
6 min.
2 times
2 times
2 times
1 time
2 times
2 times
5 min.
5 - 6 min.
7 - 8 min.
3 min.
8 min.
2 min.
SOAK WASH RINSE SPIN DELAY START
Preset time indicating 0 1 2 ........ 5 6........24 Hours (except for delicate course)
Soak time indicating 0 1 5 .........10 35 40 Minutes (except for delicate / blanket course)
Wash time indicating 0 1 2 .........19 20 Minutes.
Rinse time indicating 0 1 2 3 4 Times
ESP
cómo usar electrolux 12
Inicio diferido
1. Gire la válvula de entrada de agua y cargar la ropa en la lavadora,
asegúrese de ajustar la manguera de drenaje.
2. Presione el botón ON/OFF.
3. Seleccione PROGRAMAS, CICLO DE LAVADO Y EL NIVEL DE AGUA según
su necesidad.
4. Presione el botón CICLO DE LAVADO hasta que la luz de INICIO DIFERIDO
haga flash, presione OPCIONES para seleccionar el tiempo INICIO DIFERIDO
(el tiempo de lavado ha terminado).
5. Presione el botón INICIO/PAUSA.
6. Coloque el detergente en la lavadora y cierre la tapa de la lavadora.
Todas las luces excepto INICIO DIFERIDO se apagarán después de un
minuto. (Si configuró la función de bloqueo infantil, la luz de bloqueo para
niños se encenderá). Coloque directamente el detergente del tambor. (No
ponga detergente sobre la ropa)
Confirmación de INICIO DIFERIDO: Seleccione el botón OPCIONES para
indicar el CICLO DE LAVADO en 5 segundos.
Cancelación o cambio de INICIO DIFERIDO: INICIO DIFERIDO se cancela
automáticamente cuando está apagado. Encienda y establezca INICIO
DIFERIDO de nuevo para cambiarlo.
Esta función no está disponible para curso DELICADO.
7. Presione el botón INICIO/PAUSA
8. Cierre la tapa de la lavadora
Si desea cambiar PROGRAMAS o CICLO DE LAVADO durante la operación,
apague la energía, reinicie la energía y elija el curso que necesite.
Edredón
1. Presione ON/OFF y coloque la manguera de drenaje.
2. Abra la llave y presione el botón PROGRAMAS hasta que la luz EDREDÓN
parpadee.
3. Disuelva el detergente con 5L aprox. de agua tibia (30ºC aprox.), viértalo
sobre la cubeta de la lavadora.
4. Doble el edredón como se muestra abajo en la figura y colóquelo dentro de
la tina de la lavadora.
5. Presione el botón INICIO/PAUSA.
6. Cierre la tapa de la lavadora.
Indicación INICIO DIF. 6 7 8 ........ 24 0 1.....5 Horas
Dóblelo en dos por
el lado más largo.
Dóblelo 4 veces en
la misma dirección
Enrolle el edredón
Colóquelo en la tina de la
lavadora con el borde
hacia abajo

how to use electrolux 30
ENG
Normal operation
Preparation
Connect the discharge drain hose. Connect the water supply hose to the
faucet and turn the faucet on. Plug the power cord into a socket-outlet. Load
the laundry into the washer.
Press the On/Off button.
Press Start/Pause button
Sensor tests the choletes weight automatically (for [NORMAL], [CUSTOM],
[HEAVY]).
Auto choose the proper water power, water level, wash/spin time and rinse
times.
Use recommended amount of detergent as show in chart.
Close the washer lid.
The washer alarm will sound and stop working before spinning if the washer
lid is not closed.
Water level
Water volume aprox. (L)
Detergent indicator
Powdered detergent volume (g)
Water level
Water volume aprox. (L)
Detergent indicator
Powdered detergent volume (g)
Water level
Water volume aprox. (L)
Detergent indicator
Powdered detergent volume (g)
1
15 L
2
20 L
3
24 L
4
28 L
5
32 L
6
38 L
7
45 L
8
50 L
12 ~ 20 20 ~ 28 28 ~ 36
36 ~ 45
1
15 L
2
20 L
3
24 L
4
28 L
5
32 L
6
38 L
7
45 L
8
52 L
1
16 L
2
24 L
3
30 L
4
36 L
5
42 L
6
47 L
7
54 L
8
60 L
12 ~ 20 20 ~ 28 28 ~ 36
36 ~ 50
12 ~ 25 25 ~ 35 35 ~ 50
50 ~ 70
You may adjust the detergent volume according to the type of detergent.
Follow the recommendations on package.
Other detergent volume
How to use
6.5 kg models
7.5 kg models
9.0 kg models
ESP
13 electrolux cómo usar
Función memoria
Cuando selecciones NORMAL/ FAVORITO / PESADO, después de 30
segundos de empezar, la lavadora recordará este programa y empezará de la
misma forma la próxima vez. Esta función no está disponible para el
procedimiento RÁPIDO / DELICADO / EDREDÓN.
El NIVEL DE AGUA, INICIO DIFERIDO y REMOJO no se recordarán.
El lavado, enjuague y giro en el programa FAVORITO puede recordarse.
Se perderá la memoria si se jala el enchufe.
Función de dos pasos de limpieza
La lavadora empezará a lavar cuando el agua esté al nivel debajo del nivel 2.
Para esto, la lavadora empieza a trabajar con más cantidad de detergente.
Esta función no se afectará cuando seleccione agua de nivel 1 o nivel 2,
procedimiento EDREDÓN o DELICADO.
Cuando se selecciona REMOJO, esta función no se afectará después del
remojo
Configuración del nivel de agua
Este botón le permite escoger el apropiado nivel de agua durante el proceso
LAVADO/ENJUAGE
Presione CICLO DE LAVADO hasta que la luz de lavado parpadee, presione el
botón NIVEL DE AGUA para escoger el nivel de agua apropiado, presione
OPCIONES para configurar el tiempo de lavado. Luego de presionar el botón
CICLO DE LAVADO, hasta que la luz de enjuague parpadee, presione el botón
NIVEL DE AGUA para escoger el nivel de agua apropiado, presione el botón
OPCIONES para configurar las veces de enjuague. Luego de presionar el
botón CICLO DE LAVADO hasta que la luz CENTRIFUGADO parpadea,
presione OPCIONES para configurar las veces de giro. Por último, presione el
botón INICIO/PAUSA, la lavadora empezará a operar según el nivel de agua de
lavado y enjuague, según lo establecido.

29 electrolux operation
ENG
Programs button
To choose the washing course, press Program button.
[QUICK] for the fastest program, before the program starts can set WATER
LEVEL, START/PAUSE, ON/OFF, the other button had no response, you can
set variable wash.
If you choose the [NORMAL], [HEAVY] or [CUSTOM] option the washer will
automatically begin the NEURO & FUZZY operation.
Settings button
The SETTINGS button can be used to select Delay start, Soak, Wash, Rinse
and Spin times. Press the buttons have manual adjustment of the water
flow in the washing or rinsing process. Changing water flow will also
change flow for fuzzy control.[BLANKET] and [DELICATE] programs and the
Soak process is not adjustable flow.
Timer and Preset indicators
This indicator shows:
- Remained time during washing.
- The set time and times.
- When the washing is finished during presetting.
- When abnormal conditions occur.
- Enables to select appropriate water level by pressing Water Level button.
- In process of washing/rinsing, press Settings wash button to select the
variable speed wash water (H0, H1, H2, H3, H4, L1, L2, L3 and L4).
7
9
8
ESP
cómo usar electrolux 14
Función bloqueo para niños
Esta función evita operaciones accidentales de la lavadora.
Método de configuración
Presione el botón ON/OFF para encender la lavadora y presione el botón
PROGRAMAS por 4 segundos hasta que suene un timbre. Para restaurarlo,
repita lo anterior.
Cuando se configura el BLOQUEO PARA NIÑOS, éste se ilumina en el panel
de control e indica E5 y emite un timbre si la tapa de la lavadora está abierta
por 5 segundos durante el lavado.
Presione “BLOQUEO PARA NIÑOS”, excepto el botón de energía, el otro
botón no responde.
Suprimir el timbre final
Presione el botón ON/OFF para prender la energía y presione el botón
INICIO/PAUSA por 4 segundos hasta que emita un timbre. Para recuperarlo,
repita lo anterior o desconecte el enchufe.

ESP
15 electrolux limpieza y mantenimiento
Limpieza y mantenimiento
Limpie la lavadora
Use un paño suave para secar el agua
o suciedad de la superficie de la
lavadora.
No rocíe agua directamente a la
lavadora.
No se permite el uso de detergente,
propulsor u otros químicos para evitar
daños en la superficie.
Limpie el filtro de pelusa
(Se sugiere limpiarlo cada semana)
1. Retire el filtro de pelusa
2. Saque los restos y lave el filtro de
pelusa con agua.
3. Instale el filtro (apunte la pinza del
marco a la ranura de abajo)
(Filtro de pelusa es una parte fácil de
romper)
Limpie la entrada del agua
(Se sugiere limpiarlo cada 6 meses)
Luego de usarlo mucho tiempo, el
filtro de la entrada del agua puede
bloquearse con suciedad, por favor
destornille la manguera de entrada de
agua, retire de la válvula de entrada de
agua, el filtro de la entrada de agua,
limpie el filtro, luego monte el filtro en
la válvula y cargue la manguera de
entrada de agua.
Entrada de agua
operation electrolux 28
ENG
Operation
Programs list
Water level button
You can choose the appropriate water level that matches the load size.
Different water levels for washing rinsing optional. [Blanket] program only
select the highest the fourth gear water level, [Delicate] cant not select level
1 and level 2 water.
Wash cycle button
Process button can be used to select DELAY START, SOAK, WASH, SPIN
and RINSE process.
Temperature button
If you want to choose the water temperature, press TEMPERATURE button.
Start/Pause button
This button can be used for starting the washer operation and also can be
used to temporarily stop the washer operation.
To restart the washer operation, press START/PAUSE button again.
Power On/Off button
To turn the power on, press this buton. When you want to turn off the power
press this button again. When washing has finished, the power will be
turned off in 5 seconds automatically.
If you want to change the wash program, press On/Off button and then on
again. If you leave the washer turning on without starting the operation, the
power will be turned off in 10 minutes by itself.
1
3
4
2
5
6
12 43
5
678
9

ESP
Sugerencias y consejos
Consejos generales
Ropas blancas y de color deben ser
lavadas separadamente para evitar
que los colores se mezclen y que la
ropa se manche.
Para verificar si la ropa destiñe,
humedezca una parte de la ropa,
coloque un pedazo de tejido blanco
sobre el área humedecida y pase la
plancha caliente. Si el tejido de color
mancha el blanco, quiere decir que
destiñe.
Lave solamente tejidos que permitan
el uso de la lavadora siguiendo las
instrucciones indicadas en las
etiquetas de la ropa.
Ropas de lana deben ser lavadas
siempre separadamente y con agua
fría.
Lave separadamente ropas de
algodón y lino y la ropa de material
sintético (nylon elastano, poliamida...),
pues exigen un lavado más suave.
No utilice productos químicos que
sean recomendados para el lavado a
seco.
No utilice la lavadora para almidonar la
ropa.
Antes de colocar la ropa en la
lavadora:
1. Cierre los botones de presión y
cierres pues puede ocurrir que se
enganchen o que dañen la ropa.
2. Refuerce los botones que estén
flojos, o retírelos.
3. Retire de los bolsillos objetos como
clavos, palillos, alfileres, clips
,tornillos, monedas, etc. Ellos
pueden causar serios daños a la
lavadora y a la ropa.
No use blanqueadores en ropas de
lana, seda, cuero y lycra-elastano,
para evitar dañarlas.
Es recomendable zurcir o parchar la
ropa dañada, para que no se dañe
aun más.
Lave a mano los puños y los cuellos
de las camisas y barras de los
pantalones que es donde se acumula
más suciedad.
Para que las ropas pequeñas se laven
mejor, deberán ser colocadas dentro
de una funda o bolsa apropiada para
lavado.
Para lavar cortinas, ate la parte que
contiene los ganchos dentro de una
bolsa propia para el lavado de ropas,
eliminando la necesidad de
removerlos.
Como eliminar manchas
Es posible que determinadas
manchas no sean eliminadas con
agua y jabón. Aconsejamos, por lo
tanto los siguientes cuidados antes
del lavado.
Sangre: ponga agua oxigenada (10
vol.) sobre la mancha de sangre por
algunos minutos y enjuague
normalmente.
Grasa: ponga talco sobre la mancha,
espere algunos minutos, saque el
exceso de talco y lave normalmente.
Tambiém puede aplicar un poco de
mantequilla fresca sobre la mancha,
deje por algunos minutos y luego unte
con esencia de trementina.
Herrumbre: ponga sobre la mancha
una mezcla de sal y limón o un
producto específico contra herrumbre;
sugerencias y consejos electrolux 16
Installing water supply hose to the
washer.
Turn the nut clockwise until the nut is
turned tight while holding the hose.
Turn the nut counterclockwise after
turning the inlet valve off when you want
to detach the water supply hose.
Join the hot water supply hose to the
hot infall, and the cold water supply
hose to the cold infall.
Install the discharge drain hose
1. Pinching the two bands of the clamp
on the drain hose, connect it to the
pump (rear to cabinet) and fix the
hose band.
2. Pull the drain hose upward and fix it
to the hose clip on back over the
cabinet.
3. Hang the drain hose to the hole on
right side of top frame when the
washer is not working. Put the drain
hose to drain spout when washer
start working.
27 electrolux installation
ENG
Make sure the height of drain hose is
not less than 700mm during operation,
otherwise the washer won't work well,
or the water may flow out in the course
of washing. No more than 1000mm,
otherwise the washer will not drain
water well.
Never lay down the drain hose as water
will discharged.
Be sure the drain hose is properly routed
so it will not kik or lift from the sink.

ESP
17 electrolux sugerencias y consejos
deje actuar por algunos minutos y lave
normalmente. En las manchas
antiguas, la estructura del tejido puede
haberse dañado lo que hará que el
tejido se rompa con facilidad.
Moho: para ropas blancas o de color
resistentes al cloro, lave con
blanqueador. Para ropas de color y no
resistentes al cloro, lave la región
manchada con leche.
Tinta de Bolígrafo: apoye el local
manchado sobre un tejido absorbente,
humedezca con acetona (excepto en
seda artificial) o alcohol y refriegue con
un cepillo y lave normalmente.
Lápiz de Labios: aplique acetona
(excepto en seda artificial) o alcohol
sobre la mancha; deje actuar por
algunos minutos y lave normalmente.
Aplique éter si la pieza de ropa es de
lana o algodón. Si la pieza es de seda
use tricloroetileno.
Cera: Utilizando un objeto con borde
no cortante retire lo que pueda de la
cera, enseguida aplique sobre el lugar
una hoja de papel y plánchelo con la
hoja en el medio.
Manchas de humedad y moho:
Después de haber verificado, en un
pedazo oculto de la prenda de ropa
que esta no destiñe, póngala de
remojo en agua con blanqueador. Otra
salida es dejar la prenda de ropa
sumergida en agua oxigenada de 10%
durante 10 a 15 minutos.
Marcas de plancha: Si la tela está
levemente marcada, siga el mismo
procedimiento que se describe para
quitar manchas de moho.
Óxido: Use algún producto contra
óxido siguiendo las instrucciones del
fabricante.
Goma de mascar: Dilúyala con acetona
y retírela con un paño limpio.
Pintura: No espere a que la pintura se
seque. Trate la mancha inmediatamente
con el solvente indicado en la lata de
pintura (agua, aguarrás, tricloroetileno).
Lave con agua y jabón y, a
continuación, enjuague.
Césped: Aplique jabón delicadamente,
trate con blanqueador diluido. Para
tejidos de lana, puede obtener un buen
resultado utilizando alcohol de 90°.
Pintauñas: Ponga la parte manchada de
la pieza de ropa sobre una hoja de
papel absorbente y luego humedezca el
otro lado del objeto con acetona.
Asegúrese de cambiar la hoja de papel
absorbente con frecuencia. Continúe
ese procedimiento hasta que la mancha
haya desaparecido por completo.
Alquitrán: Aplique un poco de
mantequilla fresca sobre la mancha,
deje por algunos minutos y luego unte
con esencia de trementina.
Installation
Installing the bottom cover
1. Unplug the power cord to the washer.
2. Gently lay down the back side of
washer on a soft mant or cushion. (Be
careful to not dent the frame).
3. Insert the attached bottom cover into
the hooks of foot by straightly pushing
until reaches into the foot by straightly
pushing until reaches into the front
hooks.
4. Fasten the botton cover with a screw.
5. Gently set the washer upright.
Location of washer
1. Choose a dry location out of sunlight for
the washer.
2. Install the washer on a stable and
leveled surface.
3. Adjust he adjustable foot of washer if
necessary to make the washer leveled.
4. The maximun permissible inclination of
the supporting surface is 2º.
Connect the inlet hose.
1. Check that sealing washers are firmly
seated.
2. Attach the curved end of the hose to the
inlet valve of the washing machine.
Tighten the coupling nuts securely by
hand.
3. Attach straight end of the hose to the
water inlet valve. Tighten the coupling
nuts securely by hand.
4. Turn on the valve and check for leaks.
Tighten the coupling nuts firmly if there
is any leakage. If water pressure is
strong, close the water valve completely
then open it slightly.
Do not block the ventilation openings on the bottom of washer by carpeting
when the washer is installed on a carpeted floor.
Do not use water which is hotter
than 60ºC.
If your faucet is not suitable,
please consult technical
assistance.
Tap
Sealing washer
Twist
Tap end
Inlet hose
installation electrolux 26
ENG

ESP
Símbolos internacionales
Siempre verifique las etiquetas para los símbolos de lavar y secar, que siguen
el código internacional de etiquetas de cuidados.
SIMBOLOS INTERNACIONALES
sugerencias y consejos electrolux 18
Product description
1
2
3
4
5
6
9
Washer lid
Gradienter
Detergent box
Lint filter
Softner dispenser
Control panel
Wash / Spin tube
Parts names
10
11
12
13
Frame
Water inlet valve
Water supply hose
Power plug
Power cord
Pulsator
Adjustable foot
8
7
14
16
17
18
19
Cold water supply hose
Hot water supply hose
Discharge drain hose (only some models)
Botton cover
Screw
15
1
2
3
4
5
6
7
8
9
10
11
12
13
14
15
16 17 18 19
25 electrolux product description
ENG

safety precautions electrolux 24
ENG
Electrical safety
The wires in the main lead are coulored
in accordance with the following code:
Green/yellow: ground
Light blue: neutral
Brown: live
As the colours of he wires in the main
lead of this appliance may not
correspond with the coloured markings
identifying the terminals in your plug,
proceed as follows:
- The wire which is coloured green and
yellow must be connected to the
terminal in the plug which is marked
with the letter E or by ground symbol.
The wire which is coloured light blue
must be connected to the terminal
which is marked with the letter N or
coloured white.
The wire which is coloured brown must
be connected to the terminal which is
marked with the letter L or coloured
black.
Grounding
If the socket outlet has a grounding
terminal, securely attach the end of the
grounding wire before plugging the
power cord.
When grounding the washer, connect
the grounding wire before plugging in
the power cord.
If the socket-outlet has no grouding
terminal, consult the authorized service
centre or securely attach the end of
grounding wire to a suitable grounding
point, such as a metal cold water pipe.
Never connect the grounding wire to a
gas pipe.
Unplug the power cord before
disconnecting the grounding wire.
ESP
Solución de problemas
19 electrolux solución de problemas
Cuando los seguientes problemas ocurren, la microcomputadora detectará la
condición anormal, un timbre eletrónico sonará por unos 10 segundos y los
indicadores se muestran así:
· Revise el botón ON/OFF
· Revise el botón INICIO/PAUSA
· Revise si la condición es INICIO DIFERIDO
· Revise si el enchufe está conectado de forma segura
· Revise si hay cortes de corriente
· Revise si el plomo o el interruptor se han activado
La lavadora
no trabaja
del todo.
El agua no
fluye por el
tubo o el flujo
de agua es
escaso.
· Abra la llave de suministro de agua
· Revise si el suministro de agua ha sido desconectado.
· Revise si el filtro metálico en la entrada del agua se ha atascado
· Revise si la lavadora ha sido congelada
· Revise si la presión del agua es muy baja.
· La altura de la manguera de drenaje es menor a 700 mm
PROBLEMA
DÓNDE REVISAR
· La altura de la manguera de drenaje es mayor a 1000 mm
· Baje la manguera de drenaje del sujetador
· Revise si la manguera de drenaje tiene algún obstáculo
· Revise si la manguera de drenaje está atascada
· Revise si el drenaje está muy elevado de la tierra
El agua no
sale.
La lavadora
no gira.
· Revise si la ropa se ha amontonado en un lado de la cubeta.
· Revise si la lavadora está sobre una superficie nivelada
Cierre la tapa de la lavadora
DISPLAY
· Revise si la lavadora está bajo bloqueo infantil
· Revise si la tapa de la lavadora está abierta
· Presione el botón ON/OFF para apagar la energía.
LLame a la persona indicada.
Los indicadores de problemas pueden aparecer al presionar START/PAUSE una vez que quiera
liberar la parada de emergencia. Luego presione START/PAUSE otra vez para reiniciar la
operación.
No lava.
Otros
problemas.
E1
E2
E3
E4
E5
EA
EC

ESP
solución de problemas electrolux 20
Condiciones sin problemas
Durante el Lavado o Enjuague, el agua continúa fluyendo. Es posible que se
agregue el agua automáticamente debido a una disminución del nivel de agua.
El giro de la cubeta empieza o se detiene exactamente al inicio del giro. Esto son
giros intermitentes para un efecto de mejor de giro.
El agua entra y sube a veces durante el giro. Esto es la auto corrección de
inclinado debido a que la ropa no está equitativamente adentro.
Hay un sonido como el flujo de agua luego del giro. Este es el sonido del líquido
sobrante en el aro de equilibrio. Esto es para reducir la vibración del giro.
El panel de control se mantiene caliente luego de estar apagado. Esto es por la
función de circuito Remember.
Apague durante el trabajo y la lavadora no podrá continuar trabajando. Debe
establecer el programa otra vez.
For children
Keep children away from the washing
spinning basket and do not place box
or shelves next to the washing
machine.
Safety precautions
For the user / installer
Dismantle, repair or alterations should
only carried out by professional
technicians.
Electricity supply must be unplugged
with dry hands.
This washing machine is equipped
with the electricity wire with
bielectrode grounding socket. The
creepage protector shall be used if
possible.
Please use the single socket with
special voltage and current matched
with plug marked specification.
Damaged or loosen wire or plug
should not be used.
Do not damage wire. Do not damage
or alter the wire forcibly bend, pull
twist or handle the wire. Please do not
put weight on or trap the wire.
Do not put water in direct contact with
the unit during maintenance and
repair.
Do not put gasoline, benzine, alcohol,
thinner of fabrics with these stains into
or near to the washing machine.
Thoroughly wipe the power plug when
dirt is adhering to the prong or around
the base of the prong.
Check water supply hose connection
by turning on the water before
washing. To prevent damages caused
by possible water leakage due to
loosen screw or not tightly.
Washing machine should not be
installed in humid place or in places
exposed to wind and rain.
This washing machine is strictly
prohibited to be close to locations
with candle, mosquitorepellent
incense, dog-end or other kinds of
open flame.
Do not put your hand into the
basket until it has stopped
completely.
Do not put your hands into the
washing/ spinning basket during the
washing and rinsing process.
Do not pull the wire from the socket
when unplugging the unit.
Unplug the unit when not using the
unit for a long period of time.
Electricity supply must be
unplugged with dry hands during
maintenance and repair.
If the power cord or supply cord is
damaged, the manufacturer or its
service agent or similarly
qualified person must replace it in
order to avoid a hazard.
Water of above 50 ºC should not be
used for washing .
Do not wash, rinse and spin the
water proof fabric or cloth.
Do not stand on or put weight on
the top of the unit.
Keep hands and feet away from the
buttom of the washing machine
when it is motion.
Water supply hose should be tightly
screwed to the unit.
Please turn off the water tap when
not using the unit.
23 electrolux safety precautions
ENG

Thank you for choosing Electrolux for your washing machine brand. Our
washing machines are developed with high technical and quality standards,
with features to offer you even more comfort.
Read all instructions before using this appliance. This book contains valuable
information about operation, care and service. Keep it in a safe place.
You expect all this from Electrolux…and we deliver.
Your laundry never looked so good.
Welcome to the world of
simple handling and no worries.
Environmental Advices
This product can not be treated as
household waste. Instead shall be
handed over to the applicable
collection point for the recycling of
electrical and electronic equipment. By
ensuring this product is disposed of
correctly, you will help prevent potential
negative consequences for the
environment and human health, which
could otherwise be caused by
inappropriate waste handling of this
product. For more detail information
about recycling of this product, please
contact your local city office, your
household waste disposal service or
the shop where you purchased the
product.
21 electrolux welcome
ENG
Contents
Safety precautions...................................................................................23
Product description.................................................................................25
Installation...................................................................................26
Operation...................................................................................28
How to use...............................................................................................30
Cleaning and maintenance......................................................................35
Tips and advices......................................................................................36
Troubleshooting.......................................................................................39
Technical informations.............................................................................40
contents electrolux 22
ENG
The washing machine you bought might be different from the one shown on the
figures of this user manual, however the overview image should be similar.
Please read the information regarding to operation.
This washing machine is for household use only.
The washing machine you bought might have a different plug from the one
shown on the figures of this user manual, however the one you bought is
according to your country requirements.
-
 1
1
-
 2
2
-
 3
3
-
 4
4
-
 5
5
-
 6
6
-
 7
7
-
 8
8
-
 9
9
-
 10
10
-
 11
11
-
 12
12
-
 13
13
-
 14
14
-
 15
15
-
 16
16
-
 17
17
-
 18
18
-
 19
19
-
 20
20
-
 21
21
-
 22
22


Electrolux EWIE07F5OMG Manual de usuario
- Categoría
- Lavadoras
- Tipo
- Manual de usuario
- Este manual también es adecuado para
en otros idiomas
- English: Electrolux EWIE07F5OMG User manual
Artículos relacionados
-
Electrolux EWLI142MSLW Manual de usuario
-
-
-
Electrolux EWIE08F3MMG Manual de usuario
-
-
-
-
-
-