La página se está cargando...

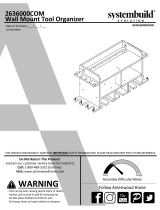
5322328COM
Full/QueenStorageHeadboard
‐Unitcantipovercausingsevereinjuryordeath.
‐Anchorunittostudinwall(ifinstructedto).
‐DoNotallowchildrentoclimbonunit.
‐Putheavyitemsonlowershelvesordrawers.
B345322328COM0
THISINSTRUCTIONBO OKLETCONTAINS
IMPORTANT
SAFETYINFORMATION.PLEASEREADANDKEEPFORFUTUREREFERENCE.
WARNING
FollowAmeriwoodHome
Tube
You
DateofPurchase___/___/___
LotNumber:
DoNotReturnThisProduct!
Contactourcustomerserviceteamforhelpfirst.
Call:1‐800‐489‐3351(tollfree)
Monday‐Friday9am‐5pmCST
Visit:www.ameriwoodhome.com
AssemblyDifficultyMeter
Easy
Tough

ContactUs!
HelpfulHints
2
ameriwoodhome.com
DoNOTreturnthisproduct!
Contactourfriendlycustomerserviceteamfirstforhelp.
Callus!
1‐800‐489‐3351
Monday‐Friday
9am‐5pmCST
Visitameriwoodhome.comtoviewthe
limitedwarrantyvalidintheU.S.andCanada.
AssemblyTips
‐Openyouritemintheareayouplantokeepittoavoidexcessivehea vylifting.
‐Identify,sortandcountthe partsbeforeattemptingassembly.
‐Compressiondowelsarelightlytappedinwithahammer.
‐Slidesarelabeledwitha
R
(right)and
L
(left)forproperplacement.
‐MakesuretoalwaysfacethepointonthetopoftheCamLocktowardsthe
outeredge.
‐Useallthenailsprovidedforthebackpanelandsprea dthemoutequally.
‐Backpanelmustbeusedtomakesureyourunitissturdy.
‐Do
NOTuseharshchemicalsorabrasivecleanersonthisitem.
‐Neverpush,pull,ordragyou rfurniture.
Tube
You
Tube
You
PEOPLENEEDEDFORASSEMBLY:1‐2
ESTIMATEDASSEMBLYTIME:1HOUR

3
ameriwoodhome.com
BeforeYouStart
Q
u
i
c
k
T
i
p
A
s
s
e
m
b
l
y
CamLockFasteningSystem
ThisCamLockFasteningSystem willbeusedthroughouttheassemblyprocess.
1
3
2
4
Tube
You
Readthrougheachstepcarefullyandfollowtheproperorder
Separateandcountallyourpartsandhardware
Giveyourselfenoughroomfortheassemblyprocess
Havethefollowingtools:FlatHeadScrewdriver,#2PhillipsHead
ScrewdriverandHammer
Caution:Ifusingapowerdrillorpowerscrewdriverforscrewing,
pleasebeawaretoslowdownandstopwhenscrewistight.
Failuretodosomayresultinstrippingthescrew.

4
ameriwoodhome.com
BoardIdentification
Notactualsize
Tube
You
LeftPanel
35260328010
RightPanel
35260328020
Top
35322328030
Partition(2)
35260328040
Shelf
35322328050
AdjustableShelf(3)
35322328060
MidPanel
35322328080
LowerPanel
35322328090
Rail
35322328100
BackPanel
K532232800
This piece is paperboard construction.
It is not made from wood, but is
required for the assembly of your unit.
A
B
C
D
E
H
I
J
K
F

5
ameriwoodhome.com
BoardIdentification
Notactualsize
Tube
You
A
B
C
D
E
F
F
H
J
K
I
F
D
This piece is paperboard construction.
It is not made from wood, but is
required for the assembly of your unit.

6
ameriwoodhome.com
PartList
ActualSize
Tube
You
NotActualSize
(x20)
#A22570
cam lock
(x20)
#A22510
cam bolt
(x12)
#A21660
wood dowel
(x10)
#A53600
angle bracket
(x32)
#A12210
#8 x 1/2" screw
(x4)
#13410
#8 x 1-3/4" screw
(x12)
#A80250
shelf support
(x54)
#A21110
nail
(x4)
#A19800
bolt
(x8)
#A25400
washer
(x4)
#A20480
nut
(x3)
#A54270
metal plate
1
2
3
4
5
6
7
8
10
11
9
12

7
ameriwoodhome.com
STEP
1
Proper orientation of CAM LOCK
Tip
Assembly
Quick
Tube
You
(x2)
#A22570
1
2
3
(x6)
#A22510
(x1)
#A21660
2
3
1
2
2
2
2
1
A
Finished Edge
2

8
ameriwoodhome.com
STEP2
Proper orientation of CAM LOCK
Tip
Assembly
Quick
Tube
You
1
2
3
(x2)
#A22570
(x6)
#A22510
(x1)
#A21660
2
3
1
1
2
2
2
2
2
B
Finished Edge

9
ameriwoodhome.com
STEP3
Proper orientation of CAM LOCK
Tip
Assembly
Quick
Tube
You
1
3
(x4)
#A22570
(x2)
#A21660
1
3
1
1
1
3
E

10
ameriwoodhome.com
STEP
4
Proper orientation of CAM LOCK
Tip
Assembly
Quick
Tube
You
1
3
1
3
1
(x4)
#A22570
(x4)
#A21660
3
3
3
1
1
H

11
ameriwoodhome.com
STEP
5
Proper orientation of CAM LOCK
Tip
Assembly
Quick
Tube
You
3
1
3
1
1
3
(x4)
#A22570
(x4)
#A21660
1
1
3
3
I

12
ameriwoodhome.com
STEP
6
Tube
You
5
12
(x12)
#A12210
(x3)
#A54270
H
I
12
5
5
5
5

13
ameriwoodhome.com
STEP
7
Tube
You
I
H
A
E
U
N
L
O
C
K
L
O
C
K
*rawedgesareshaded

14
ameriwoodhome.com
STEP8
Tube
You
A
B
H
I
E
U
N
L
O
C
K
L
O
C
K
*rawedgesareshaded

15
ameriwoodhome.com
STEP9
Tube
You
4
5
(x5)
#A53600
(x10)
#A12210
B
E
H
A
4
5
5

16
ameriwoodhome.com
STEP10
Proper orientation of CAM LOCK
Tip
Assembly
Quick
Tube
You
D
D
1
1
(x4)
#A22570
1
1
1

17
ameriwoodhome.com
STEP
11
Tube
You
6
6
6
6
6
(x4)
#13410
A
E
D
D
B
*rawedgesareshaded

18
ameriwoodhome.com
STEP12
Tube
You
2
(x8)
#A22510
2
C
2
2
2
2
2
2
2

19
ameriwoodhome.com
STEP13
Tube
You
U
N
L
O
C
K
L
O
C
K
B
C
A
D
D
*rawedgesareshaded

20
ameriwoodhome.com
STEP
14
Tube
You
4
5
(x5)
#A53600
(x10)
#A12210
D
D
B
A
4
5
5
J
C
C
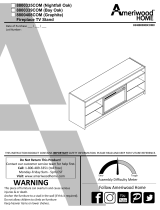
Place the rail under the two partitions (D), with the holes facing up and position between the
left panel (A) and right panel (B).
Attach the rail (J) to the top (C) using angle brackets and screws.
J

21
ameriwoodhome.com
STEP
15
Tube
You
(x54)
#A21110
IMPORTANT!
THEBACKPANELISASTRUCTURALPARTOFTHISUNIT
ANDMUSTBEINSTALLEDPROPERLY.
Attachthebackpanelasshownnailingstraightintotherawedges.
Assurethattheunitissquare.
Distancefromcornertocornermustbeequalasshown.
8
8
Assurethattheunitissquare.
Distancefromcornertocornermustbeequalasshown.
Flushedgeofbackpanel
withedgeofshelf.
product collapse, and/or serious injury.
tightened firmly. Failure to do so could cause instability,
All nails must be driven into the parts straight and
Please make sure that the Backs are attached securely.
WARNING
RawSurface

22
ameriwoodhome.com
STEP
16
Tube
You
7
7
(x12)
#A80250
Placetwelveshelfsupportstoyourdesiredheight.
Place the adjustable shelves on the shelf supports.
F
F
F
7
7
7
7
7

23
ameriwoodhome.com
STEP
17
Tube
You
9
10
11
(x4)
#A19800
(x8)
#A25400
(x4)
#A20480
Hardwaresuppliedforattachingthebedframetotheheadboard.
9
10
11
10
Boltandwashergooninsideofbedframe.

24
ameriwoodhome.com
Tube
You
MaximumLoads
Warning:Riskofinjurytopersons‐donotplaceatelevisiononthisfurniture.Thisfurnitureis
notapprovedforusewithatelevision.
CertificateofConformity
1.ThiscertificateappliestotheDorelHomeFurnishings,Inc.productidentifiedbythisinstructionmanual.
2.ThiscertificateappliestocomplianceofthisproductwiththeCPSCBanonLead‐ContainingPaint(16CFR1303).
3.Thisproductisdistributedby:DorelHomeFurnishings,Inc.
410
EastFirstStreetSouth
WrightCity,MO63390
636‐745‐3351
4.SiteofManufacture:TiffinOH
5.Seefrontpageofinstructionmanualfordateofmanufacture.
Thisunithasbeendesignedtosupportthemaximumloadsshown.Exceedingtheseloadlimits
couldcausesagging,instability,productcollapse,and/orseriousinjury.
20lbs
9.1kg
20lbs
9.1kg
20lbs
9.1kg

25
ameriwoodhome.com
Registeryourproducttoreceivethefollowing:
*Newtrenddetails‐sneakpeekonwhat'snew
*Surveys‐haveavoicewithinourcommunity
*Exclusivedealsanddiscountcodes
*Quickandeasyreplacementpartservice
Toregisteryourproduct,visitameriwoodhome.com
Visityourlocalretailer'swebsite,rateyourpurchased
productandleaveussomefeedback!
Wewouldlike
toextendabig"ThankYou"toallof
ourcustomersfortakingthetimetoassemblethis
AmeriwoodHomeproduct,andtogiveusyour
valuablefeedback.
Tube
You

26
ameriwoodhome.com
Tube
You
CubiertaDelantera
Estelibrodeinstruccionescontieneinformación
IMPORTANTE
deseguridad.Porfavorleaymanténgalo
parareferenciaenelfuturo.
NoRegreseesteproducto!
Comuniqueseconnuestroamistosoequipodeservicioalclienteparaobtener
ayuda.
Llamenosal:1‐800‐489‐3351(Gratis)Lunes‐Viernes9am‐5pmCST
Visitar:
www.ameriwoodhome.com
PRECAUCION
Estemueblepuedevolcarseycausargravesheridasy/omuerte.
Anclarelmuebleaunpostedemaderaenlapared(siestoserequiere).
NoPermitaquelosniñosmontenelmueble.
Mantengalosartículosmáspesadosenloscajonesdeabajo.
ConsejosÚtiles(página2)
‐Abrasuartículoeneláreadondeustedplaneautilizarloparaevitarlevantarymoverlomenos
‐Identificar,ordenarycontarlaspiezasantesdeintentarensamblar
‐Lasclavijasdecompresiónsegolpeanconunmartillo
‐LasdiapositivasestánmarcadasconunaR(derecha)yL(izquierda)paralacolocacióncorrecta
‐
Asegúresedequesiempreesteelpuntolocaizadoenlapartesuperiordebloqueadordeleva
estevolteadohaciabordeexterior
‐Utilizartodoslosclavosparaelpaneldeatrasydistribuirlosporigual
‐Elpaneldeatrasdebeutilizarseparaasegurarsedequelaunidadquedefijayfirme
‐Nouse
quimicasfuertesnilimpiadoresabrasivosenestearticulo
‐Nuncaempuje,tireniarrastrelosmuebles
AntesdeQueEmpieces(página3)
‐Leacuidadosamentecadapasoysigaelordencorrecto
‐Separarycontartodassuspiezasyhardware
‐Désesuficienteespacioparaelprocesodeensamble
‐Tengalassiguientesherramientas:destornilladordecabezaplana,#2cabezaPhillips
Destornilladorymartillo
‐Precaución:Siusauntaladroelectrónicooundestornilladoreléctricoparaatornillar,
porfavorasegúrese
quedejedeatornillarcuandoeltonillosesteapretado.Fallarhacerestopuedecausarbarrereltornillo.
Sistemadefijarelbloqueodeleva(página3)
Estasistemadefijarelbloqueodelevaserausadoentodoelprocesoensamble.
Español

27
ameriwoodhome.com
Página20
Coloquelabarradebajodelosdostabiques(D),conlosorificioshaciaarribaysituadosentreelpanel
izquierdo(A)yelpanelderecho(B).
Sujetelabarra(J)alapartesuperior(C)usandoescuadrasdefijaciónytornillos.
Página21
Conectelospaneltraserocomosemuestraclavandodirectamenteenlosbordessinprocesar.
Aseguraqiee;inidadescuadrada.
Distanciadeesquinaaesquinadebeserigualcomosemuestraporfavor.
IMPORTANT:ElPaneltraseroesunaparteestructuraldelaunidadydebeserinstalado
correctamente.
Página22
Coloquedocesoportesparaestantesasualturapreferida.
Coloqueelestanteadjustablesobrelossoportes.
Página23
Sesuministranherramientasparasujetarelbastidordecamaalacabecera
Elpernoylaarandelavandentrodelbastidordecama.
Página24
CARGAMAXIMA
Estaunidadhasidodiseñadaparasoportarlacargamáximaanotada.Elexcederestoslímitespuede
causarinestabilidad,colapsarsey/ocausarseriaslesiones.
ADVERTENCIA:Riesgodelesionesalaspersonas‐nocoloqueuntelevisorsobremuebles.Estemueble
noestáaprobadoparasuusoconuntelevisor.
Página25
Registresuproductopararecibirlosiguiente:
*Detallesdenuevastendencias‐Vistazoalonuevo
*Encuestas‐alecsuvozentresucomunidad
*Códigosdeofertasydescuentosexclusivos
*Fácilyrápidoserviciodepartesderemplace
Pararegistrarsuproducto,visiteameriwoodhome.com
Clasificasiónde5estrellas
Visiteel
sitiowebdesutiendalocal,califiquesucomprado
ydenossuscomentarios!
Nosgustaríaenviarungran"Agradecimiento"atodosnuestrosclientesportomarseeltiempode
ensamblaresteproductodeAmeriwoodHome,ypordarnossusvaliososcomentarios.
Gracias
Español
Tube
You

28
ameriwoodhome.com
CouvertureAvant
CELIVRETD'INSTRUCTIONCONTIENTDESINFORMATIONS
IMPORTANTES
SURLASÉCURITÉ.VEUILLEZLIRE
ETGARDERPOURUNERÉFÉRENCEFUTURE
Neretournezpasceproduit!
Contacteznotreéquipedeserviceàlaclientèleamicaled'abordpourobtenir
del'aide.
Appelez‐nous:
1‐800‐489‐3351(sansfrais)duLundiauVendredide9hà17hHeureCentrale
Visitez:
www.ameriwoodhome.com
ATTENTION
Lemeublepeutbasculeretcauserdesblessuresgravesoulamort.
Ancrerlemeubleàuneplanchemuraledanslemur(si indiqué).
Nelaissezpaslesenfantsgrimpersurlemeuble.
Placezlesarticleslourdssurlesétagèresoudanslestiroirsinférieurs.
AstucesUtiles(page2)
‐Ouvrezvotrearticledanslazonequevousprévoyezdelegarderpourmoinsdelevagelourd
‐Identifier,trieretcompterlespiècesavantd'essayerd'assembler
‐LesgoujonsdecompressionsonttaraudésavecunMarteau
‐Lesglissièressontmarquéesd'unR(droit)etd'unL(gauche)pourunbonplacement
‐
Assurez‐voustoujoursdefairefacelapointesituésurlehautdelaSerruredeCameverslebordextérieur
‐Utilisertouslesclousfournispourlepanneauarrièreetlesrépartirégalement
‐Lepanneauarrièredoitêtreutilisépourvousassurerquevotreappareilestrobuste
‐N'utilisezpasde
produitschimiquesagressifsoudenettoyantsabrasifssurcetappareil
‐Nejamaispousser,tirer,oufaireglisservotremeuble
AvantdeCommencer(page3)
‐Lisezattentivementchaqueétapeetsuivezlebonordre
‐Séparezetcompteztoutesvospiècesetmatériaux
‐Donnez‐voussuffisammentdeplacepourl'assemblage
‐Avoirlesoutilssuivants:tournevisàtêteplate,#2tournevisPhillips,etMarteau
‐
Attention:Sivousutilisezuneperceuseélectriqueouuntournevisélectriquepourvisser,veillezàralentir
etarrêterlorsquelavisestbienserrée.Lenon‐respectdecetteconsignepeutendommagerlavis.
SystèmedeFixationdeCame(page3)
CeSystèmedeFixationdeCameserautilisétoutaulongdel'assemblage
Tube
You
Français

29
ameriwoodhome.com
Page20
Placezlarampesouslesdeuxcloisons(D),lestrousverslehautetlapositionnezentrelepanneau
gauche(A)etlepanneaudroit(B).
Fixezlarampe(J)enhaut(C)àl'aidedeséquerresetdesvis.
Page21
Attachezlespanneauxarrièrecommeindiquéencliquant
directementdanslesbordsbruts.
Assurez‐vousquelemeubleestàégallté.
Ladisanceedecoindoitêtreégalecommemontré.
IMPORTANT:Lepanneauarrièreestunepartiestructurelledecetappreiletdoitêtreinstallé
correctement.
Page22
Placezdouzesupportsd'étagèreàlahauteurdésirée.
Placezl'étagèreréglablesurlessupportsd'étagère.
Page23
Matérielfournipourfixerlecadredelitàlatêtedelit
Leboulonetlarondellevontàl'intérieurducadredelit.
Page24
CHARGESMAXIMALES
Cemeubleaétéconçupoursupporterleschargesmaximalesindiquées.Enexcédantceslimitesde
charge,lemeublepourraitdevenirinstable,s'effondrer,et/oucauserdesblessuresgraves.
AVERTISSEMENT:Risquedeblessurecorporelle‐nepasplacerunetélévisionsurcemeuble.Cemeuble
n'estpasapprouvépour
uneutilisationavecunetélévision.
Page25
Enregistrezvotreproduitpourrecevoirlesélémentssuivantes:
*Détailssurlesnouvellestendances‐unaperçusurlesnouveautés
*Sondages‐avoirunevoixauseindenotrecommunauté
*Offresexclusivesetcodespromo
*Servicedepiècesderechangerapideetfacile
Pourenregistrervotreproduit,visitezameriwoodhome.com
5Étoiles
VisitezlesiteWebdevotredétaillantlocal,évaluezvotreproduit
achetéetlaissez‐nousquelquescommentaires!
Noustenonsàoffrirungrand"Merci"àtousnosclientspouravoirprisletempsd'assemblerceproduit
"AmeriwoodHome",etdenousdonnervoscommentairesprécieux.
Merci
Français
Tube
You
1/29