Veranda 116075 Instrucciones de operación
- Tipo
- Instrucciones de operación

Pro Series
Privacy/Semi-Privacy Panels
Installation Tips
Planning
•Priortoconstruction,checkwithyourlocalregulatoryagency
forspecialcoderequirementsinyourarea.
•Contactyourutilitysuppliertolocateandmarkundergroundlines.
•Sketchoutthelayoutofyourfenceandcalculatethenumberof
panels,gates,postsandcapsneededforyourproject.Adjust
layouttoaccommodateasmanyfullpanelsaspossible.Ifyou
mustuseapartialpanel,placeinthefurthestcorneroftheproperty.
•Carefulplanningandmeasuringofyourfenceprojectisessential,
asmovingpostsaftertheconcretesetsisextremelydifcult.
Digging Post Holes
•Assembleonefencepanelonalevelsurfaceandmeasurethe
widthofthepanelfromoneendpickettotheotherendpicket.
Addthewidthofonepost.Thisistheon-centermeasurementfor
postholelocation.
•Digpostholes10"to12"indiameterand36"to42"deep
(dependingonlocalordinanceorexpectedfrostdepthinwinter).
•Useastringlinetoensureallpostholesareinlineand
verifyspacingbetweenholes.
Double-check all measurements!
Setting and Installing Posts and Panels
•Startinthecorner.Measuretobesureyoucaninstallthenishedpaneltothepostwithapproximatelya2"gapfromthe
groundtothebottomofthepanel.
•Insertapostintothehole.Levelandadjustheightasneededusinggravel.DoNOTplacepostspermanentlyatthispoint.Use
bracingandshimsasneeded.Slidethereinforcedbottomrailintothepre-cutpost,lockingintoplacewiththenotchedtabs
(Fig.1).
•Placethenextpostintheground,andslidethenotchedrailintothepost.
•Placeoneendofthetoprailintothepost,allowingoneendtobefree.Installpicketsbyslidingthemintothebottomrail.
Placeasidechanneloverbothendpickets.Ifapplicable,placetoppicketsintopre-routedholesonthemid-railandthenslide
thetoprailoverthetopofthepickets.Note: When assembling scalloped or arched top panels, always pre-
arrange the pickets in the proper order prior to locking them into place.Afterallthepicketsareplacedin
thetoprail,locktheremainingendofthetoprailintothepost.
•Makesurepostsandbottomrailareleveland2"offoftheground.Fillholeswithconcrete.Mixthoroughlyandfollowthe
directionsonthebag.Checktomakesurepostsandrailsarestilllevel.Completethisaftereverysectioniscompleted.Let
concreteproperlycureaccordingtothemanufacturer’srecommendationbeforecontinuingyourinstallation.
•Repeatprocessforallremainingpanels.Refertothegateinstallationinstructionswheninstallinggates.
•InstallapostcaponeachpostusingPVCcementoranexterioradhesive.
Customer Service855-556-1852
www.ufpi.com
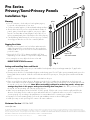
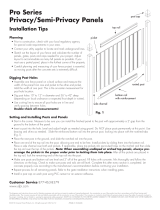
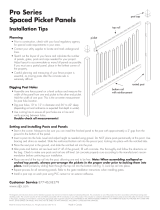
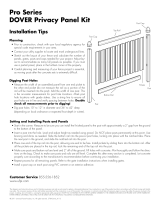
top rail
bottom rail
with reinforcement
post cap
routed post
side channel
picket
Thediagramsandinstructionsshownareforillustrationpurposesonlyandarenotmeanttoreplacealicensedprofessional.Anyconstructionoruseoftheproductmustbeinaccordancewithalllocalzoningand/
obuildingcodes.Theconsumerassumesallrisksandliabilityassociatedwiththeconstructionoruseofthisproduct.Theconsumerorcontractorshouldtakeallnecessarystepstoensurethesafetyofeveryoneinvolvedin
theproject,including,butnotlimitedto,wearingtheappropriatesafetyequipment.EXCEPTASCONTAINEDINTHEWRITTENLIMITEDWARRANTY,THEWARRANTORDOESNOTPROVIDEANYOTHERWARRANTY,
EITHEREXPRESSORIMPLIED,ANDSHALLNOTBELIABLEFORANYDAMAGES,INCLUDINGCONSEQUENTIALDAMAGES.
©2010UniversalForestProducts,Inc.Allrightsreserved.6367_4/13MadeinCanada
Fig. 1

Serie Pro
Paneles de privacidad/semi-privacidad
Consejos de instalación
Planificación
•Antesdecomenzarlaconstrucción,compruebeconsuagencia
reguladoralocalcualquierrequisitoespecialensuárea.
•Contácteseconlascompañíasdeserviciospúblicospara
localizarymarcarlaslíneassubterráneas.
•Prepareenborradoreldiseñodesucercaycalculeelnúmero
depaneles,puertas,postesymoldurasdetopequenecesitará
parasuproyecto.Cambieeldiseñoparaacomodartantos
panelescompletoscomoseaposible.Sidebeusarunpanel
parcial,póngaloenlaesquinamáslejanadelapropiedad.
•Esesencialunaplanicaciónymedicióncuidadosadesucerca,
puestoquemoverlospostesdespuésdequeelconcretoseha
asentadoesextremadamentedifícil.
Excavación de huecos para postes
•Ensambleelpanelparacercassobreunasupercieplanaymida
elanchodelpaneldesdeelpiquetedeunextremoalpiquete
delotroextremo.Añadaelanchodeunposte.Estaeslamedida
centralparalaubicacióndelhuecodelposte.
•Excavehuecosparapostesde10pulgadasa12pulgadasde
diámetroyde36pulgadasa42pulgadasdeprofundidad
(dependiendodelareglamentacióndeconstrucciónlocalode
laprofundidaddeescarchaqueseespereenelinvierno).
•Useunacuerdaalineadoraparaasegurarsequetodoslos
postesestánenlíneayveriqueelespacioentreloshuecos.
¡Compruebe dos veces todas las medidas!
Colocación e instalación de postes y paneles
•Comienceenlaesquina.Midaparaasegurarsequepuedeinstalarelpanelacabadoalposteconunespaciodeaproxima-
damente2pulgadasdesdeelsuelohastaelfondodelpanel.
•Inserteunposteenelhueco.Niveleyajustelaalturacomoseanecesariocongravilla.NOjelospostespermanentemente
porahora.Usesoportesycuñassiesnecesario.Desliceellistóninferiorreforzadoenelposteprecortadoasegurándoloen
susitioconlengüetasahuecadas(Fig.1).
•Pongaelsiguienteposteenelsueloydesliceellistónahuecadoenelposte.
•Pongaunextremodelbarandalsuperiorenelposte,dejandoqueunextremoquedelibre.Inserteestacasdeslizándolasen
ellistóninferior.Pongauncanallateralsobrelosdospiquetesextremos.Siesaplicable,pongaeltopedelospiquetesen
losagujerospre-perforadosenellistóncentralyluegodesliceelpasamanosolistónsuperiorsobreeltopedelospiquetes.
Nota: cuando ensamble paneles con topes ondulados o arqueados, ordene con anticipación los
piquetes en el orden correcto antes de asegurarlos en su sitio.Despuésdequetodaslasestacasestén
puestasenelbarandalsuperior,asegureelextremorestantedelbarandalsuperiorenelposte.
•Asegúresequeelposteyelbarandalinferioresténniveladosya2pulgadasdelsuelo.Lleneloshuecosconconcreto.Méz-
clelobienysigalasindicacionesdelabolsa.Veriquequelospostesypasamanosesténnivelados.Completeestodespués
quecadasecciónsehayacompletado.Dejequeelconcretosecureapropiadamentedeacuerdoalasrecomendaciones
delfabricanteantesdecontinuarconsuinstalación.
•Repitaelprocesocontodoslospanelesrestantes.Lealasindicacionesdeinstalacióndepuertascuandoinstalelaspuertas.
•InstaleunamolduradeposteencadaposteusandocementoPVCounadhesivoparausoexterior.
Servicio al Cliente 855-556-1852 www.ufpi.com
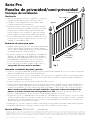
listón superior
listón inferior
con refuerzo
moldura de poste
poste perforado
canal lateral
piquete
Fig. 1
Losdiagramaseinstruccionesenestefolletosonsoloconnesilustrativosynoreemplazanaunprofesionalcerticado.Cualquierconstrucciónousodeesteproductodebeestardeacuerdocontodosloscódigoslocales
deplanicaciónurbanay/oconstrucción.Elconsumidorasumetodoriesgoyresponsabilidadasociadosconlaconstrucciónousodeesteproducto.Elconsumidorocontratistadebetomartodoslospasosnecesarios
paragarantizarlaseguridaddetodoslosinvolucradosenelproyecto,incluyendoperonolimitándosealusodelequipoapropiadodeseguridad.EXCEPTOCOMOSEINDICAENLAGARANTÍALIMITADAESCRITA,
UNIVERSALCONSUMERPRODUCTS,INC.NOOFRECENINGUNAOTRAGARANTÍA,SEAEXPRESAOIMPLÍCITA,YNOSERÁRESPONSABLEDENINGÚNDAÑO,INCLUSODEDAÑOSCONSIGUIENTES.
©2010UniversalForestProducts,Inc.Todoslosderechosreservados.63674/13HechoenCanadá
-
 1
1
-
 2
2


Veranda 116075 Instrucciones de operación
- Tipo
- Instrucciones de operación
en otros idiomas
Artículos relacionados
-
Veranda 144752 Guía de instalación
-
 Veranda 153835 Instrucciones de operación
-
 Veranda 144771 Instrucciones de operación
-
 Veranda 118675 Instrucciones de operación
-
 Veranda 131171 Guía de instalación
-
 Veranda 153149 Guía de instalación
-
 Veranda 238593 Instrucciones de operación
-
 Veranda 245316 Instrucciones de operación
-
 Veranda 238593 Guía de instalación
-
 Veranda 245316 Guía de instalación


