
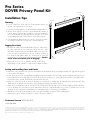
DoverExp.ai
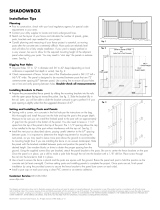
Bottom Rail
Post Cap
Post Cap
Pickets
Top Rail
Installation Tips
Planning
•Priortoconstruction,checkwithyourlocalregulatoryagencyfor
specialcoderequirementsinyourarea.
•Contactyourutilitysuppliertolocateandmarkundergroundlines.
•Sketchoutthelayoutofyourfenceandcalculatethenumberof
panels,gates,postsandcapsneededforyourproject.Adjustlay-
outtoaccommodateasmanyfullpanelsaspossible.Ifyoumust
useapartialpanel,placeinthefurthestcorneroftheproperty.
•Carefulplanningandmeasuringofyourfenceprojectisessential,
asmovingpostsaftertheconcretesetsisextremelydifcult.
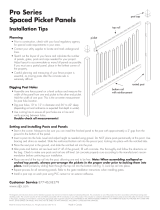
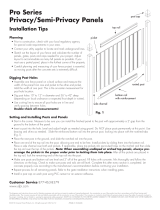
Digging Post Holes
•Measurethewidthofanassembledpanelfromoneendpicketto
theotherendpicket(donotmeasuretherailasaportionofthe
railwillbeinsertedintothepost).Addthewidthofonepost.This
istheon-centermeasurementforpostholelocations.Markpost
holelocationswithgradestakes.Useastringlinetoensureall
postholesareinlineandverifyspacingbetweenholes. Double
check all measurements prior to digging!
•Digpostholes10”to12”indiameterand36”to42”deep
(dependingonlocalordinanceorexpectedfrostdepthinwinter).
Setting and Installing Posts and Panels
•Startinthecorner.Measuretobesureyoucaninstallthenishedpaneltothepostwithapproximatelya2”gapfromtheground
tothebottomofthepanel.
•Insertapostintothehole.Levelandadjustheightasneededusinggravel.DoNOTplacepostspermanentlyatthispoint.Use
bracingandshimsasneeded.Slidethebottomrailintothepre-cutpostholes,lockingintoplacewiththenotchedtabs.Place
thenextpostintheground,andslidethenotchedrailintothepost.
•Placeoneendofthetoprailintothepost,allowingoneendtobefree.Installpicketsbyslidingthemintothebottomrail.After
allthepicketsareplacedinthetoprail,locktheremainingendofthetoprailintothepost.
•Makesurepostsandbottomrailareleveland2”offoftheground.Fillholeswithconcrete.Mixthoroughlyandfollowthedirec-
tionsonthebag.Checktomakesurepostsandrailsarestilllevel.Completethisaftereverysectioniscompleted.Letconcrete
properlycureaccordingtothemanufacturer’srecommendationbeforecontinuingyourinstallation.
•Repeatprocessforallremainingpanels.Refertothegateinstallationinstructionswheninstallinggates.
•InstallapostcaponeachpostusingPVCcementoranexterioradhesive.
Customer Service855-556-1852
www.ufpi.com
Thediagramsandinstructionsshownareforillustrationpurposesonlyandarenotmeanttoreplacealicensedprofessional.Anyconstructionoruseoftheproductmustbeinaccordancewithalllocalzoningand/obuild-
ingcodes.Theconsumerassumesallrisksandliabilityassociatedwiththeconstructionoruseofthisproduct.Theconsumerorcontractorshouldtakeallnecessarystepstoensurethesafetyofeveryoneinvolvedinthe
project,including,butnotlimitedto,wearingtheappropriatesafetyequipment.EXCEPTASCONTAINEDINTHEWRITTENLIMITEDWARRANTY,THEWARRANTORDOESNOTPROVIDEANYOTHERWARRANTY,
EITHEREXPRESSORIMPLIED,ANDSHALLNOTBELIABLEFORANYDAMAGES,INCLUDINGCONSEQUENTIALDAMAGES.
©2011UniversalForestProducts,Inc.Allrightsreserved.5784Dover_4/13
Post
Post
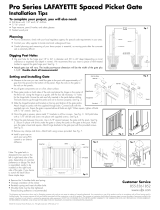
Pro Series
DOVER Privacy Panel Kit

Serie Pro
Kit de panel de privacidad DOVER
Colocación e instalación de postes y paneles
•Comienceenlaesquina.Midaparaasegurarsequepuedeinstalarelpanelacabadoalposteconunespaciodeaproximadamente2
pulgadasdesdeelsuelohastaelfondodelpanel.
•Inserteunposteenelhueco.Niveleyajustelaalturacomoseanecesariocongravilla.NOjelospostespermanentementeporahora.Use
soportesycuñassiesnecesario.Desliceellistóninferiorenlosagujerosprecortados,asegurándolosensusitioconlaslengüetasahuecadas.
•Pongaunextremodelbarandalsuperiorenelposte,dejandoqueunextremoquedelibre.Inserteestacasdeslizándolasenellistóninferior.
Despuésdequetodaslasestacasesténpuestasenelbarandalsuperior,asegureelextremorestantedelbarandalsuperiorenelposte.
•Asegúresequeelposteyelbarandalinferioresténniveladosya2pulgadasdelsuelo.Lleneloshuecosconconcreto.Mézclelobieny
sigalasindicacionesdelabolsa.Veriquequelospostesypasamanosesténnivelados.Completeestodespuésquecadasecciónsehaya
completado.Dejequeelconcretosecureapropiadamentedeacuerdoalasrecomendacionesdelfabricanteantesdecontinuarconsu
instalación.
•Repitaelprocesocontodoslospanelesrestantes.Lealasindicacionesdeinstalacióndepuertascuandoinstalelaspuertas.
•InstaleunamolduradeposteencadaposteusandocementoPVCounadhesivoparausoexterior.
Servicio al Cliente 855-556-1852
www.ufpi.com
Losdiagramaseinstruccionesenestefolletosonsoloconnesilustrativosynoreemplazanaunprofesionalcerticado.Cualquierconstrucciónousodeesteproductodebeestardeacuerdocontodosloscódigos
localesdeplanicaciónurbanay/oconstrucción.Elconsumidorasumetodoriesgoyresponsabilidadasociadosconlaconstrucciónousodeesteproducto.Elconsumidorocontratistadebetomartodoslospasos
necesariosparagarantizarlaseguridaddetodoslosinvolucradosenelproyecto,incluyendoperonolimitándosealusodelequipoapropiadodeseguridad.EXCEPTOCOMOSEINDICAENLAGARANTÍALIM-
ITADAESCRITA,UNIVERSALCONSUMERPRODUCTS,INC.NOOFRECENINGUNAOTRAGARANTÍA,SEAEXPRESAOIMPLÍCITA,YNOSERÁRESPONSABLEDENINGÚNDAÑO,INCLUSODEDAÑOS
CONSIGUIENTES.
©2011UniversalForestProducts,Inc.Todoslosderechosreservados.5784Dover_4/13
Consejos de instalación
Planificación
• Antesdecomenzarlaconstrucción,compruebeconsuagenciareguladora
localcualquierrequisitoespecialensuárea.
• Contácteseconlascompañíasdeserviciospúblicosparalocalizarymar-
carlaslíneassubterráneas.
• Prepareenborradoreldiseñodesucercaycalculeelnúmerodepaneles,
puertas,postesymoldurasdetopequenecesitaráparasuproyecto.Cam-
bieeldiseñoparaacomodartantospanelescompletoscomoseaposible.
Sidebeusarunpanelparcial,póngaloenlaesquinamáslejanadela
propiedad.
• Esesencialunaplanicaciónymedicióncuidadosadesucerca,puesto
quemoverlospostesdespuésdequeelconcretosehaasentadoesex-
tremadamentedifícil.
Excavación de huecos para postes
•Midaelanchodeunpanelensambladodesdeunaestacadelextremoa
ladelotroextremo(nomidaelbarandalpuestoqueunaporcióndeeste
barandalseráinsertadoenelposte).Añadaelanchodeunposte.Esta
eslamedidadecentroacentroparalaubicacióndeloshuecosparalos
postes.Marquelasubicacionesde loshuecosparapostesconestacas
denivelación.Useunacuerdaalineadoraparaasegurarsequetodoslos
huecosparalospostesesténenlíneayveriqueelespaciamientoentre
loshuecos.¡Verifique todas las medidas antes de comenzar
a excavar!
•Excavehuecosparapostesde10pulgadasa12pulgadasdediámetro
yde36pulgadasa42pulgadasdeprofundidad(dependiendodela
reglamentacióndeconstrucciónlocalodelaprofundidaddeescarchaque
seespereenelinvierno).
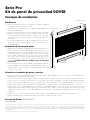
DoverExp.ai
Listónsuperior
Molduraparaposte
Listóninferior
Estacas
Poste
Poste
Molduraparaposte
-
 1
1
-
 2
2


Veranda 245316 Instrucciones de operación
- Tipo
- Instrucciones de operación
en otros idiomas
Artículos relacionados
-
Veranda 144752 Guía de instalación
-
 Veranda 116075 Instrucciones de operación
-
 Veranda 144771 Instrucciones de operación
-
 Veranda 153835 Instrucciones de operación
-
none 181989 Instrucciones de operación
-
 Veranda 116059 Guía de instalación
-
 Veranda 118675 Instrucciones de operación
-
 Veranda 118680 Guía de instalación
-
 Veranda 128011 Guía de instalación


