Duraflame DFH-TH-17-EOR Instrucciones de operación
- Categoría
- Calentadores espaciales
- Tipo
- Instrucciones de operación

INSTRUCTION MANUAL ENCLOSED
MANUEL D’INSTRUCTION À L’INTÉRIEUR
MANUAL DE INSTRUCCIONES ADJUNTO
INSTRUCTION MANUAL ENCLOSED
MANUEL D’INSTRUCTION À L’INTÉRIEUR
MANUAL DE INSTRUCCIONES ADJUNTO
ATTENTION
IF YOU HAVE ANY PROBLEMS OR QUESTIONS, EMAIL
OR CALL CUSTOMER SERVICE BEFORE YOU RETURN
THIS PRODUCT TO THE STORE WHERE IT WAS PURCHASED.
For Customer Service:
www.twinstarhome.com/duraame/
in English Call: 800-318-9373
ATTENTION
SI VOUS AVEZ DES PROBLÈMES OU QUESTIONS,
ENVOYEZ UN COURRIEL AU SERVICE À LA CLIENTÈLE OU
APPELEZ LE SERVICE À LA CLIENTÈLE AVANT DE RETOURNER
CE PRODUIT OÙ VOUS L’AVEZ ACHETÉ.
Pour le service à la clientèle:
www.twinstarhome.com/duraame/
pour le service en français: 800-318-9374
ATENCIÓN
SI TIENE ALGÚN PROBLEMA O PREGUNTAS, ENVÍE UN
MENSAJE DE CORREO ELECTRÓNICO O LLAME AL SERVICIO
DE ATENCIÓN AL CLIENTE ANTES DE DEVOLVER ESTE
PRODUCTO A LA TIENDA EN LA QUE LO COMPRÓ.
Servicio de atención al cliente:
www.twinstarhome.com/duraame/
Línea para llamadas en español: 800-318-9374
STOP
ARRÊT
PARE
STOP
ARRÊT
PARE

Ceramic (PTC) Tower Heater with Thermostat
and Oscillation
Homeowners Operating Manual
Model # : DFH-TH-17-EOR
Twin-Star International, Inc.
Delray Beach, FL 33445
Made in China • Printed in China
E-1
CONSUMER SAFETY INFORMATION
READ ALL INSTRUCTIONS BEFORE USE.
FOR HOUSEHOLD USE ONLY.
WARNING
IF THE INFORMATION IN THIS MANUAL IS NOT FOLLOWED EXACTLY, AN
ELECTRIC SHOCK OR FIRE MAY RESULT CAUSING PROPERTY DAMAGE,
PERSONAL INJURY OR LOSS OF LIFE.
DO NOT STORE OR USE GASOLINE OR OTHER FLAMMABLE VAPORS AND
LIQUIDS IN THE VICINITY OF THIS OR ANY OTHER APPLIANCE.
CONSUMER SAFETY INFORMATION
Whenever used, the following items identify safety and property damage messages
and designate a level of hazard seriousness.
- This is the safety alert symbol. It alerts you to potential personal injury hazards.
Obey all safety messages that follow this symbol to avoid possible injury or death.
DANGER - Indicates an imminently hazardous situation, which, if not avoided, will
result in death or serious injury. Usage of this signal word is limited to the most
extreme situations.
WARNING - Indicates a potentially hazardous situation, which, if not avoided, could
result in death or serious injury.
CAUTION - Indicates a potentially hazardous situation, which, if not avoided, may
result in minor/moderate injury or product/property damage. It also alerts against
unsafe practices.
NOTICE - Addresses practices not related to personal injury, such as product and/or
property damage.
Made in China
Printed in China
©2012,Twin-Star International,Inc.
In English Call: 800-318-9373
In Spanish Call: 800-318-9374
For Customer Service:

E-2
IMPORTANT INSTRUCTIONS
When using electrical appliances, basic precautions should always be followed to
reduce the risk of re, electrical shock, and injury to persons including the following:
READ ALL INSTRUCTIONS BEFORE USE.
1. Keep the product out of the reach of children and pets. This product is not intended
for use by children. Extreme caution is necessary when any heater is used near
children or the physically challenged and whenever the heater is left operating and
unattended.
2. Do not let bare skin touch hot surfaces, as heater is hot! To avoid burns, use the
handle when moving this heater. Keep combustible materials, such as furniture,
pillows, bedding, papers, clothes, and curtains at least 3 feet (0.9m) from all sides
of the heater.
3. Always unplug the heater when not in use.
4. Do not use this product in bathrooms, laundry areas, or similar damp/wet indoor
locations. Do not place the product where it may fall into a bathtub or other water
container.
5. Do not run the power cord under carpeting or cover it with throw rugs, runners, or
similar coverings. Arrange the cord away from trafc areas where it will not be
tripped over.
6. To disconnect the product from an electrical outlet, turn any controls to the Off
position, and then pull directly on the plug to remove it from the outlet; do not pull on
the power cord.
7. Do not insert or allow foreign objects to enter any ventilation or exhaust opening of
the product as this may cause electric shock or re, or damage the heater.
8. Do not block air intakes or exhaust, as this may cause a risk of re. Do not use the
product on soft surfaces, such as a bed, where openings may become blocked.
9. Do not use this product in an area where gasoline, paint, or ammable liquids are
used or stored, as this product has hot and arcing or sparking parts inside.
10. Do not place the product near a bed because objects, such as pillows or blankets,
can fall off and be ignited by the product.
11. Use this product only as described in this manual. Any other use not recommended
by the manufacturer may cause re, electric shock, or injury to persons.
12. Do not immerse or expose the power cord, plug, or product to water or other liquids.
If the product falls into water, immediately unplug it from the electrical outlet; do not
touch or reach into the water. If water or other liquids reach any internal areas of this
product, permanently discontinue its use.
13. Ensure the product is unplugged from the electrical outlet and allowed to cool before
relocating or cleaning it.
14. Use the heater in a vertical position only.
15. Do not place the product in or near an open window. Rain, snow, or other weather
elements could cause electrical short-circuiting in the product.
16. Do not use outdoors.
17. To disconnect heater, turn controls to the off position, then remove plug from outlet.
18. Do not plug into or unplug the product from the electrical outlet with a wet hand.

E-3
19. Do not operate this product if it has a damaged power cord or plug, if it malfunctions,
or if it has been dropped or damaged. This product has no user-serviceable
parts. Do not attempt to examine or repair this product yourself. Only qualied
service personnel should perform any servicing; take the product to an appliance
repair shop of your choice for inspection and repair.
20. This appliance is not intended for use by persons (included children) with reduced
physical, sensory or mental capability, or lack of experience and knowledge, unless
they have been given supervision or instruction concerning use of the appliance by a
person responsible for their safety.
21. Children should be supervised to ensure that they do not play with the appliance.
22. This product is intended solely for indoor, non-commercial, non-industrial use in
temporarily heating rooms. Do not use this product outdoors.
23. Do not operate the product continuously. Portable electric heaters are designed for
nite space heating or as a supplementary heat source. They are not intended to be
main sources of heat during the normal heating season.
24. Do not hang or wall-mount the product.
25. Place the product upright on a at, level, stable, heat-resistant surface.
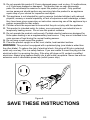
WARNING:
This product is equipped with a polarized plug (one blade is wider than
the other blade). To reduce the risk of electrical shock, this plug will t into a polarized
outlet only one way. This is a safety feature. If you are unable to insert the plug into the
electrical outlet, try reversing the plug. If the plug still does not t, contact a qualied
electrician. Always plug heaters directly into a wall outlet/ receptacle. Never use with an
extension cord or relocatable power tap (outlet/ power strip).
SAVE THESE INSTRUCTIONS
Figure A

PRODUCT SPECIFICATION
Voltage Frequency Wattage (Max) Max. Amperage
120 V~ 60 Hz 1500W 12.5 A
E-4
Note: Tolerances on all specication: +5%, -10%
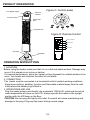
INSTALLATION INSTRUCTIONS
1. Pass the power cord down the “Power Cord Channel” between the “Right” and “Left”
Pillars, snap the “Right” and “Left” pillar together.
2. Place the pillar assembly onto the bottom of the” Main Body”. Using a Phillips
crosshead screw-driver, insert the four screws provided through the top
of the assembly and into the “Main Body”. Now tighten the screws down.
3. Run power cord through central opening in Base Assembly. Secure “Power Cord” in
“Power Cord Carriage” on the base.
4. Snap “Right Base” and “Left Base” together and fasten in place using the three
screws provided.
5. Place Base Assembly onto the bottom of the Pillar Assembly and fasten in place
using four screws.
CAUTION- Risk of re-Do not operate without base attached.
CAUTION - Operate the heater in upright position only (controls on the top). Any other
position could create a hazardous situation.
Figure B
Main body
Right Pillar
Left Pillar
Power Cord
Channel
Right Base
Center
Opening
Power Cord
Carriage
Power Cord
Carriage
Screw x 8
Left Base

OPERATION INSTRUCTIONS
1. LOCATION
Before using the heater make sure that it is on a at and stable surface. Damage may
occur if it is placed on an incline or decline.
For optimal performance, place the heater on oor beneath the coldest window in the
room. Your heater will minimize the effect of cold drafts.
2. CONNECTION
The heater must be connected to a household outlet in perfect working conditions.
Keep loose clothing, bedding, furniture and ammable material away from the wall
outlet where the heater plug is tted in.
3. OPERATIONS AND USE
Plug the heater power cord directly into a standard 120Volt AC outlet and the actual
room temperature will show on the LCD. Always operate the heater in the upright
position with the K/D base on the oor.
CAUTION: Be sure plug ts tightly into outlet. A loose t will cause overheating and
damage to the plug. Plug may feel warm during normal usage.
E-5
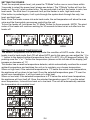
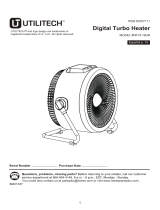
PRODUCT ORIENTATION
Receiver
Window
K/D Base
Power Pilot
light
Function button
LCD Digital display
K/D Pillar
Fireguard net
1
2
3
4
5
6
7
8
9
10
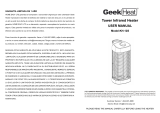
1
POWER OR STANDBY
OSCILLATION
“
--
”
“ + ”
TIMER CONTROL
222222222
3
4
5
Figure C: Control panel
Figure D: Remote Control

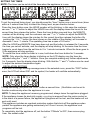
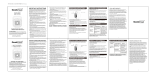
SETTING THE POWER
To set the required power level, just press the “P/Mode” button one or more times within
3 seconds to select the power level( please see below): The “P/Mode” button will turn the
heater on” fan only” when pushed once. The second push it will put the heater in auto, low
heat mode. The third time it is pressed it will put the heater in auto, high heat mode.
If the button is pushed again, it will cycle through the system back through fan only, low
heat, and high heat.
Note: Once the heater comes into auto heat mode, the set temperature will show the max
value and the thermostat commences controlling the unit.
To turn the heater off, hold down the “P/ Mode” button for three seconds. NOTE: The wind
motor of the heater will continue working for 30 seconds to blow hot air out after turn the
heater off.
OFF FAN
LOW
HIGH
SETTING THE AMBIENT TEMPERATURE
The ambient temperature can be set only under the condition of AUTO mode. After the
heater is set to heat mode, the LCD will show AUTO and in this case you can adjust the “+”or
“-“ button to the desired ambient temperature from 41 to 90°F (5 to 32 degrees Celsius). By
pushing once the “+”or “-“button the temperature (shown on the left side of the display) will
increase or decrease of 1°F.
This heater has a sensitive temperature detector, which automatically monitors the current
ambient temperature and switches the unit on to maintain your chosen temperature.
When on high heat, if the selected temperature is 1°F below the actual room temperature,
the appliance will go down to low heat. Once the selected temperature goes 1°F over the
actual room temperature, it will turn back on to high heat.
When on low heat, if the selected temperature is 2°F below the actual room temperature,
the appliance will turn itself off. Once the selected temperature goes 2°F over the actual
room temperature, it should turn back on to low heat. The unit will automatically maintain
the temperature at a constant level.
E-6

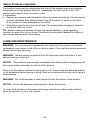
SETTING THE TIMER
NOTE: The timer can be set at all the time when the appliance is in use.
Hour setting Min.setting
Timer activated
Timer OFF
To set the required timing level, you should press the “timer” button one or more times (done
within a 3 second time limit) to select the timing level, as per direction below:
Press the timer button once, the HOUR number will be blinking, in this case the customer
can use "-" or "+" button to adjust the HOUR time until the display shows the hours for the
correct time then release the button. Press the timer button a second time, the MINUTE
number will be blinking, and the customer can use "-" or "+" button to adjust the MINUTE
time until the display shows the minutes for the correct time then release the button. By
pushing the “+”or “-” button the time (shown on the middle of the display) will increase or
decrease 1 hour / 1 minute. The operating time has a span of 24 hours.
After the HOUR and MINUTE time have been set and the button is released for 5 seconds,
the time you set will activate, and the display will stop blinking. At the same time the timer
begins to count down from the set time to 0 in 1 minute incriments. When the timer goes to
0 the appliance will stop working.
To cancel the timer while the timer is in use, hold down the timer button for 3 seconds.
NOTE: Only when the timer display is blinking on the LCD display may the timer be
adjusted using the “-“ and “+” buttons. Once you complete making any further adjustments
for 5 seconds, then the display stops blinking. With that the "-" and "+" buttons can be used
to adjust the ambient temperature again.
OSCILLATION SETTING
If you want to enlarge heating-coverage area in the selected room, press the “OSC” button
once, the LCD will show OSC and its symbol, the heater will oscillate automatically.
To stop oscillating, just press the “OSC” button a second time. (Oscillation can be set to
function continuously when the appliance is in use.
NOTE
: To keep the appliance’s memory programmed, always leave the appliance plugged.
If the appliance looses its electricity supply, e.g. plug is removed from the mains socket or
in the event of a power failure, the appliance’s programs will be lost, and the heater will not
work until reset.
This appliance includes an overheat protection system that shuts off the appliance when
partsof the appliance are getting excessively hot. Once it occurs, the appliance’s set
programs will be lost.
To completely shut the appliance off, set the button “P/Mode” to OFF, then remove plug
from the socket-outlet.
E-7

E-8
CARE AND MAINTENANCE
WARNING: Do not attempt to disassemble this product for any reason, as incorrect
re-assembly could cause a risk of re or electric shock. Only qualied service personnel
should perform any servicing.
WARNING: Always unplug the product from the electrical outlet and allow it to cool
before cleaning or storing it.
NOTICE: This product is permanently lubricated at the factory before shipping and will
not require further lubrication for the life of the product.
Clean only the exterior surface by wiping with a soft, damp cloth, and allow the product
to dry completely before storing or using. Dust can be removed from any vents using a
small vacuum.
WARNING: Do not allow water or other liquids to enter the interior of the product.
NOTICE: Do not use abrasive cleaners/pads to clean the product.
To store, wind and secure the power cord using a twist tie or rubber band, and then
place the product in a cool, dry location.
Safety Protection Systems
This product has protection safeguards that shut off the product when parts become
excessively hot. If the product shuts off, immediately turn the Control to the "OFF"
position and unplug it from the electric outlet.
If overheated:
a. Remove any objects near the product that may cause overheating. Use the product
in a well-ventilated area. Keep at least 3 feet (0.9 meters) of space on all sides
of the product to allow adequate air circulation.
b. Allow the product to cool down for at least 10 minutes before plugging it back into
an electric outlet for re-use.
TIP: Always install and maintain at least one smoke detector in good operating
condition on each oor of your home. Periodically check and/or replace the battery in
your smoke detector with a new battery.

1-YEAR LIMITED WARRANTY
The manufacturer warrants that your new Electric heater is free from manufacturing and
material defects for a period of one year from date of purchase, subject to the following
conditions and limitations.
1. Install and operate this Electric heater in accordance with the installation and
operating instructions furnished with the product at all times. Any unauthorized repair,
alteration, willful abuse, accident, or misuse of the product shall nullify this warranty.
2. This warranty is non-transferable, and is made to the original owner, provided that
the purchase was made through an authorized supplier of the product.
3. The warranty is limited to the repair or replacement of part(s) found to be defective in
material or workmanship, provided that such part(s) have been subjected to normal
conditions of use and service, after said defect is conrmed by the manufacturer’s
inspection.
4. The manufacturer may, at its discretion, fully discharge all obligations with respect to
this warranty by refunding the wholesale price of the defective part(s).
5. Any installation, labor, construction, transportation, or other related costs/expenses
arising from defective part(s), repair, replacement, or otherwise of same, will not be
covered by this warranty, or shall the manufacturer assume responsibility for same.
6. The owner/user assumes all other risks, if any, including the risk of any direct, indirect
or consequential loss or damage arising out of the use, or inability to use the product,
except as provided by law.
7. All other warranties – expressed or implied –with respect to the product, its
components and accessories, or any obligations/liabilities on the part of the
manufacturer are hereby expressly excluded.
8. The manufacturer neither assumes, nor authorizes any third party to assume on its
behalf, any other liabilities with respect to the sale of the product.
9. The warranties as outlined within this document do not apply to non accessories
used in conjunction with the installation of this product.
10. This warranty gives you specic legal rights, and you may also have other rights
which vary from state to state.
This warranty is void if:
a. The heater is subjected to prolonged periods of dampness or condensation.
b. Any unauthorized alteration, willful abuse, accident, or misuse of the product.
c. You do not have the original receipt of purchase.
IF WARRANTY SERVICE IS NEEDED
Contact the manufacturer by calling customer service department at 1-800-318-9373,
9 a.m.-5 p.m., EST, Monday-Friday. Make sure you have your warranty, your sales
receipt, location of purchase and the model/serial number of your product.
E-9

Calentador Torre de Ceramica (PTC) con
Termostato y Oscilación
MANUAL DE OPERACIÓN DEL PROPIETARIO
MODELO # : DFH-TH-17-EOR
Impreso en China
Fabricado en China
©2012,Twin-Star International,Inc.
INFORMACIÓN SOBRE SEGURIDAD PARA ELCONSUMIDOR
LEA TODAS LAS INSTRUCCIONES ANTES DE UTILIZAR EL PRODUCTO.
PARA USO DOMÉSTICO ÚNICAMENTE.
ADVERTENCIA
EN CASO DE NO SEGUIR LA INFORMACIÓN EN ESTE MANUAL
CON EXACTITUD, PODRÍAN PROVOCARSE DESCARGA ELÉCTRICA
O INCENDIO Y DAÑOS A LA PROPIEDAD, LESIONES PERSONALES O
LA PÉRDIDA DE LA VIDA.
NO GUARDE NI USE GASOLINA NI OTROS VAPORES Y LÍQUIDOS
INFLAMABLES CERCA DE ESTE APARATO, NI DE CUALQUIER OTRO.
INFORMACIÓN SOBRE SEGURIDAD PARA ELCONSUMIDOR
Los siguientes elementos, siempre que se utilizan, identican mensajes de seguridad
y daños a la propiedad, y designan un nivel de gravedad de riesgo.
- Éste es el símbolo de una alerta de seguridad. Se usa para prevenir al operario
de las lesiones corporales que podría sufrir. Siga todas las instrucciones que
acompañan este símbolo para evitar posibles lesiones o la muerte.
PELIGRO: Indica una situación de peligro inminente que, si no se evita, provocará la
muerte o lesiones graves. El uso de esta palabra de advertencia está limitado a las
situaciones más extremas.
ADVERTENCIA: Indica una situación de peligro potencial que, si no se evita, podría
ocasionar la muerte o lesiones graves.
PRECAUCIÓN: Indica una situación de peligro potencial que, si no se evita, podría
ocasionar lesiones leves o moderadas o daños al producto o a la propiedad.
También, advierte acerca de prácticas que no son seguras.
AVISO: Advierte de la existencia de prácticas que no están relacionadas con lesiones
personales, como por ejemplo, daños al producto y a la propiedad.
S-1
Línea para llamadas en inglés: 800-318-9373
Servicio de atención al cliente:
Línea
p
ara
ll
ama
d
as en es
p
año
l
: 800-318-937
4

S-2
INSTRUCCIONES IMPORTANTES
Al utilizar aparatos eléctricos, siempre deberán tomarse precauciones básicas para
reducir el riesgo de incendio, descarga eléctrica y lesiones a personas. Éstas incluyen:
LEA TODAS LAS INSTRUCCIONES ANTES DE UTILIZAR EL PRODUCTO.
1. Mantenga el producto fuera del alcance de los niños y las mascotas. Este producto
no ha sido diseñado para ser utilizado por niños. Es necesario tener sumo cuidado
cuando el calentador se utiliza cerca de niños o personas con discapacidades físicas,
y siempre que se deja funcionando y sin supervisión.
2. No toque las supercies calientes, ya que el calentador se calienta mucho cuando
está en uso. Para evitar quemaduras, use el asa para trasladar el calentador.
Mantenga los materiales inamables, como muebles, almohadas, ropa de cama,
papeles, prendas de vestir y cortinas a un mínimo de tres pies (0,9 m) de distancia de
todos los lados del calentador.
3. Siempre desenchufe el calentador cuando no esté en uso.
4. No utilice este producto en baños, áreas de lavado o lugares interiores húmedos
similares. No coloque este producto donde podría caerse en una bañera o en otro
recipiente con agua.
5. No coloque el cable de electricidad debajo de alfombras ni lo cubra con tapetes,
alfombras pequeñas o revestimientos similares. Coloque el cable lejos de las áreas
de paso y donde no ocasione tropezones.
6. Para desconectar el producto de un tomacorriente eléctrico, coloque los controles
en la posición de apagado (OFF) y luego retire el enchufe del tomacorriente; no tire
del cable.
7. No introduzca ni permita que objetos extraños ingresen a ninguna abertura de
ventilación o escape del producto, ya que esto podría causar una descarga eléctrica
o incendio o bien dañar el calentador.
8. No bloquee las entradas ni las salidas de aire, ya que esto podría provocar un riesgo
de incendio. No utilice el producto sobre supercies blandas, como una cama, donde
las aberturas podrían bloquearse.
9. No utilice este producto en un área donde se usen o guarden líquidos inamables,
gasolina o pintura, ya que el producto contiene piezas calientes y piezas que
producen arcos eléctricos o chispas en el interior.
10. No coloque el producto cerca de una cama, ya que ciertos objetos, tales como
almohadas o mantas, podrían caer e incendiarse.
11. Utilice este producto únicamente como se describe en el manual. Cualquier
otro uso no recomendado por el fabricante podría causar un incendio, una descarga
eléctrica o lesiones.
12. No sumerja el cable de electricidad, el enchufe o el producto en agua u otros
líquidos, ni los exponga a ellos. Si el producto se cayera al agua, desenchúfelo de
inmediato del tomacorriente eléctrico; no lo toque ni entre en contacto con el agua.
Si el agua u otros líquidos entraran en contacto con cualquiera de las áreas
internas del producto, deje de usarlo de forma permanente.
13. Asegúrese de que el producto esté desenchufado del tomacorriente y déjelo enfriar
antes de colocarlo en otro lado o de limpiarlo.
14. Utilice el calentador en posición vertical únicamente.
15. No coloque el producto en una ventana abierta o cerca de ella. La lluvia, la nieve u
otras condiciones climáticas podrían provocar un cortocircuito eléctrico en el
producto.
16. No utilice el aparato en exteriores.

17. Para desconectar este aparato, coloque los controles en la posición de apagado y
luego retire el enchufe del tomacorriente.
18. No enchufe ni desenchufe el producto del tomacorriente eléctrico con las manos
mojadas.
19. No haga funcionar el producto si el enchufe o el cable de electricidad está dañado,
si no funciona correctamente o si se ha caído o dañado. Este producto no incluye
piezas a las que el usuario pueda hacerles mantenimiento. No intente examinar
o reparar el producto usted mismo. Todas las tareas de mantenimiento deben ser
realizadas sólo por personal calicado; lleve el producto a un taller de reparación de
electrodomésticos que usted elija para su inspección y reparación.
20. Este aparato no está diseñado para ser utilizado por personas (incluidos niños)
con capacidades físicas, sensoriales o mentales reducidas, ni sin experiencia y
conocimiento, salvo que estén bajo supervisión o que hayan recibido las
instrucciones correspondientes acerca del uso del aparato por parte de una persona
responsable de su seguridad.
21. Los niños deben estar bajo supervisión para garantizar que no jueguen con el
aparato.
22. Este producto está diseñado únicamente para uso en interiores, no comercial y no
industrial, en ambientes temporalmente calefaccionados. No lo utilice en exteriores.
23. No haga funcionar el producto continuamente. Los calentadores eléctricos portátiles
están diseñados para calefaccionar un espacio reducido o como fuente de calor
complementaria. No están diseñados para ser fuentes principales de calor durante
la temporada habitual en la que se necesita calefacción.
24. No cuelgue el producto ni lo monte en la pared.
25. Colóquelo en posición vertical sobre una supercie plana, nivelada, estable y
resistente al calor.
ADVERTENCIA: Este producto está equipado con un enchufe polarizado (una clavija
es más ancha que la otra) para reducir el riesgo de descarga eléctrica. El enchufe
podrá colocarse en un tomacorriente polarizado de una sola manera. Ésta es una
medida de seguridad. Si no puede colocar el enchufe en el tomacorriente eléctrico,
intente invirtiendo el enchufe. Si aún así no puede, póngase en contacto con un
electricista calicado. Siempre enchufe los calentadores directamente en un receptáculo
o tomacorriente de pared. Nunca los utilice con un cable prolongador o un contacto
múltiple con tomas reubicables (tomacorriente/enchufe múltiple).
S-3
GUARDE ESTAS INSTRUCCIONES
Figura A

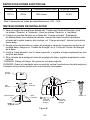
ESPECIFICACIONES ELÉCTRICAS
S-4
Voltaje Frecuencia Potencia en vatios (Max) Amperaje máximo
120 V~ 60 Hz
1500 vatios 12,5 A
Nota: Tolerancias en todas las especicaciones: +5%, -10%.
INSTRUCCIONES DE INSTALACIÓN
Figura B
1. Pase el cordón de energía por debajo del ¨Cordón del Canal de Energía¨ entre
los pilares ¨Derecho¨ e ¨Izquierdo¨, junte los pilares ¨Derecho¨ e ¨Izquierdo¨.
2. Coloque el montaje del pilar en el fondo del ¨Cuerpo principal¨. Empleando
un destornillador con cabezal de estrella, inserte los cuatro tornillos aportados
a través de la parte superior del montaje y el ¨Cuerpo principal¨. Apriete los tornillos
hacia abajo.
3. Ponga en funcionamiento el cordon de energía a través de la apertura central en el
montaje base. Asegure el ¨Cordón de Energía¨ en el ¨Porte del Cordón de Energía
de la base.
4. Junte la ¨base derecha¨ con la ¨base izquierda¨ y sujételo al lugar empleando los tres
tornillos aportados.
5. Situe la base del montaje al fondo del montaje del pilar y sujételo empleando cuatro
tornillos.
CUIDADO- Riesgo de fuego- No opere sin una base adjunta.
CUIDADO- Opere el calentador solo en posición vertical (controles en la parte superior).
Cualquier otra posición podría crear una situación arriesgada.
Cuerpo
principal
Pilar
derecho
Pilar
izquierdo
Base
Izquierda
Base Derecha
Apertura del
Centro
Porte del
Cordón de
Energía
Porte del
Cordón de
Energía
Tornillo x 8

S-5
INSTRUCCIONES DE OPERACIÓN
1. UBICACIÓN
Antes de usar el calentador asegúrese de que esté en una supercie plana y estable.
Pueden ocurrir daños si se coloca en una subida o bajada.
Para un rendimiento óptimo, coloque el calentador en el suelo debajo de la ventana
más fría de la habitación. Su calentador minimizará el efecto de las corrientes de aire
frío.
2. CONEXIÓN
El calentador debe estar conectado a una toma de corriente en perfectas condiciones
de trabajo.
Mantenga el material de ropa suelta, ropa de cama, muebles e inamables lejos de la
toma de la pared donde se enchufe la toma del calentador
3. OPERACIONES Y USO
Conecte el cable de alimentación del calentador directamente en una toma estándar
de 120 voltios de CA y la temperatura ambiente actual se mostrará en la pantalla LCD.
Siempre opere el calentador en posición vertical con la base K/D en el suelo.
PRECAUCIÓN: Asegúrese que el enchufe se ajusta rmemente en la toma de
corriente. Una mala conexión provocará un sobrecalentamiento y daños en el enchufe.
El enchufe puede calentarse durante su uso normal.
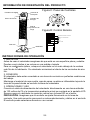
INFORMACIÓN DE ORIENTACIÓN DEL PRODUCTO
BASE K/D
Red de
protección de
fuego
Pantalla LCD digital
Ventana de
Recepción
1
2
3
4
5
6
7
8
9
10
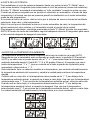
1
ENCENDIDO O MODO DE ESPER
A
OSCILACIÓN
“
--
”
“ + ”
CONTROL TEMPORIZADOR
222222222
3
4
5
Botón de función
Pilar K/D
Figura C: Panel de Controles
Figura D: Control Remoto
Indicador de
Energía

AJUSTE DE LA POTENCIA
Para establecer el nivel de potencia deseado, basta con pulsar la letra "P / Mode" una o
más veces durante 3 segundos para seleccionar el nivel de potencia (véase más adelante):
El botón "P / Mode" encenderá el calentador en "sólo ventilador" cuando se pulse una vez.
Cuando se pulse por segunda vez se pondrá el calentador en automático, el modo de baja
temperatura. La tercera vez que se presione pondrá la calefacción en el modo automático,
modo de alta temperatura.
Si se pulsa el botón de nuevo, dará un ciclo por el sistema de nuevo a través del ventilador
solamente, bajo calor y alta temperatura.
Nota: Una vez que el calentador entra en el modo automático de calor, la temperatura de
ajuste mostrará el valor máximo y el termostato iniciará el control de la unidad.
Para apagar el calentador, mantenga presionada la tecla "P / Mode" durante tres segundos.
NOTA: El motor de viento del calentador seguirá trabajando durante 30 segundos para sacar
el aire caliente después de apagar el calentador.
AJUSTE DE LA TEMPERATURA AMBIENTE
La temperatura ambiente se puede establecer sólo bajo la condición de modo AUTO.
Después de que el calentador esté congurado en modo calor, la pantalla LCD mostrará
AUTO y en este caso se puede ajustar con el "+" o "-" para seleccionar la temperatura
ambiente deseada desde 41 hasta 90 ° F (5 a 32 grados Celsius). Al empujar una vez el
botón de temperatura "+" o "-" (que se muestra en el lado izquierdo de la pantalla) esta
aumentará o disminuirá en 1 ° F.
Este calentador tiene un detector sensible a la temperatura, que controla automáticamente
la temperatura ambiente del momento y cambia la unidad para mantener la temperatura
elegida.
Cuando esté en calor alto, si la temperatura seleccionada es de 1 ° F por debajo de la
temperatura ambiente actual, el aparato va a bajar a calor bajo. Una vez que la temperatura
seleccionada vaya 1 ° F por encima de la temperatura ambiente actual, volverá a calor alto.
Cuando esté en calor bajo, si la temperatura seleccionada es de 2 ° F por debajo de
la temperatura ambiente actual, el aparato se apagará. Una vez que la temperatura
seleccionada vaya 2 ° F por encima de la temperatura ambiente actual, volverá a calor bajo.
La unidad mantendrá automáticamente la temperatura a un nivel constante.
OFF FAN
BAJA
ALTA
S-6

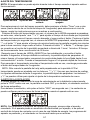
AJUSTE DEL TEMPORIZADOR
NOTA: El temporizador se puede ajustar durante todo el tiempo cuando el aparato está en
funcionamiento
Para seleccionar el nivel de tiempo requerido, debe presionar el botón "Timer" una o más
veces (hecho dentro de un límite de tiempo de 3 segundos) para seleccionar el nivel de
tiempo, según las instrucciones que se muestran a continuación:
Presione el botón del temporizador una vez, el número de la HORA empezará a parpadear,
en este caso, usted puede usar "-" o "+" para ajustar el tiempo de hora hasta que la pantalla
muestre las horas para el tiempo correcto deseado y luego suelte el botón. Presione el botón
del temporizador por segunda vez, el número de MINUTOS parpadeará, usted puede utilizar
"-" o el botón "+" para ajustar el tiempo de minutos hasta que la pantalla muestre los minutos
para la hora correcta, luego suelte el botón. Pulsando el botón "+" o Botón "-" el tiempo (que
se muestra en el centro de la pantalla) aumentará o disminuirá 1 hora / 1minutos. El tiempo
de funcionamiento tiene una duración de 24 horas.
Después que el tiempo de HORA y MINUTO se han establecido y se suelte el botón
durante 5 segundos, el tiempo denido se activará y la pantalla dejará de parpadear. Al
mismo tiempo, el temporizador comenzará la cuenta atrás desde la hora jada hasta 0 con
incrimentos de 1 minuto. Cuando el temporizador llegue a 0 el aparato dejará de funcionar.
Para cancelar el temporizador mientras el temporizador está en uso, mantenga presionado
el botón del temporizador de 3 segundos.
NOTA: Sólo cuando la pantalla del reloj esté parpadeando en la pantalla LCD el
temporizador puede ser ajustado con los botones "-" y "+". Una vez que termine de realizar
los ajustes adicionales durante 5 segundos, la pantalla dejará de parpadear. Los botones "-"
y "+" se pueden utilizar para ajustar el ajuste de la temperatura ambiente de nuevo.
Ajuste de Hora Ajusto de Min. Temporizador
activado
Temporizador
apagado
AJUSTE DE LA OSCILACIÓN
Si desea ampliar la cobertura de la zona de calentamiento en la habitación seleccionada,
pulse la "OSC" botón una vez, la pantalla mostrará OSC y su símbolo, el calentador oscilará
de forma automática.
Para detener la oscilación, sólo pulse el botón "OSC" una segunda vez. ( La oscilación se
puede congurar para funcionar de forma continua cuando el aparato está en uso.
NOTA: Para mantener la memoria del aparato programado, siempre deje el aparato
conectado. Si el aparato pierde su suministro de electricidad, por ejemplo, si se quita el
enchufe de la toma de corriente o en el caso de una fallada de energía, los programas del
aparato se perderán, y el calentador no funcionará hasta que se reinicien.
S-7

CUIDADO Y MANTENIMIENTO
ADVERTENCIA: No intente desarmar el producto por ninguna razón, ya que si se
vuelve a armar de forma incorrecta, podría provocar un riesgo de incendio o descarga
eléctrica. Todo servicio de mantenimiento debe ser realizado por personal calicado.
ADVERTENCIA: Siempre desenchufe el producto del tomacorriente eléctrico y deje
que se enfríe antes de limpiarlo o almacenarlo.
AVISO: Este producto permanece lubricado en fábrica antes del envío y no necesitará
lubricarse más durante su vida útil.
Limpie sólo la supercie exterior con un paño suave y húmedo, y deje que se seque
por completo antes de almacenarlo o usarlo. El polvo puede retirarse de cualquiera
de las ventilaciones utilizando una pequeña aspiradora.
ADVERTENCIA: No permita que ingrese agua u otros líquidos en el interior del
producto.
AVISO: No utilice almohadillas o limpiadores abrasivos para limpiar el producto.
Para guardar el cable de electricidad, enrósquelo y asegúrelo con un sujetador de
alambre o una banda elástica, y luego coloque el producto en un lugar freso y seco.
S-8
SISTEMAS DE PROTECCIÓN DE SEGURIDAD
Este producto cuenta con controles de seguridad y protección que lo desconectan
cuando las piezas se calientan excesivamente. Si el producto se desconecta, gire de
inmediato el control a la posición de apagado ("OFF") y desenchúfelo del
tomacorriente eléctrico. Si se recalienta:
a. Retire todos los objetos que estén cerca del producto que pudieran provocar
sobrecalentamiento. Utilice el producto en un área bien ventilada. Mantenga al
menos 3 pies (0,9 metros) de espacio en todos los lados del producto para permitir
una circulación de aire adecuada.
b. Deje que el producto se enfríe durante al menos diez minutos antes de volver a
enchufarlo en un tomacorriente eléctrico para volver a usarlo.
CONSEJO: Siempre instale al menos un detector de humo y manténgalo en buenas
condiciones operativas en cada piso de su hogar. Periódicamente, revise la batería
del detector de humo y reemplácela por una nueva.
Este aparato incluye un sistema de protección contra el sobrecalentamiento que
apaga el aparato cuando las partes del aparato están excesivamente calientes. Una
vez que esto ocurra, los programas establecidos del aparato se se perderán.
Para apagar completamente el aparato, coloque el botón "P / Mode" apagado y luego
desconecte el enchufe de la toma de corriente.

GARANTÍA LIMITADA DE 1 AÑO
El fabricante garantiza que su nueva estufa eléctrica no presentará defectos de
fabricación ni materiales durante un período de un año a partir de la fecha de compra,
siempre y cuando se cumplan las siguientes condiciones y limitaciones.
1. Esta estufa eléctrica se debe instalar y operar en todo momento de acuerdo con las
instrucciones de instalación y operación proporcionadas con el producto. Cualquier
reparación no autorizada, alteración, abuso deliberado, accidente o uso inadecuado
del producto anulará esta garantía.
2. Esta garantía no es transferible y sólo está disponible para el propietario original,
siempre y cuando la compra se haya realizado a través de un proveedor autorizado
del producto.
3. Esta garantía se limita a la reparación o reemplazo de piezas que se consideren
defectuosas en material o mano de obra, siempre y cuando dicha pieza haya estado
sometida a condiciones normales de uso y servicio, después de que una inspección
por parte del fabricante conrme dicho defecto.
4. El fabricante podrá, bajo su criterio, eximirse de toda obligación respecto de esta
garantía reembolsando el precio al por mayor de la pieza defectuosa.
5. Esta garantía no cubre·ningún costo de instalación, mano de obra, fabricación,
transporte o de otro tipo que surja de la pieza defectuosa, su reparación, reemplazo u
otra situación, y el fabricante no asume ninguna responsabilidad por las mismas.
6. El dueño/usuario asume todos los riegos, si los hay, incluidos los riesgos de daños o
pérdidas directos, indirectos o resultantes que surjan del uso del producto, o de la
incapacidad para usarlo, salvo que la ley estipule lo contrario.
7. Mediante el presente, se excluye expresamente cualquier otra garantía, expresa o
implícita, respecto del producto, sus componentes y accesorios, o cualquier otra
obligación o responsabilidad de parte del fabricante.
8. El fabricante no asume ni autoriza a ningún tercero a asumir en su nombre ninguna
otra responsabilidad respecto de la venta de este producto.
9. Las garantías descritas en este documento no se aplican a accesorios que no sean
del fabricante y que se usen junto con la instalación de este producto.
10. Esta garantía le otorga derechos legales especícos y es posible que usted tenga
otros derechos, que varían según el estado.
Esta garantía es nula si:
a. La chimenea está sometida a períodos prolongados de humedad o condensación.
b. Se produce cualquier alteración no autorizada, abuso deliberado, accidente o uso
inadecuado del producto.
c. Usted no tiene el recibo original de compra.
SI SE NECESITA SERVICIO DE GARANTÍA
Póngase en contacto con el fabricante llamando al departamento de Servicio al Cliente
al 1-800-318-9374, de lunes a viernes de 9 a.m. a 5 p.m., hora estándar del Este.
Asegúrese de tener su garantía, su recibo de venta, la identicación del lugar de
compra y el modelo o número de serie de su producto.
S-9

INSTRUCTION MANUAL ENCLOSED
MANUEL D’INSTRUCTION À L’INTÉRIEUR
MANUAL DE INSTRUCCIONES ADJUNTO
INSTRUCTION MANUAL ENCLOSED
MANUEL D’INSTRUCTION À L’INTÉRIEUR
MANUAL DE INSTRUCCIONES ADJUNTO
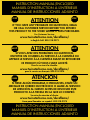
ATTENTION
IF YOU HAVE ANY PROBLEMS OR QUESTIONS, EMAIL
OR CALL CUSTOMER SERVICE BEFORE YOU RETURN
THIS PRODUCT TO THE STORE WHERE IT WAS PURCHASED.
For Customer Service:
www.twinstarhome.com/duraame/
in English Call: 800-318-9373
ATTENTION
SI VOUS AVEZ DES PROBLÈMES OU QUESTIONS,
ENVOYEZ UN COURRIEL AU SERVICE À LA CLIENTÈLE OU
APPELEZ LE SERVICE À LA CLIENTÈLE AVANT DE RETOURNER
CE PRODUIT OÙ VOUS L’AVEZ ACHETÉ.
Pour le service à la clientèle:
www.twinstarhome.com/duraame/
pour le service en français: 800-318-9374
ATENCIÓN
SI TIENE ALGÚN PROBLEMA O PREGUNTAS, ENVÍE UN
MENSAJE DE CORREO ELECTRÓNICO O LLAME AL SERVICIO
DE ATENCIÓN AL CLIENTE ANTES DE DEVOLVER ESTE
PRODUCTO A LA TIENDA EN LA QUE LO COMPRÓ.
Servicio de atención al cliente:
www.twinstarhome.com/duraame/
Línea para llamadas en español: 800-318-9374
STOP
ARRÊT
PARE
STOP
ARRÊT
PARE
-
 1
1
-
 2
2
-
 3
3
-
 4
4
-
 5
5
-
 6
6
-
 7
7
-
 8
8
-
 9
9
-
 10
10
-
 11
11
-
 12
12
-
 13
13
-
 14
14
-
 15
15
-
 16
16
-
 17
17
-
 18
18
-
 19
19
-
 20
20


Duraflame DFH-TH-17-EOR Instrucciones de operación
- Categoría
- Calentadores espaciales
- Tipo
- Instrucciones de operación
en otros idiomas
Artículos relacionados
-
Duraflame DFH-NH-3-T Guía de instalación
-
-
-
-
-
-
-
Duraflame DFH-GA-4-T Manual de usuario
-
-
Otros documentos
-
Twin-Star International DFH-CH-11-T Instrucciones de operación
-
-
 Geek Heat HA31-05E Manual de usuario
-
Silvercrest Tower Fan Heater STHL 2000 A1 Instrucciones de operación
-
 Utilitech NF15-19UR Manual de usuario
-
 Geek Heat KH-12S Guía del usuario


