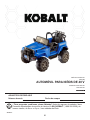
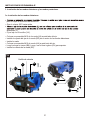
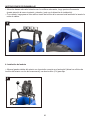
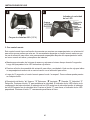
Kobalt KKC 0040-06 Instrucciones de operación
- Categoría
- Muebles de bebe
- Tipo
- Instrucciones de operación

1
ITEM # 2557197
2557198
MODEL # KKC 0040-06
KKC 2040-06
Español p. 26
Questions, problems, missing parts? Before returning to your retailer, call our customer
service department at 1-888-3KOBALT (1-888-356-2258), 8 a.m. - 8 p.m., EST, Monday -
Sunday.
ATTACH YOUR RECEIPT HERE
Serial Number Purchase Date
SM20247
40V KID CAR


2
TABLE OF CONTENTS
PRODUCT SPECIFICATIONS
Product Specications ................................................................................................. 2
Package Contents ....................................................................................................... 3
Hardware Contents ...................................................................................................... 4
Symbols ..................................................................................................................... 5
Safety Information ...................................................................................................... 6
Assembly Instructions ................................................................................................ 10
Operating Instructions ............................................................................................... 19
Care and Maintenance.............................................................................................. 22
Troubleshooting ........................................................................................................ 22
Warranty ................................................................................................................. 23
Replacement Parts List ............................................................................................. 24
SPECIFICATIONS
Voltage 40 V
Recommended age group 3-7
Max weight 65 lbs
Max speed Up to 3.72 MPH
Runtime ( with 2 ah battery ) 50 minutes
Weight without battery 42.5 lbs
Charge time ( with 2 ah battery ) 60 Minutes
Battery model KB 240C-06
Charger model KRC 40-06
Item Temperature
Kid Car Storage Temperature Range 32˚ F (0˚ C) ~ 113˚ F (45˚ C)
Kid Car Operation Temperature Range 32˚ F (0˚ C) ~ 113˚ F (45˚ C)
Battery Charging Temperature Range 39˚ F (4˚ C) ~ 104˚ F (40˚ C)
Charger Operation Temperature Range 39˚ F (4˚ C) ~ 104˚ F (40˚ C)
Battery Storage Temperature Range 32˚ F (0˚ C) ~ 113˚ F (45˚ C)
Battery Discharging Temperature Range 32˚ F (0˚ C) ~ 113˚ F (45˚ C)
The recommended ambient temperature range:

3
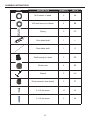
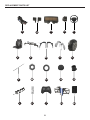
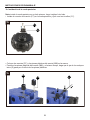
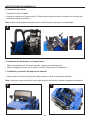
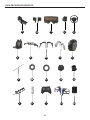
PART DESCRIPTION QUANTITY
A Windshield 1
B Sideview Mirrors 2
C Car body 1
D Headlight 2
E Front guard 1
F Wheel 4
G Car door 2
H Side roll bar frame 2
I Seat 1
J Roll bar light frame 4
PACKAGE CONTENTS
A
B
C
D
E
F
G
H
I
J

4
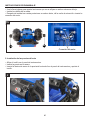
HARDWARE CONTENTS (not shown actual size)
Washer Nut Spring
Front wheel shaftRear wheel shaft Wrench
Screw 4x12mm Screw 3x12mm
Screw 4x12mm

5
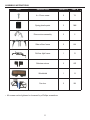
SYMBOLS
Some of the following symbols may be used on this product. Please study them and learn their mean-
ing. Proper interpretation of these symbols will allow you to operate the product better and safer.
SYMBOLS NAME DESIGNATION/EXPLANATION
V Volts Voltage
A Amperes Current
Hz Hertz Frequency (cycles per second)
Wh Watt Hour Energy Storage Capacity
Ah Amp Hour Current Capacity
Direct Current Type or a characteristic of current
Wet Conditions Alert Do not expose to rain or use in damp locations.
Read The Operator’s
Manual
To reduce the risk of injury, user must read and understand
operator’s manual before using this product.
Safety Alert Precautions that involve your safety.
The following signal words and meanings are intended to explain the levels of risk associated with
this product.
SYMBOL SIGNAL MEANING
DANGER
Indicates an imminently hazardous situation, which, if not
avoided, will result in death or serious injury.
WARNING
Indicates a potentially hazardous situation, which, if not
avoided, could result in death or serious injury.
CAUTION
Indicates a potentially hazardous situation, which, if not
avoided, may result in minor or moderate injury.
CAUTION
(Without Safety Alert Symbol) Indicates a situation that may
result in property damage.
WARNING
• To avoid serious personal injury, do not attempt to use this product until you have read this Owner's
Manual thoroughly and understand it completely. If you do not understand the warnings and
instructions in this Owner's Manual, do not use this product. Call 1-888-356-2258 for assistance.

6
SAFETY INFORMATION
Compliance information of FCC Part 15b
WARNING: Any changes or modications to this unit not expressly approved by the party
responsible for compliance could void the user’s authority to operate the equipment.
This device complies with part 15 of the FCC Rules. Operation is subject to the following two conditions:
(1) This device may not cause harmful interference, and (2) this device must accept any interference
received, including interference that may cause undesired operation.
This equipment has been tested and found to comply with the limits for a Class B digital device,
pursuant to part 15 of the FCC Rules. These limits are designed to provide reasonable protection
against harmful interference in a residential installation. This equipment generates, uses and can radiate
radio frequency energy and, if not installed and used in accordance with the instructions, may cause
harmful interference to radio communications. However, there is no guarantee that interference will not
occur in a particular installation. If this equipment does cause harmful interference to radio or television
reception, which can be determined by turning the equipment off and on, the user is encouraged to try
to correct the interference by one or more of the following measures:
• Reorient or relocate the receiving antenna.
• Increase the separation between the equipment and receiver.
• Connect the equipment into an outlet on a circuit different from that to which the receiver is
connected.
• Consult the dealer or an experienced radio/TV technician for help.

7
WARNING IMPORTANT SAFETY INSTRUCTIONS
SAFETY INFORMATION
Read and understand all instructions before using this product. Failure to follow all instructions listed
l injury.
• Weight Limit 30 kg (65 lbs).
• This toy is not suitable for children under 3 years.
• Adult assembly required.
WARNING
• To reduce the risk of injury, adult supervision is required. Never use on roadways, near motor
vehicles, on or near steep inclines or steps, swimming pools or other bodies of water. Always wear
shoes, and never allow more than 65 lb weight capacity at a time.
TO PREVENT FIRE AND ELECTRIC SHOCK:
• Only use Kobalt 40V batteries and chargers. Use of the wrong type of battery and charger could
• Kobalt 40V batteries are intended for use with other Kobalt 40V product. Kobalt 40V batteries are
.
•
• Do not allow any type of liquid on the battery or its components.
•
. Charge the
battery in a dry area only.
• Do not open the charger. Exposed wiring and circuitry inside case may cause electric shock.
• Only adults may handle or charge the battery. Never allow children to handle or charge the battery.
• Do not drop the battery. Permanent damage to the battery could occur or cause serious injury.
• Ensure the battery locks into place. Without proper battery installation the battery could fall out and
injure a child if the vehicle tips over.
• To prevent unintentional starting, ensure the power switch is in the off-position before connecting
switch could cause the product to unintentionally power on.
• Make sure the power switch is off and the battery pack is removed before clearing jammed material,
making adjustments, changing accessories, storing or servicing the kid car. Unexpected powering
of the kid car while clearing jammed material or servicing may result in serious personal injury.
• Recharge only with Kobalt 40V chargers. A charger that is suitable for one type of battery pack may
GENERAL SAFETY RULES
• Verify that the kid car is secure while transporting.
• Store the kid car in a dry area that will prevent unauthorized use or damage. Keep out of the reach
of children.
• If the labels on the kid car become defaced or start to lift off, contact customer service at 1-888-356-
2258.
• Keep these instructions in a safe place for future reference. Refer to them often and use them to
instruct other users. Anyone who uses this kid car must read these instructions carefully.
• Maintain the kid car with care.

8
SAFETY INFORMATION
create a risk of re when used with another battery pack.
• Use kid car only with specically designated battery packs. Use of any other battery packs may
create a risk of injury and re.
• When battery pack is not in use, keep it away from other metal objects, like paper clips, coins, keys,
nails, screws or other small metal objects, that can make a connection from one terminal to another.
Shorting the battery terminals together may cause burns or a re.
• Under abusive conditions, liquid may be ejected from the battery; avoid contact. If contact
accidentally occurs, ush with water. If liquid contacts eyes, seek medical help immediately. Liquid
ejected from the battery may cause irritation or burns.
• Do not use a battery pack or kid car that is damaged or modied. Damaged or modied batteries
may exhibit unpredictable behavior resulting in re, explosion or risk of injury.
• Do not expose a battery pack or kid car to re or excessive temperatures. Exposure to re or
temperature above 130°C (265°F) may cause explosion.
• Follow all charging instructions and do not charge the battery pack or kid car outside of the
temperature range specied in the instructions. Charging improperly or in temperatures outside of
the specied range may damage the battery and increase the risk of re.
• Have servicing performed by a qualied repair person using only identical replacement parts. This
will ensure that the safety of the product is maintained.
• Do not modify or attempt to repair the kid car or the battery pack (as applicable) except as indicated
in the instructions for use and care.
WARNING
To ensure your child is safe while driving, you must pay attention to the follow warning:
• The assembly and adjustment of the product must be completed by an adult. Please keep children
away from parts.
• Small parts are not suitable to be used by children under 3 years old.
• Children must use this product under the guidance of an adult, and the guardian must be in
attendance at all times to reduce risk of injury.
• The children must be guided by adult, and the guardian can’t leave during the use process.
• Don’t allow the children to stand on the foot pedal or in this car.
• The battery must be charged by an adult. Please charge before using this product.
• Please keep the packaging materials (such as plastic bags) away from children as this creates a
choking hazard.
• Strictly forbid using any accessories not provided by the manufacturer.
• The charger is not a toy and should not be used as a toy.
• The max loading of this car is 30 kg (65 lbs). Do not attempt to overload the kid car.
• The age range for this car: 3-7 years old.
• The product cannot be connected to more power than recommended.
• The kid car cannot be operated while charging.
Use notices
• Please check whether all parts are installed in place and tightly connected before use.
• Do not use in dangerous areas such as streets, roads, slopes or trenches.

9
SAFETY INFORMATION
• Please do not use it on smooth oors, such as marble oors. Do not use it on the ground with
obstacles, such as oor tiles.
• Do not move the forward / backward switch while the kid car is running.
• Do not allow children to stand on the seat or sit on the roll bar light frame, or the side bar frame.
• Do not change the structure of electronic components related to the kid car such as the remote
control.
• The remote control and the car cannot be used in rain or water. Please do not drip water or liquids
on the car or remote control. Move the kid car and remote away from potential re hazards.
• The kid car stops running when it encounters an obstacle. Please clear the obstacle before
attempting to drive the kid car.
• Do not use indoors to avoid damage to furniture or household items.
• When the remote batteries are low, the kid car will shake for a short period. Please replace the
battery in time.
• When the product is not in use, please turn off the power switch, and then remove the battery.
• This product is restricted to one person and cannot be overloaded. The maximum load is 30kg (65
lbs).

10
PART DESCRIPTION QUANTITY PART #
M10 washer of wheel 6 AA
M10 anti-loose nut of wheel 4 BB
Spring 2 CC
Front wheel shaft 1 L
Rear wheel shaft 1 S
Shaft bearing for wheel 2 DD
Wheel cover 4 EE
Wrench 2 UU
Drive connector (rear wheel) 2 FF
4 x 12 mm screw 10 VV
3 x 12 mm screw 2 XX
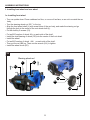
ASSEMBLY INSTRUCTIONS

11
PART DESCRIPTION QUANTITY PART #
4 x 12 mm screw 6 YY
Spring plastic parts 2 MM
Drive motors assembly 2 II
Side roll bar frame 2 HH
Roll bar light frame 1 R
Sideview mirrors 2 GG
Windshield 1 O
Car door 2 KK
ASSEMBLY INSTRUCTIONS
• All screws can be tightened or loosened by a Phillips screwdriver.

12
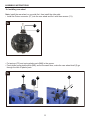
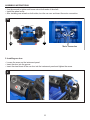
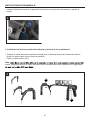
ASSEMBLY INSTRUCTIONS
1. Installing front wheel and rear wheel
1a. Installing front wheel
• Turn car upside down. Place cardboard on oor, or use a soft surface, so as not to scratch the car
body.
• Turn the steering wheel rod 180 ° to the top.
• Align the front wheel shaft (L) with screw holes of the car body, and make the steering rod go
through the hole in the center of the ront wheel shaft (L).
• Fix the shaft by 8 screws (VV).
• Put an M10 washer of wheel (AA) on each side of the shaft.
• Install the shaft bearing of wheel (DD) into the center of the front wheel.
• Install the wheel.
• Put an M10 washer of wheel(AA) on each side of the shaft.
• Then put the nut (BB) on. Then use the wrench (UU) to tighten.
• Install the wheel cover (EE).
BB
DD
1a
AA
EE
UU
Steering wheel rod
4
VV
VV
L
4

13
ASSEMBLY INSTRUCTIONS
• Put springs (CC) and spring plastic parts (MM) in the groove.
• Press down spring plastic parts (MM), and at the same time, make the rear wheel shaft (S) go
through the hole of plastic parts.
1b. Installing rear wheel
Note: Install the rear wheel on one side rst, then install the other side.
• Install the Driven connector (FF) into the rear wheel and x it with three screws (YY).
S
1b
CC
MM
S
FF
1b
YY

14
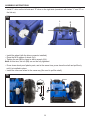
ASSEMBLY INSTRUCTIONS
• Install the wheel (with the drive connector installed).
• Place the M10 washer of wheel (AA).
• Tighten the nut (BB) by hand or with a wrench (UU).
Note: At this time, the nut (BB) can not be fully tightened.
• Press down shock proof plastic parts, and at the same time, press down the shaft and pull rmly
until it is installed in place.
• Install the other rear wheel in the same way (No need to pull the shaft).
• Install “L” drive on the left side and “R” drive on the right side (consistent with letters “L” and “R” on
the kid car).
1b
AA
BB
L
R
1b
L
R

15
ASSEMBLY INSTRUCTIONS
• Use the wrench to tighten anti-loose nuts at both ends of the shaft.
• Install the wheel cover.
• After installing rear wheels on both sides, turn the car over and insert the motor connection.
2. Installing car door
• Loosen the screw on the instrument panel.
• Insert the door into the groove.
• Insert the steel sheet of the car door into the instrument panel and tighten the screw.
2
1b
Motor connection
EE
EE

16
ASSEMBLY INSTRUCTIONS
• Insert the steel sheet of the car door into the instrument panel and tighten the screw.
2
3. Installing side roll bars and roll bar lights
• Connect the wire (in the side roll bar) with the wire in the roll bar light frame and then insert
the two sides in parallel.
• Fix it with two screws (XX).
Note: f. Be sure the
3
XX
XX

17
ASSEMBLY INSTRUCTIONS
• Align side roll bars with right holes, then rmly press down, (pay attention to the left and right frame
and installation direction).
• Carefully make the other wire pass through the hole on the car body and insert the wire joint.
4. Installing seat
• Align the hook behind the seat with the right position in the car (align seat screw holes with body
screw holes), use two screws (VV) to x.
4
VV
3

18
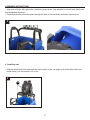
ASSEMBLY INSTRUCTIONS
5. Installing steering wheel
• Connect the wire joint.
• Insert the steering wheel into the right place. (Pay attention to tuck the wire in the steering wheel
connector when inserting the steering wheel)
Note: Try to avoid abruptly hitting the steering wheel during the assembly process.
6. Installing the windshield and sideview mirror
• Align the windshield with the right groove, then rmly press down.
• Align the rearview mirrow with the right hole, then rmly press down.
7. Installing and removing the battery pack
• Open the hood of the kid car to insert or remove the battery pack.
Note: Add the screws back to the hood after battery pack has been inserted or removed.
6 7
5

19
OPERATING INSTRUCTIONS
Warning
Please sit well and fasten the seat belt before use.
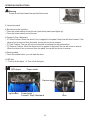
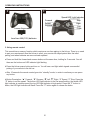
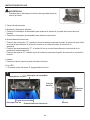
1. Instruction panel
a.Start and stop the machine
• Press the power switch to start the car (Instruction panel panel lights up).
• Press the power switch to stop the car.
b.Forward / Stop / Backward
• “D” Drive Position: When the driver’s foot is applied to the pedal, the kid car will drive foward. If the
driver’s foot is removed from the pedal, the car will not move forward.
• “P” Park Position: The car will not move forward or backward in the park position.
• “R” Reverse Position: When the driver’s foot is applied to the pedal, the car will move in reverse.
When the driver’s foot is removed from the pedal, the car will not move in reverse.
c.Steering wheel
• Press the middle button, you can hear the horn.
d.LED light
• I :Turn on all the lights. O: Turn off all the lights.
1
Power switch
Power pedal
Light switch
MP3 player
Forward / Stop / Backward
Next song
Horn
Previous song

20
OPERATING INSTRUCTIONS
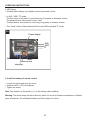
e. MP3 player
• Working status display: can display current power and volume.
• In AUX / USB / TF mode,
The rst button: short press for previous song, long press to decrease volume.
The second button: short press to stop / start.
The third button: short press for next song, Long press to increase volume.
• The "mode" button: Switch between AUX mode USB mode and TF mode.
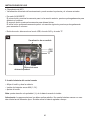
2. Install the battery of remote control
• Loosen the screw and open the cover.
• Install two AAA (1.5V) dry batteries.
• Tighten the screw.
Note: Pay attention to the polarity (+/-) of the battery when installing.
Warning: The above steps should be done by adults. Do not mix old and new batteries or different
types of batteries. The exhausted battery should be taken out in time.
1e
Power display
Music/volume
stop/play
Mode
AUX
USB
TF
Music/volume

21
OPERATING INSTRUCTIONS
3. Using remote control
This remote has a memory function which requires a one-time pairing to the kid car. There is no need
to pair your remote each time the kid car is used, your remote will stayed paired after the initial
pairing, and when batteries are removed and replaced.
a.Press and hold the forward and reverse buttons at the same time, holding for 3 seconds. You will
then see the bottom red LED indicator light ashing.
b.Press the kid car power button and turn on. You will see a red light which signals a successful
pairing of your remote to the kid car.
c.After 10 seconds the remote control goes into “standby” mode, in order to continue you can press
any button.
d.Button Description: “▲’’ Forward, ‘‘▼’’ Reverse, “
▲
” Left, ‘‘
▲
’’ Right, “S” Speed, “P” Stop. Press the
“S” button to set the speed. The bottom LED light indicator is the low-speed setting, the middle LED
light indicator is medium-speed, the top LED light indicator is high-speed. Press the “P” button to
brake, the LED light indicator will ash. Press the “P” button again to release the brake.
Loosen the screw
Load two AAA(1.5V) batteries
2
3
Forward
Speed
Reverse
Speed LED Light Indicator
Stop
Right
Left
Code

22
CARE AND MAINTENANCE
All maintenance should be carried out by a qualied repair person.
• When servicing, use only identical replacement parts. Use of any other part could create a hazard
or cause product damage.
• To ensure that your child will not be injured accidentally, please frequently check and maintain the
kid car.
• Check whether the packaging contents are complete before assembling. If you nd you are missing
packaging contents, please call 1-888-356-2258.
• Check whether screws are loose and parts are damaged when repairing.
• Please frequently check whether it is intact when installing or using every part.
• When disassembling, please follow the instructions carefully to avoid unnecessary damage.
• Please check the product and charger regularly. Check whether the wires, plugs, shells and other
parts are damaged. If they are damaged, stop using immediately until they are repaired properly.
• Before cleaning or performing any maintenance, remove the battery from the product.
• Use clean cloths to remove dirt, dust, oil, grease, etc. Use only a soft, dry cloth to clean the plastic
parts, never use detergent or alcohol.
• Be careful not to damage electronic components when cleaning the product. Do not rinse with
water. Wipe with a dry cloth.
TROUBLESHOOTING
If you still have questions or an unresolved issue after going through this troubleshooting guide, or
just want to speak to a Kobalt product expert, please call our Kobalt customer service department at
1-888-356-2258.
PROBLEM POSSIBLE CAUSE CORRECTIVE ACTION
The kid car does
not work.
1. Low battery charge.
2. The kid car has stopped
working to protect
internal circuits.
1. Charge the battery.
2. Turn off the kid car, wait for the tool
and battery to cool down, then
start the tool again.

23
1 - YEAR LIMITED WARRANTY
This 40V Kid Car is warranted to the original purchaser from the original purchase date for one (1) year
subject to the warranty coverage described herein.
This 40V Kid Car is warranted for the original user to be free from defects in material and workmanship.
If you believe that the 40V Kid Car is defective at any time during the specied warranty period, simply
return the Kid Car along with proof of purchase to the place of purchase for a free replacement or re-
fund, or call 1-888-356-2258 for warranty service.
This warranty is void if: defects in materials or workmanship or damages result from repairs or
alterations which have been made or attempted by others or the unauthorized use of nonconforming
parts; the damage is due to normal wear, damage is due to abuse (including overloading of the tool
beyond capacity), improper maintenance, neglect or accident; or the damage is due to the use of the
tool after partial failure or use with improper accessories or unauthorized repair or alteration.
This warranty gives you specic legal rights, and you may also have other rights that vary from state
to state.
WARRANTY

24
REPLACEMENT PARTS LIST
N
GG
O
FF
P
Q
R
HH
II JJ
S
BB
AA
EE
DD
L CC T KK MM

25
REPLACEMENT PARTS LIST
PART # DESCRIPTION
N Front bumper
GG Sideview mirow
O Windshield
FF Drive connector (rear wheel)
P Steering wheel
Q Seat
R Roll bar light frame
HH Side roll bar frame
II Drive motors assembly
JJ Wheel
S Rear wheel shaft
BB M10 anti-loose nut of wheel
AA M10 washer of wheel
EE Wheel cover
DD Shaft bearing for wheel
L Front wheel shaft
CC Spring
T Remote control
KK Car door
MM Spring plastic parts
UU Wrench
VV 4 x 12 mm screw
XX 3 x 12 mm screw
YY 4 x 12 mm screw
UU VV XX
YY

26
ARTÍCULO # 2557197
2557198
MODELO # KKC 0040-06
KKC 2040-06
Español p. 26
¿Tiene preguntas, problemas, piezas faltantes? Antes de regresar al vendedor, llame
a nuestro departamento de servicio al cliente al 1-888-3KOBALT (1-888-356-2258), de
lunes a viernes, de 8 a.m. a 8 p.m., hora estándar del Este.
ADJUNTE SU RECIBO AQUÍ
SM20247
AUTOMÓVIL PARA NIÑOS DE 40 V
Número de serie Fecha de compra

27
CONTENIDO
ESPECIFICACIONES DEL PRODUCTO
Especicaciones del producto ................................................................................... 27
Contenido del paquete ............................................................................................... 28
Aditamentos .............................................................................................................. 29
Símbolos ................................................................................................................... 30
Información de seguridad .......................................................................................... 31
Instrucciones de ensamblaje ..................................................................................... 35
Instrucciones de uso .................................................................................................. 44
Cuidado y mantenimiento .......................................................................................... 47
Detección de problemas ............................................................................................ 47
Garantía .................................................................................................................... 48
Lista de repuestos ..................................................................................................... 49
ESPECIFICACIONES
Voltaje 40 V
Grupo de edad recomendado 3-7
Peso máximo 29,48 kg (65 lbs)
Velocidad máxima Hasta 5,98 km/h
Tiempo de funcionamiento (con batería de 2 Ah) 50 minutos
Peso (sin la batería) 19,27 kg (42,5 lbs)
Tiempo de carga (con batería de 2 Ah) 60 minutos
Modelo de la batería KB 240C-06
Modelo del cargador KRC 40-06
Artículo Temperatura
Rango de temperatura de almacenamiento del automóvil para niños 32˚ F (0˚ C) ~ 113˚ F (45˚ C)
Rango de temperatura de funcionamiento del automóvil para niños 32˚ F (0˚ C) ~ 113˚ F (45˚ C)
Rango de temperatura de carga de la batería 39˚ F (4˚ C) ~ 104˚ F (40˚ C)
Rango de temperatura de funcionamiento del cargador 39˚ F (4˚ C) ~ 104˚ F (40˚ C)
Rango de temperatura de almacenamiento de la batería 32˚ F (0˚ C) ~ 113˚ F (45˚ C)
Rango de temperatura de descarga de la batería 32˚ F (0˚ C) ~ 113˚ F (45˚ C)
EL RANGO DE TEMPERATURA AMBIENTE RECOMENDADO:

28
PIEZA DESCRIPCIÓN CANTIDAD
A Parabrisas 1
B Espejos laterales 2
C Carrocería del auto 1
D Faro 2
E Protección frontal 1
F Rueda 4
G Puerta del auto 2
H Marco de la barra antivuelco lateral 2
I Asiento 1
J Marco ligero de la barra antivuelco 4
CONTENIDO DEL PAQUETE
A
B
C
D
E
F
G
H
I
J

29
Arandela Tuerca Resorte
Eje de las ruedas
delanteras
Eje de las ruedas
posteriores
Llave inglesa
Tornillo 4x12°mm Tornillo 3x12°mm
ADITAMIENTOS (no se muestran en el tamaño real)
Tornillo 4x12°mm

30
Algunos de los siguientes símbolos pueden ser usados en este producto. Obsérvelos y aprenda su
signicado. La interpretación correcta de estos símbolos permite una operación mejor y más segura.
Las siguientes palabras de señalización y sus signicados tienen el objeto de explicar los niveles
de riesgo relaciondos con este producto.
SÍMBOLOS
SÍMBOLOS NOMBRE DESIGNACIÓN/EXPLICACIÓN
V Voltios Voltaje
A Amperios Corriente
Hz Hercios Frecuencia (ciclos por segundo)
Wh Vatio hora Capacidad de almacenaje de energía
Ah Amperio hora Capacidad de corriente
Corriente continua Tipo o característica de corriente
Alerta de condiciones
de humedad
No exponga la unidad a la lluvia ni la use en lugares húmedos.
Lea el manual del
operador
Para reducir el riesgo de lesiones, el usuario debe leer
y comprender el manual del usuario antes de usar este
producto.
Alerta de seguridad Precauciones para su seguridad.
SÍMBOLO SEÑAL SIGNIFICADO
PELIGRO
Indica una situación de peligro inminente que, si no es
prevenida, causará la muerte o lesiones severas.
ADVERTENCIA
Indica una situación de peligro potencial que, si no es
prevenida, podría causar la muerte o lesiones severas.
PRECAUCIÓN
Indica una situación de peligro potencial que, si no es
prevenida, puede causar lesiones menores o moderadas.
PRECAUCIÓN
(Sin el símbolo de alerta de seguridad) Indica una situación
que puede causar daños materiales.
ADVERTENCIA
• Para evitar lesiones corporales serias, no intente utilizar este producto sin haber leído y comprendido
totalmente el manual del operador. Si no comprende los avisos de advertencia y las instrucciones
del manual del operador, no utilice este producto. Llame al Departamento de Atención al Consumidor
1-888-356-2258 y le brindaremos asistencia.

31
INFORMACIÓN DE SEGURIDAD
Información de cumplimiento de la Parte 15b de la FCC
ADVERTENCIA: cualquier cambio o modicación a esta unidad que no esté expresamente
aprobada por la parte responsable del cumplimiento podría anular la autorización del usuario para
utilizar el equipo.
Este dispositivo cumple con la sección 15 de las reglas de la FCC. El funcionamiento está sujeto a las
siguientes dos condiciones: (1) este dispositivo no debe causar interferencia perjudicial, y (2) deberá
aceptar cualquier interferencia recibida, incluida la interferencia que pudiese causar la operación no
deseada.
Este equipo se probó y se vericó que cumple con los límites para un dispositivo digital de clase B,
conforme a la sección 15 de las reglas de la FCC. Estos límites están diseñados para proporcionar
protección razonable contra interferencias perjudiciales en una instalación residencial. Este equipo
genera, utiliza y puede irradiar energía de radiofrecuencia y, si no se instala y se usa de acuerdo
con las instrucciones, puede causar interferencia perjudicial para las comunicaciones de radio.
Sin embargo, no se garantiza que no se producirán interferencias en una instalación en especial.
Si este equipo genera una interferencia perjudicial para la recepción de radio o televisión, que se
puede determinar al encender y apagar el equipo, se recomienda al usuario que intente corregir la
interferencia con una o más de las siguientes medidas:
• Reorientar o reubicar la antena de recepción.
• Aumentar la separación entre el equipo y el receptor.
• Conectar el equipo a un tomacorriente de un circuito distinto al que usa el receptor.
• Solicitar ayuda al distribuidor o a un técnico con experiencia en radio/TV.

32
ADVERTENCIA: INSTRUCCIONES IMPORTANTES DE SEGURIDAD
Lea y asegúrese de comprender todas las instrucciones antes de usar este producto. Si no se siguen
todas las instrucciones mencionadas a continuación, pudieran producirse descargas eléctricas,
incendios y/o lesiones severas.
• Límite de peso 29,48 kg (65 lb).
• Este juguete no es recomendable para niños menores de 3 años.
• Se requiere un adulto para el ensamblaje.
ADVERTENCIA
• Para reducir el riesgo de lesiones, se requiere la supervisión de un adulto. Nunca lo use en
carreteras, cerca de vehículos motorizados, en pendientes pronunciadas o en escalones, piscinas
u otros cuerpos de agua. Siempre use zapatos y nunca permita una capacidad de peso mayor que
29,48 kg (65 lb) a la vez.
PARA EVITAR DESCARGAS ELÉCTRICAS E INCENDIOS:
• Utilice únicamente baterías y cargadores Kobalt de 40 V. El uso del tipo incorrecto de batería y
cargador podría provocar un incendio o una explosión.
• Las baterías Kobalt de 40 V están diseñadas para usarse con otros productos Kobalt de 40 V. Las
baterías Kobalt de 40 V no están diseñadas para usarse con productos que no sean Kobalt de 40 V.
Se puede producir sobrecalentamiento, incendio o explosión.
• Nunca modique el sistema de circuito eléctrico. Las alteraciones pueden causar una descarga
eléctrica, un incendio o una explosión.
• No permita ningún tipo de líquido en la batería o sus componentes.
• No cargue cerca del calor o materiales inamables. Cargue solo en un área bien ventilada. Cargue
la batería solo en un área seca.
• No abra el cargador. El cableado y los circuitos expuestos dentro de la carcasa pueden provocar
descargas eléctricas.
• Solo los adultos pueden manipular o cargar la batería. Nunca permita que los niños manipulen o
carguen la batería.
• No deje caer la batería. Se pueden producir daños permanentes en la batería o causar lesiones
graves.
• Asegúrese de que la batería encaje en su lugar. Sin una instalación adecuada de la batería, esta
podría caerse y lesionar a un niño si el vehículo se vuelca.
NORMAS GENERALES DE SEGURIDAD
• Verique que el automóvil para niños esté seguro durante el traslado.
• Almacene el automóvil para niños en un lugar seco para evitar el uso no autorizado o daños.
Mantenga alejado del alcance de los niños.
• Si las etiquetas en el automóvil para niños se deterioran o comienzan a levantarse, póngase en
contacto con el Departamento de Servicio al Cliente al 1-888-356-2258.
• Guarde estas instrucciones en un lugar seguro para referencia futura. Consúltelas periódicamente
y úselas para instruir a otros usuarios. Cualquier persona que use este automóvil para niños debe
leer con atención estas instrucciones.
• Mantenga el automóvil para niños con cuidado.
INFORMACIÓN DE SEGURIDAD

33
INFORMACIÓN DE SEGURIDAD
• Para evitar el arranque no intencional, asegúrese de que el interruptor esté en la posición de
apagado antes de conectar el paquete de baterías o levantar el automóvil para niños. Si transporta
el automóvil para niños con la mano o el dedo en el interruptor podría provocar que el producto se
encienda involuntariamente.
• Asegúrese de que el interruptor esté apagado y de retirar el paquete de baterías antes de limpiar el
material atascado, hacer ajustes, cambiar accesorios, almacenar o reparar el automóvil para niños.
El encendido inesperado del automóvil para niños mientras se limpia el material atascado o se
realiza mantenimiento puede provocar lesiones personales graves.
• Recargue solo con cargadores Kobalt de 40 V. Un cargador adecuado para un tipo de paquete de
baterías puede crear un riesgo de incendio cuando se usa con otro paquete de baterías.
• Use el automóvil para niños solo con paquetes de baterías designados especícamente. El uso de
cualquier otro paquete de baterías puede crear un riesgo de lesión e incendio.
• Cuando no utilice el paquete de baterías, manténgalo lejos de otros objetos metálicos como
sujetapapeles, monedas, llaves, clavos, tornillos u otros objetos metálicos pequeños que pudieran
crear una conexión entre los terminales. Es posible que conectar los terminales de la batería entre
sí produzca quemaduras o un incendio.
• En condiciones de maltrato, es posible que salga líquido de la batería; evite el contacto. Si se
produce un contacto accidental, enjuague con agua. Si el líquido entra en contacto con los ojos,
solicite atención médica de inmediato. El líquido que sale de la batería puede provocar irritación o
quemaduras.
• No utilice un paquete de baterías ni el automóvil para niños si están dañados o modicados. Las
baterías dañadas o modicadas pueden mostrar una conducta impredecible que podría provocar
incendios, explosiones o riesgo de lesiones.
• No exponga el paquete de baterías ni el automóvil para niños al fuego o a una temperatura
excesiva. La exposición al fuego o a temperaturas por encima de los 130 °C (265 °F) puede causar
una explosión.
• Siga todas las instrucciones de carga y no cargue el paquete de baterías o el automóvil para
niños fuera del rango de temperatura especicado en las instrucciones. La carga inadecuada o a
temperaturas fuera del rango especicado podría dañar la batería y aumentar el riesgo de incendio.
• Haga reparar el producto por una persona calicada que utilice solo piezas de repuesto idénticas.
Esto garantizará que se mantenga la seguridad del producto.
• No modique ni intente reparar el automóvil para niños ni el paquete de baterías (según
corresponda) excepto como se indique en las instrucciones para uso y cuidado.
ADVERTENCIA
Para garantizar que su hijo esté seguro mientras conduce, debe prestar atención a la
siguiente advertencia:
• Un adulto debe realizar el ensamblaje y ajuste del producto. Mantenga a los niños alejados de las
piezas.
• Las piezas pequeñas no son aptas para niños menores de 3 años.
• Los niños deben usar este producto bajo la guía de un adulto, y el tutor debe estar presente en
todo momento para reducir el riesgo de lesiones.
• Un adulto debe guiar a los niños, y el tutor no puede irse durante el proceso de uso.
• No permita que los niños se paren en el pedal o en este automóvil.
• Un adulto debe cargar la batería. Cargue antes de usar este producto.
• Mantenga los materiales de embalaje (como bolsas de plástico) fuera del alcance de los niños, ya

34
INFORMACIÓN DE SEGURIDAD
que esto crea un peligro de asxia.
• Prohíba estrictamente el uso de accesorios no proporcionados por el fabricante.
• El cargador no es un juguete y no debe usarse como tal.
• La carga máxima de este automóvil es de 29,48 kg (65 lb). No intente sobrecargar el automóvil
para niños.
• El rango de edad para este automóvil: de 3 a 7 años.
• El producto no puede conectarse a más potencia de la recomendada.
• El automóvil para niños no se debe operar mientras se carga.
Avisos de uso
• Verique si todas las piezas están instaladas en su lugar y bien conectadas antes de su uso.
• No lo use en áreas peligrosas como calles, carreteras, pendientes o zanjas.
• No lo use en pisos lisos, como los pisos de mármol. No lo use en el piso tierra con obstáculos,
como las baldosas de piso.
• No mueva el interruptor de avance/retroceso mientras el automóvil para niños está en
funcionamiento.
• No permita que los niños se paren en el asiento o se sienten en el marco ligero de la barra
antivuelco o en el marco de la barra lateral.
• No cambie la estructura de los componentes electrónicos relacionados con el automóvil para niños,
como el control remoto.
• El control remoto y el automóvil no pueden usarse bajo la lluvia o en el agua. No deje caer agua o
líquidos sobre el automóvil o el control remoto. Aleje el automóvil para niños y el control remoto de
posibles riesgos de incendio.
• El automóvil para niños deja de funcionar cuando encuentra un obstáculo. Despeje el obstáculo
antes de intentar conducir el automóvil para niños.
• No lo use en interiores para evitar el daño a muebles u objetos domésticos.
• Cuando las baterías del control remoto están bajas, el automóvil para niños se sacudirá por un
breve período. Reemplace la batería a tiempo.
• Cuando el producto no esté en uso, apague el interruptor y retire la batería.
• Este producto está restringido a una persona y no se puede sobrecargar. La carga máxima es de
29,48 kg (65 lb).

35
PIEZA DESCRIPCIÓN CANTIDAD # DE PIEZA
Arandela M10 de la rueda 6 AA
rueda
4 BB
Resorte 2 CC
Eje de las ruedas delanteras 1 L
Eje de las ruedas posteriores 1 S
Cojinete de eje para la rueda 2 DD
Cubierta de la rueda 4 EE
Llave inglesa 2 UU
Conector de tracción (ruedas
posteriores)
2 FF
Tornillo 4x12°mm 10 VV
Tornillo 3x12°mm 2 XX
INSTRUCCIONES DE ENSAMBLAJE

36
PIEZA DESCRIPCIÓN CANTIDAD # DE PIEZA
Tornillo 4x12°mm 6 YY
Piezas de plástico del resorte 2 MM
Conjunto de motores de tracción 2 II
Marco de la barra antivuelco lateral 2 HH
Marco ligero de la barra antivuelco 1 R
Espejos laterales 2 GG
Parabrisas 1 O
Puerta del auto 2 KK
INSTRUCCIONES DE ENSAMBLAJE
• Todos los tornillos pueden apretarse o aojarse con un destornillador Phillips.

37
INSTRUCCIONES DE ENSAMBLAJE
1. Instalación de las ruedas delanteras y las ruedas posteriores
1a. Instalación de las ruedas delanteras
para no rayar la carrocería del automóvil.
• Gire el volante 180° hacia arriba
delanteras (L).
• Fije el eje con 8 tornillos (VV).
• Coloque una arandela M10 de la rueda (AA) a cada lado del eje.
• Instale el cojinete del eje de la rueda (DD) en el centro de las ruedas delanteras.
• Instale la rueda.
• Coloque una arandela M10 de rueda (AA) a cada lado del eje.
• Luego coloque la tuerca (BB). Luego, use la llave inglesa (UU) para apretar.
• Instale la cubierta de la rueda (EE).
BB
DD
1a
AA
EE
UU
Varilla de volante
4
VV
VV
L
4

38
INSTRUCCIONES DE ENSAMBLAJE
• Coloque los resortes (CC) y las piezas plásticas del resorte (MM) en la ranura.
• Presione las piezas plásticas del resorte (MM) y, al mismo tiempo, haga que el eje de la rueda pos
terior (S) pase por el oricio de las piezas plásticas.
1b. Instalación de la rueda posterior
Nota: instale la rueda posterior en un lado primero, luego instale el otro lado.
• Instale el conector de tracción (FF) en la rueda posterior y fíjelo con tres tornillos (YY).
S
1b
CC
MM
S
FF
1b
YY

39
INSTRUCCIONES DE ENSAMBLAJE
• Instale la rueda (con el conector de tracción instalado).
• Coloque la arandela M10 de rueda (AA).
• Apriete la tuerca (BB) a mano o con una llave inglesa (UU).
Nota: en este momento, la tuerca (BB) no se puede apretar completamente.
• Presione las piezas de plástico a prueba de golpes y, al mismo tiempo, presione el eje y jale rme
mente hasta que se instale en su lugar.
• Instale la otra rueda posterior de la misma manera (no es necesario jalar del eje).
• Instale la tracción “L” en el lado izquierdo y la tracción “R” en el lado derecho (tal como las letras
“L” y “R” en el automóvil para niños).
1b
AA
BB
L
R
1b
L
R

40
INSTRUCCIONES DE ENSAMBLAJE
• Use la llave inglesa para apretar las tuercas que no se aojan en ambos extremos del eje.
• Instale la cubierta de la rueda.
• Después de instalar las ruedas posteriores en ambos lados, dé la vuelta al automóvil e inserte la
conexión del motor.
2. Instalación de las puertas del auto
• Aoje el tornillo en el panel de instrumentos.
• Inserte la puerta en la ranura.
• Inserte la lámina de acero de la puerta del automóvil en el panel de instrumentos y apriete el
tornillo.
2
1b
Conexión del motor
EE
EE

41
INSTRUCCIONES DE ENSAMBLAJE
• Inserte la lámina de acero de la puerta del automóvil en el panel de instrumentos y apriete el
tornillo.
2
3. Instalación de las barras antivuelco laterales y la barra de luces antivuelco
• Conecte el cable (de la barra antivuelco lateral) con el cable del marco de la barra de luces an
tivuelco y luego inserte los dos lados en paralelo.
• Fíjelo con dos tornillos (XX).
Nota:
-
mente. Asegúrese de que el marco de la barra de luces antivuelco esté instalado en su lugar antes
3
XX
XX

42
INSTRUCCIONES DE ENSAMBLAJE
• Alinee las barras antivuelco laterales con los oricios adecuados, luego presione rmemente
(preste atención al marco izquierdo y derecho, junto con la dirección de instalación).
• Con cuidado, haga pasar el otro cable a través del oricio de la carrocería del automóvil e inserte la
unión de cables.
4. Instalación del asiento
• Alinee el gancho detrás del asiento con la posición correcta en el automóvil (alinee los oricios de
tornillos del asiento con los de la carrocería), use dos tornillos (VV) para jar.
4
VV
3

43
INSTRUCCIONES DE ENSAMBLAJE
5. Instalación del volante
• Conecte la unión de cables.
• Inserte el volante en el lugar correcto. (Preste atención para introducir el cable en el conector del
volante al insertar el volante)
Nota: intente evitar golpear abruptamente el volante durante el proceso de ensamblaje.
6. Instalación del parabrisas y el espejo lateral
• Alinee el parabrisas con la ranura correcta, luego presione rmemente.
• Alinee el espejo retrovisor con el oricio correcto, luego presione rmemente.
7. Instalación y remoción del paquete de baterías
• Abra el capó del automóvil para niños para insertar o retirar el paquete de baterías.
Nota: vuelva a colocar los tornillos en el capó después de insertar o extraer el paquete de baterías.
6 7
5

44
INSTRUCCIONES DE USO
ADVERTENCIA
Siéntese bien y abróchese el cinturón de seguridad antes de
usar el producto.
1. Panel de instrucciones
a.Arranque y detenga la máquina
• Presione el interruptor de encendido para arrancar el automóvil (el panel de instrucciones se
ilumina).
• Presione el interruptor de encendido para detener el automóvil.
b.Avance/detención/retroceso
• Posición de conducción “D”: cuando el pie del conductor presiona el pedal, el automóvil para niños
se moverá hacia delante. Si el pie del conductor se retira del pedal, el automóvil no
avanzará.
• Posición de estacionamiento “P”: el automóvil no se moverá hacia delante o hacia atrás en la
posición de estacionamiento.
• Posición de reversa “R”: cuando el pie del conductor presiona el pedal, el automóvil se moverá en
reversa.
c.Volante
• Presione el botón central, puede escuchar la bocina.
d.Luz LED
• I: Enciende todas las luces. O: Apaga todas las luces.
1
Interruptor de encendido
Pedal de encendido
Interruptor de luz
Reproductor de MP3
Avance/detención/retroceso
Siguiente
canción
Bocina
Canción
anterior

45
INSTRUCCIONES DE USO
e. Reproductor de MP3
• Visualización del estado de funcionamiento: puede mostrar la potencia y el volumen actuales.
• En modo AUX/USB/TF,
El primer botón: presione brevemente para ir a la canción anterior, presione prolongadamente para
disminuir el volumen.
El segundo botón: presione brevemente para detener/iniciar.
El tercer botón: presione brevemente para ir a la canción siguiente, presione prolongadamente
para aumentar el volumen.
• Botón de modo: alterna entre el modo USB, el modo AUX y el modo TF.
2. Instale la batería del control remoto
• Aoje el tornillo y abra la cubierta.
• Instale dos baterías secas AAA (1,5 V).
• Apriete el tornillo.
Nota: preste atención a la polaridad (+/-) de la batería cuando la instale.
Advertencia: los pasos anteriores los deben realizar adultos. No mezcle baterías nuevas con usa-
das ni baterías de diferentes tipos. Se debe retirar la batería agotada a tiempo.
1e
Visualización de encendido
Música/volumen
detener/reproducir
Modo
AUX
USB
TF
Música/volumen

46
INSTRUCCIONES DE USO
3. Con control remoto
Este control remoto tiene una función de memoria que requiere un emparejamiento con el automóvil
para niños que se realiza una sola vez. No es necesario emparejar su control remoto cada vez que
se usa el automóvil para niños, este permanecerá emparejado después del emparejamiento inicial,
así como cuando se retiren y reemplacen las baterías.
a.Mantenga presionados los botones de avance y retroceso al mismo tiempo durante 3 segundos.
Luego verá parpadear la luz LED indicadora roja inferior.
b.Presione el botón de encendido del automóvil para niños y enciéndalo. Verá una luz roja que indica
un emparejamiento exitoso de su control remoto con el automóvil para niños.
c.Luego de 10 segundos, el control remoto pasa al modo “en espera”. Para continuar puede presion
ar cualquier botón.
d.Descripción del botón: “▲” Avance, “▼” Retroceso, “
▲
” Izquierda, ‘‘
▲
’’ Derecha, “S” Velocidad, “P”
Detención. Presione el botón “S” para establecer la velocidad. El indicador de luz LED inferior es la
conguración de baja velocidad, el indicador de luz LED central es de velocidad media, el indicador
de luz LED superior es de velocidad alta. Presione el botón “P” para frenar, el indicador de luz LED
parpadeará. Presione el botón “P” nuevamente para liberar el freno.
Afloje el tornillo
Cargue dos baterías AAA (1,5 V)
2
3
Avance
Velocidad
Reversa
Indicador de velocidad
de luz LED
Detención
Derecha
Izquierda
Código

47
CUIDADO Y MANTENIMIENTO
Todos los mantenimientos debe realizarlos una persona calicada solamente.
• Al realizar una reparación, utilice solo piezas de repuesto idénticas a las de fabricación. El uso de
cualquier otra pieza puede crear un peligro o causar daños en el producto.
• Para asegurarse de que su hijo no se lesione accidentalmente, revise y mantenga con frecuencia
el automóvil para niños.
• Compruebe si el contenido del paquete está completo antes del ensamblaje. Si encuentra que falta
algún contenido del paquete, llame al 1-888-356-2258.
• Compruebe si los tornillos están ojos y las piezas están dañadas durante la reparación.
• Compruebe con frecuencia si cada pieza está intacta al instalarla o utilizarla.
• Al desensamblar, siga las instrucciones cuidadosamente para evitar daños innecesarios.
• Revise el producto y el cargador regularmente. Compruebe si los cables, los enchufes, las
cubiertas y otras piezas están dañados. Si están dañados, deje de usarlos inmediatamente hasta
que se reparen adecuadamente.
• Antes de limpiar o realizar cualquier tarea de mantenimiento, retire la batería del producto.
• Use paños limpios para eliminar la suciedad, el polvo, el aceite, la grasa, etc. Use solo un paño
suave y seco para limpiar las piezas de plástico, nunca use detergente ni alcohol.
• Tenga cuidado de no dañar los componentes electrónicos cuando limpie el producto. No enjuague
con agua. Limpie con un paño seco.
SOLUCIÓN DE PROBLEMAS
Si continua teniendo dudas o algún otro asunto sin resolver tras haber consultado esta guía de
resolución de problemas o simplemente desea hablar con un experto en productos Kobalt, llame al
servicio de atención al cliente de Kobalt al 1-888-356-2258.
PROBLEMA CAUSA POSIBLE ACCIÓN CORRECTIVA
El automóvil para
niños no funciona.
1. El nivel de carga de las
baterías está bajo.
2. El automóvil para niños
ha dejado de trabajar para
proteger los circuitos internos.
1. Cargue la batería.
2. Apague el automóvil para niños, espere que
la herramienta se enfríe y luego vuelva a
encenderla.

48
GARANTÍA DE REPARACIÓN DE 1 AÑO
Este automóvil para niños de 40 voltios está garantizado para el comprador original desde la fecha
de compra original durante un (1) año y está sujeto a la cobertura de garantía que se describe en el
presente.
Este automóvil para niños de 40 voltios tiene una garantía para el usuario original contra defectos en
los materiales y la mano de obra.
Si cree que el automóvil para niños de 40 voltios presenta fallas en cualquier momento durante el
período de garantía especicado, simplemente devuélvalo, junto con un comprobante de compra, al
lugar donde lo compró para obtener un reemplazo o reembolso sin cargo, o llame al 1-888-356-2258
para obtener el servicio de garantía.
Esta garantía es nula si: los defectos en los materiales o la mano de obra o los daños han sido causados
por reparaciones o modicaciones hechas o que se hayan intentado hacer por parte de terceros o el uso
no autorizado de piezas incompatibles; el daño es debido al desgaste normal; el daño es debido al abuso
(lo que incluye la sobrecarga de la herramienta por encima de su capacidad), mantenimiento
inadecuado, negligencia o accidente; o el daño es debido al uso de la herramienta después de una falla
parcial, el uso con accesorios inadecuados o reparaciones o alteraciones no autorizadas.
Esta garantía le concede derechos legales especícos y usted pudiera tener además otros derechos
que varían de un estado a otro.
GARANTÍA

49
LISTA DE PIEZAS DE REPUESTO
N
GG
O
FF
P
Q
R
HH
II JJ
S
BB
AA
EE
DD
L CC T KK MM

50
LISTA DE PIEZAS DE REPUESTO
# DE PIEZA DESCRIPCIÓN
N Parachoques frontal
GG Espejos laterales
O Parabrisas
FF Conector de tracción (ruedas posteriores)
P Volante
Q Asiento
R Marco ligero de la barra antivuelco
HH Marco de la barra antivuelco lateral
II Conjunto de motores de tracción
JJ Rueda
S Eje de las ruedas posteriores
BB Tuerca que no se aoja M10 de la rueda
AA Arandela M10 de la rueda
EE Cubierta de la rueda
DD Cojinete de eje para la rueda
L Eje de las ruedas delanteras
CC Resorte
T Control remoto
KK Puerta del auto
MM Piezas de plástico del resorte
UU Llave inglesa
VV Tornillo 4x12°mm
XX Tornillo 3x12°mm
YY Tornillo 4x12°mm
UU VV XX
YY

-
 1
1
-
 2
2
-
 3
3
-
 4
4
-
 5
5
-
 6
6
-
 7
7
-
 8
8
-
 9
9
-
 10
10
-
 11
11
-
 12
12
-
 13
13
-
 14
14
-
 15
15
-
 16
16
-
 17
17
-
 18
18
-
 19
19
-
 20
20
-
 21
21
-
 22
22
-
 23
23
-
 24
24
-
 25
25
-
 26
26
-
 27
27
-
 28
28
-
 29
29
-
 30
30
-
 31
31
-
 32
32
-
 33
33
-
 34
34
-
 35
35
-
 36
36
-
 37
37
-
 38
38
-
 39
39
-
 40
40
-
 41
41
-
 42
42
-
 43
43
-
 44
44
-
 45
45
-
 46
46
-
 47
47
-
 48
48
-
 49
49
-
 50
50
-
 51
51
-
 52
52


Kobalt KKC 0040-06 Instrucciones de operación
- Categoría
- Muebles de bebe
- Tipo
- Instrucciones de operación

