Aiphone DBS-1AP Manual de usuario
- Categoría
- Sistemas de intercomunicador de puerta
- Tipo
- Manual de usuario

DB-1MD
DA-1DS
PT-1211DR
(DBS-1AP)(230V)
PT-1211D
(DBS-1A)(230V)
PT-1211C
(DBS-1A)(120V)
DBS-1AP/DBS-1A
FK1498 A P0709YI
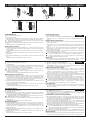
PRECAUTIONS
(Negligence could result in death or serious injury to people.)
WARNING CAUTION
(Negligence could result in injury to people or damage to property.)
1. The unit must be installed and wired by a qualified technician. Having installation performed by an
unqualified technician could result in electric shock.
2. When existing chime wires are used, it is possible that they contain AC voltage. Electric shock or unit
damage could result. Ask a qualified electrician.
3. Do not connect the unit with any non-specified power source. Fire or electric shock could result.
4. Do not dismantle or alter the unit. Fire or electric shock could result.
5. Do not open the unit case.
6. Keep the unit away from water or any other liquid. Fire or electric shock could result.
7. PT-1211DR/C/D shall be used for DA and DB systems only, and never for other devices.
8. Do not put any metal into the unit through the openings. Fire or electric shock could result.
1. When mounting the unit on wall, install the unit in a convenient location, but not where it could be jarred
or bumped. Injury could result.
2.
Before turning on power, make sure wires are not crossed or shorted. If not, fire or electric shock could result.
3. Do not install or make any wire terminations while power supply is turned on. Electric shock or unit
trouble could result.
4. To avoid system malfunction, do not install the unit in places, such as; 1. high or extreme cold
temperature area, 2. subject to moisture or humidity extremes, 3. environmental conditions: dust, oil,
chemicals, salt, etc., 4. constant vibration or impact, and 5. steam or smoke.
5. Do not put anything on or cover the unit with cloth, etc. Fire or unit trouble could result.
6. Do not install the unit where noise generating devices such as dimmer switches, invertor electrical
appliances, are close by. Fire electric shock, or unit trouble could result.
1. Keep the intercom wires more than 30cm (12") away from AC 120V, 230V wiring, AC induced noise and/or unit malfunction could result.
2. In areas where broadcasting station antennas are close by, intercom system may be affected by radio frequency interference.
3. The unit turns inoperative during power failure.
4. All the units, except for door station, is designed for indoor use only. Do not use outdoors.
5. Due to the environmental sound around the unit, it may hinder smooth communication, but this is not a malfunction.
General Prohibitions General PrecautionsProhibitions to subject the unit to water Prohibitions to dismantle the unit
GENERAL PRECAUTIONS
VORSICHTSMASSNAHMEN
(Nichtbeachtung kann zu schweren oder lebensgefährlichen Verletzungen führen.)
WARNUNG VORSICHT
(Nichtbeachtung kann zu Verletzungen oder Sachbeschädigungen führen.)
1. Die Anlage muss von einem Fachmann eingebaut und verdrahtet werden. Bei Einbau durch einen nicht
qualifizierten Techniker besteht Stromschlaggefahr.
2. Wenn bestehende Leitungen der Türglocke verwendet werden, ist es möglich, dass diese unter
Fremdspannung stehen. Dadurch besteht Stromschlaggefahr und Schäden am Gerät könnten
auftreten. Wenden Sie sich an einen qualifizierten Elektroinstallateur.
3.
Die Anlange an keine andere als die vorgesehene Stromversorgung anschließen. Es besteht sonst Brand- und Stromschlaggefahr.
4.
Das Gerät keinesfalls zerlegen oder Änderungen an diesem vornehmen. Es besteht sonst Brand- und Stromschlaggefahr.
5. Das Gerätegehäuse nicht öffnen.
6.
Das Gerät von Wasser und anderen Flüssigkeiten fernhalten. Es besteht sonst Brand- und Stromschlaggefahr.
7.
Das PT-1211DR/C/D darf nur für das DA- und DB-System verwendet werden, keinesfalls jedoch für andere Geräte.
8.
Keinesfalls Metallgegenstände in die Öffnungen des Geräts einführen. Es besteht sonst Brand- und Stromschlaggefahr.
1.
Die Anlage an einer geeigneten Stelle an der Wand, geschützt vor Stößen oder Erschütterungen, montieren. Es besteht sonst Verletzungsgefahr.
2.
Vor dem Einschalten sicherstellen, dass alle Kabel korrekt angeschlossen und nicht kurzgeschlossen sind. Es besteht sonst Brand- und Stromschlaggefahr.
3.
Keine Verdrahtungsarbeiten ausführen, während die Anlage unter Spannung steht. Sonst besteht
Stromschlaggefahr und Störungen am Gerät könnten auftreten.
4.
Um eine Funktionsstörung des Systems zu vermeiden, die Anlage nicht an folgenden Stellen einbauen: 1. Stellen mit hohen oder extrem niedrigen
Temperaturen, 2. Stellen, die extremer Feuchtigkeit oder Nässe ausgesetzt sind, 3. Stellen, an denen die Anlage folgenden
Umgebungsbedingungen ausgesetzt ist:Staub, Öl, Chemikalien, Salz usw., 4. ständigen Schwingungen oder Stößen sowie 5. Dampf und Rauch.
5.
Niemals Gegenstände auf das Gerät legen und das Gerät nicht mit einem Tuch o. Ä. abdecken. Sonst
besteht Brandgefahr und Störungen am Gerät könnten auftreten.
6.
Die Anlage nicht in der Nähe von Geräuschquellen, wie zum Beispiel Dimmerschaltern oder Wechselstrom-Elektrogeräten,
einbauen. Sonst besteht Brand- und Stromschlaggefahr und Störungen am Gerät könnten auftreten.
1. Darauf achten, dass die Sprechanlagenleitungen mindestens 30 cm von Netzanschlussleitungen mit 120 V/230 V Wechselstrom entfernt geführt werden. Andernfalls könnten Störgeräusche durch den Wechselstrom und/oder Funktionsstörungen des Geräts auftreten.
2. In unmittelbarer Nähe von Sendemasten kann es durch Hochfrequenzstörungen zu Beeinträchtigungen des Sprechanlagensystems kommen.
3. Die Anlage ist während eines Stromausfalls nicht einsatzbereit.
4. Alle Anlagen, mit Ausnahme der Türstelle, sind ausschließlich zur Verwendung in Innenräumen bestimmt. Nicht in Außenbereichen verwenden.
5. Je nach Geräuschkulisse rund um das Gerät kann die Kommunikation gestört werden. Es handelt sich jedoch nicht um eine Fehlfunktion.
Allgemeine Verbote Allgemeine VorsichtsmaßnahmenVerbote zum Schutz der Anlage vor Wasser Verbote bezüglich des Zerlegens der Anlage
PRECAUCIONES
(No seguir estas instrucciones podría provocar daños graves o incluso mortales)
ADVERTENCIA
PRECAUCIÓN
(No seguir estas instrucciones podría causar daños físicos o materiales)
1. La unidad la debe instalar y cablear un técnico calificado. La instalación hecha por un técnico no
calificado podría causar un choque eléctrico.
2.
Si se utilizan cables del tono de gong ya existentes, es posible que éstos contengan tensión de CA. Por consiguiente,
existe el riesgo de sufrir descargas eléctricas o causar daños a la unidad. Solicite la asistencia de un electricista calificado.
3.
No conecte la unidad a ninguna fuente de alimentación no especificada. Existe peligro de incendio o descarga eléctrica.
4. No desmantele ni modifique la unidad. Existe peligro de incendio o descarga eléctrica.
5. No abra la caja de la unidad.
6.
Mantenga la unidad alejada del agua o de cualquier otro líquido. Existe peligro de incendio o descarga eléctrica.
7.
El PT-1211DR/C/D debe ser utilizado exclusivamente para el sistema DA y DB, y para ningún otro dispositivo.
8. No introduzca ningún objeto metálico por las aperturas de la unidad. Existe peligro de incendio o
descarga eléctrica.
1.
Cuando monte la unidad en la pared, hágalo en un lugar apropiado, donde no pueda golpearla o moverla. ya que podría sufrir lesiones.
2. Antes de encender la energía eléctrica, verifique que los cables no están cruzados o en corto circuito. De
lo contrario, podrían producirse incendios o descargas eléctricas.
3. No instale ni trabaje los cables mientras la unidad esté conectada. Existe el riesgo de sufrir descargas
eléctricas o causar daños a la unidad.
4.
Para evitar cualquier avería en el sistema, no instale la unidad en: 1. lugares con temperatura extremadamente
alta o baja; 2. lugares con mucha humedad; 3. lugares en los que haya: polvo, aceite, productos químicos, sal,
etc.; 4. lugares en los que haya vibraciones o impactos constantes y 5. lugares en los que haya vapor o humo.
5.
No coloque nada encima de la unidad ni la cubra con tela alguna, etc. Podría provocar incendios o dañar la unidad.
6.
No instale la unidad donde esté cerca de dispositivos generadores de ruido, como dispositivos reguladores de voltaje
o equipos eléctricos inversores. ya que podría producirse un incendio, descarga eléctrica o causar daños a la unidad.
1. Mantenga los cables del sistema de intercomunicación alejados más de 30 cm del cableado de 120V, 230 V de CA, ya que podría causar ruido de CA inducido y/o fallas en la unidad.
2. En las áreas próximas a antenas de radiodifusión, el sistema de intercomunicación puede sufrir interferencias provocadas por las frecuencias de las ondas de radio.
3. La unidad deja de funcionar durante una falla en la alimentación.
4. Todas las unidades, excepto el portero, están concebidas para uso en interiores exclusivamente. No la utilice en exteriores.
5. Los ruidos medioambientales alrededor de la unidad, pueden dificultar la comunicación fluida, aunque esto no es una avería.
Prohibiciones generales Precauciones generalesProhibición de exponer al agua la unidad Prohibición de desmontar la unidad
ALLGEMEINE VORSICHTSMASSNAHMEN
PRECAUCIONES GENERALES
INSTALLATION & OPERATION MANUAL
MANUEL D'INSTALLATION ET D'UTILISATION
INSTALLATIONS- UND BEDIENUNGSANLEITUNG
MANUAL DE INSTALACIÓN Y OPERACIÓN
INSTALLATIE- EN BEDIENINGSHANDLEIDING
MANUALE D’INSTALLAZIONE E USO
HANDS-FREE TWO-WIRE ELECTRIC LOCK DOOR PHONE KIT
KIT AUDIO MAINS LIBRES
2-DRAHT-TÜRFREISPRECHSET
KIT PARA PORTERO AUTOMÁTICO ELÉCTRICO DE DOS CABLES CON MANOS LIBRES
HANDENVRIJE TWEEDRAADS-PARLOFOONSET MET DEURSLOTSTURING
KIT CITOFONO ELETTRICO A DUE FILI VIVAVOCE
PRECAUTIONS
Mesures générales d’interdiction Interdiction d'exposer l'unité à l'eau Interdiction de démonter l'appareil Précautions générales
1. L’unité doit être installée et câblée par un technicien qualifié. Si un technicien non qualifié installe le
système, un choc électrique risque de se produire.
2.
Lorsque les fils d'un carillon existant sont utilisés, il est possible qu'ils soient parcourus par une tension de courant alternatif. Vous
risquez de provoquer une décharge électrique ou un dysfonctionnement de l’appareil. Demandez conseil à un électricien qualifié.
3. Ne branchez pas l'unité sur une autre source d'alimentation que celle spécifiée. Vous risqueriez de
provoquer un incendie ou un choc électrique.
4.
Ne démontez pas et ne modifiez pas l’unité. Vous risqueriez de provoquer un incendie ou un choc électrique.
5. N'ouvrez pas le boîtier de l’unité.
6. Maintenez l'unité à distance de toute source d'eau ou de tout autre liquide. Vous risqueriez de
provoquer un incendie ou un choc électrique.
7.
Le PT-1211DR/C/D doit être uniquement utilisé avec les systèmes DA et DB, et non avec d'autres dispositifs.
8.
N'insérez pas d'objet métallique dans les ouvertures de l'unité. Vous risqueriez de provoquer un incendie ou un choc électrique.
PRECAUTIONS GENERALES
(Le non-respect de cet avertissement risque d'entraîner des blessures graves, voire mortelles)
AVERTISSEMENT
ATTENTION
(Le non-respect de cet avertissement risque d'entraîner des blessures ou des dégâts matériels.)
1. Pour fixer l’unité au mur, choisissez un endroit adapté où elle ne risque pas de subir des secousses ou
des chocs. Sinon, vous risquez de provoquer des blessures.
2. Avant de mettre l'unité sous tension, assurez-vous que les câbles ne sont ni croisés ni en court-circuit.
Dans le cas contraire, cela pourrait provoquer un incendie ou un choc électrique.
3. Ne réalisez aucune connexion lorsque le bloc d’alimentation est branché. Vous risquez de provoquer une
décharge électrique ou un dysfonctionnement de l'appareil.
4.
Pour éviter un mauvais fonctionnement du système, ne pas placer l’unité dans des endroits où: 1. la température est très
élevée ou très basse 2. le taux d'humidité est élevé 3. l'unité serait soumise à: des contacts avec de la poussière, de
l'huile, des produits chimiques, du sel, etc. 4. des vibrations ou des chocs permanents et 5. de la vapeur ou de la fumée.
5. Ne placez rien sur l'unité et ne la couvrez pas avec un chiffon, etc. Vous risqueriez de provoquer un
incendie ou d'entraîner un mauvais fonctionnement de l’appareil.
6.
N'installez pas l'unité à proximité d'appareils occasionnant des parasites (interrupteur crépusculaire, onduleur,
appareils électriques). Cela peut provoquer un incendie, une décharge électrique ou des dégâts à l'unité.
1. Ne placez pas les câbles de l'interphone à moins de 30 cm de câbles secteur 120V ou 230V car cela pourrait provoquer un bruit induit et/ou un dysfonctionnement de l'unité.
2. Dans les zones situées à proximité d'antennes émettrices, le système d'interphone risque d'être perturbé par l'interférence d'ondes radio.
3. L'unité ne fonctionne pas en cas de panne de courant.
4. Toutes les unités, sauf le poste de porte, sont destinées exclusivement à l’utilisation à l’intérieur. Ne les utilisez pas à l’extérieur.
5. Les bruits autour de l’unité peuvent perturber la communication, mais il ne s’agit pas là d’un dysfonctionnement.
- 1 -
La página se está cargando ...

2 4
C
DA
E
(*2)
F F
EL-12S
PT-1211DR
PT-1211C
PT-1211D
PT-1211DR
PT-1211C
PT-1211D
IER-2
(TAR-3)
PT-1211DR
PT-1211C
PT-1211D
2
4 4 4
2
2
2
2
2
2 2
2
DA-1DS
DBS-1AP/DBS-1A
DB-1MD
DB-1SD DB-1SD DB-1SD DB-1SD
(1) (2) (3) (4)
1 1
222
B
(*1)
(*1)
or
or
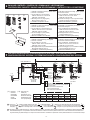
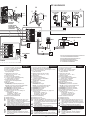
DB-1MD (+ Mounting bracket) : Master station
DA-1DS : Door station
PT-1211DR/C/D : AC transformer
DBS-1A w/PT-1211C or PT-1211D
DBS-1AP w/PT-1211DR
Mounting screw x 2 (w/gang box)
Wood mounting screw x 2
Installation & Operation manual
DB-1MD (+ Wandhalterung): Hauptgerät
DA-1DS : Türstelle
PT-1211DR/C/D : AC-Trafo
DBS-1A mit PT-1211C oder PT-1211D
DBS-1AP mit PT-1211DR
Montageschraube x 2 (mit Kabelanschlussdose)
Montageschraube für Holz x 2
Installations- und Bedienungsanleitung
DB-1MD (+ montagesteun): Hoofdpost
DA-1DS: Deurpost
PT-1211DR/C/D: AC-transformator
DBS-1A met PT-1211C of PT-1211D
DBS-1AP met PT-1211DR
Montageschroef x 2 (voor wanddoos)
Houtmontageschroef x 2
Installatie- en bedieningshandleiding
DB-1MD (+ staffa di montaggio) : Postazione principale
DA-1DS : Postazione esterna
PT-1211DR/C/D : Trasformatore CA
DBS-1A con PT-1211C o PT-1211D
DBS-1AP con PT-1211DR
Viti di montaggio x 2 (con contenitore multiplo)
Viti di montaggio per legno x 2
Manuale d’installazione e uso
DB-1MD (+ Soporte de montaje) : Aparato principal
DA-1DS : Portero
PT-1211DR/C/D : Transformador de CA
DBS-1A c/PT-1211C o PT-1211D
DBS-1AP c/PT-1211DR
Tornillo de montaje x 2 (con caja de montaje)
Tornillo de montaje en madera x 2
Manual de instalación y operación
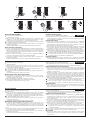
A
B
C, D, E, F
Ø0.65mm
110m
100m
55m
AWG 22
360'
330'
180'
Ø0.8mm
200m
100m
100m
AWG 20
660'
330'
330'
Ø1.0mm
310m
100m
155m
AWG 18
1,020'
330'
510'
2
3
English
Français
Deutsch
Nederlands
Español
Italiano
1.
2.
DB-1MD (+ support de montage) : Poste maître
DA-1DS: Poste de porte
PT-1211DR/C/D : Transformateur CA
DBS-1A avec PT-1211C ou PT-1211D
DBS-1AP avec PT-1211DR
Vis de montage x 2 (avec boîtier)
Vis de montage à bois x 2
Manuel d’installation et d’utilisation
PACKAGE CONTENTS / CONTENU DE L’EMBALLAGE / LIEFERUMFANG
CONTENIDO DEL PAQUETE / INHOUD VAN DE VERPAKKING / CONTENUTO DELLA CONFEZIONE
SYSTEM CONFIGURATION / CONFIGURATION DU SYSTEME/ SYSTEMKONFIGURATION
CONFIGURACIÓN DEL SISTEMA / SYSTEEMCONFIGURATIE / CONFIGURAZIONE DEL SISTEMA
Light, etc.
Lumière, etc.
Licht usw.
Luz, etc.
Optionele bediening
Luce, ecc.
Request to exit/entry button
Requête envoyée vers le bouton de sortie/d'entrée
Türfreigabe-Taste
Botón para solicitar salida/entrada
Externe deurslotbediening
Tasto richiesta di entrata/uscita
(*2): Lead wire (x4)
Câble (x4)
Sprechadern (x 4)
Puntas de cable (x4)
Aansluitdraden (x4)
Cavo principale(x4)
Power line ( ): Wired in separate jacket than main line ( ) / Câble d'alimentation ( ): câblé dans une gaine distincte de celle du câble principal ( )
Versorgungsadern ( ): Wenn möglich, in einem sep. Kabel führen ( ) / Línea de alimentación ( ): Cableado en un conector diferente al de la línea principal ( )
Voedingslijn ( ): aangesloten in afzonderlijke kabel, los van de hoofdlijn ( ) / Linea di alimentazione ( ): Collegata in una guaina separata rispetto alla linea principale ( )
2
4
2
4
2
2
2
4
4
4
2
4
(*1): OPTION
OPTION
OPTIONAL
OPCIONES
OPTIE
OPZIONE
Absolutely do not set up parallel connections from 1 inside unit to multiple AC transformers. / Ne branchez jamais des câbles de l'unité intérieure 1 en parallèle avec plusieurs transformateurs CA.
Keinesfalls Parallelschaltungen von 1 Innensprechstelle zu mehreren AC-Trafos durchführen. / No debe hacer conexiones en paralelo en absoluto desde 1 en el interior de la unidad a varios transformadores de CA.
Programmeer absoluut geen parallelle verbindingen van 1 binnenpost naar vele AC-transformatoren. / Assolutamente non impostare delle connessioni parallele dall'unità interna 1 verso dei trasformatori CA multipli.
- 3 -
La página se está cargando ...

~~~
15V
83.5mm
(3-5/16")
BA
+ 5 cm
(2")
+ 5 cm
(2")
+ 15 cm
(6")
1
3
2
5
DA-1DS
DB-1MD
DB-1SD
DB-1MD/1SD
L L D E
L L D E
D
E
B1
B2
B3
B4
BL+
BL-
~~~
~~~
IER-2
TAR-3
PS
SW
A B
PS-0603DIN/0602C/0602D
I E
B1
B2
B3
B4
B1
B2
B3
B4
PT-1211DR/C/D
PT-1211DR/C/D
PT-1211DR/C/D
15V
2
4 4 4
4
DB-1SD
DB-1SD
(1)
(2)
(3)(4)
DB-1MD
83.5mm
(3-5/16")
PT-1211DR
(230V)
PT-1211D
(230V)
PT-1211C
(120V)
DB-1SDDB-1SD DB-1SD
1
2
8mm
(3/8")
4
60mm
(2-3/8")
1,300mm
(4'3")
4
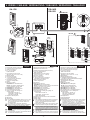
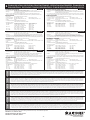
Press the tab and remove the front panel.
Connect the wires to the terminals.
Install on the gang box.
L, L: for door release.
D, E: for DB-1MD.
Door release: EL-12S or others
(More than (AC) 70 Ω, AC 9.5 ~ 20V)
Mounting bracket
Wood mounting screw
1. Press release button.
2. Insert the wire into the terminal.
Call extension or TAR-3
Lead wires: Orange/Yellow
Bell etc.
D,E: for door station.
B1,B2,B3,B4: for sub master station.
BL+,BL-: for request to exit/entry button
(Contact resistance: Less than 1KΩ)
B1,B2,B3,B4: for master station.
B1,B2,B3,B4: for sub master station.
PT-1211DR/C/D AC15V output
Option unit: Light, Gate, Garage, etc.
Contact (AC/DC)
Voltage Max.: 24V, Min.:1V
Current Max.: 1.6A, Min.:10mA
Lead wires: Brown/Red
Request to exit/entry button
A: Back wiring
B: Surface wiring
1. For DB-1MD/1SD installation, allow 5 cm (2") of open
space on either side of the unit and at least 15 cm
(6") of vertical open space from the center of the
mounting bracket.
2. For surface wiring, remove the cable jacket.
3. When connecting sub master stations, ID registration
setting is necessary for each sub master station.
(Refer to the ID setting instruction included with
DB-1SD.)
4. Not supplied (Wood mounting screws supplied with
DB-1MD/1SD)
5. To prevent shorts, be sure to cut unused lead wires at
the bottom and insulate the ends.
Auf die Lasche drücken und die vordere Abdeckung abnehmen.
Die Adern an die Klemmen anschließen.
An der Kabelanschlussdose anbringen.
L, L: für den Türöffner.
D, E: für das DB-1MD.
Türöffner: EL-12S oder andere
(Mindestens (AC) 70 Ω, AC 9,5 20 V)
Wandhalterung
Montageschraube für Holz
1. Die Klemmenentriegelung drücken.
2. Das Kabel an der Anschlussklemme befestigen.
Zusatzsignal oder TAR-3
Anschlussdrähte: Orange/Gelb
Klingel usw.
D,E: für die Türstelle.
B1,B2,B3,B4: für das Nebengerät.
BL+,BL-: für die Türfreigabe-Taste
(Kontaktwiderstand: höchstens 1 kΩ)
B1,B2,B3,B4: für das Hauptgerät.
B1,B2,B3,B4: für das Nebengerät.
PT-1211DR/C/D AC 15 V Ausgangsspannung
Optionales Gerät: Licht, Tor, Garage usw.
Kontakt (AC/DC)
Max. Spannung: 24V, Min.:1V
Max. Strom: 1,6A, Min.:10mA
Anschlussdrähte: Braun/Rot
Türfreigabe-Taste
A: Unterputzverdrahtung
B: Aufputzverdrahtung
1.
Beim Einbau des DB-1MD/1SD müssen rechts und links
der Anlage jeweils 5 cm sowie oberhalb und unterhalb
der Anlage mindestens 15 cm - von der Mitte der
Wandhalterung aus gemessen - frei gelassen werden.
2.
Im Falle einer Aufputzverdrahtung den Kabelmantel entfernen.
3. Beim Anschluss von Nebengeräten ist eine
Einstellung der ID-Registrierung für jedes Nebengerät
erforderlich. (Siehe die dem DB-1SD beiliegende
Anleitung zur ID-Einstellung.)
4. Nicht mitgeliefert (Mit dem DB-1MD/1SD werden
Montageschrauben für Holz geliefert)
5.
Zur Vermeidung von Kurzschlüssen unbedingt nicht
verwendete Adern abschneiden und die Enden isolieren.
Presione la pestaña y retírela del panel delantero.
Conecte los cables a las terminales.
Instale en la caja de montaje.
L, L: para la apertura de puertas.
D, E: para DB-1MD.
Abrepuertas: EL-12S u otros
(Más de (CA) 70 Ω, CA 9,5 20V)
Soporte de montaje
Tornillo para montaje en madera
1. Presione el botón release (Abrepuertas).
2. Inserte el cable en el terminal.
Extensión de llamada o TAR-3
Puntas de cable: Anaranjado/Amarillo
Timbre etc.
D,E: para el portero.
B1,B2,B3,B4: para aparato principal anexo.
BL+,BL-: para el botón para solicitar salida/entrada
(Resistencia de contacto: Menos de 1KΩ)
B1,B2,B3,B4: para aparato principal.
B1,B2,B3,B4: para aparato principal anexo.
PT-1211DR/C/D CA 15V salida
Unidad de opciones: Luz, Portón, Garaje, etc.
Contacto (CA/CC)
Voltaje Max.: 24V, Min.:1V
Corriente Max.: 1,6A, Min.:10mA
Puntas de cable: Marrón/Rojo
Botón para solicitar salida/entrada
A: Cableado posterior
B: Cableado de superficie
1. Para la instalación de DB-1MD/1SD, deje 5 cm de
espacio abierto en cualquiera de los lados de la
unidad y al menos 15 cm de espacio abierto vertical a
partir del centro del soporte de montaje.
2.
Para el cableado de superficie, quite el forro del cable.
3. Cuando conecte los aparatos principales anexos, es
necesario registrar el ID para cada aparato principal
anexo. (Consulte las instrucciones para registro de ID
que se incluyen con el DB-1SD.)
4. No incluido (Tornillos para montaje en madera
incluidos con el DB-1MD/1SD)
5. Para evitar cortocircuitos, asegúrese de cortar los
conductores principales sin usar en la parte inferior y
aislar las puntas.
Druk op het lipje en verwijder het frontpaneel.
Sluit de draden aan op de aansluitklemmen.
Installeer op de inbouwdoos (afzonderlijk te voorzien).
L, L: naar elektrisch deurslot.
D, E: naar DB-1MD.
Elektrisch deurslot: EL-12S of andere
(Meer dan (AC) 70 Ω, AC 9,5 20 V)
Montagesteun
Houtmontageschroef
1. Druk op de ontgrendelknop.
2. Steek de draad in de aansluitklem.
Extra bel of TAR-3
Aansluitdraden: Oranje/Geel
Deurbel, enz.
D,E: naar deurpost.
B1,B2,B3,B4: naar bijpost.
BL+,BL-: voor externe bediening deurslot
(contactweerstand: minder dan 1 KΩ)
B1,B2,B3,B4: naar hoofdpost.
B1,B2,B3,B4: naar bijpost.
transfo AC15V-uitgang
Optionele bediening: verlichting, hek, garage, enz.
Contact (AC/DC)
Spanning Max.: 24V, Min.:1V
Stroom Max.: 1,6A, Min.:10mA
Aansluitdraden: Bruin/Rood
Externe deurslotbediening
A: bekabeling in de muur
B: bekabeling boven op de muur
1. Laat bij de installatie van de DB-1MD/1SD 5 cm vrije
ruimte aan beide zijden van het toestel en ten minste
15 cm verticale vrije ruimte vanaf het midden van de
montagesteun.
2. Bij bedrading boven op de muur moet de kabelmantel
worden verwijderd.
3. Wanneer bijposten worden aangesloten, is
ID-registratie nodig voor elke bijpost. (Zie de
aanwijzingen voor het instellen van het ID-nummer in
de handleiding van de DB-1SD)
4. Niet bijgeleverd (Houtmontageschroeven bijgeleverd
bij de DB-1MD/1SD)
5.
Om kortsluitingen te voorkomen, moeten ongebruikte
draden aan de uiteinden worden afgeknipt en geïsoleerd.
Premere la linguetta e rimuovere il pannello frontale.
Collegare i cavi ai terminali.
Montare sopra il contenitore multiplo.
L, L: per attivazione dell’apriporta.
D, E: per DB-1MD.
Apriporta: EL-12S o altri
(Più di (CA) 70 Ω, CA 9,5 20 V)
Staffa di montaggio
Vite di montaggio per legno
1. Premere il pulsante di sganciamento.
2. Inserire il cavo nel terminale.
Prolunga chiamata o TAR-3
Cavi principali: Arancione/Giallo
Campanello, ecc.
D,E: per postazione esterna.
B1,B2,B3,B4: per postazione secondaria.
BL+,BL-: per tasto richiesta di entrata/uscita
(Resistenza contatti: meno di 1 KΩ)
B1,B2,B3,B4: per postazione principale.
B1,B2,B3,B4: per postazione secondaria.
PT-1211DR/C/D uscita CA 15 V
Unità opzioni: Luce, cancello, garage, ecc.
Contatto (CA/CC)
Tensione Max.: 24V, Min.:1V
Corrente Max.: 1,6A, Min.:10mA
Cavi principali: Marrone/Rosso
Tasto richiesta di entrata/uscita
A: Cablaggio posteriore
B: Cablaggio superficiale
1. Per il montaggio di DB-1MD/1SD, lasciare 5 cm di
spazio su uno dei lati dell’unità e almeno 15 cm di
spazio verticale dal centro della staffa di montaggio.
2. Per il cablaggio superficiale, rimuovere la guaina del
cavo.
3. Quando si collegano le stazioni secondarie, è
necessaria per ogni stazione l’impostazione di
registrazione ID. (Vedere le istruzioni di impostazione
ID incluse nel DB-1SD)
4. Non fornite (Viti di montaggio per legno fornite con
DB-1MD/1SD)
5. Per evitare cortocircuiti, ricordare di tagliare i
conduttori inutilizzati al fondo e di isolarne le
estremità.
English
Français
Deutsch
NederlandsEspañol Italiano
WIRING / CABLAGE/ VERDRAHTUNG / CABLEADO / BEDRADING / CABLAGGIO
Appuyez sur la languette et ôtez la face avant.
Branchez les fils sur les bornes.
Installez la boite d'encastrement(non fourni).
L, L: pour gâche électrique.
D, E: pour DB-1MD.
Gâche électrique: EL-12S ou autres
(Plus de 70 Ω (CA), 9,5 20V CA)
Support de montage
Vis de montage à bois
1. Appuyez sur le bouton d'ouverture.
2. Introduire le câble dans la borne.
Extension d'appel ou TAR-3
Câbles: Orange/Jaune
Sonnette, etc.
D,E: pour poste de porte.
B1,B2,B3,B4: pour poste secondaire.
BL+,BL-: pour requête envoyée vers le bouton de sortie/d'entrée
(résistance de contact: moins de 1KΩ)
B1,B2,B3,B4: pour poste maître.
B1,B2,B3,B4: pour poste secondaire.
Sortie PT-1211DR/C/D CA15V
Unité optionnelle: Lumière, grille, garage, etc.
Contact (CA/CC)
Tension Max.: 24V, Min.:1V
Courant Max.: 1,6A, Min.:10mA
Câbles: Marron/Rouge
Requête envoyée vers le bouton de sortie/d'entrée
A: Câblage arrière
B: Câblage saillant
1. Pour installer le DB-1MD/1SD, laissez un espace de
5 cm de chaque côté de l'unité et un espace d'au
moins 15 cm à la verticale à partir du centre du
support de montage.
2.
Pour brancher le câble saillant, ôtez la gaine du câble.
3.
Lorsque vous branchez des postes secondaires, veillez à
régler les paramètres d'enregistrement d'identifiant pour
chaque poste secondaire. (Veuillez consulter les instructions
relatives au réglage de l'identifiant fournies avec la DB-1SD.)
4. Non fourni (Vis de montage à bois fournies avec le
DB-1MD/1SD)
5.
Pour empêcher les courts-circuits, veillez à couper les
câbles inutilisés dans le fond et à isoler les extrémités.
Polarized
Polarisé
Polarität beachten
Polarizado
Gepolariseerd
Polarizzato
OR: Orange/Orange/Orange/Anaranjado/Oranje/Arancione
YE: Yellow/Jaune/Gelb/Amarillo/Geel/Giallo
BR: Brown/Marron/Braun/Marrón/Bruin/Marrone
RD: Red/Rouge/Rot/Rojo/Rood/Rosso
BK: Black/Noir/Schwarz/Negro/Zwart/Nero
BL: Blue/Bleu/Blau/Azul/Blauw/Blu
- 5 -
La página se está cargando ...

Español
Nederlands
Italiano
Modo CON MANOS LIBRES
Presione el botón de llamada del portero.
Se escuchará el tono de gong.
Presione el botón de HABLAR (TALK) momentáneamente y, después del pitido,
comuníquese con manos libres. Transmite luces LED (rojas) cuando habla, y se apagan
cuando escucha a la persona que llama (o se escuchan sonidos del exterior).
1. Durante la espera, la comunicación con el portero es posible cuando presiona el botón
de HABLAR (TALK) en la unidad interior.
Al terminar de comunicarse, presione el botón de Apagado (OFF) y la comunicación se
cortará después del pitido.
Después de aproximadamente 1 minuto, la comunicación finaliza automáticamente.
Modo "Presione y hable (PTT)"
Si vuelve a presionar el botón de HABLAR (TALK) y lo mantiene presionado durante 1
segundo o más tiempo después de presionarlo en el paso
, se escuchará otro pitido
después de aproximadamente 1 segundo, lo cuál indica que se ha activado el modo PTT.
Si se presiona brevemente el botón de
HABLAR (TALK)
(menos de 0,5 segundo), el
sistema no cambiará al modo PTT.
Durante la comunicación, mantenga presionado el botón de
HABLAR (TALK)
Para
escuchar la voz del interlocutor, suelte el botón de
HABLAR (TALK)
.
Al terminar de comunicarse, presione el botón de Apagado (OFF) y la comunicación se
cortará después del pitido.
Después de aproximadamente 1 minuto, la comunicación finaliza automáticamente.
Activación del abrepuertas
Presione el botón de APERTURA DE PUERTAS.
La apertura de la puerta se activa mientras presiona el botón APERTURA DE PUERTAS.
Cuando el sistema está encendido, la comunicación se suspende mientras esté presionado
el botón APERTURA DE PUERTAS.
Comunicación interna
Cuando presiona el botón de LLAMADA, se escucha el tono de gong y se habilita la
comunicación con la otra persona. Cuando hay 3 o más unidades interiores, se realiza una
llamada simultánea a todas las demás unidades interiores. La unidad [o "sistema"] se
apaga después de aproximadamente 1 minuto si no hay respuesta.
Si la otra persona presiona el botón de HABLAR (TALK), se habilita la comunicación
con manos libres. (Si presiona nuevamente el botón de HABLAR (TALK), se escuchará
otra señal después de aprox. 1 segundo, lo que indica que está activado el modo PTT).
Para finalizar la comunicación, presione y suelte el botón de Apagado (OFF). La
comunicación interna finaliza automáticamente al transcurrir aproximadamente 10 minutos.
2.
Si presiona el botón de APERTURA DE PUERTAS o de llamada del portero durante una llamada
de habitación a habitación o durante una comunicación interna, la comunicación terminará.
3. Se escucha un pitido que indica un error si se presiona el botón HABLAR (TALK) o
LLAMADA mientras se está utilizando otra unidad interior.
Unidad de opciones
Si presiona el botón de opciónes (que no sea cuando se activa el abrepuertas), las unidades
opcionales pueden operarse en cualquier momento (como al encender y apagar las luces).
Handenvrije modus
Druk op de oproepknop van de deurpost.
De beltoon weerklinkt.
Druk kortstondig op de spreek-knop (TALK). Er volgt een pieptoon en u kan nu
handenvrij spreken. De LED (rood) licht op wanneer u spreekt en gaat uit als u naar de
bezoeker luistert (of buitengeluiden hoort).
1. Ook zonder oproep kan verbinding met de deurpost worden gemaakt door op de
spreek-knop (TALK) van de binnenpost te drukken.
Door na het gesprek op de uitschakelknop (OFF) te drukken, eindigt de communicatie na
de pieptoon.
De communicatie eindigt automatisch na ong. 1 minuut.
Manuele (PTT) modus (Druk-om-te-spreken)
Door nogmaals op de spreek-knop (TALK) te drukken gedurende 1 seconde of langer,
weerklinkt een 2de pieptoon om aan te geven dat de manuele spreekmodus
(druk-om-te-spreken) is ingeschakeld.
Druk de TALK-knop in om te spreken en laat los om te luisteren.
Druk op de uitschakelknop (OFF) om de communicatie te beëindigen.
De communicatie eindigt automatisch na ong. 1 minuut.
Deur ontgrendelen
Druk op de knop voor deurslotsturing (SLEUTEL).
Het elektrisch deurslot wordt geactiveerd zolang de knop voor deurslotsturing wordt
ingedrukt. Tijdens bediening van het deurslot wordt de communicatie onderbroken.
Intercomgesprek tussen de binnenposten
Druk op de oproepknop (CALL) om de andere binnenpost(en) op te roepen en spreek.
Wanneer er 3 of meer binnenposten zijn, worden alle andere binnenposten gelijktijdig
opgeroepen. Het toestel [of "systeem"] wordt automatisch uitgeschakeld na ongeveer 1
minuut als er geen antwoord is.
Pas nadat de tegenpartij op de spreek-knop (TALK, druk-om-te-spreken) van een andere
binnenpost heeft gedrukt, is handenvrije communicatie in twee richtingen mogelijk. (Als
de spreek-knop (TALK, druk-om-te-spreken) opnieuw ingedrukt wordt, klinkt er na
ongeveer 1 seconde een andere pieptoon, wat aangeeft dat de PTT-modus ingeschakeld is.)
Druk kortstondig op OFF om het gesprek te beëindigen. Intercomgesprekken tussen de
binnenposten eindigen automatisch na ongeveer 10 minuten.
2.
Als de knop voor deurslotsturing (DOOR RELEASE) of de oproepknop van de deurpost tijdens een interne
oproep of interne communicatie ingedrukt wordt, wordt er een einde aan de communicatie gemaakt.
3. Als de spreek-knop (TALK) of oproepknop (CALL) wordt ingedrukt terwijl een
andere binnenpost in gebruik is, weerklinkt een pieptoon om een fout aan te geven.
Optioneel toestel
Door de optieknop in te drukken (behalve wanneer het elektrisch deurslot geactiveerd is),
kunnen de aangesloten optionele toestellen om het even wanneer worden bediend
(bijvoorbeeld verlichting in- en uitschakelen).
Modalità VIVAVOCE
Premere il pulsante di chiamata della stazione esterna.
Il cicalino suona.
Premere per un attimo il pulsante TALK (PARLARE) e, dopo il "bip", sarà possibile
comunicare in vivavoce. Il LED della trasmissione (rosso) si illumina mentre si parla e si
spegne mentre si ascolta l’interlocutore (o si avvertono suoni provenienti dall’esterno).
1. In standby, la comunicazione con la stazione esterna è possibile quando il pulsante
TALK (PARLARE) dell’unità interna viene premuto.
Terminata la comunicazione, premere il pulsante di spegnimento per concludere la
comunicazione dopo il "bip".
La comunicazione termina automaticamente dopo circa 1 minuto.
Modalità PTT: Press-To-Talk (premere per parlare)
Se il pulsante TALK (PARLARE) viene premuto di nuovo e tenuto premuto per 1
secondo o più dopo che è stato premuto nella fase
, si avvertirà un altro "bip" dopo
circa 1 secondo ad indicare che la modalità PTT è attiva. Se si preme per un breve istante
(meno di 0,5 secondi) il pulsante TALK (PARLARE), il sistema non passa alla modalità
PTT.
Durante la comunicazione, tenere premuto il pulsante TALK (PARLARE). Per ascoltare
la voce dell’interlocutore, rilasciare il pulsante TALK (PARLARE).
Terminata la comunicazione, premere il pulsante di spegnimento per concludere la
comunicazione dopo il "bip".
La comunicazione termina automaticamente dopo circa 1 minuto.
Attivazione dell’apriporta
Premere il pulsante apriporta.
La porta si apre quando il pulsante apriporta viene premuto. Quando il sistema è attivo, il
volume della comunicazione viene azzerato mentre si preme il pulsante apriporta.
Postazioni interne intercomunicanti
Quando si preme il pulsante di chiamata, il cicalino suona ed è possibile iniziare la
comunicazione con l’interlocutore. In caso di 3 o più unità interne, viene eseguita la
chiamata simultanea a tutte le unità. L’unità [o "sistema"] si spegne dopo circa 1 minuto
se non si ottiene risposta.
Se l’interlocutore preme il pulsante TALK (PARLARE), sarà possibile la comunicazione
in vivavoce. (se il pulsante TALK (PARLARE) viene premuto di nuovo, un altro segnale
suonerà dopo circa 1 secondo, ad indicare che la modalità PTT è attiva).
Premere e rilasciare il pulsante
di spegnimento
per terminare la comunicazione. La
comunicazione tra postazioni interne termina automaticamente dopo circa 10 minuti.
2. Se il pulsante apriporta o il pulsante di chiamata della stazione esterna, vengono
premuti durante la chiamata o la comunicazione tra postazioni interne, la
comunicazione terminerà.
3. Se si preme il pulsante di chiamata o TALK (PARLARE) mentre è in uso un’altra
unità interna, si avverte un "bip" ad indicare una condizione di errore.
Unità opzioni
Se si preme il pulsante opzioni (a parte quando si attiva l’apriporta), le unità opzionali
collegate possono essere usate in qualsiasi momento, ad esempio per accendere o
spegnere le luci.
- 7 -
La página se está cargando ...
Transcripción de documentos
FK1498 A P0709YI HANDS-FREE TWO-WIRE ELECTRIC LOCK DOOR PHONE KIT KIT AUDIO MAINS LIBRES 2-DRAHT-TÜRFREISPRECHSET KIT PARA PORTERO AUTOMÁTICO ELÉCTRICO DE DOS CABLES CON MANOS LIBRES PT-1211DR HANDENVRIJE TWEEDRAADS-PARLOFOONSET MET DEURSLOTSTURING (DBS-1AP)(230V) KIT CITOFONO ELETTRICO A DUE FILI VIVAVOCE PT-1211C (DBS-1A)(120V) DA-1DS DB-1MD PT-1211D (DBS-1A)(230V) PRECAUTIONS General Prohibitions DBS-1AP/DBS-1A INSTALLATION & OPERATION MANUAL MANUEL D'INSTALLATION ET D'UTILISATION INSTALLATIONS- UND BEDIENUNGSANLEITUNG MANUAL DE INSTALACIÓN Y OPERACIÓN INSTALLATIE- EN BEDIENINGSHANDLEIDING MANUALE D’INSTALLAZIONE E USO Prohibitions to subject the unit to water WARNING (Negligence could result in death or serious injury to people.) Prohibitions to dismantle the unit General Precautions CAUTION (Negligence could result in injury to people or damage to property.) 1. When mounting the unit on wall, install the unit in a convenient location, but not where it could be jarred or bumped. Injury could result. 2. Before turning on power, make sure wires are not crossed or shorted. If not, fire or electric shock could result. 3. Do not install or make any wire terminations while power supply is turned on. Electric shock or unit trouble could result. 4. To avoid system malfunction, do not install the unit in places, such as; 1. high or extreme cold temperature area, 2. subject to moisture or humidity extremes, 3. environmental conditions: dust, oil, chemicals, salt, etc., 4. constant vibration or impact, and 5. steam or smoke. 5. Do not put anything on or cover the unit with cloth, etc. Fire or unit trouble could result. 6. Do not install the unit where noise generating devices such as dimmer switches, invertor electrical appliances, are close by. Fire electric shock, or unit trouble could result. GENERAL PRECAUTIONS 1. Keep the intercom wires more than 30cm (12") away from AC 120V, 230V wiring, AC induced noise and/or unit malfunction could result. 2. In areas where broadcasting station antennas are close by, intercom system may be affected by radio frequency interference. 3. The unit turns inoperative during power failure. 4. All the units, except for door station, is designed for indoor use only. Do not use outdoors. 5. Due to the environmental sound around the unit, it may hinder smooth communication, but this is not a malfunction. 1. The unit must be installed and wired by a qualified technician. Having installation performed by an unqualified technician could result in electric shock. 2. When existing chime wires are used, it is possible that they contain AC voltage. Electric shock or unit damage could result. Ask a qualified electrician. 3. Do not connect the unit with any non-specified power source. Fire or electric shock could result. 4. Do not dismantle or alter the unit. Fire or electric shock could result. 5. Do not open the unit case. 6. Keep the unit away from water or any other liquid. Fire or electric shock could result. 7. PT-1211DR/C/D shall be used for DA and DB systems only, and never for other devices. 8. Do not put any metal into the unit through the openings. Fire or electric shock could result. PRECAUTIONS Mesures générales d’interdiction Interdiction d'exposer l'unité à l'eau AVERTISSEMENT (Le non-respect de cet avertissement risque d'entraîner des blessures graves, voire mortelles) Interdiction de démonter l'appareil Précautions générales ATTENTION (Le non-respect de cet avertissement risque d'entraîner des blessures ou des dégâts matériels.) 1. L’unité doit être installée et câblée par un technicien qualifié. Si un technicien non qualifié installe le système, un choc électrique risque de se produire. 2. Lorsque les fils d'un carillon existant sont utilisés, il est possible qu'ils soient parcourus par une tension de courant alternatif. Vous risquez de provoquer une décharge électrique ou un dysfonctionnement de l’appareil. Demandez conseil à un électricien qualifié. 3. Ne branchez pas l'unité sur une autre source d'alimentation que celle spécifiée. Vous risqueriez de provoquer un incendie ou un choc électrique. 4. Ne démontez pas et ne modifiez pas l’unité. Vous risqueriez de provoquer un incendie ou un choc électrique. 5. N'ouvrez pas le boîtier de l’unité. 6. Maintenez l'unité à distance de toute source d'eau ou de tout autre liquide. Vous risqueriez de provoquer un incendie ou un choc électrique. 7. Le PT-1211DR/C/D doit être uniquement utilisé avec les systèmes DA et DB, et non avec d'autres dispositifs. 8. N'insérez pas d'objet métallique dans les ouvertures de l'unité. Vous risqueriez de provoquer un incendie ou un choc électrique. 1. Pour fixer l’unité au mur, choisissez un endroit adapté où elle ne risque pas de subir des secousses ou des chocs. Sinon, vous risquez de provoquer des blessures. 2. Avant de mettre l'unité sous tension, assurez-vous que les câbles ne sont ni croisés ni en court-circuit. Dans le cas contraire, cela pourrait provoquer un incendie ou un choc électrique. 3. Ne réalisez aucune connexion lorsque le bloc d’alimentation est branché. Vous risquez de provoquer une décharge électrique ou un dysfonctionnement de l'appareil. 4. Pour éviter un mauvais fonctionnement du système, ne pas placer l’unité dans des endroits où: 1. la température est très élevée ou très basse 2. le taux d'humidité est élevé 3. l'unité serait soumise à: des contacts avec de la poussière, de l'huile, des produits chimiques, du sel, etc. 4. des vibrations ou des chocs permanents et 5. de la vapeur ou de la fumée. 5. Ne placez rien sur l'unité et ne la couvrez pas avec un chiffon, etc. Vous risqueriez de provoquer un incendie ou d'entraîner un mauvais fonctionnement de l’appareil. 6. N'installez pas l'unité à proximité d'appareils occasionnant des parasites (interrupteur crépusculaire, onduleur, appareils électriques). Cela peut provoquer un incendie, une décharge électrique ou des dégâts à l'unité. PRECAUTIONS GENERALES 1. Ne placez pas les câbles de l'interphone à moins de 30 cm de câbles secteur 120V ou 230V car cela pourrait provoquer un bruit induit et/ou un dysfonctionnement de l'unité. 2. Dans les zones situées à proximité d'antennes émettrices, le système d'interphone risque d'être perturbé par l'interférence d'ondes radio. 3. L'unité ne fonctionne pas en cas de panne de courant. 4. Toutes les unités, sauf le poste de porte, sont destinées exclusivement à l’utilisation à l’intérieur. Ne les utilisez pas à l’extérieur. 5. Les bruits autour de l’unité peuvent perturber la communication, mais il ne s’agit pas là d’un dysfonctionnement. VORSICHTSMASSNAHMEN Allgemeine Verbote Verbote zum Schutz der Anlage vor Wasser WARNUNG (Nichtbeachtung kann zu schweren oder lebensgefährlichen Verletzungen führen.) 1. Die Anlage muss von einem Fachmann eingebaut und verdrahtet werden. Bei Einbau durch einen nicht qualifizierten Techniker besteht Stromschlaggefahr. 2. Wenn bestehende Leitungen der Türglocke verwendet werden, ist es möglich, dass diese unter Fremdspannung stehen. Dadurch besteht Stromschlaggefahr und Schäden am Gerät könnten auftreten. Wenden Sie sich an einen qualifizierten Elektroinstallateur. 3. Die Anlange an keine andere als die vorgesehene Stromversorgung anschließen. Es besteht sonst Brand- und Stromschlaggefahr. 4. Das Gerät keinesfalls zerlegen oder Änderungen an diesem vornehmen. Es besteht sonst Brand- und Stromschlaggefahr. 5. Das Gerätegehäuse nicht öffnen. 6. Das Gerät von Wasser und anderen Flüssigkeiten fernhalten. Es besteht sonst Brand- und Stromschlaggefahr. 7. Das PT-1211DR/C/D darf nur für das DA- und DB-System verwendet werden, keinesfalls jedoch für andere Geräte. 8. Keinesfalls Metallgegenstände in die Öffnungen des Geräts einführen. Es besteht sonst Brand- und Stromschlaggefahr. ALLGEMEINE VORSICHTSMASSNAHMEN 1. 2. 3. 4. 5. VORSICHT Allgemeine Vorsichtsmaßnahmen (Nichtbeachtung kann zu Verletzungen oder Sachbeschädigungen führen.) 1. Die Anlage an einer geeigneten Stelle an der Wand, geschützt vor Stößen oder Erschütterungen, montieren. Es besteht sonst Verletzungsgefahr. 2. Vor dem Einschalten sicherstellen, dass alle Kabel korrekt angeschlossen und nicht kurzgeschlossen sind. Es besteht sonst Brand- und Stromschlaggefahr. 3. Keine Verdrahtungsarbeiten ausführen, während die Anlage unter Spannung steht. Sonst besteht Stromschlaggefahr und Störungen am Gerät könnten auftreten. 4. Um eine Funktionsstörung des Systems zu vermeiden, die Anlage nicht an folgenden Stellen einbauen: 1. Stellen mit hohen oder extrem niedrigen Temperaturen, 2. Stellen, die extremer Feuchtigkeit oder Nässe ausgesetzt sind, 3. Stellen, an denen die Anlage folgenden Umgebungsbedingungen ausgesetzt ist:Staub, Öl, Chemikalien, Salz usw., 4. ständigen Schwingungen oder Stößen sowie 5. Dampf und Rauch. 5. Niemals Gegenstände auf das Gerät legen und das Gerät nicht mit einem Tuch o. Ä. abdecken. Sonst besteht Brandgefahr und Störungen am Gerät könnten auftreten. 6. Die Anlage nicht in der Nähe von Geräuschquellen, wie zum Beispiel Dimmerschaltern oder Wechselstrom-Elektrogeräten, einbauen. Sonst besteht Brand- und Stromschlaggefahr und Störungen am Gerät könnten auftreten. Darauf achten, dass die Sprechanlagenleitungen mindestens 30 cm von Netzanschlussleitungen mit 120 V/230 V Wechselstrom entfernt geführt werden. Andernfalls könnten Störgeräusche durch den Wechselstrom und/oder Funktionsstörungen des Geräts auftreten. In unmittelbarer Nähe von Sendemasten kann es durch Hochfrequenzstörungen zu Beeinträchtigungen des Sprechanlagensystems kommen. Die Anlage ist während eines Stromausfalls nicht einsatzbereit. Alle Anlagen, mit Ausnahme der Türstelle, sind ausschließlich zur Verwendung in Innenräumen bestimmt. Nicht in Außenbereichen verwenden. Je nach Geräuschkulisse rund um das Gerät kann die Kommunikation gestört werden. Es handelt sich jedoch nicht um eine Fehlfunktion. PRECAUCIONES Prohibiciones generales Prohibición de exponer al agua la unidad ADVERTENCIA (No seguir estas instrucciones podría provocar daños graves o incluso mortales) 1. La unidad la debe instalar y cablear un técnico calificado. La instalación hecha por un técnico no calificado podría causar un choque eléctrico. 2. Si se utilizan cables del tono de gong ya existentes, es posible que éstos contengan tensión de CA. Por consiguiente, existe el riesgo de sufrir descargas eléctricas o causar daños a la unidad. Solicite la asistencia de un electricista calificado. 3. No conecte la unidad a ninguna fuente de alimentación no especificada. Existe peligro de incendio o descarga eléctrica. 4. No desmantele ni modifique la unidad. Existe peligro de incendio o descarga eléctrica. 5. No abra la caja de la unidad. 6. Mantenga la unidad alejada del agua o de cualquier otro líquido. Existe peligro de incendio o descarga eléctrica. 7. El PT-1211DR/C/D debe ser utilizado exclusivamente para el sistema DA y DB, y para ningún otro dispositivo. 8. No introduzca ningún objeto metálico por las aperturas de la unidad. Existe peligro de incendio o descarga eléctrica. PRECAUCIONES GENERALES 1. 2. 3. 4. 5. Verbote bezüglich des Zerlegens der Anlage Prohibición de desmontar la unidad Precauciones generales PRECAUCIÓN (No seguir estas instrucciones podría causar daños físicos o materiales) 1. Cuando monte la unidad en la pared, hágalo en un lugar apropiado, donde no pueda golpearla o moverla. ya que podría sufrir lesiones. 2. Antes de encender la energía eléctrica, verifique que los cables no están cruzados o en corto circuito. De lo contrario, podrían producirse incendios o descargas eléctricas. 3. No instale ni trabaje los cables mientras la unidad esté conectada. Existe el riesgo de sufrir descargas eléctricas o causar daños a la unidad. 4. Para evitar cualquier avería en el sistema, no instale la unidad en: 1. lugares con temperatura extremadamente alta o baja; 2. lugares con mucha humedad; 3. lugares en los que haya: polvo, aceite, productos químicos, sal, etc.; 4. lugares en los que haya vibraciones o impactos constantes y 5. lugares en los que haya vapor o humo. 5. No coloque nada encima de la unidad ni la cubra con tela alguna, etc. Podría provocar incendios o dañar la unidad. 6. No instale la unidad donde esté cerca de dispositivos generadores de ruido, como dispositivos reguladores de voltaje o equipos eléctricos inversores. ya que podría producirse un incendio, descarga eléctrica o causar daños a la unidad. Mantenga los cables del sistema de intercomunicación alejados más de 30 cm del cableado de 120V, 230 V de CA, ya que podría causar ruido de CA inducido y/o fallas en la unidad. En las áreas próximas a antenas de radiodifusión, el sistema de intercomunicación puede sufrir interferencias provocadas por las frecuencias de las ondas de radio. La unidad deja de funcionar durante una falla en la alimentación. Todas las unidades, excepto el portero, están concebidas para uso en interiores exclusivamente. No la utilice en exteriores. Los ruidos medioambientales alrededor de la unidad, pueden dificultar la comunicación fluida, aunque esto no es una avería. -1- 2 PACKAGE CONTENTS / CONTENU DE L’EMBALLAGE / LIEFERUMFANG CONTENIDO DEL PAQUETE / INHOUD VAN DE VERPAKKING / CONTENUTO DELLA CONFEZIONE English ① ② ③ or or ⑤ ④ ① DB-1MD (+ Mounting bracket) : Master station ② DA-1DS : Door station ③ PT-1211DR/C/D : AC transformer DBS-1A:w/PT-1211C or PT-1211D DBS-1AP:w/PT-1211DR ④ Mounting screw x 2 (w/gang box) Wood mounting screw x 2 ⑤ Installation & Operation manual Français ① DB-1MD (+ support de montage) : Poste maître ② DA-1DS: Poste de porte ③ PT-1211DR/C/D : Transformateur CA DBS-1A:avec PT-1211C ou PT-1211D DBS-1AP:avec PT-1211DR ④ Vis de montage x 2 (avec boîtier) Vis de montage à bois x 2 ⑤ Manuel d’installation et d’utilisation Deutsch ① DB-1MD (+ Wandhalterung): Hauptgerät ② DA-1DS : Türstelle ③ PT-1211DR/C/D : AC-Trafo DBS-1A:mit PT-1211C oder PT-1211D DBS-1AP:mit PT-1211DR ④ Montageschraube x 2 (mit Kabelanschlussdose) Montageschraube für Holz x 2 ⑤ Installations- und Bedienungsanleitung 3 Español ① DB-1MD (+ Soporte de montaje) : Aparato principal ② DA-1DS : Portero ③ PT-1211DR/C/D : Transformador de CA DBS-1A:c/PT-1211C o PT-1211D DBS-1AP:c/PT-1211DR ④ Tornillo de montaje x 2 (con caja de montaje) Tornillo de montaje en madera x 2 ⑤ Manual de instalación y operación Nederlands ① DB-1MD (+ montagesteun): Hoofdpost ② DA-1DS: Deurpost ③ PT-1211DR/C/D: AC-transformator DBS-1A:met PT-1211C of PT-1211D DBS-1AP:met PT-1211DR ④ Montageschroef x 2 (voor wanddoos) Houtmontageschroef x 2 ⑤ Installatie- en bedieningshandleiding Italiano ① DB-1MD (+ staffa di montaggio) : Postazione principale ② DA-1DS : Postazione esterna ③ PT-1211DR/C/D : Trasformatore CA DBS-1A:con PT-1211C o PT-1211D DBS-1AP:con PT-1211DR ④ Viti di montaggio x 2 (con contenitore multiplo) Viti di montaggio per legno x 2 ⑤ Manuale d’installazione e uso SYSTEM CONFIGURATION / CONFIGURATION DU SYSTEME / SYSTEMKONFIGURATION CONFIGURACIÓN DEL SISTEMA / SYSTEEMCONFIGURATIE / CONFIGURAZIONE DEL SISTEMA B DBS-1AP/DBS-1A DB-1MD DA-1DS 2 (1) DB-1SD (*2) 4 E (*1) EL-12S 2 A D 2 PT-1211DR PT-1211C PT-1211D (*1): OPTION OPTION OPTIONAL OPCIONES OPTIE OPZIONE (*2): Lead wire (x4) Câble (x4) Sprechadern (x 4) Puntas de cable (x4) Aansluitdraden (x4) Cavo principale(x4) 4 2 2 (2) DB-1SD IER-2 (TAR-3) 2 Light, etc. Lumière, etc. Licht usw. Luz, etc. Optionele bediening Luce, ecc. 2 C 2 2 (3) DB-1SD 4 4 1 2 F 2 1 F 2 PT-1211DR PT-1211C PT-1211D Request to exit/entry button Requête envoyée vers le bouton de sortie/d'entrée Türfreigabe-Taste Botón para solicitar salida/entrada Externe deurslotbediening Tasto richiesta di entrata/uscita A B C, D, E, F (4) DB-1SD 2 PT-1211DR PT-1211C PT-1211D (*1) Ø0.65mm AWG 22 Ø0.8mm AWG 20 Ø1.0mm AWG 18 110m 360' 200m 660' 310m 1,020' 100m 330' 100m 330' 100m 330' 55m 180' 100m 330' 155m 510' 1. Power line ( 2 ): Wired in separate jacket than main line ( 4 ) / Câble d'alimentation ( 2 ): câblé dans une gaine distincte de celle du câble principal ( 4 ) Versorgungsadern ( 2 ): Wenn möglich, in einem sep. Kabel führen ( 4 ) / Línea de alimentación ( 2 ): Cableado en un conector diferente al de la línea principal ( 4 ) Voedingslijn ( 2 ): aangesloten in afzonderlijke kabel, los van de hoofdlijn ( 4 ) / Linea di alimentazione ( 2 ): Collegata in una guaina separata rispetto alla linea principale ( 4 ) 2. Absolutely do not set up parallel connections from 1 inside unit to multiple AC transformers. / Ne branchez jamais des câbles de l'unité intérieure 1 en parallèle avec plusieurs transformateurs CA. Keinesfalls Parallelschaltungen von 1 Innensprechstelle zu mehreren AC-Trafos durchführen. / No debe hacer conexiones en paralelo en absoluto desde 1 en el interior de la unidad a varios transformadores de CA. Programmeer absoluut geen parallelle verbindingen van 1 binnenpost naar vele AC-transformatoren. / Assolutamente non impostare delle connessioni parallele dall'unità interna 1 verso dei trasformatori CA multipli. -3- A PT-1211DR/C/D B ⑭ ⑥ ⑦ PT-1211DR (230V) 83.5mm (3-5/16") Polarized Polarisé Polarität beachten Polarizado Gepolariseerd Polarizzato ⑥ 4 ~ ~ 15V 2 ⑦ DB-1MD D E B1 B2 B3 B4 BL+ BL- ⑪ ~~ 15V ⑨ ⑫ ~~ I 5 BK SW E A Español Presione la pestaña y retírela del panel delantero. Conecte los cables a las terminales. Instale en la caja de montaje. L, L: para la apertura de puertas. D, E: para DB-1MD. ⑤ Abrepuertas: EL-12S u otros (Más de (CA) 70 Ω, CA 9,5 ∼ 20V) ⑥ Soporte de montaje ⑦ Tornillo para montaje en madera ⑧ 1. Presione el botón release (Abrepuertas). 2. Inserte el cable en el terminal. ⑨ Extensión de llamada o TAR-3 Puntas de cable: Anaranjado/Amarillo ⑩ Timbre etc. ⑪ D,E: para el portero. B1,B2,B3,B4: para aparato principal anexo. BL+,BL-: para el botón para solicitar salida/entrada (Resistencia de contacto: Menos de 1KΩ) ⑫ B1,B2,B3,B4: para aparato principal. ⑬ B1,B2,B3,B4: para aparato principal anexo. ⑭ PT-1211DR/C/D CA 15V salida ⑮ Unidad de opciones: Luz, Portón, Garaje, etc. Contacto (CA/CC) Voltaje Max.: 24V, Min.:1V Corriente Max.: 1,6A, Min.:10mA Puntas de cable: Marrón/Rojo ⑯ Botón para solicitar salida/entrada A: Cableado posterior B: Cableado de superficie 1. Para la instalación de DB-1MD/1SD, deje 5 cm de espacio abierto en cualquiera de los lados de la unidad y al menos 15 cm de espacio abierto vertical a partir del centro del soporte de montaje. 2. Para el cableado de superficie, quite el forro del cable. 3. Cuando conecte los aparatos principales anexos, es necesario registrar el ID para cada aparato principal anexo. (Consulte las instrucciones para registro de ID que se incluyen con el DB-1SD.) 4. No incluido (Tornillos para montaje en madera incluidos con el DB-1MD/1SD) 5. Para evitar cortocircuitos, asegúrese de cortar los conductores principales sin usar en la parte inferior y aislar las puntas. RD TAR-3 B OR ⑩ OR BL ⑮ BR RD OR: YE: BR: RD: BK: BL: 211DR/C/D ① ② ③ ④ PS-0603DIN/0602C/0602D BK OR YE PT-1211DR/C/D PS IER-2 ⑯ ⑬ PT-1211D (230V) 83.5mm (3-5/16") 4 B1 B2 B3 B4 B1 B2 B3 B4 PT-1211C (120V) Nederlands Druk op het lipje en verwijder het frontpaneel. Sluit de draden aan op de aansluitklemmen. Installeer op de inbouwdoos (afzonderlijk te voorzien). L, L: naar elektrisch deurslot. D, E: naar DB-1MD. ⑤ Elektrisch deurslot: EL-12S of andere (Meer dan (AC) 70 Ω, AC 9,5 ∼ 20 V) ⑥ Montagesteun ⑦ Houtmontageschroef ⑧ 1. Druk op de ontgrendelknop. 2. Steek de draad in de aansluitklem. ⑨ Extra bel of TAR-3 Aansluitdraden: Oranje/Geel ⑩ Deurbel, enz. ⑪ D,E: naar deurpost. B1,B2,B3,B4: naar bijpost. BL+,BL-: voor externe bediening deurslot (contactweerstand: minder dan 1 KΩ) ⑫ B1,B2,B3,B4: naar hoofdpost. ⑬ B1,B2,B3,B4: naar bijpost. ⑭ transfo AC15V-uitgang ⑮ Optionele bediening: verlichting, hek, garage, enz. Contact (AC/DC) Spanning Max.: 24V, Min.:1V Stroom Max.: 1,6A, Min.:10mA Aansluitdraden: Bruin/Rood ⑯ Externe deurslotbediening A: bekabeling in de muur B: bekabeling boven op de muur 1. Laat bij de installatie van de DB-1MD/1SD 5 cm vrije ruimte aan beide zijden van het toestel en ten minste 15 cm verticale vrije ruimte vanaf het midden van de montagesteun. 2. Bij bedrading boven op de muur moet de kabelmantel worden verwijderd. 3. Wanneer bijposten worden aangesloten, is ID-registratie nodig voor elke bijpost. (Zie de aanwijzingen voor het instellen van het ID-nummer in de handleiding van de DB-1SD) 4. Niet bijgeleverd (Houtmontageschroeven bijgeleverd bij de DB-1MD/1SD) 5. Om kortsluitingen te voorkomen, moeten ongebruikte draden aan de uiteinden worden afgeknipt en geïsoleerd. ① ② ③ ④ -5- Orange/Orange/Orange/Anaranjado/Oranje/Arancione Yellow/Jaune/Gelb/Amarillo/Geel/Giallo Brown/Marron/Braun/Marrón/Bruin/Marrone Red/Rouge/Rot/Rojo/Rood/Rosso Black/Noir/Schwarz/Negro/Zwart/Nero Blue/Bleu/Blau/Azul/Blauw/Blu Italiano Premere la linguetta e rimuovere il pannello frontale. Collegare i cavi ai terminali. Montare sopra il contenitore multiplo. L, L: per attivazione dell’apriporta. D, E: per DB-1MD. ⑤ Apriporta: EL-12S o altri (Più di (CA) 70 Ω, CA 9,5 ∼ 20 V) ⑥ Staffa di montaggio ⑦ Vite di montaggio per legno ⑧ 1. Premere il pulsante di sganciamento. 2. Inserire il cavo nel terminale. ⑨ Prolunga chiamata o TAR-3 Cavi principali: Arancione/Giallo ⑩ Campanello, ecc. ⑪ D,E: per postazione esterna. B1,B2,B3,B4: per postazione secondaria. BL+,BL-: per tasto richiesta di entrata/uscita (Resistenza contatti: meno di 1 KΩ) ⑫ B1,B2,B3,B4: per postazione principale. ⑬ B1,B2,B3,B4: per postazione secondaria. ⑭ PT-1211DR/C/D uscita CA 15 V ⑮ Unità opzioni: Luce, cancello, garage, ecc. Contatto (CA/CC) Tensione Max.: 24V, Min.:1V Corrente Max.: 1,6A, Min.:10mA Cavi principali: Marrone/Rosso ⑯ Tasto richiesta di entrata/uscita A: Cablaggio posteriore B: Cablaggio superficiale 1. Per il montaggio di DB-1MD/1SD, lasciare 5 cm di spazio su uno dei lati dell’unità e almeno 15 cm di spazio verticale dal centro della staffa di montaggio. 2. Per il cablaggio superficiale, rimuovere la guaina del cavo. 3. Quando si collegano le stazioni secondarie, è necessaria per ogni stazione l’impostazione di registrazione ID. (Vedere le istruzioni di impostazione ID incluse nel DB-1SD) 4. Non fornite (Viti di montaggio per legno fornite con DB-1MD/1SD) 5. Per evitare cortocircuiti, ricordare di tagliare i conduttori inutilizzati al fondo e di isolarne le estremità. ① ② ③ ④ ⑤ ⑩ ⑦ ⑥ ⑪ Modo CON MANOS LIBRES ① Presione el botón de llamada del portero. ② Se escuchará el tono de gong. ③ Presione el botón de HABLAR (TALK) momentáneamente y, después del pitido, comuníquese con manos libres. Transmite luces LED (rojas) cuando habla, y se apagan cuando escucha a la persona que llama (o se escuchan sonidos del exterior). 1. Durante la espera, la comunicación con el portero es posible cuando presiona el botón de HABLAR (TALK) en la unidad interior. ④ Al terminar de comunicarse, presione el botón de Apagado (OFF) y la comunicación se cortará después del pitido. Después de aproximadamente 1 minuto, la comunicación finaliza automáticamente. Modo "Presione y hable (PTT)" ⑤ Si vuelve a presionar el botón de HABLAR (TALK) y lo mantiene presionado durante 1 segundo o más tiempo después de presionarlo en el paso ③, se escuchará otro pitido después de aproximadamente 1 segundo, lo cuál indica que se ha activado el modo PTT. Si se presiona brevemente el botón de HABLAR (TALK) (menos de 0,5 segundo), el sistema no cambiará al modo PTT. ⑥ Durante la comunicación, mantenga presionado el botón de HABLAR (TALK) Para escuchar la voz del interlocutor, suelte el botón de HABLAR (TALK). ⑦ Al terminar de comunicarse, presione el botón de Apagado (OFF) y la comunicación se cortará después del pitido. Después de aproximadamente 1 minuto, la comunicación finaliza automáticamente. Handenvrije modus ① Druk op de oproepknop van de deurpost. ② De beltoon weerklinkt. ③ Druk kortstondig op de spreek-knop (TALK). Er volgt een pieptoon en u kan nu handenvrij spreken. De LED (rood) licht op wanneer u spreekt en gaat uit als u naar de bezoeker luistert (of buitengeluiden hoort). 1. Ook zonder oproep kan verbinding met de deurpost worden gemaakt door op de spreek-knop (TALK) van de binnenpost te drukken. ④ Door na het gesprek op de uitschakelknop (OFF) te drukken, eindigt de communicatie na de pieptoon. De communicatie eindigt automatisch na ong. 1 minuut. Manuele (PTT) modus (Druk-om-te-spreken) ⑤ Door nogmaals op de spreek-knop (TALK) te drukken gedurende 1 seconde of langer, weerklinkt een 2de pieptoon om aan te geven dat de manuele spreekmodus (druk-om-te-spreken) is ingeschakeld. ⑥ Druk de TALK-knop in om te spreken en laat los om te luisteren. ⑦ Druk op de uitschakelknop (OFF) om de communicatie te beëindigen. De communicatie eindigt automatisch na ong. 1 minuut. ⑫ ⑬ Activación del abrepuertas Español ⑧ Presione el botón de APERTURA DE PUERTAS. ⑨ La apertura de la puerta se activa mientras presiona el botón APERTURA DE PUERTAS. Cuando el sistema está encendido, la comunicación se suspende mientras esté presionado el botón APERTURA DE PUERTAS. Comunicación interna ⑩ Cuando presiona el botón de LLAMADA, se escucha el tono de gong y se habilita la comunicación con la otra persona. Cuando hay 3 o más unidades interiores, se realiza una llamada simultánea a todas las demás unidades interiores. La unidad [o "sistema"] se apaga después de aproximadamente 1 minuto si no hay respuesta. ⑪ Si la otra persona presiona el botón de HABLAR (TALK), se habilita la comunicación con manos libres. (Si presiona nuevamente el botón de HABLAR (TALK), se escuchará otra señal después de aprox. 1 segundo, lo que indica que está activado el modo PTT). ⑫ Para finalizar la comunicación, presione y suelte el botón de Apagado (OFF). La comunicación interna finaliza automáticamente al transcurrir aproximadamente 10 minutos. 2. Si presiona el botón de APERTURA DE PUERTAS o de llamada del portero durante una llamada de habitación a habitación o durante una comunicación interna, la comunicación terminará. 3. Se escucha un pitido que indica un error si se presiona el botón HABLAR (TALK) o LLAMADA mientras se está utilizando otra unidad interior. Unidad de opciones ⑬ Si presiona el botón de opciónes (que no sea cuando se activa el abrepuertas), las unidades opcionales pueden operarse en cualquier momento (como al encender y apagar las luces). Deur ontgrendelen Nederlands ⑧ Druk op de knop voor deurslotsturing (SLEUTEL). ⑨ Het elektrisch deurslot wordt geactiveerd zolang de knop voor deurslotsturing wordt ingedrukt. Tijdens bediening van het deurslot wordt de communicatie onderbroken. Intercomgesprek tussen de binnenposten ⑩ Druk op de oproepknop (CALL) om de andere binnenpost(en) op te roepen en spreek. Wanneer er 3 of meer binnenposten zijn, worden alle andere binnenposten gelijktijdig opgeroepen. Het toestel [of "systeem"] wordt automatisch uitgeschakeld na ongeveer 1 minuut als er geen antwoord is. ⑪ Pas nadat de tegenpartij op de spreek-knop (TALK, druk-om-te-spreken) van een andere binnenpost heeft gedrukt, is handenvrije communicatie in twee richtingen mogelijk. (Als de spreek-knop (TALK, druk-om-te-spreken) opnieuw ingedrukt wordt, klinkt er na ongeveer 1 seconde een andere pieptoon, wat aangeeft dat de PTT-modus ingeschakeld is.) ⑫ Druk kortstondig op OFF om het gesprek te beëindigen. Intercomgesprekken tussen de binnenposten eindigen automatisch na ongeveer 10 minuten. 2. Als de knop voor deurslotsturing (DOOR RELEASE) of de oproepknop van de deurpost tijdens een interne oproep of interne communicatie ingedrukt wordt, wordt er een einde aan de communicatie gemaakt. 3. Als de spreek-knop (TALK) of oproepknop (CALL) wordt ingedrukt terwijl een andere binnenpost in gebruik is, weerklinkt een pieptoon om een fout aan te geven. Optioneel toestel ⑬ Door de optieknop in te drukken (behalve wanneer het elektrisch deurslot geactiveerd is), kunnen de aangesloten optionele toestellen om het even wanneer worden bediend (bijvoorbeeld verlichting in- en uitschakelen). Modalità VIVAVOCE ① Premere il pulsante di chiamata della stazione esterna. ② Il cicalino suona. ③ Premere per un attimo il pulsante TALK (PARLARE) e, dopo il "bip", sarà possibile comunicare in vivavoce. Il LED della trasmissione (rosso) si illumina mentre si parla e si spegne mentre si ascolta l’interlocutore (o si avvertono suoni provenienti dall’esterno). 1. In standby, la comunicazione con la stazione esterna è possibile quando il pulsante TALK (PARLARE) dell’unità interna viene premuto. ④ Terminata la comunicazione, premere il pulsante di spegnimento per concludere la comunicazione dopo il "bip". La comunicazione termina automaticamente dopo circa 1 minuto. Modalità PTT: Press-To-Talk (premere per parlare) ⑤ Se il pulsante TALK (PARLARE) viene premuto di nuovo e tenuto premuto per 1 secondo o più dopo che è stato premuto nella fase ③, si avvertirà un altro "bip" dopo circa 1 secondo ad indicare che la modalità PTT è attiva. Se si preme per un breve istante (meno di 0,5 secondi) il pulsante TALK (PARLARE), il sistema non passa alla modalità PTT. ⑥ Durante la comunicazione, tenere premuto il pulsante TALK (PARLARE). Per ascoltare la voce dell’interlocutore, rilasciare il pulsante TALK (PARLARE). ⑦ Terminata la comunicazione, premere il pulsante di spegnimento per concludere la comunicazione dopo il "bip". La comunicazione termina automaticamente dopo circa 1 minuto. Attivazione dell’apriporta Italiano ⑧ Premere il pulsante apriporta. ⑨ La porta si apre quando il pulsante apriporta viene premuto. Quando il sistema è attivo, il volume della comunicazione viene azzerato mentre si preme il pulsante apriporta. Postazioni interne intercomunicanti ⑩ Quando si preme il pulsante di chiamata, il cicalino suona ed è possibile iniziare la comunicazione con l’interlocutore. In caso di 3 o più unità interne, viene eseguita la chiamata simultanea a tutte le unità. L’unità [o "sistema"] si spegne dopo circa 1 minuto se non si ottiene risposta. ⑪ Se l’interlocutore preme il pulsante TALK (PARLARE), sarà possibile la comunicazione in vivavoce. (se il pulsante TALK (PARLARE) viene premuto di nuovo, un altro segnale suonerà dopo circa 1 secondo, ad indicare che la modalità PTT è attiva). ⑫ Premere e rilasciare il pulsante di spegnimento per terminare la comunicazione. La comunicazione tra postazioni interne termina automaticamente dopo circa 10 minuti. 2. Se il pulsante apriporta o il pulsante di chiamata della stazione esterna, vengono premuti durante la chiamata o la comunicazione tra postazioni interne, la comunicazione terminerà. 3. Se si preme il pulsante di chiamata o TALK (PARLARE) mentre è in uso un’altra unità interna, si avverte un "bip" ad indicare una condizione di errore. Unità opzioni ⑬ Se si preme il pulsante opzioni (a parte quando si attiva l’apriporta), le unità opzionali collegate possono essere usate in qualsiasi momento, ad esempio per accendere o spegnere le luci. -7--
 1
1
-
 2
2
-
 3
3
-
 4
4
-
 5
5
-
 6
6
-
 7
7
-
 8
8


Aiphone DBS-1AP Manual de usuario
- Categoría
- Sistemas de intercomunicador de puerta
- Tipo
- Manual de usuario
En otros idiomas
- français: Aiphone DBS-1AP Manuel utilisateur
- italiano: Aiphone DBS-1AP Manuale utente
- English: Aiphone DBS-1AP User manual
- Deutsch: Aiphone DBS-1AP Benutzerhandbuch
- Nederlands: Aiphone DBS-1AP Handleiding