Sony MDX-C670 El manual del propietario
- Categoría
- Receptores de medios de coche
- Tipo
- El manual del propietario

Operating Instructions
Manual de instrucciones
######
1997 by Sony Corporation
EN
ES
C
FM/AM
MiniDisc Player
MDX-C670
For installation and connections, see the supplied installation/connections
manual.
Para obtener información sobre la instalación y las conexiónes, consulte el manual
de instalación/conexiones suministrado.
##################################

2
EN
Welcome !
Thank you for purchasing the Sony MiniDisc
Player. This unit lets you enjoy a variety of
features by using a rotary remote.
In addition to the MD playback and the radio
operations, you can expand your system by
connecting an optional CD/MD changer.
If you connect an optional CD changer with
the CD-TEXT function, the CD-TEXT
information will appear in the display when
you play back a CD-TEXT disc*.
* A CD-TEXT disc is an audio CD that includes
information such as the disc name, artist name and truck
names. This information is recorded on the disc.

3
EN
Table of Contents
With Optional Equipment
CD/MD Changer
Playing a CD or an MD .................................... 12
Scanning the tracks
— Intro Scan ................................................. 13
Playing tracks repeatedly
— Repeat Play .............................................. 13
Playing tracks in random order
— Shuffle Play .............................................. 13
Labeling a CD
— Disc Memo ............................................... 13
Locating a disc by name
— List-up ...................................................... 15
Selecting the specific tracks for playback
— Bank .......................................................... 15
Additional Information
Precautions ......................................................... 16
Maintenance....................................................... 17
Dismounting the unit ....................................... 17
Location of controls .......................................... 18
Specifications ..................................................... 19
Troubleshooting guide ..................................... 20
Index ................................................................... 22
This Unit Only
Getting Started
Resetting the unit ................................................ 4
Detaching the front panel .................................. 4
Preparing the rotary remote .............................. 4
Setting the clock .................................................. 5
MD Player
Listening to an MD ............................................. 5
Playing an MD in various modes ..................... 6
Radio
Memorising stations automatically
— Best Tuning Memory (BTM) ................... 7
Memorising only the desired stations.............. 8
Receiving the memorised stations.................... 8
Storing the station names
— Station Memo ............................................ 9
Locating a station by name
— List-up ........................................................ 9
Other Functions
Using the rotary remote ................................... 10
Adjusting the sound characteristics ............... 11
Muting the sound.............................................. 11
Changing the sound and display settings ..... 11

4
EN
Getting Started
Resetting the unit
Before operating the unit for the first time or
after replacing the car battery, you must reset
the unit.
Press the reset button with a pointed object,
such as a ballpoint pen.
Note
Pressing the reset button will erase the clock and some
memorized functions.
Detaching the front panel
You can detach the front panel of this unit to
prevent the unit from being stolen.
1 Press (OFF).
2 Press (RELEASE) to open up the front
panel. Then slide the front panel a little
to the left, and pull it off towards you.
Notes
• Be sure not to drop the panel when detaching it from the
unit.
• If you press (RELEASE) to detach the panel while the
unit is still on, the unit will turn off automatically to
prevent the speakers from being damaged.
• When you carry the front panel with you, put it in the
supplied front panel case.
Attaching the front panel
Align part A of the front panel to part B of
the unit as illustrated, and push until it clicks.
Notes
• Be sure not to attach the front panel upside down.
•Do not press the front panel hard against the unit when
attaching it. Press it lightly against the unit.
•Do not press hard or put excessive pressure on the
display windows of the front panel.
•Do not expose the front panel to direct sunlight, heat
sources such as hot air ducts, and do not leave it in a
humid place. Never leave it on the dashboard of a car
parked in direct sunlight where there may be a
considerable rise in temperature.
Caution alarm
If you turn the ignition key switch to the OFF
position without removing the front panel, the
caution alarm will beep for a few seconds
(only when the POWER SELECT switch is set
to the A position).
Preparing the rotary
remote
When you mount the rotary remote, attach the
label in the illustration below.
B
A
Reset button
(OFF)
(RELEASE)
SOUND
LIST
MODE
SOUND
LIST
MODE

5
EN
Setting the clock
The clock has a 12-hour digital indication.
Example: Set the clock to 10:08
1 Press (SHIFT), then press (2) (SET UP).
1 Press (4) (n).
The hour digit flashes.
2 Set the hour.
3 Press (4) (n).
The minute digits flash.
4 Set the minute.
2 Press (SHIFT).
The clock starts.
3 Press (SHIFT).
When the mode setting is complete, the
normal playback mode appears.
Note
If the POWER SELECT switch on the bottom of the unit is
set to the B position, turn the power on first, then set the
clock.
to go backward
to go forward
to go forward
to go backward
SET UP
EQSUR
Set
Clock
SET UP
EQSUR
Set
1:‚‚
SOURCE
SET UP
EQSUR
Set
1‚:‚‚
SET UP
EQSUR
Set
1‚:‚‚
SOURCE
SET UP
EQSUR
Set
1‚:‚8
MD Player
Listening to an MD
Simply insert the MD.
Playback starts automatically.
If an MD is already inserted, press (SOURCE)
repeatedly until “MD” appears.
The title of the MD* and the track title will be
displayed on the display window, then the
playing time will appear.
* Only if these titles are prerecorded on the MD.
Tip
If the name of the MD is too long, you can scroll it across
the display window by pressing (SCRL) while the disc
name or track name is displayed.
When the last track on the MD is
over
the track number indication will return to “1,”
and the playback will restart from the first
track of the MD.
To Press
Stop playback 6 or (OFF)
Eject the MD 6
Labeled side up
Getting Started/MD Player
SET UP
EQSUR
1‚:‚8
EQSUR
TRACK
MD
3 1.‚1
Elapsed playing time
Truck number

6
EN
Locating a specific track
— Automatic Music Sensor (AMS)
During playback, press either side of
(SEEK/AMS) momentarily.
Locating a specific point in a track
— Manual Search
During playback, press and hold either
side of (SEEK/AMS). Release the button
when you have found the desired point.
Note
If “
” or “ ” appears in the display, that
means you have reached the beginning or the end of the
disc and you cannot go any further.
Playing an MD in various
modes
You can play MDs in various modes:
•Intro (Intro Scan) lets you play the first 10
seconds of all the tracks.
•Repeat (Repeat Play) repeats the current
track.
•Shuf (Shuffle Play) plays all the tracks in
random order.
Scanning for the desired track
— Intro scan
1 During playback, press (SHIFT).
Every time you press (SHIFT), only the
items you can select light up.
2 Press (3) (PLAY MODE).
To search forward
To locate succeeding tracks
To locate preceding tracks
To search backward
Changing the displayed items
Each time you press (DSPL), the item changes
as follows:
$
Elapsed playback time
$
Disc name*
1
$
Track name*
2
$
Clock
*
1
If there is no prerecorded title for a disc “NO D.Name”
will appear on the display.
*
2
If a track title is not prerecorded, “NO T.Name” will be
displayed.
Automatically scrolling a disc name
— Auto Scroll
If the disc name or track name on an MD
exceeds 10 characters and the Auto Scroll
function is on, automatically scrolls on the
display as follows:
• The disc name appears when the disc has changed (if the
disc name is selected).
• The track name appears when the track has changed (if
the track name is selected).
• The disc or track name appears depending on the setting
when you press (SOURCE) to select an MD.
If you press (DSPL) to change the display
item, the disc or track name of the MD is
scrolled automatically whether you set the
function on or off.
1 During playback, press (SHIFT).
2 Press (2) (SET UP) repeatedly until
“A.Scrl” appears.
3 Press (4) (n) to select “A.Scrl on.”
4 Press (SHIFT).
To cancel Auto Scroll, select “A.Scrl off” in
step 2 above.
Displaying the recording date of
the currently selected MD
Press (SCRL) for two seconds during MD
playback.
The recording date of the track is displayed
for about three seconds.
1
SHIFT
234567
SET UP PLAY MODE
REP SHUF
PLAY MODE
EQSUR
MD
Intro off

7
EN
3 Press (4) (n) to select “Intro on.”
Playback starts.
4 Press (SHIFT).
To go back to the normal playback mode,
select “Intro off” in step 3 above.
Playing tracks repeatedly
— Repeat Play
1 During playback, press (SHIFT).
2 Press (6) (REP) repeatedly until
“Repeat 1” appears.
Repeat play starts.
3 Press (SHIFT).
To go back to the normal playback mode,
select “Repeat off” in step 2 above.
Playing tracks in random order
— Shuffle Play
1 During playback, press (SHIFT).
2 Press (7) (SHUF) repeatedly until
“Shuf 1” appears.
Shuffle play starts.
3 Press (SHIFT).
To go back to the normal playback mode,
select “Shuf off” in step 2 above.
MD Player/Radio
PLAY MODE
EQSUR
INTRO
MD
Intro on
1
SHIFT
234567
SET UP PLAY MODE
REP SHUF
1
SHIFT
234567
SET UP PLAY MODE
REP SHUF
Radio
Memorising stations
automatically
— Best Tuning Memory (BTM)
The unit selects the stations with the strongest
signals and memorises them in the order of
their frequencies. You can store up to 10
stations on each band (FM1, FM2 and AM (or
AM1, AM2)*).
Caution
When tuning in the station while driving, use
Best Tuning Memory to prevent accidents.
1 Press (SOURCE) repeatedly to select the
tuner.
Each time you press (SOURCE), the source
changes as follows:
MD ˜ TUNER
2 Press (MODE) repeatedly to select the
band.
Each time you press (MODE), the band
changes as follows:
” FM1 ” FM2 ” AM (or AM1 ”AM2)*
3 Press (SHIFT), then press (3) (PLAY
MODE) repeatedly until “B.T.M” appears.
4 Press (4) (n).
The unit stores stations in the order of their
frequencies on the number buttons.
A beep sound and the setting is stored.
5 Press (SHIFT).
* When you set the frequency select switch to the 9K
position.
Notes
• The unit does not store stations with weak signals. If
only a few stations are received, some number buttons
will retain heir former setting.
• When a number is indicated in the display, the unit
starts storing stations from the one currently displayed.

8
EN
If you cannot tune in a preset
station
Press either side of (SEEK/AMS)
momentarily to search for the station
(automatic tuning).
Scanning stops when the unit receives a
station. Press either side of (SEEK/AMS)
repeatedly until the desired station is
received.
Note
If the automatic tuning stops too frequently, press
(SHIFT), then press (3) (PLAY MODE) repeatedly until
“Local” (local seek mode) is displayed. Then press (4)
(n) to select “Local on”. Press (SHIFT).
Only the stations with relatively strong signals will be
tuned in.
Tip
If you know the frequency of the station you want to listen
to, press and hold either side of (SEEK/AMS) until the
desired frequency appears (manual tuning).
If FM stereo reception is poor
— Monaural Mode
1 Press (SHIFT), then press (3) (PLAY
MODE) repeatedly until “Mono” is
appears.
2 Press (4) (n) repeatedly until “Mono
on“ appears.
The sound improves, but becomes
monaural (“ST” disappears).
3 Press (SHIFT).
To go back to the normal mode, select
“Mono off” in step 2 above.
Changing the displayed items
Each time you press (DSPL), the items changes
as follows:
Frequency ˜ Clock
Memorising only the
desired stations
You can store up to 10 stations on each band
(20 for FM1 and FM2, 10 for AM (or AM1 and
AM2)*) in the order of your choice.
1 Press (SOURCE) repeatedly to select the
tuner.
2 Press (MODE) repeatedly to select the
band (FM1, FM2 or AM (AM1, AM2)*).
3 Press either side of (SEEK/AMS) to tune
in the station that you want to store on
the number button.
4 Press the desired number button for two
seconds until “MEM” appears.
The number button indication appears in
the display.
* When you set the frequency select switch to the 9K
position.
Note
If you try to store another station on the same number
button, the previously stored station will be erased.
Receiving the memorised
stations
1 Press (SOURCE) repeatedly to select the
tuner.
2 Press (MODE) repeatedly to select the
band (FM1, FM2 or AM (AM1, AM2)*).
3 Press the number button ((1) to (10))
momentarily where the desired station is
stored.
* When you set the frequency select switch to the 9K
position.

9
EN
Storing the station names
—Station Memo
You can assign a name to each radio station
and store it in memory. The name of the
current station appears in the display. You can
store up to eight characters for each station.
Storing the station names
1 Tune in a station whose name you want
to store.
2 Press (LIST) for two seconds.
3 Enter the characters.
1 Rotate the dial clockwise direction to
select the desired characters.
(A n B n C n ··· Z n 0 n 1 n 2 n
··· 9 n + n – n * n / n \ n > n <
n . n _ )
If you rotate the dial counterclockwise,
the characters appear in the reverse
order.
If you want to put a blank space
between characters, select “_” (under-
bar).
2 Press (4) (n) after locating the
desired character.
The flashing cursor moves to the next
space.
If you press (1) (N), the flashing cursor
moves to the left.
3 Repeat steps 1 and 2 to enter the
entire name.
4 To return to normal radio reception,
press (LIST) for two seconds.
Tip
To erase/correct a name, enter “_” (under-bar) for each
character.
EQSUR
FM1
________
EQSUR
FM1
W_______
EQSUR
FM1
W_______
Radio
Displaying the station name
Press (DSPL) during radio reception.
Each time you press (DSPL), the item
changes as follows:
z Station name* z Frequency z Clock
* If the station name is not stored, “NO Name”
appears in the display for one second.
Erasing the station name
1 Tune in any station and press (LIST) for
two seconds.
2 Press (DSPL) for two seconds.
“Delete” and the station name appear in the
display.
3 Rotate the dial to select the name you
want to erase.
4 Press (5) (ENTER) for two seconds.
The name is erased.
Repeat steps 3 and 4 if you want to erase
other names.
5 Press (LIST) for two seconds.
The unit returns to normal radio reception
mode.
Locating a station by
name
— List-up
1 Press (LIST) momentarily.
The name assigned to the current station
appears in the display.
2 Press (LIST) repeatedly until you find the
desired station.
3 Press (5) (ENTER) to tune in the desired
station.
Note
After the station name or frequency has been displayed for
five seconds, the display goes back to normal mode. To turn
off the display, press (DSPL).
EQSUR
FM1
3 WRKISS
ENTER
EQSUR
LST
3 WRKISS

10
EN
Other Functions
Using the rotary remote
The rotary remote works by pressing buttons
and/or rotating controls.
You can control the optional CD or MD
changer with the rotary remote.
By pressing the button (the
SOURCE and MODE buttons)
Every time you press (SOURCE), the
source changes as follows:
Tuner n CD n MD
Pressing (MODE) changes the operation
in the following ways:
• Tuner: FM1 n FM2 n AM (or AM1 n AM2)
• CD changer: CD1 n CD2 n …
• MD changer: MD1 n MD2 n …
Tip
When the POWER SELECT switch is set to position B,
you can turn on this unit by pressing (SOURCE) on the
rotary remote.
By rotating the control (the SEEK/
AMS control)
Rotate the control momentarily and
release it to:
•Locate a specific track on a disc. Rotate
and hold the control until you locate the
specific point in a track, then release it to
start playback.
•Tune in the stations automatically. Rotate
and hold the control to tune in the specific
station.
(SOURCE)
(MODE)
By pressing in and rotating the
control (the PRESET/DISC control)
Push in and rotate the control to:
•Receive the stations memorised on the
number buttons.
•Change the disc.
Other operations
Changing the operative direction
The operative direction of controls is factory-
set as in the illustration below.
Press (LIST) to display the
memorised names.
Press (SOUND) to adjust the
volume and sound menu.
Rotate the VOL control to
adjust the volume.
Press (MUTE) to
mute the sound.
Press (OFF) to turn
off the unit.
OFF
To increase
To decrease

11
EN
Changing the sound and
display settings
You can set:
•Clock (page 5)
•D.Info (Dual Information) to display the
clock and the play mode at the same time
(ON) or to display the information
alternately (OFF).
•Amber/Green to change the illumination
color to amber or green.
•Dimmer to change the brightness of the
display.
— Select “Auto” to dim the display only
when you turn the lights on.
— Select “on” to dim the display.
•Contrast to adjust the contrast if the
indications in the display are not
recognizable because of the unit’s installed
position.
•Beep to turn on or off the beeps.
•RM (Rotary Remote) to change the operative
direction of the controls of the rotary remote.
— Select “norm” to use the rotary remote as
the factory preset position.
— Select “rev” when you mount the rotary
remote on the right of the steering
column.
•Loud (Loudness) to enjoy bass and treble
even at low volume. Bass and treble will be
reinforced.
•A. Scrl (Auto Scroll) (page 6 and 12)
•Disc MEMO/TEXT name (Disc memo/CD-
TEXT name) (page 14)
1 Press (SHIFT).
2 Press (2) (SET UP) repeatedly until the
desired setting mode appears.
Each time you press (2) (SET UP), the item
changes as follows:
Clock n D.Info* n Amber/Green n Dimmer
n Contrast n Beep n RM n Loud* n
A.Scrl* n Disc MEMO/TEXT name*
* When you have not turn the station or there is no
CD/MD being played, these items will not appear.
Note
The displayed item will differ depending on the source.
3 Press (4) (n) to select the desired
setting (for example: on or off).
At “Contrast” setting, pressing (4) (n)
makes the contrast higher, and pressing (1)
(N) makes the contrast lower.
4 Press (SHIFT).
When the mode setting is complete, the
normal playback mode appears.
If you need to mount the rotary remote on the
right side of the steering column, you can
reverse the controls operative direction.
Press (SOUND) two seconds while
pushing the VOL control.
Tip
You can control the operative direction of controls with the
unit.
Adjusting the sound
characteristics
You can adjust bass, treble, balance and fader.
Each source can store the bass and treble levels
respectively.
1 Select the item you want to adjust by
pressing (SOUND) repeatedly.
VOL (volume) n BAS (bass) n TRE
(treble) n BAL (balance) n FAD (fader)
2 Adjust the selected item by rotating the
dial.
Adjust within three seconds after selecting
the item. (After three seconds, the dial
functions as the volume control.)
Muting the sound
Press (MUTE) on the rotary remote.
“Mute on” flashes momentarily.
To restore the previous volume level, press
(MUTE) again.
Tip
The unit decreases the volume automatically when a
telephone call comes in (Telephone-mute function).
Other Functions

12
EN
With Optional Equipment
CD/MD Changer
You can control up to 7 CD changers and MD
changers with this unit.
If you connect an optional CD changer with
the CD-TEXT function, the CD-TEXT
information will appear in the display when
you play back a CD-TEXT disc.
Playing a CD or an MD
1 Press (SOURCE) repeatedly to select the
CD or MD.
2 Press (MODE) until the desired changer
appears.
CD/MD playback starts.
When a CD or an MD changer is connected, all
the tracks play from the beginning.
Changing the displayed items
Each time you press (DSPL) during CD, CD-
TEXT, or MD playback, the item changes as
follows:
$
Elapsed playback time
$
Disc name*
1
/Artist name*
2
$
Track name*
3
$
Clock
*
1
If you have not labeled the disc or there is no disc name
prerecorded on the MD, “NO D.Name” appears in the
display.
*
2
If you play a CD-TEXT disc, the artist name appears in
the display after the disc name. (Only for CD-TEXT
discs with the artist name)
*
3
If the track name of a CD-TEXT disc or MD is not
prerecorded, “NO T.Name” appears in the display.
You can label a personalized name for CDs
and CD-TEXT discs with the disc memo
function, refer to “Labeling a CD” (page 13).
Tip
If the name of the MD or CD-TEXT disc is too long, you
can scroll it across the display by pressing (SCRL) while
the disc name or track name is displayed.
Automatically scrolling a disc name
— Auto Scroll
If the disc name/artist name or track name on
a CD-TEXT disc or MD exceeds 10 characters
and the Auto Scroll function is on,
automatically scrolls on the display as follows:
• The disc name appears when the disc has changed (if the
disc name is selected).
• The track name appears when the track has changed (if
the track name is selected).
• The disc or track name appears depending on the setting
when you press (SOURCE) to select an MD or CD-
TEXT disc.
If you press (DSPL) to change the display
item, the disc or track name of the MD or CD-
TEXT disc is scrolled automatically whether
you set the function on or off.
1 During playback, press (SHIFT).
2 Press (2) (SET UP) repeatedly until
“A.Scrl” appears.
3 Press (4) (n) to select “A.Scrl on.”
4 Press (SHIFT).
To cancel Auto Scroll, select “A.Scrl off” in
step 2 above.
Locating a specific track
— Automatic Music Sensor (AMS)
During playback, press either side of
(SEEK/AMS) once for each track you
want to skip.
Locating a specific point in a track
— Manual Search
During playback, press and hold either
side of (SEEK/AMS). Release the button
when you have found the desired point.
To locate succeeding tracks
To locate preceding tracks
To search forward
To search backward

13
EN
Playing tracks in random
order
— Shuffle Play
You can select:
•Shuf 1 to play the tracks on the current disc
in a random order.
•Shuf 2 to play the tracks in the current
changer in a random order.
•Shuf 3 to play all the tracks in a random
order.
1 During playback, press (SHIFT).
2 Press (7) (SHUF) repeatedly until the
desired setting appears.
z Shuf 1 z Shuf 2 z Shuf 3
Shuf off Z
Shuffle Play starts.
3 Press (SHIFT).
To go back to the normal playback mode,
select “Shuf off” in step 2 above.
Labeling a CD — Disc Memo
(CD changer with custom file function)
You can label each disc with a personalized
name. You can enter up to eight characters for
a disc. If you label a CD, you can locate a disc
by name and select the specific tracks for
playback (page 15).
1 Play the CD and press (LIST) for two
seconds.
2 Enter the characters.
1 Rotate the dial in a clockwise
direction to select the desired
characters.
(A n B n C n ··· Z n 0 n 1 n 2 n
··· 9 n + n – n * n / n \ n > n <
n . n _ )
continue to next page n
Locating a disc by disc number
— Direct Disc Selection
Press the number button that
corresponds with the desired disc
number.
The desired disc in the currently selected
changer begins playback.
Scanning the tracks
— Intro Scan
You can play the first 10 seconds of all the
tracks on the currently selected disc.
1 During playback, press (SHIFT), then
press (3) (PLAY MODE) repeatedly until
“Intro” appears.
2 Press (4) (n) to select “Intro on.”
Intro Scan starts.
3 Press (SHIFT).
To go back to the normal playback mode,
select “Intro off” in step 2 above.
Playing tracks repeatedly
— Repeat Play
You can select:
•Repeat 1 to repeat a track.
•Repeat 2 to repeat a disc.
•Repeat 3 to repeat all the discs in the current
changer.
1 During playback, press (SHIFT).
2 Press (6) (REP) repeatedly until the
desired setting appears.
z Repeat 1 z Repeat 2 z Repeat 3
Repeat off Z
Repeat Play starts.
3 Press (SHIFT).
To go back to the normal playback mode,
select “Repeat off” in step 2 above.
EQSUR
DISC NAME
CD2
1 ________
EQSUR
DISC NAME
CD2
1 S_______
CD/MD Changer

14
EN
EQSUR
DISC NAME
CD2
1 S_______
If you rotate the dial in a
counterclockwise direction, the
characters appear in the reverse order.
If you want to put a blank space
between characters, select “_” (under-
bar).
2 Press (4) (n) after locating the
desired character.
The flashing cursor moves to the next
space.
If you press (1) (N), the flashing cursor
moves to the left.
3 Repeat steps 1 and 2 to enter the
entire name.
3 To return to the normal CD playback
mode, press (LIST) for two seconds.
Tip
To erase/correct a name enter “_” (under-bar) for each
character.
Displaying the disc memo name or
CD-TEXT name
When you play back a CD-TEXT disc, you can
set the priority display item to be the disc
memo name or the CD-TEXT name.
1 Press (SHIFT) during CD-TEXT disc
playback.
2 Press (2) (SET UP) repeatedly until “Disc
MEMO” or “TEXT name” appears.
3 Press (4) (n) to select “Disc MEMO” or
“TEXT name.”
4 Press (SHIFT).
After the mode setting is complete, the
display goes back to normal playback
mode.
If you want to change to the other setting, you
can do so in step 3.
Displaying the disc memo name
During CD playback, press (DSPL) .
$
Elapsed playback time
$
Disc name/Artist name*
1
$
Track name*
2
$
Clock
*
1
When you connect an optional CD changer with the CD-
TEXT function, the personalized label or the CD-TEXT
disc name appears. See below to change the display.
- To change the displayed item press (4) (n).
- To change the display using Display settings
(page 11).
*
2
If you connect an optional CD changer with the CD-
TEXT function, the CD-TEXT information will appear
on the display when you playback a CD-TEXT disc.
The display item will change depending on the setting
as follows.
A: CD-TEXT disc with disc memo
B: Normal CD with disc memo
C: CD-TEXT disc without disc memo
D: Normal CD without disc memo
Erasing the disc memo
1 Press (SOURCE) repeatedly to select the
CD.
2 Press (MODE) repeatedly to select the CD
changer.
3 Press (LIST) for two seconds.
4 Press (DSPL) for two seconds.
5 Rotate the dial to select the name you
want to erase.
6 Press (5) (ENTER) for two seconds.
The name is erased.
Repeat steps 5 and 6 if you want to erase
other names.
7 Press (LIST) for two seconds.
The unit returns to the normal CD playback
mode.
EQSUR
DISC NAME
CD2
1 SCHUBERT
Type of
disc
A
B
C
D
Priority display
setting
D.MEMO
CD-TEXT
D.MEMO
CD-TEXT
D.MEMO
CD-TEXT
D.MEMO
CD-TEXT
Actual display
Disc memo
CD-TEXT information
Disc memo
CD-TEXT information
NO D.Name
Each time you press (DSPL) during CD
playback, the item changes as follows:

15
EN
Locating a disc by name
— List-up (CD changer with custom file
function or MD changer)
You can use this function for the discs that
have been assigned a custom name. For more
information on disc names, refer to “Labeling a
CD.”
1 Press (LIST) momentarily.
The name assigned to the disc currently
playing appears in the display.
If you add disc memo labels to a CD-TEXT
disc, the display setting you make will
determine which information is displayed.
If the disc has only one set of information
(either CD-TEXT or disc memo labels ), that
information will be displayed regardless of
the display setting you make.
2 Press (LIST) repeatedly until you find the
desired disc.
3 Press (5) (ENTER) to play back the disc.
Notes
• Once a disc name has been displayed for five seconds, the
display goes back to its normal playback mode. To turn
off the display, press (DSPL).
• The track name are not displayed during MD playback.
• If there are no discs in the magazine, “NO Disc”
appears in the display.
• If a disc has not been assigned a custom file, “********”
appears in the display.
• If the disc information has not been read by the unit, “?”
appears in the display. To load the disc, first press the
number button, then choose the disc that has not been
loaded.
• The information appears only in upper cases. There are
also some letters which cannot be displayed (during MD
playback).
Selecting the specific
tracks for playback
— Bank (CD changer with custom file
function)
If you label the disc, you can set the unit to
skip tracks and play only the tracks you want.
1 Start playing the disc and press (SHIFT).
Then press (3) (PLAY MODE) for two
seconds.
ENTER
EQSUR
DISC
LST
1 SCHUBERT
PLAY MODE ENTER
EQSUR
DISC TRACK
CD2
5 3 Skip
PLAY MODE
EQSUR
BANK
CD1
Bank on
Bank edit mode.
Note
If you have not labeled the disc, the bank edit mode
does not appear and the programme edit mode appears.
To go back to the normal playback mode, press
(SHIFT).
2 Press either side of (SEEK/AMS) to select
the track number you want to skip and
press (5) (ENTER).
The indication changes from “Play” to
“Skip.” If you want to return to “Play,”
press (5) (ENTER) again.
3 Repeat step 2 to set the “Play” or “Skip”
mode on all the tracks.
4 Press (3) (PLAY MODE) for two seconds.
The unit returns to the normal CD playback
mode.
5 Press (SHIFT).
Notes
• You can set the “Play” and “Skip” mode on up to 24
tracks.
• You cannot set the “Skip” mode on all the tracks.
Playing the specific tracks only
You can select:
•Back on to play the tracks with the “Play”
setting.
•Bank inv (Inverse) to play the tracks with the
“Skip” setting.
1 During playback, press (SHIFT), then
press (3) (PLAY MODE) repeatedly until
“Bank” appears.
2 Press (4) (n) to repeatedly until the
desired setting appears.
z Bank on z Bank inv z Bank off
Playback starts from the track following the
current one.
3 Press (SHIFT).
To go back to the normal playing mode, select
“Bank off“ in step 2 above.
PLAY MODE ENTER
EQSUR
DISC TRACK
CD2
5 1 Play
CD/MD Changer

16
EN
Make sure that it is not left on the dashboard
or rear tray of a car etc. where the temperature
can also be excessive.
Notes on mounting labels
Be sure to mount labels on cartridges correctly,
as failing to do so may cause an MD to become
stuck in the changer.
•Mount the label in a suitable position.
•Remove old labels before putting new ones
on.
•Replace labels that are beginning to peel
away from the MD.
Cleaning
Wipe the surface of the MD cartridge from
time to time with a soft dry cloth.
Additional
Information
Precautions
• If your car was parked in direct sunlight
resulting in a considerable rise in
temperature inside the car, allow the unit to
cool off before operating it.
• If no power is being supplied to the unit,
check the connections first. If everything is in
order, check the fuse.
• If no sound comes from the speakers of
two-speaker systems, set the fader control to
the center position.
•If your car is equipped with a power aerial,
it will extend automatically while the unit is
operating.
If you have any questions or problems
concerning your unit that are not covered in
this manual, please consult your nearest Sony
dealer.
Moisture Condensation
On a rainy day or in a very damp area,
moisture may condense on the lenses inside
the MD player. Should this occur, the unit will
not operate properly. In this case, remove the
disc and wait for about an hour until the
moisture evaporates.
Notes on MDs
Since an MD itself is housed in a cartridge, free
from accidental contact with your fingers and
dust etc., it can withstand a certain degree of
the rough handling. However, dirt or dust on
the surface of the cartridge or a warped
cartridge may cause a malfunction quality,
observe the following.
Never touch the surface of the MD itself by
deliberately opening the shutter on the
cartridge.
Do not expose the MD to direct sunlight or
heat sources such as hot air-ducts. Do not leave
it in a car parked in the direct sunlight where
there can a considerable rise in temperature.

17
EN
Maintenance
Fuse replacement
When replacing the fuse, be sure to use one
that matches the amperage described on the
fuse. If the fuse blows, check the power
connection and replace the fuse. If the fuse
blows again after replacement, there may be an
internal malfunction. In such a case, consult
your nearest Sony dealer.
Warning
Never use a fuse with an amperage rating
exceeding the one supplied with the unit as
this could damage the unit.
Cleaning the connectors
The unit may not function properly if the
connectors between the unit and the front
panel are not clean. To prevent this, open the
front panel by pressing (RELEASE), then
detach it and clean the connectors with a
cotton swab dipped in alcohol. Do not apply
too much force. Otherwise, the connectors may
be damaged.
Main unit
Back of the front panel
Release key
(supplied)
Fuse (10 A)
Additional Information
Dismounting the unit
µ
µ
µ
µ
Press the clip inside the front cover with a thin
screwdriver, and lever the front cover free.
Pull the unit out while the
release key is inserted.

18
EN
Location of controls
Refer to the pages for details.
1 SEEK/AMS (seek/Automatic Music
Sensor/manual search) button 6, 8, 12,
15
2 SOUND button 11
3 MODE (band/changer select) button 7,
8, 12, 14
4 OFF button 4, 5
5 Dial (volume/bass/treble/balance/fader
control) 5, 9,11, 13, 14
6 Display window
7 6 (eject) button 5
8 DSPL (display mode change) button 6,
8, 9, 12, 14
9 LIST button
Disc Memo 13, 14
List-up 9, 15
Station Memo 9
!º RELEASE (front panel release) button 4,
17
!¡ Reset button (located on the front side
of the unit hidden by the front panel) 4
!™ SOURCE (source select) button 5, 6, 7, 8,
12, 14
!£ SHIFT button
PLAY MODE 6, 7, 8, 13, 15
REP 7, 13
SET UP 5, 6, 11, 12, 14
SHUF 7, 13
!¢ During radio reception:
Number buttons 8
During CD/MD playback:
Direct disc selection buttons 13
!∞ POWER SELECT switch (located on the
bottom of the unit)
See “POWER SELECT Switch” in the
Installation/Connections manual.
!§ Frequency Select switch (located on the
bottom of the unit)
See “Frequency Select Switch” in the
Installation/Connections manual.
!¶ SCRL (scroll) button 5, 6, 12
RELEASE
110
SHIFT
SOUND
SEEK/AMS
23456789
MODE
DSPL LIST
SCRL
SOURCE
OFF

19
EN
Additional Information
Specifications
MD player section
Signal-to-noise ratio 90 dB
Frequency response 10 – 20,000 Hz
Wow and flutter Below measurable limit
Tuner section
FM
Tuning range FM tuning interval:
50 kHz/200 kHz
switchable
87.5 – 108.0 MHz (at
50 kHz step)
87.5 – 107.9 MHz (at
200 kHz step)
Aerial terminal External antenna connector
Intermediate frequency 10.7 MHz
Usable sensitivity 10 dBf
Selectivity 75 dB at 400 kHz
Signal-to-noise ratio 62 dB (stereo),
65 dB (mono)
Harmonic distortion at 1 kHz
0.9 % (stereo),
0.5 % (mono)
Separation 35 dB at 1 kHz
Frequency response 30 – 15,000 Hz
Capture ratio 2 dB
AM
Tuning range AM tuning interval:
9 kHz/10 kHz switchable
531 – 1,602 kHz (at 9 kHz
step)
530 – 1,710 kHz (at 10 kHz
step)
Antenna terminal External antenna connector
Intermediate frequency 10.71 MHz/450 kHz
Sensitivity 30 µV
Power amplifier section
Outputs Speaker outputs
(sure seal connectors)
Speaker impedance 4 – 8 ohms
Maximum power output 35 W × 4 (at 4 ohms)
General
Output Line out (2)
Power antenna relay
control lead
Power amplifier control
lead
Telephone mute control
lead
Illumination control lead
Tone controls Bass ±10 dB at 100 Hz
Treble ±10 dB at 10 kHz
Power requirements 12 V DC car battery
(negative ground)
Dimensions Approx. 188 × 58 × 174 mm
(w/h/d)
Mounting dimensions Approx. 178 × 50 × 162 mm
(w/h/d)
Mass Approx. 1.1 kg
Supplied accessories Rotary remote (1)
Parts for installation and
connections (1 set)
Front panel case (1)
Optional accessories BUS cable (supplied with
an RCA pin cord)
RC-61 (1 m), RC-62 (2 m)
RCA pin cord
RC-63 (1 m), RC-64 (2 m),
RC-65 (5 m)
Optional equipment CD changer
CDX-805 (10 discs),
CDX-705 (10 discs),
CDX-T65 (6 discs),
CDX-T62 (6 discs)
MD changer
MDX-60, MDX-61
Source selector
XA-C30
U.S. and foreign patents licensed from Dolby laboratories
Licensing Corporation.
Design and specifications are subject to change without
notice.

20
EN
Troubleshooting guide
The following checklist will help you remedy the problems that you may encounter with your unit.
Before going through the checklist below, check the connection and operating procedures.
General
Problem
No sound
The contents of the memory
have been erased.
Indications do not appear in the
display.
No beep tone
Cause/Solution
•Cancel the MUTE function.
•Set the fader control to the centre position for two-speaker
systems.
•Rotate the dial in a clockwise direction to adjust the volume.
• The power cord or battery has been disconnected.
• The reset button has been pressed.
n Store again into the memory.
Remove the front panel and clean the connectors. See “Cleaning
the connectors” (page 17) for details.
The beep tone is muted.
CD/MD playback
Cause/Solution
•Another MD is already loaded.
•The MD is forcibly inserted upside down or in the wrong way.
Defective MD or dusty CD.
The ambient temperature exceeds 50°C.
Press the reset button.
• The unit is installed at an angle of more than 20°.
• The unit is not installed in a sturdy part of the car.
Problem
A disc cannot be loaded.
Play does not begin.
A disc is automatically ejected.
The operation buttons do not
function.
The sound skips due to
vibration.
Radio reception
Problem
Preset tuning is not possible.
Automatic tuning is not
possible.
The “ST” indication flashes.
Cause/Solution
• Memorise the correct frequency.
• The broadcast signal is too weak.
The broadcast signal is too weak.
n Use manual tuning.
•Tune in the frequency correctly.
•The broadcast signal is too weak.
n Set to the MONO mode (page 8).

21
EN
Additional Information
Solution
Insert the disc in the CD/MD
changer.
Insert the discs in the CD/MD
changer.
Insert another CD/MD.
Clean or insert the CD correctly.
Insert another MD.
Play an MD with recorded tracks on
it.
Press the reset button of the unit.
Close the lid or inserted the MDs
properly.
Wait until the temperature goes down
below 50°C.
Display
NO Mag
NO Disc
NG Discs
Error
Blank
Push Reset
Not Ready
High Temp
Cause
The disc magazine is not inserted in
the CD/MD changer.
No disc is inserted in the CD/MD
changer.
A CD/MD cannot play because of
some problem.
A CD is dirty or inserted upside
down.*
2
An MD does not play because of some
problem.*
2
No tracks have been recorded on an
MD.*
2
The CD/MD changer cannot be
operated because of some problem.
The lid of the MD changer is open or
MDs are not inserted properly.
The ambient temperature is more than
50°C.
*
1
*
1
Error displays (when the optional CD/MD changer is connected)
The following indications will flash for about five seconds, and an alarm sound will be heard.
*
1
When an error occurs during playback of an MD or CD, the disc number of the MD or CD dose not appear in the display.
*
2
The disc number of the disc causing the error appears in the display.
If the above-mentioned solutions do not help improve the situation, consult your nearest Sony
dealer.

22
EN
Index
A
Automatic Music Sensor (AMS) 6, 12
Automatic tuning 8
Auto Scroll 6, 12
B
Balance 11
Bank Play 15
Bass 11
Beep tone 11
Best Tuning Memory (BTM) 7
C
Caution alarm 4
CD playback 12
Clock 5
D, E
Dimmer 11
Direct disc selection 13
Disc Memo 13
Display 6, 9, 12, 14
Dual information 11
F, G, H
Fader 11
Front panel 4
Fuse 17
I, J, K
Illumination color 11
Intro Scan 6, 13
L
List-up 9, 15
Local seek 8
Locating
a disc 13, 15
a specific point 6, 12
a specific track 6, 12
a station 9
Loudness 11
M, N, O
Manual search 6, 12
Manual tuning 8
MD playback 5
Memorising a station 8
Monaural mode 8
Mute 11
P, Q
PLAY MODE
Bank 15
Intro 6, 13
Local 8
Mono 8
R
Radio 7
Repeat Play 7, 13
Reset 4
Rotary remote 4, 10
S
SET UP
Amber 11
A.Scrl 11
Beep 11
Clock 5
Contrast 11
Dimmer 11
D.Info 11
Disc MEMO 11, 14
Green 11
Loud 11
RM 11
TEXT name 11, 14
Shuffle Play 7, 13
Station Memo 9
T, U
Telephone-mute function 11
Treble 11
V, W, X, Y, Z
Volume 11

23
EN

2
ES
¡Bienvenido!
Muchas gracias por la adquisición de este
reproductor de minidiscos Sony. Esta unidad
le permitirá disfrutar de gran variedad de
funciones utilizando un mando a distancia
rotativo.
Además de las operaciones de reproducción de
minidiscos y escucha de la radio, usted podrá
ampliar su sistema conectando un cambiador
de discos compactos/minidiscos opcional.
Si conecta un cambiador opcional de CD con
función CD-TEXT, el visor mostrará la
información CD-TEXT al reproducir discos
CD-TEXT*.
* Un disco CD-TEXT es un CD de audio que contiene
información, como el título del disco, nombre del
cantante y títulos de los temas.
Esta información está registrada en el disco.

3
ES
Indice
Sólo esta unidad
Procedimientos iniciales
Restauración de la unidad ................................. 4
Extracción del panel frontal............................... 4
Preparación del mando a distancia rotativo ... 4
Ajuste del reloj..................................................... 5
Reproductor de un MD
Reproducción de un MD.................................... 5
Reproducción de minidiscos compactos en
diversos modos .............................................. 6
Radio
Memorización automática de emisoras
— Memorización de la mejor sintonía
(BTM) ............................................................... 8
Memorización de las emisoras deseadas......... 8
Recepción de emisoras memorizadas .............. 8
Almacenamiento de los nombres de emisoras
— Memorando de emisoras ......................... 9
Localización de una emisora por su frecuencia
y nombre
— Función de listado .................................. 10
Otras funciones
Uso del mando a distancia rotativo................ 10
Ajuste de las características de sonido........... 11
Cancelación del sonido .................................... 12
Cambio de los ajustes de sonido y
visualización ................................................. 12
Equipo opcional
Cambiador de CD/MD
Reproducción de discos compactos (CD) o de
minidiscos (MD) .......................................... 13
Exploración de temas
— Exploración de introducción ................. 14
Reproducción repetida de temas
— Reproducción repetida........................... 14
Reproducción de temas en orden aleatorio
— Reproducción aleatoria .......................... 14
Asignación de títulos a los discos compactos
— Memorando de discos ............................ 14
Localización de discos mediante el nombre
— Función de listado .................................. 16
Selección de temas específicos para su
reproducción
— Función de banco .................................... 16
Información complementaria
Precauciones ...................................................... 17
Mantenimiento .................................................. 19
Desmontaje de la unidad ................................. 19
Localización de los controles ........................... 20
Especificaciones ................................................. 21
Guía de solución de problemas ...................... 22
Indice alfabético ................................................ 24

4
ES
Fijación del panel frontal
Alinee la parte A del panel con la parte B de
la unidad como muestra la ilustración y, a
continuación, ejerza presión hasta oír un
chasquido.
Notas
• Asegúrese de no fijar el panel frontal al revés.
• No ejerza excesiva presión sobre el panel al fijarlo a la
unidad. Presiónelo ligeramente.
• No sujete con demasiada fuerza ni presione
excesivamente sobre el visor del panel frontal.
• No exponga el panel frontal a la luz solar directa, a
fuentes térmicas, como conductos de aire caliente, ni lo
deje en un lugar húmedo. No lo deje nunca sobre el
salpicadero de un automóvil aparcado bajo la luz solar
directa, ya que podría producirse un considerable
aumento de temperatura.
Alarma de precaución
Si gira el interruptor de la llave de encendido a
la posición OFF sin haber extraído el panel
frontal, la alarma de precaución emitirá pitidos
durante unos segundos (sólo si el interruptor
POWER SELECT está ajustado en la posición
A).
Preparación del mando a
distancia rotativo
Cuando monte el mando rotativo, adhiera la
etiqueta en la posición indicada en la siguiente
ilustración.
Procedimientos
iniciales
Restauración de la unidad
Antes de utilizar la unidad por primera vez o
después de sustituir la batería del automóvil,
es necesario restaurar dicha unidad.
Pulse el botón de restauración con un objeto
puntiagudo, como un bolígrafo.
Nota
Si pulsa el botón de restauración, se borrarán los datos del
reloj y algunas funciones memorizadas.
Extracción del panel
frontal
Es posible extraer el panel frontal de esta
unidad con el fin de evitar su robo.
1 Pulse (OFF).
2 Pulse (RELEASE) para abrir el panel
frontal. A continuación, deslícelo
ligeramente hacia la izquierda y
extráigalo tirando hacia fuera.
Notas
• Procure no dejar caer el panel al extraerlo de la unidad.
• Si pulsa (RELEASE) para extraer el panel mientras la
unidad se encuentra encendida, ésta se desactivará
automáticamente para evitar que se dañen los altavoces.
• Cuando lleve consigo el panel, guárdelo en el estuche
suministrado.
Botón de restauración
A
B
(OFF)
(RELEASE)
SOUND
LIST
MODE
SOUND
LIST
MODE

5
ES
para avanzar
para retroceder
Procedimientos iniciales/Reproductor de un MD
Ajuste del reloj
El reloj dispone de una indicación digital de 12
horas.
Ejemplo: Para ajustar el reloj a las 10:08
1 Pulse (SHIFT) y, a continuación, (2) (SET
UP).
1 Pulse (4) (n).
Los dígitos de la hora parpadean.
2 Ajuste la hora.
3 Pulse (4) (n).
Los dígitos de los minutos parpadean.
4 Ajuste los minutos.
2 Pulse (SHIFT).
El reloj se pone en funcionamiento.
3 Pulse (SHIFT).
Una vez finalizado el ajuste de modo,
aparecerá la indicación de modo de
reproducción normal.
Nota
Si el interruptor POWER SELECT de la parte inferior de
la unidad se ajusta en la posición B, active primero la
alimentación y, a continuación, ajuste el reloj.
SET UP
EQSUR
Set
Clock
SET UP
EQSUR
Set
1:‚‚
SOURCE
SET UP
EQSUR
Set
1‚:‚‚
SET UP
EQSUR
Set
1‚:‚‚
para avanzar
para retroceder
SOURCE
SET UP
EQSUR
Set
1‚:‚8
Con el lado de la etiqueta hacia arriba
Reproductor de un MD
Reproducción de un MD
Basta con insertar un MD.
La reproducción se iniciará de forma
automática.
Si ya hay un MD insertado, pulse (SOURCE)
varias veces hasta que aparezca “MD.”
El título del MD* y el de la canción se
mostrarán en el visualizador y, a continuación,
aparecerá el tiempo de reproducción.
* Solamente si los títulos se han grabado previamente en el
MD.
Consejo
Si el nombre del MD es demasiado largo, podrá hacer que
se desplace a través del visor presionando (SCRL)
mientras esté visualizándose el nombre del disco o de la
canción.
Cuando finalice la última canción
del MD
La indicación del número de canción volverá a
mostrar el valor “1” y la reproducción volverá
a iniciarse desde la primera canción del MD.
Para Pulse
Detener la reproducción 6 o (OFF)
Expulsar el MD 6
Tiempo de reproducción transcurrido
EQSUR
TRACK
MD
3 1.‚1
Número de tema
SET UP
EQSUR
1‚:‚8

6
ES
Cambio de la indicación del visor
Cada vez que pulse (DSPL), los elementos
cambiarán de la siguiente forma:
$
Tiempo de reproducción transcurrido
$
Título dee disco*
1
$
Título dee tema*
2
$
Reloj
*
1
Si no se ha grabado previamente un título para un disco,
aparecerá “NO D.Name” en el visualizador.
*
2
Si no se ha grabado previamente un título de canción,
aparecerá “NO T.Name” en el visualizador.
Desplazamiento automático del
título de un disco
— Desplazamiento automático
Si el nombre del disco o el nombre de la
canción de un disco MD sobrepasa 10
caracteres y la función de desplazamiento
automático está activada, se desplazará
automáticamente por el visualizador de la
forma siguiente:
• El nombre del disco aparecerá cuando cambie del disco (si
ha seleccionado el nombre del disco)
• El nombre de la canción aparecerá cuando cambie de
canción (si ha seleccionado el nombre de la canción)
• El nombre del disco o de la canción aparecerá
dependiendo del ajuste cuando presione (SOURCE) para
seleccionar un disco MD.
Si presione (DSPL) para cambiar el ítem de
visualización, el nombre del disco o de la
canción del disco MD se desplazará
automáticamente esté activada o no la función.
1 Durante la reproducción, pulse (SHIFT).
2 Pulse repetidamente (2) (SET UP) hasta
que aparezca “A.Scrl”.
3 Pulse (4) (n) para seleccionar “A.Scrl
on”.
4 Pulse (SHIFT).
Para cancelar la función de desplazamiento
automático, seleccione “A.Scrl off” en el paso
2 anterior.
Para buscar hacia atrás
Para buscar hacia delante
Visualización de la fecha de
grabación del MD actualmente
seleccionado
Pulse (SCRL) durante dos segundos
mientras se reproduce el MD.
La fecha de grabación del tema aparecerá
durante tres segundos aproximadamente.
Localización de un tema específico
— Sensor de música automático (AMS)
Durante la reproducción, pulse durante
un instante cualquier lado de
(SEEK/AMS).
Localización de un punto específico
de un tema — Búsqueda manual
Durante la reproducción, mantenga
pulsado cualquier lado de (SEEK/AMS).
Suelte el botón cuando encuentre la
parte que desee.
Nota
Si “
” o “ ” aparece en el visor significa
que ha alcanzado el principio o el final del disco y no será
posible pasar al siguiente.
Reproducción de
minidiscos compactos en
diversos modos
Es posible reproducir minidiscos compactos en
los siguientes modos:
•Exploración de introducción (Intro), que
permite reproducir los 10 primeros segundos
de todos los temas.
•Reproducción repetida (Repeat), que permite
repetir el tema actual.
•Reproducción aleatoria (Shuf), que permite
reproducir todos los temas en orden
aleatorio.
Para localizar temas anteriores
Para localizar temas posteriores

7
ES
Reproductor de un MD
Exploración del tema deseado
— Exploración de introducción
1 Durante la reproducción, pulse (SHIFT).
Cada vez que pulse (SHIFT), se iluminarán
sólo los elementos que pueden
seleccionarse.
2 Pulse (3) (PLAY MODE).
3 Pulse (4) (n) para seleccionar “Intro
on”.
Se iniciará la reproducción.
4 Pulse (SHIFT).
Para volver al modo de reproducción normal,
seleccione “Intro off” en el paso 3.
Reproducción repetida de temas
— Reproducción repetida
1 Durante la reproducción, pulse (SHIFT).
2 Pulse (6) (REP) varias veces hasta que
aparezca “Repeat 1”.
Se inicia la reproducción repetida.
3 Pulse (SHIFT).
Para volver al modo normal de reproducción,
seleccione “Repeat off” en el anterior paso 2.
PLAY MODE
EQSUR
MD
Intro off
PLAY MODE
EQSUR
INTRO
MD
Intro on
Reproducción de temas en orden
aleatorio — Reproduccióno aleatoria
1 Durante la reproducción, pulse (SHIFT).
2 Pulse (7) (SHUF) varias veces hasta que
aparezca “Shuf 1”.
Se inicia la reproducción aleatorio.
3 Pulse (SHIFT).
Para volver al modo normal de reproducción,
seleccione “Shuf off” en el anterior paso 2.
1
SHIFT
234567
SET UP PLAY MODE
REP SHUF
1
SHIFT
234567
SET UP PLAY MODE
REP SHUF
1
SHIFT
234567
SET UP PLAY MODE
REP SHUF

8
ES
Memorización de las
emisoras deseadas
Es posible almacenar un máximo de 10
emisoras de cada banda (20 de FM1 y FM2 y 10
de AM (o AM1 y AM2)*) en el orden que
desee.
1 Pulse (SOURCE) varias veces para
seleccionar el sintonizador.
2 Pulse (MODE) varias veces para
seleccionar la banda (FM1, FM2 o AM
(AM1, AM2)*).
3 Pulse cualquier lado de (SEEK/AMS) para
sintonizar la emisora que desee
almacenar en el botón numérico.
4 Pulse el botón numérico que desee
durante dos segundos hasta que
aparezca “MEM”.
En el visor aparecerá la indicación del
botón numérico.
* Cuando haya ajustado el selector de frecuencia a la
posición 9K.
Nota
Si almacena otra emisora en el mismo botón numérico, la
emisora previamente almacenada se borrará.
Recepción de emisoras
memorizadas
1 Pulse (SOURCE) varias veces para
seleccionar el sintonizador.
2 Pulse (MODE) varias veces para
seleccionar la banda (FM1, FM2 o AM
(AM1, AM2)*).
3 Pulse durante un instante el botón
numérico ((1) a (10)) en el que esté
almacenada la emisora que desee.
* Cuando haya ajustado el selector de frecuencia a la
posición 9K.
Si no puede sintonizar una emisora
programada
Pulse momentáneamente cualquier lado
de (SEEK/AMS) para buscar la emisora
(sintonización automática).
La exploración se detiene al recibirse una
emisora. Pulse varias veces cualquier lado
del botón (SEEK/AMS) hasta recibir la
emisora que desee.
Radio
Memorización automática
de emisoras
— Memorización de la mejor sintonía (BTM)
Esta unidad selecciona las emisoras de señal
más intensa y las memoriza por orden de
frecuencia. Es posible almacenar hasta 10
emisoras de cada banda (FM1, FM2 y AM (o
AM1, AM2)*).
Precaución
Durante la conducción utilice la memorización
de la mejor sintonía para evitar accidentes.
1 Pulse (SOURCE) varias veces para
seleccionar el sintonizador.
Cada vez que pulse (SOURCE), la fuente
cambia de la siguiente forma:
MD ˜ TUNER
2 Pulse (MODE) varias veces para
seleccionar la banda.
Cada vez que pulse (MODE), la banda
cambia de la siguiente forma:
z FM1 z FM2 zAM (o AM1 z AM2)*
3 Pulse (SHIFT) y, a continuación, (3)
(PLAY MODE) varias veces hasta que
aparezca “B.T.M”.
4 Pulse (4) (n).
La unidad almacena en los botones
numéricos las emisoras por orden de
frecuencia.
La unidad emite un pitido y el ajuste se
almacena.
5 Pulse (SHIFT).
* Cuando haya ajustado el selector de frecuencia a la
posición 9K.
Notas
• La unidad no almacenará emisoras de señales débiles. Si
se reciben pocas emisoras, algunos botones numéricos
retendrán su ajuste anterior.
• Si el visor muestra algún número, la unidad almacenará
las emisoras a partir del mostrado en el visor.

9
ES
Nota
Si la sintonización automática se detiene con demasiada
frecuencia, pulse (SHIFT) y, a continuación, (3) (PLAY
MODE) varias veces hasta que el visor muestre “Local”
(modo de búsqueda local). A continuación, pulse (4) (n)
para seleccionar “Local on”. Pulse (SHIFT).
Sólo se sintonizarán las emisoras de señal relativamente
intensa.
Consejo
Si conoce la frecuencia de la emisora que desea escuchar,
mantenga pulsado cualquier lado de (SEEK/AMS) hasta
que aparezca la frecuencia que desee (sintonización
manual).
Si la recepción de FM en estéreo es
de mala calidad — Modo monofónico
1 Pulse (SHIFT) y, a continuación, (3)
(PLAY MODE) varias veces hasta que
aparezca “Mono”.
2 Pulse (4) (n) varias veces hasta que
aparezca “Mono on”.
El sonido mejorará, aunque será monofónico
(la indicación “ST” desaparecerá).
3 Pulse (SHIFT).
Para volver al modo normal, seleccione
“Mono off” en el paso 2.
Cambio de la indicación del visor
Cada vez que pulse (DSPL), los elementos
cambiarán de la siguiente forma:
Frecuencia ˜ Reloj
Almacenamiento de los
nombres de emisoras
— Memorando de emisoras
Usted podrá asignar un nombre a cada
emisora y almacenarlo en la memoria. El
nombre de la emisora actualmente sintonizada
aparecerá en el visor. Usted podrá utilizar
hasta ocho caracteres por emisora.
Almacenamiento de los nombres
de emisoras
1 Sintonice la emisora cuyo nombre desee
almacenar.
2 Mantenga pulsado (LIST) durante dos
segundos.
Radio
EQSUR
FM1
________
EQSUR
FM1
W_______
EQSUR
FM1
W_______
EQSUR
FM1
3 WRKISS
3 Introduzca los caracteres.
1 Gire el dial en el sentido de las agujas
del reloj para seleccionar los
caracteres que desee.
(A n B n C n ··· Z n 0 n 1 n 2 n
··· 9 n + n – n * n / n \ n > n <
n . n _ )
Si gira el dial en sentido contrario a las
agujas del reloj, los caracteres aparecen
en orden inverso.
Si desea dejar un espacio en blanco entre
caracteres, seleccione “_” (subrayado).
2 Pulse (4) (n) después de haber
localizado el carácter deseado.
El cursor parpadeante se moverá hasta
el espacio siguiente.
Si pulsa (1) (N), el cursor parpadeante
se moverá hacia la izquierda.
3 Repita los pasos 1 y 2 hasta haber
introducido todo el nombre.
4 Para volver al modo de recepción normal
de la radio, mantenga pulsado (LIST)
durante dos segundos.
Consejo
Para borrar/corregir un nombre, introduzca “_”
(subrayado) para cada carácter.
Visualización del nombre de la
emisora
Pulse (DSPL) durante la recepción de una
emisora.
Cada vez que pulse (DSPL), elemento
cambiará de la forma siguiente.
z Nombre de la emisora* z Frecuencia
Reloj Z
* Si el nombre de la emisora no está almacenado, en el
visor aparecerá durante un segundo “NO Name”.

10
ES
Borrado del nombre de una emisora
1 Sintonice cualquier emisora y mantenga
pulsado (LIST) durante dos segundos.
2 Mantenga pulsado (DSPL) durante dos
segundos.
El visor muestra “Delete” y el nombre de la
emisora.
3 Gire el dial para seleccionar el nombre
que desee borrar.
4 Mantenga pulsado (5) (ENTER) durante
dos segundos.
El nombre se borrará.
Si desea borrar otros nombres, repita los
pasos 3 y 4.
5 Mantenga pulsado (LIST) durante dos
segundos.
La unidad volverá al modo de recepción
normal de la radio.
Localización de una
emisora por su frecuencia
y nombre
— Función de listado
1 Pulse momentáneamente (LIST).
Se muestra en el visor la frecuencia o el
nombre asignado a la emisora recibida.
2 Pulse repetidamente (LIST) hasta
encontrar la emisora deseada.
3 Pulse (5) (ENTER) para sintonizar la
emisora deseada.
Nota
Después de haberse visualizado el nombre o la frecuencia de
una emisora durante cinco segundos, la indicación volverá
al modo normal. Par volver al modo normal, pulse
(DSPL).
ENTER
EQSUR
LST
3 WRKISS
Otras funciones
Uso del mando a distancia
rotativo
Este mando funciona mediante la pulsación de
botones y/o el giro de controles.
Es posible controlar el cambiador de CD o MD
opcional con el mando a distancia rotativo.
Mediante la pulsación de botones
SOURCE y MODE
Cada vez que pulse (SOURCE), la fuente
cambia de la siguiente forma:
Sintonizador n CD n MD
Al pulsar (MODE) , el funcionamiento
cambia de la siguiente forma:
• Sintonizador: FM1 n FM2 n AM (o AM1 n
AM2)
• Cambiador de CD: CD1 n CD2 n ...
• Cambiador de MD: MD1 n MD2 n ...
Consejo
Si el interruptor POWER SELECT se ha ajustado en la
posición B, podrá activar la unidad pulsando (SOURCE)
en el mando a distancia rotativo.
Mediante el giro del control SEEK/
AMS
(SOURCE)
(MODE)

11
ES
Radio/Otras funciones
Gire el control momentáneamente y
suéltelo para:
•Localizar un tema específico de un disco.
Gire y mantenga girado el control hasta
localizar el punto específico de un tema y,
a continuación, suéltelo para iniciar la
reproducción.
•Sintonizar emisoras automáticamente.
Gire y mantenga girado el control para
sintonizar una determinada emisora.
Mediante el giro del control mientras
lo presiona (control PRESET/DISC)
Presione y gire el control para:
•Recibir emisoras memorizadas en los
botones numéricos.
•Cambiar el disco.
Otras operaciones
Gire el control VOL para
ajustar el volumen.
Pulse (OFF)
para desactivar
la unidad.
Pulse (SOUND) para ajustar el menú
de sonido y el volumen.
Pulse (LIST) para hacer que se visualicen
los nombres memorizados.
OFF
Pulse (MUTE)
para cancelar el
sonido.
Para aumentar
Cambio de la dirección de
funcionamiento
La dirección de funcionamiento de los
controles se ha ajustado en fábrica como se
indica en la siguiente ilustración:
Si necesita montar el mando rotativo en la
parte derecha de la columna de dirección,
puede invertir la dirección de funcionamiento
de los controles.
Mantenga pulsada (SOUND) durante dos
segundos manteniendo presionado el
control VOL.
Consejo
Usted podrá controlar el sentido de operación de los
controles con la unidad (página 12).
Ajuste de las
características de sonido
Es posible ajustar los graves, los agudos, el
balance y el equilibrio entre altavoces e,
igualmente, almacenar para cada fuente un
nivel de graves y agudos.
1 Pulse (SOUND) varias veces para
seleccionar el elemento que desee ajustar.
VOL (volumen) n BAS (graves) n TRE
(agudos) n BAL (balance) n FAD
(equilibrio entre los altavoces)
continúa en la página siguiente n
Para disminuir

12
ES
2 Gire el dial para ajustar el elemento
seleccionado.
Realice el ajuste en un intervalo de tres
segundos después de la selección.
(Transcurridos tres segundos, la función del
botón volverá a ser la de control de
volumen.)
Cancelación del sonido
Pulse (MUTE) en el mando rotativo.
“Mute on” se ilumina.
Para restaurar el nivel de volumen anterior,
vuelva a pulsar (MUTE).
Consejo
La unidad reducirá automáticamente el volumen cuando
entre una llamada telefónica (función de silenciamiento
para teléfono).
Cambio de los ajustes de
sonido y visualización
Es posible seleccionar diversos modos.
•Clock (página 5)
•D.Info (información dual), que permite
mostrar simultáneamente el reloj y el modo
de reproducción (ON) o la información de
forma alternativa (OFF).
•Amber/Green, que permite cambiar el color
de iluminación entre ámbar o verde.
•Dimmer (Atenuador), que permite cambiar el
brillo del visor.
— Seleccione “Auto” para atenuar el brillo
del visor sólo al encender las luces.
— Seleccione “on” para atenuar el brillo del
visor.
•Contrast para ajustar el contraste si las
indicaciones del visor no son visibles debido
a la posición de instalación de la unidad.
•Beep, que permite cancelar los pitidos.
•RM (Mando a distancia rotativo), que
permite cambiar la dirección de
funcionamiento de los controles del mando
rotativo.
— Seleccione “norm” para utilizar el mando
rotativo según la posición ajustada en
fábrica.
— Seleccione “rev” si monta el mando
rotativo a la derecha de la columna de
dirección.
•Loud (Sonoridad), que permite disfrutar de
buena calidad de graves y agudos incluso a
bajo volumen, reforzando estos sonidos.
•A. Scroll (Desplazamiento automático)
(página 6 y 13)
•Disc MEMO/TEXT name (Nombre de disco
MEMO/CD-TEXT) (página 15)
1 Pulse (SHIFT).
2 Pulse (2) (SET UP) varias veces hasta que
aparezca el modo de ajuste que desee.
Cada vez que pulse (2) (SET UP), los
elementos cambian de la siguiente forma:
Clock n D.Info* n Amber/Green n Dimmer
n Contrast n Beep n RM n Loud* n
A.Scrl* n Disc MEMO/TEXT name*
* Si no ha sintonizado la emisora o no ha reproducido
ningún CD/MD, no aparecerán estos puntos.
Nota
La indicación visualizada variará dependiendo de la
fuente.
3 Pulse (4) (n) para seleccionar el ajuste
que desee (por ejemplo, on u off).
En el ajuste “Contrast”, si pulsa (4) (n)
aumentará el contraste, y si pulsa (1) (N)
disminuirá.
4 Pulse (SHIFT).
Una vez finalizado el ajuste de modo,
aparecerá la indicación de modo de
reproducción normal.

13
ES
Es posible asignar títulos personalizados a los
discos compactos y a los CD-TEXT con la
función de memorando de discos. Consulte
“Asignación de títulos a los discos compactos”
(página 14).
Consejo
Si el título del MD o del disco CD-TEXT es demasiado
largo, es posible hacer que se desplace por el visor pulsando
(SCRL) mientras esté visualizándose el nombre del disco o
de la canción.
Desplazamiento automático del
título de un disco
— Desplazamiento automático
Si el nombre del disco/nombre del artista o el
nombre de la canción de un disco CD-TEXT o
MD sobrepasa 10 caracteres y la función de
desplazamiento automático está activada, se
desplazará automáticamente por el
visualizador de la forma siguiente:
• El nombre del disco aparecerá cuando cambie del disco (si
ha seleccionado el nombre del disco).
• El nombre de la canción aparecerá cuando cambie de
canción (si ha seleccionado el nombre de la canción).
• El nombre del disco o de la canción aparecerá
dependiendo del ajuste cuando presione (SOURCE) para
seleccionar un disco MD o CD-TEXT.
Si presione (DSPL) para cambiar el ítem de
visualización, el nombre del disco o de la
canción del disco MD o CD-TEXT se
desplazará automáticamente esté activada o no
la función.
1 Durante la reproducción, pulse (SHIFT).
2 Pulse (2) (SET UP) varias veces hasta que
aparezca “A.Scrl”.
3 Pulse (4) (n) para seleccionar “A.Scrl
on”.
4 Pulse (SHIFT).
Para cancelar la función de desplazamiento
automático, seleccione “A.Scrl off” en el paso
2 anterior.
Localización de un tema específico
— Sensor de música automático (AMS)
Durante la reproducción, pulse cualquier
lado de (SEEK/AMS) tantas veces como
temas desee omitir.
Para localizar temas anteriores
Para localizar temas posteriores
Equipo opcional
Cambiador de CD/MD
Esta unidad permite controlar hasta
7 cambiadores de CD y de MD.
Si conecta un cambiador opcional de CD con
función CD-TEXT, la información CD-TEXT
aparecerá en el visor al reproducir un disco
CD-TEXT.
Reproducción de discos
compactos (CD) o de
minidiscos (MD)
1 Pulse (SOURCE) varias veces para
seleccionar el CD o el MD.
2 Pulse (MODE) hasta que aparezca el
cambiador que desee.
Se inicia la reproducción de CD/MD.
Si un cambiador de CD o de MD se encuentra
conectado, todos los temas se reproducen
desde el principio.
Cambio de los elementos del visor
Cada vez que pulsa (DSPL) durante la
reproducción de un CD, CD-TEXT o MD, el
elemento cambia de la siguiente forma:
$
Tiempo de reproducción transcurrido
$
Título del disco*
1
/Nombre del artista*
2
$
Título del tema*
3
$
Reloj
*
1
Si no ha etiquetado el disco, o si el disco MD no tiene
pregrabado un nombre, en el visualizador aparecerá
“NO D.Name”.
*
2
Si reproduce un disco CD-TEXT, el nombre del artista
aparecerá en el visualizador después del nombre del
disco. (Solamente en el caso de discos CD-TEXT con
nombre de artista)
*
3
Si el nombre de canción de un disco CD-TEXT o de un
disco MD no está pregrabado, en el visualizador
aparecerá “NO T.Name”.
Otras funciones/Cambiador de CD/MD

14
ES
Para buscar hacia atrás
Para buscar hacia delante
Localización de un punto específico
de un tema — Búsqueda manual
Durante la reproducción, mantenga
pulsado cualquier lado de (SEEK/AMS).
Suelte el botón cuando localice la parte
que desee.
Localización de discos mediante el
número de disco
— Selección directa de disco
Pulse el botón numérico correspondiente
al número de disco que desee.
El disco que se encuentra en el cambiador
actualmente seleccionado comienza a
reproducirse.
Exploración de temas
— Exploración de introducción
Usted podrá reproducir los primeros 10
segundos de todos los temas del disco
actualmente seleccionado.
1 Durante la reproducción, pulse (SHIFT) y,
a continuación, (3) (PLAY MODE) varias
veces hasta que aparezca “Intro”.
2 Pulse (4) (n) para seleccionar “Intro on”.
La exploración de introducción se iniciará.
3 Pulse (SHIFT).
Para volver al modo de reproducción normal,
seleccione “Intro off” en el paso 2 anterior.
Reproducción repetida de
temas
— Reproducción repetida
Es posible seleccionar:
•Repeat 1 para repetir un tema.
•Repeat 2 para repetir un disco.
•Repeat 3 para repetir todos los discos del
cambiador actual.
1 Durante la reproducción, pulse (SHIFT).
2 Pulse (6) (REP) varias veces hasta que
aparezca el ajuste que desee.
z Repeat 1 z Repeat 2 z Repeat 3
Repeat off Z
Se inicia la reproducción repetida.
3 Pulse (SHIFT).
Para volver al modo de reproducción normal,
seleccione “Repeat off” en el paso 2 anterior.
Reproducción de temas en
orden aleatorio
— Reproducción aleatoria
Es posible seleccionar:
•Shuf 1 para reproducir los temas del disco
actual en orden aleatorio.
•Shuf 2 para reproducir los temas del
cambiador actual en orden aleatorio.
•Shuf 3 para reproducir todos los temas en
orden aleatorio.
1 Durante la reproducción, pulse (SHIFT).
2 Pulse (7) (SHUF) varias veces hasta que
aparezca el ajuste que desee.
z Shuf 1 z Shuf 2 z Shuf 3
Shuf off Z
Se inicia la reproducción en orden aleatorio.
3 Pulse (SHIFT).
Para volver al modo de reproducción normal,
seleccione “Shuf off” en el paso 2 anterior.
Asignación de títulos a los
discos compactos
— Memorando de discos (cambiador de CD
con función de archivo personalizado)
Es posible asignar un título personalizado a
cada disco, utilizando un máximo de ocho
caracteres para cada uno de éstos. La
asignación de títulos permitirá localizar los
discos por el nombre y seleccionar los temas
específicos que se quieran reproducir
(página 16).

15
ES
EQSUR
DISC NAME
CD2
1 SCHUBERT
1 Reproduzca el CD y pulse (LIST) durante
dos segundos.
2 Introduzca los caracteres.
1 Gire el dial en el sentido de las agujas
del reloj para seleccionar los
caracteres que desee.
(A n B n C n ··· Z n 0 n 1 n 2 n
··· 9 n + n – n * n / n \ n > n <
n . n _ )
Si gira el dial en el sentido contrario a
las agujas del reloj, los caracteres
aparecerán en orden inverso.
Si desea introducir un espacio en blanco
entre caracteres, seleccione “_” (barra
inferior).
2 Pulse (4) (n) después de localizar el
carácter que desee.
El cursor parpadeante se desplaza al
espacio siguiente.
Si pulsa (1) (N), el cursor parpadeante
se desplaza al lado izquierdo.
3 Repita los pasos 1 y 2 para
introducir el título completo.
3 Para volver al modo normal de
reproducción de CD, pulse (LIST)
durante dos segundos.
Consejo
Para borrar o corregir un título, introduzca “_” (barra
inferior) por cada carácter.
Visualización del título de
memorando del disco o del título
del CD-TEXT
Cuando reproduzca un disco CD-TEXT, podrá
asignar prioridad al título de memorando del
disco o al título del CD-TEXT.
1 Pulse (SHIFT) durante la reproducción de
un disco CD-TEXT.
2 Pulse (2) (SET UP) varias veces hasta que
aparezca “Disc MEMO” o “TEXT name”.
3 Pulse (4) (n) para seleccionar “Disc
MEMO” o “TEXT name”.
EQSUR
DISC NAME
CD2
1 ________
4 Pulse (SHIFT).
Después de haber finalizado el ajuste del
modo, el visor volverá al modo de
reproducción normal.
Si desea cambiar a otro ajuste, podrá hacerlo
en el paso 2.
Visualización del memorando de
discos
Pulse (DSPL) durante la reproducción de
CD.
Cada vez que pulse (DSPL) durante la
reproducción de CD, la indicación cambia
de la siguiente forma:
$
Tiempo de reproducción transcurrido
$
Título del disco/Nombre del cantante*
1
$
Título del tema*
2
$
Reloj
*
1
Cuando haya conectado un cambiador de discos CD
opcional con función de CD-TEXT, aparecerá la
etiqueta personalizada o el nombre del disco CD-TEXT.
Para cambiar la visualización, consulte más abajo.
– Para cambiar el ítem visualizado, presione (4) (n).
– Para cambiar la visualización utilizando los ajustes de
visualización (página 12).
*
2
Si ha conectado un cambiador de discos CD opcional
con la función de CD-TEXT, la información del disco
CD-TEXT aparecerá en el visualizador cuando
reproduzca un disco CD-TEXT.
El ítem de visualización cambiará dependiendo del ajuste
de la forma siguiente.
A: Disco CD-TEXT con título
B: CD normal con título
C: Disco CD-TEXT sin título
D: CD normal sin título
EQSUR
DISC NAME
CD2
1 S_______
EQSUR
DISC NAME
CD2
1 S_______
Cambiador de CD/MD
Tipo de
disco
A
B
C
D
Ajuste
prioritario del
visor
D.MEMO
CD-TEXT
D.MEMO
CD-TEXT
D.MEMO
CD-TEXT
D.MEMO
CD-TEXT
Visor
Memorando de discos
Información de CD-TEXT
Memorando de discos
Información de CD-TEXT
NO D.Name

16
ES
PLAY MODE ENTER
EQSUR
DISC TRACK
CD2
5 1 Play
2 Pulse (LIST) varias veces hasta encontrar
el disco deseado.
3 Pulse (5) (ENTER) para reproducir el
disco.
Notas
• Una vez que el título del disco se ha mostrado durante
cinco segundos, en el visor vuelve a aparecer la
indicación del modo de reproducción normal. Para que
desaparezcan las indicaciones del visor, pulse (DSPL).
• No es posible mostrar los títulos de tema durante la
reproducción de MD.
• Si no hay discos en el cargador, el visor mostrará “NO
Disc”.
• Si no se ha asignado ningún nombre personalizado a un
disco, el visor mostrará “********”.
• Si la unidad no ha leído la información de discos, el visor
mostrará “?”. Para introducir el disco, pulse en primer
lugar el botón numérico y, a continuación, seleccione el
disco que no se ha introducido.
• La información aparecerá sólo en letras mayúsculas. No
es posible mostrar ciertas letras (durante la reproducción
de MD).
Selección de temas
específicos para su
reproducción
— Función de banco (cambiador de CD con
función de archivo personalizado)
Si asigna títulos a los discos, podrá programar
la unidad para que omita temas y reproduzca
sólo los temas deseados.
1 Reproduzca el disco, pulse (SHIFT) y, a
continuación, (3) (PLAY MODE) durante
dos segundos.
Modo de edición de banco
Nota
Si no ha asignado títulos a los discos, el modo de
edición de banco no aparecerá, mostrando en su lugar
el modo de edición de programa.
Para volver al modo de reproducción normal, pulse
(SHIFT).
ENTER
EQSUR
DISC
LST
1 SCHUBERT
Borrado del memorando de discos
1 Pulse (SOURCE) varias veces para
seleccionar el CD.
2 Pulse (MODE) varias veces para
seleccionar el cambiador de CD.
3 Pulse (LIST) durante dos segundos.
4 Pulse (DSPL) durante dos segundos.
5 Gire el dial para seleccionar el título que
desee borrar.
6 Pulse (5) (ENTER) durante dos segundos.
El título se borrará.
Repita los pasos 5 y 6 para borrar otros
títulos.
7 Pulse (LIST) durante dos segundos.
La unidad vuelve al modo normal de
reproducción de CD.
Localización de discos
mediante el nombre
— Función de listado (cambiador de CD con
función de archivo personalizado o
cambiador de MD)
Esta función puede utilizarse con discos a los
que se ha asignado un título personalizado.
Para obtener más información sobre los títulos
de disco, consulte “Asignación de títulos a los
discos compactos”.
1 Pulse (LIST) durante un instante.
El nombre asignado al disco actualmente en
reproducción aparecerá en el visor.
Si añade títulos de memorando de discos en
un disco CD-TEXT, el ajuste de
visualización realizado determinará la
información que aparezca en el visor.
Si el disco sólo dispone de un grupo de
información (títulos de memorando de
discos o CD-TEXT), aparecerá esa
información independientemente del ajuste
de visualización realizado.

17
ES
PLAY MODE ENTER
EQSUR
DISC TRACK
CD2
5 3 Skip
PLAY MODE
EQSUR
BANK
CD1
Bank on
Cambiador de CD/MD/Información complementaria
Información
complementaria
Precauciones
•Si aparca el automóvil bajo la luz solar
directa y se produce un considerable
aumento de temperatura en su interior, deje
que la unidad se enfríe antes de utilizarla.
•Si la unidad no recibe alimentación,
compruebe las conexiones en primer lugar. Si
todo está en orden, examine el fusible.
•Si los altavoces no emiten sonido con un
sistema de 2 altavoces, ajuste el control de
equilibrio entre altavoces en la posición
central.
•Si el automóvil dispone de antena
motorizada, observe que ésta se extenderá
automáticamente durante el funcionamiento
de la unidad.
Si desea realizar alguna consulta o solucionar
algún problema referentes a la unidad que no
aparezcan en este manual, póngase en contacto
con el proveedor Sony más próximo.
Condensación de humedad
En días lluviosos o en zonas muy húmedas, es
posible que se condense humedad en las lentes
del interior de la unidad. Si esto ocurre, ésta no
funcionará correctamente. En este caso,
extraiga el MD y espere durante una hora
aproximadamente hasta que se evapore la
humedad.
Notas sobre los minidiscos
Puesto que el MD se encuentra alojado en un
cartucho, que lo protege del contacto
accidental con los dedos y el polvo, etc., dicho
MD puede resistir hasta cierto grado
movimientos bruscos. Sin embargo, la
existencia de suciedad o polvo en la superficie
del cartucho o la deformación del mismo
pueden causar fallos de funcionamiento. Para
disfrutar de una calidad de sonido óptima,
observe lo siguiente:
2 Pulse cualquier lado de (SEEK/AMS) para
seleccionar el número de tema que desee
omitir y, a continuación, pulse (5)
(ENTER).
La indicación cambia de “Play” a “Skip”. Si
desea volver al modo “Play”, vuelva a
pulsar (5) (ENTER).
3 Repita el paso 2 para definir el modo
“Play” o “Skip” en todos los temas.
4 Pulse (3) (PLAY MODE) durante dos
segundos.
La unidad vuelve al modo normal de
reproducción de CD.
5 Pulse (SHIFT).
Notas
• Es posible definir los modos “Play” y “Skip” para un
máximo de 24 temas.
• No es posible definir el modo “Skip” para todos los
temas.
Reproducción sólo de temas
específicos
Es posible seleccionar:
•Bank on para reproducir los temas con el
ajuste “Play”.
•Bank inv (Inverso) para reproducir los temas
con el ajuste “Skip”.
1 Durante la reproducción, pulse (SHIFT) y,
a continuación, (3) (PLAY MODE) varias
veces hasta que aparezca “Bank”.
2 Pulse (4) (n) varias veces hasta que
aparezca el ajuste que desee.
z Bank on z Bank inv z Bank off
La reproducción se inicia a partir del tema
siguiente.
3 Pulse (SHIFT).
Para volver al modo normal de reproducción,
seleccione “Bank off” en el anterior paso 2.

18
ES
No toque nunca la superficie del MD
mediante la apertura deliberada del
obturador del cartucho.
No exponga el MD a la luz solar directa ni a
fuentes térmicas como conductos de aire
caliente. No lo deje en un automóvil aparcado
bajo la luz solar directa, ya que puede
producirse un considerable aumento de
temperatura en su interior.
Asegúrese de que no lo deja en el salpicadero
ni en la bandeja trasera de un automóvil, etc.,
donde la temperatura puede igualmente ser
excesiva.
Notas sobre el montaje de las
etiquetas
Asegúrese de montar las etiquetas sobre los
cartuchos de forma correcta, ya que en caso
contrario es posible que los minidiscos se
atasquen en el cambiador.
• Monte la etiqueta en una posición adecuada.
• Retire las etiquetas viejas antes de montar
otras nuevas.
• Sustituya las etiquetas que comiencen a
despegarse del MD.
Limpieza
Limpie periódicamente la superficie del
cartucho del MD con un paño seco y suave.

19
ES
Información complementaria
Mantenimiento
Sustitución del fusible
Cuando sustituya el fusible, compruebe que
utiliza uno con el amperaje especificado en el
fusible. Si éste se funde, compruebe la
conexión de alimentación y sustitúyalo. Si una
vez sustituido vuelve a fundirse, es posible
que exista un funcionamiento defectuoso
interno. En este caso, póngase en contacto con
el proveedor Sony más próximo.
Advertencia
No utilice nunca un fusible de amperaje
superior al del suministrado con la unidad, ya
que ésta podría dañarse.
Limpieza de los conectores
La unidad puede no funcionar correctamente
si los conectores de la misma y del panel
frontal están sucios. Con el fin de evitarlo, abra
el panel frontal pulsando (RELEASE); a
continuación, sepárelo y limpie los conectores
con un bastoncillo humedecido en alcohol. No
aplique demasiada presión, ya que los
conectores podrían dañarse.
Fusible (10 A)
Unidad principal
Parte posterior del panel frontal
Desmontaje de la unidad
Llave de
liberación
(suministrada)
µ
µ
µ
µ
Presione el clip del interior de la cubierta frontal
con un destornillador fino, y haga palanca para
liberar dicha cubierta.
Tire de la unidad hacia fuera mientras la
llave de liberación se encuentra insertada.

20
ES
!¡ Botón de restauración (situado en la
parte frontal de la unidad, oculto por el
panel frontal) 4
!™ Botón SOURCE (selección de fuente) 5,
6, 8, 13, 16
!£ Botón SHIFT
PLAY MODE 7, 8, 9, 14, 16, 17
REP 7, 14
SET UP 5, 6, 12, 13, 15
SHUF 7, 14
!¢ Durante la recepción de radio:
Botones numéricos 8
Durante la reproducción de CD/MD:
Botón de selección directa de disco 14
!∞ Selector POWER SELECT (situado en la
parte inferior de la unidad)
Consulte “Selector POWER SELECT” en el
manual de Instalación/Conexiones.
!§ Selector de frecuencia (situado en la
parte inferior de la unidad)
Consulte “Selector de frecuencia” en el
manual de Instalación/Conexiones.
!¶ Botón SCRL (desplazamiento) 5, 6, 13
Localización de los controles
Consulte las páginas indicadas para obtener más información
1 Botón SEEK/AMS (búsqueda/sensor de
música automático/búsqueda manual)
6, 8, 9, 13, 14, 17
2 Botón SOUND 11
3 Botón MODE (banda/selección de
cambiador) 8, 13, 16
4 Botón OFF 4, 5
5 Dial (controles de volumen/graves/
agudos/balance/equilibrio entre
altavoces) 5, 9, 10, 12, 15, 16
6 Visor
7 Botón 6 (expulsión) 5
8 Botón DSPL (cambio del modo de
indicación) 6, 9, 10, 13, 15, 16
9 Botón LIST
Función de listado 10, 16
Memorando de discos 14, 15
Memorando de emisoras 9
!º Botón RELEASE (liberación del panel
frontal) 4, 19
RELEASE
110
SHIFT
SOUND
SEEK/AMS
23456789
MODE
DSPL LIST
SCRL
SOURCE
OFF

21
ES
Especificaciones
Sección del reproductor de
minidiscos
Relación señal-ruido 90 dB
Respuesta de frecuencia 10 – 20.000 Hz
Fluctuación y trémolo Inferior al límite medible
Sección del sintonizador
FM
Gama de sintonización Intervalo de sintonía de
FM:
50 kHz/200 kHz,
conmutable
87,5 – 108,0 MHz
(intervalo de 50 kHz)
87,5 – 107,9 MHz
(intervalo de 200 kHz)
Terminal de antena Conector de antena externa
Frecuencia intermedia 10,7 MHz
Sensibilidad útil 10 dBf
Selectividad 75 dB a 400 kHz
Relación señal-ruido 62 dB (estéreo),
65 dB (mono)
Distorsión armónica a 1 kHz
0,9 % (estéreo),
0,5 % (mono)
Separación 35 dB a 1 kHz
Respuesta de frecuencia 30 – 15.000 Hz
Relación de captura 2 dB
AM
Gama de sintonía Intervalo de sintonía de
AM:
9 kHz/10 kHz, conmutable
531 – 1.602 kHz
(intervalo de 9 kHz)
530 – 1.710 kHz
(intervalo de 10 kHz)
Terminal de antena Conector de antena externa
Frecuencia intermedia 10,71 MHz/450 kHz
Sensibilidad 30 µV
Sección del amplificador de
potencia
Salidas Salidas de altavoz
(conectores de sellado
seguro)
Impedancia de altavoz 4 – 8 ohmios
Salida máxima de potencia
35 W × 4 (a 4 ohmios)
Generales
Saidas Entrada de línea (2)
Cable de control de relé de
antena motorizada
Cable de control de
amplificador de potencia
Cable de control de
silenciamiento para
teléfono
Cable de control de
iluminación
Controles de tono Graves ±10 dB a 100 Hz
Agudos ±10 dB a 10 kHz
Requisitos de alimentación
Batería de automóvil de
12 V CC (toma a tierra
negativa)
Dimensiones Aprox. 188 × 58 × 174 mm
(an/al/prf)
Dimensión de montaje Aprox. 178 × 50 × 162 mm
(an/al/prf)
Masa Aprox. 1,1 kg
Accesorios suministrados
Mando a distancia rotativo
(1)
Componentes para
instalación y conexiones
(1 juego)
Estuche para el panel
frontal (1)
Accesorios opcionales Cable BUS (suministrado
con un cable de pines
RCA)
RC-61 (1 m), RC-62 (2 m)
Cable de pines RCA
RC-63 (1 m), RC-64 (2 m),
RC-65 (5 m)
Equipo opcional Cambiador de CD
CDX-805 (10 discos),
CDX-705 (10 discos),
CDX-T65 (6 discos),
CDX-T62 (6 discos)
Cambiador de MD
MDX-60, MDX-61
Selector de fuente
XA-C30
Las patentes EE.UU. y extranjeras han sido otorgadas por
Dolby Laboratories Licensing Corporation.
Diseño y especificaciones sujetos a cambios sin previo
aviso.
Información complementaria

22
ES
Guía de solución de problemas
La siguiente lista de comprobaciones proporciona ayuda para solucionar la mayoría de los
problemas que pueden producirse con la unidad.
Antes de consultar la lista que aparece a continuación, compruebe los procedimientos de conexión y
funcionamiento.
Generales
Problema
Ausencia de sonido.
Se ha borrado el contenido de
la memoria.
El visor no muestra
indicaciones.
No hay pitido.
Causa/Solución
•Cancele la función MUTE.
•Ajuste el control de equilibrio entre los altavoces a la posición
central para sistemas de dos altavoces.
•Gire el mando rotativo hacia la derecha para ajustar el
volumen.
•Ha desconectado el cable de alimentación o la batería.
•Ha pulsado el botón de restauración.
n Vuelva a realizar el almacenamiento en la memoria.
Retire el panel frontal y limpie los conectores. Para obtener más
información, consulte el apartado “Limpieza de los conectores”
(página 19).
No se oye pitido.
Reproducción de CD/MD
Causa/Solución
•Ya hay un MD insertado.
•Ha insertado el MD a la fuerza o al revés en el sentido
incorrecto.
Disco defectuoso (MD) o con polvo (CD).
La temperatura ambiental es superior a 50°C.
Pulse el botón de restauración.
• Ha instalado la unidad en un ángulo superior a los 20°.
• No ha instalado la unidad en una parte segura del automóvil.
Problema
No es posible insertar un disco.
La reproducción no se inicia.
El disco se expulsa
automáticamente.
Los botones de funcionamiento
no se activan.
El sonido se omite debido a
vibraciones.
Recepción de radio
Causa/Solución
• Memorice la frecuencia correcta.
• La emisión es demasiado débil.
La emisión es demasiado débil.
n Utilice la sintonización manual.
•Realice la sintonización con precisión.
•La emisión es demasiado débil.
n Realice el ajuste en el modo monofónico MONO
(página 9).
Problema
No es posible realizar la
sintonización de programación.
No es posible realizar la
sintonización automática.
La indicación “ST” parpadea.

23
ES
Indicaciones de error (cuando se ha conectado el cambiador de CD/MD opcional)
Las siguientes indicaciones parpadearán durante cinco segundos aproximadamente y se oirá una
alarma.
Solución
Inserte el disco en el cambiador de
CD/MD.
Inserte discos en el cambiador de CD/
MD.
Inserte otro CD/MD.
Limpie el CD o insértelo
correctamente.
Inserte otro MD.
Reproduzca un MD con temas
grabados.
Pulse el botón de restauración de la
unidad.
Cierre la tapa o inserte los minidiscos
correctamente.
Espere hasta que la temperatura
descienda por debajo de 50°C.
Indicación
NO Mag
NO Disc
NG Discs
Error
Blank
Push Reset
Not Ready
High Temp
Causa
No ha insertado el cargador de discos
en el cambiador de CD/MD.
No ha insertado ningún disco en el
cargador.
No es posible reproducir un CD/MD
debido a algún problema.
Un CD está sucio o ha insertado el
cuarto al revés.*
2
No es posible reproducir un MD
debido a algún problema.*
2
No ha grabado ningún tema en el
MD.*
2
No es posible emplear el cambiador de
CD/MD debido a algún problema.
La tapa del cambiador de minidiscos
está abierta o los minidiscos no se han
insertado correctamente.
La temperatura ambiente es superior a
50°C.
*
1
Si se produce un error durante la reproducción de un MD o de un CD, el número del MD o del CD no aparecerá en el visor.
*
2
El visor mostrará el número del disco que causa el error.
Si el problema no se soluciona con las sugerencias anteriormente enumeradas, póngase en contacto
con el proveedor Sony más próximo.
*
1
*
1
Información complementaria

24
ES
Indice alfabético
A
Agudos 11
Alarma de precaución 4
Atenuador 12
B
Balance 11
Búsqueda local 9
Búsqueda manual 6, 14
C
Cancelación 12
Color de iluminación 12
D
Desplazamiento automático 6, 13
E
Equilibrio entre los altavoces 11
Exploración de introducción 7, 14
F
Función de silenciamiento para teléfono 12
Fusible 19
G, H
Graves 11
I, J, K
Información dual 12
L
Listado 10, 16
Localización de
un disco 14, 16
un punto determinado 6, 14
un tema específico 6, 13
una emisora 8
M, N, O
Mando a distancia rotativo 4, 10
Memorando de discos 14
Memorando de emisoras 9
Memorización de emisoras 8
Memorización de la mejor sintonía (BTM) 8
Modo monofónico 9
P, Q
Panel frontal 4
Pitidos 12
PLAY MODE
Bank 16
Intro 7, 14
Local 9
Mono 9
R
Radio 8
Reloj 5
Reproducción aleatoria 7, 14
Reproducción de banco 16
Reproducción de CD 13
Reproducción de MD 5, 13
Reproducción repetida 7, 14
Restauración 4
S, T, U
Selección directa de disco 14
Sensor de música automático (AMS) 6, 13
SET UP
Amber 12
A.Scrl 12
Beep 12
Clock 5
Contrast 12
Dimmer 12
D.Info 12
Disc MEMO 12, 15
Green 12
Loud 12
RM 12
TEXT name 12, 15
Sintonización automática 8
Sintonización manual 9
Sonoridad 12
V, W, X, Y, Z
Visor 6, 9, 13, 15
Volumen 11

25
ES

Sony Corporation Printed in Japan
*I-3-859-436-11*(2)
-
 1
1
-
 2
2
-
 3
3
-
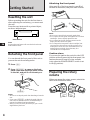 4
4
-
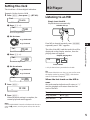 5
5
-
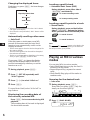 6
6
-
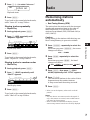 7
7
-
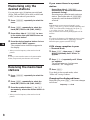 8
8
-
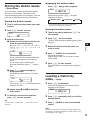 9
9
-
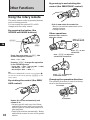 10
10
-
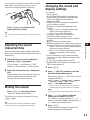 11
11
-
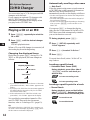 12
12
-
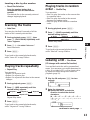 13
13
-
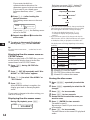 14
14
-
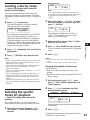 15
15
-
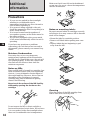 16
16
-
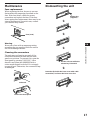 17
17
-
 18
18
-
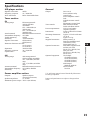 19
19
-
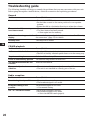 20
20
-
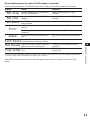 21
21
-
 22
22
-
 23
23
-
 24
24
-
 25
25
-
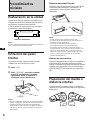 26
26
-
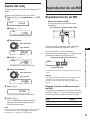 27
27
-
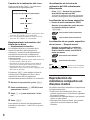 28
28
-
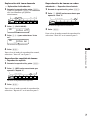 29
29
-
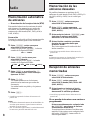 30
30
-
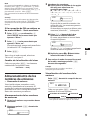 31
31
-
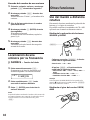 32
32
-
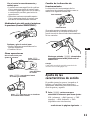 33
33
-
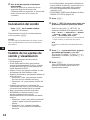 34
34
-
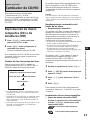 35
35
-
 36
36
-
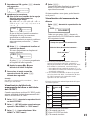 37
37
-
 38
38
-
 39
39
-
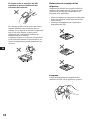 40
40
-
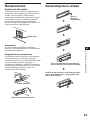 41
41
-
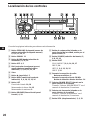 42
42
-
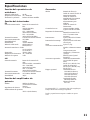 43
43
-
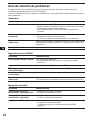 44
44
-
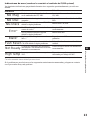 45
45
-
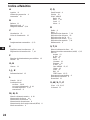 46
46
-
 47
47
-
 48
48


Sony MDX-C670 El manual del propietario
- Categoría
- Receptores de medios de coche
- Tipo
- El manual del propietario
en otros idiomas
- English: Sony MDX-C670 Owner's manual