Behringer EPX3000 Manual de usuario
- Categoría
- Equipo de música suplementario
- Tipo
- Manual de usuario
Este manual también es adecuado para

EN
ES
FR
www.behringer.com
Operating/Safety
Instructions
IMPORTANT: Read this document before
using this product. Want more informa-
tion? See the back page of this booklet.
A50-A1X40-24001
IMPORTANTES: Lea este documento
antes de empezar a usar este aparato.
¿Necesita más información? Vea la
contraportada.
IMPORTANT : Lisez ce document avant
d’utiliser le produit. Pour de plus amples
informations, veuillez consulter le dos de
ce livret.
Instrucciones de
seguridad/manejo
Mode d’emploi/
Consignes de
sécurité
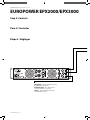
EUROPOWER
EPX2000
EPX3000
3000-WATT STEREO POWER AMPLIFIER
0
-10
-20
3000-WATT STEREO POWER AMPLIFIER

ES
FR
www.behringer.com
EUROPOWER EPX2000/EPX3000 • pg 2
EN
Important Safety
Instructions
Terminals marked with this symbol carry
electrical current of suffi cient magnitude
to constitute risk of electric shock. Use only
high-quality commercially-available speaker cables with
¼” TS plugs pre-installed. All other installation or
modifi cation should be performed only by qualifi ed
personnel.
This symbol, wherever it appears, alerts
you to the presence of uninsulated
dangerous voltage inside the enclosure -
voltage that may be suffi cient to constitute a risk
of shock.
This symbol, wherever it appears, alerts
you to important operating and
maintenance instructions in the
accompanying literature. Please read the manual.
Caution
To reduce the risk of electric shock, do not
remove the top cover (or the rear section).
No user serviceable parts inside. Refer servicing to
qualifi ed personnel.
Caution
To reduce the risk of fi re or electric shock,
do not expose this appliance to rain and
moisture. The apparatus shall not be exposed to dripping
or splashing liquids and no objects fi lled with liquids,
such as vases, shall be placed on the apparatus.
Caution
These service instructions are for use by
qualifi ed service personnel only. To reduce
the risk of electric shock do not perform any servicing
other than that contained in the operation instructions.
Repairs have to be performed by qualifi ed service
personnel.
Read these instructions.1.
Keep these instructions.2.
Heed all warnings.3.
Follow all instructions.4.
Do not use this apparatus near water.5.
Clean only with dry cloth.6.
Do not block any ventilation openings. Install in 7.
accordance with the manufacturer’s instructions.
Do not install near any heat sources such as 8.
radiators, heat registers, stoves, or other apparatus
(including amplifi ers) that produce heat.
Do not defeat the safety purpose of the polarized 9.
or grounding-type plug. A polarized plug has two blades
with one wider than the other. A grounding-type plug
has two blades and a third grounding prong. The wide
blade or the third prong are provided for your safety. If
the provided plug does not fi t into your outlet, consult an
electrician for replacement of the obsolete outlet.
Protect the power cord from being walked on or 10.
pinched particularly at plugs, convenience receptacles,
and the point where they exit from the apparatus.
Use only attachments/accessories specifi ed by the 11.
manufacturer.
Use only with 12.
the cart, stand, tripod,
bracket, or table specifi ed
by the manufacturer, or
sold with the apparatus.
When a cart is used, use
caution when moving
the cart/apparatus
combination to avoid injury from tip-over.
Unplug this apparatus during lightning storms or 13.
when unused for long periods of time.
Refer all servicing to qualifi ed service personnel.14.
Servicing is required when the apparatus has been
damaged in any way, such as power supply cord or plug
is damaged, liquid has been spilled or objects have fallen
into the apparatus, the apparatus has been exposed to
rain or moisture, does not operate normally, or has been
dropped.
The apparatus shall be connected to a MAINS socket 15.
outlet with a protective earthing connection.
Where the MAINS plug or an appliance coupler is 16.
used as the disconnect device, the disconnect device
shall remain readily operable.
I
Instrucciones de
seguridad
Las terminales marcadas con este símbolo
transportan corriente eléctrica de
magnitud sufi ciente como para constituir
un riesgo de descarga eléctrica. Utilice solo cables de
altavoz de alta calidad con clavijas TS de 6,3 mm
pre-instaladas (puede adquirirlos en comercios
especializados en audio). Cualquier otra instalación o
modifi cación debe ser realizada únicamente por un
técnico cualifi cado.
Este símbolo, siempre que aparece, le
advierte de la presencia de voltaje
peligroso sin aislar dentro de la caja; este
voltaje puede ser sufi ciente para constituir un riesgo de
descarga.
Este símbolo, siempre que aparece, le
advierte sobre instrucciones operativas y
de mantenimiento que aparecen en la
documentación adjunta. Por favor, lea el manual.
Atención
Para reducir el riesgo de descarga eléctrica,
no quite la tapa (o la parte posterior). No
hay piezas en el interior del equipo que
puedan ser reparadas por el usuario. Si es necesario,
póngase en contacto con personal cualifi cado.
Atención
Para reducir el riesgo de incendio o
descarga eléctrica, no exponga este
aparato a la lluvia, humedad o alguna otra fuente que
pueda salpicar o derramar algún líquido sobre el aparato.
No coloque ningún tipo de recipiente para líquidos sobre
el aparato.
Atención
Las instrucciones de servicio deben
llevarlas a cabo exclusivamente personal
cualifi cado. Para evitar el riesgo de una descarga
eléctrica, no realice reparaciones que no se encuentren
descritas en el manual de operaciones. Las reparaciones
deben ser realizadas exclusivamente por personal
cualifi cado.
Lea las instrucciones.1.
Conserve estas instrucciones.2.
Preste atención a todas las advertencias.3.
Siga todas las instrucciones.4.
No use este aparato cerca del agua.5.
Limpie este aparato con un paño seco.6.
No bloquee las aberturas de ventilación. Instale 7.
el equipo de acuerdo con las instrucciones del fabricante.
No instale este equipo cerca de fuentes de calor 8.
tales como radiadores, acumuladores de calor, estufas u
otros aparatos (incluyendo amplifi cadores) que puedan
producir calor.
No elimine o deshabilite nunca la conexión a tierra 9.
del aparato o del cable de alimentación de corriente. Un
enchufe polarizado tiene dos polos, uno de los cuales
tiene un contacto más ancho que el otro. Una clavija con
puesta a tierra dispone de tres contactos: dos polos y la
puesta a tierra. El contacto ancho y el tercer contacto,
respectivamente, son los que garantizan una mayor
seguridad. Si el enchufe suministrado con el equipo no
concuerda con la toma de corriente, consulte con un
electricista para cambiar la toma de corriente obsoleta.
Coloque el cable de suministro de energía de 10.
manera que no pueda ser pisado y que esté protegido de
objetos afi lados. Asegúrese de que el cable de suministro
de energía esté protegido, especialmente en la zona de
la clavija y en el punto donde sale del aparato.
Use únicamente los dispositivos o accesorios 11.
especifi cados por el fabricante.
EN
ES

EN
ES
FR
www.behringer.com
EUROPOWER EPX2000/EPX3000 • pg 3
Use únicamente la 12.
carretilla, plataforma,
trípode, soporte o mesa
especifi cados por el
fabricante o suministrados
junto con el equipo. Al
transportar el equipo,
tenga cuidado para evitar daños y caídas al tropezar con
algún obstáculo.
Desenchufe el equipo durante tormentas o si no va 13.
a utilizarlo durante un periodo largo.
Confíe las reparaciones únicamente a servicios 14.
técnicos cualifi cados. La unidad requiere mantenimiento
siempre que haya sufrido algún daño, si el cable de
suministro de energía o el enchufe presentaran daños, se
hubiera derramado un líquido o hubieran caído objetos
dentro del equipo, si el aparato hubiera estado expuesto
a la humedad o la lluvia, si ha dejado de funcionar de
manera normal o si ha sufrido algún golpe o caída.
Al conectar la unidad a la toma de corriente 15.
eléctrica asegúrese de que la conexión disponga de una
unión a tierra.
Si el enchufe o conector de red sirve como 16.
único medio de desconexión, éste debe ser accesible
fácilmente.
Consignes de sécurité
Les points repérés par ce symbole portent
une tension électrique suffi sante pour
constituer un risque d’électrocution.
Utilisez uniquement des câbles d’enceintes de haute
qualité disponibles dans les points de vente avec les
connecteurs Jack mono 6,35 mm déjà installés. Toute
autre installation ou modifi cation doit être eff ectuée
uniquement par un personnel qualifi é.
Ce symbole avertit de la présence d’une
tension dangereuse et non isolée à
l’intérieur de l’appareil - elle peut
provoquer des chocs électriques.
Attention
Ce symbol signale les consignes
d’utilisation et d’entre! Tien importantes
dans la documentation fournie. Lisez les consignes de
sécurité du manuel d’utilisation de l’appareil.
Attention
Pour éviter tout risque de choc électrique,
ne pas ouvrir le capot de l’appareil ni
démonter le panneau arrière. L’intérieur de l’appareil
ne possède aucun élément réparable par l’utilisateur.
Laisser toute réparation à un professionnel qualifi é.
Attention
Pour réduire les risques de feu et de choc
électrique, n’exposez pas cet appareil à la
pluie, à la moisissure, aux gouttes ou aux éclaboussures.
Ne posez pas de récipient contenant un liquide sur
l’appareil (un vase par exemple).
Attention
Ces consignes de sécurité et d’entretien
sont destinées à un personnel qualifi é.
Pour éviter tout risque de choc électrique, n’eff ectuez
aucune réparation sur l’appareil qui ne soit décrite par le
manuel d’utilisation. Les éventuelles réparations doivent
être eff ectuées uniquement par un technicien spécialisé.
Lisez ces consignes.1.
Conservez ces consignes.2.
Respectez tous les avertissements.3.
Respectez toutes les consignes d’utilisation.4.
N’utilisez jamais l’appareil à proximité d’un liquide.5.
Nettoyez l’appareil avec un chiff on sec.6.
Veillez à ne pas empêcher la bonne ventilation 7.
de l’appareil via ses ouïes de ventilation. Respectez
les consignes du fabricant concernant l’installation de
l’appareil.
Ne placez pas l’appareil à proximité d’une source 8.
de chaleur telle qu’un chauff age, une cuisinière ou tout
appareil dégageant de la chaleur (y compris un ampli de
puissance).
Ne supprimez jamais la sécurité des prises 9.
bipolaires ou des prises terre. Les prises bipolaires
possèdent deux contacts de largeur diff érente. Le plus
large est le contact de sécurité. Les prises terre possèdent
deux contacts plus une mise à la terre servant de
sécurité. Si la prise du bloc d’alimentation ou du cordon
d’ali-mentation fourni ne correspond pas à celles de
votre installation électrique, faites appel à un électricien
pour eff ectuer le changement de prise.
Installez le cordon d’alimentation de telle façon 10.
que personne ne puisse marcher dessus et qu’il soit
protégé d’arêtes coupantes. Assurez-vous que le cordon
d’alimentation est suffisamment protégé, notamment
au niveau de sa prise électrique et de l’endroit où il est
relié à l’appareil; cela est également valable pour une
éventuelle rallonge électrique.
Utilisez exclusivement des accessoires et des 11.
appareils supplémentaires recommandés par le
fabricant.
Utilisez exclusivement des chariots, des diables, 12.
des présentoirs, des
pieds et des surfaces de
travail recommandés
par le fabricant ou livrés
avec le produit. Déplacez
précautionneusement tout
chariot ou diable chargé
pour éviter d’éventuelles
blessures en cas de chute.
Débranchez l’appareil de la tension secteur en cas 13.
d’orage ou si l’appareil reste inutilisé pendant une longue
période de temps.
Les travaux d’entretien de l’appareil doivent 14.
être eff ectués uniquement par du personnel qualifié.
Aucun entretien n’est nécessaire sauf si l’appareil est
endommagé de quelque façon que ce soit (dommages
sur le cordon d’alimentation ou la prise par exemple), si
un liquide ou un objet a pénétré à l’intérieur du châssis,
si l’appareil a été exposé à la pluie ou à l’humidité, s’il ne
fonctionne pas correctement ou à la suite d’une chute.
L’appareil doit être connecté à une prise secteur 15.
dotée d’une protection par mise à la terre.
La prise électrique ou la prise IEC de tout appareil 16.
dénué de bouton marche/arrêt doit rester accessible en
permanence.
Technical specifi cations and appearance are subject to change without
notice. The information contained herein is correct at the time of printing.
BEHRINGER accepts no liability for any loss which may be suff ered by any
person who relies either wholly or in part upon any description, photograph
or statement contained herein. Colors and specifi cations may vary slightly
from product. Our products are sold through authorized dealers only.
Distributors and dealers are not agents of BEHRINGER and have absolutely
no authority to bind BEHRINGER by any express or implied undertaking or
representation. This manual is copyrighted. No part of this manual may
be reproduced or transmitted in any form or by any means, electronic or
mechanical, including photocopying and recording of any kind, for any
purpose, without the express written permission of Red Chip Company Ltd.
ALL RIGHTS RESERVED.
© 2009 Red Chip Company Ltd.
Trident Chambers, Wickhams Cay, P.O. Box 146,
Road Town, Tortola, British Virgin Islands
Las especificaciones técnicas y apariencia del equipo están sujetas a cambios
sin previo aviso. La información aquí contenida es correcta hasta el momento
de impresión. BEHRINGER no es responsable de la veracidad y/o exactitud
de la información, descripciones e ilustraciones aquí contenidas. Los colores
y especificaciones pueden variar ligeramente del producto. Los productos se
venden exclusivamente a través de nuestros distribuidores autorizados. Los
distribuidores y comerciantes no actúan en representación de BEHRINGER
y no tienen autorización alguna para vincular a BEHRINGER en ninguna
declaración o compromiso explícito o implícito. Este manual está protegido
por el derecho de autor. La reproducción total o parcial de su contenido, por
cualquier medio electrónico o impreso, incluyendo fotocopias y cualquier
otro tipo de registro, debe contar con la autorización expresa de Red Chip
Company Ltd.
ALL RIGHTS RESERVED.
© 2009 Red Chip Company Ltd.
Trident Chambers, Wickhams Cay, P.O. Box 146,
Road Town, Tortola, British Virgin Islands
Caractéristiques techniques et apparence susceptibles d’être modifi ées sans
notifi cation préalable. Contenu exact lors de l’impression. BEHRINGER décline
toute responsabilité concernant l’exactitude et l’intégrité des descriptions,
illustrations et indications contenues ici. Les couleurs et spécifi cations
représentées peuvent être légèrement diff érentes de celles du produit.
Les produits sont vendus uniquement par nos revendeurs agréés. Les
distributeurs et revendeurs ne sont pas des concessionnaires BEHRINGER.
Par conséquent, ils ne sont en aucun cas autorisés à lier BEHRINGER par
engagement ou représentation explicite ou implicite. Ce manuel est protégé
par copyright. Aucun extrait de ce manuel ne peut être reproduit, transmis,
photocopié ou enregistré de manière mécanique ou électronique et quels
qu’en soient le but, la forme et les moyens, sans la permission écrite de Red
Chip Company Ltd.
ALL RIGHTS RESERVED.
© 2009 Red Chip Company Ltd.
Trident Chambers, Wickhams Cay, P.O. Box 146,
Road Town, Tortola, British Virgin Islands
FR

www.behringer.com
EUROPOWER EPX2000/EPX3000 • pg 4
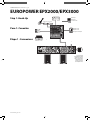
EUROPOWER EPX2000/EPX3000
L
R
XENYX 1222FX
EUROLIVE B1520 Pro EUROLIVE B1520 Pro
EUROLIVE F1220A
EUROLIVE EPX2000
ULTRACOUSTIC AC900
MONO
BRIDGE
STEREO
Live Singer-Songwriter
(Single Amplifi er/Stereo Mode)
Confi guración para directo de
cantante-compositor (un único
amplifi cador/modo stereo)
Chanteur compositeur Live
(un seul ampli/mode stéréo)
Step 1: Hook-Up
Paso 1: Conexión
Étape 1 : Connexions
Digital Recorder
Digital Recorder
Enregistreur numérique
MP3 Player
MP3 Player
Lecteur de MP3

EN
ES
FR
www.behringer.com
EUROPOWER EPX2000/EPX3000 • pg 5
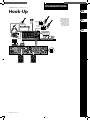
EPX2000/EPX3000
ULTRACOUSTIC AC900
V-AMPIRE
LX210
ULTRABASS
BXL1800
XENYX 2442FX
EUROLIVE EPX2000
TRUTH B2031P TRUTH B2031P
POWERPLAY PRO-XL HA4700
MONO
BRIDGE
STEREO
Full Band Recording to Computer
(Single Amplifi er/Stereo Mode)
Grabación en ordenador de un
grupo musical completo (un único
amplifi cador/modo stereo)
Enregistrement d’un groupe de
musiciens sur un ordinateur
(un seul ampli/mode stéréo)
Hook-Up

EUROPOWER EPX2000/EPX3000 • pg 6
www.behringer.com
EUROPOWER EPX2000/EPX3000
Step 1: Hook-Up
Paso 1: Conexión
Étape 1 : Connexions
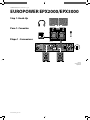
B-CONTROL DEEJAY
BCD3000
EUROLIVE EPX2000
EUROLIVE VP1520 EUROLIVE VP1520
MONO
BRIDGE
STEREO
DJ Hook-up
Confi guración para DJ
Confi guration DJ

EN
ES
FR
EUROPOWER EPX2000/EPX3000 • pg 7
www.behringer.com
EPX2000/EPX3000
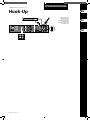
Hook-Up
V-AMP Pro
EUROLIVE EPX2000
BG412S
MONO
BRIDGE
STEREO
V-AMP Pro Guitar Rig Hook-up
(Single Amplifi er/Stereo Mode)
Confi guración para equipo de
guitarra profesional V-AMP (un único
amplifi cador/modo stereo)
Utilisation avec un V-AMP Pro Guitare
(un seul ampli/mode stéréo)

www.behringer.com
EUROPOWER EPX2000/EPX3000 • pg 8
EUROPOWER EPX2000/EPX3000
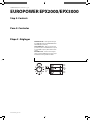
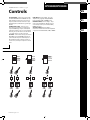
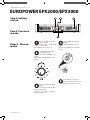
SIGNAL AND CLIP LEDs—Monitor signal level using the
green SIGNAL LEDs. Reduce the input GAIN CONTROLS if the
red CLIP LED lights up continuously.
PILOTOS SIGNAL y CLIP—Monitorice el nivel de la señal
por medio de los pilotos verdes SIGNAL. Reduzca el ajuste de
los controles GAIN si el piloto rojo CLIP se ilumina de forma
continua.
LEDS SIGNAL ET CLIP — Contrôlez le niveau di signal à
l’aide des Leds vertes SIGNAL. Réduisez les réglages de gain
d’entrée GAIN si la Led rouge CLIP LED reste allumée.
0
-10
-20
☺
Step 2: Controls
Paso 2: Controles
Étape 2 : Réglages

EN
ES
FR
EUROPOWER EPX2000/EPX3000 • pg 9
www.behringer.com
3000-WATT STEREO POWER AMPLIFIER
GAIN CONTROLS—Adjust the input level using these
knobs. To increase signal gain, rotate the knobs clockwise; to
reduce the gain, rotate the knobs
counter-clockwise.
CONTROLES GAIN—Ajuste el nivel de entrada por medio
de estos mandos. Para aumentar la ganancia de la señal, gire
estos mandos a la derecha y a la izquierda para reducirla.
BOUTONS GAIN CONTROLS — Déterminent le niveau
d’entrée. Pour augmenter le gain, tournez les boutons vers
la droite ; pour réduire le gain, tournez les boutons vers la
gauche.
POWER BUTTON/LED—Press this button to turn the
amplifi er on and off .
BOTON/PILOTO POWER—Pulse este botón para encender
o apagar el amplifi cador.
INTERRUPTEUR SECTEUR/LED — Appuyez sur ce bouotn
pour placer l’amplifi cateur sous/hors tension.
VENTILATION OPENINGS—The “back-to-front” ventilation
design prevents overheating.
RANURAS DE VENTILACION—El sistema de ventilación
con diseño “trasero-frontal” evita el recalentamiento.
OUÏES DE VENTILATION — Le tunnel de ventilation
(d’arrière vers l’avant évite les surchauff es.
Controls
RACK EARS—Secure the unit into a rack using four
attaching screws and washers (fasteners not included).
Requires two rack units.
ESCUADRAS PARA COLOCACION EN RACK—Coloque
esta unidad en un bastidor rack usando los cuatro tornillos
y arandelas incluidas (no se incluyen tuercas). Esta unidad
requiere dos espacios rack para su instalación.
POIGNÉES — Fixez l’amplifi cateur au boîtier Rack
en utilisant quatre vis et rondelles (non fournies). Cet
amplifi cateur utilise deux espaces Rack en hauteur.
EPX2000/EPX3000

EUROPOWER EPX2000/EPX3000 • pg 10
www.behringer.com
EUROPOWER EPX2000/EP3000
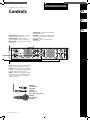
TWIST- LOCKING SPEAKER OUTPUTS—Connect the
amplifi er to the speakers using professional speaker cables
with twist-locking plugs.
SALIDAS DE ALTAVOZ CON FIJACION DE TIPO
BAYONETA—Conecte este amplifi cador a los altavoces
usando cables de altavoz profesionales con conectores con
sistema de fi jación de tipo bayoneta.
CONNEXIONS POUR ENCEINTES À VERROUILLAGE
— Connectez l’ampli aux enceintes à l’aide de fi ches
professionnelles à verrouillage.
BINDING POST SPEAKER OUTPUTS—Connect the
amplifi er to the speakers using either banana plugs or raw
speaker wire. Use the middle two posts for mono-bridged
mode.
SALIDAS DE ALTAVOZ DE TIPO BORNE—Conecte este
amplifi cador a los altavoces usando cables de altavoz
pelados o con clavijas de tipo banana. Utilice las dos salidas
centrales para el modo de puente mono.
BORNIERS POUR ENCEINTES — Reliez les enceintes à
l’ampli à l’aide de fi ches banane ou à l’aide des fi ls dénudés
des câbles d’enceintes. Utilisez les deux bornes centrales
pour utiliser le mode bridgé mono.
Step 2: Controls
Paso 2: Controles
Étape 2 : Réglages

EN
ES
FR
www.behringer.com
EUROPOWER EPX2000/EPX3000 • pg 11
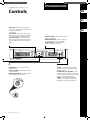
POWER CONNECTION—Plug the matching power cable
(included) into this IEC power connector.
TOMA DE CORRIENTE—Introduzca el cable de
alimentación (incluido) en esta toma de corriente IEC.
EMBASE SECTEUR — Connectez le cordon secteur fourni
à cette embase.
VENTILATION FAN—Fan speed adjusts automatically to
ensure trouble-free operation.
VENTILADOR—La velocidad de este ventilador se ajusta
de forma automática para asegurarle un funcionamiento
continuo y sin problemas.
VENTILATEUR — La vitesse du ventilateur se règle
automatiquement.
INPUTS—Connect your sound source using ¼" TRS, XLR, or
RCA plugs. The TRS jack will also accept a ¼" TS plug.
ENTRADAS—Conecte su fuente de sonido al amplifi cador
a través de conectores TRS de 6,3 mm, XLR o RCA. Las tomas
TRS también aceptan conectores TS de 6,3 mm.
ENTRÉES — Connectez votre le signal d’entrée à l’ampli
à l’aide des embases Jack stéréo 6,35 mm, XLR, ou RCA.
L’entrée Jack reçoit les fi ches symétriques (Jack stéréo) ou
asymétriques (Jack mono).
Controls
EPX2000/EPX3000
RCA Plug
Conector RCA
Fiche RCA
TRS Plug
Conector TRS
Fiche Jack 6,35 mm stéréo
XLR Plug
Conector XLR
Fiche XLR

www.behringer.com
EUROPOWER EPX2000/EPX3000 • pg 12
EUROPOWER EPX2000/EPX3000
LIMITER SWITCH—Activate the internal limiter by moving
the LIMITER SWITCH to the ON position.
INTERRUPTOR LIMITER—Active el limitador interno
colocando este interruptor en su posición ON.
LIMITEUR — Activez le limiteur interne en plaçant le
sélecteur LIMITER en position ON.
Step 2: Controls
Paso 2: Controles
Étape 2 : Réglages

EN
ES
FR
EUROPOWER EPX2000/EPX3000 • pg 13
www.behringer.com
MODE SWITCH (mono/stereo/bridge)—Choose the
amplifi er mode by toggling the sliding MODE SWITCH
between the MONO, STEREO, and BRIDGE positions.
INTERRUPTOR MODE (mono/stereo/bridge)—Elija el
modo operativo del amplifi cador cambiando la posición
de este interruptor entre las posiciones MONO, STEREO y
BRIDGE (puente mono).
SÉLECTEUR DE MODE (mono/stéréo/bridgé) —
Sélectionnez le mode de fonctionnement de l‘amplifi cateur
en plaçant le sélecteur MODE sur MONO, STEREO, ou BRIDGE.
CROSSOVER SWITCH—Activate the crossover by sliding
the CROSSOVER SWITCH from the FULLRANGE to the split
LF/HF setting. When activated, the crossover routes low
frequencies (100Hz and below) to the Channel 1 output,
while high frequencies (100Hz and above) go out through
Channel 2.
INTERRUPTOR CROSSOVER—Active el crossover o
divisor de frecuencias deslizando este interruptor desde
el ajuste FULLRANGE (rango completo) al LF/HF (división
agudos/graves). Cuando lo active, este crossover dirigirá las
frecuencias graves (100 Hz e inferiores) a la salida del canal
1 y las agudas (superiores a 100 Hz) a la del canal 2.
CROSSOVER — Activez le fi ltre actif en plaçant le sélecteur
CROSSOVER de la position FULLRANGE (large bande) à la
position LF/HF (basses fréquences/hautes fréquences). Le
fi ltre actif dirige les fréquences inférieures à 100 Hz à la
sortie du canal 1, et les fréquences supérieures à 100 Hz au
canal 2.
1 2 1 2 1 2
MONO
BRIDGE
STEREO
MONO
BRIDGE
STEREO
MONO
BRIDGE
STEREO
Controls
EPX2000/EPX3000

EUROPOWER EPX2000/EPX3000 • pg 14
www.behringer.com
Press the POWER BUTTON to switch on the
amplifi er.
Pulse el BOTON POWER para encender el
amplifi cador.
Appuyez sur la touche POWER pour placer l’amplifi cateur
sous tension.
Set the output levels on your sound source.
Ajuste el nivel de salida en su fuente de sonido.
Réglez le niveau de sortie sur la source sonore.
Make sure the amplifi er and your sound
source are turned OFF.
Asegúrese de que tanto el amplifi cador como
su fuente de sonido estén apagados.
Placez l’amplifi cateur et la source hors tension.
Set all GAIN CONTROLS to their farthest
counter-clockwise position.
Ajuste todos los CONTROLES GAIN a su tope
izquierdo.
Réglez les deux boutons de GAIN CONTROLS en position
minimale.
Turn on your sound source (mixer, CD player,
computer).
Encienda la fuente sonora (mesa de mezclas,
reproductor de CD, ordenador).
Placez la source sonore sous tension (console de mixage,
lecteur de CD, ordinateur, etc.).
EUROPOWER EPX2000/EPX3000
3000-WATT STEREO POWER AMPLIFIER
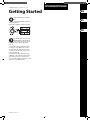
Step 3: Getting
started
Paso 3: Puesta en
marcha
Étape 3 : Mise en
œuvre

EN
ES
FR
www.behringer.com
EUROPOWER EPX2000/EPX3000 • pg 15
Adjust the GAIN CONTROLS to set the input
levels.
Ajuste los CONTROLES GAIN para fi jar el nivel
de entrada al amplifi cador.
Réglez le boutons de GAIN pour modifi er le gain d’entrée.
0
-10
-20
☺
If the CLIP LEDs light up continuously, lower
the GAIN CONTROLS until the CLIP LEDs only
light occasionally. This level should give you
the best balance between signal strength and amp
headroom.
Si los pilotos CLIP se iluminan continuamente, reduzca
la posición de los controles GAIN hasta que esos pilotos
solo se iluminen de forma puntual. Este nivel le dará el
mejor balance posible entre volumen de señal y margen o
headroom del amplifi cador.
Si les Leds CLIP restent allumées, diminuez les réglages
de GAIN jusqu’à ce que les Leds CLIP ne s’allument que de
temps en temps sur les pointes de signal. Respectez ce
niveau : il vous off re un équilibre optimal entre le niveau du
signal et la réserve dynamique disponible.
Getting Started
EPX2000/EPX3000

EUROPOWER EPX2000/EPX3000 • pg 16
www.behringer.com
EUROPOWER EPX2000/EPX3000
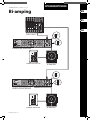
Step 4: Bi-amping
Paso 4: Bi-amping
Étape 4 :
Bi-amplifi cation
Bi-amping splits a mono signal into upper and lower
frequency bands, and then assigns each frequency band
to separate speaker cabinets. A subwoofer typically takes
the low frequency range. By splitting the signal this way,
the speakers work more effi ciently, and you can achieve a
cleaner overall sound.
To achieve the bi-amping hookup shown in this section of
Operating Instructions, use the following procedure:
El sistema de bi-amplifi cación divide una señal mono en
bandas de frecuencia superior e inferior y después asigna
cada una de ellas a recintos acústicos distintos. Por lo
general, en estos casos un subwoofer se ocupa del rango
de frecuencias graves. Al dividir la señal de esta forma, los
altavoces actúan de forma más efi caz y se puede conseguir
un sonido global más limpio.
Para conseguir la confi guración bi-amplifi cada que aparece
en la página siguiente, realice los pasos siguientes:
La bi-amplifi cation sépare un signal mono en deux bandes
de fréquences, et assigne ensuite chaque bande de
fréquences à un canal d’amplifi cation, lui-même relié à ses
propres enceintes. En général, les Subwoofers restituent
le bas du spectre sonore. En séparant ainsi le signal audio,
les enceintes fonctionnent de façon plus effi cace, et vous
obtenez un signal global mieux défi ni.
Pour câbler l’amplifi cateur en bi-amplifi cation, consultez
l’illustration et procédez comme suit :
Slide the CROSSOVER SWITCH to the
CH 1/LF-CH 2/HF setting.
Deslice el INTERRUPTOR CROSSOVER SWITCH a
la posición CH 1/LF-CH 2/HF.
Réglez le fi ltre actif CROSSOVER en position
CH 1/LF-CH 2/HF.
CH 1
CH 1
LF
LF
CH2
CH2
HF
HF
FULL
FULLR
ANGE
ANGE
Place the MODE SWITCH into STEREO mono
mode.
Coloque el INTERRUPTOR MODE en el modo
STEREO.
Placez le sélecteur MODE en position STEREO.
MONO
BRIDGE
STEREO
Run a 4-pole speaker cable with professional
twist-locking connectors from OUTPUT 1 to the
subwoofer. (The subwoofer gets its low-
frequency signal of Channel 1 from poles 2+ and 2-, while the
middle and upper frequency ranges of the signal from
Channel 2 use poles 1+ and 1-.)
Conecte un cable de altavoz de 4 polos dotado de conectores
profesionales con fi jación de tipo bayoneta desde la salida
OUTPUT 1 al subwoofer. (El subwoofer recibe su señal de bajas
frecuencias del canal 1 desde los polos 2+ y 2-, mientras que
las frecuencias medias y agudas de la señal del canal 2 usan
los polos 1+ y 1-).
Utilisez un cordon d’enceinte à quatre pôles avec
une fi che professionnelle à verrouillage entre la sortie
OUTPUT 1 et le Subwoofer (le Subwoofer est alimenté par
le signal basse fréquence de l’ampli 1, délivré par les pôles
2+ et 2-, alors que les fréquences supérieures à 100 Hz sont
alimentées par le canal 2 et les pôles 1+ et 1-).
+1
-2
-1
+2
-2
-1
+1
+2
Set the subwoofer into “BIAMPING” mode.
Ajuste el subwoofer al modo “BIAMPING” .
Confi gurez le Subwoofer pour la Bi-
amplifi cation.
Run a 2-pole speaker cable with professional
twist-locking connectors from the subwoofer to
the other speaker.
Conecte un cable de altavoz de 2 polos con conectores
profesionales con fi jación de tipo bayoneta desde el
subwoofer al otro altavoz.
Connectez un câble pour enceinte à deux fi ls avec connecteur
professionnel à verrouillage entre le Subwoofer et le satellite.
Professional Speaker Connector
Conector profesional de altavoz
Connecteur professionnel pour enceintes
Front View
Vista frontal
Vue avant
Rear View
Vista trasera
Vue arrière

EN
ES
FR
EUROPOWER EPX2000/EPX3000 • pg 17
www.behringer.com
EPX2000/EPX3000
Bi-amping
EUROLIVE EPX2000
EUROLIVE EPX2000
MONO
BRIDGE
STEREO
CH 1
LF
CH2
HF
FULLRANGE
MONO
BRIDGE
STEREO
CH 1
LF
CH2
HF
FULLRANGE
EUROLIVE B1520 PRO
B1800X PRO
EUROLIVE B1520 PRO
B1800X PRO
XENYX 1202FX

www.behringer.com
EUROPOWER EPX2000/EPX3000 • pg 18
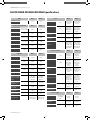
EUROPOWER EPX2000/EPX3000 Specifi cations
MODEL: EPX2000 EPX3000
Input Voltage 230V 230V
Stereo Mode (both channels driven) EPX2000 EPX3000
8Ω / 20 Hz - 20
kHz @ 0.1% THD
350W 500W
8Ω / 1kHz @ 0.1%
THD
360W 520W
4Ω / 20 Hz - 20
kHz @ 0.1% THD
600W 850W
4Ω / 1 kHz @
0.1% THD
650W 900W
2Ω / 20 Hz - 20
kHz @ 1% THD
950W 1400W
2Ω / 1 kHz @ 1%
THD
1000W 1500W
Bridged Mono EPX2000 EPX3000
8Ω / 20 Hz - 20
kHz @ 0.1% THD
1200W 1700W
8Ω / 1kHz @ 0.1%
THD
1250W 1800W
4Ω / 20 Hz - 20
kHz @ 1% THD
1900W 2800W
4Ω / 1 kHz @ 1%
THD
2000W 3000W
Distortion <0.01% <0.01%
Frequency
Response (at 10db
below rated output
power)
20Hz - 20kHz,
+0/-1 dB
5Hz - 50kHz(at
-3dB points)
20Hz - 20kHz,
+0/-1 dB
5Hz - 50kHz(at
-3dB points)
Damping Factor (1
kHz and below)
>300 @ 8Ω >400 @ 8Ω
Signal to Noise (20
Hz - 20 kHz)
>100 dB >100 dB
Voltage Gain 32dB 32dB
Input Sensitivity 1V 1V
Input Impedance
10k ohms
unbalanced / 20k
ohms balanced
10k ohms
unbalanced / 20k
ohms balanced
Controls EPX2000 EPX3000
Front
AC switch/gain
controls for each
channel
AC switch/gain
controls for each
channel
Rear
MONO Switch,
X-Over Switch,
Limiter Switch,
BRIDGE MODE
Switch
MONO Switch,
X-Over Switch,
Limiter Switch,
BRIDGE MODE
Switch
Crossover
FX 100Hz, 12dB
slope
FX 100Hz, 12dB
slope
Limiter Type
VCA CLIP Limiter,
switchable
VCA CLIP Limiter,
switchable
Indicators
Power-on: Blue
LED/Per channel
> Green Signal
LED: -20dB, -10dB/
Yellow LED: 0dB/
Clip: Red LED
Power-on: Blue
LED/Per channel
> Green Signal
LED: -20dB, -10dB/
Yellow LED: 0dB/
Clip: Red LED
Connectors (each channel) EPX2000 EPX3000
Input
Active balanced
XLR (pin 2+),
¼" TRS RCA
connectors
Active balanced
XLR (pin 2+),
¼" TRS RCA
connectors
Output
Touch-proof
binding posts/
twist-locking
professional
speaker
connectors
Touch-proof
binding posts/
twist-locking
professional
speaker
connectors
Cooling
Continuously
variable speed
fan, back-to-front
air fl ow
Continuously
variable speed
fan, back-to-front
air fl ow
Amplifi er Protection
Full short circuit,
open circuit,
thermal, ultrasonic,
RF protection.
Stable into reactive
or mismatched
loads
Full short circuit,
open circuit,
thermal, ultrasonic,
RF protection.
Stable into reactive
or mismatched
loads
Load Protection
On/off muting, DC-
fault power supply
shutdown
On/off muting, DC-
fault power supply
shutdown
Output Circuitry Class H, 2-tier Class H, 2-tier
Power Consumption EPX2000 EPX3000
1/8 Power (pink
noise) Bridged
4ohms
5A_230V /
9A_120V
7A_230V /
12A_120V
Fuse Rating
EU:10A250V/
UL:20A250V
EU:15A250V/
UL:30A250V
Size 19"/ 2U 19"/ 2U

EN
ES
FR
EUROPOWER EPX2000/EPX3000• pg 19
www.behringer.com
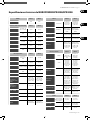
MODELO: EPX2000 EPX3000
Voltaje de entrada 230 V 230 V
Modo stereo (ambos canales reciben señal) EPX2000 EPX3000
8 Ω / 20 Hz - 20
kHz @ 0.1% THD
350 W 500 W
8 Ω / 1kHz @ 0.1%
THD
360 W 520 W
4 Ω / 20 Hz - 20
kHz @ 0.1% THD
600 W 850 W
4 Ω / 1 kHz @
0.1% THD
650 W 900 W
2 Ω / 20 Hz - 20
kHz @ 1% THD
950 W 1400 W
2 Ω / 1 kHz @ 1%
THD
1000 W 1500 W
Modo de puente mono EPX2000 EPX3000
8 Ω / 20 Hz -
20 kHz @ 0.1%
THD
1200 W 1700 W
8 Ω / 1kHz @ 0.1%
THD
1250 W 1800 W
4 Ω / 20 Hz -
20 kHz @ 1% THD
1900 W 2800 W
4 Ω / 1 kHz @ 1%
THD
2000 W 3000 W
Distorsión <0.01% <0.01%
Respuesta de
frecuencia (a 10dB
por debajo de
potencia de salida
media)
20 Hz - 20
kHz, +0/-1 dB
5 Hz - 50 kHz (en
puntos -3 dB)
20 Hz - 20
kHz, +0/-1 dB
5 Hz - 50 kHz (en
puntos -3 dB)
Factor de
amortiguación (1
kHz e inferior)
>300 @ 8 Ω >400 @ 8 Ω
Relación señal-ruido
(20 Hz - 20 kHz)
>100 dB >100 dB
Ganancia de voltaje 32 dB 32 dB
Sensibilidad de
entrada
1 V 1 V
Impedancia de
entrada
10 kΩ no
balanceado /
20 kΩ balanceado
10 kΩ no
balanceado /
20 kΩ balanceado
Controles EPX2000 EPX3000
Panel frontal
Interruptor AC/
controles de
ganancia para
cada canal
Interruptor AC/
controles de
ganancia para
cada canal
Panel trasero
Interruptores
MONO, X-Over,
Limiter y BRIDGE
MODE
Interruptores
MONO, X-Over,
Limiter y BRIDGE
MODE
Crossover o divisor
de frecuencias
FX 100 Hz,
pendiente 12 dB
FX 100 Hz,
pendiente 12 dB
Tipo de limitador
Limitador CLIP
VCA, conmutable
Limitador CLIP
VCA, conmutable
Indicadores
Encendido: piloto
azul/por canal >
Señal piloto verde:
-20 dB, -10 dB/
amarillo: 0 dB/
Clip: rojo
Encendido: piloto
azul/por canal >
Señal piloto verde:
-20 dB, -10 dB/
amarillo: 0 dB/
Clip: rojo
Conectores (cada canal) EPX2000 EPX3000
Entrada
XLR (punta 2+),
TRS 6,3 mm
balanceado activo/
RCA
XLR (punta 2+),
TRS 6,3 mm
balanceado
activo/RCA
Salida
Tipo borne/
conectores
de altavoz
profesionales
con fi jación de
bayoneta
Tipo borne/
conectores
de altavoz
profesionales
con fi jación de
bayoneta
Refrigeración
Ventilador con
velocidad variable
continuamente,
fl ujo de aire
trasero-frontal
Ventilador con
velocidad variable
continuamente,
fl ujo de aire
trasero-frontal
Protección del
amplifi cador
Protección de
cortocircuito
total, circuito
abierto, térmico,
ultrasónico, RF.
Estables con
cargas reactivas o
desigualadas
Protección de
cortocircuito
total, circuito
abierto, térmico,
ultrasónico, RF.
Estables con
cargas reactivas o
desigualadas
Protección de carga
Anulación on/off ,
Apagado en caso
de fallo DC
Anulación on/off ,
Apagado en caso
de fallo DC
Circuitería de salida Clase H, 2-tier Clase H, 2-tier
Consumo EPX2000 EPX3000
1/8 de potencia
(ruido rosa) puente
mono 4 ohmios
5 A_230 V /
9 A_120 V
7 A_230 V /
12 A_120 V
Tipo de fusible
EU:10 A 250 V/
UL:20 A 250 V
EU:15 A 250 V/
UL:30 A 250 V
Tamaño rack 19"/ 2U 19"/ 2U
Especifi caciones técnicas del EUROPOWER EPX2000/EPX3000

EUROPOWER EPX2000/EPX3000 • pg 20
www.behringer.com
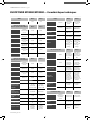
EUROPOWER EPX2000/EPX3000 — Caractéristiques techniques
MODÈLE : EPX2000 EPX3000
Tension secteur 230 V 230 V
Puissance de sortie (par canal)
Mode stéréo (les deux canaux en utilisation)
EPX2000 EPX3000
8 Ω/20 Hz -
20 kHz avec DHT
de 0,1 %
350 W 500 W
8 Ω/1 kHz avec
DHT de 0,1 %
360 W 520 W
4 Ω/20 Hz -
20 kHz avec DHT
de 0,1 %
600 W 850 W
4 Ω/1 kHz avec
DHT de 0,1 %
650 W 900 W
2 Ω/20 Hz -
20 kHz avec DHT
de 1 %
950 W 1400 W
2 Ω/1 kHz avec
DHT de 1 %
1000 W 1500 W
Puissance de sortie (par canal)
Mode bridgé (les deux canaux en utilisation)
EPX2000 EPX3000
8 Ω/20 Hz -
20 kHz avec DHT
de 0,1 %
1200 W 1700 W
8 Ω /1 kHz avec
DHT de 0,1 %
1250 W 1800 W
4 Ω/20 Hz -
20 kHz avec DHT
de 1 %
1900 W 2800 W
4 Ω/1 kHz avec
DHT de 1 %
2000 W 3000 W
Distorsion <0,01 % <0,01 %
Réponse en
fréquence (10 dB
sous la puissance
nominale)
20 Hz - 2 0kHz,
+0/-1 dB
5 Hz - 50 kHz
(points de -3 dB)
20 Hz - 2 0kHz,
+0/-1 dB
5 Hz - 50 kHz
(points de -3 dB)
Facteur
d’amortissement
(1 kHz et inférieur)
>300 dans 8Ω >400 dans 8Ω
Signal/Bruit (20 Hz -
20 kHz)
>100 dB >100 dB
Gain en tension 32 dB 32 dB
Sensibilité d’entrée 1 V 1 V
Impédance d’entrée
10 kOhms
asymétrique
20 kOhms
symétrique
10 kOhms
asymétrique
20 kOhms
symétrique
Réglages EPX2000 EPX3000
Face avant
AC switch/gain
controls for each
channel
AC switch/gain
controls for each
channel
Face arrière
Sélecteur MONO,
X-Over, Limiter,
BRIDGE MODE
Sélecteur MONO,
X-Over, Limiter,
BRIDGE MODE
Filtre actif
Coupure à 100 Hz,
12 dB/Octave
Coupure à 100 Hz,
12 dB/Octave
Type de limiteur
Limiteur de crête à
VCA commutable
Limiteur de crête
à VCA commutable
Témoins
Led bleue : Mise
sous tension
Led verte : -20 dB,
-10 dB
Led jaune : 0 dB
Led rouge :
écrêtage
Led bleue : Mise
sous tension
Led verte : -20 dB,
-10 dB
Led jaune : 0 dB
Led rouge :
écrêtage
Connecteurs (chaque canal) EPX2000 EPX3000
Entrées
XLR à symétrie
électronique (+
sur broche 2), Jack
stéréo 6,35 mm/
RCA
XLR à symétrie
électronique (+
sur broche 2), Jack
stéréo 6,35 mm/
RCA
Sorties
Borniers anti-
électrocution/
connecteur
professionnel à
verrouillage
Borniers anti-
électrocution/
connecteur
professionnel à
verrouillage.
Refroidissement
Ventilateur à
vitesse variable,
fl ux arrière/avant
Ventilateur à
vitesse variable,
fl ux arrière/avant
Protection
amplifi cateur
Court-circuits,
ligne ouverte,
thermique,
ultrasonique,
protection HF.
Stable dans une
charge réactive ou
inadaptée
Court-circuits,
ligne ouverte,
thermique,
ultrasonique,
protection HF.
Stable dans une
charge réactive ou
inadaptée
Protection de
charge
Temporisation On/
Off , défaillance
secteur
Temporisation On/
Off , défaillance
secteur
Architecture sortie Classe H, 2-tiers Classe H, 2-tiers
Consommation électrique EPX2000 EPX3000
1/8ème de
puissance (bruit
rose) Bridgé
4 Ohms
5 A version 230 V
9 A version 120 V
7 A version 230 V
12 A version120 V
Fusibles
EU : 10 A 250 V
UL : 20 A250 V
EU : 15 A250 V
UL : 30 A250 V
Dimension
19 pouces de
largeur/2 U de
hauteur
19 pouces de
largeur/2 U de
hauteur

EN
ES
FR
EUROPOWER EPX2000/EPX3000• pg 21
www.behringer.com

www.behringer.com
EUROPOWER EPX2000/EPX3000 • pg 22
Important
information
Otros aspectos
importantes
Autres informations
importantes
Other important information
Register online.1. Please register your new
BEHRINGER equipment right after you purchase it by
visiting www.behringer.com. Registering your purchase
using our simple online form helps us to process your
repair claims more quickly and effi ciently. Also, read the
terms and conditions of our warranty, if applicable.
Malfunction.2. Should your BEHRINGER product
malfunction, it is our intention to get it repaired as
quickly as possible. Please contact the BEHRINGER
retailer from whom your equipment was purchased.
Should your BEHRINGER dealer not be located in
your vicinity, you may contact one of our subsidiaries
or distributors listed at www.behringer.com in the
SUPPORT area.
Fuse compartment/Voltage 3.
selection. Before plugging the unit into a power
socket, please make sure you are using the correct mains
voltage for your particular model. Some units feature a
fuse compartment that can be operated in two diff erent
positions, allowing alternating between 230 V and 120 V.
Faulty fuses must be replaced with fuses of appropriate
rating without exception.
Registro online.1. Le recomendamos
que registre su nuevo aparato BEHRINGER justo
después de su compra accediendo a la página web
www.behringer.com. El registro de su compra a través
de nuestro sencillo sistema online nos ayudará a resolver
cualquier incidencia que se presente a la mayor brevedad
posible. Además, aproveche para leer los términos y
condiciones de nuestra garantía, si es aplicable en
su caso.
Averías.2. En el improbable caso de que su
aparato BEHRINGER esté averiado, nuestro compromiso
es repararlo lo antes posible. Póngase en contacto con
el comercio en el que adquirió este aparato. En caso
de que no pueda localizar un comercio BEHRINGER
en las cercanías, también puede ponerse en contacto
con cualquiera de nuestros distribuidores o empresas
subsidiarias que aparecen dentro de la sección SUPPORT
de la página web www.behringer.com
Compartimento del fusible /3.
Selección de voltaje. Antes de conectar este
aparato a la salida de corriente, asegúrese de que
esta sea del voltaje y amperaje adecuados para su
modelo concreto. Algunas unidades disponen de un
compartimento para fusibles que puede ser usado en dos
posiciones distintas para que pueda cambiar el voltaje
operativo del monitor entre 230 V y 120 V. En caso de que
alguno de los fusibles se queme, sustitúyalo SIEMPRE por
otro de idénticas características.
Enregistrez-vous en ligne. 1. Prenez le
temps d’enregistrer votre produit BEHRINGER aussi vite
que possible sur le site Internet www.behringer.com. Le
fait d’enregistrer le produit en ligne nous permet de gérer
les réparations plus rapidement et plus effi cacement.
Prenez également le temps de lire les termes et
conditions de notre garantie.
Dysfonctionnement.2. Si le produit
BEHRINGER venait à ne pas fonctionner correctement,
nous ferons notre possible pour le réparer dans les plus
brefs délais. Contactez le revendeur BEHRINGER où vous
avez acheté l’appareil. Si le revendeur BEHRINGER n’est
pas à proximité, contactez l’un de nos distributeurs
ou l’une de nos fi liales dont la liste se trouve sur le
site Internet www.behringer.com, dans la section
d’assistance SUPPORT.
Compartiment du fusible/Sélecteur 3.
de tension. Avant de relier les écoutes au secteur,
vérifi ez la compatibilité de la tension secteur de votre
zone géographique avec la tension sélectionnée sur les
écoutes. Certains modèles utilisent un compartiment
de fusible pouvant être confi guré de deux façons
diff érentes, permettant de travailler en 230 Vca ou en
120 Vca. Remplacez le fusible UNIQUEMENT par un autre
parfaitement identique.

EN
ES
FR
www.behringer.com
EUROPOWER EPX2000/EPX3000 • pg 23
Warranty
Other warranty rights and national law§ 1
This warranty does not exclude or limit the buyer’s statutory rights provided by
[1]
national law, in particular, any such rights against the seller that arise from a
legally effective purchase contract.
The warranty regulations mentioned herein are applicable unless they constitute
[2]
an infringement of national warranty law.
Online registration§ 2
Please do remember to register your new BEHRINGER equipment right after your
purchase by visiting http://www.behringer.com and kindly read the terms and con-
ditions of our warranty carefully. Registering your purchase and equipment with us
helps us process your repair claims quicker and more effi ciently.
Thank you for your cooperation!
Warranty§ 3
BEHRINGER (BEHRINGER International GmbH including all BEHRINGER
[1]
subsidiaries, except BEHRINGER Japan) warrants the mechanical and electro-
nic components of this product to be free of defects in material and workmanship
for a period of one (1) year
*
from the original date of purchase, in accordance
with the warranty regulations described below. If the product shows any defects
within the specifi ed warranty period that are not excluded from this warranty
as described under § 5, BEHRINGER shall, at its discretion, either replace or
repair the product using suitable new or reconditioned parts. In the case that
other parts are used which constitute an improvement, BEHRINGER may, at its
discretion, charge the customer for the additional cost of these parts.
If the warranty claim proves to be justifi ed, the product will be returned to the
[2]
user freight prepaid.
Warranty claims other than those indicated above are expressly excluded.
[3]
Return authorization number§ 4
To obtain warranty service, the buyer (or his authorized dealer) must call
[1]
BEHRINGER during normal business hours BEFORE returning the product. All
inquiries must be accompanied by a description of the problem. BEHRINGER
will then issue a return authorization number.
Subsequently, the product must be returned in its original shipping carton,
[2]
together with the return authorization number to the address indicated by
BEHRINGER.
Shipments without freight prepaid will not be accepted.
[3]
Warranty regulations§ 5
Warranty services will be furnished only if the product is accompanied by a copy
[1]
of the original retail dealer’s invoice. Any product deemed eligible for repair or
replacement under the terms of this warranty will be repaired or replaced.
If the product needs to be modifi ed or adapted in order to comply with applicable
[2]
technical or safety standards on a national or local level, in any country which is
not the country for which the product was originally developed and manufactu-
red, this modifi cation/adaptation shall not be considered a defect in materials or
workmanship. The warranty does not cover any such modifi cation/adaptation,
irrespective of whether it was carried out properly or not. Under the terms of this
warranty, BEHRINGER shall not be held responsible for any cost resulting from
such a modifi cation/adaptation.
Free inspections and maintenance/repair work are expressly excluded from this
[3]
warranty, in particular, if caused by improper handling of the product by the
user. This also applies to defects caused by normal wear and tear, in particular,
of faders, crossfaders, potentiometers, keys/buttons, tubes, guitar strings, illumi-
nants and similar parts.
Damage/defects caused by the following conditions are not covered by this
[4]
warranty:
improper handling, neglect or failure to operate the unit in compliance with the •
instructions given in BEHRINGER user or service manuals;
connection or operation of the unit in any way that does not comply with the •
technical or safety regulations applicable in the country where the product is
used;
damage/defects caused by force majeure or any other condition that is beyond •
the control of BEHRINGER.
Any repair or opening of the unit carried out by unauthorized personnel (user
[5]
included) will void the warranty.
If an inspection of the product by BEHRINGER shows that the defect in question
[6]
is not covered by the warranty, the inspection costs are payable by the customer.
Products which do not meet the terms of this warranty will be repaired exclu-
[7]
sively at the buyer’s expense. BEHRINGER will inform the buyer of any such
circumstance. If the buyer fails to submit a written repair order within 6 weeks
after notifi cation, BEHRINGER will return the unit C.O.D. with a separate
invoice for freight and packing. Such costs will also be invoiced separately when
the buyer has sent in a written repair order.
Warranty transferability§ 6
This warranty is extended exclusively to the original buyer (customer of retail dealer)
and is not transferable to anyone who may subsequently purchase this product. No
other person (retail dealer, etc.) shall be entitled to give any warranty promise on
behalf of BEHRINGER.
Claim for damage§ 7
Failure of BEHRINGER to provide proper warranty service shall not entitle
the buyer to claim (consequential) damages. In no event shall the liability of
BEHRINGER exceed the invoiced value of the product.
*
Customers in the European Union please contact BEHRINGER Germany Support for further details.

EN
ES
FR
Do you want
more information
about this
product?
We off er expanded
Owner’s Manuals in
PDF format for the
advanced user at www.behringer.com.
Downloads are available in English, Spanish,
German and Chinese.
¿Necesita más información sobre
este producto?
Para aquellos usuarios más avanzados que
necesiten más información, encontrarán
un manual de instrucciones ampliado
en formato PDF en nuestra página web
www. behringer. com. Estos manuales
están disponibles en inglés, español,
alemán y chino.
Souhaitez-vous de plus amples
informations sur ce produit ?
Vous trouverez une version plus longue
de ce mode d’emploi en anglais, en
espagnol, en allemand et en chinois au
format PDF sur le site www.behringer.com.
www.behringer.com
EUROPOWER
EPX2000
EPX3000
3000-WATT STEREO POWER AMPLIFIER
0
-10
-20
3000-WATT STEREO POWER AMPLIFIER
-
 1
1
-
 2
2
-
 3
3
-
 4
4
-
 5
5
-
 6
6
-
 7
7
-
 8
8
-
 9
9
-
 10
10
-
 11
11
-
 12
12
-
 13
13
-
 14
14
-
 15
15
-
 16
16
-
 17
17
-
 18
18
-
 19
19
-
 20
20
-
 21
21
-
 22
22
-
 23
23
-
 24
24


Behringer EPX3000 Manual de usuario
- Categoría
- Equipo de música suplementario
- Tipo
- Manual de usuario
- Este manual también es adecuado para
En otros idiomas
- français: Behringer EPX3000 Manuel utilisateur
- English: Behringer EPX3000 User manual
Documentos relacionados
-
Behringer EUROPOWER EPX3000 Manual de usuario
-
-
-
-
Behringer B205D Manual de usuario
-
-
Behringer PMP6000 Manual de usuario
-
Behringer EUROPOWER EPQ1200 Manual de usuario
-
-