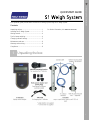
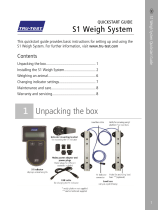
Tru-Test S1 Weigh System Guía de inicio rápido
- Tipo
- Guía de inicio rápido

S1 Weigh System Quickstart Guide
1
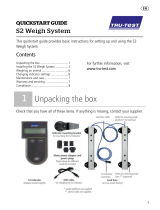
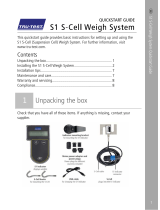
This quickstart guide provides basic instructions for setting up and using the S1 Weigh System.
Contents
Unpacking the box ................................................. 1
Installing the S1 Weigh System ............................... 2
Getting started ....................................................... 4
Tips for better weighing .......................................... 4
Changing indicator settings .................................... 5
Maintenance and care ............................................ 6
Warranty and servicing ........................................... 6
Compliance ............................................................ 6
For further information, visit www.tru-test.com.
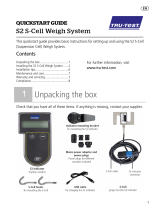
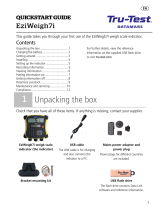
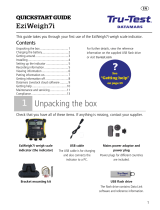
1
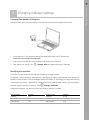
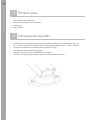
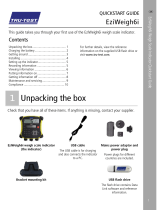
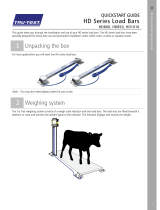
Unpacking the box
QUICKSTART GUIDE

S1 Weigh System Quickstart Guide
2
2
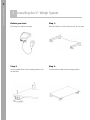
Installing the S1 Weigh System
Before you start:
Fully charge the indicator overnight.
Step 1:
Place the load bars on a flat surface up to 8’ (2.5
m) apart.
Step 2:
Use the supplied bolts to bolt the weigh platform onto
the load bars.
Step 3:
Tuck the load bar cables under the weigh platform.

S1 Weigh System Quickstart Guide
3
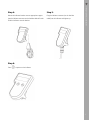
Step 4:
Mount the indicator bracket onto an appropriate support
that the indicator connector on the load bar
cable will reach.
Slide the indicator onto the bracket.
Step 6:
Press to power on the indicator.
Step 5:
Plug the indicator connector (on the load bar
cable) into the indicator and tighten up.

S1 Weigh System Quickstart Guide
4
3
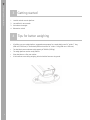
Getting started
1. Lead the animal onto the platform.
2. Let stabilize for two seconds.
3. Write down the weight.
4. Release the animal.
4
Tips for better weighing
• If building your own weigh platform, suggested measurements for a cattle platform are 24“ wide x 7‘ long
(600 mm x 2200 mm). A small animal platform should be 24“ wide x 4‘ long (600 mm x 1200 mm).
• The load bars have a maximum weigh capacity of 3300 lb (1500 kg).
• The weigh platform must be sturdy and flat.
• Place load bars on a flat, even surface.
• If the load bars move during weighing, bolt the load bar feet onto the ground.

S1 Weigh System Quickstart Guide
5
5
Changing indicator settings
Changing from pounds to kilograms
Data Link enables you to convert the display on the indicator from pounds to kilograms and vice versa.
1. Ensure that your PC has internet connectivity and download the Data Link PC Software from
livestock.tru-test.com/applications/datalink.
2. Plug one end of the USB cable into the indicator and the other end into your PC.
3. Open Data Link on your PC; click , Settings, Units to change from pounds to kilograms.
Modifying the resolution
The resolution is the amount that the scale will increment by as weight is added.
For example, if the animal weighs under 500 lb (or under 200 kg) the weight will be displayed in the nearest one
pound (or 0.5 kg) resolution. If the animal weighs between 500-1000 lb (or 200-500 kg), the weight will be shown
in the nearest two pound (or 1 kg) resolution. The default resolutions are listed below; however, you can change the
minimum weighing resolution in Data Link. Click , Settings, Resolution .
Changing the resolution may cause the scale to take longer to stabilize on a weight.
Weight range (lb)
Resolution
Weight range (kg)
Resolution
0-500 lb 1 lb 0-200 kg 0.5 kg
500-1000 lb 2 lb 200-500 kg 1 kg
1000-2000 lb 5 lb 500-1000 kg 2 kg
2000-capacity 10 lb 1000-capacity 5 kg

S1 Weigh System Quickstart Guide
6
6
Maintenance and care
• Keep the underside of the weigh platform and load bars free from dirt or stones.
• Do not leave the indicator, load bars or indicator connector immersed in water.
• Cables should be placed under the weigh platform to prevent damage.
• When not in use, always replace the dust cap on the indicator connector.
• Remove dust and moisture from the plugs and dust cap using methylated spirits, ethyl alcohol, or a suitable
electrical contact cleaner. Stronger spirits must not be used, as they may react with the plastic.
7
Warranty and servicing
For service and warranty information, see www.tru-test.com.
8
Compliance
FCC notice
This device complies with part 15 of the FCC Rules. Operation is subject to the following two conditions: (1) This device may not cause harmful interference, and (2) this device must
accept any interference received, including interference that may cause undesired operation.
This equipment has been tested and found to comply with the limits for a Class B digital device, pursuant to part 15 of the FCC Rules. These limits are designed to provide reasonable
protection against harmful interference in a residential installation.
This equipment generates, uses and can radiate radio frequency energy and, if not installed and used in accordance with the instructions, may cause harmful interference to radio
communications. However, there is no guarantee that interference will not occur in a particular installation. If this equipment does cause harmful interference to radio or television
reception, which can be determined by turning the equipment off and on, the user is encouraged to try to correct the interference by one or more of the following measures:
- Reorient or relocate the receiving antenna.
- Increase the separation between the equipment and receiver.
- Connect the equipment into an outlet on a circuit different from that to which the receiver is connected.
- Consult the dealer or an experienced radio/ TV technician for help.
All trademarks with an * are not owned by Tru-Test Limited and belong to their respective owners.

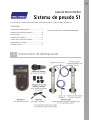
Guía de inicio rápido del Sistema de pesado S1
7
Esta guía de inicio rápido ofrece instrucciones básicas para configurar y usar el Sistema de pesado S1.
Contenido
Instrucciones de desempacado................................ 7
Instalación del Sistema de pesado S1 ...................... 8
Primeros pasos ..................................................... 10
Consejos para el pesado ....................................... 10
Cambio de los ajustes del indicador ...................... 11
Mantenimiento y cuidados .................................... 12
Garantía y servicio ................................................ 12
Para mayor información, visite www.tru-test.com.
1
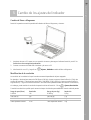
Instrucciones de desempacado
GUÍA DE INICIO RÁPIDO

Guía de inicio rápido del Sistema de pesado S1
8
2
Instalación del Sistema de pesado S1
Antes de comenzar:
Cargue completamente el indicador durante toda la noche.
Paso 1:
Coloque las barras de carga en una superficie plana y
hasta 8’ (2,5 m) de distancia entre sí.
Paso 2:
Use los tornillos incluidos para fijar la plataforma de pesado
sobre las barras de carga.
Paso 3:
Coloque los cables de la barra de carga debajo de la
plataforma de pesado.

Guía de inicio rápido del Sistema de pesado S1
9
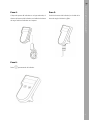
Paso 4:
Coloque el soporte del indicador en un lugar adecuado, al
alcance del conector del indicador en el cable de las barras
de carga. Deslice el indicador en el soporte.
Paso 5:
Enchufe el conector del indicador (en el cable de la
barra de carga) al indicador y fíjelo.
Paso 6:
Pulse
para encender el indicador.

Guía de inicio rápido del Sistema de pesado S1
10
3
Primeros pasos
1. Suba el animal sobre la plataforma.
2. Permita que se estabilice (unos dos segundos).
3. Anote el peso.
4. Suelte al animal.
4
Consejos para el pesado
Si desea construir su propia plataforma de pesado, las medidas sugeridas para una plataforma de vacuno son
24” x 7’ (600 x 2200 mm). Una plataforma para animales pequeños puede ser de 24” x 4’ (600 x 1200 mm).
Las barras de carga tienen una capacidad máxima de 3300 lb (1500 kg).
La plataforma de pesado debe ser sólida y plana.
Coloque las barras de carga en una superficie plana y nivelada.
Si las barras de carga se mueven durante el pesado, atornille los pies de estas al piso.

Guía de inicio rápido del Sistema de pesado S1
11
5
Cambio de los ajustes del indicador
Cambio de libras a kilogramos
Data Link le permite convertir la pantalla del indicador de libras a kilogramos y viceversa.
1. Asegúrese de que su PC cuente con una conexión a Internet y descargue el software Data Link para PC de
livestock.tru-test.com/applications/datalink.
2. Conecte un extremo del cable USB al indicador y el otro a su PC.
3. Abra Data Link en su PC y haga clic en , Ajustes, Unidades cambie de libras a kilogramos.
Modificación de la resolución
La resolución es la cantidad en la que la escala aumentará dependiendo del peso agregado.
Por ejemplo, si el animal pesa menos de 500 libras (o 200 kg), el peso se mostrará hasta la libra (o 0,5 kg) más
cercana de resolución. Si el animal pesa entre 500 y 1000 libras (o 200 y 500 kg), el peso se mostrará hasta la
segunda libra (o 1 kg) más cercana de resolución. Las resoluciones predeterminadas se muestran a continuación;
sin embargo, puede cambiar la resolución de pesado mínima de Data Link. Clic en , Ajustes, Resolución.
Si cambia la resolución es posible que le tome más tiempo a la báscula para estabilizarse cuando realice el pesado.
Rango de peso (libras)
Resolución
Rango de peso (kg)
Resolución
0-500 lb
1 lb
0-200 kg
0,5 kg
500-1000 lb
2 lb
200-500 kg
1 kg
1000-2000 lb
5 lb
500-1000 kg
2 kg
2000-capacidad máxima
10 lb
1000-capacidad máxima
5 kg

Guía de inicio rápido del Sistema de pesado S1
12
6
Mantenimiento y cuidados
Mantenga la parte inferior de la plataforma de pesado y las barras de carga libres de suciedad y rocas.
No deje el indicador, las barras de carga o el enchufe del indicador inmersos en agua.
Los cables deben colocarse debajo de la plataforma de pesado para evitar daños.
Cuando no esté en uso, coloque el tapón protector en el conector del indicador.
Quite cualquier residuo y la humedad de los enchufes y el tapón utilizando alcohol desnaturalizado, alcohol
etílico u otro detergente apropiado para contactos eléctricos. No deben usarse limpiadores más fuertes
puesto que pueden reaccionar con el plástico.
7
Garantía y servicio
Para mayor información sobre la garantía y el servicio, visite www.tru-test.com.
831484 Issue 1 11/2016
Tru-Test Limited, 2016. All rights reserved.
-
 1
1
-
 2
2
-
 3
3
-
 4
4
-
 5
5
-
 6
6
-
 7
7
-
 8
8
-
 9
9
-
 10
10
-
 11
11
-
 12
12


Tru-Test S1 Weigh System Guía de inicio rápido
- Tipo
- Guía de inicio rápido
en otros idiomas
Artículos relacionados
-
 Tru-Test S1 Weigh System Guía de inicio rápido
-
 Tru-Test S2 Weigh System Guía de inicio rápido
-
 Tru-Test EziWeigh7i Guía de inicio rápido
-
Tru-Test EziWeigh5i Guía de inicio rápido
-
 Tru-Test S1 S-Cell Guía de inicio rápido
-
Tru-Test S3 Indicator Guía de inicio rápido
-
 Tru-Test HD Series Guía de inicio rápido
-
 Tru-Test S2 Guía de inicio rápido
-
 Tru-Test EziWeigh7i Guía de inicio rápido
-
 Tru-Test EziWeigh7i Guía de inicio rápido


