
• Tighten the nuts carefully.
IMPORTANT! Do not overtighten the nuts,
breakage and chipping of vitreous china can occur.
• Cut 1/4” or more over the top of the nut.
• Attach the bolt caps.
IMPORTANT! Product damage can occur if using a
saw blade to cut off the excess T-bolt length. Make
sure vitreous china is protected and covered.
3. COMPLETING THE INSTALLATION
• Flush valve should be installed to manufacturer’s
installation instructions.
• Turn on water supply valve.
• Install water closet seat (not included).
• Flush water closet a few times and check all
connections for water seepage.
• Check for leaks.
• Place and press in new wax seal around the water
c
loset bottom outlet.
• Install new 5/16” T-bolts.
2. INSTALLING NEW WATER CLOSET
• Check rough-in dimensions and install or relocate
flush valve and outlet as indicated.
• Record model number for reference.
• Take out the temporary rag (if used) from the water
closet flange hole.
• Carefully align and lower the water closet over the
flange and T-bolts.
IMPORTANT! Do not lift or rock the water closet after
replacement. The watertight seal will have to be
replaced if breakage occurs.
• To seal, apply your full body weight around the
water closet.
• Place the plastic cap in the position indicated on
cap as marked.
• The metal washers and nuts can now be placed on
the bolt cap base and T-bolts.
THE RIGHT CHOICE
We thank you for your purchase.
Our products are 100% tested but should you have
any questions, please contact us by phone or at our
web site.
HET* Water Closet Installation Instructions
1. REMOVAL OF EXISTING WATER CLOSET
• Turn off the water supply.
• Disconnect the flush valve.
• Remove the existing water closet.
• Using putty knife, completely
remove old wax seal from floor
and bottom of water closet.
• Lay water closet down on
padded surface to help protect
the vitreous china.
WARNING: Hazardous gases
can escape through the closet flange if new water
closet is not installed quickly. A temporary fix: place a
large rag in the closet flange.
WARNING: Any vitreous china can chip or break if
the bolts or nuts are over-tightened or if mishandled.
BEFORE YOU START…
• Check all local plumbing and building codes.
• Check for any damage to the new water closet
before installation.
WHAT YOU WILL NEED…
• Putty knife • Sponge
• Safety glasses • 10” adjustable wrench
• Measuring tape • Large level
• Spud wrench • Wax seal
NOTE: Plumbing System Requirements
√ Minimum Flowing Pressure: 25 PSI
√ Minimum Flow Rate: 18 GPM
Anillo
de cera
anterior
Cubra con tela
Old
wax ring
Cover with rag
CARE AND CLEANING OF VITREOUS CHINA
Clean water closet with a cleaner safe for vitreous
c
hina such as Sloan’s Waterfree Urinal
Cleaner/Deodorizer. Spray and wipe clean using soft
cloth. Soft abrasive cleaners may be used to remove
stains.
LIMITED WARRANTY
Sloan Valve Company warrants its products to be
made of first class materials, free from defects of
material or workmanship under normal use and to
perform the service for which they are intended in a
thoroughly reliable and efficient manner when properly
installed and serviced, for a period of three years (one
year for special finishes) from date of purchase.
During this period, Sloan Valve Company will, at its
option, repair or replace any part or parts which prove
to be thus defective if returned to Sloan Valve
Company, at customer’s cost, and this shall be the
sole remedy available under this warranty. No claims
will be allowed for labor, transportation or other
incidental costs. This warranty extends only to persons
or organizations who purchase Sloan Valve Company’s
products directly from Sloan Valve Company for
purpose of resale.
THERE ARE NO WARRANTIES WHICH EXTEND
BEYOND THE DESCRIPTION ON THE FACE HEREOF. IN
NO EVENT IS SLOAN VALVE COMPANY RESPONSIBLE
FOR ANY CONSEQUENTIAL DAMAGES OF ANY
MEASURE WHATSOEVER.
NOTE: IN NO EVENT SHALL THE SLOAN VALVE
COMPANY BE LIABLE FOR INCIDENTAL DAMAGES,
RESULTING FROM IMPROPER INSTALLATION, OR
FOR DAMAGES CAUSED BY NEGLECT, ABUSE
OR ALTERATION.
The information contained in this document is subject to change
without notice.
SLOAN VALVE COMPANY
10500 Seymour Avenue
Franklin Park, IL 60131
Phone: 1-800-9-VALVE-9 (982-5839)
or 1-847-671-4300
Fax: 1-800-447-8329 or 1-847-671-4380
www.sloanvalve.com
Copyright © 2009 Sloan Valve Company
Printed in the U.S.A.
HET I.I. Code No. 0816212 Rev. 0b (12/09)
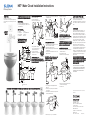
10" or 12”
(254 mm
or 305 mm)
5 ¼”
(133 mm)
15”
(381 mm)
ADA 17”
(432 mm)
26 ¾”
(679 mm)
15.875”
(403 mm)
29 ½ or 31 ½”
(749 mm)
FINISHED
WALL
FINISHED FLOOR
1 ½”
(38 mm)
3
¼” or 5 ¼”
(82 mm or 133 mm)
C
L OF OUTLET
CENTERLINE OF WASTE
2
0”
(
508 mm)
1
3.375”
(
340 mm)
11”
(279 mm)
15.875”
(403 mm)
5 ½”
(
140 mm)
TO MAXIMIZE THE PERFORMANCE OF YOUR SLOAN WATER CLOSET, USE ONLY SLOAN FLUSHOMETERS
Efficiency Series
* HET does not apply to 1.6 gpf/6.0 Lpf flush volume.

• Apriete las tuercas cuidadosamente
¡IMPORTANTE! No apriete de más las tuercas,
puede ocurrir ruptura o desconchar la porcelana.
• Corte 1/4” o más sobre la parte superior de la tuerca.
• Coloque las tapas de perno.
IMPORTANTE! Puede ocurrir daño al producto si se
usa una hoja de sierra para cortar la longitud excesiva
del perno T. Asegúrese que la porcelana esté
protegida y cubierta.
3. COMPLETAR LA INSTALACIÓN
• La válvula de descarga debe ser instalada de
acuerdo con las instrucciones de instalación del
fabricante.
• Abra la válvula de alimentación de agua.
• Instale el asiento del sanitario (no incluido).
• Descargue el sanitario unas cuantas veces y
revise todas las conexiones en busca de filtraciones
de agua.
• Revise si existen fugas por unos cuantos días.
• Coloque y presione el nuevo sello de cera alrededor
d
e la salida en la parte inferior del sanitario.
• Instale pernos-T nuevos de 5/16”.
2. INSTALAR EL NUEVO SANITARIO
• Revise las dimensiones de preparación e instale o
vuelva a colocar la válvula de descarga y la salida
como se indica.
• Guarde el número de modelo como referencia.
• Retire la tela temporal (si se usó) del agujero de
chapetón del sanitario.
• Alinee y baje el sanitario cuidadosamente sobre el
chapetón y los pernos T.
IMPORTANTE: No levante ni meza el sanitario después
de volver a colocarlo. El sello de agua deberá
reemplazarse si ocurre una ruptura.
• Para sellar, aplique el peso completo de su cuerpo
alrededor del sanitario.
• Coloque la tapa de plástico en la posición que se
indica en la tapa.
• Las arandelas y tuercas metálicas pueden
colocarse en la base de la tapa de pernos y en
los pernos.
LA ELECCIÓN CORRECTA
Le agradecemos su compra. Nuestros productos son
probados al 100%, sin embargo, si tiene alguna duda,
contáctenos por teléfono o en nuestro sitio web.
Instalación de Sanitario HET*
1. REMOVER EL SANITARIO EXISTENTE.
• Apague la alimentación de agua.
• Desconecte la válvula de descarga.
• Remueva el sanitario existente.
• Utilizando una espátula, remueva
completamente el sello de cera
anterior del piso y la parte inferior
del sanitario.
• Coloque el sanitario en una
superficie acolchada para ayudar
a proteger la porcelana.
ADVERTENCIA: Gases peligrosos pueden escapar
por el chapetón del sanitario si el nuevo sanitario no
se instala rápidamente. Revise los códigos locales de
plomería. Una solución temporal: coloque un trozo
grande de tela en el chapetón de sanitario.
ADVERTENCIA: Cualquier porcelana puede
desconcharse o romperse si los pernos o tuercas se
aprietan de más o si son mal manipulados.
• Revise los códigos locales de plomería y
construcción.
•
Revise si el nuevo sanitario presenta daños
antes de instalarlo.
LO QUE USTED NECESITA...
• Espátula • Esponja
• Lentes de Seguridad • Llave ajustable de 10
• Cinta para medir • Nivel grande
• Llave para spud • Sello de cera
NOTA: Requisitos del sistema de plomería
√ Presión mínima de flujo: 25 PSI
√ Caudal mínimo: 18 GPM
Anillo
de cera
anterior
Cubra con tela
Old
wax ring
Cover with rag
CUIDADO Y LIMPIEZA DE LA PORCELANA
Limpie los sanitarios con un limpiador seguro para
porcelana, como el Limpiador/Desodorante para
Mingitorios Waterfree de Sloan y limpie y seque
utilizando un trapo suave. Pueden utilizarse limpiadores
abrasivos suaves para remover manchas.
GARANTÍA LIMITADA
Sloan Valve Company garantiza que sus Productos
están hechos de materiales de primera clase, libres de
defectos en el material o en la fabricación, bajo uso
normal y para llevar a cabo el servicio para el cual se
han fabricado, en una forma totalmente eficiente
confiable siempre que se instalen adecuadamente y
se les dé el servicio adecuado, por un período de tres
años (un año para acabados especiales) a partir de la
fecha de compra. Durante este periodo Sloan, a su
discreción, reparará o reemplazará cualquier parte o
partes que se comprueben que estén defectuosas si
se devuelven a Sloan, a costo del cliente, y este será
el único recurso correctivo que se ofrece con esta
garantía. No se aceptarán reclamos por mano de obra,
transporte ú otros costos incidentales. La presente
garantía se extiende únicamente a personas u
organizaciones
que compren los productos de Sloan Valve Company
directamente de Sloan Valve Company con fines
de reventa.
NO EXISTEN MÁS GARANTÍAS QUE SE
EXTIENDAN MAS ALLÁ DE LA QUE SE DESCRIBIÓ
ANTERIORMENTE. EN NINGÚN CASO SLOAN VALVE
COMPANY ES RESPONSABLE POR CUALQUIER DAÑO
CONSECUENTE DE CUALQUIER CLASE.
NOTA: EN NINGÚN CASO SLOAN VALVE COMPANY
SERÁ RESPONSABLE POR DAÑOS INCIDENTALES,
RESULTADO DE INSTALACIÓN INADECUADA, O
POR DAÑOS CAUSADOS POR NEGLIGENCIA, ABUSO
O ALTERACIÓN.
La información contenida en este documento está sujeta a cambios
sin previo aviso.
SLOAN VALVE COMPANY
10500 Seymour Avenue
Franklin Park, IL 60131
Teléfono: 1-800-9-VALVE-9 o 1-841-671-4300
Fax: 1-800-447-8329 o 1-847-671-4380
www.sloanvalve.com
Copyright © 2009 Sloan Valve Company
Impreso en EE.UU.
HET I.I. Code No. 0816212 Rev. 0b (12/09)
38 mm
(1.5”)
254 mm or
305 mm
(10” or 12”)
133 mm
(5.25”)
679 mm
(26.75”)
403 mm
(15.875”)
C
L DE SALIDA
749 mm or 800 mm
(29.5” or 31.5”)
82 mm or 133 mm
(3.25” or 5.25”)
PARED
TERMINADA
PISO TERMINADO
381 mm
(15”)
ADA 432 mm
(17”)
508 mm
(20”)
340 mm
(13.375”)
2
79 mm
(
11”)
4
03 mm
(
15.875”)
140 mm
(5.5”)
Serie Efficiency
PARA MAXIMIZAR EL DESEMPEÑO DE SU SANITARIO SLOAN, USE ÚNICAMENTE FLUXÓMETROS SLOAN
* HET no aplica para volúmenes 6.0 Lpf/1.6 gpf
-
 1
1
-
 2
2


