
Prior to construction, check with your local regulatory agency for special code
requirements in your area. This product is NOT intended for use with a railing system.
The post mount is a decorative component and can only be used in those applications
where a structural mount is not required by building codes.
Step 1 - Locate center of post position on concrete surface and mark with a pencil. Drill
a 5/8" hole in the concrete a minimum of 3-1/2" deep.
Step 2 - Clean the hole with compressed air. Insert the adhesive capsule into the hole,
with the round side up. Place the threaded rod on the top of the capsule. Hammer the
threaded rod through the adhesive capsule. Clean any excess adhesive off of the con-
crete surface. Allow at least one hour to cure.
Step 3 - Place post mount over the threaded rod. Level the mount with the supplied
wedges. Place the 3x3 metal plate over the rod. Then place the flat washer, lock washer
and nut on the threaded rod. Tighten the mount, using a box wrench on the nut until the
lock washer is fully compressed.
Step 4 - Place the 4x4 post cover over the mount and seat the post into the recess.
Secure all four sides of the post with the self-tapping screws through the post and into
the post mount, using two screws on each side. Slip the skirt over the post to cover the
screws.
Step 1 - Locate center of post position on deck surface and mark with a pencil. Drill
a 5/8" hole in the substructure. The substructure can be a 2x6 cross brace secured
between the joists.
Step 2 - Insert the threaded rod through the mount and place over the drilled hole.
Level the mount with the supplied wedges. Place the 3x3 metal plate over the rod. Then
place the flat washer, lock washer and nut on the threaded rod. Repeat this process
under the deck. Tighten the mount using a box wrench on the nuts until the lock wash-
ers are fully engaged.
Step 3 - Place the 4x4 post over the mount, and seat the post into the recess. Secure all
four sides of the post with the self-tapping screws through the post and into the mount,
using two screws on each side. Slip the skirt over the post to cover the screws.
4x4 Post Mount Installation Instructions
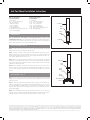
Items you will need for
concrete installation
4x4 Post
Post
Skirt
Post
Mount
4x4 Post
Deck
Surface
Concrete
•
•
•
•
•
•
•
•
GorillaMount.pdf
Joists
•
•
2x6 cross brace
•
Post
Skirt
Post
Mount
Fig. 1
Getting Started
Concrete Installation - Fig. 1
Items you will need for
deck installation
The diagrams and instructions in this brochure are for illustration purposes only and are not meant to replace a licensed professional. Any construction or use of the product must be in accordance with
all local zoning and/or building codes. The consumer assumes all risks and liability associated with the construction or use of this product. The consumer or contractor should take all necessary steps to
ensure the safety of everyone involved in the project, including, but not limited to, wearing the appropriate safety equipment.
Deck Installation - Fig. 2
4x4 Post
Post
Skirt
Post
Mount
4x4 Post
Deck
Surface
Concrete
•
•
•
•
•
•
•
•
GorillaMount.pdf
Joists
•
•
2x6 cross brace
•
Post
Skirt
Post
Mount
Fig. 2

Antes de iniciar la construcción, consulte en la agencia local correspondiente
sobre la normativa y/o reglamentación especial que sea de aplicación en su
región. Este producto NO es para ser usado con un sistema de barandales. El montaje
del poste es un componente decorativo y solamente puede ser usado en aquellas apli-
caciones donde el código de construcción no requiera un montaje estructural.
Paso 1 -
márquela con un lápiz. Taladre un hoyo de 5/8" en el concreto por un mínimo de 3-1/2"
de profundidad.
Paso 2 - Limpie el hoyo con aire comprimido. Inserte la cápsula adhesiva en el hoyo
con el lado redondeado hacia arriba. Coloque la varilla roscada en la parte superior de
lo menos una hora.
Paso 3 - Coloque el montaje del poste sobre la varilla roscada. Nivele el montaje con
las cuñas incluidas. Coloque la placa metálica de 3x3 sobre la varilla. A continuación,
coloque la arandela plana, la arandela de seguridad y la tuerca de la varilla roscada.
Apriete el montaje utilizando una llave española en la tuerca hasta que la arandela de
Paso 4 - Coloque la cubierta del poste de 4x4 sobre el montaje y asiente el poste en el
montaje del poste usando dos tornillos en cada lado. Deslice la cubierta por encima del
poste para cubrir los tornillos.
Paso 1 -
márquela con un lápiz. Perfore un hoyo de 5/8" en la subestructura. La infraestructura
puede ser un tirante en cruz de 2x6 asegurado entre las vigas.
Paso 2 - -
forado. Nivele el montaje con las cuñas incluidas. Coloque la placa metálica de 3x3
sobre la varilla. A continuación, coloque la arandela plana, la arandela de seguridad y
la tuerca de la varilla roscada. Repita este proceso bajo la terraza. Apriete el montaje
totalmente comprimidas.
Paso 3 - Coloque el poste de 4x4 sobre el montaje y asiente el poste en el hueco. Ase-
torre de montaje usando dos tornillos en cada lado. Deslice la cubierta por encima del
poste para cubrir los tornillos.
Instrucciones de instalación para montaje en poste
Elementos que necesitará para la
instalación en concreto
Poste de 4x4
Montaje
del poste
Poste de 4x4
Superficie de
la terraza
Concreto
•
•
•
•
•
•
•
•
GorillaMount.pdf
Vigas
•
•
Tirante en
cruz de 2x6
•
Cubierta
el poste
Cubierta
el poste
Montaje
del poste
Fig. 1
El comienzo
Instalación en concreto - Fig. 1
Elementos que necesitará para
la instalación de la terraza
-
rios para garantizar la seguridad de todos los involucrados en el proyecto, incluso, pero no limitado al, uso del equipo apropiado de seguridad.
Instalación de la terraza - Fig. 2
Poste de 4x4
Montaje
del poste
Poste de 4x4
Superficie de
la terraza
Concreto
•
•
•
•
•
•
•
•
GorillaMount.pdf
Vigas
•
•
Tirante en
cruz de 2x6
•
Cubierta
el poste
Cubierta
el poste
Montaje
del poste
Fig. 2
-
 1
1
-
 2
2


