Cuisinart CPO-850 Guia de referencia

Tipo
Guia de referencia
GUÍA DE REFERENCIA RÁPIDA
PREPARACIÓN Y USO
2.
Llene el depósito con agua hasta el nivel
deseado. Guíese con el indicador del nivel
de agua en la parte delantera de la unidad.
4.
Oprima el botón BREW/OFF para empezar
el ciclo de enjuague. Al final del ciclo, su
aparato está listo. Siga las instrucciones
en la página 9 del manual de
instrucciones para fijar sus preferencias y
preparar su primera jarra de café.
3.
Instale el filtro permanente de acero
inoxidable grabado con láser en el
portafiltros. Cierre la tapa.
Nota: asegúrese de que el portafiltros esté
debidamente instalado y que la tapa esté
bien cerrada.
Remoje el filtro de carbón en agua fría
durante 15 minutos, asegurándose de que
esté completamente sumergido en el agua.
Enjuague el filtro en agua fría durante 10 segundos
para limpiarlo, con las aberturas directamente bajo
el flujo de agua (véase las instrucciones completas
en la página 8 del manual de instrucciones).
Introduzca el filtro de carbón en el soporte. Abra el
depósito de agua y coloque el filtro adentro.
1.
¡IMPORTANTE!
No tire este folleto a la basura. Lea esta información antes de usar su nueva
cafetera por primera vez. Guarde esta información para futura referencia.
Estos útiles consejos complementan el manual de instrucciones. Para lograr un rendimiento
óptimo y una operación segura, lea el manual de instrucciones.
Véase las instrucciones de programación al dorso.
©2016 CuisinartPG-33914-ESP
To program the Auto On:
Press and hold the AUTO ON button for
2 seconds. The digital display will flash the
default (12:00) or previously selected time
and the AUTO ON button will flash. Follow directions
under SETTING THE TIME (#1) to program your
start-brew time. Five seconds after finishing, the unit
will automatically exit Auto On Setup mode. AUTO ON
will appear on the control panel and the AUTO ON
button will illuminate, indicating AUTO ON is activated.
NOTE: To exit Auto On Setup mode, you can also just
press AUTO ON
button again.
2.
4.
To start the brew cycle at the same time
the next day, simply press the AUTO ON
button and release. Auto On will appear
on the control panel and AUTO ON button
will be illuminated.
3.
At the programmed time, BREW/OFF will
illuminate, indicating that the brew cycle
is starting. AUTO ON will disappear from
the LCD and the AUTO ON button will no
longer be illuminated.
5.
To program the Auto Off: Press the
MENU button 3 times to get to the AUTO OFF
Menu option. The digital display will flash the
programmed Auto Off default (0:30) or
previously selected time. Follow directions under
SETTING THE TIME to program coffee brewer to shut
off from 0 to 2 hours after brew cycle is finished.
To exit/confirm Auto Off time setting: Auto Off Setup
mode will be exited automatically after 5 seconds.
To set the time: Plug in unit; 12:00
will flash in display for 30 seconds. If it
stops flashing, press MENU button 4 times
to return to CLOCK option. Press up p
button to set hour and q button to set minutes. Be
sure PM indicator is on if desired. Press MENU to set
selected time or, after 5 seconds, unit will exit Clock
Setting mode.
1.
PROGRAMMING
QUICK REFERENCE GUIDE
PurePrecision
Pour-Over
Coffee Brewer
Please see reverse side for setup and use instructions.
QUICK REFERENCE GUIDE
SETUP AND USE
2.
Pour desired amount of water into the
water reservoir. A water level indicator
is located on the front of the unit.
4.
Select BREW/OFF to start the one-time
rinse cycle. Once complete, your unit is
ready to brew coffee. Follow instructions
on page. 9 of instruction booklet to set
preferences and brew your first pot.
3.
Insert the permanent stainless steel laser-
etched filter into the filter basket holder.
Close the lid.
Note: Check to make sure the filter
basket is securely in place and lid is
completely closed.
Fully immerse the charcoal water filter
in cold tap water and soak for 15 minutes.
Flush filter by running cold tap water through
holes in bottom of compartment for 10
seconds (see complete instructions on
page 8 of your instruction booklet). Insert
the filter into the water filter holder. Open
the water reservoir and place filter holder
into the unit.
1.
IMPORTANT!
Do not throw away. Read before operating your new coffee brewer.
Keep for future reference.
These helpful hints are intended to be a supplement to the instruction booklet. In order to ensure
proper operation and optimum performance, please read the entire instruction booklet.
Please see reverse side for programming instructions.
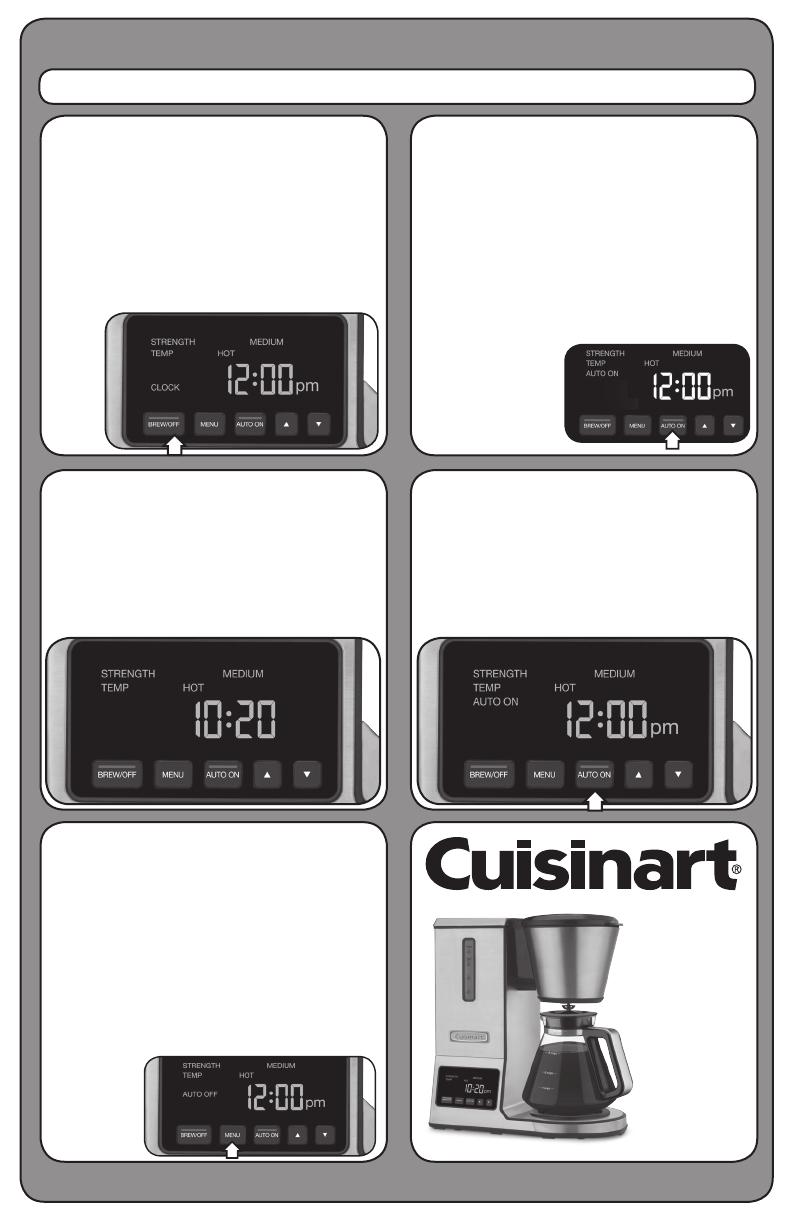
Para programar el encendido
automático:
Mantenga oprimido el botón AUTO ON
durante 2 segundos. La hora por defecto (12:00) o la
hora de encendido automático previamente fijada
aparecerá en la pantalla. Utilice las fechas para
programar la hora de encendido automático. Cinco
segundos después de haber terminado la programación,
la unidad saldrá automáticamente del modo de
programación. “AUTO ON” aparecerá en la pantalla y el
indicador luminoso AUTO ON se encenderá para indicar
que el encendido automático ha sido activado.
NOTA: para salir del
modo de programación
en cualquier momento,
presione nuevamente
el botón AUTO ON.
2.
4.
Si desea que la cafetera se ponga en
marcha automáticamente a la misma
hora al día siguiente, simplemente
presione el botón AUTO ON. “AUTO ON”
aparecerá de la pantalla y el indicador
luminoso AUTO ON se encenderá.
3.
A la hora prefijada, el indicador luminoso
BREW/OFF se encenderá y el ciclo de
preparación empezará. “AUTO ON”
desaparecerá de la pantalla y el
indicador luminoso AUTO ON se apagará.
5.
Para programar el apagado
automático: Presione el botón MENU 3
veces hasta llegar a la opción AUTO OFF. El
tiempo de apagado automático por defecto
(0:30) o el tiempo previamente fijado
aparecerá en la pantalla. Siga las instrucciones de la
sección CÓMO FIJAR LA HORA para programar otro
tiempo de apagado automático, desde 0 hasta 2 horas
después del final del ciclo de preparación.
Para salir del modo de programación y confirmar el
tiempo de apagado automático: la cafetera saldrá del
modo de programación automáticamente después de
5 segundos.
Cómo fijar la hora: Enchufe la
unidad. “12:00” aparecerá en la pantalla,
parpadeando. Si deja de parpadear,
presione el botón MENU 4 veces para
regresar a la opción CLOCK. Utilice el botón p para
fijar la hora y el botón q para fijar los minutos.
Cerciórese de que el indicador PM aparezca en la
pantalla si desea fijar una hora de tarde/noche.
Presione el botón MENU para confirmar la hora, o
espere 5 segundos para salir del modo de ajuste de
la hora.
1.
PROGRAMACIÓN
GUÍA DE REFERENCIA RÁPIDA
Cafetera con
extracción
optimizada
por infusión
PurePrecision
Véase las instrucciones de preparación al dorso.
  • Page 1 1
  • Page 2 2
  • Page 3 3
  • Page 4 4

Cuisinart CPO-850 Guia de referencia

Tipo
Guia de referencia

En otros idiomas