LG WT5101GS El manual del propietario
- Categoría
- Lavadoras
- Tipo
- El manual del propietario
Este manual también es adecuado para

OWNER’S MANUAL
WASHING MACHINE
WT5101H*
Please read this manual carefully before operating
your washing machine and retain it for future reference.
P/NO : MFL67221316
www.lg.com
~
ENGLISH
ESPAÑOL

Congratulations on your purchase
and welcome to the LG family.
Your new LG washing machine
combines the most advanced
washing technology with simple
operation and high efficiency.
Follow the operating and care
instructions in this manual, and your
washer will provide many years of
reliable service.
THANK YOU!
INTRODUCTION
INSTALLATION INSTRUCTIONS
Choose the Proper Location .................................. 9
Flooring .................................................................. 9
Clearances ............................................................. 9
Unpack the Washer .............................................. 10
Connecting the Water Lines ................................. 11
Connecting the Drain Line ...............................11-12
Leveling the Washer ............................................ 12
Connect to the Power Supply .............................. 12
HOW TO USE
Control Panel Features ......................................... 13
Operating the Washer .......................................... 14
Cycle Guide .......................................................... 15
Sorting Wash Loads ............................................. 16
Selecting Detergent .............................................. 17
About the Dispenser ............................................. 17
Loading the Dispenser ......................................... 18
The LED Display ................................................... 19
Cycle Modier Buttons ................................... 20-21
Cycle Option Buttons .................................... 22-23
PARTS AND FEATURES
Special Features ..................................................... 7
Key Parts and Components ................................... 8
TROUBLESHOOTING
Normal Sounds You May Hear ............................. 27
Before Calling for Service ............................... 27-31
SmartDiagnosis™................................................. 32
CARE AND CLEANING
Regular Cleaning ............................................ 24-25
Maintenance ......................................................... 25
Cleaning the Washer ............................................ 26
WARRANTY ..............................................33-34
SPECIFICATIONS
IMPORTANT SAFETY INSTRUCTIONS
Basic safety precautions .....................................3-4
Grounding instructions ........................................... 4
Safety instructions for installation .......................... 5
Safety instructions for use, care and cleaning,
and disposal ........................................................... 6
Key Dimensions and Specications ..................... 32
2

ENGLISH
IMPORTANT SAFETY INSTRUCTIONS
wWARNING For your safety, the information in this manual must be
followed to minimize the risk of re or explosion, electric shock, or to prevent
property damage, personal injury, or loss of life.
Your safety and the safety of others is very important.
We have provided many important safety messages in this manual and on your appliance. Always read
and obey all safety messages.
This is the safety alert symbol.
This symbol alerts you to potential hazards that can kill or hurt you and others.
All safety messages will follow the safety alert symbol and either the word DANGER or WARNING.
These words mean:
wDANGER: You can be killed or seriously injured if you don’t immediately follow instructions.
wWARNING: You can be killed or seriously injured if you don’t follow instructions.
All safety messages will tell you what the potential hazard is, tell you how to reduce the chance of
injury, and tell you what can happen if the instructions are not followed.
w
3
READ ALL INSTRUCTIONS BEFORE USE

• Before use, the washer must be properly installed as
described in this manual.
• Do not wash articles that have been previously
cleaned in, washed in, soaked in, or spotted with
gasoline, dry cleaning solvents, or other ammable
or explosive substances, as they give o vapors that
could ignite or explode.
• Do not add gasoline, dry cleaning solvents, or other
ammable or explosive substances to the wash
water. These substances give o vapors that could
ignite or explode.
• Under certain conditions, hydrogen gas may be
produced in a hot water system that has not been
used for 2 weeks or more. HYDROGEN GAS IS
EXPLOSIVE. If the hot water system has not been
used for such a period, before using the washer,
turn on all hot water faucets and let the water ow
from each for several minutes. This will release any
accumulated hydrogen gas. As the gas is ammable,
do not smoke or use an open ame during this time.
• Do not allow children to play on or in the washer.
Close supervision of children is necessary when the
washer is used near children.
• Before the washer is removed from service or
discarded, remove the lid to prevent children from
climbing inside.
• Do not install or store the washer where it will be
exposed to the weather or freezing temperatures.
• Do not tamper with controls.
• Do not repair or replace any part of the washer or
attempt any servicing other than as described in this
manual. We strongly recommend that any service be
performed by a qualied individual.
• See Installation Instructions for grounding
requirements.
• ALWAYS follow the fabric care instructions
supplied by the garment manufacturer.
• Do not place items exposed to cooking oil in your
washer. Items contaminated with cooking oils may
contribute to a chemical reaction that could cause a
load to catch re.
• Use fabric softeners or products to eliminate static
only as recommended by the manufacturer.
• This washer is not designed for maritime use or for
mobile installations such as in RVs, aircraft, etc.
• Turn o the water taps and unplug the washer if the
machine is to be left for an extended period of time,
such as during vacations.
• Packaging material can be dangerous for children.
There is a risk of suocation! Keep all packaging
from children.
• Always check the inside of the washer for foreign
objects before loading laundry. Keep the lid closed
when not in use.
• Do not reach into the washer while parts are moving.
wWARNING: To reduce the risk of fire, electric shock, or personal injury when using this appli-
ance, follow basic precautions, including the following.
BASIC SAFETY PRECAUTIONS
wWARNING For your safety, the information in this manual must be
followed to minimize the risk of re or explosion, electric shock, or to prevent
property damage, personal injury, or loss of life.
READ ALL INSTRUCTIONS BEFORE USE
IMPORTANT SAFETY INSTRUCTIONS
This appliance must be grounded. In the event of malfunction or breakdown, grounding will reduce
the risk of electric shock by providing a path of least resistance for electric current. This appliance is
equipped with a cord having an equipment-grounding conductor and grounding plug. The plug must
be plugged into an appropriate outlet that is properly installed and grounded in accordance with all
local codes and ordinances.
GROUNDING INSTRUCTIONS
wWARNING: Improper connection of the equipment-grounding conductor can result in risk of
electric shock. Check with a qualified electrician or serviceman if you are in doubt as to whether the appli-
ance is properly grounded. Do not modify the plug provided with the appliance. If it does not fit the
outlet, have a proper outlet installed by a qualified electrician. Failure to follow these warnings can cause
serious injury, fire, electrical shock, or death.
4

ENGLISH
• Refer to INSTALLATION INSTRUCTIONS for
detailed grounding procedures. Installation
instructions are packed in the washer for installer
’
s
reference. If the washer is moved to a new location,
have it checked and reinstalled by a qualied service
person. Failure to follow this warning can cause
serious injury, re, electrical shock, or death.
• Do not, under any circumstances cut or remove
the third (ground) prong from the power cord.
Failure to follow this warning can cause serious
injury, re, electrical shock, or death.
• For personal safety, this appliance must be
properly grounded. Failure to follow this warning
can cause serious injury, re, electrical shock,
or death.
• The power cord of this appliance is equipped
with a 3-prong (grounding) plug which mates
with a standard 3-prong (grounding) wall outlet to
minimize the possibility of electric shock hazard from
this appliance.
• This washer must be plugged into a
120V AC, 60Hz
grounded outlet. Failure to follow this warning can
cause serious injury, re, electrical shock, or death.
• Have the wall outlet and circuit checked by a
qualied electrician to make sure the outlet is
properly grounded. Failure to follow this warning
can cause serious injury, re, electrical shock,
or death.
• Where a standard 2-prong wall outlet is
encountered, it is your personal responsibility
and obligation to have it replaced with a properly
grounded 3-prong wall outlet. Failure to follow
this warning can cause serious injury, re, electrical
shock, or death.
• Do not install on carpet. Install washer on a solid
oor. Failure to follow this warning can cause serious
leak damage.
• Do not remove ground prong. Do not use an
adapter or extension cord. Plug into a grounded
3-prong outlet. Failure to follow these warnings can
cause serious injury, re, electrical shock, or death.
• The washer should always be plugged into its
own individual electrical outlet which has a
voltage rating that matches the rating plate. This
provides the best performance and also prevents
overloading house wiring circuits which could cause
a re hazard from overheated wires.
• Never unplug your washer by pulling on the
power cord. Always grip plug rmly and pull straight
out from the outlet. Failure to follow this warning can
cause serious injury, re, electrical shock, or death.
• Repair or replace immediately all power cords
that have become frayed or otherwise damaged.
Do not use a cord that shows cracks or abrasion
damage along its length or at either end. Failure
to follow this warning can cause serious injury, re,
electrical shock, or death.
• When installing or moving the washer, be careful
not to pinch, crush, or damage the power cord.
Failure to follow this warning can cause serious
injury, re, electrical shock, or death.
• The washer must be installed and electrically
grounded by a qualied service person in
accordance with local codes to prevent shock
hazard and assure stability during operation.
• The washer is heavy. Two or more people may
be needed to install and move the appliance.
Failure to do so can result in back or other injury.
• Store and install the washer where it will not
be exposed to temperatures below freezing or
exposed to outdoor weather conditions. Failure to
follow this warning can cause serious leak damage.
• Do not install the washer in humid spaces to
reduce the risk of electric shock. Failure to follow
this warning can cause serious injury, re, electrical
shock, or death.
• To reduce the risk of personal injury, adhere to
all industry recommended safety procedures
including the use of long sleeved gloves and
safety glasses. Failure to follow all of the safety
warnings in this manual could result in property
damage, personal injury or death.
wWARNING: To reduce the risk of fire, electric shock, or personal injury when using this appli-
ance, follow basic precautions, including the following.
SAFETY INSTRUCTIONS FOR INSTALLATION
wWARNING For your safety, the information in this manual must be
followed to minimize the risk of re or explosion, electric shock, or to prevent
property damage, personal injury, or loss of life.
READ ALL INSTRUCTIONS BEFORE USE
IMPORTANT SAFETY INSTRUCTIONS
5

IMPORTANT SAFETY INSTRUCTIONS
SAFETY INSTRUCTIONS FOR USE, CARE AND CLEANING, AND DISPOSAL
•
Unplug the washer before cleaning to avoid the
risk of electric shock.
•
Never use harsh chemicals, abrasive cleaners,
or solvents to clean the washer. They will
damage the nish.
•
Do not put oily or greasy rags or clothing on
top of the washer. These substances give o
vapors that could ignite the materials.
•
Do not wash items that are soiled with
vegetable or cooking oil. These items may
contain some oil after laundering. Due to the
remaining oil, the fabric may smoke or catch
re by itself.
•
Disconnect this appliance from the
power supply before attempting any user
maintenance. Turning the controls to the OFF
position does not disconnect this appliance
from the power supply. Failure to follow this
warning can cause serious injury, re, electrical
shock, or death.
•
Do not combine laundry products for use in
one load unless specied on the label.
•
Do not mix chlorine bleach with ammonia
or acids such as vinegar. Follow package
directions when using laundry products.
Incorrect usage can produce poisonous gas,
resulting in serious injury or death.
•
Do not reach into the washer while parts are
moving. Before loading, unloading or adding
items, press the START/PAUSE button and
allow the drum to coast to a complete stop
before reaching inside. Failure to follow this
warning can cause serious injury, re, electrical
shock, or death.
•
Do not allow children to play on or in the
washer. Close supervision of children is
necessary when the washer is used near
children. As children grow, teach them the
proper, safe use of all appliances. Failure to
comply with these warnings could result in serious
personal injuries or death.
•
Destroy the carton, plastic bag and other
packing materials after the washer is
unpacked. Children might use them for play.
Cartons covered with rugs, bedspreads, or
plastic sheets can become airtight chambers.
Failure to comply with these warnings could result
in serious personal injuries or death.
•
Keep laundry products out of reach of children.
To prevent personal injury, observe all warnings
on product labels. Failure to comply with these
warnings could result in serious personal injuries.
• Remove the lid to the washing compartment
before your washer is removed from service or
discarded to avoid the danger of children or small
animals getting trapped inside.
Failure
to do so can result in serious personal injury
or death.
wWARNING: To reduce the risk of fire, electric shock, or personal injury when using this appli-
ance, follow basic precautions, including the following.
6
SAVE THESE INSTRUCTIONS
READ ALL INSTRUCTIONS BEFORE USE
wWARNING For your safety, the information in this manual must be
followed to minimize the risk of re or explosion, electric shock, or to prevent
property damage, personal injury, or loss of life.

ENGLISH
PARTS AND FEATURES
C
B
A
E
F
G
SPECIAL FEATURES
SMARTRINSE™ WITH JET SPRAY
This washer is designed to save rinse water
by using the SMARTRINSE™ with jet spray in
COTTON/NORMAL and HEAVY DUTY cycles.
NOTE: Select FABRIC SOFTENER option or
EXTRA RINSE option, if you use fabric softener in
COTTON/NORMAL and HEAVY DUTY cycles.
WATER HEATER
The heater inside washer increases water
temperature and provides better cleaning for
SANITARY and BRIGHT WHITES™ cycle.
INVERTER DIRECT DRIVE
Inverter Direct Drive eliminates the belt and
pulleys found on most washers to provide
improved performance and reliability while
increasing energy efficiency.
LID LOCK SWITCH
The washer lid is locked during operation. The
lid can be unlocked by pressing the Start/Pause
button to stop the washer.
SLAMPROOF™ LID
The SLAMPROOF™ lid is a safety device that
closes the lid slowly. The SLAMPROOF™ lid
keeps the heavy lid from falling and injuring the
user.
WAVEFORCE™
Rapidly rotating drum uses centrifugal force and
an angled spray to pull water through the fabric,
resulting in less friction for a gentler and more
thorough cleaning.
SMARTDIAGNOSIS™
Should you experience any technical difficulty
with your washing machine, it has the capability
of transmitting data by phone to the Customer
Information Center. The call center agent records
the data transmitted from your machine and
uses it to analyze the issue, providing a fast and
effective diagnosis (refer to page 32).
D
C
E
F
G
A
B
D
Protocol P172
Sanitization Performance of Residential and
Commercial, Family Sized Clothes Washers
7

PARTS AND FEATURES
B
A
Drain
Hose
KEY PARTS AND COMPONENTS
In addition to the special features and
components outlined in the Special Features
section, there are several other important
components that are referenced in this manual.
ULTRA-CAPACITY STAINLESS STEEL DRUM
The ultra-large stainless steel drum offers extreme
durability.
TEMPERED GLASS LID
The tempered glass lid is durable and makes it
easy to see the inside of washer.
ROTARY KNOB
Turn this knob to select the desired cycle. Once
the desired cycle has been selected, the standard
presets will be shown in the display. These
settings can be adjusted using the cycle setting
buttons anytime before starting the cycle.
AUTO LEVELING FEET
The automatic leveling feet (in the rear) adjust to
improve washer stability on uneven floors.
REAR CONTROL PANEL WITH LED DISPLAY
The easy-to-read LED display show cycle
options, settings, processing, estimated time
remaining during operation.
DETERGENT DISPENSER DRAWER
There are two compartments, one each for main
wash (liquid or powder) and liquid fabric softener.
or
D
Hot Water
Inlet valve
C
E
F
B
A
Included Accessories
• Hot and Cold Water Hoses (with 2 seals per
hose at each ends)
• Tie Strap (for securing drain hose)
C
Power Cord
Cold Water
Inlet valve
D
E
F
8

ENGLISH
INSTALLATION INSTRUCTIONS
CHOOSE THE PROPER LOCATION
wWARNING
• The washer is heavy! Two or more people
are required when moving and unpacking
the washer. Failure to do so can result in back
or other injury.
• Store and install the washer where it will not
be exposed to temperatures below freezing
or exposed to outdoor weather conditions.
Failure to follow this warning can cause serious
injury, re, electrical shock, or death.
• Properly ground washer to conform with all
governing codes and ordinances. Failure to
follow this warning can cause serious injury, re,
electrical shock, or death.
• To reduce the risk of electric shock, do not
install the washer in humid spaces. Failure to
follow this warning can cause serious injury, re,
electrical shock, or death.
• The base opening must not be obstructed by
carpeting when the washer is installed on a
carpeted oor.
• Keep the area underneath and around your
appliances free of combustible materials such
as lint, paper, rags, chemicals, etc.
• Do not remove ground prong. Do not use
an adapter or extension cord. Plug into a
grounded 3-prong outlet. Failure to follow this
warning can cause serious injury, re, electrical
shock, or death.
POWER OUTLET
• The power outlet must be within 60 inches
(1.5 m) of either side of the washer.
• The appliance and outlet must be positioned so
that the plug is easily accessible.
• Do not overload the outlet with more than one
appliance.
• The outlet must be grounded in accordance with
current wiring codes and regulations.
•
Time-delay fuse or circuit breaker is recommended.
NOTE: It is the personal responsibility and
obligation of the product owner to have a
proper outlet installed by a qualified electrician.
FLOORING
• To minimize noise and vibration, the washer
MUST be installed on a solidly constructed oor.
• Allowable slope under the entire washer is
1° maximum.
• Carpeting and soft tile surfaces are not
recommended.
• Never install the washer on a platform or weakly
supported structure.
NOTE: The washer must be installed on firm
flooring to minimize vibration during the spin
cycle. Concrete flooring is best, but a wood floor
is sufficient, provided it is built to FHA standards.
The washer should not be installed on rugs or
exposed to weather.
To ensure sufficient clearance for water lines
allow minimum clearances of at least 1 inches
(2.5 cm) at the sides and 4 inches (10 cm)
behind the unit. Be sure to allow for wall, lid, or
floor moldings that may increase the required
clearances.
27″
(68.6 cm)
1″
(2.5 cm)
1″
(2.5 cm)
28.
3
/8″
(72.1 cm)
4″
(10 cm)
45
3
/8″
(115.3 cm)
55.
3
/4″
(141.7 cm)
(with lid
open)
CLEARANCES
27″
(68.6 cm)
1″
(2.5 cm)
1″
(2.5 cm)
28.
3
/8″
(72.1 cm)
4″
(10 cm)
45
3
/8″
(115.3 cm)
55.
3
/4″
(141.7 cm)
(with lid
open)
Minimum vertical space from floor to overhead
shelves, cabinets, ceilings, etc., is 56".
9

INSTALLATION INSTRUCTIONS
After the washer is in the home, remove the
carton and Styrofoam® shipping base from
the washer.
UNPACK THE WASHER
When removing the washer from the carton base,
be sure to remove the tub support in the middle
of the carton base.
If you must lay the washer down to remove the
base packaging materials, always protect the side
of the washer and lay it carefully on its side. Do
NOT lay the washer on its front or back.
TOOLS YOU WILL NEED
• Adjustable Pliers
• Carpenter’s Level
Carton Base
Tub support
1
Remove the packing block containing the
owner's manual, parts, water hoses, and
laundry product samples.
2
Unfasten the power cord from the back of the
washer.
3
10

ENGLISH
INSTALLATION INSTRUCTIONS
CONNECTING THE WATER LINES
• IMPORTANT: Use new hoses when installing
the washer. Do NOT reuse old hoses.
• IMPORTANT: Use ONLY the inlet hoses
provided by LG with this laundry product.
Aftermarket hoses are not guaranteed to t or
function correctly. Other hoses may not tighten
correctly and could cause leaks. Subsequent
damage to product or property will not be
covered under the terms of LG's warranty.
• Water supply pressure must be between 14.5
PSI and 116 PSI (100~800 kPa). If the water
supply pressure is more than 116 PSI,
a pressure reducing valve must be installed.
• Periodically check the hose for cracks, leaks,
and wear, and replace the hose every 5 years.
• Make sure that the water lines are not stretched,
pinched, crushed, or kinked.
• The washer should never be installed or stored
in a location subject to freezing temperatures.
Damage to the water lines and internal
mechanisms of the washer can result. If the
washer was exposed to freezing temperatures
prior to installation, allow it to stand at room
temperature for several hours before use.
Inspect the threaded tting on each hose and
make sure there is a rubber seal in place in
both ends.
Connect water hose to hose utilities.
Connect the water hoses to the HOT and
COLD water valves of your home. Hand
tighten, plus make an additional 1/4 turn with
pliers.
NOTE: A water heater set to deliver 120°F (49°C)
water to the washer.
or
NOTE: To avoid build up that can clog the inlet
valve screen, thoroughly ush both faucet and
hose to remove any particles or other impurities
by running water through them into a container.
NOTE:
Do not cross-thread the hose ttings. Attach the
hot water line to the red hot water inlet on the back of the
washer. Attach the cold water line to the blue cold water in-
let on the back of the washer. Tighten the ttings securely.
NOTE: Tighten the ttings securely. Open the
water taps fully to check for leaks.
Water Tap
Attach water hose to washer.
Thread the hot water hose onto the washer hot
water connection (red) and the cold water hose
onto the cold water connection (blue).
Hand tighten; then make an additional 1/8 turn with
pliers.
1
2
CONNECTING THE DRAIN LINE
• The drain hose should always be properly
secured. Failure to properly secure the drain
hose can result in ooding and property
damage.
• Do not install the end of the drain hose higher
than 96 inches (243.8 cm) above the bottom of
the washer.
• The drain must be installed in accordance with
any applicable local codes and regulations.
• Make sure that the water lines are not stretched,
pinched, crushed, or kinked.
39″
(99 cm)
Drain Hose
Standpipe
3
Rubber
Seal
Water Hose
(to water inlet
on washer)
Water Hose
(to tap)
Rubber Seal
Rubber
Seal
Water Hose
(to water inlet
on washer)
Hot
Cold
Hot
Cold
11

To make sure that the washer is properly
level, open the lid and look from above to see
if it is same as shown above. If you have a
level, check your washer with the level.
• To check if the washer is level side to side,
close the lid and place a level at the back of
the lid.
• To check if the washer is level front to back,
place a level at the side of the washer on
the edge where the cabinet side meets the
top cover.
If the washer is not level, adjust the front leveling
feet. Turn clockwise to raise, counterclockwise to
lower.
INSTALLATION INSTRUCTIONS
Firmly insert the free end of the drain hose
into the drain opening of your home. Make sure
the soft rubber end is completely inside the drain
opening.
• If the water valves and drain are built into the
wall, fasten the drain hose to one of the water
hoses with the cable tie (ribbed side on inside).
•
If your drain is a standpipe, fasten the drain hose
to the standpipe with the cable tie provided.
NOTE:
• Total height of the hose end should be approxi-
mately 35 ~ 47" (0.9 ~ 1.2 m) from the floor.
• The drain hose should be inserted no more than
8-12 inches into the standpipe.
Cable Tie
39″
(99 cm)
39″
(99 cm)
Cable Tie
CONNECT TO THE POWER SUPPLY
The washer should be plugged
into a 120V AC, 60Hz grounded
3-prong outlet.
Plug in the washer.
CONNECTING THE DRAIN LINE (cont.)
LEVELING THE WASHER
The washer spins at very high speeds, up to
1,100 RPM.
NOTE: Adjust the leveling feet only as far as
necessary to level the washer. Extending the
leveling feet more than necessary can cause
the washer to vibrate.
• All four leveling feet must rest solidly on the
floor. Rock the washer gently from corner to
corner to make sure that the washer does
not rock.
NOTE: Before installing the washer, make sure
the floor is clean, dry and free of dust, dirt, water
and oils so the washer feet can not slide easily.
Leveling feet that can move or side on the floor
can contribute to excess vibration and noise due
to poor contact with the floor.
Raise Lower
front to back
side to side
Adjust the 2 front leveling feet. Turn clockwise
to raise the washer or counterclockwise to
lower it.
2
3
1
Position the washer in the final location,
taking special care to not pinch, strain, or
crush the water and drain lines. Place a
level across the top of the washer.
Lower
Raise
12

ENGLISH
HOW TO USE
FA
D
E
B
C
CONTROL PANEL FEATURES
POWER ON/OFF BUTTON
Press to turn the washer ON. Press again to turn
the washer OFF.
NOTE: If the washer remains idle for 4 minutes
after turning the washer off, the water in the tub
will drain.
NOTE: An alarm will sound 1 minute prior to
draining, and 'dr' will appear on the display. You
may restart the washer at this time. However,
once the washer initiates draining, all functions
will be suspended, and ‘dr’ will be displayed until
draining is complete.
CYCLE SELECTOR KNOB
Turn this knob to select the desired cycle. Once
the desired cycle has been selected, the standard
presets will be shown in the display. These
settings can be adjusted using the cycle setting
buttons before starting the cycle.
START/PAUSE BUTTON
Press this button to START the selected cycle.
If the washer is running, use this button to PAUSE
the cycle without losing the current settings.
NOTE: If you do not press the START/PAUSE
button within 4 minutes of selecting a cycle, the
washer automatically turns off.
NOTE: If the washer remains idle for 8 minutes
after pausing the cycle, the water in the tub will
drain.
A
B
CYCLE MODIFIER BUTTONS
Use these buttons to select the desired cycle
options for the selected cycle. Press the button
for that setting until the indicator light for the
desired value is lit.
OPTION BUTTONS
The option buttons allow you to select
additional cycle options and will light when
selected. Certain buttons also allow you to
activate special functions by pressing and
holding the button for 3 seconds.
For detailed information about the individual
options, please see the following pages.
LED DISPLAY
The display shows the settings, estimated
time remaining, options, and status messages
for your washer. The display will remain on
through the cycle.
D
E
C
F
13

HOW TO USE
OPERATING THE WASHER
SORT LAUNDRY AND LOAD WASHER.
Refer to page 16.
1
Once you have loaded the washer and added laundry products (detergent, bleach, and/or fabric softener):
ADD DETERGENT.
Refer to pages 17-18.
2
TURN ON THE WASHER.
Press the POWER button to turn on the washer.
The lights around the cycle selector knob will
illuminate.
3
SELECT CYCLE.
Turn the cycle selector knob to the desired cycle.
The display will show the preset WASH/RINSE
temperature, SOIL LEVEL, SPIN SPEED for that
cycle.
4
SELECT CYCLE MODIFIER BUTTONS.
If you would like to change the modier for
that cycle, press the appropriate cycle settings
button(s) until the indicator light for the desired
setting is lit.
NOTE: To protect your garments, not every
WASH/RINSE temperature, SPIN SPEED, SOIL
LEVEL, or OPTION is available with every cycle.
5
SELECT OPTION BUTTONS.
Select any additional cycle options, such as
FABRIC SOFTENER or DELAY WASH.
NOTE: To protect your garments, not every
WASH/RINSE temperature, SPIN SPEED, SOIL
LEVEL, or OPTION is available with every cycle.
6
BEGIN CYCLE.
Press the START/PAUSE button to begin the
cycle. The lid will latch, the display will change,
and the washer will calculate the estimated time
remaining. Once the washer has calculated the
estimated total cycle time, the washer will start.
To pause the cycle at any time, press PAUSE.
To resume the cycle press START/PAUSE again.
7
NOTE: When the wash cycle is finished, the beeper (if set) will sound and the lid will unlock.
To prevent wrinkling, remove items from the washer immediately after the end of the cycle.
NOTE: WAVEFORCE™ is available for 8 lb. or larger loads in the COTTON/NORMAL or HEAVY DUTY
cycles.
wWARNING: To reduce the risk of fire, electric shock, or personal injury when using this appli-
ance, follow basic precautions, including the following.
14

ENGLISH
HOW TO USE
CYCLE GUIDE
NOTE: To protect your garments, not every wash/rinse temperature, spin speed, soil level, or option is available
with every cycle.
The cycle guide below shows the options and recommended fabric types for each cycle.
Cycle
Fabric Type
Wash/Rinse
Spin Speed
Soil Level
Stain
Care™
Cold
Wash™
Delicates
Low
Medium
No Spin
Cold/Cold
Warm/Cold
Warm/Warm
Light
Normal
Heavy
Dress shirts/blouses
nylons, sheer or lacy
garments
(less than 8 lbs.)
=Default setting
Bright Whites™
Medium
High
Extra High
No Spin
Low
Heavy
Light
Normal
Hot/Cold
Warm/Cold
White fabrics
Wool
Low
Medium
No Spin
Warm/Cold
Cold/Cold
Light
Normal
Heavy
Item labeled machine
washable wool
(less than 8 lbs.)
Speed Wash
High
Extra High
No Spin
Low
Medium
Warm/Warm
Cold/Cold
Warm/Cold
Light
Normal
Heavy
Lightly soiled and
small loads
Sports Wear
Medium
High
No Spin
Low
Warm/Cold
Warm/Warm
Cold/Cold
Normal
Heavy
Light
Active sports,
exercise clothing
Pure Color™
Medium
High
Extra High
No Spin
Low
Cold/Cold
Warm/Cold
Warm/Warm
Normal
Heavy
Light
Lightly soiled and
colored clothing
High
Extra High
No Spin
Low
Medium
Warm/Warm
Hot/Cold
Warm/Cold
Light
Normal
Heavy
Baby Wear
Small and lightly
soiled loads, specially
skin sensitive user.
Heavily soiled
underwear, work
clothes, diapers, etc.
(less than 11 lbs.)
Sanitary
High
Extra High
No Spin
Low
Medium
Heavy
Light
Normal
Extra Hot/Cold
Perm Press
Casual
Low
Medium
High
No Spin
Warm/Cold
Warm/Warm
Cold/Cold
Normal
Heavy
Light
Dress shirts/pants,
wrinkle-free clothing,
poly/cotton blend
clothing, tablecloths
Heavy Duty
High
Extra High
No Spin
Low
Medium
Warm/Cold
Warm/Warm
Hot/Cold
Cold/Cold
Heavy
Light
Normal
Heavy soiled cotton
fabrics
Bulky/Bedding
Medium
High
Extra High
No Spin
Low
Warm/Cold
Warm/Warm
Hot/Cold
Cold/Cold
Normal
Heavy
Light
Large items such
as blankets and
comforters
Cotton/Normal
High
Extra High
No Spin
Medium
Warm/Cold
Hot/Cold
Warm/Warm
Cold/Cold
Normal
Heavy
Light
Cotton, linen, towels,
shirts, sheets, jeans,
mixed loads
Towels
High
Extra High
No Spin
Low
Medium
Warm/Cold
Warm/Warm
Hot/Cold
Cold/Cold
Normal
Heavy
Light
Towels, shirts,
sheets, jeans, mixed
loads
Tub Clean
High
Refer to page 24.
Extra
Rinse
Fabric
Softener
Delay
Wash
* Use the Bulky/Bedding cycle for items such as pillows, comforters and other articles which have difficultly absorbing water. ONLY
WASH SMALL LOADS to make sure there is plenty of room for the load to move during washing. Keep like items together; do not mix
large bulky items with smaller clothing items. Failure to follow these instructions may result in damage to the clothing or to the washer.
15

HOW TO USE
SORTING WASH LOADS
Fabric Care Labels
Most articles of clothing feature fabric care labels
that include instructions for proper care.
Grouping Similar Items
For best results, sort clothes into loads that can
be washed with the same wash cycle.
Different fabrics have different care requirements.
Always wash dark colors separately from light
colors and whites to prevent discoloration. If
possible, do not wash heavily soiled items with
lightly soiled ones. The chart below shows
recommended groupings.
Fabric Care Labels
Bulky items should be placed as far down in the
wash basket as possible for optimal results.
Always place buoyant items at the bottom of the
wash basket.
The washer will automatically detect the load size.
Because of the high-eciency wash system, the
water level may not completely cover the load.
To add items after washer has started, press the
START/PAUSE button, lift the lid, add items, and
close the lid. Press the START/PAUSE button.
Refer to page 20.
• Check all pockets to make sure that they
are empty. Items such as clips, matches,
pens, coins, and keys can damage both your
washer and your clothes.
• Close zippers, hooks, and drawstrings to
prevent these items from snagging or tangling
on other clothes.
• Pretreat heavily stained areas for best results.
• Large items should not be more than half of the
total wash load.
• Do not wash fabrics containing ammable
materials (waxes, cleaning uids, etc.)
• The washer will not ll or operate with the lid
open.
* IMPORTANT: Use the Bulky/Bedding cycle for
large or bulky items such as poly-lled jackets,
comforters, pillows, etc. These items may not be
as absorbent as other laundry items and should
be sorted into a separate wash load for optimal
results.
wCAUTION:
• Do not load items over the tub.
Failure to follow this caution can result in leakage
or fabrics damage.
• Use the BULKY/BEDDING cycle for buoyant
or nonabsorbent items such as pillow or
comforter.
Failure to follow this caution can result in leakage.
Do not wash or spin any item labeled or known
to be water-proof or water-resistant, even if
the product care label on the item permits
machine washing. Failure to follow these
instructions could result in bodily injury, severe
damage to your laundry, your washer and/or
property damage as a result of abnormal vibration
of the washer.
- Examples of water-proof or water-resistant items
include certain mattress pads, mattress covers,
rain gear, camping gear, skiing apparel , outdoor
gear and similar items.
Loading the Washer
Sort Laundry...
by Colors by Soil by Fabric by Lint
Whites Heavy Delicates Lint Producer
Lights Normal Easy Care Lint Collector
Darks Light Sturdy
16

ENGLISH
HOW TO USE
SELECTING DETERGENT
ABOUT THE DISPENSER
IMPORTANT: Do not place or store laundry
products, such as detergent, bleach, or liquid
fabric softener, on top of your washer or dryer.
Wipe up any spills immediately. These products
can damage the finish and controls.
Designed especially to use only
HE (High-Efficiency) detergent
IMPORTANT: Your washing machine is
designed for use with only High-Efficiency (HE)
detergents, which contain suds-reducing agents.
Always look for the HE symbol when purchasing
detergent.
HE detergents produce fewer suds, dissolve
more efficiently to improve washing and rinsing
performance, and help to keep the interior of your
washer clean.
Using a regular detergent may cause over sudsing
and unsatisfactory performance and could damage
the machine or cause expensive maintenance
issues.
The automatic dispenser consists of two
compartments which hold:
• Liquid fabric softener.
• Liquid or powdered detergent.
All laundry products can be added at once in
their respective dispenser compartments. They
will be dispensed at the appropriate time for the
most effective cleaning.
After adding the laundry products to the
dispenser, close the dispenser drawer.
To add detergent, and fabric softener to the
automatic dispenser:
Open the dispenser drawer.
Load the laundry products into the
appropriate compartments.
Close the drawer slowly and smoothly
to avoid spilling, splashing or premature
dispensing of the contents.
NOTE: It is normal for a small amount of water to
remain in the dispenser compartments at the end
of the cycle.
NOTE: Do not use bleach in the dispenser
drawer.
Removing the dispenser drawer
Replacing the dispenser drawer
Pull the dispenser
drawer.
Tilt the dispenser
drawer upward and
remove it.
Place rail ② (dispenser
drawer rail) on top of
rail ①.
Push the dispenser
drawer firmly.
NOTE: Be careful not to pinch your finger.
1
1
2
2
1
2
3
Main Wash
Liquid Detergent
Compartment
Insert
Main Wash
Powder Detergent
Compartment
Liquid Fabric
Softener
Compartment
①
②
17

HOW TO USE
LOADING THE DISPENSER
Main Wash Detergent Compartment
This compartment holds laundry detergent
for the main wash cycle, which is added to
the load at the beginning of the cycle. Always
use HE (High-Eciency) detergent with your
washing machine.
Never exceed the detergent manufacturer’s
recommendations when adding detergent.
Using too much detergent can result in
detergent buildup in clothing and the washer.
Either powdered or liquid detergent may be used.
• When using liquid detergent, make sure the
liquid detergent cup and insert are in place.
Do not exceed the maximum ll line.
• When using powdered detergent, remove
the insert and liquid detergent cup from the
compartment. Powdered detergent will not
dispense with the liquid detergent cup and
insert in place.
Using the Liquid Bleach Dispenser
The bleach dispenser
automatically dilutes
and dispenses liquid
chlorine bleach at the
proper time in the
wash cycle.
Check clothing care labels for special
instructions.
Measure liquid bleach carefully, following
instructions on the bottle.
• Never pour undiluted liquid chlorine bleach
directly onto clothes or into the wash basket.
• Do not pour powdered bleach into bleach
dispenser. Do not place load items on top
of the bleach dispenser when loading and
unloading the washer.
• Avoid overlling or splashing when adding
bleach to the dispenser. The maximum
capacity of the bleach dispenser is one cup of
bleach per wash cycle. Overlling could result
in premature dispensing of bleach.
Before starting the washer, pour a pre-
measured amount of bleach directly into
bleach dispenser. If you prefer to use
powdered bleach, add it into the wash basket
directly before adding clothes.
NOTE: Please flush the bleach dispenser with
water after bleach use and then rinse out the
residue by use of Rinse & Spin cycle.
Fabric Softener Compartment
This compartment holds liquid fabric softener,
which will be automatically dispensed during the
nal rinse cycle.
• Always follow the detergent manufacturer’s
recommendations when adding fabric softener.
Do not exceed the maximum ll line. Using
too much fabric softener may result in stained
clothes.
• Dilute concentrated fabric softeners with warm
water. Do not exceed the maximum ll line.
• Never pour fabric softener directly onto the load
or into the drum.
wWARNING: Do NOT mix chlorine
bleach with ammonia or acids, such as vinegar or
rust / scale remover.
Mixing chemicals like these can produce gas
which may cause death.
Put the manufacturer’s recommended amount of
undiluted liquid chlorine bleach into the bleach
dispenser. During the final portion of the wash
cycle, two sequential flushes of the dispenser put
all the bleach into the wash load and completely
flush the dispenser to eliminate the carryover of
bleach to a subsequent load. Any liquid remaining
in the bleach dispenser at the end of the cycle is
water, not bleach.
To prevent unintentional self-siphoning of the
bleach, never fill the dispenser higher than the
maximum fill level marked on the dispenser.
When adding bleach to the dispenser, be careful
to avoid spilling it into the laundry load or leaving
droplets of bleach around the dispenser. These
things will damage your laundry items.
Fabric
Softener
Main Wash
Detergent
1
2
3
18

ENGLISH
HOW TO USE
THE LED DISPLAY
CYCLE STATUS INDICATOR
This portion of the display shows which stage
of the wash cycle is currently underway (LOAD
SENSING, WASH, RINSE, or SPIN).
ESTIMATED TIME REMAINING
When the START/PAUSE button is pressed, the
washer automatically detects the wash load
(weight) and optimizes the washing time based
on the selected cycle and options. The display
will then indicate the estimated time remaining
for the selected wash cycle.
A
B
LID LOCK INDICATOR
Indicates that the lid is locked. The washer lid
will lock while the washer is operating. The lid
can be unlocked by pressing the START/PAUSE
button to stop the washer.
DELAY WASH INDICATOR
This indicator shows that the washer has
been set for DELAY WASH. The washer will
start automatically after the set delay time
has passed.
COLDWASH™
This indicator turns on the light in eleven cycles.
These cycles save energy by using cold water.
C
D
The LED display shows the settings, estimated time remaining, options, and status messages
for your washer. When the washer is turned on, the display will illuminate.
A D
CE
B
E
19

SPIN SPEED
The washer drum spins at up to 1,100
RPM. This reduces drying time and
saves energy. Press the SPIN SPEED
button until the indicator light for the
desired setting is lit. You can change
maximum spin speed of spin cycle.
Some fabrics, such as delicates,
require a slower spin speed.
• If you select NO SPIN, the washer
turn off without spin cycle after
draining. (The cycle time will be
reduced by approximately 10
minutes.)
CYCLE MODIFIER BUTTONS
Each cycle has preset settings that are selected
automatically. You may also customize the
settings using the cycle setting buttons.
Press the button for that setting until the indicator
light for the desired value is lit.
The washer automatically adjusts the water level
for the type and size of wash load for best results
and maximum efficiency. It may seem there is no
water inside the tub in some cycles, but this is
normal.
NOTE: To protect your garments, not every
wash/rinse temperature, spin speed, soil level, or
option is available with every cycle. A beeper will
sound and the LED will not light if a selection is
not allowed. See the Cycle Guide on page 15 for
details.
SOIL LEVEL
Adjusts the selected cycle to allow
more faster agitation speed for
heavily soiled clothes or less slower
agitation speed for lightly soiled
clothes during the wash and rinse
course.
Press the SOIL LEVEL button until the
indicator light for the desired setting
is lit. You can choose between Light,
Normal or Heavy soil.
• The light will not show on this gure (▼).
WASH/RINSE
Adjust to select the proper water
temperature for the wash cycle. It is
composed of washing temperature/
rinsing temperature.
• Your washer features a heating
element to boost the hot water
temperature for Extra Hot/Cold or
Hot/Cold settings.
• Select the water temperature
suitable for the type of load you are
washing. Follow the fabric care label
for best results.
• Warm rinses leave the loads drier than cold
rinses. Warm rinses can increase wrinkling.
• In cold climates, a warm rinse makes the load
more comfortable to handle.
• Cold rinses use less energy.
• Use both hot and cold water supply for optimal
results.
HOW TO USE
SPECIAL USE
Select any additional option, such
as RINSE+SPIN, SPIN ONLY, STAIN
CARE™ or SOAK
• If you press SPECIAL USE button
without selecting a cycle, COTTON/
NORMAL cycle with SOAK is
automatically selected.
NOTE: If you press SPECIAL USE
button 3 or 4 times, the cycle will
reset to COTTON/NORMAL.
ADD GARMENTS
Laundry may be added to the load at the proper
time in the wash cycle.
• ADD GARMENTS is automatically turned on
and off. You can not select it by pressing
SPECIAL USE button.
• If additional items are added during ADD
GARMENTS light is off, it may cause
unsatisfactory performance.
During ADD GARMENTS indicator light on.
Press START/PAUSE button to pause the
washer.
Open the lid after unlocked.
Add your additional items.
Close the lid.
Press START/PAUSE button to resume
the washer cycle. The washer will start
automatically.
NOTE: If the washer remains idle for 8 minutes
after pausing the cycle, the water in the tub will
drain.
1
2
3
4
5
20

ENGLISH
HOW TO USE
SOAK
Allows the consumer to remove stains more
thoroughly by specifying additional time for the
clothing to soak during washing. At the end of
SOAK, the wash cycle will be started without
drain.
• Cycle time will be increased by 30 minutes.
• It is normal that washer do weak agitation
during SOAK cycle.
NOTE: You cannot select the SOAK option in the
TUB CLEAN cycle.
STAIN CARE™
STAIN CARE™ may be selected as an option with
HEAVY DUTY, COTTON/NORMAL and TOWELS
cycles.
• Wash only small loads for optimum fabric care.
(less than 8 lbs.)
Press the POWER button to turn on the
washer.
Press the SPECIAL USE button until the
STAIN CARE™ indicator light is lit.
Press the START/PAUSE button to start the
cycle. The washer will start automatically.
NOTE: If you select STAIN CARE™, the
COLDWASH™ option is not available.
RINSE + SPIN
Select this option to rinse and spin a load
separately from a regular cycle. This can be
helpful in preventing fresh stains from setting in
fabrics.
• You can change rinse temperature and spin
speed by pressing WASH/RINSE and SPIN
SPEED respectively.
Press the POWER button to turn on the
washer.
Press the SPECIAL USE button until the
RINSE+SPIN indicator light is lit. (The cycle
light will turn off.)
Press the START/PAUSE button to start the
cycle. The washer will start automatically.
SPIN ONLY
This button activates the Drain & Spin cycle to
drain and spin.
Press the Power button to turn on the
washer.
Press the SPECIAL USE button until the
SPIN ONLY indicator light is lit.
Press the START/PAUSE button to start the
cycle. The washer will start automatically.
1
2
3
1
2
3
CYCLE MODIFIER BUTTONS (cont.)
1
2
3
21

Press the START/PAUSE button during wash
or rinse cycle.(It is not available in spin cycle)
Press and hold the EXTRA RINSE.
Press the START/PAUSE button to start the
cycle.
If you want to use additional water, repeat
steps 1 through 3.
NOTE: If the machine reaches its maximum water
level, the WATER PLUS button will have no effect.
NOTE: You cannot select the WATER PLUS
option in the SANITARY, TUB CLEAN, and
BULKY/BEDDING cycle.
HOW TO USE
CYCLE OPTION BUTTONS
Your washing machine features several additional
cycle options to customize cycles to meet your
individual needs. Certain option buttons also
feature a special function that can be activated
by pressing and holding that option button for 3
seconds.
NOTE: To protect your garments, not every wash/
rinse temperature, spin speed, soil level, or option
is available with every cycle. See the Cycle Guide
for details.
COLDWASH™
Use this option to eliminate using
the built-in water heater booster.
For maximum efficiency, wash only
small loads. (less than 8 lbs.)
NOTE: If you select STAIN CARE™, the
COLDWASH™ option is not available.
Press the POWER button to turn on the
washer.
Turn the cycle selector knob to select the
cycle. (Refer to page 15.)
Press the COLDWASH™ button.
Press the START/PAUSE button to start the
cycle. The washer will start automatically.
EXTRA RINSE
This option will add an extra rinse
cycle to the selected cycle. Use this
option to help ensure the removal
of detergent or bleach residue from
fabrics. Pressing the EXTRA RINSE button twice
will add two additional rinses to the cycle.
Press the POWER button to turn on the
washer.
Turn the cycle selector knob to select the
desired cycle.
Press the CYCLE MODIFIER buttons to
change the desired settings.
Press the EXTRA RINSE.
• If you want to delete extra rinse, press the
EXTRA RINSE three times.
Press the START/PAUSE button to start the
cycle.
NOTE: You cannot select the EXTRA RINSE
option while the spin cycle.
1
2
3
4
5
1
2
3
4
1
2
3
4
DELAY WASH
Once you have selected the cycle
and other settings, press this button
to delay the start of the wash cycle.
Each press of the button increase
the delay time, up to 19 hours.
WATER PLUS
Select this option to add extra
water to the wash and rinse cycles
for superior results, especially with
large or bulky items.
Press and hold the EXTRA RINSE button for 3
seconds to activate or deactivate WATER PLUS.
FABRIC SOFTENER
The fabric softener is dispensed
in the final rinse. Select FABRIC
SOFTENER button to change final
rinse type from spray rinse to deep
rinse.
NOTE: LG recommends using FABRIC
SOFTENER or EXTRA RINSE options when
selecting the COTTON/NORMAL or HEAVY DUTY
cycles.
NOTE: If you select EXTRA RINSE instead of
FABRIC SOFTENER, the fabric softener will be
dispensed during the extra rinse course.
22

ENGLISH
CHILD LOCK
Use this option to prevent unwanted
use of the washer or to keep cycle
settings from being changed while
the washer is operating. Press and
hold the BEEPER button for 3 seconds to activate
or deactivate CHILD LOCK.
The washer can be locked during a cycle. Once
CHILD LOCK is selected, the display will alternate
between CL and the remaining cycle time. And
all controls except CHILD LOCK and POWER
buttons will be disabled.
NOTE: CHILD LOCK lasts after the end of cycle.
If you want to deactivate this function, press and
hold the BEEPER button for 3 seconds.
CUSTOM PROGRAM
CUSTOM PROGRAM allows you
to store a customized wash cycle
for future use. It allows you to save
favorite temperature, spin speed,
soil level, and other options for a
cycle, and then recall them at the
touch of a button.
NOTE: You may only save one custom program
at a time. Pressing and holding the CUSTOM
PROGRAM button will overwrite any previously
saved custom program.
To save a custom program:
Press the POWER button to turn on the
washer.
Turn the Cycle Selector Knob to select the
desired cycle.
Press the Cycle Modifier button to change
the desired setting.
Press the Cycle Option button to add the
desired options.
Press and hold the CUSTOM PROGRAM
button for 3 seconds.
To recall a custom program:
Press the POWER button to turn on the
washer.
Press the CUSTOM PROGRAM button. The
stored settings will be displayed.
Press the START/PAUSE button to start
the cycle. (If you press any other button,
CUSTOM PROGRAM is automatically
deselected and indicator light off.)
HOW TO USE
CYCLE OPTION BUTTONS (cont.)
1
2
3
4
5
BEEPER
Adjusts the volume of the end-of-
cycle beeper or turns it off.
1
2
3
23

wWARNING:
• Unplug the washer before cleaning to avoid the risk of electric shock. Failure to follow this warning
can cause serious injury, fire, electrical shock, or death.
• Never use harsh chemicals, abrasive cleaners, or solvents to clean the washer.
They will damage the finish.
Cleaning the Exterior
Proper care of your washer can extend its life.
The outside of the machine can be cleaned with
warm water and a mild, nonabrasive household
detergent.
Immediately wipe off any spills with a soft, damp
cloth.
IMPORTANT: Do not use methylated spirits,
solvents, or similar products.
Never use steel wool or abrasive cleansers; they
can damage the surface.
Care and Cleaning of the Interior
Use a towel or soft cloth to wipe around the
washer lid opening, and lid glass.
Always remove items from the washer as soon
as the cycle is completed. Leaving damp items
in the washer can cause wrinkling, color transfer,
and odor.
This washer has a special cycle, TUB CLEAN, to
remove inside buildup of detergent residue which
can occur in the wash tub or drum and lead to
mildew or musty smell.
Run the TUB CLEAN cycle monthly to remove
detergent buildup and other residue.
Read these instructions carefully before
beginning the TUB CLEAN cycle.
Open the lid and remove any clothing in the
wash drum.
Open the dispenser drawer.
Add liquid chlorine bleach or tub cleaner.
Some powdered or tablet tub cleaners which
are manufactured for this purpose can be
used.
(NOTE: Do not add any laundry detergent or
fabric softener to the drawer when using TUB
CLEAN.)
- If using powder cleaner
Remove the liquid detergent cup and add
powder cleaner to the main wash
compartment of the drawer.
- If using tablet cleaner
Add tablet cleaner to the wash drum
directly.
(NOTE: Do not add tablet cleaner to the
drawer.)
Close the drawer and washer lid.
Select TUB CLEAN and press START/PAUSE.
NOTE : It is recommended that TUB CLEAN
should be repeated monthly.
If mildew or smell already exists, run TUB CLEAN
for 3 consecutive weeks.
After TUB CLEAN is complete or when the
washer is not used, leave the washer lid open for
better ventilation and drying inside of the washer.
4
5
1
2
3
REGULAR CLEANING
CARE AND CLEANING
24

ENGLISH
CARE AND CLEANING
REGULAR CLEANING (cont.)
Removing Lime Buildup
If you live in an area with hard water, lime scale
can form on internal components of the washer.
Use of a water softener is recommended in areas
with hard water. If a descaler is used, make sure
that it is suitable for use in a washer, and run the
TUB CLEAN cycle before washing clothing.
Lime scale and other spots may be removed
from the stainless steel drum using a stainless
steel cleaner. Do NOT use steel wool or abrasive
cleansers; they can damage the surface.
Storing the Washer
If the washer will not be used for an extended
period of time and is in an area that could be
exposed to freezing temperatures:
Turn off water supply tap.
Disconnect hoses from water supply and
drain water from hoses.
Plug the power cord into a properly grounded
electrical outlet.
Add 1 gallon of nontoxic recreational vehicle
(RV) antifreeze to the empty wash drum.
Close the lid.
Select the spin cycle and let washer spin
for 1 minute to drain out all the water.
NOTE: Not all of the RV antifreeze will be
expelled.
1
2
3
4
5
Unplug the power cord, dry the drum interior
with a soft cloth, and close the lid.
Remove the inserts from the dispenser. Drain
any water in compartments and dry the
compartments.
Store the washer in an upright position.
To remove the antifreeze from the washer
after storage, run washer through a complete
cycle using detergent. Do not add laundry!
6
7
8
9
Leave the Lid Open
Leave the lid open after finishing laundry to keep
the tub clean.
Cleaning the Water Inlet Filters
If the washer detects that water is not entering
the dispenser, an error message will show on the
display. If you live in an area with hard water, this
may be caused by clogged inlet filters.
Turn off both water taps completely. Unscrew
the hot and cold water lines from the back of the
washer.
IMPORTANT: Use extreme care when removing
and cleaning the filters. If the filters cannot be
cleaned or are damaged, do NOT operate the
washer without the inlet filters. Contact LG
Customer Service or a qualified LG servicer.
MAINTENANCE
or
Carefully remove the filters from the water inlets,
and soak them in white vinegar or a lime scale
remover. Rinse thoroughly before reinstalling.
Press the filters back into place and reattach the
water lines. Do NOT operate the washer without
the inlet filters.
IMPORTANT: Use ONLY the inlet hoses provided
by LG with this laundry product. Aftermarket
hoses are not guaranteed to fit or function
correctly. Other hoses may not tighten correctly
and could cause leaks. Subsequent damage to
product or property will not be covered under the
terms of LG's warranty.
or
Inlet Filter
Inlet Filter
Hot
Cold
Hot
Cold
25

Proper Use of Detergent
Using too much detergent is a common
cause of laundry problems. Today’s
detergents are formulated to be effective
without visible sudsing. Be sure to
carefully read and follow manufacturer’s
recommendations for how much
detergent to use in your wash.
You can use less detergent if you have
soft water, a smaller load, or a lightly
soiled load.
NOTE: Use only low-sudsing, high-
efficiency detergent such as
Tide® HE.
Care and Cleaning of the Washer
Lid: Wash with a damp cloth on the outside and inside and dry with a soft
cloth.
Exterior: Immediately wipe off any spills. Wipe with damp cloth. Do not
touch the surface or the display with sharp objects.
Moving and Storage: Ask the service technician to remove water from drain
pump and hoses. Do not store the washer where it will be exposed to the
weather.
Long Vacations: Be sure water supply is shut off at faucets. Drain all water
from hoses if weather will be below freezing.
Dispenser Drawer: Detergent and fabric softener may build up in the
dispenser drawer. Residue should be removed once or twice a month.
Remove the drawer by pulling it straight out until it stops. Lift up on the
front of the drawer and pull it out.
1
2
3
4
CARE AND CLEANING
CLEANING THE WASHER
Remove the inserts from the 2 compartments; rinse the inserts and the
drawer with warm water to remove traces of accumulated laundry
products.
To clean the drawer opening, use a small, non-metal brush to clean the
recess. Remove all residue from the upper and lower parts of the recess.
Return the inserts to the proper compartments and replace the drawer.
26

ENGLISH
TROUBLESHOOTING
NORMAL SOUNDS YOU MAY HEAR
Problem Possible Causes Solutions
Rattling and
clanking noise
Thumping sound
Water leaking
around washer
• Foreign objects, such as
keys, coins, or safety pins,
may be in drum or pump.
• Heavy wash loads may
produce a thumping sound.
• Washer load may be out
of balance.
• Wash load may be unevenly
distributed in the drum.
• Not all leveling feet are resting
rmly on the oor.
• Floor not rigid enough.
• Fill hose connection is loose
at tap or washer.
• House drain pipes are
clogged.
• Large items such as pillow
and blanket over the tub.
• Stop washer and check drum for foreign objects. If
noise continues after the washer is restarted, call for
service.
• This is normal. If sound continues, the washer is
probably out of balance. Stop and redistribute the
wash load.
• Stop and redistribute the wash load.
• Stop washer and rearrange the wash load.
• Adjust the leveling feet. Make sure all four feet are in
rm contact with the oor while the washer is in the
spin cycle with a load.
• Make sure that the oor is solid and does not ex.
Refer to Flooring in the Installation section.
• Check hoses. Check and tighten hose connections.
• Unclog drain pipe. Contact a plumber if necessary.
• Check the cycle. If you wash large items, use
BULKY/BEDDING cycle.
• Stop washer and check the load position. Lay bulky
items into the tub.
Clicking:
• Lid lock relay when the lid locks and unlocks.
• The washer will make a series of clicking noises
as it changes the cleaning mode.
High pitched noise:
The wash basket spins faster to remove moisture
from the load.
Spraying or hissing:
Water spraying or circulating during the cycle.
Humming or gurgling:
Drain pump pumping water from the washer at
the end of a cycle.
Water sloshing sound:
A liquid in the balance ring around the wash
basket helps the basket spin smoothly.
(Washer is turned off and tub is rotated.)
Sound of water being added after the washer
has already been operating:
• The washer adapts to the load size and type to
add more water to the cycle as needed.
• The wash load may be unbalanced. If the
washer senses that the load is unbalanced, it
will stop and refill to redistribute the load.
• The washer may be diluting laundry additives to
add to the wash load.
BEFORE CALLING FOR SERVICE
Your washing machine is equipped with an automatic error-monitoring system to detect and diagnose
problems at an early stage. If your washer does not function properly or does not function at all, check the
following before you call for service.
Vibrating noise
Excessive sudsing
• Too much detergent or
incorrect detergent.
• Reduce detergent amount or use low-sudsing
detergent.
Only use detergent with the HE
(High-Eciency) logo.
The following sounds may be heard while the
washer is operating. They are normal.
27

TROUBLESHOOTING
BEFORE CALLING FOR SERVICE (cont.)
Problem Possible Causes Solutions
Washer fills with
water slowly or not
at all, or the display
shows:
Washer will not
turn on
The display shows:
• Water supply taps are not
open fully.
• Water line hoses are kinked,
pinched, or bent.
• Water inlet lters are clogged.
• Water pressure to tap or
house is too low.
• Power cord is not properly
plugged in.
• House fuse is blown, circuit
breaker has tripped, or power
outage has occurred.
• The lid is not closed properly.
• Water level is too high due to
a faulty water valve.
• Make sure that the water taps are open fully.
• Make sure the hoses are not kinked or pinched. Be
careful when moving the washer.
• Clean the inlet lters. See the Care and Cleaning
section.
• Check another faucet in the house to make sure that
household water pressure is adequate.
• Make sure that the plug is plugged securely into a
grounded, 3-prong, 120-VAC, 60-Hz. outlet.
• Reset circuit breaker or replace fuse. Do not increase
fuse capacity. If the problem is a circuit overload,
have it corrected by a qualied electrician.
• Make sure that the lid is closed properly and press
the START/PAUSE button. After starting a cycle, it
may take a few moments before the drum begins to
turn or spin. The washer will not spin unless the lid is
locked (LID LOCK will appear in the display).
• If the lid is closed and locked and the open lid error
message is displayed, call for service.
• If you press the START button while the lid is open,
dE error message will be displayed.
The display shows:
• The washer automatically
adjusts the wash time for
the amount of laundry, water
pressure, water temperature,
and other operating
conditions.
• This is normal. The washer adjusts cycle time
automatically to provide optimal results for the
selected cycle.
• If you press the START button while the lid is open,
dE error message will be displayed.
• Close the water taps, unplug the washer, and call for
service.
Wash cycle time is
longer than usual
The display shows:
•Lid lock switch error
• Make sure that the lid is closed properly and press
the START/PAUSE button. The washer will not spin
unless the lid is locked (LID LOCK will appear in the
display).
• If the lid is closed and the lid lock error message is
displayed, call for service.
Water in the washer
drains slowly or not
at all, or the display
shows:
• Drain hose is bent, pinched,
or clogged.
• Make sure the drain hose is free of clogs, kinks, etc.,
and is not pinched behind or under the washer.
The display shows:
• Clutch error
• Unplug the washer, and call for service.
28

ENGLISH
TROUBLESHOOTING
Wrinkling
• Washer not unloaded
promptly.
• Washer overloaded.
• Hot and cold water inlet
hoses are reversed.
Problem Possible Causes Solutions
The display shows:
The display shows:
• The washer has detected an
out of balance load.
• If the uE rebalance (see
above) is not successful, this
error will be displayed.
• The load is too small.
• Heavy articles are mixed with
lighter items.
• The load is out of balance.
• If the washer detects a load that is too far out of
balance to spin, it will display this code while it
is attempting to rebalance the load. The washer
will add water and try to redistribute the load
automatically. This display is for your information
only, and no action is required.
• The automatic attempt to rebalance the load was not
successful. The cycle has been paused to allow the
load to be manually adjusted.
• Small loads may need additional items to be added
to allow the washer to balance the loads.
• The load may have heavy items loaded with lighter
items. Always try to wash articles of somewhat
similar weight to allow the washer to evenly distribute
the weight of the load for spinning.
• Manually redistribute the load if articles have become
tangled preventing the automatic distribution from
working properly.
• Thermistor error
• Unplug the washer and call for service.
The display shows:
• The water level sensor is not
working correctly.
• Close the water taps, unplug the washer, and call
for service.
The display shows:
• Thermal overload protection
circuit in the motor has been
tripped.
• Allow the washer to stand for 30 minutes to allow the
motor to cool; then restart the cycle. If the LE error
code still appears, unplug the washer and call
for service.
The display shows:
Staining
• Add laundry products to the
washer drum.
• Washer not unloaded
promptly.
• Does not properly sort the
clothes.
• Load the laundry products into the dispenser.
• Always remove items from the washer as soon as
the cycle is completed.
• Always wash dark colors separately from light colors
and whites to prevent discoloration. If possible, do
not wash heavily soiled items with lightly soiled
ones.
• Always remove items from the washer as soon as
the cycle is completed.
• The washer can be fully loaded, but the drum should
not be tightly packed with items. The lid of the
washer should close easily.
• Hot water rinse can set wrinkles in garments. Check
the inlet hose connections.
BEFORE CALLING FOR SERVICE (cont.)
NOTE: If an error message is displayed for 4 minutes, the water in the tub will automatically drain. An alarm
will sound 1 minute prior to draining, and ‘dr’ will appear on the display. You may restart the washer at this
time. However, once the washer initiates draining, all functions will be suspended, and ‘dr’ will be displayed
until draining is complete.
29

TROUBLESHOOTING
BEFORE CALLING FOR SERVICE (cont.)
Problem Possible Causes Solutions
Washer won't
operate
Control panel is asleep
Washer is unplugged
Water supply is turned o
Controls are not set
properly
Lid is open-safety feature
Prevents the washer from
lling and operation when
lid is up
Circuit breaker/fuse is
tripped/blown
Electronics need to be
reset
START was not pressed
after a cycle was set
Extremely low water
pressure
Washer is too cold
Filter clogged or ll hoses
may be kinked
Energy eciency
Insucient water supply
The washer lid is open
Incorrect ll hose
connection
Water ll optimization
• This is normal. Press POWER.
• Make sure cord is plugged securely into a working outlet.
• Turn both hot and cold faucets fully on.
• Make sure the cycle was set correctly, close the lid and
press START.
• Close lid and reset cycle, to the beginning if necessary.
• Check house circuit breakers/fuses. Replace fuses or reset
breaker. The washer should have a dedicated circuit.
• Press the POWER button.
• Press START.
• Check another faucet in the house to make sure that
household water pressure is adequate.
• If the washer has been exposed to temperatures below
freezing for an extended period of time, allow it to warm
up before pressing POWER. Otherwise, the display will not
come on.
• Make sure that lters (blue and orange screens must be
free of solids) on the unit are not clogged. Turn o water
and check lter by disconnecting hose at machine. Check
that ll hoses are not kinked or clogged.
• This is an energy-ecient washer. As a result the
temperature settings for this washer may be dierent than
non-energy-ecient washers.
• Make sure that the water supply is turned on.
Make sure that the water faucets are turned to their
completely open positions.
• The washer lid must be closed for all washer cycle
operations. If the lid is opened during washer operation, all
functions will stop, including water lling.
• Make sure that the ll hoses connect the hot water supply
to the hot inlet on the washer, and the cold water supply to
the cold inlet on the washer (hot to hot, cold to cold).
• Water may not cover the top level of the clothes. This
is normal for this high-eciency washer. The water ll is
optimized by the system for best wash performance.
Washer not filling
property
30

ENGLISH
TROUBLESHOOTING
BEFORE CALLING FOR SERVICE (cont.)
Problem Possible Causes Solutions
Washer will not
drain water
Water leaks every
load
Water leaks
Incomplete or
no dispensing of
detergent
Premature
dispensing of bleach
Clogging of bleach
Poor stain removal
• Ensure that the drain hose is not kinked. Per the
recommended installation instructions, the drain outlet
cannot be over 8' above the oor.
• Check all ll and drain hose connections to ensure that
they are tight and secure.
• Oversudsing may create leaks, and may be caused by
the type and amount of detergent used. High-eciency
detergent is recommended. Make sure that detergent
and any additives are put into the correct dispenser
compartments. Follow the detergent manufacture's
recommendations for the amount of detergent, but try
using less detergent, especially if home water conditioning
or water softening units are used.
• Make sure that detergent and additives are put in to the
correct dispenser compartments. If liquid detergent is
used, make sure that the liquid detergent cup and insert
are in the detergent compartment. If powdered detergent
is used, make sure that the liquid detergent cup and insert
are not used. For all detergent types, always make sure that
the dispenser drawer is fully closed before the start of the
cycle.
• Make sure that the suggested amount of detergent is used
per the manufacture's recommendations. You may also
dilute the detergent with water to the maximum ll line on
the compartment to avoid clogging. Use only HE (High-
Eciency) detergent.
• Make sure that the water supply is turned on. Make sure
that the water faucets are turned to their completely open
positions.
• Normal operation. Residual may remain in the dispenser of
the compartments. The dispenser box may by removed for
occasional cleaning with warm water and a scrub brush.
• You cannot store bleach in the dispenser for future use.
The bleach dispenser will be dispensed every load for
optimal safety of the washer.
• Overlling the dispenser with bleach may lead to premature
dispensing. There is a maximum ll line indicated on the
bleach dispenser to help avoid overlling.
• Make sure that the bleach cover is properly seated and
snapped into place before the start of the cycle.
• You may remove and clean the bleach cover with warm
water and a scrub brush to clear clogging.
• When stain inspector is used, presoak temperature and
time are automatically selected. If you choose not to use
the stain inspector, we recommend that you select presoak
when dening your wash cycle. Always make sure that any
additives, such as your high eciency liquid detergent,
are added to the pretreat dispenser bin before starting the
cycle. Always refer to your clothes care label before treating
stains.
Kinked drain hose or drain
located higher than 8'
above oor
Hoses not installed
correctly
Oversudsing of detergent
Detergent compartments
clogged from incorrect
lling
Too much detergent use
Insucient water supply
Normal residue
Bleach dispenser lled for
future load
Overlling the bleach
dispenser
Bleach dispenser is not
seated
Insucient cleaning
Presoak not selected
31

TROUBLESHOOTING / SPECIFICATIONS
KEY DIMENSIONS AND SPECIFICATIONS
Model WT5101H*
Description Top-Loading Washer
Rated Voltage/Frequency 120V AC, 60Hz
Water Pressure 14.5~116 PSI (100~800 kPa)
Dimensions 27"(W) X 28
3
/8"(D) X 45
3
/8"(H), 55
3
/4"(H with lid open)
68.6 cm (W) X 72.1 cm (D) X 115.3 cm (H), 141.7 cm (H with lid open)
Net Weight 145.5 lbs. (66 kg)
Max. Spin Speed 1,100 RPM
The appearance and specications listed in this guide may vary due to constant product improvements.
USING SMARTDIAGNOSIS™
- Only use this feature when instructed to do so by the call center. The transmission sounds similar to a fax
machine, and so has no meaning except to the call center.
- SmartDiagnosis™ cannot be activated if the washer does not power up. If this happens, then
troubleshooting must be done without SmartDiagnosis™.
If you experience problems with your washer, call 1-800-243-0000 (1-888-542-2623 in Canada). Follow the
call center agent’s instructions, and do the following steps when requested:
Press the POWER button to turn on the washer. Do not press any other buttons or turn the cycle
selector knob.
When instructed to do so by the call center, place the mouthpiece of your phone very close to the
POWER button.
Press and hold the Wash/Rinse button for three seconds, while holding the phone mouthpiece to the
icon or POWER button.
Keep the phone in place until the tone transmission has finished. This takes about 15 seconds, and
the display will count down the time.
• For best results, do not move the phone while the tones are being transmitted.
• If the call center agent is not able to get an accurate recording of the data, you may be asked to try
again.
• Pressing the POWER button during the transmission will shut off the SmartDiagnosis™.
Once the countdown is over and the tones have stopped, resume your conversation with the call
center agent, who will then be able to assist you using the information transmitted for analysis at the
call center.
1
2
3
4
5
32

ENGLISH
Your LG Washing Machine will be will repaired or replaced, at LG’s option, if it proves to be defective in material or work-
manship under normal use, during the warranty period (“Warranty Period”) set forth below, eective from the date (“Date
of Purchase”) of original consumer purchase of the product. This warranty is good only to the original purchaser of the
product and eective only when used in the United States, including Alaska, Hawaii, and U.S. Territories.
THIS WARRANTY IS IN LIEU OF ANY OTHER WARRANTY, EXPRESS OR IMPLIED, INCLUDING WITHOUT LIMITATION,
ANY WARRANTY OF MERCHANTABILITY OR FITNESS FOR A PARTICULAR PURPOSE. TO THE EXTENT ANY IMPLIED
WARRANTY IS REQUIRED BY LAW, IT IS LIMITED IN DURATION TO THE EXPRESS WARRANTY PERIOD ABOVE.
NEITHER THE MANUFACTURER NOR ITS U.S. DISTRIBUTOR SHALL BE LIABLE FOR ANY INCIDENTAL, CONSEQUENTIAL,
INDIRECT, SPECIAL, OR PUNITIVE DAMAGES OF ANY NATURE, INCLUDING WITHOUT LIMITATION, LOST REVENUES OR
PROFITS, OR ANY OTHER DAMAGE WHETHER BASED IN CONTRACT, TORT, OR OTHERWISE. Some states do not allow the
exclusion or limitation of incidental or consequential damages or limitations on how long an implied warranty lasts, so the above ex-
clusion or limitation may not apply to you. This warranty gives you specic legal rights and you may also have other rights that vary from
state to state.
THIS LIMITED WARRANTY DOES NOT APPLY TO:
• Service trips to your home to deliver, pick up, and/or install the product, instruct, or replace house fuses or correct wiring, or
correction of unauthorized repairs.
• Damages or operating problems that result from misuse, abuse, operation outside environmental specications or contrary to the
requirements of precautions in the Operating Guide, accident, vermin, re, ood, improper installation, acts of God, unauthorized
modication or alteration, incorrect electrical current or voltage, or commercial use, or use for other than intended purpose.
The cost of repair or replacement under these excluded circumstances shall be borne by the consumer.
CUSTOMER INFORMATION CENTER NUMBERS
TO CONTACT LG ELECTRONICS
BY MAIL:
LG Customer INFORMATION Center
P. O. Box 240007
201 James Record Road
Huntsville, Alabama 35824
ATTN: CIC
WARRANTY PERIOD:
LABOR: One Year from the Date of Purchase.
PARTS (except as listed below): One Year from the Date
of Purchase.
Drum Motor (Stator, Rotor, Hall sensor):
Ten Years from the Date of Purchase.
Stainless Steel Drum: Lifetime
Replacement Units and Repair Parts may be new or
remanufactured.
Replacement Units and Repair Parts are warranted for the
remaining portion of the original unit’s warranty period.
LG ELECTRONICS, INC.
LG WASHING MACHINE LIMITED WARRANTY - USA
HOW SERVICE IS HANDLED:
In-Home Service:
Please retain dealer’s dated bill of sale or delivery
ticket as evidence of the Date of Purchase for proof of
warranty, and submit a copy of the bill of sale to the
service person at the time warranty service is provided.
Please call 1-800-243-0000 and choose the
appropriate option to locate your nearest LG
Authorized Service Center.
Or visit our Web site at: http://www.lg.com.
Call 1-800-243-0000 (24 hours a day, 365 days a
year), and select the appropriate option from the menu.
Or visit our Web site at: http://www.lg.com.
To obtain Customer Assistance, Product
Information, or Dealer or Authorized Service
Center location:
Product Registration Information
Model:
Serial Number:
Date of Purchase:
The model and serial number can be located on the rating
plate on the back of the washer.
33

34

MANUAL DE PROPIETARIO
LAVADORA
WT5101H*
Lea este manual con cuidado antes de utilizar la
lavadora y guárdelo para futuras consultas.
www.lg.com
~
ESPAÑOL

Le felicitamos por su compra y le
damos la bienvenida a la gama de
productos LG.
Su nueva lavadora LG combina la
tecnología de lavado más avanzada
con un funcionamiento sencillo y un
alto rendimiento.
Siga las instrucciones de funciona-
miento y cuidado incluidas en este
manual, y conseguirá que su lava-
dora le ofrezca un servicio fiable y
duradero.
GRACIAS.
INTRODUCCIÓN
INSTRUCCIONES DE INSTALACIÓN
Elegir el lugar adecuado ........................................ 9
Asentamiento en el suelo ....................................... 9
Espacios de instalación ......................................... 9
Desembalaje de la lavadora ................................. 10
Conexión de las líneas de agua ........................... 11
Conexión de la manguera de desagüe ..........11-12
Nivelado de la lavadora ....................................... 12
Conectar al tomacorriente ................................... 12
FUNCIONAMIENTO
Características del panel de control .................... 13
Funcionamiento de la lavadora ............................ 14
Guía de ciclos ....................................................... 15
Clasicación de las cargas de lavado ................. 16
Selección del detergente ..................................... 17
Acerca del dispensador ....................................... 17
Carga del dispensador ........................................ 18
Pantalla LED ......................................................... 19
Botones de modicación de ciclo ................. 20-21
Botones de opción de ciclo .......................... 22-23
PIEZAS Y CARACTERÍSTICAS
Características especiales ..................................... 7
Piezas y componentes clave ................................. 8
RESOLUCIÓN DE PROBLEMAS
Ruidos normales que puede escuchar ................ 27
Antes de solicitar asistencia técnica ............. 27-31
Utilización del DiagnósticoInteligente™ ............... 32
CUIDADOS Y LIMPIEZA
Limpieza regular ............................................. 24-25
Mantenimiento ..................................................... 25
Limpieza de la lavadora ....................................... 26
GARANTÍA ..................................................... 33
ESPECIFICACIONES
INSTRUCCIONES IMPORTANTES DE SEGURIDAD
Precauciones básicas de seguridad ...................3-4
Instrucciones para la toma a tierra ......................... 4
Instrucciones de seguridad para la Instalación ...... 5
Instrucciones de seguridad para uso, Cuidado,
limpieza y eliminación ............................................ 6
Dimensiones y especicaciones clave ................ 32
2

ESPAÑOL
INSTRUCCIONES IMPORTANTES DE SEGURIDAD
wADVERTENCIA Por su seguridad, debe seguir la información contenida en
este manual para minimizar el riesgo de incendio o explosión, descargas eléctricas, o
para evitar daños a la propiedad, lesiones personales o pérdida de la vida.
Su seguridad y la de otros es muy importante.
Hemos incluido algunos mensajes de seguridad importantes en este manual y en su dispositivo.
Lea y cumpla siempre todos los mensajes de seguridad.
Éste es el símbolo de alerta de seguridad.
Este símbolo le alerta de los riesgos potenciales que podrían causarle la muerte o dañar a usted y
a otros. Todos los mensajes de seguridad aparecerán después del símbolo de alerta y la palabra
“PELIGRO” o “ADVERTENCIA”.
Estas palabras significan:
wPELIGRO:
Si no cumple con las instrucciones de inmediato puede correr peligro de muerte o de lesiones graves.
wADVERTENCIA:
Si no sigue las instrucciones puede correr peligro de muerte o de lesiones graves.
Todos los mensajes de seguridad le informarán de peligros potenciales, cómo reducir las posibilidades de riesgo y le
informarán de qué pasaría si no se siguen las instrucciones.
w
3
LEA TODAS LAS INSTRUCCIONES ANTES DE UTILIZAR

• Antes de usar, la lavadora debe instalarse
correctamente según lo descrito en este manual.
• No seque artículos que previamente se hayan limpiado,
lavado, empapado, o se hayan manchado con gasolina,
disolventes de limpieza en seco, otras sustancias
inamables o explosivas puesto que emiten vapores
que podrían provocar ignición o estallar.
• No añada gasolina, disolventes de limpieza en seco,
o de otras sustancias explosivas o inamables al
agua de lavado. Estas sustancias emiten vapores
que pueden encenderse o explotar.
• Bajo ciertas condiciones, el gas hidrógeno puede ser
producido en un sistema de agua caliente que no se
haya utilizado durante 2 semanas o más. EL GAS
HIDRÓGENO ES EXPLOSIVO. Si el sistema de agua
caliente no se ha utilizado durante ese período, antes
de usar la lavadora, abra todos los grifos de agua
caliente y deje correr el agua de cada uno durante
varios minutos. Esto liberará el gas de hidrógeno
acumulado. Como el gas es inamable, no fume ni
use una llama abierta durante este tiempo.
• No permita que los niños jueguen cerca de la
lavadora. Es necesario vigilar de cerca a los niños
cuando la lavadora se utilice cerca de ellos.
• Antes de que la lavadora esté fuera de servicio o
desconectada, quite la puerta para evitar que los
niños se introduzcan en su interior.
• No instale ni coloque la lavadora en un lugar en el
cual quede expuesta a temperaturas bajo cero.
• No trate de forzar los controles.
• No repare o reemplace cualquier parte de la lavadora o
intente cualquier servicio que no sea como se describe en
este manual. Se recomienda encarecidamente que toda
reparación la lleve a cabo un técnico cualicado.
• Vea los requisitos en las instrucciones de
instalación de toma a tierra.
• Siga SIEMPRE las instrucciones de cuidado de la
tela proporcionada por el fabricante de prendas de
vestir.
• No introduzca artículos expuestos a aceites de
cocina en su lavadora. Los artículos contaminados
con aceites de cocina pueden contribuir a una
reacción química que podría provocar el incendio de
una carga de ropa.
• Use suavizantes o productos para eliminar la carga
estática como se lo recomiende el fabricante.
• Esta lavadora no está diseñada para el uso marítimo
o para instalaciones móviles, como en casas
rodantes, aeronaves, etc.
• Cortar el grifo de agua y desconectar la lavadora
si la máquina se va a dejar de usar por un período
prolongado de tiempo, como durante las vacaciones.
• El material de embalaje puede ser peligroso para los
niños. Existe riesgo de asxia. Mantenga todos los
embalajes fuera del alcance de los niños.
• Revise siempre el interior la lavadora en busca de
objetos extraños antes de la carga de lavandería.
Mantenga la puerta cerrada cuando no esté en uso.
• No toque la lavadora mientras las piezas se esten
moviendo.
wADVERTENCIA: Para reducir el riesgo de incendio, descarga eléctrica o daños a personas al
utilizar el electrodoméstico, siga las precauciones básicas, incluidas las siguientes:
PRECAUCIONES BÁSICAS DE SEGURIDAD
wADVERTENCIA Por su seguridad, debe seguir la información contenida en este
manual para minimizar el riesgo de incendio o explosión, descargas eléctricas, o para
evitar daños a la propiedad, lesiones personales o pérdida de la vida.
LEA TODAS LAS INSTRUCCIONES ANTES DE UTILIZAR
INSTRUCCIONES IMPORTANTES DE SEGURIDAD
Este electrodoméstico debe tener una toma a tierra adecuada. En caso de un mal funcionamiento o avería, dis-
poner de toma a tierra reducirá el riesgo de descargas eléctricas proporcionando una trayectoria de menor resis-
tencia para la corriente eléctrica. Este electrodoméstico debe ir equipado con un cable que tenga un conductor y
un enchufe de toma a tierra del equipo. El enchufe debe ir conectado a una toma de corriente apropiada debida-
mente instalada y con una toma a tierra que cumpla todas las leyes y ordenanzas locales.
INSTRUCCIONES PARA LA TOMA A TIERRA
wADVERTENCIA:
La conexión inadecuada del conductor de los equipos de tierra puede provocar un
riesgo de descarga eléctrica. Compruebe con un electricista o técnico cualificado si duda de si el electrodoméstico
dispone de una toma a tierra correcta. No modifique el enchufe proporcionado con el electrodoméstico. Si no cabe el
enchufe en la toma de corriente, solicite a un electricista cualificado la instalación de un enchufe apropiado. No seguir
estas advertencias puede causar lesiones serias, un incendio, una descarga eléctrica o incluso la muerte.
4

ESPAÑOL
• Consulte las INSTRUCCIONES DE INSTALACIÓN para
los procedimientos detallados de toma a tierra. Las
instrucciones de instalación se embalan en la lavadora para
referencia del instalador. Si la lavadora se mueve a una nueva
ubicación, ha de ser revisada y reinstalada por un técnico
cualicado. No seguir esta advertencia puede causar lesiones
serias, un incendio, una descarga eléctrica o incluso la muerte.
• Bajo ninguna circunstancia deberá cortar o eliminar la
tercera punta (de toma a tierra) del cable de alimentación.
No seguir esta advertencia puede causar lesiones serias, un
incendio, una descarga eléctrica o incluso la muerte.
• Por su seguridad personal, este electrodoméstico ha de
tener toma a tierra. No seguir esta advertencia puede causar
lesiones serias, un incendio, una descarga eléctrica o incluso
la muerte.
• El cable de alimentación de este electrodoméstico está
equipado con 3 patas (tomas de tierra) de enchufe que se
acopla con el estándar de 3 patas (tomas de tierra) de la
pared para reducir al mínimo la posibilidad de riesgo de
descarga eléctrica de este electrodoméstico.
• Esta lavadora debe estar conectada a una toma de tierra
de 120V AC, 60Hz. No seguir esta advertencia puede causar
lesiones serias, un incendio, una descarga eléctrica o incluso
la muerte.
• Solicitequeunelectricistacualicadocompruebela
toma de la pared y el circuito para asegurarse de que la
toma a tierra está correctamente realizada. No seguir esta
advertencia puede causar lesiones serias, un incendio, una
descarga eléctrica o incluso la muerte.
• Será su responsabilidad y obligación personal sustituir una
toma de pared de dos puntas por una toma de pared de
tres puntas con una toma a tierra adecuada. No seguir esta
advertencia puede causar lesiones serias, un incendio, una
descarga eléctrica o incluso la muerte.
• No instale la lavadora sobre una alfombra. Instale la
lavadora sobre un piso sólido. El incumplimiento de esta
advertencia puede causar daños graves provocados por
pérdidas.
• No quite la punta de toma a tierra. No utilice un adaptador
o un cable de extensión. Enchufe en una toma de 3 puntas
con toma a tierra. No seguir esta advertencia puede causar
lesiones serias, un incendio, una descarga eléctrica o incluso
la muerte.
• La lavadora siempre debería estar conectada a una toma
eléctrica individual con una tensión nominal coincidente
con la de su placa. Una instalación así proporciona el mejor
rendimiento y también evita la sobrecarga de los circuitos de
cables domésticos, lo que podría provocar riesgo de incendio
debido a unos cables recalentados.
• Nunca tire del cable de alimentación para desenchufar la
lavadora. Sujete siempre rmemente el enchufe y sáquelo de
la toma sin moverlo de lado a lado. No seguir esta advertencia
puede causar lesiones serias, un incendio, una descarga
eléctrica o incluso la muerte.
• Repare o cambie de inmediato todos los cables del
servicio eléctrico que se hayan pelado o dañado.No
utilice cables que muestren grietas o daños por abrasión
por su extensión o en cualquier extremo. No seguir esta
advertencia puede causar lesiones serias, un incendio, una
descarga eléctrica o incluso la muerte.
• Al instalar o mover la lavadora, tenga cuidado de no
pisar, machacar o dañar el cable eléctrico. No seguir esta
advertencia puede causar lesiones serias, un incendio, una
descarga eléctrica o incluso la muerte.
• La lavadora debe estar instalada y conectada a tierra por
untécnicocualicadodeacuerdoconlasleyeslocales
para evitar el peligro de choque y asegurar la estabilidad
durante la operación.
• La lavadora es pesada. Pueden ser necesarias dos o más
personas para instalar y mover el electrodoméstico. No
hacerlo puede ocasionar lesiones de espalda o de otro tipo.
• Conservar e instalar la lavadora donde no esté expuesta a
temperaturas bajo cero o a condiciones climáticas al aire
libre. El incumplimiento de esta advertencia puede causar
daños graves de fugas.
• No instale la lavadora en espacios húmedos para reducir
el riesgo de descarga eléctrica. No seguir esta advertencia
puede causar lesiones serias, un incendio, una descarga
eléctrica o la muerte.
• Para reducir el riesgo de lesiones personales, cumpla con
todos los procedimientos de seguridad recomendados
por la industria, incluyendo el uso de use guantes con
mangas largas y gafas de seguridad. En caso de no cumplir
con todas las advertencias de seguridad de este manual
se podrán producir daños sobre la propiedad, lesiones
personales o la muerte.
wADVERTENCIA: Para reducir el riesgo de incendio, descarga eléctrica o daños a personas al
utilizar el electrodoméstico, siga las precauciones básicas, incluidas las siguientes:
INSTRUCCIONES DE SEGURIDAD PARA LA INSTALACIÓN
wADVERTENCIA
Por su seguridad, debe seguir la información contenida en
este manual para minimizar el riesgo de incendio o explosión, descargas eléctricas, o
para evitar daños a la propiedad, lesiones personales o pérdida de la vida.
LEA TODAS LAS INSTRUCCIONES ANTES DE UTILIZAR
INSTRUCCIONES IMPORTANTES DE SEGURIDAD
5

INSTRUCCIONES IMPORTANTES DE SEGURIDAD
INSTRUCCIONES DE SEGURIDAD PARA USO, CUIDADO, LIMPIEZA Y ELIMINACIÓN
• Desconecte la lavadora antes de la limpieza para
evitar el riesgo de descarga eléctrica.
• Nunca use productos químicos abrasivos,
limpiadores abrasivos o disolventes para limpiar
la lavadora.
Dañarán el acabado.
• No poner trapos ni ropa empapados en aceite o
grasa en la parte superior de la lavadora.
Estas
sustancias emiten vapores que pueden encender
los materiales.
• No lave las prendas que se manchen con aceite
vegetal o de cocina.
Estos artículos pueden
contener un poco de aceite después del lavado.
Debido al aceite restante, el tejido se puede
humear o prenderse fuego por sí mismo.
• Desconecte este electrodoméstico de la fuente
de alimentación antes de efectuar cualquier
mantenimiento.
Girando los controladores
a la posición OFF no desconecta el
electrodoméstico de la fuente de alimentación.
No seguir esta advertencia puede causar lesiones
serias, un incendio, una descarga eléctrica o
incluso la muerte.
• No combine productos de lavandería en una
cargaalmenosqueseespeciqueenlaetiqueta.
• No mezcle cloro con amoníaco o ácidos como
el vinagre. Siga las instrucciones del embalaje
cuando utilice los productos de lavandería.
El
uso incorrecto puede producir gases tóxicos, lo
que resulta en lesiones graves o la muerte.
•
No toque la lavadora mientras las piezas se
estén moviendo. Antes de cargar, descargar
o agregar prendas, pulse el boton de INICIO/
PAUSA y espere hasta que el tambor se
detenga totalmente antes de colocar las
manos dentro. No seguir esta advertencia puede
causar lesiones serias, un incendio, una descarga
eléctrica o incluso la muerte.
•
No permita que los niños jueguen cerca de
la lavadora. Es necesario vigilar de cerca
a los niños cuando la lavadora se utilice
cerca de ellos. Cuando los niños crezcan,
enséñeles lo propio, el uso seguro de todos los
electrodomésticos. El incumplimiento de estas
advertencias podría resultar en graves lesiones
personales graves o la muerte.
•
Destruya la caja de cartón, bolsa de plástico
y otros materiales de embalaje después
de desembalar la lavadora. Los niños lo
pueden utilizar para jugar. Embalajes de
cartón cubiertos con alfombras, colchas,
sábanas de plástico o pueden convertirse
en cámaras herméticas. El incumplimiento de
estas advertencias podría resultar en lesiones
personales graves o la muerte.
•
Mantenga los productos de lavandería
fuera del alcance de los niños. Para evitar
lesiones personales, observar todas las
advertencias en las etiquetas de los productos.
El incumplimiento de estas advertencias podría
resultar en graves lesiones personales.
• Quite la puerta del compartimento
de la
lavadora para evitar el peligro de que los
niños o pequeños animales queden atrapados
dentro antes de que su lavadora sea quitada
de servicio o desechada. El no hacerlo puede
ocasionar lesiones personales graves o la muerte.
wADVERTENCIA : Para reducir el riesgo de incendio, descarga eléctrica o daños a personas
al utilizar el electrodoméstico, siga las precauciones básicas, incluidas las siguientes:
6
GUARDE ESTAS INSTRUCCIONES
LEA TODAS LAS INSTRUCCIONES ANTES DE UTILIZAR
wADVERTENCIA Por su seguridad, debe seguir la información contenida en
este manual para minimizar el riesgo de incendio o explosión, descargas eléctricas,
o para evitar daños a la propiedad, lesiones personales o pérdida de la vida.

ESPAÑOL
PIEZAS Y CARACTERÍSTICAS
C
B
A
E
F
G
CARACTERÍSTICAS ESPECIALES
SMARTRINSE™(ENJUAGUE INTELIGENTE)
CON SPRAY DE CHORRO
Esta lavadora está diseñada para ahorrar agua
durante el lavado mediante el uso del SMART
RINSE™ con spray de chorro en los ciclos de
lavado ALGODÓN/NORMAL y MUY SUCIO.
NOTA: Seleccione la opción SUAVIZANTE o
ENJUAGUE EXTRA, si utiliza suavizante en los
ciclos ALGODÓN/NORMAL y MUY SUCIO.
CALENTADOR DE AGUA
El calentador en el interior de la lavadora aumenta
la temperatura del agua y ofrece mayor limpieza
durante el ciclo "SANITARIO" y "BRIGHT WHITES™
(Blancos brillantes)".
MOTOR DE ACCIONAMIENTO DIRECTO
Este tipo de motor prescinde de la correa y
las poleas de la mayoría de las lavadoras para
ofrecer mayor rendimiento y fiabilidad a la vez
que aumenta la eficiencia energética.
INTERRUPTOR DE BLOQUEO DE PUERTA
La puerta de la lavadora se bloquea mientras
está en funcionamiento. La puerta se puede
desbloquear al pulsar el botón de Inicio/Pausa
para detener la lavadora.
PUERTA SLAMPROOF™
La PUERTA SLAMPROOF™ es un mecanismo de
seguridad que permite que la cubierta se cierre
con suavidad. El cierre en sí sujeta el peso de
la cubierta evitando que ésta se caiga y pueda
golpear al usuario.
WAVEFORCE™
Un tambor girando a gran velocidad utiliza fuerza
centrífuga y un pulverizador en ángulo para
pulverizar agua sobre la tela causando menos
fricción para un lavado más suave y profundo.
DIAGNÓSTICOINTELIGENTE™
Si experimenta alguna dificultad técnica en
su lavadora, podrá transmitir la información
por teléfono al Centro de Atención al Cliente.
El agente que responsa a su llamada anotará
la información transmitida con respecto a su
lavadora y la utilizará para estudiar el problema,
y le facilitará un diagnóstico rápido y efectivo
(consulte la página 32).
D
C
E
F
G
A
B
D
Protocolo P172
Ejecución de saneamiento de lavadoras domés-
ticas y comerciales de tamaño familiar
7

D
PIEZAS Y CARACTERÍSTICAS
B
A
PIEZAS Y COMPONENTES CLAVE
Además de las características y componentes
específicos citados en el apartado Características
especiales, hay otros componentes que también
se mencionan en este manual.
TAMBOR DE ACERO INOXIDABLE DE MÁXIMA CAPACIDAD
El tambor de acero inoxidable de máxima
capacidad ofrece una durabilidad óptima.
CUBIERTA DE VIDRIO TEMPLADO
La cubierta de vidrio templado es resistente y
facilita que se vea el interior de la lavadora.
BOTÓN GIRATORIO
Gire este botón para seleccionar el ciclo que
desee. Una vez seleccionado el ciclo, se
mostrarán en la pantalla los preajustes estándar.
Dichos ajustes se pueden modificar mediante los
botones de configuración de ciclo. Podrá hacerlo
en cualquier momento antes de iniciar el lavado.
PIES DE NIVELACIÓN AUTOMÁTICOS
Este pie de nivelacion (en la parte trasera) se
puede ajustar a fin de mejorar la estabilidad de la
lavadora en las superficies irregulares.
PANEL DE CONTROL POSTERIOR CON PANTALLA LED
La pantalla LED de fácil lectura muestra las
opciones de ciclo, la configuración y el tiempo
estimado restante durante el funcionamiento.
CAJÓN DISPENSADOR DE DETERGENTE
Hay dos compartimentos, uno para el detergente (en polvo
o líquido) del lavado principal y otro para el suavizante.
o
C
E
F
B
A
Accesorios incluidos
• Mangueras de agua fría y caliente Con 2
juntas por manguera en cada extremo
• Correa de sujeción (para asegurar la
manguera de drenaje)
C
Cable de
alimentación
Válvula de entrada
de agua fría
D
E
F
Manguera
de desagüe
Válvula de entrada
de agua caliente
8

ESPAÑOL
INSTRUCCIONES DE INSTALACIÓN
ELEGIR EL LUGAR ADECUADO
wADVERTENCIA
• Recuerde que la lavadora es pesada. Se
precisan dos o más personas para moverla y
retirar su embalaje. No seguir esta advertencia
puede ser motivo de daños.
• Guarde e instale la lavadora en una zona no
expuesta a temperaturas por debajo de cero
o sometida a las inclemencias del tiempo. No
seguir esta advertencia puede ocasionar daños
físicos serios, incendio, descarga eléctrica o
muerte.
• Fije la lavadora correctamente a tierra
conforme a los códigos y normativas
aplicables. No seguir esta advertencia puede
ocasionar daños físicos serios, incendio, descarga
eléctrica o muerte.
• Para reducir el riesgo de descarga eléctrica, no
instale la lavadora en entornos con humedad.
No seguir esta advertencia puede ocasionar daños
físicos serios, incendio, descarga eléctrica o muerte.
• La apertura de la base no debe obstruirse cuando
la lavadora se instale en un suelo con alfombras o
moqueta.
• Mantenga el área alrededor y bajo el dispositivo
libre de materiales combustibles, como pelusa,
papel, trapos, productos químicos, etc.
• No retire las púas de conexión a tierra. No utilice
ningún adaptador o cable alargador. Enchufe a
una toma de 3 púas de puesta a tierra. No seguir
esta advertencia puede ocasionar daños físicos
serios, incendio, descarga eléctrica o muerte.
TOMA DE CORRIENTE
• La toma de corriente debe estar a 1,5 m (60 pulg.)
de cada lado de la lavadora.
• El electrodoméstico y la toma de corriente deben
posicionarse de manera que se acceda fácilmente
al enchufe.
• No sobrecargue la toma con más de un
electrodoméstico.
• La toma debe conectarse a tierra conforme a los
códigos de cableado y las normativas aplicables.
• Se recomienda utilizar un fusible de retardo o un
disyuntor.
NOTA: Es responsabilidad y obligación personal del
propietario del producto disponer de una toma de
corriente adecuada instalada por un electricista
cualificado.
ASENTAMIENTO EN EL SUELO
• A n de minimizar el ruido y la vibración, la
lavadora DEBE instalarse en un suelo asentado
sobre una base sólida.
• La inclinación máxima permitida es de 1 grado.
• No se recomiendan los suelos de moqueta o
alfombras ni los de baldosas no rígidas.
• Nunca instale la lavadora en una plataforma o
estructura con una base de apoyo debilitada.
NOTA: La lavadora debe instalarse sobre
una superficie firme y estable para minimizar
la vibración y el ruido durante el ciclo de
centrifugado. Los suelos de cemento son
idóneos, aunque la madera también es adecuada,
siempre que cumpla con los estándares FHA.
La lavadora no debe instalarse sobre alfombras o
en exteriores.
Para asegurar que hay suficiente espacio para las líneas de
agua, deje una separación mínima de al menos 2,5 cm (1
pulg.) a ambos lados y 10 cm (4 pulg.) detrás de la unidad.
Asegúrese de dejar espacio suficiente en relación a la pared,
puerta y suelo, según pueda requerirse.
27″
(68.6 cm)
1″
(2.5 cm)
1″
(2.5 cm)
28.
3
/8″
(72.1 cm)
4″
(10 cm)
45
3
/8″
(115.3 cm)
55.
3
/4″
(141.7 cm)
(with lid
open)
ESPACIOS DE INSTALACIÓN
27″
(68.6 cm)
1″
(2.5 cm)
1″
(2.5 cm)
28.
3
/8″
(72.1 cm)
4″
(10 cm)
45
3
/8″
(115.3 cm)
55.
3
/4″
(141.7 cm)
(with lid
open)
El espacio vertical mínimo desde el suelo a las
estanterías o armarios superiores, al techo, etc.
es de 142 cm (56 pulg).
9

INSTRUCCIONES DE INSTALACIÓN
Cuando reciba la lavadora en su casa, retire la
base de cartón y poliestireno utilizada para el
envío del electrodoméstico.
DESEMBALAJE DE LA LAVADORA
Al retirar la lavadora de la caja de cartón,
asegúrese de retirar el Soporte de base del medio
de la base de cartón.
Si debe asentar la lavadora hacia abajo para
quitar los materiales de embalaje de la base,
siempre proteja el lado
de la lavadora y deposítela con cuidado sobre su
lado. NO asiente la lavadora sobre su parte frontal
o posterior.
HERRAMIENTAS A UTILIZAR
• Alicates regulables
• Nivel de carpintero
Base de cartón
Soporte de base
1
Retire la parte del embalaje que incluye
el Manual del propietario, las piezas, las
mangueras de agua y las muestras de
productos para el lavado.
2
Aoje el cable de alimentación de la parte
trasera de la lavadora.
3
10

ESPAÑOL
INSTRUCCIONES DE INSTALACIÓN
CONEXIÓN DE LAS LÍNEAS DE AGUA
• IMPORTANTE : Cuando instale la lavadora utilice
mangueras nuevas. NO reutilice ninguna ya usada.
• IMPORTANTE : Utilice SÓLO las mangueras de
entrada facilitadas por LG con este producto. El
uso de otro tipo de mangueras no garantiza un
ajuste o funcionamiento correcto. En ese caso,
podrían no ajustar debidamente y esto podría
conllevar fugas. Cualquier daño posterior en el
producto o en la propiedad no estará cubierto por
los términos de la garantía de LG.
• La presión del suministro de agua debe estar
comprendida entre 14,5 psi y 116 psi (100 a 800
kPa). Si la presión del suministro de agua es
superior a 116 psi, debe instalarse una válvula de
reducción de presión.
• Revise periódicamente las mangueras en busca
de grietas o fugas, y desgaste, y cámbielas tras 5
años.
• Asegúrese de que las líneas de agua no están en
tensión, pinzadas, aplastadas o deformadas.
• La lavadora nunca debería instalarse o guardarse
en un lugar expuesto a bajas temperaturas.
Pueden provocarse daños en las líneas de agua y
en los mecanismos internos de la lavadora. Si la
lavadora ha estado expuesta a bajas temperaturas
antes de su instalación, déjela a temperatura
ambiente durante varias horas antes de utilizarla.
Inspeccione el accesorio roscado de cada
manguera y verique que haya un sello de
goma en ambos extremos.
Sello de
caucho
Conecte las mangueras de agua a la stomas de la
casa.
Conecte las mangueras de agua a las
válvulas de agua CALIENTE y FRÍA de su
casa. Apriete con la mano y después dé una
vuelta 1/4 más con ayuda de los alicates.
NOTA:
Calentador de agua congurado para suminis-
trar agua a 49°C (120°F) a la lavadora.
o
NOTA: Para evitar que se acumule el detergente y pu-
eda atascar el ltro de la válvula de entrada, enjuague
bien con agua ambas caras y la manguera para retirar
las partículas o impurezas en un recipiente.
NOTA:
No apriete en exceso los conectores de la
manguera. Acople la linea de agua caliente a la entrada
de agua caliente de color rojo en la parte trasera de
la lavadora. Acople la linea de agua fria a la entrada
deagua fria de color azul en la parte trasera de la lava-
dora. Apriete las conexiones con rmeza.
NOTA: Apriete las conexiones con rmeza. Abra los
grifos de agua en su totalidad para comprobar que no
haya ninguna fuga.
Grifo de
agua
Acople de las mangueras de agua a la lavadora
Enrosque la manguera de agua caliente a la
conexión de agua caliente de la lavadora (rojo) y
la manguera de agua fría a la conexión de agua
fría (azul). Apriete con la mano y después dé una
vuelta 1/8 adicional con ayuda de los alicates.
1
2
CONEXIÓN DE LA MANGUERA DE DESAGÜE
• La manguera de desagüe debe colocarse
siempre correctamente. La colocación
incorrecta de la manguera de desagüe puede
conllevar a daños en el suelo y en la propiedad.
• No coloque el extremo de la manguera de
desagüe a más de 243,8 cm (96 pulg.) por
encima de la base de la lavadora.
• El drenaje del agua debe instalarse conforme a
los códigos y normativas locales aplicables.
• Asegúrese de que las líneas de agua no están
en tensión, pinzadas, aplastadas o deformadas.
39″
(99 cm)
Manguera de desagüe
Tubo
vertical
rígido
3
Sello de
caucho
Manguera de agua
(a entrada de agua
en lavadora)
Manguera
de agua
(a grifo)
Sello de
caucho
Manguera de agua
(a entrada de agua
en lavadora)
Sello de caucho
Caliente
Fría
Caliente
Fría
11

Para asegurarse de que la lavadora está
nivelada correctamente, abra la cubierta y
mire desde arriba para ver si es lo mismo que
se muestra desde al arriba. Si tiene un nivel,
compruebe la nivelación exacta de la lavadora.
•
Para comprobar si está nivelada de un lado a otro,
cerrar la tapa y coloque un nivel en la parte trasera
de la tapa.
•
Para comprobar si está nivelada de la parte
delantera a la trasera, coloque un nivel a un lado
de la lavadora en el borde donde el lado de la
estructura coincide con la cubierta superior.
Si la lavadora no está nivelada, ajuste los pies de apoyo
frontales. Gire hacia la derecha para subir o hacia la
izquierda para bajar.
INSTRUCCIONES DE INSTALACIÓN
Introduzca con firmeza el otro extremo de la
manguera de desagüe en la entrada de desagüe
de su casa.Asegúrese de que el extremo de goma
menos rígido quede completamente insertado en la
entrada de desagüe.
•
Si las válvulas de agua y drenaje están insertadas en
la pared, fije la manguera de desagüe a una de las
mangueras de agua; para ello, utilice un sujetacables (el
lado acanalado en la parte interior).
•
Si su drenaje es un tubo vertical rígido, fije el tubo
de drenaje a dicho tubo vertical; para ello, utilice el
sujetacables facilitado.
NOTA:
• La altura total del extremo de la manguera debe
ser de aproximadamente (0,9 a 1,2 m) (35 a 47
pulg.) en relación al suelo.
• La manguera de desagüe no debe insertarse más
de 8-12 pulgadas en el tubo vertical.
Sujetacables
39″
(99 cm)
39″
(99 cm)
Sujetacables
CONECTAR AL TOMACORRIENTE
La lavadora debe conectarse a
una toma de 120V AC, 60Hz y
3 púas de puesta a tierra.
Conecte la lavadora.
CONEXIÓN DE LA MANGUERA DE DESAGÜE
(cont.)
NIVELADO DE LA LAVADORA
La lavadora centrifuga a velocidades muy
elevadas, de hasta 1100 rpm.
NOTA: Ajuste el pie de nivelación sólo si es
preciso para nivelar la lavadora.
La lavadora puede vibrar si extiende el pie de
nivelación más de lo necesario.
• Los cuatro pies de nivelación deben apoyarse
con firmeza en el suelo.
Balancee la lavadora con cuidado apoyándose
en un lado y otro, para comprobar si está
debidamente equilibrada.
NOTA: Antes de instalar la lavadora, asegúrese
de que el suelo está limpio, seco y sin polvo,
suciedad, agua o restos de aceite para evitar
que el pie de apoyo de la lavadora se deslice
fácilmente. Si el pie de nivelación se mueve o
desliza por el suelo contribuirá a que haya más
vibración y ruido debido a la falta de contacto
con el suelo.
Subir Bajar
Parte
delantera a
trasera
Lado a lado
Ajuste el 2 frontales patas niveladoras. Gire
hacia la derecha para subir la lavadora o hacia la
izquierda para bajarla.
2
3
1
Coloque la lavadora en su posición final,
teniendo cuidado de no pinzar, forzar o
aplastar las líneas de agua y desagüe.
Coloque un nivel en la parte superior de la
lavadora.
SubirBajar
12

ESPAÑOL
FUNCIONAMIENTO
FA
D
E
B
C
CARACTERÍSTICAS DEL PANEL DE CONTROL
BOTÓN DE ENCENDIDO/APAGADO
Pulse para encender la lavadora. Pulse de nuevo
para apagarla.
NOTA: Si la arandela permanece inactiva durante
4 minutos tras apagar la lavadora, el agua del
tambor se drenará.
NOTA: Sonará una alarma 1 minuto antes del
vaciado de agua y aparecerá "dr" en la pantalla.
Puede reiniciar la lavadora en este momento.
Sin embargo, una vez que la lavadora haya
iniciado el vaciado de agua, todas las funciones
se suspenderán y se mostrará "dr" hasta que el
vaciado de agua haya terminado.
BOTÓN DE SELECCIÓN DE CICLO
Gire este botón para seleccionar el ciclo que desee.
Una vez seleccionado el ciclo, se mostrarán en la
pantalla los preajustes estándar. Dichos ajustes
se pueden modificar mediante los botones de
configuración de ciclo antes de iniciar el lavado.
BOTÓN DE INICIO/PAUSA
Pulse este botón para el INICIO del ciclo
seleccionado. Si la lavadora está en
funcionamiento, utilice este botón para la PAUSA
del ciclo sin perder los ajustes establecidos.
NOTA: Si no pulsa el botón de INICIO/PAUSA en
4 minutos como maximo despues de seleccionar
el ciclo, la lavadora se apagara automaticamente.
NOTA: Si la lavadora permanece inactiva durante
8 minutos después de la pausa del ciclo, el
tambor se vaciará de agua.
A
B
BOTONES DE MODIFICACIÓN DE CICLO
Utilice estos botones para seleccionar las opciones
que desea aplicar al ciclo seleccionado. Pulse
el botón para ese ajuste hasta que el indicador
luminoso del valor deseado se ilumine.
BOTONES DE OPCIONES
Estos botones le permiten seleccionar opciones
de ciclo adicionales que se iluminarán cuando
los seleccione. Ciertos botones también le
permiten activar funciones especícas al pulsar
durante 3 segundos el botón.
Para información detallada sobre opciones indi-
viduales, consulte las páginas siguientes.
PANTALLA LED
La pantalla muestra la conguración, el
tiempo estimado restante, las opciones y los
mensajes de estado de su lavadora. La pantalla
permanecerá encendida durante el ciclo.
D
E
C
F
13

FUNCIONAMIENTO
FUNCIONAMIENTO DE LA LAVADORA
ELIJA LA ROPA A LAVAR Y LA CARGA.
Consulte la página 16.
1
Después de introducir la ropa en la lavadora y tras añadir los productos de lavado (detergente, blanqueador y/o suavizante):
AÑADA DETERGENTE.
Consulte las páginas 17-18.
2
ENCIENDA LA LAVADORA.
Pulse el botón de ENCENDIDO/APAGADO para
encender la lavadora. Se iluminarán las luces alre-
dedor del botón de selección de ciclo.
3
SELECCIONE UN CICLO.
Gire el botón de selección de ciclo al ciclo deseado.La
pantalla mostrará la temperatura de LAVADO/ENJUAGUE
predeterminada, el NIVEL DE SUCIEDAD, la VELOCIDAD
DE CENTRIFUGADO para ese ciclo.
4
SELECCIONE UN BOTÓN DE MODIFICACIÓN DE CICLO.
Si quiere cambiar el modicador de ese ciclo, pulse el/
los botone/s de conguración de ciclo correspondiente/s
hasta que se ilumine el indicador del valor deseado.
NOTA: Para proteger sus prendas, no todas las
temperaturas de lavado/enjuague, la velocidad de
centrifugado, el nivel de suciedad o las opciones
están disponibles en cada ciclo.
5
SELECCIONE LOS BOTONES DE OPCIONES.
Seleccione cualquier opción de ciclo adicional, como
SUAVIZANTE o RETRASAR LAVADO pulsándola.
NOTA: Para proteger sus prendas, no todas las
temperaturas de lavado/aclarado, la velocidad de
centrifugado, el nivel de suciedad o las opciones
están disponibles en cada ciclo.
6
INICIE EL CICLO.
Pulse el botón de INICIO/PAUSA para iniciar el ciclo.
Se cerrará la puerta, la pantalla cambiará y la lava-
dora iniciará el cálculo del tiempo estimado restante.
Una vez calculado el tiempo total estimado para el
ciclo, la lavadora se pondrá en funcionamiento. Para
pausar el ciclo en cualquier momento, pulse PAUSA.
Para reanudar el ciclo desde donde se ha detenido,
pulse de nuevo INICIO/PAUSA.
7
NOTA: Cuando finalice el proceso, se escuchará la alarma (si está activada) a la vez que se desbloquea la
puerta. Para evitar las arrugas, saque la ropa de la lavadora lo antes posible una vez finalizado el ciclo.
NOTA: La fuerza de las olas está disponible con más de 8 kilos de carga de ALGODÓN / NORMAL ciclos
de PESADOS.
wADVERTENCIA: Para reducir el riesgo de incendio, descarga electrica o danos a personas al
utilizar el electrodomestico, siga las precauciones basicas, incluidas las siguientes:
14

ESPAÑOL
FUNCIONAMIENTO
GUÍA DE CICLOS
NOTA: Para proteger sus prendas, no todas las temperaturas de lavado/enjuague, la velocidad de centrifugado, el
nivel de suciedad o las opciones están disponibles en cada ciclo.
La siguiente guía de ciclos muestra las opciones y los tipos de prendas que se recomiendan para cada ciclo.
Ciclo
Tipo de prenda
Lavado/
Enjuague
Velocidad de
centrifugado
Nivel de
suciedad
Stain
Care™
Lavado
en Frío™
Delicates
Bajo
Medio
Sin centrifugado
Frío/Frío
Templado/Frío
Templado/Templado
Bajo
Normal
Alto
Camisas de etiqueta/
blusas, prendas de nylon,
muy finas o de encaje
(menos de 8 libras)
=Ajuste predeterminado
Bright Whites™
Medio
Alto
Muy alto
Sin centrifugado
Bajo
Alto
Bajo
Normal
Caliente/Frío
Templado/Frío
Prendas blancas
Wool
(Lana)
Bajo
Medio
Sin centrifugado
Templado/Frío
Frío/Frío
Bajo
Normal
Alto
Prenda etiquetada como
lana lavable en lavadora
(menos de 8 libras)
Speed Wash
(Lavado Rápido)
Alto
Muy alto
Sin centrifugado
Bajo
Medio
Templado/Templado
Frío/Frío
Templado/Frío
Bajo
Normal
Alto
Cargas poco sucias y
pequeñas
Sports Wear
(Ropa deportiva)
Medio
Alto
Sin centrifugado
Bajo
Templado/Frío
Templado/Templado
Frío/Frío
Normal
Alto
Bajo
Ropa de deporte
variada
Pure Color™
Medio
Alto
Muy alto
Sin centrifugado
Bajo
Frío/Frío
Templado/Frío
Templado/Templado
Normal
Alto
Bajo
Ropa de color y
ligeramente sucia
Alto
Muy alto
Sin centrifugado
Bajo
Medio
Templado/Templado
Caliente/Frío
Templado/Frío
Bajo
Normal
Alto
Baby Wear
(Ropa de bebe)
Prendas pequeñas y
ligeramente sucias;
específico para usuarios
de piel sensible.
Ropa interior muy
sucia, de trabajo,
pañales, etc.
(menos de 11 libras)
Sanitary
Alto
Muy alto
Sin centrifugado
Bajo
Medio
Alto
Bajo
Normal
Muy caliente/Frío
Perm Press
Casual
(Planchado
permanente Informal)
Bajo
Medio
Alto
Sin centrifugado
Templado/Frío
Templado/Templado
Frío/Frío
Normal
Alto
Bajo
Camisas de etiqueta/
pantalones, ropa antiarrugas,
ropa de poliéster/algodón,
manteles
Heavy Duty
(Muy sucio)
Alto
Muy alto
Sin centrifugado
Bajo
Medio
Templado/Frío
Templado/Templado
Caliente/Frío
Frío/Frío
Alto
Bajo
Normal
Prendas de algodón
muy sucias
Bulky/Bedding
(Voluminos/
Ropa de cama)
Medio
Alto
Muy alto
Sin centrifugado
Bajo
Templado/Frío
Templado/Templado
Caliente/Frío
Frío/Frío
Normal
Alto
Bajo
Prendas grandes
como mantas o
edredones
Cotton/Normal
(Algodón/Normal)
Alto
Muy alto
Sin centrifugado
Medio
Templado/Frío
Caliente/Frío
Templado/Templado
Frío/Frío
Normal
Alto
Bajo
Algodón, lino, toallas,
camisas, vaqueros,
cargas mixtas
Towels
(Toallas)
Alto
Muy alto
Sin centrifugado
Bajo
Medio
Templado/Frío
Templado/Templado
Caliente/Frío
Frío/Frío
Normal
Alto
Bajo
Toallas, camisas,
sábanas, vaqueros,
cargas mixtas
Tub Clean
(Limpieza de cuba)
Alto
Consulte la
página 24.
Aclarado
adicional
Suavizante
RETRASAR
LAVADO
* Utilice el ciclo Bulky/Bedding (Voluminoso / ropa de cama) para artículos como almohadas, edredones y otros artículos que
tengan problemas para absorber el agua. LAVE SOLAMENTE CARGAS PEQUEÑAS para asegurarse de que queda sitio para
que la carga se mueva durante el lavado. Agrupe los artículos similares, no mezcle artículos voluminosos con pequeñas
prendas. No seguir estas instrucciones puede causar daños en las prendas o a la lavadora.
15

La lavadora determinará automáticamente el
tamaño de la carga.
Debido al sistema de lavado de alto rendimiento,
el nivel de agua no cubrirá completamente la
carga.
Si desea introducir prendas una vez iniciado
el lavado, pulse el botón de pausa, levante la
cubierta, introduzca las prendas y ciérrela de
nuevo. Pulse el botón de inicio. Consulte la
página 20.
• Revise todos los bolsillos para asegurarse
de que están vacíos. Cualquier objeto como
clips, cerillas, bolígrafos, monedas o llaves
puede dañar tanto la lavadora como la ropa.
• Cierre las cremalleras, enganches y cordones
para prevenir que se enganchen o enreden con
otras prendas.
• Trate previamente las áreas muy sucias para
obtener los mejores resultados.
• Las prendas grandes no deberían ocupar más
de la mitad de la carga total.
• No lave prendas que contengan materiales
inamables (ceras, productos de limpieza, etc.)
• La lavadora no iniciará ningún proceso mientras
la cubierta esté abierta.
* IMPORTANTE: Use el ciclo de artículos
voluminosos/ropa de cama(Bulky/Bedding) para
estos articulos. Estos elementos pueden no ser
tan absorbentes como otras prendas de colada
y deben colocarse en una carga de lavado
independiente para obtener unos optimos
resultados.
CLASIFICACIÓN DE LAS CARGAS DE LAVADO
Etiquetas acerca del cuidado de las prendas
En la mayoría de los artículos de ropa se incluyen
etiquetas con instrucciones para un cuidado
correcto.
Agrupación de prendas similares
Para obtener unos resultados óptimos, clasifique
la ropa en cargas que puedan lavarse en el
mismo ciclo de lavado. Las prendas que sean
diferentes precisarán de un tratamiento distinto.
Lave siempre los colores oscuros separados
de los claros para evitar que se destiñan. Si
es posible, no lave prendas muy sucias con
otras que no lo estén tanto. El siguiente cuadro
muestra algunas recomendaciones al respecto.
Etiquetas acerca del cuidado de las prendas
FUNCIONAMIENTO
w PRECAUCIÓN:
•Nollevarobjetosenlabañera.
El incumplimiento de esta advertencia puede resultar
en pérdida o daño a los tejidos.
•Useelciclodevoluminosos/ropadecamapara
flotantes o no absorbentes, como una almohada
o una manta.
El incumplimiento de esta advertencia puede
provocar fugas.
No lave o seque por centrifugado ningún artículo
etiquetado o que se sabe que es a prueba de
agua o resistente al agua, aún cuando la etiqueta
de cuidados del producto permita usar lavadora.
El no seguir estas instrucciones puede resultar en
lesiones corporal, daño severo para sus prendas,
su lavadora y/o propiedad como resultado de la
vibración anormal de la lavadora.
- Ejemplos de artículos a prueba de agua o
resistente al agua incluyen ciertos tapetes para
colchón, fundas para colchones, equipo para la
lluvia, equipo para acampar, ropa para esquiar,
equipo para exteriores y artículos similares.
Carga de la lavadora
Clasificación de la ropa a lavar...
por color:
por suciedad:
por tela:
con/sin pelusa:
Ropa blanca Alto Delicada
Desprende pelusa
Ropa clara Normal Easy Care Capta pelusa
Ropa oscura Bajo Resistente
16

ESPAÑOL
FUNCIONAMIENTO
SELECCIÓN DEL DETERGENTE
ACERCA DEL DISPENSADOR
IMPORTANTE : No coloque ni deje los productos
de la lavadora, tales como detergente, blanqueador
o líquido suavizante sobre la lavadora o secadora.
Limpie de inmediato cualquier resto que pueda
derramarse. Estos productos pueden dañar el
acabado y los botones de la lavadora.
Diseñado específicamente para
el uso con detergentes de alta
eficacia (tipo "HE").
IMPORTANTE : Su lavadora está pensada para
utilizarse sólo con detergentes de alta eficacia
(denominados "HE"). Este tipo de detergentes está
pensado específicamente para las lavadoras de
carga en la parte superior y contiene propiedades
que reducen la espuma. Cuando compre el
detergente, busque siempre el símbolo "HE".
Los detergentes "HE" producen menos espuma,
se disuelven más fácilmente para mejorar el lavado
y aumentar el rendimiento y además, ayudan a
mantener el interior de su lavadora limpio. El uso
de otro detergente puede generar demasiada
espuma y ofrecer un rendimiento menos
satisfactorio.
El dispensador automático consta de dos
compartimentos destinados para:
• El líquido suavizante.
• El detergente líquido o en polvo.
El detergente líquido o en polvo. Los productos
de lavado se pueden añadir al mismo tiempo en
los respectivos compartimentos del dispensador.
Éstos se distribuirán en el momento adecuado para
garantizar mayor eficacia en la limpieza. Después
de añadir los productos correspondientes en el
dispensador, ciérrelo.
Para añadir detergente, blanqueador o suavizante
en el dispensador automático:
Abra el cajón dispensador.
Añada los productos de lavado en los
compartimentos correspondientes.
Cierre lentamente el cajón dispensador para
evitar que éstos se dispensen antes de tiempo.
NOTA: Es normal que quede un poco de agua en
los compartimentos del dispensador al finalizar el
ciclo.
NOTA: No utilice blanqueador en el cajón
dispensador.
1
2
3
Compartimento
para el detergente
líquido
Inserto
Compartimento para
el detergente del
lavado principal
Compartimento
para el líquido
suavizante
Retirar el cajón de detergente
Vuelva a colocar el cajón de detergente
Tire del cajón de
detergente.
Inclínelo hacia arriba y
retírelo.
Coloque el raíl ② (raíl del
cajón de detergente) en la
parte superior del raíl ①.
Empuje el cajón
firmemente.
NOTA: Tenga cuidado de no pellizcarse los dedos.
1
2
2
1
①
②
17

FUNCIONAMIENTO
CARGA DEL DISPENSADOR
Al añadir blanqueador en el dispensador, tenga
cuidado para evitar que se derrame en la ropa
e igualmente evite que caiga alrededor del
dispensador. Esto podría dañar la ropa que va a
lavar.
Compartimiento principal del lavado con detergente
Este compartimiento tiene detergente para el ciclo
de lavado principal, que se añade a la carga en
el inicio del ciclo. Utilice siempre detergente HE
(alta eciencia) en su lavadora. Nunca exceda
las recomendaciones del fabricante al añadir
el detergente. El uso de demasiado detergente
puede dar lugar a la acumulación de detergente
en la ropa y en la lavadora. Puede ser utilizado
cualquier detergente en polvo o líquido.
• Cuando se use detergente líquido, asegúrese
de que la taza de detergente líquido y pieza
de inserción en su lugar. No exceda la línea de
llenado máximo.
• Cuando se utiliza un detergente en polvo,
quite la pieza de inserción y retire la taza de
detergente líquido del compartimiento. El
detergente en polvo no se dispensará con
la taza del detergente líquido y la pieza de
inserción en su lugar.
Uso de la lejía líquida en el dispensador
El dispensador de
cloro automáticamente
diluye y distribuye cloro
líquido en el momento
adecuado en el ciclo de
lavado.
Compruebe las instrucciones especiales de
las etiquetas de cuidado de ropa.
Mida el cloro líquido con cuidado, siguiendo
las instrucciones de la botella
• Nunca vierta cloro puro líquido directamente
sobre la ropa o en la canasta de lavado.
•
No verter cloro en polvo en el dispensador de cloro.
No coloque objetos sobre el dispensador de lejía al
cargar o descargar la lavadora.
• Evite llenar demasiado o salpicaduras
cuando se agrega cloro para el depósito. La
capacidad máxima del dispensador de lejia
es una taza por ciclo de lavado. Si lo llena
demasiado, la lavadora podría liberar la lejía
antes del momento adecuado. por ciclo de
lavado.
Antes de iniciar el lavado, vierta la cantidad
mesurada de cloro directamente en el
dispensador de cloro. Si usted preere usar
cloro en polvo, añádalo al cesto de lavado
directamente antes de agregar la ropa.
NOTA: Enjuague el dispensador de lejía con
agua tras el uso y enjuague los residuos
utilizando el ciclo Rinse & Spin (Enjuagado y
Centrifugado).
Compartimiento del detergente
Este compartimiento contiene el suavizante
líquido, que se dispensa de forma automática
durante el ciclo de enjuague nal.
• Siga siempre las recomendaciones del
fabricante al añadir suavizante. No exceda la
línea de llenado máximo. El uso de suavizante
en exceso puede dar lugar a ropa manchada.
• Diluya los suavizantes concentrados con agua
tibia. No exceda la línea de llenado máximo.
• Nunca vierta el suavizante directamente sobre la
carga o el tambor.
wADVERTENCIA: No mezclar el
blanqueador clorado con amoníaco o ácidos como
vinagre u otros productos para eliminar el óxido y
otro tipo de suciedades.
Mezclar productos químicos como estos puede
producir gas que podría causar la muerte.
Añada en el dispensador del blanqueador la
cantidad de blanqueador clorado líquido y sin
diluir recomendado por el fabricante. Durante la
parte final del ciclo de lavado, el blanqueador
saldrá completamente del dispensador en dos
pasos sucesivos aplicándose a la ropa, con un
aclarado final del dispensador para evitar que
queden restos y afecten a lavados sucesivos.
El líquido que queda en el dispensador al final del
ciclo es agua, no blanqueador.
Para evitar la salida no intencionada de
blanqueador, nunca añada más producto del
indicado en el nivel máximo del dispensador.
Suavizante
Detergente de
lavado principal
1
2
3
18

ESPAÑOL
FUNCIONAMIENTO
PANTALLA LED
INDICADOR DE FINALIZACIÓN DE CICLO
Esta parte de la pantalla muestra qué parte del
ciclo de lavado está en curso(DETERMINACIÓN DE
CARGA, LAVADO, ENJUAGUE o CENTRIFUGADO).
TIEMPO RESTANTE ESTIMADO
Al pulsar el botón de INICIO/PAUSA, la lavadora
detecta automáticamente la carga (peso) del
lavado y optimiza el tiempo de lavado según el
ciclo y las opciones seleccionadas.
La pantalla indicará entonces el tiempo restante
estimado para el ciclo de lavado seleccionado.
A
B
INDICADOR DE BLOQUEO DE PUERTA
Indica que la puerta está bloqueada. La
puerta de la lavadora se bloqueará mientras
la lavadora esté en funcionamiento. La puerta
se puede desbloquear pulsando el botón de
INICIO/PAUSA para detener la lavadora.
INDICADOR DE RETRASO DE LAVADO
Este indicador muestra que la lavadora se
ha configurado en RETRASAR LAVADO. La
lavadora se iniciará automáticamente una vez
trascurrido el tiempo de retraso establecido.
COLDWASH™
Este indicador enciende la luz en once ciclos.
En estos ciclos se ahorra energía ya que se
utiliza agua fría.
C
D
La pantalla LED muestra la conguración, el tiempo estimado restante, las opciones y los mensajes de
estado de su lavadora. Cuando encienda la lavadora, se iluminará la pantalla.
A D
CE
B
E
19

SPIN SPEED (VELOCIDAD DE CENTRIFUGADO)
El tambor de la lavadora centrifuga
a un máximo de 1,100 rpm. Esto
reduce el tiempo de secado y ahorra
energía. Pulse el botón de VELOCIDAD
DE CENTRIFUGADO hasta que
el indicador luminoso del valor
deseado se ilumine. Puede cambiar
la velocidad de centrifugado máximo
del centrifugado en curso. Algunas
prendas, como las delicadas, requieren
una velocidad de centrifugado inferior.
• Al seleccionar NO SPIN, la lavadora se apaga
sin centrifugar después del vaciado de agua. (La
duracion del ciclo se reducira aproximadamente
10 minutos.)
BOTONES DE MODIFICACIÓN DE CICLO
Cada ciclo tiene ajustes predeterminados que se
seleccionan automáticamente. También puede
personalizar dichos ajustes utilizando los botones
de configuración de ciclo. Pulse el botón para ese
ajuste hasta que el indicador luminoso del valor
deseado se ilumine.
La lavadora ajusta automáticamente el nivel de
agua según el tipo y el tamaño de la carga a fin de
obtener unos resultados óptimos y máxima eficacia.
Puede que parezca que, en algunos ciclos, no hay
agua en la lavadora pero esto es normal.
NOTA: Para proteger sus prendas, no todas las
temperaturas de lavado/enjuague, la velocidad de
centrifugado, el nivel de suciedad o las opciones
están disponibles en cada ciclo. Se escuchará un
sonido y la pantalla LED no se encenderá si no se
permite una selección. Consulte la Guía de ciclos en
la página 15 para más información.
SOIL LEVEL (NIVEL DE SUCIEDAD)
Ajuste el ciclo seleccionado para
permitir una velocidad de movimiento
mayor en la ropa más sucia y una
velocidad menor en la ropa menos sucia
durante el lavado y aclarado en curso.
Pulse el botón de NIVEL DE SUCIEDAD
hasta que el indicador luminoso del
valor deseado se ilumine. Puede elegir
entre Poco sucio Normal o Muy sucio.
• La luz no se mostrará en esta gura (▼).
WASH/RINSE (LAVADO/ENJUAGUE)
Ajuste para seleccionar la temperatura
adecuada del agua según el ciclo de
lavado. Comprende la temperatura de
lavado y la temperatura de enjuague.
• Su lavadora consta Muy caliente/
Frio o Caliente/Frio calefactor para
aumentar la temperatura del agua
caliente adecuándose al ajuste de
Muy caliente/Frio o Caliente/Frio
(Sólo para modelos seleccionados)
• Seleccione la temperatura adecuada para el
agua según el tipo de ropa a lavar. Para unos
resultados óptimos, siga las indicaciones
detalladas en la etiqueta de la prenda.
•
En los aclarados con agua templada la ropa queda más
seca que cuando se utiliza agua fría. En los enjuagues
con agua templada aparecen más arrugas.
• En ambientes fríos, los enjuagues con agua
templada hacen que la ropa se manipule con
mayor comodidad.
• En los aclarados con agua fría se consume
menos energía.
• Para obtener unos resultados óptimos utilice
agua caliente y fría.
FUNCIONAMIENTO
ADD GARMENTS (AÑADIR PRENDAS)
Los productos se añaden a la carga en el
momento adecuado durante el ciclo de lavado.
• AÑADIR PRENDAS se activa y desactiva
automáticamente. No puede seleccionarlo
pulsando el botón de USO ESPECIAL.
• Si añade prendas adicionales cuando la luz
de AÑADIR PRENDAS esté apagada, puede
causar un rendimiento inadecuado.
Cuando AÑADIR PRENDAS esté activado, la luz
indicadora estará encendida.
Pulse el botón de INICIO/PAUSA para pausar
la lavadora.
Abra la cubierta después de su desbloqueo.
Añada las prendas adicionales.
Cierre la cubierta.
Pulse el botón de INICIO/PAUSA para
reanudar la lavadora.
NOTA: Si la puerta permanece abierta durante 8
minutos tras pausar el ciclo, el agua del tambor se
drenará.
1
2
3
4
5
SPECIAL USE (USO ESPECIAL)
Seleccione cualquier opción adicional,
como ENJUAGUE + CENTRIFUGADO,
SÓLO CENTRIFUGADO, STAIN
CARE™ o REMOJO
•
Si pulsa el botón de USO ESPECIAL sin
seleccionar un ciclo, se seleccionará de
forma automática la opción ALGODÓN/
NORMAL con REMOJO.
NOTA:
Si pulsa el botón SPECIAL USE 3 ó 4 veces, el
ciclo vuelve a comenzar por COTTON/NORMAL.
20

ESPAÑOL
FUNCIONAMIENTO
SOAK (REMOJO)
Permite al usuario eliminar las manchas más
fácilmente al especificar un tiempo adicional
para que la ropa permanezca inmersa en el agua
durante el lavado. Al final del remojo, se iniciará
el ciclo de lavado sin desagüe.
• El tiempo del ciclo se puede aumentar en
intervalos de 30 minutos.
• Es normal que la lavadora realice algún
movimiento de giro durante este ciclo.
NOTA: No puede seleccionar la opción SOAK en
el ciclo TUB CLEAN.
SPIN ONLY (SÓLO CENTRIFUGADO)
Este botón activa el ciclo Desagüe y Centrifugado para
expulsar el agua de la lavadora y centrifugar la ropa.
Pulse el botón Encendido para encender la
lavadora.
Pulse el botón USO ESPECIAL hasta que la
luz del indicador SÓLO CENTRIFUGADO se
encienda.
Pulse el botón INICIO/PAUSA para
comenzar el ciclo. La lavadora se pondrá en
funcionamiento automáticamente.
STAIN CARE™ (CUIDADO DE MANCHAS)
Puede seleccionarse STAIN CARE™ como
una opción con los ciclos HEAVY DUTY (alta
resistencia), ALGODÓN/NORMAL y TOALLAS.
• Lave únicamente cargas pequeñas para
conseguir un cuidado óptimo de los tejidos.
(menos de 8 libras)
Pulse el botón de encendido/apagado para
encender la lavadora.
Pulse el botón de USO ESPECIAL hasta que
se ilumine el indicador STAIN CARETM.
Pulse el botón de INICIO/PAUSA para iniciar
el ciclo. La lavadora se iniciará de forma
automática.
NOTA: Si selecciona STAIN CARE™, la opción
COLDWASH™ no está disponible.
RINSE + SPIN (ENJUAGUE + CENTRIFUGADO)
Utilice este ciclo para obtener un enjuague
intenso seguido de un centrifugado a alta
velocidad
• Puede cambiar la temperatura del enjuague
y la velocidad del centrifugado pulsando los
botones LAVADO/AENJUAGUE y VELOCIDAD
DE CENTRIFUGADO.
Pulse el botón de encendido/apagado para
encender la lavadora.
Pulse el botón de USO ESPECIAL hasta
que se ilumine el indicador ENJUAGUE
+ CENTRIFUGADO. (La luz del ciclo se
apagará).
Pulse el botón de INICIO/PAUSA para iniciar
el ciclo. La lavadora se iniciará de forma
automática.
1
2
3
1
2
3
BOTONES DE MODIFICACIÓN DE CICLO (cont.)
1
2
3
21

Pulse el botón de INICIO/PAUSA durante el
ciclo de lavado o aclarado.(No está disponible
en el ciclo de centrifugado)
Presione y sostenga ENJUAGUE ADICIONAL.
Pulse el botón de INICIO/PAUSA para iniciar el
ciclo.
Si quiere utilizar adicionalmente la opción MÁS
AGUA, repita los pasos 1 a 3.
NOTA: Si la lavadora alcanza el nivel maximo de
agua, aunque pulsemos el boton MAS AGUA,
éste no funcionará.
NOTA: No puede seleccionar la opción WATER
PLUS durante los ciclos SANITARY, TUB CLEAN
y BULKY/BEDDING.
FUNCIONAMIENTO
BOTONES DE OPCIÓN DE CICLO
Su lavadora incluye varias opciones de
ciclo adicionales para personalizar los ciclos
adaptándolos a sus necesidades concretas.Ciertos
botones de opciones también incluyen una función
especial que se pueden activar pulsado durante 3
segundos esa opción.
NOTA: Para proteger sus prendas, no todas las
temperaturas de lavado/enjuague, la velocidad de
centrifugado, el nivel de suciedad o las opciones
están disponibles en cada ciclo. Consulte la Guía de
ciclos para más información.
COLDWASH™
Utilice esta opción para evitar
utilizar el acelerador de calefactor
integrado.
Para una mayor eficiencia, lave
únicamente cargas pequeñas (menos de 8 libras)
y utilice la velocidad baja de centrifugado.
NOTA: Si selecciona STAIN CARE™, la opción
COLDWASH™ no está disponible.
Pulse el botón de encendido/apagado para
encender la lavadora
Gire el boton de seleccion de ciclo para elegir
el ciclo deseado. (Consulte la pagina 15.)
Pulse el botón de COLDWASH™ .
Pulse el botón de INICIO/PAUSA para iniciar
el ciclo. La lavadora se iniciará de forma
automática.
EXTRA RINSE (ENJUAGUE ADICIONAL)
Esta opción añadirá un ciclo
de enjuague adicional al ciclo
seleccionado. Utilice esta opción
para ayudar en la eliminación de los
restos de detergente o blanqueador
de las prendas.
Al pulsar dos veces el botón de ENJUAGUE
ADICIONAL añadirá dos enjuagues adicionales al
ciclo.
Pulse el botón de encendido/apagado para
encender la lavadora.
Gire el botón de selección de ciclo para
elegir el ciclo deseado.
Pulse los botones de modificación de ciclo
para cambiar los ajustes deseados.
Pulse ENJUAGUE ADICIONAL,
• Si quiere añadir dos enjuagues adicionales,
pulse el botón de ENJUAGUE ADICIONAL
dos veces.
• Si quiere eliminar el enjuague adicional,
pulse el botón de ENJUAGUE ADICIONAL
tres veces.
Pulse el botón de INICIO/PAUSA para iniciar
el ciclo.
NOTA: No puede seleccionar la opción EXTRA
RINSE durante el ciclo de centrifugado.
1
2
3
4
5
1
2
3
4
1
2
3
4
WATER PLUS (MÁS AGUA)
Seleccione esta opción para añadir
más agua a los ciclos de lavado
y aclarado para obtener unos
resultados óptimos, sobre todo con
las prendas grandes y voluminosas.
Pulse durante 3 segundos el botón
de ENJUAGUE ADICIONAL para
activar o desactivar MÁS AGUA.
FABRIC SOFTENER (SUAVIZANTE)
El suavizante se dispensa en el
aclarado final. Seleccione el botón
de SUAVIZANTE para cambiar el
tipo de aclarado final de aclarado
por chorro a aclarado intenso.
NOTA: LG recomienda utilizar la opciones
SUAVIZANTE o ENJUAGUE ADICIONAL al
seleccionar los ciclos de ALGODÓN/NORMAL o
MUY SUCIO.
NOTA: Si selecciona ENJUAGUE ADICIONAL en
vez de SUAVIZANTE, el suavizante se dispensará
durante el curso del enjuague adicional.
22

ESPAÑOL
CHILD LOCK (BLOQUEO INFANTIL)
Utilice esta opción para evitar el uso
indeseado de la lavadora o para
evitar que los ajustes del ciclo se
modifiquen mientras la lavadora está
en funcionamiento. Pulse durante 3 segundos el
botón de la alarma para activar o desactivar el
BLOQUEO INFANTIL.
La lavadora se puede bloquear durante un ciclo.
Si se ha seleccionado BLOQUEO INFANTIL, la
pantalla alternará entre CL y el tiempo restante
del ciclo. Se desactivarán todos los controles
excepto el botón de encendido/apagado y
Bloqueo Infantil.
NOTA: CHILD LOCK (BLOQUEO INFANTIL) se
mantiene después del fin del ciclo. Si desea
desactivar esta funcion, presione y sostenga 3
segundos el boton BEEPER.
CUSTOM PROGRAM (PERSONALIZAR PROGRAMA)
PERSONALIZAR PROGRAMA le
permite guardar un ciclo de lavado
personalizado para su utilización
posterior. Le permite guardar la
temperatura favorita, la velocidad de
centrifugado, el nivel de suciedad y
otras opciones aplicables a un ciclo
que después se activan con sólo
pulsar un botón.
NOTA: Solo puede guardar un programa
personalizado por vez. Pulse durante varios
segundos el boton de PERSONALIZAR
PROGRAMA para sobrescribir cualquier
programa personalizado guardado previamente.
Para guardar un programa
personalizado:
Presione el botón de encendido para
accionar la lavadora.
Gire el botón de selección de ciclo para
elegir el ciclo deseado.
Pulse los botones de modificación de ciclo
para cambiar los ajustes deseados
Pulse el botón de opción de ciclo para
cambiar las opciones deseadas.
Pulse durante aprox. 3 segundos el botón de
PERSONALIZAR PROGRAMA.
FUNCIONAMIENTO
BOTONES DE OPCIÓN DE CICLO (cont.)
1
2
3
4
5
BEEPER (ALARMA ACÚSTICA)
Ajuste el volumen de la alarma de
finalización de ciclo, o desactívela.
DELAY WASH (RETRASAR LAVADO)
Una vez haya seleccionado el ciclo
y otros ajustes, pulse este botón
para retrasar el inicio del ciclo de
lavado. Cada vez que pulse el botón,
aumentará el tiempo de retraso hasta
un máximo de 19 horas.
Para acceder a un programa personalizado:
Presione el botón de encendido para
accionar la lavadora.
Pulse el botón PERSONALIZAR
PROGRAMA. Se mostrarán los ajustes
guardados.
Pulse el botón de INICIO/PAUSA para
iniciar el ciclo. (Si pulsa cualquier otro
botón, PERSONALIZAR PROGRAMA se
desmarcará automáticamente a la vez que
se apaga la luz indicadora).
1
2
3
23

wADVERTENCIA:
•Desconectelalavadoraantesdelalimpiezaparaevitarelriesgodedescargaeléctrica.No seguir
esta advertencia puede causar lesiones serias, un incendio, una descarga eléctrica o incluso la muerte.
•Nuncauseproductosquímicosabrasivos,limpiadoresabrasivosodisolventesparalimpiarla
lavadora. Dañarán el acabado.
Limpieza del exterior
El cuidado adecuado de su lavadora puede
alargar su vida útil. El exterior de la máquina se
puede limpiar con agua tibia y un detergente
doméstico suave y no abrasivo.
Limpie inmediatamente los derrames con un paño
suave y húmedo.
IMPORTANTE: No utilizar alcohol de quemar,
disolventes, o productos similares.
Nunca use lana de acero o productos de limpieza
abrasivos, ya que pueden dañar la superficie.
Cuidado y limpieza del Interior
Use una toalla o un paño suave para limpiar
alrededor de la apertura de puerta de la
lavadora y la puerta de vidrio. Elimine siempre
los elementos de la lavadora tan pronto como
se haya completado el ciclo. Dejar artículos
húmedos en la lavadora puede causar arrugas y
la transferencia de color y olor.
Esta lavadora tiene un ciclo especial, LIMPIAR
TAMBOR, para quitar del interior la acumulación
de residuos de detergente que puede ocurrir en la
cuba de lavado o del tambor y conducir a moho
u olor a humedad.
Ejecute el ciclo LIMPIAR TAMBOR periódicamente
para eliminar la acumulación de detergentes y
otros residuos.
Lea las instrucciones cuidadosamente antes
de comenzar el ciclo de LIMPIAR TAMBOR.
Abra la puerta y quite la ropa del tambor de
lavado.
Abra el cajón dispensador.
Añada cloro líquido o un limpiador de baño.
Se pueden utilizar algunos limpiadores en polvo
o en pastilla de bañera que se fabrican para este
fin.
(NOTA: No agregue ningún detergente o
suavizante de ropa en el cajón cuando se utiliza
LIMPIAR TAMBOR.)
- Si usa limpiador en polvo
Retire la taza de detergente líquido y añada más
limpiador en polvo al compartimiento de lavado
principal del cajón.
- Si usa limpiador en pastillas
Añada más pastillas limpiadoras en el
tambor de lavado directamente.
(NOTA: No agregue más limpiador en
pastillas en el cajón.)
Cerrar el cajón y la puerta de la lavadora.
Seleccione LIMPIAR TAMBOR y pulse
COMENZAR/PAUSA.
NOTA: Se recomienda que LIMPIAR TAMBOR
debe repetirse cada mes. Si existe un olor a
moho, ejecute LIMPIAR TMABOR durante 3
semanas consecutivas. Después de que LIMPIAR
TAMBOR está completado o cuando la lavadora
no se usa, deje la puerta abierta a la lavadora
para una mejor ventilación y secado del interior
de la lavadora.
4
5
1
2
3
LIMPIEZA REGULAR
CUIDADOS Y LIMPIEZA
24

ESPAÑOL
CUIDADOS Y LIMPIEZA
LIMPIEZA REGULAR (cont.)
Extracción de acumulación de cal
Si usted vive en una zona con agua dura, se
puede formar cal en los componentes internos
de la lavadora. El uso de un ablandador de agua
es recomendable en áreas con agua dura. Si se
utiliza un descalcificador, asegúrese de que es
apto para su uso en una lavadora, y ejecutar el
ciclo de LIMPIAR TAMBOR antes de lavar la ropa.
La acumulación de sarro y otras manchas ser
quitados del tambor de acero inoxidable usando
un limpiador de acero inoxidable.
No use lana de acero ni limpiadores abrasivos, ya
que pueden dañar la superficie.
El almacenamiento de la lavadora
Si la lavadora no se va a utilizar durante un período
prolongado de tiempo y se encuentra en un área que
podría estar expuesta a temperaturas de bajo cero:
Apague el suministro de agua del grifo.
Desconecte las mangueras de suministro de
agua y drene el agua de las mangueras.
Conecte el cable de alimentación a una toma
eléctrica a tierra.
Agregue 1 galón de anticongelante no tóxico
para vehículos recreativos (RV) al tambor
vacío de la lavadora. Cierre la puerta.
Seleccione el ciclo de centrifugado y deje
centrifugar la lavadora durante 1 minuto para
drenar toda el agua.
NOTA: No se eliminará todo el
anticongelante para vehículos recreativos.
Desconecte el cable de alimentación, seque
el interior del tambor con un paño suave, y
cierre la puerta.
Elimine las inserciones del dispensador.
Drene el agua que haya quedado en los
compartimentos y séquelos.
Guarde la lavadora en posición vertical.
Para quitar el anticongelante de la lavadora
después de su almacenamiento, ejecute
lavadora en un ciclo completo usando
detergente. ¡No agregue ropa!
1
2
3
4
5
6
7
8
9
Deje la cubierta abierta
Deje la cubierta abierta una vez haya terminado el
ciclo para mantener el tambor limpio.
Limpieza de los filtros de entrada de
agua
Si la lavadora detecta que el agua no está entrando en
el dispensador, un mensaje de error se mostrará en la
pantalla. Si usted vive en una zona con agua dura, esto
puede ser causado por filtros de entrada obstruida.
Apague los grifos de agua por completo.
Desenrosque las líneas de agua fría y caliente de
la parte posterior de la lavadora.
IMPORTANTE:
Tenga sumo cuidado al retirar y limpiar
los filtros. Si los filtros no pueden ser limpiados o están
dañados, no ponga en marcha la lavadora sin los filtros
de entrada. Contacte con el servicio al cliente de LG o
un prestador de servicios cualificado.
MANTENIMIENTO
o
Retire con cuidado los filtros de las tomas de agua
y remójelos en vinagre blanco o un removedor
de cal, siguiendo las instrucciones del fabricante.
Enjuáguelos a fondo antes de reinstalarlos. Ponga
los filtros en su lugar y vuelva a conectar las líneas
de agua. La lavadora no funciona sin filtros de
entrada.
IMPORTANTE: Utilice únicamente la entrada de
mangueras de LG con este producto de lavandería.
Otras marcas de mangueras no están garantizadas
para encajar o funcionar correctamente. Otras
mangueras pueden no apretarse correctamente
y podrían causar fugas. Los daños que afecten al
producto o la propiedad no serán cubiertos bajo los
términos de la garantía de LG.
o
Filtro de
entrada
Filtro de
entrada
Caliente
Fría
Caliente
Fría
25

Uso correcto de los detergentes
Usar demasiado detergente es una causa
frecuente de problemas de lavandería. Hoy
en día los detergentes están formulados
para ser eficaces y sin espuma visible.
Asegúrese de leer cuidadosamente y
seguir las recomendaciones del fabricante
sobre la cantidad de detergente para uso
en su lavado.
Puede usar menos detergente si usted
tiene agua suave, una carga menor o
una carga poco sucia.
NOTA: Use sólo detergente de alta
eficacia bajo en espuma, como Tide
® HE.
Cuidado y limpieza de la lavadora
Tapa: Lave con un paño húmedo el exterior y el interior y secar con un paño
suave.
Exterior: Limpie inmediatamente cualquier derrame. Límpielo con un paño
húmedo. No toque la superficie o la pantalla con objetos afilados.
Mudanza y almacenamiento: Solicite al servicio técnico la eliminación del
agua de la bomba de desagüe y de las mangueras. No instale ni almacene
la lavadora en un lugar en el cual quede expuesta a las condiciones
atmosféricas.
Vacaciones largas: Asegúrese de cerrar los grifos de abastecimiento de
agua. Escurrir toda el agua de las mangueras si el tiempo está bajo cero.
Cajón dispensador: El detergente y el suavizante pueden acumularse en el
cajón dispensador. Los residuos deben de ser eliminados una o dos veces al
mes.
Retire el cajón tirando de él hacia afuera hasta que se detenga. Levante
la parte delantera del cajón y tire de ella.
1
2
3
4
CUIDADOS Y LIMPIEZA
LIMPIEZA DE LA LAVADORA
Quite las inserciones de los 2 compartimentos; enjuague las inserciones y
el cajón con el agua caliente para quitar rastros de productos de lavandería
acumulados.
Para limpiar la apertura del cajón, utilice un pequeño cepillo no metálico
para limpiar la cavidad. Quite todos los residuos de la parte superior e
inferior de la cavidad.
Vuelva a colocar los insertos de los compartimentos adecuados y vuelva a
colocar el cajón.
26

ESPAÑOL
RESOLUCIÓN DE PROBLEMAS
Ruidos normales que puede escuchar
Problema Causas posibles Soluciones
Agitación
provocando ruido
Sonido de golpes
Filtraciones de
agua alrededor de
la lavadora
•
Los objetos extraños, tales como llaves,
monedas o alleres de seguridad, puede
estar en el tambor o en la bomba.
• Lavar cargas pesadas puede
producir un sonido de golpes.
•La carga de la lavadora puede
estar desequilibrada.
• La carga del lavado puede
estar distribuida de manera
desigual en el tambor.
• No todos los pies de nivelación
descansan rmemente en el
suelo.
• Suelo insucientemente rígido.
• Vuelva a conectar la
manguera si se ha soltado del
grifo o de la lavadora.
• La entrada de las tuberías de
drenaje está obstruida.
• Artículos de gran tamaño,
tales como una almohada y
una manta dentro del tambor.
•
Pare la lavadora y compruebe si hay objetos extraños en el
tambor o en el ltro de drenaje. Si el ruido continúa después
de que se reinicie la lavadora, llame al servicio técnico.
• Esto es normal. Si el sonido continúa, la lavadora
lavadora está, probablemente, mal equilibrada.
Detener y redistribuir la carga de lavado.
• Detener y redistribuir la carga de lavado.
• Pare la lavadora y reorganice la carga de la lavado.
• Ajuste las patas de nivelación. Asegúrese de que
los cuatro pies están rmemente en contacto con el
suelo, mientras que la lavadora está en el ciclo de
centrifugado, con una carga.
• Asegúrese de que el suelo es sólido e inexible.
Consulte "Suelo" en la sección de instalación.
• Comprobar las mangueras. Compruebe y apriete las
conexiones de la manguera.
• Desatascar el tubo de drenaje. Póngase en contacto
con un fontanero si fuera necesario.
•
Compruebe el ciclo. Si lava artículos grandes, voluminosos
utilice el ciclo VOLUMINOS / ROPA DE CAMA.
• Pare la lavadora y compruebe la posición de carga.
Coloque los objetos voluminosos en la tambor.
Chasquidos:
• La cerradura de la puerta cuando el relé de la
cerradura de la puerta se abre.
• La lavadora hará una serie de chasquidos mientras
se cambia el modo de limpieza.
Ruido de alta frecuencia:
La cesta de lavado gira más rápido para quitar la
humedad de la carga.
Pulverización o silbidos:
La pulverización de agua o circulación durante el
ciclo.
Zumbido o gorgoteo:
La bomba de desagüe de bombeo de agua de la
lavadora al final de un ciclo.
Sonido del agua salpicando:
Un líquido en el anillo de equilibrado de todo el
tambor de lavado ayuda a la canasta a girar sin
problemas. (La lavadora se apaga y el tambor gira.)
El sonido del agua que se añade después de
que la lavadora ya ha estado operando:
• La lavadora se adapta al tamaño y tipo de carga para
añadir más agua en el ciclo, según sea necesario.
• La carga de lavado puede estar desequilibrada. Si la
lavadora detecta que la carga está desequilibrada, se
parará y rellenará para redistribuir la carga.
• La lavadora puede diluir los aditivos de lavandería
para añadirlos a la carga de lavado.
ANTES DE SOLICITAR ASISTENCIA TÉCNICA
Su lavadora está equipada con un sistema de control de error automático para detectar y diagnosticar
problemas en una etapa temprana. Si la lavadora no funciona correctamente o no funciona en absoluto,
compruebe lo siguiente antes de llamar al servicio técnico.
Ruido de vibración
Exceso de espuma
• Demasiado detergente o
detergente incorrecto.
• Reduzca la cantidad de detergente o use detergente
de baja espuma.
Sólo use detergente con el logotipo HE
(alta eciencia).
Los siguientes sonidos se pueden escuchar mientras
que la lavadora está en funcionamiento. Son normales.
27

RESOLUCIÓN DE PROBLEMAS
ANTES DE SOLICITAR ASISTENCIA TÉCNICA (cont.)
Problema Causas posibles Soluciones
La lavadora se llena
de agua lentamente,
no se llena o en la
pantalla se lee:
La lavadora no se
enciende
En la pantalla se lee:
•
Los grifos de suministro de agua
no están totalmente abiertos.
• Las mangueras de la línea
de agua están deformadas,
pinzadas o dobladas.
• Los ltros de entrada de agua
están obstruidos.
• La presión de agua al grifo o en
casa es insuciente.
• El cable de alimentación no
está conectado correctamente.
•
El fusible está fundido, el disyuntor
se ha desconectado o se ha
producido un corte de energía.
• La puerta no está cerrada
correctamente.
• El nivel de agua es
demasiado alto debido a un
fallo en la valvula de agua.
• Asegúrese de que los grifos de agua estén
completamente abiertos.
• Asegúrese de que las mangueras no estén deformadas
ni pinzadas. Tenga cuidado cuando mueva la lavadora.
• Limpie los ltros de entrada. Consulte la sección
Limpieza y mantenimiento.
• Compruebe en otra llave de paso de la casa para
asegurarse de que la presión del agua es adecuada.
• Asegúrese de que el enchufe esté correctamente puesto
a tierra, con una toma de 3 púas, 120 V de CA y 60-Hz.
•
Restablezca el disyuntor o cambie el fusible. No aumente la
capacidad del fusible. Si el problema radica en la sobrecarga del
circuito, éste deberá ser reparado por un electricista cualicado.
•
Asegúrese de que la puerta esté bien cerrada y pulse el botón
de INICIO/PAUSA. Después de iniciar un ciclo, tarda unos
instantes antes de que el tambor empieza a girar o centrifugar.
La lavadora no centrifugará a menos que la puerta esté
bloqueada.(En la pantalla se leerá BLOQUEAR PUERTA).
• Si la puerta está cerrada y bloqueada y aún se muestra
el mensaje de error por puerta abierta, solicite asistencia
técnica.
• Si pulsa el botón START mientras la tapa esté abierta,
aparecerá un mensaje de error.
• Cierre los grifos de agua, desenchufe la lavadora y
solicite asistencia técnica.
En la pantalla se lee:
• La lavadora ajusta
automáticamente el tiempo
de lavado según la cantidad
de ropa, la presión del agua,
su temperatura y otras
condiciones operativas.
• Esto es normal. La lavadora ajusta el tiempo del
ciclo automáticamente para ofrecer unos resultados
óptimos en el ciclo seleccionado.
El tiempo del ciclo
de lavado es más
largo de lo habitual
En la pantalla se lee:
•Error del interruptor de
bloqueo de puerta
• Asegúrese de que la puerta esté bien cerrada y
pulse el botón de INICIO/PAUSA. La lavadora no
centrifugará a menos que la puerta esté bloqueada
(En la pantalla se leerá BLOQUEAR PUERTA).
• Si la puerta está cerrada y aún se muestra el mensaje de
error por bloqueo de puerta, solicite asistencia técnica.
El agua de la lavadora
sale lentamente, no
sale o en la pantalla
se lee:
• La manguera de desagüe
está curvada, pinzada u
obstruida.
• Asegúrese de que la manguera de desagüe no
presente ninguna obstrucción, deformación, etc.
y que no esté pinzada en la parte trasera o con la
lavadora.
En la pantalla se lee:
• Error de acople
• Desenchufe la lavadora y solicite asistencia técnica.
28

ESPAÑOL
RESOLUCIÓN DE PROBLEMAS
Problema Causas posibles Soluciones
• Error del termistor
• Desenchufe la lavadora y solicite asistencia técnica.
En la pantalla se lee:
• El sensor del nivel de agua no
funciona correctamente.
• Cierre los grifos de agua, desenchufe la lavadora y
solicite asistencia técnica.
En la pantalla se lee:
• El circuito de protección
contra la sobrecarga
térmica en el motor se ha
desconectado.
• Deje la lavadora en reposo durante 30 minutos para
refrigerar el motor y después, reinicie el ciclo. Si el
error "LE" sigue apareciendo, desenchufe la lavadora
y solicite asistencia técnica.
En la pantalla se lee:
Aparición de
manchas
• Añada los productos de lavado
en el tambor de la lavadora.
• La lavadora no se ha
descargado rápidamente.
• La ropa no se ha clasicado
correctamente.
• Introduzca los productos de lavado en el dispensador.
• Saque las prendas de la lavadora tan pronto como
nalice el ciclo.
• Lave siempre los colores oscuros separados de los
claros para evitar que se destiñan. Si es posible, no
lave prendas muy sucias con otras que no lo estén
tanto.
Aparición de
arrugas
• La lavadora no se ha des
cargado con prontitud.
• Se ha introducido demasiada
ropa.
• Se han intercambiado las
mangueras de entrada de
agua caliente y fría.
• Saque las prendas de la lavadora tan pronto como
nalice el ciclo.
•
La lavadora se puede cargar hasta su capacidad máxima,
pero las prendas no deben estar comprimidas en el tambor.
La puerta de la lavadora debe cerrarse fácilmente.
• El ciclo de lavado en agua caliente puede producir
más arrugas en las prendas. Revise las conexiones
de la manguera de entrada.
ANTES DE SOLICITAR ASISTENCIA TÉCNICA (cont.)
NOTA: Si un mensaje de error permanece durante 4 minutos, el agua del tambor se vaciará
automáticamente. Sonará una alarma 1 minuto antes del vaciado de agua y aparecerá "dr" en la pantalla.
Puede reiniciar la lavadora en este momento. Sin embargo, una vez que la lavadora haya iniciado el
vaciado de agua, todas las funciones se suspenderán y se mostrará "dr" hasta que el vaciado de agua
haya terminado.
En la pantalla se lee:
En la pantalla se lee:
• Si la lavadora detecta una carga demasiado
desbalanceada como para poder girar, mostrará
este código mientras intenta rebalancear la carga.
La lavadora agregará agua e intentará redistribuir la
carga automáticamente. Esta pantalla es únicamente
para su información y no requiere ninguna acción.
• El intento automático para rebalancear la carga no
tuvo éxito. El ciclo se puso en pausa para permitir
que la carga se ajuste manualmente.
• Puede ser que necesite agregar artículos adicionales
a las cargas pequeñas para que la lavadora pueda
balancear las cargas.
• Puede ser que la carga contenga artículos pesados
y otros más ligeros. Siempre trate de lavar artículos
que de alguna manera sean de pesos similares para
ayudar a la lavadora a distribuir el peso de la carga
para una buena rotación.
• Redistribuya manualmente la carga si los artículos
se han enredado y no permiten que la distribución
automática funcione apropiadamente.
• La lavadora ha detectado una
carga desbalanceada.
• Si el rebalanceo uE (ver
arriba) no tiene éxito,
mostrará este error.
• La carga es demasiado
pequeña.
• Hay artículos pesados
mezclados con artículos más
ligeros.
• La carga está desbalanceada.
29

RESOLUCIÓN DE PROBLEMAS
ANTES DE SOLICITAR ASISTENCIA TÉCNICA (cont.)
Problema Causas posibles Soluciones
La lavadora no
funciona
Panel de control está dormido
La lavadora está desenchufado
El suministro de agua está apagado
Los controles no se
establecen correctamente
La tapa está abierta, la
característica de seguridad impide
que la carga de la lavadora y la
operación con la tapa abierta
El cortocircuito / fusible se ha
accionado / estropeado
La electrónica tiene que ser
reajustada
INICIAR no ha sido presionado después de
que se haya establecido el ciclo
Baja presión de agua
extrema
La lavadora está demasiado
fría
Filtro obstruido o las
mangueras de llenado pueden
estar dobladas
Eciencia energética
Abastecimiento de agua
insuciente
La tapa de lavadora está
abierta
La conexión de la manguera
es incorrecta
Optimización de llenado de
agua
• Esto es normal. Pulse ENCENDIDO.
•
Asegúrese que la cuerda está bien tapada en una salida en funcionamiento.
• Gire totalmente abiertos tanto grifos calientes como fríos.
• Asegúrese de que el ciclo se ha establecido correctamente,
cierre la tapa y pulse INICIAR.
• Cierre la tapa y restablezca el ciclo, hasta el comienzo si
fuera necesario.
•
Compruebe los cortacircuitos / fusibles de casa. Sustituya fusibles o
reajuste el interruptor. La lavadora debe tener un circuito dedicado.
• Pulse el boton Encendido.
• Pulsar INICIAR.
• Revise otra llave en el hogar para asegurar que la presion de
agua del hogar es adecuada.
• Si la lavadora ha sido expuesta a temperaturas bajo cero
durante un período prolongado de tiempo, permita que se
caliente antes de presionar ENCENDIDO. De lo contrario, la
pantalla no se encenderá.
•
Asegúrese de que los ltros (pantallas azul y naranja deben estar
libres de sólidos) de la unidad no estén obstruidos.Apague el agua y
compruebe el ltro desconectando la manguera a la máquina. Verique
que las mangueras no están dobladas o congestionadas.
•
Se trata de una lavadora con eciencia energética. Por
consiguiente, los ajustes de temperatura para esta lavadora
pueden ser diferentes de las lavadoras sin eciencia energética.
• Asegúrese de que el suministro de agua esté abierto.
Asegúrese de que los grifos de agua vuelven a sus
posiciones completamente abiertos.
•
La tapa de lavadora debe estar cerrada para todas las operaciones
del ciclo de lavado. Si la tapa se abre durante el lavado, todas las
funciones se detendrán, incluyendo el agua de llenado.
•
Asegúrese de que las mangueras conectan el suministro de agua
caliente a la entrada caliente de la lavadora, y el suministro de agua
fría a la entrada fría de la lavadora (caliente a caliente, frío a frío).
• E
l agua no puede cubrir el nivel superior de la ropa. Esto es
normal para esta lavadora de alta eciencia. El relleno de agua es
optimizado por el sistema para mejor rendimiento de
lavado.
La lavadora no se
llena con propiedad
30

ESPAÑOL
RESOLUCIÓN DE PROBLEMAS
ANTES DE SOLICITAR ASISTENCIA TÉCNICA (cont.)
Problema Causas posibles Soluciones
La lavadora no vacía
el agua estancada
en el tambor.
El agua se escapa
en cada carga
Fugas de agua
Incompleto o
ninguna distribución
de detergente
Dosificación
prematura de la lejía
Taponamiento de
lejía
Manguera de drenaje quebrada
o desagüe situado a más 8"
por encima del suelo
Las mangueras no están
instaladas correctamente
Uso excesivo de detergente
Los recipientes de detergentes
se obstruyeron debido a un
relleno incorrecto
Demasiado uso de detergente
Abastecimiento de agua
insuciente
Residuos normales
El recipiente de lejía se llenó
para la futura carga
Excesivo llenado del recipiente
de lejía
El recipiente de lejía no se
encuentra bien colocado.
Limpieza insuciente
• Asegúrese de que la manguera del desagüe no esté doblada.
Por instrucciones de instalación recomendadas, la salida de
desagüe no puede ser más de 8" encima del suelo.
• Revise todas las conexiones de las mangueras para
asegurarse de que estén apretadas y seguras.
•
El uso excesivo puede crear fugas, que pueden ser causadas
por el tipo y la cantidad de detergente utilizado. Se recomienda
detergente de alta eciencia. Asegúrese que el detergente
y cualquier aditivo son puestos en los recipientes de unión
del dosicador. Siga las recomendaciones del fabricante del
detergente para la cantidad de detergente, pero trate de usar
menos detergente, sobre todo si el acondicionamiento de
agua
de casa o las unidades emolientes de agua están siendo usados.
•
Asegúrese que el detergente y los aditivos son puestos en a los
recipientes de dosicador correctos. Si se utiliza detergente líquido,
asegúrese que la caja del dispensador del detergente líquido está
en el recipiente de dosicador. Si se utiliza detergente pulverizado,
asegúrese que la caja del dispensador del detergente líquido
no está siendo usada. Para todo tipo de detergente, asegúrese
siempre de que la caja del dispensador está totalmente cerrada
antes de iniciar el ciclo.
• Asegúrese de la cantidad sugerida de detergente utilizado
por las recomendaciones del fabricante. También puede
diluir el detergente con agua en la línea de llenado máximo
de la bandeja para evitar obstrucciones. Se recomienda el
detergente de alta eciencia para esta lavadora.
• Asegúrese de que el suministro de agua esté abierto.
Asegúrese de que los grifos de agua vuelven a sus
posiciones completamente abiertos.
•
Funcionamiento normal. Los residuos pueden permanecer en los
contenedores de la caja dispensadora. La caja del dispensador se
puede quitar para la limpieza de vez en cuando con agua tibia y un
cepillo de fregar.
• No puede almacenar la lejía en el dosicador para el futuro
uso. El recipiente de lejía será dispensado para cada carga
para la seguridad óptima de la lavadora.
•
El llenado excesivo del recipiente con la lejía puede llevar a
la distribución prematura. Hay una línea de llenado máximo
indicado en el recipiente de lejía para evitar el llenado excesivo.
• Asegúrese de que la tapa de la lejía esté bien colocada y
trabada en su lugar antes de iniciar el ciclo.
• Usted puede quitar y limpiar la tapa de lejía con agua tibia
y limpiar con un cepillo para eliminar el taponamiento.
31

RESOLUCIÓN DE PROBLEMAS / ESPECIFICACIONES
DIMENSIONES Y ESPECIFICACIONES CLAVE
Modelos WT5101H*
Descripción Lavadora de carga superior.
Requisitos eléctricos 120V AC, 60Hz
Presión del agua 14,5~116 PSI (100~800 kPa)
Dimensiones
27"(anchura) X 28
3
/8"(profundidad) X 45
3
/8"(altura), 55
3
/4"(altura con la puerta abierta)
68,6 cm (anchura) X 72,1 cm (profundidad) X 115,3 cm (altura), 141,7 cm (altura con la puerta abierta)
Peso neto 145,5 lbs. (66 kg)
Máx. velocidad de centrifugado
1100 RPM
El aspecto y las especicaciones puestas en la lista en esta guía pueden variar debido a mejoras del producto constantes.
UTILIZACIÓN DEL DIAGNÓSTICOINTELIGENTE™
- Utilice esta función sólo cuando así se lo indique el agente del Centro de Atención al Cliente. La
transmisión tiene un sonido similar al de un fax, y no tiene ningún significado, excepto para el Centro de
Atención al Cliente.
- El DiagnósticoInteligente™ no puede activarse si la lavadora no está conectada a la red eléctrica. Si esto
ocurre, deberán utilizarse los procedimientos normales de solución de problemas.
Si experimenta algún problema con su lavadora, llame al número 1-800-243-0000(1-888-542-2623 en
Canadá). Siga las instrucciones de nuestro agente y estos pasos, cuando así se lo soliciten:
Pulse el botón POWER para encender la lavadora. No pulse ningún otro botón ni gire el mando
selector de ciclos.
Cuando así se lo solicite el agente, coloque el auricular del teléfono muy cerca del botón POWER.
Mantenga pulsado el botón Wash/Rinse durante tres segundos, al tiempo que mantiene el auricular del
teléfono junto al icono o botón POWER.
Mantenga el teléfono en esa posición hasta que haya finalizado la transmisión del tono. Serán unos 15
segundos, y la pantalla contará el tiempo.
• Para lograr los mejores resultados, no mueva el teléfono mientras se transmiten los tonos.
• Si el agente no logra realizar una grabación precisa de los datos, quizás le pida que lo intente de
nuevo.
• Si mantiene el botón POWER pulsado durante la transmisión, se apagará el DiagnósticoInteligente™.
Cuando haya terminado el recuento y se hayan detenido los tonos, vuelva a hablar con el agente, que
le podrá ayudar con la información recogida para su análisis.
1
2
3
4
5
32

ESPAÑOL
LG Electronics Inc. reparará o reemplazará su lavadora LG, a elección de LG, si se comprueba que el montaje o los materiales son
defectuosos en un uso normal, durante el periodo de garantía establecido más adelante (“Periodo de garantía”), efectivo desde la fecha
de compra (“Fecha de compra”) del producto por el cliente original. Esta garantía es válida únicamente para el comprador original del pro-
ducto y efectiva únicamente cuando se utilice en los Estados Unidos, incluyendo Alaska, Hawai y demás territorios de los Estados Unidos.
ESTA GARANTÍA SUSTITUYE A CUALQUIER OTRA GARANTÍA, EXPLÍCITA O IMPLÍCITA, INCLUYENDO SIN LIMITACIÓN, CUALQUI-
ER GARANTÍA DE COMERCIALIZACIÓN O CAPACIDAD PARA UNA FINALIDAD ESPECÍFICA.
POR EXTENSIÓN, CUALQUIER GARANTÍA IMPLÍCITA LEGALMENTE REQUERIDA ESTÁ LIMITADA EN SU DURACIÓN AL PERIODO
DE GARANTÍA EXPRESA ANTERIOR. NI EL FABRICANTE NI SU DISTRIBUIDOR EN EE.UU. SERÁ RESPONSABLE DE NINGÚN
DAÑO INCIDENTAL, RESULTANTE, INDIRECTO, ESPECIAL O PUNITIVO DE CUALQUIER NATURALEZA, INCLUYENDO SIN LIMI-
TACIÓN, PÉRDIDA DE INGRESOS O BENEFICIOS, O CUALQUIER OTRO DAÑO, YA SEA MEDIANTE CONTRATO, AGRAVIO O DE
OTRO MODO. Algunos estados no permiten la exclusión o limitación de daños incidentales o resultantes o limitaciones sobre el tiempo de
actuación de una garantía implícita, de modo que la anterior exclusión o limitación no se le aplicaría. Esta garantía le ofrece derechos legales
especícos y también puede tener otros derechos que variarán de estado a estado.
ESTA GARANTÍA LIMITADA NO SE APLICA A:
• Desplazamientos del servicio técnico a su domicilio para entrega, recogida y/o instalación del producto, muestra de su funciona-
miento o sustitución de fusibles o corrección del cableado o reparaciones no autorizadas.
•
Daños o problemas de funcionamiento producidos por un mal uso, abuso, funcionamiento fuera de las especicaciones del entorno o contrario
a los requisitos o precauciones del manual de instrucciones, accidente, plagas, incendio, inundación, instalación incorrecta, causas de fuerza
mayor, modicaciones o alteraciones no autorizadas, corriente o voltaje no adecuado, uso comercial o uso distinto para el que está diseñado.
El coste de la reparación o recambio bajo estas circunstancias excluidas deberá ser abonado por el consumidor.
NÚMEROS DEL CENTRO INFORMACIÓN DE ATENCIÓN AL CLIENTE
CONTACTAR LG ELECTRONICS
POR CORREO:
Centro Información de atención al cliente LG
Apartado postal 240007
201 James Record Road
Huntsville, Alabama 35824
AT: CIC
PERIODO DE GARANTÍA:
MANO DE OBRA: Un año desde la fecha de compra.
PARTES (excepto las que se enumeran a continuación):
Un año desde la fecha de compra.
Motor del tambor(Stator, Rotor, Hall sensor)
: Diez anos desde la Fecha de compra.
Tambor de acero inoxidable: Ilimitada
Las unidades de sustitución y reparación de piezas pueden
ser nuevas o reconstruidas.
Las unidades y piezas de repuesto estarán en garantía durante el
periodo de tiempo restante de la garantía original de la unidad.
LG ELECTRONICS, INC.
GARANTÍA LIMITADA DE LA LAVADORA LG - EE.UU.
SOLICITUD DE SERVICIO TÉCNICO:
Servicio a domicilio:
Conserve la factura con la fecha de compra del distri-
buidor o el recibo como prueba de la fecha de compra
para comprobar la validez de la garantía y entregue una
copia de la factura de compra a la persona del servicio
técnico cuando se realice el servicio de garantía.
Llame al 1-800-243-0000 y seleccione la opción apro-
piada para localizar su centro de servicio técnico
autorizado LG más próximo.
O visite nuestra página web: http://www.lg.com.
Llame al 1-800-243-0000 (24 horas al día, 365 días al
año) y seleccione la opción apropiada del menú.
O visite nuestra página web: http://www.lg.com.
Para obtener atención al cliente, información
sobre el producto o localizar distribuidores o
centros de servicio técnico autorizados:
Información del registro de productos
Modelo:
Número de serie:
Fecha de compra:
El modelo y número de serie se encuentran en la placa en
la parte posterior de la lavadora.
33

This product qualifies for ENERGY STAR in the
“factory default (Home Use)” setting.
Changing the factory default settings or enabling other
features may increase power consumption that could
exceed the limits necessary to quality for ENERGY STAR.
1-800-243-0000
1-888-542-2623
USA
CANADA
LG Customer Information Center
www.lg.com
Register your product Online!
-
 1
1
-
 2
2
-
 3
3
-
 4
4
-
 5
5
-
 6
6
-
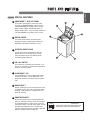 7
7
-
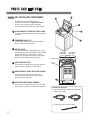 8
8
-
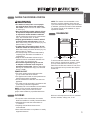 9
9
-
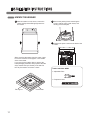 10
10
-
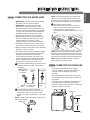 11
11
-
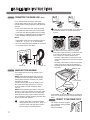 12
12
-
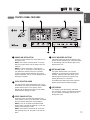 13
13
-
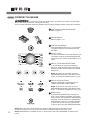 14
14
-
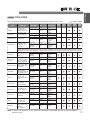 15
15
-
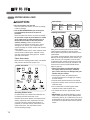 16
16
-
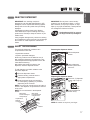 17
17
-
 18
18
-
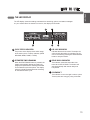 19
19
-
 20
20
-
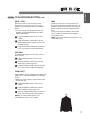 21
21
-
 22
22
-
 23
23
-
 24
24
-
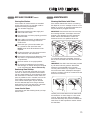 25
25
-
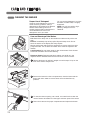 26
26
-
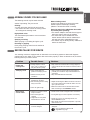 27
27
-
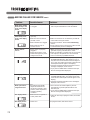 28
28
-
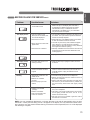 29
29
-
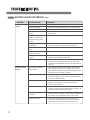 30
30
-
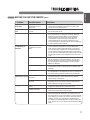 31
31
-
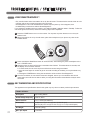 32
32
-
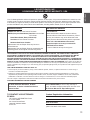 33
33
-
 34
34
-
 35
35
-
 36
36
-
 37
37
-
 38
38
-
 39
39
-
 40
40
-
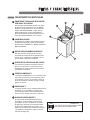 41
41
-
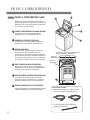 42
42
-
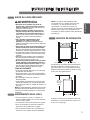 43
43
-
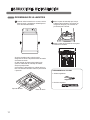 44
44
-
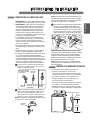 45
45
-
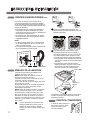 46
46
-
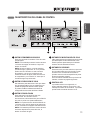 47
47
-
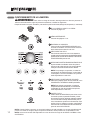 48
48
-
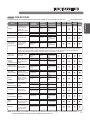 49
49
-
 50
50
-
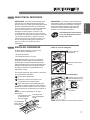 51
51
-
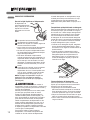 52
52
-
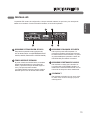 53
53
-
 54
54
-
 55
55
-
 56
56
-
 57
57
-
 58
58
-
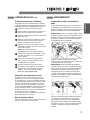 59
59
-
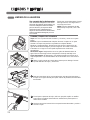 60
60
-
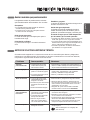 61
61
-
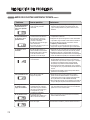 62
62
-
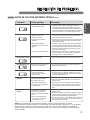 63
63
-
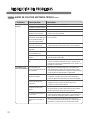 64
64
-
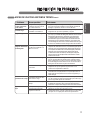 65
65
-
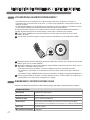 66
66
-
 67
67
-
 68
68


LG WT5101GS El manual del propietario
- Categoría
- Lavadoras
- Tipo
- El manual del propietario
- Este manual también es adecuado para
en otros idiomas
- English: LG WT5101GS Owner's manual
Artículos relacionados
-
LG 8801031531714 El manual del propietario
-
LG 8808992906438 El manual del propietario
-
LG WT5001CW El manual del propietario
-
-
LG Electronics TROMM WM2455H Manual de usuario
-
-
LG WM2688HWMA El manual del propietario
-
-