Audibax Flint Kit El manual del propietario
- Tipo
- El manual del propietario

Flint Kit
Please read the manual before using the product
USER´S
MANUAL
7
Flint Kit
NOTES

Flint Kit
16
USER´S
MANUAL
Packing List
Quantity
Bluetooth Digital Amplifier..........................................................................................1
Bottom Box...................................................................................................................1
Remote Controller.......................................................................................................1
Ceiling Speaker...........................................................................................................2
User Manual.................................................................................................................1

Flint Kit
15
USER´S
MANUAL
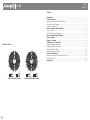
Directivity Curves
Vertical Directivity Pattern Horizontal Directivity Pattern
Contents
Introduction........................................................................................................................1
Product Overview..............................................................................................................1
High-fidelity Bluetooth Digital Amplifier...........................................................................1
Full-range Ceiling Speaker................................................................................................1
Product Information..........................................................................................................2
Basic Functions of Digital Amplifier..................................................................................3
Control Panel.....................................................................................................................3
ON/OFF, Standby Opearation.........................................................................................3
Play Functions of Digital Amplifier...................................................................................4
System Settings..................................................................................................................5
Remote Controller............................................................................................................6
Installation and Connection...........................................................................................7
Celing Speaker Installation.............................................................................................7
Digital Amplifier Connection..........................................................................................9
Terminal Function Table..................................................................................................10
Digital Amplifier Installation............................................................................................10
Technical Parameters.....................................................................................................13
Frequency Response and Distortion Curves................................................................14
Directivity Curves............................................................................................................15
Packing List......................................................................................................................16

Flint Kit
1 14
USER´S
MANUAL
Frequency Response and Distortion Curves
200100 500 1K 2K 10K5K Hz
1.00
2.00
3.00
4.00
5.00
0.01
50
100 200 500 1K 2K 5K 10K 20K
50
60
70
80
90
100
Hz
Introduction
Thank you for choosing our products. All products are strictly tested before leaving
the factory, with guaranteed quality.
In order to facilitate the installation, configuration and use of the product, please
read the manual carefully before installation.
Product Overview
This stereo music system is composed of a high-fidelity bluetooth digital amplifier
and two full-range ceiling speakers, with excellent sound quality, fashionable
design, and compact size, easy to install. It is an ideal choice for small building
environments, such us residential rooms, small offices and small retail stores.
High-fidelity Bluetooth Digital Amplifier
● Mode selection: FM, USB, SD, AUX, BLUETOOTH.
● Support MP3, WAV, FLAC and other compressed and lossless audio formats.
● Support adjustable sensitivity for AUX input.
● Support FM, which can search stations automatically and manually, and can
store 20 channels.
● Support AUX OUT.
● Wide voltage input, adaptable for 100~240VAC, 50/60Hz.
● Class D differential output.
● Support infrared remote control operation.
Full-range Ceiling Speaker
● Carbon alloy aluminum mesh with RAL white coating, which can be perfectly
integrated with any indoor occasion.
● Full range 6.5″ speaker with magnet circuit coated by a special process of
engineering plastics, and marine algae paper formed by biological deduction and
heat compression, to reproduce perfect sound and voice. (M3 is a coaxial
speaker, which has 6.5″ woofer and 0.75″ tweeter).
● Compliance with IEC 268-5 power handling capability (PHC) standard, it can
work continuously for 100 hours at rated power. With simulate acoustic feedback
exposure (SAFE) test, it can withstand twice the rated power in a short period of
time, which ensures the high reliability of the speaker under extreme conditions,
prolongs the service life and significantly reduces the chance of failure or
performance degradation
Distortion
(THD< 1.5% 1W1m100Hz-10kHz)
Frequency Response
(dB SPL, 1W, 1m)

Flint Kit
13 2
USER´S
MANUAL
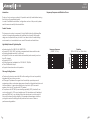
Technical Parameters Product Information
High-fidelity bluetooth digital amplifier
Full-range Ceiling Speaker
190mm
High-fidelity Bluetooth Digital Amplifier
Power Input ~100-240V
Output Power (Peak) 2 ×10W
Rated Impedance 8Ω
THD ≤0.3% (1KHz, 1W, 8Ω)
SNR >81dB
Frequency Response 20Hz – 20KHz
AUX IN Sensitivity (Adjustable) AUX: 1.0V / 500mV
AUX OUT Sensitivity (Adjustable
)
AUX: 0-1.0V
Audio Format MP3, WAV, FLAC, etc.
Bluetooth Input BT2.1+EDR
Storage USB, SD card
Product Dimensions 86×86×38mm
Full-range Ceiling Speaker
Speaker Unit 6.5”×1
Frequency Range 140Hz-16kHz
Rated Power 5W
Maximum Power 10W
MAX. SPL. 92±2dB
Sensitivity (1m/1w) 100±2
dB
Storage Temperature -25℃~+55℃
Product Dimensions 190mm×70mm
Weight 0.52kg

Flint Kit
3 12
USER´S
MANUAL
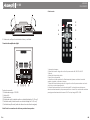
Basic Functions of Digital Amplifier
Control Panel
● Exposed Installation of Bottom Box
Note: The bottom box depth purchased can not be less than 40mm.
Drill holes in the wall that needs to be installed according to the screw holes at
the four corners of the bottom surface of the box. Thread the line end through the
reserved holes around the box, and fix the box on the wall securely with 4
self-tapping screws
Reserved Holes
Please arrange the line connection according to the actual hole position of the
box
Please refer to step 3, step 4 and step 5 in Concealed Installation of Bottom Box
to complete the installation.
● Disassembly
Find the gap between the right side of the front panel of the amplifier and the
base.
Use a slotted screwdriver to pry the buckle part of the gap carefully, and then
hold the front panel of the amplifier with both hands, and seperate the front panel
of the amplifier from the base as parallelly as possible. Be careful not to damage
the pins on the base.
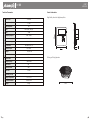
ON/OFF, Standby Operation
ON: Toggle the switch button to the right to turn on the device. OFF: Toggle the
switch button to the left to turn off the device.
Standby: Long press M to enter the standby state, and press M again to resume the
ON state
IR Receiver
Display Screen
Mode (audio source
switching/standby)
Volume +
Next Song
Volume -
Previous Song
Play/Pause
ON/OFF Button
SD slot USB port
ON
OFF

Flint Kit
11 4
USER´S
MANUAL
As show in the figures below, select the two clips in the direction of A or B,
push the outer edge outward to loosen the clips, and carefully separate the front
panel of the amplifier and the base.
Play Functions of Digital Amplifier
1. FM
Short press the "M" button to select the FM mode.
Auto Search: Long press " " to start auto searching, and the system will save the effective
radio stations automatically.
Manual Fine-tuning mode: Long press " " or " " to enter the manual fine-tuning mode,
short press " " or " " to fine-tune the current channel manual. If there is no operation
within 5 seconds, it will save the current channel and exit the manual
fine-tuning mode.
Mute: Short press " " to mute the FM.
Channel Switching: Short press " " or " " to switch the saved channels.
Volume Adjustment: Short press " +" or " -" to increase or decrease the current volume
2.USB
Short press the "M" button to select the USB mode. When there is no USB device,
the screen will display "NO" and flash. When there is a USB device, it will read the card, and
the screen will display "----" when there is no music or it cannot be decoded; and it will play
the music automatically when there is music and it can be decoded.
Play Control: Short press " " or " " to switch to previous song or next song, long press them
to fast forward or fast backward; short press " " to switch between Play and Pause.
Volume Adjustment: Short press " +" or " -" to increase or decrease the current volume.
3. SD
Short press the "M" button to select the SD mode. When there is no SD, the screen will
display "NO" and flash. When there is a SD, it will read the card, and the screen will display
"----" when there is no music or it cannot be decoded; and it will play the music
automatically and the screen will display the playback progress then there is music and it
can be decoded.
Play Control: Short press " " or " " to switch to previous song or next song, long press them
to fast forward or fast backward; short press " " to switch between Play and Pause.
Volume Adjustment: Short press " +" or " -" to increase or decrease the current volume.
4. AUX
Short press the "M" button to select the AUX mode.
Play Control: Short press " " to switch between Play and Mute. When it is muted, the LCD
screen will flash.
Volume Adjustment: Short press " +" or " -" to increase or decrease the current volume.
Sensitivity Adjustment: Long press " " or " " to fine-tune the sensitivity, which can be
switched between S1 and S2. (S1: input 500mV, S2: input 1000mV)
5. AUX OUT
This device can be used as an audio source output to other amplifier devices. When the
AUX OUT interface is connected to other devices, and when FM/USB/SD/AUX IN/Bluetooth is
selected for playback, the audio signal can be transmitted to those devices for
synchronized playback.
Connect the line end to the port on the base of the amplifier, and fix the base
on the two mounting columns with two screws.
Align the front panel of the amplifier with the fixed base in parallel, carefully
close and fasten them, and check the stability.
Note: When the front panel is fastened to the base, the pins will be inserted into the
holes on the front panel. Do not bend or damage the pins, otherwise it will cause
serious damage to the amplifier.
A
B
Parallel
Parallel

Flint Kit
5 10
USER´S
MANUAL
6.Bluetooth
Short press the "M" button to select the BT mode. When there is no connection, the screen
will flash "BT", and when the device is connected successfully, the screen will display "BT".
The Bluetooth name displayed on other devices is "DM835", with the password of 0000.
Volume Adjustment: Short press " +" or " -" to increase or decrease the current volume.
System Settings
First, please prepare a computer and connect the device to the computer via a USB cable.
Open the DM835 configuration tool in the computer.
Terminal Function Table
Digital Amplifier Installation
● Concealed Installation of Bottom Box
Note: The bottom box depth purchased can not be less than 40mm.
Open a groove suitable for the box dimension on the wall that needs to be installed, drill
holes in the groove according to the screw holes at the four corners of the bottom surface
of the box, and prepare to connect lines
*Please arrange the line connection according to the actual hole position of the box.
Thread the line end through the reserved holes around the box, put the box into the wall
groove, and fix the box in the wall groove securely with 4 self-tapping screws.
Reserved Holes Wall Groove
Wall Groove
Display the device information and connection status.
Device bluetooth name and password settings. Enter the desired bluetooth name and
password in the name and password box, and click "Configure" to complete the
modification.
Maximum volume limit settings. The maximum volume of the device that can be allowed
to be set by the user includes: 25%, 50%, 75%, and 100%. Select one of them, and click
"Configure" to complete the settings.
Function
Power Input
FM
GND
AUX IN
AUX OUT
Amplifier Output 8Ω
Symbol
N
L
ANT
R
L
R
L
OUTL
+
OUTL-
OUTR
-
OUTR
+
Name
Null
Line
Live
Line
FM
Antenna
Signal
Ground
Audio
Input
Right
Audio
Input
Left
Audio
Output
Right
Audio
Output
Left
Left
Speaker
+
Left
Speaker-
Right
Speaker-
Right
Speaker
+

Flint Kit
9 6
USER´S
MANUAL
Remote Controller
1. Standby Switch.
2. Mode Selection. Click the button to display: FM, USB, SD, AUX, BT.
3. Mute.
4. Sound Mode Selection.
5. Menu (not available yet).
6. Play Control Area. Can Play/Pause, switch to the previous song or next song, and control
the volume.
7. Play Mode Selection. Click the button to display in a loop: single cycle, and order play.
8. Number Keys Area. In SD card mode, use the number keys to directly select the track for
playback; in FM mode, use the number keys to directly input the FM frequency.
* The input range is 0870~1080. If the input frequency is out of range, it will not respond. For
example: input 0875, indicating 87.5MHZ
5. Finally, check whether the installation is firm and reliable.
Digital Amplifier Connection
Connection Ports:
Power Input ~100-240V
FM Antenna
Signal Ground
Audio Input (2×0.3mm² double-shielded audio cable)
Audio Output (2×0.3mm² double-shielded audio cable)
Amplifier Output (Oxygen-free copper speaker cable)
Note: All wire connectors cannot be exposed.
~100-240V FM
AUX IN
AUX OUT
SPEAKER 8Ω
①
②③ ④ ⑤
⑥
2
1 3
4 5
6
7
8

Flint Kit
7 8
USER´S
MANUAL
Installation and Connection
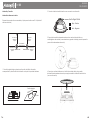
Ceiling Speaker Installation
The recommended and optimal playback space for the speakers: 50m² (including 2 ceiling
speakers)
2. Connect the audio signal cable as shown below
3. Push up the spring clamps on both sides of the speaker and keep them in this state (it is
recommended to wear working gloves for this operation to avoid spring clamps).
4. Carefully push the speaker into the open mounting hole, then slowly release the spring
clamps and gently push the speaker into the ceiling (see below)
1.Please refer to the following figure, select the hole size of the corresponding model, and
open the installation hole in the position that needs to be installed
No less than
2000-3000mm
No less than
1000mm
from the wall
No less than
1000mm
from the wall
No less than
1000mm
from the wall
No less than
1000mm
from the wall
Ceiling Speaker Ceiling Speaker
190mm
70mm
165mm-170mm
Ceiling
Hole Size
Audio Signal Cable
Red---Positive
Blue---Negative

Flint Kit
Por favor, lea el manual antes de usar el producto
MANUAL
DEL USUARIO
7
Flint Kit
NOTAS

Flint Kit
16
MANUAL
DEL USUARIO
Contenido
Cantidad
Amplificador digital bluetooth....................................................................................1
Caja inferior...................................................................................................................1
Control Remoto............................................................................................................1
Altavoz de techo..........................................................................................................2
Manual del usuario.......................................................................................................1

Flint Kit
15
MANUAL
DEL USUARIO
Directivity Curves
Patrón de directividad
horizontal
Patrón de directividad vertical
Contenido
Introducción.......................................................................................................................1
Descripción del producto.................................................................................................1
Amplificador digital Bluetooth de alta fidelidad............................................................1
Altavoz de techo de rango completo.............................................................................1
Información del Producto.................................................................................................2
Funciones básicas del amplificador digital....................................................................3
Panel de control.................................................................................................................3
ENCENDIDO/APAGADO, Operación en espera............................................................3
Funciones de reproducción del amplificador digital....................................................4
Ajustes del sistema.............................................................................................................5
Control remoto...................................................................................................................6
Instalación y Conexión......................................................................................................7
Instalación de altavoces de techo..................................................................................7
Conexión del amplificador digital...................................................................................9
Tabla de funciones de terminales..................................................................................10
Instalación de amplificador digital................................................................................10
Parámetros técnicos........................................................................................................13
Curvas de distorsión y respuesta de frecuencia...........................................................14
Curvas de directividad....................................................................................................15
Contenido.........................................................................................................................16

Flint Kit
1 14
MANUAL
DEL USUARIO
Curvas de distorsión y respuesta de frecuencia
200100 500 1K 2K 10K5K Hz
1.00
2.00
3.00
4.00
5.00
0.01
50
100 200 500 1K 2K 5K 10K 20K
50
60
70
80
90
100
Hz
Introducción
Gracias por elegir nuestros productos. Todos los productos son estrictamente
probados antes de salir de fábrica, con calidad garantizada.
Para facilitar la instalación, configuración y uso del producto, por favor lea
atentamente el manual antes de la instalación.
Descripción del producto
Este sistema de música estéreo está compuesto por un amplificador digital
bluetooth de alta fidelidad y dos altavoces de techo de rango completo, con
excelente calidad de sonido, diseño moderno y tamaño compacto, fácil de
instalar. Es una opción ideal para entornos de edificios pequeños, como
habitaciones residenciales, oficinas pequeñas y tiendas minoristas pequeñas.
Amplificador digital Bluetooth de alta fidelidad
● Selección de modo: FM, USB, SD, AUX, BLUETOOTH.
● Admite MP3, WAV, FLAC y otros formatos de audio comprimidos y sin pérdidas.
● Soporta sensibilidad ajustable para entrada AUX.
● Admite FM, que puede buscar estaciones de forma automática y manual, y
puede almacenar 20 canales.
● Admite SALIDA AUX.
● Entrada de amplio voltaje, adaptable para 100~240VAC, 50/60Hz.
● Salida diferencial clase D.
● Admite la operación de control remoto por infrarrojos.
Altavoz de techo de rango completo
● Malla de aluminio de aleación de carbono con revestimiento en blanco RAL, que
se integra perfectamente en cualquier ocasión de interior.
● Altavoz de gama completa de 6,5″ con circuito magnético recubierto por un
proceso especial de plásticos de ingeniería y papel de algas marinas formado por
deducción biológica y compresión de calor, para reproducir un sonido y una voz
perfectos. (M3 es un coaxial altavoz, que tiene un woofer de 6,5″ y un tweeter de
0,75″).
● Cumplimiento del estándar de capacidad de manejo de energía (PHC) IEC 268-5,
puede funcionar continuamente durante 100 horas a la potencia nominal. Con la
prueba de exposición de retroalimentación acústica simulada (SAFE), puede
soportar el doble de la potencia nominal en un corto período de tiempo, lo que
garantiza la alta confiabilidad del altavoz en condiciones extremas, prolonga la
vida útil y reduce significativamente la posibilidad de falla o degradación del
rendimiento
Distorsión
(THD< 1.5% 1W1m100Hz-10kHz)
Respuesta de frecuencia
(dB SPL, 1W, 1m)

Flint Kit
13 2
MANUAL
DEL USUARIO
Parámetros técnicos Información del Producto
Amplificador digital bluetooth de alta fidelidad
Altavoz de techo de rango completo
190mm
Amplificador digital Bluetooth de alta fidelidad
E
ntrada de alimentación ~100-240V
P
otencia de salida (pico) 2 ×10W
I
mpedancia nominal 8Ω
T
HD ≤0.3% (1KHz, 1W, 8Ω)
S
NR >81dB
R
espuesta frecuente 20Hz – 20KHz
S
ensibilidad AUX IN
(
ajustable)
AUX: 1.0V / 500mV
S
ensibilidad AUX OUT
(
ajustable)
AUX: 0-1.0V
F
ormato de audio MP3, WAV, FLAC, etc.
E
ntrada Bluetooth BT2.1+EDR
A
lmacenamiento USB, SD card
D
imensiones del producto 86×86×38mm
Altavoz de techo de rango
completo
U
nidad de altavoz 6.5”×1
R
ango de frecuencia 140Hz-16kHz
P
otencia nominal 5W
P
oder maximo 10W
M
ÁX. SPL. 92±2dB
S
ensibilidad (1m/1w) 100±2
dB
T
emperatura de
a
lmacenamiento
-25℃~+55℃
D
imensiones del producto 190mm×70mm
P
eso 0.52kg

Flint Kit
3 12
MANUAL
DEL USUARIO
Funciones básicas del amplificador digital
Panel de control
● Instalación expuesta de la caja inferior
Nota: La profundidad de la caja inferior comprada no puede ser inferior a 40 mm.
Perfore orificios en la pared que debe instalarse de acuerdo con los orificios
para tornillos en las cuatro esquinas de la superficie inferior de la caja. Pase el
extremo de la línea a través de los orificios reservados alrededor de la caja y fije la
caja en la pared de forma segura con 4 tornillos autorroscantes.
Hoyos Reservados
Organice la conexión de la línea de acuerdo con la posición real del orificio de la
caja.
Consulte los pasos 3, 4 y 5 en Instalación oculta de la caja inferior para
completar la instalación.
● Desmontaje
Encuentre el espacio entre el lado derecho del panel frontal del amplificador y
la base.
Utilice un destornillador plano para hacer palanca con cuidado en la parte de
la hebilla del espacio y luego sujete el panel frontal del amplificador con ambas
manos y separe el panel frontal del amplificador de la base de la forma más
paralela posible. Tenga cuidado de no dañar los pines en la base.
ENCENDIDO/APAGADO, Operación en espera
ENCENDIDO: mueva el botón del interruptor hacia la derecha para encender el
dispositivo. APAGADO: mueva el botón del interruptor hacia la izquierda para
apagar el dispositivo.
En espera: Mantenga presionado M para ingresar al estado de espera y presione
M nuevamente para reanudar el estado de ENCENDIDO.
Pantalla de visualización Receptor IR
Modo (cambio de fuente de
audio/en espera)
Volumen +
siguiente canción
Ranura SD Boton de
encendido/apagado
Puerto USB
Reproducir pausar
Volumen -
Canción anterior
ON
OFF

Flint Kit
11 4
MANUAL
DEL USUARIO
Como se muestra en las siguientes figuras, seleccione los dos clips en la
dirección de A o B, empuje el borde exterior hacia afuera para aflojar los clips y
separe con cuidado el panel frontal del amplificador y la base.
Funciones de reproducción del amplificador digital
1. FM
Presione brevemente el botón "M" para seleccionar el modo FM.
Búsqueda automática: mantenga presionado " " para iniciar la búsqueda automática, y
el sistema guardará las estaciones de radio efectivas automáticamente.
Modo de sintonización fina manual: Mantenga presionado " " o " " para ingresar al
modo de sintonización fina manual, presione brevemente " " o " " para sintonizar el canal
manual actual. Si no hay operación dentro de los 5 segundos, guardará el canal actual y
saldrá del manual modo de ajuste fino.
Silencio: presione brevemente " " para silenciar la FM.
Cambio de canal: presione brevemente " " o " " para cambiar los canales guardados.
Ajuste de volumen: presione brevemente " +" o " -" para aumentar o disminuir el
volumen actual.
2.USB
Presione brevemente el botón "M" para seleccionar el modo USB. Cuando no hay un
dispositivo USB, la pantalla mostrará "NO" y parpadeará. Cuando haya un dispositivo USB,
leerá la tarjeta y la pantalla mostrará "----" cuando no haya música o no se pueda
decodificar; y reproducirá la música automáticamente cuando haya música y se pueda
decodificar.
Control de reproducción: presione brevemente " " o " " para cambiar a la canción
anterior o siguiente, manténgalos presionados para avanzar o retroceder rápidamente;
presione brevemente " " para cambiar entre Reproducir y Pausa.
Ajuste de volumen: presione brevemente " +" o " -" para aumentar o disminuir el volumen
actual.
3. SD
Presione brevemente el botón "M" para seleccionar el modo SD. Cuando no hay SD, la
pantalla mostrará "NO" y parpadeará. Cuando hay una SD, leerá la tarjeta y la pantalla
muestra "----" cuando no hay música o no se puede decodificar; y tocará la música
automáticamente y la pantalla mostrará el progreso de la reproducción, luego hay
música y se puede decodificar.
Control de reproducción: presione brevemente " " o " " para cambiar a la canción
anterior o siguiente, manténgalos presionados para avanzar o retroceder rápidamente;
presione brevemente " " para cambiar entre Reproducir y Pausa.
Ajuste de volumen: presione brevemente " +" o " -" para aumentar o disminuir el volumen
actual.
4. AUX
Presione brevemente el botón "M" para seleccionar el modo AUX.
Control de reproducción: presione brevemente " " para cambiar entre Reproducir y
Silenciar. Cuando está silenciado, la pantalla LCD parpadeará.
Ajuste de volumen: presione brevemente " +" o " -" para aumentar o disminuir el volumen
actual. Ajuste de sensibilidad: mantenga presionado " " o " " para ajustar la
sensibilidad, que se puede cambiar entre S1 y S2. (S1: entrada 500mV, S2: entrada 1000mV)
Conecte el extremo de la línea al puerto en la base del amplificador y fije la
base en las dos columnas de montaje con dos tornillos.
Alinee el panel frontal del amplificador con la base fija en paralelo, ciérrelos y
fíjelos con cuidado, y verifique la estabilidad.
Nota: Cuando el panel frontal esté sujeto a la base, los pasadores se insertarán en
los orificios del panel frontal. No doble ni dañe los pines, de lo contrario, causará
daños graves al amplificador.
A
B
Parallel
Parallel

Flint Kit
5 10
MANUAL
DEL USUARIO
5. AUX OUT
Este dispositivo se puede utilizar como salida de fuente de audio para otros dispositivos
amplificadores. Cuando la interfaz AUX OUT está conectada a otros dispositivos y cuando
se selecciona FM/USB/SD/AUX IN/Bluetooth para la reproducción, la señal de audio se
puede transmitir a esos dispositivos para una reproducción sincronizada.
6.Bluetooth
Presione brevemente el botón "M" para seleccionar el modo BT. Cuando no haya
conexión, la pantalla parpadeará "BT", y cuando el dispositivo se conecte correctamente,
la pantalla mostrará "BT". El nombre de Bluetooth que se muestra en otros dispositivos es
"Flint Kit", con la contraseña 0000.
Ajuste de volumen: presione brevemente " +" o " -" para aumentar o disminuir el volumen
actual.
Ajustes del sistema
Primero, prepare una computadora y conecte el dispositivo a la computadora a través de
un cable USB. Abra la herramienta de configuración DM835 en la computadora.
Tabla de funciones de terminales
Instalación de amplificador digital
● Instalación oculta de la caja inferior
Nota: La profundidad de la caja inferior comprada no puede ser inferior a 40 mm.
Abra una ranura adecuada para las dimensiones de la caja en la pared que debe
instalarse, taladre orificios en la ranura de acuerdo con los orificios para tornillos en las
cuatro esquinas de la superficie inferior de la caja y prepárese para conectar las líneas.
* Organice la conexión de la línea de acuerdo con la posición real del orificio de la caja.
Pase el extremo de la línea a través de los orificios reservados alrededor de la caja,
coloque la caja en la ranura de la pared y fije la caja en la ranura de la pared de forma
segura con 4 tornillos autorroscantes.
Agujeros
reservados
Ranura de pared
Ranura de pared
Mostrar la información del dispositivo y el estado de la conexión.
Configuración de nombre y contraseña del dispositivo bluetooth. Ingrese el nombre y la
contraseña de bluetooth deseados en el cuadro de nombre y contraseña, y haga clic en
"Configurar" para completar la modificación.
Ajustes de límite de volumen máximo. El volumen máximo del dispositivo que el usuario
puede configurar incluye: 25 %, 50 %, 75 % y 100 %. Seleccione uno de ellos y haga clic en
"Configurar" para completar la configuración.
Función Entrada de
alimentación
FM
GND
ENTRADA AUX
SALIDA AUX
Salida del amplificador 8Ω
Símbolo
N
L
ANT
R
L
R
L
OUTL+
OUTL- OUTR-
OUTR
+
Nombre
línea
nula
línea
en
vivo
FM
Antena
Señal
de tierr
a
Entrada de
audio
derecha
Entrada de
audio
izquierda
Salida de
audio
derecha
Salida de
audio
izquierda
Altavoz
izquierdo +
Altavoz
izquierdo -
Altavoz
derecho -
Altavoz
derecho +

Flint Kit
9 6
MANUAL
DEL USUARIO
Control remoto
1. Interruptor de espera.
2. Selección de modo. Haga clic en el botón para mostrar: FM, USB, SD, AUX, BT.
3. Silencio.
4. Selección del modo de sonido.
5. Menú (aún no disponible).
6. Área de control de reproducción. Puede reproducir/pausar, cambiar a la canción
anterior o siguiente y controlar el volumen.
7. Selección del modo de reproducción. Haga clic en el botón para mostrar en un bucle:
ciclo único y orden de reproducción.
8. Área de teclas numéricas. En el modo de tarjeta SD, use las teclas numéricas para
seleccionar directamente la pista para reproducir; en el modo FM, use las teclas numéricas
para ingresar directamente la frecuencia FM.* The input range is 0870~1080.
5. Finalmente, verifique si la instalación es firme y confiable.
Conexión del amplificador digital
Puertos de conexión:
Entrada de energía ~100-240V
Antena FM
Señal de tierra
Entrada de audio (cable de audio con doble blindaje de 2 × 0,3 mm²)
Salida de audio (cable de audio con doble blindaje de 2 × 0,3 mm²)
Salida del amplificador (cable de altavoz de cobre libre de oxígeno)
Nota: Todos los conectores de cables no pueden estar expuestos.
~100-240V FM
AUX IN
AUX OUT
SPEAK ER 8Ω
①
②③ ④ ⑤
⑥
2
1 3
4 5
6
7
8

Flint Kit
7 8
MANUAL
DEL USUARIO
Instalación y Conexión
Instalación de altavoces de techo
El espacio de reproducción recomendado y óptimo para los altavoces: 50 m² (incluidos 2
altavoces de techo)
2. Conecte el cable de señal de audio como se muestra a continuación.
3. Empuje hacia arriba las abrazaderas de resorte en ambos lados del altavoz y
manténgalas en este estado (se recomienda usar guantes de trabajo para esta operación
para evitar las abrazaderas de resorte).
4. Empuje con cuidado el altavoz en el orificio de montaje abierto, luego suelte
lentamente las abrazaderas de resorte y empuje suavemente el altavoz hacia el techo
(vea a continuación).
1. Consulte la siguiente figura, seleccione el tamaño del orificio del modelo
correspondiente y abra el orificio de instalación en la posición que debe instalarse.
No menos de
2000-3000mm
No menos de
1000mm de
la pared
No menos de
1000mm de
la pared
No menos de
1000mm de
la pared
No menos de
1000mm de
la pared
Altavoz de techo Altavoz de techo
190mm
70mm
165mm-170mm
Techo
Tamaño de agujero
Audio Signal Cable
Rojo---Positivo
Azul---Negativo
-
 1
1
-
 2
2
-
 3
3
-
 4
4
-
 5
5
-
 6
6
-
 7
7
-
 8
8
-
 9
9
-
 10
10
-
 11
11
-
 12
12
-
 13
13
-
 14
14
-
 15
15
-
 16
16
-
 17
17
-
 18
18
-
 19
19
-
 20
20


Audibax Flint Kit El manual del propietario
- Tipo
- El manual del propietario
en otros idiomas
- English: Audibax Flint Kit Owner's manual
Artículos relacionados
Otros documentos
-
Yamaha RX-V1065 El manual del propietario
-
Yamaha RX-V2065 El manual del propietario
-
Yamaha RX-V465 El manual del propietario
-
Yamaha RX-V665 El manual del propietario
-
Yamaha RX-V765 El manual del propietario
-
Yamaha R-S500 El manual del propietario
-
Yamaha RX-V565 El manual del propietario
-
Yamaha HTR-6280 El manual del propietario
-
Yamaha RX-A2060BL Manual de usuario