Nikon AF 50mm f/1.8D Nikkor El manual del propietario
- Categoría
- Lentes de camara
- Tipo
- El manual del propietario

1
Aperture ring
Blendenring
Bague des ouvertures
Anillo de aberturas
Anello di apertura
2
Meter coupling ridge
Steuerkurve
Index de couplage du
posemètre
Protuberancia de
acoplamiento al
exposímetro
Indice di accoppiamento
dell’esposimetro
3
CPU contacts
CPU-Kontakte
Contacts CPU
Contactos CPU
Contatti CPU
4
Aperture indexing post
Anschlag für
Blendenkupplung
Douille d’indexation
d’ouverture
Poste de índice de apertura
Perno per misurazione
dell’apertura
5
Aperture-direct-readout scale
Skala für Blenden-
direkteinspiegelung
Echelle de lecture directe de
l’ouverture
Escala de lectura directa de
apertura
Scala di lettura diretta delle
aperture
6
Minimum aperture signal post
(EE servo coupling post)
Signalstift für kleinste Blende
(Kupplungsstift für
automatische
Blendensteuerung)
Levier de signal d’ouverture
minimale (levier de servo
couplage EE)
Borne de señal de abertura
mínima (Borne de
acoplador EE)
Attacco di segnale di apertura
minima (attacco per
accoppiamento EE servo)
7
Aperture scale
Blendenskala
Echelle des ouvertures
Escala de apertura
Scala delle aperture
8
Aperture index/Mounting
index
Blenden-index/Objektivindex
Index d’ouverture/index de
montage
Indice de aberturas/índice de
monturas
Indice delle aperture/Indice di
montaggio
9
Distance index line
Entfernungs Indexlinie
Ligne de repère des distance
Línea indicadora de distancias
Contrassegno distanza
!
Infrared compensation index
Infrarot-Kompensationsindex
Repère de mise au point en
infrarouge
Indicador de enfoque
infrarrojo
Indice di compensazione per
infrarossi
"
Depth-of-field scale
Schärfentiefe-Skala
Echelle des profondeurs de
champ
Escala de profundidad de
campo
Scala della profondità di
campo
#
Distance scale
Entfernungsskala
Echelle des distances
Escala de distancias
Scala delle distanze
$
Focus ring
Entfernungseinstellring
Bague de mise au point
Anillo de enfoque
Anello di messa a fuoco
%
Minimum aperture lock lever
Verriegelung für kleinste
Blende
Levier de verrouillage
d’ouverture minimale
Palanca de fijación de
apertura mínima
Leva di blocco di apertura
minima
AF Nikkor
50mm
f
/
1.8D
NIKON CORPORATION
FUJI BLDG., 2-3, MARUNOUCHI 3-CHOME, CHIYODA-KU,
TOKYO 100-8331, JAPAN
TT5F02 (80)
No reproduction in any form of this manual, in
whole or in part (except for brief quotation in
critical articles or reviews), may be made without
written authorization from NIKON CORPORATION.
Instruction Manual
Bedienungsanleitung
Manuel d’utilisation
English Deutsch Français
Jp
En
De
Fr
Es
It
Ck
Ch
You are now the proud owner of the AF Nikkor 50mm f/1.8D, a lens that will
provide you with years of exciting picture-taking opportunities. Before using this
lens, please read these instructions and the notes on safety operations in your
camera’s instruction manual. Also, keep this manual handy for future reference.
Major features
•Autofocus operation is possible with Nikon autofocus cameras (except the F3AF); manual focus
possible with all Nikon SLRs.
•Compact and lightweight. Ideal for a high-speed normal lens with a maximum aperture of f/1.8.
•For more accurate exposure control, subject distance information is transmitted from the lens to the
camera body, providing 3D Matrix Metering and 3D Multi-Sensor Balanced Fill-Flash with
appropriate Nikon cameras and Speedlights.
Important!
•Be careful not to soil or damage the CPU contacts.
•Do not attach the following accessories to the lens, as they might damage the lens CPU contacts:
Auto Extension Ring PK-1, PK-11 (use PK-11A), Auto Ring BR-4 (use BR-6 with BR-2A),
and K1 Ring.
Other accessories may not be suitable when this lens is used with certain camera bodies. For
details, refer to instruction manual for each product.
•This lens is not compatible when used with a Nikon F3AF camera with the AF Finder DX-1
attached.
Depth of field
If your camera has a depth of field preview (stop-down) function, depth of field can be observed while
looking through the camera viewfinder.
Recommended focusing screens
Various interchangeable focusing screens are available for certain Nikon SLR cameras to suit any
type of lens or picture-taking situation. Those recommended for use with this lens are listed in the
table.
Excellent focusing
: Acceptable focusing
Slight vignetting or moiré patterns appear in the viewfinder, but not on the film.
: Acceptable focusing
The in-focus image in the central spot may prove to be slightly out of focus on film. Focus on the
surrounding matte area.
( ): Indicates degree of exposure compensation needed (Center-Weighted metering only). For F6 cameras,
compensate by selecting “Other screen” in Custom Setting “b6: Screen comp.” and setting the EV level to -2.0
to +2.0 in 0.5 EV steps. When using screens other than type B or E, “Other screen” must be selected even when
the required compensation value is “0” (no compensation required). For F5 cameras, compensate using
Custom Setting #18 on the camera body. For F4-Series cameras, compensate using the Exposure
Compensation Dial for the focusing screen.
See instruction manual of the camera body for more details.
Blank box means not applicable. Since type M screen can be used for both macrophotography at a 1:1
magnification ratio and for photomicrography, it has different applications than other screens.
• When using the B/B2/B3, E/E2/E3, and K/K2/K3 focusing screens in cameras other than those listed above,
refer to the columns on the F4 + DP-20’s B, E and K screens, respectively.
Minimum aperture lock (Fig. A)
For programmed auto or shutter-priority auto exposure shooting, use the minimum aperture lock
lever to lock the lens aperture at f/22.
1 Set the lens to its minimum aperture (f/22) by aligning it with the aperture index.
2 Slide the lock lever toward the aperture ring, so the two orange dots are aligned.
To release the lock, slide the lever in the opposite direction.
Taking flash pictures with cameras with a built-in flash
All Nikon cameras with a built-in flash are usable and no vignetting occurs.
Lens care
•To remove dirt and smudges, use a soft, clean cotton cloth or lens tissue moistened with lens
cleaner. Wipe in a circular motion from the center outward.
•Never use thinner or benzene to clean the lens as this might damage the lens, result in a fire, or
cause health problems.
•To protect the front lens element, an NC filter is recommended at all times. A lens hood also helps
protect the front of the lens.
•When storing the lens in the lens case, attach both front and rear caps.
•When the lens will not be used for a long time, store it in a cool, dry place to prevent mold. Also
store the lens away from direct sunlight or chemicals such as camphor or naphthalene.
•Do not get water on the lens or drop it in water as this will cause it to rust and malfunction.
•Reinforced plastic is used for some parts of the lens. To avoid damage, never leave the lens in an
excessively hot place.
Standard accessories
•52mm snap-on front lens cap
Optional accessories
•52mm screw-in filters •Flexible lens pouch CL-S1 •Hard case CL-30S
•Rubber lens hood HR-2 •Rear lens cap LF-1 •Teleconverter TC-201/TC-14A
Specifications
Type of lens: D-type AF Nikkor lens having built-in CPU and Nikon bayonet mount
Focal length: 50mm
Maximum aperture: f/1.8
Lens construction: 6 elements in 5 groups
Picture angle: 46˚ [31˚30’ with Nikon digital cameras (Nikon DX format);
38˚ with IX240 system cameras]
Distance information: Output to camera body
Focusing: Autofocus with Nikon autofocus cameras (except F3AF); manually via
separate focus ring
Shooting distance scale
: Graduated in meters and feet from 0.45m (1.75 ft) to infinity (∞)
Closest focus distance: 0.45m (1.5 ft.)
Aperture scale: f/1.8 to f/22 on both standard and aperture-direct-readout scales
Diaphragm: Fully automatic
Exposure measurement
: Via full-aperture method with AI cameras or cameras with CPU interface
system; via stop-down method for other cameras
Attachment size: 52mm (P = 0.75mm)
Dimensions: Approx. 63.5mm dia. x 39mm extension from the camera’s lens
mounting flange
Weight: Approx. 155g (5.5 oz)
Wir danken Ihnen für das Vertrauen, das Sie Nikon mit dem Kauf des AF Nikkor
50 mm f/1.8D bewiesen haben, und wir hoffen, daß Sie viele Jahre ungetrübte
Freude an Ihrem neuen Objektiv haben werden. Bitte lesen Sie diese
Gebrauchsanweisung sorgfältig durch sowie die entsprechenden Abschnitte in der
Bedienungsanleitung Ihrer Kamera. Bewahren Sie diese Anleitung für späteres
Nachschlagen griffbereit auf.
Hauptmerkmale
•Autofokusbetrieb mit entsprechend ausgerüsteten Nikon-Autofokuskameras (außer F3AF); manuelle
Schärfeneinstellung mit allen Nikon-Spiegelreflexkameras.
•Kompakt und leicht im Gewicht. Ideal für ein lichtstarkes Normalobjektiv mit einer größten
Blendendöffnung von 1:1,8.
•Für noch genauere Belichtungsregelung wird die Distanz zum Aufnahmeobjekt vom Objektiv an die
Kamera übermittelt, so daß 3D-Matrix-Messung sowie 3D-Multi-Sensor-Aufhellblitzen mit
entsprechend geeigneten Nikon-Kameras und Nikon-Blitzgeräts möglich ist.
Achtung!
•Halten Sie die CPU-Kontakte peinlich sauber, und schützen Sie sie vor Beschädigung!
•Folgendes Zubehör darf nicht an das Objektiv angesetzt werden, da es die CPU-Kontakte
beschädigen könnte: Automatik-Zwischenring PK-1, PK-11 (stattdessen PK-11A verwenden),
Automatikring BR-4 (stattdessen BR-6 mit BR-2A verwenden) und Zwischenring K1. Anderes
Zubehör kann bei Verwendung des Objektivs mit gewissen Kameramodellen ungeeignet sein.
Einzelheiten entnehmen Sie bitte der jeweiligen Bedienungsanleitung.
•Das Objektiv ist nicht zur Verwendung mit der Nikon F3AF mit angesetztem AF-Sucher DX-1
geeignet.
Schärfentiefe
Verfügt die Kamera über eine Taste oder einen Hebel zur Schärfentiefe-Vorschau (Abblendung), so
läßt sich die Schärfentiefe im Kamerasucher verfolgen.
Empfohlene Einstellscheiben
Für bestimmte Nikon-Kameras stehen verschiedene auswechselbare Einstellscheiben zur Verfügung,
um jeder Aufnahmesituation gerecht zu werden. Die zur Verwendung mit diesem Objektiv
empfohlenen sind nachstehend aufgelistet:
: Hervorragende Scharfeinstellung
: Akzeptable Scharfeinstellung
Das Sucherbild vignettiert leicht. Die Aufnahme selbst bleibt hiervon unberührt.
: Brauchbare Scharfeinstellung.
Das im mittleren Kreis scharf eingestellte Bild könnte auf dem Film leicht unscharf abgebildet werden.
Stellen Sie auf dem umliegenden Mattfeld scharf.
( ) : Zeigt den Betrag zusätzlich erforderlicher Belichtungskorrektur (Nur mittenbetonte Belichtungsmessung).
Bei F6-Kameras korrigieren Sie durch Wahl von “Andere” in der Individualfunktion “b6: Einstellscheibe”
und Einstellen des LW-Werts im Bereich zwischen –2,0 und +2,0 in 0,5-LW-Schritten. Bei Gebrauch von
anderen Scheiben als B oder E, ist “Andere” auch dann zu wählen, wenn der erforderliche Korrekturwert “0”
beträgt (keine Korrektur nötig). Zur Einstellung des Korrekturwerts am F5 Kameragehäuse dient die
Individualfunktion Nr. 18. Mit den F4-Serien-Geräten durch den Belichtung-Kompensationsanzeiger für
Visiermattscheiben kompensieren.
Näheres hierzu finden Sie in der Bedienungsanleitung des Kameragehäuses.
Ein Leerfeld bedeutert: unbrauchbar. Da die Einstellscheibe M sowohl für Maktrofotografie bis zum
Abbildungsmaßstab 1:1 als auch Mikrofotografie eingesetzt werden kann, unterscheidet sich ihr
Anwendungsbereich von dem anderer Einstellscheiben.
• Bei Verwendung der Scheiben B/B2/B3, E/E2/E3 bzw. K/K2/K3 in anderen als den obengenannten Kameras
gelten die Spalten für die Scheiben B, E bzw. K auf F4 + DP-20.
Verriegelung auf kleinster Blende (Abb. A)
Für Programm- und Blendenautomatik muß der Blendenring auf kleinster Öffnung (22) verriegelt
werden.
1 Drehen Sie den Blendenring, bis die Blendenzahl 22 dem Blendenindex gegenübersteht.
2 Schieben Sie den Riegel in Richtung auf den Blendenring, so daß die beiden orangefarbenen
Punkte aufeinander ausgerichtet sind.
Zur Entriegelung schieben Sie den Riegel in die entgegengesetzte Richtung.
Blitzaufnahmen mit Kameras mit eingebautem Blitz
Dieses Objektiv ist ohne jegliche Vignettierungen für Blitzaufnahmen mit allen Nikon-Kameras mit
eingebautem Blitz geeignet.
Pflege des Objektivs
•Reinigen Sie die Linsenoberfläche mit einem leicht mit Linsenreiniger angefeuchteten weichen,
sauberen Baumwolltuch oder Linsenreinigungspapier. Wischen Sie dabei in einer größer
werdenden Kreisbewegung von innen nach außen.
•Verwenden Sie keinesfalls Verdünnung oder Benzin zur Reinigung, da dieses zu Beschädigungen
führen, Gesundheitsschäden verursachen oder ein Feuer auslösen könnte.
•Zum Schutz der Frontlinse empfiehlt es sich, stets ein NC-Filter aufgesetzt zu lassen. Die
Gegenlichtblende wirkt als zusätzlicher Frontlinsenschutz.
•Bei Aufbewahrung des Objektivs in seinem Köcher sollten beide Objektivdeckel aufgesetzt sein.
•Bei längerer Nichtbenutzung sollte das Objektiv an einem kühlen, trockenen Ort aufbewahrt werden.
Halten Sie das Objektiv von direkter Sonneneinstrahlung oder Chemikalien wie Kampfer oder
Naphthalin fern.
•Halten Sie das Objektiv von Wasser fern, das zur Korrosion und zu Betriebsstörungen führen kann.
•Einige Teile des Objektivs bestehen aus verstärktem Kunststoff. Lassen Sie das Objektiv deshalb
nie an übermäßig heißen Orten zurück!
Serienmäßiges Zubehör
•Aufsteckbarer Frontdeckel 52mm
Sonderzubehör
•Einschraubfilter 52 mm •Objektivbeutel CL-S1 •Fester Objektivköcher CL-30S
•Gummi-Gegenlichtblende HR-2 •Objektivrückdeckel LF-1 •Telekonverter TC-201, TC-14A
Technische Daten
Objektivtyp: AF Nikkor mit D-Charakteristik, eingebauter CPU und Nikon-
Bajonett
Brennweite: 50 mm
Maximale Blendenöffnung: f/1,8
Optischer Aufbau: 6 Linsen in 5 Gruppen
Bildwinkel: 46˚ [31°30’ bei Nikon-Digitalkameras (Nikon DX-Format);
38° bei IX240-Kameras]
Entfernungsdaten: Werden an Kameras übertragen
Schärfeneinstellung: Autofokus mit Nikon-Autofokuskameras (außer F3AF); manuell über
separaten Fokussierring
Entfernungsskala: Unterteilt in Meter und Fuß und zwar von 0,45m bis Unendlich (∞)
Kürzeste Aufnahmedistanz: 0,45 m
Blendenskala: f/1.8 — f/22, sowohl auf der Standardskala als auch der Skala für
Blendendirekteinspiegelung
Blendenart: Vollautomatisch
Belichtungsmessung: Offenblendenmessung bei Kameras mit AI-Blendenkupplung oder
CPU-Interface-System; Arbeitsblendenmessung bei allen anderen
Kameras
Befestigungsgröße: 52 mm (P = 0,75mm)
Abmessungen: ca. 63,5 mm Durchm. x 39 mm Länge bis Flansch
Gewicht: ca. 155 g
Vous êtes maintenant l’heureux propriétaire d’un AF Nikkor 50mm f/1.8D, un
objectif qui vous permettra de prendre des photos remarquables pendant des
années. Avant d’utiliser cet objectif, veuillez lire ce mode d’emploi et les remarques
sur la sécurité dans le mode d’emploi de votre boîtier. Conservez ce manuel à
portée de la main pour toute référence ultérieure.
Principales caractéristiques
•L’autofocus est possible avec un boîtier autofocus Nikon (sauf le F3AF), la mise au point manuelle
avec tous les appareils reflex Nikon.
•Compact et léger. Idéal pour un objectif normal grande vitesse à ouverture maximale de f/1.8.
•Pour assurer un contrôle d’exposition plus précis, l’information de distance au sujet est transmise
de l’objectif au boîtier, ce qui permet la mesure matricielle 3D et le dosage auto flash/ambiance par
multi-capteur 3D avec les boîtiers et flashes Nikon convenables.
Important
•Veiller à ne pas salir ni endommager les contacts CPU.
•Ne pas essayer de monter les accessoires suivants, car ils risquent d’abimer les contacts: Bague
d’auto-rallonge PK-1, PK-11 (utilisez PK-11A), Bague auto BR-4 (utilisez la bague BR-6 avec
BR-2A) et Bague K1.
D’autres accessoires peuvent ne pas convenir lorsque l’objectif est utilisé avec certains appareils.
Se référer aux manuels d’instruction.
•Cet objectif n’est pas compatible avec le boîtier F3AF équipé du viseur DX-1.
Profondeur de champ
Si votre appareil est pourvu d’une fonction de prévisionnage de la mise au point (ouverture réelle),
vous pouvez observer la profondeur de champ en regardant dans le viseur.
Écrans de mise au point recommandés
Divers écrans de mise au point sont disponibles pour certains appareils Nikon SLR qui s’adaptent à
toutes les conditions de prise de vues. Les écrans recommandés avec cet objectif sont listés ci-
dessons:
: Mise au point excellente
: Mise au point passable
Un vignetage affecte l’image du verre. L’image sur la pellicule ne porte cependant aucune trace
de ceci.
: Mise au point passable
L’image mise au point dans le cercle central pourrait s’avérer légèrement floue sur la pellicule. La mise au
point doit donc être faite sur la couronne dépolie entourant le cercle central du verre de visée.
( ): Indique la compensation de l’exposition additionnelle requise (Mesure pondérée centrale uniquement). Pour les
appareils F6, corrigez en sélectionnant “Activ.: autre“ dans le réglage personnalisé “b6: Plage visée” et en
réglant le niveau IL de -2,0 à +2,0 par pas de 0,5 IL. Lorsque vous utilisez des verres autres que ceux de type B
ou E, il faut sélectionner “Activ.: autre” même lorsque la valeur de correction est de “0“ (pas de correction
nécessaire). Pour les appareils F5, compenser en utilisant le réglage personnalisé n° 18 sur l’appareil. Pour les
appareils de la série F4, compenser en utilisant le cadran de compensation de l’exposition prévu pour les filtres
de mise au point.
Voyez le manuel d’instructions de l’appareil photo pour plus de détails.
Un blanc indique aucune application. Du fait que le verre M peut être utilisé pour la macrophotographie à un
rapport d’agradissement 1:1 et pour la photomicrographie, il a des applications diffèrentes de celles des autres
verres.
• Lors de l’utilisation de verres B/B2/B3, E/E2/E3 ou K/K2/K3 dans des appareils autres que ceux indiqués ci-
dessus, se reporter respectivement aux colonnes des verres B, E, K de F4 + DP-20.
Blocage d’ouverture minimale (Fig. A)
En mode Programme ou Auto priorité vitesse, réglez puis verrouillez le diaphragme sur l’ouverture
minimale (f/22).
1 Réglez le diaphragme sur l’ouverture mini (f/22) en alignant sur le repère d’ouverture.
2 Glissez le curseur de blocage vers la bague de diaphragme de sorte que les deux points orange
soient alignés.
Pour débloquer, glissez le curseur dans l’autre direction.
Prise de vues au flash avec un appareil à flash intégré
Tous les appareils Nikon à flash intégré sont utilisables et il n’y a pas de vignettage.
Soin de l’objectif
•Utilisez un chiffon en coton doux et propre ou du tissu de nettoyage pour objectif légèrement
humidifié de liquide de nettoyage pour objectif pour éliminer la saleté et les taches. Essuyez avec
des mouvements circulaires du centre vers l’extérieur.
•Ne jamais employer de solvant ou de benzènes qui pourrait endommager l’objectif, prendre feu ou
nuire à la santé.
•Il est recommandé d’utiliser un filtre NC en permanence, pour protéger la lentille frontale. Un
paresoleil assure également une bonne protection contre les chocs.
•Lors du rangement de l’objectif dans son étui, penser à remettre en place les bouchons avant et
arrière.
•En cas d’inutilisation pour une longue période, entreposer le matériel dans un endroit frais, sec et
aéré pour éviter les moisissures. Tenir le matériel éloigné des sources de lumière, et des produits
chimiques (camphre, naphtaline, etc.).
•Eviter les projections d’eau ainsi que l’immersion, qui peut provoquer la rouille et des dommages
irréparables.
•Divers matériaux de synthèse sont utilisés dans la fabrication. Pour éviter tout problème, ne pas
soumettre l’objectif à de fortes chaleurs.
Accessoires fournis
•Bouchon avant d’objectif diamètre 52 mm
Accessoires en option
•Filtres vissants 52 mm •Sac souple pour objectif CL-S1 •Etui rigide CL-30S
•Téléconvertisseurs TC-201, TC-14A •Parasoleil de caoutchouc HR-2 •Bouchon arrière LF-1
Caractéristiques
Type d’objectif: Nikkor AF de type D avec processeur et monture baïonnette Nikon
Focale: 50 mm
Ouverture maximale: f/1,8
Construction optique: 6 éléments en 5 groupes
Champ angulaire: 46˚ [31°30’ avec l’appareil numérique Nikon (format Nikon DX);
38° sur les appareils de système IX240]
Informations sur
la distance: A l’appareil
Mise au point: Autofocus avec un boîtier autofocus Nikon (sauf F3AF);
manuel par bague de mise au point séparée
Echelle des distances: Graduée en mètres et pieds depuis 0,45m (1,75 pieds) à l’infini (∞)
Distance de mise au
point minimale: 0,45 m
Echelle des ouvertures: f/1.8 — f/22 pour les échelles standard et de lecture directe de
l’ouverture
Diaphragme: Entièrement automatique
Mesure de l’exposition: Via méthode pleine ouverture avec les appareil AI ou appareils avec
système d’interface CPU; par fermeture pour les autres appareils
Taille des accessoires: 52 mm (P = 0,75 mm)
Dimensions: Env. 63,5 mm diam. x 39 mm rallonge de la bride de montage d’objectif
de l’appareil
Poids: Env. 155 g
F5+DP-30
G3
G4
H2B
C
D
E
EC-B
EC-E
FJKLMP
R
S
T
U
F4+DP-20
F3
F4+DA-20
F5+DA-30
A G1 G2
H1
H3
H4
F6
Manual de instrucciones
Manuale di istruzioni
Fig. A Palanca de bloqueo de apertura
mínima
Fig. A Leva di blocco al diaframma minimo
F5+DP-30
G3
G4
H2B
C
D
E
EC-B
EC-E
FJKLMP
R
S
T
U
F4+DP-20
F3
F4+DA-20
F5+DA-30
A G1 G2
H1
H3
H4
F6
Screen
Camera
F5+DP-30
G3
G4
H2B
C
D
E
EC-B
EC-E
FJKLMP
R
S
T
U
F4+DP-20
F3
F4+DA-20
F5+DA-30
A G1 G2
H1
H3
H4
F6
Einstellscheibe
Kamera
F5+DP-30
G3
G4
H2B
C
D
E
EC-B
EC-E
FJKLMP
R
S
T
U
F4+DP-20
F3
F4+DA-20
F5+DA-30
A G1 G2
H1
H3
H4
F6
Verre
Appareil
Fig. A Minimum aperture lock lever
Abb. A Verriegelung für kleinste Blende
Fig. A Levier de verrouillage d’ouverture
minimale

Español Italiano
Usted es ahora el nuevo propietario del AF Nikkor 50 mm f/1.8D, un objetivo para
que pueda disfrutar de muchos años de oportunidades para hacer fotografías
excitantes. Antes de utilizar este objetivo, lea estas instrucciones y las notas sobre
un uso seguro en el manual de instrucciones de su cámara. Guarde este manual en
un lugar a mano para su referencia en el futuro.
Principales funciones
•Es posible un funcionamiento con enfoque automático en las cámaras de enfoque automático
de Nikon (excepto F3AF); aunque es posible el enfoque manual con todas las SLR de Nikon.
•Compacto y liviano. Ideal para un objetivo normal de alta velocidad con una apertura máxima
de f/1.8.
•Para un control de exposición más preciso, la información de distancia del objeto se transmite del
objetivo a la cámara, para una medición por matriz tridimensional y un flash de relleno balanceado
con sensor múltiple tridimensional, con las cámaras Nikon y Speedlights apropiados.
¡Importante!
•Tener cuidado de no manchar o dañar los contactos de la CPU.
•No montar en el objetivo los siguientes accesorios, ya que podrían dañar los contactos de la CPU:
Anillo de Autoextensión PK-1, PK-11 (utilice PK-11A), Anillo Auto BR-4 (utilice BR-6 con BR-2A)
o Anillo K1.
Puede que otros accesorios no sean apropiados cuando se usa este objetivo con determinados
cuerpos de cámara. Para más detalles, ver el manual de instrucciones de cada producto.
•Este objetivo no se puede usar con una cámara Nikon F3AF que lleve montado el Visor AF DX-1.
Profundidad de campo
Si su cámara tiene una función de previsualización de profundidad de campo (cierre de iris), puede
observarse la profundidad de campo mientras mira por el visor de la cámara.
Pantallas de enfoque recomendadas
Hay diferentes pantallas de enfoque intercambiables para algunas cámaras SLR de Nikon apropiados
para cualquier situación fotográfica. Las recomendadas para utilizar con este objetivo son las que
aparecen en la lista a continuación.
: Enfoque excelente
: Enfoque aceptable
Ligero viñeteo afecta la imagen de la pantalla, pero la imagen de la película no es afectada
por esto.
: Enfoque aceptable
La imagen enfocada en el circulo central puede resultar ligeramente desenfocada en la fotografía. Se
aconseja enfocar mediante el área mate circundante.
( ) : Indica la cantidad de compensación adicional necesaria (Solamente medición ponderada central). Para
cámaras F6, compense seleccionando “Otra pantalla” en el ajuste personal del usuario “b6: Compens
pantalla” y ajustando el nivel EV a -2,0 a +2,0 en pasos de 0,5 EV. Cuando se utilice una pantalla que no
sea de tipo B o E, debe seleccionarse “Otra pantalla” incluso cuando el valor de compensación requerido
sea “0” (no se requiere compensación). Para la cámara F5 compense usando el ajuste personal del usuario
No. 18 en el cuerpo de la cámara. Para las cámaras de la serie F4, compense usando el dial de
compensación de exposición para las pantallas de enfoque.
Para más detalles, consulte el manual de instrucciones de la cámara.
Los blancos significan inaplicable. Como la pantalla de tipo M se usa para macrofotografía a una razón de
aumento de 1:1 asi como para microfotografía, su aplicación es distinta a la de las demás pantallas.
• Cuando se utilicen las pantallas de enfoque B/B2/B3, E/E2/E3 y K/K2/K3 en cámaras distintas de las
relacionadas arriba, vea las columnas de las pantallas B, E y K, de F4 + DP-20 respectivamente.
Bloqueo de la apertura mínima (Fig. A)
Para disparar con exposición automática programada o automática con prioridad al obturador, utilizar
la palanca de bloqueo de la apertura mínima para fijar la apertura del objetivo en f/22.
1 Ajustar el objetivo a su apertura mínima (f/22) alineándolo con el índice de apertura.
2 Deslice la palanca de fijación hacia el anillo de aperturas para que se alineen dos puntos naranjas.
Para desbloquearlo, deslizar la palanca en la dirección opuesta.
Cuando se hacen fotografías con flash en cámaras con flash incorporado
Todas las cámaras Nikon con flash incorporado pueden utilizarse sin que se produzca un viñetado.
Forma de cuidar el objetivo
•Para eliminar la suciedad y las manchas, utilice un paño de algodón suave y limpio o un papel para
cristales empapado con limpiador de cristales. Limpie con un movimiento circular del centro al
borde exterior.
•No usar en ningún caso disolvente o benceno para limpiar el objetivo ya que podría dañarlo,
provocar un incendio o causar problemas sanitarios.
•Se recomienda utilizar en todo momento un filtro NC para proteger el elemento frontal del objetivo.
También un parasol contribuirá a proteger la parte frontal del objetivo.
•Cuando se guarde el objetivo en su estuche, colocarle las dos tapas.
•Cuando no se vaya a utilizar el objetivo durante largo tiempo, guardarlo en un lugar fresco y seco
para evitar la formación de moho. Guardar el objetivo, además, lejos de la luz solar directa o de
productos químicos tales como alcanfor o naftalina.
•No mojar el objetivo ni dejarlo caer al agua, ya que se oxidaría y no funcionaría bien.
•Algunas partes del objetivo son de plástico reforzado. Para evitar daños, no dejarlo nunca en un
lugar excesivamente caliente.
Accesorios estándar
•Tapa frontal a presíon de 52mm
Accesorios opcionales
•Filtros roscados de 52 mm •Bolsa de objetivo flexible CL-S1 •Valija dura CL-30S
•Teleconvertidores TC-201, TC-14A •Parasol de hule HR-2 •Tapa trasera del objetivo LF-1
Especificaciones
Tipo de objetivo: AF Nikkor tipo D con CPU incorporada y montura de bayoneta
Nikon
Distancia focal: 50 mm
Abertura máxima: f/1,8
Estructura del objetivo: 6 lentes en 5 grupos
Angulo de imagen: 46˚[31°30’ con cámaras digitales Nikon (Formato Nikon DX); 38°
con cámaras de sistema IX240]
Información de distancia: Salida al cuerpo de la cámara
Enfoque: Enfoque automático con cámaras de enfoque automático de Nikon
(excepto F3AF); manual por anillo de enfoque independiente
Escala de distancias
de las tomas: Graduada en metros y en pies desde 0,45m (1,75 pies) hasta
infinito (∞)
Distancia de enfoque
más cercana: 0,45 m (1,5 pies)
Escala de aberturas: f/1.8 — f/22 en escalas normales y de lectura directa de aberturas
Diafragma: Totalmente automático
Medición de la exposición: Método de abertura total con cámaras AI o cámaras con sistema de
interfase CPU; método de reducción de parada para otras cámara.
Tamaño de accesorios: 52 mm (P = 0,75mm)
Dimensiones: Aprox. 63,5 mm de diám. x 39 mm desde la pestaña de montaje
Peso: Aprox. 155 g (5,5 onzas)
F5+DP-30
G3
G4
H2B
C
D
E
EC-B
EC-E
FJKLMP
R
S
T
U
F4+DP-20
F3
F4+DA-20
F5+DA-30
A G1 G2
H1
H3
H4
F6
Pantalla
Cámara
Ora potete dire con orgoglio di possedere l’AF Nikkor 50mm f/1.8D, un obiettivo
che vi offrirà per anni eccitanti opportunità per scattare fotografie. Prima di usare
l’obiettivo, leggere queste istruzioni e le note sulle operazioni di sicurezza
contenute nel manuale di istruzioni della vostra fotocamera. Tenere inoltre il
presente manuale a portata di mano per poterlo consultare in futuro.
Caratteristiche principali
•Il funzionamento con messa a fuoco automatica è possibile con le fotocamere autofocus Nikon
(tranne la F3AF); la messa a fuoco manuale è possibile con tutte le reflex Nikon.
•Unità compatta e leggera. Ideale per un obiettivo normale ad alta velocità e apertura massima di
f/1.8.
•Per un controllo più accurato dell’esposizione, le informazioni sulla distanza del soggetto vengono
trasmesse dall’obiettivo al corpo della fotocamera, garantendo il 3D Matrix Metering e il 3D Multi-
Sensor Balanced Fill-Flash con le fotocamere e gli Speedlight Nikon appropriati.
Importante!
•Fate attenzione a non sporcare o danneggiare i contatti CPU.
•Gli accessori elencati non vanno montati su questo obiettivo, in quanto potrebbero danneggiarne i
contatti CPU: Anello di Prolunga Automatico PK-1, PK-11 (usare PK-11A), Anello Auto BR-4
(usare BR-6 con BR-2A), Anello K1.
Altri accessori, nell’impiego con determinati corpi camera, possono risultare inadatti. Per maggiori
dettagli, consultate i relativi manuali di istruzioni.
•Quest’ottica non è utilizzabile abbinata alla fotocamera Nikon F3AF con il mirino autofocus DX-1
montato.
Profondità di campo
Se la vostra fotocamera è dotata di un pulsante o di una leva per l’anteprima della profondità di
campo (Stop-Down), è possibile osservare la profondità di campo guardando nel mirino della
fotocamera.
Schermi di messa a fuoco consigliati
Per alcune fotocamere SLR Nikon sono disponibili vari schermi di messa a fuoco intercambiabili
adatti a ogni situazione di ripresa. Gli schermi consigliati per l’uso con questo obiettivo sono
elencati sotto.
: Messa a fuoco eccellente
: Messa a fuoco accettabile
L’immagine sullo schermo presenta una riduzione di luminosità o tracce di fenomeno del moiré. Questo
però non lascia tracce sulla pellicola.
: Messa a fuoco accettabile
L’immagine messa a fuoco al centro potrebbe risultare leggermente fuori fuoco sulla pellicola. Mettere a
fuoco la zona circostante il soggetto.
( ) : Indica il valore della compensazione di esposizione aggiuntiva richiesto (Solamente misurazione a
preferenza centrale). Con le fotocamere F6, compensare selezionando “Otra pantalla” nell’impostazione
personalizzata “b6: Compens pantalla”, quindi impostando il livello EV tra -2.0 e +2.0 ad intervalli di 0,5
EV. Quando si utilizzano schermate diverse da B o E, è necessario selezionare “Otra pantalla” anche quando
il valore di compensazione richiesto è pari a “0” (nessuna compensazione necessaria). Per la fotocamera
F5, compensare utilizzando l’impostazione personalizzata 18 sul corpo della fotocamera. Per gli apparecchi
della serie F4, compensare utilizzando il quadrante di compensazione dell’esposizione previsto per i filtri di
messa a fuoco.
Per ulteriori dettagli, fare riferimento al manuale d’istruzioni della fotocamera.
Il quadrato vuoto non è applicabile. Come lo schermo del tipo M può essere utilizzato per macrofotografia con
rapporto di ingrandimento 1:1 e fotomicrografia, esso presenta differenti applicazioni che agli altri schermi.
• Impiegando gli schermi B/B2/B3, E/E2/E3 ed K/K2/K3 con fotocamere diverse da quelle elencate sopra, fare
riferimento alle colonne riguardanti gli schermi B, E e K di F4 + DP-20, rispettivamente.
Blocco al diaframma minimo (Fig. A)
Per la ripresa nei modi di esposizione automatica Programmata o a Priorità dei tempi, fate uso della
leva di blocco al diaframma minimo, per mantenere prefissato il valore f/22.
1 Regolate il diaframma al valore minimo, f/22, allineandolo all’indice delle aperture.
2 Spingete la leva di blocco verso l’anello di apertura cosicché i due puntini arancioni risultino
allineati.
Per liberare la leva, spingetela nella direzione opposta.
Quando si scattano fotografie con il flash utilizzando fotocamere con
flash incorporato
Tutte le fotocamere Nikon con flash incorporato sono utilizzabili e non si riscontrerà alcuna riduzione
di luminosità ai margini dell'immagine (vignettatura).
Cura e manutenzione dell’obiettivo
•Per rimuovere sporco e macchie, utilizzare un panno di cotone morbido o un panno per lenti
imbevuto con un detergente per lenti. Passare il panno con un movimento circolare dal centro
verso il bordo esterno.
•Per la pulizia non utilizzate mai solventi o benzina, che potrebbero danneggiare l’obiettivo, causare
incendi o problemi di intossicazione.
•Per la protezione della lente frontale è buona norma tenere sempre montato un filtro NC. Anche il
paraluce contribuisce validamente a proteggere la parte anteriore dell’obiettivo.
•Prima di porre l’obiettivo nell’astuccio o in borsa, montate entrambi i coperchi protettivi.
•Se rimane a lungo inutilizzato, riponetelo in un ambiente fresco e ventilato per prevenire la formazione
di muffe. Tenetelo inoltre lontano dal sole o da agenti chimici come canfora o naftalina.
•Non bagnatelo e fate attenzione che non cada in acqua. La formazione di ruggine potrebbe
danneggiarlo in modo irreparabile.
•Alcune parti della montatura sono realizzate in materiale plastico rinforzato. Per evitare danni non
lasciate mai l’obiettivo in un luogo eccessivamente caldo.
Accessori in dotazione
•Tappo anteriore da 52mm dia.
Accessori opzionali
•Filtri a vite da 52mm •Portaobiettivo morbido CL-S1 •Portaobiettivo duro CL-30S
•Teleconvertidori TC-201, TC-14A •Il cappuccio de gomma HR-2 •Tappo posteriore LF-1
Caratteristiche tecniche
Tipo: Obiettivo AF Nikkor tipo D con CPU incorporata e attacco a
baionetta Nikon.
Lunghezza focale: 50 mm
Apertura massima: f/1,8
Costruzione obiettivo: 6 elementi in 5 gruppi
Angolo di campo: 46˚ [31°30’ con fotocamera digitale Nikon, (Formato Nikon DX);
38° con fotocamere sistema IX240]
Dati distanze: Uscita verso il corpo fotocamera
Messa a fuoco: Messa a fuoco automatica con fotocamere autofocus Nikon (tranne
F3AF); manuale mediante anello di messa a fuoco separato
Scala della distanza
di ripresa: Graduata in metri e piedi da 0,45m all’infinito (∞).
Distanza focale minima: 0,45m
Scala delle aperture: f/1.8 — f/22 sia sulla scala standard che sulla scala di lettura
diretta della aperture
Diaframma: Completamente automatico
Misurazione
dell’esposizione: Con metodo ad apertura massima per le fotocamere AI o per quelle
con sistema di interfaccia CPU; con metodo Stop-Down per le altre
fotocamere.
Misura dell’accessorio: 52 mm (P = 0,75mm)
Dimensioni: Circa. 63,5 mm diam. x 39 mm estensione della flangia
Peso: Circa 155 g
F5+DP-30
G3
G4
H2B
C
D
E
EC-B
EC-E
FJKLMP
R
S
T
U
F4+DP-20
F3
F4+DA-20
F5+DA-30
A G1 G2
H1
H3
H4
F6
Schermo
Fotocamera
Close-up attachment
Nahaufnahmezubehör
Accessoires macro
Accesorio de
acercamiento
Dispositivi Close-Up
Objetivo en la posición invertida
Obiettivo alla posizione inversa
Lens in reverse position
Objektive in Reprostellung
Objectif en position retournée
Reproduction
ratio
Abbildungs-
maßstab
Rapport de
reproduction
Relación de
reproducción
Rapporto di
riproduzione
Subject field
Aufnahmefeld
Champ couvert
Campo abarcado
Campo del
soggetto
Focused distance
Eingestellte
Entfernung
Distance de
mise au point
Distancia de
enfoque
Distanza messa
a fuoco
Objetivo en la posición normal
Obiettivo alla posizione normale
Lens in normal position
Objektive in Normalstellung
Objectif en position normale
Reproduction
ratio
Abbildungs-
maßstab
Rapport de
reproduction
Relación de
reproducción
Rapporto di
riproduzione
PN-series rings
Zwischenringe PN
Bagues PN
Anillo de la serie PN
Anello serie PN
Reprocopy outfit PF-2/PF-3/PF-4
Reprogerät PF-2/PF-3/PF-4
Statif de reproduction
PF-3/PF-3/PF-4
Unidad de repro-copia
PF-2/PF-3/PF-4
Corredo per riproduzione/copia
PF-2/PF-3/PF-4
Extension bellows PB-6E
Zusatzbalgen PB-6E
Soufflet additionnel PB-6E
Fuelle de extensión PB-6E
Estensione soffietto PB-6E
Macro copy stand PB-6M
Makrokopiereinrichtung PB-6M
Statif macro PB-6M
Estativo de reproducción
macro PB-6M
Supporto per copie micro PB-6M
Slide copying adapter PS-6
Diakopiergerät PS-6
Reprodia PS-6
Adaptador para la reproducción
de diapositivas PS-6
Adattatore duplicazione
diapositive PS-6
Slide copying adapter PS-4/PS-5
Diakopiergerät PS-4/PS-5
Reprodia PS-4/PS-5
Adaptador para la reproducción
de diapositivas PS-4/PS-5
Adattatore duplicazione
diapositive PS-4/PS-5
Bellows PB-6
Balgengerät PB-6
Soufflet PB-6
Fuelles PB-6
Soffietto PB-6
Bellows PB-4/PB-5
Balgengerät PB-4/PB-5
Soufflet PB-4/PB-5
Fuelles PB-4/PB-5
Soffietto PB-4/PB-5
PK-series rings
Zwischenringe PK
Bagues PK
Anillo de la serie PK
Anello serie PK
Close-up lens No. 2
Nahlinse Nr. 2
Lentille additionnelle n˚ 2
Lente de aproximación N˚. 2
Obiettivo close up N. 2
Close-up lens No. 1
Nahlinse Nr. 1
Lentille additionnelle n˚ 1
Lente de aproximación N˚. 1
Obiettivo close up N. 1
Close-up lens No. 0
Nahlinse Nr. 0
Lentille additionnelle n˚ 0
Lente de aproximación N˚. 0
Obiettivo close up N. 0
1.0 – 1.2
8.0 – 8.0
(inch)
20.3 – 20.4
(cm)
0.93 1.4 –
0.81 1.2
(inch)
2.4 3.5 –
2.1 3.1
(cm)
1/15 – 1/6.6
33.6 – 17.7
(inch)
85.3 – 44.9
(cm)
13.7 20.6 –
6.3 9.4
(inch)
34.9 52.3 –
15.9 23.8
(cm)
1.4 – 8.41/1.1 – 8.5
8.2 – 21.2
(inch)
20.7 – 53.7
(cm)
0.70 1.1 –
0.11 0.17
(inch)
1.8 2.7 –
0.29 0.43
(cm)
8.0 – 21.4
(inch)
20.3 – 54.4
(cm)
1.0 1.5 –
0.11 0.17
(inch)
2.6 3.9 –
0.28 0.42
(cm)
1.4 – 2.91/1.1 – 3.0
8.2 – 10.6
(inch)
20.7 – 26.9
(cm)
0.70 1.1 –
0.32 0.48
(inch)
1.8 2.7 –
0.81 1.2
(cm)
8.0 – 10.6
(inch)
20.3 – 26.9
(cm)
1.0 1.5 –
0.32 0.48
(inch)
2.6 3.9 –
0.81 1.2
(cm)
1.4 – 2.91/1.1 – 2.9
8.2 – 10.5
(inch)
20.7 – 26.6
(cm)
0.70 1.1 –
0.33 0.49
(inch)
1.8 2.7 –
0.83 1.3
(cm)
8.0 – 10.5
(inch)
20.3 – 26.6
(cm)
1.0 1.5 –
0.33 0.49
(inch)
2.6 3.9 –
0.83 1.25
(cm)
1.6 – 4.31/1.2 – 2.7
8.4 – 13.1
(inch)
21.3 – 33.3
(cm)
0.61 0.91 –
0.22 0.33
(inch)
1.5 2.3 –
0.56 0.84
(cm)
8.0 – 10.1
(inch)
20.4 – 25.7
(cm)
1.1 1.7 –
0.35 0.53
(inch)
2.9 4.3 –
0.89 1.3
(cm)
1.4 – 3.91/1.1 – 4.0
8.2 – 12.4
(inch)
20.7 – 31.4
(cm)
0.70 1.1 –
0.24 0.36
(inch)
1.8 2.7 –
0.61 0.92
(cm)
8.0 – 12.6
(inch)
20.3 – 32.0
(cm)
1.0 1.5 –
0.23 0.35
(inch)
2.6 3.9 –
0.6 0.89
(cm)
1.6 – 4.31/1.2 – 3.6
8.4 – 13.1
(inch)
21.3 – 33.3
(cm)
0.61 0.91 –
0.22 0.33
(inch)
1.5 2.3 –
0.56 0.84
(cm)
8.0 – 11.8
(inch)
20.4 – 29.9
(cm)
1.1 1.7 –
0.26 0.4
(inch)
2.9 4.3 –
0.67 1.0
(cm)
1/6.5 – 1.1
17.3 – 8.0
(inch)
44.0 – 20.3
(cm)
6.1 9.1 –
0.85 1.3
(inch)
15.5 23.2 –
2.2 3.2
(cm)
1/6.6 – 1/3.3
17.1 – 10.8
(inch)
43.4 – 27.5
(cm)
6.2 9.3 –
3.1 4.6
(inch)
15.7 23.6 –
7.9 11.8
(cm)
1/13 – 1/4.4
30.4 – 13.1
(inch)
77.1 – 33.4
(cm)
12.3 18.5 –
4.1 6.2
(inch)
31.3 46.9 –
10.5 15.8
(cm)
1/27 – 1/5.3
Photographic Range With Close-Up Attachments
Fotografische Bereiche mit dem Nahaufnahme-Zubehör
Rapports obtenus en proxiphotographie et photomacrographie
Rangos fotográficos con accesorios de aceramiento
Fotografia con dispositivi per riprese Close-Up
Subject field
Aufnahmefeld
Champ couvert
Campo abarcado
Campo del
soggetto
Focused distance
Eingestellte
Entfernung
Distance de
mise au point
Distancia de
enfoque
Distanza messa
a fuoco
59.0 – 15.0
(inch)
150 – 38.1
(cm)
25.8 38.7 –
5.0 7.5
(inch)
65.6 98.4 –
12.8 19.1
(cm)
*
**
***
* The first values are for the PK-11A ring used alone and the other ones for the PK-11A—PK-13, PK-11—PK-13, or PK-1—PK-3
rings used together. However, the PK-11 and PK-1 rings can not be attached directly to the lens.
** The Macro Adapter Ring BR-3 is used to connect the reverse lens to the copying adapter.
*** The figures shown here represent the ranges obtained with the subject on the baseplate, using the lens without any close-up
attachment.
* Die ersten Werte gelten für den Zwischenring PK-11A, wenn dieser allein benutzt wird. Die anderen Werte gelten für die
Kombinationen PK-11A—PK-13, PK-11—PK-13 oder PK-1—PK-3. Die Zwischenringe PK-11 und PK-1 lassen sich nicht direkt
am Objektiv anbringen!
** Der Umkehrring BR-3 ist zum Anschluß des Objektives in Reprostellung an den Kopieransatz.
*** Die Angaben beziehen sich auf die Abstände, die entstehen, wenn das Objekt auf der Grundplatte liegt und das Objektiv nicht mit
Nahaufnahmezubehör versehen ist.
* Les premières valeurs sont pour la bague PK-11A utilisée seulement et les autres pour les bagues PK-11A—PK13, PK-11—PK-
13 ou PK-1—PK-3 utilsees ensemble. Toutefois, les bagues PK-11 et PK-1 ne peuvent être directement fixées à l’objectif.
** La bague d’adaptateur macro BR-3 sert à relier l’objectif monté à retourné l’adaptateur de reproduction.
*** Les chiffres indiqués représentent les rapports obtenus avec le sujet sur le plateau. l’objectif étant utilisé san asccessoire macro.
* Los primeros valores son para el caso en que se utilice el anillo PK-11A solo y los otros valores para el caso en que se utilicen
los anillos PK-11A—PK-13, PK-11—PK-13, o PK-1—PK-3 juntos. Sin embargo, no es posible montar los anillos PK-11 y PK-
1 en el objetivo en forma directa.
** El anillo macro adaptador BR-3 sirve para acoplar el objetivo invertivo al adaptador de reproducción.
*** Las cifras indicadas representan los intervalos obtenidos con los sujetos en la pletina de base, sin emplear ningún accesorio de
aproximación en el objetivo.
*I primi valori sono per l’anello PK-11A usato da solo mentre i seguenti sono per gli anelli PK-11A—PK-13, PK-11—PK-13, o
PK-1—PK-3 usati assieme. Si tenga comunque presente che gli anelli PK-11 e PK-1 non possono essere agganciati direttamente
all’obiettivo.
** L’anello adattatore macro BR-3 viene usatao per collegare l’obiettivo montato in modo inverso all’adattatore di duplicazione.
*** I dati indicati in alto rappresentano i valori ottenuti con il soggetto posto sulla base usando l’obiettivo senza l’ausilo di dispositivi
close-up.
Profundidad de campo
SchärfentiefentabelleDepth of field
Focused distance
Eingestellte Entfernung
Distance de mise au point
Distancia de enfoque
Distanza messa a fuoco
Profundidad de campo
Profondità di campoDepth of field
Schärfentiefe
Profondeur de champ
Reproduction ratio
Abbildungsmaßstab
Rapport de reproduction
Relación de reproducción
Rapporto di riproduzione
f/2.8 f/4 f/5.6 f/8 f/11 f/16 f/22
0.448–
0.452
0.496–
0.504
0.443–
0.458
0.440–
0.461
0.490–
0.510
0.486–
0.515
0.584–
0.617
0.578–
0.624
14–
1.12–
1.29
0.949–
1.06
0.769–
0.834
0.677–
0.724
10–
1.09–
1.33
0.929–
1.08
0.757–
0.849
0.668–
0.736
1.38–
1.65
1.33–
1.72
3.75–
7.53
2.52–
3.73
1.78–
2.29
3.40–
9.65
2.35–
4.16
1.70–
2.44
0.446–
0.454
0.445–
0.455
0.481–
0.521
0.430–
0.473
0.423–
0.482
0.497–
0.503
0.447–
0.453
0.495–
0.505
0.493–
0.507
0.436–
0.465
0.473–
0.531
0.464–
0.543
0.5
0.45
1/7.63
1/6.64
0.595–
0.605
0.692–
0.708
0.592–
0.608
0.589–
0.612
0.657–
0.750
0.558–
0.650
0.544–
0.672
44–
1.17–
1.23
0.983–
1.02
0.790–
0.811
0.693–
0.708
40–
1.17–
1.23
0.981–
1.02
0.789–
0.812
0.594–
0.606
29–
1.16–
1.24
0.974–
1.03
0.784–
0.817
0.688–
0.712
20–
1.14–
1.26
0.963–
1.04
0.778–
0.824
0.684–
0.717
7–
1.06–
1.39
0.905–
1.12
0.742–
0.870
0.570–
0.634
5–
1.01–
1.50
0.868–
1.19
0.718–
0.906
0.640–
0.776
4–
0.95–
1.65
0.828–
1.28
0.693–
0.955
0.620–
0.809
Profondità di campo
1.46–
1.54
1.92–
2.09
1.44–
1.57
1.41–
1.60
1.61–
2.65
1.20–
2.02
1.12–
2.34
4.52–
5.60
2.82–
3.20
1.92–
2.08
4.47–
5.68
2.81–
3.22
1.45–
1.55
4.29–
6.01
2.74–
3.32
1.88–
2.13
4.04–
6.58
2.64–
3.48
1.84–
2.20
3.04–
14.92
2.18–
4.89
1.28–
1.82
2.58–
186.84
1.94–
6.89
1.48–
3.13
2.20–
1.72–
13.79
1.36–
4.00
Profondeur de champ
5
3
2
1.5
1.2
1.0
0.8
0.7
0.6
1/
1/95.0
1/56.2
1/36.8
1/27.1
1/21.3
1/17.4
1/13.50
1/11.55
1/9.60
f/2f/1.8
Depth of field
Focused
distance
Depth of field
Reproduction
ratio
f/1.8 f/2 f/2.8 f/5.6
1´5-11/16˝–
1´6-5/16˝
1´7-15/16˝–
1´8-13/16˝
1´11-5/6˝–
2´5/8˝
47´–
4´7˝–
5´6˝
3´8-7/8˝–
4´3-9/16˝
2´10-5/16˝–
3´1-13/16˝
2´4-7/8˝–
2´7-1/8˝
14´2˝–
34´1˝
11´1˝–
109´10˝
17´8˝–
23´0˝
17´5˝–
23´5˝
16´7˝–
25´2˝
15´5˝–
28´4˝
12´7˝–
49´1˝
9´3˝– 7´9˝–
20 1/116.2
8´4-5/16˝–
12´5˝
6´2-1/8˝–
8´1˝
f/4 f/11
1´7-1/4˝–
1´9-11/16˝
1´5-3/8˝–
1´6-5/8˝
2´3-15/16˝–
2´8-3/8˝
24´–
4´3˝–
6´1-3/16˝
3´6-1/4˝–
4´7-11/16˝
2´8-7/8˝–
3´3-13/16˝
1´10-3/4˝–
2´1-3/8˝
5´6-3/4˝–
9´6-5/16˝
7´2-3/4˝–
16´5˝
f/8 f/16 f/22
1´5-7/8˝–
1´6-1/16˝
1´8-3/16˝–
1´8-1/2˝
1´5-13/16˝–
1´6-1/8˝
1´5-3/4˝–
1´6-3/16˝
1´7-3/4˝–
1´9˝
1´5-1/8˝–
1´6-7/8˝
1´4-7/8˝–
1´7-5/16˝
1´8-1/4˝–
1´8-1/2˝
1´5-7/8˝–
1´6-1/16˝
1´8-1/8˝–
1´8-9/16˝
1´8-1/16˝–
1´8-11/16˝
1´5-9/16˝–
1´6-7/16˝
1´7-1/4˝–
1´9-11/16˝
1´6-13/16˝–
1´10-1/4˝
1.7
1.5
1/8.0
1/6.8
1´11-3/4˝–
2´3/16˝
2´5-9/16˝–
2´6-3/8˝
1´11-5/8˝–
2´5/16˝
1´11-1/2˝–
2´7/16˝
2´4-7/16˝–
2´7-11/16˝
1´10-1/4˝–
2´2-1/16˝
1´9-11/16˝–
2´2-15/16˝
145´–
4´10-1/4˝–
5´1-3/4˝
3´10-15/16˝–
4´1-1/16˝
2´11-7/16˝–
3´7/16˝
2´5-5/8˝–
2´6-5/16˝
131´–
4´10-1/16˝–
5´2˝
3´10-13/16˝–
4´1-3/16˝
2´11-3/8˝–
3´5/8˝
1´11-3/4˝–
2´3/16˝
93´–
4´9-3/8˝–
5´2-13/16˝
3´10-3/8˝–
4´1-11/16˝
2´11-1/8˝–
3´7/8˝
2´5-7/16˝–
2´6-9/16˝
65´–
4´8-5/16˝–
5´4-1/8˝
3´9-11/16˝–
4´2-1/2˝
2´10-3/4˝–
3´1-1/4˝
2´5-3/16˝–
2´6-13/16˝
33´–
4´5-1/8˝–
5´9˝
3´7-11/16˝–
4´5-5/16˝
2´9-11/16˝–
3´2-11/16˝
1´11-1/16˝–
2´15/16˝
16´–
3´11-13/16˝–
6´9-1/2˝
3´4-1/8˝–
5´-1/8˝
2´7-11/16˝–
3´5-7/8˝
2´3-1/16˝–
2´9-11/16˝
12´–
3´8-1/2˝–
7´10-9/16˝
3´1-7/8˝–
5´6-5/8˝
2´6-5/16˝–
3´8-5/8˝
2´2-3/16˝–
2´11-5/16˝
6´8-3/16˝–
7´4-3/16˝
5´6-3/4˝–
8´7-15/16˝
9´4-13/16˝–
10´8˝
6´8-1/2˝–
7´3-3/4˝
9´4-1/16˝–
10´9˝
9´1-1/4˝–
11´1˝
6´6-3/4˝–
7´6˝
8´9-3/16˝–
11´7˝
6´4-11/16˝–
7´8-7/8˝
7´9-13/16˝–
13´11˝
6´5-1/4˝–
23´6˝
5´1-1/8˝–
11´5-1/4˝
5´8-3/8˝–
49´0˝
4´7-9/16˝–
15´1-5/8˝
10
7
5
4
3
2.5
2.0
1/
1/57.1
1/39.4
1/27.6
1/21.7
1/15.7
1/12.8
1/9.8
*
**
***
*
**
***
Transcripción de documentos
日本語 AF Nikkor 50mm f/1.8D English このたびは、ニッコールレンズをお買い上げいただきありがとうございます。 ご使用の前にこの「使用説明書」をよくお読みのうえ、十分に理解してから正し くお使いください。お読みになった後は、お使いになる方がいつでも見られる所 に必ず保管してください。 ニコンのAF[オートフォーカス]カメラ(F3AFを除く)との組み合わせでオートフォーカ ス撮影ができます。また、マニュアル(手動)によるピント合わせも可能です。 Manual de instrucciones Manuale di istruzioni 使用説明書 Instruction Manual Bedienungsanleitung Manuel d’utilisation 使用説明書の内容が破損などによって判読できなくなったときは、当社サービス機関にて新しい使用説明書をお求めください(有料)。 NIKON CORPORATION No reproduction in any form of this manual, in whole or in part (except for brief quotation in critical articles or reviews), may be made without written authorization from NIKON CORPORATION. FUJI BLDG., 2-3, MARUNOUCHI 3-CHOME, CHIYODA-KU, TOKYO 100-8331, JAPAN TT5F02 (80) Jp En De Fr Es It Ck Ch ● 軽量・コンパクトで、また開放F値がF1.8と非常に明るく、標準レンズとして最適です。 ● 被写体までの距離情報をカメラボディに伝達する機能を備えていますので、距離情報に対応 したニコンカメラやスピードライト使用時、より的確な露出制御を実現する3D-マルチパター ン測光や3D-マルチBL調光を可能とします。 • Autofocus operation is possible with Nikon autofocus cameras (except the F3AF); manual focus possible with all Nikon SLRs. • Compact and lightweight. Ideal for a high-speed normal lens with a maximum aperture of f/1.8. • For more accurate exposure control, subject distance information is transmitted from the lens to the camera body, providing 3D Matrix Metering and 3D Multi-Sensor Balanced Fill-Flash with appropriate Nikon cameras and Speedlights. Important! 注記 ● レンズのCPU信号接点は汚さないようにご注意ください。 ● CPU信号接点を破損しますので、オート接写リングPK-1、PK-11、オートリング BR-4ま たはK1リングはご使用になれません(PK-11の代わりにはPK-11Aリングを、またオート リングBR-4の代わりにはBR-6とBR-2Aを組み合わせてご使用ください)。その他のアクセ サリーとカメラボディとの組み合わせ使用に際しては、必ず各製品の使用説明書も併せてご 参照ください。 ● You are now the proud owner of the AF Nikkor 50mm f/1.8D, a lens that will provide you with years of exciting picture-taking opportunities. Before using this lens, please read these instructions and the notes on safety operations in your camera’s instruction manual. Also, keep this manual handy for future reference. Major features 主な特長 ● Deutsch ニコンF3AF用DX-1ファインダーと組み合わせての使用はできません。 • Be careful not to soil or damage the CPU contacts. • Do not attach the following accessories to the lens, as they might damage the lens CPU contacts: Auto Extension Ring PK-1, PK-11 (use PK-11A), Auto Ring BR-4 (use BR-6 with BR-2A), and K1 Ring. Other accessories may not be suitable when this lens is used with certain camera bodies. For details, refer to instruction manual for each product. • This lens is not compatible when used with a Nikon F3AF camera with the AF Finder DX-1 attached. Depth of field 被写界深度 プレビュー(絞り込み)機構を持つカメラでは、撮影前に被写界深度を確認することができ ます。 If your camera has a depth of field preview (stop-down) function, depth of field can be observed while looking through the camera viewfinder. Recommended focusing screens ファインダースクリーンとの組み合わせ ニコンF6、F5、F4シリーズカメラボディには、多種類のファインダースクリーンがあり、レ ンズのタイプや撮影条件に合わせて最適なものを選べます。このレンズに適したファインダー Various interchangeable focusing screens are available for certain Nikon SLR cameras to suit any type of lens or picture-taking situation. Those recommended for use with this lens are listed in the table. Screen 説明書も併せてご参照ください。) スクリーン A B カメラ 図A Fig. A Abb. A Fig. A 1 絞りリング Aperture ring Blendenring Bague des ouvertures Anillo de aberturas Anello di apertura 2 露出計連動ガイド Meter coupling ridge Steuerkurve Index de couplage du posemètre Protuberancia de acoplamiento al exposímetro Indice di accoppiamento dell’esposimetro 3 CPU信号接点 CPU contacts CPU-Kontakte Contacts CPU Contactos CPU Contatti CPU 4 開放F値連動ガイド Aperture indexing post Anschlag für Blendenkupplung Douille d’indexation d’ouverture Poste de índice de apertura Perno per misurazione dell’apertura 最小絞りロックレバー Minimum aperture lock lever Verriegelung für kleinste Blende Levier de verrouillage d’ouverture minimale 5 ファインダー内直読用絞り目盛 8 絞り指標/着脱指標 Aperture-direct-readout scale Skala für Blendendirekteinspiegelung Echelle de lecture directe de l’ouverture Escala de lectura directa de apertura Scala di lettura diretta delle aperture Fig. A Palanca de bloqueo de apertura mínima Fig. A Leva di blocco al diaframma minimo Aperture index/Mounting index Blenden-index/Objektivindex Index d’ouverture/index de montage Indice de aberturas/índice de monturas Indice delle aperture/Indice di montaggio 6 最小絞り信号ガイド(EE連動ガイド) 9 距離目盛基準線 Distance scale Entfernungsskala Minimum aperture signal post Distance index line Echelle des distances (EE servo coupling post) Entfernungs Indexlinie Escala de distancias Signalstift für kleinste Blende Ligne de repère des distance Scala delle distanze (Kupplungsstift für Línea indicadora de distancias automatische Contrassegno distanza Blendensteuerung) Levier de signal d’ouverture $ フォーカスリング minimale (levier de servo Focus ring ! 赤外指標 couplage EE) Entfernungseinstellring Infrared compensation index Borne de señal de abertura Bague de mise au point Infrarot-Kompensationsindex mínima (Borne de Anillo de enfoque Repère de mise au point en acoplador EE) Anello di messa a fuoco infrarouge Attacco di segnale di apertura Indicador de enfoque minima (attacco per infrarrojo accoppiamento EE servo) Indice di compensazione per % 最小絞りロックレバー infrarossi Minimum aperture lock lever Verriegelung für kleinste Blende Levier de verrouillage 7 絞り目盛 d’ouverture minimale Aperture scale Palanca de fijación de Blendenskala apertura mínima Echelle des ouvertures Leva di blocco di apertura Escala de apertura minima Scala delle aperture 表示と意味は次のようになっています。 警告 この表示を無視して、誤った取り扱いをすると、人が死亡または重傷を負う可能性が想定される 内容を示しています。 注意 この表示を無視して、誤った取り扱いをすると人が傷害を負う可能性が想定される内容および物 的損害の発生が想定される内容を示しています。 絵表示の例 △記号は、注意(警告を含む)を促す内容を告げるものです。図の中や近くに具体的な注意内容(左図 の場合は感電注意)が描かれています。 記号は、禁止(してはいけないこと)の行為を告げるものです。図の中や近くに具体的な禁止内容(左 図の場合は分解禁止)が描かれています。 ●記号は、行為を強制すること(必ずすること)を告げるものです。図の中や近くに具体的な強制内 容(左図の場合は電池を取り出す)が描かれています。 警告 ◎ ◎ ◎ F4+DP-20 ◎ ◎ F4+DA-20 ◎ ◎ ◎ (+0.5) (+0.5) (+1.0) ◎ ◎ ◎ Camera U D EC-E F6 ◎ ◎ ◎ ◎ ◎ ◎ ◎ ◎ ◎ ◎ ◎ ◎ ◎ F5+DA-30 ◎ ◎ ◎ ◎ F4+DP-20 ◎ ◎ ◎ ◎ ◎ (+0.5) (+0.5) (+1.0) ◎ ◎ ◎ ◎ F4+DA-20 ◎ ◎ ◎ F3 ◎ ◎ ◎ ◎ L ◎ ◎ (+1.0) ◎ K ◎ ◎ ◎ J ◎ ◎ (+0.5) (+0.5) ◎ R S T F ◎ ◎ (+0.5) ◎ ◎ ◎ ◎ M ◎ ◎ U ◎ ◎ ◎ :視野の一部が多少見にくくなりますが、撮影結果に全く影響がありません。 △ :スプリットの合致像は見えますが、ピント合わせは精度上適しません。 ( ) :中央部重点測光時の補正値です。F6カメラの場合、測光値の補正は、カメラのカスタム 型以外を使用する場合は、補正量が0でも、 「B or E以外」にセットしてください。F5カ メラの場合は、カスタムセッティングNo.18の設定で測光値の補正を行います。F4シリ ーズカメラの場合は、ファインダースクリーン露出補正ダイヤルを回して補正を行いま す。詳しくはカメラの使用説明書をご覧ください。 空欄 :使用不適当です。ただし、Mスクリーンの場合、撮影倍率1/1倍以上の近接撮影に用 いられるため、この限りではありません。 * 上記以外のカメラでB/B2/B3、E/E2/E3、K/K2/K3スクリーンの見え方は、それぞ ◎ ◎ ◎ ◎ : Excellent focusing ○ : Acceptable focusing Slight vignetting or moiré patterns appear in the viewfinder, but not on the film. △ : Acceptable focusing The in-focus image in the central spot may prove to be slightly out of focus on film. Focus on the surrounding matte area. ( ) : Indicates degree of exposure compensation needed (Center-Weighted metering only). For F6 cameras, compensate by selecting “Other screen” in Custom Setting “b6: Screen comp.” and setting the EV level to -2.0 to +2.0 in 0.5 EV steps. When using screens other than type B or E, “Other screen” must be selected even when the required compensation value is “0” (no compensation required). For F5 cameras, compensate using Custom Setting #18 on the camera body. For F4-Series cameras, compensate using the Exposure Compensation Dial for the focusing screen. See instruction manual of the camera body for more details. Blank box means not applicable. Since type M screen can be used for both macrophotography at a 1:1 magnification ratio and for photomicrography, it has different applications than other screens. • When using the B/B2/B3, E/E2/E3, and K/K2/K3 focusing screens in cameras other than those listed above, refer to the columns on the F4 + DP-20’s B, E and K screens, respectively. おくことができます。まずレンズの絞りリングを回し、最小絞り(最も大きい数値)を絞り指 標に合わせます。次に、最小絞りロックレバーを絞りリングの方向にスライドし2つのオレン ジ指標を合わせます。これで絞りリングは最小絞りでロックされます。ロックレバーを反対方 For programmed auto or shutter-priority auto exposure shooting, use the minimum aperture lock lever to lock the lens aperture at f/22. 1 Set the lens to its minimum aperture (f/22) by aligning it with the aperture index. 2 Slide the lock lever toward the aperture ring, so the two orange dots are aligned. 向にスライドするとロックは解除されます。 To release the lock, slide the lever in the opposite direction. カメラ内蔵フラッシュ使用時のご注意 Taking flash pictures with cameras with a built-in flash ニコンの全てのフラッシュ内蔵カメラは、画面のケラレなくお使いいただけます。 All Nikon cameras with a built-in flash are usable and no vignetting occurs. レンズのお手入れと取り扱い上のご注意 Lens care レンズ表面のホコリや汚れは、市販のレンズクリーナーを湿らせた柔らかい木綿の布で、中 心から外側に円を描くように拭き取ります。 ● シンナーやベンジンなどの有機溶剤は絶対に使用しないでください。 ● レンズ表面の汚れや傷を防ぐために、L37Cフィルターを常用することをおすすめします。ま た、レンズフードも役立ちます。 ● レンズをケースに入れるときは、必ず、レンズキャップを前後に取り付けてください。 ● レンズを長期間使用しないときは、カビやサビを防ぐために、高温多湿のところを避けて風 通しのよい場所に保管してください。また、直射日光のあたるところ、ナフタリンや樟脳の あるところも避けてください。 ● レンズを水に濡らすと、部品がサビつくなどして故障の原因となりますのでご注意ください。 ● ストーブの前など、高温になるところに置かないでください。極端に温度が高くなると、外 観の一部に使用している強化プラスチックが変形することがあります。 Standard accessories 付属アクセサリー ● • To remove dirt and smudges, use a soft, clean cotton cloth or lens tissue moistened with lens cleaner. Wipe in a circular motion from the center outward. • Never use thinner or benzene to clean the lens as this might damage the lens, result in a fire, or cause health problems. • To protect the front lens element, an NC filter is recommended at all times. A lens hood also helps protect the front of the lens. • When storing the lens in the lens case, attach both front and rear caps. • When the lens will not be used for a long time, store it in a cool, dry place to prevent mold. Also store the lens away from direct sunlight or chemicals such as camphor or naphthalene. • Do not get water on the lens or drop it in water as this will cause it to rust and malfunction. • Reinforced plastic is used for some parts of the lens. To avoid damage, never leave the lens in an excessively hot place. •52mm snap-on front lens cap 52mmスプリング式前キャップ Optional accessories 別売アクセサリー ● 52mmねじ込み式フィルター ● ラバーフード HR-2 ● ● ソフトケース CL-S1 裏ぶた LF-1 ● ● ハードケース CL-30S テレコンバータ TC-201S/TC-14AS 仕様 •52mm screw-in filters •Flexible lens pouch CL-S1 •Hard case CL-30S •Rubber lens hood HR-2 •Rear lens cap LF-1 •Teleconverter TC-201/TC-14A Specifications 型式: ニコンFマウントCPU内蔵Dタイプ、AFレンズ 焦点距離: 50mm 最大口径比: Important • Veiller à ne pas salir ni endommager les contacts CPU. • Ne pas essayer de monter les accessoires suivants, car ils risquent d’abimer les contacts: Bague d’auto-rallonge PK-1, PK-11 (utilisez PK-11A), Bague auto BR-4 (utilisez la bague BR-6 avec BR-2A) et Bague K1. D’autres accessoires peuvent ne pas convenir lorsque l’objectif est utilisé avec certains appareils. Se référer aux manuels d’instruction. • Cet objectif n’est pas compatible avec le boîtier F3AF équipé du viseur DX-1. Profondeur de champ Si votre appareil est pourvu d’une fonction de prévisionnage de la mise au point (ouverture réelle), vous pouvez observer la profondeur de champ en regardant dans le viseur. Schärfentiefe Écrans de mise au point recommandés Verfügt die Kamera über eine Taste oder einen Hebel zur Schärfentiefe-Vorschau (Abblendung), so läßt sich die Schärfentiefe im Kamerasucher verfolgen. Divers écrans de mise au point sont disponibles pour certains appareils Nikon SLR qui s’adaptent à toutes les conditions de prise de vues. Les écrans recommandés avec cet objectif sont listés cidessons: Verre Für bestimmte Nikon-Kameras stehen verschiedene auswechselbare Einstellscheiben zur Verfügung, um jeder Aufnahmesituation gerecht zu werden. Die zur Verwendung mit diesem Objektiv empfohlenen sind nachstehend aufgelistet: F5+DP-30 ◎ Minimum aperture lock (Fig. A) プログラムオートやシャッター優先オートによる撮影時は、絞りリングを最小絞りに固定して • Halten Sie die CPU-Kontakte peinlich sauber, und schützen Sie sie vor Beschädigung! • Folgendes Zubehör darf nicht an das Objektiv angesetzt werden, da es die CPU-Kontakte beschädigen könnte: Automatik-Zwischenring PK-1, PK-11 (stattdessen PK-11A verwenden), Automatikring BR-4 (stattdessen BR-6 mit BR-2A verwenden) und Zwischenring K1. Anderes Zubehör kann bei Verwendung des Objektivs mit gewissen Kameramodellen ungeeignet sein. Einzelheiten entnehmen Sie bitte der jeweiligen Bedienungsanleitung. • Das Objektiv ist nicht zur Verwendung mit der Nikon F3AF mit angesetztem AF-Sucher DX-1 geeignet. F6 れF4+DP-20のB、E、Kスクリーンの欄を参考にしてください。 最小絞りロックレバー(図A) Achtung! A Kamera (+0.5) ◎ • Autofokusbetrieb mit entsprechend ausgerüsteten Nikon-Autofokuskameras (außer F3AF); manuelle Schärfeneinstellung mit allen Nikon-Spiegelreflexkameras. • Kompakt und leicht im Gewicht. Ideal für ein lichtstarkes Normalobjektiv mit einer größten Blendendöffnung von 1:1,8. • Für noch genauere Belichtungsregelung wird die Distanz zum Aufnahmeobjekt vom Objektiv an die Kamera übermittelt, so daß 3D-Matrix-Messung sowie 3D-Multi-Sensor-Aufhellblitzen mit entsprechend geeigneten Nikon-Kameras und Nikon-Blitzgeräts möglich ist. Einstellscheibe ◎ (+0.5) (+0.5) ◎ P (+0.5) ◎ ○ B ◎ ◎ ◎ ◎ C D E EC-B EC-E F G1 G2 ◎ ◎ ◎ ◎ K ◎ F4+DP-20 ◎ ◎ F4+DA-20 ◎ ◎ ◎ (+0.5) (+0.5) (+1.0) ◎ ◎ ◎ ◎ ◎ ◎ (+0.5) ◎ ◎ ◎ ◎ ◎ R S T P U ◎ ◎ (+0.5) ◎ ◎ ◎ ◎ ◎ : Hervorragende Scharfeinstellung ○ : Akzeptable Scharfeinstellung Das Sucherbild vignettiert leicht. Die Aufnahme selbst bleibt hiervon unberührt. △ : Brauchbare Scharfeinstellung. Das im mittleren Kreis scharf eingestellte Bild könnte auf dem Film leicht unscharf abgebildet werden. Stellen Sie auf dem umliegenden Mattfeld scharf. ( ) : Zeigt den Betrag zusätzlich erforderlicher Belichtungskorrektur (Nur mittenbetonte Belichtungsmessung). Bei F6-Kameras korrigieren Sie durch Wahl von “Andere” in der Individualfunktion “b6: Einstellscheibe” und Einstellen des LW-Werts im Bereich zwischen –2,0 und +2,0 in 0,5-LW-Schritten. Bei Gebrauch von anderen Scheiben als B oder E, ist “Andere” auch dann zu wählen, wenn der erforderliche Korrekturwert “0” beträgt (keine Korrektur nötig). Zur Einstellung des Korrekturwerts am F5 Kameragehäuse dient die Individualfunktion Nr. 18. Mit den F4-Serien-Geräten durch den Belichtung-Kompensationsanzeiger für Visiermattscheiben kompensieren. Näheres hierzu finden Sie in der Bedienungsanleitung des Kameragehäuses. Ein Leerfeld bedeutert: unbrauchbar. Da die Einstellscheibe M sowohl für Maktrofotografie bis zum Abbildungsmaßstab 1:1 als auch Mikrofotografie eingesetzt werden kann, unterscheidet sich ihr Anwendungsbereich von dem anderer Einstellscheiben. • Bei Verwendung der Scheiben B/B2/B3, E/E2/E3 bzw. K/K2/K3 in anderen als den obengenannten Kameras gelten die Spalten für die Scheiben B, E bzw. K auf F4 + DP-20. Verriegelung auf kleinster Blende (Abb. A) Für Programm- und Blendenautomatik muß der Blendenring auf kleinster Öffnung (22) verriegelt werden. 1 Drehen Sie den Blendenring, bis die Blendenzahl 22 dem Blendenindex gegenübersteht. 2 Schieben Sie den Riegel in Richtung auf den Blendenring, so daß die beiden orangefarbenen Punkte aufeinander ausgerichtet sind. Zur Entriegelung schieben Sie den Riegel in die entgegengesetzte Richtung. Blitzaufnahmen mit Kameras mit eingebautem Blitz Dieses Objektiv ist ohne jegliche Vignettierungen für Blitzaufnahmen mit allen Nikon-Kameras mit eingebautem Blitz geeignet. Pflege des Objektivs • Reinigen Sie die Linsenoberfläche mit einem leicht mit Linsenreiniger angefeuchteten weichen, sauberen Baumwolltuch oder Linsenreinigungspapier. Wischen Sie dabei in einer größer werdenden Kreisbewegung von innen nach außen. • Verwenden Sie keinesfalls Verdünnung oder Benzin zur Reinigung, da dieses zu Beschädigungen führen, Gesundheitsschäden verursachen oder ein Feuer auslösen könnte. • Zum Schutz der Frontlinse empfiehlt es sich, stets ein NC-Filter aufgesetzt zu lassen. Die Gegenlichtblende wirkt als zusätzlicher Frontlinsenschutz. • Bei Aufbewahrung des Objektivs in seinem Köcher sollten beide Objektivdeckel aufgesetzt sein. • Bei längerer Nichtbenutzung sollte das Objektiv an einem kühlen, trockenen Ort aufbewahrt werden. Halten Sie das Objektiv von direkter Sonneneinstrahlung oder Chemikalien wie Kampfer oder Naphthalin fern. • Halten Sie das Objektiv von Wasser fern, das zur Korrosion und zu Betriebsstörungen führen kann. • Einige Teile des Objektivs bestehen aus verstärktem Kunststoff. Lassen Sie das Objektiv deshalb nie an übermäßig heißen Orten zurück! Serienmäßiges Zubehör C E D EC-B EC-E F G1 G2 G3 H1 H3 H2 G4 H4 J K L ◎ ◎ ◎ F5+DP-30 ◎ ◎ ◎ ◎ ◎ ◎ ◎ F5+DA-30 ◎ ◎ ◎ ◎ ◎ ◎ ◎ F4+DP-20 ◎ ◎ F4+DA-20 ◎ ◎ ◎ (+0.5) (+0.5) (+1.0) ◎ ◎ F3 ◎ B F6 ◎ (+0.5) (+0.5) ◎ M ◎ ◎ (+1.0) L ◎ ◎ ◎ ◎ ◎ ◎ J ◎ F5+DA-30 F3 G3 H1 H3 H2 G4 H4 Appareil A ◎ ◎ ◎ (+1.0) ◎ ◎ (+0.5) P ◎ ◎ ◎ ◎ ◎ ◎ ◎ ◎ ◎ Blocage d’ouverture minimale (Fig. A) En mode Programme ou Auto priorité vitesse, réglez puis verrouillez le diaphragme sur l’ouverture minimale (f/22). 1 Réglez le diaphragme sur l’ouverture mini (f/22) en alignant sur le repère d’ouverture. 2 Glissez le curseur de blocage vers la bague de diaphragme de sorte que les deux points orange soient alignés. Pour débloquer, glissez le curseur dans l’autre direction. Prise de vues au flash avec un appareil à flash intégré Tous les appareils Nikon à flash intégré sont utilisables et il n’y a pas de vignettage. Soin de l’objectif • Utilisez un chiffon en coton doux et propre ou du tissu de nettoyage pour objectif légèrement humidifié de liquide de nettoyage pour objectif pour éliminer la saleté et les taches. Essuyez avec des mouvements circulaires du centre vers l’extérieur. • Ne jamais employer de solvant ou de benzènes qui pourrait endommager l’objectif, prendre feu ou nuire à la santé. • Il est recommandé d’utiliser un filtre NC en permanence, pour protéger la lentille frontale. Un paresoleil assure également une bonne protection contre les chocs. • Lors du rangement de l’objectif dans son étui, penser à remettre en place les bouchons avant et arrière. • En cas d’inutilisation pour une longue période, entreposer le matériel dans un endroit frais, sec et aéré pour éviter les moisissures. Tenir le matériel éloigné des sources de lumière, et des produits chimiques (camphre, naphtaline, etc.). • Eviter les projections d’eau ainsi que l’immersion, qui peut provoquer la rouille et des dommages irréparables. • Divers matériaux de synthèse sont utilisés dans la fabrication. Pour éviter tout problème, ne pas soumettre l’objectif à de fortes chaleurs. Accessoires fournis •Bouchon avant d’objectif diamètre 52 mm Accessoires en option •Filtres vissants 52 mm •Sac souple pour objectif CL-S1 •Etui rigide CL-30S •Téléconvertisseurs TC-201, TC-14A •Parasoleil de caoutchouc HR-2 •Bouchon arrière LF-1 レンズ構成: 5群6枚 f/1.8 Sonderzubehör 落下などによって破損し、内部が露出したときは、露出部に手を触れないこと 画角: Lens construction: 6 elements in 5 groups Picture angle: Type d’objectif: Nikkor AF de type D avec processeur et monture baïonnette Nikon 撮影距離情報: カメラボディへの撮影距離情報出力可能 46˚ [31˚30’ with Nikon digital cameras (Nikon DX format); 38˚ with IX240 system cameras] •Einschraubfilter 52 mm φ •Objektivbeutel CL-S1 •Fester Objektivköcher CL-30S •Gummi-Gegenlichtblende HR-2 •Objektivrückdeckel LF-1 •Telekonverter TC-201, TC-14A Caractéristiques 感電したり、破損部でケガをする原因となります。 カメラの電池を抜いて、販売店または当社サービス機関に修理を依頼してください。 46°(ニコンデジタルカメラ[ニコンDXフォーマット] 装着時31° 30′ 、IX240カメラ装着時38° ) ピント合わせ: オートフォーカス(フォーカスリング回転によりマニュアルフォーカス も可) Technische Daten Focale: 50 mm Objektivtyp: Ouverture maximale: f/1,8 Construction optique: 6 éléments en 5 groupes Champ angulaire: 46˚ [31°30’ avec l’appareil numérique Nikon (format Nikon DX); 38° sur les appareils de système IX240] Focusing: Autofocus with Nikon autofocus cameras (except F3AF); manually via separate focus ring 熱くなる、煙が出る、こげ臭いなどの異常時は、速やかにカメラの電池を取り出すこと 撮影距離目盛: ∞〜0.45m、1.75ft(併記) そのまま使用すると火災、やけどの原因となります。電池を取り出す際、やけどに十分注意してくだ さい。電池を抜いて、販売店または当社サービス機関に修理を依頼してください。 最短撮影距離: 0.45m 絞り目盛: 1.8、2.8、4、5.6、8、11、16、22 最小絞りロック可能(ファインダー内直読み用目盛併記) Shooting distance scale: Graduated in meters and feet from 0.45m (1.75 ft) to infinity (∞) 絞り方式: 自動絞り Aperture scale: 測光方式: CPU・AI方式のカメラボディでは開放測光、従来方式のカメラボディで は絞り込み測光。 発火したり感電の原因となります。 プロパンガス・ガソリンなど引火性ガスや粉塵の発生する場所で使用すると、爆発や火災の原因と なります。 アタッチメントサイズ:52mm(P = 0.75mm) 大きさ: 失明や視力障害の原因となります。 質量(重さ): 注意 ぬれた手でさわらないこと 感電の原因になることがあります。 製品は幼児の手の届かないところに置くこと ケガの原因になることがあります。 使用しないときは、レンズにキャップをつけるか太陽光のあたらない所に保管すること 太陽光が焦点を結び、火災の原因になることがあります。 三脚にカメラやレンズを取り付けたまま移動しないこと 転倒したりぶつけたりしてケガの原因になることがあります。 Closest focus distance: 0.45m (1.5 ft.) Diaphragm: f/1.8 to f/22 on both standard and aperture-direct-readout scales Fully automatic Exposure measurement: Via full-aperture method with AI cameras or cameras with CPU interface system; via stop-down method for other cameras 約63.5mm(最大径)×約39mm(長さ:バヨネット基準面からレンズ 先端まで) Attachment size: 52mm (P = 0.75mm) 約155g Dimensions: Approx. 63.5mm dia. x 39mm extension from the camera’s lens mounting flange Weight: Approx. 155g (5.5 oz) AF Nikkor mit D-Charakteristik, eingebauter CPU und NikonBajonett Brennweite: 50 mm Maximale Blendenöffnung: f/1,8 Optischer Aufbau: 6 Linsen in 5 Gruppen Bildwinkel: 46˚ [31°30’ bei Nikon-Digitalkameras (Nikon DX-Format); 38° bei IX240-Kameras] Entfernungsdaten: Werden an Kameras übertragen Schärfeneinstellung: Autofokus mit Nikon-Autofokuskameras (außer F3AF); manuell über separaten Fokussierring Entfernungsskala: Unterteilt in Meter und Fuß und zwar von 0,45m bis Unendlich (∞) Kürzeste Aufnahmedistanz: 0,45 m Blendenskala: f/1.8 — f/22, sowohl auf der Standardskala als auch der Skala für Blendendirekteinspiegelung Blendenart: Vollautomatisch Belichtungsmessung: Offenblendenmessung bei Kameras mit AI-Blendenkupplung oder CPU-Interface-System; Arbeitsblendenmessung bei allen anderen Kameras Befestigungsgröße: 52 mm (P = 0,75mm) Abmessungen: ca. 63,5 mm Durchm. x 39 mm Länge bis Flansch Gewicht: ca. 155 g ◎ ◎ ◎ : Mise au point excellente ○ : Mise au point passable Un vignetage affecte l’image du verre. L’image sur la pellicule ne porte cependant aucune trace de ceci. △ : Mise au point passable L’image mise au point dans le cercle central pourrait s’avérer légèrement floue sur la pellicule. La mise au point doit donc être faite sur la couronne dépolie entourant le cercle central du verre de visée. ( ) : Indique la compensation de l’exposition additionnelle requise (Mesure pondérée centrale uniquement). Pour les appareils F6, corrigez en sélectionnant “Activ.: autre“ dans le réglage personnalisé “b6: Plage visée” et en réglant le niveau IL de -2,0 à +2,0 par pas de 0,5 IL. Lorsque vous utilisez des verres autres que ceux de type B ou E, il faut sélectionner “Activ.: autre” même lorsque la valeur de correction est de “0“ (pas de correction nécessaire). Pour les appareils F5, compenser en utilisant le réglage personnalisé n° 18 sur l’appareil. Pour les appareils de la série F4, compenser en utilisant le cadran de compensation de l’exposition prévu pour les filtres de mise au point. Voyez le manuel d’instructions de l’appareil photo pour plus de détails. Un blanc indique aucune application. Du fait que le verre M peut être utilisé pour la macrophotographie à un rapport d’agradissement 1:1 et pour la photomicrographie, il a des applications diffèrentes de celles des autres verres. • Lors de l’utilisation de verres B/B2/B3, E/E2/E3 ou K/K2/K3 dans des appareils autres que ceux indiqués cidessus, se reporter respectivement aux colonnes des verres B, E, K de F4 + DP-20. 50mm Distance information: Output to camera body U (+0.5) ◎ Maximum aperture: •Aufsteckbarer Frontdeckel 52mmφ R S T ◎ (+0.5) (+0.5) ◎ M Focal length: レンズまたはカメラで直接太陽や強い光を見ないこと 移動禁止 (+0.5) P :最適です。 引火・爆発のおそれのある場所では使用しないこと 保管注意 ◎ ◎ M EC-B F5+DP-30 ◎ (+1.0) ◎ L E • L’autofocus est possible avec un boîtier autofocus Nikon (sauf le F3AF), la mise au point manuelle avec tous les appareils reflex Nikon. • Compact et léger. Idéal pour un objectif normal grande vitesse à ouverture maximale de f/1.8. • Pour assurer un contrôle d’exposition plus précis, l’information de distance au sujet est transmise de l’objectif au boîtier, ce qui permet la mesure matricielle 3D et le dosage auto flash/ambiance par multi-capteur 3D avec les boîtiers et flashes Nikon convenables. 1:1.8 感電したり、異常動作をしてケガの原因となります。 水につけたり水をかけたり、雨にぬらしたりしないこと 放置禁止 ◎ ◎ K C Hauptmerkmale Principales caractéristiques D-type AF Nikkor lens having built-in CPU and Nikon bayonet mount すぐに修理依頼を 感電注意 ◎ J B Vous êtes maintenant l’heureux propriétaire d’un AF Nikkor 50mm f/1.8D, un objectif qui vous permettra de prendre des photos remarquables pendant des années. Avant d’utiliser cet objectif, veuillez lire ce mode d’emploi et les remarques sur la sécurité dans le mode d’emploi de votre boîtier. Conservez ce manuel à portée de la main pour toute référence ultérieure. Type of lens: 分解したり修理・改造をしないこと 見ないこと ◎ G3 H1 H3 H2 G4 H4 ◎ お守りいただく内容の種類を、次の絵表示で区分し、説明しています。 使用禁止 G1 G2 F5+DA-30 F3 表示について 水かけ禁止 ◎ ◎ EC-E F メニュー「b6:スクリーン補正」を「B or E以外」にセットして行います。B型およびE ご使用の前に「安全上のご注意」をよくお読みのうえ、正しくお使いください。この「安全上のご注意」は、 製品を安全に正しく使用していただき、あなたや他の人々への危害や財産への損害を未然に防止するために、 重要な内容を記載しています。お読みになった後は、お使いになる方がいつでも見られる所に必ず保管して ください。なお、カメラ本体の使用説明書に記載されている「安全上のご注意」もあわせてお読みください。 電池を取る ◎ ◎ ◎ ◎ EC-B 構図の決定やピント合わせの目的には ● 接触禁止 D F6 # 距離目盛 安全上のご注意 分解禁止 E F5+DP-30 " 被写界深度目盛 Depth-of-field scale Schärfentiefe-Skala Echelle des profondeurs de champ Escala de profundidad de campo Scala della profondità di campo C A R S T Wir danken Ihnen für das Vertrauen, das Sie Nikon mit dem Kauf des AF Nikkor 50 mm f/1.8D bewiesen haben, und wir hoffen, daß Sie viele Jahre ungetrübte Freude an Ihrem neuen Objektiv haben werden. Bitte lesen Sie diese Gebrauchsanweisung sorgfältig durch sowie die entsprechenden Abschnitte in der Bedienungsanleitung Ihrer Kamera. Bewahren Sie diese Anleitung für späteres Nachschlagen griffbereit auf. Empfohlene Einstellscheiben スクリーンは、下表のとおりです。(なお、ご使用に際しては、必ず、各カメラボディの使用 G3 H1 G1 G2 H3 H2 G4 H4 Français Informations sur la distance: Mise au point: A l’appareil Autofocus avec un boîtier autofocus Nikon (sauf F3AF); manuel par bague de mise au point séparée Echelle des distances: Graduée en mètres et pieds depuis 0,45m (1,75 pieds) à l’infini (∞) Distance de mise au point minimale: 0,45 m Echelle des ouvertures: f/1.8 — f/22 pour les échelles standard et de lecture directe de l’ouverture Diaphragme: Entièrement automatique Mesure de l’exposition: Via méthode pleine ouverture avec les appareil AI ou appareils avec système d’interface CPU; par fermeture pour les autres appareils Taille des accessoires: 52 mm (P = 0,75 mm) Dimensions: Env. 63,5 mm diam. x 39 mm rallonge de la bride de montage d’objectif de l’appareil Poids: Env. 155 g Español Italiano Usted es ahora el nuevo propietario del AF Nikkor 50 mm f/1.8D, un objetivo para que pueda disfrutar de muchos años de oportunidades para hacer fotografías excitantes. Antes de utilizar este objetivo, lea estas instrucciones y las notas sobre un uso seguro en el manual de instrucciones de su cámara. Guarde este manual en un lugar a mano para su referencia en el futuro. Ora potete dire con orgoglio di possedere l’AF Nikkor 50mm f/1.8D, un obiettivo che vi offrirà per anni eccitanti opportunità per scattare fotografie. Prima di usare l’obiettivo, leggere queste istruzioni e le note sulle operazioni di sicurezza contenute nel manuale di istruzioni della vostra fotocamera. Tenere inoltre il presente manuale a portata di mano per poterlo consultare in futuro. Principales funciones Caratteristiche principali • Es posible un funcionamiento con enfoque automático en las cámaras de enfoque automático de Nikon (excepto F3AF); aunque es posible el enfoque manual con todas las SLR de Nikon. • Compacto y liviano. Ideal para un objetivo normal de alta velocidad con una apertura máxima de f/1.8. • Para un control de exposición más preciso, la información de distancia del objeto se transmite del objetivo a la cámara, para una medición por matriz tridimensional y un flash de relleno balanceado con sensor múltiple tridimensional, con las cámaras Nikon y Speedlights apropiados. ■接写表 ■Photographic Range With Close-Up Attachments ■Fotografische Bereiche mit dem Nahaufnahme-Zubehör ■Rapports obtenus en proxiphotographie et photomacrographie ■Rangos fotográficos con accesorios de aceramiento ■Fotografia con dispositivi per riprese Close-Up • Il funzionamento con messa a fuoco automatica è possibile con le fotocamere autofocus Nikon (tranne la F3AF); la messa a fuoco manuale è possibile con tutte le reflex Nikon. • Unità compatta e leggera. Ideale per un obiettivo normale ad alta velocità e apertura massima di f/1.8. • Per un controllo più accurato dell’esposizione, le informazioni sulla distanza del soggetto vengono trasmesse dall’obiettivo al corpo della fotocamera, garantendo il 3D Matrix Metering e il 3D MultiSensor Balanced Fill-Flash con le fotocamere e gli Speedlight Nikon appropriati. • Tener cuidado de no manchar o dañar los contactos de la CPU. • No montar en el objetivo los siguientes accesorios, ya que podrían dañar los contactos de la CPU: Anillo de Autoextensión PK-1, PK-11 (utilice PK-11A), Anillo Auto BR-4 (utilice BR-6 con BR-2A) o Anillo K1. Puede que otros accesorios no sean apropiados cuando se usa este objetivo con determinados cuerpos de cámara. Para más detalles, ver el manual de instrucciones de cada producto. • Este objetivo no se puede usar con una cámara Nikon F3AF que lleve montado el Visor AF DX-1. • Fate attenzione a non sporcare o danneggiare i contatti CPU. • Gli accessori elencati non vanno montati su questo obiettivo, in quanto potrebbero danneggiarne i contatti CPU: Anello di Prolunga Automatico PK-1, PK-11 (usare PK-11A), Anello Auto BR-4 (usare BR-6 con BR-2A), Anello K1. Altri accessori, nell’impiego con determinati corpi camera, possono risultare inadatti. Per maggiori dettagli, consultate i relativi manuali di istruzioni. • Quest’ottica non è utilizzabile abbinata alla fotocamera Nikon F3AF con il mirino autofocus DX-1 montato. Profundidad de campo Profondità di campo Si su cámara tiene una función de previsualización de profundidad de campo (cierre de iris), puede observarse la profundidad de campo mientras mira por el visor de la cámara. Pantallas de enfoque recomendadas Schermi di messa a fuoco consigliati Hay diferentes pantallas de enfoque intercambiables para algunas cámaras SLR de Nikon apropiados para cualquier situación fotográfica. Las recomendadas para utilizar con este objetivo son las que aparecen en la lista a continuación. Per alcune fotocamere SLR Nikon sono disponibili vari schermi di messa a fuoco intercambiabili adatti a ogni situazione di ripresa. Gli schermi consigliati per l’uso con questo obiettivo sono elencati sotto. A B C E D ◎ ◎ EC-B EC-E F G3 H1 G1 G2 H3 H2 G4 H4 ◎ J K ◎ L M R S T P Schermo U Fotocamera A B C D E EC-B EC-E ◎ F6 ◎ ◎ ◎ ◎ ◎ ◎ ◎ ◎ F G3 H1 G1 G2 H3 H2 G4 H4 ◎ ◎ ◎ ◎ ◎ ◎ ◎ ◎ ◎ ◎ ◎ ◎ ◎ ◎ ◎ ◎ ◎ ◎ ◎ F5+DA-30 ◎ ◎ ◎ F4+DP-20 ◎ ◎ ◎ F4+DP-20 ◎ ◎ F4+DA-20 ◎ ◎ ◎ ◎ ◎ ◎ (+0.5) (+1.0) F4+DA-20 ◎ (+0.5) (+0.5) (+0.5) (+1.0) ◎ ◎ ◎ ◎ ◎ ◎ ◎ ◎ (+0.5) ◎ ◎ ◎ ◎ (+0.5) (+0.5) ◎ ◎ ◎ (+0.5) ◎ ◎ F3 ◎ ◎ ◎ : Enfoque excelente ○ : Enfoque aceptable Ligero viñeteo afecta la imagen de la pantalla, pero la imagen de la película no es afectada por esto. △ : Enfoque aceptable La imagen enfocada en el circulo central puede resultar ligeramente desenfocada en la fotografía. Se aconseja enfocar mediante el área mate circundante. ( ) : Indica la cantidad de compensación adicional necesaria (Solamente medición ponderada central). Para cámaras F6, compense seleccionando “Otra pantalla” en el ajuste personal del usuario “b6: Compens pantalla” y ajustando el nivel EV a -2,0 a +2,0 en pasos de 0,5 EV. Cuando se utilice una pantalla que no sea de tipo B o E, debe seleccionarse “Otra pantalla” incluso cuando el valor de compensación requerido sea “0” (no se requiere compensación). Para la cámara F5 compense usando el ajuste personal del usuario No. 18 en el cuerpo de la cámara. Para las cámaras de la serie F4, compense usando el dial de compensación de exposición para las pantallas de enfoque. Para más detalles, consulte el manual de instrucciones de la cámara. Los blancos significan inaplicable. Como la pantalla de tipo M se usa para macrofotografía a una razón de aumento de 1:1 asi como para microfotografía, su aplicación es distinta a la de las demás pantallas. • Cuando se utilicen las pantallas de enfoque B/B2/B3, E/E2/E3 y K/K2/K3 en cámaras distintas de las relacionadas arriba, vea las columnas de las pantallas B, E y K, de F4 + DP-20 respectivamente. Bloqueo de la apertura mínima (Fig. A) Para disparar con exposición automática programada o automática con prioridad al obturador, utilizar la palanca de bloqueo de la apertura mínima para fijar la apertura del objetivo en f/22. 1 Ajustar el objetivo a su apertura mínima (f/22) alineándolo con el índice de apertura. 2 Deslice la palanca de fijación hacia el anillo de aperturas para que se alineen dos puntos naranjas. Para desbloquearlo, deslizar la palanca en la dirección opuesta. Cuando se hacen fotografías con flash en cámaras con flash incorporado ◎ (+1.0) ◎ L ◎ F5+DA-30 (+1.0) K ◎ F5+DP-30 ◎ J ◎ F5+DP-30 F3 ◎ (+0.5) ◎ ◎ ◎ ◎ ◎ ◎ P R S T ◎ ◎ ◎ ◎ ◎ : Messa a fuoco eccellente ○ : Messa a fuoco accettabile L’immagine sullo schermo presenta una riduzione di luminosità o tracce di fenomeno del moiré. Questo però non lascia tracce sulla pellicola. △ : Messa a fuoco accettabile L’immagine messa a fuoco al centro potrebbe risultare leggermente fuori fuoco sulla pellicola. Mettere a fuoco la zona circostante il soggetto. ( ) : Indica il valore della compensazione di esposizione aggiuntiva richiesto (Solamente misurazione a preferenza centrale). Con le fotocamere F6, compensare selezionando “Otra pantalla” nell’impostazione personalizzata “b6: Compens pantalla”, quindi impostando il livello EV tra -2.0 e +2.0 ad intervalli di 0,5 EV. Quando si utilizzano schermate diverse da B o E, è necessario selezionare “Otra pantalla” anche quando il valore di compensazione richiesto è pari a “0” (nessuna compensazione necessaria). Per la fotocamera F5, compensare utilizzando l’impostazione personalizzata 18 sul corpo della fotocamera. Per gli apparecchi della serie F4, compensare utilizzando il quadrante di compensazione dell’esposizione previsto per i filtri di messa a fuoco. Per ulteriori dettagli, fare riferimento al manuale d’istruzioni della fotocamera. Il quadrato vuoto non è applicabile. Come lo schermo del tipo M può essere utilizzato per macrofotografia con rapporto di ingrandimento 1:1 e fotomicrografia, esso presenta differenti applicazioni che agli altri schermi. • Impiegando gli schermi B/B2/B3, E/E2/E3 ed K/K2/K3 con fotocamere diverse da quelle elencate sopra, fare riferimento alle colonne riguardanti gli schermi B, E e K di F4 + DP-20, rispettivamente. Quando si scattano fotografie con il flash utilizzando fotocamere con flash incorporato Forma de cuidar el objetivo Tutte le fotocamere Nikon con flash incorporato sono utilizzabili e non si riscontrerà alcuna riduzione di luminosità ai margini dell'immagine (vignettatura). • Para eliminar la suciedad y las manchas, utilice un paño de algodón suave y limpio o un papel para cristales empapado con limpiador de cristales. Limpie con un movimiento circular del centro al borde exterior. • No usar en ningún caso disolvente o benceno para limpiar el objetivo ya que podría dañarlo, provocar un incendio o causar problemas sanitarios. • Se recomienda utilizar en todo momento un filtro NC para proteger el elemento frontal del objetivo. También un parasol contribuirá a proteger la parte frontal del objetivo. • Cuando se guarde el objetivo en su estuche, colocarle las dos tapas. • Cuando no se vaya a utilizar el objetivo durante largo tiempo, guardarlo en un lugar fresco y seco para evitar la formación de moho. Guardar el objetivo, además, lejos de la luz solar directa o de productos químicos tales como alcanfor o naftalina. • No mojar el objetivo ni dejarlo caer al agua, ya que se oxidaría y no funcionaría bien. • Algunas partes del objetivo son de plástico reforzado. Para evitar daños, no dejarlo nunca en un lugar excesivamente caliente. Accesorios estándar •Tapa frontal a presíon de 52mm PNリング PN-series rings Zwischenringe PN Bagues PN Anillo de la serie PN Anello serie PN •Filtros roscados de 52 mm •Bolsa de objetivo flexible CL-S1 •Valija dura CL-30S •Teleconvertidores TC-201, TC-14A •Parasol de hule HR-2 •Tapa trasera del objetivo LF-1 Accessori opzionali Especificaciones Caratteristiche tecniche Tipo de objetivo: AF Nikkor tipo D con CPU incorporada y montura de bayoneta Nikon Tipo: Obiettivo AF Nikkor tipo D con CPU incorporata e attacco a baionetta Nikon. Distancia focal: 50 mm Lunghezza focale: 50 mm Abertura máxima: f/1,8 Apertura massima: f/1,8 Estructura del objetivo: 6 lentes en 5 grupos Costruzione obiettivo: 6 elementi in 5 gruppi Angulo de imagen: 46˚ [31°30’ con cámaras digitales Nikon (Formato Nikon DX); 38° con cámaras de sistema IX240] Angolo di campo: 46˚ [31°30’ con fotocamera digitale Nikon, (Formato Nikon DX); 38° con fotocamere sistema IX240] Información de distancia: Salida al cuerpo de la cámara Dati distanze: Uscita verso il corpo fotocamera Enfoque: Enfoque automático con cámaras de enfoque automático de Nikon (excepto F3AF); manual por anillo de enfoque independiente Messa a fuoco: Messa a fuoco automatica con fotocamere autofocus Nikon (tranne F3AF); manuale mediante anello di messa a fuoco separato Graduada en metros y en pies desde 0,45m (1,75 pies) hasta infinito (∞) 0,45 m (1,5 pies) ** *** * ** *** * ■被写界深度表 ■Depth of field ■Schärfentiefentabelle ■ Profundidad de campo ■Profondità di campo ■ 撮影距離 Focused distance Eingestellte Entfernung Distance de mise au point Distancia de enfoque Distanza messa a fuoco Scala della distanza di ripresa: Graduata in metri e piedi da 0,45m all’infinito (∞). 0.45 Distanza focale minima: 0,45m 0.5 Scala delle aperture: f/1.8 — f/22 sia sulla scala standard che sulla scala di lettura diretta della aperture 0.6 Escala de aberturas: f/1.8 — f/22 en escalas normales y de lectura directa de aberturas Diaframma: Diafragma: Totalmente automático Misurazione dell’esposizione: Medición de la exposición: Método de abertura total con cámaras AI o cámaras con sistema de interfase CPU; método de reducción de parada para otras cámara. * •Filtri a vite da 52mm •Portaobiettivo morbido CL-S1 •Portaobiettivo duro CL-30S •Teleconvertidori TC-201, TC-14A •Il cappuccio de gomma HR-2 •Tappo posteriore LF-1 Completamente automatico Con metodo ad apertura massima per le fotocamere AI o per quelle con sistema di interfaccia CPU; con metodo Stop-Down per le altre fotocamere. 0.7 0.8 1.0 1.2 Tamaño de accesorios: 52 mm (P = 0,75mm) Dimensiones: Aprox. 63,5 mm de diám. x 39 mm desde la pestaña de montaje Misura dell’accessorio: 52 mm (P = 0,75mm) 2 Aprox. 155 g (5,5 onzas) Dimensioni: Circa. 63,5 mm diam. x 39 mm estensione della flangia 3 Peso: Circa 155 g 5 1.5 ∞ 被写界深度 Depth of field Schärfentiefe Profondeur de champ f/1.8 0.448– 0.452 0.497– 0.503 0.595– 0.605 0.693– 0.708 0.790– 0.811 0.983– 1.02 1.17– 1.23 1.46– 1.54 1.92– 2.08 2.82– 3.20 4.52– 5.60 44– ∞ ■Profondeur de champ ■ Profundidad de campo Profondità di campo f/2 f/2.8 f/4 f/5.6 f/8 f/11 f/16 f/22 0.447– 0.453 0.496– 0.504 0.594– 0.606 0.692– 0.708 0.789– 0.812 0.981– 1.02 1.17– 1.23 1.45– 1.55 1.92– 2.09 2.81– 3.22 4.47– 5.68 40– ∞ 0.446– 0.454 0.495– 0.505 0.592– 0.608 0.688– 0.712 0.784– 0.817 0.974– 1.03 1.16– 1.24 1.44– 1.57 1.88– 2.13 2.74– 3.32 4.29– 6.01 29– ∞ 0.445– 0.455 0.493– 0.507 0.589– 0.612 0.684– 0.717 0.778– 0.824 0.963– 1.04 1.14– 1.26 1.41– 1.60 1.84– 2.20 2.64– 3.48 4.04– 6.58 20– ∞ 0.443– 0.458 0.490– 0.510 0.584– 0.617 0.677– 0.724 0.769– 0.834 0.949– 1.06 1.12– 1.29 1.38– 1.65 1.78– 2.29 2.52– 3.73 3.75– 7.53 14– ∞ 0.440– 0.461 0.486– 0.515 0.578– 0.624 0.668– 0.736 0.757– 0.849 0.929– 1.08 1.09– 1.33 1.33– 1.72 1.70– 2.44 2.35– 4.16 3.40– 9.65 10– ∞ 0.436– 0.465 0.481– 0.521 0.570– 0.634 0.657– 0.750 0.742– 0.870 0.905– 1.12 1.06– 1.39 1.28– 1.82 1.61– 2.65 2.18– 4.89 3.04– 14.92 7– ∞ 0.430– 0.473 0.473– 0.531 0.558– 0.650 0.640– 0.776 0.718– 0.906 0.868– 1.19 1.01– 1.50 1.20– 2.02 1.48– 3.13 1.94– 6.89 2.58– 186.84 5– ∞ 0.423– 0.482 0.464– 0.543 0.544– 0.672 0.620– 0.809 0.693– 0.955 0.828– 1.28 0.95– 1.65 1.12– 2.34 1.36– 4.00 1.72– 13.79 2.20– ∞ 4– ∞ ** *** (m) 撮影倍率 Reproduction ratio Abbildungsmaßstab Rapport de reproduction Relación de reproducción Rapporto di riproduzione * ■Depth of field 1/6.64 Focused distance 1/7.63 1.5 1/9.60 1.7 1/11.55 2.0 1/13.50 2.5 1/17.4 3 1/21.3 4 1/27.1 5 1/36.8 7 1/56.2 10 1/95.0 1/∞ (ft) Depth of field f/2.8 f/4 f/5.6 f/8 f/1.8 f/2 20 1´5-7/8˝– 1´6-1/16˝ 1´8-1/4˝– 1´8-1/2˝ 1´11-3/4˝– 2´3/16˝ 2´5-5/8˝– 2´6-5/16˝ 2´11-7/16˝– 3´7/16˝ 3´10-15/16˝– 4´1-1/16˝ 4´10-1/4˝– 5´1-3/4˝ 6´8-1/2˝– 7´3-3/4˝ 9´4-13/16˝– 10´8˝ 17´8˝– 23´0˝ 1´5-7/8˝– 1´6-1/16˝ 1´8-3/16˝– 1´8-1/2˝ 1´11-3/4˝– 2´3/16˝ 2´5-9/16˝– 2´6-3/8˝ 2´11-3/8˝– 3´5/8˝ 3´10-13/16˝– 4´1-3/16˝ 4´10-1/16˝– 5´2˝ 6´8-3/16˝– 7´4-3/16˝ 9´4-1/16˝– 10´9˝ 17´5˝– 23´5˝ 1´5-13/16˝– 1´6-1/8˝ 1´8-1/8˝– 1´8-9/16˝ 1´11-5/8˝– 2´5/16˝ 2´5-7/16˝– 2´6-9/16˝ 2´11-1/8˝– 3´7/8˝ 3´10-3/8˝– 4´1-11/16˝ 4´9-3/8˝– 5´2-13/16˝ 6´6-3/4˝– 7´6˝ 9´1-1/4˝– 11´1˝ 16´7˝– 25´2˝ 1´5-3/4˝– 1´6-3/16˝ 1´8-1/16˝– 1´8-11/16˝ 1´11-1/2˝– 2´7/16˝ 2´5-3/16˝– 2´6-13/16˝ 2´10-3/4˝– 3´1-1/4˝ 3´9-11/16˝– 4´2-1/2˝ 4´8-5/16˝– 5´4-1/8˝ 6´4-11/16˝– 7´8-7/8˝ 8´9-3/16˝– 11´7˝ 15´5˝– 28´4˝ 1´5-11/16˝– 1´6-5/16˝ 1´7-15/16˝– 1´8-13/16˝ 1´11-5/6˝– 2´5/8˝ 2´4-7/8˝– 2´7-1/8˝ 2´10-5/16˝– 3´1-13/16˝ 3´8-7/8˝– 4´3-9/16˝ 4´7˝– 5´6˝ 6´2-1/8˝– 8´1˝ 8´4-5/16˝– 12´5˝ 14´2˝– 34´1˝ 1´5-9/16˝– 1´6-7/16˝ 1´7-3/4˝– 1´9˝ 1´11-1/16˝– 2´15/16˝ 2´4-7/16˝– 2´7-11/16˝ 2´9-11/16˝– 3´2-11/16˝ 3´7-11/16˝– 4´5-5/16˝ 4´5-1/8˝– 5´9˝ 5´6-3/4˝– 8´7-15/16˝ 7´9-13/16˝– 13´11˝ 12´7˝– 49´1˝ ∞ 145´– ∞ 131´– ∞ 93´– ∞ 65´– ∞ 47´– ∞ 33´– ∞ f/11 ** *** * Reproduction ratio f/16 f/22 1´5-3/8˝– 1´6-5/8˝ 1´7-1/4˝– 1´9-11/16˝ 1´10-3/4˝– 2´1-3/8˝ 2´3-15/16˝– 2´8-3/8˝ 2´8-7/8˝– 3´3-13/16˝ 3´6-1/4˝– 4´7-11/16˝ 4´3˝– 6´1-3/16˝ 5´6-3/4˝– 9´6-5/16˝ 7´2-3/4˝– 16´5˝ 11´1˝– 109´10˝ 1´5-1/8˝– 1´6-7/8˝ 1´7-1/4˝– 1´9-11/16˝ 1´10-1/4˝– 2´2-1/16˝ 2´3-1/16˝– 2´9-11/16˝ 2´7-11/16˝– 3´5-7/8˝ 3´4-1/8˝– 5´-1/8˝ 3´11-13/16˝– 6´9-1/2˝ 5´1-1/8˝– 11´5-1/4˝ 6´5-1/4˝– 23´6˝ 1´4-7/8˝– 1´7-5/16˝ 1´6-13/16˝– 1´10-1/4˝ 1´9-11/16˝– 2´2-15/16˝ 2´2-3/16˝– 2´11-5/16˝ 2´6-5/16˝– 3´8-5/8˝ 3´1-7/8˝– 5´6-5/8˝ 3´8-1/2˝– 7´10-9/16˝ 4´7-9/16˝– 15´1-5/8˝ 5´8-3/8˝– 49´0˝ 1/6.8 ** *** 1/8.0 * 9´3˝– ∞ 7´9˝– ∞ 1/116.2 24´– ∞ 16´– ∞ 12´– ∞ 1/∞ 1/9.8 1/12.8 1/15.7 1/21.7 ** *** * 1/27.6 1/39.4 1/57.1 ** *** * ** *** Aufnahmefeld Eingestellte Entfernung Distance de mise au point Distancia de enfoque Distanza messa a fuoco Champ couvert Campo abarcado Campo del soggetto ― 59.0 – 15.0 25.8×38.7 – (inch) 5.0×7.5 (inch) ― ― 31.3×46.9 – 77.1 – 33.4 10.5×15.8 (cm) (cm) ― ― ― ― ― ― 17.1 – 10.8 6.2×9.3 – (inch) 3.1×4.6 (inch) ― ― 15.5×23.2 – 44.0 – 20.3 2.2×3.2 (cm) (cm) ― ― ― ― ― 43.4 – 27.5 15.7×23.6 – (cm) 7.9×11.8 (cm) ― 1/6.6 – 1/3.3 ― 1.5×2.3 – 21.3 – 33.3 0.56×0.84 (cm) (cm) 2.9×4.3 – 20.4 – 29.9 0.67×1.0 (cm) (cm) 1/1.2 – 3.6 1.6 – 4.3 1.1×1.7 – 8.0 – 11.8 0.26×0.4 (inch) (inch) 0.61×0.91 – 8.4 – 13.1 0.22×0.33 (inch) (inch) 2.6×3.9 – 20.3 – 32.0 0.6×0.89 (cm) (cm) 1.8×2.7 – 20.7 – 31.4 0.61×0.92 (cm) (cm) 1.4 – 3.9 1.0×1.5 – 8.0 – 12.6 0.23×0.35 (inch) (inch) 0.70×1.1 – 8.2 – 12.4 0.24×0.36 (inch) (inch) 20.4 – 25.7 2.9×4.3 – (cm) 0.89×1.3 (cm) 1.5×2.3 – 21.3 – 33.3 0.56×0.84 (cm) (cm) 1/1.2 – 2.7 1.6 – 4.3 1.1×1.7 – 8.0 – 10.1 0.35×0.53 (inch) (inch) 8.4 – 13.1 0.61×0.91 – (inch) 0.22×0.33 (inch) 20.3 – 26.6 2.6×3.9 – (cm) 0.83×1.25 (cm) 20.7 – 26.6 1.8×2.7 – (cm) 0.83×1.3 (cm) 1/1.1 – 2.9 1.4 – 2.9 1.0×1.5 – 8.0 – 10.5 0.33×0.49 (inch) (inch) 0.70×1.1 – 8.2 – 10.5 0.33×0.49 (inch) (inch) 20.3 – 26.9 2.6×3.9 – (cm) 0.81×1.2 (cm) 20.7 – 26.9 1.8×2.7 – (cm) 0.81×1.2 (cm) 1/1.1 – 3.0 1.4 – 2.9 1.0×1.5 – 8.0 – 10.6 0.32×0.48 (inch) (inch) 0.70×1.1 – 8.2 – 10.6 0.32×0.48 (inch) (inch) 20.3 – 54.4 2.6×3.9 – (cm) 0.28×0.42 (cm) 1.8×2.7 – 20.7 – 53.7 0.29×0.43 (cm) (cm) 1/1.1 – 8.5 1.4 – 8.4 8.2 – 21.2 0.70×1.1 – 0.11×0.17 (inch) (inch) 8.0 – 21.4 1.0×1.5 – 0.11×0.17 (inch) (inch) *** 複写装置PF-2/PF-3/PF-4 Reprocopy outfit PF-2/PF-3/PF-4 Reprogerät PF-2/PF-3/PF-4 Statif de reproduction PF-3/PF-3/PF-4 Unidad de repro-copia PF-2/PF-3/PF-4 Corredo per riproduzione/copia PF-2/PF-3/PF-4 Accessori in dotazione •Tappo anteriore da 52mm dia. Distancia de enfoque más cercana: エクステンションベローズPB-6E Extension bellows PB-6E Zusatzbalgen PB-6E Soufflet additionnel PB-6E Fuelle de extensión PB-6E Estensione soffietto PB-6E • Per rimuovere sporco e macchie, utilizzare un panno di cotone morbido o un panno per lenti imbevuto con un detergente per lenti. Passare il panno con un movimento circolare dal centro verso il bordo esterno. • Per la pulizia non utilizzate mai solventi o benzina, che potrebbero danneggiare l’obiettivo, causare incendi o problemi di intossicazione. • Per la protezione della lente frontale è buona norma tenere sempre montato un filtro NC. Anche il paraluce contribuisce validamente a proteggere la parte anteriore dell’obiettivo. • Prima di porre l’obiettivo nell’astuccio o in borsa, montate entrambi i coperchi protettivi. • Se rimane a lungo inutilizzato, riponetelo in un ambiente fresco e ventilato per prevenire la formazione di muffe. Tenetelo inoltre lontano dal sole o da agenti chimici come canfora o naftalina. • Non bagnatelo e fate attenzione che non cada in acqua. La formazione di ruggine potrebbe danneggiarlo in modo irreparabile. • Alcune parti della montatura sono realizzate in materiale plastico rinforzato. Per evitare danni non lasciate mai l’obiettivo in un luogo eccessivamente caldo. Accesorios opcionales Escala de distancias de las tomas: マクロコピースタンドPB-6M Macro copy stand PB-6M Makrokopiereinrichtung PB-6M Statif macro PB-6M Estativo de reproducción macro PB-6M Supporto per copie micro PB-6M 撮影距離 Focused distance ― 1/1.1 – 4.0 スライドコピー装置PS-6 Slide copying adapter PS-6 Diakopiergerät PS-6 Reprodia PS-6 Adaptador para la reproducción de diapositivas PS-6 Adattatore duplicazione diapositive PS-6 被写界面積 Subject field ― 12.3×18.5 – 30.4 – 13.1 4.1×6.2 (inch) (inch) ** Cura e manutenzione dell’obiettivo Campo del soggetto 6.1×9.1 – 17.3 – 8.0 0.85×1.3 (inch) (inch) スライドコピー装置PS-4/PS-5 Slide copying adapter PS-4/PS-5 Diakopiergerät PS-4/PS-5 Reprodia PS-4/PS-5 Adaptador para la reproducción de diapositivas PS-4/PS-5 Adattatore duplicazione diapositive PS-4/PS-5 Per la ripresa nei modi di esposizione automatica Programmata o a Priorità dei tempi, fate uso della leva di blocco al diaframma minimo, per mantenere prefissato il valore f/22. 1 Regolate il diaframma al valore minimo, f/22, allineandolo all’indice delle aperture. 2 Spingete la leva di blocco verso l’anello di apertura cosicché i due puntini arancioni risultino allineati. Per liberare la leva, spingetela nella direzione opposta. Campo abarcado 1/6.5 – 1.1 ベローズアタッチメントPB-6 Bellows PB-6 Balgengerät PB-6 Soufflet PB-6 Fuelles PB-6 Soffietto PB-6 Blocco al diaframma minimo (Fig. A) Champ couvert 1/13 – 1/4.4 * ベローズアタッチメントPB-4/PB-5 Bellows PB-4/PB-5 Balgengerät PB-4/PB-5 Soufflet PB-4/PB-5 Fuelles PB-4/PB-5 Soffietto PB-4/PB-5 ◎ (+0.5) Aufnahmefeld 撮影距離 撮影倍率 Focused distance Reproduction ratio Eingestellte AbbildungsEntfernung maßstab Distance de Rapport de mise au point reproduction Distancia de Relación de enfoque reproducción Distanza messa Rapporto di a fuoco riproduzione 1/27 – 1/5.3 U PKリング PK-series rings Zwischenringe PK Bagues PK Anillo de la serie PK Anello serie PK 被写界面積 Subject field Objetivo en la posición invertida レンズ逆向き Obiettivo alla posizione inversa Lens in reverse position Objektive in Reprostellung Objectif en position retournée 150 – 38.1 65.6×98.4 – (cm) 12.8×19.1 (cm) ◎ (+0.5) (+0.5) ◎ M クローズアップレンズNo.0 Close-up lens No. 0 Nahlinse Nr. 0 Lentille additionnelle n˚ 0 Lente de aproximación N˚. 0 Obiettivo close up N. 0 クローズアップレンズNo.2 Close-up lens No. 2 Nahlinse Nr. 2 Lentille additionnelle n˚ 2 Lente de aproximación N˚. 2 Obiettivo close up N. 2 Todas las cámaras Nikon con flash incorporado pueden utilizarse sin que se produzca un viñetado. Peso: 撮影倍率 Reproduction ratio Abbildungsmaßstab Rapport de reproduction Relación de reproducción Rapporto di riproduzione クローズアップレンズNo.1 Close-up lens No. 1 Nahlinse Nr. 1 Lentille additionnelle n˚ 1 Lente de aproximación N˚. 1 Obiettivo close up N. 1 Se la vostra fotocamera è dotata di un pulsante o di una leva per l’anteprima della profondità di campo (Stop-Down), è possibile osservare la profondità di campo guardando nel mirino della fotocamera. F6 Objetivo en la posición normal レンズ正方向 Obiettivo alla posizione normale Lens in normal position Objektive in Normalstellung Objectif en position normale Importante! ¡Importante! Pantalla Cámara 使用器具 Close-up attachment Nahaufnahmezubehör Accessoires macro Accesorio de acercamiento Dispositivi Close-Up 34.9×52.3 – 85.3 – 44.9 15.9×23.8 (cm) (cm) ― ― 13.7×20.6 – 33.6 – 17.7 6.3×9.4 (inch) (inch) ― ― 2.4×3.5 – 20.3 – 20.4 2.1×3.1 (cm) (cm) ― ― ― ― ― 1/15 – 1/6.6 ― 1.0 – 1.2 0.93×1.4 – 8.0 – 8.0 0.81×1.2 (inch) (inch) PKリングのはじめの数値はPK-11Aリング1個使用のとき、あとの数値はPK-11A〜PK-13リング、PK-11〜PK-13リングまたは PK-1〜PK-3リングを連結したときのものです。ただし、PK-11リングおよびPK-1リングは、このレンズに直接取り付けることはで きませんので、ご注意ください。 スライド複写装置PS-4、PS-5のレンズ逆向き時の倍率範囲は、BR-3リングを併用したときのものです。 複写装置PF-2、PF-3、PF-4は、レンズ単体で用いたとき、複写台の載物面上の撮影可能範囲を示します。 The first values are for the PK-11A ring used alone and the other ones for the PK-11A—PK-13, PK-11—PK-13, or PK-1—PK-3 rings used together. However, the PK-11 and PK-1 rings can not be attached directly to the lens. The Macro Adapter Ring BR-3 is used to connect the reverse lens to the copying adapter. The figures shown here represent the ranges obtained with the subject on the baseplate, using the lens without any close-up attachment. Die ersten Werte gelten für den Zwischenring PK-11A, wenn dieser allein benutzt wird. Die anderen Werte gelten für die Kombinationen PK-11A—PK-13, PK-11—PK-13 oder PK-1—PK-3. Die Zwischenringe PK-11 und PK-1 lassen sich nicht direkt am Objektiv anbringen! Der Umkehrring BR-3 ist zum Anschluß des Objektives in Reprostellung an den Kopieransatz. Die Angaben beziehen sich auf die Abstände, die entstehen, wenn das Objekt auf der Grundplatte liegt und das Objektiv nicht mit Nahaufnahmezubehör versehen ist. Les premières valeurs sont pour la bague PK-11A utilisée seulement et les autres pour les bagues PK-11A—PK13, PK-11—PK13 ou PK-1—PK-3 utilsees ensemble. Toutefois, les bagues PK-11 et PK-1 ne peuvent être directement fixées à l’objectif. La bague d’adaptateur macro BR-3 sert à relier l’objectif monté à retourné l’adaptateur de reproduction. Les chiffres indiqués représentent les rapports obtenus avec le sujet sur le plateau. l’objectif étant utilisé san asccessoire macro. Los primeros valores son para el caso en que se utilice el anillo PK-11A solo y los otros valores para el caso en que se utilicen los anillos PK-11A—PK-13, PK-11—PK-13, o PK-1—PK-3 juntos. Sin embargo, no es posible montar los anillos PK-11 y PK1 en el objetivo en forma directa. El anillo macro adaptador BR-3 sirve para acoplar el objetivo invertivo al adaptador de reproducción. Las cifras indicadas representan los intervalos obtenidos con los sujetos en la pletina de base, sin emplear ningún accesorio de aproximación en el objetivo. I primi valori sono per l’anello PK-11A usato da solo mentre i seguenti sono per gli anelli PK-11A—PK-13, PK-11—PK-13, o PK-1—PK-3 usati assieme. Si tenga comunque presente che gli anelli PK-11 e PK-1 non possono essere agganciati direttamente all’obiettivo. L’anello adattatore macro BR-3 viene usatao per collegare l’obiettivo montato in modo inverso all’adattatore di duplicazione. I dati indicati in alto rappresentano i valori ottenuti con il soggetto posto sulla base usando l’obiettivo senza l’ausilo di dispositivi close-up.-
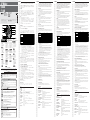 1
1
-
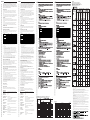 2
2


Nikon AF 50mm f/1.8D Nikkor El manual del propietario
- Categoría
- Lentes de camara
- Tipo
- El manual del propietario
En otros idiomas
Documentos relacionados
-
Nikon 2137 Manual de usuario
-
-
-
-
-
-
-
Nikon 18-35mm Manual de usuario
-
-