GE CSA1201RSS El manual del propietario
- Categoría
- Microondas
- Tipo
- El manual del propietario

Write the model and serial
numbers here:
Model # _________________
Serial # _________________
Find these numbers on a label
inside the oven.
GE is a trademark of the General Electric Company. Manufactured under trademark license.
ESPAÑOL
Para consultar una version en
español de este manual de
instrucciones, visite nuestro sitio de
internet GEAppliances.com.
OWNER’S MANUAL
ADVANTIUM
®
OVEN
49-40624-3 12-16 GEA
CSA1201
http://geadvantium.com
GE Profile™ and Cafe™
SAFETY INFORMATION .........3
ADVANTIUM
Getting to Know Advantium? ............9
Features .............................10
Controls ............................. 11
SPEEDCOOKING
Power Level ..........................12
Cooking Tips .........................13
Cookware
............................13
Pre-set Speedcook Menu
..............14
My Recipe ...........................16
Things That Are Normal ...............17
CONVECTION BAKING .........18
BROILING AND TOASTING .....19
WARMING AND PROOFING ... 20
MICROWAVING
Cookware ............................21
Pre-Set Selections ....................21
Cook By Time ........................22
Power Levels .........................22
My Recipes ..........................22
Cooking Tips .........................22
Defrost ..............................23
Sensor Cooking ..................... 24
Things That Are Normal ...............25
OTHER FEATURES ............. 26
CARE AND CLEANING ......... 29
TROUBLESHOOTING ............32
WARRANTY ..................... 34
OPTIONAL KITS .................35
CONSUMER SUPPORT ......... 36

2 49-40624-3
THANK YOU FOR MAKING GE APPLIANCES A PART OF YOUR HOME.
Whether you grew up with GE Appliances, or this is your first, we’re happy to have you in the family.
We take pride in the craftsmanship, innovation and design that goes into every GE Appliances
product, and we think you will too. Among other things, registration of your appliance ensures that we
can deliver important product information and warranty details when you need them.
Register your GE appliance now online. Helpful websites and phone numbers are available in the
Consumer Support section of this Owner’s Manual. You may also mail in the pre-printed registration
card included in the packing material.

49-40624-3 3
READ AND SAVE THESE INSTRUCTIONS
IMPORTANT SAFETY INFORMATION
READ ALL INSTRUCTIONS BEFORE USING THE APPLIANCE
SAFETY INFORMATION
WARNING
To reduce the risk of burns, electric shock, fire, injury to persons, or exposure to
excessive microwave energy:
When using electrical appliances, basic safety precautions should be followed, including the following:
Ŷ 5HDGDOOLQVWUXFWLRQVEHIRUHXVLQJWKLVDSSOLDQFH
Ŷ 5HDGDQGIROORZWKHVSHFLILFSUHFDXWLRQVLQWKH
PRECAUTIONS TO AVOID POSSIBLE EXPOSURE
TO EXCESSIVE MICROWAVE ENERGY section on
page 7.
Ŷ 8VHWKLVDSSOLDQFHRQO\IRULWVLQWHQGHGXVHDV
described in this manual. Do not use corrosive
chemicals or vapors in this appliance. This oven is
specifically designed to heat, dry or cook food, and is
not intended for laboratory or industrial use.
Ŷ 7KLVDSSOLDQFHPXVWRQO\EHVHUYLFHGE\TXDOLILHG
service personnel. Contact nearest authorized
service facility for examination, repair or adjustment.
INSTALLATION
Ŷ ,QVWDOORUORFDWHWKLVDSSOLDQFHRQO\LQDFFRUGDQFH
with the provided installation instructions.
Ŷ This appliance must be grounded. Connect only
to properly grounded outlet. See “GROUNDING
INSTRUCTIONS” found on page 7.
Ŷ 7KLVPLFURZDYHRYHQLV8/OLVWHGIRULQVWDOODWLRQRYHU
both gas (less than 60,000BTU) and electric ranges.
Ŷ 7KLVRYHUWKHUDQJHRYHQLVGHVLJQHGIRUXVHRYHU
UDQJHVQRZLGHUWKDQƎ,WPD\EHLQVWDOOHGRYHU
ERWKJDVDQGHOHFWULFFRRNLQJHTXLSPHQW
Ŷ Do not operate this appliance if it has a damaged
power cord or plug, if it is not working properly, or if it
has been damaged or dropped.
Ŷ .HHSFRUGDZD\IURPKHDWHGVXUIDFHV
Ŷ Do not let cord hang over the edge of the table or
counter
Ŷ 'RQRWLPPHUVHFRUGRUSOXJLQZDWHU
Ŷ 'RQRWFRYHURUEORFNDQ\RSHQLQJVRQWKH
appliance.
Ŷ 'RQRWVWRUHWKLVDSSOLDQFHRXWGRRUV'RQRWXVHWKLV
product near water—for example, in a wet basement,
near a swimming pool, near a sink or in similar
locations.
Ŷ 'RQRWPRXQWWKLVDSSOLDQFHRYHUDVLQN
TO REDUCE THE RISK OF FIRE IN THE CAVITY:
Ŷ Do not overcook food. Carefully attend appliance
when paper, plastic or other combustible materials
are placed inside the oven to facilitate cooking.
Ŷ 5HPRYHZLUHWZLVWWLHVDQGPHWDOKDQGOHVIURP
paper or plastic containers before placing them in
the oven.
Ŷ ,IPDWHULDOVLQVLGHWKHRYHQLJQLWHNHHSWKHRYHQ
door closed, turn the oven off and disconnect the
power cord or shut off power at the fuse or circuit
breaker panel.
Ŷ 'RQRWVWRUHDQ\PDWHULDOVLQWKLVRYHQZKHQQRWLQ
use. Do not leave paper products, cooking utensils
or food in the cavity when not in use. All racks
should be removed from oven when not in use.
Ŷ 'RQRWRSHUDWHWKHPLFURZDYHIHDWXUHZLWKRXWIRRGLQ
the oven.
Ŷ 'RQRWXVHWKH6HQVRU)HDWXUHVWZLFHLQVXFFHVVLRQ
on the same food portion. If food is undercooked
DIWHUWKHILUVWFRXQWGRZQXVH&22.%<7,0(IRU
additional cooking time.
Ŷ 7KHZLUHRYHQUDFNVKRXOGQRWEHXVHGIRU
speedcook or microwave cooking to prevent arcing.
TO REDUCE THE RISK OF BURNS:
Ŷ %HFDUHIXOZKHQRSHQLQJFRQWDLQHUVRIKRWIRRG8VH
pot holders and direct steam away from face and
hands.
Ŷ 9HQWSLHUFHRUVOLWFRQWDLQHUVSRXFKHVRUSODVWLF
bags to prevent build-up of pressure.
Ŷ %HFDUHIXOZKHQWRXFKLQJWKHWXUQWDEOHGRRUUDFNV
or walls of the oven which may become hot during
use.
Ŷ /LTXLGVDQGFHUWDLQIRRGVKHDWHGLQWKHPLFURZDYH
oven can present a risk of burn when removing
them from the microwave. The potential for a burn is
greater in young children, who should not be allowed
to remove hot items from the microwave.

4 49-40624-3
SAFETY INFORMATION
READ AND SAVE THESE INSTRUCTIONS
IMPORTANT SAFETY INFORMATION
READ ALL INSTRUCTIONS BEFORE USING THE APPLIANCE
WARNING
Arcing can occur during both speedcooking and microwave cooking. If you see arcing,
press the CANCEL/OFF pad and correct the problem.
Arcing is the microwave term for sparks in the oven.
Arcing is caused by:
Ŷ 0HWDORUIRLOWRXFKLQJWKHVLGHRIWKHRYHQ
Ŷ )RLOQRWPROGHGWRIRRGXSWXUQHGHGJHVDFWOLNH
antennas).
Ŷ 8VHIRLORQO\DVUHFRPPHQGHGLQWKLVPDQXDO
Ŷ 0HWDOFRRNZDUHXVHGGXULQJHLWKHUVSHHGFRRNRU
microwave cooking (except for the pans provided
with the oven).
Ŷ 0HWDOVXFKDVWZLVWWLHVSRXOWU\SLQVRU
gold-rimmed dishes, in the oven.
Ŷ 5HF\FOHGSDSHUWRZHOVFRQWDLQLQJVPDOOPHWDO
pieces being used in the oven.
WARNING
Continued
OPERATING
Ŷ $VZLWKDQ\DSSOLDQFHFORVHVXSHUYLVLRQLV
necessary when used by children.
Ŷ 'RQRWRSHUDWHWKHRYHQZLWKRXWWKHWXUQWDEOHLQ
place. The turntable must be unrestricted so it can
turn.
Ŷ 'RQRWVWRUHDQ\WKLQJGLUHFWO\RQWRSRIWKH
microwave oven surface when the microwave oven
is in operation.
Ŷ 2YHUVL]HGIRRGVRURYHUVL]HGPHWDOXWHQVLOVVKRXOG
not be inserted in a microwave/convection oven as
they may create a fire or risk of electric shock.
Ŷ Do not use paper products in oven when appliance
is operating in any cooking mode except microwave.
Ŷ 6RPHSURGXFWVVXFKDVZKROHHJJVDQGVHDOHG
containers—for example, closed jars—are able to
explode and should not be heated in this oven.
Ŷ 'RQRWRYHUFRRNSRWDWRHV7KH\FRXOGGHK\GUDWHDQG
catch fire, causing damage to your oven.
Ŷ 'RQRWFRYHUUDFNVRUDQ\RWKHUSDUWRIWKHRYHQZLWK
meal foil. This will cause overheating of the oven.
Ŷ &RRNPHDWDQGSRXOWU\WKRURXJKO\²
PHDWWRDWOHDVWDQ,17(51$/WHPSHUDWXUHRI)
and poultry to at least an INTERNAL temperature
RI)&RRNLQJWRWKHVHWHPSHUDWXUHVXVXDOO\
protects against foodborne illness.
Ŷ 7KLVRYHQLVQRWDSSURYHGRUWHVWHGIRUPDULQHXVH
CLEANING
Ŷ .HHSWKHRYHQIUHHIURPJUHDVHEXLOGXS
Ŷ 'RQRWFOHDQZLWKPHWDOVFRXULQJSDGV3LHFHVFDQ
burn off the pad and touch electrical parts involving a
risk of electric shock.
Ŷ :KHQFOHDQLQJVXUIDFHVRIGRRUDQGRYHQWKDW
comes together on closing the door, use only mild,
nonabrasive soaps, or detergents applied with a
clean sponge or soft cloth. Rinse well.
SUPER HEATED WATER
Ŷ /LTXLGVVXFKDVZDWHUFRIIHHRUWHDDUHDEOHWR
be overheated beyond the boiling point without
appearing to be boiling. Visible bubbling or boiling
when the container is removed from the microwave
oven is not always present. THIS COULD RESULT
IN VERY HOT LIQUIDS SUDDENLY BOILING
OVER WHEN THE CONTAINER IS DISTURBED
OR A SPOON OR OTHER UTENSIL IS INSERTED
INTO THE LIQUID.
Ŷ 7RUHGXFHWKHULVNRILQMXU\WRSHUVRQV
'RQRWRYHUKHDWWKHOLTXLG
6WLUWKHOLTXLGERWKEHIRUHDQGKDOIZD\WKURXJK
heating it.
- Do not use straight-sided containers with narrow
necks.
- After heating, allow the container to stand in the
microwave oven for a short time before removing
the container.
- Use extreme care when inserting a spoon or other
utensil into the container.

49-40624-3 5
READ AND SAVE THESE INSTRUCTIONS
IMPORTANT SAFETY INFORMATION
READ ALL INSTRUCTIONS BEFORE USING THE APPLIANCE
SAFETY INFORMATION
WARNING
SPEEDCOOK OVEN-SAFE COOKWARE
Ŷ The oven and door will get very hot when
speedcooking.
Ŷ Cookware will become hot because of heat
transferred from the heated food. Oven mitts will be
needed to handle the cookware.
Ŷ 'RQRWXVHFRYHULQJVFRQWDLQHUVRUFRRNLQJ
roasting bags made of foil, plastic, wax or paper
when speedcooking.
Ŷ 'RQRWFRYHUWKHWXUQWDEOHZLUHRYHQUDFNWUD\VRU
any part of the oven with metal foil. This will cause
arcing in the oven.
Ŷ 8VHWKHQRQVWLFNPHWDOWUD\LQWKHVDPHZD\\RX
would use a shallow baking pan or baking tray.
Ŷ 3ODFHIRRGGLUHFWO\RQWKHWUD\VZKHQFRRNLQJ
unless prompted by the oven to do otherwise.
Ŷ 'RQRWXVHWKHZLUHRYHQUDFNIRUVSHHGFRRNLQJ
Ŷ $Q\RYHQVDIHGLVKFDQEHXVHGLQ\RXURYHQ
Recipes in the Advantium Cookbook were tested in
Pyrex
®
glass cookware and Corningware
®
ceramic
casseroles. Cook times and results may vary when
using other types of oven-safe dishes. Place them
directly on the trays.
Ŷ 8VHRIWKHFOHDUJODVVWUD\ZKHQVSHHGFRRNLQJZLOO
result in inferior cooking performance.
WARNING
OVEN-SAFE COOKWARE FOR BAKING, BROILING, WARMING,
PROOFING & TOASTING
Ŷ The oven and door will get very hot when
baking, broiling, warming, proofing or toasting.
Ŷ Cookware will become hot. Oven mitts will be
needed to handle the cookware.
Ŷ 'RQRWFRYHUGLVKHVRUXVHSODVWLFFRQWDLQHUV
plastic cooking/roasting bags, plastic wrap, wax
paper or paper when broiling or toasting.
Ŷ 8VHWKHQRQVWLFNPHWDOWUD\LQWKHVDPHZD\\RX
would use a shallow baking pan or baking tray.
Ŷ 8VHWKHDOXPLQXPEDNLQJVKHHWRQWKHZLUHRYHQ
rack, and place them on the non-stick metal tray
when baking on two levels, broiling or toasting
foods.
Ŷ 3ODFHIRRGGLUHFWO\RQWKHWUD\VZKHQFRRNLQJ
unless prompted by the oven to do otherwise.
Ŷ $Q\RYHQVDIHGLVKFDQEHXVHGLQ\RXURYHQ
Recipes in the Advantium Cookbook were tested in
Pyrex
®
glass cookware and Corningware
®
ceramic
casseroles. Cook times and results may vary when
using other types of oven-safe dishes. Place them
directly on the trays.
Ŷ 8VHRIWKHFOHDUJODVVWUD\ZKHQEDNLQJEURLOLQJ
warming, proofing or toasting will result in inferior
cooking performance.
The turntable must always
be in place when using the
oven.
The turntable must always
be in place when using the
oven.
Put food directly on the non-
stick metal tray to speedcook.
Put food directly on the non-
stick metal tray to bake on
one level.
Put food directly on the wire rack or in the
appropriate dish and place on rack when baking or
warming multipe levels.

6 49-40624-3
READ AND SAVE THESE INSTRUCTIONS
IMPORTANT SAFETY INFORMATION
READ ALL INSTRUCTIONS BEFORE USING THE APPLIANCE
SAFETY INFORMATION
WARNING
MICROWAVE-SAFE COOKWARE
Make sure to use suitable cookware during microwave
cooking. Most glass casseroles, cooking dishes,
measuring cups, custard cups, pottery or china
dinnerware which does not have metallic trim or glaze
with a metallic sheen can be used. Some cookware is
labeled “suitable for microwaving.”
Ŷ 3ODFHIRRGRUPLFURZDYDEOHFRQWDLQHUGLUHFWO\RQ
the clear glass tray to cook your food.
Ŷ 8VHRIWKHQRQVWLFNPHWDOWUD\GXULQJPLFURZDYH
cooking will result in inferior cooking performance.
Ŷ &RRNZDUHPD\EHFRPHKRWEHFDXVHRIKHDW
transferred from the heated food. Oven mitts may
be needed to handle the cookware.
Ŷ 'RQRWXVHUHF\FOHGSDSHUSURGXFWV5HF\FOHG
paper towels, napkins and waxed paper may
contain metal flecks which could cause arcing or
ignite. Paper products containing nylon or nylon
filaments should be avoided, as they may also
ignite.
Ŷ 8VHIRLORQO\DVGLUHFWHGLQWKLVPDQXDO:KHQXVLQJ
IRLOLQWKHRYHQNHHSWKHIRLODWOHDVWƎDZD\IURP
the sides of the oven.
Ŷ ,I\RXXVHDPHDWWKHUPRPHWHUZKLOHFRRNLQJPDNH
sure it is safe for use in microwave ovens.
Ŷ 6RPHIRDPWUD\VOLNHWKRVHWKDWPHDWLVSDFNDJHG
on) have a thin strip of metal embedded in the
bottom. When microwaved, the metal can burn the
floor of the oven or ignite a paper towel.
Ŷ 3DSHUWRZHOVZD[HGSDSHUDQGSODVWLFZUDSFDQEH
used to cover dishes in order to retain moisture and
prevent spattering. Be sure to vent plastic wrap so
steam can escape.
Ŷ 1RWDOOSODVWLFZUDSLVVXLWDEOHIRUXVHLQPLFURZDYH
ovens. Check the package for proper use.
Ŷ ³%RLODEOH´FRRNLQJSRXFKHVDQGWLJKWO\FORVHGSODVWLF
bags should be slit, pierced or vented as directed by
package. If they are not, plastic could burst during
or immediately after cooking, possibly resulting in
injury. Also, plastic storage containers should be at
least partially uncovered because they form a tight
seal. When cooking with containers tightly covered
with plastic wrap, remove covering carefully and
direct steam away from hands and face.
Ŷ 3ODVWLFFRRNZDUH²3ODVWLFFRRNZDUHGHVLJQHGIRU
microwave cooking is very useful, but should be
used carefully. Even microwave-safe plastic may
not be as tolerant of overcooking conditions as are
glass or ceramic materials and may soften or char if
subjected to short periods of overcooking. In longer
exposures to overcooking, the food and cookware
could ignite.
Ŷ 'RQRWXVHWKHZLUHRYHQUDFNIRUPLFURZDYLQJ
)ROORZWKHVHJXLGHOLQHV
1. Use microwave-safe plastics only and use them in
strict compliance with the cookware manufacturer’s
recommendations.
2. Do not microwave empty containers.
3. Do not permit children to use plastic cookware
without complete supervision.
The turntable must
always be in place when
using the oven.
The clear glass tray
should always be in place
when microwaving.

49-40624-3 7
SAFETY INFORMATION
READ AND SAVE THESE INSTRUCTIONS
IMPORTANT SAFETY INFORMATION
READ ALL INSTRUCTIONS BEFORE USING THE APPLIANCE
PRECAUTIONS TO AVOID POSSIBLE EXPOSURE
TO EXCESSIVE MICROWAVE ENERGY
(a) Do Not Attempt to operate this oven with the
door open since open-door operation can result
in harmful exposure to microwave energy. It is
important not to defeat or tamper with the safety
interlocks.
(b) Do Not Place any object between the oven front
face and the door or allow soil or cleaner residue to
accumulate on sealing surfaces.
(c) Do Not Operate the oven if it is damaged.
It is particularly important that the oven door close
properly and that there is no damage to the:
(1) door (bent),
(2) hinges and latches (broken or loosened),
(3) door seals and sealing surfaces.
(d) The Oven Should Not be adjusted or repaired by
DQ\RQHH[FHSWSURSHUO\TXDOLILHGVHUYLFHSHUVRQQHO
GROUNDING INSTRUCTIONS
WARNING
Improper use of the grounding plug can result in a risk of electric shock.
This appliance must be
grounded. In the event of
an electrical short circuit,
grounding reduces the risk of
electric shock by providing an
escape wire for the electric
current.
7KLVDSSOLDQFHLVHTXLSSHGZLWKDSRZHUFRUGKDYLQJD
grounding wire with a grounding plug. The plug must
be plugged into an outlet that is properly installed and
grounded.
&RQVXOWDTXDOLILHGHOHFWULFLDQRUVHUYLFHWHFKQLFLDQLI
the GROUNDING INSTRUCTIONS are not completely
understood, or if doubt exists as to whether the
appliance is properly grounded.
If the outlet is a standard 2-prong wall outlet, it is
your personal responsibility and obligation to have it
replaced with a properly grounded 3-prong wall outlet.
Do not under any circumstances cut or remove the
third (ground) prong from the power cord.
Do not use an extension cord. If the power cord is too
VKRUWKDYHDTXDOLILHGHOHFWULFLDQRUVHUYLFHWHFKQLFLDQ
install an outlet near the appliance.
)RUEHVWRSHUDWLRQSOXJWKLVDSSOLDQFHLQWRLWVRZQ
electrical outlet to prevent flickering of lights, blowing
of fuse or tripping of circuit breaker.
Ensure proper
ground exists
before use.

8 49-40624-3
IMPORTANT SAFETY INFORMATION
READ ALL INSTRUCTIONS BEFORE USING THE APPLIANCE
SAFETY INFORMATION
READ AND SAVE THESE INSTRUCTIONS
NOTICE: PACEMAKERS
Most pacemakers are shielded from interference from electronic products, including microwaves. However,
patients with pacemakers may wish to consult their physicians if they have concerns.
THE VENT FAN
The fan will operate automatically under certain
FRQGLWLRQVVHH9HQW)DQVHFWLRQ7DNHFDUHWR
prevent the starting and spreading of accidental
cooking fires while the vent fan is in use.
Ŷ Clean the underside of the Advantium often. Do not
allow grease to build up on the Advantium or the fan
filters.
Ŷ In the event of a grease fire on the surface units
below the Advantium, smother a flaming pan on the
surface unit by covering the pan completely with a
lid, a cookie sheet or a flat tray.
Ŷ Use care when cleaning the vent fan filters.
Corrosive cleaning agents, such as lye-based oven
cleaners, may damage the filters.
Ŷ When preparing flaming foods under the Advantium,
turn the fan on.
Ŷ Never leave surface units beneath your Advantium
unattended at high heat settings. Boilovers cause
smoking and greasy spillovers that may ignite and
spread if the Advantium vent fan is operating. To
PLQLPL]HDXWRPDWLFIDQRSHUDWLRQXVHDGHTXDWH
sized cookware and use high heat on surface units
only when necessary.
STATE OF CALIFORNIA PROPOSITION 65 WARNINGS
WARNING
This product contains one or more chemicals known to the State of California to cause cancer,
and birth defects or other reproductive harm.

49-40624-3 9
Getting to Know Advantium
What is Advantium?
The new Advantium oven uses breakthrough Speedcook
technology to harness the power of light. The Advantium
oven cooks the outside of foods much like conventional
radiant heat, while also penetrating the surface so the
inside cooks simultaneously.
While halogen light is the primary source of power, a
ceramic heater assists in the cooking, with a “microwave
ERRVW´DGGHGLQVRPHFRRNLQJDOJRULWKPV)RRGFRRNV
evenly and fast, retaining its natural moisture.
The Advantium oven is capable of speedcooking,
convection baking, broiling, toasting, warming, proofing
and microwaving. The Speedcook feature is the biggest
benefit of the Advantium oven.
1RSUHKHDWLQJLVUHTXLUHGWRVSHHGFRRN3ODFHWKHIRRG
in the oven and start cooking immediately. Time is saved
because there is no preheat and because speedcook
cooks faster.
ADVANTIUM: *HWWLQJWR.QRZ$GYDQWLXP

10 49-40624-3
Features
ADVANTIUM: )HDWXUHV
1. Turntable
The turntable must always be in place, on the oven
floor, for all cooking. Be sure the turntable is seated
securely over the spindle in the center of the oven.
2. Metal Tray
Put food directly on the metal tray and place on the
turntable when using the speedcook, broil, and toast.
3. Wire Oven Rack
Put food directly on a metal tray or in an oven-safe dish
on the wire oven rack only when convection baking or
warming.
4. Clear Glass Tray
Place on the turntable when using the microwave
features. Place food or microwave-safe cookware
directly on the tray.
5. Upper Halogen Lamp/Ceramic Heater
A 500W halogen lamp and 700W ceramic heater cook
food from above in speedcook, broil and toast.
6. Window
Allows food to be viewed during cooking.
7. Door Handle
Pull to open the door.
8. Door Latches
The door must be securely latched for the oven to
operate.
9. Lower Ceramic Heater
One 375W ceramic heater cooks food from the bottom
in speedcook, broil and toast.
10. Control Panel
The pads used to operate the oven are located on the
control panel.
11. Convection System
One 1550W heating element cooks food with a
convection fan circulating the hot air throughout the
cavity in convection bake and warm.
Throughout this manual, features and appearance may vary from your model.
1
5
6
7
8
9
11
10
2
3 4

49-40624-3 11
Controls
ADVANTIUM: Controls
With your Advantium oven, you can cook with high-intensity halogen lights, ceramic heaters and
convection heating element, and/or conventional microwave energy.
SELECTOR DIAL
Turn to select. Press to enter.
Turn to select food, power level, or temperature selections.
Also use the dial to increase (turn clockwise) or decrease (turn
counterclockwise) time. Simply press the button to enter the
selection.
BACK
Press this pad to step back one or more levels in the
programming process.
HELP
Press this pad to find out more about your oven’s features.
DISPLAY
Shows feature selections and information about the oven when
in use.
START/PAUSE
Press this pad to start or pause any cooking function.
CLEAR/OFF
Press this pad to cancel ALL oven programs except clock, auto
night light, timer, vent fan, and surface light.
SPEEDCOOK
Press this pad to access the pre-set speedcook menu or to set
your own speedcook program.
CONV BAKE
Press this pad to use convection bake.
MICROWAVE
Press this pad to access the microwave menu or to set your
own microwave program.
SETTINGS
Press this pad to set the clock and access Turntable On/Off,
Auto Conversion, Auto Nightlight, Beeper Volume, Reminder,
and Temperature Units.
COOKING OPTIONS
Press this pad to access Repeat Last, Broil, Proof, Toast, Warm
and Delay Start.
MICRO 30 SECS
Starts the microwave for 30 seconds of cooking time. An
additional 30 seconds is added to the remaining cooking time
each time the pad is pressed.
TIMER ON/OFF
Press this pad to set a minute and seconds timer.
SURFACE LIGHT
Press this pad to turn the cooktop light on and off.
VENT
Press this pad to turn the vent fan on and off.

12 49-40624-3
Speedcooking
SPEEDCOOKING
Prior to the first use of your oven, the clock must be set. See the Clock section.
Before you begin, make sure the turntable is in place. Use the metal tray and your own glass or ceramic cookware,
if needed.
Speedcook Power Level
The Advantium uses power from high intensity halogen
lamps, a ceramic heater, and microwaves to cook food
from the top, bottom and interior simultaneously to seal
in moisture and flavor.
When using the pre-set menu foods, the power levels
are already selected for you. However, power levels can
be adjusted when using pre-set menu foods and MY
RECIPE.
Each power level gives you halogen lamp or ceramic
heater power and microwave energy for a certain
percentage of the time.
)RUH[DPSOH
U–07 Upper halogen lamp and ceramic heater on 70%
of the time.
L–07 Lower ceramic heater on 70% of the time.
M–03 Microwave on 30% of the time.
NOTE: Be careful when adjusting power levels so that
you do not overcook or undercook food.
3UHVVWKH63(('&22.SDGDQGVHOHFW\RXUIRRG
(follow instructions from Using the pre-set speedcook
menu).
2. When display shows EDIT, SAVE or START, turn the
dial to select EDIT.
If you do not want to change one of the settings, just
press the dial to move to the next selection.
3. Press the dial if you do not want to adjust cooking
time.
4. Turn the dial clockwise to increase or
counterclockwise to decrease the upper power level.
Press the dial to enter.
5. Turn the dial to change the lower power level. Press
the dial to enter.
6. Turn the dial to change the microwave power level.
Press the dial to enter.
Note that the upper and lower level settings limit the
PLFURZDYHSRZHUOHYHO)RUH[DPSOHLIWKHXSSHURU
lower power level is set to a 7, the microwave can be set
no higher than a 3.
7. Press the START/PAUSE pad or the selector dial to
start cooking.
The turntable must always be in
place when using the oven.
Put food directly on the metal
tray to speedcook.
Ŷ,IWKHGRRULVRSHQHGGXULQJFRRNLQJWKHRYHQZLOOVWRS
and PAUSE will appear in the display. Close the door
and press the Start/Pause pad to resume cooking.
Ŷ$WDQ\WLPHGXULQJFRRNLQJ\RXFDQFKDQJHWLPHRU
power levels by selecting EDIT.
Ŷ6SHHGFRRNLQJPHDWVLQWKHRYHQPD\SURGXFHVPRNH
Ŷ7RFRRNIRUDGGLWLRQDOWLPHDIWHUDFRRNLQJF\FOHKDV
been completed, use the Resume feature as instructed
on the display.
WARNING
When using speedcook programs, remember that the oven, door and dishes will
be very hot!

49-40624-3 13
Speedcooking
SPEEDCOOKING
Cooking Tips
Arrange food on the metal trays as shown to ensure
consistent and even browning.
Foods can touch but should not overlap.
)UHVKPHDWFKLFNHQILVKRUVHDIRRGWKDWKDVEHHQIUR]HQ
should be thawed before cooking. (The microwave de-
IURVWIHDWXUHFDQEHXVHG)RURWKHUIUR]HQSUHSDFNDJHG
foods, follow package directions.
Speedcook Cookware
Ŷ &RRNZDUHZLOOEHFRPHKRW2YHQPLWWVZLOOEHQHHGHG
to handle the cookware.
Ŷ )ROORZFRRNZDUHVXJJHVWLRQVRQWKHRYHQGLVSOD\RU
in the Cookbook.
Ŷ 3ODFHIRRGGLUHFWO\RQWKHPHWDOWUD\ZKHQFRRNLQJ
unless prompted by the oven to do otherwise.
Ŷ 8VHWKHPHWDOWUD\LQWKHVDPHZD\\RXZRXOGXVHD
shallow baking pan or baking tray.
Ŷ ,QDGGLWLRQWRWKHFRRNZDUHSURYLGHG\RXFDQXVH
non-metal casserole dishes, pie plates and other
heat-safe cookware. Place them directly on the metal
tray.
Ŷ %HVXUHWRVHOHFWDVL]HWKDWZLOOURWDWHHDVLO\
Ŷ 3ODFHWKHPHWDOWUD\RQWKH
turntable. Place glass or
ceramic cookware on the
tray.
Ŷ 'RQRWXVHFRRNZDUHRU
coverings made of paper, plastic, or foil when cooking
during a speedcook cycle.
Circular pattern
(Example: biscuits, cookies)
Spoke pattern
(Example: crescent
rolls, breadsticks)
Single layer
(Example: appetizers)
Side by side pattern
(Example: meats and poultry)
Speedcook Power Level (cont)
Follow these general guidelines when selecting
the best U=, L=, and M= settings for your favorite
recipes:
8 6HOHFWDKLJKHUVHWWLQJIRUWKLQIRRGVUHTXLULQJ
a golden brown top (example: fish fillets, toast,
boneless chicken breasts). Select a lower setting
for thicker foods and foods with high sugar or fat
content (example: muffins, roasts, casseroles) or
WKDWUHTXLUHDORQJHUFRRNWLPH
L = Select a higher setting for thick or dense foods that
PD\QRWFRRNTXLFNO\LQWKHFHQWHUH[DPSOHVWHDNV
casseroles). Select a lower setting for thin foods
(example: cookies).
M = Select a higher setting to shorten cooking time for
dense or heavy foods (example: casseroles, whole
chicken). Select a lower setting for delicate foods
H[DPSOHEUHDGVRUIRRGVUHTXLULQJORQJHUFRRN
times for tender results (example: stew, pot roast).

14 49-40624-3
Speedcooking
SPEEDCOOKING
Pre-set Speedcook Menu
The Advantium is already pre-set to cook over 175
popular foods.
3UHVVWKH63(('&22.SDG
If no selection is made within 15 seconds, the display
will return to blank.
2. Turn the selector dial to select the type of food
category you want. Press the dial to enter.
3. Turn the selector dial to select the specific food
(menu selection). Press the dial to enter.
4. Turn the selector dial to select amount, size and/
RUGRQHQHVVLIUHTXLUHGWKHRYHQZLOOSURPSW\RX
Press the dial after each selection.
5. Once the display shows: EDIT, SAVE or START press
the START/PAUSE pad or the selector dial to start
cooking.
7XUQWKHIRRGRYHUZKHQWKHRYHQVLJQDOV7851)22'
OVER (for certain foods).
:KHQWKHRYHQVLJQDOV&+(&.IRU'21(1(66FKHFN
to see if your food is done to your liking (for certain
foods).
To review settings during cooking, press the selector dial.
If you enter an undesired selection at any time, simply
SUHVVWKH%$&.SDGDQGUHHQWHUWKHGHVLUHGVHOHFWLRQV
Speedcooking meats in the oven may produce smoke.

49-40624-3 15
Pre-Set Speedcook Menu Selections
Per USDA Guidelines, cook meat to an INTERNAL
WHPSHUDWXUHRIDWOHDVW)DQGSRXOWU\WRDQ
,17(51$/WHPSHUDWXUHRIDWOHDVW)
Cooking to these temperatures usually protects against
IRRGERUQHLOOQHVV)RUPRUHLQIRUPDWLRQVHH
www.foodsafety.gov.
Speedcooking
SPEEDCOOKING
Food Category Menu Selection
Appetizers Bagel Bites
Cheese Sticks
(JJ5ROOV)UR]HQ
Jalapeño Poppers
0HDW%DOOV)UR]HQ
Nachos
Nuts, Roasted
Onion Rings
Pizza Rolls
Soft Pretzels (frozen)
7DTXLWRVIUR]HQ
Breads Biscuits
Bread Sticks
Cheese Bread
Crescent Rolls
Dinner Rolls
Garlic Bread
Texas Toast
Breakfast Belgian Waffles
Breakfast Pizza
)UHQFK7RDVW
Hashbrown Patties
Pancakes (frozen)
Rolls (refrigerated)
Sausage Biscuit
Sausage Links
Sausage Patties
Strudel (frozen)
Turnovers
Waffles (frozen)
)ood Category Menu Selection
Chicken Bone-In
Boneless
)LOOHWIUR]HQ
)LQJHUIUR]HQ
)ULHGIUR]HQ
Nugget (frozen)
Patty (frozen)
Tender (frozen)
Wings (frozen)
Whole
Desserts Brownie Mix
Cookies
Pie (fresh fruit)
Pie Crust
Rolls (refrigerated)
Turnovers
Entree Egg Rolls (frozen)
Meatloaf (9x5)
7DTXLWRVIUR]HQ
0HDWV )LOHW0LJQRQ
Hamburger
Lamb Chops
Pork Chops
Ribeye Steak
Sirloin Steak
Strip Steak
T-Bone Steak
Tenderloin
3L]]D 'HOL)UHVK
)UR]HQ3L]]D
Use Precooked Crust
Potatoes Baked Potato
Hashbrown Patties
)UR]HQ)ULHV
)UR]HQ1XJJHW
Sweet Potato/Yam
Food Category Menu Selection
Sandwich Corn Dog (frozen)
Crescent Roll Hot Dog
Grilled Sandwich
Pocket Sandwich
6HDIRRG &RG)LOOHWV
)LVK6WLFNVIUR]HQ
)UR]HQ%UHDGHG
2UDQJH5RXJK\)LOOHW
Salmon
Shellfish
Swordfish Steak (1”)
Talapia
Tuna Steaks
Whitefish/Cod
Side Dish Casserole
Refried Beans (16 oz)
Roasted Asparagus
Roasted Bell Pepper
Roasted Chilies (3-6)
Roasted Corn (1-4)
Roasted Garlic
Roasted Mixed Vegetables
Scalloped Potatoes

16 49-40624-3
My Recipe - Custom speedcooking
The Advantium gives you the flexibility
to cook your favorite dishes.
If you want to cook a food item that is
not among the pre-set selections, use
My Recipe to custom speedcook.
3UHVVWKH63(('&22.SDGDQG
select MY RECIPE. Press the dial
to enter. Select NEW RECIPE.
If no entries are made within 15
seconds, the display will return to
blank.
2. Turn the selector dial to select the cooking time.
Press the dial to enter.
The display will prompt you to select the power
level(s).
3. Turn the dial to select the upper power level. Turn
the dial clockwise to increase or counterclockwise
to decrease the upper power level. Press the dial to
enter.
4. Turn the dial to select the lower power level. Press
the dial to enter.
5. Turn the dial to select the microwave power level.
Press the dial to enter.
6. Press the START/PAUSE pad or press the selector
dial to start cooking.
)RUSRZHUOHYHODQGFRRNLQJWLPHVXJJHVWLRQVXVH\RXU
cooking guide, cookbook and the pre-set speedcook
menu selections.
My Recipe - to enter and save
Add and save up to 30 of your own Speedcook or
microwave recipes, or pre-set Speedcook menu recipes
DVDIDYRULWHUHFLSH2QFHLW¶VGRQH\RXFDQTXLFNO\
recall your favorite so that your food cooks just the way
you want it every time!
3UHVVWKH63(('&22.RU0,&52:$9(SDG
2. Turn the dial to select MY RECIPE. Press the dial to
enter.
3. Turn the dial until NEW RECIPE appears. Press the
dial to enter.
(17(5&22.7,0(DSSHDUV7XUQWKHGLDOWRVHOHFW
the cooking time. Press the dial to enter.
The display will prompt you to select the power level(s).
5. Turn the dial clockwise to increase or
counterclockwise to decrease the power level(s).
Press the dial to enter.
)RUSRZHUOHYHODQGFRRNLQJWLPHVXJJHVWLRQVXVH\RXU
cooking guide or cookbook.
6. Select SAVE from the summary screen.
63(//7+()22'1$0(DSSHDUV7XUQWKHGLDOWR
the first letter of your food description and press the
dial to enter. Continue this process to spell the rest of
the food name. Press the START/PAUSE pad to save
the recipe and its name.
My Recipe - to find and use
To find and use stored recipes:
3UHVVWKH63(('&22.RU0,&52:$9(SDG
2. Turn the dial to select MY RECIPE.
3. The recipe names you entered will appear.
4. Turn dial until the recipe you want is displayed and
press the dial to enter.
5. Press the START/PAUSE pad or press the selector
dial to start cooking.
My Recipe - to adjust or change
To adjust or change stored recipes:
3UHVVWKH63(('&22.RU0,&52:$9(SDG
2. Turn the dial to select MY RECIPE.
3. Turn the dial to the recipe you want to change. Press
the dial to enter. Current settings appear.
4. Select EDIT.
5. Turn the dial to adjust the cooking time and press the
dial to enter.
6. Turn the dial to change the power level(s) and press
the dial to enter each power level.
7. Turn the dial to change the recipe name. Press the
dial to enter each letter change.
8. Press the START/PAUSE pad to save the revised
recipe.
)RUSRZHUOHYHODQGFRRNLQJWLPHVXJJHVWLRQVXVH\RXU
cooking guide or cookbook.
Speedcooking
SPEEDCOOKING

49-40624-3 17
My Recipe - to delete
To delete stored recipes:
3UHVVWKH63(('&22.RU0,&52:$9(SDG
2. Turn the dial to select MY RECIPE.
3. Select the recipe you would like to delete.
4. Turn the dial to select DELETE.
Things that are Normal
Cooking Times
Ŷ :KHQVSHHGFRRNLQJSUHVHWPHQXIRRGV\RXPD\
VHH237,0,=,1*&22.7,0(LQWKHGLVSOD\VHYHUDO
seconds after you press START/PAUSE. The oven
automatically senses the electrical voltage level in
your home and adjusts the cooking time up or down
for proper cooking.
Cooling Fans
Ŷ The fans will be on during cooking. At the end of
cooking, the fans may continue to run for a short
time to cool internal components. The fans will
automatically shut off when the internal parts of the
oven have cooled. The screen will display “Oven is
Cooling”.
Ŷ The oven vent will emit warm air while the oven is on.
Ŷ The exhaust fan may come on automatically if the
oven becomes hot. See Automatic fan section.
Lights
Ŷ When the oven is on, light may be visible around the
door or outer case.
Ŷ The halogen lights will dim and cycle on and off
during a speedcook cycle, sometimes even at full
power levels. This is normal. The oven senses the
heat level and adjusts automatically.
Oven Heat
Ŷ 1RSUHKHDWLQJWLPHLVUHTXLUHGGXULQJVSHHGFRRN
cycles. The oven begins cooking immediately.
Ŷ The door and inside of the oven will be very hot. Use
caution when opening the door and removing food.
Be cautious of steam or vapor that may escape from
around the door.
Ŷ Do not use cookware or coverings made of paper,
plastic, or foil when speedcooking.
Ŷ When cooking for an extended period of time, the
oven may automatically reduce the power levels to
maintain the appropriate level of oven heat.
Sounds
Ŷ Clicks and a fan blowing are normal sounds during
cooking. The electronic control is turning components
on and off.
Interference
Ŷ TV/radio interference might be noticed while using the
microwave, similar to the interference caused by other
small appliances. It does not indicate a problem with
the microwave. Move the radio or TV as far away from
the microwave as possible, or check the position of the
TV/radio antenna.
Speedcooking
SPEEDCOOKING

18 49-40624-3
CONVECTION BAKING
Convection Baking
Convection baking allows you to
cook foods the same way as a
conventional oven, using an element
to heat the air inside the oven. Any
RYHQWHPSHUDWXUHIURP)WR
)PD\EHVHW
A fan gently circulates heated air
throughout the oven, over and
around the food. Because the
heated air is kept constantly moving,
some foods cook slightly faster than
in regular oven cooking.
Before you begin, make sure the
metal rack is in place. Both racks
may be used for two level cooking.
WARNING
When baking, remember that the
oven, door and dishes will be very hot!
Per USDA Guidelines, cook meat to an INTERNAL
WHPSHUDWXUHRIDWOHDVW)DQGSRXOWU\WRDQ
,17(51$/WHPSHUDWXUHRIDWOHDVW)&RRNLQJWR
these temperatures usually protects against foodborne
LOOQHVV)RUPRUHLQIRUPDWLRQVHHZZZIRRGVDIHW\JRY
How to Convection Bake
3UHVV&219%$.(SDG
2. Turn the dial to set the temperature and press the dial
to enter.
3. Press the dial to enter and confirm the selection.
To start immediately without setting a cook time, select
START or press the START/PAUSE pad:
To set a cook time:
7XUQWKHGLDODQGVHOHFW&22.7,0(
2. Turn the dial to set the cook time and press the dial
to enter.
3. To start the cook time immediately, place the food in
WKHRYHQDQGVHOHFW67$57&22.7,0(7KHQSUHVV
the dial or the START/PAUSE pad to start. The cook
time will immediately start to count down.
To start cook time after preheat, select START
PREHEAT. The oven will signal once the oven reaches
the cooking temperature. Place the food in the oven and
press the START/PAUSE pad. The cook time will begin
to count down.
If the oven door is opened during cooking, “Pause” will
appear in the display. Close the door and press START/
PAUSE pad.
Cook times are shown in hours and minutes and can be
set to a maximum of 2 hours 59 minutes. Time can be
changed during cooking by turning the dial.
Cooking Tips
Ŷ0HWDOSDQVDUHUHFRPPHQGHGIRUDOOW\SHVRIEDNHG
products, but especially where browning is important.
Ŷ'DUNRUGXOOILQLVKPHWDOSDQVDUHEHVWIRUEUHDGVDQG
pies because they absorb heat and produce crisper
crust.
Ŷ6KLQ\DOXPLQXPSDQVDUHEHWWHUIRUFDNHVFRRNLHVRU
muffins because they reflect heat and help produce a
light tender crust.
Ŷ*ODVVRUJODVVFHUDPLFFDVVHUROHRUEDNLQJGLVKHV
are best suited for egg and cheese recipes due to the
cleanability of glass.
Ŷ:KHQEDNLQJRQRQHOHYHOXVHWKHORZHUOHYHO7KHWRS
clips are to only be used in two level baking.
Put food directly on the metal tray or in the
appropriate dish and place on wire oven rack
when baking or warming.

49-40624-3 19
BAKING, BROILING, AND TOASTING
Broiling and Toasting
Broil and toast use the upper lamps and lower heater to
broil or toast food similar to a conventional oven.
Before you begin, make sure the turntable is in place.
Use the metal tray when toasting and when broiling.
WARNING
When baking or toasting, remember
that the oven cavity, the oven door and dishes will
be very hot!
How to Broil
3UHVVWKH&22.,1*237,216SDG
2. Turn the dial to BROIL and press to enter.
3. Place the food in the oven and select START or
press the START/PAUSE pad to start.
If the oven door is opened during cooking, “Pause” will
appear in the display. Close the door and press the
START/PAUSE pad.
How to Toast
3UHVVWKH&22.,1*237,216SDG
2. Turn the dial to TOAST and press to enter.
3. Turn the dial to set the toast time, place the food in
the oven and select START or press the START/
PAUSE pad to start.
If the oven door is opened during cooking, “Pause” will
appear in the display. Close the door and press the
START/PAUSE pad.
Cooking Tips for Broiling
Ŷ Broiling times may be shorter in the Advantium oven
because of the use of halogen lamps. Make sure to
monitor food closely to get the desired results.
Ŷ)RUEHVWUHVXOWVZKHQEURLOLQJSODFHIRRGGLUHFWO\RQ
the metal tray.
Ŷ%URLOLQJPHDWVLQWKHRYHQPD\SURGXFHVPRNH
Ŷ,ISUHKHDWLQJWKHRYHQWREURLOPHDWSUHKHDWZLWKWKH
metal tray in the oven and place food on the hot metal
tray for best searing of meat.
Ŷ)RUEHVWSHUIRUPDQFHSUHKHDWWKHRYHQIRUPLQXWHV
when broiling meat. Chicken performs best with no
preheating.
Ŷ)RRGVVKRXOGEHWXUQHGKDOIZD\WKURXJKEURLOLQJWLPH
Ŷ Remove thinner pieces as needed to prevent
overcooking and drying.
Cooking Tips for Toasting
Ŷ)RUEHVWUHVXOWVZKHQWRDVWLQJXVHWKHPHWDOWUD\
Ŷ No turning is necessary for most foods.
Ŷ When toasting nuts, stir halfway through the cooking
time.
Ŷ Toast thicker pieces a longer time, thinner pieces a
shorter time.
The turntable must
always be in place when
using the oven.
Put food directly on the
metal tray.

20 49-40624-3
Warming and Proofing
WARMING AND PROOFING
Warming
The WARM feature will keep hot, cooked foods at
serving temperature. Always start with hot food. Use
cookware and utensils that can withstand temperatures
XSWR)
3UHVVWKH&22.,1*237,216SDG
2. Turn the dial to select WARM. Press the dial to enter.
3. Turn the dial to select the level of moisture you want.
See the chart and tips below. Press the dial to enter.
4. Select START or press the START/PAUSE pad
to start. The oven starts warming immediately and
shows the amount of warming time to complete.
If the oven door is opened during warming, “Pause”
will appear in the display. Close the door and press the
START/PAUSE pad.
To Crisp Stale Items:
Ŷ 6HOHFWWKH&5,63VHWWLQJ3UHKHDWWKHRYHQIRU
minutes.
NOTE: Only preheat when crisping stale items.
Ŷ 3ODFHIRRGRUGLVKHVGLUHFWO\RQWKHPHWDOWUD\
Ŷ &KHFNFULVSQHVVDIWHUPLQXWHV$GGWLPHDV
needed.
Tips for Crisp Food
Ŷ /HDYHIRRGXQFRYHUHG
Ŷ 'RQRWXVHSODVWLFFRQWDLQHUVRUSODVWLFZUDS
Ŷ 3UHKHDWLQJLVQRWQHFHVVDU\H[FHSWIRUFULVSLQJVWDOH
items. (See To Crisp Stale Items.)
Tips for Moist Food
Ŷ &RYHUIRRGZLWKOLGRUDOXPLQXPIRLO
Ŷ 'RQRWXVHSODVWLFFRQWDLQHUVRUSODVWLFZUDS
Ŷ 3UHKHDWLQJLVQRWQHFHVVDU\
Proofing
The proofing feature automatically provides an
appropriate temperature for the proofing process, and
therefore does not have a temperature adjustment.
3UHVVWKH&22.,1*237,216SDG
7XUQWKHGLDOWRVHOHFW3522)DQGSUHVVWRHQWHU
3. Select START or press the START/PAUSE pad
to start. The oven starts proofing immediately and
shows the amount of proofing time to complete.
Ŷ &KHFNEUHDGSURGXFWVHDUO\WRDYRLGRYHUSURRILQJ
Ŷ 7RDYRLGORZHULQJWKHRYHQWHPSHUDWXUHDQG
lengthening proofing time, do not open the oven door
unnecessarily.
NOTES:
Ŷ 'RQRWXVHWKHSURRILQJPRGHIRUZDUPLQJIRRGRU
keeping food hot. The proofing oven temperature is
not hot enough to hold foods at safe temperatures.
Use the WARM feature to keep food warm.
Ŷ 3URRILQJZLOOQRWRSHUDWHLIWKHRYHQLVWRRKRW$OORZ
the oven to cool before proofing.
The turntable must always be in
place when using the oven.
Put food or oven-safe cookware
directly on the metal tray to warm.
)RRG7\SH Moisture Setting
Casseroles MOIST
Chili/Soup MOIST
Pancakes, waffles MOIST
Pizza CRISP
Potatoes, baked CRISP
Chips/Crackers CRISP
Temperature and Moisture Selection Chart
Put bread dough in a
bowl/bread pan and place
on the metal tray to proof.
The turntable must always
be in place when using
the oven.

49-40624-3 21
Microwaving
MICROWAVING
Make sure the turntable is in place.
Use the clear glass tray.
Place food or microwavable container directly on the
clear glass tray to cook your food.
Cookware
Make sure that cookware is suitable for microwaving.
The turntable must always
be in place when using the oven.
The clear glass tray should always
be in place when microwaving.
Microwave Pre-Set Selections
1. Press the MICROWAVE pad.
If no selection is made within 15 seconds, the display will
return to blank.
7XUQWKHGLDOWRVHOHFW&22.'()5267%(9(5-
AGE, POPCORN, MELT, REHEAT, SIMMER and
62)7(1
3. Turn the dial to find the food you want to cook, de-
frost or reheat. Press the dial to enter.
4. Turn the selector dial to select the type, amount,
weight and/or size as prompted by the oven. Press
the dial after each selection.
5. Press the dial or the START/PAUSE pad to start
cooking.
To review settings during cooking, press the selector dial.
If the door is opened during cooking, the oven will stop
and PAUSE will appear in the display. Close the door and
press START/ PAUSE to resume cooking.
If you enter an undesired selection at any time, simply
SUHVVWKH%$&.SDGDQGUHHQWHUWKHGHVLUHGVHOHFWLRQV
Ŷ Cook
%\)RRG7\SH
-By Time
-By Time 1 & 2
ŶDefrost
-1.0 lb Quick
-By Time
%\)RRG7\SH
-By Weight
-Melt
-Soften
ŶBeverage
-Water (8 oz)
-Coffee (8 oz)
-Tea (8 oz)
-Milk (8 oz)
-Hot Cocoa (8 oz)
ŶPopcorn
(2.9 or 3.5 oz)
ŶMelt
-Butter
-Caramel
-Cheese
-Chocolate Chips
-Marshmallow
ŶSimmer
ŶSoften
-Butter
-Cream Cheese
)URVWLQJR]
-Ice Cream
ŶReheat
–Beverage
–Casserole
–Chicken
–Pasta
–Pizza
±3ODWHRI)RRG
–Rice
–Soup
–Steaks/Chops
–Vegetables

22 49-40624-3
Microwaving
MICROWAVING
Cook By Time
8VH&22.%<7,0(WRPLFURZDYHIRRGWKDWLVQRWLQWKH
pre-set microwave selections.
1. Press the MICROWAVE pad.
7XUQWKHGLDOWRVHOHFW&22.%<7,0(DQGSUHVVWKH
dial to enter.
3. Turn the dial to set the cook time and press the dial
to enter.
4. Turn the dial to set the power level and press the dial
to enter.
5. Press the dial or the START/ PAUSE pad to start
cooking.
<RXPD\RSHQWKHGRRUGXULQJ&22.%<7,0(WRFKHFN
the food. Close the door and press START/PAUSE to
resume cooking.
Cook By Time 1 & 2
8VH&22.%<7,0(WRPLFURZDYHIRRGWKDW
UHTXLUHVWZRGLIIHUHQWWLPHVDQGSRZHUOHYHOV
1. Press the MICROWAVE pad.
7XUQWKHGLDOWRVHOHFW&22.DQGSUHVVWKHGLDOWR
enter.
7XUQWKHGLDOWRVHOHFW&22.%<7,0(DQG
press the dial to enter.
4. Turn the dial to set the first time and press the dial
to enter. Repeat for the first power level, the second
time, and the second power level.
5. Press the dial or the START/PAUSE pad to start
cooking.
My Recipes
See the MY RECIPE sections in the Speedcook section
of this book for instructions on how to save, use, change
or delete a microwave custom recipe.
Micro 30 Secs
Press MICRO 30 SECS repeatedly for 30 second
increments of microwave cooking time. Oven starts
immediately.
The power level is automatically set at high, but you
can change it for more flexibility. See Microwave power
levels section for instructions.
Cooking Tips
Ŷ:KHQFRRNLQJEDFRQOD\HUVWULSVRQDSODWH&RYHU
each layer with a paper towel.
Ŷ:KHQFRRNLQJYHJHWDEOHVXVHDPLFURZDYHVDIH
casserole or bowl. Cover with a microwave-safe lid or
vented plastic wrap.
Ŷ )RUIUR]HQYHJHWDEOHVIROORZWKHSDFNDJHLQVWUXFWLRQV
for adding water.
Ŷ )RUIUHVKYHJHWDEOHVDGGWDEOHVSRRQVRIZDWHUIRU
each serving.
Microwave Power Level(s)
The microwave power level is automatically set on all
PLFURZDYHIHDWXUHVEXW\RXFDQFKDQJHLWIRU&22.
%<7,0(&22.%<7,0(0,&526(&6DQG
'()5267%<7,0(
)LUVWIROORZGLUHFWLRQVIRU&22.%<7,0(&22.%<
7,0(0,&52RU'()5267%<7,0(
2. Select START or press the START/PAUSE pad to
start.
3. Press EDIT to change the cooking time and then
the microwave power level. Press the dial to enter
cooking time and power level changes.
Here are some examples of uses for various power
levels:
High 10:)LVKEDFRQYHJHWDEOHVERLOLQJOLTXLGV
Med-High 7: Gentle cooking of meat and poultry; baking
casseroles and reheating.
Medium 5: Slow cooking and tenderizing for stews and
less tender cuts of meat.
Low 2 or 3: Defrosting; simmering; delicate sauces.
Warm 1: .HHSLQJIRRGZDUPVRIWHQLQJEXWWHU

49-40624-3 23
Microwaving
MICROWAVING
Defrost By Food Type
'()5267%<)22'7<3(DXWRPDWLFDOO\VHWVWKH
defrosting times and power levels to give even defrosting
results for meats, poultry and fish weighing up to 6
pounds.
1. Remove meat from the package and place it on a
microwave-safe dish. Bread should be left in the
package with any metal twist-ties removed.
2. Press the MICROWAVE pad.
7XUQWKHGLDOWR'()52673UHVVWKHGLDOWRHQWHU
7XUQWKHGLDOWR'()5267%<)22'7<3(3UHVV
the dial to enter.
5. Turn the dial to select food type. Press the dial to
enter.
6. Turn the dial to the food weight, using the Conversion
*XLGHDWULJKW)RUH[DPSOHGLDOIRUSRXQGV
(1 pound, 3 oz.) Press the dial to enter.
7. Press the dial or START/PAUSE pad to start
defrosting.
8. Turn the food over when the oven signals TURN
)22'29(5
Ŷ 5HPRYHGHIURVWHGPHDWRUVKLHOGZDUPDUHDVZLWK
small pieces of foil for even defrosting.
Ŷ $IWHUGHIURVWLQJPRVWPHDWVQHHGWRVWDQGPLQXWHV
to complete defrosting. Large roasts should stand for
about 30 minutes.
Conversion Guide
If the weight of food is stated in pounds and ounces, the
ounces must be converted to tenths (.1) of a pound.
Weight of Food
in Ounces
Enter Food Weight
(tenths of a pound)
1-2 .1
3.2
4-5 .3
6-7 .4
8.5
9-10 .6
11 .7
12-13 .8
14-15 .9
Defrost By Time
8VH'()5267%<7,0(WRGHIURVWIRUDVHOHFWHGOHQJWK
of time.
1. Press the MICROWAVE pad.
7XUQWKHVHOHFWRUGLDOWR'()52673UHVVWKHGLDOWR
enter.
7XUQWKHGLDOWR'()5267%<7,0(3UHVVWKHGLDOWR
enter.
4. Turn the dial to select the time you want. Press the
dial to enter.
5. Press the dial or START/PAUSE pad to start
defrosting.
6. Turn the food over when the oven signals TURN
)22'29(5
Power level is automatically set at 3, but can be
changed. To change the power levels, see Microwave
power levels for instructions.
<RXFDQGHIURVWVPDOOLWHPVTXLFNO\E\UDLVLQJWKHSRZHU
level after entering the time. Power level 7 cuts the total
defrosting time in about half; power level 10 cuts the total
time to about 1/3. When defrosting at high power levels,
IRRGZLOOQHHGPRUHIUHTXHQWDWWHQWLRQWKDQXVXDODQG
may have some cooking.
Defrosting Tips
8VH'()5267%<)22'7<3(IRUPHDWSRXOWU\ILVK
DQGEUHDG8VH'()5267%<7,0(IRUPRVWRWKHU
frozen foods.
Ŷ)RRGVIUR]HQLQSDSHURUSODVWLFFDQEHGHIURVWHG
LQWKHSDFNDJHZKHQXVLQJ'()5267%<7,0(
Meats should be taken out of the package when
XVLQJ'()5267%<)22'7<3(&ORVHGSDFNDJHV
should be slit, pierced or vented after food has partially
defrosted. Plastic storage containers should be
partially uncovered.
Ŷ)DPLO\VL]HSUHSDFNDJHGIUR]HQGLQQHUVFDQEH
defrosted and microwaved. If the food is in a foil
container, transfer it to a microwave-safe dish.
Ŷ)RRGVWKDWVSRLOHDVLO\VKRXOGQRWEHDOORZHGWRVLW
out for more than one hour after defrosting. Room
temperature promotes the growth of harmful bacteria.
Ŷ:KHQGHIURVWHGIRRGVKRXOGEHFRROEXWVRIWHQHGLQ
all areas. If still slightly icy, return to the microwave
very briefly, or let it stand a few minutes.
Ŷ:KHQGHIURVWLQJRUPRUHSRXQGVRIJURXQGRUFXEHG
meat, remove defrosted portions at the turn signals.

24 49-40624-3
Microwaving
MICROWAVING
Sensor Cooking
The Advantium’s microwave mode features sensor
cooking and reheating. The oven automatically senses
when food is done and shuts itself off-eliminating the
need to program cook times and power levels.
The sensor feature detects the increasing humidity
released during cooking. The oven automatically adjusts
the cooking time to various types and amounts of food.
To use the sensor features:
1. Press the MICROWAVE pad.
7XUQWKHGLDOWRVHOHFW&22.%<)22'ORFDWHG
XQGHU&22.5(+($7RU6,00(5
)RU&22.%<)22'DQG5(+($7VHOHFWDIRRGDQG
SUHVVWKHGLDOWRHQWHU)RU6,00(5VHWWKHWLPHWR
simmer after the soup, sauce or stew has come to a
boil.
4. Press the dial or press the START/PAUSE pad to start
cooking.
Do not open the oven door until time is counting down
on the display. If you open the door while sensor
cooking, “Sensor Error - Close door and press START”
will appear. Close the door immediately and press the
START/PAUSE pad to begin again.
NOTE: Do not use the sensor features twice in
succession on the same food portion-it may result
in severely overcooked or burnt food. If food is
XQGHUFRRNHGDIWHUWKHILUVWFRXQWGRZQXVH&22.%<
TIME for additional cooking time.
Ŷ ,I\RXKDYHEHHQFRRNLQJDQGWKHRYHQLVKRWLWPD\
indicate that it is too hot for sensor cooking. In that
case, the oven will automatically change to time
cooking and may prompt for weights or amounts of
food.
Ŷ 7RVKRUWHQRUOHQJWKHQWKHFRRNWLPHZDLWXQWLOWKH
time countdown shows in the display. Then turn the
dial to add or subtract time.
MICROWAVE SENSOR PROGRAMS:
Ŷ*URXQG0HDW
Ŷ3RSFRUQ±3UHSDFNDJHGPLFURZDYHSRSFRUQ
3.0 oz. to 3.5 oz.
Ŷ3RWDWR
Ŷ5LFH
Ŷ6RXS
Ŷ9HJHWDEOHV&DQQHG)UHVK)UR]HQ
Ŷ&KLFNHQ5HKHDW
Ŷ3DVWD5HKHDW
Ŷ3ODWHRI)RRG5HKHDW
Ŷ6RXS5HKHDW
Ŷ9HJHWDEOH5HKHDW
Ŷ6LPPHU
Notes about the Reheat program:
Reheated foods may have wide variations in
temperature. Some areas may be extremely hot.
It is best to use C22. BY TIME and not REHEAT for
these foods:
Ŷ %UHDGSURGXFWV
Ŷ )RRGWKDWPXVWEHUHKHDWHGXQFRYHUHG
Ŷ )RRGVWKDWQHHGWREHVWLUUHGRUWXUQHG
Ŷ )RRGVFDOOLQJIRUDGU\ORRNRUFULVSVXUIDFHDIWHU
reheating
+RZWRDGMXVWWKHRYHQ¶VDXWRPDWLF&22.%<)22'
and REHEAT settings for a shorter or longer cook time
(not available for all food types):
To reduce the automatic cooking times: Right after the
oven starts, turn the dial counterclockwise until a minus
(“-“) sign or a double minus (“--“) sign appears and press
the dial to enter. A minus (“-“) sign is a 10% reduction
of cooking time and a double minus (“--“) sign is a 20%
reduction of cooking time.
To increase the automatic cooking times: Right after the
oven starts, turn the dial clockwise until a plus (“+“) sign
or a double plus (“++“) sign appears and press the dial
to enter. A plus (“+“) sign is a 10% increase of cooking
time and a double plus (“++“) sign is a 20% increase of
cooking time.

49-40624-3 25
Sensor Cooking Cookware
The proper containers and covers are essential for best
sensor cooking.
Ŷ$OZD\VXVHPLFURZDYHVDIHFRQWDLQHUVDQGFRYHUWKHP
with lids or vented plastic wrap. Never use tight sealing
plastic containers—they can prevent steam from
escaping and cause food to overcook.
Ŷ%HVXUHWKHRXWVLGHRIWKHFRRNLQJFRQWDLQHUVDQG
the inside of the oven are dry before placing food in
the oven. Beads of moisture turning into steam can
mislead the sensor.
Ŷ%HYHUDJHVDUHEHVWKHDWHGXQFRYHUHG
Covered
Vented
Dry off dishes so they
don’t mislead the sensor.
Microwaving
MICROWAVING
Things that are Normal
Interference
Ŷ79UDGLRLQWHUIHUHQFHPLJKWEHQRWLFHGZKLOHXVLQJWKH
microwave. Similar to the interference caused by other
small appliances, it does not indicate a problem with
the microwave. Move the radio or TV as far away from
the microwave as possible, or check the position of the
TV/radio antenna.
Oven Heat
Ŷ&RRNZDUHPD\EHFRPHKRWEHFDXVHRIKHDW
transferred from the heated food. Oven mitts may be
needed to handle the cookware.
Ŷ6WHDPRUYDSRUPD\HVFDSHIURPDURXQGWKHGRRU

26 49-40624-3
Other Features
OTHER FEATURES
Cooking Complete
To remind you that you have food in the oven, the
RYHQZLOOGLVSOD\WKHFRRNLQJPRGHDQG&22.,1*
COMPLETE and beep once a minute until you either
RSHQWKHRYHQGRRURUSUHVVWKH&/($52))SDG
Repeat last
Use this time saving feature for cooking repetitive items
like cookies or appetizers. This feature will repeat the
last cooking cycle used, including time, temperature,
power levels, and turntable settings
NOTE: The last program used is stored for two hours.
3UHVV&22.,1*237,216DQGVHOHFW5(3($7
LAST.
2. The last cooking cycle will be displayed.
3. Press the START/PAUSE pad or the selector dial to
start cooking.
Resume feature
1. If your food needs to cook a bit longer, you can
restart the oven by pressing the START/PAUSE pad
or selector dial.
5(680(&22.,1*ZLOOEHGLVSOD\HGDQGWKHRYHQ
will restart immediately at 10% of the original time.
The program stays in memory for 5 minutes. After that
you will need to begin the program again.
Clock
The clock must be set before you can use your oven for
the first time. When setting the clock time for the first
time go directly to step two.
The clock is designed to turn off when unit is idle for
30 seconds to minimize the standby power usage. The
clock will turn on when unit is in use or door is opened.
There is not an override option available based on the
'2(HQHUJ\UHTXLUHPHQWV
1. To change the clock time, press the SETTINGS pad
DQGWXUQWKHGLDOWR&/2&.6(77,1*66HOHFW6(7
TIME.
2. Turn the dial to set hours. Press the dial to enter.
NOTE: Setting hours sets AM/PM.
3. Turn the dial to set minutes. Press the dial to enter.
Auto Conversion
Auto conversion automatically reduces the convection
baking temperature. You still input the recipe
temperature and the oven control does the rest.
To change the setting, press the SETTINGS pad
and turn the dial to AUTO CONVERSION. Press the
dial to enter. Turn the dial to change the setting to
&219(56,2121RU&219(56,212))3UHVVWKH
dial to enter.
Beeper Volume
Use this feature to adjust the volume of the beeper. You
can even turn it off.
Press the SETTINGS pad, turn the dial to select
BEEPER VOLUME, press the dial to enter. Select the
beeper volume, press the dial to enter.
Temperature Units
To change temperature units, press the SETTINGS pad
and select TEMPERATURE UNITS. Turn the dial to
VHOHFW)RU&DQGSUHVVWKHGLDOWRHQWHU

49-40624-3 27
Delay Start
Use this feature to delay when the oven will start cooking
LQ&219%$.(&22.%<7,0(&22.%<7,0(
'()5267%<7,0(RU'()5267%<:(,*+7
3UHVVWKH&22.,1*237,216SDG
2. Turn the dial to select DELAY START and press the
dial to enter.
3. Turn the dial to set the start time hour and minutes,
press the dial to enter.
NOTE: Setting the hours sets AM/PM.
4. Set the cooking mode.
The oven will start the programmed cooking mode when
the clock time and the delay start time are the same.
Reminder
Use this feature to set an alarm beep to sound at a
specific time of day.
1. Press the SETTINGS pad, turn the dial to select
REMINDER and press the dial to enter.
2. Select SET REMINDER and press the dial to enter.
3.
Turn the dial to set the time hour and minutes, press
the dial to enter. NOTE: Setting the hours set AM/PM.
To turn off the Reminder, press the SETTINGS pad, turn
the dial to select REMINDER and press the dial to enter.
Turn the dial to select CLEAR REMINDER and press the
dial to enter.
To check the Reminder time, press the SETTINGS pad,
turn the dial to select REMINDER and press the dial
to enter. Turn the dial to select REVIEW REMINDER
and press the dial to enter. The display will show the
Reminder time.
Turntable On/OFF
Use this feature to keep the turntable from turning when
using a dish is too large to rotate in the cavity.
78517$%/(212))LVQRWDSHUPDQHQWVHWWLQJ
Press the SETTINGS pad, turn the dial to select
78517$%/(212))DQGSUHVVWKHGLDOWRHQWHU7XUQ
WKHGLDOWRVHOHFW78517$%/(21RU78517$%/(2))
press the dial to enter.
NOTE:
Ŷ7KHWXUQWDEOHZLOOQRWWXUQRIILQ6SHHGFRRN%URLO
Toast, or Microwave Sensor modes.
Ŷ$FRRNLQJF\FOHPXVWEHVWDUWHGZLWKLQPLQXWHVRI
turning the turnable off, or the turntable will reset to the
on setting.
Ŷ7KHWXUQWDEOHZLOODOVRUHPDLQRIIIRUFRRNLQJF\FOHV
started within 5 minutes of the end of any cooking
cycle for which the turntable was off.
Auto Night Light
Use this feature to set the surface light to come on and
go off at a certain time.
1. Press the SETTINGS pad, turn the dial to select
AUTO NIGHT LIGHT and press the dial to enter.
2. Select SET ON TIME and press the dial to enter.
3. Turn the dial to set on time hour and minutes, press
the dial to enter. Turn the dial to set off time hour and
minutes, press the dial to enter. NOTE: Setting the
hours sets AM/PM.
To disable the Auto Night Light feature, press the
SETTINGS pad, turn the dial to select AUTO NIGHT
LIGHT and press the dial to enter. Turn the dial to select
DEACTIVATE and press the dial to enter.
To check the Auto Night Light on and off times, press
the SETTINGS pad, turn the dial to select AUTO NIGHT
LIGHT and press the dial to enter. Turn the dial to select
5(9,(:212))7,0(6DQGSUHVVWKHGLDOWRHQWHU
The display will show the on and off time for the Auto
Night light.
NOTE:
Ŷ$XWR1LJKW/LJKWZLOOWXUQRQWKHVXUIDFHOLJKWWRWKH
night setting, when the clock time matches the Auto
Night Light on time, even if the surface light is on the
bright setting.
Ŷ$XWR1LJKW/LJKWZLOODOZD\VWXUQWKHVXUIDFHOLJKWRII
when the clock time matches the Auto Night Light off
time if the surface light is turned on.
Other Features
OTHER FEATURES
Surface Light
Use to light your cooktop.
3UHVVWKH685)$&(/,*+7SDGWRFKDQJHIURPEULJKW
to night to off.

28 49-40624-3
Other Features
OTHER FEATURES
Help
Use this feature to find out more about your oven and its
features.
1. Press the HELP pad.
2. Turn the dial to select the feature name. Press the
dial to enter.
The display will show a description for the program you
have chosen. Use the dial to scroll up or down to read
the description.
Control Lock-Out
You may lock the control panel to prevent the oven from
being accidentally started during cleaning or being used
by children.
3UHVVDQGKROG&/($52))IRUVHFRQGVWRORFNDQG
unlock.
When the control panel is locked, CONTROL IS
/2&.('ZLOOEHGLVSOD\HGEULHIO\DQ\WLPHDSDGRUGLDOLV
pressed.
Vent Fan
The vent fan removes steam and other vapors from
surface cooking.
3UHVVWKH9(17)$1SDGWRFKDQJHIURPKLJKWR
medium to low to off.
The vent fan may come on automatically if the oven gets
too hot, even if the oven isn’t running. The screen will
GLVSOD\³1RUPDO2SHUDWLRQ)DQLVRQGXHWRKLJKKHDW
)DQZLOOVKXWRIIDXWRPDWLFDOO\´
Automatic Fan
&RROLQJIDQVDXWRPDWLFDOO\WXUQRQDVUHTXLUHGWR
keep the internal oven components and control from
overheating.
The vent fan may come on automatically if the oven gets
too hot, even if the oven isn’t running. The screen will
GLVSOD\³1RUPDO2SHUDWLRQ)DQLVRQGXHWRKLJKKHDW
)DQZLOOVKXWRIIDXWRPDWLFDOO\´
Timer
Use this feature anytime you need a general purpose
timer. It can even be used while cooking in the oven.
1. Press the TIMER pad.
2. Turn the dial to select the minutes. Press the dial to
enter.
3. Turn the dial to select the seconds. Press the dial to
enter.
To cancel, press the TIMER pad.
Features found in the HELP function.
Adding Time Cooking Options Reminder
Auto Conversion Defrost Repeat Last
Auto Night Light 'HIURVWE\)RRG Resume
Back Defrost by Time Sensor Cooking
Beeper Volume Defrost by Weight Simmer
Beverage Delay Start Soften
Broil Edit Speed Cook
Clear/Off Help Start/Pause
Clock Melt Temperature Units
Control Lockout Micro 30 Secs Timer On/Off
Conv Bake Microwave Turntable On/Off
&RRNE\)RRG7\SH My Recipes Toast
Cook by Time Proof Warm
Cook by Time 1 & 2 Reheat

49-40624-3 29
Inside of the oven
Be certain the oven control is turned off and the oven is
warm or cool to the touch before cleaning any part of this
oven.
Clean the inside of the oven often for proper heating
performance.
Some spatters can be removed with a paper towel,
RWKHUVPD\UHTXLUHDZDUPVRDS\FORWK5HPRYHJUHDV\
spatters with a sudsy cloth, then rinse with a damp cloth.
If the dirt and spatter do not come off easily with a warm
sudsy cloth, place a medium sized bowl full of water in
WKHXQLWRQWKHPHWDOWUD\DQGSUHVVWKH63(('&22.
pad. Select MY RECIPE and set for 10 minutes at U=3,
L=3, M=7.This should loosen the dirt in the oven so that
it can be removed with a warm sudsy cloth.
If you notice yellowing on the metal inside the oven
that cannot be removed with a warm sudsy cloth, use a
stainless steel cleaner that removes heat discoloration
and/or tarnishing. You can then clean the inside of the
oven as you normally do.
Do not use abrasive cleaners or sharp utensils on oven
walls.
Never use a commercial oven cleaner on any part of
your oven.
Do not clean the inside of the oven with metal scouring
pads. Pieces can break off the pad inside the oven,
causing electrical shock as well as damaging the inside
surface finish of the oven.
Removable Turntable
The area underneath the turntable should be cleaned
IUHTXHQWO\WRDYRLGRGRUVDQGVPRNLQJGXULQJDFRRNLQJ
cycle.
The turntable can be broken if dropped. Wash carefully
in warm, sudsy water. Dry completely and replace.
To replace the turntable, place its center over the spindle
in the center of the oven and turn it until it seats into
place.
Cooking Trays and Wire Oven Rack
To prevent breakage, allow the trays to cool completely
before cleaning. Wash carefully in hot, sudsy water or in
the dishwasher.
Do not use abrasives to clean the glass tray or wire oven
rack, as they may damage the finish.
A plastic scrubbing pad may be used to clean the metal
trays.
Mica Sheet
Do not remove the mica sheet.
To clean the mica sheet: Allow the oven to cool
completely. Wipe clean with a warm soapy cloth.
Do not use the oven without
the turntable in place.
Turntable
Care and Cleaning
CARE AND CLEANING
Metal tray
Clear glass tray
Wire oven rack
Mica Sheet

30 49-40624-3
Care and Cleaning
CARE AND CLEANING
Outside of the Oven
We recommend against using cleaners with ammonia
or alcohol, as they can damage the appearance of
the oven. If you choose to use a common household
cleaner, first apply the cleaner directly to a clean cloth,
then wipe the soiled area.
Case
Clean the outside of the microwave with a sudsy cloth.
Rinse and then dry. Wipe the window clean with a damp
cloth.
Control Panel
Wipe with a damp cloth. Dry thoroughly. Do not use
cleaning sprays, large amounts of soap and water,
abrasives or sharp objects on the panel - they can
damage it. Some paper towels can also scratch the
control panel.
Stainless Steel Surfaces (on some models)
The stainless steel panel can be cleaned with Stainless
Steel Magic or a similar product using a clean, soft
cloth. Apply stainless cleaner carefully, avoiding the
surrounding plastic or glass parts. Do not use appliance
wax, polish, bleach or products containing chlorine on
stainless steel.
Plastic Color Panels (on some models)
Use a clean, soft, lightly dampened cloth, then dry
thoroughly.
Door Seal
It’s important to keep the area clean where the door
seals against the oven. Use only mild, non-abrasive
detergents applied with a clean sponge or soft cloth.
Rinse well.
Bottom
Clean off the grease and dust on the bottom often. Use a
solution of warm water and detergent.
Replacing the Surface Light
1. To replace the surface light, first disconnect the power
at the main fuse or circuit breaker panel or unplug the
oven.
2. Remove the screw from the side of the light
compartment cover and lower the cover until it stops.
3. Be sure the bulb to be replaced is cool before
removing. Gently pull the bulb from the receptacle.
Replace with a 130 volt, 50-watt halogen bulb. Order
WB08X10051 from your GE Appliances supplier.
4. Raise the light cover and replace the screw. Connect
electrical power to the oven.
Removing and Cleaning the Filters
1. The metal filters trap grease released by foods on the
cooktop. They also prevent flames from foods on the
cooktop from damaging the inside of the oven.
)RUWKLVUHDVRQWKHILOWHUVPXVWDOZD\VEHLQSODFH
when the hood is used. The vent filters should be
cleaned once a month, or as needed.
3. To remove, slide them to the rear using the tabs. Pull
down and out.
4. To clean the vent filters, soak them and then swish
around in hot water and detergent. Don’t use
ammonia or ammonia products because they will
darken the metal. Light brushing can be used to
remove embedded dirt.
5. Rinse, shake and let dry before replacing.
6. To replace, slide the filters into the frame slots on the
back of each opening. Press up and to the front to
lock into place.
Remove screw

49-40624-3 31
Replacing the Oven Cavity Lamp
1. Disconnect power at the main fuse or circuit breaker
panel.
2. Remove the top grill by removing the two screws that
hold it in place.
3. Remove charcoal filter if present. Slide the filter
toward the left and pull toward the front to remove.
NOTE: Charcoal filter is an optional kit, you may not
have one.
4. Remove the screw holding the lamp shield in place.
5. Pull the lamp shield out. Pull the light bulb out and
replace with the 120V-130V, 20-watt halogen bulb.
Order WB25X10019 from your GE Appliances
supplier.
6. Return the lamp and lamp shield to original position
and replace screw and charcoal filter.
7. Replace the grill and 2 screws. Reconnect power to
the oven
Charcoal Filter (JX81D - optional kit)
If the model is not vented to the outside, the air will be
recirculated through a disposable charcoal filter that
helps remove smoke and odors.
The charcoal filter cannot be cleaned. It must be
replaced. Order Part No. JX81D-WB02X10943 from your
GE Appliances supplier.
The charcoal filter should be replaced when it is
noticeably dirty or discolored (usually after 6 to 12
months, depending on usage).
To install a new filter:
1. Remove plastic and other outer wrapping from the
new filter.
2. Remove the top grill by removing the two screws that
hold it in place.
3. Insert the filter into the top opening of the oven as
shown.
4. It will rest at an angle on two back support tabs and in
front by two tabs.
5. Replace the grill and two screws.
To remove the filter, repeat step 2 above, remove the
filter and repeat step 5.
Care and Cleaning
CARE AND CLEANING
FEDERAL COMMUNICATIONS COMMISSION RADIO FREQUENCY
INTERFERENCE STATEMENT (U.S.A. ONLY)
7KLVHTXLSPHQWJHQHUDWHVDQGXVHV,60IUHTXHQF\
energy and if not installed and used properly, that is in
strict accordance with the manufacturer’s instructions,
may cause interference to radio and television
reception. It has been type tested and found to comply
ZLWKOLPLWVIRU,60(TXLSPHQWSXUVXDQWWRSDUWRI
)&&5XOHVZKLFKDUHGHVLJQHGWRSDUWRI)&&
Rules, which are designed to provide residential
installation.
However, there is no guarantee that interference will not
RFFXULQDSDUWLFXODULQVWDOODWLRQ,IWKLVHTXLSPHQWGRHV
cause interference to radio or television reception, which
FDQEHGHWHUPLQHGE\WXUQLQJWKHHTXLSPHQWRIIDQGRQ
the user is encouraged to try to correct the interference
by one or more of the following:
Ŷ5HRULHQWWKHUHFHLYLQJDQWHQQDRIWKHUDGLRRU
television.
Ŷ5HORFDWHWKH0LFURZDYH2YHQZLWKUHVSHFWWRWKH
receiver.
Ŷ0RYHWKHPLFURZDYHRYHQDZD\IURPWKHUHFHLYHU
Ŷ3OXJWKHPLFURZDYHRYHQLQWRDGLIIHUHQWRXWOHWVRWKDW
the microwave oven and the receiver are on different
branch codes.
The manufacturer is not responsible for any radio of TV
interference caused by unauthorized modification to this
microwave oven. It is the responsibility of the user to
correct such interference.

32 49-40624-3
Problem Possible Cause What To Do
LIGHTS
Light during a speedcook
cycle dims and cycles on and
off, even at full power levels
This is normal. Power level has
been automatically reduced
because the oven is hot.
This is normal. The oven senses the heat level and
adjusts automatically.
Light visible around the
door and outer case while
speedcooking
This is normal. When the oven is on, light may be visible around
the door and outer case.
FAN
Fan continues to run after
cooking stops
The oven is cooling. The fan will automatically shut off when the
internal parts of the oven have cooled.
Oven vent emits warm air
while oven is on
This is normal.
Vent fan comes on
automatically when oven not
in use.
This is normal. If the cooktop or oven gets hot enough the vent fan
FRPHVRQVHH$XWRPDWLF)DQVHFWLRQ
Fan comes on automatically
when using the microwave
This is normal. If the microwave is used after speedcook and the
oven senses that it is too hot, the vent fan comes on
to cool the oven.
The oven makes unusual
sounds while cooking.
Clicks and fans blowing are
normal. The relay board is turning
the components on and off.
These sounds are normal.
Fan sound changes while
cooking.
This is normal. )DQPD\WXUQRQRURIIGXULQJFRRNLQJWRPDLQWDLQ
cooking temperature.
COOKING
Smoke comes out of the oven
when the door is opened
Food is high in fat content.
Aerosol spray used on the pans.
Smoke is normal when cooking high-fat foods. Use
vegetable oil or olive oil on the meat itself instead
of coating the entire pan.
Food is not fully cooked
or browned at the end of a
cooking program
Programmed times may not match
the size or amount of food you are
cooking.
Increase or decrease time for doneness or adjust
the upper or lower lamps for browning.
Oven has turned off in Warm,
Proof, or Convection Bake
The maximum cooking time of 179
minutes has been reached.
This is normal. The control will automatically turn
off the oven and indicate that cooking time is
reached. The cooking time is not always displayed.
A cooking time was set for
Convection Bake to start after
preheat and the door was not
opened at the end of preheat.
This is normal The control will automatically turn
off the oven after one hour and indicate that
cooking is complete if the door is not opened.
DISPLAY
The display is blank The clock is designed to turn off when unit is idle for
30 seconds to minimize the standby power usage.
(See Clock section)
Control Panel “LOCKED”
appears in display.
The control has been locked. 3UHVVDQGKROG&/($52))IRUDERXWVHFRQGV
WRXQORFNWKHFRQWURO6HH2WKHU)HDWXUHV6HFWLRQ
Control display is lighted yet
oven will not start
Clock is not set. )ROORZSURPSWVWRVHWWKHFORFN
Door not securely closed. Open the door and close securely.
Delay Start was accidentally set. 3UHVV&/($52))DQGUHVHW
Oven is in DEMO Mode. Unplug the oven for 1 minute. Then, plug the oven
back into the wall. DO NOT set the oven clock;
press and hold the HELP and START/PAUSE
pads for 3 seconds. The control should exit DEMO
mode. Set clock and continue.
CLEAR/OFF was pressed
accidentally.
Reset cooking program and press START/PAUSE.
Troubleshooting Tips... Before you call for service
Save time and money! Review the charts on the following pages first and you may not need to call for service.
TROUBLESHOOTING TIPS

49-40624-3 33
TROUBLESHOOTING TIPS
Troubleshooting Tips... Before you call for service
Problem Possible Cause What To Do
OTHER PROBLEMS
The door and inside of the
oven feels hot
The oven produces intense heat
in a small space.
This is normal. Use oven mitts to remove food
when ready.
Floor of the oven is warm, even
when the oven has not been
used.
The cooktop light is located below
the oven floor. When the light is on,
the heat it produces may make the
oven floor get warm.
This is normal.
Oven will not start A fuse in your home may be
blown or the circuit breaker
tripped.
Replace fuse or reset circuit breaker.
Power surge. Unplug the oven, then plug it back in.
Plug not fully inserted into wall
outlet.
Make sure the plug on the oven is fully inserted
into wall outlet.
Glass microwave tray does not
lock into center hub.
Align the protrusion on the bottom of the glass
microwave tray with the indentation in the
turntable. This fit is not tight, some movement is
normal.

34 49-40624-3
Staple your receipt here. Proof of the original purchase
date is needed to obtain service under the warranty.
GEAppliances.com
$OOZDUUDQW\VHUYLFHLVSURYLGHGE\RXU)DFWRU\6HUYLFH&HQWHUVRUDQDXWKRUL]HG&XVWRPHU&DUH
®
technician. To schedule
service online, visit us at www.geappliances.com/service_and_support/, or call GE Appliances at 800.GE.CARES
(800.432.2737). Please have your serial number and your model number available when calling for service.
What GE Appliances will not cover:
Ŷ6HUYLFHWULSVWR\RXUKRPHWRWHDFK\RXKRZWRXVHWKH
product.
Ŷ,PSURSHULQVWDOODWLRQGHOLYHU\RUPDLQWHQDQFH
Ŷ3URGXFWQRWDFFHVVLEOHWRSURYLGHUHTXLUHGVHUYLFH
Ŷ)DLOXUHRIWKHSURGXFWRUGDPDJHWRWKHSURGXFWLILWLV
abused, misused (for example, cavity arcing from wire
rack or metal/foil), or used for other than the intended
purpose or used commercially.
Ŷ5HSODFHPHQWRIKRXVHIXVHVRUUHVHWWLQJ
of circuit breakers.
Ŷ5HSODFHPHQWRIWKHFRRNWRSOLJKWEXOEV
Ŷ'DPDJHWRWKHSURGXFWFDXVHGE\DFFLGHQWILUHIORRGV
or acts of God.
Ŷ,QFLGHQWDORUFRQVHTXHQWLDOGDPDJHFDXVHGE\SRVVLEOH
defects with this appliance.
Ŷ'DPDJHFDXVHGDIWHUGHOLYHU\
WARRANTY
Advantium Oven Warranty
EXCLUSION OF IMPLIED WARRANTIES
Your sole and exclusive remedy is product repair as provided in this Limited Warranty. Any implied warranties,
including the implied warranties of merchantability or fitness for a particular purpose, are limited to one year or
the shortest period allowed by law.
This warranty is extended to the original purchaser and any succeeding owner for products purchased for home use
within the USA. If the product is located in an area where service by a GE Appliances Authorized Servicer is not available,
\RXPD\EHUHVSRQVLEOHIRUDWULSFKDUJHRU\RXPD\EHUHTXLUHGWREULQJWKHSURGXFWWRDQ$XWKRUL]HG*($SSOLDQFHV
Service location for service. In Alaska, the warranty excludes the cost of shipping or service calls to your home.
6RPHVWDWHVGRQRWDOORZWKHH[FOXVLRQRUOLPLWDWLRQRILQFLGHQWDORUFRQVHTXHQWLDOGDPDJHV7KLVZDUUDQW\JLYHV\RX
specific legal rights, and you may also have other rights which vary from state to state. To know what your legal rights
are, consult your local or state consumer affairs office or your state’s Attorney General.
Warrantor: GE Appliances
For the period of GE Appliances will replace
One year
)URPWKHGDWH
of the original
purchase
Any part of the oven which fails due to a defect in materials or workmanship. During this
limited one-year warranty, GE Appliances will also provide, free of charge, all labor and
related service costs to replace the defective part.
Five years
)URPWKHGDWH
of the original
purchase
The magnetron tube, if the magnetron tube fails due to a defect in materials or workmanship.
During this five-year limited warranty, you will be responsible for any labor or in-home
service costs.

49-40624-3 35
OPTIONAL KITS
Optional Kits
Filler Panel Kits
Ŷ -;%666WDLQOHVV6WHHO
Ŷ -;%(66ODWH
Ŷ -;%:::KLWH
Ŷ -;%%%%ODFN
When replacing a 36” range hood, filler panel kits fill
in the additional width to provide a custom built-in
appearance.
)RULQVWDOODWLRQEHWZHHQFDELQHWVRQO\QRWIRUHQGRI
cabinet installation. Each kit contains two 3” wide filler
panels.
Bump Out Kit
Ŷ -;%803%%
Use when installing the microwave with cabinets that are
15” deep. The bump out kit will allow the microwave to
be installed so that the ventilation holes on the top-front
of the appliances are not blocked.
Filter Kits
Ŷ -;'²5HFLUFXODWLQJ&KDUFRDO)LOWHU.LW
)LOWHUNLWVDUHXVHGZKHQWKHRYHQFDQQRWEHYHQWHGWR
the outside.
To order, call GE Appliances at 877.959.8688 or go to
GEApplianceparts.com
Available at extra cost from your GE Appliances supplier.

36 49-40624-3
3ULQWHGLQWKH.RUHD
Consumer Support
CONSUMER SUPPORT
GE Appliances Website
+DYHDTXHVWLRQRUQHHGDVVLVWDQFHZLWK\RXUDSSOLDQFH"7U\WKH*($SSOLDQFHV:HEVLWHKRXUVDGD\DQ\GD\
of the year! You can also shop for more great GE Appliances products and take advantage of all our on-line support
services designed for your convenience. In the US: GEAppliances.com
Register Your Appliance
Register your new appliance on-line at your convenience! Timely product registration will allow for enhanced
communication and prompt service under the terms of your warranty, should the need arise. You may also mail in
the pre-printed registration card included in the packing material. In the US: GEAppliances.com/register
Schedule Service
Expert GE Appliances repair service is only one step away from your door. Get on-line and schedule your service at
your convenience any day of the year. In the US: GEAppliances.com/ge/service-and-support/service.htm
or call 800.432.2737 during normal business hours.
Extended Warranties
Purchase a GE Appliances extended warranty and learn about special discounts that are available while your
warranty is still in effect. You can purchase it on-line anytime. GE Appliances Services will still be there after your
warranty expires. In the US: GEAppliances.com/ge/service-and-support/shop-for-extended-service-plans.htm
or call 800.626.2224 during normal business hours.
Remote Connectivity
)RUDVVLVWDQFHZLWKZLUHOHVVQHWZRUNFRQQHFWLYLW\IRUPRGHOVZLWKUHPRWHHQDEOH
visit our website at GEAppliances.com/ge/connected-appliances/ or call 800.220.6899 in the US.
Parts and Accessories
,QGLYLGXDOVTXDOLILHGWRVHUYLFHWKHLURZQDSSOLDQFHVFDQKDYHSDUWVRUDFFHVVRULHVVHQWGLUHFWO\WRWKHLUKRPHV
(VISA, MasterCard and Discover cards are accepted). Order on-line today 24 hours every day.
In the US: GEApplianceparts.com or by phone at 877.959.8688 during normal business hours.
Instructions contained in this manual cover procedures to be performed by any user. Other servicing
generally should be referred to qualified service personnel. Caution must be exercised, since improper
servicing may cause unsafe operation.
Contact Us
If you are not satisfied with the service you receive from GE Appliances, contact us on our Website with all the
details including your phone number, or write to:
,QWKH86*HQHUDO0DQDJHU&XVWRPHU5HODWLRQV_*($SSOLDQFHV$SSOLDQFH3DUN_/RXLVYLOOH.<
GEAppliances.com/ge/service-and-support/contact.htm

Anote aquí el número de modelo y
serie:
Modelo # ________________
Serie # __________________
Encontrará estos números en la
etiquetaadentro del horno.
HORNO ADVANTIUM®
49-40624-3 12-16 GEA
CSA1201
http://geadvantium.com
GE Profile™ y Cafe™
GE es una marca registrada de General Electric Company. Fabricado bajo licencia de marca.
MANUAL DEL USUARIO
INFORMACIÓN DE SEGURIDAD ....3
ADVANTIUM
Familiarícese con Advantium ................9
Funciones ...............................10
Controles ................................ 11
COCCIÓN RÁPIDA
Nivel de potencia de cocción rápida ........12
Consejos de cocción ......................13
Recipientes ..............................13
Menú predeterminado .....................14
Receta ..................................16
Lo que es normal .........................17
HORNEAR CON CONVECCIÓN ....18
ASAR Y TOSTAR ....................19
CALENTAR Y FERMENTAR
......... 20
COCCIÓN POR MICROONDAS
Recipientes de cocina .....................21
Selecciones Predeterminadas
...............21
Cocinar por tiempo .......................22
Cocimiento con tiempo 1 y 2 ...............22
Niveles de potencia de microonda ..........22
Mis Recetas ..............................22
Consejos de cocimiento ...................22
Descogelación. . . . . . . . . . . . . . . . . . . . . . . . . . . .23
Cocción por sensor .......................24
Lo que es normal .........................25
OTRAS FUNCIONES .................26
CUIDADO Y LIMPIEZA ..............29
CONSEJOS PARA LA SOLUCIÓN
DE PROBLEMAS .....................32
GARANTÍA ...........................34
KITS OPCIONALES ..................35
SOPORTE PARA EL CONSUMIDOR
..36

2 49-40624-3
GRACIAS POR HACER QUE GE APPLIANCES SEA PARTE DE SU HOGAR.
Ya sea que haya crecido usando GE Appliances, o que ésta es su primera vez, nos complace
tenerlo en la familia.
Sentimos orgullo por el nivel de arte, innovación y diseño de cada uno de los electrodomésticos de
GE Appliances, y creemos que usted también. Entre otras cosas, el registro de su electrodoméstico
asegura que podamos entregarle información importante del producto y detalles de la garantía
cuando los necesite.
Registre su electrodoméstico GE ahora a través de Internet. Sitios Web y números telefónicos útiles
están disponibles en la sección de Soporte para el Consumidor de este Manual del Propietario.
También puede enviar una carta en la tarjeta de inscripción preimpresa que se incluye con
el material embalado.

49-40624-3 3
INFORMACIÓN DE SEGURIDAD
LEA Y GUARDE ESTAS INSTRUCCIONES
INFORMACIÓN IMPORTANTE DE SEGURIDAD
LEA TODAS LAS INSTRUCCIONES ANTES DE USAR
ADVERTENCIA
Para reducir el riesgo de quemaduras, descargas eléctricas, incendio, lesiones o exposición
a energía de microondas excesiva:
Cuando utilice aparatos eléctricos, se deben seguir las precauciones de seguridad básicas, entre las que se incluyen las
siguientes:
Ŷ /HDWRGDVODVLQVWUXFFLRQHVDQWHVGHXWLOL]DUHVWHDSDUDWR
Ŷ /HD\VLJDODVSUHFDXFLRQHVHVSHFtILFDVGHODVHFFLyQ
Precauciones para evitar una posible exposición a
excesiva energía de microondas la página 7
Ŷ 8WLOLFHHVWHDSDUDWRVyORSDUDORVILQHVGHVFULWRVHQHVWH
manual. No utilice químicos corrosivos o vapores en este
aparato.Este horno está específicamente diseñado para
calentar, deshidratar y cocinar alimentos, no se diseñó
para uso en laboratorios o para uso industrial.
Ŷ (VWHDSDUDWRVyORGHEHVHUUHSDUDGRSRUSHUVRQDOGH
servicio calificado. Contacte a la empresa de servicio
autorizada para la revisión, reparación o ajuste de este
aparato.
INSTALLATION
Ŷ ,QVWDOH\FRORTXHHVWHDSDUDWRGHDFXHUGRFRQODV
Instrucciones de Instalación suministradas.
Ŷ
Este aparato debe contar con una conexión a tierra.
Conecte sólo a un tomacorriente con adecuada conexión a
tierra. Ver la sección Instrucciones de conexión a tierra de
la página 7.
Ŷ (VWHKRUQRGHPLFURRQGDVVHHQFXHQWUDDSUREDGRSRU
8/SDUDODLQVWDODFLyQVREUHFRFLQDVDJDVPHQRVGH
%78\HOpFWULFDV
Ŷ (VWHKRUQRSDUDXVDUVREUHODHVWXIDHVWiGLVHxDGRSDUD
usarse sobre estufas de un ancho no superior a 36”.
Puede instalarse sobre equipamientos de cocción a gas y
eléctricos.
Ŷ No utilice este aparato si tiene el cable eléctrico o el
enchufe dañados, si no funciona bien o si ha sufrido una
avería o una caída.
Ŷ 0DQWHQJDHOFDEOHDOHMDGRGHVXSHUILFLHVFDOLHQWHV
Ŷ No permita que el cable eléctrico cuelgue sobre el borde
de la mesa o del mostrador de encimera.
Ŷ 1RVXPHUMDHOFDEOHHOpFWULFRRHOHQFKXIHHQDJXD
Ŷ 1RFXEUDQLEORTXHHQLQJXQDDEHUWXUDGHODSDUDWR
Ŷ 1RJXDUGHHVWHDSDUDWRHQHOH[WHULRU1RORXWLOLFHFHUFD
del agua – por ejemplo, en un sótano mojado, cerca de
una piscina, cerca de un grifo o en ubicaciones similares.
Ŷ 1RPRQWHHVWHDSDUDWRDUULEDGHOIUHJDGHUR
PARA REDUCIR EL RIESGO DE INCENDIO EN LA
CAVIDAD DEL HORNO:
Ŷ 1RFRFLQHGHPiVORVDOLPHQWRV3UHVWHDWHQFLyQDO
aparato cuando se coloquen papel, plástico u otros
materiales combustibles dentro del horno durante la
cocción.
Ŷ 4XLWHORVJDQFKLWRVGHDODPEUH\ODVPDQLMDVGHPHWDOGH
los recipientes de papel o de plástico antes de colocarlos
en el horno.
Ŷ 6LORVPDWHULDOHVXELFDGRVGHQWURGHOKRUQRVHSUHQGHQ
fuego, mantenga cerrada la puerta del horno, apáguelo y
desconecte el cable eléctrico, o corte la energía desde el
panel de fusibles o del interruptor de circuitos. Si se abre
la puerta, el fuego puede propagarse.
Ŷ 1RXWLOLFHHOKRUQRSDUDDOPDFHQDUHOHPHQWRV1RGHMH
productos de papel, utensilios de cocina o alimentos en
el horno cuando no lo esté usando. Todos los estantes
deberán ser retirados del horno cuando no se encuentren
en uso.
Ŷ 1RRSHUHHOKRUQRVLQDOLPHQWRVDGHQWUR
Ŷ 1RXWLOLFHODVIXQFLRQHVGHOVHQVRUGRVYHFHVVHJXLGDV
en la misma porción de comida. Si los alimentos no se
cocinaron después de la primera cuenta regresiva, utilice
&22.%<7,0(FRFLQDUSRUWLHPSRSDUDREWHQHUWLHPSR
de cocción adicional.
Ŷ 3DUDHYLWDUFKLVSDVQRVHGHEHXWLOL]DUODSDUULOODGH
alambre del horno para el cocimiento rápido o cocimiento
con microonda.
A FIN DE REDUCIR RIESGOS DE QUEMADURAS:
Ŷ 7HQJDFXLGDGRDODEULUHQYDVHVFRQFRPLGDFDOLHQWH8VH
manijas y aleje el vapor del rostro y las manos.
Ŷ 9HQWLOHSHUIRUHRFRUWHHQYDVHVEROVDVREROVDV
plásticas para evitar la acumulación de presión.
Ŷ 7HQJDFXLGDGRDOWRFDUHOSODWRJLUDWRULRODSXHUWD
estantes o paredes del horno, los cuales se podrán
calentar durante el uso.
Ŷ /RVOtTXLGRV\FLHUWDVFRPLGDVFDOHQWDGDVHQHOKRUQR
microondas pueden presentar riesgos de quemaduras,
DOVHUUHWLUDGRVGHOKRUQRPLFURRQGDV/DSRVLELOLGDGGH
quemaduras es mayor en niños pequeños, a los cuales
no se les deberá permitir retirar ítems calientes del horno
microondas.

4 49-40624-3
INFORMACIÓN DE SEGURIDAD
LEA Y GUARDE ESTAS INSTRUCCIONES
ADVERTENCIA
El arco puede ocurrir durante el cocimiento rápido y el de microondas. Si
observa chispas, presione la tecla CLEAR/OFF y corrija el problema.
Formación de arco, es el término de microondas, utilizado
SDUDFKLVSDVHQHOKRUQR/DVFKLVSDVSXHGHQVHUFDXVDGDV
por:
Ŷ &RQWDFWRGHPHWDORDOXPLQLRHQORVODGRVGHOKRUQR
Ŷ $OXPLQLRQRPROGHDGRDODOLPHQWRODVRULOODVTXHQR
HVWiQGREODGDVDFW~DQFRPRDQWHQDV
Ŷ 8WLOLFHHODOXPLQLRGHODPDQHUDHQTXHVHUHFRPLHQGDHQ
este manual.
Ŷ 0HWDOHVFRPRDPDUUHVJUDSDVHQDYHVRSODWRVFRQ
orillas de oro colocados en el horno.
Ŷ /RVUHFLSLHQWHVGHPHWDORODSDUULOODGHDODPEUHGHO
horno utilizada durante el cocimientorápido o el de
PLFURRQGDFRQH[FHSFLyQGHODVSDQDVVXPLQLVWUDGDVFRQ
HOKRUQR
Ŷ 7RDOODVGHSDSHOUHFLFODGDVTXHFRQWHQJDQSHTXHxRV
pedazos de metal utilizados en el horno.
INFORMACIÓN IMPORTANTE DE SEGURIDAD
LEA TODAS LAS INSTRUCCIONES ANTES DE USAR
ADVERTENCIA
Continuado
USO
Ŷ (OXVRGHFXDOTXLHUHOHFWURGRPpVWLFRSRUSDUWHGHQLxRV
debería ser supervisado de cerca por un adulto.
Ŷ 1RKDJDIXQFLRQDUHOKRUQRVLQHOSODWRJLUDWRULRHQVX
lugar. El plato giratorio no debe tener ninguna clase de
bloqueo para que pueda girar.
Ŷ 1RDOPDFHQHQLQJ~QHOHPHQWRGLUHFWDPHQWHVREUHOD
superficie del horno de microondas cuando éste se
encuentre en funcionamiento.
Ŷ 1RGHEHQXWLOL]DUVHDOLPHQWRVRXWHQVLOLRVPHWiOLFRVGH
grandes dimensiones en este horno porque pueden crear
un incendio o un riesgo de descarga eléctrica.
Ŷ No utilice productos de papel cuando el aparato se utiliza
en modos diferentes al microondas.
Ŷ $OJXQRVSURGXFWRVFRPRKXHYRVHQWHURV\UHFLSLHQWHV
sellados – por ejemplo, botes sellados – pueden explotar
y no deben calentarse en este horno. Si lo utiliza de esta
manera puede resultar en una lesión.
Ŷ 1RFRFLQHODVSDSDVH[FHVLYDPHQWH3XHGHQ
deshidratarse y provocar fuego, causando daños al horno.
Ŷ 1RFXEUDODVSDUULOODVXRWUDSDUWHGHOKRUQRFRQSDSHO
metálico. Esto puede sobrecalentar el horno.
Ŷ &RFLQHODFDUQHGHUHVKDVWDDOFDQ]DUXQDWHPSHUDWXUD
INTERNA de por lo menos 160°F y las carnes de ave a
XQDWHPSHUDWXUD,17(51$GHSRUORPHQRV)/D
cocción a estas temperaturas generalmente protege de
enfermedades transmitidas por los alimentos.
Ŷ (VWHKRUQRQRHVWiDSUREDGRQLSUREDGRSDUDXVRPDULQR
LIMPIEZA
Ŷ 0DQWHQJDHOKRUQROLEUHGHDFXPXODFLRQHVGHJUDVD
Ŷ 1ROLPSLHFRQHVSRQMLOODVGHPHWDO3XHGHQGHVSUHQGHUVH
pedazos de la esponjilla y tocar partes eléctricas,
provocando un riesgo de descarga eléctrica.
Ŷ (VLPSRUWDQWHPDQWHQHUOLPSLDHOiUHDGRQGHODSXHUWDVH
sella contra el microondas. Sólo use detergentes suaves
no abrasivos aplicados con una esponja limpia o un paño
suave. Enjuague bien.
AGUA SOBRECALENTADA
Ŷ 2VOtTXLGRVFRPRHODJXDFDIpRWpSXHGHQFDOHQWDUVH
arriba del punto de hervor sin que aparenten que están
hirviendo. No siempre existen burbujas visibles o hervor
cuando retira el recipiente del horno microonda. ESTO
38('(5(68/7$5(1/Ë48,'2608<&$/,(17(6
48(+,(59(15(3(17,1$0(17(&8$1'26(
08(9((/5(&,3,(17(2,1752'8&(81$&8&+$5$
8275287(16,/,2(1(//Ë48,'2
Ŷ 3DUDUHGXFLUHOULHVJRGHXQDOHVLyQSHUVRQDO
- No sobrecaliente el líquido.
- Mueva el líquido antes y a la mitad del calentamiento.
- No utilice recipientes rectos con cuellos angostos.
'HVSXpVGHFDOHQWDUSHUPLWDTXHHOUHFLSLHQWHGHVFDQVH
en el horno microonda por un período corto de tiempo,
antes de retirar el recipiente.
- Tenga mucho cuidado cuando inserte una cuchara u otro
utensilio adentro del recipiente.

49-40624-3 5
LEA Y GUARDE ESTAS INSTRUCCIONES
INFORMACIÓN DE SEGURIDAD
INFORMACIÓN IMPORTANTE DE SEGURIDAD
LEA TODAS LAS INSTRUCCIONES ANTES DE USAR
ADVERTENCIA
RECIPIENTES DE COCINA SEGUROS DISEÑADOS PARA HORNEAR, ASAR,
CALENTAR, ACTIVAR Y TOSTAR
Ŷ El horno y la compuerta se tornarán muy calientes
cuando se hornea, asa, calienta, activa o tuesta algo.
Ŷ Los recipientes de cocina se tornarán muy calientes.
Se requerirán guantes de cocina protectores para
manipular los recipientes de cocina.
Ŷ 1RXWLOLFHWDSDVUHFLSLHQWHVQLEROVDVGHFRFFLyQDVDGR
fabricadas de láminas de metal, plástico, cera o papel
cuando cocine con la función de cocción rápida.
Ŷ 8WLOLFHODEDQGHMDPHWiOLFDDQWLDGKHUHQWHGHODPLVPD
forma que utilizaría una bandeja o charola para hornear
plana.
Ŷ 8WLOLFHODOiPLQDGHKRUQHDUGHDOXPLQLRHQODSDUULOODGH
alambre del horno y colóquela en la bandeja metálica
antiadherente cuando hornee en dos niveles, ase o
tueste alimentos.
Ŷ &RORTXHORVDOLPHQWRVGLUHFWDPHQWHHQODVEDQGHMDV
cuando cocine, a menos que el horno le indique hacer
otra cosa.
Ŷ 3XHGHXWLOL]DUHQHOKRUQRFXDOTXLHUSODWRGLVHxDGRSDUD
PLFURRQGDV/DVUHFHWDVGHO/LEURGHFRFLQD$GYDQWLXP
se probaron en recipientes de cocina de vidrio Pyrex
®
y cacerolas de cerámica Corningware
®
/RVWLHPSRV\
resultados de cocción pueden variar cuando se utilizan
otros tipos de recipientes diseñados para hornos
microondas. Colóquelos directamente en las bandejas.
Ŷ 8WLOL]DUODEDQGHMDGHYLGULRWUDQVSDUHQWHFXDQGRKRUQHD
asa, calienta, activa o tuesta puede producir resultados
insatisfactorios.
ADVERTENCIA
UTENSILIOS PARA COCCIÓN RÁPIDA SEGUROS PARA MICROONDAS
Ŷ El horno y la compuerta se tornarán muy calientes
cuando se utiliza la función de cocción rápida.
Ŷ Los utensilios de cocina se tornarán muy calientes
debido a la transferencia de calor proveniente de los
alimentos calentados. Se requerirán guantes de cocina
protectores para manipular los recipientes de cocina.
Ŷ 1RXWLOLFHWDSDVUHFLSLHQWHVREROVDVGHFRFFLyQDVDGR
fabricadas de láminas de metal, plástico, cera o papel
cuando cocine con la función de cocción rápida.
Ŷ 1RFXEUDODEDVHJLUDWRULDSDUULOODGHDODPEUHEDQGHMDV
ni ninguna pieza del horno con lámina de metal. Esto
provocará arqueo voltaico en el horno.
Ŷ 8WLOLFHODEDQGHMDGHPHWDODQWLDGKHUHQWHHODPLVPD
forma que utilizaría una bandeja o charola para hornear
plana.
Ŷ &RORTXHORVDOLPHQWRVGLUHFWDPHQWHHQODVEDQGHMDV
cuando cocine, a menos que el horno le indique otra
cosa.
Ŷ 3XHGHXWLOL]DUHQHOKRUQRFXDOTXLHUSODWRGLVHxDGRSDUD
PLFURRQGDV/DVUHFHWDVGHO/LEURGHFRFLQD$GYDQWLXP
se probaron en recipientes de cocina de vidrio Pyrex
®
y cacerolas de cerámica Corningware
®
/RVWLHPSRV\
resultados de cocción pueden variar cuando se utilizan
otros tipos de recipientes diseñados para hornos
microondas. Colóquelos directamente en las bandejas.
Ŷ 8WLOL]DUODEDQGHMDGHYLGULRWUDQVSDUHQWHPLHQWUDVXWLOL]D
la función de cocción rápida puede producir resultados
insatisfactorios.
/DEDVHJLUDWRULDVLHPSUH
debe estar colocada en su
lugar cuando se utiliza el
horno.
/DEDVHJLUDWRULDVLHPSUH
debe estar colocada en su
lugar cuando se utiliza el
horno.
Coloque la comida
directamente en la bandeja
antiadherente de metal para
realizar la cocción rápida.
Coloque los alimentos
directamente en la bandeja
antiadherente de metal para
hornear a un solo nivel.
Coloque la comida directamente sobre el estante
con rejilla o en el plato adecuado y coloque el
mismo sobre el estante al hornear o calentar en
múltiples niveles.

6 49-40624-3
INFORMACIÓN DE SEGURIDAD
INFORMACIÓN IMPORTANTE DE SEGURIDAD
LEA TODAS LAS INSTRUCCIONES ANTES DE USAR
LEA Y GUARDE ESTAS INSTRUCCIONES
ADVERTENCIA
RECIPIENTES DE COCINA SEGUROS DISEÑADOS PARA
MICROONDAS
Asegúrese de utilizar recipientes de cocina adecuados durante
la cocción a microondas. Se pueden utilizar la mayoría de
las cacerolas, platos para cocinar, tazas de medir, tazas
normales, cerámica o loza que no tengan bordes metálicos o
vidriados con un recubrimiento metálico. Algunos recipientes
de cocina se encuentran marcados como adecuados para
microondas.
Ŷ &RORTXHORVDOLPHQWRVRUHFLSLHQWHSDUDPLFURRQGDV
directamente en la bandeja de vidrio transparente para
cocinar sus alimentos.
Ŷ /DXWLOL]DFLyQGHODEDQGHMDPHWiOLFDDQWLDGKHUHQWH
durante la cocción en microondas puede producir
resultados insatisfactorios.
Ŷ /RVXWHQVLOLRVGHFRFLQDSXHGHQWRUQDUVHPX\FDOLHQWHV
debido a la transferencia de calor proveniente de los
alimentos calentados. Podrían requerirse guantes de
cocina para manipular los recipientes de cocina.
Ŷ 1RXWLOLFHSURGXFWRVGHSDSHOUHFLFODGR/DVWRDOODV
servilletas y papel encerado fabricados de material
reciclado pueden contener partículas metálicas que
pueden causar arqueo voltaico o prender fuego. Se deben
evitar los productos de papel que contienen nylon o
filamentos de nylon, ya que también pueden incendiarse.
Ŷ 8WLOLFHODVOiPLQDVPHWiOLFDV~QLFDPHQWHFRPRVHLQGLFD
en este manual. Cuando utilice la lámina de metal en el
KRUQRPDQWHQJDODOiPLQDSRUORPHQRVƎDOHMDGDGHORV
costados del horno.
Ŷ 6LXWLOL]DXQWHUPyPHWURGHFDUQHPLHQWUDVFRFLQD
asegúrese que sea seguro para utilizarse en hornos
microondas.
Ŷ $OJXQDVEDQGHMDVGHHVSXPDFRPRDTXHOODVHQODVTXH
VHHPSDFDODFDUQHWLHQHQXQDWLULWDGHPHWDOGHOJDGD
empotrada en la parte inferior. Cuando se cocinan con
microondas, el metal puede quemar el fondo del horno o
hacer que arda una toalla de papel.
Ŷ 6HSXHGHXWLOL]DUWRDOODVGHSDSHOSDSHOHQFHUDGR\ODV
envolturas plásticas para cubrir los platos con el propósito
de mantener la humedad y prevenir los salpicones.
Asegúrese de ventilar cortando la envoltura plástica para
que pueda escapar el vapor.
Ŷ 1RWRGDVODVFXELHUWDVSOiVWLFDVVRQDGHFXDGDVSDUD
KRUQRVPLFURRQGDV/HDHQODFDMDODVLQVWUXFFLRQHV
correspondientes.
Ŷ 6HGHEHQFRUWDUSHUIRUDURYHQWLODUFRPRVHLQGLFDHQOD
caja las bolsas de cocina “hervibles” y bolsas plásticas
FHUUDGDVKHUPpWLFDPHQWH'HORFRQWUDULRHOSOiVWLFR
puede reventarse durante o inmediatamente después de
la cocción, resultando en una posible lesión. También,
los recipientes de almacenamiento plásticos deben al
menos estar parcialmente descubiertos debido a que
forman un sello muy ajustado. Al cocinar con recipientes
cubiertos con envoltura plástica de manera muy ajustada,
quite cuidadosamente la cubierta y dirija el vapor fuera y
alejado de manos y rostro.
Ŷ 5HFLSLHQWHVGHFRFLQDSOiVWLFRV²/RVUHFLSLHQWHVGH
cocina diseñados para microondas son muy útiles, pero
deben utilizarse con cuidado. Incluso el plástico diseñado
para microondas podría no tolerar condiciones de sobre
cocción, así como los materiales de vidrio o cerámica
y podrían suavizarse o carbonizarse si se exponen a
períodos cortos de sobre cocción. En exposiciones
más prolongadas a la sobrecocción, los alimentos y los
recipientes de cocina podrían coger fuego.
Ŷ 1RXWLOLFHODSDUULOODGHDODPEUHGHOKRUQRSDUDFRFLQDUFRQ
microonda.
Siga las siguientes pautas:
8WLOLFHSOiVWLFRVVHJXURVSDUDPLFURRQGDV~QLFDPHQWH\
utilícelos estrictamente según las especificaciones del
fabricante.
2. No cocine en el microondas recipientes vacíos.
3. No permita que los niños utilicen recipientes de plástico
sin vigilarlos bien.
/Dbase giratoria siempre
debe estar colocada en su
lugar cuando se utiliza el
horno.
/D bandeja de cristal
transparente siempre deberá
estar en su lugar cuando se
cocina con microondas.

49-40624-3 7
INFORMACIÓN DE SEGURIDAD
INFORMACIÓN IMPORTANTE DE SEGURIDAD
LEA TODAS LAS INSTRUCCIONES ANTES DE USAR
LEA Y GUARDE ESTAS INSTRUCCIONES
INSTRUCCIONES DE CONEXIÓN A TIERRA
ADVERTENCIA
El uso inadecuado del enchufe de conexión a tierra puede provocar un riesgo de
descarga eléctrica.
Tste aparato debe contar con
una conexión a tierra. En caso
de un cortocircuito, la conexión
a tierra reduce el riesgo de una
descarga eléctrica al brindar un
cable de escape para la corriente
eléctrica.
Este aparato se encuentra
equipado con un cable eléctrico
que contiene un cable de conexión a tierra con un enchufe
de conexión a tierra. El enchufe debe conectarse en un
tomacorriente con adecuada instalación y conexión a tierra.
Consulte a un electricista o técnico calificado si no comprende
por completo las instrucciones de conexión a tierra, o si no
sabe si el aparato cuenta con una adecuada conexión a
tierra.
Para el uso de este aparato, es su responsabilidad y
obligación cambiar un tomacorriente de pared estándar de 3
clavijas por uno de 4 clavijas y 30 amperios con adecuada
conexión a tierra.
Bajo ninguna circunstancia corte o quite la clavija a tierra del
cable eléctrico.
No utilice un enchufe adaptador con este aparato.
No utilice un cable de extensión con este aparato. Si el
cable eléctrico es demasiado corto, solicite a un electricista o
técnico calificado la instalación de un tomacorriente cerca del
aparato.
Para un mejor funcionamiento, enchufe este aparato en su
propio circuito eléctrico para evitar que las luces parpadeen,
que el fusible se queme o que el interruptor de circuitos salte.
PRECAUCIONES PARA EVITAR LA POSIBLE
EXPOSICIÓN A ENERGÍA DE MICROONDAS EXCESIVA
(a) No intente hacer funcionar el horno con
la compuerta abierta ya que ésto puede provocar
exposición peligrosa a la energía de microondas. Es
importante no forzar ni dañar los seguros.
(b) No coloque ningún objeto entre la parte frontal del horno
y la compuerta, ni permita que se acumulen residuos de
producto limpiador o detergente, suciedad o polvo en las
superficies de sellado.
(c) No haga funcionar el horno si se encuentra dañado. Es
particularmente importante cerrar bien la compuerta
ODFRPSXHUWDGREODGDRFXUYDGD
ODVELVDJUDV\SHVWLOORVURWRVRIORMRV
VHOORVGHODFRPSXHUWD\VXSHUILFLHVGHVHOODGR
(d) El horno no debe ser ajustado o reparado por ninguna
persona, excepto por personal de mantenimiento
calificado.
Verifique que haya una
conexión a tierra adecuada
antes del uso

8 49-40624-3
EL VENTILADOR
El ventilador funciona automáticamente en ciertas
FRQGLFLRQHVYHUODVHFFLyQ9HQWLODGRU(YLWHHOLQLFLR\
propagación de incendios accidentales de cocción mientras
el ventilador se encuentra en uso.
Ŷ /LPSLHDPHQXGRODSDUWHLQIHULRUGHOPLFURRQGDV1R
permita que la grasa se acumule en el microondas o en
los filtros del ventilador.
Ŷ En caso de un incendio de grasa en las unidades de
superficie debajo del horno de microondas, apague
el recipiente en llamas sobre la unidad de superficie
cubriendo el recipiente por completo con una tapa, una
plancha para galletas o una bandeja plana.
Ŷ 7HQJDFXLGDGRDOOLPSLDUORVILOWURVGHOYHQWLODGRU/RV
agentes de limpieza corrosivos, como los limpiadores de
horno basados en lejía, pueden dañar los filtros.
Ŷ Si flambea alimentos debajo del horno de microondas,
encienda el ventilador.
Ŷ Nunca deje unidades de superficie desatendidas debajo
de su horno de microondas en configuraciones de
FDORUDOWDV/RVDOLPHQWRVTXHKLHUYHQ\VHGHUUDPDQ
pueden provocar humo y derrames grasosos que
pueden prenderse fuego y propagarse si el ventilador
del microondas se encuentra en funcionamiento. Para
minimizar el funcionamiento del ventilador automático,
utilice recipientes de cocción del tamaño adecuado y use
calor alto en las unidades de superficie sólo cuando sea
necesario.
INFORMACIÓN DE SEGURIDAD
INFORMACIÓN IMPORTANTE DE SEGURIDAD
LEA TODAS LAS INSTRUCCIONES ANTES DE USAR
LEA Y GUARDE ESTAS INSTRUCCIONES
AVISO: MARCAPASOS
/DPD\RUtDGHORVPDUFDSDVRVVHHQFXHQWUDQSURWHJLGRVFRQWUDODLQWHUIHUHQFLDGHSURGXFWRVHOHFWUyQLFRVLQFOX\HQGRORV
microondas. Sin embargo, los pacientes que tengan marcapasos deberían consultar a sus médicos si tienen alguna duda.
ADVERTENCIAS DE LA PROPOSICIÓN 65 DEL ESTADO DE CALIFORNIA:
ADVERTENCIA
Este producto contiene uno o más químicos que el Estado de California entiende que producen
cáncer, y defectos en el nacimiento u otros daños reproductivos.

49-40624-3 9
¿Qué es Advantium?
El horno Advantium utiliza tecnologíaavanzada de
Cocimiento rápido paraaprovechar la energía de la luz.
Elhorno Advantium cocina el exterior delos alimentos
muy parecido al calor radiante convencional, al mismo
tiempoen que penetra la superficie para cocinar el
interior simultáneamente.
/DOX]KDOyJHQDHVODIXHQWHSULPDULDGHHQHUJtDXQ
sistema de conveccióny un calentador de cerámica
ayudan alcocimiento, con un “refuerzo de microonda”
DJUHJDGRHQDOJXQRVDOJRULWPRVGHFRFLPLHQWR/RV
alimentos se cocinan parejos y rápido, al mismo
tiempoen que retienen su humedad natural.
El horno Advantium es capaz de cocinar rápido, hornear
con convección, asar, tostar, calentar, fermentar y
FRFLQDUFRQPLFURRQGD/DIXQFLyQGHFRFLPLHQWRUiSLGR
es el mayor beneficio del horno Advantium.
Para cocinar rápido no se requiere precalentar.
Coloque los alimentos en elhorno y comience a cocinar
inmediatamente. Se ahorra tiempo ya que noprecalienta
y debido a que éste cocinamás rápido.
Familiarícese con Advantium
ADVANTIUM: Familiarícese con Advantium

10 49-40624-3
Funciones del Horno
ADVANTIUM: Funciones del horno
1. Plato Giratorio
Para todos los tipos de cocimiento el plato giratorio siempre
debe estar en su lugar, en el piso del horno. Asegúresede
que esté colocado seguro sobre eleje en el centro del horno.
2. Bandeja de Metal
Al cocinar rápido, asar y tostar coloque los alimentos
directamente en la bandeja de metal y coloque el plato
giratorio.
3. Parrilla de Alambre del Horno
Al hornear con convección o calentar coloque los alimentos
directamente en labandeja de metal o plato seguro para
elhorno sobre la parilla de alambre del horno.
4. Bandeja de Vidrio Claro
Coloque el plato giratorio cuando utilice las funciones de
microonda. Coloque los alimentos o el recipiente seguro
paramicroondas directamente en la bandeja.
5. Lámparas Halógena Superior y Calentador Cerámico
8QDOiPSDUDKDOyJHQDGH:\XQFDOHQWDGRUFHUiPLFR
de 700W cocinan la comida desde arriba al cocinar rápido,
asar y tostar.
6. Ventana
Permite que se vea la comida durante la cocción.
7. Manilleta de la Puerta
+DOHSDUDDEULUODSXHUWD
8. Aldabas de la Puerta
Para que el horno funcione la puerta debe estar cerrada con
la aldaba.
9. Calentador de Cerámica Inferior
8QFDOHQWDGRUGHFHUiPLFDGH:FRFLQDORVDOLPHQWRV
por la parte deabajo, al cocinar rápido, asar otostar.
10. Panel de Control
/DVWHFODVXWLOL]DGDVSDUDRSHUDUHOKRUQRHVWiQXELFDGDVHQ
el panel decontrol.
11. Sistema de Convección
8QHOHPHQWRGHFDOHQWDPLHQWRGH:FRFLQDORV
alimentos con unventilador de convección haciendocircular
el aire caliente a través dela cavidad para hornear con
convección y calentar.
A través de este manual, las características y apariencia pueden variar de las de su modelo
1
5
6
7
8
9
11
10
2
3 4

49-40624-3 11
Controles
ADVANTIUM: Controles
Con su horno advantium usted podrá cocinar con luces halógenas de altaintensidad, calentadores de cerámica,
HOHPHQWRGHFDOHQWDPLHQWRGHFRQYHFFLyQ\RFRQHQHUJtDGHPLFURRQGDFRQYHQFLRQDO
SELECTOR DIAL (dial selector)
Girepara seleccionar. Presione para ingresar. Gire para seleccionar
alimentos, nivel de energía o selecciones de temperatura. También
XWLOLFHHOGLDOSDUDDXPHQWDUJLUHHQVHQWLGRGHODVDJXMDVGHOUHORM
RGLVPLQXLUJLUHHQVHQWLGRFRQWUDULRDODVDJXMDVGHOUHORMHOWLHPSR
Simplemente presione el botón para ingresar la selección.
BACK (regreso)
Presione este botón para retroceder uno o más niveles del proceso de
programación.
HELP (ayuda)
Presione este botón para averiguar más sobre las funciones del horno.
DISPLAY (pantalla)
Muestra las selecciones de las funciones e información sobre el horno
cuando se encuentra en uso.
START/PAUSE (inicio/pausa)
Presione esta tecla para iniciar o detener cualquier función de
cocimiento.
CLEAR/OFF (borrar/apagar)
3UHVLRQHHVWDWHFODSDUDFDQFHODU72'26ORVSURJUDPDVGHOKRUQR
con excepción del reloj,la luz automática nocturna, el cronómetro,
elventilador del respirador y la luz de superficie.
SPEEDCOOK (cocimiento rápido)
Presione este botón para acceder al menú predeterminado de cocción
rápida o para configurar su propio programa de cocción
CONV BAKE (hornear con convección)
Presione esta tecla para hornear con convección.
MICROWAVE (microonda)
Presione esta tecla para accesar el menú delmicroonda o para ajustar
su propio programade microonda.
SETTINGS (ajustes)
Presione esta tecla para programar el reloj yaccesar al plato giratorio
RQRIIFRQYHUVLyQDXWRPiWLFDOX]QRFWXUQDDXWRPiWLFDYROXPHQGHO
pito, recordatorio y unidadesde temperatura.
COOKING OPTIONS (opciones de coc.)
Presione este botón para acceder a repetir el último, asar, leudar,
tostar, calentar e inicio retardado.
MICRO 30 SECS (micro 30 segundos)
Inicia el microondas durante 30 segundos de cocción. Se agregan 30
segundos adicionales al tiempo de cocción restante cada vez que se
presiona el botón.
TIMER ON/OFF (cronómetro on/off)
Presione este botón para retroceder uno o más niveles del proceso de
programación.
SURFACE LIGHT (luz de la superficie)
Presione esta tecla para encender y apagarla luz de la plancha.
VENT (ventilador)
Presione esta tecla para encender y apagarel ventilador del respirador.

12 49-40624-3
Cocción Rápida
COCCIÓN RÁPIDA
Nivel de potencia de la función de cocción rápida
El Advantium utiliza energía de las lámparas halógenas de alta
intensidad, delcalentador de cerámica, y de microondas para
cocinar simultáneamente los alimentos porarriba, abajo y en el
interior, y sellar lahumedad y el sabor.
Cuando utilice el menú predeterminado dealimentos, los
niveles de potencia yaestán seleccionados para usted.
Sin embargo, estos se pueden ajustar al utilizar el menú
SUHGHWHUPLQDGRGHDOLPHQWRV\0<5(&,3(PLUHFHWD
Cada nivel de potencia le ofrece energíade la lámpara
halógena o del calentadorde cerámica y de microonda durante
cierto porcentaje de tiempo o le ofrece calentamiento para el
sistema de convección.
Por ejemplo:
8± /iPSDUDKDOyJHQDVXSHULRU\&DOHQWDGRU&HUiPLFR
encendida el 70% del tiempo.
/± &DOHQWDGRUGHFHUiPLFDLQIHULRUHQFHQGLGRHOGHO
tiempo.
M–03 Microonda encendido el 30% del tiempo.
NOTA: Tenga cuidado al ajustar los niveles de potencia de
manera que no cocinelos alimentos demasiado o muy poco.
3UHVLRQHODWHFOD63(('&22.\VHOHFFLRQHVXFRPLGD
VLJDODVLQVWUXFFLRQHVGHXVRGHOPHQ~SUHGHWHUPLQDGRGH
FRFLPLHQWRUiSLGR
&XDQGRODSDQWDOODPXHVWUH(',76$9(R67$57JLUHHO
GLDOSDUDVHOHFFLRQDU(',7HGLWDU
Si no desea cambiar ninguno de losajustes, simplemente
presione eldial y pase a la siguiente selección.
3. Presione el dial si no desea ajustar el tiempo de
cocimiento.
4. Gire el dial en dirección de las manecillas de reloj para
aumentar o al contrario para disminuir el nivelde potencia
superior. Presione eldial para seleccionar.
5. Gire el dial para cambiar el nivel depotencia inferior.
Presione el dial para seleccionar.
6. Gire el dial para cambiar el nivel de potencia de microonda.
Presione el dial para seleccionar.
Note que la selección de niveles superior e inferior limitan el
nivel de potencia de microonda. Por ejemplo, si el nivel de
potencia superior o inferior se ajusta a 7, el microonda no se
podrá ajustar más alto que 3.
3UHVLRQHODWHFOD67$573$86(RHOGLDOVHOHFWRUSDUD
comenzara cocinar.
ADVERTENCIA
Riesgo de quemaduras
Cuando utilice los programas de cocción rápida, recuerde que el horno, compuerta y los platos se
¡encontrarán muy calientes!
$QWHVGHXWLOL]DUVXKRUQRSRUSULPHUDYH]VHGHEHSURJUDPDUHOUHORM&RQVXOWHODVHFFLyQGH&ORFNUHORM
Antes de empezar, asegúrese que se encuentre colocada la base giratoria. Si es necesario, utilice la bandeja de metal
antiadherente y sus propios recipientes de cocina de cerámica o vidrio.
El plato giratorio debe estar
colocadoen su lugar siempre que
utiliza el horno..
Para cocinar ràpido coloque los
alimentos directamente en la
bandeja de metal.
Ŷ (OKRUQRVHGHWHQGUiVLDEUHODSXHUWDGXUDQWHHOFRFLPLHQWR
\DSDUHFHUi3$86(HQODSDQWDOOD3DUDUHDQXGDUHO
FRFLPLHQWRFLHUUHODSXHUWH\SUHVLRQH67$573$86(
Ŷ 6HOHFFLRQH(',7SDUDFDPELDUHOWLHPSRRORVQLYHOHVGH
potencia en cualquier momento durante el cocimiento.
Ŷ 6HSURGXFHKXPRDOFRFLQDUUiSLGRFDUQHVHQHOKRUQR
Ŷ 3DUDFRFLQDUXQWLHPSRDGLFLRQDOGHVSXpVGHTXHWHUPLQyHO
ciclo de cocimiento, utilice lafunción para Reanudar, como
se le indica enla pantalla.

49-40624-3 13
Cocción Rápida
COCCIÓN RÁPIDA
Consejos de cocción
Arrange food on the metal trays as shown to ensure consistent
and even browning.
Foods can touch but should not overlap.
/DFDUQHSROORSHVFDGRRPDULVFRVIUHVFRVTXHHVWiQFRQJH-
ODGRVGHEHQGHVFRQJHODUVHDQWHVGHFRFLQDUORV3XHGHXWLOL]DU
ODIXQFLyQGHGHVFRQJHODFLyQGHOPLFURRQGD6LJDODVLQVWUXF-
cionesdel paquete para otros alimentos congelados empaca-
dos.
Recipientes para cocción rápida
ADVERTENCIA
Riesgode quemaduras
Ŷ /RVUHFLSLHQWVVHFDOHQWDUiQ1HFHVLWDUiJXDQWHVSDUD
manipular los recipientes.
Ŷ Siga las sugerencias para el recipienteque aparecen en la
SDQWDOODGHOKRUQRRHQHO/LEURGH5HFHWDV
Ŷ Cuando cocine coloque los alimentos directamente en la
bandeja de metal o en la bandeja de metal para asar, a
menos de que el horno le indique lo contrario.
Ŷ 8WLOLFHODEDQGHMDGHPHWDOGHODPLVPDPDQHUDHQTXH
utilizaría una pana parahornear baja o una bandeja para
hornear.
Ŷ Ademas de los utensilios suministrados,usted puede
utilizar platos de cacerolasque
no sean de metal, platos
para tartasy otros recipientes
seguros para el calor.
Colóquelos directamente en la
bandejade metal.
Ŷ Asegúrese de seleccionar un tamaño querote fácilmente.
Ŷ Coloque la bandeja de metal o la bandeja de metal para
asar en el plato giratorio. Coloque el recipiente de vidrio o
cerámicaen la bandeja.
Ŷ Cuando cocine rápido no utilice recipientes ni cubiertas
hechas de papel, plástico o aluminio.
Patrón circular
(MHPSORELVFRFKRV
JDOOHWDV
Patrón de rayo
(MHPSORFURLVVDQWV
SDOLWRVGHSDQ
8QDFDSD
(MHPSORDSHULWLYRV
Patrón lado a lado
(MHPSORFDUQHV\SROORV
Nivel de potencia de la función de cocción rápida (cont)
Siga estas guías generales cuando seleccione los mejores
ajustes de U=, L=, y M= para sus recetas favoritas.
8 6HOHFFLRQHXQDMXVWHPiVDOWRSDUDDOLPHQWRVGHOJDGRV
TXHUHTXLHUHQXQFDIpGRUDGRHQODSDUWHGHDUULEDSRU
ejemplo: filetes de pescado, tostadas, pechugas de
SROORGHVKXHVDGDV6HOHFFLRQHXQDMXVWHPiVEDMRSDUD
alimentos gruesos o con muchocontenido de azúcar o
JUDVDSRUHMHPSORPXIILQVURVWL]DGRVFDFHURODVRTXH
requieran un tiempo decocimiento más largo.
/ 6HOHFFLRQHXQDMXVWHPiVDOWRSDUDDOLPHQWRVJUXHVRVR
densos que norequieren un cocimiento rápido en elcentro
SRUHMHPSORVWHDNVFDFHURODV6HOHFFLRQHXQDMXVWHPiV
EDMRSDUDDOLPHQWRVGHOJDGRVSRUHMHPSORJDOOHWDV
0 6HOHFFLRQHXQDMXVWHPiVDOWRSDUDDFRUWDUHOWLHPSRGH
FRFLPLHQWRSDUDDOLPHQWRVGHQVRVRSHVDGRVSRUHMHPSOR
FDFHURODVSROORVHQWHURV6HOHFFLRQHXQDMXVWHPiVEDMR
SDUDDOLPHQWRVGHOLFDGRVSRUHMHPSORSDQHVRDOLPHQWRV
que requierenun período de cocimiento más largopara
REWHQHUUHVXOWDGRVVXDYHVSRUHMHPSORVWHDNVFDUQH
SDUDDVDU

14 49-40624-3
Menú predeterminado de cocimiento rápido
El Advantium está preconfigurado para cocinar más de 175
comidas populares.
3UHVLRQHODWHFOD63(('&22.
Si no se realiza ninguna entrada durante 15 segundos, la
pantalla volverá a quedar en blanco.
2. Gire el dial selector para seleccionar la categoría del tipo
de alimento que desea. Presione eldial para seleccionar.
3. Gire el dial selector para seleccionar el alimento específico
VHOHFFLyQGHPHQ~3UHVLRQHHOGLDOSDUDVHOHFFLRQDU
4. Gire el dial selector para seleccionar la cantidad, tamaño
\RFRFLPLHQWRVLORUHTXLHUHHOKRUQROHLQGLFDUi3UHVLRQH
el dial despuésde cada selección.
8QDYH]TXHODSDQWDOODPXHVWUH(',7HGLWDU6$9(
JXDUGDUR67$57LQLFLDUSUHVLRQHODWHFOD67$57
3$86(RHOGLDOVHOHFWRUSDUDFRPHQ]DUDFRFLQDU
9ROWHHODFRPLGDFXDQGRHOKRUQROHLQGLTXH7851)22'
29(5SDUDFLHUWRWLSRGHFRPLGD
&XDQGRHOKRUQRLQGLTXH&+(&.IRU'21(1(66UHYLVH
SDUDYHUVLODFRPLGDHVWiFRFLQDGDDVXJXVWRSDUD
FLHUWRVDOLPHQWRV
Si desea revisar los ajustes durante el cocomiento presione el
dial selector.
Si entró una selección no deseada, simplemente presione
en cualquier momento latecla BACK y vuelva a entrar las
selecciones deseadas.
Se puede producir humo cuando cocinarápido carne en el
horno.
Cocción Rápida
COCCIÓN RÁPIDA

49-40624-3 15
Selecciones del menú predeterminado de cocimiento rápido
'HDFXHUGRFRQOD*XtDGHOD86'$VHGHEHFRFLQDUODFDUQH
a una temperatura INTERNA de por lo menos 160ºF y el pollo
a una tempreatura INTERNA de por lo menos 180ºF.
Cocinar a estas temperaturas generalmente protege contra
efermedades producidas por los alimentos. Para más
información visite la pagina www.foodsafety.gov.
Categoría Alimento Selección del Menú
Aperitivos Bocadillos de Bagel
Palitos de Queso
Rollos (congelados)
Jalapeño Poppers
Bolitas de Carne (cong.)
Nachos
Nueces, Rostizadas
Aros de Cebolla
Rollos de Pizza
Pretzels Suaves (cong.)
Taquitos (congelados)
Panes Biscochos
Palitos de Pan
Pan de Queso
Rollos
Rollos para la cena
Pan de ajo
Tostadas Texanas
Desayumo Waffles Belgas
Pizza de Desayuno
Tostadas a la Francesa
Tortitas de Papa
Panqueques
(congelados)
Rollos (refrigerados)
Biscocho con Salchicha
Chorizos
Tortitas de Salchicha
Strudel (congelados)
Empanadas
Waffles (congelados)
Categoría Alimento Selección del Menú
Pollo Con hueso
Sin Hueso
Filete (congelado)
Dedos (congelado)
Frito (congelado)
Nugget (congelado)
Tortita (congelado)
Tierno (congelado)
Alas (congelado)
Entero
Postres Mezcla de Brownie
Galletas
Tartas (fruta fresca)
Cubierta para Tartas
Rollos (refrigerados)
Empanadas
Entradas Rollos (congelados)
Pan de carne (9x5)
Taquitos (congelados)
Carnes Filet Mignon
Hamburguesas
Chuletas de Cordero
Chuletas de Cerdo
Ribeye Steak
Sirloin Steak
Strip Steak
TBone Steak
Tenderloin
Pizza Deli/Fresca
Pizza Congelada
Utilice corteza precocida
Papas Papa horneada
Tortitas de papa
Papas congeladas
Nugetts congelados
Camote/Jícama
Categoría Alimento Selección del Menú
Sándwich Banderillas (congelados)
Rollo de Hot Dog
Sandwich a la Parrilla
Sandwich relleno
Mariscos Filetes de Bacalao
Palitos de pescado
(cong.)
Empanizado congelado
Filete de pescado reloj
Salmón
Mariscos
Steak de Pescado
Espada (1”)
Talapia
Steaks de Atún
Pescado blanco/Bacalao
Guarnición Cacerola
Frijoles Fritos (16 oz)
Espárragos rostizados
Pimentón rostizado
Chiles rostizados (36)
Maíz rostizado (14)
Ajo rostizado
Vegetales mixtos
rostizados
Escalopas de papas
Cocción Rápida
COCCIÓN RÁPIDA

16 49-40624-3
Mi Receta cocimiento rápido personalizado
El Advantium le ofrece flexibilidad
alcocinar sus platos favoritos.
Si desea cocinar una comida que nose
encuentra entre nuestras selecciones
predeterminada, utilice My Recipepara
personalizar el cocimiento rápido.
3UHVLRQHODWHFOD63(('&22.
\VHOHFFLRQH0<5(&,3(PL
UHFHWD/XHJRSUHVLRQHHOGLDOSDUD
seleccionar. Seleccione NEW RECIPE
UHFHWDQXHYD
Si no se realiza ninguna entrada
durante 15 segundos, la pantalla
volverá a quedar en blanco.
2. Gire el dial selector para seleccionar el tiempo de
cocimiento. Presione el dial para seleccionar.
/DSDQWDOODOHLQGLFDUiTXHGHEHVHOHFFLRQDUHOQLYHOR
niveles de potencia.
3. Gire el dial para seleccionar el nivelde potencia superior.
Gire el dial en dirección de las manecillas del relojpara
aumentar o en dirección contrariapara disminuir el nivel de
potencia superior. Presione el dial para seleccionar.
4. Gire el dial para seleccionar el nivel depotencia inferior.
Presione para seleccionar.
5. Gire el dial para seleccionar el nivel depotencia de
microonda. Presione paraseleccionar.
3UHVLRQHODWHFOD67$573$86(RSUHVLRQHHOGLDOVHOHFWRU
para comenzara cocinar.
Para sugerencias sobre el nivel de potencia o tiempo de
cocimiento, utilice la guíade cocimiento, libro de recetas o las
selecciones del menú predeterminado de cocimiento rápido.
Mi Receta para entrar y salvar
Agrega y guarda hasta 30 de sus recetas para cocimiento
rápido o microonda, o las recetas del menú predeterminado de
FRFLPLHQWRUiSLGRFRPRXQDUHFHWDIDYRULWD8QDYH]UHDOL]DGD
puedellamar rápidamente y en cualquier momento su receta
favorita para cocinar la comida como a usted le gusta!
3UHVLRQHODWHFOD63(('&22.R0,&52:$9(
*LUHHOGLDOSDUDVHOHFFLRQDU0<5(&,3(PLUHFHWD
Presione el dial para seleccionar.
*LUHHOGLDOKDVWDTXHDSDUH]FD1(:5(&,3(QXHYD
UHFHWD3UHVLRQHHOGLDOSDUDVHOHFFLRQDU
$SDUHFHUi(17(5&22.7,0(HQWUHHOWLHPSRGH
FRFLPLHQWR*LUHHOGLDOSDUDHVFRJHUHOWLHPSRGH
cocimiento. Presione el dial para seleccionar.
/DSDQWDOODOHLQGLFDUiTXHGHEHVHOHFFLRQDUORVQLYHOHV
de potencia.
5. Gire el dial en dirección de las manecillas de reloj para
aumentar o al contrario para disminuir el nivel de potencia
superior. Presione el dial para seleccionar.
8WLOLFHODJXtDGHFRFLPLHQWRROLEURGHUHFHWDVSDUDYHU
sugerencias del nivel de potencia y del tiempo de cocimiento.
6HOHFFLRQH6$9(JXDUGDUGHOUHVXPHQGHODSDQWDOOD
$SDUHFHUi63(//7+()22'1$0(GHOHWUHHHO
QRPEUHGHODFRPLGD*LUHHOGLDOKDVWDODSULPHUDOHWUD
dela descripción de su comida y presioneel dial para
seleccionar. Continúeeste proceso hasta deletrear el
UHVWRGHOQRPEUH3UHVLRQHODWHFOD67$573$86(SDUD
guardar la receta y sunombre.
Mi Receta encontrar y utilizar
Para encontrar y utilizar las recetas guardadas:
3UHVLRQHODWHFOD63(('&22.R0,&52:$9(
*LUHHOGLDOSDUDVHOHFFLRQDU0<5(&,3(PLUHFHWD
3. Aparecerán en la pantalla los nombresde las recetas que
ha guardado.
4. Gire el dial hasta que aparezca lareceta que desea y
presione el dialpara seleccionar.
3UHVLRQHODWHFOD67$573$86(RHOGLDOVHOHFWRUSDUD
comenzar el cocimiento.
Mi Receta para ajustar o cambiar
Para ajustar o cambiar las recetas guardadas: :
3UHVLRQHORVERWRQHV63(('&22.FRFFLyQUiSLGDR
0,&52:$9(PLFURRQGDV
*LUHHOGLDOSDUDVHOHFFLRQDU0<5(&,3(PLUHFHWD
3. Gire el dial hasta la receta que desea cambiar. Presione el
dial para ingresar. Aparecerán las configuraciones actuales.
(OLMD(',7HGLWDU
5. Gire el dial para ajustar el tiempo de cocción y presione el
dial para ingresar.
6. Gire el dial para cambiar los niveles de energía y presione
el dial para ingresar cada nivel de energía.
7. Gire el dial para cambiar el nombre de la receta. Presione
el dial para ingresar cada cambio de letra.
3UHVLRQHHOERWyQ67$573$86(LQLFLDUSDXVDSDUD
guardar la receta modificada.
Para nivel de energía y sugerencias de tiempo de cocción,
utilice su guía de cocción o recetario.
Cocción Rápida
COCCIÓN RÁPIDA

49-40624-3 17
Mi Receta para eliminar
Para eliminar las recetas guardadas:
3UHVLRQHODWHFOD63(('&22.R0,&52:$9(
*LUHHOGLDOSDUDVHOHFFLRQDU0<5(&,3(PLUHFHWD
3. Seleccione la receta que desea eliminar.
*LUHHOGLDOSDUDVHOHFFLRQDU'(/(7(HOLPLQDU
Lo que es normal
Tiempos de cocimiento
Ŷ Al cocinar rápido con el menú predeterminadode alimentos,
podrá ver en la pantalla OPTIMIZING COOK TIME
RSWLPL]DQGRHOWLHPSRGHFRFLPLHQWRYDULRVVHJXQGRV
GHVSXpVGHSUHVLRQDU67$53$86((OKRUQRGHWHFWD
automáticamente el nivel del voltaje eléctrico de su casa y
ajusta el tiempo de cocimiento hacia arriba o hacia abajo
para un cocimiento adecuado.
Ventiladores de Enfriamiento
Ŷ /RVYHQWLODGRUHVVHHQFHQGHUiQGXUDQWHHOFRFLPLHQWR$O
final, éstos continuarán durante un tiempo corto para enfriar
ORVFRPSRQHQWHVLQWHUQRV/RVYHQWLODGRUHVVHDSDJDUiQ
automáticamente cuando las piezas internas del horno
HVWpQIUtDV/DSDQWDOODPRVWUDUi³2YHQLV&RROLQJ´HOKRUQR
VHHVWiHQIULDQGR
Ŷ 0LHQWUDVHOKRUQRHVWpHQFHQGLGRHOUHVSLUDGRUHPLWLUiXQ
aire caliente.
Ŷ &XDQGRHOKRUQRHVWiFDOLHQWHHOYHQWLODGRUGHHVFDSHVH
enciende automáticamente.Vea la sección del Ventilador
Automático.
Luces
Ŷ &XDQGRHOKRUQRHVWiHQFHQGLGRODOX]HVWDUiYLVLEOH
alrededor de la puerta o de lacaja exterior.
Ŷ /DVOXFHVKDOyJHQDVVHRSDFDUiQ\VHHQFHQGHUiQ\
apagarán durante el ciclo de cocimiento rápido, algunas
veces a niveles de potencia completa. Esto es normal. El
hornodetecta el nivel de calor y se ajusta automáticamente.
Calor del Horno
Ŷ /RVFLFORVGHFRFLPLHQWRUiSLGRQRUHTXLHUHQXQWLHPSR
de precalentamiento. El horno comienzaa cocinar
inmediatamente.
Ŷ /DSXHUWD\HOLQWHULRUGHOKRUQRHVWDUiQPX\FDOLHQWHV
Tenga cuidado al abrir la puerta y retirarlos alimentos.
Tenga cuidado del vapor quese puede salir alrededor de la
puerta.
Ŷ &XDQGRFRFLQHUiSLGRQRXWLOLFHUHFLSLHQWHVQLFXELHUWDV
hechas de papel, plástico o aluminio.
Ŷ &XDQGRFRFLQHSRUXQSHUtGRODUJRGHWLHPSRHOKRUQR
puede reducir automáticamente los niveles de potencia
para mantener el nivelapropiado de calor en el horno.
Sonidos
Ŷ (VQRUPDOHVFXFKDUGXUDQWHHOFRFLPLHQWRFKDVTXLGRV\
el soplador del ventilador. El controlelectrónico enciende y
apaga los componentes.
Interferencia
Ŷ 6HSXHGHREVHUYDULQWHUIHUHQFLDGH79UDGLRFXDQGRXWLOL]D
el microonda, similar a la interferencia causada por otros
aparatos pequeños.Esto no indica un problema con el
microonda.Mueva el radio o la TV lo más lejos posible
GHOPLFURRQGDRUHYLVHODSRVLFLyQGHODDQWHQDGHOD79
radio.
Cocción Rápida
COCCIÓN RÁPIDA

18 49-40624-3
HORNEAR CON CONVECCIÓN
Hornear con Convección
+RUQHDUFRQFRQYHFFLyQOHSHUPLWH
cocinar los alimentos de la misma
manera que un horno convencional,
utiliza un elemento para calentar el aire
adentro del horno. Se puede programar
cualquier temperatura entre 250ºF a
450ºF.
El ventilador circula suavemente el
aire caliente a través del horno, sobre
\DOUHGHGRUGHORVDOLPHQWRV'HELGR
a que el aire caliente se mantiene
en constante movimiento, algunos
alimentos se cocinan un poco más
rápido, a diferencia de los hornos de
cocimiento regular.
Antes de comenzar, asegúrese que la parrilla de metal esté en
su lugar. Se pueden utilizar ambas parrillas en los dos niveles
de cocimiento.
ADVERTENCIA
Riesgode quemaduras
Cuando hornee, recuerde que el horno, la puerta y
losplatos están muy calientes.
'HDFXHUGRFRQOD86'$FRFLQHODFDUQHDXQDWHPSHUDWXUD
INTERNA de por lo menos 160ºF, el pollo a una tempreatura
INTERNA de por lo menos 180ºF. Cocinar a estas
temperaturas generalmente protege contra enfermedades
producidas por los alimentos. Para más información visite la
página www.foodsafety.gov.
Cómo se Hornea con Convección
3UHVLRQHHOERWyQ&219%$.(KRUQHDUSRUFRQYHFFLyQ
2. Gire el dial para configurar la temperatura y presione el dial
para ingresar
3. Presione el dial para ingresar y confirmar la selección.
Para iniciar de inmediato sin configurar un tiempo de cocción,
VHOHFFLRQH67$57LQLFLDURSUHVLRQHHOERWyQ67$573$86(
LQLFLDUSDXVD
Para configurar un tiempo de cocción:
*LUHHOGLDO\VHOHFFLRQH&22.7,0(WLHPSRGHFRFFLyQ
2. Gire el dial para configurar el tiempo de cocción y presione
el dial para ingresar.
3. Para iniciar el tiempo de cocción de inmediato, coloque los
alimentos en el horno y seleccione START COOK TIME
LQLFLDUWLHPSRGHFRFFLyQ/XHJRSUHVLRQHHOGLDORHO
ERWyQ67$573$86(LQLFLDUSDXVDSDUDLQLFLDU(OWLHPSR
de cocción iniciará de inmediato la cuenta regresiva.
Para iniciar el tiempo de cocción después del
SUHFDOHQWDPLHQWRVHOHFFLRQH67$5735(+($7LQLFLDU
SUHFDOHQWDPLHQWR(OKRUQRHPLWLUiXQDVHxDOFXDQGRDOFDQFH
la temperatura de cocción. Coloque los alimentos en el horno y
SUHVLRQHHOERWyQ67$573$86(LQLFLDUSDXVD(OWLHPSRGH
cocción iniciará la cuenta regresiva.
Si la puerta del horno se abre durante la cocción, “Pause”
SDXVDDSDUHFHUiHQODSDQWDOOD&LHUUHODSXHUWD\SUHVLRQHHO
ERWyQ67$573$86(LQLFLDUSDXVD
/RVWLHPSRVGHFRFFLyQVHPXHVWUDQHQKRUDV\PLQXWRV\
pueden configurarse hasta un máximo de 2 horas 59 minutos.
El tiempo puede cambiarse durante la cocción girando el dial.
Consejos de cocimiento
Ŷ6HUHFRPLHQGDQSDQDVGHPHWDOSDUDWRGRVORVWLSRVGH
productos horneados, pero especialmente cuando es
importante dorar.
Ŷ/DVSDQDVGHPHWDORVFXUDVRFRQDFDEDGRPDWHVRQ
mejores para panes y tartaletas, ya que absorben el calor y
producen cortezas más crujientes.
Ŷ/DVSDQDVGHDOXPLQLREULOODQWHVRQPHMRUHVSDUDSDVWHOHV
galletas o muffins, ya que reflejan el calor y ayudan a
producir una corteza ligeramente suave.
Ŷ/DVFDFHURODVGHYLGULRRGHDOHDFLyQGHFHUiPLFD\YLGULRR
los platos para hornear son mejores para recetas con huevo
y queso debido a la fácil limpieza del vidrio.
Ŷ$OKRUQHDUHQXQVRORQLYHOXWLOLFHHOLQIHULRU/RVVXMHWDGRUHV
superiores sólo deben utilizarse para hornear en los dos
niveles.
Cuando hornee o caliente en los dos niveles
coloque el alimento en la bandeja de metal
o en elplato apropiado y colóquelo sobre la
parrilla dealambre del horno.

49-40624-3 19
ASAR Y TOSTAR
Asar y Tostar
Asar y tostar utilizan las lámparas superiores y el calentador
inferior para asar o tostar los alimentos similar al horno
convencional.
Antes de comenzar asegúrese que el plato giratorio esté en
su lugar. Al tostar utilice la bandeja de metal y al asar utilice la
bandeja de metal o la bandejade metal para asar
ADVERTENCIA
Riesgode quemaduras
Al asar o tostar, recuerde que la cavidad del horno, la
puerta del horno y platos va a ser muy caliente!
Cómo asar
3UHVLRQHHOERWyQ&22.,1*237,216RSFLRQHVGH
FRFFLyQ
*LUHHOGLDOD%52,/DVDU\SUHVLRQHSDUDLQJUHVDU
3. Coloque los alimentos en el horno y seleccione START
LQLFLDURSUHVLRQHHOERWyQ67$573$86(LQLFLDUSDXVD
para iniciar.
Si la puerta del horno se abre durante la cocción, “Pause”
SDXVDDSDUHFHUiHQODSDQWDOOD&LHUUHODSXHUWD\SUHVLRQHHO
ERWyQ67$573$86(LQLFLDUSDXVD
Cómo tostar
3UHVLRQHHOERWyQ&22.,1*237,216RSFLRQHVGH
FRFFLyQ
*LUHHOGLDOD72$67WRVWDU\SUHVLRQHSDUDLQJUHVDU
3. Gire el dial para configurar el tiempo de tostado, coloque
ORVDOLPHQWRVHQHOKRUQR\VHOHFFLRQH67$57LQLFLDU
RSUHVLRQHHOERWyQ67$573$86(LQLFLDUSDXVDSDUD
iniciar.
Si la puerta del horno se abre durante la cocción, “Pause”
SDXVDDSDUHFHUiHQODSDQWDOOD&LHUUHODSXHUWD\SUHVLRQHHO
ERWyQ67$573$86(LQLFLDUSDXVD
Consejos de cocimiento para asar
Ŷ/RVWLHPSRVGHDVDUSXHGHQVHUPiVFRUWRVHQHOKRUQR
Advantium ya queutiliza lámparas halógenas. Asegúre
se de monitorear de cerca los alimentos para obtener los
resultados deseados.
Ŷ3DUDPHMRUHVUHVXOWDGRVDODVDUFRORTXHORVDOLPHQWRV
directamente en la bandeja de metal para asar
Ŷ6HSURGXFHKXPRDODVDUFDUQHHQHOKRUQR
Ŷ6LSUHFDOLHQWDHOKRUQRSDUDDVDUFDUQHSUHFDOLHQWHFRQOD
bandeja de metal para asar en el horno y para una mejor
brasa en la carne colóquela sobre la bandeja caliente.
Ŷ3DUDXQPHMRUUHQGLPLHQWRFXDQGRDVHFDUQHSUHFDOLHQWHHO
horno durante 5 minutos. El pollo tiene mejores resultados
sin precalentar el horno.
Ŷ6HGHEHQYROWHDUORVDOLPHQWRVDODPLWDGGHOWLHPSRGH
asado.
Ŷ5HWLUHODVSLH]DVPiVILQDVSDUDHYLWDUTXHVHFRFLQHQ
demasiado y que se sequen.
Consejos de cocimiento para tostar
Ŷ8WLOLFHODEDQGHMDGHPHWDOSDUDPHMRUHVUHVXOWDGRVDOWRVWDU
Ŷ1RQHFHVLWDGDUOHYXHOWDDODPD\RUtDGHORVDOLPHQWRVV
Ŷ$OWRVWDUQXHYHVP~HYDORVDODPLWDGGHOWLHPSRGH
cocimiento.
Ŷ7XHVWHODVSLH]DVPiVJUXHVDVSRUPiVWLHPSRODVSLH]DV
delgadas menos tiempo.
Cuando utilice el horno el
plato giratorio debeestar
siempre ensu lugar.
Coloque los alimentos
directamente.

20 49-40624-3
Calentar y Fermentar
CALENTAR Y FERMENTAR
Calentar
/DIXQFLyQ:$50PDQWHQGUiFDOLHQWHODVFRPLGDVFRFLQDGDV
a temperaturas de servicio. Siempre comience con la comida
FDOLHQWH8WLOLFHUHFLSLHQWHV\XWHQVLOLRVTXHSXHGDQVRSRUWDU
temperaturas hasta 230ºF.
3UHVLRQHODRSFLyQ&22.,1*237,216RSFLRQHVGH
FRFLPLHQWR
2. Gire el dial para seleccionar WARM.Presione el dial para
seleccionar
3. Gire el dial para seleccionar el nivel de humedad que
desea. Vea el cuadro y consejos a continuación.Presione
el dial para seleccionar.
6HOHFFLRQH67$57LQLFLDURSUHVLRQHHOERWyQ67$57
3$86(LQLFLDUSDXVDSDUDLQLFLDU(OKRUQRFRPLHQ]DD
calentar de inmediato e indica la cantidad de tiempo de
calentamiento que se debe completar.
Si la puerta del horno se abre durante el calentamiento,
³3DXVH´SDXVDDSDUHFHUiHQODSDQWDOOD&LHUUHODSXHUWD\
SUHVLRQHHOERWyQ67$573$86(LQLFLDUSDXVD
Para hacer crujiente los alimentos viejos:
Ŷ6HOHFFLRQHHODMXVWHGH&5,633UHFDOLHQWHHOKRUQRGXUDQWH
10 minutos.
NOTA: Sólo precaliente cuando desee hacer crujiente los
alimentos viejos.
Ŷ&RORTXHODFRPLGDRORVSODWRVGLUHFWDPHQWHHQODEDQGHMD
de metal.
Ŷ5HYLVHSDUDYHUVLHVWiFUXMLHQWHGHVSXpVGHPLQXWRV6L
es necesario, agregue más tiempo.
Consejos para alimentos crujientes:
Ŷ1RFXEUDORVDOLPHQWRV
Ŷ1RXWLOLFHUHFLSLHQWHVSOiVWLFRVQLHQYROWRULRVSOiVWLFRV
Ŷ1RHVQHFHVDULRSUHFDOHQWDUDPHQRVTXHGHVHHKDFHU
FUXMLHQWHDOLPHQWRVYLHMRV9HD+DFHUFUXMLHQWHORVDOLPHQWRV
YLHMRV
Consejos para alimentos húmedos:
Ŷ&XEUDORVDOLPHQWRVFRQXQDWDSDRFRQSDSHOGHDOXPLQLR
Ŷ1RXWLOLFHUHFLSLHQWHVSOiVWLFRVQLHQYROWRULRVSOiVWLFRV
Ŷ1RHVQHFHVDULRSUHFDOHQWDU
Fermentar
/DIXQFLyQSDUDIHUPHQWDUVXPLQLVWUDDXWRPiWLFDPHQWHOD
temperatura apropiada para el proceso de fermentación,por lo
tanto, no necesita ajustar la temperatura.
3UHVLRQHODRSFLyQ&22.,1*237,216RSFLRQHVGH
FRFLPLHQWR
*LUHHOGLDOSDUDVHOHFFLRQDU3522)OHXGDU\SUHVLRQH
para ingresar.
6HOHFFLRQH67$57LQLFLDURSUHVLRQHHOERWyQ67$57
3$86(LQLFLDUSDXVDSDUDLQLFLDU(OKRUQRFRPLHQ]D
a leudar de inmediato e indica la cantidad de tiempo de
leudado que se debe completar.
Ŷ 3DUDHYLWDUEDMDUODWHPSHUDWXUDGHOKRUQR\SURORQJDUHO
tiempo de fermentación, no abra la puerta del horno sin
necesidad.
Ŷ 5HYLVHORVSURGXFWRVGHSDQDQWHVSDUDHYLWDU
sobrefermentarlos.
NOTAS:
Ŷ 1RXWLOLFHHOPRGRGHIHUPHQWDFLyQSDUDFDOHQWDUDOLPHQWRV
RSDUDPDQWHQHUFDOLHQWHODFRPLGD/DWHPSHUDWXUD
de fermentación no es lo suficientemente caliente para
PDQWHQHUODFRPLGDDWHPSHUDWXUDVVHJXUDV8WLOLFHOD
función WARM para mantener la comida caliente
Ŷ /DIXQFLyQGHIHUPHQWDFLyQQRRSHUDUiVLHOKRUQRHVWi
demasiado caliente. Permita que el horno se enfríe antes
de fermentar
Cuando utilice el horno el plato
giratorio debe estar siempre en
su lugar.
Para calentar coloque los alimentos
o el recipiente seguro para el horno
directamente en la bandeja de metal.
Tipo de Comida $MXVWHGH+XPHGDG
Cacerolas +~PHGR
&KLOL6RSD +~PHGR
Panqueques, waffles +~PHGR
Pizza Crujiente
Papas, horneadas Crujiente
3DSDOLQDV*DOOHWDV Crujiente
Cuadro de Selección de Temperatura y Humedad
Para fermentar coloque la
PDVDHQXQWD]yQSDQD
para pan y colóquela en la
bandeja de metal
Cuando utilice el horno el
plato giratorio debe estar
siempre en su lugar.

49-40624-3 21
Cocinando en el Microonda
COCINANDO EN EL MICROONDA
$VHJ~UHVHTXHHOSODWRJLUDWRULRHVWpHQVXOXJDU8WLOLFHOD
bandeja de vidrio claro.
Coloque los alimentos o el recipiente para microondas
directamente en la bandeja devidrio claro, para cocinar los
alimentos.
Recipientes de cocimiento
Asegúrese que todos los recipientes sean adecuados para
cocinar en microondas.
Selecciones Predeterminadas para el Microondas
1. Presione la tecla MICROWAVE
Si no se realiza ninguna entrada durante 15 segundos, la pan-
talla volverá a quedar en blanco.
*LUHHOGLDOSDUDVHOHFFLRQDU&22.FRFLQDU'()5267
GHVFRQJHODU%(9(5$*(EHELGD323&251SDORPLWDV
GHPDt]0(/7GHUUHWLU5(+($7UHFDOHQWDU6,00(5
IXHJROHQWR\62)7(1DEODQGDU
3. Gire el dial para encontrar la comida que desea cocinar, des-
congelar o recalentar. Presione el dial para seleccionar.
4. Gire el dial selector para seleccionar el tipo, cantidad, peso
\RWDPDxRFRPROHLQGLTXHHOKRUQR3UHVLRQHHOGLDO
después de cada selección.
3UHVLRQHHOGLDORHOERWyQ67$573$86(LQLFLDUSDXVD
para iniciar la cocción.
Presione el dial selector para revisar los ajustes durante el
cocimiento.
Si abre la puerta durante el cocimiento, el horno se detendrá
\ODSDQWDOODPRVWUDUi3$86(&LHUUHODSXHUWD\SUHVLRQH
67$573$86(SDUDUHDQXGDUHOFRFLPLHQWR
Si entró una selección no deseada simplemente presione en
cualquier momento la tecla BACK y vuelta a introducir lasselec-
ciones deseadas.
ŶCocimiento
–Por tipo de comida
–Por tiempo
–Por tiempo 1 y 2
ŶDescongelación
1.0 lb rápido
Por tiempo
Por tipo de comida
Por peso
'HUUHWLU
Ablandar
Ŷ Bebidas
$JXDR]
&DIpR]
7pR]
/HFKHR]
&RFRDFDOLHQWHR]
Ŷ Palomitas de Maíz
DR]
Ŷ Derrettir
Mantequilla
Caramelo
4XHVR
Chispas de Chocolate
Malavaviscos
Ŷ Cocimiento Lento
Ŷ Ablandar
Mantequilla
4XHVR&UHPD
*ODVHDGRVR]
+HODGR
ŶRecalentar
–Bebidas
–Cacerolas
–Pollo
–Pasta
–Pizza
–Plato de comida
–Arroz
–Sopa
±)LOHWHV&KXOHWDV
–Vegetales
Cuando utilice el horno el plato
giratorio debe estar siempre en
su lugar.
Cuando cocine en el microondas
la bandejade vidrio claro siempre
debe estaren su lugar.

22 49-40624-3
Cocinando en el Microonda
COCINANDO EN EL MICROONDA
Cocimiento con tiempo
8WLOLFH&22.%<7,0(&RFLQDUFRQWLHPSRSDUDFRFLQDUHQHO
microonda alimentos que no se encuentran en las selecciones
predeterminadas del microondas.
1. Presione la tecla MICROWAVE.
3UHVLRQHHOGLDOSDUDVHOHFFLRQDU&22.%<7,0(&RFLQDU
FRQWLHPSR\OXHJRSUHVLyQHORSDUDVHOHFFLRQDU
3. Gire el dial para ajustar el tiempo de cocimiento y luego
presiónelo para seleccionar.
4. Gire el dial para ajustar el nivel de potencia luego presiónelo
para seleccionar.
3UHVLRQHHOGLDORODWHFOD67$573$86(SDUDFRPHQ]DUD
cocinar.
3XHGHDEULUODSXHUWDGXUDQWHHO&22.%<7,0(&RFLQDUFRQ
WLHPSRSDUDUHYLVDUODFRPLGD&LHUUHODSXHUWD\SUHVLRQH
67$573$86(SDUDUHDQXGDUHOFRFLPLHQWR
Cocimiento con tiempo 1 y 2
8WLOLFH&22.%<7,0(&RFLQDUFRQWLHPSR\SDUD
cocinar con microonda los alimentos que requieren dos
diferentes tiemposy niveles de potencia.
1. Presione la tecla MICROWAVE.
2. Gire el dial para seleccionar COOK y presiónelo para
seleccionar.
*LUHHOGLDOSDUDVHOHFFLRQDUHO&22.%<7,0(
&RFLPLHQWRFRQWLHPSR\\SUHVLyQHORSDUDVHOHFFLRQDU
4. Gire el dial para ajustar el 1er tiempo ypresiónelo para
seleccionar. Repitapara el 1er nivel de potencia, el
2dotiempo y el 2 do nivel de potencia.
3UHVLRQHHOGLDORODWHFOD67$573$86(SDUDFRPHQ]DUD
cocinar.
Mis Recetas
9HDODVVHFFLRQHVGH0<5(&,3(0LV5HFHWDVHQODVHFFLyQ
de Cocimiento Rápido de este libro para ver las instrucciones
de cómo guardar, usar, cambiar o eliminar una receta
personalizada del microonda.
Micro 30 segundos
Presione MICRO 30 SECS repetídamente para incrementar 30
segundos el tiempo de cocimiento en el microondas. El horno
arranca inmediatamente
El nivel de potencia se ajusta automáticamente en alto, pero lo
puede cambiar para mayor flexibilidad. Vea las instrucciones
en la sección Niveles de Potencia del Microondas.
Consejos de cocimiento
Ŷ&XDQGRFRFLQHWRFLQRFRORTXHODWLUDVHQFDSDVVREUHHO
plato. Cubra cada capa con papel toalla.
Ŷ&XDQGRFRFLQHYHJHWDOHVXWLOLFHXQDFDFHURODRWD]yQ
seguro para el microondas. Cúbralos con una tapa seguro
para el microondas o con un envoltorio plástico ventilado.
Ŷ3DUDYHJHWDOHVFRQJHODGRVDJUHJXHDJXDGHDFXHUGRFRQ
las instrucciones del paquete
Ŷ3DUDYHJHWDOHVIUHVFRVDJUpJXHOHFXFKDUDGDVGHDJXDD
cada porción.
Niveles de potencia de microonda
El nivel de energía del microondas se configura
automáticamente en todas las funciones del microondas
SHURXVWHGSXHGHFDPELDUORSRU&22.%<7,0(FRFLQDU
SRUWLHPSR&22.%<7,0(FRFLQDUSRUWLHPSR
0,&526(&PLFURVHJ\'()5267%<7,0(
GHVFRQJHODUSRUWLHPSR
1. Primero, siga las instrucciones para COOK BY TIME
FRFLQDUSRUWLHPSR&22.%<7,0(FRFLQDUSRU
WLHPSR0,&52PLFUR\'()5267%<7,0(
GHVFRQJHODUSRUWLHPSR
6HOHFFLRQH67$57LQLFLDURSUHVLRQHHOERWyQ67$57
3$86(LQLFLDUSDXVDSDUDLQLFLDU
3UHVLRQH(',7HGLWDUSDUDFDPELDUHOWLHPSRGHFRFFLyQ
y luego el nivel de energía del microondas. Presione el dial
para ingresar el tiempo de cocción y los cambios al nivel de
energía.
/RVVLJXLHQWHVVRQDOJXQRVHMHPSORVGHGLIHUHQWHVQLYHOHVGH
energía
High (alto) 10: Pescado, tocino, vegetales, líquidos en hervor.
MedHigh (medalto) 7: Cocción suave de carne de res y de
ave; horneado de estofados y recalentamiento.
Medium (medio) 5: Para cocción lenta y para tiernizar
estofados y cortes de carne menos tiernos.
Low (abajo) 2 ó 3: 'HVFRQJHODUKHUYLUDIXHJROHQWRVDOVDV
delicadas.
Warm (tibio) 1: Mantener alimentos calientes; ablandar
mantequilla.

49-40624-3 23
Cocinando en el Microonda
COCINANDO EN EL MICROONDA
Descongelar por tipo de comida
'(6&21*(/$53257,32'(&20,'$DMXVWD
automáticamente los tiempos y niveles de potencia de
descongelación, para dar resultados más parejosa las carnes,
pollo y pescado que pesanhasta 6 libras.
1. Retire la carne del empaque y colóquela en un plato
seguro para el microondas. El pan debe permanecer en el
empaque, pero retire los amarres de metal.
2. Presione la tecla MICROWAVE.
*LUHHOGLDOD'()52673UHVLRQHHOGLDOSDUDVHOHFFLRQDU
*LUHHOGLDOSDUD'(6&21*(/$53257,32'(&20,'$
Presione el dial para seleccionar.
5. Presione el dial para escogerr el tipo de comida. Presione el
dial para seleccionar.
6. Gire el dial al peso de la comida, utilice la Guía de
Conversión de la derecha. Por ejemplo, dial 1.2 para 1.2
OLEUDVOLEUDRQ]DV3UHVLRQHHOGLDOSDUDVHOHFFLRQDU
3UHVLRQHHOGLDORODWHFOD67$573$86(SDUDFRPHQ]DUD
descongelar.
9ROWHHODFRPLGDFXDQGRHOKRUQROHLQGLTXH7851)22'
OVER.
Ŷ Para una descongelación pareja retire la carne descongelada
o forre las áreas tibias con pequeños pedazosde aluminio.
Ŷ'HVSXpVGHGHVFRQJHODUODPD\RUtDGHODVFDUQHVQHFHVLWDQ
descansar 5 minutos para completar la descongelación.
/RVURVWL]DGRVJUDQGHVGHEHQGHVFDQVDUDSUR[LGDPHQWH
minutos.
Guía de Conversión
Si el peso de la comida está en libras y onzas, las onzas
GHEHQVHUFRQYHUWLGDVDODGpFLPDSDUWHGHXQDOLEUD
Peso de la
Comida en Onzas
Ingrese el Peso de la Comida
(décimas de una libra)
1-2 .1
3.2
4-5 .3
6-7 .4
8.5
9-10 .6
11 .7
12-13 .8
14-15 .9
Descogelación con tiempo
8WLOLFHOD'()5267%<7,0('HVFRQJHODFLyQFRQWLHPSR
para descongelar durante untiempo seleccionado.
1. Presione la tecla MICROWAVE.
*LUHHOGLDOVHOHFWRUD'()52673UHVLRQHHOGLDOSDUD
seleccionar.
*LUHHOGLDOVHOHFWRUD'()5267%<7,0(3UHVLRQHHOGLDO
para seleccionar.
4. Gire el dial selector para seleccionar el tiempo que desea.
Presioneel dial para seleccionar.
3UHVLRQHHOGLDORODWHFOD67$573$86(SDUDFRPHQ]DUD
descongelar.
9ROWHHODFRPLGDFXDQGRHOKRUQROHLQGLTXH7851)22'
OVER.
El nivel de potencia se ajuste automáticamente en 3, pero lo
puede cambiar. Para cambiar los niveles de potencia, vea las
instrucciones de Niveles de Potencia del Microonda.
8VWHGSXHGHGHVFRQJHODUUiSLGDPHQWHSHTXHxDVFDQWLGDGHV
de alimentos al elevar el nivel de potencia después de entrar
el tiempo. El nivel de potencia 7 acorta el tiempo total de
descongelacióna la mitad; el nivel de potencia 10 acortael
WLHPSRWRWDOHQDSUR[LPDGDPHQWH$OGHVFRQJHODUHQ
niveles de potenciaaltos, los alimentos necesitarán una
frecuente atención, más de la usual y éstos se pueden cocinar
un poco.
Consejos para descongelar
8WLOLFH'()5267%<)22'7<3('HVFRQJHODUSRUWLSRGH
FRPLGDSDUDFDUQHSROORSHVFDGR\SDQ8WLOLFH'()5267
%<7,0('HVFRQJHODFLyQFRQWLHPSRSDUDODPD\RUtDGHODV
comidas congeladas.
Ŷ/DVFRPLGDVFRQJHODGDVHQSDSHORSOiVWLFRSXHGHQ
GHVFRQJHODUVHHQHOHPSDTXHFXDQGRXWLOL]D'()5267%<
7,0(&XDQGRXWLOL]D'()5267%<)22'7<3(GHEHU
UHWLUDUODFDUQHGHOHPSDTXH/RVHPSDTXHVFHUUDGRVGHEHQ
ranurarse, pincharse o ventilarse después de que la comida
HVWpSDUFLDOPHQWHGHVFRQJHODGD/RVUHFLSLHQWHVSOiVWLFRV
deben estarparcialmente destapados.
Ŷ/DVFHQDVIDPLOLDUDVFRQJHODGDVSUHHPSDFDGDVSXHGHQ
descongelarse y cocinarse en el microondas. Si lacomida
está en un recipiente de aluminio, transfiérala a un plato
seguro para el micoondas.
Ŷ/DVFRPLGDVTXHVHDUUXLQDQIiFLOPHQWHQRGHEHQ
permanecer afuera por más de una hora, despues de
GHVFRQJHODUOD/DWHPSHUDWXUDDPELHQWHSURPXHYHHO
crecimiento de bacterías dañinas.
Ŷ$OGHVFRQJHODUVHODFRPLGDGHEHHVWDUIUtDSHURVXDYHHQ
todas las áreas.Si todavía tiene un poco de hielo, regrésela
brevemente al microondas odéjela descansar un par de
minutos.
Ŷ$OGHVFRQJHODURPiVOLEUDVGHFDUQHPROLGDRHQFXERV
retire las porciones descongeladas, cuando se le indique que
debe voltearlo.

24 49-40624-3
Cocinando en el Microonda
COCINANDO EN EL MICROONDA
Consejos para el cocimiento con sensor del microonda
El modo de microonda del horno Advantium tiene un
sensor de cocimiento y recalentamiento. El horno detecta
automáticamente si la comida está cocinada y se apaga el solo
eliminando la necesidad de programar tiempos de cocimiento y
niveles de potencia.
/DVIXQFLRQHVFRQVHQVRUGHWHFWDQODKXPHGDG
creciente liberada durante el cocimiento. El horno ajusta
automáticamente el tiempo de cocimiento para varios tipos y
cantidades de comida.
Para usar todas las funciones con sensor:
3UHVLRQHHOERWyQ0,&52:$9(PLFURRQGDV
*LUHHOGLDOSDUDVHOHFFLRQDU&22.%<)22'FRFLQDU
SRUDOLPHQWRXELFDGRGHEDMRGH&22.5(+($7
UHFDOHQWDUR6,00(5IXHJROHQWR
*DUD&22.%<)22'FRFLQDUSRUDOLPHQWR\5(+($7
UHFDOHQWDUVHOHFFLRQHXQDOLPHQWR\SUHVLRQHHOGLDOSDUD
LQJUHVDU3DUD6,00(5IXHJROHQWRFRQILJXUHHOWLHPSR
para cocción a fuego lento después de que la sopa, salsa o
estofado haya alcanzado el hervor.
3UHVLRQHHOGLDORHOERWyQ67$573$86(LQLFLDUSDXVD
para iniciar la cocción.
No abra la puerta del horno hasta que comience la cuenta
regresiva en la pantalla. Si usted abre la puerta mientras se
realiza la cocción por sensor, aparecerá en la pantalla “Sensor
(UURU&ORVHGRRUDQGSUHVV67$57´(UURUGHVHQVRU±&LHUUH
ODSXHUWD\SUHVLRQH67$57&LHUUHODSXHUWDGHLQPHGLDWR
\SUHVLRQHHOERWyQ67$573$86(LQLFLDUSDXVDSDUD
recomenzar
ADVERTENCIA
Riesgo de fuego
No utilice las funciones con sensor dos veces consecutivas
en la misma porción de comida – se puede sobre cocinar o
quemar. Si la comida está cruda después de terminar el primer
WLHPSRXWLOLFH7,0(&22.FRFLPLHQWRFRQWLHPSRSDUD
agregar tiempo adicional de cocimiento.
Ŷ6LXVWHGKDHVWDGRFRFLQDQGR\HOKRUQRHVWiFDOLHQWHSXHGH
indicar que se encuentra muy caliente para cocinar por
sensor. En ese caso, el horno cambiará automáticamente
a cocción por tiempo y puede preguntar sobre el peso o la
cantidad de alimentos
Ŷ3DUDDFRUWDURSURORQJDUHOWLHPSRGHFRFFLyQHVSHUHDTXH
ODFXHQWDUHJUHVLYDDSDUH]FDHQODSDQWDOOD/XHJRJLUHHO
dial para agregar o restar tiempo.
PROGRAMAS DE SENSOR DEL MICROONDA
Ŷ&DUQHPROLGD
Ŷ3DORPLWDVGH0Dt]
(Palomitas de maíz en paquete para el microondas,
2.9 oz. a 3.5 oz.)
Ŷ3DSD
Ŷ$UUR]
Ŷ6RSD
Ŷ9HJHWDOHVHQODWDGRVIUHVFRVFRQJHODGRV
Ŷ5HFDOHQWDUSROOR
Ŷ5HFDOHQWDUSDVWD
Ŷ5HFDOHQWDUXQSODWRGHFRPLGD
Ŷ5HFDOHQWDUVRSD
Ŷ5HFDOHQWDUYHJHWDOHV
Ŷ5HFDOHQWDUYHJHWDOHV
Ŷ&RFLPLHQWROHQWR
Notas sobre el programa Reheat (recalentar):
/RVDOLPHQWRVUHFDOHQWDGRVSXHGHQWHQHUDPSOLDVYDULDFLRQHV
de temperatura. Algunas áreas pueden estar extremadamente
calientes.
(VPHMRUXWLOL]DU&22.%<7,0(FRFLQDUSRUWLHPSR\QR
5(+($7UHFDOHQWDUFRQHVWRVDOLPHQWRV
Ŷ Productos panificados.
Ŷ Alimentos que deben recalentarse sin tapa.
Ŷ Alimentos que deben mezclarse o girarse
Ŷ Alimentos que deben quedar con aspecto o superficies
crujientes después de recalentarse.
Cómo ajustar las configuraciones automáticas del horno COOK
%<)22'FRFLQDUSRUDOLPHQWR\5(+($7UHFDOHQWDUSDUD
REWHQHUXQWLHPSRGHFRFFLyQPD\RURPHQRUQRGLVSRQLEOHHQ
WRGRVORVWLSRVGHDOLPHQWRV
3DUDUHGXFLUORVWLHPSRVGHFRFFLyQDXWRPiWLFRV'HVSXpV
de que el horno se acciona, gire el dial en sentido contrario a
ODVDJXMDVGHOUHORMKDVWDTXHDSDUH]FDXQVLJQRPHQRV³³
RXQVLJQRPHQRVGREOH³³\SUHVLRQHHOGLDOSDUDLQJUHVDU
8QVLJQRPHQRV³³HVXQDUHGXFFLyQGHOGHOWLHPSRGH
FRFFLyQ\XQVLJQRPHQRVGREOH³³HVXQDUHGXFFLyQGHO
del tiempo de cocción.
3DUDDXPHQWDUORVWLHPSRVGHFRFFLyQDXWRPiWLFRV'HVSXpV
de que el horno se acciona, gire el dial en sentido de las
DJXMDVGHOUHORMKDVWDTXHDSDUH]FDXQVLJQRPiV³³RXQ
VLJQRPiVGREOH³³\SUHVLRQHHOGLDOSDUDLQJUHVDU8Q
VLJQRPiV³³HVXQDXPHQWRGHOGHOWLHPSRGHFRFFLyQ
\XQVLJQRPiVGREOH³³HVXQDXPHQWRGHOGHOWLHPSR
de cocción.

49-40624-3 25
Utensilio de Cocción con Sensor
/RVUHFLSLHQWHV\FXELHUWDVDGHFXDGDVVRQHVHQFLDOHVSDUDXQ
mejor cocimiento con sensor.
Ŷ6LHPSUHXWLOLFHUHFLSLHQWHVVHJXURVSDUDHOPLFURRQGDV\
cúbralos con tapaderas o envoltura plástica ventilada. Nunca
utilice cubiertas plásticas herméticas – ya que evitan que la
humedad salga y se puede sobrecocinar la comida
Ŷ$QWHVGHFRORFDUODFRPLGDDGHQWURGHOKRUQRDVHJ~UHVHGH
que el exterior de los recipientes y que el interior del horno
HVWpQVHFRV/DVJRWDVGHKXPHGDGTXHVHFRQYLHUWHQHQ
vapor pueden engañar al sensor.
Ŷ/DVSDORPLWDVGHPDt]\ODVSDSDVVHFDOLHQWDQPHMRU
destapadas.
Cubierta
Ventilada
Seque los platos para que
no seequivoque el sensor.
Cocinando en el Microonda
COCINANDO EN EL MICROONDA
Lo que es normal
Interferencia
Ŷ6HSXHGHREVHUYDULQWHUIHUHQFLDGH79UDGLRFXDQGRXWLOL]D
el microonda, similar a la interferencia causada por otros
aparatos pequeños. Esto no indica un problema con el
microonda. Mueva el radio o la TV lo más lejos posible del
PLFURRQGDRUHYLVHODSRVLFLyQGHODDQWHQDGHOD79UDGLR
Calor del Horno
Ŷ/RVUHFLSLHQWHVVHSXHGHQFDOHQWDUGHELGRDODWUDQVIHUHQFLD
GHFDORUGHORVDOLPHQWRVFDOLHQWHV8WLOLFHJXDQWHVSDUD
manipularlos.
Ŷ(OYDSRUVHSXHGHVDOLUDOUHGHGRUGHODSXHUWD

26 49-40624-3
Otras Funciones
OTRAS FUNCIONES
Cocimiento completo
Para recordarle que hay alimentos en el horno, en la pantalla
SRGUiYHUVHHOPRGRGHFRFFLyQ\&22.,1*&203/(7(
FRFFLyQFRPSOHWD\VHRLUiXQSLWLGRXQDYH]SRUPLQXWRKDVWD
TXHVHDEUDODSXHUWDGHOKRUQRRVHSUHVLRQHHOERWyQ&/($5
2))ERUUDUDSDJDGR
Repita la última función
8WLOLFHHVWDIXQFLyQSDUDDKRUUDUWLHPSRSDUDDOLPHQWRVTXH
cocina repetidas veces, como galletas y aperitivos.
NOTA: El último programa que utilizóse guarda durante dos
horas.
3UHVLRQH&22.,1*237,216RSFLRQHVGHFRFLPLHQWR\
VHOHFFLRQH5(3($7/$67UHSLWDHO~OWLPR
/DSDQWDOODPRVWUDUiHO~OWLPRDOLPHQWRTXHSUHDMXVWy
3UHVLRQHODWHFOD67$573$86(RHOGLDOVHOHFWRUSDUD
comenzar acocinar.
Función para Reanudar
1. Si necesita cocinar la comida pormás tiempo, usted puede
UHLQLFLDUHOKRUQRDOSUHVLRQDUODWHFOD67$573$86(RHO
dial selector.
/DSDQWDOODPRVWUDUi5(680(&22.,1*UHDQXGDUHO
FRFLPLHQWR\HOKRUQRYROYHUiDLQLFLDUDXWRPiWLFDPHQWHDO
10% del tiempo original.
El programa permanece en memoria durante 5 minutos.
'HVSXpVQHFHVLWDUiSURJUDPDUGHQXHYR9HDODVHFFLyQGH8VR
del menú predeterminado de cocimiento rápido.
Clock (reloj)
'HEHSURJUDPDUHOUHORMDQWHVGHXWLOL]DUHOKRUQRSRU
primera vez. Cuando programe elreloj por primera vez vaya
directamente alpaso dos.
El reloj fue diseñado para apagar la unidad cuando quede
inactiva durante 30 segundos, a fin de minimizar el uso de
la energía en suspensión. El reloj se encenderá cuando la
unidad se encuentre en uso, la puerta sea abierta, la tecla
&$1&(/2))&DQFHODU$SDJDUVHDSUHVLRQDGDRHOGLDOVHD
presionado. No hay una opción de anulación disponible basada
HQORVUHTXLVLWRVGHHQHUJtD'2(
1. Para cambiar la hora del reloj, presione la tecla SETTINGS
\JLUHHOGLDOD&/2&.6(77,1*6DMXVWHVGHOUHORM
6HOHFFLRQH6(77,0(ODKRUD
2. Gire el dial para ajustar la hora. Presióne lopara
seleccionar. NOTA: 6HSURJUDPD$030
3. Gire el dial para ajustar los minutos. Presione el dial para
seleccionar.
Auto Conversion (conversión automática)
/DFRQYHUVLyQDXWRPiWLFDUHGXFHDXWRPiWLFDPHQWHOD
temperatura de hornear con convección. Siempre debe
introducir la temperatura de la receta y el horno hará el resto.
Para cambiar el ajuste, presióne la tecla SETTINGS y gire el
GLDOD$872&219(56,213UHVLRQHHOGLDOSDUDVHOHFFLRQDU
Gire el dial para cambiar los ajustes a CONVERSION ON
RU&219(56,212))&RQYHUVLyQHQFHQGLGRRDSDJDGR
Presione el dial para seleccionar.
Beeper Volume (voumen del pito)
8WLOLFHHVWDFDUDFWHUtVWLFDSDUDDMXVWDUHOYROXPHQGHOSLWLGR
8VWHGWDPELpQSXHGHGHVDFWLYDUOD
3UHVLRQHHOERWyQ6(77,1*6FRQILJXUDFLRQHVJLUHHOGLDO
SDUDVHOHFFLRQDU%((3(592/80(YROXPHQGHOSLWLGR
presione el dial para ingresar. Seleccione el volumen del pitido,
presione el dial para ingresar.
Temperature Units (unidades de temperatura)
Para cambiar las unidades de temperatura, presione el botón
6(77,1*6FRQILJXUDFLRQHV\VHOHFFLRQH7(03(5$785(
81,76XQLGDGHVGHWHPSHUDWXUD*LUHHOGLDOSDUDVHOHFFLRQDU
F o C y presione el dial para ingresar.
Surface Light (luz de superficie)
Se utiliza para iluminar la plancha.
3UHVLRQHODWHFOD685)$&(/,*+7OX]GHVXSHUILFLHSDUD
cambiar deluz nocturna a luz apagada.

49-40624-3 27
Delay Start (inicio retardado)
8WLOLFHHVWDIXQFLyQGHUHWDUGRFXDQGRHOKRUQRFRPLHQ]DD
FRFLQDUHQ&219%$.(KRUQHDUSRUFRQYHFFLyQ&22.%<
7,0(FRFLQDUSRUWLHPSR&22.%<7,0(FRFLQDUSRU
WLHPSR'()5267%<7,0(GHVFRQJHODUSRUWLHPSRR
'()5267%<:(,*+7GHVFRQJHODUSRUSHVR
3UHVLRQHHOERWyQ&22.,1*237,216RSFLRQHVGH
FRFFLyQ
*LUHHOGLDOSDUDVHOHFFLRQDU'(/$<67$57LQLFLR
UHWDUGDGR\SUHVLRQHHOGLDOSDUDLQJUHVDU
3. Gire el dial para configurar la hora y minutos de la hora
GHLQLFLR\SUHVLRQHHOGLDOSDUDLQJUHVDU127$/D
FRQILJXUDFLyQGHKRUDVHKDFHHQ$030
4. Configure el modo de cocción.
El horno comenzará el modo de cocción programado cuando
la hora actual y la hora de inicio retardado sean la misma.
Reminder (recordatorio)
8WLOLFHHVWDIXQFLyQSDUDFRQILJXUDUHODFFLRQDPLHQWRGHOVRQLGR
de una alarma en un momento específico del día.
3UHVLRQHHOERWyQ6(77,1*6FRQILJXUDFLRQHVJLUHHOGLDO
SDUDVHOHFFLRQDU5(0,1'(5UHFRUGDWRULR\SUHVLRQHHO
dial para ingresar.
6HOHFFLRQH6(75(0,1'(5FRQILJXUDUUHFRUGDWRULR\
presione el dial para ingresar.
3. Gire el dial para configurar la hora y minutos y presione el
dial para ingresar. NOTA: /DFRQILJXUDFLyQGHKRUDVHKDFH
HQ$030
Para desactivar el recordatorio, presione el botón SETTINGS
FRQILJXUDFLRQHVJLUHHOGLDOSDUDVHOHFFLRQDU5(0,1'(5
UHFRUGDWRULR\SUHVLRQHHOGLDOSDUDLQJUHVDU*LUHHOGLDO
SDUDVHOHFFLRQDU&/($55(0,1'(5ERUUDUUHFRUGDWRULR\
presione el dial para ingresar.
Para desactivar la hora del recordatorio, presione el botón
6(77,1*6FRQILJXUDFLRQHVJLUHHOGLDOSDUDVHOHFFLRQDU
5(0,1'(5UHFRUGDWRULR\SUHVLRQHHOGLDOSDUDLQJUHVDU
*LUHHOGLDOSDUDVHOHFFLRQDU5(9,(:5(0,1'(5UHYLVDU
UHFRUGDWRULR\SUHVLRQHHOGLDOSDUDLQJUHVDU/DSDQWDOOD
mostrará.
Turntable On/OFF (plato giratorio On/Off)
8WLOLFHHVWDIXQFLyQSDUDHYLWDUTXHHOSODWRJLUDWRULRJLUH
cuando usa un plato demasiado grande para poder girar en la
cavidad.
78517$%/(212))3ODWR*LUDWRULR(QFHQGLGR$SDJDGR
se encuentra en una configuración permanente.
3UHVLRQHHOERWyQ6(77,1*6FRQILJXUDFLRQHVJLUHHO
GLDOSDUDVHOHFFLRQDU78517$%/(212))SODWRJLUDWRULR
HQFHQGLGRDSDJDGR\SUHVLRQHHOGLDOSDUDLQJUHVDU*LUH
HOGLDOSDUDVHOHFFLRQDU78517$%/(21SODWRJLUDWRULR
HQFHQGLGRR78517$%/(2))SODWRJLUDWRULRDSDJDGR\
luego presione el dial para ingresar.
NOTA:
Ŷ(OSODWRJLUDWRULRQRVHGHVDFWLYDHQORVPRGRVFRFFLyQ
rápida, asar, tostar o sensor de microondas.
Ŷ6LVHVHOHFFLRQD78517$%/(2))SODWRJLUDWRULRDSDJDGR
durante la cocción, el plato giratorio se desactivará hasta
el final de este ciclo de cocción. El plato giratorio volverá
a funcionar en el próximo ciclo de cocción y si se utiliza la
IXQFLyQ5(680(UHDQXGDU
Ŷ6LVHVHOHFFLRQD78517$%/(2))SODWRJLUDWRULRDSDJDGR
antes de comenzar a cocinar, el plato giratorio permanecerá
desactivado para cualquier cocción que se inicie en los
SUy[LPRVPLQXWRV'HVSXpVGHORVPLQXWRVHOSODWR
JLUDWRULRYROYHUiDXWRPiWLFDPHQWHD78517$%/(21SODWR
JLUDWRULRHQFHQGLGR
Auto Night Light (luz nocturna automática)
8WLOLFHHVWDIXQFLyQSDUDFRQILJXUDUTXHODOX]GHVXSHUILFLHVH
encienda y apague a una hora determinada.
3UHVLRQHHOERWyQ6(77,1*6FRQILJXUDFLRQHVJLUHHO
GLDOSDUDVHOHFFLRQDU$8721,*+7/,*+7OX]QRFWXUQD
DXWRPiWLFD\SUHVLRQHHOGLDOSDUDLQJUHVDU
6HOHFFLRQH6(7217,0(FRQILJXUDUSDUDKRUD\SUHVLRQH
el dial para ingresar.
3. Gire el dial para configurar la hora y minutos y presione
el dial para ingresar. Gire el dial para desactivar la
configuración de hora y minutos y presione el dial para
LQJUHVDU1RWD/DFRQILJXUDFLyQGHKRUDVHKDFHHQ$030
Para desactivar la luz nocturna automática en forma
SHUPDQHQWHSUHVLRQHHOERWyQ6(77,1*6FRQILJXUDFLRQHV
JLUHHOGLDOSDUDVHOHFFLRQDU$8721,*+7/,*+7OX]QRFWXUQD
DXWRPiWLFD\SUHVLRQHHOGLDOSDUDLQJUHVDU*LUHHOGLDOSDUD
VHOHFFLRQDU'($&7,9$7(GHVDFWLYDU\SUHVLRQHHOGLDOSDUD
ingresar.
Para desactivar la luz nocturna automática en forma
SHUPDQHQWHSUHVLRQHHOERWyQ6(77,1*6FRQILJXUDFLRQHV
JLUHHOGLDOSDUDVHOHFFLRQDU$8721,*+7/,*+7OX]QRFWXUQD
DXWRPiWLFD\SUHVLRQHHOGLDOSDUDLQJUHVDU*LUHHOGLDOSDUD
VHOHFFLRQDU5(9,(:212))7,0(6UHYLVDUKRUDHQFHQGLGR
DSDJDGR\SUHVLRQHHOGLDOSDUDLQJUHVDU/DSDQWDOODPRVWUDUi
la hora de encendido y apagado de la luz nocturna automática.
NOTA:
Ŷ6LVHSUHVLRQDHOERWyQ685)$&(/,*+7OX]GHVXSHUILFLH
mientras se encuentra encendida la luz nocturna automática,
la luz de superficie se quita de la luz nocturna automática por
HVDYH](OERWyQ685)$&(/,*+7OX]GHVXSHUILFLHGHEH
SUHVLRQDUVHSDUDDSDJDUODOX]GHVXSHUILFLH/DOX]QRFWXUQD
automática se encenderá de nuevo en el próximo horario
programado.
Ŷ6LODOX]GHVXSHUILFLH\DVHHQFXHQWUDHQFHQGLGDFXDQGR
la luz nocturna automática se encuentra programada
para encenderse, la luz de superficie no utilizará las
configuraciones de la luz nocturna automática. El botón
685)$&(/,*+7OX]GHVXSHUILFLHGHEHSUHVLRQDUVHSDUD
DSDJDUODOX]GHVXSHUILFLH/DOX]QRFWXUQDDXWRPiWLFDVH
encenderá de nuevo en el próximo horario programado.
Otras Funciones
OTRAS FUNCIONES

28 49-40624-3
Otras Funciones
OTRAS FUNCIONES
Help (ayuda)
8WLOLFHHVWDIXQFLyQSDUDVDEHUPiVDFHUFDGHVXKRUQR\VXV
funciones.
3UHVLRQHODWHFOD+(/3
2. Gire el dial para escoger el nombrede la función. Presione
el dial paraseleccionar.
/DSDQWDOODOHPRVWUDUiXQDGHVFULSFLyQGHOSURJUDPDTXH
seleccionó.
Control Lock-Out (bloqueo del control)
Puede bloquear el panel de control para evitar que enciendan
el horno accidentalmente durante la limpieza o paraque no lo
utilicen los niños.
3UHVLRQH\VRVWHQJDGXUDQWHVHJXQGRDODWHFOD&/($52))
para bloqueary desbloquear.
Cuando el panel de control está bloqueado, cada vez
que presiona una tecla o eldial se mostrará en la pantalla
&21752/,6/2&.('FRQWUROHVWiEORTXHDGR
Vent Fan (ventilador del respirador)
El respirador del ventilador retira los vapores de la superficie
de cocimiento.
Presione la tecla VENT FAN para cambiar de alto, a medio, a
bajo, aapagado.
El ventilador del respirador se puede encender
automáticamente si el horno secalienta demasiado, aún
FXDQGRQRHVWpIXQFLRQDQGR/DSDQWDOODPRVWUDUi³1RUPDO
Operation: Fan is on due to high heat.Fan will shut off
DXWRPDWLFDOO\´2SHUDFLyQ1RUPDO(OYHQWLODGRUHVWi
encendido debido al calor alto. El ventilador se apagará
DXWRPiWLFDPHQWH
Automatic Fan (ventiladores automáticos)
/RVYHQWLODGRUHVGHHQIULDPLHQWRVHHQFLHQGHQ
automáticamente para evitar el sobrecalentamiento de los
componentes internos del horno y del control.
El ventilador del respirador se puede encender
automáticamente si el horno se calienta demasiado,
D~QFXDQGRQRHVWpIXQFLRQDQGR/DSDQWDOODPRVWUDUi
“Normal Operation: Fan is on due to high heat.Fan will shut
RIIDXWRPDWLFDOO\´2SHUDFLyQ1RUPDO(OYHQWLODGRUHVWi
encendido debido al calor alto. El ventilador se apagará
DXWRPiWLFDPHQWH
Timer (cronómetro)
8WLOLFHHVWDIXQFLyQFDGDYH]TXHQHFHVLWHXQFURQyPHWUR/D
puede utilizar mientras cocina en el horno.
1. Presione la tecla TIMER.
2. Gire el dial para escoger los minutos. Presiónelo para
seleccionar.
3. Gire el dial para escoger los segundos. Presiónelo para
seleccionar.
Para cancelar, presione la tecla TIMER (Temporizador).
Características que encontrará en la función HELP (ayuda).
Agregar tiempo Opciones de cocimiento Recordatorio
Conversión Automática 'HVFRQJHODFLyQ Repetir el último
/X]1RFWXUQD$XWRPiWLFD 'HVFRQJSRU&RPLGD Reanudar
Regresso 'HVFRQJFRQ7LHPSR Cocimiento con sensor
Volumen del Pito 'HVFRQJSRU3HVR Cocimiento lento
Bebidas Inicio demorado Ablandar
Asar Editar Cocimiento rápido
%RUUDU$SDJDU Ayuda ,QLFLR3$86$
Reloj 'HUUHWLU 8QLGDGHVGHWHPSHUDWXUD
Bloqueo del Control Micro 30 Segs &URQyPHWUR2Q2II
+RUQHDUFRQ&RQYHFFLyQ Microonda Tostar
Cocinar por Tipo Mis Recetas 3ODWR*LUDWRULR212))
Cocinar con Tiempo Fermentar Calentar
Cocinar con Tiempo 1 y 2 Recalentar

49-40624-3 29
Plato giratorio removible
El área debajo del plato giratorio debe limpiarse
frecuentemente para evitar oloros y humo durante el ciclo de
cocimiento.
(OSODWRJLUDWRULRVHSXHGHTXHEUDUVLORGHMDFDHU/iYHORFRQ
cuidado en aguatibia y jabonosa. Séquelo bien y colóquelo en
su lugar.
Para colocar el plato giratorio, coloque elcentro sobre el eje en
el centro del hornoy gírelo hasta que esté colocado en sulugar.
Bandejas de cocimiento y parrilla de alambre del horno
Para evitar que se quiebren, permitaque las bandejas se
HQIUtHQFRPSOHWDPHQWHDQWHVGHOLPSLDUODV/DYHFRQFXLGDGR
en agua caliente jabonosa oen la lavadora de platos.
No utilice abrasivos para limpiar la bandeja de vidrio ni la
parrilla de alambre delhorno, ya que se puede dañar el
acabado.
Se debe utilizar un estropajo plástico paralimpiar las bandejas
de metal.
Lámina de mica
Para limpiar la lámina de mica:
3HUPLWDTXHHOKRUQRVHHQIUtHFRPSOHWDPHQWH/LPSLHFRQXQ
paño tibio jabonoso.
No utilice el horno sin el platogiratorio
en su lugar.
Plato giratorio
Cuidado y Limpieza
CUIDADO Y LIMPIEZA
Bandeja de metal
Bandeja de vidrio claro
Parrilla de alambre del horno
/iPLQDGHPLFD
Interior del horno
Antes de limpiar cualquier parte delhorno asegúrese que el
control del horno esté apagado y que esté frío o tibio al tacto.
/LPSLHHOLQWHULRUGHOKRUQRIUHFXHQWHPHQWHSDUDTXHSXHGD
calentar adecuadamente.
Algunas salpicaduras pueden ser removidas con papel
toalla, otras requieren un paño tibio jabonoso.Remueva las
salpicaduras de grasacon un paño jabonoso, luego enjuague
con un paño húmedo.
Si el sucio y las salpicaduras no salenfácilmente con un paño
tibio jabonoso, coloque un tazón mediano lleno de agua
adentro de la unidad, sobre la bandeja de metal y presionela
WHFOD63(('&22.6HOHFFLRQH0<5(&,3(6\DMXVWH
PLQXWRVD8 / 0 (VWRGHEHDIORMDUHOVXFLRDGHQWUR
del horno demanera que lo pueda remover conun paño tibio
jabonoso.
Si observa un amarillentamiento enel metal adentro del horno
que no puede ser removido con un pañotibio jabonoso, utilice
un limpiadorpara acero inoxidable que remuevela decoloración
SRUFDORU\RPDQFKDV3XHGHOLPSLDUHOLQWHULRUGHOKRUQRFRPR
lo haría normalmente.
No utilice limpiadores abrasivos niutensilios filosos en las
paredes delhorno.
Nunca utilice limpiadores comerciales para hornos en ninguna
parte de suhorno.
No limpie el interior del horno con estropajos de metal.
Se pueden quebrar pedazos del estropajo adentro del
horno,causando un toque eléctrico, así comodaño al acabado
de la superficie interiordel horno.

30 49-40624-3
Cuidado y Limpieza
CUIDADO Y LIMPIEZA
Exterior del horno
No recomendamos el uso de limpiadores con amoníaco o
alcohol, ya que pueden dañar la apariencia del horno. Si
escoge utilizar un limpiador casero común, aplique primero el
limpiador directamente en el pañode limpieza, luego limpie el
área sucia.
Caja
/LPSLHHOH[WHULRUGHOPLFURRQGDFRQXQSDxRMDERQRVR
(QMXDJXH\VHTXH/LPSLHHOYLGULRFRQXQSDxRK~PHGD
Panel de Control
/LPSLHFRQXQSDxRK~PHGR6HTXHFRPSOHWDPHQWH1RXWLOLFH
limpiadores en espray, grandes cantidades de jabón y agua,
abrasivos u objetos filosos en el panel estos lo pueden dañar.
Algunos tipos de papel toalla también pueden rayar el panel de
control.
Superficies de Acero Inoxidable HQDOJXQRVPRGHORV
Puede limpiar el panel de acero inoxidable con Stainless Steel
Magic o un producto similar, con un paño limpio y suave.
Aplique con cuidado el limpiador de acero inoxidable, evite
las piezas plásticas y de vidrio de alrededor. No utilice en el
aceroinoxidable cera para aparatos, pastas, blanqueadores o
productos que contengan cloro.
Paneles Plásticos de Color HQDOJXQRVPRGHORV
8WLOLFHXQSDxROLPSLRVXDYHOLJHUDPHQWHKXPHGHFLGROXHJR
seque completamente.
Sello de la Puerta
Es importante mantener limpia el área donde sella la puerta
FRQHOKRUQR8WLOLFHGHWHUJHQWHVVXDYHVQRDEUDVLYRV
aplicados con un paño o esponja. Enjuague bien.
Parte Inferior
/LPSLHUHJXODUPHQWHODJUDVD\HOSROYRGHODSDUWHGHDEDMR
8WLOLFHXQDVROXFLyQGHDJXDWLELDFRQGHWHUJHQWH
Cómo reemplazar la luz de superficie
1. Para cambiar la luz de superficie, primero desconecte
la energia en el fusible principal o panel del interruptor
automático.
2. Retire el tornillo del interior de la cubierta del compartimiento
de la luz y bájela hasta que se detenga.
3. Antes de retirar el bombillo que va acambiar, asegúrese que
HVWpIUtR+iOHORVXDYHPHQWHGHOUHFHSWiFXOR
Cámbielo por un bombillo halógeno de 130 voltios, 50watts.
Ordene el bombilloWB08X10051 de su distribuidor GE
Appliances.
/HYDQWHODFXELHUWD\FRORTXHHOWRUQLOOR&RQHFWHOD
electricidad al horno.
Retiro y limpieza de los filtros
/RVILOWURVGHPHWDODWUDSDQODJUDVDTXHVXHOWDQORV
alimentos en la plancha. También evitan que las llamas de
los alimentos en la plancha dañen el interior del horno.
2. Por esta razón, los filtros deben estar colocados en su lugar
VLHPSUHTXHXWLOL]DHOH[WUDFWRU/RVILOWURVGHOUHVSLUDGRU
deben limpiarse una vez al meso cuando sea necesario.
3. Para retirarlos, utilice las orejetas para deslizarlos hacia la
SDUWHGHDWUiV+DOHKDFLDDEDMR\KDFLDDIXHUD
4. Para limpiar los filtros del respirador, remójelos y luego
sacúdalos en agua caliente y jabón. No utilice amoníaco ni
productos con amoníaco ya que pueden oscurecer el metal.
/RSXHGHFHSLOODUVXDYHPHQWHSDUDUHPRYHUHOVXFLRSHJDGR
5. Antes de colocarlos enjuáguelos, sacúdalos y déjelos secar.
6. Para colocarlos, deslice los filtros adentro de las ranuras del
marco en la parte de atrás de cada abertura. Presione hacia
arriba y hacia el frente para cerrarlos en su lugar.
Retire el tornillo

49-40624-3 31
Cómo reemplazar la luz de la cavidad
'HVFRQHFWHODHQHUJtDHQHOIXVLEOHSULQFLSDORSDQHOGHO
interruptor automático.
2. Retire la parrilla superior, retire los dos tornillos que la
sostienen en su lugar.
5HWLUHHOILOWURGHFDUEyQVLORWLHQH'HVOtFHORKDFLDOD
izquierda y hálelo hacia el frente para retirarlo. NOTA: El
filtro de carbón es un kit opcional, no es necesario tenerlo.
4. Retire el tornillo que sostiene el protector de la lámpara en
su lugar.
6DTXHHOSURWHFWRUGHODOiPSDUD+DOHHOERPELOORDIXHUD
y cámbielo por una lámpara de horno de 120V130V, 20W.
Ordene el bombillo WB25X10019 de su distribuidor GE
Appliances.
6. Regrese la lámpara y el protector a su posición original y
coloque el tornillo y el filtro de carbón.
7. Coloque la parrilla y los 2 tornillos. Reconecte la energía al
horno.
Filtro de carbón (JX81D kit opcional)
Si el modelo no está ventilado hacia el exterior, el aire
recirculará a través del filtro de carbón desechable, el cual
ayuda a retirar el humo y los olores.
El filtro de carbón no se puede limpiar, debe ser cambiado.
2UGHQHOD3LH]D1R-;':%;GHVXGLVWULEXLGRU
GE Appliances.
El filtro de carbón debe cambiarse cuando lo vea sucio o
GHFRORUDGRJHQHUDOPHQWHGHDPHVHV
GHSHQGLHQGRGHOXVR
Para instalar un filtro nuevo:
1. Retire del filtro nuevo el plástico y el otro envoltorio exterior.
2. Retire la parrilla superior, para eso debe retirar los dos
tornillos que la sostienen en su lugar.
3. Inserte el filtro adentro de la abertura superior del horno,
como se muestra.
'HVFDQVDUiHQXQiQJXORVREUHODVGRVRUHMHWDVGHVRSRUWH
traseras y por el frente por dos orejetas.
5. Coloque la parrilla y los dos tornillos.
Para retirar el filtro, repita el paso 2 anterior, retire el filtro y
repita el paso 5.
Cuidado y Limpieza
CUIDADO Y LIMPIEZA
DECLARACIÓN DE INTERFERENCIA POR RADIOFRECUENCIA DE LA
FEDERAL COMMUNICATIONS COMMISSION (COMISIÓON FEDERAL DE
COMUNICACIONES) (EE.UU. ÚNICAMENTE)
Este equipamiento genera y utiliza energía de
frecuencia ISM y si no es instalado y usado de forma
adecuada, estando en estricto cumplimiento con las
instrucciones del fabricante, podrá generar interferencia
en la recepción de radio y televisión. Fue evaluado de
forma específica y se comprobó que cumple con los
límites de Equipamientos ISM, de acuerdo con la parte
18 de las Reglas de la FCC, que fueron diseñadas para
brindar una instalación residencial.
Sin embargo, no se garantiza que no se presenten
interferencias en una instalación en particular. Si este
equipamiento genera interferencias en la recepción
de radio o televisión, lo que se puede comprobar
encendiendo y apagando el equipo, se aconseja al
usuario que intente corregir la interferencia a través de
una de las siguientes medidas:
Ŷ5HRULHQWHODDQWHQDUHFHSWRUDGHODUDGLRRHO
televisor.
Ŷ5HXELTXHHO+RUQR0LFURRQGDVHQUHODFLyQDO
receptor.
Ŷ$OHMHHOKRUQRPLFURRQGDVGHODSRVLFLyQGHOUHFHSWRU
Ŷ(QFKXIHHOKRUQRPLFURRQGDVHQXQWRPDFRUULHQWH
diferente, de modo que el horno microondas y el
receptor estén en diferentes recepciones de códigos.
El fabricante no es responsable por ninguna
interferencia de radio o TV generada por modificaciones
no autorizadas sobre este horno microondas. Es
responsabilidad del usuario corregir tales interferencias.

32 49-40624-3
Problema Causas Posibles Qué se debe hacer / Explicación
LUCES
Se opaca la luz durante un
ciclo de cocimiento
rápido y se
enciende y apaga, aún en niveles
de potencia completa.
Esto es normal. El nivel de potencia
ha sido reducido
automáticamente
ya que el horno está caliente.
Esto es normal. El horno detecta el nivel de calor y se
ajusta automáticamente.
Luz visible alrededor de la puerta
y de la caja exterior al cocinar
rápido.
Esto es normal. Cuando el horno está encendido, hay una luz visible
alrededor de la puerta y de la caja exterior.
VENTILADOR
El ventilador continúa
funcionando después de terminar
de cocinar
El horno se está enfriando. El ventilador se apagará automáticamente las piezas
internas del horno se hayan enfriado.
El respirador del horno emite un
aire caliente mientras el horno
está encendido.
Esto es normal.
El ventilador del respirador
se enciende automáticamente
cuando horno no está en so.
Esto es normal. ISi la plancha o el horno se calientan, el ventilador del
UHVSLUDGRUVHHQFLHQGH9HDODVHFFLyQ9HQWLODGRUHO
HO$XWRPiWLFR
El ventilador se encien enciende
automáticamente detectará que
cuando ventilador micronda.
Esto es normal. Si se utiliza el horno después de cocimiento rápido, el
horno está demasiado caliente, el se utiliza el se del
respirador se encenderá para friar el horno.
El horno hace sonidos inusuales
al cocinar.
Chasquidos y el ventilador soplando
son sonidos normales. El relé
del tablero está encendiendo y
apagando los componentes.
Estos sonidos son normales.
El sonido del ventilador cambia al
cocinar.
Esto es normal. El ventilador se enciende y apaga durante el
cocimiento para mantener la temperatura.
COCIMIENTO
Sale humo del horno cuando se
abre la puerta.
La comida tiene alto conte nido
de grasa. Se utilizó espray en las
panas.
El humo es normal al cocinar comidas con mucha
JUDVD8WLOLFHDFHLWHYHJHWDORGHROLYDHQODFDUQHHQ
lugar de cubrir toda la pana.
Al final del programa de
cocimiento la comida no está
cocida ni dorada.
Los tiempos programados no
concuerdan con el tamaño ni
la cantidad de comida que va a
cocinar.
Aumente o disminuya el tiempo para cocinar o
ajuste las lámparas superior e completamente
inferior para dorar.
El horno se apagó en Warm
(Caliente), Proof (Prueba), o
Convection Bake (Honeado por
Convección)
El tiempo máximo de cocción de
179 minutos fue alcanzado.
Esto es normal. El control apagará de forma
automática el horno e indicará que el tiempo de
cocción fue alcanzado. El tiempo de cocción no
siempre es exhibido.
Se configuró un tiempo de
cocción para que Convection
Bake (Horneado por
Convección) comience luego
del precalentamiento y la
puerta no se abrió al finalizar el
precalentamiento.
Esto es normal. El control apagará el horno de
forma automática luego de una hora e indicará
que la cocción está completa si la puerta no está
abierta.
¡Ahorre tiempo y dinero! Primero revise los cuadros que aparecen en las siguientes páginas y es posible que no necesite solicitar
reparaciones.a
CONSEJOS PARA LA SOLUCIÓN DE PROBLEMAS
Consejos para la Solución de Problemas... Antes de solicitar el servicio
técnico

49-40624-3 33
CONSEJOS PARA LA SOLUCIÓN DE PROBLEMAS
Problema Causas Posibles Qué se debe hacer / Explicación
DISPLAY
La pantalla está en blanco.
El reloj fue diseñado para apagar la unidad cuando
quede inactiva durante 30 segundos, a fin de
minimizar el uso de la energía en suspensión.
&RQVXOWHODVHFFLyQGHO5HORM
Aparece en la pantalla Panel
LOCKED”
El control está bloqueado. 3UHVLRQH\VRVWHQJD&/($52))³&RQWUROGXUDQWH
3 segundos para desbloquear el control. Vea la
sección Otras Funciones.
La pantalla delcontrol está
encendida pero el horno no
arranca.
El reloj no está programado. Siga las instrucciones para programarel reloj.
La puerta no está cerrada. Abra la puerta y ciérrela segura.
Se seleccionó accidentalmente
mente el Inicio Demorado.
3UHVLRQH&/($52))\YXHOYDDDMXVWDU
El horno está en el modo de
demostración.
'HVHQFKXIHHOKRUQRSRUPLQXWROXHJRHQFK~IHOR
en la pared. NO programe el reloj. Presione y
VRVWHQJDGXUDQWHVHJXQGRVODVWHFODV+(/3\
67$573$86((OFRQWUROGHEHVDOLUGHOPRGRGH
demonstración. Programe el reloj y continúe.
Se presionó accidentalmente
CLEAR/OFF
Reajuste el programa de cocimiento y presione
67$573$86(
OTROS PROBLEMAS
La puerta y el interior del horno
se sienten caliente.
El horno produce un calor intenso
en espacios pequeños.
Esto es normal. Cuando la comida esté lista, utilice
guantes para retirarla.
El piso del horno está tibio, aún
cuando no ha sido utilizado.
La luz de la plancha está ubicada
debajo del piso del horno. Cuando
se en ciende, el calor que produce
puede calentar el piso del horno.
Esto es normal.
El horno no arranca Se pudo haber quemado un
fusible o disparado el interruptor
automático de su casa.
Cambie el fusible o reajuste el interruptor automático.
Sobrevoltaje 'HVHQFKXIHHOKRUQR\HQFK~IHORGHQXHYR
El enchufe no está completamente
insertado en el en chufe de la
pared.
Asegúrese que el enchufe del horno esté
completamente insertado en el enchufe de la pared.
La bandeja de vidrio del
microonda no se traba en el eje
central.
Alinee los salientes en la parte de abajo de
la bandeja de vidrio para el microoda con las
indentaciones en el plato giratorio. Este ajuste no
queda apretado, es normal algo de movimiento.
Consejos para la Solución de Problemas... Antes de solicitar el servicio
técnico

34 49-40624-3
GARANTÍA
GEAppliances.com
Todo el servicio de garantía es provisto por nuestros Centros de Servicio de Fabricación, o un técnico autorizado de Customer Care®.
Para programar una visita del servicio técnico a través de Internet, visítenos en www.geappliances.com/service_and_support/, o
OODPHDO*(&$5(6&XDQGROODPHSDUDVROLFLWDUHOVHUYLFLRWHQJDORVQ~PHURVGHVHULH\PRGHORGLVSRQLEOHV
Lo que GE Appliances no cubrirá:
Ŷ9LVLWDVGHVHUYLFLRDGRPLFLOLRSDUDHQVHxDUOHDXWLOL]DUHVWH
producto.
Ŷ,QVWDODFLyQHQWUHJDRPDQWHQLPLHQWRLQDGHFXDGRV
Ŷ3URGXFWRQRDFFHVLEOHSDUDIDFLOLWDUHOVHUYLFLRUHTXHULGR
Ŷ)DOORVGHOSURGXFWRVLKD\DEXVRPDOXVRSRUHMHPSOR
FKLVSDVGHQWURGHKRUQRPLFURRQGDVGHOHVWDQWHPHWiOLFR
SDSHOGHDOXPLQLRRXVRSDUDRWURVSURSyVLWRVTXHORV
propuestos, o si se usa con fines comerciales.
Ŷ5HHPSOD]RGHIXVLEOHVGHOKRJDURUHLQLFLDOL]DFLyQGH
interruptores de circuitos.
Ŷ5HHPSOD]RGHERPELOODVGHODOX]GHODHVWXID
Ŷ'DxRVRFDVLRQDGRVDOSURGXFWRSRUPRWLYRGHDFFLGHQWH
incendio, inundaciones o actos fortuitos.
Ŷ'DxRVLQFLGHQWDOHVRLQGLUHFWRVFDXVDGRVSRUSRVLEOHV
defectos de este aparato.
Ŷ'DxRVFDXVDGRVGHVSXpVGHODHQWUHJD
Garantía del horno Advantium
EXCLUSIÓN DE GARANTÍAS IMPLÍCITAS
6X~QLFD\H[FOXVLYDDOWHUQDWLYDHVODUHSDUDFLyQGHOSURGXFWRFRPRVHLQGLFDHQOD*DUDQWtD/LPLWDGD/DVJDUDQWtDV
implícitas, incluyendo garantías implícitas de comerciabilidad o conveniencia sobre un propósito particular, se limitan a un
año o al período más corto permitido por la ley.
Esta garantía se extiende al comprador original y a cualquier dueño subsiguiente de productos comprados para uso hogareño dentro
GH((886LHOSURGXFWRHVWiHQXQiUHDGRQGHQRVHHQFXHQWUDGLVSRQLEOHXQ3URYHHGRU$XWRUL]DGRGHO6HUYLFLR7pFQLFRGH*(
Appliances, usted será responsable por el costo de un viaje o se podrá requerir que traiga el producto a una ubicación del Servicio
Técnico de GE Appliances autorizado para recibir el servicio. En Alaska, la garantía excluye el costo de envío o llamadas del servicio a
su hogar.
Algunos estados no permiten la exclusión o limitación de daños fortuitos o consecuentes. Esta garantía le da derechos legales
específicos y es posible que tenga otros derechos legales que varían entre un estado y otro. Para conocer cuáles son sus derechos
legales, consulte a la oficina de asuntos del consumidor local o estatal o al Fiscal de su estado.
Garante: GE Appliances
Por el período de GE Appliances Reemplazará:
Un año
'HVGHODIHFKDGH
compra original
Cualquier parte del horno que falle debido a un defecto en los materiales o mano de obra.
'XUDQWHHVWDgarantía limitada de un año, GE Appliances también proveerá, gratis, toda la
mano de obra y servicio relacionado para reemplazar la pieza defectuosa.
Cinco año
'HVGHODIHFKDGH
compra original
El tubo magnetrón, si el tubo magnetrón falla debido a un defecto de materiales o mano de
REUD'XUDQWHHVWDgarantía limitada de cinco años, usted será responsable de toda mano
de obra o costos de la reparación a domicilio.
Abroche su recibo aquí. Para acceder al servicio técnico de acuerdo con
la garantía deberá contar con la prueba de la fecha original de compra.

49-40624-3 35
KITS OPCIONALES
Kits opcionales
Kits de paneles de relleno:
Ŷ -;%66$FHUR,QR[LGDEOH
Ŷ -;%(6/R]D
Ŷ -;%::%ODQFR
Ŷ -;%%%1HJUR
Al colocar un extractor de estufa de 36”, los kits de
paneles rellenan el ancho adicional para darle una
apariencia empotrada personalizada.
Solamente para una instalación entre los gabinetes; no
son para instalaciones al final de los gabinetes.
Cada kit contiene: dos paneles de relleno de 3” de
ancho.
Kit de Montaje
Ŷ -;%803%%
8VHORVPLVPRVDOLQVWDODUHOKRUQRPLFURRQGDVFRQ
gabinetes con una profundidad de 15”. El kit de montaje
permitirá que el horno microondas sea instalado de
modo tal que los agujeros de la ventilación en la parte
superior frontal de los electrodomésticos no queden
bloqueados.
Kits de Filtros
Ŷ-;'².LWGH)LOWURGH&DUEyQSDUD5HFLUFXODFLyQW
/RVNLWVGHILOWURVVRQXWLOL]DGRVFXDQGRHOKRUQRQRSXHGHVHU
ventilado hacia el exterior.
Vea la cubierta trasera para ordenar por teléfono o en
GEAppliances.com.
'LVSRQLEOHHQVXGLVWULEXLGRU*($SSOLDQFHVDXQFRVWRDGLFLRQDO

36 49-40624-3
Impreso en Corea
Soporte para el Consumidor
SOPORTE PARA EL CONSUMIDOR
Sitio Web de GE Appliances
¢'HVHDUHDOL]DUXQDFRQVXOWDRQHFHVLWDD\XGDFRQVXHOHFWURGRPpVWLFR"£,QWHQWHDWUDYpVGHO6LWLR:HEGH*($SSOLDQFHVODV
KRUDVGHOGtDFXDOTXLHUGtDGHODxR8VWHGWDPELpQSXHGHFRPSUDUPiVHOHFWURGRPpVWLFRVPDUDYLOORVRVGH*($SSOLDQFHV\
aprovechar todos nuestros servicios de soporte a través de Internet, diseñados para su conveniencia.
(Q((88GEAppliances.com
Registre su Electrodoméstico
£5HJLVWUHVXHOHFWURGRPpVWLFRQXHYRDWUDYpVGH,QWHUQHWVHJ~QVXFRQYHQLHQFLD8QUHJLVWURSXQWXDOGHVXSURGXFWRSHUPLWLUi
una mejor comunicación y un servicio más puntual de acuerdo con los términos de su garantía, en caso de surgir la necesidad.
También puede enviar una carta en la tarjeta de inscripción preimpresa que se incluye con el material embalado.
(Q((88GEAppliances.com/register
Servicio Programado
El servicio de reparación de expertos de GE Appliances está a sólo un paso de su puerta. Conéctese a través de Internet y programe
VXVHUYLFLRDVXFRQYHQLHQFLDFXDOTXLHUGtDGHODxR(Q((88GEAppliances.com/ge/service-and-support/service.htm
o comuníquese al 800.432.2737 durante el horario de atención comercial.
Garantías Extendidas
Adquiera una garantía extendida de GE Appliances y conozca los descuentos especiales que están disponibles mientras su
JDUDQWtDD~QHVWiYLJHQWH/DSXHGHDGTXLULUHQFXDOTXLHUPRPHQWRDWUDYpVGH,QWHUQHW/RVVHUYLFLRVGH*($SSOLDQFHVD~Q
estarán allí cuando su garantía caduque.
(Q((88GEAppliances.com/ge/service-and-support/shop-for-extended-service-plans.htm
o comuníquese al 800.626.2224 durante el horario de atención comercial.
Conectividad Remota
3DUDVROLFLWDUDVLVWHQFLDSDUDODFRQHFWLYLGDGGHUHGLQDOiPEULFDSDUDPRGHORVFRQDFFHVRUHPRWR
visite nuestro sitio web en GEAppliances.com/ge/connected-appliances/RFRPXQtTXHVHDOHQ((88
Piezas y Accesorios
Aquellos individuos calificados para realizar el servicio técnico de sus propios electrodomésticos podrán solicitar el envío de
SLH]DVRDFFHVRULRVGLUHFWDPHQWHDVXVKRJDUHVVHDFHSWDQODVWDUMHWDV9,6$0DVWHU&DUG\'LVFRYHU2UGHQHKR\DWUDYpVGH
,QWHUQHWGXUDQWHODVKRUDVWRGRVORVGtDV(Q((88GEApplianceparts.com o de forma telefónica al 877.959.8688 durante
el horario de atención comercial.
Las instrucciones que figuran en este manual cubren los procedimientos que serán realizados por cualquier usuario.
Otros servicios técnicos generalmente deben ser derivados a personal calificado del servicio. Se deberá tener cuidado,
ya que una reparación indebida podrá hacer que el funcionamiento no sea seguro.
Contáctenos
Si no se encuentra satisfecho con el servicio que recibió de GE Appliances, comuníquese con nosotros a través de nuestro sitio
Web con todos los detalles, incluyendo su número telefónico, o escriba a:
(Q((88*HQHUDO0DQDJHU&XVWRPHU5HODWLRQV_*($SSOLDQFHV$SSOLDQFH3DUN_/RXLVYLOOH.<
GEAppliances.com/ge/service-and-support/contact.htm
-
 1
1
-
 2
2
-
 3
3
-
 4
4
-
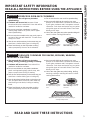 5
5
-
 6
6
-
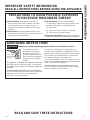 7
7
-
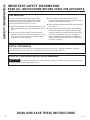 8
8
-
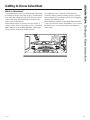 9
9
-
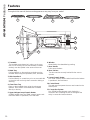 10
10
-
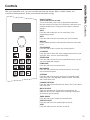 11
11
-
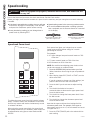 12
12
-
 13
13
-
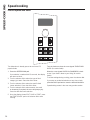 14
14
-
 15
15
-
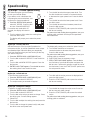 16
16
-
 17
17
-
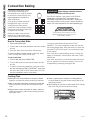 18
18
-
 19
19
-
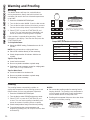 20
20
-
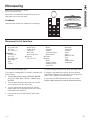 21
21
-
 22
22
-
 23
23
-
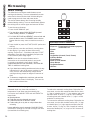 24
24
-
 25
25
-
 26
26
-
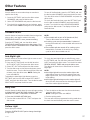 27
27
-
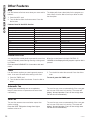 28
28
-
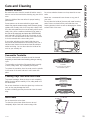 29
29
-
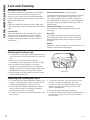 30
30
-
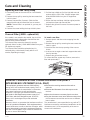 31
31
-
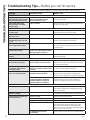 32
32
-
 33
33
-
 34
34
-
 35
35
-
 36
36
-
 37
37
-
 38
38
-
 39
39
-
 40
40
-
 41
41
-
 42
42
-
 43
43
-
 44
44
-
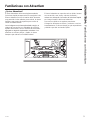 45
45
-
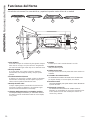 46
46
-
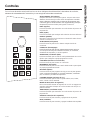 47
47
-
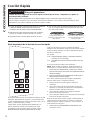 48
48
-
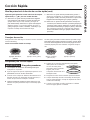 49
49
-
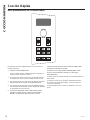 50
50
-
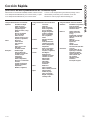 51
51
-
 52
52
-
 53
53
-
 54
54
-
 55
55
-
 56
56
-
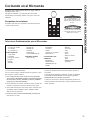 57
57
-
 58
58
-
 59
59
-
 60
60
-
 61
61
-
 62
62
-
 63
63
-
 64
64
-
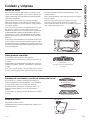 65
65
-
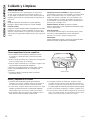 66
66
-
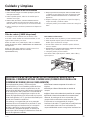 67
67
-
 68
68
-
 69
69
-
 70
70
-
 71
71
-
 72
72


GE CSA1201RSS El manual del propietario
- Categoría
- Microondas
- Tipo
- El manual del propietario
en otros idiomas
- English: GE CSA1201RSS Owner's manual
Artículos relacionados
-
GE Cafe Series CT9800SHSS El manual del propietario
-
GE ZSC1202JSS El manual del propietario
-
 Cafe CWB713P2NS1 El manual del propietario
-
-
GE PSB9100DFWW El manual del propietario
-
-
Cafe CSB923M2NS5 El manual del propietario
-
GE Cafe Series PVM1790DRBB El manual del propietario
-
GE Profile PSB9240EF3ES El manual del propietario
-
GE PSA9120SFSS Guía del usuario

Otros documentos
-
 GE Monogram ZSC1001JSS DL 51442b831de99087b4ed517e2c8f
-
 GE Monogram ZSA1201JSS DL 9b8430882c908479613ccc1b5f9a
-
-
 Cafe CSB923M2NS5 El manual del propietario
-
LG MS1142GWA El manual del propietario
-
-


