Silvercrest 286794 El manual del propietario
- Categoría
- Barbacoas
- Tipo
- El manual del propietario

IAN 286794
CONTACT Grill
PArrillA ElÉCTriCA DE CONTACTO SKGl 1500 A1
CONTACT Grill
Operating instructions PArrillA ElÉCTriCA DE CONTACTO
Instrucciones de uso

US - EN Operating instructions Page 1
US - ES Instrucciones de uso Página 33
Before reading, unfold the page containing the illustrations and familiarize yourself with all functions of the
device.
Antes de empezar a leer abra la página que contiene las imágenes y, en seguida, familiarícese con todas
las funciones del dispositivo.

A
B

US-EN │ 1 ■
SKGL 1500 A1
Table of Contents
Introduction ....................................2
Warning types .................................2
Safety instructions ..............................3
Important cord information ................................ 5
Proper use ..................................... 8
Operating elements .............................8
Unpacking and connecting .......................9
Package contents and initial inspection ...................... 9
Unpacking ............................................ 9
Handling and operation .........................9
Before first use. . . . . . . . . . . . . . . . . . . . . . . . . . . . . . . . . . . . . . . . . 10
Control Panel .........................................10
Operation ............................................11
Temperature settings ....................................13
"Contact grill" position ..................................13
"Tabletop grill" position .................................. 14
Tips and tricks .................................16
Cleaning and maintenance ......................17
Storage ......................................19
Troubleshooting ...............................19
Disposal ......................................21
Appendix ....................................22
Technical specifications ..................................22
FCC Compliance Statement ..............................22
3 year limited warranty ..................................23
Distributor ............................................24
Recipes ......................................25
"Contact grill" position ..................................25
"Panini grill" position ....................................27
"Tabletop grill" position .................................. 30
IB_286794_LB9.indb 1 07.09.17 15:28

■ 2 │ US-EN SKGL 1500 A1
Introduction
Congratulations on the purchase of your new appliance.
You have selected a high-quality product. The operating instructions
are part of this product. They contain important information about
safety, usage, and disposal. Before using the product, please
familiarize yourself with all operating and safety instructions.
Use the product only as described and for the specified range of
applications. Please also pass these operating instructions on to
any future owner.
Warning types
The following warning types are used in these operating instructions:
This is the safety alert symbol. It is used to alert you to
potential injury hazards. Obey all safety messages that
follow this symbol to avoid possible injury and death.
DANGER indicates a hazardous situation that, if not avoided,
will result in death or serious injury.
WARNING indicates a hazardous situation that, if not avoided,
could result in death or serious injury.
CAUTION indicates a hazardous situation that, if not avoided,
could result in minor or moderate injury.
NOTICE indicates information that is considered important, but
not hazardous (e. g. messages related to property damage).
IB_286794_LB9.indb 2 07.09.17 15:28

US-EN │ 3 ■
SKGL 1500 A1
Safety instructions
This section contains important safety instructions for using the ap-
pliance. This appliance complies with statutory safety regulations.
Improper use may result in personal injury and property damage.
IMPORTANT SAFETY
INSTRUCTIONS
SAVE THESE INSTRUCTIONS
When using electrical appliances, basic safety precautions
should always be followed, including the following:
1. READ ALL INSTRUCTIONS.
2. Do not touch hot surfaces. Use handles or knobs.
3. To protect against electric shock, do not immerse cord, plugs
or the appliance in water or other liquids.
4. Provide a stable location for the appliance.
5. Children younger than 8 years of age are to be kept away
from the appliance and the power cord.
6. This appliance may be used by children who are 8 years of
age or older and by persons with reduced physical, sensory
or mental capabilities, or lack of experience and/or knowledge,
if they are supervised or have been instructed in the safe use
of the appliance and have understood the potential risks.
7. Children may only attempt to carry out cleaning and mainte-
nance tasks on the appliance if they are at least 8 years old
and under supervision.
8. Unplug the appliance from the wall outlet when not in use
and before cleaning. Allow the appliance to cool before put-
ting on or taking off parts and before cleaning it.
IB_286794_LB9.indb 3 07.09.17 15:28

■ 4 │ US-EN SKGL 1500 A1
9. Check the appliance for visible external damage before use.
Do not operate appliances that have been damaged or
dropped.
10. Do not operate any appliance with a damaged cord or plug
or after the appliance malfunctions or has been damaged in
any manner. Return the appliance to the nearest authorized
service provider for examination, repair or adjustment.
11. Repairs on the appliance should only be carried out by
authorized service providers or the customer service depart-
ment. Improper repairs may put the user at risk. Furthermore,
this invalidates the warranty.
12. Defective components must always be replaced with original
replacement parts. Only using original replacement parts
can ensure that they meet the safety requirements.
13. Do not use the appliance outdoors.
14.
Do not let cord hang over the edge of table or counter, or
touch hot surfaces.
15. Do not place the appliance on or near a hot gas or electric
burner, or in a heated oven.
16.
To disconnect the appliance, pull the plug out of the wall
outlet.
17. Do not use the appliance for anything other than its intended
use.
IB_286794_LB9.indb 4 07.09.17 15:28

US-EN │ 5 ■
SKGL 1500 A1
18. A fire may occur if the appliance is covered or touches
flammable material, including curtains, draperies, walls,
etc., while in operation. Do not store any item on top of the
appliance while it is in operation.
19.
Do not clean with metal scouring pads. Pieces can break off
the pad and touch electrical parts, causing a risk of electric
shock.
20. If possible, place the appliance near an electrical outlet.
Make sure that the power plug is quickly accessible in case
of danger and that the power cord cannot become a tripping
hazard.
SAVE THESE INSTRUCTIONS
FOR HOUSEHOLD USE ONLY.
This product contains chemicals known to the State of California
to cause cancer and birth defects or other reproductive harm.
Important cord information
This appliance has a polarized plug. To reduce the risk of elec-
tric shock, there is only one way this plug is intended to fit into
a polarized outlet. If the plug does not completely fit into the
outlet, reverse the plug. If it still does not fit, contact a qualified
electrician. Do not attempt to modify the plug in any way.
a) A short power supply cord (or detachable power supply cord)
should be used to reduce the risk resulting from becoming
entangled in, or tripping over a longer cord.
b) Longer detachable power supply cords or extensions cords
may be used if they are used carefully.
IB_286794_LB9.indb 5 07.09.17 15:28

■ 6 │ US-EN SKGL 1500 A1
c) If a longer detachable power supply cord or extension cord is
used:
1) The marked electrical rating of the cord set or extension
cord should be at least as great as the electrical rating of the
appliance;
2) The cord should be arranged so that it will not drape over
the countertop or tabletop, where it can be pulled on by
children, or tripped over unintentionally; and
3) If the appliance has a grounded plug, the cord set or
extension cord should also be a grounded 3-wire cord.
Additional safety instructions
► Ensure that the appliance never comes into contact with water
while the plug is inserted into a power outlet, especially if you
are using it in the kitchen and close to the sink.
► Never immerse the appliance in water or other liquids.
► Ensure that the power cord never gets wet or damp when the
appliance is in use. Route the cord so that it cannot be trapped
or damaged in any way.
► Arrange for defective power plugs and/or cords to be replaced
as soon as possible by a qualified technician or by our customer
service department to avoid the risk of injury.
► Set up the appliance as close as possible to the electrical power
outlet. Ensure that the power plug is quickly reachable in case of
danger, and also that there is no danger of tripping over the cord.
► The appliance must be connected to a power outlet with a pro-
tective earth. The supply voltage must match the specifications
on the rating plate of the appliance.
► Always disconnect the plug from the power outlet after use.
Simply turning the appliance off is not sufficient, as it remains
IB_286794_LB9.indb 6 07.09.17 15:28

US-EN │ 7 ■
SKGL 1500 A1
under power for as long as the plug is inserted into the power
outlet.
► Always hold the power cord by the plug. Never pull on the
power cord itself and never handle the cord with wet hands.
► Do not place the appliance or any furniture or other items on
top of the power cord and avoid pinching it.
► You must not open the housing of the appliance nor attempt to
repair or modify the appliance. When the housing is opened or
the appliance is modified by an unauthorized party, there is a
risk of death from electric shock and the warranty is invalidated.
Caution! Hot surface!
► Parts of the appliance will become hot during operation; you
should only hold the appliance by the handle.
► Baked foods can burn! Never set up and use the appliance in
the vicinity of flammable objects, especially not under curtains.
► Do not use an external timer switch or a separate remote
control system to operate the appliance.
► Never leave the appliance unattended during operation.
► Ensure that the appliance, the power cord, and the plug do
not come into contact with heat sources such as hotplates or
naked flames.
► To protect the non-stick coating, do not use metallic tools such
as knives, forks, etc. If the non-stick coating is damaged, stop
using the appliance.
IB_286794_LB9.indb 7 07.09.17 15:28

■ 8 │ US-EN SKGL 1500 A1
► Operate the appliance only with the original accessories
supplied.
► Do not use charcoal or similar fuels to operate the appliance!
Proper use
This appliance is only intended for grilling food indoors. Any
use other than the intended use is considered to be improper.
The appliance is not intended for use in commercial or industrial
environments.
The manufacturer accepts no responsibility for damage caused by
improper use or repairs, unauthorized modifications, or the use of
unapproved replacement parts. The risk is borne solely by the user.
Operating elements
Illustration A:
1 Support feet
2 Safety lock
3 180° unlocking button
4 Fat outlet
5 Cord retainer
6 Light element
7 Green "Ready" indicator light
8 Control panel
9 RELEASE button (lower hot plate)
0 Fat collection tray
q Hot plates
w RELEASE button (upper hot plate)
Illustration B:
e Cleaning scraper
IB_286794_LB9.indb 8 07.09.17 15:28

US-EN │ 9 ■
SKGL 1500 A1
Unpacking and connecting
RISK OF SUFFOCATION!
Do not play with packaging materials.
Package contents and initial inspection
The appliance comes standard with the following components
(see foldout):
● Contact Grill
● Fat drip tray
● Cleaning scraper
● Operating instructions
Check the package for completeness and signs of visible damage.
If the delivery is incomplete or damage has occurred as a result of
defective packaging or during transport, contact the customer service
hotline (see "3 year limited warranty" section).
Unpacking
♦ Take all the parts out of the box.
♦ Remove the packaging material and any protective wrapping.
Handling and operation
This section contains important instructions for handling the
appliance.
IB_286794_LB9.indb 9 07.09.17 15:28

■ 10 │ US-EN SKGL 1500 A1
Before first use
During first use, you may notice a slight smell (there may also be minimal
smoke). This is normal and dissipates after a short time. Ensure sufficient
ventilation. For instance, by opening a window.
1) First, clean the appliance as described in "Cleaning and
maintenance”.
2) Read these operating instructions carefully.
3) Set up the appliance in accordance with the safety informa-
tion.
4) Unlock the appliance by setting the safety lock 2 to .
5) Open the appliance.
6) Wipe the hot plates q with a damp cloth.
7) Close the appliance.
8) Insert the plug of the power cord into a properly connected,
grounded power outlet that provides the voltage specified in
the chapter on "Technical specifications". Allow the appliance
to heat up for approx. 5 minutes at maximum heat by setting
the corresponding settings using the control panel 8.
9) Once the appliance is hot, disconnect the power plug from
the power outlet and allow the appliance to cool down.
10) Clean the appliance again with a damp cloth.
The appliance is now ready for use.
Control Panel
Use the control panel 8to adjust the temperature and time.
"+" button: increase temperature or heating time
Power button : turn the appliance on or off
T/MIN button: select temperature or heating time
Display: LCD display
"-" button: decrease temperature or heating time
IB_286794_LB9.indb 10 07.09.17 15:29

US-EN │ 11 ■
SKGL 1500 A1
►The green "Ready" indicator light 7 lights up as soon as the
set temperature has been reached. It might turn off again at
some point after heating up. This means that the temperature
has fallen below the set temperature and the appliance is
heating up again!
►Note that every entry is accompanied by a beep.
Operation
The appliance is extremely hot during use! For this reason,
do not touch anything but the handle 3 during use!
1) Use the handle to close the lid of the appliance.
2) Insert the fat collection tray 0 into the appliance.
3) Connect the power plug to the power outlet again. You will
hear a beep and you will see "OFF" on the display . The
display will light up blue and automatically turn off again after
one minute if no entry is made.
4) Use the power button to turn the appliance on. The
display will light up blue. You will hear two beeps and
the appliance will start heating up until it reaches the preset
temperature of 194 °F (90 °C) (keep-warm mode). As soon
as the set temperature has been reached, you will hear three
IB_286794_LB9.indb 11 07.09.17 15:29

■ 12 │ US-EN SKGL 1500 A1
beeps and see the green "Ready" indicator light 7 light up.
During operation, the light element 6 is lit up blue.
5) Press the T/MIN button and press or hold the "+" or
"-" buttons to set the desired temperature (300–450 °F
| 150–230 °C). You will hear two beeps and the green
"Ready" indicator light 7 turns off. If needed, press the T/
MIN button again to set the heating time (1–90 min) using
the "+" and "-" buttons. As soon as the set temperature
has been reached, the green "Ready" indicator light 7 lights
up and the temperature is maintained. Once the set heating
time has passed, you will hear two beeps and the appliance
will switch back to keep-warm mode 194 °F (90 °C). The
appliance automatically turns off after one hour if no entries
are made.
You can also activate the keep-warm mode [194 °F (90 °C)]
manually, e.g. before the set heating time is over. To do this, press
the "-" button . The automatic keep-warm function will remain
active.
6) Press the power button to turn off the appliance, then
disconnect the power plug from the power outlet.
7) Clean the appliance as described in the chapter on "Cleaning
and maintenance".
Disconnect the power plug from the power outlet whenever you are
not using the appliance. Using the power button is not sufficient
to turn off the appliance.
►The green "Ready" indicator light 7 lights up as soon as the set
temperature has been reached. It might turn off again at some
point after heating up. This means that the temperature has fallen
below the set temperature and the appliance is heating up again.
►Note that a every entry is accompanied by a beep.
IB_286794_LB9.indb 12 07.09.17 15:29

US-EN │ 13 ■
SKGL 1500 A1
There are 3 different ways of using this grill:
–completely open, using both hot plates q as a tabletop grill.
–with a movable upper hot plate q as a contact grill, e.g.
to grill meat from both sides.
–with a fixed upper hot plate q as a panini grill, e.g. to
make grilled cheese toast.
Temperature settings
The ideal temperature depends on what you are grilling. Use the
following guide to determine the most suitable temperature:
194 °F (90 °C): keep-warm mode
300–350 °F (150–175 °C): low temperature, e.g. for
vegetables or panini
350–390 °F (175–200 °C): medium temperature, e.g. for fish
390–450 °F (200–230 °C): high temperature, e.g. for meat
The above temperature indications are merely a guide. Ideal
temperatures may vary depending on the condition of the food!
"Contact grill" position
1) Connect the power plug to the power outlet and press the
power button to turn the appliance on.
2) Set the desired temperature and, if necessary, heating time
as described in the "Operation" chapter and wait until the set
temperature has been reached.
3) Open the lid of the appliance and place the food on the
lower hot plate q.
4) Use the handle to close the lid of the appliance.
5) The movable upper hot plate q is always parallel to the low-
er hot plate q, even if thick food is being grilled.
This ensures optimal results.
IB_286794_LB9.indb 13 07.09.17 15:29

■ 14 │ US-EN SKGL 1500 A1
6) After a while, check how much your food has browned.
Use the handle to open the lid of the appliance.
Start with short grilling durations and increase the time until you
find the appropriate setting.
7) Once you are happy with the degree of browning, remove
your food from the grill.
Do not use pointed or sharp objects to remove your food.
They might damage the surface of the hot plates q.
8) Use the power button to turn off the appliance, then
disconnect the power plug from the power outlet.
Disconnect the power plug from the power outlet whenever you
are not using the appliance. Using the power button is not
sufficient to turn off the appliance.
"Tabletop grill" position
1) Connect the power plug to the power outlet and press the
power button to turn the appliance on.
2) Set the desired temperature and, if necessary, heating time
as described in the "Operation" chapter and wait until the set
temperature has been reached.
3) Unfold both support feet 1 (Fig. 1).
4) Press the 180° unlocking button 3 (Fig. 1) and open the lid
of the appliance until both hot plates q can be used as a
tabletop grill.
IB_286794_LB9.indb 14 07.09.17 15:29

US-EN │ 15 ■
SKGL 1500 A1
Fig. 1
5) The hot plates q are now next to each other and ready to be
used as a tabletop grill (Fig. 2).
Fig. 2
6) Place the food on the hot plates q.
7) Turn it halfway through the grill process to ensure both sides
are thoroughly cooked; remove it from the hot plates q once
it is ready to eat.
IB_286794_LB9.indb 15 07.09.17 15:29

■ 16 │ US-EN SKGL 1500 A1
Do not use pointed or sharp objects to remove or turn your food.
They might damage the surface of the hot plates q.
8) Use the power button to turn off the appliance, then
disconnect the power plug from the power outlet.
Disconnect the power plug from the power outlet whenever you
are not using the appliance. Using the power button is not
sufficient to turn off the appliance.
Tips and tricks
■ Marinade meat before grilling it to achieve especially tender
results and a shorter cooking time. You can use sour cream,
red wine, vinegar, buttermilk, or fresh fruit juice, e.g. papaya
or pineapple juice. Add herbs or spices depending on your
personal preferences. Do not add salt to your marinade as it
dehydrates the meat and makes it tough. Fully submerge the
meat in the marinade and close the container. Ideally, allow it
to marinade over night.
■ The hot plates qhave non-stick coating, so you do not
need to add extra oil or fat. If you wish to use extra oil or fat
anyway, choose a product that is suitable for frying food, e.g.
rapeseed oil.
■ Use meat that has the same thickness throughout to ensure
even cooking.
■ If you are uncertain whether the meat is fully cooked on the
inside, use a standard meat thermometer.
IB_286794_LB9.indb 16 07.09.17 15:29

US-EN │ 17 ■
SKGL 1500 A1
Cleaning and maintenance
Risk of death by electric shock! Please obey the following
safety information to prevent potential risks:
► Before cleaning the appliance, disconnect the power plug and
wait for the appliance to cool down completely.
► Never clean the appliance under running water or submerge
it in water. The appliance could be irreparably damaged!
Damage to the appliance!
► To avoid irreparable damage, make sure no moisture penetrates
the appliance.
► Do not clean the surface with abrasive cleaning agents, or sharp
or scratchy objects.
■ Once the hot plates q have cooled down, use the cleaning
scraper e on the hot plates q to scrape grease and food
residue into the fat collection tray 0.
■ Empty and clean the fat collection tray 0.
■ Wipe the hot plates q with a damp cloth. Do not use aggres-
sive detergents, rough sponges or pointy objects to clean the
hot plates, as those can damage the non-stick coating.
In case of stubborn dirt or baked-on food residue, remove the
hot plates q:
–Open the appliance.
–Hold on to the upper hot plate q to keep it from falling
and press the RELEASE button w. The upper hot plate q
will be released from the appliance.
–Press the RELEASE button 9 and simultaneously lift the
lower hot plate q.
IB_286794_LB9.indb 17 07.09.17 15:29

■ 18 │ US-EN SKGL 1500 A1
Clean the hot plates q in warm water with a little dish detergent.
If a large amount of food is encrusted on the hot plates q, allow
them to soak for a while. After cleaning, rinse the hot plate q
with clear water to remove the suds. Dry all parts well. The hot
plates q must be dry before you reattach them to the appliance!
To reattach the hot plates q, push the hot plates q onto the base
until both gaps next to the fat outlet 4 interlink with the hooks
on the base. Now, push the front of the hot plate q down until it
clicks into place.
Do the same with the second hot plate q.
■ A damp cloth will suffice for cleaning the outside of the appli-
ance.
Before using the appliance again, ensure that all parts are
completely dry.
■ Wipe the cleaning scraper e with a damp cloth. For stubborn
dirt, add a mild detergent to the cloth or clean the scraper
wish warm water and dish soap.
The hot plates q, fat collection tray 0 and cleaning scraper e
are dishwasher-proof. We recommend that you hand-wash them,
however, as this is a gentler process.
IB_286794_LB9.indb 18 07.09.17 15:29

US-EN │ 19 ■
SKGL 1500 A1
Storage
Lock the appliance by setting the safety lock 2 to . Wrap the
power cord around the cord retainer 5 on the bottom of the
appliance in a clockwise direction.
Fig. 3
Store the cleaned appliance in a clean, dust-free, and dry loca-
tion.
Troubleshooting
This section contains important instructions for troubleshooting
the appliance. The following table helps identify and solve minor
problems.
If an error occurs, the display of the appliance will show the
corresponding error code. You will hear beeps and all buttons
will be blocked so that the control panel 8 becomes unusable.
Please adhere to the following instructions.
IB_286794_LB9.indb 19 07.09.17 15:29

■ 20 │ US-EN SKGL 1500 A1
Defect Cause Solution
The appliance is
not working.
The power plug is
not connected to the
power supply.
Insert the plug into a power
outlet.
The power outlet is
defective. Use a different power outlet.
The appliance is
defective.
Contact the customer service
department.
The display shows
ER1.
A short circuit has
occurred in the
system.
Disconnect the power plug
from the power outlet and
contact customer service.
The display shows
ER2.
The lower hot plate
qhas been in-
serted incorrectly.
Insert the lower hot plate q
correctly.
The display shows
ER3.
The temperature of
the hot plates q
exceeds 608 °F
(320 °C); the
appliance has over-
heated.
Disconnect the power plug
from the power outlet. Wait for
the appliance to cool down
completely, then reconnect the
appliance to a power outlet.
If the malfunction cannot be corrected with the suggestions
above, or if you have determined that the malfunction may have
other causes, please contact our customer service department.
IB_286794_LB9.indb 20 07.09.17 15:29

US-EN │ 21 ■
SKGL 1500 A1
Disposal
Disposal of the appliance
Electrical appliances may not be thrown away as part of normal
household trash. If you can no longer use your electrical device,
dispose of it in accordance with the legal provisions applicable in
your state. This will ensure that old electrical devices are recycled
and environmental pollution is kept to a minimum. Further informa-
tion about disposal is available on the Internet at www.epa.gov
Disposal of packaging
The packaging protects the appliance from damage during
transport. The packaging materials have been selected for their
environmental friendliness and ease of disposal, and are therefore
recyclable.
The packaging is made of environmentally friendly materials
that can be disposed of at your local recycling center.
If possible, keep the original packaging of the appliance through-
out the entire warranty period so you can repackage it properly
if you need to submit a warranty claim.
IB_286794_LB9.indb 21 07.09.17 15:29

■ 22 │ US-EN SKGL 1500 A1
Appendix
Technical specifications
Voltage supply 120V ~ | 60 Hz
Power consumption 1500W
FCC Compliance Statement
This device complies with Part 15 of the FCC Rules. Operation is
subject to the following two conditions:
(1) This device may not cause harmful interference, and (2) this
device must accept any interference received, including interfer-
ence that may cause undesired operation.
Changes or modifications not expressly
approved by the party responsible for compliance could void the
user’s authority to operate the equipment.
NOTE: This equipment has been tested and found to comply
with the limits for Class B digital devices, pursuant to part 15 of
the FCC rules. These limits are designed to provide reasonable
protection against harmful interference in a residential installation.
This equipment generates, uses and can radiate radio frequen-
cy energy and, if not installed and used in accordance with the
instructions, may cause harmful interference to radio communi-
cations. However, there is no guarantee that interference will not
occur in a particular installation.
If this equipment does cause harmful interference to radio or televi-
sion reception, which can be determined by turning the equipment
off and on, the user is encouraged to try to correct the interference
by one or more of the following measures:
–Reorient or relocate the receiving antenna.
–Increase the separation between the equipment and the
receiver.
IB_286794_LB9.indb 22 07.09.17 15:29

US-EN │ 23 ■
SKGL 1500 A1
–Connect the equipment into an outlet on a circuit different
from that to which the receiver is connected.
–Consult the dealer or an experienced radio/TV technician
for help.
3 year limited warranty
What does this warranty cover?
The warranty covers:
● Damage, breakage or inoperability due to defect.
● Damage not caused by normal wear and tear or failure to follow
the safety and maintenance instructions provided in the user
manual.
What is not covered by the warranty?
The warranty does not cover damage caused by:
● Normal wear and tear of the product, including fragile parts
(such as switches, glass, etc.);
● Improper use or transport;
● Disregarding safety and maintenance instructions;
● Accidents or acts of nature (e.g. lightning, fire, water, etc.);
● Tampering with the product (such as removing cover, unscrewing
screws etc.)
Consequential and incidental damages are also not covered under
this warranty. However, some states do not allow the exclusion or
limitation of incidental or consequential damages, so this limitation
or exclusion may not apply to you.
What is the period of coverage and warranty resolution?
The warranty is for 3 years from the date of purchase.
At our discretion, product will either be refunded or replaced.
What will we not do?
We will not:
IB_286794_LB9.indb 23 07.09.17 15:29

■ 24 │ US-EN SKGL 1500 A1
● Start a new warranty period upon product exchange;
● Repair product.
How to process the warranty?
To initiate, please:
● Call customer service at 1 (844) 543-5872
● Visit the Website Customer Service Platform at
www.lidl.com/contact-us
or
● Visit a LIDL store for further assistance
To ensure the quickest warranty return process, please have the
following available:
● The original sales receipt that includes the date purchased;
● The product and manual in the original package;
● A statement of the problem.
What must you do to keep the warranty in effect?
● Retain the original receipt;
● Follow all product instructions;
● Do not repair or modify the product.
How does state law relate to this warranty?
This warranty gives you specific legal rights, and you may also have
other rights which vary from state to state. All implied warranties
are limited by the duration and terms of this warranty. Some states
do not allow limitations on how long an implied warranty lasts, so
the above limitation may not apply to you.
Distributor
LIDL US LLC.
ARLINGTON
VA 22202
IB_286794_LB9.indb 24 07.09.17 15:29

US-EN │ 25 ■
SKGL 1500 A1
Recipes
The temperatures and times specified in the recipes are merely
recommendations. Ideal temperatures may vary depending on
the condition of the food!
"Contact grill" position
Tex-Mex Burger
2 lb (900 g) ground beef
6 tbsp. barbecue sauce
6 tbsp. finely chopped onions
3 tbsp. fresh or store-bought salsa
1/2 tbsp. chili powder
4 large hamburger buns
1) Mix the ground beef, onions, salsa, chili powder, and barbecue
sauce in a large bowl.
2) Form four evenly sized hamburger patties with a thickness of
approximately ¾ in (2 cm).
3) Heat up the appliance (390–450 °F | 200–230 °C).
4) Grill the hamburgers on the preheated appliance (contact
position) for 8–10 minutes. When the patties are done, serve
them between the hamburger buns and garnish them with
your preferred ingredients and condiments.
IB_286794_LB9.indb 25 07.09.17 15:29

■ 26 │ US-EN SKGL 1500 A1
Rump steak with a spring onion herb sauce
1.1 lb (500 g) lean rump steak (125 g per steak)
¼ lb (120 g) margarine
1 tsp. Worcestershire sauce
1 finely chopped clove of garlic
4 tbsp. finely chopped parsley
4 finely chopped spring onions
1) Mix the margarine and Worcestershire sauce in a small bowl,
then add the garlic, parsley and spring onions.
2) Heat up the appliance to the maximum temperature
(450 °F | 230 °C).
3) Grill the steak for approx. 3 minutes.
4) Brush the steak with the spring onion-herb sauce and continue
grilling it at approx. 392 °F (200 °C) for another 4 minutes.
Any sauce dripping into the fat collection tray can be poured
over the steak before serving!
Tuna with orange slices
(4 servings)
4 fresh tuna steaks (6 oz | 170 g each)
1 orange
1 tbsp. finely chopped parsley
Salt
Pepper
1) Peel the orange and cut it into slices with a thickness of approx.
¼ in (5 mm).
2) Preheat the appliance (392 °F | 200 °C).
3) Place the tuna steaks on the preheated grill and sprinkle
parsley, salt and pepper over them.
4) Cover the tuna steaks in orange slices and grill them for 6–8
minutes.
5) Before serving, remove the grilled orange slices.
IB_286794_LB9.indb 26 07.09.17 15:29

US-EN │ 27 ■
SKGL 1500 A1
"Panini grill" position
Spinach-cheese panini
9 oz (250 g) spinach leaves
1 onion
1 clove of garlic
1 tbsp. oil
2 tsp. lemon juice
1 pinch of salt (and pepper)
4 slices of toast/white bread
1½ oz (40 g) herb butter
2⅔ oz (75 g) mozzarella
1 oz (20 g) pine nuts
1) Pick and wash the spinach leaves.
2) Peel and finely chop the onion and garlic, then sauté both in
hot oil until the onion becomes translucent. Add the spinach.
Season with lemon juice, salt and pepper.
3) Butter the toast with the herb butter.
4) Slice the mozzarella.
5) Distribute the mozzarella and the drained spinach on two
slices of toast and sprinkle pine nuts on top.
6) Cover the panini with another slice of toast.
7) Preheat the appliance (approx. 350 °F | 175 °C).
8) Carefully place the panini on the preheated grill.
9) Use the safety lock 2 to set the desired distance to the upper
hot plate q and close the lid.
10)
The panini should be grilled to a golden-brown color.
IB_286794_LB9.indb 27 07.09.17 15:29

■ 28 │ US-EN SKGL 1500 A1
Chicken breast panini
14 oz (400 g) chicken breast fillet
1 oz (20 g) butter
Pepper, salt, paprika
¼ lb (120 g) bacon strips
6 slices of toast/white bread
3 tbsp. salad dressing (yogurt)
1 oz (30 g) iceberg lettuce
2 tomatoes
1 avocado
1 tsp. lemon juice
2 oz (50 g) cucumber
1) Briefly rinse the chicken breast fillets under running water and
pat them dry with a paper towel.
2) Preheat the appliance to the maximum temperature (450 °F |
230°C) and briefly brown the chicken in the contact position.
3) Continue grilling the fillets at 350 °F (175 °C) for approx.
10 minutes until cooked through. Season them with salt,
pepper and paprika and set them aside.
4) Fry the bacon in a frying pan until crispy.
5) Spread the yogurt dressing across 3 slices of toast/white
bread, add the lettuce and sliced and seasoned tomatoes.
6) Slice the chicken breast fillets lengthwise and place them on
top of the tomatoes.
7) Top the chicken breast fillets with the bacon.
8) Slice the avocado open vertically and twist it to separate it
from the stone. Peel and slice the avocado. Drizzle lemon
juice on top of the avocado to prevent it from going brown.
Distribute the slices on the panini.
9) Slice the cucumber and place it on top of the avocado slices.
10)
Cover the panini with another slice of toast.
IB_286794_LB9.indb 28 07.09.17 15:29

US-EN │ 29 ■
SKGL 1500 A1
11) Place the panini on the hot plate q.
12)
Use the safety lock 2 to set the desired distance to the upper
hot plate q and close the lid.
13) The panini should be grilled to a golden-brown color.
Mustard baguette
1 baguette
1 clove of garlic
2 oz (50 g) gherkins (pickled with mustard seed)
1½ oz (40 g) Pecorino cheese
1 tbsp. hot mustard
2 tbsp. sweet mustard
2 oz (50 g) butter
2 tbsp. chopped chives
Salt and pepper
1) Make several cuts into the baguette in approximately 1 in in-
tervals. Be careful not to cut through the baguette completely.
2) Peel and mince the garlic, dice the gherkins very finely and
grate the Pecorino cheese.
3) Mix both types of mustard, the softened butter, garlic, gher-
kins, Pecorino cheese, and chives together and season with
salt and pepper to taste.
4) Fill the mustard-infused butter into the cuts of the baguette and
wrap the baguette in tin foil.
5) Preheat the appliance to 350–392 °F (175-200 °C).
6) Place the baguettes on the hot plate q.
7) Use the safety lock 2 to set the desired distance to the upper
hot plate q and close the lid.
8) The baguette should have a golden-brown color.
IB_286794_LB9.indb 29 07.09.17 15:29

■ 30 │ US-EN SKGL 1500 A1
"Tabletop grill" position
Chicken or turkey breast
7 oz (200 g) chicken or turkey breast
a little flour
1) Add some oil to the hot plates q and preheat the appliance
to the maximum temperature (450 °F | 230 °C). Make sure
to use oil that is suitable for frying.
2) Slice the 7 oz (200 g) of chicken or turkey breast and dust
with flour.
3) Grill the meat for 4 minutes, then turn it, salt it lightly and grill
the other side for another 4 minutes.
Grilled vegetables
2 bell peppers
1 zucchini
1 eggplant
Olive oil
Salt
Pepper
Herbes de Provence (mixed dried herbs)
1) Thoroughly clean the vegetables. Halve, deseed and slice the
bell pepper. Halve the eggplant and zucchini vertically, then
cut them into pieces of approx. ¼ in (0.5 cm).
2) Brush the vegetables with olive oil.
3) Preheat the appliance to 300–350 °F (150 - 175°C).
4) Place the vegetables on the preheated hot plate q and grill
them for approx. 8–10 minutes on each side until lightly
browned.
5) Season with salt, pepper and (if desired) Herbes de Provence.
IB_286794_LB9.indb 30 07.09.17 15:29

US-EN │ 31 ■
SKGL 1500 A1
Coconut curry prawns
3.5 oz (100 g) red curry paste
¼ cup (50 ml) coconut milk
14 oz (400 g) prawns (or crab or shrimp)
7 oz (200 g) sugar snaps (snow peas)
2 bell peppers
2 onions
2 cloves of garlic
Salt and pepper
Aluminum foil
1) Mix the curry paste and the coconut milk together.
2) Wash the prawns, snap peas and bell peppers.
3) Peel the onions and garlic cloves.
4) Chop the onions, garlic cloves and bell peppers into small
pieces.
5) Evenly distribute the prawns and vegetables across four sheets
of aluminum foil. The aluminum foil sheets must be large
enough to wrap the ingredients into small packages. Drizzle
the curry-coconut sauce on top and season with salt and
pepper.
6) Wrap the packages tight enough for the liquid to be safely
contained.
7) Preheat the appliance to 300–350 °F (150–175 °C).
8) Place the prepared packages on the preheated hot plate q
and grill them for approx. 15 minutes on each side.
IB_286794_LB9.indb 31 07.09.17 15:29

■ 32 │ US-EN
SKGL 1500 A1
Grilled corn on the cob
2 sweet corn cobs
3.5 oz (100 g) herb butter
Garlic salt
Salt
Pepper
Aluminum foil
1) Spread the herb butter on a sheet of aluminum foil.
2) Salt the corn on a cob and wrap it in the aluminum foil.
3) Preheat the appliance to 300–350 °F (150–175 °C).
4) Place the package on the hot plates q.
5) After 15 minutes, turn the package around and continue
cooking the corn on the cob for another 15 minutes.
6) Season the corn on the cob with garlic salt and pepper.
IB_286794_LB9.indb 32 07.09.17 15:29

US-ES │ 33 ■
SKGL 1500 A1
Contenido
Introducción ..................................34
Tipos de advertencias ..........................34
Instrucciones de seguridad ......................35
Información importante sobre el cable ......................37
Uso adecuado .................................40
Elementos operativos ...........................41
Desempaque y conexión ........................42
Contenido del empaque e inspección inicial .................42
Desempaque ..........................................42
Manejo y operación ............................42
Antes del primer uso ....................................43
Panel de control .......................................44
Operación ...........................................45
Ajustes de temperatura ..................................47
Posición "parrilla de contacto" ............................47
Posición "parrilla de mesa" ...............................48
Sugerencias y trucos ...........................50
Limpieza y mantenimiento ......................51
Almacenamiento ..............................53
Solución de problemas .........................53
Eliminación ...................................55
Apéndice .....................................56
Especificaciones técnicas ................................56
Declaración de conformidad de la FCC .....................56
Garantía limitada de 3 años .............................57
Importador ...........................................59
Recetas ......................................60
Posición "parrilla de contacto" ............................60
Posición de "parrilla para panini" ..........................62
Posición "parrilla de mesa" ...............................65
IB_286794_LB9.indb 33 07.09.17 15:29

■ 34 │ US-ES SKGL 1500 A1
Introducción
Felicidades por la compra de su nuevo dispositivo.
Ha seleccionado un producto de alta calidad. El instructivo de
uso es parte de este producto. Contiene información importante
sobre seguridad, uso y eliminación. Antes de usar el producto,
familiarícese con todas las instrucciones de uso y seguridad.
Use el producto solamente como se describe y para la variedad
de aplicaciones especificada. También entregue este instructivo
de operación a cualquier propietario futuro.
Tipos de advertencias
Los siguientes tipos de advertencias se usan en este instructivo de
operación:
Este es el símbolo de alerta de seguridad. Se usa para
alertarle sobre peligros de lesiones potenciales. Obedez-
ca todos los mensajes de seguridad a continuación de
este símbolo para evitar posibles lesiones y la muerte.
PELIGRO indica una situación peligrosa que, si no se evita, provo-
cará la muerte o lesiones graves.
ADVERTENCIA indica una situación peligrosa que, si no se evita,
podría provocar la muerte o lesiones graves.
PRECAUCIÓN indica una situación peligrosa que, si no se evita,
podría provocar lesiones leves o moderadas.
AVISO indica información que se considera importante, pero no
está relacionada con peligro (por ejemplo, mensajes relaciona-
dos con daños materiales).
IB_286794_LB9.indb 34 07.09.17 15:29

US-ES │ 35 ■
SKGL 1500 A1
Instrucciones de seguridad
Esta sección contiene instrucciones de seguridad importantes
para el uso del dispositivo. Este dispositivo cumple con las normas
de seguridad legales. El uso inadecuado puede provocar lesiones
personales y daños materiales.
INSTRUCCIONES IMPORTANTES
DE SEGURIDAD
CONSERVE ESTE INSTRUCTIVO
Al usar dispositivos eléctricos, siempre deben observarse pre-
cauciones básicas de seguridad, entre otras:
1. LEA TODAS LAS INSTRUCCIONES.
2. No toque las superficies calientes. Use asas o perillas.
3. Para protegerse contra descargas eléctricas, no sumerja el
cable, enchufe o el dispositivo en agua u otros líquidos.
4. Coloque el dispositivo en un lugar estable.
5. Los niños menores de 8 años de edad deben mantenerse
alejados del dispositivo y el cable de alimentación.
6. Este dispositivo puede ser usado por niños a partir de 8 años
de edad y por personas con capacidades físicas, sensoriales
o mentales reducidas o falta de experiencia y conocimiento,
si son supervisados o han sido instruidos en el uso seguro del
dispositivo y han entendido los riesgos potenciales.
7. Los niños solo pueden intentar realizar tareas de limpieza y
mantenimiento del dispositivo si tienen al menos 8 años de
edad y están bajo supervisión.
IB_286794_LB9.indb 35 07.09.17 15:29

■ 36 │ US-ES SKGL 1500 A1
8. Desenchufe el dispositivo de la toma eléctrica cuando no
lo use y antes de limpiarlo. Deje que el dispositivo se enfríe
antes de colocar o retirar partes, y antes de limpiarlo.
9. Verifique si el dispositivo muestra daño externo visible antes
de usarlo. No use dispositivos que estén dañados o que se
hayan dejado caer.
10. No opere ningún dispositivo con el cable o clavija dañados
o después de que el mismo haya fallado o haya sido daña-
do de alguna manera. Devuelva el dispositivo al proveedor
de servicios autorizado más cercano para que lo revise,
repare o ajuste.
11. Únicamente los proveedores de servicios autorizados o
el departamento de servicio al cliente deberán realizar
reparaciones al dispositivo. Las reparaciones inadecuadas
pueden poner en riesgo al usuario. Además, invalidan la
garantía.
12. Los componentes defectuosos siempre deben reemplazarse
por refacciones originales. Solamente el uso de refacciones
originales de reemplazo puede garantizar el cumplimiento
de los requisitos de seguridad.
13. No use el dispositivo en exteriores.
14. No permita que el cable cuelgue sobre el borde de una
mesa o barra, o que toque superficies calientes.
15. No coloque el dispositivo sobre o cerca de un quemador
de gas o eléctrico, o sobre un horno caliente.
16. Para desconectar el dispositivo, desconecte el enchufe de la
toma de corriente.
17. No use el dispositivo para ningún otro fin que no sea el
previsto.
IB_286794_LB9.indb 36 07.09.17 15:29

US-ES │ 37 ■
SKGL 1500 A1
18. Se puede producir fuego si el dispositivo se cubre con o
toca material inflamable, tal como cortinas, paredes, etc.
durante la operación. No coloque ningún artículo sobre el
dispositivo mientras esté en operación.
19. No lo limpie con fibras metálicas de fregar. Pueden des-
prenderse fragmentos de la fibra y tocar partes eléctricas,
lo cual puede provocar riesgo de descarga eléctrica.
20. Si es posible, coloque el dispositivo cerca de una toma de
corriente. Asegúrese de que el enchufe esté en un lugar de
rápido acceso en caso de peligro y que el cable de alimenta-
ción no constituya un riesgo de tropezar.
CONSERVE ESTE INSTRUCTIVO
EXCLUSIVO PARA USO DOMÉSTICO.
Este producto contiene químicos que, en el Estado de California,
se sabe que provocan cáncer y defectos de nacimiento u otros
daños reproductivos.
Información importante sobre el cable
Este dispositivo tiene un enchufe polarizado. Para reducir el ries-
go de descargas eléctricas, solo hay una manera en que esta
clavija puede introducirse en un contacto polarizado. Si el en-
chufe no se introduce por completo en el contacto, inviértalo. Si
aun así no se introduce, póngase en contacto con un electricista
calificado. No intente modificar el enchufe de ningún modo.
a) Deberá usarse un cable de alimentación corto (o un cable de
corriente desprendible) para reducir el riesgo que resulta de
enredarse o tropezarse con un cable largo.
IB_286794_LB9.indb 37 07.09.17 15:29

■ 38 │ US-ES SKGL 1500 A1
b) Pueden usarse cables de alimentación largos desprendibles o
extensiones si se usan con cuidado.
c) Si se usa un cable de alimentación más largo desprendible o
una extensión:
1) Las características eléctricas marcadas en el juego de
cable o extensión deberán ser por lo menos similares a las
del dispositivo;
2) El cable deberá ser tendido de tal manera que no cuelgue
sobre la barra o mesa donde pueda ser jalado por niños o
con el que pueda tropezarse involuntariamente; y
3) Si el dispositivo tiene un enchufe de tipo aterrizado, el
juego de cable o extensión también deberá ser un cable de
3 hilos de tipo aterrizado.
Instrucciones de seguridad adicionales
► Asegúrese de que el dispositivo nunca entre en contacto con
agua mientras la clavija esté insertada en la toma de corriente,
especialmente si lo está usando en la cocina y cerca del frega-
dero.
► ¡NUNCA sumerja el dispositivo en agua u otros líquidos!
► Asegúrese de que el cable de alimentación nunca se moje o hu-
medezca cuando el dispositivo esté en uso. Tienda el cable de
tal manera que no quede atrapado o resulte dañado de alguna
forma.
► Solicite que un técnico calificado o el departamento de Servi-
cio al Cliente sustituya las clavijas y/o cables de alimentación
dañados tan pronto como sea posible para evitar el riesgo de
lesiones.
IB_286794_LB9.indb 38 07.09.17 15:29

US-ES │ 39 ■
SKGL 1500 A1
► Coloque el dispositivo lo más cerca posible de la toma de
corriente eléctrica. Asegúrese de poder acceder a la clavija
de alimentación rápidamente en caso de peligro, y que no
existe el riesgo de tropiezos con el cable.
► Conecte el dispositivo a una toma de corriente con conexión
a tierra de protección. El voltaje de alimentación debe cumplir
con las especificaciones indicadas en la placa de información
del dispositivo.
► Siempre desconecte la clavija de la toma de corriente después
del uso. Simplemente apagar el dispositivo no es suficiente, ya
que permanecerá energizado mientras la clavija esté insertada
a la toma de alimentación.
► Sostenga siempre el cable eléctrico por la clavija. Nunca jale
el cable eléctrico y nunca lo maneje con las manos húmedas.
► No coloque el dispositivo o ningún mueble u otros artículos
sobre el cable eléctrico, y evite prensarlo.
► No debe abrir la carcasa del dispositivo ni intentar reparar o
modificar el mismo. Cuando un tercero no autorizado abre la
carcasa o modifica el dispositivo, existe el riesgo de muerte
debido a descarga eléctrica, y la garantía se anula.
¡Precaución! ¡Superficie caliente!
► Las partes del dispositivo se calentarán durante la operación;
deberá sostener el dispositivo únicamente por el asa.
► ¡Los alimentos horneados pueden quemarse! Nunca coloque
y use el dispositivo en la cercanía de objetos inflamables,
especialmente debajo de cortinas.
IB_286794_LB9.indb 39 07.09.17 15:29

■ 40 │ US-ES SKGL 1500 A1
► No use un temporizador externo o un sistema de control
remoto independiente para operar el dispositivo.
► Nunca deje el dispositivo desatendido durante la operación.
► Asegúrese de que el dispositivo, el cable de alimentación y la
clavija no entren en contacto con fuentes de calor tales como
placas térmicas o flamas abiertas.
► Para proteger el recubrimiento antiadherente, no use herra-
mientas metálicas como cuchillos, tenedores, etc. Si la capa
antiadherente está dañada, deje de usar el dispositivo.
► Opere el dispositivo solamente con los accesorios originales
incluidos.
► ¡No use carbón o combustibles similares para operar el
dispositivo!
Uso adecuado
Este dispositivo está diseñado exclusivamente para cocinar a la
parrilla alimentos en espacios interiores. Cualquier otro uso que
no sea el previsto se considera inadecuado. Este dispositivo no
está diseñado para usarse en ambientes comerciales ni industriales.
El fabricante no acepta ninguna responsabilidad por daños
causados por el uso o reparaciones indebidos, modificaciones no
autorizadas o por el uso de refacciones no aprobadas. El usuario
asume completamente el riesgo.
IB_286794_LB9.indb 40 07.09.17 15:29

US-ES │ 41 ■
SKGL 1500 A1
Elementos operativos
Ilustración A:
1 Patas de apoyo
2 Bloqueo de seguridad
3 Botón de desbloqueo de 180°
4 Salida de grasa
5 Retén del cable
6 Elemento de luz
7 Luz indicadora verde "Listo"
8 Panel de control
9 Botón de RELEASE (placa caliente inferior)
0 Bandeja de recolección de grasa
q Placas calientes
w Botón de RELEASE (placa caliente superior)
Ilustración B:
e Raspador de limpieza
IB_286794_LB9.indb 41 07.09.17 15:29

■ 42 │ US-ES SKGL 1500 A1
Desempaque y conexión
¡RIESGO DE ASFIXIA!
No juegue con los materiales de empaque.
Contenido del empaque e inspección inicial
El dispositivo se entrega de manera estándar con los siguientes
componentes (ver página desplegable):
● Parrilla eléctrica de contacto
● Bandeja de goteo de grasa
● Raspador de limpieza
● Instructivo de operación
Verifique que el paquete esté completo y no muestre signos visibles de
daño.
Si la entrega está incompleta o dañada debido al empaque defectuoso
o durante el transporte, póngase en contacto con la línea directa de
Servicio al Cliente (vea la sección "Garantía limitada de 3 años").
Desempaque
♦ Saque todos los elementos de la caja.
♦ Retire el material de empaque y cualquier película protectora.
Manejo y operación
Esta sección contiene instrucciones importantes para el manejo
del dispositivo.
IB_286794_LB9.indb 42 07.09.17 15:29

US-ES │ 43 ■
SKGL 1500 A1
Antes del primer uso
Durante el primer uso podrá notar un ligero olor (también puede generar-
se un poco de humo). Esto es normal y se disipa después de poco tiempo.
Asegúrese de que haya suficiente ventilación. Por ejemplo, abra una
ventana.
1) Primero, limpie el dispositivo como se describe en la sección
"Limpieza y mantenimiento".
2) Lea con atención este instructivo de operación.
3) Instale el dispositivo de acuerdo con las instrucciones de
seguridad.
4) Desbloquee el dispositivo al colocar el bloqueo de seguridad
2 en .
5) Abra el dispositivo.
6) Limpie las placas calientes q con una tela humedecida.
7) Cierre el dispositivo.
8) Inserte la clavija del cable eléctrico en una toma de corriente
con conexión a tierra conectada correctamente, que propor-
cione el voltaje especificado en el capítulo de "Especificacio-
nes técnicas". Permita que el dispositivo se caliente durante
aproximadamente 5 minutos al máximo calor; fije los ajustes
correspondientes mediante el panel de control 8.
9) Una vez que el dispositivo esté caliente, desconecte la clavija
de la toma de corriente y permita que el dispositivo se enfríe.
10) Limpie el dispositivo nuevamente con una tela humedecida.
Ahora el dispositivo está listo para usarse.
IB_286794_LB9.indb 43 07.09.17 15:29

■ 44 │ US-ES SKGL 1500 A1
Panel de control
Use el panel de control 8para ajustar la temperatura y el tiempo.
Botón "+": aumente la temperatura o el tiempo
de calentamiento
Botón de encendido : encienda o apague el dispositivo
Botón T/MIN: seleccione la temperatura o el tiempo
de calentamiento
Pantalla: Pantalla LCD
Botón "-": disminuya la temperatura o el tiempo
de calentamiento
►La luz indicadora verde "Listo" 7 se enciende en cuanto se
alcanza la temperatura establecida. Podría volver a apagarse
en algún momento después del calentamiento. ¡Esto significa
que la temperatura ha disminuido por debajo de la temperatura
establecida y que el dispositivo se está calentando nuevamente!
►Observe que cada acción está acompañada por un pitido.
IB_286794_LB9.indb 44 07.09.17 15:29

US-ES │ 45 ■
SKGL 1500 A1
Operación
¡El dispositivo se calienta mucho durante el uso! ¡Por esta
razón, no toque nada excepto el asa durante el uso!
1) Use el asa para cerrar la tapa del dispositivo.
2) Introduzca la bandeja de recolección de grasa 0 en el
dispositivo.
3) Vuelva a conectar la clavija en la toma de corriente. Escuchará
un pitido y verá "OFF" (Apagado) en la pantalla . La pan-
talla se iluminará en color azul y volverá a apagarse auto-
máticamente después de un minuto si no se realiza ninguna
acción.
4) Use el botón de encendido para encender el dispositivo.
La pantalla se iluminará en color azul. Escuchará dos piti-
dos y el dispositivo comenzará a calentarse hasta llegar a la
temperatura preestablecida de 194 °F (90 °C) (modo para
mantener caliente). Una vez que se alcance la temperatura
establecida, escuchará tres pitidos y verá que la luz indicadora
"Listo" 7 se ilumina. Durante la operación, el elemento de
luz 6 está iluminado en azul.
5) Presione el botón T/MIN y presione o sostenga el bo-
tón "+" o "-" para establecer la temperatura deseada
(300–450 °F | 150–230 °C). Escuchará dos pitidos y la
luz indicadora verde "Listo" 7 se apaga. Si es necesario,
vuelva a presionar el botón T/MIN para establecer el
tiempo de calentamiento (1–90 min) con los botones "+"
y "-" . Una vez que se alcanza la temperatura establecida,
la luz indicadora verde "Listo" 7 se ilumina y la temperatura
se mantiene. Una vez que ha transcurrido el tiempo de calen-
tamiento, escuchará dos pitidos y el dispositivo regresará al
modo para mantener caliente a 194 °F (90 °C). El disposi-
tivo se apaga automáticamente después de una hora si no
realiza ninguna acción.
IB_286794_LB9.indb 45 07.09.17 15:29

■ 46 │ US-ES SKGL 1500 A1
También puede activar el modo para mantener caliente [194 °F
(90 °C)] manualmente, por ejemplo antes de que el tiempo de
calentamiento finalice. Para hacer esto, presione el botón "-" .
La función automática para mantener caliente permanece activa.
6) Presione el botón de encendido para apagar el disposi-
tivo, y luego desconecte la clavija de la toma de corriente.
7) Limpie el dispositivo como se describe en la sección "Limpieza
y mantenimiento".
Desconecte la clavija de la toma de corriente siempre que no esté
usando el dispositivo. Usar el botón de encendido no es sufi-
ciente para apagar el dispositivo.
►La luz indicadora verde "Listo" 7 se enciende en cuanto se
alcanza la temperatura establecida. Podría volver a apagarse
en algún momento después del calentamiento. Esto significa
que la temperatura ha disminuido por debajo de la temperatura
establecida y que el dispositivo se está calentando nuevamente.
►Observe que cada acción está acompañada por un pitido.
Hay 3 formas diferentes de usar esta parrilla:
–completamente abierta, usando las dos placas q como
una parrilla de mesa.
–con una placa caliente superior móvil q como una parri-
lla de contacto, por ejemplo para asar carne por ambos
lados.
–con una placa caliente superior fija q como una parrilla
para panini, por ejemplo para cocinar pan tostado de
queso asado.
IB_286794_LB9.indb 46 07.09.17 15:29

US-ES │ 47 ■
SKGL 1500 A1
Ajustes de temperatura
La temperatura ideal depende de lo que esté cocinando. Use la
siguiente guía para determinar la temperatura más adecuada:
194 °F (90 °C): modo para mantener caliente
300–350 °F (150–175 °C): baja temperatura, por ejemplo
para verduras o panini
350–390 °F (175–200 °C): temperatura media, por ejemplo
para pescado
390–450 °F (200–230 °C):
temperatura alta, por ejemplo
para carne
Las indicaciones de temperatura anteriores son solamente como
guía. ¡Las temperaturas ideales pueden variar dependiendo de
la condición de los alimentos!
Posición "parrilla de contacto"
1) Conecte la clavija en la toma de corriente y presione el botón
de encendido para encender el dispositivo.
2) Establezca la temperatura deseada y, si es necesario, el
tiempo de calentamiento como se describe en la sección
"Operación", y espere hasta que se alcance la temperatura
establecida.
3) Abra la tapa del dispositivo y coloque la comida en la placa
caliente inferior q.
4) Use el asa para cerrar la tapa del dispositivo.
5) La placa caliente superior movible q siempre está paralela
a la placa caliente inferior q, incluso si se está cocinando
comida gruesa.
Esto asegura resultados óptimos.
6) Después de un rato, revise qué tan tostada está la comida.
Use el asa para abrir la tapa del dispositivo.
IB_286794_LB9.indb 47 07.09.17 15:29

■ 48 │ US-ES SKGL 1500 A1
Empiece con tiempos cortos de cocinado y aumente el tiempo
hasta que encuentre el ajuste adecuado.
7) Una vez que esté a gusto con el grado de tostado, retire la
comida de la parilla.
No use objetos puntiagudos ni cortantes para retirar la comida.
Estos podrían dañar la superficie de las placas calientes q.
8) Use el botón de encendido para apagar el dispositivo,
y luego desconecte la clavija de la toma de corriente.
Desconecte la clavija de la toma de corriente siempre que no esté
usando el dispositivo. Usar el botón de encendido no es
suficiente para apagar el dispositivo.
Posición "parrilla de mesa"
1) Conecte la clavija en la toma de corriente y presione el botón
de encendido para encender el dispositivo.
2) Establezca la temperatura deseada y, si es necesario, el
tiempo de calentamiento como se describe en la sección
"Operación", y espere hasta que se alcance la temperatura
establecida.
3) Despliegue las patas de apoyo 1 (Fig. 1).
4) Presione el botón de desbloqueo de 180° 3 (Fig. 1) y abra
la tapa del dispositivo hasta que ambas placas calientes q
puedan usarse como una parrilla de mesa.
IB_286794_LB9.indb 48 07.09.17 15:29

US-ES │ 49 ■
SKGL 1500 A1
Fig. 1
5) Las placas calientes q ahora están una junto a otra y listas
para usarse como parrilla de mesa (Fig. 2).
Fig. 2
6) Coloque la comida en las placas calientes q.
7) Gírela a la mitad del proceso de preparación para asegurarse
de que ambos lados se cocinen completamente; retírela de
las placas calientes q una vez que esté lista para comer.
IB_286794_LB9.indb 49 07.09.17 15:29

■ 50 │ US-ES SKGL 1500 A1
No use objetos puntiagudos ni cortantes para voltear la comida.
Estos podrían dañar la superficie de las placas calientes q.
8) Use el botón de encendido para apagar el dispositivo,
y luego desconecte la clavija de la toma de corriente.
Desconecte la clavija de la toma de corriente siempre que no esté
usando el dispositivo. Usar el botón de encendido no es
suficiente para apagar el dispositivo.
Sugerencias y trucos
■ Marine la carne antes de asarla para lograr resultados espe-
cialmente suaves y un tiempo de cocinado más corto. Puede
usar crema agria, vino tinto, suero de leche o jugo de fruta
fresca como de papaya o piña. Agregue hierbas y especias
según sus preferencias personales. No agregue sal a su
marinado, ya que deshidrata la carne y la hace dura. Sumerja
completamente la carne en el marinado y cierre el recipiente.
De manera ideal, deje marinar durante la noche.
■ Las placas calientes qtienen una capa antiadherente, de
manera que no es necesario agregar aceite o grasa extra.
Si desea usar aceite o grasa extra de cualquier manera, elija
un producto adecuado para freír comida, como el aceite de
semilla de colza.
■ Use carne que tenga el mismo grosor en toda su extensión
para asegurar un cocido uniforme.
■ Si no está seguro de si la carne está completamente cocida
por dentro, use un termómetro estándar para carne.
IB_286794_LB9.indb 50 07.09.17 15:29

US-ES │ 51 ■
SKGL 1500 A1
Limpieza y mantenimiento
¡Riesgo de muerte por descarga eléctrica! Obedezca la
siguiente información de seguridad para prevenir riesgos poten-
ciales:
► Antes de limpiar el dispositivo, desconecte la clavija y espere a
que el dispositivo se enfríe completamente.
► Nunca limpie el dispositivo con el chorro de agua ni lo sumerja
en agua. ¡El dispositivo podría dañarse irreparablemente!
¡Daño al dispositivo!
► Para evitar daños irreparables, asegúrese de que la humedad
no penetre en el dispositivo.
► No limpie la superficie con limpiadores abrasivos u objetos
filosos o ásperos.
■ Una vez que las placas calientes q se hayan enfriado, use
el raspador de limpieza e en las placas calientes q para
raspar la grasa y residuos de comida hacia la bandeja de
recolección de grasa 0.
■ Vacíe y limpie la bandeja de recolección de grasa 0.
■ Limpie las placas calientes q con una tela humedecida. No
use detergentes agresivos, esponjas ásperas u objetos puntia-
gudos para limpiar las placas calientes, ya que estos pueden
dañar la capa antiadherente.
En caso de suciedad difícil de quitar o residuos de comida
quemados en la superficie, retire las placas calientes q:
–Abra el dispositivo.
–Sostenga la placa caliente superior q para evitar que cai-
ga y presione el botón de RELEASE w. La placa caliente
superior q se soltará del dispositivo.
–Presione el botón de RELEASE 9 y levante al mismo tiem-
po la placa caliente inferior q.
IB_286794_LB9.indb 51 07.09.17 15:29

■ 52 │ US-ES SKGL 1500 A1
Limpie las placas calientes q en agua tibia con un poco de
detergente para trastes. Si hay una gran cantidad de comida
incrustada en las placas calientes q, déjelas remojar durante al-
gún tiempo. Después de limpiarla, enjuague la placa caliente q
con agua limpia para eliminar la espuma del jabón. Seque bien
todas las partes. ¡Las placas calientes q deben secarse antes de
volver a colocarlas en el dispositivo!
Para volver a colocar las placas calientes q, presione las placas
calientes q hacia la base hasta que ambas aberturas junto a la
salida de la grasa 4 se traben con los ganchos en la base. Aho-
ra, presione el frente de la placa caliente q hacia abajo hasta
que haga clic en su lugar.
Haga lo mismo con la otra placa caliente q.
■ Una tela humedecida será suficiente para limpiar la parte
externa del dispositivo.
Antes de volver a usar el dispositivo, asegúrese de que todas
las partes estén completamente secas.
■ Limpie el raspador de limpieza e con una tela humedecida.
Para suciedad difícil, agregue un detergente suave a la tela o
limpie el raspador con agua tibia y jabón para trastes.
Las placas calientes q, la bandeja de recolección de grasa 0
y el raspador de limpieza e pueden lavarse en la máquina
lavavajillas. Sin embargo, recomendamos que los lave a mano,
ya que este proceso es más delicado.
IB_286794_LB9.indb 52 07.09.17 15:29

US-ES │ 53 ■
SKGL 1500 A1
Almacenamiento
Asegure el dispositivo colocando el bloqueo de seguridad 2 en
. Enrolle el cable de alimentación en el retén del cable 5 en la
parte inferior del dispositivo en sentido de las manecillas del reloj.
Fig. 3
Guarde el dispositivo limpio en un lugar limpio, libre de polvo y
seco.
Solución de problemas
Esta sección contiene instrucciones importantes para solucionar
problemas del dispositivo. La tabla siguiente ayuda a identificar
y resolver problemas menores.
Si ocurre un error, la pantalla del dispositivo mostrará el código
de error correspondiente. Escuchará pitidos y todos los botones
se bloquearán, de manera que el panel de control 8 no podrá
utilizarse. Obedezca las siguientes instrucciones.
IB_286794_LB9.indb 53 07.09.17 15:29

■ 54 │ US-ES SKGL 1500 A1
Falla Causa Solución
El dispositivo no
funciona.
La clavija de alimen-
tación no está co-
nectada en la toma
de alimentación.
Inserte la clavija en una toma
de corriente.
La toma de corrien-
te está defectuosa. Use otra toma de corriente.
El dispositivo está
defectuoso.
Póngase en contacto con el
departamento de servicio al
cliente.
La pantalla mues-
tra ER1.
Ocurrió un cortocir-
cuito en el sistema.
Desconecte la clavija del
contacto de corriente y llame al
servicio al cliente.
La pantalla mues-
tra ER2.
La placa calien-
te inferior qse
colocó de manera
incorrecta.
Inserte correctamente la placa
caliente inferior q.
La pantalla mues-
tra ER3.
La temperatura de
las placas calientes
q excede 608 °F
(320 °C); el dispo-
sitivo está sobreca-
lentado.
Desconecte la clavija de
alimentación de la toma de
corriente. Espere a que el
dispositivo se enfríe completa-
mente y vuelva a conectarlo en
una toma de corriente.
Si el mal funcionamiento no puede corregirse con una de las
sugerencias anteriores, o si determina que la causa de la falla es
otra distinta, comuníquese con nuestro departamento de Servicio
al Cliente.
IB_286794_LB9.indb 54 07.09.17 15:29

US-ES │ 55 ■
SKGL 1500 A1
Eliminación
Eliminación del dispositivo
Los dispositivos eléctricos no deben desecharse como parte de la
basura doméstica normal. Si ya no puede usar su dispositivo, eli-
mínelo de conformidad con las disposiciones legales aplicables en
su localidad. Esto asegura que los dispositivos eléctricos usados
sean reciclados y la contaminación ambiental se mantenga a un
nivel mínimo. Puede encontrar más información sobre la elimina-
ción de desechos en Internet en www.epa.gov
Eliminación del empaque
El empaque protege al dispositivo contra daños durante el trans-
porte. Los materiales de empaque han sido seleccionados por
su compatibilidad ambiental y facilidad de eliminación y, por lo
tanto, son reciclables.
Los materiales de empaque están hechos de materiales
que no dañan el medio ambiente y que puede desechar
en su centro de reciclaje local.
Si es posible, conserve el material de embalaje original del
dispositivo durante todo el periodo de garantía para que el dis-
positivo pueda volver a empaquetarse adecuadamente en caso
de presentar una reclamación de garantía.
IB_286794_LB9.indb 55 07.09.17 15:29

■ 56 │ US-ES SKGL 1500 A1
Apéndice
Especificaciones técnicas
Alimentación de voltaje 120V ~ | 60Hz
Consumo de energía 1500 W
Declaración de conformidad de la FCC
Este dispositivo cumple con la parte 15 del Reglamento de la
FCC. La operación está sujeta a las dos siguientes condiciones:
(1) Este dispositivo no puede causar interferencia dañina y (2)
este dispositivo debe aceptar cualquier interferencia recibida, in-
cluyendo interferencia que pueda causar operación no deseable.
Los cambios o modificaciones no aproba-
dos expresamente por la parte responsable del cumplimiento
normativo podrían invalidar la autoridad del usuario de operar
este equipo.
NOTA: Este equipo se ha probado y se ha determinado que
cumple con los límites de los dispositivo digitales Clase B, de con-
formidad con la parte 15 del reglamento de la FCC. Estos límites
están diseñados para proporcionar protección razonable contra
interferencia dañina en una instalación residencial.
Este equipo genera, usa y puede emitir energía de radiofrecuen-
cia y, si no se instala y usa de acuerdo con las instrucciones, pue-
de causar interferencia dañina a las comunicaciones de radio. Sin
embargo, no hay garantía de que ocurrirá interferencia en una
instalación en particular.
Si este equipo causa interferencia dañina a la recepción de radio
o televisión, lo cual puede determinarse al apagar y encender el
equipo, se aconseja al usuario intentar corregir la interferencia
mediante una o más de las siguientes medidas:
–Reoriente o reubique la antena receptora.
IB_286794_LB9.indb 56 07.09.17 15:29

US-ES │ 57 ■
SKGL 1500 A1
–Incremente la distancia entre el equipo y el receptor.
–Conecte el equipo en una toma de un circuito eléctrico
diferente a la que está conectado el receptor.
–Consulte al distribuidor o a un técnico experimentado en
radio o television para solicitar ayuda.
Garantía limitada de 3 años
Lo que cubre la presente garantía
La garantía incluye:
● Daños, quebraduras o incapacidad para funcionar debido a
defectos.
● Daños que no hayan sido causados por el desgaste propio del
uso o por no seguir las instrucciones de seguridad y mantención
incluidas en el manual para el usuario.
Lo que no cubre esta garantía
La garantía no cubre daños causados por:
● El desgaste propio del uso del producto, incluidas las partes
frágiles (como interruptores, piezas de vidrio, etc.).
● Uso o transporte no indicado del producto.
● Desatención a las instrucciones de seguridad y mantención.
● Accidentes o causas de fuerza mayor (e.g. relámpagos, incendio,
inundación, etc.).
● Manipulación mal intencionada del producto (retirar la cubierta,
tornillos, etc.).
La presente garantía tampoco cubre daños indirectos o emergentes.
Sin embargo algunos estados no permiten la exclusión o limitación
de daños indirectos o emergentes, por lo que dicha exclusión o
limitación pudiera no aplicarse en su caso.
IB_286794_LB9.indb 57 07.09.17 15:29

■ 58 │ US-ES SKGL 1500 A1
Período de cobertura y resolución de la garantía
La garantía es válida por 3 años a partir de la fecha de compra.
La empresa, según lo estime conveniente, devolverá el dinero o
repondrá el producto.
La empresa no:
● Dará inicio a un nuevo período de garantía al hacerse el cambio
del producto.
● Reparará el producto.
¿Cómo se tramita la garantía?
Recomendamos que primero usted:
● Llame al Servicio de atención al cliente al 1 (844) 543-5872.
● Visite el Portal de atención al cliente en
www.lidl.com/contact-us
● Visite una de nuestras tiendas LIDL en caso de cualquier inquietud.
A fin de acelerar el trámite de la garantía, tenga a bien contar con
lo siguiente:
● Recibo de venta original que incluya la fecha de compra.
● Producto y manual en su empaque original.
● Descripción del problema.
¿Qué debe hacer usted para mantener la garantía vigente?
● Guardar el recibo original.
● Seguir todas las instrucciones para el uso del producto.
● No realizar ninguna reparación ni alteración al producto.
IB_286794_LB9.indb 58 07.09.17 15:29

US-ES │ 59 ■
SKGL 1500 A1
¿De qué manera influyen las leyes estatales con esta
garantía?
La presente garantía le otorga derechos legales específicos, y
pudiera usted contar con otros derechos los cuales varían de un
estado a otro. Todas las garantías implícitas se encuentran limitadas
a la duración y términos de la presente garantía. Algunos estados
no permiten limitaciones al período de tiempo y términos de la
garantía implícita, por lo que dichas limitaciones pudieran no
aplicarse en su caso.
Importador
LIDL US LLC.
ARLINGTON
VA 22202
IB_286794_LB9.indb 59 07.09.17 15:29

■ 60 │ US-ES SKGL 1500 A1
Recetas
Las temperaturas y tiempos especificados en las recetas son
solamente recomendaciones. ¡Las temperaturas ideales pueden
variar dependiendo de la condición de los alimentos!
Posición "parrilla de contacto"
Hamburguesa Tex-Mex
900 g (2 lb) de carne molida
6 cucharadas de salsa para carne asada
6 cucharadas de cebollas finamente picadas
3 cucharadas de salsa fresca o comercial
1/2 cucharada de polvo de chile
4 panes grandes para hamburguesa
1) Mezcle la carne molida, las cebollas, la salsa, el polvo de
chile y la salsa para asado en un recipiente grande.
2) Forme cuatro tortas de hamburguesa de tamaño pequeño
de un grosor de aproximadamente 2 cm (¾ de pulgada).
3) Caliente el dispositivo (390–450 °F | 200–230 °C).
4) Ase las hamburguesas en el dispositivo precalentado (posi-
ción de contacto) durante 8–10 minutos. Cuando las tortas
estén cocidas, colóquelas entre los panes para hamburguesa
y adórnelas con sus ingredientes y condimentos preferidos.
IB_286794_LB9.indb 60 07.09.17 15:29

US-ES │ 61 ■
SKGL 1500 A1
Filete de lomo de ternera con salsa de hierbas y cebolleta
500 g (1.1 lb) de filete de lomo de ternera magro (125 g por filete)
120 g (¼ de lb) de margarina
1 cucharadita de salsa Worcestershire
1 diente de año picado finamente
4 cucharadas de perejil picado finamente
4 cebolletas picadas finamente
1) Mezcle la margarina y la salsa Worcestershire en un tazón
pequeño, y agregue el ajo, el perejil y las cebolletas.
2) Caliente el dispositivo a la máxima temperatura (450 °F |
230 °C).
3) Ase el lomo durante aprox. 3 minutos.
4) Impregne el lomo con la salsa de cebolletas y continúe asán-
dolo a aprox. 392 °F (200 °C) durante otros 4 minutos.
¡La salsa que escurra hacia la bandeja de recolección de grasa
puede verterse sobre el lomo antes de servirse!
Atún con rebanadas de naranja
(4 porciones)
4 rebanadas de atún fresco (6 oz | 170 g cada uno)
1 naranja
1 cucharada de perejil picado finamente
Sal
Pimienta
1) Pele la naranja y córtela en rebanadas de un grosor aprox.
de 5 mm (¼ de pulgada).
2) Precaliente el dispositivo (392 °F | 200 °C).
3) Coloque las rebanadas de atún en la parilla del dispositivo
precalentado y esparza el perejil, la sal y la pimienta sobre
ellos.
IB_286794_LB9.indb 61 07.09.17 15:29

■ 62 │ US-ES SKGL 1500 A1
4) Cubra las rebanadas de atún con rebanadas de naranja y
áselos durante 6–8 minutos.
5) Antes de servir, retire las rebanadas de naranja asadas.
Posición de "parrilla para panini"
Panini de espinacas y queso
250 g (9 oz) de hojas de espinacas
1 cebolla
1 diente de ajo
1 cucharada de aceite
2 cucharaditas de jugo de limón
1 pizca de sal (y pimienta)
4 rebanadas de pan tostado o pan blanco
40 g (1½ oz) de mantequilla a las hierbas
75 g (2⅔ oz) de queso mozzarella
20 g (1 oz) de piñones
1) Tome y lave las hojas de espinacas.
2) Pele y pique en trocitos finos la cebolla y el ajo, y luego sofría
ambos en aceite caliente hasta que la cebolla quede translú-
cida. Agregue las espinacas. Sazone con jugo de limón, sal y
pimienta.
3) Unte el pan tostado con la mantequilla a las hierbas.
4) Rebane el queso mozzarella.
5) Distribuya el queso mozzarella y las espinacas drenadas sobre
dos rebanadas de pan tostado y esparza los piñones encima.
6) Cubra el panini con otra rebanada de pan tostado.
7) Precaliente el dispositivo (350 °F | 175 °C).
8) Coloque el panini con cuidado en la parrilla precalentada.
9) Use el bloqueo de seguridad 2 para establecer la distancia
deseada hasta la placa caliente superior q y cierre la tapa.
10) El panini deberá tostarse hasta adquirir un color café dorado.
IB_286794_LB9.indb 62 07.09.17 15:29

US-ES │ 63 ■
SKGL 1500 A1
Panini de pechuga de pollo
400 g (14 oz) de filete de pechuga de pollo
20 g (1 oz) de mantequilla
Pimienta, sal y pimentón
120 g (¼ de lb) de tiras de tocino
6 rebanadas de pan tostado o pan blanco
3 cucharadas de aderezo de ensalada (yogurt)
30 g (1 oz) de lechuga iceberg
2 tomates
1 aguacate
1 cucharaditas de jugo de limón
50 g (2 oz) de pepino
1) Enjuague brevemente los filetes de pechuga de pollo bajo el
chorro de agua y séquelos con una servilleta de papel.
2) Precaliente el dispositivo a la máxima temperatura (450
°F | 230°C) y dore brevemente el pollo en la posición de
contacto.
3) Continúe asando los filetes a 350 °F (175 °C) durante
aprox. 10 minutos hasta que estén cocidos. Sazónelos con
sal, pimienta y pimentón y apártelos.
4) Fría el tocino en una cacerola hasta que quede crujiente.
5) Esparza el aderezo de yogurt en 3 rebanadas de pan tostado
o pan blanco, agregue la lechuga y los tomates rebanados y
condimentados.
6) Rebane los filetes de pechuga de pollo a lo largo y colóquelos
sobre los tomates.
7) Cubra los filetes de pechuga de pollo con el tocino.
8) Rebane el aguacate abierto a lo largo y voltéelo para sepa-
rarlo del hueso. Pele y rebane el aguacate. Exprima jugo de
limón sobre el aguacate para evitar que se oxide. Distribuya
las rebanadas sobre el panini.
IB_286794_LB9.indb 63 07.09.17 15:29

■ 64 │ US-ES SKGL 1500 A1
9) Rebane el pepino y colóquelo sobre las rebanadas de agua-
cate.
10)
Cubra el panini con otra rebanada de pan tostado.
11) Coloque el panini sobre la placa caliente q.
12) Use el bloqueo de seguridad 2 para establecer la distancia
deseada hasta la placa caliente superior q y cierre la tapa.
13)
El panini deberá tostarse hasta adquirir un color café dorado.
Baguette de mostaza
1 baguette
1 diente de ajo
50 g (2 oz) de pepinillos (escabechados con semillas de mostaza)
40 g (1½ oz) de queso Pecorino
1 cucharada de mostaza picante
2 cucharadas de mostaza dulce
50 g (2 oz) de mantequilla
2 cucharadas de cebollín picado
Sal y pimienta
1) Corte la baguette en varias partes a intervalos aproximados de
2.5 cm. Tenga cuidado de no cortar la baguette completamente.
2) Pele y pique en trocitos el ajo, pique los pepinillos muy fina-
mente y ralle el queso Pecorino.
3) Mezcle las dos mostazas, la mantequilla ablandada, el ajo,
los pepinillos y el cebollín picado juntos, y sazone con sal y
pimienta al gusto.
4) Llene con la mantequilla mezclada con mostaza los cortes de
la baguette y envuelva la baguette en papel aluminio.
5) Precaliente el dispositivo a 350–392 °F (175-200 °C).
6) Coloque las baguettes en la placa caliente q.
7) Use el bloqueo de seguridad 2 para establecer la distancia
deseada hasta la placa caliente superior q y cierre la tapa.
8) La baguette deberá tener un color café dorado.
IB_286794_LB9.indb 64 07.09.17 15:29

US-ES │ 65 ■
SKGL 1500 A1
Posición "parrilla de mesa"
Pechuga de pollo o pavo
200 g (7 oz) de pechuga de pollo o pavo
Un poco de harina
1) Agregue un poco de aceite a las placas calientes q y preca-
liente el dispositivo a la máxima temperatura (450 °F |
230 °C). Asegúrese de usar aceite adecuado para freír.
2) Rebane los 200 g (7 oz) de pechuga de pollo o pavo y
espolvoree con harina.
3) Ase la carne durante 4 minutos, luego voltéela, agregue una
poca de sal y ase el otro lado durante otros 4 minutos.
Verduras asadas
2 pimientos
1 calabacita
1 berenjena
Aceite de oliva
Sal
Pimienta
Hierbas provenzales (hierbas secas mezcladas)
1) Lave profusamente las verduras. Parta a la mitad, quite las se-
millas y rebane los pimientos. Parta a la mitad la berenjena y
la calabacita a lo largo, y luego córtelas en trozos de aprox.
0.5 cm (¼ de pulg).
2) Unte las verduras con aceite de oliva.
3) Precaliente el dispositivo a 300–350 °F (150 - 175 °C).
4) Coloque las verduras en la placa caliente precalentada q y
áselas durante aprox. 8–10 minutos de cada lado hasta que
queden ligeramente doradas.
5) Sazone con sal, pimienta y, si lo desea, hierbas provenzales.
IB_286794_LB9.indb 65 07.09.17 15:29

■ 66 │ US-ES SKGL 1500 A1
Mariscos con curry y coco
100 g (3.5 oz) de pasta de curry roja
50 ml (¼ de taza) de leche de coco
400 g (14 oz) de mariscos (o jaibas o camarones)
200 g (7 oz) de chícharos verdes (guisantes chinos)
2 pimientos
2 cebollas
2 dientes de ajo
Sal y pimienta
Papel de aluminio
1) Mezcle la pasta de curry y la leche de coco.
2) Lave los mariscos, los chícharos y los pimientos.
3) Pele las cebollas y los dientes de ajo.
4) Pique las cebollas, los dientes de ajo y los pimientos en trozos
pequeños.
5) Distribuya de manera uniforme los mariscos y verduras en
cuatro hojas de papel de aluminio. Las hojas de papel de
aluminio deben ser suficientemente grandes para envolver
los ingredientes en pequeños paquetes. Exprima la salsa de
curry-coco encima y sazone con sal y pimienta.
6) Envuelva bien los paquetes de modo que el líquido no se
derrame.
7) Precaliente el dispositivo a 300–350 °F (150–175 °C).
8) Coloque los paquetes preparados en la placa caliente preca-
lentada q y áselos durante aprox. 15 minutos en cada lado.
IB_286794_LB9.indb 66 07.09.17 15:29

US-ES │ 67 ■
SKGL 1500 A1
Elote asado
2 elotes de maíz dulce
100 g (3.5 oz) de mantequilla a las hierbas
Sal de ajo
Sal
Pimienta
Papel de aluminio
1) Unte la mantequilla a las hierbas en una hoja de papel de
aluminio.
2) Agregue sal al elote y envuélvalo en el papel de aluminio.
3) Precaliente el dispositivo a 300–350 °F (150–175 °C).
4) Coloque el paquete en las placas calientes q.
5) Después de 15 minutos, dé la vuelta al paquete y continúe
cociendo el elote durante otros 15 minutos.
6) Sazone el elote con sal de ajo y pimienta.
IB_286794_LB9.indb 67 07.09.17 15:29

■ 68 │ US-ES
SKGL 1500 A1
IB_286794_LB9.indb 68 07.09.17 15:29

IAN 286794
LidL US LLC.
ARLINGTON
VA 22202
Made in /Hecho en: China
Last Information Update · Estado de las informaciones:
08 / 2017 · Ident.-No.: SKGL1500A1-082017-1
9
-
 1
1
-
 2
2
-
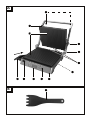 3
3
-
 4
4
-
 5
5
-
 6
6
-
 7
7
-
 8
8
-
 9
9
-
 10
10
-
 11
11
-
 12
12
-
 13
13
-
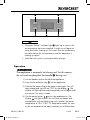 14
14
-
 15
15
-
 16
16
-
 17
17
-
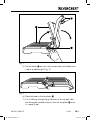 18
18
-
 19
19
-
 20
20
-
 21
21
-
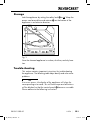 22
22
-
 23
23
-
 24
24
-
 25
25
-
 26
26
-
 27
27
-
 28
28
-
 29
29
-
 30
30
-
 31
31
-
 32
32
-
 33
33
-
 34
34
-
 35
35
-
 36
36
-
 37
37
-
 38
38
-
 39
39
-
 40
40
-
 41
41
-
 42
42
-
 43
43
-
 44
44
-
 45
45
-
 46
46
-
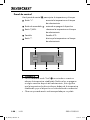 47
47
-
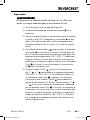 48
48
-
 49
49
-
 50
50
-
 51
51
-
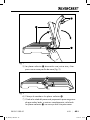 52
52
-
 53
53
-
 54
54
-
 55
55
-
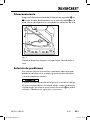 56
56
-
 57
57
-
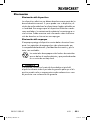 58
58
-
 59
59
-
 60
60
-
 61
61
-
 62
62
-
 63
63
-
 64
64
-
 65
65
-
 66
66
-
 67
67
-
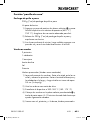 68
68
-
 69
69
-
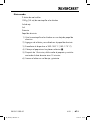 70
70
-
 71
71
-
 72
72


Silvercrest 286794 El manual del propietario
- Categoría
- Barbacoas
- Tipo
- El manual del propietario
en otros idiomas
- English: Silvercrest 286794 Owner's manual
Artículos relacionados
-
Silvercrest 294607 El manual del propietario
-
-
-
-
-
-
Silvercrest SKGE 2000 C3 Manual de usuario
