
WA -MBA
PROFESSIONAL BROADCAST BOOM ARM
QUICK START GUIDE
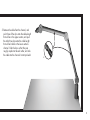
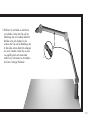
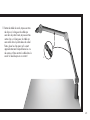
The WA-MBA is a professional broadcast boom arm, with an internal spring,
three adjustment points and a built-in cable management channel for a clean
on-camera look for your stream. Whether you’re performing voiceovers, game
streaming or podcasting, the WA-MBA gives professional results every time.

2
GETTING STARTED
The MBA is intended to be mounted on a desktop or similar flat
surface, using the removable C-clamp assembly at the base of
the boom arm.
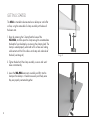
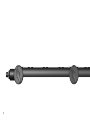
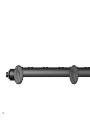
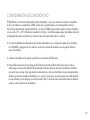
1. Begin by removing the C-clamp from the base of the
WA-MBA, and then open the clamp enough to accommodate
the depth of your desktop by unscrewing the clamping bolt. The
clamp is seated properly when both of its surfaces are making
solid contact with the flat surfaces on the top and underside of
the desk (see Image A).
2. Tighten the bolt until the clamp assembly is secure and won’t
move unintentionally.
3. Lower the WA-MBA boom arm assembly and fit it into the
clamp on the desktop - it should move easily and freely once
they are properly connected together.
Image A

3
SETTING UP YOUR MICROPHONE
The WA-MBA is a professional boom arm, and there are a number of different ways to mount a microphone to it.
Microphones can attach to the MBA via hard or shock mount, or even directly to the microphone itself if desired.
The MBA can attach mounts or clips using either 3/8” or 5/8” threading (using the included adapter), and the
microphone can hang from underneath the arm (the traditional mount in broadcast situations), or be mounted face up
above it if desired.
1. Once it’s properly assembled on the C-clamp base, attach your microphone’s mount onto the WA-MBA and make
sure it is secure (do not over-tighten, or you risk damaging the mounting threads).
2. Connect your microphone to the mount according to the manufacturer’s directions.
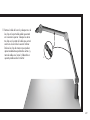
3. There are tightening bolts at the three bends in the boom arm assembly, each of which secures a different portion of
the arm’s movement. While holding the microphone firmly to prevent it from dropping or falling, slightly loosen the
clamps and move the mic into a rough approximation of where you would like it positioned long-term (don’t worry
about getting it perfect at this stage, as you will tweak the final position afterwards). Once the mic’s position is close
to where you would like it to be, re-tighten the clamps.

4
REFINE YOUR SETUP
Now that you have the MBA fully set up and your microphone is roughly in the right place, you can take the
time to get things looking and sounding perfect for your stream.
1. Sit down at your desk, and get your body into the position it will normally be in when you’re streaming.
2. Determine the best place for the microphone to be placed for both sound quality concerns and on-camera
look (if you’re using a camera). This will be different depending on the type of microphone you have and the
position of the camera and any lighting you’re using, and may require some experimentation to get right.
3. Once you’ve determined the proper angle and orientation for the microphone, hold the mic again for safety,
and manipulate the three tightening bolts again to move it into the proper position. Make sure that the mic sits
properly, and that the adjustment bolts are secure so that the arm will not droop over time.
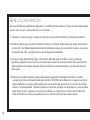
4. Now that your microphone is properly situated, you can clean up the final look by connecting the mic to its
cable and using the boom arm’s internal channel to tuck the cable out of sight. The WA-MBA ships with a
set of six plastic clips that are designed to securely hold the cable into the hidden channel, but before you go
any further it’s a good idea to perform a “rough fit”, tucking the cable into the channel all the way down to the
C-Clamp to see where you will want to place the clips. We suggest using three clips on the cable that will be
inserted into the channel on the lower boom arm section, and three clips for the cable to be inserted into the
upper section’s channel.

5
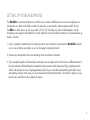
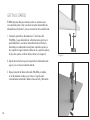
5. Remove the cable from the channel, and
push three of the clips onto the cable length
that will be in the upper section, and push
the other three clips onto the cable length
that will be hidden in the lower section’s
channel. Slide the clips so that they are
roughly equidistant to each other, and tuck
the cable into the channel. Instant pro look! x3

6
TECHNICAL SPECIFICATIONS
Maximum Bearing Weight: 5 pounds (includes
both mic and shock-mount)
Threading Compatibility both 3/8” and 5/8”
threads are supported, using the included adapter
Top Arm Length: 36.5 cm
Bottom Arm Length: 36.5 cm
Cable Management: hidden channel for hiding
cable, using included retaining clips
BOX CONTENTS
WA-MBA Broadcast Boom Arm
Desktop C-Clamp mount
3/8” to 5/8” adapter
Cable Channel Clips

7
WARRANTY STATEMENT
Warm Audio warranties this product to be free from defect in materials and workmanship for one year from the date
of purchase, for the original purchaser to whom this equipment is registered. This warranty is non-transferrable.
This warranty is void in the event of damage incurred from unauthorized service to this unit, or from electrical or
mechanical modification. This warranty does not cover damage resulting from abuse, accidental damage, misuse,
improper electrical conditions such as mis-wiring, incorrect voltage or frequency, unstable power, disconnection from
earth ground (for products requiring a 3 pin, grounded power cable), or from exposure to hostile environmental
conditions such as moisture, humidity, smoke, fire, sand or other debris, and extreme temperatures.
Warm Audio will, at its sole discretion, repair or replace this product in a timely manner. This limited warranty extends
only to products determined to be defective and does not cover incidental costs such as equipment rental, loss of
revenue, etc. Please visit us at www.warmaudio.com for more information on your warranty, or to request
warranty service.
This warranty applies to products sold in the United States of America. For warranty information in any other country,
please refer to your local Warm Audio distributor. This warranty provides specific legal rights, which may vary from
state to state. Depending on the state in which you live, you may have rights in addition to those covered in this
statement. Please refer to your state laws or see your local Warm Audio retailer for more information.

8

9
WA -MBA
PROFESSIONELLER MIKROFONAUSLEGERARM
KURZANLEITUNG
Der WA-MBA ist ein professioneller Mikrofonauslegerarm mit einer internen Feder,
drei Einstellpunkten und einem integrierten Kabelverlegungskanal für ein klares
Aussehen Ihres Streams auf der Kamera. Egal, ob Sie Voiceover, Game-Streaming
oder Podcasting durchführen, der WA-MBA liefert stets professionelle Ergebnisse.

10
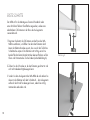
ERSTE SCHRITTE
Der MBA ist für die Montage auf einem Schreibtisch oder
einer ähnlichen flachen Oberfläche vorgesehen, wobei eine
abnehmbare C-Klammer an der Basis des Auslegerarms
verwendet wird.
1 Beginnen Sie damit, die C-Klammer von der Basis des WA-
MBA zu entfernen, und öffnen Sie dann die Klammer durch
Lösen der Klemmschraube so weit, dass sie sich der Tiefe Ihres
Schreibtisches anpasst. Die Klammer sitzt richtig, wenn ihre
beiden Flächen festen Kontakt mit den ebenen Flächen auf der
Ober- und Unterseite des Tisches haben (siehe Abbildung A).
2 Ziehen Sie die Schraube an, bis die Klammer gesichtert ist und
sich nicht unbeabsichtigt bewegen kann.
3 Senken Sie den Auslegerarm des WA-MBA ab und stecken Sie
diesen in die Klammer auf dem Schreibtisch – der Auslegerarm
sollte sich leicht und frei bewegen lassen, sobald sie richtig
miteinander verbunden sind.
Abbildung A

11
EINRICHTEN IHRES MIKROFONS
Der WA-MBA ist ein professioneller Auslegerarm und es gibt verschiedene Möglichkeiten, ein Mikrofon daran zu
befestigen. Mikrofone können am MBA über eine harte oder Stoßdämpferhalterung befestigt werden, auf Wunsch
auch direkt am Mikrofon selbst. Der MBA kann Halterungen oder Clips entweder mit 3/8- oder 5/8-Zollgewinde (mit
dem mitgelieferten Adapter) anbringen und das Mikrofon kann unter dem Arm hängen (die traditionelle Halterung in
Rundfunksituationen) oder auf Wunsch mit der Vorderseite nach oben darüber montiert werden.
4 Sobald der Auslegerarm richtig auf der C-Klammer-Basis montiert ist, bringen Sie die Halterung Ihres Mikrofons
am WA-MBA an und vund stellen Sie sicher, dass sie sicher befestigt ist (nicht zu fest anziehen, da sonst die
Befestigungsgewinde beschädigt werden könnten).
5 Schließen Sie Ihr Mikrofon nach den Anweisungen des Herstellers an die Halterung an.
6 An den drei Biegungen in der Auslegerarmbaugruppe befinden sich Spannschrauben, von denen jede einen anderen
Teil der Armbewegung sichert. Halten Sie das Mikrofon fest, um zu verhindern, dass es herunterfällt oder herabfällt.
Lösen Sie die Klemmen leicht und bewegen Sie das Mikrofon in eine grobe Annäherung an die Position, an der Sie es
langfristig positionieren möchten (machen Sie sich keine Sorgen, dass Sie es in diesem Stadium perfekt hinbekommen,
da Sie die endgültige Position danach noch optimieren werden). Sobald sich die Position des Mikrofons in der Nähe
der gewünschten Position befindet, ziehen Sie die Klemmen wieder fest.

12
IHREN AUFBAU VERFEINERN
Jetzt, da Sie den MBA vollständig eingestellt haben und Ihr Mikrofon ungefähr an der richtigen Stelle ist, können Sie sich
die Zeit nehmen, um alles perfekt für Ihren Stream aussehen und klingen zu lassen.
7 Setzen Sie sich an Ihren Schreibtisch und bringen Sie Ihren Körper in die Position, in der er sich normalerweise befindet,
wenn Sie streamen.
8 Bestimmen Sie den besten Platz für das Mikrofon, sowohl aus Gründen der Tonqualität als auch des Aussehens vor der
Kamera (wenn Sie eine Kamera verwenden). Dies ist je nach Art des verwendeten Mikrofons und je nach Position der
Kamera und der verwendeten Beleuchtung unterschiedlich und erfordert möglicherweise etwas Ausprobieren, um die
richtige Einstellung zu finden.
9 Wenn Sie den richtigen Winkel und die richtige Ausrichtung des Mikrofons bestimmt haben, halten Sie das Mikrofon zur
Sicherheit wieder fest und verwenden Sie die drei Befestigungsschrauben erneut, um es in die richtige Position zu bringen.
Vergewissern Sie sich, dass das Mikrofon richtig sitzt und dass die Einstellschrauben gesichert sind, damit der Arm mit der
Zeit nicht durchhängt.
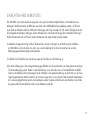
10 Nun, da Ihr Mikrofon richtig positioniert ist, können Sie den letzten Schliff vornehmen, indem Sie das Mikrofon an das
Kabel anschließen und den internen Kanal des Auslegerarms nutzen, um das Kabel außer Sichtweite zu verlegen. Der
WA-MBA wird mit einem Satz von sechs Kunststoff-Clips geliefert, die das Kabel sicher im verborgenen Kanal halten
sollen. Bevor Sie jedoch weitergehen, ist es ratsam, eine grobe „Grobeinstellung“ vorzunehmen und das Kabel bis zur
C-Klammer in den Kanal zu stecken, um zu sehen, wo Sie die Clips anbringen möchten. Wir empfehlen die Verwendung
von drei Clips für das Kabel, das in den Kanal am unteren Auslegerarmabschnitt eingeführt wird, und drei Clips für das
Kabel, das in den Kanal des oberen Abschnitts eingeführt wird.

13
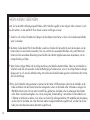
11 Entfernen Sie das Kabel aus dem Kanal
und schieben Sie drei der Clips auf die
Kabellänge, die sich im oberen Abschnitt
befinden wird, und schieben Sie die
anderen drei Clips auf die Kabellänge, die
im Kanal des unteren Abschnitts verborgen
sein wird. Schieben Sie die Clips so, dass
sie ungefähr gleich weit voneinander
entfernt sind, und stecken Sie das Kabel in
den Kanal. Sofortiger Profi-Look!
x3

14
TECHNISCHE DATEN
Maximales Lagergewicht: 2,27 kg (einschließlich
Mikrofon und Stoßdämpferhalterung)
Gewindeschneidekompatibilität: Mit dem
mitgelieferten Adapter werden sowohl 3/8- als
auch 5/8-Zollgewinde unterstützt
Länge des Oberarms: 36,5 cm
Länge des Unterarms: 36,5 cm
Kabelmanagement: verborgener Kanal zum
Verbergen von Kabeln mit Hilfe der mitgelieferten
Halte-Clips
LIEFERUMFANG
Mikrofonauslegerarm WA-MBA
C-Klammer-Halterung für den Schreibtisch
3/8- auf 5/8-Zoll-Adapter
Clips für den Kabelkanal

15
GARANTIEERKLÄRUNG
Warm Audio garantiert, dass dieses Produkt für den Erstkäufer, auf den dieses Gerät registriert ist, für ein Jahr ab
Kaufdatum keine Material- und Verarbeitungsfehler enthält. Diese Garantie ist nicht übertragbar.
Diese Garantie erlischt im Falle von Schäden, die durch unbefugte Wartung dieses Gerätes oder durch elektrische oder
mechanische Veränderungen entstehen. Diese Garantie gilt nicht für Schäden, die durch Missbrauch, versehentliche
Beschädigung, Fehlgebrauch, unsachgemäße elektrische Bedingungen wie Fehlverdrahtung, falsche Spannung oder
Frequenz, instabile Stromversorgung, Trennung vom Erdboden (für Produkte, die ein 3-poliges, geerdetes Netzkabel
erfordern) oder durch Einwirkung feindlicher Umgebungsbedingungen wie Nässe, Feuchtigkeit, Rauch, Feuer, Sand oder
andere Rückstände und extreme Temperaturen entstehen.
Warm Audio wird dieses Produkt nach eigenem Ermessen zeitnah reparieren oder ersetzen. Diese beschränkte Garantie
erstreckt sich nur auf Produkte, die als defekt festgestellt wurden, und deckt keine Nebenkosten wie Gerätemiete,
Einnahmeverluste usw. ab. Bitte besuchen Sie für weitere Informationen zu Ihrer Garantie oder um einen Garantieservice
anzufordern, unsere Website www.warmaudio.com.
Diese Garantie gilt für Produkte, die in den Vereinigten Staaten von Amerika verkauft werden. Für Garantieinformationen
in allen anderen Ländern wenden Sie sich bitte an Ihren lokalen Warm Audio-Händler. Diese Garantie gewährt
spezifische Rechtsansprüche, die von Staat zu Staat unterschiedlich sein können. Je nachdem, in welchem Staat
Sie leben, haben Sie möglicherweise weitere Rechte als die in dieser Erklärung genannten. Bitte beachten Sie Ihre
Landesrechte oder wenden Sie sich für weitere Informationen an Ihren lokalen Händler von Warm Audio.
Entworfen in Austin, Texas.

16

17
WA -MBA
BRAS ARTICULÉ POUR MICROPHONE PROFESSIONNEL
GUIDE DE DÉMARRAGE RAPIDE
Le WA-MBA est un bras articulé pour microphone professionnel avec un ressort
interne, trois points de réglage et un canal de gestion des câbles intégré
pour avoir un look propre et épuré quand vous êtes filmé. Que ce soit pour le
doublage, le streaming de jeu-vidéo ou le podcast, le WA-MBA est la garantie
d’obtenir des résultats professionnels à chaque session.

18
MISE EN PLACE
Le MBA a été conçu pour être monté sur un bureau ou autre
surface plane similaire à l’aide de la pince amovible à la base du
bras articulé.
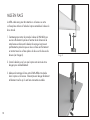
1. Commencez par retirer la pince de la base du WA-MBA, puis
ouvrez suffisamment la pince en fonction de la dimension de
votre bureau en dévissant le boulon de serrage. La pince est
parfaitement ajustée lorsque ses deux surfaces sont fermement
en contact avec les surfaces planes du dessus et du dessous du
bureau (voir Image A).
2. Serrez le boulon jusqu’à ce que la pince soit sécurisée et ne
bougera pas accidentellement.
3. Abaissez le montage du bras articulé WA-MBA et insérez-le
dans la pince sur le bureau. Il devrait pouvoir bouger facilement
et librement une fois qu’ils sont bien connectés ensemble.
Image A

19
INSTALLATION DE VOTRE MICROPHONE
Le WA-MBA est un bras articulé professionnel et il existe différentes façons d’y monter un microphone. Les microphones
peuvent être attachés au MBA via des supports à fixation ou à suspension, ou même directement au microphone lui-
même si vous le désirez. Des supports ou des clips peuvent être attachés au MBA avec un filetage de 3/8” ou 5/8”
(à l’aide de l’adaptateur inclus), et le microphone peut pendre en dessous du bras (le montage traditionnel pour les
émissions), ou peut être monté vers le haut si vous le désirez.
4. Une fois qu’il est parfaitement monté sur la pince, attachez le support de votre microphone sur le WA-MBA et
assurez-vous qu’il soit sécurisé (ne le serrez pas trop ou vous pourriez endommager les filetages de montage).
5. Connectez votre microphone au support en suivant les instructions du fabricant.
6. Il y a des boulons de serrage aux trois angles du bras articulé, chacun sécurise une partie différente du mouvement
du bras. Tout en vous assurant de bien tenir votre microphone pour qu’il ne tombe pas, desserrez légèrement les
pinces et placez le microphone dans la position qui se rapproche le plus de ce que vous recherchez sur le long terme
(il n’y a pas besoin que ce soit parfait à ce stade, vous pourrez ajuster la position finale plus tard). Une fois que la
position du microphone vous satisfait, resserrez les pinces.

20
AJUSTEZ VOTRE INSTALLATION
Maintenant que votre MBA est parfaitement en place et que votre microphone est plus ou moins dans la bonne
position, vous pouvez vous concentrer sur l’amélioration de l’apparence et du son de votre émission.
7. Asseyez-vous à votre bureau et placez-vous de le même manière que si vous étiez déjà en pleine émission.
8. Déterminez la meilleure position de votre microphone en fonction de la qualité du son et de son apparence
devant la caméra (si vous en utilisez une). Il y aura des différences selon le type de microphone que vous
utilisez ou bien selon la position de la caméra et de l’éclairage. Il vous faudra expérimenter pour maîtriser cela.
9. Une fois que vous avez déterminé l’angle et l’orientation du microphone, maintenez le microphone à nouveau
pour le sécuriser, et resserrez les boulons de verrouillage pour qu’ils soient dans la bonne position. Assurez-vous
que le microphone est bien en place et que les boulons d’ajustement sont bien sécurisés pour que le bras ne
s’affaisse pas au bout d’un moment.
10. Maintenant que votre microphone est parfaitement configuré, vous pouvez arranger l’apparence finale en
connectant le microphone à son câble à l’aide du canal interne du bras qui permet de cacher les câbles. Le
WA-MBA est accompagné de six clips de fixation en plastique qui ont été conçus pour maintenir le câble
dans le canal interne mais, avant que vous n’alliez plus loin, il est préférable d’essayer de faire rentrer
approximativement le câble dans le canal jusqu’à la pince pour déterminer où vous souhaitez placer les clips.
Nous vous suggérons d’utiliser trois clips sur le câble qui sera inséré dans le canal dans la partie basse du
bras, et trois clips pour le câble qui sera inséré dans la partie haute du canal.

21
11. Retirez le câble du canal, et poussez trois
des clips sur la longueur du câble qui
sera dans la partie haute, et poussez trois
autres clips sur la longueur du câble qui
sera caché dans la partie basse du canal.
Faites glisser les clips pour qu’ils soient
approximativement à équidistance les uns
des autres, et faites rentrer le câble dans le
canal. Un look de pro en un instant! x3

22
CARACTÉRISTIQUES TECHNIQUES
Capacité de charge maximale: 2,27 kg (inclut le
microphone et son support)
Compatibilité de filetage: les filetages 3/8” et 5/8”
sont compatibles à l’aide de l’adaptateur inclus
Longueur du bras supérieur: 36,5 cm
Longueur du bras inférieur: 36,5 cm
Gestion des câbles: canal caché pour dissimuler les
câbles à l’aide des clips inclus
BOX CONTENTS
Bras articulé pour microphone WA-MBA
Pince de montage pour bureau
Adaptateur 3/8” vers 5/8”
Clips de canal de câble

23
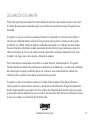
DÉCLARATION DE GARANTIE
Warm Audio garantit que ce produit est exempt de défauts de matériaux et de fabrication pendant un an à compter de
la date d’achat pour le premier acheteur au nom duquel ce matériel est enregistré. Cette garantie n’est pas transférable.
Cette garantie est annulée en cas de dommage résultant d’une réparation non autorisée de cet appareil ou d’une
modification électrique ou mécanique. La présente garantie ne couvre pas les dommages résultant d’abus, de
dommages accidentels, de mauvaise utilisation, de conditions électriques inappropriées telles que câblage incorrect,
tension ou fréquence incorrectes, alimentation instable, déconnexion de la terre (pour les produits nécessitant un câble
d’alimentation à 3 broches, mis à la terre), ou de l’exposition à des conditions environnementales hostiles telles que la
buée, l’humidité, la fumée, le feu, le sable ou d’autres débris et les températures extrêmes.
Warm Audio réparera ou remplacera ce produit en temps voulu, à sa seule discrétion. Cette garantie limitée s’applique
uniquement aux produits jugés défectueux et ne couvre pas les frais accessoires tels que la location d’équipement, la
perte de revenus, etc. Rendez-vous sur www.warmaudio.com pour plus d’informations sur votre garantie ou pour faire
appel au service de garantie.
Cette garantie s’applique aux produits vendus aux États-Unis d’Amérique. Pour obtenir des informations sur la garantie
dans tout autre pays, veuillez vous adresser à votre distributeur Warm Audio local. Cette garantie prévoit des droits
légaux spécifiques, qui peuvent varier d’un État à l’autre. Selon l’état dans lequel vous vivez, vous pouvez avoir des
droits en plus de ceux couverts dans cette déclaration. Veuillez vous référer aux lois de votre état ou consulter votre
revendeur Warm Audio local pour plus d’informations.
Conçu au Austin, Texas.

24

25
WA -MBA
BRAZO ARTICULADO PROFESIONAL PARA BROADCAST
GUÍA DE INICIO RÁPIDO
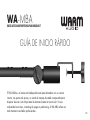
El WA-MBA es un brazo articulado profesional para broadcast con un resorte
interno, tres puntos de ajuste y un canal de manejo de cable incorporado para
disponer de una visión limpia ante la cámara durante la transmisión. Ya sea
realizando locuciones, streaming de juegos o podcasting, el WA-MBA ofrece en
todo momento resultados profesionales.

26
GETTING STARTED
El MBA está pensado para montarse sobre un escritorio o en
una superficie plana similar usando el conjunto desmontable de
abrazadera en forma de C que se encuentra en la base del brazo.
1. Comience quitando la abrazadera en C de la base del
WA-MBA y luego abriéndola lo suficiente para ajustarla a la
profundidad de su escritorio, destornillando el tornillo de la
abrazadera. La abrazadera estará bien asentada cuando sus
dos superficies hagan contacto sólido con las superficies planas
de la parte superior e inferior del escritorio (ver imagen A).
2. Apriete el tornillo hasta que el conjunto de la abrazadera esté
seguro y no se mueva involuntariamente.
3. Baje el conjunto del brazo articulado WA-MBA y encájelo
en la abrazadera situada ya en la mesa. Cuando estén
correctamente conectados, debería moverse fácil y libremente.
imagen A

27
CONFIGURACIÓN DE SU MICRÓFONO
El WA-MBA es un brazo articulado profesional para broadcast, y hay varias maneras de montar un micrófono
en él. Los micrófonos se pueden fijar al MBA a través de un soporte rígido o con amortiguación (araña), o
incluso fijarse directamente al propio micrófono si se desea. El MBA puede acoplar soportes o pinzas utilizando
una rosca de 3/8” o 5/8” (utilizando el adaptador incluido), y el micrófono puede colgar por debajo del brazo
(el montaje tradicional en broadcast), o montarse hacia arriba por encima de él si se desea.
4. Una vez ensamblado correctamente en la base de la abrazadera en C, coloque el soporte de su micrófono
en el WA-MBA y asegúrese de que esté bien sujeto (no lo apriete demasiado o se arriesgará a dañar las
roscas de montaje).
5. Coloque el micrófono en el soporte siguiendo las instrucciones del fabricante.
6. Hay tornillos de ajuste en los tres pliegues de flexión del conjunto del brazo articulado, cada uno de los
cuales asegura una porción diferente del movimiento del mismo. Mientras sostiene el micrófono con firmeza
para evitar que se caiga, afloje ligeramente las abrazaderas y mueva el micrófono a la posición aproximada
donde le gustaría que quedase colocado para su uso en lo sucesivo (no se preocupe por que quede perfecto
en este momento, ya que después ajustará la posición final). Cuando el micro se encuentre cerca de donde le
gustaría, vuelva a apretar las abrazaderas.

28
REFINE SU CONFIGURACIÓN
Ahora que el MBA está completamente configurado y su micrófono está más o menos en el lugar correcto, dedique tiempo
a que las cosas se vean y suenen perfectas para su transmisión.
7. Siéntese en su escritorio y ponga su cuerpo en la posición en la que estará normalmente cuando esté transmitiendo.
8. Determine el mejor lugar para colocar el micrófono, tanto por la calidad de sonido como por la imagen ante la cámara
(si utiliza una). Será diferente dependiendo del tipo de micrófono que tenga y de la posición de la cámara, así como de
la iluminación que utilice, y puede que acertar requiera algo de experimentación.
9. Una vez que haya determinado el ángulo y la orientación adecuados para el micrófono, vuelva a sujetarlo por
seguridad y manipule los tres tornillos de ajuste de nuevo para colocarlo en la posición correcta. Para que el brazo no
acabe cayéndose con el tiempo, asegúrese de que el micrófono se asiente correctamente y que los tornillos de ajuste
estén seguros.
10. Ahora que su micrófono está bien situado, puede mejorar el aspecto final conectando el micrófono a su cable y
usando el canal interno del brazo articulado para ocultarlo. El WA-MBA sale de fábrica con un juego de seis clips de
plástico diseñados para sujetar el cable de forma segura en el canal oculto, pero antes de ir más allá, es buena idea
realizar un “ajuste aproximado”, metiendo el cable en el canal hasta que llegue a la abrazadera en C para ver dónde
quiere colocar los clips. Sugerimos usar tres clips en el cable que se insertará en el canal de la sección inferior del
brazo del micrófono y tres clips para el cable que se vaya a insertar en el canal de la sección superior.

29
11. Retire el cable del canal y coloque tres de
los clips en la parte del cable que estará
en la sección superior. Coloque los otros
tres clips en la parte del cable que estará
oculta en el canal de la sección inferior.
Deslice los clips de manera que queden
aproximadamente equidistantes entre sí y
meta el cable en el canal. ¡Obtendrá un
aspecto profesional al instante! x3

30
ESPECIFICACIONES TÉCNICAS
Peso de carga máximo: 5 libras (2,27 kilos) (incluyendo
micrófono y soporte de araña)
Compatibilidad de rosca: se admiten tanto roscas de
3/8” como de 5/8” usando el adaptador incluido
Longitud del brazo superior: 36,5 cm
Longitud del brazo inferior: 36,5 cm
Manejo del cable: canal para ocultar el cable usando
los clips de retención incluidos
CONTENIDO DE LA CAJA
Brazo articulado para broadcast WA-MBA
Soporte de abrazadera en forma de C para escritorio
Adaptador de 3/8” a 5/8”
Clips para el canal del cable

31
DECLARACIÓN DE GARANTÍA
Warm Audio garantiza que este producto no tendrá defectos de materiales y mano de obra durante un año a partir
de la fecha de compra para el comprador original a cuyo nombre esté registrado este equipo. Esta garantía no es
transferible.
Esta garantía se anula en caso de que se produzcan daños por una reparación no autorizada a esta unidad, así
como por una modificación eléctrica o mecánica. Esta garantía no cubre los daños resultantes por abuso, daños
accidentales, uso indebido, condiciones eléctricas inadecuadas como puede ser un cableado incorrecto, voltaje o
frecuencia incorrectos, alimentación inestable, desconexión de la toma de tierra (para productos que requieran un
cable de alimentación de 3 clavijas con conexión a tierra) o exposición a condiciones ambientales hostiles como
humedad, humo, fuego, arena u otros desechos y temperaturas extremas.
Warm Audio reparará o reemplazará este producto, a su entera discreción, de manera oportuna. Esta garantía
limitada se extiende únicamente a los productos que se determine que son defectuosos, y no cubre costes incidentales
tales como alquiler de equipos, pérdida de ingresos, etc. Visítenos en www.warmaudio.com para obtener más
información sobre su garantía o para solicitar asistencia técnica en garantía.
Esta garantía se aplica a los productos vendidos en los Estados Unidos de América. Para obtener información
sobre la garantía en cualquier otro país, consulte a su distribuidor local de Warm Audio. Esta garantía proporciona
derechos legales específicos que pueden variar de un estado a otro. Dependiendo del estado en el que viva, puede
que tenga otros derechos además de los que se incluyen en esta declaración. Para obtener más información, consulte
las leyes de su estado o a su distribuidor local de Warm Audio.
Diseñado en Austin, Texas.

32

33
WA -MBA
专业广播吊臂
快速启动指南
WA-MBA 是一款专业级广播吊臂,带有内部弹簧,三个调节点和内置
线缆管理通道,可播放出清晰的拍摄效果。无论您利用它进行配音、
游戏流式传输还是播客,WA-MBA 每次都能提供专业的效果。

34
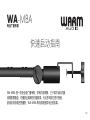
入门
MBA 旨在使用吊臂基座的可移动 C 型夹组件安装在桌面
或类似的平面上。
1. 首先,从 WA-MBA 的基座上卸下 C 型夹,然后松开固
定螺栓,将夹子打开到足以容纳桌面深度的程度。当夹
子的两个表面与桌面的上下平面均紧密接触时,夹子就
被正确定位了(参见图 A)。
2. 拧紧螺栓,直到夹子组件牢固,不会意外移动。
3. 降低 WA-MBA 吊臂组件并将其安装到桌面上的夹子
中——正确连接在一起后,应可轻松自由地移动吊臂。
参见图 A

35
设置您的话筒
WA-MBA 是一款专业级吊臂,有多种方法可以将话筒安装在其上面。可以通过硬架或防震架将话筒安
装到 MBA 上,如果需要,甚至可以将话筒直接安装到吊臂上。MBA 可以使用 3/8 英寸或 5/8 英寸螺
纹(使用随附的适配器)来连接支架或夹子,并且话筒可以悬在臂下(广播中的传统支架),或根据需
要将其面朝上安装在臂上。
4. 在将吊臂正确安装在 C 型夹基座上之后,请将话筒座安装到 WA-MBA 上并确保其牢固(请勿过度拧
紧,否则可能会损坏安装螺纹)。
5. 根据制造商的说明将话筒连接到话筒座上。
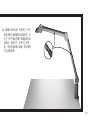
6. 在吊臂装置的三个弯曲处有紧固螺栓,每个螺栓都可固定吊臂不同部分的活动。在握紧话筒以防止其
掉落或脱落时,稍微松开夹子,将话筒大致移动到您希望长期放置的位置(在此阶段不要担心其位置
是否完全合适,因为您之后可以调整其最终位置)。一旦话筒的位置接近您想要的位置,请重新拧紧
夹子。

36
精调您的设置
现在,您已经安装好了 MBA,并且话筒已大致处于正确的位置,您可以花一些时间让设备在播放
时看起来和听起来更加完美。
7. 坐在办公桌旁,让身体处于播放时您通常应处于的位置。
8. 出于声音质量和相机画面(如果使用相机)的考虑,确定放置话筒的最佳位置。这会有所不同,
具体取决于您使用的话筒类型、相机位置以及您使用的照明设备,并且可能需要通过一些实验才
能确定话筒的正确位置。
9. 确定话筒的正确角度和方向后,为安全起见,请再次握住话筒,然后再次调整三个紧固螺栓将其
移至正确的位置。确保话筒正确放置,并且紧固调节螺栓,以使吊臂不会随时间的推移而下垂。
10. 现在您已正确定位了话筒,您可以将话筒连接到其线缆并将线缆塞入吊臂的内部通道使话筒的
外观整洁。WA-MBA 随附有一组六个塑料夹,旨在将电缆牢固地固定在隐藏的通道中,但在
进一步操作之前,最好先进行“粗装配”,将线缆全部塞入通道中一直到 C 形夹,以查看将要
放置夹子的位置。我们建议用三个夹子插入吊臂下部通道段固定线缆,用另三个夹子插入吊臂
上部通道段固定线缆。

37
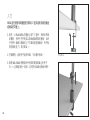
11. 从通道中取出电缆,然后将三个夹子
推至吊臂上部通道段的线缆部位,将
另三个夹子推至吊臂下部通道段的线
缆部位。滑动夹子,使夹子之间等
距,然后将线缆塞入通道。即时获得
专业拍摄效果!
x3

38
技术规格
最大承重量:5 磅(包括话筒和防震架)
螺纹兼容性:使用随附的适配器可同时支持
3/8 英寸和 5/8 英寸螺纹
上臂长度:36.5 厘米
下臂长度:36.5 厘米
线缆管理:使用随附的固定夹,可在隐藏的
通道中隐藏线缆
包装盒内所含物品
WA-MBA 广播吊臂
桌面 C 型夹座
3/8 英寸至 5/8 英寸适配器
线缆通道夹

39
质保声明
Warm Audio 向注册了本产品的原始购买者保证,自购买之日起的一年内,本产品不会出现用料和工
艺上的缺陷。本质保不可转让。
擅自对本产品进行未经许可的维修,或者对产品进行电学或机械改造从而导致本产品受损的,不在质保
范围内。质保范围不包括滥用本品、意外损坏、误用本品,以及包括接线错误、电压或频率错误、电源
不稳定、接地线断开(如使用带有 3 脚接地线的产品)等电源使用不当的情况,或者将本产品暴露在包
括水分、潮湿、烟雾、明火、沙子或其它碎片,以及极端温度在内的恶劣环境之下出现的问题。
Warm Audio 将自行决定及时地对产品进行修理或更换。本品采用有限质保,只有在确认本品的确
存在瑕疵时方可延保,设备租赁、收入损失等附带成本不在质保范围内。请访问 www.warmaudio.
com,详细了解质保内容,或要求我们提供质保服务。
本质保适用于在美国出售的产品。如需了解其它国家的质保信息,请联系您当地的 Warm Audio 经销
商。本质保提供特定的法律权利,该权利在各州可能不尽相同。基于您所在的州,您可能享有本声明未
述及的权利。请参考您所在州的法律,或咨询您当地的 Warm Audio 零售商,以了解更多信息。
专业广播吊臂

Designed in Austin, Texas
-
 1
1
-
 2
2
-
 3
3
-
 4
4
-
 5
5
-
 6
6
-
 7
7
-
 8
8
-
 9
9
-
 10
10
-
 11
11
-
 12
12
-
 13
13
-
 14
14
-
 15
15
-
 16
16
-
 17
17
-
 18
18
-
 19
19
-
 20
20
-
 21
21
-
 22
22
-
 23
23
-
 24
24
-
 25
25
-
 26
26
-
 27
27
-
 28
28
-
 29
29
-
 30
30
-
 31
31
-
 32
32
-
 33
33
-
 34
34
-
 35
35
-
 36
36
-
 37
37
-
 38
38
-
 39
39
-
 40
40


En otros idiomas
- français: Warm Audio WA-MBA Mode d'emploi
- English: Warm Audio WA-MBA User guide
- Deutsch: Warm Audio WA-MBA Benutzerhandbuch
Otros documentos
-
Ryobi CST-180M El manual del propietario
-
WIKA PSA-31 Instrucciones de operación
-
-
-
-
Verano Tumba V642 Manual de usuario
-
Blitz Pneustar 2 N2 El manual del propietario
-
AVENTICS Pressure sensor PE5 El manual del propietario