
Installation Instructions • Notice ďInstallation • Instrucciones de Instalación
Catalog Number(s) • Numéro(s) de Catalogue • Les Numéros de Catalogue:
Country of Origin: Made in China • Pays ďorigine: Fabriqué en Chine • Pais de origen: Hecho en China
Nuvo P10 Player Portfolio Keypad
Claviers pour lecteur audio Nuvo P10
Teclado de la cartera de reproductores P10 Nuvo
Doc. #1507239 06/11 Rev A
NV-P10-WH, NV-P10-LA, NV-P10-NI
1
2
Pull a Cat 5, Cat5e or Cat 6 cable from a
802.3af Class 1 compliant PoE port of a
Power Over Ethernet Switch or power injector
that provides a minimum of 10/100BaseT
Ethernet to a single gang box or low voltage
ring to the eventual location of the P10
keypad. Use the TIA/EIA 568A wiring
standard on both ends of the cable while
crimping the RJ45 connector.
INSTALLATION INSTRUCTIONS
Please read these instructions
completely before you begin.
NOTICE D’INSTALLATION
Veuillez lire toutes ces instructions
avant de commencer.
INSTRUCCIONES DE INSTALACIÓN
Lea completamente estas
instrucciones antes de comenzar.
Faites passer un câble Cat 5, Cat 5e ou Cat 6 depuis
un port PoE 802.3af conforme Classe 1 d'un
interrupteur ou d'un injecteur d'alimentation alimenté
par Ethernet qui génère au moins 10/100BaseT
Ethernet dans un boîtier simple ou une boucle basse
tension vers l'emplacement final du clavier P10.
Utilisez le câblage standard TIA/EIA 568A aux
deux extrémités du câble lors du sertissage du
connecteur RJ45.
Extienda un cable Cat 5, Cat5e o Cat 6 desde un
puerto POE 802.3af Clase 1 compatible de un
interruptor de Alimentación por Ethernet o inyector de
alimentación que proporcione Ethernet de un mínimo
de 10/100BaseT a una caja de un solo juego o a un
anillo de voltaje en la ubicación eventual del teclado
P10. Utilice el estándar de cableado TIA/EIA 568A en
ambos extremos del cable al sujetar el conector RJ45.
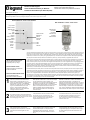
The$Nuvo$P10$Keypad$(NV3P103XX)$offers$convenient$in3wall$control$of$core$functions$of$a$single$zone$of$any$Player$Portfolio$system.$The$
P10$offers$users$easy$command$of$Volume,$Mute,$Play,$and$Pause,$as$well$as$Next/Previous$track$navigation,$and$with$additional$access$
to$five$system$preset$Favorites.$With$its$sleek$backlit$design,$available$colo r$op tio ns $(wh ite,$light$alm o n d$an d $nicke l),$and $sing le3gang$
architecture,$the$P10$fits$into$any$decor,$pairing$simplicity$with$style.$The$P10$works$in$conjunction$with$the$NuVo$Player$app$thro ug h$
two3way$communication$that$keeps$both$control$methods$in$perfect$sync,$and$is$powered$by$a$single$RJ45$POE$connection.
At the NV-P10 location, plug the terminated Cat 5
cable from the switch port or power injector into the
Ethernet port of NV-P10 then plug the other end into
the POE supplying device. FIG 2
3
Open the NuVo Player app and go to
settings/add a NuVo component. Follow the
instructions to bind the keypad to a zone.
FIG 3
Ouvrez l'application NuVo Player et rendez-vous
sur Paramètres/Ajouter un composant NuVo
(settings/add a NuVo component). Suivez les
instructions pour associer le clavier à une zone.
FIG. 3
Abra la aplicación del reproductor NuVo y vaya a
configuración/agregar un componente NuVo. Siga
las instrucciones para vincular el teclado con una
zona. FIG 3
À l'emplacement du NV-P10, branchez l'extrémité
du câble Cat 5 du port de l'interrupteur ou de
l'injecteur d'alimentation dans le port Ethernet du
NV-P10, puis branchez l'autre extrémité dans
l'appareil d'alimentation PoE. FIG. 2
En la ubicación del NV-P10, conecte el cable Cat 5
terminado del puerto del interruptor o del inyector
de alimentación al puerto Ethernet del NV-10 y
luego conecte el otro extremo en el dispositivo que
suministra POE. FIG 2
PW1060
Inpu
t
Skip
FWD / Back
Suivant
Avance / Retour
Saltear
Avance/Retroceso
NV-P10-XX POE Keypad
Clavier PoE d'alimentation par Ethernet
Teclado de alimentación por Ethernet (POE)
NVP-10-WH Front • Avant • Parte delantera
Entrada
Entrée
Input
Favorite
Button
Favoris
Bouton
Botón
Play / Pause
Lecture / Pause
Reproducción/
Pausa
Volume Control
Réglage du
volume
Control de
volumen
Mute
Muet
Silenciar
Le$clavier$Nuvo$P10$(NV3P103XX)$permet$de$commander$depuis$un$système$intégré$au$mur$les$fonctions$essentielles$de$tout$système$de$
lecteur$de$façon$pratique$pour$une$zo ne $dé term in ée .$Le$P 10$o ffre$a ux $u tilisate urs $de s$co m m a nd es $fac iles$d e$v olu m e ,$mo d e$m u et,$
lecture$et$mise$en$pause,$ainsi$que$les$fonctions$de$navigation$Suivant/Précédent,$et$un$accès$supplémentaire$à$cinq$préréglages$favoris$
du$système.$Avec$son$design$rétroéclairé$élégant$et$discret,$ses$choix$de$couleurs$(blanc,$amande$clair$et$nickel)$et$son$architecture$à$
jonction$simple,$le$P10$s'intègre$à$toutes $vo s $d éc o ra t io n s ,$a ss o ci a n t$s implicité$et$style.$Le$P10$fonctio n n e$e n $co n j o n ct io n $a v ec $
l'application$NuVo$Player$avec$un$système$d e$c om m u n ica tion $d eu x$voies$qui$maintient$les$deux$modes$de$commande$parfaitement$
synchronisés,$et$il$est$alimenté$par$une$connexion$PoE$RJ45$unique.
El$teclado$P10$Nuvo$(NV3P103XX)$ofrece$un$cómodo$control$empotrado$de$las$funciones$principales$para$una$zona$de$cualquiera$de$los$
sistemas$de$la$cartera$de$reproductores.$El$P10$ofrece$a$los$usuarios$sencillos$comandos$para$Volumen,$Silenciar,$Reproducir$y$Poner$en$
pausa,$así$como$para$la$navegación$entre$pistas$con$Siguiente/Anterior,$y$con$acceso$adicional$a$cinco$Favoritos$preestablecidos$del$
sistema.$Con$su$elegante$diseño$de$retroiluminación,$las$opciones$de$colores$disponibles$(blanco,$almendra$claro$y$níquel)$y$su$
arquitectura$de$un$solo$juego,$el$P10$se$adapta$a$cualquier$decoración,$combinando$simplicidad$con$estilo.$El$P10$funciona$en$conjunto$
con$la$aplicación$del$reproductor$NuVo$a$través$de$una$comunicación$de$dos$vías$que$mantiene$ambos$métodos$de$control$en$perfecta$
sincronización,$y$está$alimentado$por$una$sola$conexión$POE$RJ45.
POE Ethernet
Connection
Connexion
Ethernet PoE
Conexión
Ethernet POE
FIG 1
Input
FIG 2
Input
NVP-10-WH Rear • Arrière • Parte trasera
Entrada
Entrée
Input
La página se está cargando...
Transcripción de documentos
NV-P10-XX POE Keypad Clavier PoE d'alimentation par Ethernet Teclado de alimentación por Ethernet (POE) Nuvo P10 Player Portfolio Keypad Claviers pour lecteur audio Nuvo P10 Teclado de la cartera de reproductores P10 Nuvo Installation Instructions • Notice ďInstallation • Instrucciones de Instalación Doc. #1507239 06/11 Rev A Catalog Number(s) • Numéro(s) de Catalogue • Les Numéros de Catalogue: NV-P10-WH, NV-P10-LA, NV-P10-NI Country of Origin: Made in China • Pays ďorigine: Fabriqué en Chine • Pais de origen: Hecho en China NVP-10-WH Front • Avant • Parte delantera NVP-10-WH Rear • Arrière • Parte trasera Play / Pause Entrada Entrada Lecture / Pause Reproducción/ Pausa POE Ethernet Connection Entrée Skip FWD / Back Suivant Avance / Retour Input Volume Control Connexion Ethernet PoE Réglage du volume Conexión Ethernet POE Control de volumen Saltear Avance/Retroceso Favorite Button Entrée Input Mute Muet Favoris Bouton Silenciar Botón FIG 1 Input INSTALLATION INSTRUCTIONS Please read these instructions completely before you begin. NOTICE D’INSTALLATION Veuillez lire toutes ces instructions avant de commencer. INSTRUCCIONES DE INSTALACIÓN Lea completamente estas instrucciones antes de comenzar. 1 2 3 FIG 2 The Nuvo P10 Keypad (NV-‐P10-‐XX) offers convenient in-‐wall control of core functions of a single zone of any Player Portfolio system. The P10 offers users easy command of Volume, Mute, Play, and Pause, as well as Next/Previous track navigation, and with additional access to five system preset Favorites. With its sleek backlit design, available color options (white, lInput ight almond and nickel), and single-‐gang architecture, the P10 fits into any decor, pairing simplicity with style. The P10 works in conjunction with the NuVo Player app through two-‐way communication that keeps both control methods in perfect sync, and is powered by a single RJ45 POE connection. Le clavier Nuvo P10 (NV-‐P10-‐XX) permet de commander depuis un système intégré au mur les fonctions essentielles de tout système de lecteur de façon pratique pour une zone déterminée. Le P10 offre aux utilisateurs des commandes faciles de volume, mode muet, lecture et mise en pause, ainsi que les fonctions de navigation Suivant/Précédent, et un accès supplémentaire à cinq préréglages favoris du système. Avec son design rétroéclairé élégant et discret, ses choix de couleurs (blanc, amande clair et nickel) et son architecture à jonction simple, le P10 s'intègre à toutes vos décorations, associant simplicité et style. Le P10 fonctionne en conjonction avec PW1060 l'application NuVo Player avec un système de communication deux voies qui maintient les deux modes de commande parfaitement synchronisés, et il est alimenté par une connexion PoE RJ45 unique. El teclado P10 Nuvo (Inpu NV-‐P10-‐XX) ofrece un cómodo control empotrado de las funciones principales para una zona de cualquiera de los sistemas de la cartera de reproductores. El P10 ofrece a los usuarios sencillos comandos para Volumen, Silenciar, Reproducir y Poner en pausa, así como para tla navegación entre pistas con Siguiente/Anterior, y con acceso adicional a cinco Favoritos preestablecidos del sistema. Con su elegante diseño de retroiluminación, las opciones de colores disponibles (blanco, almendra claro y níquel) y su arquitectura de un solo juego, el P10 se adapta a cualquier decoración, combinando simplicidad con estilo. El P10 funciona en conjunto con la aplicación del reproductor NuVo a través de una comunicación de dos vías que mantiene ambos métodos de control en perfecta sincronización, y está alimentado por una sola conexión POE RJ45. Pull a Cat 5, Cat5e or Cat 6 cable from a 802.3af Class 1 compliant PoE port of a Power Over Ethernet Switch or power injector that provides a minimum of 10/100BaseT Ethernet to a single gang box or low voltage ring to the eventual location of the P10 keypad. Use the TIA/EIA 568A wiring standard on both ends of the cable while crimping the RJ45 connector. Faites passer un câble Cat 5, Cat 5e ou Cat 6 depuis un port PoE 802.3af conforme Classe 1 d'un interrupteur ou d'un injecteur d'alimentation alimenté par Ethernet qui génère au moins 10/100BaseT Ethernet dans un boîtier simple ou une boucle basse tension vers l'emplacement final du clavier P10. Utilisez le câblage standard TIA/EIA 568A aux deux extrémités du câble lors du sertissage du connecteur RJ45. Extienda un cable Cat 5, Cat5e o Cat 6 desde un puerto POE 802.3af Clase 1 compatible de un interruptor de Alimentación por Ethernet o inyector de alimentación que proporcione Ethernet de un mínimo de 10/100BaseT a una caja de un solo juego o a un anillo de voltaje en la ubicación eventual del teclado P10. Utilice el estándar de cableado TIA/EIA 568A en ambos extremos del cable al sujetar el conector RJ45. At the NV-P10 location, plug the terminated Cat 5 cable from the switch port or power injector into the Ethernet port of NV-P10 then plug the other end into the POE supplying device. FIG 2 À l'emplacement du NV-P10, branchez l'extrémité du câble Cat 5 du port de l'interrupteur ou de l'injecteur d'alimentation dans le port Ethernet du NV-P10, puis branchez l'autre extrémité dans l'appareil d'alimentation PoE. FIG. 2 En la ubicación del NV-P10, conecte el cable Cat 5 terminado del puerto del interruptor o del inyector de alimentación al puerto Ethernet del NV-10 y luego conecte el otro extremo en el dispositivo que suministra POE. FIG 2 Open the NuVo Player app and go to settings/add a NuVo component. Follow the instructions to bind the keypad to a zone. FIG 3 Ouvrez l'application NuVo Player et rendez-vous sur Paramètres/Ajouter un composant NuVo (settings/add a NuVo component). Suivez les instructions pour associer le clavier à une zone. FIG. 3 Abra la aplicación del reproductor NuVo y vaya a configuración/agregar un componente NuVo. Siga las instrucciones para vincular el teclado con una zona. FIG 3-
 1
1
-
 2
2


Legrand P10 Keypad Instrucciones de operación
- Tipo
- Instrucciones de operación
en otros idiomas
- français: Legrand P10 Keypad Mode d'emploi
- English: Legrand P10 Keypad Operating instructions
Artículos relacionados
-
Legrand NVP20VLIV Guía de instalación
-
Legrand P30 Guía de instalación
-
-
Legrand P400 Guía de instalación
-
-
Legrand NVP500NA Guía de instalación
-
-
Legrand AU7050WH Manual de usuario
-
-