Home Fashion Technologies 8503684100 Manual de usuario
- Tipo
- Manual de usuario

Preparation:
1. Read all instructions carefully before you begin installation.
We strongly suggest you watch the installation video at www.homefashiontech.com
.
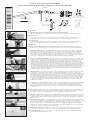
2. Verify Parts
If any parts are missing, do not return the doors. Instead, call (281) 955-5837 or
(866) 658-7530 or email info@homefashiontech.com. We will send the part(s) to you.
.3. Gather Tools
Electric drill, drill bits (3/32" and 3/16"), tape measure, pencil, #2 Phillips screwdriver,
4' level, step ladder, stud finder, adjustable wrench or 10mm and 19mm sockets.
Installation:
1. Measure the width of the door opening. Find the center of the opening and place a
mark 86-1/8" above the floor. This is going to be for the center hole of the horizontal rail.
2. Mark the five holes. The horizontal rail has five holes for bolts. Have an assistant help
hold the horizontal rail so the center hole is over the center mark you made at 86-1/8"
above the floor. Level the rail with the 4' level. Mark the four remaining holes. Drill pilot
holes with the 3/16" drill bit. The three center holes must be in studs. If they are not, you
will need to add extra support with a Header Board (see step 3). If the two holes nearest
each end of the rail are not in studs, use the dry wall anchors (included).
3. If you need a Header Board, purchase a 1x4" board of hard wood species. A wider 1X6"
board may be used if desired (remember the holes for the horizontal rail must be 86-1/8"
from the floor). The length of the header should be the length of the horizontal rail, or
slightly longer. Prepare the board by staining or painting, if desired. Use 10 screws at
least 2-1/2" long (not included). Avoid placing the screws along the center of the header.
Header screws should be across the top and bottom of header (2 per stud). The horizontal
rail will be mounted along the center. Please review the Header Board installation video
at homefashiontech.com. Place marks on the board that match the holes in the horizontal
rail. Have an assistant help hold the horizontal rail so the center hole is over the center
mark you made at 86-1/8" above the floor. Level the rail with the 4' level. Mark the four
remaining holes and pre-drill holes.
4. Find the hole you made at the center of the opening that is 86-1/8" above the floor. With
help from your assistant, pick up the horizontal rail and place one of the 4" lag bolts
through the center hole. Place a spacer on the bolt so that the spacer will be between the
rail and the wall. The large end of the spacer goes next to the wall. Insert the bolt into the
hole you drilled. Tighten it until it is just snug. Use your 4' level to level the rail. Insert the
second 4" bolt through the hole in the rail that is just to the left of the center hole. Apply
the spacer. Tighten until snug and check the level. Repeat for the hole on the right of the
center, then for the far left and for the far right. Each time check to level the metal rail.
Tighten the lag bolts.
5. Lay the doors on the floor. Each door has four red dots that mark where the handles are
to be attached. Lay the doors with these dots facing up. Drill a very shallow pilot hole in
each red dot with the 3/32" drill. Use the ¾" screws and the #2 Phillips screwdriver to
attach the handles. Handles cannot be placed anywhere other than where the red dots
are located.
6. Attach the rollers. Each door comes with brackets for the rollers already installed. Place
the roller bracket over the pre-installed brackets, make certain they are straight, and use
the 19 mm socket or an adjustable wrench to tighten the roller bracket bolts.
7. Hang the doors. Pick up the left door and slide the rollers onto the horizontal rail from the
left side. Slide a door stopper on the left end of the horizontal rail. Position the stopper so
that the door just touches the stopper when the door is fully open and tighten. Repeat for
the right door.
8. Attach the floor guides. Each door has a groove on the bottom edge that slides over a
guide to keep the door in good alignment. Decide if the floor guide or the wall guide is best
for your needs. Place a guide about 1/2" outside the edge of the door opening (door
jamb). Slide the door over the guide and position the guide so that the door is hanging
straight up and down (hanging vertically plumb). Screw the guide to the floor or the wall
using the 1" screws. Repeat for the other door.
9. Install the center door stop. Loosen the center lag bolt just a bit. Slide the center door
stop over the lag bolt so that it fits snugly on the horizontal rail. Tighten the lag bolt.
10. You're finished! If you need assistance, call us at (281) 955-5637 or (866) 658-7530 or
email info@homefashiontech.com.
Home Fashion Technologies
PVC Composite Split Barn Door Installation Guide
Parts list:
1 Horizontal Rail
2 Door Handles
1 Center Door Stop
4 Roller Brackets
2 End Door Stops
2 Base Moulding Guides
4 Screws (1")
2 Floor Guides
4 Floor Guide Anchors
(for cement or tile floor)
8 Roller Bracket
Bolts (1.3" bolts)
8 Door Handle
Screws (3/4")
5 Horizontal Rail Spacers
5 Horizontal Rail Bolts (4" lag bolts)

Preparation:
1. Lea las instrucciones antes de comenzar la instalación.
Sugerimos enfáticamente que mire el video de instalación en www.homefashiontech.com.
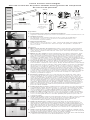
2. Verifique las partes.
No devuelva la puerta si faltan partes. En vez de eso, llame al 281-955-5837 o
866-658-7530, o envíe un correo electrónico a info@homefashiontech.com.
Le enviaremos las partes faltantes.
3. Reúna las herramientas.
Taladro eléctrico, brocas (de 3/32" y 3/16"), cinta de medir, lápiz, destornillador Phillips
Nº 2, nivel de 4', escalera de mano, detector de vigas, llave ajustable o boquillas de
10 mm y 19 mm.
Instalación:
1. Mida el ancho del vano de la puerta. Encuentre el centro del vano y haga una marca
86-1/8" sobre el piso. Esta será para el agujero central del riel horizontal. Encuentre el
centro del vano y haga una marca 86-1/8" sobre el piso. Esta será para el agujero central
del riel horizontal.
2. Marque los cinco agujeros.. El riel horizontal tiene cinco agujeros para pernos. Haga
que un asistente le ayude a sostener el riel horizontal de modo que el agujero central
esté sobre la marca central que hizo 86-1/8" sobre el piso. Nivele el riel con el nivel de 4'.
Maque los cuatro agujeros restantes. Taladre agujeros pilotos con la broca de 3/16". Los
tres agujeros centrales deben estar en las vigas. De lo contrario, deberá añadir soporte
con un travesaño (ver el paso 3). Si los dos agujeros más cercanos a cada extremo del riel
no están en las vigas, use los tarugos para pared de mampostería (incluidos).
3. Si necesita un travesaño, compre un tablero de madera dura de 1X4". Se puede usar
un tablero más ancho de 1X6" si así lo desea (recuerde que los agujeros para el riel
horizontal deben estar 86-1/8" sobre el piso). El largo del travesaño debe ser igual al largo
del riel horizontal o un poco más largo. Tiña o pinte el tablero si lo desea. Use 10 tornillos
de al menos 2-1/2" de largo (no incluidos). Evite colocar los tornillos a lo largo del centro
del travesaño. Los tornillos se deben colocar en los extremos superior e inferior del
travesaño (2 por viga). El riel horizontal se montará a lo largo del centro. Repase el video
de instalación del travesaño en homefashiontech.com. Coloque marcas en el tablero que
correspondan con los agujeros en el riel horizontal. Haga que un asistente le ayude a
sostener el riel horizontal de modo que el agujero central esté sobre la marca central que
hizo 86 1/8" sobre el piso. Nivele el riel con el nivel de 4'. Maque los cuatro agujeros
restantes y pretaladre los agujeros. .
4. Encuentre el agujero que hizo en el centro del vano que está 86-1/8" sobre el piso.
Con la ayuda de su asistente, levante el riel horizontal e inserte uno de los pernos de
cabeza cuadrada de 4" en el agujero central. Coloque un espaciador en el perno de
modo que el espaciador quede entre el riel y la pared. El extremo grande del espaciador
debe estar adyacente a la pared. Inserte el perno en el agujero que taladró. Apriételo
hasta que quede ajustado. Use el nivel de 4' para nivelar el riel. Inserte el segundo perno
de 4" en el agujero del riel que está justo a la izquierda del agujero central. Coloque el
espaciador. Apriete hasta que esté ajustado y verifique el nivel. Entonces repita para el
agujero a la derecha del centro. Luego para el agujero de extrema izquierda y entonces
para el de extrema derecha. Cada vez revise para nivelar el riel de metal. Apriete los
pernos de cabeza cuadrada.
5. Tienda las puertas en el piso. Cada puerta tiene cuatro puntos rojos que marcan dónde
se instalarán las manijas. Tienda las puertas con estos puntos apuntando hacia arriba.
Taladre un agujero piloto muy poco profundo en cada punto rojo con el taladro de 3/32".
Use los tornillos de 3/4" y el destornillador Phillips Nº 2 para sujetar las manijas. No
colocar las manijas en ninguna otra parte que no sea el lugar con los puntos rojos.
6. Instale los rodillos. Cada puerta viene con los soportes para los rodillos ya instalados.
Coloque el soporte de rodillo sobre los soportes preinstalados, asegúrese de que estén
rectos y use la boquilla de 19 mm o una llave ajustable para apretar los pernos de los
soportes de rodillo.
7. Cuelgue las puertas. Levante la puerta izquierda y deslice los rodillos en el riel horizontal
desde el lado izquierdo. Deslice un tope de puerta en el extremo izquierdo del riel
horizontal. Sitúe el tope de modo que la puerta apenas lo toque cuando esté
completamente abierta y apriételo. Repita para la puerta derecha
8. Instale las guías de piso. Cada puerta tiene una ranura en el borde inferior que se
desliza sobre una guía para mantener la puerta alineada. Decida si la guía de piso o la
guía de pared es mejor para sus necesidades. Coloque una guía aproximadamente 1/2"
afuera del borde del vano de la puerta (montante de la puerta). Deslice la puerta sobre la
guía y sitúe la guía de modo que la puerta esté colgada recta arriba y abajo (plomada
vertical). Atornille la guía al piso o a la pared con los tornillos de 1". Repita para la otra
puerta.
9. Instale el tope de puerta central. Afloje un poco el perno de cabeza cuadrada central.
Deslice el tope de puerta central sobre el perno de cabeza cuadrada de modo que quede
ajustado en el riel horizontal. Apriete el perno de cabeza cuadrada.
10. ¡Completó la instalación! Si necesita ayuda, llámenos al 281-955-5637 o 866-658-7530,
o envíe un correo electrónico a info@homefashiontech.com.com.
Home Fashion Technologies
Guía de instalación de puerta dividida estilo granero de compuesto
de cloruro de polivinilo
Parts list:
1 riel horizontal
2 manijas de puerta
1 el tope de puerta central
4 soportes de
rodillo
2 topes de extremo
de puerta
2 guías de moldura
4 tornillos de 1"
2 guías de piso
4 tarugos para guía de piso
(para piso de cemento o
baldosa)
8 pernos para
soportes de rodillo
8 tornillos para
manijas de puerta
(3/4")
5 espaciadores para el riel
horizontal
5 pernos para el riel horizontal
(pernos de cabeza cuadrada de 4")
-
 1
1
-
 2
2


Home Fashion Technologies 8503684100 Manual de usuario
- Tipo
- Manual de usuario
en otros idiomas
Otros documentos
-
Craftsman 13955918 El manual del propietario
-
-
-
-
-
-
Genie 3042-TKV Guía de instalación
-
-
-
 Wayne-Dalton 3324B-Z Manual de usuario
