Nikon AF-S NIKKOR 80-400mm f/4.5-5.6G ED VR Manual de usuario
- Categoría
- Lentes de camara
- Tipo
- Manual de usuario

AF-S NIKKOR 80-400mm f/4.5-5.6G ED VR
Nano Crystal Coat
■
■
Depth of fi eld (Metric)
Depth of fi eld (Metric)
■
■
Tiefenschärfe
Tiefenschärfe
■
■
Profondeur de champ
Profondeur de champ
■
■
Scherptediepte
Scherptediepte
(m)
• Focus distance
• Entfernungseinstellung
• Distance de mise au
point
• Scherpstelafstand
• Depth of eld
• Tiefenschärfe
• Profondeur de
champ
• Scherptediepte
• Reproduction ratio
• Abbildungsmaßstab
• Rapport de reproduction
• Reproductieverhouding
[f=80 mm]
f/4.5 f/5.6 f/8 f/11 f/16 f/22 f/32
1.8
1.69 – 1.82 1.67 – 1.84 1.64 – 1.88 1.60 – 1.94 1.55 – 2.03 1.48 – 2.18 1.39 – 2.43 1/20.6
2.5
2.37 – 2.65 2.34 – 2.69 2.28 – 2.77 2.20 – 2.91 2.10 – 3.12 1.97 – 3.49 1.82 – 4.20 1/29.7
4 3.67 – 4.40 3.60 – 4.50 3.46 – 4.76 3.28 – 5.17 3.05 – 5.89 2.79 – 7.36 2.49 – 11.52 1/48.1
6 5.29 – 6.95 5.14 – 7.22 4.86 – 7.89 4.50 – 9.09 4.09 – 11.62 3.62 – 19.29 3.13 – 387.52 1/72.6
9 7.48 – 11.32 7.19 – 12.07 6.64 – 14.08 6.00 – 18.45 5.28 – 33.09 4.53 – ∞ 3.78 – ∞
1/109.4
12 9.44 – 16.53 8.98 – 18.18 8.14 – 23.17 7.20 – 38.00 6.19 – 436.05 5.17 – ∞ 4.21 – ∞
1/146.2
20 13.76 – 36.89 12.81 – 46.28
11.16 – 102.65
9.45 – ∞ 7.78 – ∞ 6.24 – ∞ 4.89 – ∞
1/244.2
40
20.96 – 483.45
18.83 – ∞ 15.47 – ∞ 12.37 – ∞ 9.65 – ∞ 7.38 – ∞ 5.57 – ∞
1/489.3
∞ 43.96 – ∞ 35.53 – ∞ 25.18 – ∞ 17.87 – ∞ 12.70 – ∞ 9.04 – ∞ 6.45 – ∞ 1/∞
[f=105 mm]
f/4.8 f/5.6 f/8 f/11 f/16 f/22 f/32
1.8
1.71 – 1.80 1.70 – 1.81 1.68 – 1.83 1.65 – 1.87 1.61 – 1.92 1.56 – 2.00 1.50 – 2.13 1/16.4
2.5
2.41 – 2.60 2.40 – 2.61 2.36 – 2.66 2.30 – 2.74 2.23 – 2.86 2.13 – 3.04 2.02 – 3.34 1/23.5
4 3.78 – 4.25 3.74 – 4.30 3.65 – 4.44 3.52 – 4.65 3.35 – 4.99 3.14 – 5.56 2.89 – 6.67 1/37.8
6 5.52 – 6.57 5.44 – 6.69 5.24 – 7.03 4.98 – 7.58 4.65 – 8.52 4.27 – 10.35 3.82 – 14.93 1/56.8
9 7.97 – 10.35 7.80 – 10.65 7.39 – 11.54 6.89 – 13.08 6.28 – 16.14 5.59 – 24.23 4.85 – 85.67 1/85.4
12
10.23 – 14.53
9.96 – 15.13 9.31 – 16.97 8.52 – 20.52 7.61 – 29.20 6.63 – 73.64 5.61 – ∞
1/114.0
20
15.53 – 28.16 14.91 – 30.49 13.49 – 39.02 11.90 – 64.73
10.21 – ∞ 8.51 – ∞ 6.90 – ∞
1/190.2
40
25.39 – 95.04
23.78 – 127.97
20.38 – ∞ 16.96 – ∞ 13.72 – ∞ 10.82 – ∞ 8.35 – ∞
1/380.7
∞ 69.60 – ∞ 58.71 – ∞ 41.57 – ∞ 29.46 – ∞ 20.90 – ∞ 14.85 – ∞ 10.57 – ∞ 1/∞
[f=135 mm]
f/5 f/5.6 f/8 f/11 f/16 f/22 f/32 f/36
1.8
1.72 – 1.78 1.72 – 1.79 1.70 – 1.80 1.68 – 1.82 1.66 – 1.86 1.62 – 1.90 1.57 – 1.98 1.56 – 2.01 1/13.1
2.5
2.44 – 2.56 2.43 – 2.57 2.41 – 2.60 2.37 – 2.65 2.32 – 2.71 2.25 – 2.82 2.17 – 2.97 2.13 – 3.05 1/18.7
4 3.85 – 4.16 3.83 – 4.18 3.77 – 4.26 3.68 – 4.38 3.57 – 4.56 3.42 – 4.85 3.22 – 5.32 3.15 – 5.55 1/29.8
6 5.68 – 6.36 5.64 – 6.41 5.50 – 6.60 5.32 – 6.89 5.09 – 7.34 4.79 – 8.09 4.43 – 9.49
4.29 – 10.23
1/44.6
9 8.30 – 9.83 8.22 – 9.95
7.94 – 10.40 7.57 – 11.12 7.11 – 12.34 6.54 – 14.61 5.89 – 19.82 5.65 – 23.31
1/66.8
12
10.80 – 13.51 10.66 – 13.74 10.19 – 14.61
9.60 – 16.07 8.87 – 18.73 8.01 – 24.47 7.05 – 43.51 6.72 – 64.69
1/89.0
20
16.89 – 24.54 16.55 – 25.29 15.46 – 28.42 14.13 – 34.47 12.61 – 49.40
10.95 – 128.54
9.25 – ∞ 8.69 – ∞
1/148.3
40
29.27 – 63.34 28.28 – 68.58 25.23 – 97.60
21.90 – 243.92
18.46 – ∞ 15.13 – ∞ 12.07 – ∞ 11.13 – ∞
1/296.5
∞ 109.57 – ∞ 96.93 – ∞ 68.61 – ∞ 48.59 – ∞ 34.44 – ∞ 24.43 – ∞ 17.35 – ∞ 15.49 – ∞ 1/∞
[f=200 mm]
f/5.3 f/5.6 f/8 f/11 f/16 f/22 f/32 f/38
1.8
1.73 – 1.77 1.73 – 1.77 1.72 – 1.78 1.71 – 1.79 1.70 – 1.80 1.68 – 1.83 1.65 – 1.86 1.63 – 1.89 1/9.4
2.5
2.47 – 2.53 2.47 – 2.54 2.45 – 2.55 2.43 – 2.57 2.40 – 2.60 2.37 – 2.65 2.32 – 2.72 2.29 – 2.77 1/13.2
4 3.92 – 4.08 3.92 – 4.09 3.88 – 4.12 3.84 – 4.18 3.78 – 4.26 3.69 – 4.37 3.58 – 4.55 3.51 – 4.67 1/20.7
6 5.83 – 6.18 5.82 – 6.19 5.75 – 6.27 5.66 – 6.39 5.53 – 6.57 5.35 – 6.84 5.12 – 7.27 4.99 – 7.58 1/30.7
9 8.63 – 9.40 8.62 – 9.42 8.47 – 9.61 8.26 – 9.89
8.00 – 10.31 7.64 – 10.98 7.20 – 12.09
6.94 – 12.94
1/45.7
12
11.37 – 12.71 11.33 – 12.75 11.08 – 13.09 10.74 – 13.61 10.30 – 14.41
9.73 – 15.73 9.03 – 18.08
8.63 – 20.02
1/60.7
20
18.32 – 22.02 18.24 – 22.14 17.60 – 23.17 16.77 – 24.81 15.73 – 27.56 14.46 – 32.73 12.99 – 44.62 12.19 – 58.41
1/100.7
40
33.87 – 48.88 33.60 – 49.45 31.52 – 54.83 28.98 – 64.83 26.03 – 87.43
22.76 – 173.08
19.35 – ∞ 17.64 – ∞
1/200.7
∞ 223.49 – ∞ 212.56 – ∞ 150.40 – ∞ 106.46 – ∞ 75.40 – ∞ 53.43 – ∞ 37.90 – ∞ 31.93 – ∞ 1/∞
[f=300 mm]
f/5.6 f/8 f/11 f/16 f/22 f/32 f/40
1.8
1.74 – 1.76 1.74 – 1.76 1.73 – 1.77 1.72 – 1.78 1.71 – 1.79 1.69 – 1.81 1.68 – 1.83 1/6.9
2.5
2.48 – 2.52 2.47 – 2.53 2.46 – 2.54 2.45 – 2.55 2.43 – 2.58 2.40 – 2.61 2.38 – 2.64 1/9.4
4 3.96 – 4.04 3.94 – 4.06 3.92 – 4.09 3.89 – 4.12 3.84 – 4.18 3.78 – 4.25 3.73 – 4.33 1/14.4
6 5.91 – 6.09 5.88 – 6.13 5.83 – 6.18 5.76 – 6.26 5.67 – 6.37 5.55 – 6.55 5.44 – 6.71 1/21.1
9 8.82 – 9.19 8.74 – 9.27 8.64 – 9.39 8.50 – 9.57 8.31 – 9.82 8.06 – 10.22 7.85 – 10.59 1/31.1
12
11.68 – 12.34 11.56 – 12.48 11.38 – 12.69 11.15 – 13.00 10.83 – 13.47 10.42 – 14.20 10.07 – 14.92
1/41.1
20
19.16 – 20.92 18.83 – 21.33 18.39 – 21.93 17.80 – 22.85 17.03 – 24.29 16.05 – 26.68 15.28 – 29.25
1/67.7
40
36.83 – 43.78 35.68 – 45.53 34.16 – 48.31 32.22 – 52.88 29.83 – 61.08 27.01 – 78.34
24.93 – 104.73
1/134.4
∞ 475.50 – ∞ 338.24 – ∞ 239.38 – ∞ 169.49 – ∞ 120.06 – ∞ 85.11 – ∞ 67.71 – ∞ 1/∞
[f=400 mm]
f/5.6 f/8 f/11 f/16 f/22 f/32 f/40
1.8
1.74 – 1.76 1.74 – 1.76 1.74 – 1.76 1.73 – 1.77 1.72 – 1.78 1.71 – 1.79 1.70 – 1.80 1/5.7
2.5
2.49 – 2.51 2.48 – 2.52 2.48 – 2.53 2.47 – 2.54 2.45 – 2.55 2.43 – 2.57 2.42 – 2.59 1/7.6
4 3.97 – 4.03 3.96 – 4.04 3.95 – 4.05 3.93 – 4.08 3.90 – 4.11 3.85 – 4.16 3.82 – 4.20 1/11.5
6 5.94 – 6.06 5.92 – 6.08 5.89 – 6.11 5.85 – 6.16 5.79 – 6.23 5.71 – 6.33 5.64 – 6.42 1/16.5
9 8.88 – 9.12 8.84 – 9.17 8.78 – 9.24 8.69 – 9.34 8.57 – 9.49 8.40 – 9.71 8.26 – 9.91 1/24.2
12
11.80 – 12.21 11.73 – 12.29 11.62 – 12.41 11.47 – 12.59 11.26 – 12.85 10.99 – 13.24 10.75 – 13.61
1/31.8
20
19.47 – 20.56 19.29 – 20.77 19.01 – 21.11 18.62 – 21.61 18.11 – 22.36 17.43 – 23.52 16.88 – 24.66
1/52.2
40
38.01 – 42.22 37.33 – 43.10 36.32 – 44.53 35.00 – 46.74 33.28 – 50.26 31.13 – 56.30 29.46 – 63.05
1/103.3
∞ 789.34 – ∞ 577.42 – ∞ 408.64 – ∞ 289.30 – ∞ 204.92 – ∞ 145.24 – ∞ 115.53 – ∞ 1/∞
• Unlike other lenses, the focal length of internal focus (IF) lenses decreases with focus
distance.
• Im Gegensatz zu den anderen Objektiven verringert sich die Brennweite der Objektive
mit Innenfokussierung (IF) mit der Entfernungseinstellung.
• Contrairement aux autres objectifs, la focale des objectifs à mise au point interne (IF)
diminue avec la distance de mise au point.
• In tegenstelling tot andere objectieven daalt de brandpuntsafstand van interne
scherpstelling (IF) met scherpstelafstand.
■ Depth of field (Imperial) (ft)
Focus distance Depth of field Reproduction ratio
[f=80 mm]
f/4.5 f/5.6 f/8 f/11 f/16 f/22 f/32
7
6 ft 8 ⁄ in. –
7 ft 4 ⁄ in.
6 ft 7 ⁄ in. –
7 ft 5 ⁄ in.
6 ft 5 ⁄ in. –
7 ft 7 ⁄ in.
6 ft 3 ⁄ in. –
7 ft 11 ⁄ in.
6 ft ⁄ in. –
8 ft 5 ⁄ in.
5 ft 8 ⁄ in. –
9 ft 2 ⁄ in.
5 ft 3 ⁄ in. –
10 ft 7 ⁄ in.
1/25.3
15
13 ft 7 ⁄ in. –
16 ft 8 ⁄ in.
13 ft 3 ⁄ in. –
17 ft 2 ⁄ in.
12 ft 8 ⁄ in. –
18 ft 4 ⁄ in.
11 ft 11 ⁄ in. –
20 ft 2 ⁄ in.
11 ft ⁄ in. –
23 ft 8 ⁄ in.
10 ft ⁄ in. –
31 ft 5 ⁄ in.
8 ft 10 ⁄ in. –
59 ft 5 ⁄ in.
1/55.1
25
21 ft 3 ⁄ in. –
30 ft 3 in.
20 ft 7 ⁄ in. –
31 ft 10 ⁄ in.
19 ft 2 ⁄ in. –
35 ft 11 ⁄ in.
17 ft 6 ⁄ in. –
44 ft 1 ⁄ in.
15 ft 8 ⁄ in. –
65 ft ⁄ in.
13 ft 7 ⁄ in. –
203 ft 1 ⁄ in.
11 ft 6 ⁄ in. –
∞
1/92.5
70
47 ft 2 ⁄ in. –
136 ft 10 ⁄ in.
43 ft 9 ⁄ in. –
177 ft 7 ⁄ in.
37 ft 11 ⁄ in. –
496 ft 10 ⁄ in.
31 ft 11 ⁄ in. –
∞
26 ft 2 ⁄ in. –
∞
20 ft 10 ⁄ in. –
∞
16 ft 3 ⁄ in. –
∞
1/260.6
∞
144 ft 2 ⁄ in. –
∞
116 ft 6 ⁄ in. –
∞
82 ft 7 ⁄ in. –
∞
58 ft 7 ⁄ in. –
∞
41 ft 7 ⁄ in. –
∞
29 ft 7 ⁄ in. –
∞
21 ft 2 ⁄ in. –
∞
1/∞
[f=105 mm]
f/4.8 f/5.6 f/8 f/11 f/16 f/22 f/32
7
6 ft 9 ⁄ in. –
7 ft 2 ⁄ in.
6 ft 9 in. –
7 ft 3 ⁄ in.
6 ft 7 ⁄ in. –
7 ft 4 ⁄ in.
6 ft 6 ⁄ in. –
7 ft 6 ⁄ in.
6 ft 4 ⁄ in. –
7 ft 9 ⁄ in.
6 ft 1 ⁄ in. –
8 ft 3 in.
5 ft 9 ⁄ in. –
8 ft 11 ⁄ in.
1/20.0
15
14 ft ⁄ in. –
16 ft ⁄ in.
13 ft 10 ⁄ in. –
16 ft 3 ⁄ in.
13 ft 6 in. –
16 ft 10 ⁄ in.
12 ft 11 ⁄ in. –
17 ft 10 ⁄ in.
12 ft 3 ⁄ in. –
19 ft 4 ⁄ in.
11 ft 5 ⁄ in. –
22 ft 1 ⁄ in.
10 ft 5 ⁄ in. –
27 ft 7 ⁄ in.
1/43.2
25
22 ft 6 ⁄ in. –
28 ft 1 ⁄ in.
22 ft 1 ⁄ in. –
28 ft 9 ⁄ in.
21 ft 1 ⁄ in. –
30 ft 8 ⁄ in.
19 ft 10 ⁄ in. –
33 ft 11 ⁄ in.
18 ft 3 ⁄ in. –
39 ft 11 ⁄ in.
16 ft 5 ⁄ in. –
53 ft 5 ⁄ in.
14 ft 5 ⁄ in. –
103 ft 5 ⁄ in.
1/72.3
70
53 ft 6 ⁄ in. –
101 ft 3 ⁄ in.
51 ft 3 ⁄ in. –
110 ft 6 ⁄ in.
46 ft 2 ⁄ in. –
145 ft 9 ⁄ in.
40 ft 6 ⁄ in. –
266 ft 2 ⁄ in.
34 ft 7 ⁄ in. –
∞
28 ft 8 ⁄ in. –
∞
23 ft 1 ⁄ in. –
∞
1/202.9
∞
228 ft 4 ⁄ in. –
∞
192 ft 7 ⁄ in. –
∞
136 ft 4 ⁄ in. –
∞
96 ft 8 ⁄ in. –
∞
68 ft 6 ⁄ in. –
∞
48 ft 8 ⁄ in. –
∞
34 ft 7 ⁄ in. –
∞
1/∞
[f=135 mm]
f/5 f/5.6 f/8 f/11 f/16 f/22 f/32 f/36
7
6 ft 10 ⁄ in. –
7 ft 1 ⁄ in.
6 ft 10 ⁄ in. –
7 ft 2 ⁄ in.
6 ft 9 ⁄ in. –
7 ft 3 in.
6 ft 8 ⁄ in. –
7 ft 4 ⁄ in.
6 ft 6 ⁄ in. –
7 ft 6 ⁄ in.
6 ft 4 ⁄ in. –
7 ft 9 in.
6 ft 2 ⁄ in. –
8 ft 1 ⁄ in.
6 ft 1 ⁄ in. –
8 ft 3 ⁄ in.
1/16.0
15
14 ft 4 ⁄ in. –
15 ft 8 ⁄ in.
14 ft 3 ⁄ in. –
15 ft 9 ⁄ in.
14 ft ⁄ in. –
16 ft 1 ⁄ in.
13 ft 7 ⁄ in. –
16 ft 7 ⁄ in.
13 ft 2 ⁄ in. –
17 ft 5 ⁄ in.
12 ft 6 ⁄ in. –
18 ft 8 ⁄ in.
11 ft 9 ⁄ in. –
20 ft 10 ⁄ in.
11 ft 5 ⁄ in. –
21 ft 11 ⁄ in.
1/34.0
25
23 ft 4 ⁄ in. –
26 ft 11 ⁄ in.
23 ft 1 ⁄ in. –
27 ft 2 ⁄ in.
22 ft 5 ⁄ in. –
28 ft 2 ⁄ in.
21 ft 6 ⁄ in. –
29 ft 10 ⁄ in.
20 ft 4 ⁄ in. –
32 ft 5 ⁄ in.
18 ft 11 ⁄ in. –
37 ft 1 ⁄ in.
17 ft 3 in. –
46 ft 7 ⁄ in.
16 ft 7 ⁄ in. –
52 ft 3 ⁄ in.
1/56.6
70
58 ft 6 ⁄ in. –
87 ft 2 ⁄ in.
57 ft 3 ⁄ in. –
90 ft 1 ⁄ in.
53 ft 3 ⁄ in. –
102 ft 4 ⁄ in.
48 ft 6 ⁄ in. –
126 ft 8 ⁄ in.
43 ft 1 ⁄ in. –
∞
37 ft 2 ⁄ in. –
∞
31 ft 3 ⁄ in. –
∞
29 ft 3 ⁄ in. –
∞
1/158.2
∞
359 ft 6 in. –
∞
318 ft ⁄ in. –
∞
225 ft 1 ⁄ in. –
∞
159 ft 5 ⁄ in. –
∞
112 ft 11 ⁄ in. –
∞
80 ft 1 ⁄ in. –
∞
56 ft 11 ⁄ in. –
∞
50 ft 9 ⁄ in. –
∞
1/∞
[f=200 mm]
f/5.3 f/5.6 f/8 f/11 f/16 f/22 f/32 f/38
7
6 ft 11 ⁄ in. –
7 ft ⁄ in.
6 ft 10 ⁄ in. –
7 ft 1 ⁄ in.
6 ft 10 ⁄ in. –
7 ft 1 ⁄ in.
6 ft 9 ⁄ in. –
7 ft 2 ⁄ in.
6 ft 9 ⁄ in. –
7 ft 3 ⁄ in.
6 ft 8 ⁄ in. –
7 ft 4 ⁄ in.
6 ft 6 ⁄ in. –
7 ft 6 ⁄ in.
6 ft 5 ⁄ in. –
7 ft 7 ⁄ in.
1/11.4
15
14 ft 8 ⁄ in. –
15 ft 4 ⁄ in.
14 ft 7 ⁄ in. –
15 ft 4 ⁄ in.
14 ft 6 ⁄ in. –
15 ft 6 ⁄ in.
14 ft 3 ⁄ in. –
15 ft 9 in.
14 ft ⁄ in. –
16 ft 1 ⁄ in.
13 ft 8 ⁄ in. –
16 ft 7 ⁄ in.
13 ft 2 ⁄ in. –
17 ft 4 ⁄ in.
12 ft 11 ⁄ in. –
17 ft 10 ⁄ in.
1/23.5
25
24 ft 1 ⁄ in. –
25 ft 11 ⁄ in.
24 ft ⁄ in. –
25 ft 11 ⁄ in.
23 ft 8 ⁄ in. –
26 ft 5 ⁄ in.
23 ft 2 ⁄ in. –
27 ft ⁄ in.
22 ft 6 ⁄ in. –
28 ft ⁄ in.
21 ft 8 ⁄ in. –
29 ft 6 ⁄ in.
20 ft 7 ⁄ in. –
31 ft 11 ⁄ in.
19 ft 11 ⁄ in. –
33 ft 9 ⁄ in.
1/38.8
70
63 ft 9 ⁄ in. –
77 ft 7 ⁄ in.
63 ft 5 ⁄ in. –
78 ft ⁄ in.
61 ft 1 ⁄ in. –
81 ft 11 ⁄ in.
58 ft 1 ⁄ in. –
88 ft 2 ⁄ in.
54 ft 3 ⁄ in. –
98 ft 10 ⁄ in.
49 ft 8 ⁄ in. –
119 ft 6 ⁄ in.
44 ft 5 ⁄ in. –
169 ft 9 ⁄ in.
41 ft 7 ⁄ in. –
233 ft 8 ⁄ in.
1/107.4
∞
733 ft 2 ⁄ in. –
∞
697 ft 4 ⁄ in. –
∞
493 ft 5 ⁄ in. –
∞
349 ft 3 ⁄ in. –
∞
247 ft 4 ⁄ in. –
∞
175 ft 3 ⁄ in. –
∞
124 ft 4 ⁄ in. –
∞
104 ft 9 ⁄ in. –
∞
1/∞
[f=300 mm]
f/5.6 f/8 f/11 f/16 f/22 f/32 f/40
7
6 ft 11 ⁄ in. –
7 ft ⁄ in.
6 ft 11 ⁄ in. –
7 ft ⁄ in.
6 ft 10 ⁄ in. –
7 ft 1 ⁄ in.
6 ft 10 ⁄ in. –
7 ft 1 ⁄ in.
6 ft 9 ⁄ in. –
7 ft 2 ⁄ in.
6 ft 9 in. –
7 ft 3 ⁄ in.
6 ft 8 ⁄ in. –
7 ft 4 ⁄ in.
1/8.2
15
14 ft 9 ⁄ in. –
15 ft 2 ⁄ in.
14 ft 9 ⁄ in. –
15 ft 3 in.
14 ft 7 ⁄ in. –
15 ft 4 ⁄ in.
14 ft 6 ⁄ in. –
15 ft 6 ⁄ in.
14 ft 4 ⁄ in. –
15 ft 8 ⁄ in.
14 ft ⁄ in. –
16 ft ⁄ in.
13 ft 10 ⁄ in. –
16 ft 4 ⁄ in.
1/16.3
25
24 ft 6 ⁄ in. –
25 ft 5 ⁄ in.
24 ft 4 ⁄ in. –
25 ft 7 ⁄ in.
24 ft 1 ⁄ in. –
25 ft 11 ⁄ in.
23 ft 9 ⁄ in. –
26 ft 4 ⁄ in.
23 ft 3 ⁄ in. –
26 ft 11 ⁄ in.
22 ft 8 ⁄ in. –
27 ft 10 ⁄ in.
22 ft 2 ⁄ in. –
28 ft 8 ⁄ in.
1/26.5
70
66 ft 10 ⁄ in. –
73 ft 5 ⁄ in.
65 ft 8 ⁄ in. –
74 ft 11 ⁄ in.
64 ft ⁄ in. –
77 ft 2 ⁄ in.
61 ft 10 ⁄ in. –
80 ft 8 ⁄ in.
59 ft ⁄ in. –
86 ft 2 ⁄ in.
55 ft 5 ⁄ in. –
95 ft 4 ⁄ in.
52 ft 8 ⁄ in. –
105 ft 5 ⁄ in.
1/72.2
∞
1560 ft ⁄ in. –
∞
1109 ft 8 ⁄ in. –
∞
785 ft 4 ⁄ in. –
∞
556 ft ⁄ in. –
∞
393 ft 10 ⁄ in. –
∞
279 ft 2 ⁄ in. –
∞
222 ft 1 ⁄ in. –
∞
1/∞
[f=400 mm]
f/5.6 f/8 f/11 f/16 f/22 f/32 f/40
7
6 ft 11 ⁄ in. –
7 ft ⁄ in.
6 ft 11 ⁄ in. –
7 ft ⁄ in.
6 ft 11 ⁄ in. –
7 ft ⁄ in.
6 ft 10 ⁄ in. –
7 ft 1 ⁄ in.
6 ft 10 ⁄ in. –
7 ft 1 ⁄ in.
6 ft 9 ⁄ in. –
7 ft 2 ⁄ in.
6 ft 9 ⁄ in. –
7 ft 2 ⁄ in.
1/6.7
15
14 ft 10 ⁄ in. –
15 ft 1 ⁄ in.
14 ft 10 ⁄ in. –
15 ft 1 ⁄ in.
14 ft 9 ⁄ in. –
15 ft 2 ⁄ in.
14 ft 8 ⁄ in. –
15 ft 3 ⁄ in.
14 ft 6 ⁄ in. –
15 ft 5 ⁄ in.
14 ft 4 ⁄ in. –
15 ft 7 ⁄ in.
14 ft 3 ⁄ in. –
15 ft 10 ⁄ in.
1/12.9
25
24 ft 8 ⁄ in. –
25 ft 3 ⁄ in.
24 ft 7 ⁄ in. –
25 ft 4 ⁄ in.
24 ft 5 ⁄ in. –
25 ft 6 ⁄ in.
24 ft 2 ⁄ in. –
25 ft 9 ⁄ in.
23 ft 11 ⁄ in. –
26 ft 2 ⁄ in.
23 ft 6 ⁄ in. –
26 ft 8 ⁄ in.
23 ft 2 ⁄ in. –
27 ft 2 ⁄ in.
1/20.7
70
68 ft ⁄ in. –
72 ft ⁄ in.
67 ft 4 ⁄ in. –
72 ft 10 ⁄ in.
66 ft 3 ⁄ in. –
74 ft 1 ⁄ in.
64 ft 10 ⁄ in. –
76 ft ⁄ in.
63 ft ⁄ in. –
78 ft 10 ⁄ in.
60 ft 6 ⁄ in. –
83 ft 2 ⁄ in.
58 ft 6 in. –
87 ft 6 ⁄ in.
1/55.7
∞
2589 ft 8 ⁄ in. –
∞
1894 ft 5 ⁄ in. –
∞
1340 ft 8 ⁄ in. –
∞
949 ft 2 ⁄ in. –
∞
672 ft 3 ⁄ in. –
∞
476 ft 6 ⁄ in. –
∞
379 ft ⁄ in. –
∞
1/∞
• Unlike other lenses, the focal length of internal focus (IF) lenses decreases with focus
distance.
Figure 1/Abbildung 1/Figure 1/afbeelding 1
Figure 2/Abbildung 2/Figure 2/afbeelding 2
En
User’s Manual
De
Benutzerhandbuch
Fr
Manuel d’utilisation
Nl
Gebruikshandleiding
It
Manuale d’uso
Es
Manual del usuario
Pt
Manual do utilizador
Printed in Japan
SB0K03(7E)
7MAA907E-03
Thank you for your purchase of a NIKKOR lens. Before using this product, please carefully
read both these instructions and the camera manual.
Note: When mounted on a DX-format digital single-lens re ex camera such as the D7000
or cameras in the D300 series, this lens has an angle of view of 20° – 4° and a focal length
equivalent to 120 – 600 mm (35 mm format).
For Your Safety
For Your Safety
A
A
CAUTIONS
CAUTIONS
• Do not disassemble. Touching the internal parts of the camera or lens could result in injury. In the
event of malfunction, the product should be repaired only by a qualifi ed technician. Should
the product break open as the result of a fall or other accident, remove the camera battery and/
or disconnect the AC adapter and then take the product to a Nikon-authorized service center
for inspection.
• Turn the camera o immediately in the event of malfunction. Should you notice smoke or an unusual
smell coming from the equipment, immediately unplug the AC adapter and remove the cam-
era battery, taking care to avoid burns. Continued operation could result in fi re or injury. After
removing the battery, take the equipment to a Nikon-authorized service center for inspection.
• Do not use in the presence of ammable gas. Operating electronic equipment in the presence of
fl ammable gas could result in explosion or fi re.
• Do not look at the sun through the lens or the camera view nder. Viewing the sun or other bright light
source through the lens or viewfi nder could cause permanent visual impairment.
• Keep out of reach of children. Failure to observe this precaution could result in injury.
• Observe the following precautions when handling the lens and camera:
- Keep the lens and camera dry. Failure to observe this precaution could result in fi re or electric shock.
- Do not handle the lens or camera with wet hands. Failure to observe this precaution could
result in electric shock.
- Keep the sun well out of the frame when shooting backlit subjects. Sunlight focused into the
camera when the sun is in or close to the frame could cause a fi re.
- If the lens will not be used for an extended period, attach the front and rear lens caps and
store the lens out of direct sunlight. If left in direct sunlight, the lens could focus the sun’s rays
onto fl ammable objects, causing fi re.
• Do not carry tripods with a lens or camera attached. You could trip or accidentally strike others, result-
ing in injury.
• Do not leave the lens where it will be exposed to extremely high temperatures, such as in an enclosed au-
tomobile or in direct sunlight. Failure to observe this precaution could adversely aff ect the lens’
internal parts, causing fi re.
Notice for Customers in Europe
Notice for Customers in Europe
This symbol indicates that electrical and electronic equipment is to be col-
lected separately.
The following apply only to users in European countries:
• This product is designated for separate collection at an appropriate col-
lection point. Do not dispose of as household waste.
• Separate collection and recycling helps conserve natural resources and
prevent negative consequences for human health and the environment that might
result from incorrect disposal.
• For more information, contact the retailer or the local authorities in charge of waste
management.
English
■
■
Parts of the Lens (Figure 1)
Parts of the Lens (Figure 1)
q
Lens hood mounting mark
w
Zoom ring
e
Focal length scale
r
Focal length mark
t
Focus distance indicator
y
Focus distance mark
u
Focus ring
i
Lens rotation index
o
Lens mounting mark
!0
Rubber lens-mount gasket
!1
CPU contacts
!2
Focus-mode switch
!3
Focus limit switch
!4
Vibration reduction ON/OFF switch
!5
Vibration reduction mode switch
!6
Zoom lock switch
!7
Lens hood
!8
Lens hood alignment mark
!9
Lens hood lock mark
@0
Lens hood lock release button
@1
Tripod collar lock screw
@2
Position indices (90°)
@3
Tripod collar
■
■
Compatibility
Compatibility
Check marks (“✔“) indicate supported features, dashes (“—”) features that are not sup-
ported. Some limitations may apply; see the camera manual for details.
Camera
Camera
Exposure (shooting) mode
Exposure (shooting) mode
Function
Function
P
P
4
4
S
S
A
A
M
M
AF
AF
5
5
VR
VR
6
6
Nikon digital single-lens refl ex cameras, F6, F5, F100,
F/N80-series
1
, F/N75-series
1
, F/N65-series
1
✔✔✔✔✔✔
Pronea 600i/6i
1
, Pronea S
2
✔✔✔✔✔
—
F4-series, F90X/N90s
1
, F90-series/N90
1
, F70-series/N70
1
✔✔
——
✔
—
F60-series/N60
1
, F/N55-series
1
, F50-series/N50
1
,
F-401x/N5005
1
, F-401s/N4004s
1
, F-401/N4004
1
✔✔✔✔
——
F-801s/N8008s
1
, F-801/N8008
1
, F-601M/N6000
1
✔✔
————
F3AF, F-601/N6006
1
, F-501/N2020
3
, Nikon manual focus
cameras (excluding F-601
M/N6000
1
)
—
1. N-series cameras and Pronea 6i sold in U. S. A. only.
2. Exposure mode M (manual) not available.
3. N2020 sold in U. S. A. and Canada only.
4. Includes AUTO and scene (Digital Vari-Program) modes.
5. Autofocus.
6. Vibration reduction.
■
■
Focus
Focus
Supported focus modes are shown in the following table (for information on camera
focus modes, see the camera manual).
Camera
Camera
Camera
Camera
focus mode
focus mode
Lens focus mode
Lens focus mode
A/M
A/M
M/A
M/A
M
M
Nikon digital single-lens refl ex cam-
eras, F6, F5, F4-series, F100, F90X/N90s
*
,
F90-series/N90
*
, F/N80-series
*
, F/N75-series
*
,
F70-series/N70
*
, F/N65-series
*
,
Pronea 600i/6i
*
, Pronea S
AF
Autofocus
with manual
override
(AF priority)
Autofocus
with manual
override (manual
priority)
Manual
focus with
electronic
range nder
MF
Manual focus
(electronic range nder available with all
cameras except F-601
M/N6000
*
)
F60-series/N60
*
, F/N55-series
*
, F50-series/N50
*
,
F-801s/N8008s
*
, F-801/N8008
*
, F-601M/N6000
*
,
F-401x/N5005
*
, F-401s/N4004s
*
, F-401/N4004
*
AF, MF
* N-series cameras and Pronea 6i sold in U. S. A. only.
A/M and M/A Modes
A/M and M/A Modes
• M/A: Autofocus can be over-ridden by rotating the lens focus ring.
• A/M: As above, except that the focus ring must be rotated farther before the
autofocus is over-ridden, preventing accidental changes to focus caused by
unintended operation of the focus ring.
z
Slide the lens focus-mode switch to A/M or M/A.
x
Focus.
If desired, autofocus can be over-ridden by rotating the lens focus ring while the
shutter-release button is pressed halfway (or, if the camera is equipped with an
AF-ON button, while the AF-ON button is pressed). To refocus using autofocus, press
the shutterrelease button halfway or press the AF-ON button again.
The Focus Limit Switch
The Focus Limit Switch
This switch determines the focus distance limits for autofocus.
• FULL: Select this option for subjects that may be closer than 6 m
(19.69 ft).
• ∞–6 m: If your subject will always be at distance of at least 6 m (19.69 ft),
select this option for faster focusing.
■
■
Zoom and Depth of Field
Zoom and Depth of Field
Before focusing, rotate the zoom ring to adjust the focal length and frame the photo-
graph. If the camera o ers depth-of- eld preview (stop down), depth of eld can be
previewed in the view nder.
Note: Focal length decreases as the focus distance shortens. Note that the focus distance
indicator is intended only as a guide and may not accurately show the distance to the
subject and may, due to depth of eld or other factors, not show ∞ when the camera is
focused on a distant object.
To lock the zoom ring, rotate it to the 80mm position and slide the zoom lock switch to
LOCK. This prevents the lens extending under its own weight while the camera is being
carried from place to place.
■
■
Aperture
Aperture
Aperture is adjusted using camera controls.
Zoom and Maximum Aperture
Zoom and Maximum Aperture
Changes to zoom can alter the maximum aperture by up to ⁄EV. The camera however
automatically takes this into account when setting exposure, and no modi cations to
camera settings are required following adjustments to zoom.
■
■
Built-in Flash Units
Built-in Flash Units
When using the built-in ash on cameras equipped with a built-in ash unit, remove the
lens hood to prevent vignetting (shadows created where the end of the lens obscures
the built-in ash).
■
■
Vibration Reduction (VR)
Vibration Reduction (VR)
Vibration reduction (VR) reduces blur caused by camera shake, allowing shutter speeds up
to 4.0 stops slower than would otherwise be the case (measured at 400mm with a D4
camera according to Camera and Imaging Products Association [CIPA] standards; e ects vary
with the photographer and shooting conditions). This increases the range of shutter speeds
available and permits hand-held, tripod-free photography in a wide range of situations.
Using the Vibration Reduction ON/OFF Switch
Using the Vibration Reduction ON/OFF Switch
• Select ON to enable vibration reduction
. Vibration reduction is activated when
the shutter-release button is pressed halfway, reducing the e ects of cam-
era shake for improved framing and focus.
• Select OFF to turn vibration reduction o .
Using the Vibration Reduction Mode Switch
Using the Vibration Reduction Mode Switch
The vibration reduction mode switch is used to select the vibration reduction mode
when vibration reduction is on.
• Select NORMAL to reduce the e ects of vibration when photographing
from a xed position and in other situations with comparatively little
camera motion.
• Select ACTIVE to reduce the e ects of vibration when shooting from a moving vehicle, while
walking, and in other situations with active camera motion.
Using Vibration Reduction: Notes
Using Vibration Reduction: Notes
• Slide the vibration reduction switch to OFF if the camera does not support vibration reduction.
Leaving vibration reduction on may greatly increase the drain on the battery, particularly in the
case of Pronea 600i/6i cameras.
• When using vibration reduction, press the shutter-release button halfway and wait for the image
in the viewfi nder to stabilize before pressing the shutter-release button the rest of the way down.
• When vibration reduction is active, the image in the viewfi nder may be blurred after the shutter
is released. This does not indicate a malfunction.
• Slide the vibration reduction mode switch to NORMAL for panning shots. When the camera is panned,
vibration reduction applies only to motion that is not part of the pan (if the camera is panned hori-
zontally, for example, vibration reduction will be applied only to vertical shake), making it much
easier to pan the camera smoothly in a wide arc.
• Do not turn the camera off or remove the lens while vibration reduction is in eff ect. If power to the lens
is cut while vibration reduction is on, the lens may rattle when shaken. This is not a malfunction, and can
be corrected by reattaching the lens and turning the camera on.
• If the camera is equipped with a built-in fl ash, vibration reduction will be disabled while the
fl ash charges.
• ON is generally recommended when the camera is mounted on a monopod or a tripod with an un-
secured head, although OFF may be preferred depending shooting conditions and the type of tripod.
■
■
The Lens Hood
The Lens Hood
The lens hoods protect the lens and block stray light that would otherwise cause are
or ghosting.
Attaching the Hood
Attaching the Hood
Align the lens hood mounting mark (●) with the
lens hood alignment mark (
) and then rotate
the hood (
w
) until the ● mark is aligned with the
lens hood lock mark (—
{).
When attaching or removing the hood, hold it near the symbol on its base and avoid
gripping it too tightly. Vignetting may occur if the hood is not correctly attached.
The hood can be reversed and mounted on the lens when not in use.
Detaching the Hood
Detaching the Hood
Press the lens hood lock release button (
q
), rotate
the hood in the direction shown by the arrow (
w
),
and remove it as shown (
e
).
■
■
Focusing Screens
Focusing Screens
The following cameras support a variety of focusing screens for use in di erent situations.
Screen
Screen
Camera
Camera
A
A
B
B
C
C
E
E
EC-B
EC-B
EC-E
EC-E
G1
G1
G2
G2
G3
G3
G4
G4
J
J
L
L
M
M
U
U
F6
—
— ——— —
F5+ DP-30
{
{
(–0.5)
F5+ DA-30
(+1.0)
{
(–0.5)
(+0.5)
: Recommended.
{: Vignetting visible in viewfi nder (photographs are not aff ected).
—: Not compatible with camera.
( ):
Figures in parentheses give the exposure compensation for center-weighted metering.
Select “Other screen” for Custom Setting b6 (“Screen comp.”) when adjusting exposure
compensation for the F6; note that with screens other than B or E, “Other screen” must be
selected even when the value for exposure compensation is 0. Exposure compensation
for the F5 can be adjusted using Custom Setting 18; see the camera manual for details
.
Empty cell: Not suited to use with this lens. Note that type M screens can however be used for
photomicrography and macro photography at magnifi cations of 1 : 1 or higher.
Note: The F5 supports matrix metering with A, B, E, EC-B/EC-E, J, and L focusing screens only.
■
■
Using a Tripod (Figure 2)
Using a Tripod (Figure 2)
The lens is equipped with a detachable rotating tripod collar; when using a tripod, attach
it to the collar, not to the camera. To attach the collar to the lens:
z
Slightly loosen the tripod collar lock screw (
q
).
x
Align the alignment mark on top of the lens with the mark on the collar (
w
)
and insert the lens into the collar.
c
Rotate the lens to the desired position (three positions are available at 90° inter-
vals), stopping when the alignment mark on top of the lens is aligned with the
desired position mark on the collar (
e
), and then tighten the tripod collar lock
screw (
r
). Be sure the screw is fully tightened; if the screw is not tight, the lens
may fall from of the tripod collar.
Removing the Tripod Collar
Removing the Tripod Collar
z
Being careful not to remove the screw from its socket, loosen the tripod collar
lock screw until the collar rotates freely (
t
).
x
Align the alignment mark on top of the lens with the mark on the collar (
y
)
and remove the lens from the collar (
u
).
■
■
Lens Care
Lens Care
• Do not pick up or hold the lens or camera using only the lens hood.
• Keep the CPU contacts clean.
• Should the rubber lens-mount gasket be damaged, cease use immediately and take the lens to
a Nikon-authorized service center for repair.
• Use a blower to remove dust and lint from the lens surfaces. To remove smudges and fi nger-
prints, apply a small amount of ethanol or lens cleaner to a soft, clean cotton cloth or lens-
cleaning tissue and clean from the center outwards using a circular motion, taking care not to
leave smears or touch the glass with your fi ngers.
• Never use organic solvents such as paint thinner or benzene to clean the lens.
• The lens hood or NC fi lters can be used to protect the front lens element.
• Attach the front and rear caps before placing the lens in its fl exible pouch.
• If the lens will not be used for an extended period, store it in a cool, dry location to prevent mold and
rust. Do not store in direct sunlight or with naphtha or camphor moth balls.
• Keep the lens dry. Rusting of the internal mechanism can cause irreparable damage.
• Leaving the lens in extremely hot locations could damage or warp parts made from reinforced plastic.
• Rapid changes in temperature may cause damaging condensation inside and outside the lens.
Before taking the lens from a warm to a cold environment or vice versa, place it in a bag or
plastic case to slow the change in temperature.
■
■
Supplied Accessories
Supplied Accessories
• 77 mm snap-on Front Lens Cap LC-77
• Rear Lens Cap LF-4
• Bayonet Hood HB-65
• Flexible Lens Pouch CL-M2
■
■
Compatible Accessories
Compatible Accessories
• 77 mm screw-on fi lters
• AF-I/AF-S Teleconverters TC-14E
1
/TC-14E II
1
/TC-17E II
2
/TC-20E
2
/TC-20E II
2
/TC-20E III
2
1 Autofocus is available only with cameras that off er f/8 support.
2 Autofocus not supported.
■
■
Specifi cations
Specifi cations
Type
Type Type G AF-S lens with built-in CPU and F mount
Focal length
Focal length 80 – 400 mm
Maximum aperture
Maximum aperture f/4.5 – 5.6
Lens construction
Lens construction 20 elements in 12 groups (including 4 ED lens elements, 1 super ED lens element, and
lens elements with a Nano-Crystal coating)
Angle of view
Angle of view
• Nikon lm SLR and FX-format D-SLR cameras: 30°10
c – 6°10c
• Nikon DX-format D-SLR cameras: 20° – 4°
Focal length scale
Focal length scale Graduated in millimeters (80, 105, 135, 200, 300, 400)
Distance information
Distance information Output to camera
Zoom
Zoom Manual zoom using independent zoom ring
Focusing
Focusing Nikon Internal Focusing (IF) System with autofocus controlled by Silent
Wave Motor and separate focus ring for manual focus
Vibration reduction
Vibration reduction Lens shift using voice coil motors (VCMs)
Focus distance indicator
Focus distance indicator 1.5 m to infi nity (∞)
Minimum focus
Minimum focus
distance
distance
• AF: 1.75 m (5.74 ft) from focal plane at all zoom positions
• MF: 1.5 m (4.92 ft) from focal plane at all zoom positions
Diaphragm blades
Diaphragm blades 9 (rounded diaphragm opening)
Diaphragm
Diaphragm Fully automatic
Aperture range
Aperture range • 80mm focal length: f/4.5 – 32 • 400mm focal length: f/5.6 – 40
The minimum aperture displayed may vary depending on the size of the
exposure increment selected with the camera.
Metering
Metering Full aperture
Focus limit switch
Focus limit switch Two positions: FULL (∞ – 1.75 m) and ∞ – 6 m
Filter-attachment size
Filter-attachment size 77 mm (P = 0.75 mm)
Dimensions
Dimensions Approx. 95.5 mm maximum diameter × 203 mm (distance from camera lens
mount ange)
Weight
Weight Approx. 1570 g (3.5 lb), including tripod collar
Approx. 1480 g (3.3 lb) without tripod collar
Nikon reserves the right to change the specifi cations of the hardware described in this manual at any
time and without prior notice.
Deutsch
Vielen Dank für den Kauf eines NIKKOR-Objektivs. Bitte lesen Sie sorgfältig diese
Anleitung und das Kamerahandbuch, bevor Sie dieses Produkt verwenden.
Hinweis: Wenn das Objektiv mit einer digitalen Spiegelre exkamera mit DX-Format wie
der D7000 oder einer Kamera der D300-Serie verwendet wird, hat es einen Blickwinkel
von 20° – 4°, der einer Brennweite von 120 – 600 mm beim Kleinbildformat entspricht.
Für Ihre Sicherheit
Für Ihre Sicherheit
A
A
SICHERHEITSHINWEISE
SICHERHEITSHINWEISE
• Nicht auseinanderbauen. Das Berühren der Innenteile von Kamera oder Objektiv könnte zu
Verletzungen führen. Im Falle einer Fehlfunktion sollte das Produkt auschließlich von einem
qualifi zierten Fachmann repariert werden. Sollte das Produkt aufgrund eines Herunterfallens oder
eines Unfalles aufbrechen, entfernen Sie den Kamera-Akku und/oder trennen Sie den Netzadapter
vom Netz und bringen Sie das Produkt zur Inspektion zum Nikon-Kundendienst.
• Schalten Sie die Kamera im Falle einer Fehlfunktion unverzüglich ab. Wenn Sie Rauch oder einen
ungewöhnlichen Geruch aus Ihrer Ausrüstung wahrnehmen, trennen Sie sofort den Netzadapter
vom Netz und entfernen Sie den Kamera-Akku. Geben Sie dabei acht, dass Sie sich nicht verbrennen.
Ein weiterer Betrieb könnte zu einem Brand oder zu Verletzungen führen. Nach Entfernen des Akkus
bringen Sie die Ausrüstung zur Inspektion zum Nikon-Kundendienst.
• Nicht in Gegenwart von ent ammbarem Gas verwenden. Der Betrieb von Elektrogeräten in Gegenwart von
entfl ammbarem Gas könnte zu einer Explosion oder zu einem Brand führen.
• Blicken Sie nicht durch das Objektiv oder den Kamerasucher in die Sonne. Das Betrachten der Sonne oder einer
anderen hellen Lichtquelle durch das Objektiv oder den Sucher kann zu permanenten Sehstörungen führen.
• Außerhalb der Reichweite von Kindern aufbewahren. Ein Nichtbeachten dieser Vorsichtsmaßnahme
kann zu Verletzungen führen.
• Beachten Sie die folgenden Vorsichtsmaßnahmen beim Umgang mit Kamera und Objektiv:
- Halten Sie Objektiv und Kamera stets trocken. Ein Nichtbeachten dieser Vorsichtsmaßnahme
kann zu Feuer oder Stromschlägen führen.
- Bedienen Sie die Kamera oder das Objektiv nicht mit nassen Händen. Ein Nichtbeachten
dieser Vorsichtsmaßnahme kann zu Stromschlägen führen.
- Halten Sie die Sonne sicher außerhalb des Bildbereiches, wenn Sie Motive im Gegenlicht
aufnehmen. Sonnenlicht, das in der Kamera fokussiert wird, wenn sich die Kamera im oder
nah beim Bildmotiv befi ndet, kann zu einem Brand führen.
- Wird das Objektiv für längere Zeit nicht verwendet, bringen Sie den vorderen und hinteren
Objektivdeckel an und lagern Sie das Objektiv an einem Ort ohne direkte Sonneneinstrahlung.
Wird es in direktem Sonnenlicht gelagert, könnte das Objektiv die Sonnenstrahlen auf
entfl ammbare Objekte fokussieren und Sie so entzünden.
• Tragen Sie Stative nicht mit aufgesetzter Kamera oder aufgesetztem Objektiv. Es besteht die Gefahr zu
stolpern oder versehentlich andere Personen zu stoßen, was zu Verletzungen führen kann.
• Lagern Sie das Objektiv nicht an Orten, an denen es extrem hohen Temperaturen ausgesetzt ist, wie beispielsweise
in einem geschlossenen Auto oder direkt in der Sonne. Andernfalls können die internen Teile des Objektivs
nachteilig beeinfl usst werden und es könnte zu einem Brand kommen.
Hinweis für Kunden in Europa
Hinweis für Kunden in Europa
Durch dieses Symbol wird angezeigt, dass elektrische und elektronische
Geräte getrennt entsorgt werden müssen.
Folgendes gilt für Verbraucher in europäischen Ländern:
• Dieses Produkt muss an einer geeigneten Sammelstelle separat entsorgt
werden. Eine Entsorgung über den Hausmüll ist unzulässig.
• Durch getrennte Entsorgung und Recycling können natürliche Rohsto e
bewahrt und durch falsche Entsorgung verursachte, schädliche Folgen für die
menschliche Gesundheit und Umwelt verhindert werden.
• Weitere Informationen erhalten Sie bei Ihrem Fachhändler oder bei den für die
Abfallentsorgung zuständigen Behörden bzw. Unternehmen.
■
■
Objektivkomponenten (
Objektivkomponenten (
Abbildung 1
Abbildung 1
)
)
q
Markierung für das Ansetzen der
Gegenlichtblende
w
Zoomring
e
Brennweitenskala
r
Markierung für Brennweitenskala
t
Entfernungsskala
y
Markierung für Entfernungseinstellung
u
Fokussierring
i
Positionsmarkierung für Objektivdrehung
o
Markierung für die Ausrichtung des Objektivs
!0
Dichtungsmanschette
!1
CPU-Kontakte
!2
Fokusmodusschalter
!3
Fokusbegrenzungsschalter
!4
Bildstabilisator-EIN/AUS-Schalter
!5
Bildstabilisatormodus-Schalter
!6
Zoom-Arretierungsschalter
!7
Gegenlichtblende
!8
Markierung für die Ausrichtung der
Gegenlichtblende
!9
Markierung für die Arretierung der
Gegenlichtblende
@0
Entriegelungstaste für Gegenlichtblende
@1
Stativschellen-Befestigungsschraube
@2
Positionsmarkierungen (90°)
@3
Stativschelle
■
■
Kompatibilität
Kompatibilität
Haken (»✔«) zeigen unterstützte Funktionen, Striche (»—«) nicht unterstützte Funktionen
an. Es können Einschränkungen gelten; beachten Sie das Handbuch der Kamera für
Einzelheiten.
Kamera
Kamera
Belichtungssteuerung
Belichtungssteuerung
Funktion
Funktion
P
P
2
2
S
S
A
A
M
M
AF
AF
3
3
VR
VR
4
4
Digitale Nikon-Spiegelrefl exkameras, F6, F5, F100,
F80-Serie, F75-Serie, F65-Serie,
✔✔✔✔✔✔
Pronea 600i, Pronea S
1
✔✔✔✔✔
—
F4-Serie, F90X, F90-Serie, F70-Serie
✔✔
——
✔
—
F60-Serie, F55-Serie, F50-Serie, F-401x, F-401s, F-401
✔✔✔✔
——
F-801s, F-801, F-601
M
✔✔
————
F3AF, F-601, F-501, Nikon-MF-Kameras (außer F-601
M
)
—
1. Manuelle Belichtungssteuerung (M) nicht verfügbar.
2. Schließt AUTO-Modus und Motivprogramme ein.
3. Autofokus.
4. Bildstabilisator.
■
■
Scharfeinstellung
Scharfeinstellung
Unterstützte Fokusmodi werden in der folgenden Tabelle aufgeführt (Beachten Sie das
Handbuch der Kamera für Informationen zu den Fokusmodi der Kamera).
Kamera
Kamera
Kamera-
Kamera-
Fokusmodus
Fokusmodus
Objektiv-Fokusmodus
Objektiv-Fokusmodus
A/M
A/M
M/A
M/A
M
M
Digitale Nikon-Spiegelrefl exkameras
,
F6, F5, F4-Serie, F100, F90X, F90-Serie,
F80-Serie, F75-Serie, F70-Serie, F65-Serie,
Pronea 600i, Pronea S
AF
Autofokus mit
AF-Priorität
Autofokus mit Priorität
der manuellen
Scharfstellung
Manueller
Fokus mit
elektronischer
Einstellhilfe
MF
Manueller Fokus
(elektronische Einstellhilfe bei allen Kameras außer
F-601M verfügbar)
F60-Serie, F55-Serie, F50-Serie, F-801s,
F-801, F-601
M
, F-401x, F-401s, F-401
AF, MF
A/M- und M/A-Modus
A/M- und M/A-Modus
• M/A: Die Scharfeinstellung des Autofokus kann durch manuelles Drehen des
Fokussierings außer Kraft gesetzt werden.
• A/M: Wie oben, nur muss der Fokussierring weiter gedreht werden, bevor die
Scharfeinstellung außer Kraft gesetzt wird. Auf diese Weise wird verhindert,
dass ein unbeabsichtigtes Verstellen des Fokussierrings zu einem Verstellen
der Scharfeinstellung führt.
z
Schieben Sie den Fokusmodus-Schalter des Objektivs in die Position A/M oder M/A.
x
Fokussieren Sie.
In den Autofokus kann bei Bedarf eingegri en werden, indem der Fokusring am
Objektiv gedreht wird, während der Auslöser bis zum ersten Druckpunkt gedrückt
wird (oder, falls die Kamera mit einem AF-ON-Taste ausgestattet wird, während die
AF-ON-Taste gedrückt ist). Um mit dem Autofokus neu zu fokussieren, drücken Sie
erneut den Auslöser bis zum ersten Druckpunkt oder die AF-ON-Taste.
Der Fokusbegrenzungsschalter
Der Fokusbegrenzungsschalter
Dieser Schalter bestimmt die Begrenzung der Entfernungseinstellung für den Autofokus.
• FULL: Wählen Sie diese Option für Motive, die näher als 6 Meter liegen.
• ∞–6 m: Wählen Sie diese Option für schnelleres Scharfstellen, wenn sich Ihr
Motiv stets in einer Entfernung von mindestens 6 Metern befi ndet.
■
■
Zoom und Tiefenschärfe
Zoom und Tiefenschärfe
Drehen Sie, bevor Sie fokussieren, den Zoomring, um die Brennweite einzustellen und
einen Bildausschnitt zu wählen. Verfügt die Kamera über eine Abblendtaste, kann die
Tiefenschärfe im Sucher im Voraus bewertet werden.
Hinweis: Die Brennweite nimmt bei der Fokussierung auf nahe Motive ab. Beachten Sie,
dass die Entfernungsskala nur als Orientierungshilfe dient und eventuell nicht die genaue
Entfernung zum Motiv anzeigt und eventuell aufgrund der Tiefenschärfe oder anderer
Faktoren ∞ nicht anzeigt, wenn die Kamera auf ein entferntes Motiv fokussiert hat.
Um den Zoomring zu arretieren, drehen Sie ihn in die 80-mm-Position und schieben Sie den
Zoom-Arretierungsschalter in die Position LOCK. Auf diese Weise wird verhindert, dass der
Objektivtubus aufgrund des eigenen Gewichts ausfährt, während die Kamera transportiert wird.
■
■
Blende
Blende
Die Blende wird mit den Bedienelementen der Kamera eingestellt.
Zoom und maximale Blende
Zoom und maximale Blende
Änderungen am Zoom können die maximale Blende um bis zu ⁄ LW verändern. Die Kamera
berücksichtigt dies allerdings automatisch beim Einstellen der Belichtung und Sie müssen
nach Anpassung des Zooms keine Veränderungen an den Kameraeinstellungen vornehmen.
■
■
Integrierte Blitzgeräte
Integrierte Blitzgeräte
Entfernen Sie die Gegenlichtblende, wenn Sie das integrierte Blitzgerät der Kamera verwenden
(sofern vorhanden), da die Gegenlichtblende sonst einen Schatten ins Motiv werfen würde.
■
■
Bildstabilisator
Bildstabilisator
(VR)
(VR)
Der Bildstabilisator (VR) reduziert das Risiko einer Verwacklungsunschärfe und ermöglicht
das Fotogra eren mit bis zu 4,0 Blendenstufen längeren Belichtungszeiten (ermittelt bei
400mm Brennweite mit einer D4-Kamera nach CIPA-Standards [Camera and Imaging
Products Association]; je nach Fotograf und Aufnahmebedingungen kann die Wirkung
unterschiedlich ausfallen). Dies ermöglicht eine größere Auswahl an Belichtungszeiten
und erlaubt in den unterschiedlichsten Aufnahmesituationen ein Fotogra eren aus
freier Hand ohne Stativ.
Verwendung des Bildstabilisator AN/AUS-Schalters
Verwendung des Bildstabilisator AN/AUS-Schalters
• Wählen Sie ON (EIN), um den Bildstabilisator zu aktivieren. Der Bildstabilisator
wird aktiviert, wenn der Auslöser bis zum ersten Druckpunkt gedrückt
wird; er verringert die E ekte einer Kamera-Verwacklung für verbesserte
Motivwahl und Scharfstellung.
• Wählen Sie OFF (AUS), um den Bildstabilisator auszuschalten.
Verwendung des Bildstabilisator-Modusschalters
Verwendung des Bildstabilisator-Modusschalters
Der Bildstabilisator-Modusschalter wird verwendet, um den Bildstabilisator-Modus
auszuwählen, wenn der Bildstabilisator aktiviert ist.
• Wählen Sie NORMAL aus, um die Vibrationse ekte beim Fotogra eren
von einer festen Position aus und in anderen Situationen, in denen
die Kamera kaum bewegt wird, zu verringern.
• Wählen Sie ACTIVE aus
,
um die Vibrationse ekte bei der Aufnahme aus einem fahrenden
Fahrzeug heraus, beim Gehen und in anderen Situationen, in denen die Kamera häu g
bewegt wird, zu verringern.
Verwendung des Bildstabilisators: Hinweise
Verwendung des Bildstabilisators: Hinweise
• Schieben Sie den Bildstabilisatorschalter auf OFF, wenn die Kamera den Bildstabilisator nicht
unterstützt. Bleibt der Bildstabilisator eingeschaltet, kann sich der Akku schneller entladen,
besonders bei Pronea 600i-Kameras.
• Drücken Sie bei Verwendung des Bildstabilitsators den Auslöser bis zum ersten Druckpunkt und
warten Sie, bis sich das Bild im Sucher stabilisiert, bevor Sie den Auslöser vollständig drücken.
• Wenn der Bildstabilisator aktiv ist, ist das Bild im Sucher möglicherweise verschwommen, wenn
der Auslöser gedrückt wurde. Dies stellt keine Fehlfunktion dar.
• Schieben Sie den Bildstabilisatormodus-Schalter in die Position NORMAL, wenn Sie die Kamera
schwenken wollen. Beim Schwenken wirkt sich der Bildstabilisator nur auf die Bewegungskomponenten
aus, die nicht der Schwenkrichtung entsprechen (wird die Kamera beispielsweise waagerecht
geschwenkt, kompensiert der Bildstabilisator nur senkrechte Bewegungskomponenten). So kann die
Kamera ruckelfrei in einem weiten Bogen geschwenkt werden.
• Schalten Sie die Kamera nicht ab und entfernen Sie nicht das Objektiv, solange der
Bildstabilisator aktiv ist. Wenn die Stromversorgung des Objektivs unterbrochen wird, solange
der Bildstabilisator aktiv ist, könnte das Objektiv klappern, wenn es geschüttelt wird. Dies stellt
keine Fehlfunktion dar und kann dadurch beseitigt werden, dass das Objektiv wieder angesetzt
und die Kamera eingeschaltet wird.
• Verfügt die Kamera über ein eingebautes Blitzgerät, wird der Bildstabilisator deaktiviert,
solange das Blitzgerät sich aufl ädt.
• ON wird in der Regel empfohlen, wenn die Kamera auf ein Einbein- oder Dreibeinstativ mit
unbefestigtem Kopf montiert wird. Jedoch kann OFF je nach Aufnahmebedingungen oder
Stativtyp geeigneter sein.
■
■
Befestigen der Gegenlichtblende
Befestigen der Gegenlichtblende
Die Gegenlichtblende schützt das Objektiv und verhindert das Eindringen von Streulicht,
das ansonsten zu Kontrastverlust oder Geisterbildern führen würde.
Befestigen der Gegenlichtblende
Befestigen der Gegenlichtblende
Richten Sie die Markierung für das Ansetzen der
Gegenlichtblende (
●
) an der Markierung für die
Ausrichtung der Gegenlichtblende ( ) aus. Drehen
Sie anschließend die Gegenlichtblende (
w
), bis die
●
-Markierung an der Markierung für die Arretierung
der Gegenlichtblende ausgerichtet ist (—
{
).
Halten Sie die Gegenlichtblende beim Anbringen oder Abnehmen in der Nähe des
-Symbols an der Basis fest und umfassen Sie sie nicht zu fest. Bei falschem Anbringen der
Gegenlichtblende kann es zu Vignettierungen kommen.
Die Gegenlichtblende kann umgekehrt auf dem Objektiv angebracht werden, wenn sie
nicht verwendet wird.
Abnehmen der Gegenlichtblende
Abnehmen der Gegenlichtblende
Drücken Sie die Taste zur Entriegelung
der Gegenlichtblende (
q
), drehen Sie die
Gegenlichtblende in Pfeilrichtung (
w
) und
nehmen Sie sie wie angezeigt ab (
e
).
■
■
Einstellscheiben
Einstellscheiben
Die folgenden Kameras unterstützen eine Anzahl Einstellscheiben für die Verwendung
in verschiedenen Situationen.
Scheibe
Scheibe
Kamera
Kamera
A
A
B
B
C
C
E
E
EC-B
EC-B
EC-E
EC-E
G1
G1
G2
G2
G3
G3
G4
G4
J
J
L
L
M
M
U
U
F6
—
— ——— —
F5+ DP-30
{
{
(–0,5)
F5+ DA-30
(+1,0)
{
(–0,5)
(+0,5)
: Empfohlen.
{: Vignettierung im Sucher sichtbar (Bilder sind nicht betroff en).
—: Nicht mit der Kamera kompatibel.
( ): Zahlen in Klammern geben die Belichtungskorrektur für mittenbetonte Messung
an. Wählen Sie bei der F6 die Option »Andere« für die Individualfunktion b6 (»Einst.
scheibe.«), um die Belichtungskorrektur für eine Einstellscheibe anzupassen.
Beachten Sie, dass bei Verwendung anderer Einstellscheiben als Typ B oder E auch
dann »Andere« ausgewählt werden muss, wenn keine Belichtungskorrektur erfolgt.
An der F5 kann die Belichtungskorrektur mit der Individualfunktion 18 eingestellt
werden. Beachten Sie das Kamerahandbuch für weitere Einzelheiten.
Leere Zelle: Nicht für die Verwendung mit diesem Objektiv geeignet. Beachten Sie jedoch,
dass Scheiben vom Typ M für Fotomikrografi e und Makrofotografi e mit
Abbildungsmaßstäben von 1 : 1 oder höher verwendet werden können.
Hinweis: Bei der F5 steht die Matrixmessung nur mit den Einstellscheiben A, B, E, EC-B, EC-E, J und L zur Verfügung.
Verwenden eines Stativs (Abbildung 2)
Verwenden eines Stativs (Abbildung 2)
Das Objektiv ist mit einer abnehmbaren und drehbaren Stativschelle ausgestattet; wenn
Sie ein Stativ verwenden, sollten Sie es an der Schelle und nicht an der Kamera befestigen.
So befestigen Sie die Schelle am Objektiv:
z
Lockern Sie die Stativschellen-Befestigungsschraube (
q
) ein wenig.
x
Richten Sie die Ausrichtungsmarkierung auf der Oberseite des Objektivs an
der
-Markierung an der Schelle (
w
) aus und setzen Sie das Objektiv in die
Schelle ein.
c
Drehen Sie das Objektiv in die gewünschte Position (drei Positionen in
Schritten von 90° stehen zur Auswahl), bis die Ausrichtungsmarkierung auf
der Objektivoberseite an der gewünschten Positionsmarkierung an der Schelle
(
e
) ausgerichtet ist. Ziehen Sie anschließend die Befestigungsschraube (
r
)
an der Stativschelle fest an. Vergewissern Sie sich, dass die Schraube wirklich
fest angezogen ist. Wenn die Schraube nicht fest ist, kann das Objektiv aus der
Stativschelle fallen.
Entfernen der Stativschelle
Entfernen der Stativschelle
z
Lockern Sie die Befestigungsschraube der Stativschelle, bis sich die Schelle frei bewegt.
Geben Sie dabei acht, dass sich die Schraube nicht aus dem Gewinde löst (
t
).
x
Richten Sie die Ausrichtungsmarkierung auf der Oberseite des Objektivs an der
-Markierung an der Schelle aus (
y
) und nehmen Sie das Objektiv aus der
Schelle (
u
).
■
■
Pfl ege des Objektivs
Pfl ege des Objektivs
• Halten oder heben Sie das Objektiv oder die Kamera nicht an der angesetzten Gegenlichblende.
• Halten Sie die CPU-Kontakte sauber.
• Sollte die Dichtungsmanschette beschädigt werden, setzen Sie den Gebrauch sofort aus und
bringen Sie das Objektiv zum Nikon-Kundendienst zur Reparatur.
• Verwenden Sie zum Entfernen von Staub und Verunreinigungen vom Objektiv einen Blasebalg.
Um Schmierfl ecke und Fingerabdrücke zu entfernen, bringen Sie eine kleine Menge Ethanol oder
Objektivreiniger auf ein weiches, sauberes Baumwolltuch oder ein Objektivreinigungstuch auf
und reinigen Sie das Objektiv mit Kreisbewegungen von der Mitte nach außen. Achten Sie dabei
darauf, dass keine Schmierfl ecke verbleiben, und dass sie das Glas nicht mit den Fingern berühren.
• Verwenden Sie niemals organische Lösungsmittel wie Verdünner oder Waschbenzin zur
Reinigung des Objektivs.
• Zum Schutz der Frontlinse kann die Gegenlichtblende oder ein Klarglasfi lter (NC) verwendet werden.
• Bringen Sie den vorderen und den hinteren Objektivdeckel auf dem Objektiv an, bevor sie es
in seiner Tasche verstauen.
• Wenn das Objektiv für längere Zeit nicht verwendet wird, lagern Sie es an einem kühlen,
trockenen Ort, um Schimmel und Korrosion zu vermeiden. Lagern sie das Objektiv nicht direkt
in der Sonne oder mit Mottenkugeln aus Naphtha oder Kampfer.
• Halten Sie das Objektiv stets trocken. Eindringendes Wasser kann zur Korrosion innenliegender
Teile und irreparablen Schäden führen.
• Das Lagern des Objektiv an sehr heißen Orten kann Teile aus verstärktem Plastik beschädigen
oder verformen.
• Plötzliche Temperaturschwankungen können eine schädliche Bildung von Kondenswasser
im und auf dem Objektiv verursachen. Bevor Sie es an einen Ort mit deutlich höherer oder
niedrigerer Temperatur bringen, sollten Sie das Objektiv in eine Tasche oder eine Plastiktüte
packen, um eine langsame Temperaturangleichung zu bewirken.
■
■
Im Lieferumfang enthaltenes Zubehör
Im Lieferumfang enthaltenes Zubehör
• Vorderer Objektivdeckel LC-77 mit Schnappverschluss (77 mm)
• Hinterer Objektivdeckel LF-4
• Bajonett-Gegenlichtblende HB-65
• Objektivbeutel CL-M2
■
■
Kompatibles Zubehör
Kompatibles Zubehör
• 77 mm-Schraubfi lter
• AF-I/AF-S-Telekonverter TC-14E
1
/TC-14E II
1
/TC-17E II
2
/TC-20E
2
/TC-20E II
2
/TC-20E III
2
1 Der Autofokus steht nur bei Kameras zur Verfügung, die eine Lichtstärke von 1:8 unterstützen.
2 Der Autofokus steht nicht zur Verfügung.
■
■
Technische Daten
Technische Daten
Typ
Typ Typ G AF-S Objektiv mit eingebauter CPU und F-Bajonettanschluss
Brennweite
Brennweite 80 – 400 mm
Lichtstärke
Lichtstärke 1 : 4,5 – 5,6
Optischer Aufbau
Optischer Aufbau 20 Linsen in 12 Gruppen (einschließlich 4 ED-Glas-Linsen, 1 Super-ED-Linse und
Linsen mit Nanokristallvergütung)
Bildwinkel
Bildwinkel
• Nikon-Spiegelre exkameras für das Kleinbild- oder FX-Format:
30°10c – 6°10c
• Nikon-Spiegelre exkameras für das DX-Format: 20°– 4°
Brennweitenskala
Brennweitenskala Unterteilt im Millimeter (80, 105, 135, 200, 300, 400)
Entfernungsinformation
Entfernungsinformation
Übermittlung an die Kamera
Zoom
Zoom Manueller Zoom mit unabhängigem Zoomring
Fokussierung
Fokussierung Nikon Innenfokussierung (IF), gesteuert durch Silent-Wave-Motor und
separatem Fokussierring für die manuelle Fokussierung
Bildstabilisator
Bildstabilisator Bewegliche Linsengruppe mit Voice-Coil-Motoren (VCMs)
Entfernungsskala
Entfernungsskala 1,5 m bis Unendlich (∞)
Naheinstellgrenze
Naheinstellgrenze • AF: 1,75 m von der Sensorebene bei allen Zoompositionen
• MF: 1,5 m von der Sensorebene bei allen Zoompositionen
Blendenlamellen
Blendenlamellen 9 (abgerundet)
Blendensteuerung
Blendensteuerung Vollautomatisch
Blendenbereich
Blendenbereich • 80 mm Brennweite: 4,5 bis 32
• 400 mm Brennweite: 5,6 bis 40
Die angezeigte kleinste Blendenöff nung kann abhängig von der Größe
der Belichtungsschrittweite, die mit der Kamera gewählt wurde, variieren.
Belichtungsmessung
Belichtungsmessung Off enblende
Fokusbegrenzungsschalter
Fokusbegrenzungsschalter
Zwei Positionen: FULL (VOLLSTÄNDIG) (∞ – 1,75 m) und ∞ – 6 m
Filtergewinde
Filtergewinde 77 mm (P = 0,75 mm)
Abmessungen
Abmessungen ca. 95,5 mm maximaler Durchmesser × 203 mm (Länge ab Bajonettau age)
Gewicht
Gewicht ca. 1570 g, einschließlich Stativschelle
ca. 1480 g, ohne Stativschelle
Änderungen und Irrtümer vorbehalten.
Français
Nous vous remercions d’avoir acheté un objectif NIKKOR. Avant de l’utiliser, veuillez lire
attentivement ces instructions et le manuel de l’appareil photo.
Remarque : Lorsqu’il est monté sur un appareil photo numérique re ex de format DX
comme le D7000 ou les appareils photo de la gamme D300, cet objectif a un angle
de champ de 20° – 4° et une focale équivalente à 120 – 600 mm (format 24 × 36 mm).
Pour votre sécurité
Pour votre sécurité
A
A
ATTENTION
ATTENTION
• Ne pas démonter. Toucher les parties internes de l’appareil photo ou de l’objectif peut provoquer
des blessures. En cas de dysfonctionnement, le produit devra être réparé par un technicien
qualifi é uniquement. Si le produit s’ouvre à cause d’une chute ou de tout autre accident, retirez
l’accumulateur de l’appareil photo et/ou débranchez l’adaptateur secteur et confi ez le produit
à un centre Nikon agréé pour le faire vérifi er.
• Mettre immédiatement l’appareil hors tension en cas de dysfonctionnement. Si vous détectez de la
fumée ou une odeur inhabituelle provenant de l’équipement, débranchez immédiatement
l’adaptateur secteur et retirez l’accumulateur de l’appareil photo, tout en prenant soin de ne
pas vous brûler. Poursuivre son utilisation peut provoquer un incendie ou des blessures. Après
avoir retiré l’accumulateur, confi ez l’équipement à un centre Nikon agréé pour le faire vérifi er.
• Ne pas utiliser en présence de gaz in ammable. L’utilisation d’équipement électronique en présence
d’un gaz infl ammable peut provoquer une explosion ou un incendie.
• Ne pas regarder le soleil avec l’objectif ou le viseur de l’appareil photo. Regarder le soleil ou toute autre source
lumineuse intense avec l’objectif ou le viseur peut provoquer des troubles de la vision irréversibles.
• Tenir éloigné des enfants. Le non-respect de cette précaution peut provoquer des blessures.
• Suivre les précautions ci-dessous lors de la manipulation de l’objectif et de l’appareil photo :
- Tenir l’objectif et l’appareil photo au sec. Le non-respect de cette précaution peut provoquer
un incendie ou un choc électrique.
- Ne pas manipuler l’objectif ou l’appareil photo avec des mains mouillées. Le non-respect de
cette précaution peut provoquer un choc électrique.
- Ne pas inclure le soleil dans le cadrage lors de la prise de vue de sujets en contre-jour. La
concentration de la lumière du soleil dans l’appareil photo lorsque le soleil est dans ou à
proximité du champ de l’image peut provoquer un incendie.
- Si vous n’avez pas l’intention d’utiliser l’objectif pendant une période prolongée, fi xez les
bouchons avant et arrière et rangez l’objectif hors de la lumière directe du soleil. Si l’objectif
est laissé en contact direct avec la lumière du soleil, les rayons peuvent toucher des objets
infl ammables, provoquant ainsi un incendie.
• Ne pas porter un trépied sur lequel un objectif ou l’appareil photo est xé. Vous risqueriez de trébucher
ou de frapper accidentellement des personnes, provoquant ainsi des blessures.
• Ne pas laisser l’objectif là où il serait exposé à des températures élevées, comme une voiture fermée ou à la
lumière directe du soleil. Le non-respect de cette précaution peut avoir des répercussions sur les
parties internes de l’objectif, pouvant provoquer un incendie.
Avis pour les clients en Europe
Avis pour les clients en Europe
Ce symbole indique que le matériel électrique et électronique doit être jeté
dans les conteneurs appropriés.
Les mentions suivantes s’appliquent uniquement aux utilisateurs situés
dans les pays européens :
• Ce produit doit être jeté dans un point de collecte approprié. Il ne doit
pas être jeté avec les déchets ménagers.
• Le tri sélectif et le recyclage permettent de préserver les ressources naturelles et d’éviter
les conséquences négatives pour la santé humaine et l’environnement, qui peuvent être
provoquées par une élimination incorrecte.
• Pour plus d’informations, contactez votre revendeur ou les autorités locales chargées
de la gestion des déchets.
Avis pour les clients en France
Avis pour les clients en France
LE PRODUIT ET SON EMBALLAGE RELÈVENT D’UNE CONSIGNE DE TRI
■
■
Parties de l’objectif (Figure 1)
Parties de l’objectif (Figure 1)
q
Repère de montage du parasoleil
w
Bague de zoom
e
Échelle des focales
r
Repère de l’échelle des focales
t
Indicateur de distance de mise au point
y
Repère de distance de mise au point
u
Bague de mise au point
i
Repère de rotation de l’objectif
o
Repère de montage de l’objectif
!0
Joint en caoutchouc de la monture
d’objectif
!1
Contacts du microprocesseur
!2
Commutateur du mode de mise au point
!3
Commutateur de la limite de mise au point
!4
Commutateur ON/OFF de réduction de
vibration
!5
Commutateur du mode de réduction de
vibration
!6
Commutateur de verrouillage du zoom
!7
Parasoleil
!8
Repère d’alignement du parasoleil
!9
Repère de verrouillage du parasoleil
@0
Commande de déverrouillage du parasoleil
@1
Vis de fi xation du collier pour trépied
@2
Repères de position (90°)
@3
Collier pour trépied
■
■
Compatibilité
Compatibilité
Les marques (« ✔ ») indiquent les fonctions prises en charge, les traits (« — ») les
fonctions non prises en charge. Certaines restrictions peuvent s’appliquer ; consultez le
manuel de l’appareil photo pour plus de détails.
Appareil photo
Appareil photo
Mode d’exposition
Mode d’exposition
(prise de vue)
(prise de vue)
Fonction
Fonction
P
P
2
2
S
S
A
A
M
M
AF
AF
3
3
VR
VR
4
4
Refl ex numériques Nikon, F6, F5, F100, gamme F80,
gamme F75, gamme F65
✔✔✔✔✔✔
Pronea 600i, Pronea S
1
✔✔✔✔✔
—
Gamme F4, F90X, gamme F90, gamme F70
✔✔
——
✔
—
Gamme F60, gamme F55, gamme F50, F-401x, F-401s, F-401
✔✔✔✔
——
F-801s, F-801, F-601
M
✔✔
————
F3AF, F-601, F-501, appareils MF Nikon (sauf F-601
M) —
1. Mode d’exposition M (manuel) non disponible.
2. Inclut les modes AUTO et scène (Vari-programme).
3. Autofocus.
4. Réduction de vibration.
■
■
Mise au point
Mise au point
Les modes de mise au point pris en charge sont indiqués dans le tableau suivant (pour en savoir
plus sur les modes de mise au point de l’appareil photo, consultez le manuel de ce dernier).
Appareil photo
Appareil photo
Mode de mise
Mode de mise
au point de
au point de
l’appareil photo
l’appareil photo
Mode de mise au point de l’objectif
Mode de mise au point de l’objectif
A/M
A/M
M/A
M/A
M
M
Refl ex numériques Nikon,
F6, F5, gamme F4, F100, F90X,
gamme F90, gamme F80,
gamme F75, gamme F70,
gamme F65, Pronea 600i,
Pronea S
AF
Autofocus à
priorité manuelle
(priorité AF)
Autofocus à priorité
manuelle (priorité
manuelle)
Mise au point
manuelle avec
télémètre
électronique
MF
Mise au point manuelle
(télémètre électronique disponible sur tous les appareils
photo excepté F-601M)
Gamme F60, gamme F55,
gamme F50, F-801s, F-801,
F-601
M, F-401x, F-401s, F-401
AF, MF
Modes A/M et M/A
Modes A/M et M/A
• M/A : l’autofocus peut être désactivé à l’aide de la bague de mise au point
de l’objectif.
• A/M : comme ci-dessus, sauf que la bague de mise au point doit être
tournée davantage pour désactiver l’autofocus, ce qui permet d’éviter des
modifi cations accidentelles de la mise au point dues à une manipulation
involontaire de la bague.
z
Positionnez le commutateur du mode de mise au point de l’objectif sur A/M ou M/A.
x
E ectuez la mise au point.
Si vous le souhaitez, vous pouvez désactiver l’autofocus en pivotant la bague
de mise au point de l’objectif avec le déclencheur appuyé à mi-course (ou avec
la commande AF-ON appuyée, si l’appareil photo est pourvu d’une commande
AF-ON). Pour refaire la mise au point avec l’autofocus, appuyez à mi-course sur le
déclencheur ou appuyez de nouveau sur la commande AF-ON.
Commutateur de la limite de mise au point
Commutateur de la limite de mise au point
Ce commutateur permet de dé nir les limites de la distance de mise au point en mode autofocus.
• FULL : Sélectionnez cette option lorsque vous photographiez des sujets
probablement situés à des distances inférieures à 6 m.
• ∞–6 m :
Si votre sujet se situe toujours à une distance égale ou supérieure à
6 m, sélectionnez cette option pour eff ectuer la mise au point plus rapidement.
■
■
Zoom et profondeur de champ
Zoom et profondeur de champ
Avant de faire la mise au point, tournez la bague de zoom pour régler la focale et cadrer la
photographie. Si l’appareil photo o re un aperçu de la profondeur de champ (fermeture
du diaphragme), il est possible d’avoir un aperçu de la profondeur de champ dans le viseur.
Remarque: la focale diminue au fur et à mesure que la distance de mise au point se
raccourcit. Notez que l’indicateur de la distance de mise au point doit seulement être
considéré comme un guide. En e et, il peut ne pas a cher avec précision la distance au
sujet. En outre, en raison de la profondeur de champ ou d’autres facteurs, il peut ne pas
indiquer ∞ lorsque l’appareil photo fait le point sur un objet éloigné.
Pour verrouiller la bague de zoom, placez-la sur 80 mm et positionnez le commutateur
de verrouillage du zoom sur LOCK. Cela permet d’éviter que l’objectif ne sorte, entraîné
par son propre poids, lors du transport de l’appareil photo.
■
■
Ouverture
Ouverture
Pour régler l’ouverture, utilisez les commandes de l’appareil photo.
Zoom et ouverture maximale
Zoom et ouverture maximale
Modi er le zoom peut altérer l’ouverture maximale jusqu’à ⁄L. L’appareil photo prend
cela automatiquement en compte lors du réglage de l’exposition et aucune modi cation
des réglages de l’appareil photo n’est nécessaire après les ajustements du zoom.
■
■
Flash intégré
Flash intégré
Lors de l’utilisation d’un ash intégré sur les appareils photo qui en sont équipés, enlevez le
parasoleil pour éviter l’e et de vignettage (ombres créées lorsque l’extrémité de l’objectif
occulte le ash intégré).
■
■
Réduction de vibration (VR)
Réduction de vibration (VR)
La fonction de réduction de vibration (VR) atténue les phénomènes de ou provoqués par le bougé
de l’appareil photo, ce qui permet de recourir à des vitesses d’obturation jusqu’à 4,0 fois plus lentes
que celles normalement utilisées (mesures e ectuées à 400mm avec un appareil photo D4, selon les
normes de la CIPA [Camera and Imaging Products Association] ; les e ets varient selon le photographe
et les conditions de prise de vue). Cela augmente la plage des vitesses d’obturation disponibles et
permet de prendre des photos à main levée, sans trépied, dans de nombreuses situations.
Utilisation du commutateur ON/OFF pour la réduction de vibration
Utilisation du commutateur ON/OFF pour la réduction de vibration
• Sélectionnez ON (ACTIVÉ) pour activer la réduction de vibration. La réduction
de vibration est activée lorsque vous appuyez à mi-course sur le
déclencheur, réduisant ainsi les e ets du bougé d’appareil pour vous
permettre d’améliorer le cadrage et la mise au point.
• Sélectionnez OFF (DÉSACTIVÉ) pour désactiver la réduction de vibration.
Utilisation du commutateur du mode de réduction de vibration
Utilisation du commutateur du mode de réduction de vibration
Le commutateur du mode de réduction de vibration permet de sélectionner le mode de
réduction de vibration lorsque la réduction de vibration est activée.
• Sélectionnez NORMAL pour réduire les e ets des vibrations lorsque vous
photographiez depuis une position xe et de manière générale, dans
les situations où le mouvement de l’appareil photo est relativement
peu important.
• Sélectionnez ACTIVE pour réduire les e ets des vibrations lorsque vous photographiez
depuis un véhicule en mouvement, lorsque vous marchez et de manière générale, dans
les situations où le mouvement de l’appareil photo est important.
Utiliser la réduction de vibration : Remarques
Utiliser la réduction de vibration : Remarques
• Positionnez le commutateur de réduction de vibration sur OFF si l’appareil photo ne prend pas
en charge la fonction de réduction de vibration. Si la réduction de vibration est constamment
activée, cela risque d’augmenter considérablement la consommation de l’accumulateur, en
particulier pour les appareils photo Pronea 600i.
• Lorsque vous utilisez la réduction de vibration, appuyez sur le déclencheur à mi-course et attendez
que l’image se stabilise dans le viseur avant d’appuyer sur le déclencheur jusqu’en fi n de course.
• Lorsque la réduction de vibration est activée, l’image dans le viseur peut être fl oue une fois le
déclencheur relâché. Cela n’indique pas un dysfonctionnement.
• Positionnez le commutateur du mode de réduction de vibration sur NORMAL pour eff ectuer
des fi lés panoramiques. Lorsque vous eff ectuez un fi lé panoramique, la réduction de vibration
s’applique uniquement au mouvement ne faisant pas partie du fi lé (par exemple, si l’appareil
photo est utilisé pour faire un fi lé horizontal, la réduction de vibration ne s’applique qu’au
tremblement vertical). Il est ainsi beaucoup plus facile de réaliser de longs fi lés panoramiques.
• Ne mettez pas l’appareil photo hors tension et ne retirez pas l’objectif pendant que la réduction
de vibration est activée. Si l’alimentation de l’objectif est coupée alors que la réduction de
vibration est activée, l’objectif peut vibrer s’il est secoué. Il ne s’agit pas d’un dysfonctionnement
et cela peut être corrigé en refi xant l’objectif et en mettant l’appareil photo sous tension.
• Si l’appareil photo est équipé d’un fl ash intégré, la réduction de vibration est désactivée
pendant que le fl ash se charge.
• ON est généralement recommandé lorsque l’appareil photo est monté sur un monopode ou
un trépied équipé d’une tête non sécurisée, même si OFF peut être préférable dans certaines
conditions de prise de vue et avec certains types de trépieds.
■
■
Parasoleil
Parasoleil
Le parasoleil protège l’objectif et bloque la lumière di use pouvant causer de la lumière
parasite ou une image fantôme.
Fixation du parasoleil
Fixation du parasoleil
Alignez le repère de montage du parasoleil (●)
sur le repère d’alignement du parasoleil ( ), puis
tournez le parasoleil (
w
) jusqu’à ce que le repère
●
soit aligné sur le repère de verrouillage du parasoleil
(—
{).
Lors de la xation ou du retrait du parasoleil, tenez-le près du symbole
sur sa base,
et évitez de le serrer trop fermement. Un vignettage peut se produire si le parasoleil n’est
pas correctement attaché.
Le parasoleil peut être retourné et monté sur l’objectif lorsqu’il n’est pas utilisé.
Retrait du parasoleil
Retrait du parasoleil
Appuyez sur la commande de déverrouillage du
parasoleil (
q
), tournez ce dernier dans le sens
indiqué par la èche (
w
) et retirez-le comme le
montre l’illustration (
e
).
■
■
Verres de visée
Verres de visée
Les appareils photo suivants sont compatibles avec un grand nombre de verres de visée
adaptés à di érentes situations.
Verre
Verre
Appareil photo
Appareil photo
A
A
B
B
C
C
E
E
EC-B
EC-B
EC-E
EC-E
G1
G1
G2
G2
G3
G3
G4
G4
J
J
L
L
M
M
U
U
F6
—
— ——— —
F5+ DP-30
{
{
(–0,5)
F5+ DA-30
(+1,0)
{
(–0,5)
(+0,5)
: Recommandé.
{ :
Vignettage visible dans le viseur (les photos ne sont pas aff ectées).
— : Non compatible avec l’appareil photo.
( ) :
Les chiff res entre parenthèses donnent la correction d’exposition pour la mesure pondérée centrale.
Sélectionnez « Activ.: autre » pour le Réglage personnalisé b6 (« Plage visée ») lors de l’ajustement
de la correction d’exposition pour l’appareil photo F6 ; remarquez qu’avec les verres autres que B ou
E, « Activ.: autre » doit être sélectionné, et ce même lorsque la valeur pour la correction d’exposition
est de 0. La correction d’exposition pour l’appareil photo F5 peut être ajustée en utilisant le Réglage
personnalisé 18 ; consultez le manuel de l’appareil photo pour plus de détails.
Cellule vide : L’utilisation ne convient pas avec cet objectif. Veuillez remarquer cependant
que les verres de type M peuvent être utilisés pour la microphotographie et la
macrophotographie avec un grossissement de 1 : 1 ou plus.
Remarque : L’appareil photo F5 prend en charge la mesure matricielle avec les verres de visée A, B, E,
EC-B/EC-E, J, et L uniquement.
■
■
Utilisation d’un trépied (Figure 2)
Utilisation d’un trépied (Figure 2)
L’objectif est équipé d’un collier pour trépied rotatif et amovible. Lorsque vous utilisez un trépied,
xez ce dernier au collier et non à l’appareil photo. Pour xer le collier sur l’objectif
:
z
Desserrez légèrement la vis de fi xation du collier (
q
).
x
Alignez le repère d’alignement situé en haut de l’objectif sur le repère du collier
(
w
) et insérez l’objectif dans le collier.
c
Tournez l’objectif jusqu’à la position souhaitée (trois positions sont possibles, à 90°
d’intervalle) et arrêtez-vous lorsque le repère d’alignement situé en haut de l’objectif
est aligné sur le repère de la position de votre choix, situé sur le collier (
e
), puis serrez
la vis de fi xation du collier (
r
). Veillez à ce que la vis soit bien serrée ; si ce n’est pas le
cas, l’objectif peut se détacher du collier.
Retrait du collier pour trépied
Retrait du collier pour trépied
z
En faisant attention de ne pas retirer la vis de son fi letage, desserrez-la jusqu’à ce que le
collier tourne librement (
t
).
x
Alignez le repère d’alignement situé en haut de l’objectif sur le repère du collier
(
y
) et retirez l’objectif du collier (
u
).
■
■
Entretien de l’objectif
Entretien de l’objectif
• Ne prenez pas ou ne tenez pas l’objectif ou l’appareil photo en saisissant uniquement le parasoleil.
• Maintenez les contacts du microprocesseur propres.
• Si le joint en caoutchouc de la monture d’objectif est endommagé, cessez immédiatement
l’utilisation et confi ez l’objectif à un centre Nikon agréé pour le faire réparer.
• Utilisez une souffl ette pour enlever la poussière et les peluches sur la surface de l’objectif. Pour
eff acer les taches et les traces de doigt, imprégnez un morceau de tissu propre en coton avec
une petite quantité d’éthanol ou de nettoyant pour objectif ou utilisez une lingette de nettoyage
d’objectif, et nettoyez avec un mouvement circulaire à partir du centre vers l’extérieur, tout en
prenant soin de ne pas laisser de taches, ni de toucher le verre avec vos doigts.
• N’utilisez jamais de solvants organiques comme un diluant à peinture ou du benzène pour nettoyer l’objectif.
• Le parasoleil ou les fi ltres NC peuvent être utilisés pour protéger la lentille frontale.
• Fixez les bouchons avant et arrière avant de placer l’objectif dans son étui.
• Si vous n’avez pas l’intention d’utiliser l’objectif pendant une période prolongée, rangez-le dans
un endroit frais et sec pour éviter la moisissure et la rouille. Ne pas ranger à la lumière directe
du soleil ou avec des boules antimites de naphtaline ou de camphre.
• Tenez l’objectif au sec. La formation de rouille sur le mécanisme interne peut causer des dégâts irréparables.
• Laisser l’objectif dans des endroits extrêmement chauds peut endommager ou déformer les
éléments composés de plastique renforcé.
• Les changements brusques de température peuvent être à l’origine d’une condensation
préjudiciable à l’intérieur et à l’extérieur de l’objectif. Avant de faire passer l’objectif d’un
environnement chaud à froid ou vice versa, rangez-le dans un sac ou dans une boîte en
plastique pour ralentir le changement de température.
■
■
Accessoires fournis
Accessoires fournis
• Bouchon avant d’objectif encliquetable 77 mm LC-77
• Bouchon arrière d’objectif LF-4
• Parasoleil à baïonnette HB-65
• Étui souple pour objectif CL-M2
■
■
Accessoires compatibles
Accessoires compatibles
• Filtres à visser 77 mm
• Téléconvertisseurs AF-I/AF-S TC-14E
1
/TC-14E II
1
/TC-17E II
2
/TC-20E
2
/TC-20E II
2
/TC-20E III
2
1 L’autofocus est uniquement disponible avec les appareils photo prenant en charge l’ouverture f/8.
2 L’autofocus n’est pas pris en charge.
■
■
Caractéristiques
Caractéristiques
Type
Type
Objectif AF-S de type G avec microprocesseur intégré et
monture F
Focale
Focale 80 – 400 mm
Ouverture maximale
Ouverture maximale f/4.5 – 5.6
Construction optique
Construction optique 20 lentilles en 12 groupes (dont 4 lentilles en verre ED, 1 lentille
en verre super ED et des lentilles béné ciant d’un traitement nanocristal)
Angle de champ
Angle de champ • Re ex numériques Nikon de format FX et re ex
argentiques Nikon : 30°10
c – 6°10c
• Re ex numériques Nikon de format DX : 20° – 4°
Échelle des focales
Échelle des focales Graduée en millimètres (80, 105, 135, 200, 300, 400)
Information de distance
Information de distance
Communiquée au boîtier de l’appareil photo
Zoom
Zoom Zoom manuel utilisant une bague de zoom indépendante
Mise au point
Mise au point
Système de mise au point interne de Nikon (IF, Internal Focusing)
avec autofocus commandé par un moteur ondulatoire silencieux
(SWM) et bague de mise au point pour mise au point manuelle
Réduction de vibration
Réduction de vibration Décentrement avec voice coil motors (VCMs)
Indicateur de distance de mise au point
Indicateur de distance de mise au point
1,5 m à l’infi ni (∞)
Distance minimale de mise au point
Distance minimale de mise au point • AF: 1,75 m depuis le plan focal à toutes les focales
• MF: 1,5 m depuis le plan focal à toutes les focales
Lamelles de diaphragme
Lamelles de diaphragme
9 (diaphragme circulaire)
Diaphragme
Diaphragme Intégralement automatique
Plage des ouvertures
Plage des ouvertures • Focale 80 mm : f/4.5 à f/32 • Focale 400 mm : f/5.6 à f/40
L’ouverture minimale affi chée peut varier en fonction de
l’incrément d’exposition sélectionné avec l’appareil photo.
Mesure
Mesure Pleine ouverture
Commutateur de la limite de mise
Commutateur de la limite de mise
au point
au point
Deux positions : FULL (∞ – 1,75 m) et ∞ – 6 m
Diamètre de xation pour ltre
Diamètre de xation pour ltre 77 mm (P = 0,75 mm)
Dimensions
Dimensions Environ 95,5 mm de diamètre maximum × 203 mm (distance
à partir du plan d’appui de la monture d’objectif de l’appareil photo)
Poids
Poids Environ 1570 g, avec le collier pour trépied
Environ 1480 g, sans le collier pour trépied
Nikon se réserve le droit de modifi er les caractéristiques du matériel décrit dans ce manuel à tout
moment et sans préavis.
Nederlands
Gefeliciteerd met de aanschaf van een NIKKOR-objectief. Lees voordat u dit product
gebruikt zorgvuldig deze instructies en de camerahandleiding door.
Opmerking: Indien gemonteerd op een digitale re excamera in DX-formaat zoals de
D7000 of camera’s in de D300 serie, heeft dit objectief een kijkhoek van 20° – 4° en een
brandpuntsafstand gelijkwaardig aan 120 – 600 mm (35 mm formaat).
Voor uw veiligheid
Voor uw veiligheid
A
A
WAARSCHUWINGEN
WAARSCHUWINGEN
• Niet demonteren. Het aanraken van de interne onderdelen van de camera of objectief kan letsel
veroorzaken. In het geval van een defect moet het product alleen door een gekwalifi ceerd
technicus worden gerepareerd. Mocht het product openbreken als gevolg van een val of ander
ongeluk, verwijder de camerabatterij en/of ontkoppel de lichtnetadapter en breng het product
naar een Nikon geautoriseerd servicecenter.
• Zet de camera in het geval van een defect onmiddellijk uit. Bemerkt u dat er rook of een andere
ongebruikelijke geur uit het apparaat komt, haal dan onmiddellijk de lichtnetadapter uit het
stopcontact en verwijder de camerabatterij en zorg dat u geen brandwonden oploopt. Het
voortzetten van de werking van het apparaat kan brand of letsel tot gevolg hebben. Breng
na het verwijderen van de batterij het apparaat voor inspectie naar een Nikon geautoriseerd
servicecenter.
• Niet gebruiken in de aanwezigheid van brandbaar gas. Het bedienen van elektronische apparatuur in de
aanwezigheid van brandbaar gas kan een explosie of brand tot gevolg hebben.
• Kijk niet via het objectief of de camerazoeker naar de zon. Kijken naar de zon of andere heldere
lichtbron via het objectief of de zoeker kan permanent visueel letsel veroorzaken.
• Houd buiten bereik van kinderen. Het niet in acht nemen van deze voorzorgsmaatregel kan letsel tot
gevolg hebben.
• Neem tijdens het hanteren van het objectief en de camera de volgende voorzorgsmaatregelen in acht:
- Zorg dat het object en de camera droog blijven. Het niet in acht nemen van deze
voorzorgsmaatregel kan brand of een elektrische schok tot gevolg hebben.
- Hanteer het objectief of de camera niet met natte handen. Het niet in acht nemen van deze
voorzorgsmaatregel kan een elektrische schok tot gevolg hebben.
- Houd de zon goed uit het beeld tijdens het opnemen van onderwerpen met tegenlicht.
Zonlicht dat wordt scherpgesteld in de camera terwijl de zon zich in of nabij het beeld
bevindt kan brand veroorzaken.
- Bevestig de achter- en voorlensdop als het objectief voor langere tijd niet wordt gebruikt
en bewaar het objectief niet in direct zonlicht. Als u het in direct zonlicht laat liggen, kan
het objectief de zonnestralen op brandbare objecten scherpstellen en brand veroorzaken.
• Draag geen statieven met het objectief of de camera eraan bevestigd. U kunt struikelen of per ongeluk
anderen raken, met letsel als gevolg.
• Laat het objectief niet achter waar het wordt blootgesteld aan extreem hoge temperaturen, zoals in een
afgesloten auto of in direct zonlicht. Het niet in acht nemen van deze voorzorgsmaatregel kan de
interne onderdelen van het objectief nadelig beïnvloeden en brand veroorzaken.
Mededeling voor Europese klanten
Mededeling voor Europese klanten
Dit pictogram geeft aan dat elektrische en elektronische apparaten via
gescheiden inzameling moet worden afgevoerd.
Het volgende is alleen van toepassing op gebruikers in Europese landen:
• Dit product moet gescheiden van het overige afval worden ingeleverd
bij een daarvoor bestemd inzamelingspunt. Gooi dit product niet weg
als huishoudafval.
• Gescheiden inzameling en recycling helpt bij het behoud van natuurlijke bronnen en
voorkomt negatieve consequenties voor mens en milieu die kunnen ontstaan door
onjuist weggooien van afval.
• Neem voor meer informatie contact op met de leverancier of de gemeentelijke
reinigingsdienst.
■
■
Onderdelen van het objectief (afbeelding 1)
Onderdelen van het objectief (afbeelding 1)
q
Bevestigingsmarkering voor zonnekap
w
Zoomring
e
Schaal brandpuntsafstand
r
Markering brandpuntsafstand
t
Aanduiding voor scherpstelafstand
y
Markering voor scherpstelafstand
u
Scherpstelring
i
Objectiefrotatie-index
o
Objectief montagemarkering
!0
Rubberen afdichting voor
objectiefbevestiging
!1
CPU-contacten
!2
Schakelaar voor scherpstelstand
!3
Schakelaar scherpstellimiet
!4
Vibratiereductie ON/OFF (AAN/UIT)-
schakelaar
!5
Schakelaar voor de stand vibratiereductie
!6
Zoomvergrendelingsschakelaar
!7
Zonnekap
!8
Uitlijnmarkering op zonnekap
!9
Vergendelmarkering op zonnekap
@0
Ontgrendelingsknop zonnekap
@1
Borgschroef statiefgondel
@2
Positie-indices (90 °)
@3
Statiefkraag
■
■
Compatibiliteit
Compatibiliteit
Vinkjes (“✔”) duiden ondersteunde functies aan, functies met een streepje (“—”)
worden niet ondersteund. Er zijn een aantal beperkingen van toepassing: zie de
camerahandleiding voor details.
Camera
Camera
Belichtingsstand
Belichtingsstand
(opname)
(opname)
Functie
Functie
P
P
2
2
S
S
A
A
M
M
AF
AF
3
3
VR
VR
4
4
Nikon digitale refl excamera’s, F6, F5, F100, F80-Serie,
F75-Serie, F65-Serie
✔✔✔✔✔✔
Pronea 600i, Pronea S
1
✔✔✔✔✔
—
F4-Serie, F90X, F90-Serie, F70-Serie
✔✔
——
✔
—
F60-Serie, F55-Serie, F50-Serie, F-401x, F-401s, F-401
✔✔✔ ✔
——
F-801s, F-801, F-601
M
✔✔
————
F3AF, F-601, F-501, Nikon MF camera’s (behalve F-601
M
) —
1. Belichtingsmodus M (handmatig) is niet beschikbaar.
2. Omvat AUTO en onderwerpstanden (Digitaal Vari-programma).
3. Autofocus
4. Vibratiereductie.
■
■
Scherpstellen
Scherpstellen
Ondersteunde scherpstelstanden worden in de volgende tabel getoond (zie de
camerahandleiding voor informatie over de scherpstelmodi van de camera).
Camera
Camera
Camerascherpstelstand
Camerascherpstelstand
Objectiefscherpstelstand
Objectiefscherpstelstand
A/M
A/M
M/A
M/A
M
M
Nikon digitale
refl excamera’s, F6, F5,
F4-Serie, F100, F90X,
F90-Serie, F80-Serie,
F75-Serie, F70-Serie,
F65-Serie, Pronea 600i,
Pronea S
AF
Autofocus met
handcorrectie
(AF-prioriteit)
Autofocus met
handcorrectie
(handmatige
prioriteit)
Handmatige
scherpstelling
met
elektronische
afstandsmeter
MF
Handmatige scherpstelling
(elektronische afstandsmeter beschikbaar voor alle
camera’s behalve F-601
M
)
F60-Serie, F55-Serie,
F50-Serie, F-801s,
F-801, F-601
M
, F-401x,
F-401s, F-401
AF, MF
A/M- en M/A-standen
A/M- en M/A-standen
• M/A: Autofocus kan worden uitgeschakeld door aan de scherpstelring van
het objectief te draaien.
• A/M: Zoals hierboven, behalve dat de scherpstelring verder moet worden
gedraaid voordat de autofocus wordt uitgeschakeld, zodat onvoorziene
wijzigingen aan de scherpstelling door onbedoelde bediening van de
scherpstelring worden voorkomen.
z
Schuif de schakelaar voor de scherpstelstand van het objectief naar A/M of M/A.
x
Scherpstellen.
Indien gewenst, kan autofocus worden overgenomen door aan de scherpstelring
van het objectief te draaien terwijl de ontspanknop half wordt ingedrukt (of, als de
camera is uitgerust met een AF-ON-knop, terwijl de AF-ON-knop wordt ingedrukt).
Druk, om opnieuw scherp te stellen met behulp van autofocus, de ontspanknop
half in of druk nogmaals op de AF-ON-knop.
De schakelaar voor de scherpstellimiet
De schakelaar voor de scherpstellimiet
Deze schakelaar bepaalt de limieten voor de scherpstelafstand voor autofocus.
• FULL: Selecteer deze optie voor onderwerpen die zich op een afstand van
minder dan 6 m bevinden.
• ∞–6 m: Indien uw onderwerp zich altijd op een afstand van ten minste 6 m
bevindt, selecteer deze optie om sneller te kunnen scherpstellen.
■
■
Zoom en scherptediepte
Zoom en scherptediepte
Draai aan de zoomring voordat u scherpstelt om de brandpuntsafstand aan te passen
en de foto te kadreren. Als de camera over voorbeeld scherptediepte beschikt (stop
omlaag), kan scherptediepte ook als voorbeeld in de zoeker worden bekeken.
Opmerking: Brandpuntsafstand neemt af als de scherpstelafstand wordt verkort. Merk op
dat de aanduiding voor scherpstelafstand alleen als leidraad is bedoeld en is mogelijk
niet nauwkeurig genoeg om de afstand tot het onderwerp te tonen en toont mogelijk
niet, door scherptediepte of andere factoren, ∞ wanneer de camera op een ver voorwerp
wordt scherpgesteld.
Draai de zoomring naar de 80 mm-positie om deze te vergrendelen en schuif de
schakelaar van de zoomvergrendeling naar LOCK (VERGRENDELEN). Dit voorkomt dat het
objectief door zijn eigen gewicht wordt verlengd terwijl de camera van de ene naar de
andere plaats wordt gedragen.
■
■
Diafragma
Diafragma
Diafragma wordt met behulp van de camerabesturingen aangepast.
Zoom en maximale diafragma
Zoom en maximale diafragma
Wijzigt zodat zoom het maximale diafragma tot maximaal ⁄ LW aan kan passen. De
camera houdt er bij het instellen van de belichting echter automatisch rekening mee
en zijn er geen modi caties van de camera-instellingen vereist voor de volgende
zoomaanpassingen.
■
■
Ingebouwde fl itser
Ingebouwde fl itser
Bij het gebruik van de ingebouwde itser op camera’s uitgerust met een ingebouwde
itser, verwijder de zonnekap om vignettering te voorkomen (schaduwen aangemaakt
waar het uiteinde van het objectief de ingebouwde itser verduisterd).
■
■
Vibratiereductie (VR)
Vibratiereductie (VR)
Vibratiereductie (VR) vermindert onscherpte veroorzaakt door cameratrilling, waardoor
sluitertijden tot maximaal 4,0 stops langer duren dan anders het geval zou zijn (gemeten
bij 400 mm met een D4 camera volgens Camera and Imaging Products Association [CIPA]-
normen; e ecten variëren afhankelijk van de fotograaf en opnameomstandigheden). Dit
verhoogt het bereik van de beschikbare sluitertijden en laat handbediende, statiefvrije
fotogra e toe in vele verschillende situaties.
De vibratiereductie AAN/UIT-schakelaar gebruiken
De vibratiereductie AAN/UIT-schakelaar gebruiken
• Selecteer ON om vibratiereductie in te schakelen. Vibratiereductie wordt
geactiveerd wanneer de ontspanknop half wordt ingedrukt,
waarbij de e ecten van cameratrilling voor verbeterde kadrering en
scherpstelling worden verminderd.
• Selecteer OFF om vibratiereductie uit te schakelen.
De schakelaar vibratiereductiestand gebruiken
De schakelaar vibratiereductiestand gebruiken
De schakelaar vibratiereductiestand wordt gebruikt om de vibratiereductiestand te
selecteren terwijl vibratiereductie is ingeschakeld.
• Selecteer NORMAL om de e ecten van trillingen te verminderen tijdens
het fotograferen vanuit een vaste positie en in andere situaties met
relatief weinig camerabeweging.
• Selecteer ACTIVE om de e ecten van trillingen te verminderen bij het fotograferen van een
bewegend voertuig, tijdens het lopen en in andere situaties met actieve camerabeweging.
Vibratiereductie gebruiken: opmerkingen
Vibratiereductie gebruiken: opmerkingen
• Schuif de vibratiereductieschakelaar naar OFF als de camera geen vibratiereductie ondersteunt.
Het ingeschakeld laten van de vibratiereductie kan de batterij snel doen leeglopen,
voornamelijk in het geval van Pronea 600i camera’s.
• Druk bij het gebruik van vibratiereductie de ontspanknop half in en wacht totdat de afbeelding
in de zoeker is gestabiliseerd, voordat de ontspanknop in zijn geheel wordt ingedrukt.
• Wanneer vibratiereductie actief is, kan de afbeelding in de zoeker onscherp worden nadat de
sluiter wordt vrijgegeven. Dit duidt niet op een defect.
• Schuif de schakelaar van de stand vibratiereductie naar NORMAL (NORMAAL) voor het pannen
van opnamen. Wanneer de camera wordt gepand, is vibratiereductie alleen van toepassing op
beweging die geen deel uitmaakt van het pannen (bijvoorbeeld, als de camera horizontaal
wordt gepand, zal alleen verticale trilling worden toegepast), waardoor het veel eenvoudiger is
om de camera soepel in een brede boog te pannen.
• Zet de camera niet uit of verwijder het objectief niet wanneer vibratiereductie in werking is.
Indien de voeding naar het objectief wordt afgekoppeld wanneer vibratiereductie actief is, kan
het objectief rammelen wanneer deze schudt. Dit duidt niet op een defect en kan met behulp
van het herbevestigen van het objectief en het inschakelen van de camera worden verholpen.
• Als de camera is voorzien van een ingebouwde fl itser, wordt vibratiereductie uitgeschakeld
wanneer de fl itser laadt.
• ON (AAN) wordt doorgaans aanbevolen wanneer de camera op een monopod of een statief
met een niet-vergrendelde kop is gemonteerd, ondanks het feit dat OFF (UIT) mogelijk de
voorkeur heeft afhankelijk van de opnameomstandigheden en het type statief.
■
■
De zonnekap
De zonnekap
De zonnekap beschermt het objectief en blokkeert dwaallicht dat anders lichtvlekken of
beeldschaduwen veroorzaakt.
De zonnekap bevestigen
De zonnekap bevestigen
Breng de bevestigingsmarkering op de zonnekap
(
●) op één lijn met de uitlijnmarkering op de
zonnekap (
) en draai vervolgens aan de
zonnekap (
w
) totdat de
● -markering op één
lijn is gebracht met de vergrendelmarkering op de
zonnekap (—
{).
Houd, bij het bevestigen of verwijderen van de kap, deze vlakbij het
symbool op
de bijbehorende basis om te stevig vastpakken te vermijden. Vignettering kan zich
voordoen als de kap niet juist is bevestigd.
Wanneer niet in gebruik, kan de kap worden omgedraaid en gemonteerd op het
objectief.
De zonnekap verwijderen
De zonnekap verwijderen
Druk op de ontgrendelingsknop van de zonnekap
(
q
), draai de zonnekap in de richting van de pijl
(
w
) en verwijder zoals weergegeven (
e
).
■
■
Scherpstelschermen
Scherpstelschermen
De volgende camera’s ondersteunen een verscheidenheid aan scherpstelschermen voor
gebruik in verschillende situaties.
Scherm
Scherm
Camera
Camera
A
A
B
B
C
C
E
E
EC-B
EC-B
EC-E
EC-E
G1
G1
G2
G2
G3
G3
G4
G4
J
J
L
L
M
M
U
U
F6
—
— ——— —
F5+ DP-30
{
{
(–0,5)
F5+ DA-30
(+1,0)
{
(–0,5)
(+0,5)
: Aanbevolen.
{: Vignettering zichtbaar in zoeker (foto’s worden niet beïnvloedt).
—: Niet compatibel met camera.
( ): Cijfers tussen haakjes geven de belichtingscompensatie voor centrumgerichte
lichtmeting. Selecteer “Other screen (Ander matglas)” voor Persoonlijke instelling
b6 (“Screen comp. (Compensatie voor matglas)”) tijdens het aanpassen van de
belichtingscompensatie voor de F6; merk op dat bij schermen anders dan B of E “Other
screen (Ander matglas)” moet worden geselecteerd, zelfs wanneer de waarde voor
belichtingscompensatie 0 is. Belichtingscompensatie voor de F5 kan met behulp van
Persoonlijke instelling 18 worden aangepast; zie de camerahandleiding voor details.
Lege cel: Niet geschikt voor gebruik met deze objectief. Merk op dat type M schermen niettemin
kunnen worden gebruikt voor fotomicrografi e en macrofotografi e bij vergrotingen van
1 : 1 of hoger.
Opmerking: De F5 ondersteunt alleen matrixmeting met A, B, E, EC-B/EC-E, J en L scherpstelschermen.
■
■
Een statief gebruiken (afbeelding 2)
Een statief gebruiken (afbeelding 2)
Het objectief is voorzien van een afneembare roterende statiefgondel; bevestig het
objectief op de statiefgondel en niet op de camera bij het gebruik van een statief. Om
de statiefgondel op het objectief te bevestigen:
z
Draai de borgschroef van de statiefgondel (
q
) iets los.
x
Breng de uitlijnmarkering bovenop het objectief op één lijn met de
-markering op de statiefgondel (
w
) en plaats het objectief in de statiefgondel.
c
Draai het objectief naar de gewenste positie (drie beschikbare posities bij
intervallen van 90 °), stop wanneer de uitlijnmarkering bovenop het objectief op
één lijn is gebracht met de gewenste positiemarkering op de statiefgondel (
e
)
en draai vervolgens de borgschroef van de statiefgondel (
r
) vast. Controleer
of de schroef volledig is vastgedraaid; als de schroef niet goed vast zit, kan het
objectief van de statiefgondel vallen.
De statiefgondel verwijderen
De statiefgondel verwijderen
z
Draai de borgschroef van de statiefgondel los totdat de statiefgondel vrij roteert
(
t
), waarbij moet worden opgelet dat de schroef niet uit de aansluiting wordt
verwijderd.
x
Breng de uitlijnmarkering bovenop het objectief op één lijn met de
-markering op de statiefgondel (
y
) en verwijder het objectief van de
statiefgondel (
u
).
■
■
Onderhoud objectief
Onderhoud objectief
• Pak of houd het objectief of de camera niet alleen met behulp van de zonnekap vast.
• Houd de CPU-contacten schoon.
• Mocht de rubberen afdichting voor objectiefbevestiging beschadigt zijn, staak onmiddellijk
het gebruik en breng het objectief voor reparatie naar een Nikon geautoriseerd servicecenter.
• Gebruik een blaasbalgje om stof en pluizen van de objectiefoppervlakken te verwijderen.
Voor het verwijderen van vlekken en vingerafdrukken moet u een kleine hoeveelheid ethanol
of objectiefreiniger op een zachte, schone katoenen doek of objectief reinigingsdoekje
aanbrengen en reinig met een draaiende beweging vanuit het midden naar buiten toe. Zorg
dat er geen vegen achterblijven en raak het glas niet met uw vingers aan.
• Gebruik voor het reinigen van het objectief nooit organische oplosmiddelen zoals verfthinner
of benzeen.
• De zonnekap of NC fi lters kunnen worden gebruikt ter bescherming van het voorste
objectiefelement.
• Bevestig de voor- en achterlensdoppen voordat u het objectief in het fl exibele tasje plaatst.
• Als het objectief voor langere tijd niet wordt gebruikt, moet u het op een koele en droge plaats
bewaren. Zo voorkomt u schimmel en roest. Bewaar niet in direct zonlicht of in combinatie met
mottenballen van nafta of kamfer.
• Zorg dat het objectief droog blijft. Het roesten van het interne mechanisme kan onherstelbare
schade veroorzaken.
• Het objectief achterlaten op extreem hete locaties kan schade veroorzaken of onderdelen
gemaakt van versterkt plastic kunnen kromtrekken.
• Snelle temperatuursveranderingen kunnen schadelijke condensatie veroorzaken aan de
binnen- en buitenkant van het objectief. Plaats, voordat u het objectief van een warme naar
een koude omgeving of vice versa verplaatst, het objectief in een tas of plastic etui om de
temperatuursverandering te vertragen.
■
■
Meegeleverde accessoires
Meegeleverde accessoires
• 77 mm makkelijk te bevestigen voorste objectiefdop LC-77
• Achterste objectiefdop LF-4
• Bajonetkap HB-65
• Flexibel objectiefetui CL-M2
■
■
Compatibele accessoires
Compatibele accessoires
• 77 mm vastschroefbare fi lters
• AF-I/AF-S-teleconverter TC-14E
1
/TC-14E II
1
/TC-17E II
2
/TC-20E
2
/TC-20E II
2
/TC-20E III
2
1 Autofocus is uitsluitend beschikbaar voor camera’s met ondersteuning voor f/8.
2 Autofocus wordt niet ondersteund.
■
■
Specifi caties
Specifi caties
Type
Type Type G AF-S objectief met ingebouwde CPU- en F-vatting
Brandpuntsafstand
Brandpuntsafstand 80 – 400 mm
Maximale diafragma
Maximale diafragma f/4.5 – 5.6
Objectiefconstructie
Objectiefconstructie 20 elementen in 12 groepen (inclusief 4 ED-objectiefelementen, 1 super
ED-objectiefelement en objectiefelementen met een Nano-Crystal coating)
Weergavehoek
Weergavehoek
• Nikon lm SLR en D-SLR camera’s in FX-formaat: 30°10
c
– 6°10
c
• Nikon D-SLR camera’s in DX-formaat: 20° – 4°
Schaal brandpuntsafstand
Schaal brandpuntsafstand Gegradeerd in millimeters (80, 105, 135, 200, 300, 400)
Afstandsinformatie
Afstandsinformatie Uitvoer naar camera
Zoom
Zoom Handmatige zoom met behulp van zoomring
Scherpstellen
Scherpstellen Nikon Internal Focusing (IF) System met autofocus aangestuurd
door Silent Wave Motor en afzonderlijke scherpstelring voor
handmatige scherpstelling
Vibratiereductie
Vibratiereductie Lens-shift met behulp van voice coil motors (VCMs)
Aanduiding voor
Aanduiding voor
scherpstelafstand
scherpstelafstand
1,5 m tot oneindig (∞)
Kortste scherpstelafstand
Kortste scherpstelafstand • AF: 1,75 m van fi lmvlak bij alle zoomposities
• MF: 1,5 m van fi lmvlak bij alle zoomposities
Diafragmabladen
Diafragmabladen 9 (ronde diafragmaopeningen)
Diafragma
Diafragma Volledig automatisch
Diafragmabereik
Diafragmabereik • 80 mm brandpuntsafstand: f/4.5 tot f/32
• 400 mm brandpuntsafstand: f/5.6 tot f/40
Het weergegeven minimale diafragma kan variëren afhankelijk
van de grootte van de belichtingstoename die is geselecteerd
met de camera.
Lichtmeting
Lichtmeting Volledig diafragma
Schakelaar scherpstellimiet
Schakelaar scherpstellimiet Twee standen: FULL (∞ – 1,75 m) en ∞ – 6 m
Maat voor lters/
Maat voor lters/
voorzetlenzen
voorzetlenzen
77 mm (P = 0,75 mm)
Afmetingen
Afmetingen Ca. 95,5 mm maximum diameter × 203 mm (afstand vanaf
objectiefbevestigingsvlak van de camera)
Gewicht
Gewicht Ca. 1570 g inclusief statiefkraag
Ca. 1480 g zonder statiefkraag
Nikon behoudt zich het recht de specifi caties van de hardware, zoals beschreven in deze handleiding,
te allen tijde zonder voorafgaande kennisgeving te wijzigen.

©
2013 Nikon Corporation
Figura 1/Figura 1/Figura 1
Figura 2/Figura 2/Figura 2
■
■
Profondità di campo
Profondità di campo
■
■
Profundidad de campo
Profundidad de campo
■
■
Profundidade de campo
Profundidade de campo
(m)
• Distanza di messa a
fuoco
• Distancia de enfoque
• Distância de focagem
• Profondità di campo
• Profundidad de
campo
• Profundidade de
campo
• Rapporto di
riproduzione
• Relación de
reproducción
• Razão de reprodução
[f=80 mm]
f/4.5 f/5.6 f/8 f/11 f/16 f/22 f/32
1.8
1.69 – 1.82 1.67 – 1.84 1.64 – 1.88 1.60 – 1.94 1.55 – 2.03 1.48 – 2.18 1.39 – 2.43 1/20.6
2.5
2.37 – 2.65 2.34 – 2.69 2.28 – 2.77 2.20 – 2.91 2.10 – 3.12 1.97 – 3.49 1.82 – 4.20 1/29.7
4 3.67 – 4.40 3.60 – 4.50 3.46 – 4.76 3.28 – 5.17 3.05 – 5.89 2.79 – 7.36 2.49 – 11.52 1/48.1
6 5.29 – 6.95 5.14 – 7.22 4.86 – 7.89 4.50 – 9.09 4.09 – 11.62 3.62 – 19.29 3.13 – 387.52 1/72.6
9 7.48 – 11.32 7.19 – 12.07 6.64 – 14.08 6.00 – 18.45 5.28 – 33.09 4.53 – ∞ 3.78 – ∞
1/109.4
12 9.44 – 16.53 8.98 – 18.18 8.14 – 23.17 7.20 – 38.00 6.19 – 436.05 5.17 – ∞ 4.21 – ∞
1/146.2
20 13.76 – 36.89 12.81 – 46.28
11.16 – 102.65
9.45 – ∞ 7.78 – ∞ 6.24 – ∞ 4.89 – ∞
1/244.2
40
20.96 – 483.45
18.83 – ∞ 15.47 – ∞ 12.37 – ∞ 9.65 – ∞ 7.38 – ∞ 5.57 – ∞
1/489.3
∞ 43.96 – ∞ 35.53 – ∞ 25.18 – ∞ 17.87 – ∞ 12.70 – ∞ 9.04 – ∞ 6.45 – ∞ 1/∞
[f=105 mm]
f/4.8 f/5.6 f/8 f/11 f/16 f/22 f/32
1.8
1.71 – 1.80 1.70 – 1.81 1.68 – 1.83 1.65 – 1.87 1.61 – 1.92 1.56 – 2.00 1.50 – 2.13 1/16.4
2.5
2.41 – 2.60 2.40 – 2.61 2.36 – 2.66 2.30 – 2.74 2.23 – 2.86 2.13 – 3.04 2.02 – 3.34 1/23.5
4 3.78 – 4.25 3.74 – 4.30 3.65 – 4.44 3.52 – 4.65 3.35 – 4.99 3.14 – 5.56 2.89 – 6.67 1/37.8
6 5.52 – 6.57 5.44 – 6.69 5.24 – 7.03 4.98 – 7.58 4.65 – 8.52 4.27 – 10.35 3.82 – 14.93 1/56.8
9 7.97 – 10.35 7.80 – 10.65 7.39 – 11.54 6.89 – 13.08 6.28 – 16.14 5.59 – 24.23 4.85 – 85.67 1/85.4
12
10.23 – 14.53
9.96 – 15.13 9.31 – 16.97 8.52 – 20.52 7.61 – 29.20 6.63 – 73.64 5.61 – ∞
1/114.0
20
15.53 – 28.16 14.91 – 30.49 13.49 – 39.02 11.90 – 64.73
10.21 – ∞ 8.51 – ∞ 6.90 – ∞
1/190.2
40
25.39 – 95.04
23.78 – 127.97
20.38 – ∞ 16.96 – ∞ 13.72 – ∞ 10.82 – ∞ 8.35 – ∞
1/380.7
∞ 69.60 – ∞ 58.71 – ∞ 41.57 – ∞ 29.46 – ∞ 20.90 – ∞ 14.85 – ∞ 10.57 – ∞ 1/∞
[f=135 mm]
f/5 f/5.6 f/8 f/11 f/16 f/22 f/32 f/36
1.8
1.72 – 1.78 1.72 – 1.79 1.70 – 1.80 1.68 – 1.82 1.66 – 1.86 1.62 – 1.90 1.57 – 1.98 1.56 – 2.01 1/13.1
2.5
2.44 – 2.56 2.43 – 2.57 2.41 – 2.60 2.37 – 2.65 2.32 – 2.71 2.25 – 2.82 2.17 – 2.97 2.13 – 3.05 1/18.7
4 3.85 – 4.16 3.83 – 4.18 3.77 – 4.26 3.68 – 4.38 3.57 – 4.56 3.42 – 4.85 3.22 – 5.32 3.15 – 5.55 1/29.8
6 5.68 – 6.36 5.64 – 6.41 5.50 – 6.60 5.32 – 6.89 5.09 – 7.34 4.79 – 8.09 4.43 – 9.49
4.29 – 10.23
1/44.6
9 8.30 – 9.83 8.22 – 9.95
7.94 – 10.40 7.57 – 11.12 7.11 – 12.34 6.54 – 14.61 5.89 – 19.82 5.65 – 23.31
1/66.8
12
10.80 – 13.51 10.66 – 13.74 10.19 – 14.61
9.60 – 16.07 8.87 – 18.73 8.01 – 24.47 7.05 – 43.51 6.72 – 64.69
1/89.0
20
16.89 – 24.54 16.55 – 25.29 15.46 – 28.42 14.13 – 34.47 12.61 – 49.40
10.95 – 128.54
9.25 – ∞ 8.69 – ∞
1/148.3
40
29.27 – 63.34 28.28 – 68.58 25.23 – 97.60
21.90 – 243.92
18.46 – ∞ 15.13 – ∞ 12.07 – ∞ 11.13 – ∞
1/296.5
∞ 109.57 – ∞ 96.93 – ∞ 68.61 – ∞ 48.59 – ∞ 34.44 – ∞ 24.43 – ∞ 17.35 – ∞ 15.49 – ∞ 1/∞
[f=200 mm]
f/5.3 f/5.6 f/8 f/11 f/16 f/22 f/32 f/38
1.8
1.73 – 1.77 1.73 – 1.77 1.72 – 1.78 1.71 – 1.79 1.70 – 1.80 1.68 – 1.83 1.65 – 1.86 1.63 – 1.89 1/9.4
2.5
2.47 – 2.53 2.47 – 2.54 2.45 – 2.55 2.43 – 2.57 2.40 – 2.60 2.37 – 2.65 2.32 – 2.72 2.29 – 2.77 1/13.2
4 3.92 – 4.08 3.92 – 4.09 3.88 – 4.12 3.84 – 4.18 3.78 – 4.26 3.69 – 4.37 3.58 – 4.55 3.51 – 4.67 1/20.7
6 5.83 – 6.18 5.82 – 6.19 5.75 – 6.27 5.66 – 6.39 5.53 – 6.57 5.35 – 6.84 5.12 – 7.27 4.99 – 7.58 1/30.7
9 8.63 – 9.40 8.62 – 9.42 8.47 – 9.61 8.26 – 9.89
8.00 – 10.31 7.64 – 10.98 7.20 – 12.09
6.94 – 12.94
1/45.7
12
11.37 – 12.71 11.33 – 12.75 11.08 – 13.09 10.74 – 13.61 10.30 – 14.41
9.73 – 15.73 9.03 – 18.08
8.63 – 20.02
1/60.7
20
18.32 – 22.02 18.24 – 22.14 17.60 – 23.17 16.77 – 24.81 15.73 – 27.56 14.46 – 32.73 12.99 – 44.62 12.19 – 58.41
1/100.7
40
33.87 – 48.88 33.60 – 49.45 31.52 – 54.83 28.98 – 64.83 26.03 – 87.43
22.76 – 173.08
19.35 – ∞ 17.64 – ∞
1/200.7
∞ 223.49 – ∞ 212.56 – ∞ 150.40 – ∞ 106.46 – ∞ 75.40 – ∞ 53.43 – ∞ 37.90 – ∞ 31.93 – ∞ 1/∞
[f=300 mm]
f/5.6 f/8 f/11 f/16 f/22 f/32 f/40
1.8
1.74 – 1.76 1.74 – 1.76 1.73 – 1.77 1.72 – 1.78 1.71 – 1.79 1.69 – 1.81 1.68 – 1.83 1/6.9
2.5
2.48 – 2.52 2.47 – 2.53 2.46 – 2.54 2.45 – 2.55 2.43 – 2.58 2.40 – 2.61 2.38 – 2.64 1/9.4
4 3.96 – 4.04 3.94 – 4.06 3.92 – 4.09 3.89 – 4.12 3.84 – 4.18 3.78 – 4.25 3.73 – 4.33 1/14.4
6 5.91 – 6.09 5.88 – 6.13 5.83 – 6.18 5.76 – 6.26 5.67 – 6.37 5.55 – 6.55 5.44 – 6.71 1/21.1
9 8.82 – 9.19 8.74 – 9.27 8.64 – 9.39 8.50 – 9.57 8.31 – 9.82 8.06 – 10.22 7.85 – 10.59 1/31.1
12
11.68 – 12.34 11.56 – 12.48 11.38 – 12.69 11.15 – 13.00 10.83 – 13.47 10.42 – 14.20 10.07 – 14.92
1/41.1
20
19.16 – 20.92 18.83 – 21.33 18.39 – 21.93 17.80 – 22.85 17.03 – 24.29 16.05 – 26.68 15.28 – 29.25
1/67.7
40
36.83 – 43.78 35.68 – 45.53 34.16 – 48.31 32.22 – 52.88 29.83 – 61.08 27.01 – 78.34
24.93 – 104.73
1/134.4
∞ 475.50 – ∞ 338.24 – ∞ 239.38 – ∞ 169.49 – ∞ 120.06 – ∞ 85.11 – ∞ 67.71 – ∞ 1/∞
[f=400 mm]
f/5.6 f/8 f/11 f/16 f/22 f/32 f/40
1.8
1.74 – 1.76 1.74 – 1.76 1.74 – 1.76 1.73 – 1.77 1.72 – 1.78 1.71 – 1.79 1.70 – 1.80 1/5.7
2.5
2.49 – 2.51 2.48 – 2.52 2.48 – 2.53 2.47 – 2.54 2.45 – 2.55 2.43 – 2.57 2.42 – 2.59 1/7.6
4 3.97 – 4.03 3.96 – 4.04 3.95 – 4.05 3.93 – 4.08 3.90 – 4.11 3.85 – 4.16 3.82 – 4.20 1/11.5
6 5.94 – 6.06 5.92 – 6.08 5.89 – 6.11 5.85 – 6.16 5.79 – 6.23 5.71 – 6.33 5.64 – 6.42 1/16.5
9 8.88 – 9.12 8.84 – 9.17 8.78 – 9.24 8.69 – 9.34 8.57 – 9.49 8.40 – 9.71 8.26 – 9.91 1/24.2
12
11.80 – 12.21 11.73 – 12.29 11.62 – 12.41 11.47 – 12.59 11.26 – 12.85 10.99 – 13.24 10.75 – 13.61
1/31.8
20
19.47 – 20.56 19.29 – 20.77 19.01 – 21.11 18.62 – 21.61 18.11 – 22.36 17.43 – 23.52 16.88 – 24.66
1/52.2
40
38.01 – 42.22 37.33 – 43.10 36.32 – 44.53 35.00 – 46.74 33.28 – 50.26 31.13 – 56.30 29.46 – 63.05
1/103.3
∞ 789.34 – ∞ 577.42 – ∞ 408.64 – ∞ 289.30 – ∞ 204.92 – ∞ 145.24 – ∞ 115.53 – ∞ 1/∞
• Al contrario di altri obiettivi, la lunghezza focale degli obiettivi con messa a fuoco interna
(IF) diminuisce con l’aumento della distanza di messa a fuoco.
• A diferencia de otros objetivos, la distancia focal de los objetivos de enfoque interno (IF)
disminuye con la distancia de enfoque.
• Ao contrário de outras objectivas, a distância focal das objectivas de focagem interna (FI)
diminui com a distância de focagem.
Español
Gracias por adquirir un objetivo NIKKOR. Antes de utilizar este producto, lea
detenidamente tanto estas instrucciones como el manual de la cámara.
Nota: Cuando está montado en una cámara digital de formato DX ré ex de objetivo
único como la D7000 o en las cámaras de la serie D300, este objetivo tiene un
ángulo de visión de 20° – 4° y una distancia focal equivalente a 120 – 600 mm
(formato de 35 mm).
Por su seguridad
Por su seguridad
A
A
PRECAUCIONES
PRECAUCIONES
• No desarmar. Tocar las piezas internas de la cámara o el objetivo podría resultar en
lesiones. En caso de mal funcionamiento, el producto debe ser reparado solamente por
un técnico cualifi cado. Si el producto llegara a romperse debido a una caída o accidente,
quite la batería de la cámara y/o desconecte el adaptador de CA y después lleve el
producto a un servicio técnico autorizado de Nikon para inspeccionarlo.
• Apague inmediatamente la cámara en caso de mal funcionamiento. Si llegara a notar humo o un
olor inusual proveniente del equipo, desconecte inmediatamente el adaptador de CA y
quite la batería de la cámara, procurando evitar quemaduras. Si continúa operando el
equipo podría causar fuego o lesiones. Después de quitar la batería, lleve el equipo a un
servicio técnico autorizado de Nikon para inspeccionarlo.
• No lo use en presencia de gas in amable. Operar equipo electrónico en la presencia de gas
infl amable podría resultar en una explosión o incendio.
• No mire hacia el sol a través del objetivo o del visor de la cámara. Ver el sol u otra fuente de luz
brillante a través del objetivo o del visor podría ocasionar daños oculares permanentes.
• Manténgalo lejos del alcance de los niños. De no tener en cuenta esta precaución podría
resultar en lesiones.
• Tenga presentes las siguientes precauciones al manipular el objetivo y la cámara:
- Mantenga seco el objetivo y la cámara. De no tener en cuenta esta precaución podría
resultar en un incendio o descarga eléctrica.
- No manipule el objetivo ni la cámara con las manos mojadas. De no tener en cuenta
esta precaución podría resultar en descargas eléctricas.
- Mantenga el sol fuera del fotograma al disparar a sujetos a contraluz. La luz del sol
enfocada en la cámara cuando el sol se encuentra en o cerca del fotograma podría
ocasionar un incendio.
- Si el objetivo no se va a usar por un periodo largo de tiempo, coloque la tapa del
objetivo delantera y trasera y mantenga el objetivo lejos de la luz solar directa. Si lo
deja a la luz solar directa, el objetivo podría enfocar los rayos del sol sobre objetos
infl amables, ocasionando un incendio.
• No transporte el trípode con un objetivo o con la cámara instalada. Podría caerse o golpear
accidentalmente a otros, ocasionando lesiones.
• No deje el objetivo donde esté expuesto a temperaturas extremadamente altas, como en un
automóvil cerrado o a la luz solar directa. De no tener presente esta precaución podría afectar
adversamente las piezas internas del objetivo, ocasionando un incendio.
Aviso para los clientes en Europa
Aviso para los clientes en Europa
Este símbolo indica que los equipos eléctricos y electrónicos deben
ser desechados por separado.
La nota siguiente corresponde únicamente a los usuarios de los países
europeos:
• Este producto se ha diseñado para desecharlo por separado en un
punto de recogida de residuos adecuado. No lo tire con la basura doméstica.
• Desechar y reciclar por separado ayuda a conservar los recursos naturales
y previene las consecuencias dañinas para la salud humana y el entorno que
podrían surgir a causa de un desecho incorrecto.
• Para obtener más información, puede ponerse en contacto con el vendedor o
con las autoridades locales encargadas de la gestión de residuos.
■
■
Partes del objetivo
Partes del objetivo
(Figura 1)
(Figura 1)
q
Marca de montaje del parasol
w
Anillo del zoom
e
Escala de la distancia focal
r
Marca de la distancia focal
t
Indicador de distancia de enfoque
y
Marca de distancia de enfoque
u
Anillo de enfoque
i
Índice de rotación del objetivo
o
Marca de montaje de objetivo
!0
Junta de goma de montaje del
objetivo
!1
Contactos de CPU
!2
Interruptor de modo de enfoque
!3
Interruptor de límite de enfoque
!4
Interruptor de activación/desactivación de
la reducción de la vibración
!5
Interruptor de modo de reducción de la
vibración
!6
Interruptor de bloqueo del zoom
!7
Parasol de objetivo
!8
Marca de alineación del parasol
!9
Marca de bloqueo del parasol
@0
Botón de bloqueo del parasol
@1
Tornillo de bloqueo del anillo del trípode
@2
Índices de posición (90°)
@3
Cuello del trípode
■
■
Compatibilidad
Compatibilidad
Las marcas de veri cación (“✔“) indican las funciones compatibles, los guiones
(“—”) las funciones que no son compatibles. Podrían aplicarse algunas limitaciones;
consulte el manual de la cámara para más detalles.
Cámara
Cámara
Modo de exposición
Modo de exposición
(disparo)
(disparo)
Función
Función
P
P
4
4
S
S
A
A
M
M
AF
AF
5
5
VR
VR
6
6
Cámaras digitales réfl ex de objetivo único de Nikon,
F6, F5, F100, Serie F/N80
1
, Serie F/N75
1
, Serie F/N65
1
✔✔✔✔✔✔
Pronea 600i/6i
1
, Pronea S
2
✔✔✔✔✔
—
Serie F4, F90X/N90s
1
, Serie F90/N90
1
, Serie F70/N70
1
✔✔
——
✔
—
Serie F60/N60
1
, Serie F/N55
1
, Serie F50/N50
1
,
F-401x/N5005
1
, F-401s/N4004s
1
, F-401/N4004
1
✔✔✔✔
——
F-801s/N8008s
1
, F-801/N8008
1
, F-601M/N6000
1
✔✔
————
F3AF, F-601/N6006
1
, F-501/N2020
3
, Nikon enfoque
manual cámaras (excepto F-601M/N6000
1
)
—
1. Solo las cámaras de la serie N y Pronea 6i vendidas en Estados Unidos.
2. El modo de exposición M (manual) no está disponible.
3. Solo la N2020 vendida en Estados Unidos y Canadá.
4. Incluye los modos AUTO y de escena (Vari-Program Digital).
5. Autofoco.
6. Reducción de la vibración.
■
■
Enfoque
Enfoque
Los modos de enfoque compatibles se muestran en la siguiente tabla (para más
información sobre los modos de enfoque de la cámara, consulte el manual de la
cámara).
Cámara
Cámara
Modo de
Modo de
enfoque
enfoque
de cámara
de cámara
Modo de enfoque del objetivo
Modo de enfoque del objetivo
A/M
A/M
M/A
M/A
M
M
Cámaras digitales réfl ex de objetivo único
de Nikon, F6, F5, Serie F4, F100,
F90X/N90s
*
, Serie F90/N90
*
, Serie F/N80
*
,
Serie F/N75
*
, Serie F70/N70
*
, Serie F/N65
*
,
Pronea 600i/6i
*
, Pronea S
AF
Autofoco con
anulación
manual
(prioridad AF)
Autofoco con
anulación
manual
(prioridad
manual)
Enfoque
manual con
telémetro
electrónico
MF
Enfoque manual
(telémetro electrónico disponible con todas
las cámaras excepto F-601
M
/N6000
*
)
Serie F60/N60
*
,
Serie F/N55
*
,
Serie F50/N50
*
,
F-801s/N8008s
*
, F-801/N8008
*
,
F-601M/N6000
*
, F-401x/N5005
*
,
F-401s/N4004s
*
, F-401/N4004
*
AF, MF
* Solo las cámaras de la serie N y Pronea 6i vendidas en Estados Unidos.
Modos A/M y M/A
Modos A/M y M/A
• M/A: El autofoco puede anularse girando el anillo de enfoque del objetivo.
• A/M: Tal y como se ha mencionado anteriormente, excepto que el anillo
de enfoque debe ser girado aún más antes de que el autofoco se anule,
evitando cambios accidentales en el enfoque a causa de una operación
del anillo de enfoque no intencionada.
z
Deslice el interruptor de modo de enfoque del objetivo a A/M o M/A.
x
Enfoque.
Si lo desea, el autofoco puede ser controlado manualmente girando el anillo
de enfoque del objetivo mientras pulsa el disparador hasta la mitad (o, si la
cámara está equipada con un botón AF-ON, cuando se pulse el botón AF-ON).
Para volver a enfocar usando el autofoco, pulse el disparador hasta la mitad o
pulse nuevamente el botón AF-ON.
Interruptor de límite de enfoque
Interruptor de límite de enfoque
Este interruptor determina los límites de distancia de enfoque para el autofoco.
• FULL: Seleccione esta opción para sujetos que puedan estar a menos
de 6 m (19,69 pie).
• ∞–6 m: Si el sujeto estará siempre a una distancia de al menos 6 m
(19,69 pie), seleccione esta opción para que el enfoque sea más rápido.
■
■
Zoom y Profundidad de campo
Zoom y Profundidad de campo
Antes de enfocar, gire el anillo del zoom para ajustar la distancia focal y encuadre
la fotografía. Si la cámara cuenta con vista previa de la profundidad de campo
(reducción de apertura de diafragma), la profundidad de campo también puede
visualizarse previamente en el visor.
Nota:
La distancia focal disminuye conforme se acorte la distancia de enfoque. Tenga
en cuenta que el indicador de distancia de enfoque es simplemente una guía y
podría no mostrar de forma precisa la distancia hasta el sujeto, así como, debido a la
profundidad del campo y otros factores, podría no mostrar ∞ cuando la cámara está
enfocando un objeto lejano.
Para bloquear el anillo del zoom, gírelo a la posición de 80 mm y deslice el
interruptor de bloqueo del zoom hacia LOCK. Con ello evitará que el objetivo se
extienda bajo su propio peso mientras la cámara es transportada de un sitio a otro.
■
■
Diafragma
Diafragma
El diafragma se ajusta usando los controles de la cámara.
Zoom y Diafragma máximo
Zoom y Diafragma máximo
Los cambios en el zoom pueden alterar el diafragma máximo hasta a ⁄ EV. La cámara
sin embargo toma esto en cuenta automáticamente al ajustar la exposición, y no
se requiere ningún tipo de modi cación en los ajustes de la cámara después de
ajustar el zoom.
■
■
Unidades de fl ash incorporado
Unidades de fl ash incorporado
Al usar el ash incorporado en cámaras equipadas con un ash incorporado, quite
el parasol para evitar el viñeteado (sombras creadas donde el extremo del objetivo
oscurece el ash incorporado).
■
■
Reducción de la vibración (VR)
Reducción de la vibración (VR)
La reducción de la vibración (VR) reduce las borrosidades causadas por las sacudidas
de la cámara, permitiendo velocidades de obturación de hasta 4,0 paradas más
lentas de lo normal (medido a 400 mm con una cámara D4 según los estándares
de Camera and Imaging Products Association [CIPA]; los efectos podrían variar en
función del fotógrafo y de las condiciones de disparo). Esto aumenta la gama de
velocidades de obturación disponibles y permite la realización de fotografías a
pulso y sin trípode en una gran variedad de situaciones.
Uso del interruptor ON/OFF de reducción de la vibración
Uso del interruptor ON/OFF de reducción de la vibración
• Seleccione ON para activar la reducción de la vibración.
La reducción de
la vibración se activa cuando se pulsa el disparador hasta la mitad,
reduciendo los efectos de las sacudidas de la cámara para mejorar el
encuadre y el enfoque.
• Seleccione OFF para desactivar la reducción de la vibración.
Uso del interruptor del modo de reducción de la vibración
Uso del interruptor del modo de reducción de la vibración
El interruptor del modo de reducción de la vibración se utiliza para seleccionar el
modo de reducción de la vibración cuando la reducción de vibración está activada.
• Seleccione NORMAL para reducir los efectos de la vibración al
fotogra ar desde una posición ja y en aquellas otras situaciones
en las que la cámara se mueva ligeramente.
• Seleccione ACTIVE
para reducir los efectos de la vibración al disparar desde un vehículo
en movimiento, al andar y en aquellas otras situaciones en las que la cámara se mueva
activamente.
Uso de la reducción de la vibración: Notas
Uso de la reducción de la vibración: Notas
• Deslice el interruptor de reducción de vibración a la posición OFF si la cámara no es
compatible con la reducción de vibración. Dejar activada la reducción de la vibración
podría aumentar considerablemente el agotamiento de la batería, especialmente con
las cámaras Pronea 600i/6i.
• Al usar la reducción de la vibración, pulse el disparador hasta la mitad y espere a que se
estabilice la imagen en el visor antes de pulsar totalmente el disparador.
• Al activar la reducción de la vibración, la imagen en el visor podría difuminarse después
de haber soltado el obturador.
• Deslice el interruptor del modo de reducción de la vibración hacia NORMAL para disparos
de barrido. Al barrer la cámara, la reducción de la vibración solamente es aplicada al
movimiento que no forma parte del barrido (si la cámara es barrida horizontalmente, por
ejemplo, la reducción de la vibración se aplicará únicamente a las sacudidas verticales),
facilitando el barrido suave de la cámara en una amplio arco.
• No apague la cámara ni desmonte el objetivo cuando se encuentre en efecto la
reducción de vibración. Si se corta la alimentación del objetivo cuando se encuentre
activa la reducción de la vibración, el objetivo podría producir un ruido al sacudirlo.
Esto no es un mal funcionamiento, y se puede corregir volviendo a montar el objetivo y
encendiendo la cámara.
• Si la cámara está equipada con un fl ash incorporado, la reducción de la vibración se
desactivará mientras esté cargando el fl ash.
• ON se recomienda por norma general al instalar la cámara sobre un monopié o un
trípode con un cabezal no asegurado, sin embargo OFF podría ser preferible en función
de las condiciones de disparo y del tipo de trípode.
■
■
Parasol del objetivo
Parasol del objetivo
El parasol protege al objetivo y bloquea la luz directa que podría ocasionar destello
o fantasma.
Instalación del parasol
Instalación del parasol
Aliene la marca de montaje del parasol (●)
con la marca de alineación del parasol ( ) y,
a continuación, gire el parasol (
w
) hasta que
la marca ● esté alineada con la marca de
bloqueo del parasol (—{).
Al montar o quitar el parasol, sujételo cerca del símbolo sobre su base y evite
apretarlo demasiado fuerte. El viñeteado puede presentarse si el parasol no está
instalado correctamente.
El parasol se puede invertir y montar sobre el objetivo cuando no esté en uso.
Desinstalación del parasol
Desinstalación del parasol
Pulse el botón de bloqueo del parasol (
q
), gire
el parasol en la dirección indicada por la echa
(
w
) y extráigalo tal y como se indica (
e
).
■
■
Pantallas de enfoque
Pantallas de enfoque
Las siguientes cámaras son compatibles con una gran variedad de pantallas de
enfoque para usarse en diferentes situaciones.
Pantalla
Pantalla
Cámara
Cámara
A
A
B
B
C
C
E
E
EC-B
EC-B
EC-E
EC-E
G1
G1
G2
G2
G3
G3
G4
G4
J
J
L
L
M
M
U
U
F6
—
— ——— —
F5+ DP-30
{
{
(–0,5)
F5+ DA-30
(+1,0)
{
(–0,5)
(+0,5)
: Recomendado.
{: Viñeteado visible en el visor (las fotografías no se ven afectadas).
—: No compatible con la cámara.
( ): Las cifras entre paréntesis proporcionan la compensación de exposición para
la medición central ponderada. Seleccione “Otra pantalla” para la confi guración
personalizada b6 (“Compens pantalla”) al ajustar la compensación de exposición
para la F6; tenga en cuenta que con otras pantallas diferentes a B o E, se debe
seleccionar “Otra pantalla” incluso cuando el valor para la compensación de
exposición sea 0. La compensación de exposición para la F5 se puede ajustar
usando la confi guración personalizada 18; consulte el manual de la cámara para
más detalles.
Celda vacía: No es adecuado usar esta pantalla con este objetivo. Tenga en cuenta que las
pantallas tipo M sin embargo se pueden usar para la fotomicrografía y para la
fotografía a nivel macro en ampliaciones de 1 : 1 o superiores.
Nota: La F5 es compatible con medición matricial usando las pantallas de enfoque A, B, E, EC-B/
EC-E, J y L únicamente.
■
■
Uso de un trípode (fi gura 2)
Uso de un trípode (fi gura 2)
El objetivo está equipado con un anillo para trípode giratorio extraíble; al usar un
trípode, instálelo en el anillo, no en la cámara. Para instalar el anillo en el objetivo:
z
Afl oje ligeramente el tornillo de bloqueo del anillo del trípode (
q
).
x
Alinee la marca de alineación de la parte superior del objetivo con la marca
del anillo (
w
) e introduzca el objetivo en el anillo.
c
Gire el objetivo hasta la posición deseada (existen disponibles tres posiciones
en intervalos de 90°), deteniéndose cuando la marca de alineación de la parte
superior del objetivo esté alineada con la marca de la posición deseada del anillo
(
e
) y, a continuación, apriete el tornillo de bloqueo del anillo del trípode (
r
).
Asegúrese de que el tornillo esté completamente apretado; en caso contrario, el
objetivo podría desprenderse del anillo del trípode.
Extracción del anillo del trípode
Extracción del anillo del trípode
z
Teniendo cuidado de no extraer el tornillo de su toma, afl oje el tornillo de
bloqueo del anillo del trípode hasta que el anillo gire libremente (
t
).
x
Alinee la marca de alineación de la parte superior del objetivo con la marca
del anillo (
y
) y extraiga el objetivo del anillo (
u
).
■
■
Cuidado del objetivo
Cuidado del objetivo
• No recoja o sujete el objetivo o la cámara usando solamente el parasol de objetivo.
• Mantenga los contactos CPU limpios.
• Si se daña la junta de goma de montaje del objetivo, deje de usarlo inmediatamente y
lleve el objetivo al servicio técnico autorizado de Nikon para repararlo.
• Use un soplador para quitar el polvo y la pelusa de la superfi cie del objetivo. Para quitar
tizna y las huellas dactilares, aplique una pequeña cantidad de etanol o limpiador para
objetivo en un paño de algodón limpio o en un papel de limpieza de objetivo y limpie
del centro hacia afuera usando movimientos circulares, teniendo cuidado de no dejar
manchas ni de tocar el cristal con sus dedos.
• Nunca use solventes orgánicos como el disolvente de pintura o benceno para limpiar
el objetivo.
• El parasol o los fi ltros NC se pueden usar para proteger el elemento delantero del objetivo.
• Coloque la tapa delantera y trasera antes de colocar el objetivo en su bolsa fl exible.
• Si el objetivo no se va a usar durante un periodo prolongado de tiempo, guárdelo en un
lugar frío y seco para evitar la formación de moho y corrosión. No lo guarde a la luz solar
directa o con bolas para polilla de alcanfor o de naftalina.
• Mantenga el objetivo seco. La oxidación del mecanismo interno puede ocasionar daños
irreparables.
• Dejar el objetivo en lugares extremadamente calientes podría averiar o deformar las
piezas hechas de plástico reforzado.
• Los cambios rápidos de temperatura podrían provocar condensación dañina dentro y fuera
del objetivo. Antes de transportar el objetivo de un ambiente frío a otro caliente o viceversa,
colóquelo en una bolsa o estuche de plástico para atenuar el cambio de temperatura.
Italiano
Grazie per aver scelto un obiettivo NIKKOR. Prima di usare questo prodotto, leggere
attentamente sia queste istruzioni sia il manuale della fotocamera.
Nota: Quando è montato su una fotocamera re ex digitale ad obiettivo singolo,
formato DX, come la D7000 o le fotocamere della serie D300, questo obiettivo ha
un angolo di visuale di 20° – 4° ed una lunghezza focale equivalente a 120 – 600 mm
(formato 35 mm).
Per la vostra sicurezza
Per la vostra sicurezza
A
A
PRECAUZIONI
PRECAUZIONI
• Non disassemblare. Toccare le parti interne della fotocamera o dell’obiettivo può provocare
ferimenti. In caso di malfunzionamento, il prodotto deve essere riparato esclusivamente
da un tecnico qualifi cato. In caso di apertura del prodotto in seguito a cadute o altri
incidenti, rimuovere la batteria della fotocamera e/o disconnettere l’adattatore CA,
quindi portare il prodotto ad un centro di assistenza autorizzato Nikon, per un controllo.
• Spegnere la fotocamera immediatamente in caso di malfunzionamento. Qualora si noti fumo o
strani odori provenire dall’attrezzatura, disconnettere immediatamente l’adattatore CA
e rimuovere la batteria della fotocamera, facendo attenzione a non scottarsi. Un uso
senza pause può dare luogo a incendi o ferimenti. Dopo aver rimosso la batteria, portare
l’attrezzatura ad un centro di assistenza autorizzato Nikon, per un controllo.
• Non usare in presenza di gas in ammabili. L’utilizzo di apparecchi elettronici in presenza di gas
infi ammabili può dare luogo ad esplosioni o incendi.
• Non osservare il sole attraverso l’obiettivo o il mirino della fotocamera. Osservare il sole o altre
fonti di luce intensa, attraverso l’obiettivo o il mirino, può causare disabilità visive
permanenti.
• Tenere al di fuori della portata dei bambini. L’inadempienza di questa precauzione può dare
luogo a ferimenti.
• Osservare le seguenti precauzioni quando si maneggiano l’obiettivo e la fotocamera:
- Tenere asciutti l’obiettivo e la fotocamera. L’inadempienza di questa precauzione può
dare luogo a incendi o scosse elettriche.
- Non maneggiare l’obiettivo o la fotocamera con le mani bagnate. L’inadempienza di
questa precauzione può dare luogo a scosse elettriche.
- Tenere il sole al di fuori dell’inquadratura quando si scattano foto di soggetti
controluce. La luce solare messa a fuoco nella fotocamera, quando il sole è all’interno o
nelle vicinanze dell’inquadratura, potrebbe causare un incendio.
- Se l’obiettivo non viene usato per un periodo prolungato, attaccare i tappi anteriore e
posteriore dell’obiettivo e conservarlo in un luogo al di fuori della luce solare diretta.
Qualora venga lasciato sotto la luce solare diretta, l’obiettivo potrebbe far convergere i
raggi solari su di un oggetto infi ammabile, causando un incendio.
• Non trasportare treppiedi con un obiettivo o fotocamera attaccati. Potrebbe capitare di
inciampare o colpire altre persone accidentalmente, causando ferimenti.
• Non lasciare l’obiettivo in luoghi dove potrebbe essere esposto a temperature estremamente alte,
come, ad esempio, all’interno di un’automobile chiusa o alla luce solare diretta. L’inadempienza di
questa precauzione può causare danni alle parti interne dell’obiettivo, causando incendi.
Avviso per gli utenti europei
Avviso per gli utenti europei
Questo simbolo indica che gli apparecchi elettrici ed elettronici
devono essere smaltiti negli appositi contenitori di ri uti.
Le seguenti istruzioni sono rivolte esclusivamente agli utenti di paesi
europei:
• Il presente prodotto deve essere smaltito nell’apposito contenitore
di ri uti. Non smaltire insieme ai ri uti domestici.
• La raccolta di erenziata e il riciclaggio aiutano a preservare le risorse naturali e
a prevenire le conseguenze negative per la salute umana e per l’ambiente che
potrebbero essere provocate dallo smaltimento scorretto.
• Per ulteriori informazioni, vi preghiamo di contattare le autorità locali responsabili
dello smaltimento dei ri uti.
■
■
Componenti dell’obiettivo (Figura 1)
Componenti dell’obiettivo (Figura 1)
q
Riferimento di innesto paraluce
w
Anello zoom
e
Scala delle lunghezze focali
r
Riferimento scala lunghezze focali
t
Indicatore della distanza di messa a
fuoco
y
Riferimento della distanza di messa
a fuoco
u
Anello di messa a fuoco
i
Indice di rotazione obiettivo
o
Riferimento di innesto obiettivo
!0
Guarnizione in gomma di innesto
obiettivo
!1
Contatti CPU
!2
Selettore del modo di messa a fuoco
!3
Interruttore limite di messa a fuoco
!4
Interruttore riduzione vibrazioni ON/OFF
!5
Interruttore modo riduzione vibrazioni
!6
Interruttore dispositivo di blocco zoom
!7
Paraluce
!8
Riferimento di allineamento paraluce
!9
Riferimento di blocco paraluce
@0
Pulsante di sblocco paraluce
@1
Vite di blocco fl angia treppiedi
@2
Indici di posizione (90°)
@3
Flangia treppiedi
■
■
Compatibilità
Compatibilità
I segni di spunta ("✔") indicano le caratteristiche supportate, i trattini ("—")
indicano le caratteristiche non supportate. Possono vigere alcune limitazioni; si
veda il manuale della fotocamera per dettagli.
Fotocamera
Fotocamera
Modo di esposizione
Modo di esposizione
(ripresa)
(ripresa)
Funzione
Funzione
P
P
2
2
S
S
A
A
M
M
AF
AF
3
3
VR
VR
4
4
Fotocamere digitali refl ex con obiettivo singolo
Nikon, F6, F5, F100, serie F80, serie F75, serie F65
✔✔✔✔✔✔
Pronea 600i, Pronea S
1
✔✔✔✔✔
—
Serie F4, F90X, serie F90, serie F70
✔✔
——
✔
—
Serie F60, serie F55, serie F50, F-401x, F-401s, F-401
✔✔✔✔
——
F-801s, F-801, F-601
M
✔✔
————
F3AF, F-601, F-501, fotocamere Nikon con messa a
fuoco manuale (tranne F-601
M)
—
1. Modo di esposizione M (manuale) non disponibile.
2. Include i modi AUTO e scene (Digital Vari-Program).
3. Autofocus
4. Riduzione vibrazioni.
■
■
Messa a fuoco
Messa a fuoco
I modi di messa a fuoco supportati sono mostrati nella seguente tabella (per
informazioni sui modi di messa a fuoco della fotocamera, vedere il manuale della
fotocamera).
Fotocamera
Fotocamera
Modo messa
Modo messa
a fuoco
a fuoco
fotocamera
fotocamera
Modo messa a fuoco obiettivo
Modo messa a fuoco obiettivo
A/M
A/M
M/A
M/A
M
M
Fotocamere digitali refl ex con
obiettivo singolo Nikon, F6, F5,
serie F4, F100, F90X, serie F90,
serie F80, serie F75, serie F70,
serie F65, Pronea 600i, Pronea S
AF
Esclusione
dell'autofocus
manuale
(priorità AF)
Esclusione
dell'autofocus
manuale
(priorità manuale)
Messa a fuoco
manuale con
telemetro
elettronico
MF
Messa a fuoco manuale
(telemetro elettronico disponibile con tutte le
fotocamere, eccetto F-601
M)
Serie F60, serie F55, serie F50,
F-801s, F-801, F-601M, F-401x,
F-401s, F-401
AF, MF
Modi A/M e M/A
Modi A/M e M/A
• M/A: l'autofocus può essere escluso ruotando l'anello di messa a fuoco
dell'obiettivo.
• A/M: come sopra, tranne che l'anello di messa a fuoco deve essere
ruotato ulteriormente prima che l'autofocus venga escluso, evitando
i cambiamenti accidentali della messa a fuoco causati da operazioni
involontarie dell'anello di messa a fuoco.
z
Far scorrere il selettore del modo di messa a fuoco dell'obiettivo su A/M
o M/A.
x
Messa a fuoco.
Se lo si desidera, l’autofocus può essere compensato manualmente, ruotando
l’anello di messa a fuoco mentre il pulsante di scatto è premuto a metà corsa
(oppure, se la fotocamera è dotata di un pulsante AF-ON, mentre è premuto
il pulsante AF-ON). Per mettere nuovamente a fuoco utilizzando l’autofocus,
premere nuovamente il pulsante di scatto a metà corsa oppure il pulsante
AF-ON.
Interruttore limite di messa a fuoco
Interruttore limite di messa a fuoco
Questo interruttore stabilisce i limiti della distanza di messa a fuoco per l’autofocus.
• FULL: Selezionate questa opzione per soggetti che possono trovarsi a distanze
minori di 6 m.
• ∞–6 m: Se il soggetto sarà sempre a una distanza di almeno 6 m, selezionate
questa opzione per una messa a fuoco più rapida.
■
■
Zoom e profondità di campo
Zoom e profondità di campo
Prima di mettere a fuoco, ruotare l’anello zoom per regolare la lunghezza focale e
inquadrare la fotogra a. Se la fotocamera è dotata di anteprima di profondità di
campo (stop down), è possibile visualizzare l’anteprima di profondità di campo
nel mirino.
Nota: La lunghezza focale diminuisce all’accorciarsi della distanza di messa a fuoco.
Si noti che l’indicatore della distanza di messa a fuoco costituisce semplicemente
una guida e potrebbe non mostrare con precisione la distanza dall’oggetto e, a
causa della profondità di campo o di altri fattori, potrebbe non indicare ∞ quando
la fotocamera sta mettendo a fuoco un oggetto distante.
Per bloccare l'anello zoom, ruotarlo sulla posizione 80 mm e far scorrere
l'interruttore del dispositivo di blocco zoom su LOCK (BLOCCO). Ciò impedisce
che l'obiettivo si estenda a causa del proprio peso mentre la fotocamera viene
trasportata da un luogo all'altro.
■
■
Diaframma
Diaframma
L’apertura del diaframma è regolata tramite i controlli della fotocamera.
Zoom e apertura massima
Zoom e apertura massima
Modi che dello zoom possono alterare l’apertura massima no a ⁄ EV. La
fotocamera tiene comunque conto di ciò quando imposta l’esposizione e non
è necessaria alcuna modi ca alle impostazioni della fotocamera in seguito a
modi che allo zoom.
■
■
Unità fl ash incorporate
Unità fl ash incorporate
Quando si usa il ash incorporato su fotocamere dotate di un’unità ash incorporata,
rimuovere il paraluce, onde evitare vignettatture (ombre create dove l’estremità
dell’obiettivo oscura il ash incorporato).
■
■
Riduzione vibrazioni (VR)
Riduzione vibrazioni (VR)
La riduzione vibrazioni (VR) riduce la sfocatura causata dal movimento della
fotocamera, consentendo tempi di posa più lenti no a 4,0 arresti di come
sarebbe in caso contrario (misurato a 400 mm con una fotocamera D4 in base agli
standard della Camera and Imaging Products Association [CIPA]; gli e etti variano
in base al fotografo e alle condizioni di ripresa). Ciò amplia la gamma dei tempi di
posa disponibili e permette la fotogra a con fotocamera tenuta in mano, senza
treppiedi, in una vasta gamma di situazioni.
Utilizzando il selettore ON/OFF riduzione vibrazioni
Utilizzando il selettore ON/OFF riduzione vibrazioni
• Selezionare ON per abilitare la riduzione vibrazioni. La riduzione
vibrazioni viene attivata quando il pulsante di scatto è premuto a
metà corsa, riducendo gli e etti del movimento della fotocamera
per ottenere un’inquadratura e una messa a fuoco migliori.
• Selezionare OFF per disattivare la riduzione vibrazioni.
Utilizzando il selettore modo riduzione vibrazioni
Utilizzando il selettore modo riduzione vibrazioni
Il selettore modo riduzione vibrazioni è utilizzato per selezionare il modo di
riduzione delle vibrazioni quando questa funzione è attiva.
• Selezionare NORMAL per ridurre gli e etti delle vibrazioni quando
si scattano foto da una posizione ssa e in altre situazioni con
movimento della fotocamera relativamente ridotto.
• Selezionare ACTIVE per ridurre gli e etti delle vibrazioni quando si scattano foto da un
veicolo in movimento, mentre si cammina e in altre situazioni con movimento della
fotocamera attivo.
Uso della riduzione vibrazioni: note
Uso della riduzione vibrazioni: note
• Fare scorrere l’interruttore di riduzione vibrazioni su OFF se la fotocamera non supporta
la riduzione vibrazioni. Lasciare attiva la riduzione vibrazioni potrebbe aumentare
notevolmente il consumo della batteria, particolarmente nel caso delle fotocamere
Pronea 600i.
• Quando si usa la riduzione vibrazioni, premere il pulsante di scatto a metà corsa e
attendere che l’immagine nel mirino si stabilizzi, prima di premere del tutto il pulsante
di scatto.
• Quando è attiva la riduzione vibrazioni, l’immagine nel mirino potrebbe risultare sfocata
dopo lo scatto. Ciò non indica un malfunzionamento.
• Far scorrere l'interruttore del modo riduzione vibrazioni su NORMAL (NORMALE) per scatti
di riprese panoramiche. Quando si eff ettua una ripresa panoramica con la fotocamera, la
riduzione vibrazioni si applica soltanto al movimento che non è parte della panoramica
(se si eff ettua una ripresa panoramica orizzontale, per esempio, la riduzione vibrazioni
si applica soltanto al movimento verticale), rendendo più facile l'eff ettuazione regolare
della panoramica in un ampio arco.
• Non spegnere la fotocamera e non rimuovere l’obiettivo mentre la riduzione vibrazioni
è attiva. Se viene interrotta l’alimentazione all’obiettivo mentre la riduzione vibrazioni
è attiva, l’obiettivo potrebbe tintinnare quando viene scosso. Ciò non rappresenta
un malfunzionamento e può essere corretto attaccando nuovamente l’obiettivo e
riaccendendo la fotocamera.
• Se la fotocamera è dotata di un fl ash incorporato, la riduzione vibrazioni verrà disattivata
mentre il fl ash sta caricando.
• ON è consigliato in generale quando la fotocamera è montata su un monopiede o
un treppiedi con una testina non fi ssata, mentre OFF può essere preferito in base alle
condizioni di ripresa e al tipo di treppiedi.
■
■
Il paraluce
Il paraluce
Il paraluce protegge l’obiettivo e blocca la luce sporadica che altrimenti potrebbe
causare fenomeni di luce parassita e immagini fantasma.
Montaggio del paraluce
Montaggio del paraluce
Allineare il riferimento di innesto paraluce (●)
con il riferimento di allineamento paraluce
( ) e quindi ruotare il paraluce (
w
) nché il
riferimento ● non è allineato con il riferimento
di blocco paraluce (—{).
Quando si attacca o rimuove il paraluce, mantenerlo in prossimità del simbolo
presente sulla sua base ed evitare di a errarlo con troppa forza. Se il paraluce non
è attaccato correttamente, possono veri carsi vignettature.
Il paraluce può essere girato su se stesso e montato sull’obiettivo quando non
utilizzato.
Rimozione del paraluce
Rimozione del paraluce
Premere il pulsante di sblocco del paraluce
(
q
), ruotare il paraluce nella direzione
mostrata dalla freccia (
w
) e rimuoverlo
come mostrato (
e
).
■
■
Schermi di messa a fuoco
Schermi di messa a fuoco
Le seguenti fotocamere supportano di erenti schermi di messa a fuoco in diverse
situazioni.
Schermo
Schermo
Fotocamera
Fotocamera
A
A
B
B
C
C
E
E
EC-B
EC-B
EC-E
EC-E
G1
G1
G2
G2
G3
G3
G4
G4
J
J
L
L
M
M
U
U
F6
—
— ——— —
F5+ DP-30
{
{
(–0,5)
F5+ DA-30
(+1,0)
{
(–0,5)
(+0,5)
: Consigliato.
{: Vignettattura visibile nel mirino (le fotografi e non ne sono infl uenzate).
—: Non compatibile con la fotocamera.
( ): Le cifre in parentesi indicano la compensazione dell’esposizione per la
misurazione esposimetrica concentrata. Selezionare "Other screen (Altro
schermo)" dall’impostazione personalizzata b6 ("Screen comp. (Compensazione
schermo)") quando si regola la compensazione dell’esposizione per la F6; si noti
che con schermi diversi da quelli B ed E, è necessario selezionare "Other screen
(Altro schermo)" anche se il valore per la compensazione dell’esposizione è
0. La compensazione dell’esposizione per la F5 può essere regolata usando
l’impostazione personalizzata 18; si veda il manuale della fotocamera per
dettagli.
Casella vuota: Non adatto per l’uso con questo obiettivo. Si noti che gli schermi M
possono comunque essere usati per microfotografi a e fotografi a macro agli
ingrandimenti di 1 : 1 o superiori.
Nota: La F5 supporta la misurazione matrix solo con gli schermi A, B, E, EC-B/ EC-E, J ed L.
■
■
Uso di un treppiedi (Figura 2)
Uso di un treppiedi (Figura 2)
L'obiettivo è dotato di una angia treppiedi rimovibile e rotante; quando si usa
un treppiedi, collegarlo alla angia, non alla fotocamera. Per collegare la angia
all'obiettivo:
z
Allentare leggermente la vite di blocco della angia del treppiedi (
q
).
x
Allineare il riferimento di allineamento sulla parte superiore dell'obiettivo
con il riferimento
sulla angia (
w
) e inserire l'obiettivo nella
angia.
c
Ruotare l'obiettivo sulla posizione desiderata (sono disponibili tre
posizioni a intervalli di 90°), fermandosi quando il riferimento di
allineamento sulla parte superiore dell'obiettivo è allineato con il
riferimento della posizione desiderata sulla angia (
e
), quindi serrare
la vite di blocco della angia del treppiedi (
r
). Assicurarsi che la
vite sia completamente serrata; se la vite non è serrata, l'obiettivo
potrebbe cadere dalla angia del treppiedi.
Rimozione della angia del treppiedi
Rimozione della angia del treppiedi
z
Facendo attenzione a non rimuovere la vite dal suo alveo, allentare la
vite di blocco della angia del treppiedi nché la angia non ruota
liberamente (
t
).
x
Allineare il riferimento di allineamento sulla parte superiore dell'obiettivo
con il riferimento sulla angia (
y
) e rimuovere l'obiettivo dalla angia
(
u
).
■
■
Cura dell’obiettivo
Cura dell’obiettivo
• Non aff errare o mantenere l’obiettivo o la fotocamera usando solo il paraluce.
• Mantenere puliti i contatti CPU.
• Nel caso in cui la guarnizione in gomma di innesto obiettivo sia danneggiata,
interrompere immediatamente l’utilizzo e portare l’obiettivo ad un centro di assistenza
autorizzata Nikon per la riparazione.
• Usare un soffi etto per rimuovere polvere e pelucchi dalla superfi cie della lente
dell’obiettivo. Per rimuovere macchie e impronte digitali, applicare una piccola quantità
di etanolo o di pulitore per lenti su un tessuto in cotone o in micro-fi bra e pulire la lente
con un movimento circolare dal centro verso l’esterno, avendo cura di non lasciare
macchie e di non toccare il vetro con le dita.
• Per la pulizia della lente non usare mai solventi organici, come solventi per vernici o benzene.
• Il paraluce o fi ltri NC possono essere usati per proteggere l’elemento frontale dell’obiettivo.
• Attaccare i tappi anteriore e posteriore prima di riporre l’obiettivo nella sua borsa
fl essibile.
• Se si prevede di non utilizzare l’obiettivo per un periodo prolungato, conservarlo in un
luogo fresco e asciutto, onde evitare che si creino muff a e ruggine. Non conservare in
luoghi esposti alla luce diretta del sole o in presenza di naftalina o canfora.
• Tenere asciutto l’obiettivo. La presenza di ruggine nel meccanismo interno potrebbe
causare un danno irreparabile.
• Lasciare l’obiettivo in luoghi estremamente caldi può danneggiare o deformare le parti
realizzate in plastica rinforzata.
• Rapidi cambiamenti di temperatura potrebbero provocare una dannosa condensa
all’interno e all’esterno dell’obiettivo. Prima di portare l’obiettivo da un ambiente caldo a
uno freddo o viceversa, posizionarlo in una borsa o una custodia di plastica per rallentare
la variazione di temperatura.
■
■
Accessori in dotazione
Accessori in dotazione
• Copriobiettivo anteriore snap-on 77 mm LC-77
• Copriobiettivo posteriore LF-4
• Paraluce a baionetta HB-65
• Custodia morbida per obiettivo CL-M2
■
■
Accessori compatibili
Accessori compatibili
• Filtri a vite da 77 mm
• Moltiplicatori di focale AF-I/AF-S TC-14E
1
/TC-14E II
1
/TC-17E II
2
/TC-20E
2
/TC-20E II
2
/
TC-20E III
2
1 L'autofocus è disponibile soltanto con fotocamere che off rono supporto per f/8.
2 L'autofocus non è supportato.
Português
Obrigado por ter adquirido uma objetiva NIKKOR. Antes de utilizar este produto,
por favor, leia com atenção tanto estas instruções como o manual da câmara.
Nota: Quando montada numa câmara digital re ex de objetiva simples de formato
DX tal como a D7000 ou câmaras na série D300, esta objetiva tem um ângulo de
visão de 20° – 4° e uma distância focal equivalente a 120 – 600 mm (formato de
35 mm).
Para Sua Segurança
Para Sua Segurança
A
A
PRECAUÇÕES
PRECAUÇÕES
• Não desmontar. Tocar nas partes internas da câmara ou da objetiva pode resultar em
lesões. Em caso de mau funcionamento, o produto deve apenas ser reparado por um
técnico qualifi cado. Se o produto se quebrar como resultado de queda ou outro acidente,
remova a bateria da câmara e/ou desconecte o adaptador CA e depois leve o produto a
um centro de assistência autorizado da Nikon para inspeção.
• Desligar a câmara imediatamente em caso de mau funcionamento. Se reparar em fumo ou
num odor incomum a sair do equipamento, desligue o adaptador CA da tomada
imediatamente e remova a bateria da câmara, tendo cuidado para evitar queimaduras. A
operação continuada pode resultar em incêndio ou lesões. Após remover a bateria, leve
o equipamento a um centro de assistência autorizado da Nikon para inspeção.
• Não utilizar na presença de gás in amável. Operar equipamento eletrónico na presença de
gás infl amável pode resultar em explosão ou incêndio.
• Não olhar para o sol através da objetiva ou do visor da câmara. Ver o sol ou outra fonte de iluminação
forte através da objetiva ou do visor pode causar incapacidade visual permanente.
• Manter fora do alcance das crianças. A não observância desta precaução pode resultar em
lesões.
• Observe as seguintes precauções ao manusear a objetiva e a câmara:
- Mantenha a objetiva e a câmara secas. A não observância desta precaução pode
resultar em incêndio ou choque elétrico.
- Não manuseie a objetiva ou a câmara com mãos molhadas. A não observância desta
precaução pode resultar em choque elétrico.
- Mantenha o sol sufi cientemente fora do enquadramento ao fotografar motivos em
contraluz. A luz do sol focada na câmara quando o sol está no enquadramento ou
perto deste pode causar um incêndio.
- Se a objetiva não for usada por um período extenso, coloque as tampas frontal e
traseira e armazene a objetiva longe de luz solar direta. Se deixada sob luz solar direta,
a objetiva pode focar os raios solares em objetos infl amáveis, causando incêndio.
• Não transportar tripés com uma objetiva ou câmara montadas. Pode tropeçar ou acertar em
terceiros acidentalmente, resultando em lesões.
• Não deixar a objetiva onde esteja exposta a temperaturas extremamente altas, como num veículo
fechado ou sob luz solar direta. A não observância desta precaução pode afetar adversamente
as peças internas da objetiva, causando incêndio.
Aviso para os Clientes na Europa
Aviso para os Clientes na Europa
Este símbolo indica que os equipamentos elétricos e eletrónicos
devem ser recolhidos separadamente.
O seguinte aplica-se apenas aos utilizadores em países Europeus:
• Este produto é indicado para recolha separada num ponto de
recolha apropriado. Não descarte como lixo doméstico.
• A recolha separada e a reciclagem ajudam a conservar recursos naturais e a evitar
consequências negativas para a saúde humana e para o ambiente que podem
resultar do descarte inadequado.
• Para mais informações, contacte o revendedor ou as autoridades locais
responsáveis pela gestão de resíduos.
■
■
Peças da Objetiva (Figura 1)
Peças da Objetiva (Figura 1)
q
Marca de montagem do para-sol da
objetiva
w
Anel de zoom
e
Escala de distâncias focais
r
Marca de distâncias focais
t
Indicador de distância de focagem
y
Marca da distância de focagem
u
Anel de focagem
i
Índice de rotação da objetiva
o
Marca de montagem da objetiva
!0
Junta de borracha da montagem da
objetiva
!1
Contactos CPU
!2
Comutador de modo de focagem
!3
Comutador de limite de focagem
!4
Comutador LIGAR/DESLIGAR de
redução da vibração
!5
Comutador de modo de redução da
vibração
!6
Comutador de bloqueio do zoom
!7
Para-sol da objetiva
!8
Marca de alinhamento do para-sol da
objetiva
!9
Marca de bloqueio do para-sol da
objetiva
@0
Botão de desbloqueio do para-sol da
objetiva
@1
Parafuso de fi xação do colar do tripé
@2
Índices de posição (90°)
@3
Colar de tripé
■
■
Compatibilidade
Compatibilidade
As marcas de veri cação ("✔") indicam funções suportadas e os travessões ("—")
funções que não são suportadas. Podem aplicar-se algumas limitações; consulte o
manual da câmara para detalhes.
Câmara
Câmara
Modo de exposição
Modo de exposição
(disparo)
(disparo)
Função
Função
P
P
2
2
S
S
A
A
M
M
AF
AF
3
3
VR
VR
4
4
Câmaras digitais refl ex de objetiva simples Nikon, F6,
F5, F100, série F80, série F75, série F65
✔✔✔✔✔✔
Pronea 600i, Pronea S
1
✔✔✔✔✔
—
Série F4, F90X, série F90, série F70
✔✔
——
✔
—
Série F60, série F55, série F50, F-401x, F-401s, F-401
✔✔✔✔
——
F-801s, F-801, F-601
M
✔✔
————
F3AF, F-601, F-501, câmaras de focagem manual da
Nikon (excluindo F-601
M)
—
1. Modo de exposição M (manual) não disponível.
2. Inclui os modos AUTO e cena (Digital Vari-Program).
3. Focagem automática.
4. Redução da vibração.
■
■
Focagem
Focagem
Os modos de focagem suportados são mostrados na seguinte tabela (para
informações sobre os modos de focagem da câmara, consulte o manual da
câmara).
Câmara
Câmara
Modo de
Modo de
focagem da
focagem da
câmara
câmara
Modo de focagem da objetiva
Modo de focagem da objetiva
A/M
A/M
M/A
M/A
M
M
Câmaras digitais refl ex de objetiva
simples Nikon, F6, F5, série F4,
F100, F90X, série F90, série F80,
série F75, série F70, série F65,
Pronea 600i, Pronea S
AF
Focagem
automática
com opção
manual
(prioridade
a AF)
Focagem
automática
com opção
manual
(prioridade
manual)
Focagem
manual com
telémetro
eletrónico
MF
Focagem manual
(telémetro eletrónico disponível com todas as
câmaras, exceto a F-601
M)
Série F60, série F55, série F50, F-801s,
F-801, F-601
M,
F-401x, F-401s, F-401
AF, MF
Modos A/M e M/A
Modos A/M e M/A
• M/A: A focagem automática pode ser anulada rodando o anel de
focagem da objetiva.
• A/M: Como acima, exceto que o anel de focagem deve ser rodado
adicionalmente antes de a focagem automática ser anulada, evitando
alterações acidentais à focagem causadas pela operação não
intencional do anel de focagem.
z
Deslize o comutador do modo de focagem da objetiva para A/M ou M/A.
x
Focar.
Se desejado, a focagem automática pode ser anulada rodando o anel
de focagem da objetiva enquanto o botão de disparo do obturador é
ligeiramente premido (ou, se a câmara estiver equipada com um botão AF-ON,
enquanto o botão AF-ON estiver premido). Para voltar a focar utilizando a
focagem automática, prima ligeiramente o botão de disparo do obturador ou
prima o botão AF-ON de novo.
O Comutador de Limite de Focagem
O Comutador de Limite de Focagem
Este comutador determina os limites da distância de focagem para a focagem
automática.
• FULL: Selecione esta opção para motivos que possam fi car mais perto que 6 m.
• ∞–6 m: Se o seu motivo irá estar sempre a uma distância de pelo menos 6 m,
selecione esta opção para focagem mais rápida.
■
■
Zoom e Profundidade de Campo
Zoom e Profundidade de Campo
Antes de focar, rode o anel de zoom para ajustar a distância focal e enquadrar
a fotogra a. Se a câmara oferecer pré-visualização de profundidade de campo
(número f inferior), a profundidade de campo pode ser pré-visualizada no visor.
Nota: A distância focal é reduzida à medida que a distância de focagem diminui.
Note que o indicador da distância de focagem está concebido apenas como um
guia e pode não mostrar com precisão a distância ao motivo e pode, devido à
profundidade de campo e outros fatores, não mostrar ∞ quando a câmara está
focada num objeto distante.
Para bloquear o anel de zoom, rode-o para a posição 80 mm e deslize o comutador
de bloqueio do zoom para LOCK (BLOQUEADO). Isto evita que a objetiva se
prolongue sob o seu próprio peso enquanto a câmara está a ser transportada de
um lado para o outro.
■
■
Abertura
Abertura
A abertura é ajustada utilizando os controlos da câmara.
Zoom e Abertura Máxima
Zoom e Abertura Máxima
Alterações ao zoom podem alterar a abertura máxima em até ⁄EV. Contudo, a
câmara toma isto em conta automaticamente ao de nir a exposição, e não são
necessárias modi cações às de nições da câmara em seguimento aos ajustes de
zoom.
■
■
Unidades de Flash Incorporado
Unidades de Flash Incorporado
Ao utilizar o ash incorporado em câmaras equipadas com uma unidade de ash
incorporado, remova o para-sol da objetiva para evitar a vinhetagem (sombras
criadas onde a extremidade da objetiva obscurece o ash incorporado).
■
■
Redução da Vibração (VR, Vibration Reduction)
Redução da Vibração (VR, Vibration Reduction)
A redução da vibração (VR) reduz o efeito tremido causado pela vibração da
câmara, permitindo velocidades do obturador até 4,0 pontos mais lentas que o
que seria normal (medidas a 400 mm com uma câmara D4 de acordo com as
normas da Camera and Imaging Products Association [CIPA]; os efeitos podem
variar com o fotógrafo e com as condições fotográ cas). Isto aumenta a gama de
velocidades do obturador disponíveis e permite fotogra a portátil sem tripé numa
ampla variedade de situações.
Utilizar o Comutador ON/OFF (LIGAR/DESLIGAR) de Redução da Vibração
Utilizar o Comutador ON/OFF (LIGAR/DESLIGAR) de Redução da Vibração
• Selecione ON (LIGAR) para ativar a redução da vibração. A redução da
vibração é ativada quando o botão de disparo do obturador
é ligeiramente premido, reduzindo os efeitos da vibração da
câmara para enquadramento e focagem melhorados.
• Selecione OFF (DESLIGAR) para desligar a redução da vibração.
Utilizar o Comutador de Modo de Redução da Vibração
Utilizar o Comutador de Modo de Redução da Vibração
O comutador de modo de redução da vibração é utilizado para selecionar o modo
de redução da vibração quando a redução da vibração está ligada.
• Selecione NORMAL para reduzir os efeitos da vibração ao fotografar
de uma posição xa e em outras situações com relativamente
pouco movimento da câmara.
• Selecione ACTIVE (ATIVO) para reduzir os efeitos da vibração ao fotografar de um veículo
em movimento, ao andar e em outras situações com movimento da câmara ativo.
Utilizar a Redução da Vibração: Notas
Utilizar a Redução da Vibração: Notas
• Deslize o comutador de redução da vibração para OFF (DESLIGAR) se a câmara não
suportar redução da vibração. Deixar a redução da vibração ligada pode aumentar em
grande medida o gasto da bateria, particularmente no caso de câmaras Pronea 600i.
• Ao utilizar a redução da vibração, prima ligeiramente o botão de disparo do obturador
e espere que a imagem no visor estabilize antes de premir completamente o botão de
disparo do obturador.
• Quando a redução da vibração está ativa, a imagem no visor poderá fi car desfocada após
o obturador ser disparado. Isto não indica mau funcionamento.
• Deslize o comutador do modo de redução da vibração para NORMAL para fotografi as
panorâmicas. Quando a câmara é orientada, a redução da vibração aplica-se apenas
ao movimento que não faz parte da orientação (se a câmara estiver orientada
horizontalmente, por exemplo, a redução da vibração será aplicada apenas à vibração
vertical), tornando muito mais fácil orientar a câmara suavemente num arco amplo.
• Não desligue a câmara nem remova a objetiva enquanto a redução da vibração estiver
em vigor. Se a alimentação à objetiva for cortada enquanto a redução da vibração
está ligada, a objetiva pode fazer barulhos ao ser agitada. Isto não constitui mau
funcionamento e pode ser corrigido voltando a montar a objetiva e ligando a câmara.
• Se a câmara estiver equipada com um fl ash incorporado, a redução da vibração será
desativada enquanto o fl ash carrega.
• ON (LIGADO) é geralmente recomendado quando a câmara está montada num
monopé ou num tripé com uma cabeça não segura, apesar de poder ser preferido OFF
(DESLIGADO) dependendo das condições fotográfi cas e do tipo de tripé.
■
■
O Para-sol da Objetiva
O Para-sol da Objetiva
Os para-sóis da objetiva protegem a objetiva e bloqueiam a luz dispersa que
causaria de outro modo re exo ou efeito fantasma.
Montar o Para-sol
Montar o Para-sol
Alinhe a marca de montagem do para-sol da
objetiva (
●) com a marca de alinhamento
do para-sol da objetiva ( ) e depois rode
o para-sol (
w
) até que a marca
● esteja
alinhada com a marca de bloqueio do para-
sol da objetiva (—{).
Ao montar ou remover o para-sol, segure-o perto do símbolo na sua base e
evite apertá-lo em demasia. Pode ocorrer vinhetagem se o para-sol não estiver
montado corretamente.
O para-sol pode ser revertido e montado na objetiva quando não estiver a ser
utilizado.
Desmontar o Para-sol
Desmontar o Para-sol
Prima o botão de desbloqueio do para-sol
da objetiva (
q
), rode o para-sol na direção
mostrada pela seta (
w
) e remova-o como
mostrado (
e
).
■
■
Ecrãs de Focagem
Ecrãs de Focagem
As seguintes câmaras suportam uma variedade de ecrãs de focagem para
utilização em diferentes situações.
Ecrã
Ecrã
Câmara
Câmara
A
A
B
B
C
C
E
E
EC-B
EC-B
EC-E
EC-E
G1
G1
G2
G2
G3
G3
G4
G4
J
J
L
L
M
M
U
U
F6
—
— ——— —
F5+ DP-30
{
{
(–0,5)
F5+ DA-30
(+1,0)
{
(–0,5)
(+0,5)
: Recomendado.
{: Vinhetagem visível no visor (as fotografi as não são afetadas).
—: Não compatível com a câmara.
( ): Os valores entre parênteses dão a compensação de exposição para a medição central
ponderada. Selecione "Outro ecrã" para o Ajuste Personalizado b6 ("Comp. do ecrã")
ao ajustar a compensação de exposição para a F6; note que, com ecrãs que não B e E,
"Outro ecrã" tem de estar selecionado mesmo quando o valor para a compensação
de exposição é 0. A compensação de exposição para a F5 pode ser ajustada utilizando
o Ajuste Personalizado 18; consulte o manual da câmara para detalhes.
Casa vazia: Não adequada para utilização com esta objetiva. Note que os ecrãs de tipo M podem
contudo ser utilizados para fotomicrografi a e fotografi a macro em magnifi cações de
1 : 1 ou superior.
Nota: A F5 apenas suporta medição matricial com ecrãs de focagem A, B, E, EC-B/EC-E, J e L.
■
■
Utilizar um Tripé (Figura 2)
Utilizar um Tripé (Figura 2)
A objetiva está equipada com um colar rotativo amovível de tripé; ao utilizar um
tripé, monte-o no colar, não na câmara. Para montar o colar na objetiva:
z
Desaperte ligeiramente o parafuso de xação do colar do tripé (
q
).
x
Alinhe a marca de alinhamento no topo da objetiva com a marca
no colar (
w
) e insira a objetiva no colar.
c
Rode a objetiva para a posição desejada (estão disponíveis três
posições a intervalos de 90°), parando quando a marca de alinhamento
no topo da objetiva está alinhada com a marca da posição desejada
no colar (
e
) e depois aperte o parafuso de xação do colar do tripé
(
r
). Certi que-se de que o parafuso está completamente apertado;
se o parafuso não estiver apertado, a objetiva pode cair do colar do
tripé.
Remover o Colar do Tripé
Remover o Colar do Tripé
z
Tendo cuidado para não remover o parafuso do seu encaixe, desaperte
o parafuso de xação do colar do tripé até que o colar rode livremente
(
t
).
x
Alinhe a marca de alinhamento no topo da objetiva com a marca
no colar (
y
) e remova a objetiva do colar (
u
).
■
■
Specifi che
Specifi che
Tipo
Tipo Obiettivo di tipo G AF-S con CPU incorporata ed innesto a
baionetta F-Mount
Lunghezza focale
Lunghezza focale 80 – 400 mm
Apertura massima
Apertura massima f/4.5 – 5.6
Costruzione obiettivo
Costruzione obiettivo 20 elementi in 12 gruppi (inclusi 4 elementi obiettivo ED, 1 elemento
obiettivo super ED ed elementi obiettivo con un rivestimento Nano-Crystal)
Angolo di campo
Angolo di campo • Fotocamere Nikon SLR a pellicola e D-SLR formato FX:
30°10
c – 6°10c
• Fotocamere Nikon D-SLR formato DX: 20° – 4°
Scala delle lunghezze focali
Scala delle lunghezze focali Graduata in millimetri (80, 105, 135, 200, 300, 400)
Informazioni sulla distanza
Informazioni sulla distanza Inviate alla fotocamera
Zoom
Zoom Zoom manuale con anello zoom indipendente
Messa a fuoco
Messa a fuoco Sistema di messa a Fuoco Interna (IF) Nikon con autofocus
controllato da motore Silent Wave e anello di messa a fuoco
separato per messa a fuoco manuale
Riduzione vibrazioni
Riduzione vibrazioni Decentramento ottico con motori voice coil (VCMs)
Indicatore della distanza di
Indicatore della distanza di
messa a fuoco
messa a fuoco
Da 1,5 m a infi nito (∞)
Distanza minima di messa
Distanza minima di messa
a fuoco
a fuoco
• AF: 1,75 m dal piano focale a tutte le posizioni dello zoom
• MF: 1,5 m dal piano focale a tutte le posizioni dello zoom
Lamelle del diaframma
Lamelle del diaframma 9 (apertura del diaframma arrotondata)
Diaframma
Diaframma Completamente automatico
Gamma del diaframma
Gamma del diaframma • Lunghezza focale 80 mm: da f/4.5 a f/32
• Lunghezza focale 400 mm: da f/5.6 a f/40
L’apertura minima visualizzata potrebbe variare in base alla
dimensione dell’incremento di esposizione selezionato con la
fotocamera.
Misurazione esposimetrica
Misurazione esposimetrica Apertura massima
Interruttore limite di messa
Interruttore limite di messa
a fuoco
a fuoco
Due posizioni: FULL (∞ – 1,75 m) e ∞ – 6 m
Dimensione attacco ltro
Dimensione attacco ltro 77 mm (P = 0,75 mm)
Dimensioni
Dimensioni Diametro massimo di circa 95,5 mm × 203 mm (
distanza dalla
angia di innesto dell’obiettivo della fotocamera
)
Peso
Peso Circa 1570 g inclusa fl angia treppiedi
Circa 1480 g senza fl angia treppiedi
Nikon si riserva il diritto di cambiare le specifi che hardware descritte in questo manuale, in
qualsiasi momento e senza previa notifi ca.
■
■
Accesorios suministrados
Accesorios suministrados
• Tapa frontal a presión del objetivo de 77 mm LC-77
• Tapa trasera del objetivo LF-4
• Parasol de bayoneta HB-65
• Bolsa fl exible para objetivo CL-M2
■
■
Accesorios compatibles
Accesorios compatibles
• Filtros con rosca de 77 mm
• Teleconversores AF-I/AF-S TC-14E
1
/TC-14E II
1
/TC-17E II
2
/TC-20E
2
/TC-20E II
2
/TC-20E III
2
1 Autofoco está disponible únicamente con cámaras compatibles con f/8.
2 Autofoco no compatible.
■
■
Especifi caciones
Especifi caciones
Tipo
Tipo Objetivo tipo G AF-S con CPU incorporado y montura F
Longitud focal
Longitud focal 80 – 400 mm
Diafragma máximo
Diafragma máximo f/4.5 – 5.6
Construcción de objetivo
Construcción de objetivo 20 elementos en 12 grupos (incluyendo 4 elementos de objetivo ED,
1 elemento de objetivo súper ED y elementos de objetivo con revestimiento de
nanocristal)
Ángulo de visión
Ángulo de visión • Cámaras D-SLR de formato FX y SLR de película Nikon:
30°10c – 6°10c
• Cámaras D-SLR de formato DX Nikon: 20° – 4°
Escala de la distancia focal
Escala de la distancia focal Graduado en milímetros (80, 105, 135, 200, 300, 400)
Información de distancia
Información de distancia Salida a cámara
Zoom
Zoom Zoom manual usando el anillo del zoom independiente
Enfoque
Enfoque
Sistema de Enfoque Interno (IF) de Nikon con autofoco controlado
por medio de Silent Wave Motor (motor de onda silenciosa) y anillo
de enfoque por separado para el enfoque manual
Reducción de la vibración
Reducción de la vibración
Desplazamiento de lente usando voice coil motors (VCMs)
Indicador de distancia de
Indicador de distancia de
enfoque
enfoque
1,5 m a infi nito (∞)
Distancia de enfoque
Distancia de enfoque
mínima
mínima
• AF: 1,75 m (5,74 pie) desde el plano focal en todas las
posiciones de zoom
• MF: 1,5 m (4,92 pie) desde el plano focal en todas las
posiciones de zoom
Cuchillas del diafragma
Cuchillas del diafragma 9 (apertura de diafragma redondeada)
Diafragma
Diafragma Completamente automático
Alcance de apertura
Alcance de apertura • Distancia focal de 80 mm: f/4.5 a f/32
• Distancia focal de 400 mm: f/5.6 a f/40
El diafragma mínimo visualizado puede variar dependiendo
del tamaño del incremento de la exposición seleccionado con
la cámara.
Medición
Medición Apertura total
Interruptor de límite de
Interruptor de límite de
enfoque
enfoque
Dos posiciones: FULL (COMPLETO) (∞ – 1,75 m) y ∞ – 6 m
Tamaño de accesorio del
Tamaño de accesorio del
ltro
ltro
77 mm (P = 0,75 mm)
Dimensiones
Dimensiones Aprox. 95,5 mm de diámetro máximo × 203 mm (distancia a
partir de la brida de montura del objetivo)
Peso
Peso Aprox. 1570 g (3,5 lb), incluyendo el cuello del trípode
Aprox. 1480 g (3,3 lb) sin el cuello del trípode
Nikon se reserva el derecho de cambiar las especifi caciones del hardware descritas en este manual en
cualquier momento y sin previo aviso.
■
■
Cuidados com a Objetiva
Cuidados com a Objetiva
• Não pegue ou segure a objetiva ou a câmara utilizando apenas o para-sol da objetiva.
• Mantenha os contactos CPU limpos.
• Se a junta de borracha da montagem da objetiva fi car danifi cada, cesse a utilização
imediatamente e leve a objetiva a um centro de assistência autorizado da Nikon para
reparação.
• Utilize uma pera de ar para remover pó e sujidade das superfícies da objetiva. Para
remover manchas e impressões digitais, aplique uma pequena quantidade de etanol
ou produto de limpeza de objetivas num pano macio e limpo de algodão ou pano de
limpeza de objetivas e limpe do centro para fora utilizando um movimento circular,
tendo cuidado para não deixar nódoas ou tocar no vidro com os seus dedos.
• Nunca utilize solventes orgânicos como diluente ou benzeno para limpar as objetivas.
• O para-sol da objetiva ou os fi ltros NC podem ser utilizados para proteger o elemento
de objetiva frontal.
• Monte as tampas frontal e traseira antes de colocar a objetiva na sua bolsa fl exível.
• Se a objetiva não for utilizada durante um período extenso, armazene num local fresco e seco
para evitar bolor e ferrugem. Não armazene sob luz solar direta ou com bolas de naftalina
ou cânfora.
• Mantenha a objetiva limpa. Ferrugem no mecanismo interno pode causar danos
irreparáveis.
• Deixar a objetiva em locais extremamente quentes pode danifi car ou deformar peças
feitas de plástico reforçado.
• Mudanças bruscas de temperatura podem causar condensação que danifi ca o interior
e o exterior da objetiva. Antes de levar a objetiva de um ambiente quente para o frio
ou vice-versa, coloque-a num saco ou caixa de plástico para retardar a mudança de
temperatura.
■
■
Acessórios Fornecidos
Acessórios Fornecidos
• Tampa Frontal da Objetiva de encaixe de 77 mm LC-77
• Tampa Traseira da Objetiva LF-4
• Para-sol da Baioneta HB-65
• Bolsa Flexível da Objetiva CL-M2
■
■
Acessórios Compatíveis
Acessórios Compatíveis
• Filtros de rosca de 77 mm
• Teleconversores AF-I/AF-S TC-14E
1
/TC-14E II
1
/TC-17E II
2
/TC-20E
2
/TC-20E II
2
/TC-20E III
2
1 A focagem automática está disponível apenas com câmaras que suportem f/8.
2 Focagem automática não suportada.
■
■
Especifi cações
Especifi cações
Tipo
Tipo Objetiva de tipo G AF-S com CPU incorporado e montagem F
Distância focal
Distância focal 80 – 400 mm
Abertura máxima
Abertura máxima f/4.5 – 5.6
Construção da objetiva
Construção da objetiva 20 elementos em 12 grupos (incluindo 4 elementos de objetiva ED, 1
elemento de objetiva super ED e elementos de objetiva com um revestimento de
Nano Cristais)
Ângulo de visão
Ângulo de visão
• Câmaras de lmar SLR e D-SLR de formato FX Nikon: 30°10
c
– 6°10
c
• Câmaras D-SLR de formato DX Nikon: 20° – 4°
Escala de distâncias focais
Escala de distâncias focais Graduada em milímetros (80, 105, 135, 200, 300, 400)
Informações da distância
Informações da distância Enviadas para a câmara
Zoom
Zoom Zoom manual utilizando o anel de zoom independente
Focagem
Focagem Sistema de focagem interna da Nikon (Internal Focusing (IF))
com focagem automática controlado pelo Motor silencioso e
anel de zoom para focagem manual separado
Redução da vibração
Redução da vibração Deslocamento da lente utilizando voice coil motors (VCMs)
Indicador da distância de
Indicador da distância de
focagem
focagem
1,5 m ao infi nito (∞)
Distância de focagem
Distância de focagem
mínima
mínima
• AF: 1,75 m do plano focal em todas as posições de zoom
• MF: 1,5 m do plano focal em todas as posições de zoom
Lâminas do diafragma
Lâminas do diafragma 9 (abertura redonda do diafragma)
Diafragma
Diafragma Completamente automático
Alcance da abertura
Alcance da abertura • Distância focal de 80mm: f/4.5 – 32
• Distância focal de 400 mm: f/5.6 – 40
A abertura mínima exibida pode variar dependendo do tamanho
do incremento de exposição selecionado com a câmara.
Medição
Medição Abertura completa
Comutador de limite de
Comutador de limite de
focagem
focagem
Duas posições: FULL (AMPLO) (∞ – 1,75 m) e ∞ – 6 m
Tamanho do ltro
Tamanho do ltro 77 mm (P = 0,75 mm)
Dimensões
Dimensões Aprox. 95,5 mm de diâmetro máximo × 203 mm (distância do
rebordo de montagem da objetiva da câmara)
Peso
Peso Aprox. 1570 g incluindo o colar de tripé
Aprox. 1480 g sem o colar de tripé
A Nikon reserva-se o direito de alterar todas as especifi cações do hardware descritas neste manual a
qualquer momento e sem aviso prévio.
Transcripción de documentos
AF-S NIKKOR 80-400mm f/4.5-5.6G ED VR Nano Crystal Coat En De Fr Nl It Es Pt User’s Manual Benutzerhandbuch Manuel d’utilisation Gebruikshandleiding Manuale d’uso Manual del usuario Manual do utilizador Printed in Japan SB0K03(7E) 7MAA907E-03 ■ Parts of the Lens (Figure 1) q Lens hood mounting mark w Zoom ring e Focal length scale r Focal length mark t Focus distance indicator y Focus distance mark u Focus ring i Lens rotation index o Lens mounting mark !0 Rubber lens-mount gasket !1 CPU contacts !2 Focus-mode switch !3 !4 !5 !6 !7 !8 !9 @0 @1 @2 @3 Focus limit switch Vibration reduction ON/OFF switch Vibration reduction mode switch Zoom lock switch Lens hood Lens hood alignment mark Lens hood lock mark Lens hood lock release button Tripod collar lock screw Position indices (90°) Tripod collar • M/A: Autofocus can be over-ridden by rotating the lens focus ring. • A/M: As above, except that the focus ring must be rotated farther before the autofocus is over-ridden, preventing accidental changes to focus caused by unintended operation of the focus ring. z Slide the lens focus-mode switch to A/M or M/A. x Focus. If desired, autofocus can be over-ridden by rotating the lens focus ring while the shutter-release button is pressed halfway (or, if the camera is equipped with an AF-ON button, while the AF-ON button is pressed). To refocus using autofocus, press the shutterrelease button halfway or press the AF-ON button again. The Focus Limit Switch This switch determines the focus distance limits for autofocus. • FULL: Select this option for subjects that may be closer than 6 m (19.69 ft). • ∞–6 m: If your subject will always be at distance of at least 6 m (19.69 ft), select this option for faster focusing. ■ Zoom and Depth of Field Before focusing, rotate the zoom ring to adjust the focal length and frame the photograph. If the camera offers depth-of-field preview (stop down), depth of field can be previewed in the viewfinder. Note: Focal length decreases as the focus distance shortens. Note that the focus distance indicator is intended only as a guide and may not accurately show the distance to the subject and may, due to depth of field or other factors, not show ∞ when the camera is focused on a distant object. To lock the zoom ring, rotate it to the 80 mm position and slide the zoom lock switch to LOCK. This prevents the lens extending under its own weight while the camera is being carried from place to place. ■ Aperture Aperture is adjusted using camera controls. Zoom and Maximum Aperture Changes to zoom can alter the maximum aperture by up to 2⁄3 EV. The camera however automatically takes this into account when setting exposure, and no modifications to camera settings are required following adjustments to zoom. ■ Built-in Flash Units When using the built-in flash on cameras equipped with a built-in flash unit, remove the lens hood to prevent vignetting (shadows created where the end of the lens obscures the built-in flash). ■ Vibration Reduction (VR) Vibration reduction (VR) reduces blur caused by camera shake, allowing shutter speeds up to 4.0 stops slower than would otherwise be the case (measured at 400 mm with a D4 camera according to Camera and Imaging Products Association [CIPA] standards; effects vary with the photographer and shooting conditions). This increases the range of shutter speeds available and permits hand-held, tripod-free photography in a wide range of situations. Using the Vibration Reduction ON/OFF Switch • Select ON to enable vibration reduction. Vibration reduction is activated when the shutter-release button is pressed halfway, reducing the effects of camera shake for improved framing and focus. • Select OFF to turn vibration reduction off. Using the Vibration Reduction Mode Switch The vibration reduction mode switch is used to select the vibration reduction mode when vibration reduction is on. • Select NORMAL to reduce the effects of vibration when photographing from a fixed position and in other situations with comparatively little camera motion. • Select ACTIVE to reduce the effects of vibration when shooting from a moving vehicle, while walking, and in other situations with active camera motion. Using Vibration Reduction: Notes • Slide the vibration reduction switch to OFF if the camera does not support vibration reduction. Leaving vibration reduction on may greatly increase the drain on the battery, particularly in the case of Pronea 600i/6i cameras. • When using vibration reduction, press the shutter-release button halfway and wait for the image in the viewfinder to stabilize before pressing the shutter-release button the rest of the way down. • When vibration reduction is active, the image in the viewfinder may be blurred after the shutter is released. This does not indicate a malfunction. • Slide the vibration reduction mode switch to NORMAL for panning shots. When the camera is panned, vibration reduction applies only to motion that is not part of the pan (if the camera is panned horizontally, for example, vibration reduction will be applied only to vertical shake), making it much easier to pan the camera smoothly in a wide arc. • Do not turn the camera off or remove the lens while vibration reduction is in effect. If power to the lens is cut while vibration reduction is on, the lens may rattle when shaken. This is not a malfunction, and can be corrected by reattaching the lens and turning the camera on. • If the camera is equipped with a built-in flash, vibration reduction will be disabled while the flash charges. • ON is generally recommended when the camera is mounted on a monopod or a tripod with an unsecured head, although OFF may be preferred depending shooting conditions and the type of tripod. ■ The Lens Hood The lens hoods protect the lens and block stray light that would otherwise cause flare or ghosting. Attaching the Hood Align the lens hood mounting mark (●) with the lens hood alignment mark ( ) and then rotate the hood (w) until the ● mark is aligned with the lens hood lock mark (—{). Thank you for your purchase of a NIKKOR lens. Before using this product, please carefully read both these instructions and the camera manual. Note: When mounted on a DX-format digital single-lens reflex camera such as the D7000 or cameras in the D300 series, this lens has an angle of view of 20° – 4° and a focal length equivalent to 120 – 600 mm (35 mm format). When attaching or removing the hood, hold it near the symbol on its base and avoid gripping it too tightly. Vignetting may occur if the hood is not correctly attached. For Your Safety A CAUTIONS Detaching the Hood • Do not disassemble. Touching the internal parts of the camera or lens could result in injury. In the event of malfunction, the product should be repaired only by a qualified technician. Should the product break open as the result of a fall or other accident, remove the camera battery and/ or disconnect the AC adapter and then take the product to a Nikon-authorized service center for inspection. • Turn the camera off immediately in the event of malfunction. Should you notice smoke or an unusual smell coming from the equipment, immediately unplug the AC adapter and remove the camera battery, taking care to avoid burns. Continued operation could result in fire or injury. After removing the battery, take the equipment to a Nikon-authorized service center for inspection. • Do not use in the presence of flammable gas. Operating electronic equipment in the presence of flammable gas could result in explosion or fire. • Do not look at the sun through the lens or the camera viewfinder. Viewing the sun or other bright light source through the lens or viewfinder could cause permanent visual impairment. • Keep out of reach of children. Failure to observe this precaution could result in injury. • Observe the following precautions when handling the lens and camera: - Keep the lens and camera dry. Failure to observe this precaution could result in fire or electric shock. - Do not handle the lens or camera with wet hands. Failure to observe this precaution could result in electric shock. - Keep the sun well out of the frame when shooting backlit subjects. Sunlight focused into the camera when the sun is in or close to the frame could cause a fire. - If the lens will not be used for an extended period, attach the front and rear lens caps and store the lens out of direct sunlight. If left in direct sunlight, the lens could focus the sun’s rays onto flammable objects, causing fire. • Do not carry tripods with a lens or camera attached. You could trip or accidentally strike others, resulting in injury. • Do not leave the lens where it will be exposed to extremely high temperatures, such as in an enclosed automobile or in direct sunlight. Failure to observe this precaution could adversely affect the lens’ internal parts, causing fire. Notice for Customers in Europe This symbol indicates that electrical and electronic equipment is to be collected separately. The following apply only to users in European countries: • This product is designated for separate collection at an appropriate collection point. Do not dispose of as household waste. • Separate collection and recycling helps conserve natural resources and prevent negative consequences for human health and the environment that might result from incorrect disposal. • For more information, contact the retailer or the local authorities in charge of waste management. The hood can be reversed and mounted on the lens when not in use. Press the lens hood lock release button (q), rotate the hood in the direction shown by the arrow (w), and remove it as shown (e). ■ Focusing Screens The following cameras support a variety of focusing screens for use in different situations. Screen EC-B Camera A B C E EC-E G1 G2 G3 G4 J L M U F6 F5+ DP-30 F5+ DA-30 — { { — — — — — { (–0.5) (+1.0) (–0.5) (+0.5) Recommended. Vignetting visible in viewfinder (photographs are not affected). —: Not compatible with camera. ( ): Figures in parentheses give the exposure compensation for center-weighted metering. Select “Other screen” for Custom Setting b6 (“Screen comp.”) when adjusting exposure compensation for the F6; note that with screens other than B or E, “Other screen” must be selected even when the value for exposure compensation is 0. Exposure compensation for the F5 can be adjusted using Custom Setting 18; see the camera manual for details. Empty cell: Not suited to use with this lens. Note that type M screens can however be used for photomicrography and macro photography at magnifications of 1 : 1 or higher. Note: The F5 supports matrix metering with A, B, E, EC-B/EC-E, J, and L focusing screens only. : {: ■ Using a Tripod (Figure 2) The lens is equipped with a detachable rotating tripod collar; when using a tripod, attach it to the collar, not to the camera. To attach the collar to the lens: z Slightly loosen the tripod collar lock screw (q). x Align the alignment mark on top of the lens with the mark on the collar (y) and remove the lens from the collar (u). ■ Compatibility Check marks (“✔“) indicate supported features, dashes (“—”) features that are not supported. Some limitations may apply; see the camera manual for details. Exposure (shooting) mode Function Camera P4 S A M AF 5 VR 6 Nikon digital single-lens reflex cameras, F6, F5, F100, ✔ ✔ ✔ ✔ ✔ ✔ F/N80-series 1, F/N75-series 1, F/N65-series 1 1 2 Pronea 600i/6i , Pronea S ✔ ✔ ✔ ✔ ✔ — F4-series, F90X/N90s 1, F90-series/N90 1, F70-series/N70 1 ✔ ✔ — — ✔ — F60-series/N60 1, F/N55-series 1, F50-series/N50 1, ✔ ✔ ✔ ✔ — — F-401x/N5005 1, F-401s/N4004s 1, F-401/N4004 1 F-801s/N8008s 1, F-801/N8008 1, F-601M/N6000 1 ✔ ✔ — — — — F3AF, F-601/N6006 1, F-501/N2020 3, Nikon manual focus — cameras (excluding F-601M/N6000 1) 1. N-series cameras and Pronea 6i sold in U. S. A. only. 2. Exposure mode M (manual) not available. 3. N2020 sold in U. S. A. and Canada only. 4. Includes AUTO and scene (Digital Vari-Program) modes. 5. Autofocus. 6. Vibration reduction. English Dieser Schalter bestimmt die Begrenzung der Entfernungseinstellung für den Autofokus. • FULL: Wählen Sie diese Option für Motive, die näher als 6 Meter liegen. • ∞–6 m: Wählen Sie diese Option für schnelleres Scharfstellen, wenn sich Ihr Motiv stets in einer Entfernung von mindestens 6 Metern befindet. x Align the alignment mark on top of the lens with the A/M and M/A Modes Figure 2/Abbildung 2/Figure 2/afbeelding 2 Der Fokusbegrenzungsschalter z Being careful not to remove the screw from its socket, loosen the tripod collar lock screw until the collar rotates freely (t). ■ Focus Supported focus modes are shown in the following table (for information on camera focus modes, see the camera manual). Lens focus mode Camera Camera focus mode A/M M/A M Autofocus Autofocus Manual Nikon digital single-lens reflex camwith manual with manual focus with eras, F6, F5, F4-series, F100, F90X/N90s *, AF override override (manual electronic F90-series/N90 *, F/N80-series *, F/N75-series *, (AF priority) priority) rangefinder F70-series/N70 *, F/N65-series *, Pronea 600i/6i *, Pronea S MF Manual focus F60-series/N60 *, F/N55-series *, F50-series/N50 *, (electronic rangefinder available with all F-801s/N8008s *, F-801/N8008 *, F-601M/N6000 *, AF, MF cameras except F-601M/N6000 *) F-401x/N5005 *, F-401s/N4004s *, F-401/N4004 * * N-series cameras and Pronea 6i sold in U. S. A. only. Figure 1/Abbildung 1/Figure 1/afbeelding 1 Removing the Tripod Collar mark on the collar (w) and insert the lens into the collar. c Rotate the lens to the desired position (three positions are available at 90° intervals), stopping when the alignment mark on top of the lens is aligned with the desired position mark on the collar (e), and then tighten the tripod collar lock screw (r). Be sure the screw is fully tightened; if the screw is not tight, the lens may fall from of the tripod collar. ■ Lens Care • Do not pick up or hold the lens or camera using only the lens hood. • Keep the CPU contacts clean. • Should the rubber lens-mount gasket be damaged, cease use immediately and take the lens to a Nikon-authorized service center for repair. • Use a blower to remove dust and lint from the lens surfaces. To remove smudges and fingerprints, apply a small amount of ethanol or lens cleaner to a soft, clean cotton cloth or lenscleaning tissue and clean from the center outwards using a circular motion, taking care not to leave smears or touch the glass with your fingers. • Never use organic solvents such as paint thinner or benzene to clean the lens. • The lens hood or NC filters can be used to protect the front lens element. • Attach the front and rear caps before placing the lens in its flexible pouch. • If the lens will not be used for an extended period, store it in a cool, dry location to prevent mold and rust. Do not store in direct sunlight or with naphtha or camphor moth balls. • Keep the lens dry. Rusting of the internal mechanism can cause irreparable damage. • Leaving the lens in extremely hot locations could damage or warp parts made from reinforced plastic. • Rapid changes in temperature may cause damaging condensation inside and outside the lens. Before taking the lens from a warm to a cold environment or vice versa, place it in a bag or plastic case to slow the change in temperature. ■ Zoom und Tiefenschärfe Drehen Sie, bevor Sie fokussieren, den Zoomring, um die Brennweite einzustellen und einen Bildausschnitt zu wählen. Verfügt die Kamera über eine Abblendtaste, kann die Tiefenschärfe im Sucher im Voraus bewertet werden. ■ Supplied Accessories • 77 mm snap-on Front Lens Cap LC-77 • Rear Lens Cap LF-4 ■ Integrierte Blitzgeräte Entfernen Sie die Gegenlichtblende, wenn Sie das integrierte Blitzgerät der Kamera verwenden (sofern vorhanden), da die Gegenlichtblende sonst einen Schatten ins Motiv werfen würde. • Bayonet Hood HB-65 • Flexible Lens Pouch CL-M2 ■ Compatible Accessories • 77 mm screw-on filters • AF-I/AF-S Teleconverters TC-14E 1/TC-14E II 1/TC-17E II 2/TC-20E 2/TC-20E II 2/TC-20E III 2 1 Autofocus is available only with cameras that offer f/8 support. 2 Autofocus not supported. Type G AF-S lens with built-in CPU and F mount 80 – 400 mm f/4.5 – 5.6 20 elements in 12 groups (including 4 ED lens elements, 1 super ED lens element, and lens elements with a Nano-Crystal coating) Angle of view • Nikon film SLR and FX-format D-SLR cameras: 30° 10c – 6° 10c • Nikon DX-format D-SLR cameras: 20° – 4° Focal length scale Graduated in millimeters (80, 105, 135, 200, 300, 400) Distance information Output to camera Zoom Manual zoom using independent zoom ring Focusing Nikon Internal Focusing (IF) System with autofocus controlled by Silent Wave Motor and separate focus ring for manual focus Vibration reduction Lens shift using voice coil motors (VCMs) Focus distance indicator 1.5 m to infinity (∞) Minimum focus • AF: 1.75 m (5.74 ft) from focal plane at all zoom positions distance • MF: 1.5 m (4.92 ft) from focal plane at all zoom positions Diaphragm blades 9 (rounded diaphragm opening) Diaphragm Fully automatic Aperture range • 80 mm focal length: f/4.5 – 32 • 400 mm focal length: f/5.6 – 40 The minimum aperture displayed may vary depending on the size of the exposure increment selected with the camera. Metering Full aperture Focus limit switch Two positions: FULL (∞ – 1.75 m) and ∞ – 6 m Filter-attachment size 77 mm (P = 0.75 mm) Dimensions Approx. 95.5 mm maximum diameter × 203 mm (distance from camera lens mount flange) Weight Approx. 1570 g (3.5 lb), including tripod collar Approx. 1480 g (3.3 lb) without tripod collar Nikon reserves the right to change the specifications of the hardware described in this manual at any time and without prior notice. Deutsch Vielen Dank für den Kauf eines NIKKOR-Objektivs. Bitte lesen Sie sorgfältig diese Anleitung und das Kamerahandbuch, bevor Sie dieses Produkt verwenden. Hinweis: Wenn das Objektiv mit einer digitalen Spiegelreflexkamera mit DX-Format wie der D7000 oder einer Kamera der D300-Serie verwendet wird, hat es einen Blickwinkel von 20° – 4°, der einer Brennweite von 120 – 600 mm beim Kleinbildformat entspricht. Für Ihre Sicherheit A SICHERHEITSHINWEISE • Nicht auseinanderbauen. Das Berühren der Innenteile von Kamera oder Objektiv könnte zu Verletzungen führen. Im Falle einer Fehlfunktion sollte das Produkt auschließlich von einem qualifizierten Fachmann repariert werden. Sollte das Produkt aufgrund eines Herunterfallens oder eines Unfalles aufbrechen, entfernen Sie den Kamera-Akku und/oder trennen Sie den Netzadapter vom Netz und bringen Sie das Produkt zur Inspektion zum Nikon-Kundendienst. • Schalten Sie die Kamera im Falle einer Fehlfunktion unverzüglich ab. Wenn Sie Rauch oder einen ungewöhnlichen Geruch aus Ihrer Ausrüstung wahrnehmen, trennen Sie sofort den Netzadapter vom Netz und entfernen Sie den Kamera-Akku. Geben Sie dabei acht, dass Sie sich nicht verbrennen. Ein weiterer Betrieb könnte zu einem Brand oder zu Verletzungen führen. Nach Entfernen des Akkus bringen Sie die Ausrüstung zur Inspektion zum Nikon-Kundendienst. • Nicht in Gegenwart von entflammbarem Gas verwenden. Der Betrieb von Elektrogeräten in Gegenwart von entflammbarem Gas könnte zu einer Explosion oder zu einem Brand führen. • Blicken Sie nicht durch das Objektiv oder den Kamerasucher in die Sonne. Das Betrachten der Sonne oder einer anderen hellen Lichtquelle durch das Objektiv oder den Sucher kann zu permanenten Sehstörungen führen. • Außerhalb der Reichweite von Kindern aufbewahren. Ein Nichtbeachten dieser Vorsichtsmaßnahme kann zu Verletzungen führen. • Beachten Sie die folgenden Vorsichtsmaßnahmen beim Umgang mit Kamera und Objektiv: - Halten Sie Objektiv und Kamera stets trocken. Ein Nichtbeachten dieser Vorsichtsmaßnahme kann zu Feuer oder Stromschlägen führen. - Bedienen Sie die Kamera oder das Objektiv nicht mit nassen Händen. Ein Nichtbeachten dieser Vorsichtsmaßnahme kann zu Stromschlägen führen. - Halten Sie die Sonne sicher außerhalb des Bildbereiches, wenn Sie Motive im Gegenlicht aufnehmen. Sonnenlicht, das in der Kamera fokussiert wird, wenn sich die Kamera im oder nah beim Bildmotiv befindet, kann zu einem Brand führen. - Wird das Objektiv für längere Zeit nicht verwendet, bringen Sie den vorderen und hinteren Objektivdeckel an und lagern Sie das Objektiv an einem Ort ohne direkte Sonneneinstrahlung. Wird es in direktem Sonnenlicht gelagert, könnte das Objektiv die Sonnenstrahlen auf entflammbare Objekte fokussieren und Sie so entzünden. • Tragen Sie Stative nicht mit aufgesetzter Kamera oder aufgesetztem Objektiv. Es besteht die Gefahr zu stolpern oder versehentlich andere Personen zu stoßen, was zu Verletzungen führen kann. • Lagern Sie das Objektiv nicht an Orten, an denen es extrem hohen Temperaturen ausgesetzt ist, wie beispielsweise in einem geschlossenen Auto oder direkt in der Sonne. Andernfalls können die internen Teile des Objektivs nachteilig beeinflusst werden und es könnte zu einem Brand kommen. Hinweis für Kunden in Europa Durch dieses Symbol wird angezeigt, dass elektrische und elektronische Geräte getrennt entsorgt werden müssen. Folgendes gilt für Verbraucher in europäischen Ländern: • Dieses Produkt muss an einer geeigneten Sammelstelle separat entsorgt werden. Eine Entsorgung über den Hausmüll ist unzulässig. • Durch getrennte Entsorgung und Recycling können natürliche Rohstoffe bewahrt und durch falsche Entsorgung verursachte, schädliche Folgen für die menschliche Gesundheit und Umwelt verhindert werden. • Weitere Informationen erhalten Sie bei Ihrem Fachhändler oder bei den für die Abfallentsorgung zuständigen Behörden bzw. Unternehmen. Fokusbegrenzungsschalter Bildstabilisator-EIN/AUS-Schalter Bildstabilisatormodus-Schalter Zoom-Arretierungsschalter Gegenlichtblende Markierung für die Ausrichtung der Gegenlichtblende Markierung für die Arretierung der Gegenlichtblende Entriegelungstaste für Gegenlichtblende Stativschellen-Befestigungsschraube Positionsmarkierungen (90°) Stativschelle ■ Kompatibilität Haken (»✔«) zeigen unterstützte Funktionen, Striche (»—«) nicht unterstützte Funktionen an. Es können Einschränkungen gelten; beachten Sie das Handbuch der Kamera für Einzelheiten. Belichtungssteuerung P2 S A M Kamera Digitale Nikon-Spiegelreflexkameras, F6, F5, F100, ✔ F80-Serie, F75-Serie, F65-Serie, 1 ✔ Pronea 600i, Pronea S ✔ F4-Serie, F90X, F90-Serie, F70-Serie ✔ F60-Serie, F55-Serie, F50-Serie, F-401x, F-401s, F-401 ✔ F-801s, F-801, F-601M F3AF, F-601, F-501, Nikon-MF-Kameras (außer F-601M) 1. Manuelle Belichtungssteuerung (M) nicht verfügbar. 2. Schließt AUTO-Modus und Motivprogramme ein. 3. Autofokus. 4. Bildstabilisator. Kamera Digitale Nikon-Spiegelreflexkameras, F6, F5, F4-Serie, F100, F90X, F90-Serie, F80-Serie, F75-Serie, F70-Serie, F65-Serie, Pronea 600i, Pronea S F60-Serie, F55-Serie, F50-Serie, F-801s, F-801, F-601M, F-401x, F-401s, F-401 AF MF AF, MF A/M ■ Blende Die Blende wird mit den Bedienelementen der Kamera eingestellt. Zoom und maximale Blende Änderungen am Zoom können die maximale Blende um bis zu 2⁄3 LW verändern. Die Kamera berücksichtigt dies allerdings automatisch beim Einstellen der Belichtung und Sie müssen nach Anpassung des Zooms keine Veränderungen an den Kameraeinstellungen vornehmen. Der Bildstabilisator (VR) reduziert das Risiko einer Verwacklungsunschärfe und ermöglicht das Fotografieren mit bis zu 4,0 Blendenstufen längeren Belichtungszeiten (ermittelt bei 400 mm Brennweite mit einer D4-Kamera nach CIPA-Standards [Camera and Imaging Products Association]; je nach Fotograf und Aufnahmebedingungen kann die Wirkung unterschiedlich ausfallen). Dies ermöglicht eine größere Auswahl an Belichtungszeiten und erlaubt in den unterschiedlichsten Aufnahmesituationen ein Fotografieren aus freier Hand ohne Stativ. Verwendung des Bildstabilisator AN/AUS-Schalters • Wählen Sie ON (EIN), um den Bildstabilisator zu aktivieren. Der Bildstabilisator wird aktiviert, wenn der Auslöser bis zum ersten Druckpunkt gedrückt wird; er verringert die Effekte einer Kamera-Verwacklung für verbesserte Motivwahl und Scharfstellung. • Wählen Sie OFF (AUS), um den Bildstabilisator auszuschalten. Verwendung des Bildstabilisator-Modusschalters Der Bildstabilisator-Modusschalter wird verwendet, um den Bildstabilisator-Modus auszuwählen, wenn der Bildstabilisator aktiviert ist. • Wählen Sie NORMAL aus, um die Vibrationseffekte beim Fotografieren von einer festen Position aus und in anderen Situationen, in denen die Kamera kaum bewegt wird, zu verringern. • Wählen Sie ACTIVE aus, um die Vibrationseffekte bei der Aufnahme aus einem fahrenden Fahrzeug heraus, beim Gehen und in anderen Situationen, in denen die Kamera häufig bewegt wird, zu verringern. Verwendung des Bildstabilisators: Hinweise • Schieben Sie den Bildstabilisatorschalter auf OFF, wenn die Kamera den Bildstabilisator nicht unterstützt. Bleibt der Bildstabilisator eingeschaltet, kann sich der Akku schneller entladen, besonders bei Pronea 600i-Kameras. • Drücken Sie bei Verwendung des Bildstabilitsators den Auslöser bis zum ersten Druckpunkt und warten Sie, bis sich das Bild im Sucher stabilisiert, bevor Sie den Auslöser vollständig drücken. • Wenn der Bildstabilisator aktiv ist, ist das Bild im Sucher möglicherweise verschwommen, wenn der Auslöser gedrückt wurde. Dies stellt keine Fehlfunktion dar. • Schieben Sie den Bildstabilisatormodus-Schalter in die Position NORMAL, wenn Sie die Kamera schwenken wollen. Beim Schwenken wirkt sich der Bildstabilisator nur auf die Bewegungskomponenten aus, die nicht der Schwenkrichtung entsprechen (wird die Kamera beispielsweise waagerecht geschwenkt, kompensiert der Bildstabilisator nur senkrechte Bewegungskomponenten). So kann die Kamera ruckelfrei in einem weiten Bogen geschwenkt werden. • Schalten Sie die Kamera nicht ab und entfernen Sie nicht das Objektiv, solange der Bildstabilisator aktiv ist. Wenn die Stromversorgung des Objektivs unterbrochen wird, solange der Bildstabilisator aktiv ist, könnte das Objektiv klappern, wenn es geschüttelt wird. Dies stellt keine Fehlfunktion dar und kann dadurch beseitigt werden, dass das Objektiv wieder angesetzt und die Kamera eingeschaltet wird. • Verfügt die Kamera über ein eingebautes Blitzgerät, wird der Bildstabilisator deaktiviert, solange das Blitzgerät sich auflädt. • ON wird in der Regel empfohlen, wenn die Kamera auf ein Einbein- oder Dreibeinstativ mit unbefestigtem Kopf montiert wird. Jedoch kann OFF je nach Aufnahmebedingungen oder Stativtyp geeigneter sein. ✔ ✔ ✔ ✔ ✔ ✔ ✔ ✔ ✔ — — ✔ ✔ ✔ ✔ — — — — — — — — — Objektiv-Fokusmodus M/A M Manueller Autofokus mit Priorität Fokus mit Autofokus mit der manuellen elektronischer AF-Priorität Scharfstellung Einstellhilfe Manueller Fokus (elektronische Einstellhilfe bei allen Kameras außer F-601M verfügbar) A/M- und M/A-Modus • M/A: Die Scharfeinstellung des Autofokus kann durch manuelles Drehen des Fokussierings außer Kraft gesetzt werden. • A/M: Wie oben, nur muss der Fokussierring weiter gedreht werden, bevor die Scharfeinstellung außer Kraft gesetzt wird. Auf diese Weise wird verhindert, dass ein unbeabsichtigtes Verstellen des Fokussierrings zu einem Verstellen der Scharfeinstellung führt. z Schieben Sie den Fokusmodus-Schalter des Objektivs in die Position A/M oder M/A. x Fokussieren Sie. In den Autofokus kann bei Bedarf eingegriffen werden, indem der Fokusring am Objektiv gedreht wird, während der Auslöser bis zum ersten Druckpunkt gedrückt wird (oder, falls die Kamera mit einem AF-ON-Taste ausgestattet wird, während die AF-ON-Taste gedrückt ist). Um mit dem Autofokus neu zu fokussieren, drücken Sie erneut den Auslöser bis zum ersten Druckpunkt oder die AF-ON-Taste. • Nikon-Spiegelreflexkameras für das Kleinbild- oder FX-Format: 30° 10c – 6° 10c • Nikon-Spiegelreflexkameras für das DX-Format: 20°– 4° Brennweitenskala Unterteilt im Millimeter (80, 105, 135, 200, 300, 400) Entfernungsinformation Übermittlung an die Kamera Zoom Manueller Zoom mit unabhängigem Zoomring Fokussierung Nikon Innenfokussierung (IF), gesteuert durch Silent-Wave-Motor und separatem Fokussierring für die manuelle Fokussierung Bildstabilisator Bewegliche Linsengruppe mit Voice-Coil-Motoren (VCMs) Entfernungsskala 1,5 m bis Unendlich (∞) Naheinstellgrenze • AF: 1,75 m von der Sensorebene bei allen Zoompositionen • MF: 1,5 m von der Sensorebene bei allen Zoompositionen Blendenlamellen 9 (abgerundet) Blendensteuerung Vollautomatisch Blendenbereich • 80 mm Brennweite: 4,5 bis 32 • 400 mm Brennweite: 5,6 bis 40 Die angezeigte kleinste Blendenöffnung kann abhängig von der Größe der Belichtungsschrittweite, die mit der Kamera gewählt wurde, variieren. Belichtungsmessung Offenblende Fokusbegrenzungsschalter Zwei Positionen: FULL (VOLLSTÄNDIG) (∞ – 1,75 m) und ∞ – 6 m Filtergewinde 77 mm (P = 0,75 mm) Abmessungen ca. 95,5 mm maximaler Durchmesser × 203 mm (Länge ab Bajonettauflage) Gewicht ca. 1570 g, einschließlich Stativschelle ca. 1480 g, ohne Stativschelle Bildwinkel Änderungen und Irrtümer vorbehalten. Français Nous vous remercions d’avoir acheté un objectif NIKKOR. Avant de l’utiliser, veuillez lire attentivement ces instructions et le manuel de l’appareil photo. Remarque : Lorsqu’il est monté sur un appareil photo numérique reflex de format DX comme le D7000 ou les appareils photo de la gamme D300, cet objectif a un angle de champ de 20° – 4° et une focale équivalente à 120 – 600 mm (format 24 × 36 mm). Pour votre sécurité A ATTENTION • Ne pas démonter. Toucher les parties internes de l’appareil photo ou de l’objectif peut provoquer des blessures. En cas de dysfonctionnement, le produit devra être réparé par un technicien qualifié uniquement. Si le produit s’ouvre à cause d’une chute ou de tout autre accident, retirez l’accumulateur de l’appareil photo et/ou débranchez l’adaptateur secteur et confiez le produit à un centre Nikon agréé pour le faire vérifier. • Mettre immédiatement l’appareil hors tension en cas de dysfonctionnement. Si vous détectez de la fumée ou une odeur inhabituelle provenant de l’équipement, débranchez immédiatement l’adaptateur secteur et retirez l’accumulateur de l’appareil photo, tout en prenant soin de ne pas vous brûler. Poursuivre son utilisation peut provoquer un incendie ou des blessures. Après avoir retiré l’accumulateur, confiez l’équipement à un centre Nikon agréé pour le faire vérifier. • Ne pas utiliser en présence de gaz inflammable. L’utilisation d’équipement électronique en présence d’un gaz inflammable peut provoquer une explosion ou un incendie. • Ne pas regarder le soleil avec l’objectif ou le viseur de l’appareil photo. Regarder le soleil ou toute autre source lumineuse intense avec l’objectif ou le viseur peut provoquer des troubles de la vision irréversibles. • Tenir éloigné des enfants. Le non-respect de cette précaution peut provoquer des blessures. • Suivre les précautions ci-dessous lors de la manipulation de l’objectif et de l’appareil photo : - Tenir l’objectif et l’appareil photo au sec. Le non-respect de cette précaution peut provoquer un incendie ou un choc électrique. - Ne pas manipuler l’objectif ou l’appareil photo avec des mains mouillées. Le non-respect de cette précaution peut provoquer un choc électrique. - Ne pas inclure le soleil dans le cadrage lors de la prise de vue de sujets en contre-jour. La concentration de la lumière du soleil dans l’appareil photo lorsque le soleil est dans ou à proximité du champ de l’image peut provoquer un incendie. - Si vous n’avez pas l’intention d’utiliser l’objectif pendant une période prolongée, fixez les bouchons avant et arrière et rangez l’objectif hors de la lumière directe du soleil. Si l’objectif est laissé en contact direct avec la lumière du soleil, les rayons peuvent toucher des objets inflammables, provoquant ainsi un incendie. • Ne pas porter un trépied sur lequel un objectif ou l’appareil photo est fixé. Vous risqueriez de trébucher ou de frapper accidentellement des personnes, provoquant ainsi des blessures. • Ne pas laisser l’objectif là où il serait exposé à des températures élevées, comme une voiture fermée ou à la lumière directe du soleil. Le non-respect de cette précaution peut avoir des répercussions sur les parties internes de l’objectif, pouvant provoquer un incendie. Befestigen der Gegenlichtblende Les mentions suivantes s’appliquent uniquement aux utilisateurs situés dans les pays européens : • Ce produit doit être jeté dans un point de collecte approprié. Il ne doit pas être jeté avec les déchets ménagers. • Le tri sélectif et le recyclage permettent de préserver les ressources naturelles et d’éviter les conséquences négatives pour la santé humaine et l’environnement, qui peuvent être provoquées par une élimination incorrecte. • Pour plus d’informations, contactez votre revendeur ou les autorités locales chargées de la gestion des déchets. Richten Sie die Markierung für das Ansetzen der Gegenlichtblende (●) an der Markierung für die Ausrichtung der Gegenlichtblende ( ) aus. Drehen Sie anschließend die Gegenlichtblende (w), bis die ● -Markierung an der Markierung für die Arretierung der Gegenlichtblende ausgerichtet ist (—{). Halten Sie die Gegenlichtblende beim Anbringen oder Abnehmen in der Nähe des -Symbols an der Basis fest und umfassen Sie sie nicht zu fest. Bei falschem Anbringen der Gegenlichtblende kann es zu Vignettierungen kommen. Die Gegenlichtblende kann umgekehrt auf dem Objektiv angebracht werden, wenn sie nicht verwendet wird. Ce symbole indique que le matériel électrique et électronique doit être jeté dans les conteneurs appropriés. Avis pour les clients en France LE PRODUIT ET SON EMBALLAGE RELÈVENT D’UNE CONSIGNE DE TRI Abnehmen der Gegenlichtblende Drücken Sie die Taste zur Entriegelung der Gegenlichtblende (q), drehen Sie die Gegenlichtblende in Pfeilrichtung (w) und nehmen Sie sie wie angezeigt ab (e). ■ Einstellscheiben Die folgenden Kameras unterstützen eine Anzahl Einstellscheiben für die Verwendung in verschiedenen Situationen. Scheibe EC-B Kamera A B C E EC-E G1 G2 G3 G4 J L M U F6 — — — — — F5+ DP-30 { F5+ DA-30 { — { (–0,5) (+1,0) (–0,5) (+0,5) Empfohlen. : {: Vignettierung im Sucher sichtbar (Bilder sind nicht betroffen). —: Nicht mit der Kamera kompatibel. ( ): Zahlen in Klammern geben die Belichtungskorrektur für mittenbetonte Messung an. Wählen Sie bei der F6 die Option »Andere« für die Individualfunktion b6 (»Einst. scheibe.«), um die Belichtungskorrektur für eine Einstellscheibe anzupassen. Beachten Sie, dass bei Verwendung anderer Einstellscheiben als Typ B oder E auch dann »Andere« ausgewählt werden muss, wenn keine Belichtungskorrektur erfolgt. An der F5 kann die Belichtungskorrektur mit der Individualfunktion 18 eingestellt werden. Beachten Sie das Kamerahandbuch für weitere Einzelheiten. Leere Zelle: Nicht für die Verwendung mit diesem Objektiv geeignet. Beachten Sie jedoch, dass Scheiben vom Typ M für Fotomikrografie und Makrofotografie mit Abbildungsmaßstäben von 1 : 1 oder höher verwendet werden können. Hinweis: Bei der F5 steht die Matrixmessung nur mit den Einstellscheiben A, B, E, EC-B, EC-E, J und L zur Verfügung. ■ Verwenden eines Stativs (Abbildung 2) Das Objektiv ist mit einer abnehmbaren und drehbaren Stativschelle ausgestattet; wenn Sie ein Stativ verwenden, sollten Sie es an der Schelle und nicht an der Kamera befestigen. So befestigen Sie die Schelle am Objektiv: z Lockern Sie die Stativschellen-Befestigungsschraube (q) ein wenig. x Richten Sie die Ausrichtungsmarkierung auf der Oberseite des Objektivs an der -Markierung an der Schelle (w) aus und setzen Sie das Objektiv in die Schelle ein. c Drehen Sie das Objektiv in die gewünschte Position (drei Positionen in Schritten von 90° stehen zur Auswahl), bis die Ausrichtungsmarkierung auf der Objektivoberseite an der gewünschten Positionsmarkierung an der Schelle (e) ausgerichtet ist. Ziehen Sie anschließend die Befestigungsschraube (r) an der Stativschelle fest an. Vergewissern Sie sich, dass die Schraube wirklich fest angezogen ist. Wenn die Schraube nicht fest ist, kann das Objektiv aus der Stativschelle fallen. Entfernen der Stativschelle x Richten Sie die Ausrichtungsmarkierung auf der Oberseite des Objektivs an der ✔ Typ G AF-S Objektiv mit eingebauter CPU und F-Bajonettanschluss 80 – 400 mm 1 : 4,5 – 5,6 20 Linsen in 12 Gruppen (einschließlich 4 ED-Glas-Linsen, 1 Super-ED-Linse und Linsen mit Nanokristallvergütung) Avis pour les clients en Europe z Lockern Sie die Befestigungsschraube der Stativschelle, bis sich die Schelle frei bewegt. ✔ Typ Brennweite Lichtstärke Optischer Aufbau ■ Befestigen der Gegenlichtblende Die Gegenlichtblende schützt das Objektiv und verhindert das Eindringen von Streulicht, das ansonsten zu Kontrastverlust oder Geisterbildern führen würde. Funktion AF 3 VR 4 ■ Scharfeinstellung Unterstützte Fokusmodi werden in der folgenden Tabelle aufgeführt (Beachten Sie das Handbuch der Kamera für Informationen zu den Fokusmodi der Kamera). KameraFokusmodus Um den Zoomring zu arretieren, drehen Sie ihn in die 80-mm-Position und schieben Sie den Zoom-Arretierungsschalter in die Position LOCK. Auf diese Weise wird verhindert, dass der Objektivtubus aufgrund des eigenen Gewichts ausfährt, während die Kamera transportiert wird. ■ Bildstabilisator (VR) ■ Specifications Type Focal length Maximum aperture Lens construction ■ Objektivkomponenten ((Abbildung Abbildung 1 1)) q Markierung für das Ansetzen der !3 Gegenlichtblende !4 w Zoomring !5 e Brennweitenskala !6 r Markierung für Brennweitenskala !7 t Entfernungsskala !8 y Markierung für Entfernungseinstellung u Fokussierring !9 i Positionsmarkierung für Objektivdrehung o Markierung für die Ausrichtung des Objektivs @0 !0 Dichtungsmanschette @1 !1 CPU-Kontakte @2 !2 Fokusmodusschalter @3 Hinweis: Die Brennweite nimmt bei der Fokussierung auf nahe Motive ab. Beachten Sie, dass die Entfernungsskala nur als Orientierungshilfe dient und eventuell nicht die genaue Entfernung zum Motiv anzeigt und eventuell aufgrund der Tiefenschärfe oder anderer Faktoren ∞ nicht anzeigt, wenn die Kamera auf ein entferntes Motiv fokussiert hat. ■ Technische Daten Geben Sie dabei acht, dass sich die Schraube nicht aus dem Gewinde löst (t). -Markierung an der Schelle aus (y) und nehmen Sie das Objektiv aus der Schelle (u). ■ Pflege des Objektivs • Halten oder heben Sie das Objektiv oder die Kamera nicht an der angesetzten Gegenlichblende. • Halten Sie die CPU-Kontakte sauber. • Sollte die Dichtungsmanschette beschädigt werden, setzen Sie den Gebrauch sofort aus und bringen Sie das Objektiv zum Nikon-Kundendienst zur Reparatur. • Verwenden Sie zum Entfernen von Staub und Verunreinigungen vom Objektiv einen Blasebalg. Um Schmierflecke und Fingerabdrücke zu entfernen, bringen Sie eine kleine Menge Ethanol oder Objektivreiniger auf ein weiches, sauberes Baumwolltuch oder ein Objektivreinigungstuch auf und reinigen Sie das Objektiv mit Kreisbewegungen von der Mitte nach außen. Achten Sie dabei darauf, dass keine Schmierflecke verbleiben, und dass sie das Glas nicht mit den Fingern berühren. • Verwenden Sie niemals organische Lösungsmittel wie Verdünner oder Waschbenzin zur Reinigung des Objektivs. • Zum Schutz der Frontlinse kann die Gegenlichtblende oder ein Klarglasfilter (NC) verwendet werden. • Bringen Sie den vorderen und den hinteren Objektivdeckel auf dem Objektiv an, bevor sie es in seiner Tasche verstauen. • Wenn das Objektiv für längere Zeit nicht verwendet wird, lagern Sie es an einem kühlen, trockenen Ort, um Schimmel und Korrosion zu vermeiden. Lagern sie das Objektiv nicht direkt in der Sonne oder mit Mottenkugeln aus Naphtha oder Kampfer. • Halten Sie das Objektiv stets trocken. Eindringendes Wasser kann zur Korrosion innenliegender Teile und irreparablen Schäden führen. • Das Lagern des Objektiv an sehr heißen Orten kann Teile aus verstärktem Plastik beschädigen oder verformen. • Plötzliche Temperaturschwankungen können eine schädliche Bildung von Kondenswasser im und auf dem Objektiv verursachen. Bevor Sie es an einen Ort mit deutlich höherer oder niedrigerer Temperatur bringen, sollten Sie das Objektiv in eine Tasche oder eine Plastiktüte packen, um eine langsame Temperaturangleichung zu bewirken. ■ Im Lieferumfang enthaltenes Zubehör • Vorderer Objektivdeckel LC-77 mit Schnappverschluss (77 mm) • Hinterer Objektivdeckel LF-4 • Bajonett-Gegenlichtblende HB-65 • Objektivbeutel CL-M2 ■ Kompatibles Zubehör • 77 mm-Schraubfilter • AF-I/AF-S-Telekonverter TC-14E 1/TC-14E II 1/TC-17E II 2/TC-20E 2/TC-20E II 2/TC-20E III 2 1 Der Autofokus steht nur bei Kameras zur Verfügung, die eine Lichtstärke von 1:8 unterstützen. 2 Der Autofokus steht nicht zur Verfügung. ■ Parties de l’objectif (Figure 1) q Repère de montage du parasoleil w Bague de zoom e Échelle des focales r Repère de l’échelle des focales t Indicateur de distance de mise au point y Repère de distance de mise au point u Bague de mise au point i Repère de rotation de l’objectif o Repère de montage de l’objectif !0 Joint en caoutchouc de la monture d’objectif !1 Contacts du microprocesseur !2 Commutateur du mode de mise au point !3 Commutateur de la limite de mise au point !4 Commutateur ON/OFF de réduction de vibration !5 Commutateur du mode de réduction de vibration !6 Commutateur de verrouillage du zoom !7 Parasoleil !8 Repère d’alignement du parasoleil !9 Repère de verrouillage du parasoleil @0 Commande de déverrouillage du parasoleil @1 Vis de fixation du collier pour trépied @2 Repères de position (90°) @3 Collier pour trépied ■ Compatibilité Les marques (« ✔ ») indiquent les fonctions prises en charge, les traits (« — ») les fonctions non prises en charge. Certaines restrictions peuvent s’appliquer ; consultez le manuel de l’appareil photo pour plus de détails. Mode d’exposition (prise de vue) Fonction Appareil photo P2 S A M AF 3 VR 4 Reflex numériques Nikon, F6, F5, F100, gamme F80, ✔ ✔ ✔ ✔ ✔ ✔ gamme F75, gamme F65 Pronea 600i, Pronea S 1 ✔ ✔ ✔ ✔ ✔ — Gamme F4, F90X, gamme F90, gamme F70 ✔ ✔ — — ✔ — Gamme F60, gamme F55, gamme F50, F-401x, F-401s, F-401 ✔ ✔ ✔ ✔ — — F-801s, F-801, F-601M ✔ ✔ — — — — F3AF, F-601, F-501, appareils MF Nikon (sauf F-601M) — 1. Mode d’exposition M (manuel) non disponible. 2. Inclut les modes AUTO et scène (Vari-programme). 3. Autofocus. 4. Réduction de vibration. ■ Mise au point Les modes de mise au point pris en charge sont indiqués dans le tableau suivant (pour en savoir plus sur les modes de mise au point de l’appareil photo, consultez le manuel de ce dernier). Mode de mise Mode de mise au point de l’objectif au point de Appareil photo l’appareil photo A/M M/A M Reflex numériques Nikon, Mise au point Autofocus à Autofocus à priorité F6, F5, gamme F4, F100, F90X, manuelle avec AF priorité manuelle manuelle (priorité gamme F90, gamme F80, télémètre (priorité AF) manuelle) gamme F75, gamme F70, électronique gamme F65, Pronea 600i, MF Pronea S Mise au point manuelle Gamme F60, gamme F55, (télémètre électronique disponible sur tous les appareils gamme F50, F-801s, F-801, photo excepté F-601M) AF, MF F-601M, F-401x, F-401s, F-401 Modes A/M et M/A • M/A : l’autofocus peut être désactivé à l’aide de la bague de mise au point de l’objectif. • A/M : comme ci-dessus, sauf que la bague de mise au point doit être tournée davantage pour désactiver l’autofocus, ce qui permet d’éviter des modifications accidentelles de la mise au point dues à une manipulation involontaire de la bague. ■ Flash intégré Lors de l’utilisation d’un flash intégré sur les appareils photo qui en sont équipés, enlevez le parasoleil pour éviter l’effet de vignettage (ombres créées lorsque l’extrémité de l’objectif occulte le flash intégré). ■ Réduction de vibration (VR) La fonction de réduction de vibration (VR) atténue les phénomènes de flou provoqués par le bougé de l’appareil photo, ce qui permet de recourir à des vitesses d’obturation jusqu’à 4,0 fois plus lentes que celles normalement utilisées (mesures effectuées à 400 mm avec un appareil photo D4, selon les normes de la CIPA [Camera and Imaging Products Association] ; les effets varient selon le photographe et les conditions de prise de vue). Cela augmente la plage des vitesses d’obturation disponibles et permet de prendre des photos à main levée, sans trépied, dans de nombreuses situations. Utilisation du commutateur ON/OFF pour la réduction de vibration • Sélectionnez ON (ACTIVÉ) pour activer la réduction de vibration. La réduction de vibration est activée lorsque vous appuyez à mi-course sur le déclencheur, réduisant ainsi les effets du bougé d’appareil pour vous permettre d’améliorer le cadrage et la mise au point. • Sélectionnez OFF (DÉSACTIVÉ) pour désactiver la réduction de vibration. Utilisation du commutateur du mode de réduction de vibration Le commutateur du mode de réduction de vibration permet de sélectionner le mode de réduction de vibration lorsque la réduction de vibration est activée. • Sélectionnez NORMAL pour réduire les effets des vibrations lorsque vous photographiez depuis une position fixe et de manière générale, dans les situations où le mouvement de l’appareil photo est relativement peu important. • Sélectionnez ACTIVE pour réduire les effets des vibrations lorsque vous photographiez depuis un véhicule en mouvement, lorsque vous marchez et de manière générale, dans les situations où le mouvement de l’appareil photo est important. Utiliser la réduction de vibration : Remarques • Positionnez le commutateur de réduction de vibration sur OFF si l’appareil photo ne prend pas en charge la fonction de réduction de vibration. Si la réduction de vibration est constamment activée, cela risque d’augmenter considérablement la consommation de l’accumulateur, en particulier pour les appareils photo Pronea 600i. • Lorsque vous utilisez la réduction de vibration, appuyez sur le déclencheur à mi-course et attendez que l’image se stabilise dans le viseur avant d’appuyer sur le déclencheur jusqu’en fin de course. • Lorsque la réduction de vibration est activée, l’image dans le viseur peut être floue une fois le déclencheur relâché. Cela n’indique pas un dysfonctionnement. • Positionnez le commutateur du mode de réduction de vibration sur NORMAL pour effectuer des filés panoramiques. Lorsque vous effectuez un filé panoramique, la réduction de vibration s’applique uniquement au mouvement ne faisant pas partie du filé (par exemple, si l’appareil photo est utilisé pour faire un filé horizontal, la réduction de vibration ne s’applique qu’au tremblement vertical). Il est ainsi beaucoup plus facile de réaliser de longs filés panoramiques. • Ne mettez pas l’appareil photo hors tension et ne retirez pas l’objectif pendant que la réduction de vibration est activée. Si l’alimentation de l’objectif est coupée alors que la réduction de vibration est activée, l’objectif peut vibrer s’il est secoué. Il ne s’agit pas d’un dysfonctionnement et cela peut être corrigé en refixant l’objectif et en mettant l’appareil photo sous tension. • Si l’appareil photo est équipé d’un flash intégré, la réduction de vibration est désactivée pendant que le flash se charge. • ON est généralement recommandé lorsque l’appareil photo est monté sur un monopode ou un trépied équipé d’une tête non sécurisée, même si OFF peut être préférable dans certaines conditions de prise de vue et avec certains types de trépieds. ■ Parasoleil Le parasoleil protège l’objectif et bloque la lumière diffuse pouvant causer de la lumière parasite ou une image fantôme. Fixation du parasoleil Alignez le repère de montage du parasoleil (●) sur le repère d’alignement du parasoleil ( ), puis tournez le parasoleil (w) jusqu’à ce que le repère ● soit aligné sur le repère de verrouillage du parasoleil (—{). Lors de la fixation ou du retrait du parasoleil, tenez-le près du symbole sur sa base, et évitez de le serrer trop fermement. Un vignettage peut se produire si le parasoleil n’est pas correctement attaché. Le parasoleil peut être retourné et monté sur l’objectif lorsqu’il n’est pas utilisé. Retrait du parasoleil Appuyez sur la commande de déverrouillage du parasoleil (q), tournez ce dernier dans le sens indiqué par la flèche (w) et retirez-le comme le montre l’illustration (e). Les appareils photo suivants sont compatibles avec un grand nombre de verres de visée adaptés à différentes situations. Verre EC-B Appareil photo A B C E EC-E G1 G2 G3 G4 J L M U F6 F5+ DP-30 F5+ DA-30 — { { — — — — — { (–0,5) (+1,0) (–0,5) (+0,5) Recommandé. Vignettage visible dans le viseur (les photos ne sont pas affectées). —: Non compatible avec l’appareil photo. ( ): Les chiffres entre parenthèses donnent la correction d’exposition pour la mesure pondérée centrale. Sélectionnez « Activ.: autre » pour le Réglage personnalisé b6 (« Plage visée ») lors de l’ajustement de la correction d’exposition pour l’appareil photo F6 ; remarquez qu’avec les verres autres que B ou E, « Activ.: autre » doit être sélectionné, et ce même lorsque la valeur pour la correction d’exposition est de 0. La correction d’exposition pour l’appareil photo F5 peut être ajustée en utilisant le Réglage personnalisé 18 ; consultez le manuel de l’appareil photo pour plus de détails. Cellule vide : L’utilisation ne convient pas avec cet objectif. Veuillez remarquer cependant que les verres de type M peuvent être utilisés pour la microphotographie et la macrophotographie avec un grossissement de 1 : 1 ou plus. Remarque : L’appareil photo F5 prend en charge la mesure matricielle avec les verres de visée A, B, E, EC-B/EC-E, J, et L uniquement. : {: ■ Utilisation d’un trépied (Figure 2) L’objectif est équipé d’un collier pour trépied rotatif et amovible. Lorsque vous utilisez un trépied, fixez ce dernier au collier et non à l’appareil photo. Pour fixer le collier sur l’objectif : z Desserrez légèrement la vis de fixation du collier (q). x Alignez le repère d’alignement situé en haut de l’objectif sur le repère du collier (w) et insérez l’objectif dans le collier. c Tournez l’objectif jusqu’à la position souhaitée (trois positions sont possibles, à 90° d’intervalle) et arrêtez-vous lorsque le repère d’alignement situé en haut de l’objectif est aligné sur le repère de la position de votre choix, situé sur le collier (e), puis serrez la vis de fixation du collier (r). Veillez à ce que la vis soit bien serrée ; si ce n’est pas le cas, l’objectif peut se détacher du collier. collier tourne librement (t). du collier (y) et retirez l’objectif du collier (u). ■ Entretien de l’objectif • Ne prenez pas ou ne tenez pas l’objectif ou l’appareil photo en saisissant uniquement le parasoleil. • Maintenez les contacts du microprocesseur propres. • Si le joint en caoutchouc de la monture d’objectif est endommagé, cessez immédiatement l’utilisation et confiez l’objectif à un centre Nikon agréé pour le faire réparer. • Utilisez une soufflette pour enlever la poussière et les peluches sur la surface de l’objectif. Pour effacer les taches et les traces de doigt, imprégnez un morceau de tissu propre en coton avec une petite quantité d’éthanol ou de nettoyant pour objectif ou utilisez une lingette de nettoyage d’objectif, et nettoyez avec un mouvement circulaire à partir du centre vers l’extérieur, tout en prenant soin de ne pas laisser de taches, ni de toucher le verre avec vos doigts. • N’utilisez jamais de solvants organiques comme un diluant à peinture ou du benzène pour nettoyer l’objectif. • Le parasoleil ou les filtres NC peuvent être utilisés pour protéger la lentille frontale. • Fixez les bouchons avant et arrière avant de placer l’objectif dans son étui. • Si vous n’avez pas l’intention d’utiliser l’objectif pendant une période prolongée, rangez-le dans un endroit frais et sec pour éviter la moisissure et la rouille. Ne pas ranger à la lumière directe du soleil ou avec des boules antimites de naphtaline ou de camphre. • Tenez l’objectif au sec. La formation de rouille sur le mécanisme interne peut causer des dégâts irréparables. • Laisser l’objectif dans des endroits extrêmement chauds peut endommager ou déformer les éléments composés de plastique renforcé. • Les changements brusques de température peuvent être à l’origine d’une condensation préjudiciable à l’intérieur et à l’extérieur de l’objectif. Avant de faire passer l’objectif d’un environnement chaud à froid ou vice versa, rangez-le dans un sac ou dans une boîte en plastique pour ralentir le changement de température. ■ Accessoires fournis • Bouchon avant d’objectif encliquetable 77 mm LC-77 • Bouchon arrière d’objectif LF-4 • Parasoleil à baïonnette HB-65 • Étui souple pour objectif CL-M2 ■ Accessoires compatibles • Filtres à visser 77 mm • Téléconvertisseurs AF-I/AF-S TC-14E 1/TC-14E II 1/TC-17E II 2/TC-20E 2/TC-20E II 2/TC-20E III 2 1 L’autofocus est uniquement disponible avec les appareils photo prenant en charge l’ouverture f/8. 2 L’autofocus n’est pas pris en charge. ■ Caractéristiques Type Modifier le zoom peut altérer l’ouverture maximale jusqu’à 2⁄3 L. L’appareil photo prend cela automatiquement en compte lors du réglage de l’exposition et aucune modification des réglages de l’appareil photo n’est nécessaire après les ajustements du zoom. Nikon se réserve le droit de modifier les caractéristiques du matériel décrit dans ce manuel à tout moment et sans préavis. Commutateur de la limite de mise au point Ce commutateur permet de définir les limites de la distance de mise au point en mode autofocus. • FULL : Sélectionnez cette option lorsque vous photographiez des sujets probablement situés à des distances inférieures à 6 m. • ∞–6 m : Si votre sujet se situe toujours à une distance égale ou supérieure à 6 m, sélectionnez cette option pour effectuer la mise au point plus rapidement. ■ Zoom et profondeur de champ Avant de faire la mise au point, tournez la bague de zoom pour régler la focale et cadrer la photographie. Si l’appareil photo offre un aperçu de la profondeur de champ (fermeture du diaphragme), il est possible d’avoir un aperçu de la profondeur de champ dans le viseur. Remarque : la focale diminue au fur et à mesure que la distance de mise au point se raccourcit. Notez que l’indicateur de la distance de mise au point doit seulement être considéré comme un guide. En effet, il peut ne pas afficher avec précision la distance au sujet. En outre, en raison de la profondeur de champ ou d’autres facteurs, il peut ne pas indiquer ∞ lorsque l’appareil photo fait le point sur un objet éloigné. Pour verrouiller la bague de zoom, placez-la sur 80 mm et positionnez le commutateur de verrouillage du zoom sur LOCK. Cela permet d’éviter que l’objectif ne sorte, entraîné par son propre poids, lors du transport de l’appareil photo. ■ Ouverture Pour régler l’ouverture, utilisez les commandes de l’appareil photo. Voor uw veiligheid A WAARSCHUWINGEN • Niet demonteren. Het aanraken van de interne onderdelen van de camera of objectief kan letsel veroorzaken. In het geval van een defect moet het product alleen door een gekwalificeerd technicus worden gerepareerd. Mocht het product openbreken als gevolg van een val of ander ongeluk, verwijder de camerabatterij en/of ontkoppel de lichtnetadapter en breng het product naar een Nikon geautoriseerd servicecenter. • Zet de camera in het geval van een defect onmiddellijk uit. Bemerkt u dat er rook of een andere ongebruikelijke geur uit het apparaat komt, haal dan onmiddellijk de lichtnetadapter uit het stopcontact en verwijder de camerabatterij en zorg dat u geen brandwonden oploopt. Het voortzetten van de werking van het apparaat kan brand of letsel tot gevolg hebben. Breng na het verwijderen van de batterij het apparaat voor inspectie naar een Nikon geautoriseerd servicecenter. • Niet gebruiken in de aanwezigheid van brandbaar gas. Het bedienen van elektronische apparatuur in de aanwezigheid van brandbaar gas kan een explosie of brand tot gevolg hebben. • Kijk niet via het objectief of de camerazoeker naar de zon. Kijken naar de zon of andere heldere lichtbron via het objectief of de zoeker kan permanent visueel letsel veroorzaken. • Houd buiten bereik van kinderen. Het niet in acht nemen van deze voorzorgsmaatregel kan letsel tot gevolg hebben. • Neem tijdens het hanteren van het objectief en de camera de volgende voorzorgsmaatregelen in acht: - Zorg dat het object en de camera droog blijven. Het niet in acht nemen van deze voorzorgsmaatregel kan brand of een elektrische schok tot gevolg hebben. - Hanteer het objectief of de camera niet met natte handen. Het niet in acht nemen van deze voorzorgsmaatregel kan een elektrische schok tot gevolg hebben. - Houd de zon goed uit het beeld tijdens het opnemen van onderwerpen met tegenlicht. Zonlicht dat wordt scherpgesteld in de camera terwijl de zon zich in of nabij het beeld bevindt kan brand veroorzaken. - Bevestig de achter- en voorlensdop als het objectief voor langere tijd niet wordt gebruikt en bewaar het objectief niet in direct zonlicht. Als u het in direct zonlicht laat liggen, kan het objectief de zonnestralen op brandbare objecten scherpstellen en brand veroorzaken. • Draag geen statieven met het objectief of de camera eraan bevestigd. U kunt struikelen of per ongeluk anderen raken, met letsel als gevolg. • Laat het objectief niet achter waar het wordt blootgesteld aan extreem hoge temperaturen, zoals in een afgesloten auto of in direct zonlicht. Het niet in acht nemen van deze voorzorgsmaatregel kan de interne onderdelen van het objectief nadelig beïnvloeden en brand veroorzaken. ■ De zonnekap De onne ap be che m he ob ec e en b o ee dwaa ch da ande bee d chaduwen ve oo aa ch v e en o De onnekap beve gen B ng d b g ng ma ng op d onn ap ● op n n m d u nma ng op d onn ap n d aa o g n aan d ng op n onn ap w o da d ● ma n g ba h m d g nd ma ng op d onn ap —{ Houd b he beve gen o ve w de en van de ap de e v a b he ymboo op de b beho ende ba om e ev g va pa en e ve m den V gne e ng an ch voo doen a de ap n e u beve gd Wannee n e n geb u ob ec e an de ap wo den omged aa d en gemon ee d op he De onnekap ve w de en D u op d on g nd ng nop an d onn ap h ng an d p q d aa d onn ap n d w n w d oa w g g n e Mededeling voor Europese klanten Dit pictogram geeft aan dat elektrische en elektronische apparaten via gescheiden inzameling moet worden afgevoerd. Het volgende is alleen van toepassing op gebruikers in Europese landen: • Dit product moet gescheiden van het overige afval worden ingeleverd bij een daarvoor bestemd inzamelingspunt. Gooi dit product niet weg als huishoudafval. • Gescheiden inzameling en recycling helpt bij het behoud van natuurlijke bronnen en voorkomt negatieve consequenties voor mens en milieu die kunnen ontstaan door onjuist weggooien van afval. • Neem voor meer informatie contact op met de leverancier of de gemeentelijke reinigingsdienst. ■ Onderdelen van het objectief (afbeelding 1) q Bevestigingsmarkering voor zonnekap !3 Schakelaar scherpstellimiet w Zoomring !4 Vibratiereductie ON/OFF (AAN/UIT)schakelaar e Schaal brandpuntsafstand r Markering brandpuntsafstand !5 Schakelaar voor de stand vibratiereductie t Aanduiding voor scherpstelafstand !6 Zoomvergrendelingsschakelaar y Markering voor scherpstelafstand !7 Zonnekap u Scherpstelring !8 Uitlijnmarkering op zonnekap i Objectiefrotatie-index !9 Vergendelmarkering op zonnekap o Objectief montagemarkering @0 Ontgrendelingsknop zonnekap !0 Rubberen afdichting voor @1 Borgschroef statiefgondel objectiefbevestiging @2 Positie-indices (90 °) !1 CPU-contacten @3 Statiefkraag !2 Schakelaar voor scherpstelstand ■ Compatibiliteit Vinkjes (“✔”) duiden ondersteunde functies aan, functies met een streepje (“—”) worden niet ondersteund. Er zijn een aantal beperkingen van toepassing: zie de camerahandleiding voor details. Camera Nikon digitale reflexcamera’s, F6, F5, F100, F80-Serie, F75-Serie, F65-Serie Pronea 600i, Pronea S 1 F4-Serie, F90X, F90-Serie, F70-Serie F60-Serie, F55-Serie, F50-Serie, F-401x, F-401s, F-401 Belichtingsstand (opname) P2 S A M Functie AF 3 VR 4 ✔ ✔ ✔ ✔ ✔ ✔ ✔ ✔ ✔ ✔ ✔ ✔ ✔ ✔ ✔ ✔ — — — ✔ ✔ ✔ ✔ — — — — — — F-801s, F-801, F-601M F3AF, F-601, F-501, Nikon MF camera’s (behalve F-601M) 1. Belichtingsmodus M (handmatig) is niet beschikbaar. 2. Omvat AUTO en onderwerpstanden (Digitaal Vari-programma). 3. Autofocus 4. Vibratiereductie. Camera Nikon digitale reflexcamera’s, F6, F5, F4-Serie, F100, F90X, F90-Serie, F80-Serie, F75-Serie, F70-Serie, F65-Serie, Pronea 600i, Pronea S F60-Serie, F55-Serie, F50-Serie, F-801s, F-801, F-601M, F-401x, F-401s, F-401 Camerascherpstelstand AF 6 Objectiefscherpstelstand M/A M Handmatige Autofocus met Autofocus met scherpstelling handcorrectie handcorrectie met (handmatige (AF-prioriteit) elektronische prioriteit) afstandsmeter A/M Handmatige scherpstelling (elektronische afstandsmeter beschikbaar voor alle camera’s behalve F-601M) A/M- en M/A-standen • M/A: Autofocus kan worden uitgeschakeld door aan de scherpstelring van het objectief te draaien. • A/M: Zoals hierboven, behalve dat de scherpstelring verder moet worden gedraaid voordat de autofocus wordt uitgeschakeld, zodat onvoorziene wijzigingen aan de scherpstelling door onbedoelde bediening van de scherpstelring worden voorkomen. z Schuif de schakelaar voor de scherpstelstand van het objectief naar A/M of M/A. x Scherpstellen. Indien gewenst, kan autofocus worden overgenomen door aan de scherpstelring van het objectief te d aa en e w de on pan nop ha wo d nged u o a de came a u ge u me een A ON nop e w de A ON nop wo d nged u D u om opn euw che p e e en me behu p van au o ocu de on pan nop ha n o d u nogmaa op de A ON nop De hake aa voo de he p e m e De e cha e aa bepaa de m e en voo de che p e a and voo au o ocu U e e ee de e op e oo onde we pen d e h op een nd n m nde d n 6 m be nden ∞– m nd en uw onde we p h d op een nd n en m n e 6 m be nd e e ee de e op e om ne e e unnen he p e en ■ Zoom en scherp ed ep e D aa aan de oom ng voo da u che p e om de b andpun a and aan e pa en en de o o e ad e en A de came a ove voo bee d che p ed ep e be ch op om aag an che p ed ep e oo a voo bee d n de oe e wo den be e en Opm ng B andpun a and neem a a de che p e a and wo d ve o Me op da de aandu d ng voo che p e a and a een a e d aad bedoe d en moge n e nauw eu g genoeg om de a and o he onde we p e onen en oon moge n e doo che p ed ep e o ande e ac o en ∞ wannee de came a op een ve voo we p wo d che pge e d D aa de oom ng naa de 80 mm po e om de e e ve g ende en en chu de cha e aa van de oomve g ende ng naa O K VERGRENDELEN D voo om da he ob ec e doo n e gen gew ch wo d ve engd e w de came a van de ene naa de ande e p aa wo d ged agen ■ D a ragma D a agma wo d me behu p van de came abe u ngen aangepa 5+ DP 30 5+ DA 30 — Opm ■ ngebouwde fl ser B he geb u van de ngebouwde fl e op came a u ge u me een ngebouwde fl e ve w de de onne ap om v gne e ng e voo omen chaduwen aangemaa waa he u e nde van he ob ec e de ngebouwde fl e ve du e d ■V De v b a e edu e AAN U hake aa geb u ken ON om b du n h n V b a e educ e wo d geac vee d wannee de on pan nop ha wo d nged u waa b de effec en van came a ng voo ve be e de ad e ng en che p e ng wo den ve m nde d O om b du u h n De hake aa v b a e edu e and geb u ken De cha e aa v b a e educ e and wo d geb u om de v b a e educ e and e e ec e en e w v b a e educ e nge cha e d NORMA om de effec en van ngen e ve m nde en den he o og a e en vanu een va e po e en n ande e ua e me e a e we n g came abeweg ng A V om de effec en van ngen e ve m nde en b he o og a e en van een bewegend voe u g den he open en n ande e ua e me ac eve came abeweg ng { — — — — — { –0 5 z D aa de bo g ch oe van de a e gonde q e o x B eng de u nma ke ng bovenop he ob ec e op één n me de ma ke ng op de a e gonde w en p aa he ob ec e n de a e gonde c D aa he ob ec e naa de gewen e po e d e be ch kba e po e b n e va en van 90 op wannee de u nma ke ng bovenop he ob ec e op één n geb ach me de gewen e po ema ke ng op de a e gonde e en d aa ve vo gen de bo g ch oe van de a e gonde r va Con o ee o de ch oe vo ed g va ged aa d a de ch oe n e goed va kan he ob ec e van de a e gonde va en ■ Depth of field (Metric) ■ Tiefenschärfe ■ Profondeur de champ ■ Scherptediepte (m) • Focus distance • Entfernungseinstellung • Distance de mise au point • Scherpstelafstand • Depth of field • Tiefenschärfe • Profondeur de champ • Scherptediepte • Reproduction ratio • Abbildungsmaßstab • Rapport de reproduction • Reproductieverhouding [f=80 mm] f/4.5 f/5.6 f/8 f/11 f/16 f/22 f/32 1.8 1.69 – 1.82 1.67 – 1.84 1.64 – 1.88 1.60 – 1.94 1.55 – 2.03 1.48 – 2.18 1.39 – 2.43 1/20.6 2.5 2.37 – 2.65 2.34 – 2.69 2.28 – 2.77 2.20 – 2.91 2.10 – 3.12 1.97 – 3.49 1.82 – 4.20 1/29.7 4 3.67 – 4.40 3.60 – 4.50 3.46 – 4.76 3.28 – 5.17 3.05 – 5.89 2.79 – 7.36 2.49 – 11.52 1/48.1 6 5.29 – 6.95 5.14 – 7.22 4.86 – 7.89 4.50 – 9.09 4.09 – 11.62 3.62 – 19.29 3.13 – 387.52 1/72.6 9 7.48 – 11.32 7.19 – 12.07 6.64 – 14.08 6.00 – 18.45 5.28 – 33.09 4.53 – ∞ 3.78 – ∞ 1/109.4 12 9.44 – 16.53 8.98 – 18.18 8.14 – 23.17 7.20 – 38.00 6.19 – 436.05 5.17 – ∞ 4.21 – ∞ 1/146.2 20 13.76 – 36.89 12.81 – 46.28 11.16 – 102.65 9.45 – ∞ 7.78 – ∞ 6.24 – ∞ 4.89 – ∞ 1/244.2 40 20.96 – 483.45 18.83 – ∞ 15.47 – ∞ 12.37 – ∞ 9.65 – ∞ 7.38 – ∞ 5.57 – ∞ 1/489.3 ∞ 43.96 – ∞ 35.53 – ∞ 25.18 – ∞ 17.87 – ∞ 12.70 – ∞ 9.04 – ∞ 6.45 – ∞ 1/∞ [f=105 mm] f/4.8 f/5.6 f/8 f/11 f/16 f/22 f/32 1.8 1.71 – 1.80 1.70 – 1.81 1.68 – 1.83 1.65 – 1.87 1.61 – 1.92 1.56 – 2.00 1.50 – 2.13 1/16.4 2.5 2.41 – 2.60 2.40 – 2.61 2.36 – 2.66 2.30 – 2.74 2.23 – 2.86 2.13 – 3.04 2.02 – 3.34 1/23.5 4 3.78 – 4.25 3.74 – 4.30 3.65 – 4.44 3.52 – 4.65 3.35 – 4.99 3.14 – 5.56 2.89 – 6.67 1/37.8 6 5.52 – 6.57 5.44 – 6.69 5.24 – 7.03 4.98 – 7.58 4.65 – 8.52 4.27 – 10.35 3.82 – 14.93 1/56.8 9 7.97 – 10.35 7.80 – 10.65 7.39 – 11.54 6.89 – 13.08 6.28 – 16.14 5.59 – 24.23 4.85 – 85.67 1/85.4 12 10.23 – 14.53 9.96 – 15.13 9.31 – 16.97 8.52 – 20.52 7.61 – 29.20 6.63 – 73.64 5.61 – ∞ 1/114.0 20 15.53 – 28.16 14.91 – 30.49 13.49 – 39.02 11.90 – 64.73 10.21 – ∞ 8.51 – ∞ 6.90 – ∞ 1/190.2 40 25.39 – 95.04 23.78 – 127.97 20.38 – ∞ 16.96 – ∞ 13.72 – ∞ 10.82 – ∞ 8.35 – ∞ 1/380.7 ∞ 69.60 – ∞ 58.71 – ∞ 41.57 – ∞ 29.46 – ∞ 20.90 – ∞ 14.85 – ∞ 10.57 – ∞ 1/∞ [f=135 mm] f/5 f/5.6 f/8 f/11 f/16 f/22 f/32 f/36 1.8 1.72 – 1.78 1.72 – 1.79 1.70 – 1.80 1.68 – 1.82 1.66 – 1.86 1.62 – 1.90 1.57 – 1.98 1.56 – 2.01 1/13.1 2.5 2.44 – 2.56 2.43 – 2.57 2.41 – 2.60 2.37 – 2.65 2.32 – 2.71 2.25 – 2.82 2.17 – 2.97 2.13 – 3.05 1/18.7 4 3.85 – 4.16 3.83 – 4.18 3.77 – 4.26 3.68 – 4.38 3.57 – 4.56 3.42 – 4.85 3.22 – 5.32 3.15 – 5.55 1/29.8 6 5.68 – 6.36 5.64 – 6.41 5.50 – 6.60 5.32 – 6.89 5.09 – 7.34 4.79 – 8.09 4.43 – 9.49 4.29 – 10.23 1/44.6 9 8.30 – 9.83 8.22 – 9.95 7.94 – 10.40 7.57 – 11.12 7.11 – 12.34 6.54 – 14.61 5.89 – 19.82 5.65 – 23.31 1/66.8 12 10.80 – 13.51 10.66 – 13.74 10.19 – 14.61 9.60 – 16.07 8.87 – 18.73 8.01 – 24.47 7.05 – 43.51 6.72 – 64.69 1/89.0 20 16.89 – 24.54 16.55 – 25.29 15.46 – 28.42 14.13 – 34.47 12.61 – 49.40 10.95 – 128.54 9.25 – ∞ 8.69 – ∞ 1/148.3 40 29.27 – 63.34 28.28 – 68.58 25.23 – 97.60 21.90 – 243.92 18.46 – ∞ 15.13 – ∞ 12.07 – ∞ 11.13 – ∞ 1/296.5 ∞ 109.57 – ∞ 96.93 – ∞ 68.61 – ∞ 48.59 – ∞ 34.44 – ∞ 24.43 – ∞ 17.35 – ∞ 15.49 – ∞ 1/∞ [f=200 mm] f/5.3 f/5.6 f/8 f/11 f/16 f/22 f/32 f/38 1.8 1.73 – 1.77 1.73 – 1.77 1.72 – 1.78 1.71 – 1.79 1.70 – 1.80 1.68 – 1.83 1.65 – 1.86 1.63 – 1.89 1/9.4 2.5 2.47 – 2.53 2.47 – 2.54 2.45 – 2.55 2.43 – 2.57 2.40 – 2.60 2.37 – 2.65 2.32 – 2.72 2.29 – 2.77 1/13.2 4 3.92 – 4.08 3.92 – 4.09 3.88 – 4.12 3.84 – 4.18 3.78 – 4.26 3.69 – 4.37 3.58 – 4.55 3.51 – 4.67 1/20.7 6 5.83 – 6.18 5.82 – 6.19 5.75 – 6.27 5.66 – 6.39 5.53 – 6.57 5.35 – 6.84 5.12 – 7.27 4.99 – 7.58 1/30.7 9 8.63 – 9.40 8.62 – 9.42 8.47 – 9.61 8.26 – 9.89 8.00 – 10.31 7.64 – 10.98 7.20 – 12.09 6.94 – 12.94 1/45.7 12 11.37 – 12.71 11.33 – 12.75 11.08 – 13.09 10.74 – 13.61 10.30 – 14.41 9.73 – 15.73 9.03 – 18.08 8.63 – 20.02 1/60.7 20 18.32 – 22.02 18.24 – 22.14 17.60 – 23.17 16.77 – 24.81 15.73 – 27.56 14.46 – 32.73 12.99 – 44.62 12.19 – 58.41 1/100.7 40 33.87 – 48.88 33.60 – 49.45 31.52 – 54.83 28.98 – 64.83 26.03 – 87.43 22.76 – 173.08 19.35 – ∞ 17.64 – ∞ 1/200.7 ∞ 223.49 – ∞ 212.56 – ∞ 150.40 – ∞ 106.46 – ∞ 75.40 – ∞ 53.43 – ∞ 37.90 – ∞ 31.93 – ∞ 1/∞ [f=300 mm] f/5.6 f/8 f/11 f/16 f/22 f/32 f/40 1.8 1.74 – 1.76 1.74 – 1.76 1.73 – 1.77 1.72 – 1.78 1.71 – 1.79 1.69 – 1.81 1.68 – 1.83 1/6.9 2.5 2.48 – 2.52 2.47 – 2.53 2.46 – 2.54 2.45 – 2.55 2.43 – 2.58 2.40 – 2.61 2.38 – 2.64 1/9.4 4 3.96 – 4.04 3.94 – 4.06 3.92 – 4.09 3.89 – 4.12 3.84 – 4.18 3.78 – 4.25 3.73 – 4.33 1/14.4 6 5.91 – 6.09 5.88 – 6.13 5.83 – 6.18 5.76 – 6.26 5.67 – 6.37 5.55 – 6.55 5.44 – 6.71 1/21.1 9 8.82 – 9.19 8.74 – 9.27 8.64 – 9.39 8.50 – 9.57 8.31 – 9.82 8.06 – 10.22 7.85 – 10.59 1/31.1 12 11.68 – 12.34 11.56 – 12.48 11.38 – 12.69 11.15 – 13.00 10.83 – 13.47 10.42 – 14.20 10.07 – 14.92 1/41.1 20 19.16 – 20.92 18.83 – 21.33 18.39 – 21.93 17.80 – 22.85 17.03 – 24.29 16.05 – 26.68 15.28 – 29.25 1/67.7 40 36.83 – 43.78 35.68 – 45.53 34.16 – 48.31 32.22 – 52.88 29.83 – 61.08 27.01 – 78.34 24.93 – 104.73 1/134.4 ∞ 475.50 – ∞ 338.24 – ∞ 239.38 – ∞ 169.49 – ∞ 120.06 – ∞ 85.11 – ∞ 67.71 – ∞ 1/∞ [f=400 mm] f/5.6 f/8 f/11 f/16 f/22 f/32 f/40 1.8 1.74 – 1.76 1.74 – 1.76 1.74 – 1.76 1.73 – 1.77 1.72 – 1.78 1.71 – 1.79 1.70 – 1.80 1/5.7 2.5 2.49 – 2.51 2.48 – 2.52 2.48 – 2.53 2.47 – 2.54 2.45 – 2.55 2.43 – 2.57 2.42 – 2.59 1/7.6 4 3.97 – 4.03 3.96 – 4.04 3.95 – 4.05 3.93 – 4.08 3.90 – 4.11 3.85 – 4.16 3.82 – 4.20 1/11.5 6 5.94 – 6.06 5.92 – 6.08 5.89 – 6.11 5.85 – 6.16 5.79 – 6.23 5.71 – 6.33 5.64 – 6.42 1/16.5 9 8.88 – 9.12 8.84 – 9.17 8.78 – 9.24 8.69 – 9.34 8.57 – 9.49 8.40 – 9.71 8.26 – 9.91 1/24.2 12 11.80 – 12.21 11.73 – 12.29 11.62 – 12.41 11.47 – 12.59 11.26 – 12.85 10.99 – 13.24 10.75 – 13.61 1/31.8 20 19.47 – 20.56 19.29 – 20.77 19.01 – 21.11 18.62 – 21.61 18.11 – 22.36 17.43 – 23.52 16.88 – 24.66 1/52.2 40 38.01 – 42.22 37.33 – 43.10 36.32 – 44.53 35.00 – 46.74 33.28 – 50.26 31.13 – 56.30 29.46 – 63.05 1/103.3 ∞ 789.34 – ∞ 577.42 – ∞ 408.64 – ∞ 289.30 – ∞ 204.92 – ∞ 145.24 – ∞ 115.53 – ∞ 1/∞ • Unlike other lenses, the focal length of internal focus (IF) lenses decreases with focus distance. • Im Gegensatz zu den anderen Objektiven verringert sich die Brennweite der Objektive mit Innenfokussierung (IF) mit der Entfernungseinstellung. • Contrairement aux autres objectifs, la focale des objectifs à mise au point interne (IF) diminue avec la distance de mise au point. • In tegenstelling tot andere objectieven daalt de brandpuntsafstand van interne scherpstelling (IF) met scherpstelafstand. De a e gonde ve w de en z D aa de bo g ch oe van de a e gonde o o da de a e gonde v o ee t waa b moe wo den opge e da de ch oe n e u de aan u ng wo d ve w de d x B eng de u nma ke ng bovenop he ob ec e op één n me de ma ke ng op de a e gonde y en ve w de he ob ec e van de a e gonde u ■ Onderhoud ob ec e P o houd he ob e e o de me n e een me behu p n de onne p Houd de CPU on en hoon Mo h de ubbe en d h ng oo ob e e be e g ng be h d g n onm dde he geb u en b eng he ob e e oo ep e n een N on ge u o ee d e e en e Geb u een b b g e om o en p u en n de ob e e oppe en e e w de en Voo he e w de en n e en en nge d u en moe u een e ne hoe ee he d e h no o ob e e e n ge op een h e hone oenen doe o ob e e e n g ng doe e nb engen en e n g me een d ende beweg ng nu he m dden n bu en oe Zo g d e geen egen h e b en en he g n e me uw nge n Geb u oo he e n gen n he ob e e noo o g n he op o m dde en o e h nne o ben een De onne p o NC fi e unnen wo den geb u e be he m ng n he oo e ob e e e emen Be e g de oo en h e en doppen oo d u he ob e e n he fle be e e p A he ob e e oo nge e d n e wo d geb u moe u he op een oe e en d oge p bew en Zo oo om u h mme en oe Bew n e n d e on h o n omb n e me mo enb en n n o me Zo g d he ob e e d oog b He oe en n he n e ne me h n me n onhe e b e h de e oo en He ob e e h e en op e eem he e o e n h de e oo en o onde de en gem n e e p unnen om e en ne e empe uu e nde ngen unnen h de e onden e e oo en n de b nnen en bu en n n he ob e e P oo d u he ob e e n een w me n een oude omge ng o e e ep he ob e e n een o p e u om de empe uu e nde ng e e gen ■ Meege everde accesso res 77 mm m e e be e gen oo e ob e e dop C 77 A h e e ob e e dop 4 B one p HB 65 e be ob e e e u C M2 ■ Compa be e accesso res 77 mm h oe b e fi e A A e e on e e C 14 C 14 1 Au o o u u u end be h b oo 2 Au o o u wo d n e onde eund ■ Spec fica es p B ndpun nd M m d gm Ob on u W g ho h b ndpun A nd n o m oom h p n nd Vb du A ndu d ng oo h p nd Ko h p D D D gm b d n gm gm b h m ng h h p M oo fi oo n n A m ng n G w h C 17 C 20 C 20 C 20 me me onde eun ng oo 8 pe G A ob e e me ngebouwde CPU en ng 80 – 400 mm 4 5–5 6 20 e emen en n 12 g oepen m m m m N N on fi m R n D R m n om 30 10 – 6 10 N on D R m nD o m 20 – 4 Geg dee d n m me e U oe n me H ndm ge oom me behu p n oom ng N on n e n Fo u ng em me u o o u nge uu d doo en W e Mo o en onde e he p e ng oo h ndm ge he p e ng en h me behu p n vo e co mo o M 1 5 m o one nd g ∞ nd bra ereduc e VR V b a e educ e VR ve m nde on che p e ve oo aa doo came a ng waa doo u e den o max maa 4 0 op ange du en dan ande he geva ou n geme en b 400 mm me een D4 came a vo gen ame a and mag ng P oduc A oc a on C PA no men effec en va ë en a han e van de o og aa en opnameom and gheden D ve hoog he be e van de be ch ba e u e den en aa handbed ende a e v e o og afie oe n ve e ve ch ende ua e { ■ Een s a e gebru ken a bee d ng 2 He ob ec e voo en van een a neemba e o e ende a e gonde beve g he ob ec e op de a e gonde en n e op de came a b he geb u van een a e Om de a e gonde op he ob ec e e beve gen oom en ma ma e d a agma W g oda oom he max ma e d a agma o max maa LW aan an pa en De came a houd e b he n e en van de be ch ng ech e au oma ch e en ng mee en n e geen mod fica e van de came a n e ngen ve e voo de vo gende oomaanpa ngen — +1 0 –0 5 +0 5 A nbe o en V gne e ng h b n oe e o o wo den n e be n oed N e omp be me me C e u en h e ge en de be h ng ompen e oo en umge h e h me ng e e ee O he een Ande m g oo Pe oon e n e ng b6 een omp Compen e oo m g den he np en n de be h ng ompen e oo de 6 me op d b he men nde d n B o O he een Ande m g moe wo den ge e e ee d e w nnee de w de oo be h ng ompen e 0 Be h ng ompen e oo de 5 n me behu p n Pe oon e n e ng 18 wo den ngep e de me h nd e d ng oo de N e ge h oo geb u me de e ob e e Me op d pe M he men n e em n unnen wo den geb u oo o om og fie en m o o og fie b e g o ngen n 1 1 o hoge ng D 5 ond un a n ma m ng m A B C B C n h p h mn { — MF AF, MF ■ Scherps e schermen De vo gende came a onde eunen een ve che denhe d aan che p e che men voo geb u n ve ch ende ua e h m B m A B G G G G M U — ■ Scherpstellen Ondersteunde scherpstelstanden worden in de volgende tabel getoond (zie de camerahandleiding voor informatie over de scherpstelmodi van de camera). z En faisant attention de ne pas retirer la vis de son filetage, desserrez-la jusqu’à ce que le Zoom et ouverture maximale Si vous le souhaitez, vous pouvez désactiver l’autofocus en pivotant la bague de mise au point de l’objectif avec le déclencheur appuyé à mi-course (ou avec la commande AF-ON appuyée, si l’appareil photo est pourvu d’une commande AF-ON). Pour refaire la mise au point avec l’autofocus, appuyez à mi-course sur le déclencheur ou appuyez de nouveau sur la commande AF-ON. Opmerking: Indien gemonteerd op een digitale reflexcamera in DX-formaat zoals de D7000 of camera’s in de D300 serie, heeft dit objectief een kijkhoek van 20° – 4° en een brandpuntsafstand gelijkwaardig aan 120 – 600 mm (35 mm formaat). Retrait du collier pour trépied x Alignez le repère d’alignement situé en haut de l’objectif sur le repère hu de b e edu e h e n O de me geen b e edu e onde eun He nge h e d en n de b e edu e n de b e ne doen eeg open oo n me n he ge n P one 600 me D u b he geb u n b e edu e de on p n nop h n en w h o d de bee d ng n de oe e ge b ee d oo d de on p n nop n n gehee wo d nged u W nnee b e edu e e n de bee d ng n de oe e on he p wo den n d de u e wo d gege en D du d n e op een de e hu de h e n de nd b e edu e n NORMA NORMAA oo he p nnen n opn men W nnee de me wo d gep nd b e edu e een n oep ng op beweg ng d e geen dee u m n he p nnen b oo bee d de me ho on wo d gep nd een e e ng wo den oegep w doo he ee een oud ge om de me oepe n een b ede boog e p nnen Ze de me n e u o e w de he ob e e n e w nnee b e edu e n we ng nd en de oed ng n he ob e e wo d ge oppe d w nnee b e edu e e n he ob e e mme en w nnee de e hud D du d n e op een de e en n me behu p n he he be e gen n he ob e e en he n h e en n de me wo den e ho pen A de me oo en n een ngebouwde fl e wo d b e edu e u ge h e d w nnee de fl e d ON AAN wo d doo g n nbe o en w nnee de me op een monopod o een e me een n e e g ende de op gemon ee d ond n he e d O U moge de oo eu hee h n e n de opn meom nd gheden en he pe e Gefeliciteerd met de aanschaf van een NIKKOR-objectief. Lees voordat u dit product gebruikt zorgvuldig deze instructies en de camerahandleiding door. ■ Verres de visée Objectif AF-S de type G avec microprocesseur intégré et monture F Focale 80 – 400 mm Ouverture maximale f/4.5 – 5.6 Construction optique 20 lentilles en 12 groupes (dont 4 lentilles en verre ED, 1 lentille en verre super ED et des lentilles bénéficiant d’un traitement nanocristal) Angle de champ • Reflex numériques Nikon de format FX et reflex argentiques Nikon : 30° 10c – 6° 10c • Reflex numériques Nikon de format DX : 20° – 4° Échelle des focales Graduée en millimètres (80, 105, 135, 200, 300, 400) Information de distance Communiquée au boîtier de l’appareil photo Zoom Zoom manuel utilisant une bague de zoom indépendante Mise au point Système de mise au point interne de Nikon (IF, Internal Focusing) avec autofocus commandé par un moteur ondulatoire silencieux (SWM) et bague de mise au point pour mise au point manuelle Réduction de vibration Décentrement avec voice coil motors (VCMs) Indicateur de distance de mise au point 1,5 m à l’infini (∞) Distance minimale de mise au point • AF: 1,75 m depuis le plan focal à toutes les focales • MF: 1,5 m depuis le plan focal à toutes les focales Lamelles de diaphragme 9 (diaphragme circulaire) Diaphragme Intégralement automatique Plage des ouvertures • Focale 80 mm : f/4.5 à f/32 • Focale 400 mm : f/5.6 à f/40 L’ouverture minimale affichée peut varier en fonction de l’incrément d’exposition sélectionné avec l’appareil photo. Mesure Pleine ouverture Deux positions : FULL (∞ – 1,75 m) et ∞ – 6 m Commutateur de la limite de mise au point Diamètre de fixation pour filtre 77 mm (P = 0,75 mm) Dimensions Environ 95,5 mm de diamètre maximum × 203 mm (distance à partir du plan d’appui de la monture d’objectif de l’appareil photo) Poids Environ 1570 g, avec le collier pour trépied Environ 1480 g, sans le collier pour trépied z Positionnez le commutateur du mode de mise au point de l’objectif sur A/M ou M/A. x Effectuez la mise au point. V b a e edu e geb u ken opme k ngen Nederlands m A 1 75 m n fi m b e oompo e M 15m nfim b e oompo e 9 onde d gm open ngen Vo ed g u om h mm b ndpun nd 4 5 o 32 mm b ndpun nd 5 6 o 40 He wee gege en m n m e d gm n ë en h n e n de g oo e n de be h ng oen me d e ge e e ee d me de me Vo ed g d gm wee nden U ∞ – 1 75 m en ∞ – 6 m 77 mm = mm C 95 5 mm m mum d me e × 203 mm m C 1570 g n u e e g C 1480 g onde e g N on b houd h h h d p fia an d ha dwa a n d ond oo a gaand nn g ng w g n oa b h n nd hand d ng ■ Depth of field (Imperial) (ft) Focus distance Depth of field Reproduction ratio [f=80 mm] f/4.5 f/5.6 f/8 f/11 f/16 f/22 f/32 6 ft 8 4⁄16 in. – 6 ft 7 5⁄16 in. – 6 ft 5 10⁄16 in. – 6 ft 3 4⁄16 in. – 6 ft 4⁄16 in. – 5 ft 8 6⁄16 in. – 5 ft 3 10⁄16 in. – 7 1/25.3 7 ft 4 3⁄16 in. 7 ft 5 4⁄16 in. 7 ft 7 11⁄16 in. 7 ft 11 4⁄16 in. 8 ft 5 1⁄16 in. 9 ft 2 8⁄16 in. 10 ft 7 15⁄16 in. 13 ft 7 5⁄16 in. – 13 ft 3 12⁄16 in. – 12 ft 8 10⁄16 in. – 11 ft 11 12⁄16 in. – 11 ft 13⁄16 in. – 10 ft 2⁄16 in. – 8 ft 10 1⁄16 in. – 15 1/55.1 16 ft 8 12⁄16 in. 17 ft 2 8⁄16 in. 18 ft 4 1⁄16 in. 20 ft 2 12⁄16 in. 23 ft 8 8⁄16 in. 31 ft 5 8⁄16 in. 59 ft 5 8⁄16 in. 21 ft 3 15⁄16 in. – 20 ft 7 7⁄16 in. – 19 ft 2 12⁄16 in. – 17 ft 6 13⁄16 in. – 15 ft 8 3⁄16 in. – 13 ft 7 7⁄16 in. – 11 ft 6 4⁄16 in. – 25 1/92.5 30 ft 3 in. 31 ft 10 3⁄16 in. 35 ft 11 12⁄16 in. 44 ft 1 3⁄16 in. 65 ft 6⁄16 in. 203 ft 1 5⁄16 in. ∞ 47 ft 2 3⁄16 in. – 43 ft 9 8⁄16 in. – 37 ft 11 6⁄16 in. – 31 ft 11 8⁄16 in. – 26 ft 2 1⁄16 in. – 20 ft 10 9⁄16 in. – 16 ft 3 10⁄16 in. – 70 1/260.6 136 ft 10 5⁄16 in. 177 ft 7 3⁄16 in. 496 ft 10 5⁄16 in. ∞ ∞ ∞ ∞ 144 ft 2 12⁄16 in. – 116 ft 6 13⁄16 in. – 82 ft 7 7⁄16 in. – 58 ft 7 7⁄16 in. – 41 ft 7 15⁄16 in. – 29 ft 7 15⁄16 in. – 21 ft 2 3⁄16 in. – ∞ 1/∞ ∞ ∞ ∞ ∞ ∞ ∞ ∞ [f=105 mm] f/4.8 f/5.6 f/8 f/11 f/16 f/22 f/32 6 ft 9 8⁄16 in. – 6 ft 9 in. – 6 ft 7 13⁄16 in. – 6 ft 6 4⁄16 in. – 6 ft 4 1⁄16 in. – 6 ft 1 5⁄16 in. – 5 ft 9 12⁄16 in. – 1/20.0 7 7 ft 2 12⁄16 in. 7 ft 3 4⁄16 in. 7 ft 4 11⁄16 in. 7 ft 6 13⁄16 in. 7 ft 9 15⁄16 in. 8 ft 3 in. 8 ft 11 3⁄16 in. 14 ft 13⁄16 in. – 13 ft 10 15⁄16 in. – 13 ft 6 in. – 12 ft 11 10⁄16 in. – 12 ft 3 8⁄16 in. – 11 ft 5 6⁄16 in. – 10 ft 5 4⁄16 in. – 15 1/43.2 16 ft 13⁄16 in. 16 ft 3 8⁄16 in. 16 ft 10 13⁄16 in. 17 ft 10 1⁄16 in. 19 ft 4 7⁄16 in. 22 ft 1 1⁄16 in. 27 ft 7 7⁄16 in. 22 ft 6 4⁄16 in. – 22 ft 1 5⁄16 in. – 21 ft 1 5⁄16 in. – 19 ft 10 1⁄16 in. – 18 ft 3 10⁄16 in. – 16 ft 5 14⁄16 in. – 14 ft 5 14⁄16 in. – 25 1/72.3 28 ft 1 7⁄16 in. 28 ft 9 8⁄16 in. 30 ft 8 12⁄16 in. 33 ft 11 12⁄16 in. 39 ft 11 14⁄16 in. 53 ft 5 14⁄16 in. 103 ft 5 10⁄16 in. 53 ft 6 10⁄16 in. – 51 ft 3 13⁄16 in. – 46 ft 2 12⁄16 in. – 40 ft 6 13⁄16 in. – 34 ft 7 5⁄16 in. – 28 ft 8 4⁄16 in. – 23 ft 1 15⁄16 in. – 70 1/202.9 101 ft 3 15⁄16 in. 110 ft 6 15⁄16 in. 145 ft 9 13⁄16 in. 266 ft 2 10⁄16 in. ∞ ∞ ∞ 228 ft 4 1⁄16 in. – 192 ft 7 5⁄16 in. – 136 ft 4 13⁄16 in. – 96 ft 8 1⁄16 in. – 68 ft 6 13⁄16 in. – 48 ft 8 8⁄16 in. – 34 ft 7 15⁄16 in. – ∞ 1/∞ ∞ ∞ ∞ ∞ ∞ ∞ ∞ [f=135 mm] f/5 f/5.6 f/8 f/11 f/16 f/22 f/32 f/36 6 ft 10 5⁄16 in. – 6 ft 10 1⁄16 in. – 6 ft 9 4⁄16 in. – 6 ft 8 3⁄16 in. – 6 ft 6 12⁄16 in. – 6 ft 4 11⁄16 in. – 6 ft 2 3⁄16 in. – 6 ft 1 1⁄16 in. – 7 1/16.0 7 ft 1 13⁄16 in. 7 ft 2 1⁄16 in. 7 ft 3 in. 7 ft 4 3⁄16 in. 7 ft 6 2⁄16 in. 7 ft 9 in. 8 ft 1 7⁄16 in. 8 ft 3 8⁄16 in. 14 ft 4 9⁄16 in. – 14 ft 3 10⁄16 in. – 14 ft 6⁄16 in. – 13 ft 7 15⁄16 in. – 13 ft 2 3⁄16 in. – 12 ft 6 12⁄16 in. – 11 ft 9 6⁄16 in. – 11 ft 5 12⁄16 in. – 15 1/34.0 15 ft 8 3⁄16 in. 15 ft 9 6⁄16 in. 16 ft 1 9⁄16 in. 16 ft 7 13⁄16 in. 17 ft 5 6⁄16 in. 18 ft 8 10⁄16 in. 20 ft 10 15⁄16 in. 21 ft 11 14⁄16 in. 23 ft 4 1⁄16 in. – 23 ft 1 11⁄16 in. – 22 ft 5 6⁄16 in. – 21 ft 6 8⁄16 in. – 20 ft 4 11⁄16 in. – 18 ft 11 6⁄16 in. – 17 ft 3 in. – 16 ft 7 9⁄16 in. – 25 1/56.6 26 ft 11 3⁄16 in. 27 ft 2 6⁄16 in. 28 ft 2 12⁄16 in. 29 ft 10 1⁄16 in. 32 ft 5 10⁄16 in. 37 ft 1 5⁄16 in. 46 ft 7 9⁄16 in. 52 ft 3 2⁄16 in. 58 ft 6 2⁄16 in. – 57 ft 3 8⁄16 in. – 53 ft 3 8⁄16 in. – 48 ft 6 4⁄16 in. – 43 ft 1 1⁄16 in. – 37 ft 2 10⁄16 in. – 31 ft 3 2⁄16 in. – 29 ft 3 10⁄16 in. – 70 1/158.2 87 ft 2 6⁄16 in. 90 ft 1 5⁄16 in. 102 ft 4 1⁄16 in. 126 ft 8 12⁄16 in. ∞ ∞ ∞ ∞ 359 ft 6 in. – 318 ft 6⁄16 in. – 225 ft 1 3⁄16 in. – 159 ft 5 1⁄16 in. – 112 ft 11 14⁄16 in. – 80 ft 1 13⁄16 in. – 56 ft 11 3⁄16 in. – 50 ft 9 12⁄16 in. – ∞ 1/∞ ∞ ∞ ∞ ∞ ∞ ∞ ∞ ∞ [f=200 mm] f/5.3 f/5.6 f/8 f/11 f/16 f/22 f/32 f/38 6 ft 11 1⁄16 in. – 6 ft 10 15⁄16 in. – 6 ft 10 9⁄16 in. – 6 ft 9 15⁄16 in. – 6 ft 9 2⁄16 in. – 6 ft 8 1⁄16 in. – 6 ft 6 10⁄16 in. – 6 ft 5 10⁄16 in. – 7 1/11.4 7 ft 15⁄16 in. 7 ft 1 1⁄16 in. 7 ft 1 9⁄16 in. 7 ft 2 3⁄16 in. 7 ft 3 2⁄16 in. 7 ft 4 7⁄16 in. 7 ft 6 8⁄16 in. 7 ft 7 13⁄16 in. 14 ft 8 1⁄16 in. – 14 ft 7 13⁄16 in. – 14 ft 6 2⁄16 in. – 14 ft 3 13⁄16 in. – 14 ft 12⁄16 in. – 13 ft 8 6⁄16 in. – 13 ft 2 14⁄16 in. – 12 ft 11 6⁄16 in. – 1/23.5 15 15 ft 4 3⁄16 in. 15 ft 4 7⁄16 in. 15 ft 6 4⁄16 in. 15 ft 9 in. 16 ft 1 1⁄16 in. 16 ft 7 1⁄16 in. 17 ft 4 7⁄16 in. 17 ft 10 15⁄16 in. 24 ft 1 9⁄16 in. – 24 ft 15⁄16 in. – 23 ft 8 10⁄16 in. – 23 ft 2 12⁄16 in. – 22 ft 6 15⁄16 in. – 21 ft 8 8⁄16 in. – 20 ft 7 3⁄16 in. – 19 ft 11 6⁄16 in. – 1/38.8 25 25 ft 11 4⁄16 in. 25 ft 11 14⁄16 in. 26 ft 5 3⁄16 in. 27 ft 13⁄16 in. 28 ft 8⁄16 in. 29 ft 6 8⁄16 in. 31 ft 11 12⁄16 in. 33 ft 9 8⁄16 in. 63 ft 9 6⁄16 in. – 63 ft 5 14⁄16 in. – 61 ft 1 11⁄16 in. – 58 ft 1 3⁄16 in. – 54 ft 3 10⁄16 in. – 49 ft 8 8⁄16 in. – 44 ft 5 4⁄16 in. – 41 ft 7 3⁄16 in. – 70 1/107.4 77 ft 7 3⁄16 in. 78 ft 6⁄16 in. 81 ft 11 4⁄16 in. 88 ft 2 6⁄16 in. 98 ft 10 15⁄16 in. 119 ft 6 4⁄16 in. 169 ft 9 15⁄16 in. 233 ft 8 8⁄16 in. 733 ft 2 14⁄16 in. – 697 ft 4 13⁄16 in. – 493 ft 5 4⁄16 in. – 349 ft 3 8⁄16 in. – 247 ft 4 9⁄16 in. – 175 ft 3 12⁄16 in. – 124 ft 4 1⁄16 in. – 104 ft 9 4⁄16 in. – ∞ 1/∞ ∞ ∞ ∞ ∞ ∞ ∞ ∞ ∞ [f=300 mm] f/5.6 f/8 f/11 f/16 f/22 f/32 f/40 6 ft 11 6⁄16 in. – 6 ft 11 3⁄16 in. – 6 ft 10 15⁄16 in. – 6 ft 10 7⁄16 in. – 6 ft 9 13⁄16 in. – 6 ft 9 in. – 6 ft 8 4⁄16 in. – 1/8.2 7 7 ft 10⁄16 in. 7 ft 13⁄16 in. 7 ft 1 1⁄16 in. 7 ft 1 9⁄16 in. 7 ft 2 4⁄16 in. 7 ft 3 6⁄16 in. 7 ft 4 3⁄16 in. 14 ft 9 15⁄16 in. – 14 ft 9 2⁄16 in. – 14 ft 7 15⁄16 in. – 14 ft 6 4⁄16 in. – 14 ft 4 1⁄16 in. – 14 ft 15⁄16 in. – 13 ft 10 5⁄16 in. – 15 1/16.3 15 ft 2 3⁄16 in. 15 ft 3 in. 15 ft 4 5⁄16 in. 15 ft 6 2⁄16 in. 15 ft 8 14⁄16 in. 16 ft 13⁄16 in. 16 ft 4 7⁄16 in. 24 ft 6 12⁄16 in. – 24 ft 4 9⁄16 in. – 24 ft 1 11⁄16 in. – 23 ft 9 10⁄16 in. – 23 ft 3 15⁄16 in. – 22 ft 8 8⁄16 in. – 22 ft 2 4⁄16 in. – 25 1/26.5 25 ft 5 8⁄16 in. 25 ft 7 13⁄16 in. 25 ft 11 4⁄16 in. 26 ft 4 3⁄16 in. 26 ft 11 6⁄16 in. 27 ft 10 5⁄16 in. 28 ft 8 10⁄16 in. 66 ft 10 7⁄16 in. – 65 ft 8 3⁄16 in. – 64 ft 8⁄16 in. – 61 ft 10 7⁄16 in. – 59 ft 10⁄16 in. – 55 ft 5 12⁄16 in. – 52 ft 8 3⁄16 in. – 70 1/72.2 73 ft 5 6⁄16 in. 74 ft 11 8⁄16 in. 77 ft 2 12⁄16 in. 80 ft 8 6⁄16 in. 86 ft 2 4⁄16 in. 95 ft 4 15⁄16 in. 105 ft 5 10⁄16 in. 1560 ft 15⁄16 in. – 1109 ft 8 10⁄16 in. – 785 ft 4 9⁄16 in. – 556 ft 13⁄16 in. – 393 ft 10 15⁄16 in. – 279 ft 2 14⁄16 in. – 222 ft 1 11⁄16 in. – ∞ 1/∞ ∞ ∞ ∞ ∞ ∞ ∞ ∞ [f=400 mm] f/5.6 f/8 f/11 f/16 f/22 f/32 f/40 6 ft 11 10⁄16 in. – 6 ft 11 8⁄16 in. – 6 ft 11 4⁄16 in. – 6 ft 10 15⁄16 in. – 6 ft 10 9⁄16 in. – 6 ft 9 15⁄16 in. – 6 ft 9 6⁄16 in. – 7 1/6.7 7 ft 6⁄16 in. 7 ft 10⁄16 in. 7 ft 12⁄16 in. 7 ft 1 1⁄16 in. 7 ft 1 9⁄16 in. 7 ft 2 4⁄16 in. 7 ft 2 14⁄16 in. 14 ft 10 11⁄16 in. – 14 ft 10 1⁄16 in. – 14 ft 9 6⁄16 in. – 14 ft 8 4⁄16 in. – 14 ft 6 13⁄16 in. – 14 ft 4 13⁄16 in. – 14 ft 3 2⁄16 in. – 15 1/12.9 15 ft 1 7⁄16 in. 15 ft 1 15⁄16 in. 15 ft 2 12⁄16 in. 15 ft 3 13⁄16 in. 15 ft 5 8⁄16 in. 15 ft 7 15⁄16 in. 15 ft 10 3⁄16 in. 24 ft 8 10⁄16 in. – 24 ft 7 5⁄16 in. – 24 ft 5 8⁄16 in. – 24 ft 2 14⁄16 in. – 23 ft 11 4⁄16 in. – 23 ft 6 8⁄16 in. – 23 ft 2 4⁄16 in. – 25 1/20.7 25 ft 3 8⁄16 in. 25 ft 4 13⁄16 in. 25 ft 6 13⁄16 in. 25 ft 9 12⁄16 in. 26 ft 2 1⁄16 in. 26 ft 8 4⁄16 in. 27 ft 2 1⁄16 in. 68 ft 8⁄16 in. – 67 ft 4 3⁄16 in. – 66 ft 3 13⁄16 in. – 64 ft 10 15⁄16 in. – 63 ft 4⁄16 in. – 60 ft 6 8⁄16 in. – 58 ft 6 in. – 1/55.7 70 72 ft 15⁄16 in. 72 ft 10 9⁄16 in. 74 ft 1 11⁄16 in. 76 ft 4⁄16 in. 78 ft 10 1⁄16 in. 83 ft 2 12⁄16 in. 87 ft 6 15⁄16 in. 2589 ft 8 14⁄16 in. – 1894 ft 5 10⁄16 in. – 1340 ft 8 4⁄16 in. – 949 ft 2 3⁄16 in. – 672 ft 3 13⁄16 in. – 476 ft 6 6⁄16 in. – 379 ft 6⁄16 in. – ∞ 1/∞ ∞ ∞ ∞ ∞ ∞ ∞ ∞ • Unlike other lenses, the focal length of internal focus (IF) lenses decreases with focus distance. Utilizzando il selettore ON/OFF riduzione vibrazioni Italiano • Selezionare ON per abilitare la riduzione vibrazioni. La riduzione vibrazioni viene attivata quando il pulsante di scatto è premuto a metà corsa, riducendo gli effetti del movimento della fotocamera per ottenere un’inquadratura e una messa a fuoco migliori. • Selezionare OFF per disattivare la riduzione vibrazioni. Grazie per aver scelto un obiettivo NIKKOR. Prima di usare questo prodotto, leggere attentamente sia queste istruzioni sia il manuale della fotocamera. Nota: Quando è montato su una fotocamera reflex digitale ad obiettivo singolo, formato DX, come la D7000 o le fotocamere della serie D300, questo obiettivo ha un angolo di visuale di 20° – 4° ed una lunghezza focale equivalente a 120 – 600 mm (formato 35 mm). Per la vostra sicurezza A PRECAUZIONI Figura 1/Figura 1/Figura 1 • Non disassemblare. Toccare le parti interne della fotocamera o dell’obiettivo può provocare ferimenti. In caso di malfunzionamento, il prodotto deve essere riparato esclusivamente da un tecnico qualificato. In caso di apertura del prodotto in seguito a cadute o altri incidenti, rimuovere la batteria della fotocamera e/o disconnettere l’adattatore CA, quindi portare il prodotto ad un centro di assistenza autorizzato Nikon, per un controllo. • Spegnere la fotocamera immediatamente in caso di malfunzionamento. Qualora si noti fumo o strani odori provenire dall’attrezzatura, disconnettere immediatamente l’adattatore CA e rimuovere la batteria della fotocamera, facendo attenzione a non scottarsi. Un uso senza pause può dare luogo a incendi o ferimenti. Dopo aver rimosso la batteria, portare l’attrezzatura ad un centro di assistenza autorizzato Nikon, per un controllo. • Non usare in presenza di gas infiammabili. L’utilizzo di apparecchi elettronici in presenza di gas infiammabili può dare luogo ad esplosioni o incendi. • Non osservare il sole attraverso l’obiettivo o il mirino della fotocamera. Osservare il sole o altre fonti di luce intensa, attraverso l’obiettivo o il mirino, può causare disabilità visive permanenti. • Tenere al di fuori della portata dei bambini. L’inadempienza di questa precauzione può dare luogo a ferimenti. • Osservare le seguenti precauzioni quando si maneggiano l’obiettivo e la fotocamera: - Tenere asciutti l’obiettivo e la fotocamera. L’inadempienza di questa precauzione può dare luogo a incendi o scosse elettriche. - Non maneggiare l’obiettivo o la fotocamera con le mani bagnate. L’inadempienza di questa precauzione può dare luogo a scosse elettriche. - Tenere il sole al di fuori dell’inquadratura quando si scattano foto di soggetti controluce. La luce solare messa a fuoco nella fotocamera, quando il sole è all’interno o nelle vicinanze dell’inquadratura, potrebbe causare un incendio. - Se l’obiettivo non viene usato per un periodo prolungato, attaccare i tappi anteriore e posteriore dell’obiettivo e conservarlo in un luogo al di fuori della luce solare diretta. Qualora venga lasciato sotto la luce solare diretta, l’obiettivo potrebbe far convergere i raggi solari su di un oggetto infiammabile, causando un incendio. • Non trasportare treppiedi con un obiettivo o fotocamera attaccati. Potrebbe capitare di inciampare o colpire altre persone accidentalmente, causando ferimenti. • Non lasciare l’obiettivo in luoghi dove potrebbe essere esposto a temperature estremamente alte, come, ad esempio, all’interno di un’automobile chiusa o alla luce solare diretta. L’inadempienza di questa precauzione può causare danni alle parti interne dell’obiettivo, causando incendi. Avviso per gli utenti europei Le seguenti istruzioni sono rivolte esclusivamente agli utenti di paesi europei: • Il presente prodotto deve essere smaltito nell’apposito contenitore di rifiuti. Non smaltire insieme ai rifiuti domestici. • La raccolta differenziata e il riciclaggio aiutano a preservare le risorse naturali e a prevenire le conseguenze negative per la salute umana e per l’ambiente che potrebbero essere provocate dallo smaltimento scorretto. • Per ulteriori informazioni, vi preghiamo di contattare le autorità locali responsabili dello smaltimento dei rifiuti. ■ Componenti dell’obiettivo (Figura 1) q Riferimento di innesto paraluce !1 Contatti CPU w Anello zoom !2 Selettore del modo di messa a fuoco e Scala delle lunghezze focali !3 Interruttore limite di messa a fuoco r Riferimento scala lunghezze focali !4 Interruttore riduzione vibrazioni ON/OFF t Indicatore della distanza di messa a !5 Interruttore modo riduzione vibrazioni fuoco !6 Interruttore dispositivo di blocco zoom y Riferimento della distanza di messa !7 Paraluce a fuoco !8 Riferimento di allineamento paraluce u Anello di messa a fuoco !9 Riferimento di blocco paraluce i Indice di rotazione obiettivo @0 Pulsante di sblocco paraluce o Riferimento di innesto obiettivo @1 Vite di blocco flangia treppiedi !0 Guarnizione in gomma di innesto @2 Indici di posizione (90°) obiettivo @3 Flangia treppiedi ■ Compatibilità I segni di spunta ("✔") indicano le caratteristiche supportate, i trattini ("—") indicano le caratteristiche non supportate. Possono vigere alcune limitazioni; si veda il manuale della fotocamera per dettagli. Fotocamera Fotocamere digitali reflex con obiettivo singolo Nikon, F6, F5, F100, serie F80, serie F75, serie F65 ✔ ✔ ✔ ✔ Serie F4, F90X, serie F90, serie F70 Serie F60, serie F55, serie F50, F-401x, F-401s, F-401 F-801s, F-801, F-601M Figura 2/Figura 2/Figura 2 Funzione AF 3 VR 4 ✔ ✔ ✔ ✔ ✔ ✔ Pronea 600i, Pronea S 1 F3AF, F-601, F-501, fotocamere Nikon con messa a fuoco manuale (tranne F-601M) 1. Modo di esposizione M (manuale) non disponibile. 2. Include i modi AUTO e scene (Digital Vari-Program). 3. Autofocus 4. Riduzione vibrazioni. ✔ ✔ ✔ ✔ ✔ ✔ ✔ — — — ✔ — ✔ ✔ — — — — — — — ■ Messa a fuoco I modi di messa a fuoco supportati sono mostrati nella seguente tabella (per informazioni sui modi di messa a fuoco della fotocamera, vedere il manuale della fotocamera). Fotocamera Fotocamere digitali reflex con obiettivo singolo Nikon, F6, F5, serie F4, F100, F90X, serie F90, serie F80, serie F75, serie F70, serie F65, Pronea 600i, Pronea S Serie F60, serie F55, serie F50, F-801s, F-801, F-601M, F-401x, F-401s, F-401 Modo messa a fuoco fotocamera AF MF AF, MF Modo messa a fuoco obiettivo A/M Esclusione dell'autofocus manuale (priorità AF) Il selettore modo riduzione vibrazioni è utilizzato per selezionare il modo di riduzione delle vibrazioni quando questa funzione è attiva. • Selezionare NORMAL per ridurre gli effetti delle vibrazioni quando si scattano foto da una posizione fissa e in altre situazioni con movimento della fotocamera relativamente ridotto. • Selezionare ACTIVE per ridurre gli effetti delle vibrazioni quando si scattano foto da un veicolo in movimento, mentre si cammina e in altre situazioni con movimento della fotocamera attivo. Uso della riduzione vibrazioni: note • Fare scorrere l’interruttore di riduzione vibrazioni su OFF se la fotocamera non supporta la riduzione vibrazioni. Lasciare attiva la riduzione vibrazioni potrebbe aumentare notevolmente il consumo della batteria, particolarmente nel caso delle fotocamere Pronea 600i. • Quando si usa la riduzione vibrazioni, premere il pulsante di scatto a metà corsa e attendere che l’immagine nel mirino si stabilizzi, prima di premere del tutto il pulsante di scatto. • Quando è attiva la riduzione vibrazioni, l’immagine nel mirino potrebbe risultare sfocata dopo lo scatto. Ciò non indica un malfunzionamento. • Far scorrere l'interruttore del modo riduzione vibrazioni su NORMAL (NORMALE) per scatti di riprese panoramiche. Quando si effettua una ripresa panoramica con la fotocamera, la riduzione vibrazioni si applica soltanto al movimento che non è parte della panoramica (se si effettua una ripresa panoramica orizzontale, per esempio, la riduzione vibrazioni si applica soltanto al movimento verticale), rendendo più facile l'effettuazione regolare della panoramica in un ampio arco. • Non spegnere la fotocamera e non rimuovere l’obiettivo mentre la riduzione vibrazioni è attiva. Se viene interrotta l’alimentazione all’obiettivo mentre la riduzione vibrazioni è attiva, l’obiettivo potrebbe tintinnare quando viene scosso. Ciò non rappresenta un malfunzionamento e può essere corretto attaccando nuovamente l’obiettivo e riaccendendo la fotocamera. • Se la fotocamera è dotata di un flash incorporato, la riduzione vibrazioni verrà disattivata mentre il flash sta caricando. • ON è consigliato in generale quando la fotocamera è montata su un monopiede o un treppiedi con una testina non fissata, mentre OFF può essere preferito in base alle condizioni di ripresa e al tipo di treppiedi. ■ Il paraluce Il paraluce protegge l’obiettivo e blocca la luce sporadica che altrimenti potrebbe causare fenomeni di luce parassita e immagini fantasma. Montaggio del paraluce Questo simbolo indica che gli apparecchi elettrici ed elettronici devono essere smaltiti negli appositi contenitori di rifiuti. Modo di esposizione (ripresa) P2 S A M Utilizzando il selettore modo riduzione vibrazioni M/A M Esclusione Messa a fuoco dell'autofocus manuale con manuale telemetro (priorità manuale) elettronico o M/A. x Messa a fuoco. Se lo si desidera, l’autofocus può essere compensato manualmente, ruotando l’anello di messa a fuoco mentre il pulsante di scatto è premuto a metà corsa (oppure, se la fotocamera è dotata di un pulsante AF-ON, mentre è premuto il pulsante AF-ON). Per mettere nuovamente a fuoco utilizzando l’autofocus, premere nuovamente il pulsante di scatto a metà corsa oppure il pulsante AF-ON. Interruttore limite di messa a fuoco Questo interruttore stabilisce i limiti della distanza di messa a fuoco per l’autofocus. • FULL: Selezionate questa opzione per soggetti che possono trovarsi a distanze minori di 6 m. • ∞–6 m: Se il soggetto sarà sempre a una distanza di almeno 6 m, selezionate questa opzione per una messa a fuoco più rapida. ■ Zoom e profondità di campo Prima di mettere a fuoco, ruotare l’anello zoom per regolare la lunghezza focale e inquadrare la fotografia. Se la fotocamera è dotata di anteprima di profondità di campo (stop down), è possibile visualizzare l’anteprima di profondità di campo nel mirino. Nota: La lunghezza focale diminuisce all’accorciarsi della distanza di messa a fuoco. Si noti che l’indicatore della distanza di messa a fuoco costituisce semplicemente una guida e potrebbe non mostrare con precisione la distanza dall’oggetto e, a causa della profondità di campo o di altri fattori, potrebbe non indicare ∞ quando la fotocamera sta mettendo a fuoco un oggetto distante. Per bloccare l'anello zoom, ruotarlo sulla posizione 80 mm e far scorrere l'interruttore del dispositivo di blocco zoom su LOCK (BLOCCO). Ciò impedisce che l'obiettivo si estenda a causa del proprio peso mentre la fotocamera viene trasportata da un luogo all'altro. ■ Diaframma L’apertura del diaframma è regolata tramite i controlli della fotocamera. Zoom e apertura massima Modifiche dello zoom possono alterare l’apertura massima fino a 2⁄3 EV. La fotocamera tiene comunque conto di ciò quando imposta l’esposizione e non è necessaria alcuna modifica alle impostazioni della fotocamera in seguito a modifiche allo zoom. ■ Unità flash incorporate Quando si usa il flash incorporato su fotocamere dotate di un’unità flash incorporata, rimuovere il paraluce, onde evitare vignettatture (ombre create dove l’estremità dell’obiettivo oscura il flash incorporato). ■ Riduzione vibrazioni (VR) La riduzione vibrazioni (VR) riduce la sfocatura causata dal movimento della fotocamera, consentendo tempi di posa più lenti fino a 4,0 arresti di come sarebbe in caso contrario (misurato a 400 mm con una fotocamera D4 in base agli standard della Camera and Imaging Products Association [CIPA]; gli effetti variano in base al fotografo e alle condizioni di ripresa). Ciò amplia la gamma dei tempi di posa disponibili e permette la fotografia con fotocamera tenuta in mano, senza treppiedi, in una vasta gamma di situazioni. Nikon si riserva il diritto di cambiare le specifiche hardware descritte in questo manuale, in qualsiasi momento e senza previa notifica. • No desarmar. Tocar las piezas internas de la cámara o el objetivo podría resultar en lesiones. En caso de mal funcionamiento, el producto debe ser reparado solamente por un técnico cualificado. Si el producto llegara a romperse debido a una caída o accidente, quite la batería de la cámara y/o desconecte el adaptador de CA y después lleve el producto a un servicio técnico autorizado de Nikon para inspeccionarlo. • Apague inmediatamente la cámara en caso de mal funcionamiento. Si llegara a notar humo o un olor inusual proveniente del equipo, desconecte inmediatamente el adaptador de CA y quite la batería de la cámara, procurando evitar quemaduras. Si continúa operando el equipo podría causar fuego o lesiones. Después de quitar la batería, lleve el equipo a un servicio técnico autorizado de Nikon para inspeccionarlo. • No lo use en presencia de gas inflamable. Operar equipo electrónico en la presencia de gas inflamable podría resultar en una explosión o incendio. • No mire hacia el sol a través del objetivo o del visor de la cámara. Ver el sol u otra fuente de luz brillante a través del objetivo o del visor podría ocasionar daños oculares permanentes. • Manténgalo lejos del alcance de los niños. De no tener en cuenta esta precaución podría resultar en lesiones. • Tenga presentes las siguientes precauciones al manipular el objetivo y la cámara: - Mantenga seco el objetivo y la cámara. De no tener en cuenta esta precaución podría resultar en un incendio o descarga eléctrica. - No manipule el objetivo ni la cámara con las manos mojadas. De no tener en cuenta esta precaución podría resultar en descargas eléctricas. - Mantenga el sol fuera del fotograma al disparar a sujetos a contraluz. La luz del sol enfocada en la cámara cuando el sol se encuentra en o cerca del fotograma podría ocasionar un incendio. - Si el objetivo no se va a usar por un periodo largo de tiempo, coloque la tapa del objetivo delantera y trasera y mantenga el objetivo lejos de la luz solar directa. Si lo deja a la luz solar directa, el objetivo podría enfocar los rayos del sol sobre objetos inflamables, ocasionando un incendio. • No transporte el trípode con un objetivo o con la cámara instalada. Podría caerse o golpear accidentalmente a otros, ocasionando lesiones. • No deje el objetivo donde esté expuesto a temperaturas extremadamente altas, como en un automóvil cerrado o a la luz solar directa. De no tener presente esta precaución podría afectar adversamente las piezas internas del objetivo, ocasionando un incendio. Rimozione del paraluce Premere il pulsante di sblocco del paraluce (q), ruotare il paraluce nella direzione mostrata dalla freccia (w) e rimuoverlo come mostrato (e). ■ Schermi di messa a fuoco Le seguenti fotocamere supportano differenti schermi di messa a fuoco in diverse situazioni. Schermo EC-B Fotocamera A B C E EC-E G1 G2 G3 G4 J L M U F6 F5+ DP-30 F5+ DA-30 — — — — — — { { (–0,5) { (+1,0) (–0,5) (+0,5) : {: Consigliato. Vignettattura visibile nel mirino (le fotografie non ne sono influenzate). —: Non compatibile con la fotocamera. ( ): Le cifre in parentesi indicano la compensazione dell’esposizione per la misurazione esposimetrica concentrata. Selezionare "Other screen (Altro schermo)" dall’impostazione personalizzata b6 ("Screen comp. (Compensazione schermo)") quando si regola la compensazione dell’esposizione per la F6; si noti che con schermi diversi da quelli B ed E, è necessario selezionare "Other screen (Altro schermo)" anche se il valore per la compensazione dell’esposizione è 0. La compensazione dell’esposizione per la F5 può essere regolata usando l’impostazione personalizzata 18; si veda il manuale della fotocamera per dettagli. Casella vuota: Non adatto per l’uso con questo obiettivo. Si noti che gli schermi M possono comunque essere usati per microfotografia e fotografia macro agli ingrandimenti di 1 : 1 o superiori. Nota: La F5 supporta la misurazione matrix solo con gli schermi A, B, E, EC-B/ EC-E, J ed L. ■ Uso di un treppiedi (Figura 2) L'obiettivo è dotato di una flangia treppiedi rimovibile e rotante; quando si usa un treppiedi, collegarlo alla flangia, non alla fotocamera. Per collegare la flangia all'obiettivo: z Allentare leggermente la vite di blocco della flangia del treppiedi (q). x Allineareilriferimentodiallineamentosullapartesuperioredell'obiettivo con il riferimento flangia. sulla flangia (w) e inserire l'obiettivo nella c Ruotare l'obiettivo sulla posizione desiderata (sono disponibili tre posizioni a intervalli di 90°), fermandosi quando il riferimento di allineamento sulla parte superiore dell'obiettivo è allineato con il riferimento della posizione desiderata sulla flangia (e), quindi serrare la vite di blocco della flangia del treppiedi (r). Assicurarsi che la vite sia completamente serrata; se la vite non è serrata, l'obiettivo potrebbe cadere dalla flangia del treppiedi. Rimozione della flangia del treppiedi z Facendo attenzione a non rimuovere la vite dal suo alveo, allentare la vite di blocco della flangia del treppiedi finché la flangia non ruota liberamente (t). Por su seguridad A PRECAUCIONES con il riferimento sulla flangia (y) e rimuovere l'obiettivo dalla flangia ■ Cura dell’obiettivo • Non afferrare o mantenere l’obiettivo o la fotocamera usando solo il paraluce. • Mantenere puliti i contatti CPU. • Nel caso in cui la guarnizione in gomma di innesto obiettivo sia danneggiata, interrompere immediatamente l’utilizzo e portare l’obiettivo ad un centro di assistenza autorizzata Nikon per la riparazione. • Usare un soffietto per rimuovere polvere e pelucchi dalla superficie della lente dell’obiettivo. Per rimuovere macchie e impronte digitali, applicare una piccola quantità di etanolo o di pulitore per lenti su un tessuto in cotone o in micro-fibra e pulire la lente con un movimento circolare dal centro verso l’esterno, avendo cura di non lasciare macchie e di non toccare il vetro con le dita. • Per la pulizia della lente non usare mai solventi organici, come solventi per vernici o benzene. • Il paraluce o filtri NC possono essere usati per proteggere l’elemento frontale dell’obiettivo. • Attaccare i tappi anteriore e posteriore prima di riporre l’obiettivo nella sua borsa flessibile. • Se si prevede di non utilizzare l’obiettivo per un periodo prolungato, conservarlo in un luogo fresco e asciutto, onde evitare che si creino muffa e ruggine. Non conservare in luoghi esposti alla luce diretta del sole o in presenza di naftalina o canfora. • Tenere asciutto l’obiettivo. La presenza di ruggine nel meccanismo interno potrebbe causare un danno irreparabile. • Lasciare l’obiettivo in luoghi estremamente caldi può danneggiare o deformare le parti realizzate in plastica rinforzata. • Rapidi cambiamenti di temperatura potrebbero provocare una dannosa condensa all’interno e all’esterno dell’obiettivo. Prima di portare l’obiettivo da un ambiente caldo a uno freddo o viceversa, posizionarlo in una borsa o una custodia di plastica per rallentare la variazione di temperatura. ■ Accessori in dotazione • Copriobiettivo anteriore snap-on 77 mm LC-77 • Copriobiettivo posteriore LF-4 • Paraluce a baionetta HB-65 • Custodia morbida per obiettivo CL-M2 ■ Accessori compatibili • Filtri a vite da 77 mm • Moltiplicatori di focale AF-I/AF-S TC-14E 1/TC-14E II 1/TC-17E II 2/TC-20E 2/TC-20E II 2/ TC-20E III 2 1 L'autofocus è disponibile soltanto con fotocamere che offrono supporto per f/8. 2 L'autofocus non è supportato. Nota: La distancia focal disminuye conforme se acorte la distancia de enfoque. Tenga en cuenta que el indicador de distancia de enfoque es simplemente una guía y podría no mostrar de forma precisa la distancia hasta el sujeto, así como, debido a la profundidad del campo y otros factores, podría no mostrar ∞ cuando la cámara está enfocando un objeto lejano. Para bloquear el anillo del zoom, gírelo a la posición de 80 mm y deslice el interruptor de bloqueo del zoom hacia LOCK. Con ello evitará que el objetivo se extienda bajo su propio peso mientras la cámara es transportada de un sitio a otro. ■ Diafragma El diafragma se ajusta usando los controles de la cámara. Zoom y Diafragma máximo Los cambios en el zoom pueden alterar el diafragma máximo hasta a 2⁄3 EV. La cámara sin embargo toma esto en cuenta automáticamente al ajustar la exposición, y no se requiere ningún tipo de modificación en los ajustes de la cámara después de ajustar el zoom. ■ Unidades de flash incorporado Al usar el flash incorporado en cámaras equipadas con un flash incorporado, quite el parasol para evitar el viñeteado (sombras creadas donde el extremo del objetivo oscurece el flash incorporado). ■ Reducción de la vibración (VR) La reducción de la vibración (VR) reduce las borrosidades causadas por las sacudidas de la cámara, permitiendo velocidades de obturación de hasta 4,0 paradas más lentas de lo normal (medido a 400 mm con una cámara D4 según los estándares de Camera and Imaging Products Association [CIPA]; los efectos podrían variar en función del fotógrafo y de las condiciones de disparo). Esto aumenta la gama de velocidades de obturación disponibles y permite la realización de fotografías a pulso y sin trípode en una gran variedad de situaciones. • Seleccione ON para activar la reducción de la vibración. La reducción de la vibración se activa cuando se pulsa el disparador hasta la mitad, reduciendo los efectos de las sacudidas de la cámara para mejorar el encuadre y el enfoque. • Seleccione OFF para desactivar la reducción de la vibración. Uso del interruptor del modo de reducción de la vibración El interruptor del modo de reducción de la vibración se utiliza para seleccionar el modo de reducción de la vibración cuando la reducción de vibración está activada. • Seleccione NORMAL para reducir los efectos de la vibración al fotografiar desde una posición fija y en aquellas otras situaciones en las que la cámara se mueva ligeramente. • Seleccione ACTIVE para reducir los efectos de la vibración al disparar desde un vehículo en movimiento, al andar y en aquellas otras situaciones en las que la cámara se mueva activamente. Uso de la reducción de la vibración: Notas • Deslice el interruptor de reducción de vibración a la posición OFF si la cámara no es compatible con la reducción de vibración. Dejar activada la reducción de la vibración podría aumentar considerablemente el agotamiento de la batería, especialmente con las cámaras Pronea 600i/6i. • Al usar la reducción de la vibración, pulse el disparador hasta la mitad y espere a que se estabilice la imagen en el visor antes de pulsar totalmente el disparador. • Al activar la reducción de la vibración, la imagen en el visor podría difuminarse después de haber soltado el obturador. • Deslice el interruptor del modo de reducción de la vibración hacia NORMAL para disparos de barrido. Al barrer la cámara, la reducción de la vibración solamente es aplicada al movimiento que no forma parte del barrido (si la cámara es barrida horizontalmente, por ejemplo, la reducción de la vibración se aplicará únicamente a las sacudidas verticales), facilitando el barrido suave de la cámara en una amplio arco. • No apague la cámara ni desmonte el objetivo cuando se encuentre en efecto la reducción de vibración. Si se corta la alimentación del objetivo cuando se encuentre activa la reducción de la vibración, el objetivo podría producir un ruido al sacudirlo. Esto no es un mal funcionamiento, y se puede corregir volviendo a montar el objetivo y encendiendo la cámara. • Si la cámara está equipada con un flash incorporado, la reducción de la vibración se desactivará mientras esté cargando el flash. • ON se recomienda por norma general al instalar la cámara sobre un monopié o un trípode con un cabezal no asegurado, sin embargo OFF podría ser preferible en función de las condiciones de disparo y del tipo de trípode. ■ Parasol del objetivo El parasol protege al objetivo y bloquea la luz directa que podría ocasionar destello o fantasma. Instalación del parasol Aviso para los clientes en Europa Aliene la marca de montaje del parasol (●) con la marca de alineación del parasol ( ) y, a continuación, gire el parasol (w) hasta que la marca ● esté alineada con la marca de bloqueo del parasol (—{). Este símbolo indica que los equipos eléctricos y electrónicos deben ser desechados por separado. La nota siguiente corresponde únicamente a los usuarios de los países europeos: • Este producto se ha diseñado para desecharlo por separado en un punto de recogida de residuos adecuado. No lo tire con la basura doméstica. • Desechar y reciclar por separado ayuda a conservar los recursos naturales y previene las consecuencias dañinas para la salud humana y el entorno que podrían surgir a causa de un desecho incorrecto. • Para obtener más información, puede ponerse en contacto con el vendedor o con las autoridades locales encargadas de la gestión de residuos. ■ Partes del objetivo (Figura 1) q Marca de montaje del parasol w Anillo del zoom e Escala de la distancia focal r Marca de la distancia focal t Indicador de distancia de enfoque y Marca de distancia de enfoque u Anillo de enfoque i Índice de rotación del objetivo o Marca de montaje de objetivo !0 Junta de goma de montaje del objetivo !1 Contactos de CPU !2 Interruptor de modo de enfoque !3 Interruptor de límite de enfoque !4 Interruptor de activación/desactivación de la reducción de la vibración !5 Interruptor de modo de reducción de la vibración !6 Interruptor de bloqueo del zoom !7 Parasol de objetivo !8 Marca de alineación del parasol !9 Marca de bloqueo del parasol @0 Botón de bloqueo del parasol @1 Tornillo de bloqueo del anillo del trípode @2 Índices de posición (90°) @3 Cuello del trípode ■ Compatibilidad Las marcas de verificación (“✔“) indican las funciones compatibles, los guiones (“—”) las funciones que no son compatibles. Podrían aplicarse algunas limitaciones; consulte el manual de la cámara para más detalles. x Allineareilriferimentodiallineamentosullapartesuperioredell'obiettivo (u). ■ Zoom y Profundidad de campo Antes de enfocar, gire el anillo del zoom para ajustar la distancia focal y encuadre la fotografía. Si la cámara cuenta con vista previa de la profundidad de campo (reducción de apertura de diafragma), la profundidad de campo también puede visualizarse previamente en el visor. Gracias por adquirir un objetivo NIKKOR. Antes de utilizar este producto, lea detenidamente tanto estas instrucciones como el manual de la cámara. Quando si attacca o rimuove il paraluce, mantenerlo in prossimità del simbolo presente sulla sua base ed evitare di afferrarlo con troppa forza. Se il paraluce non è attaccato correttamente, possono verificarsi vignettature. Il paraluce può essere girato su se stesso e montato sull’obiettivo quando non utilizzato. Este interruptor determina los límites de distancia de enfoque para el autofoco. • FULL: Seleccione esta opción para sujetos que puedan estar a menos de 6 m (19,69 pie). • ∞–6 m: Si el sujeto estará siempre a una distancia de al menos 6 m (19,69 pie), seleccione esta opción para que el enfoque sea más rápido. Uso del interruptor ON/OFF de reducción de la vibración Español Nota: Cuando está montado en una cámara digital de formato DX réflex de objetivo único como la D7000 o en las cámaras de la serie D300, este objetivo tiene un ángulo de visión de 20° – 4° y una distancia focal equivalente a 120 – 600 mm (formato de 35 mm). Modi A/M e M/A z Far scorrere il selettore del modo di messa a fuoco dell'obiettivo su A/M Obiettivo di tipo G AF-S con CPU incorporata ed innesto a baionetta F-Mount Lunghezza focale 80 – 400 mm Apertura massima f/4.5 – 5.6 Costruzione obiettivo 20 elementi in 12 gruppi (inclusi 4 elementi obiettivo ED, 1 elemento obiettivo super ED ed elementi obiettivo con un rivestimento Nano-Crystal) Angolo di campo • Fotocamere Nikon SLR a pellicola e D-SLR formato FX: 30° 10c – 6° 10c • Fotocamere Nikon D-SLR formato DX: 20° – 4° Scala delle lunghezze focali Graduata in millimetri (80, 105, 135, 200, 300, 400) Informazioni sulla distanza Inviate alla fotocamera Zoom Zoom manuale con anello zoom indipendente Messa a fuoco Sistema di messa a Fuoco Interna (IF) Nikon con autofocus controllato da motore Silent Wave e anello di messa a fuoco separato per messa a fuoco manuale Riduzione vibrazioni Decentramento ottico con motori voice coil (VCMs) Indicatore della distanza di Da 1,5 m a infinito (∞) messa a fuoco Distanza minima di messa • AF: 1,75 m dal piano focale a tutte le posizioni dello zoom a fuoco • MF: 1,5 m dal piano focale a tutte le posizioni dello zoom Lamelle del diaframma 9 (apertura del diaframma arrotondata) Diaframma Completamente automatico Gamma del diaframma • Lunghezza focale 80 mm: da f/4.5 a f/32 • Lunghezza focale 400 mm: da f/5.6 a f/40 L’apertura minima visualizzata potrebbe variare in base alla dimensione dell’incremento di esposizione selezionato con la fotocamera. Misurazione esposimetrica Apertura massima Interruttore limite di messa Due posizioni: FULL (∞ – 1,75 m) e ∞ – 6 m a fuoco Dimensione attacco filtro 77 mm (P = 0,75 mm) Dimensioni Diametro massimo di circa 95,5 mm × 203 mm (distanza dalla flangia di innesto dell’obiettivo della fotocamera) Peso Circa 1570 g inclusa flangia treppiedi Circa 1480 g senza flangia treppiedi Allineare il riferimento di innesto paraluce (●) con il riferimento di allineamento paraluce ( ) e quindi ruotare il paraluce (w) finché il riferimento ● non è allineato con il riferimento di blocco paraluce (—{). Messa a fuoco manuale (telemetro elettronico disponibile con tutte le fotocamere, eccetto F-601M) • M/A: l'autofocus può essere escluso ruotando l'anello di messa a fuoco dell'obiettivo. • A/M: come sopra, tranne che l'anello di messa a fuoco deve essere ruotato ulteriormente prima che l'autofocus venga escluso, evitando i cambiamenti accidentali della messa a fuoco causati da operazioni involontarie dell'anello di messa a fuoco. Interruptor de límite de enfoque ■ Specifiche Tipo Modo de exposición (disparo) P4 S A M Función Cámara AF 5 VR 6 Cámaras digitales réflex de objetivo único de Nikon, ✔ ✔ ✔ ✔ ✔ ✔ F6, F5, F100, Serie F/N80 1, Serie F/N75 1, Serie F/N65 1 Pronea 600i/6i 1, Pronea S 2 ✔ ✔ ✔ ✔ ✔ — Serie F4, F90X/N90s 1, Serie F90/N90 1, Serie F70/N70 1 ✔ ✔ — — ✔ — Serie F60/N60 1, Serie F/N55 1, Serie F50/N50 1, ✔ ✔ ✔ ✔ — — F-401x/N5005 1, F-401s/N4004s 1, F-401/N4004 1 1 1 1 F-801s/N8008s , F-801/N8008 , F-601M/N6000 ✔ ✔ — — — — F3AF, F-601/N6006 1, F-501/N2020 3, Nikon enfoque — manual cámaras (excepto F-601M/N6000 1) 1. Solo las cámaras de la serie N y Pronea 6i vendidas en Estados Unidos. 2. El modo de exposición M (manual) no está disponible. 3. Solo la N2020 vendida en Estados Unidos y Canadá. 4. Incluye los modos AUTO y de escena (Vari-Program Digital). 5. Autofoco. 6. Reducción de la vibración. ■ Enfoque Los modos de enfoque compatibles se muestran en la siguiente tabla (para más información sobre los modos de enfoque de la cámara, consulte el manual de la cámara). Cámara Cámaras digitales réflex de objetivo único de Nikon, F6, F5, Serie F4, F100, F90X/N90s *, Serie F90/N90 *, Serie F/N80 *, Serie F/N75 *, Serie F70/N70 *, Serie F/N65 *, Pronea 600i/6i *, Pronea S Modo de enfoque de cámara AF Modo de enfoque del objetivo A/M Autofoco con anulación manual (prioridad AF) M/A M Autofoco con Enfoque anulación manual con manual telémetro (prioridad electrónico manual) MF Enfoque manual Serie F60/N60 *, Serie F/N55 *, Serie F50/N50 *, (telémetro electrónico disponible con todas F-801s/N8008s *, F-801/N8008 *, AF, MF las cámaras excepto F-601M/N6000 *) F-601M/N6000 *, F-401x/N5005 *, F-401s/N4004s *, F-401/N4004 * * Solo las cámaras de la serie N y Pronea 6i vendidas en Estados Unidos. Modos A/M y M/A • M/A: El autofoco puede anularse girando el anillo de enfoque del objetivo. • A/M: Tal y como se ha mencionado anteriormente, excepto que el anillo de enfoque debe ser girado aún más antes de que el autofoco se anule, evitando cambios accidentales en el enfoque a causa de una operación del anillo de enfoque no intencionada. z Deslice el interruptor de modo de enfoque del objetivo a A/M o M/A. x Enfoque. Si lo desea, el autofoco puede ser controlado manualmente girando el anillo de enfoque del objetivo mientras pulsa el disparador hasta la mitad (o, si la cámara está equipada con un botón AF-ON, cuando se pulse el botón AF-ON). Para volver a enfocar usando el autofoco, pulse el disparador hasta la mitad o pulse nuevamente el botón AF-ON. Al montar o quitar el parasol, sujételo cerca del símbolo sobre su base y evite apretarlo demasiado fuerte. El viñeteado puede presentarse si el parasol no está instalado correctamente. El parasol se puede invertir y montar sobre el objetivo cuando no esté en uso. Pulse el botón de bloqueo del parasol (q), gire el parasol en la dirección indicada por la flecha (w) y extráigalo tal y como se indica (e). ■ Pantallas de enfoque Las siguientes cámaras son compatibles con una gran variedad de pantallas de enfoque para usarse en diferentes situaciones. Pantalla EC-B Cámara A B C E EC-E G1 G2 G3 G4 J L M U F5+ DP-30 F5+ DA-30 ■ Accesorios compatibles • Filtros con rosca de 77 mm • Teleconversores AF-I/AF-S TC-14E 1/TC-14E II 1/TC-17E II 2/TC-20E 2/TC-20E II 2/TC-20E III 2 1 Autofoco está disponible únicamente con cámaras compatibles con f/8. 2 Autofoco no compatible. — { { — — — — — { (–0,5) (+1,0) (–0,5) (+0,5) Recomendado. : {: Viñeteado visible en el visor (las fotografías no se ven afectadas). —: No compatible con la cámara. ( ): Las cifras entre paréntesis proporcionan la compensación de exposición para la medición central ponderada. Seleccione “Otra pantalla” para la configuración personalizada b6 (“Compens pantalla”) al ajustar la compensación de exposición para la F6; tenga en cuenta que con otras pantallas diferentes a B o E, se debe seleccionar “Otra pantalla” incluso cuando el valor para la compensación de exposición sea 0. La compensación de exposición para la F5 se puede ajustar usando la configuración personalizada 18; consulte el manual de la cámara para más detalles. Celda vacía: No es adecuado usar esta pantalla con este objetivo. Tenga en cuenta que las pantallas tipo M sin embargo se pueden usar para la fotomicrografía y para la fotografía a nivel macro en ampliaciones de 1 : 1 o superiores. Nota: La F5 es compatible con medición matricial usando las pantallas de enfoque A, B, E, EC-B/ EC-E, J y L únicamente. ■ Uso de un trípode (figura 2) El objetivo está equipado con un anillo para trípode giratorio extraíble; al usar un trípode, instálelo en el anillo, no en la cámara. Para instalar el anillo en el objetivo: Objetivo tipo G AF-S con CPU incorporado y montura F 80 – 400 mm f/4.5 – 5.6 20 elementos en 12 grupos (incluyendo 4 elementos de objetivo ED, 1 elemento de objetivo súper ED y elementos de objetivo con revestimiento de nanocristal) Ángulo de visión • Cámaras D-SLR de formato FX y SLR de película Nikon: 30° 10c – 6° 10c • Cámaras D-SLR de formato DX Nikon: 20° – 4° Escala de la distancia focal Graduado en milímetros (80, 105, 135, 200, 300, 400) Información de distancia Salida a cámara Zoom Zoom manual usando el anillo del zoom independiente Enfoque Sistema de Enfoque Interno (IF) de Nikon con autofoco controlado por medio de Silent Wave Motor (motor de onda silenciosa) y anillo de enfoque por separado para el enfoque manual Reducción de la vibración Desplazamiento de lente usando voice coil motors (VCMs) Indicador de distancia de 1,5 m a infinito (∞) enfoque Distancia de enfoque • AF: 1,75 m (5,74 pie) desde el plano focal en todas las mínima posiciones de zoom • MF: 1,5 m (4,92 pie) desde el plano focal en todas las posiciones de zoom Cuchillas del diafragma 9 (apertura de diafragma redondeada) Diafragma Completamente automático Alcance de apertura • Distancia focal de 80 mm: f/4.5 a f/32 • Distancia focal de 400 mm: f/5.6 a f/40 El diafragma mínimo visualizado puede variar dependiendo del tamaño del incremento de la exposición seleccionado con la cámara. Medición Apertura total Interruptor de límite de Dos posiciones: FULL (COMPLETO) (∞ – 1,75 m) y ∞ – 6 m enfoque Tamaño de accesorio del 77 mm (P = 0,75 mm) filtro Dimensiones Aprox. 95,5 mm de diámetro máximo × 203 mm (distancia a partir de la brida de montura del objetivo) Peso Aprox. 1570 g (3,5 lb), incluyendo el cuello del trípode Aprox. 1480 g (3,3 lb) sin el cuello del trípode Nikon se reserva el derecho de cambiar las especificaciones del hardware descritas en este manual en cualquier momento y sin previo aviso. Português Obrigado por ter adquirido uma objetiva NIKKOR. Antes de utilizar este produto, por favor, leia com atenção tanto estas instruções como o manual da câmara. Nota: Quando montada numa câmara digital reflex de objetiva simples de formato DX tal como a D7000 ou câmaras na série D300, esta objetiva tem um ângulo de visão de 20° – 4° e uma distância focal equivalente a 120 – 600 mm (formato de 35 mm). • Não desmontar. Tocar nas partes internas da câmara ou da objetiva pode resultar em lesões. Em caso de mau funcionamento, o produto deve apenas ser reparado por um técnico qualificado. Se o produto se quebrar como resultado de queda ou outro acidente, remova a bateria da câmara e/ou desconecte o adaptador CA e depois leve o produto a um centro de assistência autorizado da Nikon para inspeção. • Desligar a câmara imediatamente em caso de mau funcionamento. Se reparar em fumo ou num odor incomum a sair do equipamento, desligue o adaptador CA da tomada imediatamente e remova a bateria da câmara, tendo cuidado para evitar queimaduras. A operação continuada pode resultar em incêndio ou lesões. Após remover a bateria, leve o equipamento a um centro de assistência autorizado da Nikon para inspeção. • Não utilizar na presença de gás inflamável. Operar equipamento eletrónico na presença de gás inflamável pode resultar em explosão ou incêndio. • Não olhar para o sol através da objetiva ou do visor da câmara. Ver o sol ou outra fonte de iluminação forte através da objetiva ou do visor pode causar incapacidade visual permanente. • Manter fora do alcance das crianças. A não observância desta precaução pode resultar em lesões. • Observe as seguintes precauções ao manusear a objetiva e a câmara: - Mantenha a objetiva e a câmara secas. A não observância desta precaução pode resultar em incêndio ou choque elétrico. - Não manuseie a objetiva ou a câmara com mãos molhadas. A não observância desta precaução pode resultar em choque elétrico. - Mantenha o sol suficientemente fora do enquadramento ao fotografar motivos em contraluz. A luz do sol focada na câmara quando o sol está no enquadramento ou perto deste pode causar um incêndio. - Se a objetiva não for usada por um período extenso, coloque as tampas frontal e traseira e armazene a objetiva longe de luz solar direta. Se deixada sob luz solar direta, a objetiva pode focar os raios solares em objetos inflamáveis, causando incêndio. • Não transportar tripés com uma objetiva ou câmara montadas. Pode tropeçar ou acertar em terceiros acidentalmente, resultando em lesões. • Não deixar a objetiva onde esteja exposta a temperaturas extremamente altas, como num veículo fechado ou sob luz solar direta. A não observância desta precaução pode afetar adversamente as peças internas da objetiva, causando incêndio. Este símbolo indica que os equipamentos elétricos e eletrónicos devem ser recolhidos separadamente. O seguinte aplica-se apenas aos utilizadores em países Europeus: • Este produto é indicado para recolha separada num ponto de recolha apropriado. Não descarte como lixo doméstico. • A recolha separada e a reciclagem ajudam a conservar recursos naturais e a evitar consequências negativas para a saúde humana e para o ambiente que podem resultar do descarte inadequado. • Para mais informações, contacte o revendedor ou as autoridades locais responsáveis pela gestão de resíduos. ■ Peças da Objetiva (Figura 1) q Marca de montagem do para-sol da objetiva w Anel de zoom e Escala de distâncias focais r Marca de distâncias focais t Indicador de distância de focagem y Marca da distância de focagem u Anel de focagem i Índice de rotação da objetiva o Marca de montagem da objetiva !0 Junta de borracha da montagem da objetiva !1 Contactos CPU !2 Comutador de modo de focagem !3 Comutador de limite de focagem !4 Comutador LIGAR/DESLIGAR de redução da vibração !5 Comutador de modo de redução da vibração !6 Comutador de bloqueio do zoom !7 Para-sol da objetiva !8 Marca de alinhamento do para-sol da objetiva !9 Marca de bloqueio do para-sol da objetiva @0 Botão de desbloqueio do para-sol da objetiva @1 Parafuso de fixação do colar do tripé @2 Índices de posição (90°) @3 Colar de tripé ■ Compatibilidade As marcas de verificação ("✔") indicam funções suportadas e os travessões ("—") funções que não são suportadas. Podem aplicar-se algumas limitações; consulte o manual da câmara para detalhes. Série F60, série F55, série F50, F-401x, F-401s, F-401 Extracción del anillo del trípode z Teniendo cuidado de no extraer el tornillo de su toma, afloje el tornillo de bloqueo del anillo del trípode hasta que el anillo gire libremente (t). x Alinee la marca de alineación de la parte superior del objetivo con la marca Focar. Se desejado, a focagem automática pode ser anulada rodando o anel de focagem da objetiva enquanto o botão de disparo do obturador é ligeiramente premido (ou, se a câmara estiver equipada com um botão AF-ON, enquanto o botão AF-ON estiver premido). Para voltar a focar utilizando a focagem automática, prima ligeiramente o botão de disparo do obturador ou prima o botão AF-ON de novo. O Comutador de Limite de Focagem Este comutador determina os limites da distância de focagem para a focagem automática. • FULL: Selecione esta opção para motivos que possam ficar mais perto que 6 m. • ∞–6 m: Se o seu motivo irá estar sempre a uma distância de pelo menos 6 m, selecione esta opção para focagem mais rápida. ■ Zoom e Profundidade de Campo Antes de focar, rode o anel de zoom para ajustar a distância focal e enquadrar a fotografia. Se a câmara oferecer pré-visualização de profundidade de campo (número f inferior), a profundidade de campo pode ser pré-visualizada no visor. Nota: A distância focal é reduzida à medida que a distância de focagem diminui. Note que o indicador da distância de focagem está concebido apenas como um guia e pode não mostrar com precisão a distância ao motivo e pode, devido à profundidade de campo e outros fatores, não mostrar ∞ quando a câmara está focada num objeto distante. Para bloquear o anel de zoom, rode-o para a posição 80 mm e deslize o comutador de bloqueio do zoom para LOCK (BLOQUEADO). Isto evita que a objetiva se prolongue sob o seu próprio peso enquanto a câmara está a ser transportada de um lado para o outro. ■ Abertura A abertura é ajustada utilizando os controlos da câmara. Zoom e Abertura Máxima Alterações ao zoom podem alterar a abertura máxima em até 2⁄3 EV. Contudo, a câmara toma isto em conta automaticamente ao definir a exposição, e não são necessárias modificações às definições da câmara em seguimento aos ajustes de zoom. ■ Unidades de Flash Incorporado Ao utilizar o flash incorporado em câmaras equipadas com uma unidade de flash incorporado, remova o para-sol da objetiva para evitar a vinhetagem (sombras criadas onde a extremidade da objetiva obscurece o flash incorporado). ■ Redução da Vibração (VR, Vibration Reduction) A redução da vibração (VR) reduz o efeito tremido causado pela vibração da câmara, permitindo velocidades do obturador até 4,0 pontos mais lentas que o que seria normal (medidas a 400 mm com uma câmara D4 de acordo com as normas da Camera and Imaging Products Association [CIPA]; os efeitos podem variar com o fotógrafo e com as condições fotográficas). Isto aumenta a gama de velocidades do obturador disponíveis e permite fotografia portátil sem tripé numa ampla variedade de situações. Utilizar o Comutador ON/OFF (LIGAR/DESLIGAR) de Redução da Vibração • Selecione ON (LIGAR) para ativar a redução da vibração. A redução da vibração é ativada quando o botão de disparo do obturador é ligeiramente premido, reduzindo os efeitos da vibração da câmara para enquadramento e focagem melhorados. • Selecione OFF (DESLIGAR) para desligar a redução da vibração. F-801s, F-801, F-601M Câmara Câmaras digitais reflex de objetiva simples Nikon, F6, F5, série F4, F100, F90X, série F90, série F80, série F75, série F70, série F65, Pronea 600i, Pronea S AF MF Série F60, série F55, série F50, F-801s, F-801, F-601M, F-401x, F-401s, F-401 AF, MF O comutador de modo de redução da vibração é utilizado para selecionar o modo de redução da vibração quando a redução da vibração está ligada. • Selecione NORMAL para reduzir os efeitos da vibração ao fotografar de uma posição fixa e em outras situações com relativamente pouco movimento da câmara. • Selecione ACTIVE (ATIVO) para reduzir os efeitos da vibração ao fotografar de um veículo em movimento, ao andar e em outras situações com movimento da câmara ativo. Utilizar a Redução da Vibração: Notas ✔ ✔ ✔ — — — ✔ — ✔ ✔ — — — — — — — Modo de focagem da objetiva A/M Focagem automática com opção manual (prioridade a AF) M/A Focagem automática com opção manual (prioridade manual) M ■ Acessórios Fornecidos • Tampa Frontal da Objetiva de encaixe de 77 mm LC-77 • Tampa Traseira da Objetiva LF-4 • Para-sol da Baioneta HB-65 • Bolsa Flexível da Objetiva CL-M2 ■ Acessórios Compatíveis • Filtros de rosca de 77 mm • Teleconversores AF-I/AF-S TC-14E 1/TC-14E II 1/TC-17E II 2/TC-20E 2/TC-20E II 2/TC-20E III 2 1 A focagem automática está disponível apenas com câmaras que suportem f/8. 2 Focagem automática não suportada. ■ Especificações Tipo Distância focal Abertura máxima Construção da objetiva Objetiva de tipo G AF-S com CPU incorporado e montagem F 80 – 400 mm f/4.5 – 5.6 20 elementos em 12 grupos (incluindo 4 elementos de objetiva ED, 1 elemento de objetiva super ED e elementos de objetiva com um revestimento de Nano Cristais) Ângulo de visão • Câmaras de filmar SLR e D-SLR de formato FX Nikon: 30° 10c – 6° 10c • Câmaras D-SLR de formato DX Nikon: 20° – 4° Escala de distâncias focais Graduada em milímetros (80, 105, 135, 200, 300, 400) Informações da distância Enviadas para a câmara Zoom Zoom manual utilizando o anel de zoom independente Focagem Sistema de focagem interna da Nikon (Internal Focusing (IF)) com focagem automática controlado pelo Motor silencioso e anel de zoom para focagem manual separado Redução da vibração Deslocamento da lente utilizando voice coil motors (VCMs) Indicador da distância de 1,5 m ao infinito (∞) focagem Distância de focagem • AF: 1,75 m do plano focal em todas as posições de zoom mínima • MF: 1,5 m do plano focal em todas as posições de zoom Lâminas do diafragma 9 (abertura redonda do diafragma) Diafragma Completamente automático Alcance da abertura • Distância focal de 80 mm: f/4.5 – 32 • Distância focal de 400 mm: f/5.6 – 40 A abertura mínima exibida pode variar dependendo do tamanho do incremento de exposição selecionado com a câmara. Medição Abertura completa Comutador de limite de Duas posições: FULL (AMPLO) (∞ – 1,75 m) e ∞ – 6 m focagem Tamanho do filtro 77 mm (P = 0,75 mm) Dimensões Aprox. 95,5 mm de diâmetro máximo × 203 mm (distância do rebordo de montagem da objetiva da câmara) Peso Aprox. 1570 g incluindo o colar de tripé Aprox. 1480 g sem o colar de tripé A Nikon reserva-se o direito de alterar todas as especificações do hardware descritas neste manual a qualquer momento e sem aviso prévio. ■ Profondità di campo ■ Profundidad de campo ■ Profundidade de campo (m) • Distanza di messa a • Profondità di campo fuoco • Profundidad de • Distancia de enfoque campo • Distância de focagem • Profundidade de campo • Rapporto di riproduzione • Relación de reproducción • Razão de reprodução [f=80 mm] f/4.5 f/5.6 f/8 f/11 f/16 f/22 f/32 1.8 1.69 – 1.82 1.67 – 1.84 1.64 – 1.88 1.60 – 1.94 1.55 – 2.03 1.48 – 2.18 1.39 – 2.43 1/20.6 2.5 2.37 – 2.65 2.34 – 2.69 2.28 – 2.77 2.20 – 2.91 2.10 – 3.12 1.97 – 3.49 1.82 – 4.20 1/29.7 4 3.67 – 4.40 3.60 – 4.50 3.46 – 4.76 3.28 – 5.17 3.05 – 5.89 2.79 – 7.36 2.49 – 11.52 1/48.1 6 5.29 – 6.95 5.14 – 7.22 4.86 – 7.89 4.50 – 9.09 4.09 – 11.62 3.62 – 19.29 3.13 – 387.52 1/72.6 9 7.48 – 11.32 7.19 – 12.07 6.64 – 14.08 6.00 – 18.45 5.28 – 33.09 4.53 – ∞ 3.78 – ∞ 1/109.4 12 9.44 – 16.53 8.98 – 18.18 8.14 – 23.17 7.20 – 38.00 6.19 – 436.05 5.17 – ∞ 4.21 – ∞ 1/146.2 20 13.76 – 36.89 12.81 – 46.28 11.16 – 102.65 9.45 – ∞ 7.78 – ∞ 6.24 – ∞ 4.89 – ∞ 1/244.2 40 20.96 – 483.45 18.83 – ∞ 15.47 – ∞ 12.37 – ∞ 9.65 – ∞ 7.38 – ∞ 5.57 – ∞ 1/489.3 ∞ 43.96 – ∞ 35.53 – ∞ 25.18 – ∞ 17.87 – ∞ 12.70 – ∞ 9.04 – ∞ 6.45 – ∞ 1/∞ [f=105 mm] f/4.8 f/5.6 f/8 f/11 f/16 f/22 f/32 1.8 1.71 – 1.80 1.70 – 1.81 1.68 – 1.83 1.65 – 1.87 1.61 – 1.92 1.56 – 2.00 1.50 – 2.13 1/16.4 2.5 2.41 – 2.60 2.40 – 2.61 2.36 – 2.66 2.30 – 2.74 2.23 – 2.86 2.13 – 3.04 2.02 – 3.34 1/23.5 4 3.78 – 4.25 3.74 – 4.30 3.65 – 4.44 3.52 – 4.65 3.35 – 4.99 3.14 – 5.56 2.89 – 6.67 1/37.8 6 5.52 – 6.57 5.44 – 6.69 5.24 – 7.03 4.98 – 7.58 4.65 – 8.52 4.27 – 10.35 3.82 – 14.93 1/56.8 9 7.97 – 10.35 7.80 – 10.65 7.39 – 11.54 6.89 – 13.08 6.28 – 16.14 5.59 – 24.23 4.85 – 85.67 1/85.4 12 10.23 – 14.53 9.96 – 15.13 9.31 – 16.97 8.52 – 20.52 7.61 – 29.20 6.63 – 73.64 5.61 – ∞ 1/114.0 20 15.53 – 28.16 14.91 – 30.49 13.49 – 39.02 11.90 – 64.73 10.21 – ∞ 8.51 – ∞ 6.90 – ∞ 1/190.2 40 25.39 – 95.04 23.78 – 127.97 20.38 – ∞ 16.96 – ∞ 13.72 – ∞ 10.82 – ∞ 8.35 – ∞ 1/380.7 ∞ 69.60 – ∞ 58.71 – ∞ 41.57 – ∞ 29.46 – ∞ 20.90 – ∞ 14.85 – ∞ 10.57 – ∞ 1/∞ [f=135 mm] f/5 f/5.6 f/8 f/11 f/16 f/22 f/32 f/36 1.8 1.72 – 1.78 1.72 – 1.79 1.70 – 1.80 1.68 – 1.82 1.66 – 1.86 1.62 – 1.90 1.57 – 1.98 1.56 – 2.01 1/13.1 2.5 2.44 – 2.56 2.43 – 2.57 2.41 – 2.60 2.37 – 2.65 2.32 – 2.71 2.25 – 2.82 2.17 – 2.97 2.13 – 3.05 1/18.7 4 3.85 – 4.16 3.83 – 4.18 3.77 – 4.26 3.68 – 4.38 3.57 – 4.56 3.42 – 4.85 3.22 – 5.32 3.15 – 5.55 1/29.8 6 5.68 – 6.36 5.64 – 6.41 5.50 – 6.60 5.32 – 6.89 5.09 – 7.34 4.79 – 8.09 4.43 – 9.49 4.29 – 10.23 1/44.6 9 8.30 – 9.83 8.22 – 9.95 7.94 – 10.40 7.57 – 11.12 7.11 – 12.34 6.54 – 14.61 5.89 – 19.82 5.65 – 23.31 1/66.8 12 10.80 – 13.51 10.66 – 13.74 10.19 – 14.61 9.60 – 16.07 8.87 – 18.73 8.01 – 24.47 7.05 – 43.51 6.72 – 64.69 1/89.0 20 16.89 – 24.54 16.55 – 25.29 15.46 – 28.42 14.13 – 34.47 12.61 – 49.40 10.95 – 128.54 9.25 – ∞ 8.69 – ∞ 1/148.3 40 29.27 – 63.34 28.28 – 68.58 25.23 – 97.60 21.90 – 243.92 18.46 – ∞ 15.13 – ∞ 12.07 – ∞ 11.13 – ∞ 1/296.5 ∞ 109.57 – ∞ 96.93 – ∞ 68.61 – ∞ 48.59 – ∞ 34.44 – ∞ 24.43 – ∞ 17.35 – ∞ 15.49 – ∞ 1/∞ [f=200 mm] f/5.3 f/5.6 f/8 f/11 f/16 f/22 f/32 f/38 1.8 1.73 – 1.77 1.73 – 1.77 1.72 – 1.78 1.71 – 1.79 1.70 – 1.80 1.68 – 1.83 1.65 – 1.86 1.63 – 1.89 1/9.4 2.5 2.47 – 2.53 2.47 – 2.54 2.45 – 2.55 2.43 – 2.57 2.40 – 2.60 2.37 – 2.65 2.32 – 2.72 2.29 – 2.77 1/13.2 4 3.92 – 4.08 3.92 – 4.09 3.88 – 4.12 3.84 – 4.18 3.78 – 4.26 3.69 – 4.37 3.58 – 4.55 3.51 – 4.67 1/20.7 6 5.83 – 6.18 5.82 – 6.19 5.75 – 6.27 5.66 – 6.39 5.53 – 6.57 5.35 – 6.84 5.12 – 7.27 4.99 – 7.58 1/30.7 9 8.63 – 9.40 8.62 – 9.42 8.47 – 9.61 8.26 – 9.89 8.00 – 10.31 7.64 – 10.98 7.20 – 12.09 6.94 – 12.94 1/45.7 12 11.37 – 12.71 11.33 – 12.75 11.08 – 13.09 10.74 – 13.61 10.30 – 14.41 9.73 – 15.73 9.03 – 18.08 8.63 – 20.02 1/60.7 20 18.32 – 22.02 18.24 – 22.14 17.60 – 23.17 16.77 – 24.81 15.73 – 27.56 14.46 – 32.73 12.99 – 44.62 12.19 – 58.41 1/100.7 40 33.87 – 48.88 33.60 – 49.45 31.52 – 54.83 28.98 – 64.83 26.03 – 87.43 22.76 – 173.08 19.35 – ∞ 17.64 – ∞ 1/200.7 ∞ 223.49 – ∞ 212.56 – ∞ 150.40 – ∞ 106.46 – ∞ 75.40 – ∞ 53.43 – ∞ 37.90 – ∞ 31.93 – ∞ 1/∞ [f=300 mm] f/5.6 f/8 f/11 f/16 f/22 f/32 f/40 1.8 1.74 – 1.76 1.74 – 1.76 1.73 – 1.77 1.72 – 1.78 1.71 – 1.79 1.69 – 1.81 1.68 – 1.83 1/6.9 2.5 2.48 – 2.52 2.47 – 2.53 2.46 – 2.54 2.45 – 2.55 2.43 – 2.58 2.40 – 2.61 2.38 – 2.64 1/9.4 4 3.96 – 4.04 3.94 – 4.06 3.92 – 4.09 3.89 – 4.12 3.84 – 4.18 3.78 – 4.25 3.73 – 4.33 1/14.4 6 5.91 – 6.09 5.88 – 6.13 5.83 – 6.18 5.76 – 6.26 5.67 – 6.37 5.55 – 6.55 5.44 – 6.71 1/21.1 9 8.82 – 9.19 8.74 – 9.27 8.64 – 9.39 8.50 – 9.57 8.31 – 9.82 8.06 – 10.22 7.85 – 10.59 1/31.1 12 11.68 – 12.34 11.56 – 12.48 11.38 – 12.69 11.15 – 13.00 10.83 – 13.47 10.42 – 14.20 10.07 – 14.92 1/41.1 20 19.16 – 20.92 18.83 – 21.33 18.39 – 21.93 17.80 – 22.85 17.03 – 24.29 16.05 – 26.68 15.28 – 29.25 1/67.7 40 36.83 – 43.78 35.68 – 45.53 34.16 – 48.31 32.22 – 52.88 29.83 – 61.08 27.01 – 78.34 24.93 – 104.73 1/134.4 ∞ 475.50 – ∞ 338.24 – ∞ 239.38 – ∞ 169.49 – ∞ 120.06 – ∞ 85.11 – ∞ 67.71 – ∞ 1/∞ [f=400 mm] f/5.6 f/8 f/11 f/16 f/22 f/32 f/40 1.8 1.74 – 1.76 1.74 – 1.76 1.74 – 1.76 1.73 – 1.77 1.72 – 1.78 1.71 – 1.79 1.70 – 1.80 1/5.7 2.5 2.49 – 2.51 2.48 – 2.52 2.48 – 2.53 2.47 – 2.54 2.45 – 2.55 2.43 – 2.57 2.42 – 2.59 1/7.6 4 3.97 – 4.03 3.96 – 4.04 3.95 – 4.05 3.93 – 4.08 3.90 – 4.11 3.85 – 4.16 3.82 – 4.20 1/11.5 6 5.94 – 6.06 5.92 – 6.08 5.89 – 6.11 5.85 – 6.16 5.79 – 6.23 5.71 – 6.33 5.64 – 6.42 1/16.5 9 8.88 – 9.12 8.84 – 9.17 8.78 – 9.24 8.69 – 9.34 8.57 – 9.49 8.40 – 9.71 8.26 – 9.91 1/24.2 12 11.80 – 12.21 11.73 – 12.29 11.62 – 12.41 11.47 – 12.59 11.26 – 12.85 10.99 – 13.24 10.75 – 13.61 1/31.8 20 19.47 – 20.56 19.29 – 20.77 19.01 – 21.11 18.62 – 21.61 18.11 – 22.36 17.43 – 23.52 16.88 – 24.66 1/52.2 40 38.01 – 42.22 37.33 – 43.10 36.32 – 44.53 35.00 – 46.74 33.28 – 50.26 31.13 – 56.30 29.46 – 63.05 1/103.3 ∞ 789.34 – ∞ 577.42 – ∞ 408.64 – ∞ 289.30 – ∞ 204.92 – ∞ 145.24 – ∞ 115.53 – ∞ 1/∞ • Al contrario di altri obiettivi, la lunghezza focale degli obiettivi con messa a fuoco interna (IF) diminuisce con l’aumento della distanza di messa a fuoco. • A diferencia de otros objetivos, la distancia focal de los objetivos de enfoque interno (IF) disminuye con la distancia de enfoque. • Ao contrário de outras objectivas, a distância focal das objectivas de focagem interna (FI) diminui com a distância de focagem. ■ O Para-sol da Objetiva Os para-sóis da objetiva protegem a objetiva e bloqueiam a luz dispersa que causaria de outro modo reflexo ou efeito fantasma. Montar o Para-sol Alinhe a marca de montagem do para-sol da objetiva (●) com a marca de alinhamento do para-sol da objetiva ( ) e depois rode o para-sol (w) até que a marca ● esteja alinhada com a marca de bloqueio do parasol da objetiva (—{). Ao montar ou remover o para-sol, segure-o perto do símbolo na sua base e evite apertá-lo em demasia. Pode ocorrer vinhetagem se o para-sol não estiver montado corretamente. O para-sol pode ser revertido e montado na objetiva quando não estiver a ser utilizado. Desmontar o Para-sol Prima o botão de desbloqueio do para-sol da objetiva (q), rode o para-sol na direção mostrada pela seta (w) e remova-o como mostrado (e). ■ Ecrãs de Focagem As seguintes câmaras suportam uma variedade de ecrãs de focagem para utilização em diferentes situações. Ecrã EC-B Câmara A B C E EC-E G1 G2 G3 G4 J L M U F6 F5+ DA-30 ✔ ✔ ✔ ✔ ■ Cuidados com a Objetiva • Não pegue ou segure a objetiva ou a câmara utilizando apenas o para-sol da objetiva. • Mantenha os contactos CPU limpos. • Se a junta de borracha da montagem da objetiva ficar danificada, cesse a utilização imediatamente e leve a objetiva a um centro de assistência autorizado da Nikon para reparação. • Utilize uma pera de ar para remover pó e sujidade das superfícies da objetiva. Para remover manchas e impressões digitais, aplique uma pequena quantidade de etanol ou produto de limpeza de objetivas num pano macio e limpo de algodão ou pano de limpeza de objetivas e limpe do centro para fora utilizando um movimento circular, tendo cuidado para não deixar nódoas ou tocar no vidro com os seus dedos. • Nunca utilize solventes orgânicos como diluente ou benzeno para limpar as objetivas. • O para-sol da objetiva ou os filtros NC podem ser utilizados para proteger o elemento de objetiva frontal. • Monte as tampas frontal e traseira antes de colocar a objetiva na sua bolsa flexível. • Se a objetiva não for utilizada durante um período extenso, armazene num local fresco e seco para evitar bolor e ferrugem. Não armazene sob luz solar direta ou com bolas de naftalina ou cânfora. • Mantenha a objetiva limpa. Ferrugem no mecanismo interno pode causar danos irreparáveis. • Deixar a objetiva em locais extremamente quentes pode danificar ou deformar peças feitas de plástico reforçado. • Mudanças bruscas de temperatura podem causar condensação que danifica o interior e o exterior da objetiva. Antes de levar a objetiva de um ambiente quente para o frio ou vice-versa, coloque-a num saco ou caixa de plástico para retardar a mudança de temperatura. • Deslize o comutador de redução da vibração para OFF (DESLIGAR) se a câmara não suportar redução da vibração. Deixar a redução da vibração ligada pode aumentar em grande medida o gasto da bateria, particularmente no caso de câmaras Pronea 600i. • Ao utilizar a redução da vibração, prima ligeiramente o botão de disparo do obturador e espere que a imagem no visor estabilize antes de premir completamente o botão de disparo do obturador. • Quando a redução da vibração está ativa, a imagem no visor poderá ficar desfocada após o obturador ser disparado. Isto não indica mau funcionamento. • Deslize o comutador do modo de redução da vibração para NORMAL para fotografias panorâmicas. Quando a câmara é orientada, a redução da vibração aplica-se apenas ao movimento que não faz parte da orientação (se a câmara estiver orientada horizontalmente, por exemplo, a redução da vibração será aplicada apenas à vibração vertical), tornando muito mais fácil orientar a câmara suavemente num arco amplo. • Não desligue a câmara nem remova a objetiva enquanto a redução da vibração estiver em vigor. Se a alimentação à objetiva for cortada enquanto a redução da vibração está ligada, a objetiva pode fazer barulhos ao ser agitada. Isto não constitui mau funcionamento e pode ser corrigido voltando a montar a objetiva e ligando a câmara. • Se a câmara estiver equipada com um flash incorporado, a redução da vibração será desativada enquanto o flash carrega. • ON (LIGADO) é geralmente recomendado quando a câmara está montada num monopé ou num tripé com uma cabeça não segura, apesar de poder ser preferido OFF (DESLIGADO) dependendo das condições fotográficas e do tipo de tripé. ✔ ✔ ✔ ✔ ✔ ✔ ■ Focagem Os modos de focagem suportados são mostrados na seguinte tabela (para informações sobre os modos de focagem da câmara, consulte o manual da câmara). Modo de focagem da câmara Utilizar o Comutador de Modo de Redução da Vibração F5+ DP-30 F3AF, F-601, F-501, câmaras de focagem manual da Nikon (excluindo F-601M) 1. Modo de exposição M (manual) não disponível. 2. Inclui os modos AUTO e cena (Digital Vari-Program). 3. Focagem automática. 4. Redução da vibração. del anillo (y) y extraiga el objetivo del anillo (u). ■ Cuidado del objetivo • No recoja o sujete el objetivo o la cámara usando solamente el parasol de objetivo. • Mantenga los contactos CPU limpios. • Si se daña la junta de goma de montaje del objetivo, deje de usarlo inmediatamente y lleve el objetivo al servicio técnico autorizado de Nikon para repararlo. • Use un soplador para quitar el polvo y la pelusa de la superficie del objetivo. Para quitar tizna y las huellas dactilares, aplique una pequeña cantidad de etanol o limpiador para objetivo en un paño de algodón limpio o en un papel de limpieza de objetivo y limpie del centro hacia afuera usando movimientos circulares, teniendo cuidado de no dejar manchas ni de tocar el cristal con sus dedos. • Nunca use solventes orgánicos como el disolvente de pintura o benceno para limpiar el objetivo. • El parasol o los filtros NC se pueden usar para proteger el elemento delantero del objetivo. • Coloque la tapa delantera y trasera antes de colocar el objetivo en su bolsa flexible. • Si el objetivo no se va a usar durante un periodo prolongado de tiempo, guárdelo en un lugar frío y seco para evitar la formación de moho y corrosión. No lo guarde a la luz solar directa o con bolas para polilla de alcanfor o de naftalina. • Mantenga el objetivo seco. La oxidación del mecanismo interno puede ocasionar daños irreparables. • Dejar el objetivo en lugares extremadamente calientes podría averiar o deformar las piezas hechas de plástico reforzado. • Los cambios rápidos de temperatura podrían provocar condensación dañina dentro y fuera del objetivo. Antes de transportar el objetivo de un ambiente frío a otro caliente o viceversa, colóquelo en una bolsa o estuche de plástico para atenuar el cambio de temperatura. z Deslize o comutador do modo de focagem da objetiva para A/M ou M/A. Função AF 3 VR 4 ✔ ✔ ✔ ✔ Pronea 600i, Pronea S 1 x Alinee la marca de alineación de la parte superior del objetivo con la marca en intervalos de 90°), deteniéndose cuando la marca de alineación de la parte superior del objetivo esté alineada con la marca de la posición deseada del anillo (e) y, a continuación, apriete el tornillo de bloqueo del anillo del trípode (r). Asegúrese de que el tornillo esté completamente apretado; en caso contrario, el objetivo podría desprenderse del anillo del trípode. Modo de exposição (disparo) P2 S A M Câmara Câmaras digitais reflex de objetiva simples Nikon, F6, F5, F100, série F80, série F75, série F65 Série F4, F90X, série F90, série F70 c Gire el objetivo hasta la posición deseada (existen disponibles tres posiciones • M/A: A focagem automática pode ser anulada rodando o anel de focagem da objetiva. • A/M: Como acima, exceto que o anel de focagem deve ser rodado adicionalmente antes de a focagem automática ser anulada, evitando alterações acidentais à focagem causadas pela operação não intencional do anel de focagem. Para Sua Segurança A PRECAUÇÕES z Afloje ligeramente el tornillo de bloqueo del anillo del trípode (q). del anillo (w) e introduzca el objetivo en el anillo. Modos A/M e M/A x ■ Especificaciones Tipo Longitud focal Diafragma máximo Construcción de objetivo Aviso para os Clientes na Europa Desinstalación del parasol F6 ■ Accesorios suministrados • Tapa frontal a presión del objetivo de 77 mm LC-77 • Parasol de bayoneta HB-65 • Tapa trasera del objetivo LF-4 • Bolsa flexible para objetivo CL-M2 — — — — — — { { (–0,5) { (–0,5) (+1,0) (+0,5) : {: Recomendado. Vinhetagem visível no visor (as fotografias não são afetadas). —: Não compatível com a câmara. ( ): Os valores entre parênteses dão a compensação de exposição para a medição central ponderada. Selecione "Outro ecrã" para o Ajuste Personalizado b6 ("Comp. do ecrã") ao ajustar a compensação de exposição para a F6; note que, com ecrãs que não B e E, "Outro ecrã" tem de estar selecionado mesmo quando o valor para a compensação de exposição é 0. A compensação de exposição para a F5 pode ser ajustada utilizando o Ajuste Personalizado 18; consulte o manual da câmara para detalhes. Casa vazia: Não adequada para utilização com esta objetiva. Note que os ecrãs de tipo M podem contudo ser utilizados para fotomicrografia e fotografia macro em magnificações de 1 : 1 ou superior. Nota: A F5 apenas suporta medição matricial com ecrãs de focagem A, B, E, EC-B/EC-E, J e L. ■ Utilizar um Tripé (Figura 2) A objetiva está equipada com um colar rotativo amovível de tripé; ao utilizar um tripé, monte-o no colar, não na câmara. Para montar o colar na objetiva: z Desaperte ligeiramente o parafuso de fixação do colar do tripé (q). x Alinhe a marca de alinhamento no topo da objetiva com a marca no colar (w) e insira a objetiva no colar. Focagem manual com telémetro eletrónico Focagem manual (telémetro eletrónico disponível com todas as câmaras, exceto a F-601M) c Rode a objetiva para a posição desejada (estão disponíveis três posições a intervalos de 90°), parando quando a marca de alinhamento no topo da objetiva está alinhada com a marca da posição desejada no colar (e) e depois aperte o parafuso de fixação do colar do tripé (r). Certifique-se de que o parafuso está completamente apertado; se o parafuso não estiver apertado, a objetiva pode cair do colar do tripé. Remover o Colar do Tripé z Tendo cuidado para não remover o parafuso do seu encaixe, desaperte o parafuso de fixação do colar do tripé até que o colar rode livremente (t). x Alinhe a marca de alinhamento no topo da objetiva com a marca no colar (y) e remova a objetiva do colar (u). © 2013 Nikon Corporation-
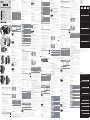 1
1
-
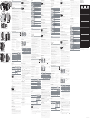 2
2


Nikon AF-S NIKKOR 80-400mm f/4.5-5.6G ED VR Manual de usuario
- Categoría
- Lentes de camara
- Tipo
- Manual de usuario
en otros idiomas
- français: Nikon AF-S NIKKOR 80-400mm f/4.5-5.6G ED VR Manuel utilisateur
- italiano: Nikon AF-S NIKKOR 80-400mm f/4.5-5.6G ED VR Manuale utente
- English: Nikon AF-S NIKKOR 80-400mm f/4.5-5.6G ED VR User manual
- Deutsch: Nikon AF-S NIKKOR 80-400mm f/4.5-5.6G ED VR Benutzerhandbuch
- Nederlands: Nikon AF-S NIKKOR 80-400mm f/4.5-5.6G ED VR Handleiding
- português: Nikon AF-S NIKKOR 80-400mm f/4.5-5.6G ED VR Manual do usuário
Artículos relacionados
-
Nikon AF-S NIKKOR 18-35mm f/3.5-4.5G ED Manual de usuario
-
-
-
-
-
-
-
