
1. Open the tube containing the blue reagent.
2. The blue reagent has to be dissolved when the oil sam-
ple is poured into the tube. To achieve it, there are two
options a) and b):
a) Pour the oil sample at room temperature up to the lower
part of the label of the tube. Put the open tube in a mi-
crowave (use a small glass or something similar to prevent
the tube from falling) and heat from 5 to 10 seconds at
maximum power. If you do not have a microwave, heat
some water and dip the tube properly closed until the mi-
xture is dissolved.
b) Place the tube in the anti-burn holder and pour the
warm oil sample (at least 60 ºC) up to the lower part of the
label. Wait a few seconds and close the tube tightly with
the cap and remove the anti-burn holder. If the sample
does not reach the temperature required to melt the blue
reagent, follow option a).
3. Shake the tube well (for a minute) in order to produce a
uniform mixture (the color changes when the oil is mixed
with the reagent).
4. Allow the mixture to settle for 2 minutes. Hold the tube
vertically near a source of light and compare the obtained
Acolor to the color scale.
5. At the end of the reaction, the mixture (fat and reagent)
6. If the mixture reaches color 4 (17% to 23%), be extre-
mely careful, as it is quite close to the 25% legal limit (BOE,
Order of the 26th of January, 1989).
7. Keep the tubes away from direct light or heat (the rea-
gent melts close to 60ºC).
1. Öffnen Sie das Plastikröhrchen mit der blauen Substanz.
2. Die blaue Substanz muss mit der Ölprobe vermischt wer-
den. Dafür gibt es folgende Möglichkeiten a) und b):
a) Füllen Sie die Ölprobe bei Raumtemperatur bis zum un-
teren Abschnitt des Plastikröhrchenetiketts ein. Stellen Sie
das geöffnete Plastikröhrchen in die Mikrowelle (benutzen
Sie dafür ein kleines Glas oder ähnliches, damit das Röhr-
chen nicht umkippen kann) und erhitzen Sie es für 5 bis
10 Sekunden bei maximaler Stärke. Sollte keine Mikrowelle
zur Verfügung stehen, können Sie das gut verschlossene
Röhrchen auch im Wasserbad erhitzen, bis die Ölprobe und
b) Platzieren Sie das Röhrchen in den mitgelieferten Ver-
brennschutz-Halter und füllen Sie die erwärmte Ölprobe
(mindestens 60 °C) bis zum unteren Abschnitt des Plas-
tikröhrchenetiketts ein. Warten Sie einige Sekunden, da-
nach verschließen Sie das Röhrchen fest und nehmen den
Verbrennschutz-Halter ab. Sollte die Temperatur nicht aus-
Sie nach a) vor.
3. Schütteln Sie das Röhrchen (zirka 1 Minute), um eine
homogene Mischung zu erhalten (die Farbe ändert sich,
wenn sich das Öl mit der Substanz mischt).
4. Lassen Sie die Mischung für 2 Minuten ruhen. Halten Sie
das Röhrchen horizontal (in der Nähe einer Lichtquelle) und
vergleichen Sie die Farbe mit der Farbskala.
5. Am Ende der Reaktion verfestigt sich das Gemisch aus
Öl und Reagenz.
6. Wenn die Mischung Farbstufe 4 (17% bis 23%) errei-
cht ist, ist höchste Vorsicht geboten, da dies sehr nah am
erlaubten Grenzwert von 25% liegt (BOE, Gesetz vom 26.
Januar 1989).
7. Halten Sie die Röhrchen von direktem Licht oder Wärme
1. Destape el tubo que contiene el reactivo azul.
2. Debe conseguir que el reactivo azul se disuelva cuan-
do introduzca la muestra de aceite en el tubo. Para ello,
puede actuar de dos formas:
a) Añada la muestra de aceite a temperatura ambiente
hasta la marca inferior de la etiqueta del tubo. Introduzca
el tubo destapado en un microondas (puede usar un vaso
pequeño o recipiente similar como soporte) y manténgalo
de 5 a 10 segundos a máxima potencia. [Si no dispone
de microondas, caliente un poco de agua e introduzca el
tubo debidamente tapado hasta que la mezcla se disuel-
va.].
b) Coloque el tubo en el soporte anti-quemadura e intro-
duzca la muestra de aceite caliente (por lo menos a 60 ºC
hasta la marca inferior de la etiqueta del tubo. Espere unos
segundos y cierre el tubo completamente con su tapón y
quite el soporte anti-quemadura. Si la muestra no hubiera
alcanzado la temperatura necesaria para fundir el reactivo
azul, actúe según la opción a).
3. Agite bien el tubo tapado hasta que se produzca una
mezcla uniforme (el aceite cambia de color al mezclarse
con el reactivo).
4. Espere 2 minutos dejando la mezcla en reposo. Man-
tenga el tubo vertical cerca de una fuente de luz y com-
pare el color obtenido con la tabla de colores.
5.
6. Si alcanza el color 4 (17 a 23%) tenga el máximo cui-
dado porque está muy cerca del límite legal del 25% de
compuestos polares (BOE, Orden de 26 de Enero de 1989).
7. Mantenga los tubos alejados de la luz directa o del calor
(el reactivo funde cerca de los 60 ºC.
t5IFVTFPGHMBTTJOTUSVNFOUTJTOPUSFDPNNFOEFELFFQBXBZGSPNDIJMESFOt%JFVFSXFOEVOHWPO(MBTHFSÊUFOXJSE
OJDIUFNQGPIMFOWPO,JOEFSOGFSOIBMUFOt4FEFTBDPOTFKBMBVUJMJ[BDJØOEFVUFOTJMJPTEFWJESJPNBOUFOFSGVFSBEFM
BMDBODFEFMPTOJ×PTt4JTDPOTJHMJBMVTPEJTUSVNFOUJEJWFUSPUFOFSFMPOUBOPEBMMBQPSUBUBEFJCBNCJOJtLVUJMJTBUJPO
EJOTUSVNFOUTEFWFSSFOFTUQBTSFDPNNBOEÏFHBSEFSMPJOEFTFOGBOUTt/ÍPÏSFDPNFOEBEPPVTPEFJOTUSVNFOUPT
EFWJESPNBOUFOIBMPOHFEPBMDBODFEBTDSJBOÎBT
INSTRUCTIONS OF USE
ANWEISUNG DER VERWENDUNG
INSTRUCCIONES DE USO
1. Aprire la provetta che contiene il reattivo blú.
2. Il reattivo deve dissolversi al introdurre il campione d’olio
nella provetta. Si puo fare in due maniere diverse:
a. Aggiungere il campione d’olio a temperature ambiente
la provetta aperta nel micronde (si puó usare un piccolo reci-
piente come appogigio) mantenerlo per 5 a 10 secondi alla
massima potenza. In caso de non avere micronde scaldare
miscela si dissolva.
b. Mettere la provetta nel sopporto anti-ustioni e introdurre il
dell’etichetta, aspettare vari secondi e chidere completamen-
te la provetta com il suo tappo, togliere il sopporto anti ustio-
ne. Se il campione non raggiunge la temperatura necessária
per fondere il reattivo blú, seguir ele indicazioni del punto a.
3.
miscel uniforme. (l’olio cambia di colore al mischiarsi com
il reattivo).
4. Aspettare due minuti, lasciando la miscela a riposo. Man-
tenere la provetta in posizione verticale, vicino ad una fote
di luce, compararei l colore ottenuto com la tabela colori.
5.
6. Al ottenere il colore 4 (17 a 23 %) fare la massima atten-
zione perche il limite legale é del 25% per component polari.
(BOE, Ordine 26 Gennaio 1989).
7. Mantenere le provette lontani dalla luce direta o calore (il
reattivo fonde circa i 60ºC)
1.
2. Placez le tube dans l’appui anti-brûlure et ouvrez-le.
3. Recueillez l’échantillon.
4. Versez l’échantillon dans le tube.
5. Placer l’échantillon jusqu’à la partie inférieure de l’éti-
quette.
Attention: Utilisez toujours l’appui anti-brûlure pour éviter
de vous brûler.
6. Les échantillons recueillis à la température ambiante peu-
vent être chauffés (micro-ondes, bain-marie).
7. Placez le bouchon sur le tube.
8. Agitez jusqu’à la dissolution et le mélange complet des
phases.
9. Attendez deux minutes pour que la réaction se produise.
10. Comparez les résultats avec l’échelle des couleurs
fournie.
11. Ecartez la graisse si le résultat est supérieur à 25% de
composants polaires (couleur 5).
12.
fournie.
13. Conservez le test effectué pour référence future.
L’utilisation des récipients en verre, tels que pipettes, pour
la récolte des graisses chaudes est déconseillée! Conserver
hors de la portée des enfants.
2. Coloque o tubo no suporte anti-queimadura e abra-o.
3. Recolha a amostra.
4. Verta a amostra para o tubo.
5. Coloque a amostra até à parte inferior da etiqueta.
Atenção: Use sempre o suporte anti-queimaduras para
evitar queimar-se.
6. Amostras recolhidas à temperatura ambiente podem ser
aquecidas (micro-ondas, banho maria).
7. Coloque a tampa no tubo.
8. Agite até completa dissolução e mistura das fases.
9. Espere 2 minutos para a reação ocorrer.
10. Compare os resultados com a escala de cores fornecida.
11. Descarte a gordura se o resultado for superior a 25% de
compostos polares (cor 5).
12. Registe os resultados na folha de registos fornecida.
13. Guarde o teste realizado para referência futura.
INSTRUCTIONS D’UTILISATION
INSTRUÇÕES DE UTILIZAÇÃO
ISTRUZIONI D’USO
1-2 MIN.
3421
Biomedal, S.L. | Avda. Américo Vespucio, 5-4, Planta 1ª, Mód. 12 41092 Sevilla, España (Spain)
Tel. +34 954 08 12 76 Fax. +34 954 08 12 79 | [email protected] www.biomedal.com
DIAGNOSTICS
1. Open the tube containing the blue reagent.
2. The blue reagent has to be dissolved when the oil
sample is poured into the tube. To achieve it, there are
two options a) and b):
a) Pour the oil sample at room temperature up to the
lower part of the label of the tube. Put the open tube
in a microwave (use a small glass or something similar
to prevent the tube from falling) and heat from 5 to
10 seconds at maximum power. If you do not have a
microwave, heat some water and dip the tube properly
closed until the mixture is dissolved.
b) Place the tube in the anti-burn holder and pour the
warm oil sample (at least 60 ºC) up to the lower part of
the label. Wait a few seconds and close the tube tightly
with the cap and remove the anti-burn holder. If the
sample does not reach the temperature required to melt
the blue reagent, follow option a).
3. Shake the tube well (for a minute) in order to produce
a uniform mixture (the color changes when the oil is
mixed with the reagent).
4. Allow the mixture to settle for 2 minutes. Hold the
tube vertically near a source of light and compare the
obtained Acolor to the color scale.
5. At the end of the reaction, the mixture (fat and rea-
6. If the mixture reaches color 4 (17% to 23%), be ex-
tremely careful, as it is quite close to the 25% legal limit
(BOE, Order of the 26th of January, 1989).
7. Keep the tubes away from direct light or heat (the
reagent melts close to 60ºC).
INSTRUCTIONS OF USE
1. Öffnen Sie das Plastikröhrchen mit der blauen Subs-
tanz.
2. Die blaue Substanz muss mit der Ölprobe vermischt
werden. Dafür gibt es folgende Möglichkeiten a) und b):
a) Füllen Sie die Ölprobe bei Raumtemperatur bis zum
unteren Abschnitt des Plastikröhrchenetiketts ein. Ste-
llen Sie das geöffnete Plastikröhrchen in die Mikrowelle
(benutzen Sie dafür ein kleines Glas oder ähnliches, da-
mit das Röhrchen nicht umkippen kann) und erhitzen
Sie es für 5 bis 10 Sekunden bei maximaler Stärke. Sollte
keine Mikrowelle zur Verfügung stehen, können Sie das
gut verschlossene Röhrchen auch im Wasserbad erhit-
zen, bis die Ölprobe und die blaue Substanz vollständig
b) Platzieren Sie das Röhrchen in den mitgelieferten Ver-
brennschutz-Halter und füllen Sie die erwärmte Ölpro-
be (mindestens 60 °C) bis zum unteren Abschnitt des
Plastikröhrchenetiketts ein. Warten Sie einige Sekunden,
danach verschließen Sie das Röhrchen fest und nehmen
den Verbrennschutz-Halter ab. Sollte die Temperatur ni-
gen, gehen Sie nach a) vor.
3. Schütteln Sie das Röhrchen (zirka 1 Minute), um eine
homogene Mischung zu erhalten (die Farbe ändert sich,
wenn sich das Öl mit der Substanz mischt).
4. Lassen Sie die Mischung für 2 Minuten ruhen. Halten
Sie das Röhrchen horizontal (in der Nähe einer Lichtquel-
le) und vergleichen Sie die Farbe mit der Farbskala.
5. Am Ende der Reaktion verfestigt sich das Gemisch aus
Öl und Reagenz.
6. Wenn die Mischung Farbstufe 4 (17% bis 23%) errei-
cht ist, ist höchste Vorsicht geboten, da dies sehr nah am
erlaubten Grenzwert von 25% liegt (BOE, Gesetz vom
26. Januar 1989).
7. Halten Sie die Röhrchen von direktem Licht oder Wär-
ANWEISUNG DER VERWENDUNG
1. Destape el tubo que contiene el reactivo azul.
2. Debe conseguir que el reactivo azul se disuelva
cuando introduzca la muestra de aceite en el tubo.
Para ello, puede actuar de dos formas:
a) Añada la muestra de aceite a temperatura ambi-
ente hasta la marca inferior de la etiqueta del tubo.
Introduzca el tubo destapado en un microondas
(puede usar un vaso pequeño o recipiente similar
como soporte) y manténgalo de 5 a 10 segundos a
máxima potencia. [Si no dispone de microondas, cal-
iente un poco de agua e introduzca el tubo debida-
mente tapado hasta que la mezcla se disuelva.].
b) Coloque el tubo en el soporte anti-quemadura e
introduzca la muestra de aceite caliente (por lo menos
a 60 ºC hasta la marca inferior de la etiqueta del tubo.
Espere unos segundos y cierre el tubo completamente
con su tapón y quite el soporte anti-quemadura. Si la
muestra no hubiera alcanzado la temperatura nece-
saria para fundir el reactivo azul, actúe según la op-
ción a).
3. Agite bien el tubo tapado hasta que se produz-
ca una mezcla uniforme (el aceite cambia de color al
mezclarse con el reactivo).
4. Espere 2 minutos dejando la mezcla en reposo.
Mantenga el tubo vertical cerca de una fuente de luz
y compare el color obtenido con la tabla de colores.
5.
6. Si alcanza el color 4 (17 a 23%) tenga el máximo
cuidado porque está muy cerca del límite legal del
25% de compuestos polares (BOE, Orden de 26 de
Enero de 1989).
7. Mantenga los tubos alejados de la luz directa o del
calor (el reactivo funde cerca de los 60 ºC.
INSTRUCCIONES DE USO
1. Aprire la provetta che contiene il reattivo blú.
2. Il reattivo deve dissolversi al introdurre il campione
d’olio nella provetta. Si puo fare in due maniere diverse:
a. Aggiungere il campione d’olio a temperature ambien-
trodurre la provetta aperta nel micronde (si puó usare un
piccolo recipiente come appogigio) mantenerlo per 5 a
10 secondi alla massima potenza. In caso de non avere
micronde scaldare un po’ d’aqcua e introdurre la prove-
b. Mettere la provetta nel sopporto anti-ustioni e in-
al segno inferiore dell’etichetta, aspettare vari secondi
e chidere completamente la provetta com il suo tappo,
togliere il sopporto anti ustione. Se il campione non rag-
giunge la temperatura necessária per fondere il reattivo
blú, seguir ele indicazioni del punto a.
3.
miscel uniforme. (l’olio cambia di colore al mischiarsi
com il reattivo).
4. Aspettare due minuti, lasciando la miscela a riposo.
Mantenere la provetta in posizione verticale, vicino ad
una fote di luce, compararei l colore ottenuto com la
tabela colori.
5.
6. Al ottenere il colore 4 (17 a 23 %) fare la massima
attenzione perche il limite legale é del 25% per compo-
nent polari. (BOE, Ordine 26 Gennaio 1989).
7. Mantenere le provette lontani dalla luce direta o calo-
re (il reattivo fonde circa i 60ºC)
1.
2. Placez le tube dans l’appui anti-brûlure et ouvrez-le.
3. Recueillez l’échantillon.
4. Versez l’échantillon dans le tube.
5. Placer l’échantillon jusqu’à la partie inférieure de l’éti-
quette.
Attention: Utilisez toujours l’appui anti-brûlure pour
éviter de vous brûler.
6. Les échantillons recueillis à la température ambiante
peuvent être chauffés (micro-ondes, bain-marie).
7. Placez le bouchon sur le tube.
8. Agitez jusqu’à la dissolution et le mélange complet
des phases.
9. Attendez deux minutes pour que la réaction se pro-
duise.
10. Comparez les résultats avec l’échelle des couleurs
fournie.
11. Ecartez la graisse si le résultat est supérieur à 25%
de composants polaires (couleur 5).
12.
fournie.
13. Conservez le test effectué pour référence future.
L’utilisation des récipients en verre, tels que pipettes,
pour la récolte des graisses chaudes est déconseillée!
Conserver hors de la portée des enfants.
2. Coloque o tubo no suporte anti-queimadura e abra-o.
3. Recolha a amostra.
4. Verta a amostra para o tubo.
5. Coloque a amostra até à parte inferior da etiqueta.
Atenção: Use sempre o suporte anti-queimaduras para
evitar queimar-se.
6. Amostras recolhidas à temperatura ambiente podem
ser aquecidas (micro-ondas, banho maria).
7. Coloque a tampa no tubo.
8. Agite até completa dissolução e mistura das fases.
9. Espere 2 minutos para a reação ocorrer.
10. Compare os resultados com a escala de cores for-
necida.
11. Descarte a gordura se o resultado for superior a
25% de compostos polares (cor 5).
12. Registe os resultados na folha de registos fornecida.
13. Guarde o teste realizado para referência futura.
t5IFVTFPGHMBTTJOTUSVNFOUTJTOPUSFDPNNFOEFELFFQBXBZGSPNDIJMESFOt%JFVFSXFOEVOHWPO(MBTHFSÊUFOXJSE
OJDIUFNQGPIMFOWPO,JOEFSOGFSOIBMUFOt4FEFTBDPOTFKBMBVUJMJ[BDJØOEFVUFOTJMJPTEFWJESJPNBOUFOFSGVFSBEFM
BMDBODFEFMPTOJ×PTt4JTDPOTJHMJBMVTPEJTUSVNFOUJEJWFUSPUFOFSFMPOUBOPEBMMBQPSUBUBEFJCBNCJOJtLVUJMJTBUJPO
EJOTUSVNFOUTEFWFSSFOFTUQBTSFDPNNBOEÏFHBSEFSMPJOEFTFOGBOUTt/ÍPÏSFDPNFOEBEPPVTPEFJOTUSVNFOUPT
EFWJESPNBOUFOIBMPOHFEPBMDBODFEBTDSJBOÎBT
INSTRUCTIONS D’UTILISATION
INSTRUÇÕES DE UTILIZAÇÃO
ISTRUZIONI D’USO
1-2 MIN.
3421
1. Open the tube containing the blue reagent.
2. The blue reagent has to be dissolved when the oil sam-
ple is poured into the tube. To achieve it, there are two
options a) and b):
a) Pour the oil sample at room temperature up to the lower
part of the label of the tube. Put the open tube in a mi-
crowave (use a small glass or something similar to prevent
the tube from falling) and heat from 5 to 10 seconds at
maximum power. If you do not have a microwave, heat
some water and dip the tube properly closed until the mi-
xture is dissolved.
b) Place the tube in the anti-burn holder and pour the
warm oil sample (at least 60 ºC) up to the lower part of the
label. Wait a few seconds and close the tube tightly with
the cap and remove the anti-burn holder. If the sample
does not reach the temperature required to melt the blue
reagent, follow option a).
3. Shake the tube well (for a minute) in order to produce a
uniform mixture (the color changes when the oil is mixed
with the reagent).
4. Allow the mixture to settle for 2 minutes. Hold the tube
vertically near a source of light and compare the obtained
Acolor to the color scale.
5. At the end of the reaction, the mixture (fat and reagent)
6. If the mixture reaches color 4 (17% to 23%), be extre-
mely careful, as it is quite close to the 25% legal limit (BOE,
Order of the 26th of January, 1989).
7. Keep the tubes away from direct light or heat (the rea-
gent melts close to 60ºC).
1. Öffnen Sie das Plastikröhrchen mit der blauen Substanz.
2. Die blaue Substanz muss mit der Ölprobe vermischt wer-
den. Dafür gibt es folgende Möglichkeiten a) und b):
a) Füllen Sie die Ölprobe bei Raumtemperatur bis zum un-
teren Abschnitt des Plastikröhrchenetiketts ein. Stellen Sie
das geöffnete Plastikröhrchen in die Mikrowelle (benutzen
Sie dafür ein kleines Glas oder ähnliches, damit das Röhr-
chen nicht umkippen kann) und erhitzen Sie es für 5 bis
10 Sekunden bei maximaler Stärke. Sollte keine Mikrowelle
zur Verfügung stehen, können Sie das gut verschlossene
Röhrchen auch im Wasserbad erhitzen, bis die Ölprobe und
b) Platzieren Sie das Röhrchen in den mitgelieferten Ver-
brennschutz-Halter und füllen Sie die erwärmte Ölprobe
(mindestens 60 °C) bis zum unteren Abschnitt des Plas-
tikröhrchenetiketts ein. Warten Sie einige Sekunden, da-
nach verschließen Sie das Röhrchen fest und nehmen den
Verbrennschutz-Halter ab. Sollte die Temperatur nicht aus-
Sie nach a) vor.
3. Schütteln Sie das Röhrchen (zirka 1 Minute), um eine
homogene Mischung zu erhalten (die Farbe ändert sich,
wenn sich das Öl mit der Substanz mischt).
4. Lassen Sie die Mischung für 2 Minuten ruhen. Halten Sie
das Röhrchen horizontal (in der Nähe einer Lichtquelle) und
vergleichen Sie die Farbe mit der Farbskala.
5. Am Ende der Reaktion verfestigt sich das Gemisch aus
Öl und Reagenz.
6. Wenn die Mischung Farbstufe 4 (17% bis 23%) errei-
cht ist, ist höchste Vorsicht geboten, da dies sehr nah am
erlaubten Grenzwert von 25% liegt (BOE, Gesetz vom 26.
Januar 1989).
7. Halten Sie die Röhrchen von direktem Licht oder Wärme
1. Destape el tubo que contiene el reactivo azul.
2. Debe conseguir que el reactivo azul se disuelva cuan-
do introduzca la muestra de aceite en el tubo. Para ello,
puede actuar de dos formas:
a) Añada la muestra de aceite a temperatura ambiente
hasta la marca inferior de la etiqueta del tubo. Introduzca
el tubo destapado en un microondas (puede usar un vaso
pequeño o recipiente similar como soporte) y manténgalo
de 5 a 10 segundos a máxima potencia. [Si no dispone
de microondas, caliente un poco de agua e introduzca el
tubo debidamente tapado hasta que la mezcla se disuel-
va.].
b) Coloque el tubo en el soporte anti-quemadura e intro-
duzca la muestra de aceite caliente (por lo menos a 60 ºC
hasta la marca inferior de la etiqueta del tubo. Espere unos
segundos y cierre el tubo completamente con su tapón y
quite el soporte anti-quemadura. Si la muestra no hubiera
alcanzado la temperatura necesaria para fundir el reactivo
azul, actúe según la opción a).
3. Agite bien el tubo tapado hasta que se produzca una
mezcla uniforme (el aceite cambia de color al mezclarse
con el reactivo).
4. Espere 2 minutos dejando la mezcla en reposo. Man-
tenga el tubo vertical cerca de una fuente de luz y com-
pare el color obtenido con la tabla de colores.
5.
6. Si alcanza el color 4 (17 a 23%) tenga el máximo cui-
dado porque está muy cerca del límite legal del 25% de
compuestos polares (BOE, Orden de 26 de Enero de 1989).
7. Mantenga los tubos alejados de la luz directa o del calor
(el reactivo funde cerca de los 60 ºC.
t5IFVTFPGHMBTTJOTUSVNFOUTJTOPUSFDPNNFOEFELFFQBXBZGSPNDIJMESFOt%JFVFSXFOEVOHWPO(MBTHFSÊUFOXJSE
OJDIUFNQGPIMFOWPO,JOEFSOGFSOIBMUFOt4FEFTBDPOTFKBMBVUJMJ[BDJØOEFVUFOTJMJPTEFWJESJPNBOUFOFSGVFSBEFM
BMDBODFEFMPTOJ×PTt4JTDPOTJHMJBMVTPEJTUSVNFOUJEJWFUSPUFOFSFMPOUBOPEBMMBQPSUBUBEFJCBNCJOJtLVUJMJTBUJPO
EJOTUSVNFOUTEFWFSSFOFTUQBTSFDPNNBOEÏFHBSEFSMPJOEFTFOGBOUTt/ÍPÏSFDPNFOEBEPPVTPEFJOTUSVNFOUPT
EFWJESPNBOUFOIBMPOHFEPBMDBODFEBTDSJBOÎBT
INSTRUCTIONS OF USE
ANWEISUNG DER VERWENDUNG
INSTRUCCIONES DE USO
1. Aprire la provetta che contiene il reattivo blú.
2. Il reattivo deve dissolversi al introdurre il campione d’olio
nella provetta. Si puo fare in due maniere diverse:
a. Aggiungere il campione d’olio a temperature ambiente
la provetta aperta nel micronde (si puó usare un piccolo reci-
piente come appogigio) mantenerlo per 5 a 10 secondi alla
massima potenza. In caso de non avere micronde scaldare
miscela si dissolva.
b. Mettere la provetta nel sopporto anti-ustioni e introdurre il
dell’etichetta, aspettare vari secondi e chidere completamen-
te la provetta com il suo tappo, togliere il sopporto anti ustio-
ne. Se il campione non raggiunge la temperatura necessária
per fondere il reattivo blú, seguir ele indicazioni del punto a.
3.
miscel uniforme. (l’olio cambia di colore al mischiarsi com
il reattivo).
4. Aspettare due minuti, lasciando la miscela a riposo. Man-
tenere la provetta in posizione verticale, vicino ad una fote
di luce, compararei l colore ottenuto com la tabela colori.
5.
6. Al ottenere il colore 4 (17 a 23 %) fare la massima atten-
zione perche il limite legale é del 25% per component polari.
(BOE, Ordine 26 Gennaio 1989).
7. Mantenere le provette lontani dalla luce direta o calore (il
reattivo fonde circa i 60ºC)
1.
2. Placez le tube dans l’appui anti-brûlure et ouvrez-le.
3. Recueillez l’échantillon.
4. Versez l’échantillon dans le tube.
5. Placer l’échantillon jusqu’à la partie inférieure de l’éti-
quette.
Attention: Utilisez toujours l’appui anti-brûlure pour éviter
de vous brûler.
6. Les échantillons recueillis à la température ambiante peu-
vent être chauffés (micro-ondes, bain-marie).
7. Placez le bouchon sur le tube.
8. Agitez jusqu’à la dissolution et le mélange complet des
phases.
9. Attendez deux minutes pour que la réaction se produise.
10. Comparez les résultats avec l’échelle des couleurs
fournie.
11. Ecartez la graisse si le résultat est supérieur à 25% de
composants polaires (couleur 5).
12.
fournie.
13. Conservez le test effectué pour référence future.
L’utilisation des récipients en verre, tels que pipettes, pour
la récolte des graisses chaudes est déconseillée! Conserver
hors de la portée des enfants.
2. Coloque o tubo no suporte anti-queimadura e abra-o.
3. Recolha a amostra.
4. Verta a amostra para o tubo.
5. Coloque a amostra até à parte inferior da etiqueta.
Atenção: Use sempre o suporte anti-queimaduras para
evitar queimar-se.
6. Amostras recolhidas à temperatura ambiente podem ser
aquecidas (micro-ondas, banho maria).
7. Coloque a tampa no tubo.
8. Agite até completa dissolução e mistura das fases.
9. Espere 2 minutos para a reação ocorrer.
10. Compare os resultados com a escala de cores fornecida.
11. Descarte a gordura se o resultado for superior a 25% de
compostos polares (cor 5).
12. Registe os resultados na folha de registos fornecida.
13. Guarde o teste realizado para referência futura.
INSTRUCTIONS D’UTILISATION
INSTRUÇÕES DE UTILIZAÇÃO
ISTRUZIONI D’USO
1-2 MIN.
3421
Biomedal, S.L. | Avda. Américo Vespucio, 5-4, Planta 1ª, Mód. 12 41092 Sevilla, España (Spain)
Tel. +34 954 08 12 76 Fax. +34 954 08 12 79 | [email protected] www.biomedal.com
DIAGNOSTICS
1. Open the tube containing the blue reagent.
2. The blue reagent has to be dissolved when the oil
sample is poured into the tube. To achieve it, there are
two options a) and b):
a) Pour the oil sample at room temperature up to the
lower part of the label of the tube. Put the open tube
in a microwave (use a small glass or something similar
to prevent the tube from falling) and heat from 5 to
10 seconds at maximum power. If you do not have a
microwave, heat some water and dip the tube properly
closed until the mixture is dissolved.
b) Place the tube in the anti-burn holder and pour the
warm oil sample (at least 60 ºC) up to the lower part of
the label. Wait a few seconds and close the tube tightly
with the cap and remove the anti-burn holder. If the
sample does not reach the temperature required to melt
the blue reagent, follow option a).
3. Shake the tube well (for a minute) in order to produce
a uniform mixture (the color changes when the oil is
mixed with the reagent).
4. Allow the mixture to settle for 2 minutes. Hold the
tube vertically near a source of light and compare the
obtained Acolor to the color scale.
5. At the end of the reaction, the mixture (fat and rea-
6. If the mixture reaches color 4 (17% to 23%), be ex-
tremely careful, as it is quite close to the 25% legal limit
(BOE, Order of the 26th of January, 1989).
7. Keep the tubes away from direct light or heat (the
reagent melts close to 60ºC).
INSTRUCTIONS OF USE
1. Öffnen Sie das Plastikröhrchen mit der blauen Subs-
tanz.
2. Die blaue Substanz muss mit der Ölprobe vermischt
werden. Dafür gibt es folgende Möglichkeiten a) und b):
a) Füllen Sie die Ölprobe bei Raumtemperatur bis zum
unteren Abschnitt des Plastikröhrchenetiketts ein. Ste-
llen Sie das geöffnete Plastikröhrchen in die Mikrowelle
(benutzen Sie dafür ein kleines Glas oder ähnliches, da-
mit das Röhrchen nicht umkippen kann) und erhitzen
Sie es für 5 bis 10 Sekunden bei maximaler Stärke. Sollte
keine Mikrowelle zur Verfügung stehen, können Sie das
gut verschlossene Röhrchen auch im Wasserbad erhit-
zen, bis die Ölprobe und die blaue Substanz vollständig
b) Platzieren Sie das Röhrchen in den mitgelieferten Ver-
brennschutz-Halter und füllen Sie die erwärmte Ölpro-
be (mindestens 60 °C) bis zum unteren Abschnitt des
Plastikröhrchenetiketts ein. Warten Sie einige Sekunden,
danach verschließen Sie das Röhrchen fest und nehmen
den Verbrennschutz-Halter ab. Sollte die Temperatur ni-
gen, gehen Sie nach a) vor.
3. Schütteln Sie das Röhrchen (zirka 1 Minute), um eine
homogene Mischung zu erhalten (die Farbe ändert sich,
wenn sich das Öl mit der Substanz mischt).
4. Lassen Sie die Mischung für 2 Minuten ruhen. Halten
Sie das Röhrchen horizontal (in der Nähe einer Lichtquel-
le) und vergleichen Sie die Farbe mit der Farbskala.
5. Am Ende der Reaktion verfestigt sich das Gemisch aus
Öl und Reagenz.
6. Wenn die Mischung Farbstufe 4 (17% bis 23%) errei-
cht ist, ist höchste Vorsicht geboten, da dies sehr nah am
erlaubten Grenzwert von 25% liegt (BOE, Gesetz vom
26. Januar 1989).
7. Halten Sie die Röhrchen von direktem Licht oder Wär-
ANWEISUNG DER VERWENDUNG
1. Destape el tubo que contiene el reactivo azul.
2. Debe conseguir que el reactivo azul se disuelva
cuando introduzca la muestra de aceite en el tubo.
Para ello, puede actuar de dos formas:
a) Añada la muestra de aceite a temperatura ambi-
ente hasta la marca inferior de la etiqueta del tubo.
Introduzca el tubo destapado en un microondas
(puede usar un vaso pequeño o recipiente similar
como soporte) y manténgalo de 5 a 10 segundos a
máxima potencia. [Si no dispone de microondas, cal-
iente un poco de agua e introduzca el tubo debida-
mente tapado hasta que la mezcla se disuelva.].
b) Coloque el tubo en el soporte anti-quemadura e
introduzca la muestra de aceite caliente (por lo menos
a 60 ºC hasta la marca inferior de la etiqueta del tubo.
Espere unos segundos y cierre el tubo completamente
con su tapón y quite el soporte anti-quemadura. Si la
muestra no hubiera alcanzado la temperatura nece-
saria para fundir el reactivo azul, actúe según la op-
ción a).
3. Agite bien el tubo tapado hasta que se produz-
ca una mezcla uniforme (el aceite cambia de color al
mezclarse con el reactivo).
4. Espere 2 minutos dejando la mezcla en reposo.
Mantenga el tubo vertical cerca de una fuente de luz
y compare el color obtenido con la tabla de colores.
5.
6. Si alcanza el color 4 (17 a 23%) tenga el máximo
cuidado porque está muy cerca del límite legal del
25% de compuestos polares (BOE, Orden de 26 de
Enero de 1989).
7. Mantenga los tubos alejados de la luz directa o del
calor (el reactivo funde cerca de los 60 ºC.
INSTRUCCIONES DE USO
1. Aprire la provetta che contiene il reattivo blú.
2. Il reattivo deve dissolversi al introdurre il campione
d’olio nella provetta. Si puo fare in due maniere diverse:
a. Aggiungere il campione d’olio a temperature ambien-
trodurre la provetta aperta nel micronde (si puó usare un
piccolo recipiente come appogigio) mantenerlo per 5 a
10 secondi alla massima potenza. In caso de non avere
micronde scaldare un po’ d’aqcua e introdurre la prove-
b. Mettere la provetta nel sopporto anti-ustioni e in-
al segno inferiore dell’etichetta, aspettare vari secondi
e chidere completamente la provetta com il suo tappo,
togliere il sopporto anti ustione. Se il campione non rag-
giunge la temperatura necessária per fondere il reattivo
blú, seguir ele indicazioni del punto a.
3.
miscel uniforme. (l’olio cambia di colore al mischiarsi
com il reattivo).
4. Aspettare due minuti, lasciando la miscela a riposo.
Mantenere la provetta in posizione verticale, vicino ad
una fote di luce, compararei l colore ottenuto com la
tabela colori.
5.
6. Al ottenere il colore 4 (17 a 23 %) fare la massima
attenzione perche il limite legale é del 25% per compo-
nent polari. (BOE, Ordine 26 Gennaio 1989).
7. Mantenere le provette lontani dalla luce direta o calo-
re (il reattivo fonde circa i 60ºC)
1.
2. Placez le tube dans l’appui anti-brûlure et ouvrez-le.
3. Recueillez l’échantillon.
4. Versez l’échantillon dans le tube.
5. Placer l’échantillon jusqu’à la partie inférieure de l’éti-
quette.
Attention: Utilisez toujours l’appui anti-brûlure pour
éviter de vous brûler.
6. Les échantillons recueillis à la température ambiante
peuvent être chauffés (micro-ondes, bain-marie).
7. Placez le bouchon sur le tube.
8. Agitez jusqu’à la dissolution et le mélange complet
des phases.
9. Attendez deux minutes pour que la réaction se pro-
duise.
10. Comparez les résultats avec l’échelle des couleurs
fournie.
11. Ecartez la graisse si le résultat est supérieur à 25%
de composants polaires (couleur 5).
12.
fournie.
13. Conservez le test effectué pour référence future.
L’utilisation des récipients en verre, tels que pipettes,
pour la récolte des graisses chaudes est déconseillée!
Conserver hors de la portée des enfants.
2. Coloque o tubo no suporte anti-queimadura e abra-o.
3. Recolha a amostra.
4. Verta a amostra para o tubo.
5. Coloque a amostra até à parte inferior da etiqueta.
Atenção: Use sempre o suporte anti-queimaduras para
evitar queimar-se.
6. Amostras recolhidas à temperatura ambiente podem
ser aquecidas (micro-ondas, banho maria).
7. Coloque a tampa no tubo.
8. Agite até completa dissolução e mistura das fases.
9. Espere 2 minutos para a reação ocorrer.
10. Compare os resultados com a escala de cores for-
necida.
11. Descarte a gordura se o resultado for superior a
25% de compostos polares (cor 5).
12. Registe os resultados na folha de registos fornecida.
13. Guarde o teste realizado para referência futura.
t5IFVTFPGHMBTTJOTUSVNFOUTJTOPUSFDPNNFOEFELFFQBXBZGSPNDIJMESFOt%JFVFSXFOEVOHWPO(MBTHFSÊUFOXJSE
OJDIUFNQGPIMFOWPO,JOEFSOGFSOIBMUFOt4FEFTBDPOTFKBMBVUJMJ[BDJØOEFVUFOTJMJPTEFWJESJPNBOUFOFSGVFSBEFM
BMDBODFEFMPTOJ×PTt4JTDPOTJHMJBMVTPEJTUSVNFOUJEJWFUSPUFOFSFMPOUBOPEBMMBQPSUBUBEFJCBNCJOJtLVUJMJTBUJPO
EJOTUSVNFOUTEFWFSSFOFTUQBTSFDPNNBOEÏFHBSEFSMPJOEFTFOGBOUTt/ÍPÏSFDPNFOEBEPPVTPEFJOTUSVNFOUPT
EFWJESPNBOUFOIBMPOHFEPBMDBODFEBTDSJBOÎBT
INSTRUCTIONS D’UTILISATION
INSTRUÇÕES DE UTILIZAÇÃO
ISTRUZIONI D’USO
1-2 MIN.
3421
During deep fat frying, the fats and oils are exposed
to atmospheric oxygen and to moisture at high tem-
peratures (over 160 ºC) for long periods of time. As a
consequence, a series of chemical reactions take place.
These reactions produce various harmful compounds
and alter, at the same time, the fat/oil organoleptic char-
acteristics (odor, color, taste) and the health effects of
the oil/fat. Among these substances, polar compounds
may be found; their control allows the assessment of oil
oxidation grades.
The importance of controlling polar compounds is also
regulated by the Order of the 26th of January 1989 pub-
stuffs which have been prepared or been in contact with
oils with a polar content equal to or exceeding 25%.
Oleotest is a colorimetric assay that allows to determine
the total polar compounds in frying fats in less than 2
minutes. It is a feasible and safe way to control the quality
Oleotest is suitable for the most frequently used oils
Other types of oils may require a different color scale.
Oleotest remains stable after being used: keep the
tubes so that you can use them in your auto-control
system.
WHY OLEOTEST?
POR QUÉ OLEOTEST?
OBSERVACIONES
OBSERVATIONS
WHY CONTROL FRYING OILS?
Durante el proceso de fritura, las grasas
o los aceites se exponen al oxígeno atmos-
férico, a la humedad y a altas temperaturas
(por encima de 160 ºC por periodos largos; como
consecuencia, tienen lugar una serie de reacciones
químicas que producen diversos compuestos nocivos y
que alteran, a su vez, las características organolépticas
(olor, color, sabor) e, incluso, la salubridad de la grasa/
aceite. Entre estas sustancias se encuentran los com-
puestos polares y su control permite valorar el grado
de oxidación del aceite. La importancia de controlar los
compuestos polares lo dicta, también, la Orden del 26 de
Enero de 1989 del BOE, que prohíbe la comercialización
de alimentos que hayan sido preparados o hayan estado
en contacto con aceites que tengan un 25% de estos
compuestos polares o más.
POR QUÉ CONTROLAR LOS ACEITES DE FREÍR?
Oleotest es un método fiable y rápido que mide la
concentración de compuestos polares totales en los
aceites de fritura. De esta forma, Oleotest permite
realizar, en pocos minutos y de forma muy sencilla,
una evaluación fiable de la calidad de los aceites de
freír, sin necesidad de equipos o instrumentos sofisti-
cados. Oleotest es seguro y no utiliza disolventes
inflamables.
Oleotest es idóneo para los aceites más utilizados en
fritura (aceite de girasol, aceite de soja, aceite de maíz y
aceite de cacahuete). Otros tipos de aceite podrían req-
uerir una escala de colores diferente. Oleotest se man-
tiene estable después de su utilización: conserve los tu-
bos como parte integrante de su sistema de autocontrol.
vimeo.com/oleotest
facebook.com/oleotest
oleotest.com
https://es-es.facebook.com/OleotestES
Nº
contenido de la freidora
content of the fryer
t'FDIB
t%BUF
t'JSNBEFM
responsable
t4JHOBUVre of the
person in charge
tTemperatura del Aceite (ºC)
t0JMTemperature (ºC)
1
2
3
4
5
6
7
8
9
10
11
12
13
14
15
16
17
18
19
20
21
22
23
24
25
26
27
28
28
30
31
32
33
34
35
36
37
38
39
40
41
42
43
44
45
46
47
48
49
50
3FTVMUBEPTt3FTVMUT
12345
tValidado por
tValidated by
t'FDIB
t%BUF
CONTROL DEL ACEITE DE FREÍR
RAPID TEST TO CONTROL FRYING OILS
During deep fat frying, the fats
and oils are exposed to atmospheric
oxygen and to moisture at high tem-
peratures (over 160 ºC) for long periods of
time. As a consequence, a series of chemical
reactions take place. These reactions produce vari-
ous harmful compounds and alter, at the same time, the
fat/oil organoleptic characteristics (odor, color, taste) and
the health effects of the oil/fat. Among these substances,
polar compounds may be found; their control allows the
assessment of oil oxidation grades.
The importance of controlling polar compounds is also
regulated by several national regulations and Global
health recommendations which prohibit the sale of
foodstuffs which have been prepared or been in contact
with oils with a polar content equal to or exceeding 25%.
Oleotest is a colorimetric assay that allows to determine
the total polar compounds in frying fats in less than 2
minutes. It is a feasible and safe way to control the quality
Oleotest is suitable for the most frequently used oils
Other types of oils may require a different color scale.
Oleotest remains stable after being used: keep the
tubes so that you can use them in your auto-control
system.
WHY OLEOTEST?
POR QUÉ OLEOTEST?
OBSERVACIONES
OBSERVATIONS
WHY CONTROL FRYING OILS?
Durante el proceso de fritura, las grasas o los aceites
se exponen al oxígeno atmosférico, a la humedad y a
altas temperaturas (por encima de 160 ºC por periodos
largos; como consecuencia, tienen lugar una serie de
reacciones químicas que producen diversos compuestos
nocivos y que alteran, a su vez, las características or-
ganolépticas (olor, color, sabor) e, incluso, la salubridad
de la grasa/aceite. Entre estas sustancias se encuentran
los compuestos polares y su control permite valorar el
grado de oxidación del aceite. La importancia de contro-
lar los compuestos polares lo dicta, también, recomen-
daciones globales, que prohíbe la comercialización de
alimentos que hayan sido preparados o hayan estado
en contacto con aceites que tengan un 25% de estos
compuestos polares o más.
POR QUÉ CONTROLAR LOS ACEITES DE FREÍR?
Oleotest es un método fiable y rápido que mide la
concentración de compuestos polares totales en los
aceites de fritura. De esta forma, Oleotest permite
realizar, en pocos minutos y de forma muy sencilla,
una evaluación fiable de la calidad de los aceites de
freír, sin necesidad de equipos o instrumentos sofisti-
cados. Oleotest es seguro y no utiliza disolventes
inflamables.
Oleotest es idóneo para los aceites más utilizados en
fritura (aceite de girasol, aceite de soja, aceite de maíz y
aceite de cacahuete). Otros tipos de aceite podrían req-
uerir una escala de colores diferente. Oleotest se man-
tiene estable después de su utilización: conserve los tu-
bos como parte integrante de su sistema de autocontrol.
vimeo.com/oleotest
facebook.com/oleotest
oleotest.com
Nº
content of the fryer
contenido de la freidora
t%BUF
t'FDIB
t4JHOBUVre of the
person in charge
t'JSNBEFM
responsable
t0JMTemperature (ºC)
tTemperatura del Aceite (ºC)
1
2
3
4
5
6
7
8
9
10
11
12
13
14
15
16
17
18
19
20
21
22
23
24
25
26
27
28
28
30
31
32
33
34
35
36
37
38
39
40
41
42
43
44
45
46
47
48
49
50
t3FTVMUTt3FTVMUBEPT
12345
tValidated by
tValidado por
t%BUF
t'FDIB
RAPID TEST TO CONTROL FRYING OILS
CONTROL DEL ACEITE DE FREÍR
926050 G22M 1/4

1. Open the tube containing the blue reagent.
2. The blue reagenthasto be dissolved when the oil sam-
ple is poured into the tube. To achieve it, there are two
options a) and b):
a) Pour theoil sampleat room temperature up to the lower
part of the label of the tube. Put the open tube in a mi-
crowave(useasmall glass or something similar to prevent
the tube from falling) and heat from 5to 10 seconds at
maximum power. If youdo not haveamicrowave, heat
some waterand dip the tube properly closed until the mi-
xture is dissolved.
b) Place the tubein the anti-burn holder and pour the
warm oil sample(at least 60 ºC) up to the lower part of the
label. Wait afew secondsand close the tube tightly with
the cap and remove the anti-burn holder. If the sample
does not reach the temperature required to melt the blue
reagent, follow option a).
3. Shakethetube well (for a minute) in order to produce a
uniform mixture (the color changeswhen the oil is mixed
with the reagent).
4. Allowthe mixture to settle for 2 minutes. Hold the tube
vertically nearasource of light and compare the obtained
Acolor to the color scale.
5. At the end of the reaction, the mixture (fat and reagent)
6. If the mixture reachescolor4(17% to 23%), be extre-
mely careful, as it is quite close to the 25% legallimit (BOE,
Order of the 26th of January, 1989).
7. Keep the tubesaway from direct light or heat (the rea-
gent melts close to 60ºC).
1. Öffnen Sie dasPlastikröhrchen mit der blauen Substanz.
2. Die blaue Substanz muss mit der Ölprobe vermischt wer-
den. Dafür gibt es folgende Möglichkeiten a) und b):
a) FüllenSiedie Ölprobe bei Raumtemperatur bis zum un-
teren Abschnitt des Plastikröhrchenetiketts ein. Stellen Sie
das geöffnetePlastikröhrchen in dieMikrowelle(benutzen
Sie dafür einkleinesGlas oder ähnliches, damit dasRöhr-
chen nicht umkippen kann) und erhitzen Sie es für 5 bis
10 Sekunden bei maximaler Stärke. Sollte keine Mikrowelle
zur Verfügung stehen, können Sie dasgut verschlossene
Röhrchen auchim Wasserbad erhitzen, bis die Ölprobe und
b) Platzieren SiedasRöhrchen in den mitgelieferten Ver-
brennschutz-Halter und füllen Sie die erwärmte Ölprobe
(mindestens 60 °C) bis zumunteren Abschnitt des Plas-
tikröhrchenetiketts ein. Warten Sie einige Sekunden, da-
nach verschließen Sie das Röhrchen fest und nehmen den
Verbrennschutz-Halter ab. Sollte die Temperatur nichtaus-
Sie nacha) vor.
3. Schütteln Sie das Röhrchen (zirka 1Minute), um eine
homogeneMischung zu erhalten (die Farbe ändert sich,
wenn sich dasÖl mit der Substanz mischt).
4.Lassen Siedie Mischung für 2Minuten ruhen. Halten Sie
das Röhrchen horizontal (in der Nähe einer Lichtquelle) und
vergleichen Sie die Farbe mit der Farbskala.
5. Am Ende der Reaktion verfestigt sich das Gemisch aus
Öl und Reagenz.
6.Wenn die Mischung Farbstufe 4(17% bis 23%) errei-
chtist, isthöchste Vorsichtgeboten, da dies sehr nah am
erlaubten Grenzwert von 25% liegt (BOE, Gesetz vom 26.
Januar 1989).
7. Halten Sie die Röhrchen von direktem Licht oder Wärme
1. Destape el tubo que contiene el reactivo azul.
2. Debe conseguir que el reactivoazul se disuelvacuan-
do introduzca la muestra de aceite en el tubo. Para ello,
puede actuar de dos formas:
a) Añadala muestra de aceite a temperatura ambiente
hasta la marca inferior de la etiqueta del tubo. Introduzca
el tubo destapado en un microondas (puede usar un vaso
pequeño orecipiente similarcomo soporte) ymanténgalo
de 5 a 10 segundos amáximapotencia. [Sino dispone
de microondas, caliente un poco de agua eintroduzca el
tubo debidamente tapado hasta que la mezclasedisuel-
va.].
b) Coloqueel tubo en el soporte anti-quemadura eintro-
duzca la muestra de aceite caliente (por lo menosa60 ºC
hasta la marca inferior de la etiqueta del tubo. Espere unos
segundos ycierre el tubo completamente con su tapón y
quiteelsoporte anti-quemadura. Si la muestra no hubiera
alcanzadola temperatura necesariapara fundir el reactivo
azul, actúe según la opción a).
3. Agite bien el tubo tapadohasta quese produzcauna
mezcla uniforme (el aceite cambiade color al mezclarse
con el reactivo).
4. Espere 2 minutos dejando la mezcla en reposo. Man-
tenga el tubo vertical cerca de unafuente de luz y com-
pare el color obtenido con la tabla de colores.
5.
6. Si alcanza el color4(17 a23%) tenga el máximo cui-
dado porque estámuy cerca del límite legal del25% de
compuestos polares (BOE, Orden de 26 de Enerode1989).
7. Mantenga los tubos alejados de la luz directaodelcalor
(el reactivo funde cerca de los 60 ºC.
t5IFVTFPGHMBTTJOTUSVNFOUTJTOPUSFDPNNFOEFELFFQBXBZGSPNDIJMESFOt%JFVFSXFOEVOHWPO(MBTHFSÊUFOXJSE
OJDIUFNQGPIMFOWPO,JOEFSOGFSOIBMUFOt4FEFTBDPOTFKBMBVUJMJ[BDJØOEFVUFOTJMJPTEFWJESJPNBOUFOFSGVFSBEFM
BMDBODFEFMPTOJ×PTt4JTDPOTJHMJBMVTPEJTUSVNFOUJEJWFUSPUFOFSFMPOUBOPEBMMBQPSUBUBEFJCBNCJOJtLVUJMJTBUJPO
EJOTUSVNFOUTEFWFSSFOFTUQBTSFDPNNBOEÏFHBSEFSMPJOEFTFOGBOUTt/ÍPÏSFDPNFOEBEPPVTPEFJOTUSVNFOUPT
EFWJESPNBOUFOIBMPOHFEPBMDBODFEBTDSJBOÎBT
INSTRUCTIONS OF USE
ANWEISUNG DER VERWENDUNG
INSTRUCCIONES DE USO
1. Aprire la provetta che contiene il reattivo blú.
2. Il reattivo devedissolversi al introdurre il campione d’olio
nella provetta. Si puo fare in due maniere diverse:
a.Aggiungere il campione d’olio atemperature ambiente
la provetta apertanel micronde(si puó usare un piccolo reci-
pientecome appogigio) mantenerlo per5a10 secondialla
massima potenza. In caso de non avere micronde scaldare
miscela si dissolva.
b. Mettere la provetta nel sopporto anti-ustionieintrodurre il
dell’etichetta,aspettare vari secondi e chidere completamen-
te la provettacom il suo tappo,togliere il sopporto anti ustio-
ne. Se il campionenon raggiunge la temperatura necessária
per fondere il reattivo blú, seguir ele indicazioni del punto a.
3.
miscel uniforme. (l’olio cambiadicolore al mischiarsi com
il reattivo).
4. Aspettare due minuti, lasciando la miscelaariposo. Man-
tenere la provetta in posizione verticale,vicinoaduna fote
di luce, compararei l colore ottenuto com la tabela colori.
5.
6. Al ottenere il colore4(17a23 %) fare la massima atten-
zione perche il limitelegaleédel25%percomponent polari.
(BOE, Ordine 26 Gennaio 1989).
7. Mantenere le provette lontani dalla luce diretaocalore (il
reattivo fonde circa i 60ºC)
1.
2. Placez le tube dans l’appui anti-brûlure et ouvrez-le.
3. Recueillez l’échantillon.
4. Versez l’échantillon dans le tube.
5. Placerl’échantillon jusqu’à la partie inférieure de l’éti-
quette.
Attention: Utilisez toujours l’appui anti-brûlure pour éviter
de vous brûler.
6. Les échantillons recueillis àla température ambiante peu-
vent être chauffés (micro-ondes, bain-marie).
7. Placez le bouchon sur le tube.
8. Agitez jusqu’à la dissolution et le mélange complet des
phases.
9. Attendez deux minutes pour que la réaction se produise.
10. Comparez les résultats avec l’échelle descouleurs
fournie.
11. Ecartez la graisse si le résultat estsupérieurà25% de
composants polaires (couleur 5).
12.
fournie.
13. Conservez letest effectué pour référence future.
L’utilisationdes récipients en verre, tels que pipettes, pour
la récolte des graisses chaudes est déconseillée! Conserver
hors de la portée des enfants.
2. Coloque o tubo no suporte anti-queimadura e abra-o.
3. Recolha a amostra.
4. Verta a amostra para o tubo.
5. Coloque a amostra até à parte inferior da etiqueta.
Atenção:Use sempre o suporte anti-queimaduraspara
evitar queimar-se.
6. Amostras recolhidas àtemperatura ambiente podem ser
aquecidas (micro-ondas, banho maria).
7. Coloque a tampa no tubo.
8. Agite até completa dissolução e mistura das fases.
9. Espere 2 minutos para areação ocorrer.
10. Compare os resultados com aescala de cores fornecida.
11. Descarte agordura seoresultado for superior a 25% de
compostos polares (cor 5).
12. Registe os resultados na folha de registos fornecida.
13. Guarde o testerealizado para referência futura.
INSTRUCTIONS D’UTILISATION
INSTRUÇÕES DE UTILIZAÇÃO
ISTRUZIONI D’USO
1-2 MIN.
3421
Biomedal, S.L. | Avda. Américo Vespucio, 5-4, Planta 1ª, Mód. 12 41092 Sevilla, España (Spain)
Tel. +34 954 08 12 76 Fax. +34 954 08 12 79 | [email protected] www.biomedal.com
DIAGNOSTICS
1. Aprire la provetta che contiene il reattivo blú.
2. Il reattivo deve dissolversi al introdurre il campione d’olio
nella provetta. Si puo fare in due maniere diverse:
a. Aggiungere il campione d’olio a temperature ambiente
la provetta aperta nel micronde (si puó usare un piccolo reci-
piente come appogigio) mantenerlo per 5 a 10 secondi alla
massima potenza. In caso de non avere micronde scaldare
miscela si dissolva.
b. Mettere la provetta nel sopporto anti-ustioni e introdurre il
dell’etichetta, aspettare vari secondi e chidere completamen-
te la provetta com il suo tappo, togliere il sopporto anti ustio-
ne. Se il campione non raggiunge la temperatura necessária
per fondere il reattivo blú, seguir ele indicazioni del punto a.
3.
miscel uniforme. (l’olio cambia di colore al mischiarsi com
il reattivo).
4. Aspettare due minuti, lasciando la miscela a riposo. Man-
tenere la provetta in posizione verticale, vicino ad una fote
di luce, compararei l colore ottenuto com la tabela colori.
5.
6. Al ottenere il colore 4 (17 a 23 %) fare la massima atten-
zione perche il limite legale é del 25% per component polari.
(BOE, Ordine 26 Gennaio 1989).
7. Mantenere le provette lontani dalla luce direta o calore (il
reattivo fonde circa i 60ºC)
1.
2. Placez le tube dans l’appui anti-brûlure et ouvrez-le.
3. Recueillez l’échantillon.
4. Versez l’échantillon dans le tube.
5. Placer l’échantillon jusqu’à la partie inférieure de l’éti-
quette.
Attention: Utilisez toujours l’appui anti-brûlure pour éviter
de vous brûler.
6. Les échantillons recueillis à la température ambiante peu-
vent être chauffés (micro-ondes, bain-marie).
7. Placez le bouchon sur le tube.
8. Agitez jusqu’à la dissolution et le mélange complet des
phases.
9. Attendez deux minutes pour que la réaction se produise.
10. Comparez les résultats avec l’échelle des couleurs
fournie.
11. Ecartez la graisse si le résultat est supérieur à 25% de
composants polaires (couleur 5).
12.
fournie.
13. Conservez le test effectué pour référence future.
L’utilisation des récipients en verre, tels que pipettes, pour
la récolte des graisses chaudes est déconseillée! Conserver
hors de la portée des enfants.
2. Coloque o tubo no suporte anti-queimadura e abra-o.
3. Recolha a amostra.
4. Verta a amostra para o tubo.
5. Coloque a amostra até à parte inferior da etiqueta.
Atenção: Use sempre o suporte anti-queimaduras para
evitar queimar-se.
6. Amostras recolhidas à temperatura ambiente podem ser
aquecidas (micro-ondas, banho maria).
7. Coloque a tampa no tubo.
8. Agite até completa dissolução e mistura das fases.
9. Espere 2 minutos para a reação ocorrer.
10. Compare os resultados com a escala de cores fornecida.
11. Descarte a gordura se o resultado for superior a 25% de
compostos polares (cor 5).
12. Registe os resultados na folha de registos fornecida.
13. Guarde o teste realizado para referência futura.
INSTRUCTIONS D’UTILISATION
INSTRUÇÕES DE UTILIZAÇÃO
ISTRUZIONI D’USO
1-2 MIN.
3421
1. Open the tube containing the blue reagent.
2. The blue reagenthasto be dissolved when the oil sam-
ple is poured into the tube. To achieve it, there are two
options a) and b):
a) Pour theoil sampleat room temperature up to the lower
part of the label of the tube. Put the open tube in a mi-
crowave(useasmall glass or something similar to prevent
the tube from falling) and heat from 5to 10 seconds at
maximum power. If youdo not haveamicrowave, heat
some waterand dip the tube properly closed until the mi-
xture is dissolved.
b) Place the tubein the anti-burn holder and pour the
warm oil sample(at least 60 ºC) up to the lower part of the
label. Wait afew secondsand close the tube tightly with
the cap and remove the anti-burn holder. If the sample
does not reach the temperature required to melt the blue
reagent, follow option a).
3. Shakethetube well (for a minute) in order to produce a
uniform mixture (the color changeswhen the oil is mixed
with the reagent).
4. Allowthe mixture to settle for 2 minutes. Hold the tube
vertically nearasource of light and compare the obtained
Acolor to the color scale.
5. At the end of the reaction, the mixture (fat and reagent)
6. If the mixture reachescolor4(17% to 23%), be extre-
mely careful, as it is quite close to the 25% legallimit (BOE,
Order of the 26th of January, 1989).
7. Keep the tubesaway from direct light or heat (the rea-
gent melts close to 60ºC).
1. Öffnen Sie dasPlastikröhrchen mit der blauen Substanz.
2. Die blaue Substanz muss mit der Ölprobe vermischt wer-
den. Dafür gibt es folgende Möglichkeiten a) und b):
a) FüllenSiedie Ölprobe bei Raumtemperatur bis zum un-
teren Abschnitt des Plastikröhrchenetiketts ein. Stellen Sie
das geöffnetePlastikröhrchen in dieMikrowelle(benutzen
Sie dafür einkleinesGlas oder ähnliches, damit dasRöhr-
chen nicht umkippen kann) und erhitzen Sie es für 5 bis
10 Sekunden bei maximaler Stärke. Sollte keine Mikrowelle
zur Verfügung stehen, können Sie dasgut verschlossene
Röhrchen auchim Wasserbad erhitzen, bis die Ölprobe und
b) Platzieren SiedasRöhrchen in den mitgelieferten Ver-
brennschutz-Halter und füllen Sie die erwärmte Ölprobe
(mindestens 60 °C) bis zumunteren Abschnitt des Plas-
tikröhrchenetiketts ein. Warten Sie einige Sekunden, da-
nach verschließen Sie das Röhrchen fest und nehmen den
Verbrennschutz-Halter ab. Sollte die Temperatur nichtaus-
Sie nacha) vor.
3. Schütteln Sie das Röhrchen (zirka 1Minute), um eine
homogeneMischung zu erhalten (die Farbe ändert sich,
wenn sich dasÖl mit der Substanz mischt).
4.Lassen Siedie Mischung für 2Minuten ruhen. Halten Sie
das Röhrchen horizontal (in der Nähe einer Lichtquelle) und
vergleichen Sie die Farbe mit der Farbskala.
5. Am Ende der Reaktion verfestigt sich das Gemisch aus
Öl und Reagenz.
6.Wenn die Mischung Farbstufe 4(17% bis 23%) errei-
chtist, isthöchste Vorsichtgeboten, da dies sehr nah am
erlaubten Grenzwert von 25% liegt (BOE, Gesetz vom 26.
Januar 1989).
7. Halten Sie die Röhrchen von direktem Licht oder Wärme
1. Destape el tubo que contiene el reactivo azul.
2. Debe conseguir que el reactivoazul se disuelvacuan-
do introduzca la muestra de aceite en el tubo. Para ello,
puede actuar de dos formas:
a) Añadala muestra de aceite a temperatura ambiente
hasta la marca inferior de la etiqueta del tubo. Introduzca
el tubo destapado en un microondas (puede usar un vaso
pequeño orecipiente similarcomo soporte) ymanténgalo
de 5 a 10 segundos amáximapotencia. [Sino dispone
de microondas, caliente un poco de agua eintroduzca el
tubo debidamente tapado hasta que la mezclasedisuel-
va.].
b) Coloqueel tubo en el soporte anti-quemadura eintro-
duzca la muestra de aceite caliente (por lo menosa60 ºC
hasta la marca inferior de la etiqueta del tubo. Espere unos
segundos ycierre el tubo completamente con su tapón y
quiteelsoporte anti-quemadura. Si la muestra no hubiera
alcanzadola temperatura necesariapara fundir el reactivo
azul, actúe según la opción a).
3. Agite bien el tubo tapadohasta quese produzcauna
mezcla uniforme (el aceite cambiade color al mezclarse
con el reactivo).
4. Espere 2 minutos dejando la mezcla en reposo. Man-
tenga el tubo vertical cerca de unafuente de luz y com-
pare el color obtenido con la tabla de colores.
5.
6. Si alcanza el color4(17 a23%) tenga el máximo cui-
dado porque estámuy cerca del límite legal del25% de
compuestos polares (BOE, Orden de 26 de Enerode1989).
7. Mantenga los tubos alejados de la luz directaodelcalor
(el reactivo funde cerca de los 60 ºC.
t5IFVTFPGHMBTTJOTUSVNFOUTJTOPUSFDPNNFOEFELFFQBXBZGSPNDIJMESFOt%JFVFSXFOEVOHWPO(MBTHFSÊUFOXJSE
OJDIUFNQGPIMFOWPO,JOEFSOGFSOIBMUFOt4FEFTBDPOTFKBMBVUJMJ[BDJØOEFVUFOTJMJPTEFWJESJPNBOUFOFSGVFSBEFM
BMDBODFEFMPTOJ×PTt4JTDPOTJHMJBMVTPEJTUSVNFOUJEJWFUSPUFOFSFMPOUBOPEBMMBQPSUBUBEFJCBNCJOJtLVUJMJTBUJPO
EJOTUSVNFOUTEFWFSSFOFTUQBTSFDPNNBOEÏFHBSEFSMPJOEFTFOGBOUTt/ÍPÏSFDPNFOEBEPPVTPEFJOTUSVNFOUPT
EFWJESPNBOUFOIBMPOHFEPBMDBODFEBTDSJBOÎBT
INSTRUCTIONS OF USE
ANWEISUNG DER VERWENDUNG
INSTRUCCIONES DE USO
1. Aprire la provetta che contiene il reattivo blú.
2. Il reattivo devedissolversi al introdurre il campione d’olio
nella provetta. Si puo fare in due maniere diverse:
a.Aggiungere il campione d’olio atemperature ambiente
la provetta apertanel micronde(si puó usare un piccolo reci-
pientecome appogigio) mantenerlo per5a10 secondialla
massima potenza. In caso de non avere micronde scaldare
miscela si dissolva.
b. Mettere la provetta nel sopporto anti-ustionieintrodurre il
dell’etichetta,aspettare vari secondi e chidere completamen-
te la provettacom il suo tappo,togliere il sopporto anti ustio-
ne. Se il campionenon raggiunge la temperatura necessária
per fondere il reattivo blú, seguir ele indicazioni del punto a.
3.
miscel uniforme. (l’olio cambiadicolore al mischiarsi com
il reattivo).
4. Aspettare due minuti, lasciando la miscelaariposo. Man-
tenere la provetta in posizione verticale,vicinoaduna fote
di luce, compararei l colore ottenuto com la tabela colori.
5.
6. Al ottenere il colore4(17a23 %) fare la massima atten-
zione perche il limitelegaleédel25%percomponent polari.
(BOE, Ordine 26 Gennaio 1989).
7. Mantenere le provette lontani dalla luce diretaocalore (il
reattivo fonde circa i 60ºC)
1.
2. Placez le tube dans l’appui anti-brûlure et ouvrez-le.
3. Recueillez l’échantillon.
4. Versez l’échantillon dans le tube.
5. Placerl’échantillon jusqu’à la partie inférieure de l’éti-
quette.
Attention: Utilisez toujours l’appui anti-brûlure pour éviter
de vous brûler.
6. Les échantillons recueillis àla température ambiante peu-
vent être chauffés (micro-ondes, bain-marie).
7. Placez le bouchon sur le tube.
8. Agitez jusqu’à la dissolution et le mélange complet des
phases.
9. Attendez deux minutes pour que la réaction se produise.
10. Comparez les résultats avec l’échelle descouleurs
fournie.
11. Ecartez la graisse si le résultat estsupérieurà25% de
composants polaires (couleur 5).
12.
fournie.
13. Conservez letest effectué pour référence future.
L’utilisationdes récipients en verre, tels que pipettes, pour
la récolte des graisses chaudes est déconseillée! Conserver
hors de la portée des enfants.
2. Coloque o tubo no suporte anti-queimadura e abra-o.
3. Recolha a amostra.
4. Verta a amostra para o tubo.
5. Coloque a amostra até à parte inferior da etiqueta.
Atenção:Use sempre o suporte anti-queimaduraspara
evitar queimar-se.
6. Amostras recolhidas àtemperatura ambiente podem ser
aquecidas (micro-ondas, banho maria).
7. Coloque a tampa no tubo.
8. Agite até completa dissolução e mistura das fases.
9. Espere 2 minutos para areação ocorrer.
10. Compare os resultados com aescala de cores fornecida.
11. Descarte agordura seoresultado for superior a 25% de
compostos polares (cor 5).
12. Registe os resultados na folha de registos fornecida.
13. Guarde o testerealizado para referência futura.
INSTRUCTIONS D’UTILISATION
INSTRUÇÕES DE UTILIZAÇÃO
ISTRUZIONI D’USO
1-2 MIN.
3421
Biomedal, S.L. | Avda. Américo Vespucio, 5-4, Planta 1ª, Mód. 12 41092 Sevilla, España (Spain)
Tel. +34 954 08 12 76 Fax. +34 954 08 12 79 | [email protected] www.biomedal.com
DIAGNOSTICS
1. Open the tube containing the blue reagent.
2. The blue reagent has to be dissolved when the oil
sample is poured into the tube. To achieve it, there are
two options a) and b):
a) Pour the oil sample at room temperature up to the
lower part of the label of the tube. Put the open tube
in a microwave (use a small glass or something similar
to prevent the tube from falling) and heat from 5 to
10 seconds at maximum power. If you do not have a
microwave, heat some water and dip the tube properly
closed until the mixture is dissolved.
b) Place the tube in the anti-burn holder and pour the
warm oil sample (at least 60 ºC) up to the lower part of
the label. Wait a few seconds and close the tube tightly
with the cap and remove the anti-burn holder. If the
sample does not reach the temperature required to melt
the blue reagent, follow option a).
3. Shake the tube well (for a minute) in order to produce
a uniform mixture (the color changes when the oil is
mixed with the reagent).
4. Allow the mixture to settle for 2 minutes. Hold the
tube vertically near a source of light and compare the
obtained Acolor to the color scale.
5. At the end of the reaction, the mixture (fat and rea-
6. If the mixture reaches color 4 (17% to 23%), be ex-
tremely careful, as it is quite close to the 25% legal limit
(BOE, Order of the 26th of January, 1989).
7. Keep the tubes away from direct light or heat (the
reagent melts close to 60ºC).
INSTRUCTIONS OF USE
1. Öffnen Sie das Plastikröhrchen mit der blauen Subs-
tanz.
2. Die blaue Substanz muss mit der Ölprobe vermischt
werden. Dafür gibt es folgende Möglichkeiten a) und b):
a) Füllen Sie die Ölprobe bei Raumtemperatur bis zum
unteren Abschnitt des Plastikröhrchenetiketts ein. Ste-
llen Sie das geöffnete Plastikröhrchen in die Mikrowelle
(benutzen Sie dafür ein kleines Glas oder ähnliches, da-
mit das Röhrchen nicht umkippen kann) und erhitzen
Sie es für 5 bis 10 Sekunden bei maximaler Stärke. Sollte
keine Mikrowelle zur Verfügung stehen, können Sie das
gut verschlossene Röhrchen auch im Wasserbad erhit-
zen, bis die Ölprobe und die blaue Substanz vollständig
b) Platzieren Sie das Röhrchen in den mitgelieferten Ver-
brennschutz-Halter und füllen Sie die erwärmte Ölpro-
be (mindestens 60 °C) bis zum unteren Abschnitt des
Plastikröhrchenetiketts ein. Warten Sie einige Sekunden,
danach verschließen Sie das Röhrchen fest und nehmen
den Verbrennschutz-Halter ab. Sollte die Temperatur ni-
gen, gehen Sie nach a) vor.
3. Schütteln Sie das Röhrchen (zirka 1 Minute), um eine
homogene Mischung zu erhalten (die Farbe ändert sich,
wenn sich das Öl mit der Substanz mischt).
4. Lassen Sie die Mischung für 2 Minuten ruhen. Halten
Sie das Röhrchen horizontal (in der Nähe einer Lichtquel-
le) und vergleichen Sie die Farbe mit der Farbskala.
5. Am Ende der Reaktion verfestigt sich das Gemisch aus
Öl und Reagenz.
6. Wenn die Mischung Farbstufe 4 (17% bis 23%) errei-
cht ist, ist höchste Vorsicht geboten, da dies sehr nah am
erlaubten Grenzwert von 25% liegt (BOE, Gesetz vom
26. Januar 1989).
7. Halten Sie die Röhrchen von direktem Licht oder Wär-
ANWEISUNG DER VERWENDUNG
1. Destape el tubo que contiene el reactivo azul.
2. Debe conseguirque el reactivo azul se disuelva
cuando introduzca la muestra de aceite en el tubo.
Para ello, puede actuar de dos formas:
a) Añadalamuestrade aceite atemperatura ambi-
ente hasta la marca inferior de la etiqueta del tubo.
Introduzca el tubodestapado en un microondas
(puede usar un vaso pequeño orecipiente similar
como soporte)ymanténgalo de 5a10 segundos a
máxima potencia. [Si no dispone de microondas, cal-
iente un poco de agua eintroduzca el tubo debida-
mente tapado hasta que la mezcla se disuelva.].
b) Coloqueel tuboen el soporte anti-quemadura e
introduzcalamuestra de aceite caliente (por lo menos
a60 ºC hasta la marca inferior de la etiqueta del tubo.
Espere unos segundos ycierre el tubo completamente
con su tapón y quite el soporte anti-quemadura. Si la
muestra no hubiera alcanzado la temperatura nece-
saria para fundir el reactivo azul, actúe según la op-
ción a).
3. Agite bien el tubo tapado hasta que se produz-
ca una mezcla uniforme (el aceite cambia de color al
mezclarse con el reactivo).
4. Espere2minutos dejando la mezcla en reposo.
Mantenga el tubo vertical cerca de una fuente de luz
y compare el color obtenido con la tabla de colores.
5.
6. Si alcanza el color 4(17 a23%) tenga el máximo
cuidado porque estámuy cerca del límitelegal del
25% de compuestos polares (BOE, Orden de 26 de
Enero de 1989).
7. Mantenga los tubos alejados de la luz directa o del
calor (el reactivo funde cerca de los 60 ºC.
INSTRUCCIONES DE USO
1. Aprire la provetta che contiene il reattivo blú.
2. Il reattivo deve dissolversi al introdurre il campione
d’olio nella provetta. Si puo fare in due maniere diverse:
a. Aggiungere il campione d’olio a temperature ambien-
trodurre la provetta aperta nel micronde (si puó usare un
piccolo recipiente come appogigio) mantenerlo per 5 a
10 secondi alla massima potenza. In caso de non avere
micronde scaldare un po’ d’aqcua e introdurre la prove-
b. Mettere la provetta nel sopporto anti-ustioni e in-
al segno inferiore dell’etichetta, aspettare vari secondi
e chidere completamente la provetta com il suo tappo,
togliere il sopporto anti ustione. Se il campione non rag-
giunge la temperatura necessária per fondere il reattivo
blú, seguir ele indicazioni del punto a.
3.
miscel uniforme. (l’olio cambia di colore al mischiarsi
com il reattivo).
4. Aspettare due minuti, lasciando la miscela a riposo.
Mantenere la provetta in posizione verticale, vicino ad
una fote di luce, compararei l colore ottenuto com la
tabela colori.
5.
6. Al ottenere il colore 4 (17 a 23 %) fare la massima
attenzione perche il limite legale é del 25% per compo-
nent polari. (BOE, Ordine 26 Gennaio 1989).
7. Mantenere le provette lontani dalla luce direta o calo-
re (il reattivo fonde circa i 60ºC)
1.
2. Placez le tube dans l’appui anti-brûlure et ouvrez-le.
3. Recueillez l’échantillon.
4. Versez l’échantillon dans le tube.
5. Placer l’échantillon jusqu’à la partie inférieure de l’éti-
quette.
Attention: Utilisez toujours l’appui anti-brûlure pour
éviter de vous brûler.
6. Les échantillons recueillis à la température ambiante
peuvent être chauffés (micro-ondes, bain-marie).
7. Placez le bouchon sur le tube.
8. Agitez jusqu’à la dissolution et le mélange complet
des phases.
9. Attendez deux minutes pour que la réaction se pro-
duise.
10. Comparez les résultats avec l’échelle des couleurs
fournie.
11. Ecartez la graisse si le résultat est supérieur à 25%
de composants polaires (couleur 5).
12.
fournie.
13. Conservez le test effectué pour référence future.
L’utilisation des récipients en verre, tels que pipettes,
pour la récolte des graisses chaudes est déconseillée!
Conserver hors de la portée des enfants.
2. Coloque o tubo no suporte anti-queimadura e abra-o.
3. Recolha a amostra.
4. Verta a amostra para o tubo.
5. Coloque a amostra até à parte inferior da etiqueta.
Atenção: Use sempre o suporte anti-queimaduras para
evitar queimar-se.
6. Amostras recolhidas à temperatura ambiente podem
ser aquecidas (micro-ondas, banho maria).
7. Coloque a tampa no tubo.
8. Agite até completa dissolução e mistura das fases.
9. Espere 2 minutos para a reação ocorrer.
10. Compare os resultados com a escala de cores for-
necida.
11. Descarte a gordura se o resultado for superior a
25% de compostos polares (cor 5).
12. Registe os resultados na folha de registos fornecida.
13. Guarde o teste realizado para referência futura.
t5IFVTFPGHMBTTJOTUSVNFOUTJTOPUSFDPNNFOEFELFFQBXBZGSPNDIJMESFOt%JFVFSXFOEVOHWPO(MBTHFSÊUFOXJSE
OJDIUFNQGPIMFOWPO,JOEFSOGFSOIBMUFOt4FEFTBDPOTFKBMBVUJMJ[BDJØOEFVUFOTJMJPTEFWJESJPNBOUFOFSGVFSBEFM
BMDBODFEFMPTOJ×PTt4JTDPOTJHMJBMVTPEJTUSVNFOUJEJWFUSPUFOFSFMPOUBOPEBMMBQPSUBUBEFJCBNCJOJtLVUJMJTBUJPO
EJOTUSVNFOUTEFWFSSFOFTUQBTSFDPNNBOEÏFHBSEFSMPJOEFTFOGBOUTt/ÍPÏSFDPNFOEBEPPVTPEFJOTUSVNFOUPT
EFWJESPNBOUFOIBMPOHFEPBMDBODFEBTDSJBOÎBT
INSTRUCTIONS D’UTILISATION
INSTRUÇÕES DE UTILIZAÇÃO
ISTRUZIONI D’USO
1-2 MIN.
3421
1. Open the tube containing the blue reagent.
2. The blue reagenthasto be dissolved when the oil sam-
ple is poured into the tube. To achieve it, there are two
options a) and b):
a) Pour theoil sampleat room temperature up to the lower
part of the label of the tube. Put the open tube in a mi-
crowave(useasmall glass or something similar to prevent
the tube from falling) and heat from 5to 10 seconds at
maximum power. If youdo not haveamicrowave, heat
some waterand dip the tube properly closed until the mi-
xture is dissolved.
b) Place the tubein the anti-burn holder and pour the
warm oil sample(at least 60 ºC) up to the lower part of the
label. Wait afew secondsand close the tube tightly with
the cap and remove the anti-burn holder. If the sample
does not reach the temperature required to melt the blue
reagent, follow option a).
3. Shakethetube well (for a minute) in order to produce a
uniform mixture (the color changeswhen the oil is mixed
with the reagent).
4. Allowthe mixture to settle for 2 minutes. Hold the tube
vertically nearasource of light and compare the obtained
Acolor to the color scale.
5. At the end of the reaction, the mixture (fat and reagent)
6. If the mixture reachescolor4(17% to 23%), be extre-
mely careful, as it is quite close to the 25% legallimit (BOE,
Order of the 26th of January, 1989).
7. Keep the tubesaway from direct light or heat (the rea-
gent melts close to 60ºC).
1. Öffnen Sie dasPlastikröhrchen mit der blauen Substanz.
2. Die blaue Substanz muss mit der Ölprobe vermischt wer-
den. Dafür gibt es folgende Möglichkeiten a) und b):
a) FüllenSiedie Ölprobe bei Raumtemperatur bis zum un-
teren Abschnitt des Plastikröhrchenetiketts ein. Stellen Sie
das geöffnetePlastikröhrchen in dieMikrowelle(benutzen
Sie dafür einkleinesGlas oder ähnliches, damit dasRöhr-
chen nicht umkippen kann) und erhitzen Sie es für 5 bis
10 Sekunden bei maximaler Stärke. Sollte keine Mikrowelle
zur Verfügung stehen, können Sie dasgut verschlossene
Röhrchen auchim Wasserbad erhitzen, bis die Ölprobe und
b) Platzieren SiedasRöhrchen in den mitgelieferten Ver-
brennschutz-Halter und füllen Sie die erwärmte Ölprobe
(mindestens 60 °C) bis zumunteren Abschnitt des Plas-
tikröhrchenetiketts ein. Warten Sie einige Sekunden, da-
nach verschließen Sie das Röhrchen fest und nehmen den
Verbrennschutz-Halter ab. Sollte die Temperatur nichtaus-
Sie nacha) vor.
3. Schütteln Sie das Röhrchen (zirka 1Minute), um eine
homogeneMischung zu erhalten (die Farbe ändert sich,
wenn sich dasÖl mit der Substanz mischt).
4.Lassen Siedie Mischung für 2Minuten ruhen. Halten Sie
das Röhrchen horizontal (in der Nähe einer Lichtquelle) und
vergleichen Sie die Farbe mit der Farbskala.
5. Am Ende der Reaktion verfestigt sich das Gemisch aus
Öl und Reagenz.
6.Wenn die Mischung Farbstufe 4(17% bis 23%) errei-
chtist, isthöchste Vorsichtgeboten, da dies sehr nah am
erlaubten Grenzwert von 25% liegt (BOE, Gesetz vom 26.
Januar 1989).
7. Halten Sie die Röhrchen von direktem Licht oder Wärme
1. Destape el tubo que contiene el reactivo azul.
2. Debe conseguir que el reactivoazul se disuelvacuan-
do introduzca la muestra de aceite en el tubo. Para ello,
puede actuar de dos formas:
a) Añadala muestra de aceite a temperatura ambiente
hasta la marca inferior de la etiqueta del tubo. Introduzca
el tubo destapado en un microondas (puede usar un vaso
pequeño orecipiente similarcomo soporte) ymanténgalo
de 5 a 10 segundos amáximapotencia. [Sino dispone
de microondas, caliente un poco de agua eintroduzca el
tubo debidamente tapado hasta que la mezclasedisuel-
va.].
b) Coloqueel tubo en el soporte anti-quemadura eintro-
duzca la muestra de aceite caliente (por lo menosa60 ºC
hasta la marca inferior de la etiqueta del tubo. Espere unos
segundos ycierre el tubo completamente con su tapón y
quiteelsoporte anti-quemadura. Si la muestra no hubiera
alcanzadola temperatura necesariapara fundir el reactivo
azul, actúe según la opción a).
3. Agite bien el tubo tapadohasta quese produzcauna
mezcla uniforme (el aceite cambiade color al mezclarse
con el reactivo).
4. Espere 2 minutos dejando la mezcla en reposo. Man-
tenga el tubo vertical cerca de unafuente de luz y com-
pare el color obtenido con la tabla de colores.
5.
6. Si alcanza el color4(17 a23%) tenga el máximo cui-
dado porque estámuy cerca del límite legal del25% de
compuestos polares (BOE, Orden de 26 de Enerode1989).
7. Mantenga los tubos alejados de la luz directaodelcalor
(el reactivo funde cerca de los 60 ºC.
t5IFVTFPGHMBTTJOTUSVNFOUTJTOPUSFDPNNFOEFELFFQBXBZGSPNDIJMESFOt%JFVFSXFOEVOHWPO(MBTHFSÊUFOXJSE
OJDIUFNQGPIMFOWPO,JOEFSOGFSOIBMUFOt4FEFTBDPOTFKBMBVUJMJ[BDJØOEFVUFOTJMJPTEFWJESJPNBOUFOFSGVFSBEFM
BMDBODFEFMPTOJ×PTt4JTDPOTJHMJBMVTPEJTUSVNFOUJEJWFUSPUFOFSFMPOUBOPEBMMBQPSUBUBEFJCBNCJOJtLVUJMJTBUJPO
EJOTUSVNFOUTEFWFSSFOFTUQBTSFDPNNBOEÏFHBSEFSMPJOEFTFOGBOUTt/ÍPÏSFDPNFOEBEPPVTPEFJOTUSVNFOUPT
EFWJESPNBOUFOIBMPOHFEPBMDBODFEBTDSJBOÎBT
INSTRUCTIONS OF USE
ANWEISUNG DER VERWENDUNG
INSTRUCCIONES DE USO
1. Aprire la provetta che contiene il reattivo blú.
2. Il reattivo devedissolversi al introdurre il campione d’olio
nella provetta. Si puo fare in due maniere diverse:
a.Aggiungere il campione d’olio atemperature ambiente
la provetta apertanel micronde(si puó usare un piccolo reci-
pientecome appogigio) mantenerlo per5a10 secondialla
massima potenza. In caso de non avere micronde scaldare
miscela si dissolva.
b. Mettere la provetta nel sopporto anti-ustionieintrodurre il
dell’etichetta,aspettare vari secondi e chidere completamen-
te la provettacom il suo tappo,togliere il sopporto anti ustio-
ne. Se il campionenon raggiunge la temperatura necessária
per fondere il reattivo blú, seguir ele indicazioni del punto a.
3.
miscel uniforme. (l’olio cambiadicolore al mischiarsi com
il reattivo).
4. Aspettare due minuti, lasciando la miscelaariposo. Man-
tenere la provetta in posizione verticale,vicinoaduna fote
di luce, compararei l colore ottenuto com la tabela colori.
5.
6. Al ottenere il colore4(17a23 %) fare la massima atten-
zione perche il limitelegaleédel25%percomponent polari.
(BOE, Ordine 26 Gennaio 1989).
7. Mantenere le provette lontani dalla luce diretaocalore (il
reattivo fonde circa i 60ºC)
1.
2. Placez le tube dans l’appui anti-brûlure et ouvrez-le.
3. Recueillez l’échantillon.
4. Versez l’échantillon dans le tube.
5. Placerl’échantillon jusqu’à la partie inférieure de l’éti-
quette.
Attention: Utilisez toujours l’appui anti-brûlure pour éviter
de vous brûler.
6. Les échantillons recueillis àla température ambiante peu-
vent être chauffés (micro-ondes, bain-marie).
7. Placez le bouchon sur le tube.
8. Agitez jusqu’à la dissolution et le mélange complet des
phases.
9. Attendez deux minutes pour que la réaction se produise.
10. Comparez les résultats avec l’échelle descouleurs
fournie.
11. Ecartez la graisse si le résultat estsupérieurà25% de
composants polaires (couleur 5).
12.
fournie.
13. Conservez letest effectué pour référence future.
L’utilisationdes récipients en verre, tels que pipettes, pour
la récolte des graisses chaudes est déconseillée! Conserver
hors de la portée des enfants.
2. Coloque o tubo no suporte anti-queimadura e abra-o.
3. Recolha a amostra.
4. Verta a amostra para o tubo.
5. Coloque a amostra até à parte inferior da etiqueta.
Atenção:Use sempre o suporte anti-queimaduraspara
evitar queimar-se.
6. Amostras recolhidas àtemperatura ambiente podem ser
aquecidas (micro-ondas, banho maria).
7. Coloque a tampa no tubo.
8. Agite até completa dissolução e mistura das fases.
9. Espere 2 minutos para areação ocorrer.
10. Compare os resultados com aescala de cores fornecida.
11. Descarte agordura seoresultado for superior a 25% de
compostos polares (cor 5).
12. Registe os resultados na folha de registos fornecida.
13. Guarde o testerealizado para referência futura.
INSTRUCTIONS D’UTILISATION
INSTRUÇÕES DE UTILIZAÇÃO
ISTRUZIONI D’USO
1-2 MIN.
3421
Biomedal, S.L. | Avda. Américo Vespucio, 5-4, Planta 1ª, Mód. 12 41092 Sevilla, España (Spain)
Tel. +34 954 08 12 76 Fax. +34 954 08 12 79 | [email protected] www.biomedal.com
DIAGNOSTICS
1. Open the tube containing the blue reagent.
2. The blue reagent has to be dissolved when the oil
sample is poured into the tube. To achieve it, there are
two options a) and b):
a) Pour the oil sample at room temperature up to the
lower part of the label of the tube. Put the open tube
in a microwave (use a small glass or something similar
to prevent the tube from falling) and heat from 5 to
10 seconds at maximum power. If you do not have a
microwave, heat some water and dip the tube properly
closed until the mixture is dissolved.
b) Place the tube in the anti-burn holder and pour the
warm oil sample (at least 60 ºC) up to the lower part of
the label. Wait a few seconds and close the tube tightly
with the cap and remove the anti-burn holder. If the
sample does not reach the temperature required to melt
the blue reagent, follow option a).
3. Shake the tube well (for a minute) in order to produce
a uniform mixture (the color changes when the oil is
mixed with the reagent).
4. Allow the mixture to settle for 2 minutes. Hold the
tube vertically near a source of light and compare the
obtained Acolor to the color scale.
5. At the end of the reaction, the mixture (fat and rea-
6. If the mixture reaches color 4 (17% to 23%), be ex-
tremely careful, as it is quite close to the 25% legal limit
(BOE, Order of the 26th of January, 1989).
7. Keep the tubes away from direct light or heat (the
reagent melts close to 60ºC).
INSTRUCTIONS OF USE
1. Öffnen Sie das Plastikröhrchen mit der blauen Subs-
tanz.
2. Die blaue Substanz muss mit der Ölprobe vermischt
werden. Dafür gibt es folgende Möglichkeiten a) und b):
a) Füllen Sie die Ölprobe bei Raumtemperatur bis zum
unteren Abschnitt des Plastikröhrchenetiketts ein. Ste-
llen Sie das geöffnete Plastikröhrchen in die Mikrowelle
(benutzen Sie dafür ein kleines Glas oder ähnliches, da-
mit das Röhrchen nicht umkippen kann) und erhitzen
Sie es für 5 bis 10 Sekunden bei maximaler Stärke. Sollte
keine Mikrowelle zur Verfügung stehen, können Sie das
gut verschlossene Röhrchen auch im Wasserbad erhit-
zen, bis die Ölprobe und die blaue Substanz vollständig
b) Platzieren Sie das Röhrchen in den mitgelieferten Ver-
brennschutz-Halter und füllen Sie die erwärmte Ölpro-
be (mindestens 60 °C) bis zum unteren Abschnitt des
Plastikröhrchenetiketts ein. Warten Sie einige Sekunden,
danach verschließen Sie das Röhrchen fest und nehmen
den Verbrennschutz-Halter ab. Sollte die Temperatur ni-
gen, gehen Sie nach a) vor.
3. Schütteln Sie das Röhrchen (zirka 1 Minute), um eine
homogene Mischung zu erhalten (die Farbe ändert sich,
wenn sich das Öl mit der Substanz mischt).
4. Lassen Sie die Mischung für 2 Minuten ruhen. Halten
Sie das Röhrchen horizontal (in der Nähe einer Lichtquel-
le) und vergleichen Sie die Farbe mit der Farbskala.
5. Am Ende der Reaktion verfestigt sich das Gemisch aus
Öl und Reagenz.
6. Wenn die Mischung Farbstufe 4 (17% bis 23%) errei-
cht ist, ist höchste Vorsicht geboten, da dies sehr nah am
erlaubten Grenzwert von 25% liegt (BOE, Gesetz vom
26. Januar 1989).
7. Halten Sie die Röhrchen von direktem Licht oder Wär-
ANWEISUNG DER VERWENDUNG
1. Destape el tubo que contiene el reactivo azul.
2. Debe conseguirque el reactivo azul se disuelva
cuando introduzca la muestra de aceite en el tubo.
Para ello, puede actuar de dos formas:
a) Añadalamuestrade aceite atemperatura ambi-
ente hasta la marca inferior de la etiqueta del tubo.
Introduzca el tubodestapado en un microondas
(puede usar un vaso pequeño orecipiente similar
como soporte)ymanténgalo de 5a10 segundos a
máxima potencia. [Si no dispone de microondas, cal-
iente un poco de agua eintroduzca el tubo debida-
mente tapado hasta que la mezcla se disuelva.].
b) Coloqueel tuboen el soporte anti-quemadura e
introduzcalamuestra de aceite caliente (por lo menos
a60 ºC hasta la marca inferior de la etiqueta del tubo.
Espere unos segundos ycierre el tubo completamente
con su tapón y quite el soporte anti-quemadura. Si la
muestra no hubiera alcanzado la temperatura nece-
saria para fundir el reactivo azul, actúe según la op-
ción a).
3. Agite bien el tubo tapado hasta que se produz-
ca una mezcla uniforme (el aceite cambia de color al
mezclarse con el reactivo).
4. Espere2minutos dejando la mezcla en reposo.
Mantenga el tubo vertical cerca de una fuente de luz
y compare el color obtenido con la tabla de colores.
5.
6. Si alcanza el color 4(17 a23%) tenga el máximo
cuidado porque estámuy cerca del límitelegal del
25% de compuestos polares (BOE, Orden de 26 de
Enero de 1989).
7. Mantenga los tubos alejados de la luz directa o del
calor (el reactivo funde cerca de los 60 ºC.
INSTRUCCIONES DE USO
1. Aprire la provetta che contiene il reattivo blú.
2. Il reattivo deve dissolversi al introdurre il campione
d’olio nella provetta. Si puo fare in due maniere diverse:
a. Aggiungere il campione d’olio a temperature ambien-
trodurre la provetta aperta nel micronde (si puó usare un
piccolo recipiente come appogigio) mantenerlo per 5 a
10 secondi alla massima potenza. In caso de non avere
micronde scaldare un po’ d’aqcua e introdurre la prove-
b. Mettere la provetta nel sopporto anti-ustioni e in-
al segno inferiore dell’etichetta, aspettare vari secondi
e chidere completamente la provetta com il suo tappo,
togliere il sopporto anti ustione. Se il campione non rag-
giunge la temperatura necessária per fondere il reattivo
blú, seguir ele indicazioni del punto a.
3.
miscel uniforme. (l’olio cambia di colore al mischiarsi
com il reattivo).
4. Aspettare due minuti, lasciando la miscela a riposo.
Mantenere la provetta in posizione verticale, vicino ad
una fote di luce, compararei l colore ottenuto com la
tabela colori.
5.
6. Al ottenere il colore 4 (17 a 23 %) fare la massima
attenzione perche il limite legale é del 25% per compo-
nent polari. (BOE, Ordine 26 Gennaio 1989).
7. Mantenere le provette lontani dalla luce direta o calo-
re (il reattivo fonde circa i 60ºC)
1.
2. Placez le tube dans l’appui anti-brûlure et ouvrez-le.
3. Recueillez l’échantillon.
4. Versez l’échantillon dans le tube.
5. Placer l’échantillon jusqu’à la partie inférieure de l’éti-
quette.
Attention: Utilisez toujours l’appui anti-brûlure pour
éviter de vous brûler.
6. Les échantillons recueillis à la température ambiante
peuvent être chauffés (micro-ondes, bain-marie).
7. Placez le bouchon sur le tube.
8. Agitez jusqu’à la dissolution et le mélange complet
des phases.
9. Attendez deux minutes pour que la réaction se pro-
duise.
10. Comparez les résultats avec l’échelle des couleurs
fournie.
11. Ecartez la graisse si le résultat est supérieur à 25%
de composants polaires (couleur 5).
12.
fournie.
13. Conservez le test effectué pour référence future.
L’utilisation des récipients en verre, tels que pipettes,
pour la récolte des graisses chaudes est déconseillée!
Conserver hors de la portée des enfants.
2. Coloque o tubo no suporte anti-queimadura e abra-o.
3. Recolha a amostra.
4. Verta a amostra para o tubo.
5. Coloque a amostra até à parte inferior da etiqueta.
Atenção: Use sempre o suporte anti-queimaduras para
evitar queimar-se.
6. Amostras recolhidas à temperatura ambiente podem
ser aquecidas (micro-ondas, banho maria).
7. Coloque a tampa no tubo.
8. Agite até completa dissolução e mistura das fases.
9. Espere 2 minutos para a reação ocorrer.
10. Compare os resultados com a escala de cores for-
necida.
11. Descarte a gordura se o resultado for superior a
25% de compostos polares (cor 5).
12. Registe os resultados na folha de registos fornecida.
13. Guarde o teste realizado para referência futura.
t5IFVTFPGHMBTTJOTUSVNFOUTJTOPUSFDPNNFOEFELFFQBXBZGSPNDIJMESFOt%JFVFSXFOEVOHWPO(MBTHFSÊUFOXJSE
OJDIUFNQGPIMFOWPO,JOEFSOGFSOIBMUFOt4FEFTBDPOTFKBMBVUJMJ[BDJØOEFVUFOTJMJPTEFWJESJPNBOUFOFSGVFSBEFM
BMDBODFEFMPTOJ×PTt4JTDPOTJHMJBMVTPEJTUSVNFOUJEJWFUSPUFOFSFMPOUBOPEBMMBQPSUBUBEFJCBNCJOJtLVUJMJTBUJPO
EJOTUSVNFOUTEFWFSSFOFTUQBTSFDPNNBOEÏFHBSEFSMPJOEFTFOGBOUTt/ÍPÏSFDPNFOEBEPPVTPEFJOTUSVNFOUPT
EFWJESPNBOUFOIBMPOHFEPBMDBODFEBTDSJBOÎBT
INSTRUCTIONS D’UTILISATION
INSTRUÇÕES DE UTILIZAÇÃO
ISTRUZIONI D’USO
1-2 MIN.
3421
During deep fat frying, the fats and oils are exposed
to atmospheric oxygen and to moisture at high tem-
peratures (over 160 ºC) for long periods of time. As a
consequence, a series of chemical reactions take place.
These reactions produce various harmful compounds
and alter, at the same time, the fat/oil organoleptic char-
acteristics (odor, color, taste) and the health effects of
the oil/fat. Among these substances, polar compounds
may be found; their control allows the assessment of oil
oxidation grades.
The importance of controlling polar compounds is also
regulated by the Order of the 26th of January 1989 pub-
stuffs which have been prepared or been in contact with
oils with a polar content equal to or exceeding 25%.
Oleotestis a colorimetric assay that allowsto determine
the total polar compoundsin frying fats in less than 2
minutes. It is afeasibleand safe way to control the quality
Oleotest is suitable for the most frequently used oils
Other types of oils may require a different color scale.
Oleotest remains stable after being used:keep the
tubes so that you can use them in your auto-control
system.
WHY OLEOTEST?
POR QUÉ OLEOTEST?
OBSERVACIONES
OBSERVATIONS
WHY CONTROL FRYING OILS?
Durante el proceso de fritura, las grasas
olos aceites se exponen al oxígeno atmos-
férico, a la humedad yaaltas temperaturas
(porencima de 160 ºC por periodos largos; como
consecuencia, tienen lugar una serie de reacciones
químicas que producen diversos compuestos nocivos y
que alteran, a su vez, las características organolépticas
(olor, color, sabor) e, incluso, la salubridad de la grasa/
aceite. Entre estas sustancias se encuentran los com-
puestos polares y su control permite valorar el grado
de oxidación delaceite. La importancia de controlar los
compuestos polares lo dicta, también, la Orden del 26 de
Enero de 1989 del BOE,que prohíbe la comercialización
de alimentos que hayan sido preparados ohayan estado
en contacto con aceites quetengan un 25%de estos
compuestos polares o más.
POR QUÉ CONTROLAR LOS ACEITES DE FREÍR?
Oleotest es un método fiable y rápido que mide la
concentración de compuestos polares totales en los
aceites de fritura.De esta forma, Oleotest permite
realizar, en pocos minutos ydeforma muy sencilla,
una evaluación fiable de la calidad de los aceites de
freír, sinnecesidadde equipos o instrumentos sofisti-
cados. Oleotest es seguro y no utiliza disolventes
inflamables.
Oleotest es idóneo para los aceites más utilizados en
fritura (aceite de girasol, aceite de soja, aceite de maíz y
aceite de cacahuete). Otros tipos de aceite podrían req-
uerir una escala de colores diferente. Oleotest se man-
tiene estable después de su utilización: conserve los tu-
bos como parte integrante de su sistema de autocontrol.
vimeo.com/oleotest
facebook.com/oleotest
oleotest.com
https://es-es.facebook.com/OleotestES
Nºcontenido de la freidora
content of the fryer
t'FDIB
t%BUF
t'JSNBEFM
responsable
t4JHOBUVre of the
person in charge
tTemperatura del Aceite (ºC)
t0JMTemperature (ºC)
1
2
3
4
5
6
7
8
9
10
11
12
13
14
15
16
17
18
19
20
21
22
23
24
25
26
27
28
28
30
31
32
33
34
35
36
37
38
39
40
41
42
43
44
45
46
47
48
49
50
3FTVMUBEPTt3FTVMUT
12345
tValidado por
tValidated by
t'FDIB
t%BUF
CONTROL DEL ACEITE DE FREÍR
RAPID TEST TO CONTROL FRYING OILS
During deep fat frying, the fats
andoils are exposed to atmospheric
oxygenand to moisture at high tem-
peratures (over 160 ºC) for long periods of
time. As aconsequence, aseries of chemical
reactions take place. These reactions produce vari-
ous harmful compoundsand alter, at the same time, the
fat/oil organoleptic characteristics (odor, color, taste) and
the health effects of the oil/fat. Among these substances,
polar compounds may be found;their control allows the
assessment of oil oxidation grades.
The importance of controlling polar compounds is also
regulated by several national regulations andGlobal
health recommendations which prohibit the sale of
foodstuffs whichhavebeen prepared or beenin contact
with oils with apolar content equal to or exceeding 25%.
Oleotestis a colorimetric assay that allowsto determine
the total polar compoundsin frying fats in less than 2
minutes. It is afeasibleand safe way to control the quality
Oleotest is suitable for the most frequently used oils
Other types of oils may require a different color scale.
Oleotest remains stable after being used:keep the
tubes so that you can use them in your auto-control
system.
WHY OLEOTEST?
POR QUÉ OLEOTEST?
OBSERVACIONES
OBSERVATIONS
WHY CONTROL FRYING OILS?
Durante el proceso de fritura, las grasas o los aceites
se exponen al oxígeno atmosférico, a la humedad y a
altas temperaturas (por encima de 160 ºC por periodos
largos; como consecuencia, tienen lugar una serie de
reacciones químicas que producen diversos compuestos
nocivos y que alteran, a su vez, las características or-
ganolépticas (olor, color, sabor) e, incluso, la salubridad
de la grasa/aceite. Entre estas sustancias se encuentran
los compuestos polares y su control permite valorar el
grado de oxidación del aceite. La importancia de contro-
lar los compuestos polares lo dicta, también, recomen-
daciones globales, que prohíbe la comercialización de
alimentos que hayan sido preparados o hayan estado
en contacto con aceites que tengan un 25% de estos
compuestos polares o más.
POR QUÉ CONTROLAR LOS ACEITES DE FREÍR?
Oleotest es un método fiable y rápido que mide la
concentración de compuestos polares totales en los
aceites de fritura. De estaforma,Oleotest permite
realizar, en pocos minutosydeforma muy sencilla,
una evaluación fiable de la calidad de los aceites de
freír, sinnecesidadde equipos o instrumentos sofisti-
cados. Oleotest es seguro y no utiliza disolventes
inflamables.
Oleotest es idóneo para los aceites más utilizados en
fritura (aceite de girasol, aceite de soja, aceite de maíz y
aceite de cacahuete). Otros tipos de aceite podrían req-
uerir una escala de colores diferente. Oleotest se man-
tiene estable después de su utilización: conserve los tu-
bos como parte integrante de su sistema de autocontrol.
vimeo.com/oleotest
facebook.com/oleotest
oleotest.com
Nºcontent of the fryer
contenido de la freidora
t%BUF
t'FDIB
t4JHOBUVre of the
person in charge
t'JSNBEFM
responsable
t0JMTemperature (ºC)
tTemperatura del Aceite (ºC)
1
2
3
4
5
6
7
8
9
10
11
12
13
14
15
16
17
18
19
20
21
22
23
24
25
26
27
28
28
30
31
32
33
34
35
36
37
38
39
40
41
42
43
44
45
46
47
48
49
50
t3FTVMUTt3FTVMUBEPT
12345
tValidated by
tValidado por
t%BUF
t'FDIB
RAPID TEST TO CONTROL FRYING OILS
CONTROL DEL ACEITE DE FREÍR
926050 G22M 2/4

1. Open the tube containing the blue reagent.
2. The blue reagenthasto be dissolved when the oil sam-
ple is poured into the tube. To achieve it, there are two
options a) and b):
a) Pour theoil sampleat room temperature up to the lower
part of the label of the tube. Put the open tube in a mi-
crowave(useasmall glass or something similar to prevent
the tube from falling) and heat from 5to 10 seconds at
maximum power. If youdo not haveamicrowave, heat
some waterand dip the tube properly closed until the mi-
xture is dissolved.
b) Place the tubein the anti-burn holder and pour the
warm oil sample(at least 60 ºC) up to the lower part of the
label. Wait afew secondsand close the tube tightly with
the cap and remove the anti-burn holder. If the sample
does not reach the temperature required to melt the blue
reagent, follow option a).
3. Shakethetube well (for a minute) in order to produce a
uniform mixture (the color changeswhen the oil is mixed
with the reagent).
4. Allowthe mixture to settle for 2 minutes. Hold the tube
vertically nearasource of light and compare the obtained
Acolor to the color scale.
5. At the end of the reaction, the mixture (fat and reagent)
6. If the mixture reachescolor4(17% to 23%), be extre-
mely careful, as it is quite close to the 25% legallimit (BOE,
Order of the 26th of January, 1989).
7. Keep the tubesaway from direct light or heat (the rea-
gent melts close to 60ºC).
1. Öffnen Sie dasPlastikröhrchen mit der blauen Substanz.
2. Die blaue Substanz muss mit der Ölprobe vermischt wer-
den. Dafür gibt es folgende Möglichkeiten a) und b):
a) FüllenSiedie Ölprobe bei Raumtemperatur bis zum un-
teren Abschnitt des Plastikröhrchenetiketts ein. Stellen Sie
das geöffnetePlastikröhrchen in dieMikrowelle(benutzen
Sie dafür einkleinesGlas oder ähnliches, damit dasRöhr-
chen nicht umkippen kann) und erhitzen Sie es für 5 bis
10 Sekunden bei maximaler Stärke. Sollte keine Mikrowelle
zur Verfügung stehen, können Sie dasgut verschlossene
Röhrchen auchim Wasserbad erhitzen, bis die Ölprobe und
b) Platzieren SiedasRöhrchen in den mitgelieferten Ver-
brennschutz-Halter und füllen Sie die erwärmte Ölprobe
(mindestens 60 °C) bis zumunteren Abschnitt des Plas-
tikröhrchenetiketts ein. Warten Sie einige Sekunden, da-
nach verschließen Sie das Röhrchen fest und nehmen den
Verbrennschutz-Halter ab. Sollte die Temperatur nichtaus-
Sie nacha) vor.
3. Schütteln Sie das Röhrchen (zirka 1Minute), um eine
homogeneMischung zu erhalten (die Farbe ändert sich,
wenn sich dasÖl mit der Substanz mischt).
4.Lassen Siedie Mischung für 2Minuten ruhen. Halten Sie
das Röhrchen horizontal (in der Nähe einer Lichtquelle) und
vergleichen Sie die Farbe mit der Farbskala.
5. Am Ende der Reaktion verfestigt sich das Gemisch aus
Öl und Reagenz.
6.Wenn die Mischung Farbstufe 4(17% bis 23%) errei-
chtist, isthöchste Vorsichtgeboten, da dies sehr nah am
erlaubten Grenzwert von 25% liegt (BOE, Gesetz vom 26.
Januar 1989).
7. Halten Sie die Röhrchen von direktem Licht oder Wärme
1. Destape el tubo que contiene el reactivo azul.
2. Debe conseguir que el reactivoazul se disuelvacuan-
do introduzca la muestra de aceite en el tubo. Para ello,
puede actuar de dos formas:
a) Añadala muestra de aceite a temperatura ambiente
hasta la marca inferior de la etiqueta del tubo. Introduzca
el tubo destapado en un microondas (puede usar un vaso
pequeño orecipiente similarcomo soporte) ymanténgalo
de 5 a 10 segundos amáximapotencia. [Sino dispone
de microondas, caliente un poco de agua eintroduzca el
tubo debidamente tapado hasta que la mezclasedisuel-
va.].
b) Coloqueel tubo en el soporte anti-quemadura eintro-
duzca la muestra de aceite caliente (por lo menosa60 ºC
hasta la marca inferior de la etiqueta del tubo. Espere unos
segundos ycierre el tubo completamente con su tapón y
quiteelsoporte anti-quemadura. Si la muestra no hubiera
alcanzadola temperatura necesariapara fundir el reactivo
azul, actúe según la opción a).
3. Agite bien el tubo tapadohasta quese produzcauna
mezcla uniforme (el aceite cambiade color al mezclarse
con el reactivo).
4. Espere 2 minutos dejando la mezcla en reposo. Man-
tenga el tubo vertical cerca de unafuente de luz y com-
pare el color obtenido con la tabla de colores.
5.
6. Si alcanza el color4(17 a23%) tenga el máximo cui-
dado porque estámuy cerca del límite legal del25% de
compuestos polares (BOE, Orden de 26 de Enerode1989).
7. Mantenga los tubos alejados de la luz directaodelcalor
(el reactivo funde cerca de los 60 ºC.
t5IFVTFPGHMBTTJOTUSVNFOUTJTOPUSFDPNNFOEFELFFQBXBZGSPNDIJMESFOt%JFVFSXFOEVOHWPO(MBTHFSÊUFOXJSE
OJDIUFNQGPIMFOWPO,JOEFSOGFSOIBMUFOt4FEFTBDPOTFKBMBVUJMJ[BDJØOEFVUFOTJMJPTEFWJESJPNBOUFOFSGVFSBEFM
BMDBODFEFMPTOJ×PTt4JTDPOTJHMJBMVTPEJTUSVNFOUJEJWFUSPUFOFSFMPOUBOPEBMMBQPSUBUBEFJCBNCJOJtLVUJMJTBUJPO
EJOTUSVNFOUTEFWFSSFOFTUQBTSFDPNNBOEÏFHBSEFSMPJOEFTFOGBOUTt/ÍPÏSFDPNFOEBEPPVTPEFJOTUSVNFOUPT
EFWJESPNBOUFOIBMPOHFEPBMDBODFEBTDSJBOÎBT
INSTRUCTIONS OF USE
ANWEISUNG DER VERWENDUNG
INSTRUCCIONES DE USO
1. Aprire la provetta che contiene il reattivo blú.
2. Il reattivo devedissolversi al introdurre il campione d’olio
nella provetta. Si puo fare in due maniere diverse:
a.Aggiungere il campione d’olio atemperature ambiente
la provetta apertanel micronde(si puó usare un piccolo reci-
pientecome appogigio) mantenerlo per5a10 secondialla
massima potenza. In caso de non avere micronde scaldare
miscela si dissolva.
b. Mettere la provetta nel sopporto anti-ustionieintrodurre il
dell’etichetta,aspettare vari secondi e chidere completamen-
te la provettacom il suo tappo,togliere il sopporto anti ustio-
ne. Se il campionenon raggiunge la temperatura necessária
per fondere il reattivo blú, seguir ele indicazioni del punto a.
3.
miscel uniforme. (l’olio cambiadicolore al mischiarsi com
il reattivo).
4. Aspettare due minuti, lasciando la miscelaariposo. Man-
tenere la provetta in posizione verticale,vicinoaduna fote
di luce, compararei l colore ottenuto com la tabela colori.
5.
6. Al ottenere il colore4(17a23 %) fare la massima atten-
zione perche il limitelegaleédel25%percomponent polari.
(BOE, Ordine 26 Gennaio 1989).
7. Mantenere le provette lontani dalla luce diretaocalore (il
reattivo fonde circa i 60ºC)
1.
2. Placez le tube dans l’appui anti-brûlure et ouvrez-le.
3. Recueillez l’échantillon.
4. Versez l’échantillon dans le tube.
5. Placerl’échantillon jusqu’à la partie inférieure de l’éti-
quette.
Attention: Utilisez toujours l’appui anti-brûlure pour éviter
de vous brûler.
6. Les échantillons recueillis àla température ambiante peu-
vent être chauffés (micro-ondes, bain-marie).
7. Placez le bouchon sur le tube.
8. Agitez jusqu’à la dissolution et le mélange complet des
phases.
9. Attendez deux minutes pour que la réaction se produise.
10. Comparez les résultats avec l’échelle descouleurs
fournie.
11. Ecartez la graisse si le résultat estsupérieurà25% de
composants polaires (couleur 5).
12.
fournie.
13. Conservez letest effectué pour référence future.
L’utilisationdes récipients en verre, tels que pipettes, pour
la récolte des graisses chaudes est déconseillée! Conserver
hors de la portée des enfants.
2. Coloque o tubo no suporte anti-queimadura e abra-o.
3. Recolha a amostra.
4. Verta a amostra para o tubo.
5. Coloque a amostra até à parte inferior da etiqueta.
Atenção:Use sempre o suporte anti-queimaduraspara
evitar queimar-se.
6. Amostras recolhidas àtemperatura ambiente podem ser
aquecidas (micro-ondas, banho maria).
7. Coloque a tampa no tubo.
8. Agite até completa dissolução e mistura das fases.
9. Espere 2 minutos para areação ocorrer.
10. Compare os resultados com aescala de cores fornecida.
11. Descarte agordura seoresultado for superior a 25% de
compostos polares (cor 5).
12. Registe os resultados na folha de registos fornecida.
13. Guarde o testerealizado para referência futura.
INSTRUCTIONS D’UTILISATION
INSTRUÇÕES DE UTILIZAÇÃO
ISTRUZIONI D’USO
1-2 MIN.
3421
Biomedal, S.L. | Avda. Américo Vespucio, 5-4, Planta 1ª, Mód. 12 41092 Sevilla, España (Spain)
Tel. +34 954 08 12 76 Fax. +34 954 08 12 79 | [email protected] www.biomedal.com
DIAGNOSTICS
1. Open the tube containing the blue reagent.
2. The blue reagent has to be dissolved when the oil sam-
ple is poured into the tube. To achieve it, there are two
options a) and b):
a) Pour the oil sample at room temperature up to the lower
part of the label of the tube. Put the open tube in a mi-
crowave (use a small glass or something similar to prevent
the tube from falling) and heat from 5 to 10 seconds at
maximum power. If you do not have a microwave, heat
some water and dip the tube properly closed until the mi-
xture is dissolved.
b) Place the tube in the anti-burn holder and pour the
warm oil sample (at least 60 ºC) up to the lower part of the
label. Wait a few seconds and close the tube tightly with
the cap and remove the anti-burn holder. If the sample
does not reach the temperature required to melt the blue
reagent, follow option a).
3. Shake the tube well (for a minute) in order to produce a
uniform mixture (the color changes when the oil is mixed
with the reagent).
4. Allow the mixture to settle for 2 minutes. Hold the tube
vertically near a source of light and compare the obtained
Acolor to the color scale.
5. At the end of the reaction, the mixture (fat and reagent)
6. If the mixture reaches color 4 (17% to 23%), be extre-
mely careful, as it is quite close to the 25% legal limit (BOE,
Order of the 26th of January, 1989).
7. Keep the tubes away from direct light or heat (the rea-
gent melts close to 60ºC).
1. Öffnen Sie das Plastikröhrchen mit der blauen Substanz.
2. Die blaue Substanz muss mit der Ölprobe vermischt wer-
den. Dafür gibt es folgende Möglichkeiten a) und b):
a) Füllen Sie die Ölprobe bei Raumtemperatur bis zum un-
teren Abschnitt des Plastikröhrchenetiketts ein. Stellen Sie
das geöffnete Plastikröhrchen in die Mikrowelle (benutzen
Sie dafür ein kleines Glas oder ähnliches, damit das Röhr-
chen nicht umkippen kann) und erhitzen Sie es für 5 bis
10 Sekunden bei maximaler Stärke. Sollte keine Mikrowelle
zur Verfügung stehen, können Sie das gut verschlossene
Röhrchen auch im Wasserbad erhitzen, bis die Ölprobe und
b) Platzieren Sie das Röhrchen in den mitgelieferten Ver-
brennschutz-Halter und füllen Sie die erwärmte Ölprobe
(mindestens 60 °C) bis zum unteren Abschnitt des Plas-
tikröhrchenetiketts ein. Warten Sie einige Sekunden, da-
nach verschließen Sie das Röhrchen fest und nehmen den
Verbrennschutz-Halter ab. Sollte die Temperatur nicht aus-
Sie nach a) vor.
3. Schütteln Sie das Röhrchen (zirka 1 Minute), um eine
homogene Mischung zu erhalten (die Farbe ändert sich,
wenn sich das Öl mit der Substanz mischt).
4. Lassen Sie die Mischung für 2 Minuten ruhen. Halten Sie
das Röhrchen horizontal (in der Nähe einer Lichtquelle) und
vergleichen Sie die Farbe mit der Farbskala.
5. Am Ende der Reaktion verfestigt sich das Gemisch aus
Öl und Reagenz.
6.Wenn die Mischung Farbstufe 4 (17% bis 23%) errei-
cht ist, ist höchste Vorsicht geboten, da dies sehr nah am
erlaubten Grenzwert von 25% liegt (BOE, Gesetz vom 26.
Januar 1989).
7. Halten Sie die Röhrchen von direktem Licht oder Wärme
1. Destape el tubo que contiene el reactivo azul.
2. Debe conseguir que el reactivo azul se disuelva cuan-
do introduzca la muestra de aceite en el tubo. Para ello,
puede actuar de dos formas:
a) Añada la muestra de aceite a temperatura ambiente
hasta la marca inferior de la etiqueta del tubo. Introduzca
el tubo destapado en un microondas (puede usar un vaso
pequeño o recipiente similar como soporte) y manténgalo
de 5 a 10 segundos a máxima potencia. [Si no dispone
de microondas, caliente un poco de agua e introduzca el
tubo debidamente tapado hasta que la mezcla se disuel-
va.].
b) Coloque el tubo en el soporte anti-quemadura e intro-
duzca la muestra de aceite caliente (por lo menos a 60 ºC
hasta la marca inferior de la etiqueta del tubo. Espere unos
segundos y cierre el tubo completamente con su tapón y
quite el soporte anti-quemadura. Si la muestra no hubiera
alcanzado la temperatura necesaria para fundir el reactivo
azul, actúe según la opción a).
3. Agite bien el tubo tapado hasta que se produzca una
mezcla uniforme (el aceite cambia de color al mezclarse
con el reactivo).
4. Espere 2 minutos dejando la mezcla en reposo. Man-
tenga el tubo vertical cerca de una fuente de luz y com-
pare el color obtenido con la tabla de colores.
5.
6. Si alcanza el color 4 (17 a 23%) tenga el máximo cui-
dado porque está muy cerca del límite legal del 25% de
compuestos polares (BOE, Orden de 26 de Enero de 1989).
7. Mantenga los tubos alejados de la luz directa o del calor
(el reactivo funde cerca de los 60 ºC.
t5IFVTFPGHMBTTJOTUSVNFOUTJTOPUSFDPNNFOEFELFFQBXBZGSPNDIJMESFOt%JFVFSXFOEVOHWPO(MBTHFSÊUFOXJSE
OJDIUFNQGPIMFOWPO,JOEFSOGFSOIBMUFOt4FEFTBDPOTFKBMBVUJMJ[BDJØOEFVUFOTJMJPTEFWJESJPNBOUFOFSGVFSBEFM
BMDBODFEFMPTOJ×PTt4JTDPOTJHMJBMVTPEJTUSVNFOUJEJWFUSPUFOFSFMPOUBOPEBMMBQPSUBUBEFJCBNCJOJtLVUJMJTBUJPO
EJOTUSVNFOUTEFWFSSFOFTUQBTSFDPNNBOEÏFHBSEFSMPJOEFTFOGBOUTt/ÍPÏSFDPNFOEBEPPVTPEFJOTUSVNFOUPT
EFWJESPNBOUFOIBMPOHFEPBMDBODFEBTDSJBOÎBT
INSTRUCTIONS OF USE
ANWEISUNG DER VERWENDUNG
INSTRUCCIONES DE USO
1. Aprire la provetta che contiene il reattivo blú.
2. Il reattivo deve dissolversi al introdurre il campione d’olio
nella provetta. Si puo fare in due maniere diverse:
a. Aggiungere il campione d’olio a temperature ambiente
la provetta aperta nel micronde (si puó usare un piccolo reci-
piente come appogigio) mantenerlo per 5 a 10 secondi alla
massima potenza. In caso de non avere micronde scaldare
miscela si dissolva.
b. Mettere la provetta nel sopporto anti-ustioni e introdurre il
dell’etichetta, aspettare vari secondi e chidere completamen-
te la provetta com il suo tappo, togliere il sopporto anti ustio-
ne. Se il campione non raggiunge la temperatura necessária
per fondere il reattivo blú, seguir ele indicazioni del punto a.
3.
miscel uniforme. (l’olio cambia di colore al mischiarsi com
il reattivo).
4. Aspettare due minuti, lasciando la miscela a riposo. Man-
tenere la provetta in posizione verticale, vicino ad una fote
di luce, compararei l colore ottenuto com la tabela colori.
5.
6. Al ottenere il colore 4 (17 a 23 %) fare la massima atten-
zione perche il limite legale é del 25% per component polari.
(BOE, Ordine 26 Gennaio 1989).
7. Mantenere le provette lontani dalla luce direta o calore (il
reattivo fonde circa i 60ºC)
1.
2. Placez le tube dans l’appui anti-brûlure et ouvrez-le.
3. Recueillez l’échantillon.
4. Versez l’échantillon dans le tube.
5. Placer l’échantillon jusqu’à la partie inférieure de l’éti-
quette.
Attention: Utilisez toujours l’appui anti-brûlure pour éviter
de vous brûler.
6. Les échantillons recueillis à la température ambiante peu-
vent être chauffés (micro-ondes, bain-marie).
7. Placez le bouchon sur le tube.
8. Agitez jusqu’à la dissolution et le mélange complet des
phases.
9. Attendez deux minutes pour que la réaction se produise.
10. Comparez les résultats avec l’échelle des couleurs
fournie.
11. Ecartez la graisse si le résultat est supérieur à 25% de
composants polaires (couleur 5).
12.
fournie.
13. Conservez le test effectué pour référence future.
L’utilisation des récipients en verre, tels que pipettes, pour
la récolte des graisses chaudes est déconseillée! Conserver
hors de la portée des enfants.
2. Coloque o tubo no suporte anti-queimadura e abra-o.
3. Recolha a amostra.
4. Verta a amostra para o tubo.
5. Coloque a amostra até à parte inferior da etiqueta.
Atenção: Use sempre o suporte anti-queimaduras para
evitar queimar-se.
6. Amostras recolhidas à temperatura ambiente podem ser
aquecidas (micro-ondas, banho maria).
7. Coloque a tampa no tubo.
8. Agite até completa dissolução e mistura das fases.
9. Espere 2 minutos para a reação ocorrer.
10. Compare os resultados com a escala de cores fornecida.
11. Descarte a gordura se o resultado for superior a 25% de
compostos polares (cor 5).
12. Registe os resultados na folha de registos fornecida.
13. Guarde o teste realizado para referência futura.
INSTRUCTIONS D’UTILISATION
INSTRUÇÕES DE UTILIZAÇÃO
ISTRUZIONI D’USO
1-2 MIN.
3421
Biomedal, S.L. | Avda. Américo Vespucio, 5-4, Planta 1ª, Mód. 12 41092 Sevilla, España (Spain)
Tel. +34 954 08 12 76 Fax. +34 954 08 12 79 | [email protected] www.biomedal.com
DIAGNOSTICS
1. Open the tube containing the blue reagent.
2. The blue reagenthasto be dissolved when the oil sam-
ple is poured into the tube. To achieve it, there are two
options a) and b):
a) Pour theoil sampleat room temperature up to the lower
part of the label of the tube. Put the open tube in a mi-
crowave(useasmall glass or something similar to prevent
the tube from falling) and heat from 5to 10 seconds at
maximum power. If youdo not haveamicrowave, heat
some waterand dip the tube properly closed until the mi-
xture is dissolved.
b) Place the tubein the anti-burn holder and pour the
warm oil sample(at least 60 ºC) up to the lower part of the
label. Wait afew secondsand close the tube tightly with
the cap and remove the anti-burn holder. If the sample
does not reach the temperature required to melt the blue
reagent, follow option a).
3. Shakethetube well (for a minute) in order to produce a
uniform mixture (the color changeswhen the oil is mixed
with the reagent).
4. Allowthe mixture to settle for 2 minutes. Hold the tube
vertically nearasource of light and compare the obtained
Acolor to the color scale.
5. At the end of the reaction, the mixture (fat and reagent)
6. If the mixture reachescolor4(17% to 23%), be extre-
mely careful, as it is quite close to the 25% legallimit (BOE,
Order of the 26th of January, 1989).
7. Keep the tubesaway from direct light or heat (the rea-
gent melts close to 60ºC).
1. Öffnen Sie dasPlastikröhrchen mit der blauen Substanz.
2. Die blaue Substanz muss mit der Ölprobe vermischt wer-
den. Dafür gibt es folgende Möglichkeiten a) und b):
a) FüllenSiedie Ölprobe bei Raumtemperatur bis zum un-
teren Abschnitt des Plastikröhrchenetiketts ein. Stellen Sie
das geöffnetePlastikröhrchen in dieMikrowelle(benutzen
Sie dafür einkleinesGlas oder ähnliches, damit dasRöhr-
chen nicht umkippen kann) und erhitzen Sie es für 5 bis
10 Sekunden bei maximaler Stärke. Sollte keine Mikrowelle
zur Verfügung stehen, können Sie dasgut verschlossene
Röhrchen auchim Wasserbad erhitzen, bis die Ölprobe und
b) Platzieren SiedasRöhrchen in den mitgelieferten Ver-
brennschutz-Halter und füllen Sie die erwärmte Ölprobe
(mindestens 60 °C) bis zumunteren Abschnitt des Plas-
tikröhrchenetiketts ein. Warten Sie einige Sekunden, da-
nach verschließen Sie das Röhrchen fest und nehmen den
Verbrennschutz-Halter ab. Sollte die Temperatur nichtaus-
Sie nacha) vor.
3. Schütteln Sie das Röhrchen (zirka 1Minute), um eine
homogeneMischung zu erhalten (die Farbe ändert sich,
wenn sich dasÖl mit der Substanz mischt).
4.Lassen Siedie Mischung für 2Minuten ruhen. Halten Sie
das Röhrchen horizontal (in der Nähe einer Lichtquelle) und
vergleichen Sie die Farbe mit der Farbskala.
5. Am Ende der Reaktion verfestigt sich das Gemisch aus
Öl und Reagenz.
6.Wenn die Mischung Farbstufe 4(17% bis 23%) errei-
chtist, isthöchste Vorsichtgeboten, da dies sehr nah am
erlaubten Grenzwert von 25% liegt (BOE, Gesetz vom 26.
Januar 1989).
7. Halten Sie die Röhrchen von direktem Licht oder Wärme
1. Destape el tubo que contiene el reactivo azul.
2. Debe conseguir que el reactivoazul se disuelvacuan-
do introduzca la muestra de aceite en el tubo. Para ello,
puede actuar de dos formas:
a) Añadala muestra de aceite a temperatura ambiente
hasta la marca inferior de la etiqueta del tubo. Introduzca
el tubo destapado en un microondas (puede usar un vaso
pequeño orecipiente similarcomo soporte) ymanténgalo
de 5 a 10 segundos amáximapotencia. [Sino dispone
de microondas, caliente un poco de agua eintroduzca el
tubo debidamente tapado hasta que la mezclasedisuel-
va.].
b) Coloqueel tubo en el soporte anti-quemadura eintro-
duzca la muestra de aceite caliente (por lo menosa60 ºC
hasta la marca inferior de la etiqueta del tubo. Espere unos
segundos ycierre el tubo completamente con su tapón y
quiteelsoporte anti-quemadura. Si la muestra no hubiera
alcanzadola temperatura necesariapara fundir el reactivo
azul, actúe según la opción a).
3. Agite bien el tubo tapadohasta quese produzcauna
mezcla uniforme (el aceite cambiade color al mezclarse
con el reactivo).
4. Espere 2 minutos dejando la mezcla en reposo. Man-
tenga el tubo vertical cerca de unafuente de luz y com-
pare el color obtenido con la tabla de colores.
5.
6. Si alcanza el color4(17 a23%) tenga el máximo cui-
dado porque estámuy cerca del límite legal del25% de
compuestos polares (BOE, Orden de 26 de Enerode1989).
7. Mantenga los tubos alejados de la luz directaodelcalor
(el reactivo funde cerca de los 60 ºC.
t5IFVTFPGHMBTTJOTUSVNFOUTJTOPUSFDPNNFOEFELFFQBXBZGSPNDIJMESFOt%JFVFSXFOEVOHWPO(MBTHFSÊUFOXJSE
OJDIUFNQGPIMFOWPO,JOEFSOGFSOIBMUFOt4FEFTBDPOTFKBMBVUJMJ[BDJØOEFVUFOTJMJPTEFWJESJPNBOUFOFSGVFSBEFM
BMDBODFEFMPTOJ×PTt4JTDPOTJHMJBMVTPEJTUSVNFOUJEJWFUSPUFOFSFMPOUBOPEBMMBQPSUBUBEFJCBNCJOJtLVUJMJTBUJPO
EJOTUSVNFOUTEFWFSSFOFTUQBTSFDPNNBOEÏFHBSEFSMPJOEFTFOGBOUTt/ÍPÏSFDPNFOEBEPPVTPEFJOTUSVNFOUPT
EFWJESPNBOUFOIBMPOHFEPBMDBODFEBTDSJBOÎBT
INSTRUCTIONS OF USE
ANWEISUNG DER VERWENDUNG
INSTRUCCIONES DE USO
1. Aprire la provetta che contiene il reattivo blú.
2. Il reattivo devedissolversi al introdurre il campione d’olio
nella provetta. Si puo fare in due maniere diverse:
a.Aggiungere il campione d’olio atemperature ambiente
la provetta apertanel micronde(si puó usare un piccolo reci-
pientecome appogigio) mantenerlo per5a10 secondialla
massima potenza. In caso de non avere micronde scaldare
miscela si dissolva.
b. Mettere la provetta nel sopporto anti-ustionieintrodurre il
dell’etichetta,aspettare vari secondi e chidere completamen-
te la provettacom il suo tappo,togliere il sopporto anti ustio-
ne. Se il campionenon raggiunge la temperatura necessária
per fondere il reattivo blú, seguir ele indicazioni del punto a.
3.
miscel uniforme. (l’olio cambiadicolore al mischiarsi com
il reattivo).
4. Aspettare due minuti, lasciando la miscelaariposo. Man-
tenere la provetta in posizione verticale,vicinoaduna fote
di luce, compararei l colore ottenuto com la tabela colori.
5.
6. Al ottenere il colore4(17a23 %) fare la massima atten-
zione perche il limitelegaleédel25%percomponent polari.
(BOE, Ordine 26 Gennaio 1989).
7. Mantenere le provette lontani dalla luce diretaocalore (il
reattivo fonde circa i 60ºC)
1.
2. Placez le tube dans l’appui anti-brûlure et ouvrez-le.
3. Recueillez l’échantillon.
4. Versez l’échantillon dans le tube.
5. Placerl’échantillon jusqu’à la partie inférieure de l’éti-
quette.
Attention: Utilisez toujours l’appui anti-brûlure pour éviter
de vous brûler.
6. Les échantillons recueillis àla température ambiante peu-
vent être chauffés (micro-ondes, bain-marie).
7. Placez le bouchon sur le tube.
8. Agitez jusqu’à la dissolution et le mélange complet des
phases.
9. Attendez deux minutes pour que la réaction se produise.
10. Comparez les résultats avec l’échelle descouleurs
fournie.
11. Ecartez la graisse si le résultat estsupérieurà25% de
composants polaires (couleur 5).
12.
fournie.
13. Conservez letest effectué pour référence future.
L’utilisationdes récipients en verre, tels que pipettes, pour
la récolte des graisses chaudes est déconseillée! Conserver
hors de la portée des enfants.
2. Coloque o tubo no suporte anti-queimadura e abra-o.
3. Recolha a amostra.
4. Verta a amostra para o tubo.
5. Coloque a amostra até à parte inferior da etiqueta.
Atenção:Use sempre o suporte anti-queimaduraspara
evitar queimar-se.
6. Amostras recolhidas àtemperatura ambiente podem ser
aquecidas (micro-ondas, banho maria).
7. Coloque a tampa no tubo.
8. Agite até completa dissolução e mistura das fases.
9. Espere 2 minutos para areação ocorrer.
10. Compare os resultados com aescala de cores fornecida.
11. Descarte agordura seoresultado for superior a 25% de
compostos polares (cor 5).
12. Registe os resultados na folha de registos fornecida.
13. Guarde o testerealizado para referência futura.
INSTRUCTIONS D’UTILISATION
INSTRUÇÕES DE UTILIZAÇÃO
ISTRUZIONI D’USO
1-2 MIN.
3421
Biomedal, S.L. | Avda. Américo Vespucio, 5-4, Planta 1ª, Mód. 12 41092 Sevilla, España (Spain)
Tel. +34 954 08 12 76 Fax. +34 954 08 12 79 | [email protected] www.biomedal.com
DIAGNOSTICS
1. Open the tube containing the blue reagent.
2. The blue reagent has to be dissolved when the oil
sample is poured into the tube. To achieve it, there are
two options a) and b):
a) Pour the oil sample at room temperature up to the
lower part of the label of the tube. Put the open tube
in a microwave (use a small glass or something similar
to prevent the tube from falling) and heat from 5 to
10 seconds at maximum power. If you do not have a
microwave, heat some water and dip the tube properly
closed until the mixture is dissolved.
b) Place the tube in the anti-burn holder and pour the
warm oil sample (at least 60 ºC) up to the lower part of
the label. Wait a few seconds and close the tube tightly
with the cap and remove the anti-burn holder. If the
sample does not reach the temperature required to melt
the blue reagent, follow option a).
3. Shake the tube well (for a minute) in order to produce
a uniform mixture (the color changes when the oil is
mixed with the reagent).
4. Allow the mixture to settle for 2 minutes. Hold the
tube vertically near a source of light and compare the
obtained Acolor to the color scale.
5. At the end of the reaction, the mixture (fat and rea-
6. If the mixture reaches color 4 (17% to 23%), be ex-
tremely careful, as it is quite close to the 25% legal limit
(BOE, Order of the 26th of January, 1989).
7. Keep the tubes away from direct light or heat (the
reagent melts close to 60ºC).
INSTRUCTIONS OF USE
1. Öffnen Sie das Plastikröhrchen mit der blauen Subs-
tanz.
2. Die blaue Substanz muss mit der Ölprobe vermischt
werden. Dafür gibt es folgende Möglichkeiten a) und b):
a) Füllen Sie die Ölprobe bei Raumtemperatur bis zum
unteren Abschnitt des Plastikröhrchenetiketts ein. Ste-
llen Sie das geöffnete Plastikröhrchen in die Mikrowelle
(benutzen Sie dafür ein kleines Glas oder ähnliches, da-
mit das Röhrchen nicht umkippen kann) und erhitzen
Sie es für 5 bis 10 Sekunden bei maximaler Stärke. Sollte
keine Mikrowelle zur Verfügung stehen, können Sie das
gut verschlossene Röhrchen auch im Wasserbad erhit-
zen, bis die Ölprobe und die blaue Substanz vollständig
b) Platzieren Sie das Röhrchen in den mitgelieferten Ver-
brennschutz-Halter und füllen Sie die erwärmte Ölpro-
be (mindestens 60 °C) bis zum unteren Abschnitt des
Plastikröhrchenetiketts ein. Warten Sie einige Sekunden,
danach verschließen Sie das Röhrchen fest und nehmen
den Verbrennschutz-Halter ab. Sollte die Temperatur ni-
gen, gehen Sie nach a) vor.
3. Schütteln Sie das Röhrchen (zirka 1 Minute), um eine
homogene Mischung zu erhalten (die Farbe ändert sich,
wenn sich das Öl mit der Substanz mischt).
4. Lassen Sie die Mischung für 2 Minuten ruhen. Halten
Sie das Röhrchen horizontal (in der Nähe einer Lichtquel-
le) und vergleichen Sie die Farbe mit der Farbskala.
5. Am Ende der Reaktion verfestigt sich das Gemisch aus
Öl und Reagenz.
6. Wenn die Mischung Farbstufe 4 (17% bis 23%) errei-
cht ist, ist höchste Vorsicht geboten, da dies sehr nah am
erlaubten Grenzwert von 25% liegt (BOE, Gesetz vom
26. Januar 1989).
7. Halten Sie die Röhrchen von direktem Licht oder Wär-
ANWEISUNG DER VERWENDUNG
1. Destape el tubo que contiene el reactivo azul.
2. Debe conseguirque el reactivo azul se disuelva
cuando introduzca la muestra de aceite en el tubo.
Para ello, puede actuar de dos formas:
a) Añadalamuestrade aceite atemperatura ambi-
ente hasta la marca inferior de la etiqueta del tubo.
Introduzca el tubodestapado en un microondas
(puede usar un vaso pequeño orecipiente similar
como soporte)ymanténgalo de 5a10 segundos a
máxima potencia. [Si no dispone de microondas, cal-
iente un poco de agua eintroduzca el tubo debida-
mente tapado hasta que la mezcla se disuelva.].
b) Coloqueel tuboen el soporte anti-quemadura e
introduzcalamuestra de aceite caliente (por lo menos
a60 ºC hasta la marca inferior de la etiqueta del tubo.
Espere unos segundos ycierre el tubo completamente
con su tapón y quite el soporte anti-quemadura. Si la
muestra no hubiera alcanzado la temperatura nece-
saria para fundir el reactivo azul, actúe según la op-
ción a).
3. Agite bien el tubo tapado hasta que se produz-
ca una mezcla uniforme (el aceite cambia de color al
mezclarse con el reactivo).
4. Espere2minutos dejando la mezcla en reposo.
Mantenga el tubo vertical cerca de una fuente de luz
y compare el color obtenido con la tabla de colores.
5.
6. Si alcanza el color 4(17 a23%) tenga el máximo
cuidado porque estámuy cerca del límitelegal del
25% de compuestos polares (BOE, Orden de 26 de
Enero de 1989).
7. Mantenga los tubos alejados de la luz directa o del
calor (el reactivo funde cerca de los 60 ºC.
INSTRUCCIONES DE USO
1. Aprire la provetta che contiene il reattivo blú.
2. Il reattivo deve dissolversi al introdurre il campione
d’olio nella provetta. Si puo fare in due maniere diverse:
a. Aggiungere il campione d’olio a temperature ambien-
trodurre la provetta aperta nel micronde (si puó usare un
piccolo recipiente come appogigio) mantenerlo per 5 a
10 secondi alla massima potenza. In caso de non avere
micronde scaldare un po’ d’aqcua e introdurre la prove-
b. Mettere la provetta nel sopporto anti-ustioni e in-
al segno inferiore dell’etichetta, aspettare vari secondi
e chidere completamente la provetta com il suo tappo,
togliere il sopporto anti ustione. Se il campione non rag-
giunge la temperatura necessária per fondere il reattivo
blú, seguir ele indicazioni del punto a.
3.
miscel uniforme. (l’olio cambia di colore al mischiarsi
com il reattivo).
4. Aspettare due minuti, lasciando la miscela a riposo.
Mantenere la provetta in posizione verticale, vicino ad
una fote di luce, compararei l colore ottenuto com la
tabela colori.
5.
6. Al ottenere il colore 4 (17 a 23 %) fare la massima
attenzione perche il limite legale é del 25% per compo-
nent polari. (BOE, Ordine 26 Gennaio 1989).
7. Mantenere le provette lontani dalla luce direta o calo-
re (il reattivo fonde circa i 60ºC)
1.
2. Placez le tube dans l’appui anti-brûlure et ouvrez-le.
3. Recueillez l’échantillon.
4. Versez l’échantillon dans le tube.
5. Placer l’échantillon jusqu’à la partie inférieure de l’éti-
quette.
Attention: Utilisez toujours l’appui anti-brûlure pour
éviter de vous brûler.
6. Les échantillons recueillis à la température ambiante
peuvent être chauffés (micro-ondes, bain-marie).
7. Placez le bouchon sur le tube.
8. Agitez jusqu’à la dissolution et le mélange complet
des phases.
9. Attendez deux minutes pour que la réaction se pro-
duise.
10. Comparez les résultats avec l’échelle des couleurs
fournie.
11. Ecartez la graisse si le résultat est supérieur à 25%
de composants polaires (couleur 5).
12.
fournie.
13. Conservez le test effectué pour référence future.
L’utilisation des récipients en verre, tels que pipettes,
pour la récolte des graisses chaudes est déconseillée!
Conserver hors de la portée des enfants.
2. Coloque o tubo no suporte anti-queimadura e abra-o.
3. Recolha a amostra.
4. Verta a amostra para o tubo.
5. Coloque a amostra até à parte inferior da etiqueta.
Atenção: Use sempre o suporte anti-queimaduras para
evitar queimar-se.
6. Amostras recolhidas à temperatura ambiente podem
ser aquecidas (micro-ondas, banho maria).
7. Coloque a tampa no tubo.
8. Agite até completa dissolução e mistura das fases.
9. Espere 2 minutos para a reação ocorrer.
10. Compare os resultados com a escala de cores for-
necida.
11. Descarte a gordura se o resultado for superior a
25% de compostos polares (cor 5).
12. Registe os resultados na folha de registos fornecida.
13. Guarde o teste realizado para referência futura.
t5IFVTFPGHMBTTJOTUSVNFOUTJTOPUSFDPNNFOEFELFFQBXBZGSPNDIJMESFOt%JFVFSXFOEVOHWPO(MBTHFSÊUFOXJSE
OJDIUFNQGPIMFOWPO,JOEFSOGFSOIBMUFOt4FEFTBDPOTFKBMBVUJMJ[BDJØOEFVUFOTJMJPTEFWJESJPNBOUFOFSGVFSBEFM
BMDBODFEFMPTOJ×PTt4JTDPOTJHMJBMVTPEJTUSVNFOUJEJWFUSPUFOFSFMPOUBOPEBMMBQPSUBUBEFJCBNCJOJtLVUJMJTBUJPO
EJOTUSVNFOUTEFWFSSFOFTUQBTSFDPNNBOEÏFHBSEFSMPJOEFTFOGBOUTt/ÍPÏSFDPNFOEBEPPVTPEFJOTUSVNFOUPT
EFWJESPNBOUFOIBMPOHFEPBMDBODFEBTDSJBOÎBT
INSTRUCTIONS D’UTILISATION
INSTRUÇÕES DE UTILIZAÇÃO
ISTRUZIONI D’USO
1-2 MIN.
3421
1. Open the tube containing the blue reagent.
2. The blue reagenthasto be dissolved when the oil sam-
ple is poured into the tube. To achieve it, there are two
options a) and b):
a) Pour theoil sampleat room temperature up to the lower
part of the label of the tube. Put the open tube in a mi-
crowave(useasmall glass or something similar to prevent
the tube from falling) and heat from 5to 10 seconds at
maximum power. If youdo not haveamicrowave, heat
some waterand dip the tube properly closed until the mi-
xture is dissolved.
b) Place the tubein the anti-burn holder and pour the
warm oil sample(at least 60 ºC) up to the lower part of the
label. Wait afew secondsand close the tube tightly with
the cap and remove the anti-burn holder. If the sample
does not reach the temperature required to melt the blue
reagent, follow option a).
3. Shakethetube well (for a minute) in order to produce a
uniform mixture (the color changeswhen the oil is mixed
with the reagent).
4. Allowthe mixture to settle for 2 minutes. Hold the tube
vertically nearasource of light and compare the obtained
Acolor to the color scale.
5. At the end of the reaction, the mixture (fat and reagent)
6. If the mixture reachescolor4(17% to 23%), be extre-
mely careful, as it is quite close to the 25% legallimit (BOE,
Order of the 26th of January, 1989).
7. Keep the tubesaway from direct light or heat (the rea-
gent melts close to 60ºC).
1. Öffnen Sie dasPlastikröhrchen mit der blauen Substanz.
2. Die blaue Substanz muss mit der Ölprobe vermischt wer-
den. Dafür gibt es folgende Möglichkeiten a) und b):
a) FüllenSiedie Ölprobe bei Raumtemperatur bis zum un-
teren Abschnitt des Plastikröhrchenetiketts ein. Stellen Sie
das geöffnetePlastikröhrchen in dieMikrowelle(benutzen
Sie dafür einkleinesGlas oder ähnliches, damit dasRöhr-
chen nicht umkippen kann) und erhitzen Sie es für 5 bis
10 Sekunden bei maximaler Stärke. Sollte keine Mikrowelle
zur Verfügung stehen, können Sie dasgut verschlossene
Röhrchen auchim Wasserbad erhitzen, bis die Ölprobe und
b) Platzieren SiedasRöhrchen in den mitgelieferten Ver-
brennschutz-Halter und füllen Sie die erwärmte Ölprobe
(mindestens 60 °C) bis zumunteren Abschnitt des Plas-
tikröhrchenetiketts ein. Warten Sie einige Sekunden, da-
nach verschließen Sie das Röhrchen fest und nehmen den
Verbrennschutz-Halter ab. Sollte die Temperatur nichtaus-
Sie nacha) vor.
3. Schütteln Sie das Röhrchen (zirka 1Minute), um eine
homogeneMischung zu erhalten (die Farbe ändert sich,
wenn sich dasÖl mit der Substanz mischt).
4.Lassen Siedie Mischung für 2Minuten ruhen. Halten Sie
das Röhrchen horizontal (in der Nähe einer Lichtquelle) und
vergleichen Sie die Farbe mit der Farbskala.
5. Am Ende der Reaktion verfestigt sich das Gemisch aus
Öl und Reagenz.
6.Wenn die Mischung Farbstufe 4(17% bis 23%) errei-
chtist, isthöchste Vorsichtgeboten, da dies sehr nah am
erlaubten Grenzwert von 25% liegt (BOE, Gesetz vom 26.
Januar 1989).
7. Halten Sie die Röhrchen von direktem Licht oder Wärme
1. Destape el tubo que contiene el reactivo azul.
2. Debe conseguir que el reactivoazul se disuelvacuan-
do introduzca la muestra de aceite en el tubo. Para ello,
puede actuar de dos formas:
a) Añadala muestra de aceite a temperatura ambiente
hasta la marca inferior de la etiqueta del tubo. Introduzca
el tubo destapado en un microondas (puede usar un vaso
pequeño orecipiente similarcomo soporte) ymanténgalo
de 5 a 10 segundos amáximapotencia. [Sino dispone
de microondas, caliente un poco de agua eintroduzca el
tubo debidamente tapado hasta que la mezclasedisuel-
va.].
b) Coloqueel tubo en el soporte anti-quemadura eintro-
duzca la muestra de aceite caliente (por lo menosa60 ºC
hasta la marca inferior de la etiqueta del tubo. Espere unos
segundos ycierre el tubo completamente con su tapón y
quiteelsoporte anti-quemadura. Si la muestra no hubiera
alcanzadola temperatura necesariapara fundir el reactivo
azul, actúe según la opción a).
3. Agite bien el tubo tapadohasta quese produzcauna
mezcla uniforme (el aceite cambiade color al mezclarse
con el reactivo).
4. Espere 2 minutos dejando la mezcla en reposo. Man-
tenga el tubo vertical cerca de unafuente de luz y com-
pare el color obtenido con la tabla de colores.
5.
6. Si alcanza el color4(17 a23%) tenga el máximo cui-
dado porque estámuy cerca del límite legal del25% de
compuestos polares (BOE, Orden de 26 de Enerode1989).
7. Mantenga los tubos alejados de la luz directaodelcalor
(el reactivo funde cerca de los 60 ºC.
t5IFVTFPGHMBTTJOTUSVNFOUTJTOPUSFDPNNFOEFELFFQBXBZGSPNDIJMESFOt%JFVFSXFOEVOHWPO(MBTHFSÊUFOXJSE
OJDIUFNQGPIMFOWPO,JOEFSOGFSOIBMUFOt4FEFTBDPOTFKBMBVUJMJ[BDJØOEFVUFOTJMJPTEFWJESJPNBOUFOFSGVFSBEFM
BMDBODFEFMPTOJ×PTt4JTDPOTJHMJBMVTPEJTUSVNFOUJEJWFUSPUFOFSFMPOUBOPEBMMBQPSUBUBEFJCBNCJOJtLVUJMJTBUJPO
EJOTUSVNFOUTEFWFSSFOFTUQBTSFDPNNBOEÏFHBSEFSMPJOEFTFOGBOUTt/ÍPÏSFDPNFOEBEPPVTPEFJOTUSVNFOUPT
EFWJESPNBOUFOIBMPOHFEPBMDBODFEBTDSJBOÎBT
INSTRUCTIONS OF USE
ANWEISUNG DER VERWENDUNG
INSTRUCCIONES DE USO
1. Aprire la provetta che contiene il reattivo blú.
2. Il reattivo devedissolversi al introdurre il campione d’olio
nella provetta. Si puo fare in due maniere diverse:
a.Aggiungere il campione d’olio atemperature ambiente
la provetta apertanel micronde(si puó usare un piccolo reci-
pientecome appogigio) mantenerlo per5a10 secondialla
massima potenza. In caso de non avere micronde scaldare
miscela si dissolva.
b. Mettere la provetta nel sopporto anti-ustionieintrodurre il
dell’etichetta,aspettare vari secondi e chidere completamen-
te la provettacom il suo tappo,togliere il sopporto anti ustio-
ne. Se il campionenon raggiunge la temperatura necessária
per fondere il reattivo blú, seguir ele indicazioni del punto a.
3.
miscel uniforme. (l’olio cambiadicolore al mischiarsi com
il reattivo).
4. Aspettare due minuti, lasciando la miscelaariposo. Man-
tenere la provetta in posizione verticale,vicinoaduna fote
di luce, compararei l colore ottenuto com la tabela colori.
5.
6. Al ottenere il colore4(17a23 %) fare la massima atten-
zione perche il limitelegaleédel25%percomponent polari.
(BOE, Ordine 26 Gennaio 1989).
7. Mantenere le provette lontani dalla luce diretaocalore (il
reattivo fonde circa i 60ºC)
1.
2. Placez le tube dans l’appui anti-brûlure et ouvrez-le.
3. Recueillez l’échantillon.
4. Versez l’échantillon dans le tube.
5. Placerl’échantillon jusqu’à la partie inférieure de l’éti-
quette.
Attention: Utilisez toujours l’appui anti-brûlure pour éviter
de vous brûler.
6. Les échantillons recueillis àla température ambiante peu-
vent être chauffés (micro-ondes, bain-marie).
7. Placez le bouchon sur le tube.
8. Agitez jusqu’à la dissolution et le mélange complet des
phases.
9. Attendez deux minutes pour que la réaction se produise.
10. Comparez les résultats avec l’échelle descouleurs
fournie.
11. Ecartez la graisse si le résultat estsupérieurà25% de
composants polaires (couleur 5).
12.
fournie.
13. Conservez letest effectué pour référence future.
L’utilisationdes récipients en verre, tels que pipettes, pour
la récolte des graisses chaudes est déconseillée! Conserver
hors de la portée des enfants.
2. Coloque o tubo no suporte anti-queimadura e abra-o.
3. Recolha a amostra.
4. Verta a amostra para o tubo.
5. Coloque a amostra até à parte inferior da etiqueta.
Atenção:Use sempre o suporte anti-queimaduraspara
evitar queimar-se.
6. Amostras recolhidas àtemperatura ambiente podem ser
aquecidas (micro-ondas, banho maria).
7. Coloque a tampa no tubo.
8. Agite até completa dissolução e mistura das fases.
9. Espere 2 minutos para areação ocorrer.
10. Compare os resultados com aescala de cores fornecida.
11. Descarte agordura seoresultado for superior a 25% de
compostos polares (cor 5).
12. Registe os resultados na folha de registos fornecida.
13. Guarde o testerealizado para referência futura.
INSTRUCTIONS D’UTILISATION
INSTRUÇÕES DE UTILIZAÇÃO
ISTRUZIONI D’USO
1-2 MIN.
3421
Biomedal, S.L. | Avda. Américo Vespucio, 5-4, Planta 1ª, Mód. 12 41092 Sevilla, España (Spain)
Tel. +34 954 08 12 76 Fax. +34 954 08 12 79 | [email protected] www.biomedal.com
DIAGNOSTICS
1. Open the tube containing the blue reagent.
2. The blue reagent has to be dissolved when the oil
sample is poured into the tube. To achieve it, there are
two options a) and b):
a) Pour the oil sample at room temperature up to the
lower part of the label of the tube. Put the open tube
in a microwave (use a small glass or something similar
to prevent the tube from falling) and heat from 5 to
10 seconds at maximum power. If you do not have a
microwave, heat some water and dip the tube properly
closed until the mixture is dissolved.
b) Place the tube in the anti-burn holder and pour the
warm oil sample (at least 60 ºC) up to the lower part of
the label. Wait a few seconds and close the tube tightly
with the cap and remove the anti-burn holder. If the
sample does not reach the temperature required to melt
the blue reagent, follow option a).
3. Shake the tube well (for a minute) in order to produce
a uniform mixture (the color changes when the oil is
mixed with the reagent).
4. Allow the mixture to settle for 2 minutes. Hold the
tube vertically near a source of light and compare the
obtained Acolor to the color scale.
5. At the end of the reaction, the mixture (fat and rea-
6. If the mixture reaches color 4 (17% to 23%), be ex-
tremely careful, as it is quite close to the 25% legal limit
(BOE, Order of the 26th of January, 1989).
7. Keep the tubes away from direct light or heat (the
reagent melts close to 60ºC).
INSTRUCTIONS OF USE
1. Öffnen Sie das Plastikröhrchen mit der blauen Subs-
tanz.
2. Die blaue Substanz muss mit der Ölprobe vermischt
werden. Dafür gibt es folgende Möglichkeiten a) und b):
a) Füllen Sie die Ölprobe bei Raumtemperatur bis zum
unteren Abschnitt des Plastikröhrchenetiketts ein. Ste-
llen Sie das geöffnete Plastikröhrchen in die Mikrowelle
(benutzen Sie dafür ein kleines Glas oder ähnliches, da-
mit das Röhrchen nicht umkippen kann) und erhitzen
Sie es für 5 bis 10 Sekunden bei maximaler Stärke. Sollte
keine Mikrowelle zur Verfügung stehen, können Sie das
gut verschlossene Röhrchen auch im Wasserbad erhit-
zen, bis die Ölprobe und die blaue Substanz vollständig
b) Platzieren Sie das Röhrchen in den mitgelieferten Ver-
brennschutz-Halter und füllen Sie die erwärmte Ölpro-
be (mindestens 60 °C) bis zum unteren Abschnitt des
Plastikröhrchenetiketts ein. Warten Sie einige Sekunden,
danach verschließen Sie das Röhrchen fest und nehmen
den Verbrennschutz-Halter ab. Sollte die Temperatur ni-
gen, gehen Sie nach a) vor.
3. Schütteln Sie das Röhrchen (zirka 1 Minute), um eine
homogene Mischung zu erhalten (die Farbe ändert sich,
wenn sich das Öl mit der Substanz mischt).
4. Lassen Sie die Mischung für 2 Minuten ruhen. Halten
Sie das Röhrchen horizontal (in der Nähe einer Lichtquel-
le) und vergleichen Sie die Farbe mit der Farbskala.
5. Am Ende der Reaktion verfestigt sich das Gemisch aus
Öl und Reagenz.
6. Wenn die Mischung Farbstufe 4 (17% bis 23%) errei-
cht ist, ist höchste Vorsicht geboten, da dies sehr nah am
erlaubten Grenzwert von 25% liegt (BOE, Gesetz vom
26. Januar 1989).
7. Halten Sie die Röhrchen von direktem Licht oder Wär-
ANWEISUNG DER VERWENDUNG
1. Destape el tubo que contiene el reactivo azul.
2. Debe conseguirque el reactivo azul se disuelva
cuando introduzca la muestra de aceite en el tubo.
Para ello, puede actuar de dos formas:
a) Añadalamuestrade aceite atemperatura ambi-
ente hasta la marca inferior de la etiqueta del tubo.
Introduzca el tubodestapado en un microondas
(puede usar un vaso pequeño orecipiente similar
como soporte)ymanténgalo de 5a10 segundos a
máxima potencia. [Si no dispone de microondas, cal-
iente un poco de agua eintroduzca el tubo debida-
mente tapado hasta que la mezcla se disuelva.].
b) Coloqueel tuboen el soporte anti-quemadura e
introduzcalamuestra de aceite caliente (por lo menos
a60 ºC hasta la marca inferior de la etiqueta del tubo.
Espere unos segundos ycierre el tubo completamente
con su tapón y quite el soporte anti-quemadura. Si la
muestra no hubiera alcanzado la temperatura nece-
saria para fundir el reactivo azul, actúe según la op-
ción a).
3. Agite bien el tubo tapado hasta que se produz-
ca una mezcla uniforme (el aceite cambia de color al
mezclarse con el reactivo).
4. Espere2minutos dejando la mezcla en reposo.
Mantenga el tubo vertical cerca de una fuente de luz
y compare el color obtenido con la tabla de colores.
5.
6. Si alcanza el color 4(17 a23%) tenga el máximo
cuidado porque estámuy cerca del límitelegal del
25% de compuestos polares (BOE, Orden de 26 de
Enero de 1989).
7. Mantenga los tubos alejados de la luz directa o del
calor (el reactivo funde cerca de los 60 ºC.
INSTRUCCIONES DE USO
1. Aprire la provetta che contiene il reattivo blú.
2. Il reattivo deve dissolversi al introdurre il campione
d’olio nella provetta. Si puo fare in due maniere diverse:
a. Aggiungere il campione d’olio a temperature ambien-
trodurre la provetta aperta nel micronde (si puó usare un
piccolo recipiente come appogigio) mantenerlo per 5 a
10 secondi alla massima potenza. In caso de non avere
micronde scaldare un po’ d’aqcua e introdurre la prove-
b. Mettere la provetta nel sopporto anti-ustioni e in-
al segno inferiore dell’etichetta, aspettare vari secondi
e chidere completamente la provetta com il suo tappo,
togliere il sopporto anti ustione. Se il campione non rag-
giunge la temperatura necessária per fondere il reattivo
blú, seguir ele indicazioni del punto a.
3.
miscel uniforme. (l’olio cambia di colore al mischiarsi
com il reattivo).
4. Aspettare due minuti, lasciando la miscela a riposo.
Mantenere la provetta in posizione verticale, vicino ad
una fote di luce, compararei l colore ottenuto com la
tabela colori.
5.
6. Al ottenere il colore 4 (17 a 23 %) fare la massima
attenzione perche il limite legale é del 25% per compo-
nent polari. (BOE, Ordine 26 Gennaio 1989).
7. Mantenere le provette lontani dalla luce direta o calo-
re (il reattivo fonde circa i 60ºC)
1.
2. Placez le tube dans l’appui anti-brûlure et ouvrez-le.
3. Recueillez l’échantillon.
4. Versez l’échantillon dans le tube.
5. Placer l’échantillon jusqu’à la partie inférieure de l’éti-
quette.
Attention: Utilisez toujours l’appui anti-brûlure pour
éviter de vous brûler.
6. Les échantillons recueillis à la température ambiante
peuvent être chauffés (micro-ondes, bain-marie).
7. Placez le bouchon sur le tube.
8. Agitez jusqu’à la dissolution et le mélange complet
des phases.
9. Attendez deux minutes pour que la réaction se pro-
duise.
10. Comparez les résultats avec l’échelle des couleurs
fournie.
11. Ecartez la graisse si le résultat est supérieur à 25%
de composants polaires (couleur 5).
12.
fournie.
13. Conservez le test effectué pour référence future.
L’utilisation des récipients en verre, tels que pipettes,
pour la récolte des graisses chaudes est déconseillée!
Conserver hors de la portée des enfants.
2. Coloque o tubo no suporte anti-queimadura e abra-o.
3. Recolha a amostra.
4. Verta a amostra para o tubo.
5. Coloque a amostra até à parte inferior da etiqueta.
Atenção: Use sempre o suporte anti-queimaduras para
evitar queimar-se.
6. Amostras recolhidas à temperatura ambiente podem
ser aquecidas (micro-ondas, banho maria).
7. Coloque a tampa no tubo.
8. Agite até completa dissolução e mistura das fases.
9. Espere 2 minutos para a reação ocorrer.
10. Compare os resultados com a escala de cores for-
necida.
11. Descarte a gordura se o resultado for superior a
25% de compostos polares (cor 5).
12. Registe os resultados na folha de registos fornecida.
13. Guarde o teste realizado para referência futura.
t5IFVTFPGHMBTTJOTUSVNFOUTJTOPUSFDPNNFOEFELFFQBXBZGSPNDIJMESFOt%JFVFSXFOEVOHWPO(MBTHFSÊUFOXJSE
OJDIUFNQGPIMFOWPO,JOEFSOGFSOIBMUFOt4FEFTBDPOTFKBMBVUJMJ[BDJØOEFVUFOTJMJPTEFWJESJPNBOUFOFSGVFSBEFM
BMDBODFEFMPTOJ×PTt4JTDPOTJHMJBMVTPEJTUSVNFOUJEJWFUSPUFOFSFMPOUBOPEBMMBQPSUBUBEFJCBNCJOJtLVUJMJTBUJPO
EJOTUSVNFOUTEFWFSSFOFTUQBTSFDPNNBOEÏFHBSEFSMPJOEFTFOGBOUTt/ÍPÏSFDPNFOEBEPPVTPEFJOTUSVNFOUPT
EFWJESPNBOUFOIBMPOHFEPBMDBODFEBTDSJBOÎBT
INSTRUCTIONS D’UTILISATION
INSTRUÇÕES DE UTILIZAÇÃO
ISTRUZIONI D’USO
1-2 MIN.
3421
During deep fat frying, the fats and oils are exposed
to atmospheric oxygen and to moisture at high tem-
peratures (over 160 ºC) for long periods of time. As a
consequence, a series of chemical reactions take place.
These reactions produce various harmful compounds
and alter, at the same time, the fat/oil organoleptic char-
acteristics (odor, color, taste) and the health effects of
the oil/fat. Among these substances, polar compounds
may be found; their control allows the assessment of oil
oxidation grades.
The importance of controlling polar compounds is also
regulated by the Order of the 26th of January 1989 pub-
stuffs which have been prepared or been in contact with
oils with a polar content equal to or exceeding 25%.
Oleotestis a colorimetric assay that allowsto determine
the total polar compoundsin frying fats in less than 2
minutes. It is afeasibleand safe way to control the quality
Oleotest is suitable for the most frequently used oils
Other types of oils may require a different color scale.
Oleotest remains stable after being used:keep the
tubes so that you can use them in your auto-control
system.
WHY OLEOTEST?
POR QUÉ OLEOTEST?
OBSERVACIONES
OBSERVATIONS
WHY CONTROL FRYING OILS?
Durante el proceso de fritura, las grasas
olos aceites se exponen al oxígeno atmos-
férico, a la humedad yaaltas temperaturas
(porencima de 160 ºC por periodos largos; como
consecuencia, tienen lugar una serie de reacciones
químicas que producen diversos compuestos nocivos y
que alteran, a su vez, las características organolépticas
(olor, color, sabor) e, incluso, la salubridad de la grasa/
aceite. Entre estas sustancias se encuentran los com-
puestos polares y su control permite valorar el grado
de oxidación delaceite. La importancia de controlar los
compuestos polares lo dicta, también, la Orden del 26 de
Enero de 1989 del BOE,que prohíbe la comercialización
de alimentos que hayan sido preparados ohayan estado
en contacto con aceites quetengan un 25%de estos
compuestos polares o más.
POR QUÉ CONTROLAR LOS ACEITES DE FREÍR?
Oleotest es un método fiable y rápido que mide la
concentración de compuestos polares totales en los
aceites de fritura.De esta forma, Oleotest permite
realizar, en pocos minutos ydeforma muy sencilla,
una evaluación fiable de la calidad de los aceites de
freír, sinnecesidadde equipos o instrumentos sofisti-
cados. Oleotest es seguro y no utiliza disolventes
inflamables.
Oleotest es idóneo para los aceites más utilizados en
fritura (aceite de girasol, aceite de soja, aceite de maíz y
aceite de cacahuete). Otros tipos de aceite podrían req-
uerir una escala de colores diferente. Oleotest se man-
tiene estable después de su utilización: conserve los tu-
bos como parte integrante de su sistema de autocontrol.
vimeo.com/oleotest
facebook.com/oleotest
oleotest.com
https://es-es.facebook.com/OleotestES
Nºcontenido de la freidora
content of the fryer
t'FDIB
t%BUF
t'JSNBEFM
responsable
t4JHOBUVre of the
person in charge
tTemperatura del Aceite (ºC)
t0JMTemperature (ºC)
1
2
3
4
5
6
7
8
9
10
11
12
13
14
15
16
17
18
19
20
21
22
23
24
25
26
27
28
28
30
31
32
33
34
35
36
37
38
39
40
41
42
43
44
45
46
47
48
49
50
3FTVMUBEPTt3FTVMUT
12345
tValidado por
tValidated by
t'FDIB
t%BUF
CONTROL DEL ACEITE DE FREÍR
RAPID TEST TO CONTROL FRYING OILS
During deep fat frying, the fats
andoils are exposed to atmospheric
oxygenand to moisture at high tem-
peratures (over 160 ºC) for long periods of
time. As aconsequence, aseries of chemical
reactions take place. These reactions produce vari-
ous harmful compoundsand alter, at the same time, the
fat/oil organoleptic characteristics (odor, color, taste) and
the health effects of the oil/fat. Among these substances,
polar compounds may be found;their control allows the
assessment of oil oxidation grades.
The importance of controlling polar compounds is also
regulated by several national regulations andGlobal
health recommendations which prohibit the sale of
foodstuffs whichhavebeen prepared or beenin contact
with oils with apolar content equal to or exceeding 25%.
Oleotestis a colorimetric assay that allowsto determine
the total polar compoundsin frying fats in less than 2
minutes. It is afeasibleand safe way to control the quality
Oleotest is suitable for the most frequently used oils
Other types of oils may require a different color scale.
Oleotest remains stable after being used:keep the
tubes so that you can use them in your auto-control
system.
WHY OLEOTEST?
POR QUÉ OLEOTEST?
OBSERVACIONES
OBSERVATIONS
WHY CONTROL FRYING OILS?
Durante el proceso de fritura, las grasas o los aceites
se exponen al oxígeno atmosférico, a la humedad y a
altas temperaturas (por encima de 160 ºC por periodos
largos; como consecuencia, tienen lugar una serie de
reacciones químicas que producen diversos compuestos
nocivos y que alteran, a su vez, las características or-
ganolépticas (olor, color, sabor) e, incluso, la salubridad
de la grasa/aceite. Entre estas sustancias se encuentran
los compuestos polares y su control permite valorar el
grado de oxidación del aceite. La importancia de contro-
lar los compuestos polares lo dicta, también, recomen-
daciones globales, que prohíbe la comercialización de
alimentos que hayan sido preparados o hayan estado
en contacto con aceites que tengan un 25% de estos
compuestos polares o más.
POR QUÉ CONTROLAR LOS ACEITES DE FREÍR?
Oleotest es un método fiable y rápido que mide la
concentración de compuestos polares totales en los
aceites de fritura. De estaforma,Oleotest permite
realizar, en pocos minutosydeforma muy sencilla,
una evaluación fiable de la calidad de los aceites de
freír, sinnecesidadde equipos o instrumentos sofisti-
cados. Oleotest es seguro y no utiliza disolventes
inflamables.
Oleotest es idóneo para los aceites más utilizados en
fritura (aceite de girasol, aceite de soja, aceite de maíz y
aceite de cacahuete). Otros tipos de aceite podrían req-
uerir una escala de colores diferente. Oleotest se man-
tiene estable después de su utilización: conserve los tu-
bos como parte integrante de su sistema de autocontrol.
vimeo.com/oleotest
facebook.com/oleotest
oleotest.com
Nºcontent of the fryer
contenido de la freidora
t%BUF
t'FDIB
t4JHOBUVre of the
person in charge
t'JSNBEFM
responsable
t0JMTemperature (ºC)
tTemperatura del Aceite (ºC)
1
2
3
4
5
6
7
8
9
10
11
12
13
14
15
16
17
18
19
20
21
22
23
24
25
26
27
28
28
30
31
32
33
34
35
36
37
38
39
40
41
42
43
44
45
46
47
48
49
50
t3FTVMUTt3FTVMUBEPT
12345
tValidated by
tValidado por
t%BUF
t'FDIB
RAPID TEST TO CONTROL FRYING OILS
CONTROL DEL ACEITE DE FREÍR
Hygiena Diagnostica España, Calle Cañada Real 31-33-35, Polígono Industrial "Parque Plata", 41900 Camas,
Sevilla, Spain. Tel +34 954 08 12 76 Fax: +34 954 08 12 79 [email protected] www.hygiena.com
926050 G22M 3/4

1. Open the tube containing the blue reagent.
2. The blue reagent has to be dissolved when the oil sam-
ple is poured into the tube. To achieve it, there are two
options a) and b):
a) Pour the oil sample at room temperature up to the lower
part of the label of the tube. Put the open tube in a mi-
crowave (use a small glass or something similar to prevent
the tube from falling) and heat from 5 to 10 seconds at
maximum power. If you do not have a microwave, heat
some water and dip the tube properly closed until the mi-
xture is dissolved.
b) Place the tube in the anti-burn holder and pour the
warm oil sample (at least 60 ºC) up to the lower part of the
label. Wait a few seconds and close the tube tightly with
the cap and remove the anti-burn holder. If the sample
does not reach the temperature required to melt the blue
reagent, follow option a).
3. Shake the tube well (for a minute) in order to produce a
uniform mixture (the color changes when the oil is mixed
with the reagent).
4. Allow the mixture to settle for 2 minutes. Hold the tube
vertically near a source of light and compare the obtained
Acolor to the color scale.
5. At the end of the reaction, the mixture (fat and reagent)
6. If the mixture reaches color 4 (17% to 23%), be extre-
mely careful, as it is quite close to the 25% legal limit (BOE,
Order of the 26th of January, 1989).
7. Keep the tubes away from direct light or heat (the rea-
gent melts close to 60ºC).
1. Öffnen Sie das Plastikröhrchen mit der blauen Substanz.
2. Die blaue Substanz muss mit der Ölprobe vermischt wer-
den. Dafür gibt es folgende Möglichkeiten a) und b):
a) Füllen Sie die Ölprobe bei Raumtemperatur bis zum un-
teren Abschnitt des Plastikröhrchenetiketts ein. Stellen Sie
das geöffnete Plastikröhrchen in die Mikrowelle (benutzen
Sie dafür ein kleines Glas oder ähnliches, damit das Röhr-
chen nicht umkippen kann) und erhitzen Sie es für 5 bis
10 Sekunden bei maximaler Stärke. Sollte keine Mikrowelle
zur Verfügung stehen, können Sie das gut verschlossene
Röhrchen auch im Wasserbad erhitzen, bis die Ölprobe und
b) Platzieren Sie das Röhrchen in den mitgelieferten Ver-
brennschutz-Halter und füllen Sie die erwärmte Ölprobe
(mindestens 60 °C) bis zum unteren Abschnitt des Plas-
tikröhrchenetiketts ein. Warten Sie einige Sekunden, da-
nach verschließen Sie das Röhrchen fest und nehmen den
Verbrennschutz-Halter ab. Sollte die Temperatur nicht aus-
Sie nach a) vor.
3. Schütteln Sie das Röhrchen (zirka 1 Minute), um eine
homogene Mischung zu erhalten (die Farbe ändert sich,
wenn sich das Öl mit der Substanz mischt).
4. Lassen Sie die Mischung für 2 Minuten ruhen. Halten Sie
das Röhrchen horizontal (in der Nähe einer Lichtquelle) und
vergleichen Sie die Farbe mit der Farbskala.
5. Am Ende der Reaktion verfestigt sich das Gemisch aus
Öl und Reagenz.
6. Wenn die Mischung Farbstufe 4 (17% bis 23%) errei-
cht ist, ist höchste Vorsicht geboten, da dies sehr nah am
erlaubten Grenzwert von 25% liegt (BOE, Gesetz vom 26.
Januar 1989).
7. Halten Sie die Röhrchen von direktem Licht oder Wärme
1. Destape el tubo que contiene el reactivo azul.
2. Debe conseguir que el reactivo azul se disuelva cuan-
do introduzca la muestra de aceite en el tubo. Para ello,
puede actuar de dos formas:
a) Añada la muestra de aceite a temperatura ambiente
hasta la marca inferior de la etiqueta del tubo. Introduzca
el tubo destapado en un microondas (puede usar un vaso
pequeño o recipiente similar como soporte) y manténgalo
de 5 a 10 segundos a máxima potencia. [Si no dispone
de microondas, caliente un poco de agua e introduzca el
tubo debidamente tapado hasta que la mezcla se disuel-
va.].
b) Coloque el tubo en el soporte anti-quemadura e intro-
duzca la muestra de aceite caliente (por lo menos a 60 ºC
hasta la marca inferior de la etiqueta del tubo. Espere unos
segundos y cierre el tubo completamente con su tapón y
quite el soporte anti-quemadura. Si la muestra no hubiera
alcanzado la temperatura necesaria para fundir el reactivo
azul, actúe según la opción a).
3. Agite bien el tubo tapado hasta que se produzca una
mezcla uniforme (el aceite cambia de color al mezclarse
con el reactivo).
4. Espere 2 minutos dejando la mezcla en reposo. Man-
tenga el tubo vertical cerca de una fuente de luz y com-
pare el color obtenido con la tabla de colores.
5.
6. Si alcanza el color 4 (17 a 23%) tenga el máximo cui-
dado porque está muy cerca del límite legal del 25% de
compuestos polares (BOE, Orden de 26 de Enero de 1989).
7. Mantenga los tubos alejados de la luz directa o del calor
(el reactivo funde cerca de los 60 ºC.
t5IFVTFPGHMBTTJOTUSVNFOUTJTOPUSFDPNNFOEFELFFQBXBZGSPNDIJMESFOt%JFVFSXFOEVOHWPO(MBTHFSÊUFOXJSE
OJDIUFNQGPIMFOWPO,JOEFSOGFSOIBMUFOt4FEFTBDPOTFKBMBVUJMJ[BDJØOEFVUFOTJMJPTEFWJESJPNBOUFOFSGVFSBEFM
BMDBODFEFMPTOJ×PTt4JTDPOTJHMJBMVTPEJTUSVNFOUJEJWFUSPUFOFSFMPOUBOPEBMMBQPSUBUBEFJCBNCJOJtLVUJMJTBUJPO
EJOTUSVNFOUTEFWFSSFOFTUQBTSFDPNNBOEÏFHBSEFSMPJOEFTFOGBOUTt/ÍPÏSFDPNFOEBEPPVTPEFJOTUSVNFOUPT
EFWJESPNBOUFOIBMPOHFEPBMDBODFEBTDSJBOÎBT
INSTRUCTIONS OF USE
ANWEISUNG DER VERWENDUNG
INSTRUCCIONES DE USO
1. Aprire la provetta che contiene il reattivo blú.
2. Il reattivo deve dissolversi al introdurre il campione d’olio
nella provetta. Si puo fare in due maniere diverse:
a. Aggiungere il campione d’olio a temperature ambiente
la provetta aperta nel micronde (si puó usare un piccolo reci-
piente come appogigio) mantenerlo per 5 a 10 secondi alla
massima potenza. In caso de non avere micronde scaldare
miscela si dissolva.
b. Mettere la provetta nel sopporto anti-ustioni e introdurre il
dell’etichetta, aspettare vari secondi e chidere completamen-
te la provetta com il suo tappo, togliere il sopporto anti ustio-
ne. Se il campione non raggiunge la temperatura necessária
per fondere il reattivo blú, seguir ele indicazioni del punto a.
3.
miscel uniforme. (l’olio cambia di colore al mischiarsi com
il reattivo).
4. Aspettare due minuti, lasciando la miscela a riposo. Man-
tenere la provetta in posizione verticale, vicino ad una fote
di luce, compararei l colore ottenuto com la tabela colori.
5.
6. Al ottenere il colore 4 (17 a 23 %) fare la massima atten-
zione perche il limite legale é del 25% per component polari.
(BOE, Ordine 26 Gennaio 1989).
7. Mantenere le provette lontani dalla luce direta o calore (il
reattivo fonde circa i 60ºC)
1.
2. Placez le tube dans l’appui anti-brûlure et ouvrez-le.
3. Recueillez l’échantillon.
4. Versez l’échantillon dans le tube.
5. Placer l’échantillon jusqu’à la partie inférieure de l’éti-
quette.
Attention: Utilisez toujours l’appui anti-brûlure pour éviter
de vous brûler.
6. Les échantillons recueillis à la température ambiante peu-
vent être chauffés (micro-ondes, bain-marie).
7. Placez le bouchon sur le tube.
8. Agitez jusqu’à la dissolution et le mélange complet des
phases.
9. Attendez deux minutes pour que la réaction se produise.
10. Comparez les résultats avec l’échelle des couleurs
fournie.
11. Ecartez la graisse si le résultat est supérieur à 25% de
composants polaires (couleur 5).
12.
fournie.
13. Conservez le test effectué pour référence future.
L’utilisation des récipients en verre, tels que pipettes, pour
la récolte des graisses chaudes est déconseillée! Conserver
hors de la portée des enfants.
2. Coloque o tubo no suporte anti-queimadura e abra-o.
3. Recolha a amostra.
4. Verta a amostra para o tubo.
5. Coloque a amostra até à parte inferior da etiqueta.
Atenção: Use sempre o suporte anti-queimaduras para
evitar queimar-se.
6. Amostras recolhidas à temperatura ambiente podem ser
aquecidas (micro-ondas, banho maria).
7. Coloque a tampa no tubo.
8. Agite até completa dissolução e mistura das fases.
9. Espere 2 minutos para a reação ocorrer.
10. Compare os resultados com a escala de cores fornecida.
11. Descarte a gordura se o resultado for superior a 25% de
compostos polares (cor 5).
12. Registe os resultados na folha de registos fornecida.
13. Guarde o teste realizado para referência futura.
INSTRUCTIONS D’UTILISATION
INSTRUÇÕES DE UTILIZAÇÃO
ISTRUZIONI D’USO
1-2 MIN.
3421
Biomedal, S.L. | Avda. Américo Vespucio, 5-4, Planta 1ª, Mód. 12 41092 Sevilla, España (Spain)
Tel. +34 954 08 12 76 Fax. +34 954 08 12 79 | [email protected] www.biomedal.com
DIAGNOSTICS
1. Open the tube containing the blue reagent.
2. The blue reagent has to be dissolved when the oil
sample is poured into the tube. To achieve it, there are
two options a) and b):
a) Pour the oil sample at room temperature up to the
lower part of the label of the tube. Put the open tube
in a microwave (use a small glass or something similar
to prevent the tube from falling) and heat from 5 to
10 seconds at maximum power. If you do not have a
microwave, heat some water and dip the tube properly
closed until the mixture is dissolved.
b) Place the tube in the anti-burn holder and pour the
warm oil sample (at least 60 ºC) up to the lower part of
the label. Wait a few seconds and close the tube tightly
with the cap and remove the anti-burn holder. If the
sample does not reach the temperature required to melt
the blue reagent, follow option a).
3. Shake the tube well (for a minute) in order to produce
a uniform mixture (the color changes when the oil is
mixed with the reagent).
4. Allow the mixture to settle for 2 minutes. Hold the
tube vertically near a source of light and compare the
obtained Acolor to the color scale.
5. At the end of the reaction, the mixture (fat and rea-
6. If the mixture reaches color 4 (17% to 23%), be ex-
tremely careful, as it is quite close to the 25% legal limit
(BOE, Order of the 26th of January, 1989).
7. Keep the tubes away from direct light or heat (the
reagent melts close to 60ºC).
INSTRUCTIONS OF USE
1. Öffnen Sie das Plastikröhrchen mit der blauen Subs-
tanz.
2. Die blaue Substanz muss mit der Ölprobe vermischt
werden. Dafür gibt es folgende Möglichkeiten a) und b):
a) Füllen Sie die Ölprobe bei Raumtemperatur bis zum
unteren Abschnitt des Plastikröhrchenetiketts ein. Ste-
llen Sie das geöffnete Plastikröhrchen in die Mikrowelle
(benutzen Sie dafür ein kleines Glas oder ähnliches, da-
mit das Röhrchen nicht umkippen kann) und erhitzen
Sie es für 5 bis 10 Sekunden bei maximaler Stärke. Sollte
keine Mikrowelle zur Verfügung stehen, können Sie das
gut verschlossene Röhrchen auch im Wasserbad erhit-
zen, bis die Ölprobe und die blaue Substanz vollständig
b) Platzieren Sie das Röhrchen in den mitgelieferten Ver-
brennschutz-Halter und füllen Sie die erwärmte Ölpro-
be (mindestens 60 °C) bis zum unteren Abschnitt des
Plastikröhrchenetiketts ein. Warten Sie einige Sekunden,
danach verschließen Sie das Röhrchen fest und nehmen
den Verbrennschutz-Halter ab. Sollte die Temperatur ni-
gen, gehen Sie nach a) vor.
3. Schütteln Sie das Röhrchen (zirka 1 Minute), um eine
homogene Mischung zu erhalten (die Farbe ändert sich,
wenn sich das Öl mit der Substanz mischt).
4. Lassen Sie die Mischung für 2 Minuten ruhen. Halten
Sie das Röhrchen horizontal (in der Nähe einer Lichtquel-
le) und vergleichen Sie die Farbe mit der Farbskala.
5. Am Ende der Reaktion verfestigt sich das Gemisch aus
Öl und Reagenz.
6. Wenn die Mischung Farbstufe 4 (17% bis 23%) errei-
cht ist, ist höchste Vorsicht geboten, da dies sehr nah am
erlaubten Grenzwert von 25% liegt (BOE, Gesetz vom
26. Januar 1989).
7. Halten Sie die Röhrchen von direktem Licht oder Wär-
ANWEISUNG DER VERWENDUNG
1. Destape el tubo que contiene el reactivo azul.
2. Debe conseguir que el reactivo azul se disuelva
cuando introduzca la muestra de aceite en el tubo.
Para ello, puede actuar de dos formas:
a) Añada la muestra de aceite a temperatura ambi-
ente hasta la marca inferior de la etiqueta del tubo.
Introduzca el tubo destapado en un microondas
(puede usar un vaso pequeño o recipiente similar
como soporte) y manténgalo de 5 a 10 segundos a
máxima potencia. [Si no dispone de microondas, cal-
iente un poco de agua e introduzca el tubo debida-
mente tapado hasta que la mezcla se disuelva.].
b) Coloque el tubo en el soporte anti-quemadura e
introduzca la muestra de aceite caliente (por lo menos
a 60 ºC hasta la marca inferior de la etiqueta del tubo.
Espere unos segundos y cierre el tubo completamente
con su tapón y quite el soporte anti-quemadura. Si la
muestra no hubiera alcanzado la temperatura nece-
saria para fundir el reactivo azul, actúe según la op-
ción a).
3. Agite bien el tubo tapado hasta que se produz-
ca una mezcla uniforme (el aceite cambia de color al
mezclarse con el reactivo).
4. Espere 2 minutos dejando la mezcla en reposo.
Mantenga el tubo vertical cerca de una fuente de luz
y compare el color obtenido con la tabla de colores.
5.
6. Si alcanza el color 4 (17 a 23%) tenga el máximo
cuidado porque está muy cerca del límite legal del
25% de compuestos polares (BOE, Orden de 26 de
Enero de 1989).
7. Mantenga los tubos alejados de la luz directa o del
calor (el reactivo funde cerca de los 60 ºC.
INSTRUCCIONES DE USO
1. Aprire la provetta che contiene il reattivo blú.
2. Il reattivo deve dissolversi al introdurre il campione
d’olio nella provetta. Si puo fare in due maniere diverse:
a. Aggiungere il campione d’olio a temperature ambien-
trodurre la provetta aperta nel micronde (si puó usare un
piccolo recipiente come appogigio) mantenerlo per 5 a
10 secondi alla massima potenza. In caso de non avere
micronde scaldare un po’ d’aqcua e introdurre la prove-
b. Mettere la provetta nel sopporto anti-ustioni e in-
al segno inferiore dell’etichetta, aspettare vari secondi
e chidere completamente la provetta com il suo tappo,
togliere il sopporto anti ustione. Se il campione non rag-
giunge la temperatura necessária per fondere il reattivo
blú, seguir ele indicazioni del punto a.
3.
miscel uniforme. (l’olio cambia di colore al mischiarsi
com il reattivo).
4. Aspettare due minuti, lasciando la miscela a riposo.
Mantenere la provetta in posizione verticale, vicino ad
una fote di luce, compararei l colore ottenuto com la
tabela colori.
5.
6. Al ottenere il colore 4 (17 a 23 %) fare la massima
attenzione perche il limite legale é del 25% per compo-
nent polari. (BOE, Ordine 26 Gennaio 1989).
7. Mantenere le provette lontani dalla luce direta o calo-
re (il reattivo fonde circa i 60ºC)
1.
2. Placez le tube dans l’appui anti-brûlure et ouvrez-le.
3. Recueillez l’échantillon.
4. Versez l’échantillon dans le tube.
5. Placer l’échantillon jusqu’à la partie inférieure de l’éti-
quette.
Attention: Utilisez toujours l’appui anti-brûlure pour
éviter de vous brûler.
6. Les échantillons recueillis à la température ambiante
peuvent être chauffés (micro-ondes, bain-marie).
7. Placez le bouchon sur le tube.
8. Agitez jusqu’à la dissolution et le mélange complet
des phases.
9. Attendez deux minutes pour que la réaction se pro-
duise.
10. Comparez les résultats avec l’échelle des couleurs
fournie.
11. Ecartez la graisse si le résultat est supérieur à 25%
de composants polaires (couleur 5).
12.
fournie.
13. Conservez le test effectué pour référence future.
L’utilisation des récipients en verre, tels que pipettes,
pour la récolte des graisses chaudes est déconseillée!
Conserver hors de la portée des enfants.
2. Coloque o tubo no suporte anti-queimadura e abra-o.
3. Recolha a amostra.
4. Verta a amostra para o tubo.
5. Coloque a amostra até à parte inferior da etiqueta.
Atenção: Use sempre o suporte anti-queimaduras para
evitar queimar-se.
6. Amostras recolhidas à temperatura ambiente podem
ser aquecidas (micro-ondas, banho maria).
7. Coloque a tampa no tubo.
8. Agite até completa dissolução e mistura das fases.
9. Espere 2 minutos para a reação ocorrer.
10. Compare os resultados com a escala de cores for-
necida.
11. Descarte a gordura se o resultado for superior a
25% de compostos polares (cor 5).
12. Registe os resultados na folha de registos fornecida.
13. Guarde o teste realizado para referência futura.
t5IFVTFPGHMBTTJOTUSVNFOUTJTOPUSFDPNNFOEFELFFQBXBZGSPNDIJMESFOt%JFVFSXFOEVOHWPO(MBTHFSÊUFOXJSE
OJDIUFNQGPIMFOWPO,JOEFSOGFSOIBMUFOt4FEFTBDPOTFKBMBVUJMJ[BDJØOEFVUFOTJMJPTEFWJESJPNBOUFOFSGVFSBEFM
BMDBODFEFMPTOJ×PTt4JTDPOTJHMJBMVTPEJTUSVNFOUJEJWFUSPUFOFSFMPOUBOPEBMMBQPSUBUBEFJCBNCJOJtLVUJMJTBUJPO
EJOTUSVNFOUTEFWFSSFOFTUQBTSFDPNNBOEÏFHBSEFSMPJOEFTFOGBOUTt/ÍPÏSFDPNFOEBEPPVTPEFJOTUSVNFOUPT
EFWJESPNBOUFOIBMPOHFEPBMDBODFEBTDSJBOÎBT
INSTRUCTIONS D’UTILISATION
INSTRUÇÕES DE UTILIZAÇÃO
ISTRUZIONI D’USO
1-2 MIN.
3421
1. Open the tube containing the blue reagent.
2. The blue reagent has to be dissolved when the oil sam-
ple is poured into the tube. To achieve it, there are two
options a) and b):
a) Pour the oil sample at room temperature up to the lower
part of the label of the tube. Put the open tube in a mi-
crowave (use a small glass or something similar to prevent
the tube from falling) and heat from 5 to 10 seconds at
maximum power. If you do not have a microwave, heat
some water and dip the tube properly closed until the mi-
xture is dissolved.
b) Place the tube in the anti-burn holder and pour the
warm oil sample (at least 60 ºC) up to the lower part of the
label. Wait a few seconds and close the tube tightly with
the cap and remove the anti-burn holder. If the sample
does not reach the temperature required to melt the blue
reagent, follow option a).
3. Shake the tube well (for a minute) in order to produce a
uniform mixture (the color changes when the oil is mixed
with the reagent).
4. Allow the mixture to settle for 2 minutes. Hold the tube
vertically near a source of light and compare the obtained
Acolor to the color scale.
5. At the end of the reaction, the mixture (fat and reagent)
6. If the mixture reaches color 4 (17% to 23%), be extre-
mely careful, as it is quite close to the 25% legal limit (BOE,
Order of the 26th of January, 1989).
7. Keep the tubes away from direct light or heat (the rea-
gent melts close to 60ºC).
1. Öffnen Sie das Plastikröhrchen mit der blauen Substanz.
2. Die blaue Substanz muss mit der Ölprobe vermischt wer-
den. Dafür gibt es folgende Möglichkeiten a) und b):
a) Füllen Sie die Ölprobe bei Raumtemperatur bis zum un-
teren Abschnitt des Plastikröhrchenetiketts ein. Stellen Sie
das geöffnete Plastikröhrchen in die Mikrowelle (benutzen
Sie dafür ein kleines Glas oder ähnliches, damit das Röhr-
chen nicht umkippen kann) und erhitzen Sie es für 5 bis
10 Sekunden bei maximaler Stärke. Sollte keine Mikrowelle
zur Verfügung stehen, können Sie das gut verschlossene
Röhrchen auch im Wasserbad erhitzen, bis die Ölprobe und
b) Platzieren Sie das Röhrchen in den mitgelieferten Ver-
brennschutz-Halter und füllen Sie die erwärmte Ölprobe
(mindestens 60 °C) bis zum unteren Abschnitt des Plas-
tikröhrchenetiketts ein. Warten Sie einige Sekunden, da-
nach verschließen Sie das Röhrchen fest und nehmen den
Verbrennschutz-Halter ab. Sollte die Temperatur nicht aus-
Sie nach a) vor.
3. Schütteln Sie das Röhrchen (zirka 1 Minute), um eine
homogene Mischung zu erhalten (die Farbe ändert sich,
wenn sich das Öl mit der Substanz mischt).
4. Lassen Sie die Mischung für 2 Minuten ruhen. Halten Sie
das Röhrchen horizontal (in der Nähe einer Lichtquelle) und
vergleichen Sie die Farbe mit der Farbskala.
5. Am Ende der Reaktion verfestigt sich das Gemisch aus
Öl und Reagenz.
6. Wenn die Mischung Farbstufe 4 (17% bis 23%) errei-
cht ist, ist höchste Vorsicht geboten, da dies sehr nah am
erlaubten Grenzwert von 25% liegt (BOE, Gesetz vom 26.
Januar 1989).
7. Halten Sie die Röhrchen von direktem Licht oder Wärme
1. Destape el tubo que contiene el reactivo azul.
2. Debe conseguir que el reactivo azul se disuelva cuan-
do introduzca la muestra de aceite en el tubo. Para ello,
puede actuar de dos formas:
a) Añada la muestra de aceite a temperatura ambiente
hasta la marca inferior de la etiqueta del tubo. Introduzca
el tubo destapado en un microondas (puede usar un vaso
pequeño o recipiente similar como soporte) y manténgalo
de 5 a 10 segundos a máxima potencia. [Si no dispone
de microondas, caliente un poco de agua e introduzca el
tubo debidamente tapado hasta que la mezcla se disuel-
va.].
b) Coloque el tubo en el soporte anti-quemadura e intro-
duzca la muestra de aceite caliente (por lo menos a 60 ºC
hasta la marca inferior de la etiqueta del tubo. Espere unos
segundos y cierre el tubo completamente con su tapón y
quite el soporte anti-quemadura. Si la muestra no hubiera
alcanzado la temperatura necesaria para fundir el reactivo
azul, actúe según la opción a).
3. Agite bien el tubo tapado hasta que se produzca una
mezcla uniforme (el aceite cambia de color al mezclarse
con el reactivo).
4. Espere 2 minutos dejando la mezcla en reposo. Man-
tenga el tubo vertical cerca de una fuente de luz y com-
pare el color obtenido con la tabla de colores.
5.
6. Si alcanza el color 4 (17 a 23%) tenga el máximo cui-
dado porque está muy cerca del límite legal del 25% de
compuestos polares (BOE, Orden de 26 de Enero de 1989).
7. Mantenga los tubos alejados de la luz directa o del calor
(el reactivo funde cerca de los 60 ºC.
t5IFVTFPGHMBTTJOTUSVNFOUTJTOPUSFDPNNFOEFELFFQBXBZGSPNDIJMESFOt%JFVFSXFOEVOHWPO(MBTHFSÊUFOXJSE
OJDIUFNQGPIMFOWPO,JOEFSOGFSOIBMUFOt4FEFTBDPOTFKBMBVUJMJ[BDJØOEFVUFOTJMJPTEFWJESJPNBOUFOFSGVFSBEFM
BMDBODFEFMPTOJ×PTt4JTDPOTJHMJBMVTPEJTUSVNFOUJEJWFUSPUFOFSFMPOUBOPEBMMBQPSUBUBEFJCBNCJOJtLVUJMJTBUJPO
EJOTUSVNFOUTEFWFSSFOFTUQBTSFDPNNBOEÏFHBSEFSMPJOEFTFOGBOUTt/ÍPÏSFDPNFOEBEPPVTPEFJOTUSVNFOUPT
EFWJESPNBOUFOIBMPOHFEPBMDBODFEBTDSJBOÎBT
INSTRUCTIONS OF USE
ANWEISUNG DER VERWENDUNG
INSTRUCCIONES DE USO
1. Aprire la provetta che contiene il reattivo blú.
2. Il reattivo deve dissolversi al introdurre il campione d’olio
nella provetta. Si puo fare in due maniere diverse:
a. Aggiungere il campione d’olio a temperature ambiente
la provetta aperta nel micronde (si puó usare un piccolo reci-
piente come appogigio) mantenerlo per 5 a 10 secondi alla
massima potenza. In caso de non avere micronde scaldare
miscela si dissolva.
b. Mettere la provetta nel sopporto anti-ustioni e introdurre il
dell’etichetta, aspettare vari secondi e chidere completamen-
te la provetta com il suo tappo, togliere il sopporto anti ustio-
ne. Se il campione non raggiunge la temperatura necessária
per fondere il reattivo blú, seguir ele indicazioni del punto a.
3.
miscel uniforme. (l’olio cambia di colore al mischiarsi com
il reattivo).
4. Aspettare due minuti, lasciando la miscela a riposo. Man-
tenere la provetta in posizione verticale, vicino ad una fote
di luce, compararei l colore ottenuto com la tabela colori.
5.
6. Al ottenere il colore 4 (17 a 23 %) fare la massima atten-
zione perche il limite legale é del 25% per component polari.
(BOE, Ordine 26 Gennaio 1989).
7. Mantenere le provette lontani dalla luce direta o calore (il
reattivo fonde circa i 60ºC)
1.
2. Placez le tube dans l’appui anti-brûlure et ouvrez-le.
3. Recueillez l’échantillon.
4. Versez l’échantillon dans le tube.
5. Placer l’échantillon jusqu’à la partie inférieure de l’éti-
quette.
Attention: Utilisez toujours l’appui anti-brûlure pour éviter
de vous brûler.
6. Les échantillons recueillis à la température ambiante peu-
vent être chauffés (micro-ondes, bain-marie).
7. Placez le bouchon sur le tube.
8. Agitez jusqu’à la dissolution et le mélange complet des
phases.
9. Attendez deux minutes pour que la réaction se produise.
10. Comparez les résultats avec l’échelle des couleurs
fournie.
11. Ecartez la graisse si le résultat est supérieur à 25% de
composants polaires (couleur 5).
12.
fournie.
13. Conservez le test effectué pour référence future.
L’utilisation des récipients en verre, tels que pipettes, pour
la récolte des graisses chaudes est déconseillée! Conserver
hors de la portée des enfants.
2. Coloque o tubo no suporte anti-queimadura e abra-o.
3. Recolha a amostra.
4. Verta a amostra para o tubo.
5. Coloque a amostra até à parte inferior da etiqueta.
Atenção: Use sempre o suporte anti-queimaduras para
evitar queimar-se.
6. Amostras recolhidas à temperatura ambiente podem ser
aquecidas (micro-ondas, banho maria).
7. Coloque a tampa no tubo.
8. Agite até completa dissolução e mistura das fases.
9. Espere 2 minutos para a reação ocorrer.
10. Compare os resultados com a escala de cores fornecida.
11. Descarte a gordura se o resultado for superior a 25% de
compostos polares (cor 5).
12. Registe os resultados na folha de registos fornecida.
13. Guarde o teste realizado para referência futura.
INSTRUCTIONS D’UTILISATION
INSTRUÇÕES DE UTILIZAÇÃO
ISTRUZIONI D’USO
1-2 MIN.
3421
Biomedal, S.L. | Avda. Américo Vespucio, 5-4, Planta 1ª, Mód. 12 41092 Sevilla, España (Spain)
Tel. +34 954 08 12 76 Fax. +34 954 08 12 79 | [email protected] www.biomedal.com
DIAGNOSTICS
1. Open the tube containing the blue reagent.
2. The blue reagent has to be dissolved when the oil
sample is poured into the tube. To achieve it, there are
two options a) and b):
a) Pour the oil sample at room temperature up to the
lower part of the label of the tube. Put the open tube
in a microwave (use a small glass or something similar
to prevent the tube from falling) and heat from 5 to
10 seconds at maximum power. If you do not have a
microwave, heat some water and dip the tube properly
closed until the mixture is dissolved.
b) Place the tube in the anti-burn holder and pour the
warm oil sample (at least 60 ºC) up to the lower part of
the label. Wait a few seconds and close the tube tightly
with the cap and remove the anti-burn holder. If the
sample does not reach the temperature required to melt
the blue reagent, follow option a).
3. Shake the tube well (for a minute) in order to produce
a uniform mixture (the color changes when the oil is
mixed with the reagent).
4. Allow the mixture to settle for 2 minutes. Hold the
tube vertically near a source of light and compare the
obtained Acolor to the color scale.
5. At the end of the reaction, the mixture (fat and rea-
6. If the mixture reaches color 4 (17% to 23%), be ex-
tremely careful, as it is quite close to the 25% legal limit
(BOE, Order of the 26th of January, 1989).
7. Keep the tubes away from direct light or heat (the
reagent melts close to 60ºC).
INSTRUCTIONS OF USE
1. Öffnen Sie das Plastikröhrchen mit der blauen Subs-
tanz.
2. Die blaue Substanz muss mit der Ölprobe vermischt
werden. Dafür gibt es folgende Möglichkeiten a) und b):
a) Füllen Sie die Ölprobe bei Raumtemperatur bis zum
unteren Abschnitt des Plastikröhrchenetiketts ein. Ste-
llen Sie das geöffnete Plastikröhrchen in die Mikrowelle
(benutzen Sie dafür ein kleines Glas oder ähnliches, da-
mit das Röhrchen nicht umkippen kann) und erhitzen
Sie es für 5 bis 10 Sekunden bei maximaler Stärke. Sollte
keine Mikrowelle zur Verfügung stehen, können Sie das
gut verschlossene Röhrchen auch im Wasserbad erhit-
zen, bis die Ölprobe und die blaue Substanz vollständig
b) Platzieren Sie das Röhrchen in den mitgelieferten Ver-
brennschutz-Halter und füllen Sie die erwärmte Ölpro-
be (mindestens 60 °C) bis zum unteren Abschnitt des
Plastikröhrchenetiketts ein. Warten Sie einige Sekunden,
danach verschließen Sie das Röhrchen fest und nehmen
den Verbrennschutz-Halter ab. Sollte die Temperatur ni-
gen, gehen Sie nach a) vor.
3. Schütteln Sie das Röhrchen (zirka 1 Minute), um eine
homogene Mischung zu erhalten (die Farbe ändert sich,
wenn sich das Öl mit der Substanz mischt).
4. Lassen Sie die Mischung für 2 Minuten ruhen. Halten
Sie das Röhrchen horizontal (in der Nähe einer Lichtquel-
le) und vergleichen Sie die Farbe mit der Farbskala.
5. Am Ende der Reaktion verfestigt sich das Gemisch aus
Öl und Reagenz.
6. Wenn die Mischung Farbstufe 4 (17% bis 23%) errei-
cht ist, ist höchste Vorsicht geboten, da dies sehr nah am
erlaubten Grenzwert von 25% liegt (BOE, Gesetz vom
26. Januar 1989).
7. Halten Sie die Röhrchen von direktem Licht oder Wär-
ANWEISUNG DER VERWENDUNG
1. Destape el tubo que contiene el reactivo azul.
2. Debe conseguir que el reactivo azul se disuelva
cuando introduzca la muestra de aceite en el tubo.
Para ello, puede actuar de dos formas:
a) Añada la muestra de aceite a temperatura ambi-
ente hasta la marca inferior de la etiqueta del tubo.
Introduzca el tubo destapado en un microondas
(puede usar un vaso pequeño o recipiente similar
como soporte) y manténgalo de 5 a 10 segundos a
máxima potencia. [Si no dispone de microondas, cal-
iente un poco de agua e introduzca el tubo debida-
mente tapado hasta que la mezcla se disuelva.].
b) Coloque el tubo en el soporte anti-quemadura e
introduzca la muestra de aceite caliente (por lo menos
a 60 ºC hasta la marca inferior de la etiqueta del tubo.
Espere unos segundos y cierre el tubo completamente
con su tapón y quite el soporte anti-quemadura. Si la
muestra no hubiera alcanzado la temperatura nece-
saria para fundir el reactivo azul, actúe según la op-
ción a).
3. Agite bien el tubo tapado hasta que se produz-
ca una mezcla uniforme (el aceite cambia de color al
mezclarse con el reactivo).
4. Espere 2 minutos dejando la mezcla en reposo.
Mantenga el tubo vertical cerca de una fuente de luz
y compare el color obtenido con la tabla de colores.
5.
6. Si alcanza el color 4 (17 a 23%) tenga el máximo
cuidado porque está muy cerca del límite legal del
25% de compuestos polares (BOE, Orden de 26 de
Enero de 1989).
7. Mantenga los tubos alejados de la luz directa o del
calor (el reactivo funde cerca de los 60 ºC.
INSTRUCCIONES DE USO
1. Aprire la provetta che contiene il reattivo blú.
2. Il reattivo deve dissolversi al introdurre il campione
d’olio nella provetta. Si puo fare in due maniere diverse:
a. Aggiungere il campione d’olio a temperature ambien-
trodurre la provetta aperta nel micronde (si puó usare un
piccolo recipiente come appogigio) mantenerlo per 5 a
10 secondi alla massima potenza. In caso de non avere
micronde scaldare un po’ d’aqcua e introdurre la prove-
b. Mettere la provetta nel sopporto anti-ustioni e in-
al segno inferiore dell’etichetta, aspettare vari secondi
e chidere completamente la provetta com il suo tappo,
togliere il sopporto anti ustione. Se il campione non rag-
giunge la temperatura necessária per fondere il reattivo
blú, seguir ele indicazioni del punto a.
3.
miscel uniforme. (l’olio cambia di colore al mischiarsi
com il reattivo).
4. Aspettare due minuti, lasciando la miscela a riposo.
Mantenere la provetta in posizione verticale, vicino ad
una fote di luce, compararei l colore ottenuto com la
tabela colori.
5.
6. Al ottenere il colore 4 (17 a 23 %) fare la massima
attenzione perche il limite legale é del 25% per compo-
nent polari. (BOE, Ordine 26 Gennaio 1989).
7. Mantenere le provette lontani dalla luce direta o calo-
re (il reattivo fonde circa i 60ºC)
1.
2. Placez le tube dans l’appui anti-brûlure et ouvrez-le.
3. Recueillez l’échantillon.
4. Versez l’échantillon dans le tube.
5. Placer l’échantillon jusqu’à la partie inférieure de l’éti-
quette.
Attention: Utilisez toujours l’appui anti-brûlure pour
éviter de vous brûler.
6. Les échantillons recueillis à la température ambiante
peuvent être chauffés (micro-ondes, bain-marie).
7. Placez le bouchon sur le tube.
8. Agitez jusqu’à la dissolution et le mélange complet
des phases.
9. Attendez deux minutes pour que la réaction se pro-
duise.
10. Comparez les résultats avec l’échelle des couleurs
fournie.
11. Ecartez la graisse si le résultat est supérieur à 25%
de composants polaires (couleur 5).
12.
fournie.
13. Conservez le test effectué pour référence future.
L’utilisation des récipients en verre, tels que pipettes,
pour la récolte des graisses chaudes est déconseillée!
Conserver hors de la portée des enfants.
2. Coloque o tubo no suporte anti-queimadura e abra-o.
3. Recolha a amostra.
4. Verta a amostra para o tubo.
5. Coloque a amostra até à parte inferior da etiqueta.
Atenção: Use sempre o suporte anti-queimaduras para
evitar queimar-se.
6. Amostras recolhidas à temperatura ambiente podem
ser aquecidas (micro-ondas, banho maria).
7. Coloque a tampa no tubo.
8. Agite até completa dissolução e mistura das fases.
9. Espere 2 minutos para a reação ocorrer.
10. Compare os resultados com a escala de cores for-
necida.
11. Descarte a gordura se o resultado for superior a
25% de compostos polares (cor 5).
12. Registe os resultados na folha de registos fornecida.
13. Guarde o teste realizado para referência futura.
t5IFVTFPGHMBTTJOTUSVNFOUTJTOPUSFDPNNFOEFELFFQBXBZGSPNDIJMESFOt%JFVFSXFOEVOHWPO(MBTHFSÊUFOXJSE
OJDIUFNQGPIMFOWPO,JOEFSOGFSOIBMUFOt4FEFTBDPOTFKBMBVUJMJ[BDJØOEFVUFOTJMJPTEFWJESJPNBOUFOFSGVFSBEFM
BMDBODFEFMPTOJ×PTt4JTDPOTJHMJBMVTPEJTUSVNFOUJEJWFUSPUFOFSFMPOUBOPEBMMBQPSUBUBEFJCBNCJOJtLVUJMJTBUJPO
EJOTUSVNFOUTEFWFSSFOFTUQBTSFDPNNBOEÏFHBSEFSMPJOEFTFOGBOUTt/ÍPÏSFDPNFOEBEPPVTPEFJOTUSVNFOUPT
EFWJESPNBOUFOIBMPOHFEPBMDBODFEBTDSJBOÎBT
INSTRUCTIONS D’UTILISATION
INSTRUÇÕES DE UTILIZAÇÃO
ISTRUZIONI D’USO
1-2 MIN.
3421
During deep fat frying, the fats and oils are exposed
to atmospheric oxygen and to moisture at high tem-
peratures (over 160 ºC) for long periods of time. As a
consequence, a series of chemical reactions take place.
These reactions produce various harmful compounds
and alter, at the same time, the fat/oil organoleptic char-
acteristics (odor, color, taste) and the health effects of
the oil/fat. Among these substances, polar compounds
may be found; their control allows the assessment of oil
oxidation grades.
The importance of controlling polar compounds is also
regulated by the Order of the 26th of January 1989 pub-
stuffs which have been prepared or been in contact with
oils with a polar content equal to or exceeding 25%.
Oleotest is a colorimetric assay that allows to determine
the total polar compounds in frying fats in less than 2
minutes. It is a feasible and safe way to control the quality
Oleotest is suitable for the most frequently used oils
Other types of oils may require a different color scale.
Oleotest remains stable after being used: keep the
tubes so that you can use them in your auto-control
system.
WHY OLEOTEST?
POR QUÉ OLEOTEST?
OBSERVACIONES
OBSERVATIONS
WHY CONTROL FRYING OILS?
Durante el proceso de fritura, las grasas
o los aceites se exponen al oxígeno atmos-
férico, a la humedad y a altas temperaturas
(por encima de 160 ºC por periodos largos; como
consecuencia, tienen lugar una serie de reacciones
químicas que producen diversos compuestos nocivos y
que alteran, a su vez, las características organolépticas
(olor, color, sabor) e, incluso, la salubridad de la grasa/
aceite. Entre estas sustancias se encuentran los com-
puestos polares y su control permite valorar el grado
de oxidación del aceite. La importancia de controlar los
compuestos polares lo dicta, también, la Orden del 26 de
Enero de 1989 del BOE, que prohíbe la comercialización
de alimentos que hayan sido preparados o hayan estado
en contacto con aceites que tengan un 25% de estos
compuestos polares o más.
POR QUÉ CONTROLAR LOS ACEITES DE FREÍR?
Oleotest es un método fiable y rápido que mide la
concentración de compuestos polares totales en los
aceites de fritura. De esta forma, Oleotest permite
realizar, en pocos minutos y de forma muy sencilla,
una evaluación fiable de la calidad de los aceites de
freír, sin necesidad de equipos o instrumentos sofisti-
cados. Oleotest es seguro y no utiliza disolventes
inflamables.
Oleotest es idóneo para los aceites más utilizados en
fritura (aceite de girasol, aceite de soja, aceite de maíz y
aceite de cacahuete). Otros tipos de aceite podrían req-
uerir una escala de colores diferente. Oleotest se man-
tiene estable después de su utilización: conserve los tu-
bos como parte integrante de su sistema de autocontrol.
vimeo.com/oleotest
facebook.com/oleotest
oleotest.com
https://es-es.facebook.com/OleotestES
Nº
contenido de la freidora
content of the fryer
t'FDIB
t%BUF
t'JSNBEFM
responsable
t4JHOBUVre of the
person in charge
tTemperatura del Aceite (ºC)
t0JMTemperature (ºC)
1
2
3
4
5
6
7
8
9
10
11
12
13
14
15
16
17
18
19
20
21
22
23
24
25
26
27
28
28
30
31
32
33
34
35
36
37
38
39
40
41
42
43
44
45
46
47
48
49
50
3FTVMUBEPTt3FTVMUT
12345
tValidado por
tValidated by
t'FDIB
t%BUF
CONTROL DEL ACEITE DE FREÍR
RAPID TEST TO CONTROL FRYING OILS
During deep fat frying, the fats
and oils are exposed to atmospheric
oxygen and to moisture at high tem-
peratures (over 160 ºC) for long periods of
time. As a consequence, a series of chemical
reactions take place. These reactions produce vari-
ous harmful compounds and alter, at the same time, the
fat/oil organoleptic characteristics (odor, color, taste) and
the health effects of the oil/fat. Among these substances,
polar compounds may be found; their control allows the
assessment of oil oxidation grades.
The importance of controlling polar compounds is also
regulated by several national regulations and Global
health recommendations which prohibit the sale of
foodstuffs which have been prepared or been in contact
with oils with a polar content equal to or exceeding 25%.
Oleotest is a colorimetric assay that allows to determine
the total polar compounds in frying fats in less than 2
minutes. It is a feasible and safe way to control the quality
Oleotest is suitable for the most frequently used oils
Other types of oils may require a different color scale.
Oleotest remains stable after being used: keep the
tubes so that you can use them in your auto-control
system.
WHY OLEOTEST?
POR QUÉ OLEOTEST?
OBSERVACIONES
OBSERVATIONS
WHY CONTROL FRYING OILS?
Durante el proceso de fritura, las grasas o los aceites
se exponen al oxígeno atmosférico, a la humedad y a
altas temperaturas (por encima de 160 ºC por periodos
largos; como consecuencia, tienen lugar una serie de
reacciones químicas que producen diversos compuestos
nocivos y que alteran, a su vez, las características or-
ganolépticas (olor, color, sabor) e, incluso, la salubridad
de la grasa/aceite. Entre estas sustancias se encuentran
los compuestos polares y su control permite valorar el
grado de oxidación del aceite. La importancia de contro-
lar los compuestos polares lo dicta, también, recomen-
daciones globales, que prohíbe la comercialización de
alimentos que hayan sido preparados o hayan estado
en contacto con aceites que tengan un 25% de estos
compuestos polares o más.
POR QUÉ CONTROLAR LOS ACEITES DE FREÍR?
Oleotest es un método fiable y rápido que mide la
concentración de compuestos polares totales en los
aceites de fritura. De esta forma, Oleotest permite
realizar, en pocos minutos y de forma muy sencilla,
una evaluación fiable de la calidad de los aceites de
freír, sin necesidad de equipos o instrumentos sofisti-
cados. Oleotest es seguro y no utiliza disolventes
inflamables.
Oleotest es idóneo para los aceites más utilizados en
fritura (aceite de girasol, aceite de soja, aceite de maíz y
aceite de cacahuete). Otros tipos de aceite podrían req-
uerir una escala de colores diferente. Oleotest se man-
tiene estable después de su utilización: conserve los tu-
bos como parte integrante de su sistema de autocontrol.
vimeo.com/oleotest
facebook.com/oleotest
oleotest.com
Nº
content of the fryer
contenido de la freidora
t%BUF
t'FDIB
t4JHOBUVre of the
person in charge
t'JSNBEFM
responsable
t0JMTemperature (ºC)
tTemperatura del Aceite (ºC)
1
2
3
4
5
6
7
8
9
10
11
12
13
14
15
16
17
18
19
20
21
22
23
24
25
26
27
28
28
30
31
32
33
34
35
36
37
38
39
40
41
42
43
44
45
46
47
48
49
50
t3FTVMUTt3FTVMUBEPT
12345
tValidated by
tValidado por
t%BUF
t'FDIB
RAPID TEST TO CONTROL FRYING OILS
CONTROL DEL ACEITE DE FREÍR
926050 G22M 4/4
-
 1
1
-
 2
2
-
 3
3
-
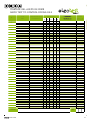 4
4


en otros idiomas
- italiano: H Hygiena 926050 Manuale utente
- English: H Hygiena 926050 User manual
- Deutsch: H Hygiena 926050 Benutzerhandbuch
Otros documentos
-
 Mr Maria Miffy XL Manual de usuario
-
Hanna Instruments HI3895 El manual del propietario
-
Sera phosphate-Test (PO4) Information For Use
-
-
-
 Hach PHOSPHAX indoor sc Addendum
-
3M Allergen Protein Rapid Kit Instrucciones de operación
-
 Hach AMTAX sc Manual de usuario
-
 Hach POLYMETRON 8810 ISE Basic User Manual
-


