Icon Legend Series Studio Large Diaphragm Condenser Microphone Manual de usuario
- Categoría
- Micrófonos
- Tipo
- Manual de usuario

ENGLISH
FRANÇAIS
DEUTSCHE
ESPAÑOL
日本語
ITALIANO
Studio large-diaphragm condenser microphone
Microphone à condensateur de studio à large diaphragme
Großmembran-Kondensatormikrofon für Studioaufnahmen
Micrófono de condensador de estudio de diafragma grande
Microfono a condensatore da studio a diaframma largo
スタジオ用大口径ダイアフラム コンデンサー マイクロホン
User manual
N1630
Legend
Apollo / Artemis
series
-10dB

Important Safety Instructions
1. Read these instructions.
2. Keep these instructions.
3. Heed all warnings.
4. Follow all instructions.
5. Do not use this apparatus near water.
6. Clean only with dry cloth.
7. Do not block any ventilation openings. Install in accordance with the
manufacture’s instructions.
8. Do not install near any heat sources such as radiators, heat registers, stoves,
or other apparatus (including amplifiers) that produce heat.
9. Only use attachments/accessories specified by the manufacturer.
ENGLISH
FRANÇAIS
ATTENTION: Pour éviter tout risque d'électrocution ou d'incendie, ne pas exposer
cet appareil à la pluie ou à l'humidité. Pour éviter tout risque d'électrocution, ne pas
ôter le couvercle ou le dos du boîtier. Cet appareil ne contient aucune pièce
remplaçable par l'utilisateur. Confiez toutes les réparations à un personnel qualifié.
Le signe avec un éclair dans un triangle prévient l'utilisateur de la présence d'une
tension dangereuse et non isolée dans l'appareil. Cette tension constitue un risque
d'électrocution. Le signe avec un point d'exclamation dans un triangle prévient
l'utilisateur d'instructions importantes relatives à l'utilisation et à la maintenance
du produit.
Consignes de sécurité importantes
1. Veuillez lire toutes les instructions avant d'utiliser l'appareil.
2. Conserver ces instructions pour toute lecture ultérieure.
3. Lisez avec attention toutes les consignes de sécurité.
4. Suivez les instructions du fabricant.
5. Ne pas utiliser cet appareil près d'une source liquide ou dans un lieu humide.
6. Nettoyez l'appareil uniquement avec un tissu humide.
7. Veillez à ne pas obstruer les fentes prévues pour la ventilation de l'appareil.
Installez l'appareil selon les instructions du fabricant.
8. Ne pas installer près d'une source de chaleur (radiateurs, etc.) ou de tout
équipement susceptible de générer de la chaleur (amplificateurs de puissance
par exemple).
9. Ne pas retirer la terre du cordon secteur ou de la prise murale. Les fiches
canadiennes avec polarisation (avec une lame plus large) ne doivent pas être
modifiées. Si votre

prise murale ne correspond pas au modèle fourni, consultez votre électricien.
10. Protégez le cordon secteur contre tous les dommages possibles (pincement,
tension, torsion,, etc.). Veillez à ce que le cordon secteur soit libre, en particulier
à sa sortie du boîtier.
11. Déconnectez l'appareil du secteur en présence d'orage ou lors de périodes
d'inutilisation prolongées.
12. Consultez un service de réparation qualifié pour tout dysfonctionnement
(dommage sur le cordon secteur, baisse de performances, exposition à la pluie,
projection liquide dans l'appareil, introduction d'un objet dans le boîtier, etc.).
DEUTSCHE
ACHTUNG: Um die Gefahr eines Brandes oder Stromschlags zu verringern, sollten
Sie dieses Gerät weder Regen noch Feuchtigkeit aussetzen.Um die Gefahr eines
Stromschlags zu verringern, sollten Sie weder Deckel noch Rückwand des Geräts
entfernen. Im Innern befinden sich keine Teile, die vom Anwender gewartet werden
können. Überlassen Sie die Wartung qualifiziertem Fachpersonal.Der Blitz mit
Pfeilspitze im gleichseitigen Dreieck soll den Anwender vor nichtisolierter "gefährlicher
Spannung" im Geräteinnern warnen. Diese Spannung kann so hoch sein, dass
die Gefahr eines Stromschlags besteht. Das Ausrufezeichen im gleichseitigen
Dreieck soll den Anwender auf wichtige Bedienungs- und Wartungsanleitungen
aufmerksam machen, die im mitgelieferten Informationsmaterial näher beschrieben
werden.
Wichtige Sicherheitsvorkehrungen
1. Lesen Sie alle Anleitungen, bevor Sie das Gerät in Betrieb nehmen.
2. Bewahren Sie diese Anleitungen für den späteren Gebrauch gut auf.
3. Bitte treffen Sie alle beschriebenen Sicherheitsvorkehrungen.
4. Befolgen Sie die Anleitungen des Herstellers.
5. Benutzen Sie das Gerät nicht in der Nähe von Wasser oder Feuchtigkeit.
6. Verwenden Sie zur Reinigung des Geräts nur ein feuchtes Tuch.
7. Blockieren Sie keine Belüftungsöffnungen. Nehmen Sie den Einbau des
Geräts nur entsprechend den Anweisungen des Herstellers vor.
8. Bauen Sie das Gerät nicht in der Nähe von Wärmequellen wie Heizkörpern,
Wärmeklappen, Öfen oder anderen Geräten (inklusive Verstärkern) ein, die
Hitze erzeugen.
9. Setzen Sie die Sicherheitsfunktion des polarisierten oder geerdeten Steckers
nicht außer Kraft. Ein polarisierter Stecker hat zwei flache, unterschiedlich breite
Pole. Ein geerdeter Stecker hat zwei flache Pole und einen dritten Erdungsstift.
Der breitere Pol oder der dritte Stift dient Ihrer Sicherheit. Wenn der vorhandene
Stecker nicht in Ihre Steckdose passt, lassen Sie die veraltete Steckdose von
einem Elektriker ersetzen.
10. Schützen Sie das Netzkabel dahingehend, dass niemand darüber laufen und
es nicht geknickt werden kann. Achten Sie hierbei besonders auf Netzstecker,
Mehrfachsteckdosen und den Kabelanschluss am Gerät.
11. Ziehen Sie den Netzstecker des Geräts bei Gewittern oder längeren
Betriebspausen aus der Steckdose.
12. Überlassen Sie die Wartung qualifiziertem Fachpersonal. Eine Wartung ist
notwendig, wenn das Gerät auf irgendeine Weise, beispielsweise am Kabel
oder Netzstecker beschädigt wurde, oder wenn Flüssigkeiten oder Objekte in
das Gerät gelangt sind, es Regen oder Feuchtigkeit ausgesetzt war, nicht mehr
wie gewohnt betrieben werden kann oder fallen gelassen wurde.

ESPAÑOL
PRECAUCION: Para reducir el riesgo de incendios o descargas, no permita que este
aparato quede expuesto a la lluvia o la humedad. Para reducir el riesgo de descarga
eléctrica, nunca quite la tapa ni el chasis. Dentro del aparato no hay piezas susceptibles
de ser reparadas por el usuario. Dirija cualquier reparación al servicio técnico oficial.
El símbolo del relámpago dentro del triángulo equilátero pretende advertir al usuario de la
presencia de "voltajes peligrosos" no aislados dentro de la carcasa del producto, que
pueden ser de la magnitud suficiente como para constituir un riesgo de descarga eléctrica
a las personas. El símbolo de exclamación dentro del triángulo equilátero quiere advertirle
de la existencia de importantes instrucciones de manejo y mantenimiento (reparaciones)
en los documentos que se adjuntan con este aparato.
Instrucciones importantes de seguridad
1. Lea todo este manual de instrucciones antes de comenzar a usar la unidad.
2. Conserve estas instrucciones para cualquier consulta en el futuro.
3. Cumpla con todo lo indicado en las precauciones de seguridad.
4. Observe y siga todas las instrucciones del fabricante.
5. Nunca utilice este aparato cerca del agua o en lugares húmedos.
6. Limpie este aparato solo con un trapo suave y ligeramente humedecido.
7. No bloquee ninguna de las aberturas de ventilación. Instale este aparato de acuerdo
a las instrucciones del fabricante.
8. No instale este aparato cerca de fuentes de calor como radiadores, calentadores,
hornos u otros aparatos (incluyendo amplificadores) que produzcan calor.
9. No anule el sistema de seguridad del enchufe de tipo polarizado o con toma de
tierra. Un enchufe polarizado tiene dos bornes, uno más ancho que el otro. Uno con
toma de tierra tiene dos bornes normales y un tercero para la conexión a tierra. El
borne ancho o el tercero se incluyen como medida de seguridad. Cuando el enchufe
no encaje en su salida de corriente, llame a un electricista para que le cambie su
salida anticuada.
10. Evite que el cable de corriente quede en una posición en la que pueda ser pisado o
aplastado, especialmente en los enchufes, receptáculos y en el punto en el que
salen de la unidad.
11. Desconecte de la corriente este aparato durante las tormentas eléctricas o cuando
no lo vaya a usar durante un periodo de tiempo largo.
12. Dirija cualquier posible reparación solo al servicio técnico oficial. Deberá hacer que
su aparato sea reparado cuando esté dañado de alguna forma, como si el cable de
corriente o el enchufe están dañados, o si se han derramado líquidos o se ha
introducido algún objeto dentro de la unidad, si esta ha quedado expuesta a la lluvia
o la humedad, si no funciona normalmente o si ha caído al suelo.
ITALIANO
ATTENZIONE: per ridurre il rischio di incendio o di scariche elettriche, non esponete
questo apparecchio a pioggia o umidità. Per ridurre il pericolo di scariche elettriche
evitate di rimuoverneil coperchio o il pannello posteriore. Non esistono all'interno
dell'apparecchio parti la cui regolazione è a cura dell'utente. Per eventuale assistenza,
fate riferimento esclusivamente a personale qualificato. Il fulmine con la punta a freccia
all'interno di un triangolo equilatero avvisa l'utente della presenza di "tensioni pericolose"
non isolate all'interno dell'apparecchio, tali da costituire un possibile rischio discariche
elettriche dannose per le persone. Il punto esclamativo all'interno di un triangolo equilatero
avvisa l'utente della presenza di importanti istruzioni di manutenzione (assistenza) nella
documentazione che accompagna il prodotto.

Importanti Istruzioni di Sicurezza
1. Prima di usare l'apparecchio, vi preghiamo di leggerne per intero le istruzioni.
2. Conservate tali istruzioni per una eventuale consultazione futura.
3. Vi preghiamo di rispettare tutte le istruzioni di sicurezza.
4. Seguite tutte le istruzioni del costruttore.
5. Non usate questo apparecchio vicino ad acqua o umidità.
6. Pulite l'apparecchio esclusivamente con un panno asciutto.
7. Evitate di ostruire una qualsiasi delle aperture di ventilazione. Posizionatelo seguendo
le istruzioni del costruttore.
8. Non posizionatelo vicino a sorgenti di calore come radiatori, scambiatori di calore,
forni o altri apparecchi (amplificatori compresi) in grado di generare calore.
9. Non disattivate la protezione di sicurezza costituita dalla spina polarizzata o dotata di
collegamento a terra. Una spina polarizzata è dotata di due spinotti, uno più piccolo
ed uno più grande. Una spina dotata di collegamento a terra è dotata di due spinotti più
un terzo spinotto di collegamento a terra. Questo terzo spinotto, eventualmente anche
più grande, viene fornito per la vostra sicurezza. Se la spina fornita in dotazione non
si adatta alla vostra presa, consultate un elettricista per la sostituzione della presa
obsoleta.
10. Proteggete il cavo di alimentazione in modo che non sia possibile camminarci sopra
né piegarlo, con particolare attenzione alle prese, ai punti di collegamento e al punto in
cui esce dall'apparecchio.
11. Staccate l'apparecchio dalla alimentazione in caso di temporali o tempeste o se non
lo usate per un lungo periodo.
12. Per l'assistenza, fate riferimento esclusivamente a personale qualificato. È necessaria
l'assistenza se l'apparecchio ha subito un qualsiasi tipo di danno, come danni al cavo
o alla spina di alimentazione, nel caso in cui sia stato versato del liquido o siano caduti
oggetti al suo interno, sia stato esposto a pioggia o umidità, non funzioni correttamente
o sia stato fatto cadere.
日本語
電気製品は安全のための注意事項を守らないと、火災や人身事故になるこ
とがあります。
この取扱説明書には、事故を防ぐための重要な注意事項と製品の取り扱いかたを示してい
ます。この取扱説明書をよくお読みのうえ、製品を安全にお使いください。お読みになっ
たあとは、いつでも見られるところに必ず保管してください。
警告
ICON製品は安全に十分配慮して設計されています。しかし、電気製品はすべて、まちがっ
た使いかたをすると、火災や感電などにより人身事故になることがあり危険です。事故を
防ぐために次のことを必ずお守りください。
安全のための注意事項を守る
この取扱説明書の注意事項をよくお読みください。製品全般の注意事項が記載されています。
故障したら使わない
本体やACパワーアダプター、充電器などの動作がおかしくなったり、破損しているのに
お気付きの場合はすぐにお買い上げ店またはアイコンサービス窓口に修理をご依頼ください。
万一、異常が起きたら
アイコンサービスセンター
1
USBケーブルを抜く
2
お買い上げ店またはアイコン
サービス窓口に修理を依頼する
3
変な音・
においがしたら、
煙が出たら
-10dB

警告表示の意味
取扱説明書および製品では、次のような表示をしています。表示の内容をよく理解
してから本文をお読みください。
警告
この表示の注意事項を
守らないと、火災・感
電・破裂などにより
死亡や大けがなどの
人身事故が生じるこ
とがあります
注意
この表示の注意事項を
守らないと、感電や
その他の事故により
けがをしたり周辺の
器具に損害を与えた
りすることがあります。
注意を促す
記号
行為を禁止
する記号
行為を指示
する記号
火災 感電 指挟み
禁止 分解
禁止
接触
禁止
プラグを
コンセン
トから抜く
強制
火災や感電の原因となります。絶対に自分で分解しないでください。内部の点検や修理は
お買い上げ店またはアイコンサービス窓口にご依頼ください。
警告 火災 感電 下記の注意事項を守らないと火災・感電により
死亡や大けがの原因となります。
分解や改造をしない
水や異物が入ると火災や感電の原因となります。この機種は防水構造にはなっていません
ので、水中や雨天での使用はできません。万一、水や異物が入ったときは、すぐにスイッチを
切り、ACパワーアダプターや充電器をコンセントから抜いてください。電池を使用している
場合は、すぐに電池を取り出してください。そして、お買い上げ店またはアイコンサービス
窓口にご相談ください。
内部に水や異物を入れない
ショルダーベルトやハンドストラップに手を通したまま本体を固定しないで持ち運ぶと、
本体に衝撃を与えたり、ドアにはさまったりして故障やけがの原因となります。
持ち運ぶときは、手でおさえるか、ポケットに入れるなど固定してください。
電源コードを傷つけると、火災や感電の原因となります。• 電源コードを加工したり、
傷つけたりしない。• 重いものをのせたり、引っ張ったりしない。• 熱器具に近づけない。
加熱しない。• 電源コードを抜くときは、必ずプラグを持って抜く。万一、電源
コードが傷んだら、お買い上げ店またはアイコンサービス窓口に交換をご依頼ください。
電源コードを傷つけない
遠くで雷が鳴りだしたときは、落雷を避けるため、すぐにご使用を中止してください。屋外
で使用時は、安全な場所へ避難してください。
雷が鳴りだしたら、使用しない
持ち運びのときに振り回さない
注意 下記の注意事項を守らないとけがをしたり周辺の家財に損害を与
えたりすることがあります。
上記のような場所で使うと、火災や感電の原因となることがあります。
湿気やほこり、油煙、湯気の多い場所では使わない
長期間使用しないときは電源コードやバッテリーをはずして保管してください。
火災の原因となることがあります。
長期間使用しないときは、電源をはずす
電源コード、AVケーブルやUSBケーブルを抜くケーブルは足に引っかけると製品の落下や
転倒などによりけがの原因となることがあるため、十分注意して接続・配置してください。
コード類は正しく配置する

Einführung
So registrieren Sie Ihr ICON Pro Audio- Produkt in Ihrem
persönlichen Konto
Betrieb des Apollo/Artemis
Energieversorgung des Apollo/Artemis
Signalpegel einstellen
Platzierung des Mikrofons
Popschutz
Montage des Apollo/Artemis
Funktionen
Wartung und Reparatur
Technische Daten
15
17
18
18
18
18-19
19
19
20
21
DEUTSCHE
FRANÇAIS
Introductions
Enregistrement de votre produit ICON Pro Audio sur votre compte
personnel
Réglage du niveau du signal
Placement du microphone
P-Poping
Fixation du Apollo/Artemis
Caractéristiques
Utilisation du Apollo/Artemis
Mise sous tension du Apollo/Artemis
Entretien et réparations
Spécifications
8
10
11
11
11
11
12
12
13
14
ENGLISH
Introduction
Register your ICON ProAudio product to your personal account
Operating the Apollo/Artemis
Powering the Apollo/Artemis
Features
Setting up the signal level
Microphone Placement
P-Poping
Mounting the Apollo/Artemis
Services
Specifications
1
3
4
4
4
4
5
5
6
7
2
9
16

ESPAÑOL
Introducción
Registre su producto ICON Pro Audio en su cuenta personal
Operación del Apollo/Artemis
Encendido del Apollo/Artemis
Ajuste del nivel de señal
Ubicación del micrófono
Estallidos
Instalación del Apollo/Artemis
Características
Servicio
Especificaciones
22
24
25
25
26
25-26
26
27
28
25
日本語
はじめに
Apollo/Artemisの使用法
Apollo/Artemisの電源供給
信号レベルの設定
マイクロホンの配置
Pポッピング
Apollo/Artemisの配置
お客様のアカウントでICON Pro Audio 製品をご登録ください
機能
製品仕様
修理について
29
31
32
32
32
32-33
33
33
34
35
ITALIANO
Introduzione
Uso dell’Apollo/Artemis
Alimentazione dell’Apollo/Artemis
Regolazione del livello del segnale
Posizionamento del microfono
P-Popping
Montaggio dell’Apollo/Artemis
Revisione
Registrate nel vostro account il prodotto ICON Pro Audio acquistato.
Caratteristiche
Dati tecnici
36
38
39
39
39
39-40
40
40
41
42
23
30
37

ENGLISH
Introduction
Thank you for purchasing the ICON Legend series Apollo/Artemis studio large-diaphragm
condenser microphone. We sincerely trust this product will provide years of satisfactory
service, but if anything is not to your complete satisfaction, we will endeavor to make
things right.
In these pages, you'll find a detailed description of the features of the Apollo/Artemis,
step-by-step instructions for its setup and use, and full specifications.
Please register the product on our website at the below link www.iconproaudio.
com/registration:
You'll also find a warranty card enclosed---please don't forget to fill it out and mail it so
that you can receive online technical support at: www.iconproaudio.com. And so we can
send you updated information about these and other ICON products in the future. As
with most electronic devices, we strongly recommend you retain the original packaging.
In the unlikely event the product must be returned for servicing, the original packaging
(or reasonable equivalent) is required.
With proper care , your Apollo/Artemis will operate without any trouble for many years.
We recommend that you record your serial number in the space provided below for
future reference.
1

Register your ICON ProAudio product to your
personal account
1.Check serial number of your device
Please go to http:// iconproaudio.com/registration or scan the QR code
below.
Input your device’s serial number and the other information on the
screen. Click“Submit”.
A message will pop up showing your device information such as
model name and its serial number - Click “Register this device to my
account” or if you see any other message, please contact our after-
sales service team
2.Log in to your personal account page for existing user or sign
up for new user
Existing user: Please log into your personal user page by inputing
your user name and password.
New user: Please click “Sign Up” and fill in all the information.
3.Download all useful materials
All your registered devices under your account will show on the
page. Each product will be listed along with all its available files
such as drivers, firmware, user manual in different languages and
bundled software etc. for download.
Please make sure you have download the necessary files such as
driver before you begin device installation.
2

Features
Professional Large-diaphragm condenser microphone for unsurpassed audio quality
Ideal as main and support microphone for most differing recording situations
Cardioid pickup pattern for outstanding sound source separation and feedback rejection
Pressure-gradient transducer with shock-mounted capsule
Prefect for vocals and acoustic instruments
External 36-52 Volt phantom power operation
Heavy-duty suspension mount and wooden transport case included
Ultra-rugged construction with metal die-cast body
High-quality components and exceptionally rugged construction ensure long lift.
-10dB
3

Operating the Apollo/Artemis
Powering the Apollo/Artemis
The Apollo/Artemis is a large diaphragm condenser microphone and therefore needs to
be operated by connecting a phantom power supply. Phantom power is standard on
most quality mixers, outboard MIC-pres and hard disk recorders. If necessary an external
phantom power supply can also be used. The Apollo/Artemis receives the phantom
power directly from a MIC cable when connected to a mixer or other microphone input
that includes a phantom supply. The power is actually sent OUT of the microphone INPUT,
riding silently along with the audio signal. Most mixers have a switch to engage the
phantom power so be sure to check that the phantom power is on.
Setting up the signal level
When connecting the Apollo/Artemis to a mixer or recorder input, be sure that the input
is of microphone level. Also, be sure that the phantom power is engaged as explained
at the previous section “Powering the Apollo/Artemis”. Most mixers and recorders of
reasonable quality will offer a microphone input with MIC trim (usually called Trim or
Gain) control. The purpose of the MIC trim control is to optimize the amount of good
signal to any noise associated with the mixers electronics. A good MIC pre with trim also
will have a Peak or Clip LED. To set a good level on the MIC, set the Apollo/Artemis up in
front of the desired sound source and slowly raise the MIC trim control until you see the
Peak LED light up. Then, turn the mix trim control down until the LED does not light any
more. On most mixers,the ideal setting is that the trim control is turned up as much as
possible without lighting the Peak LED.
Microphone Placement
In order to maximize the sound quality, you must pay careful attention to the placement
of your Apollo/Artemis and how it is positioned for the instrument or vocalist that you
are miking. All microphones, especially unidirectional or cardioid microphones, exhibit a
phenomenon know as the “proximity effect”. Very simply put, proximity effect is a
resulting change in the frequency response of a microphone based on the position of the
MIC capsule relative to the sound source. Specifically, when you point a cardioid MIC
directly at the sound source (on-axis) you will get the best frequency response, however,
when you start pointing the microphone slightly away (off-axis) you will notice the low
frequency dropping off and the microphone will start to sound thinner.
For most vocal applications you'll want to position the microphone directly in front of
the artist. The same may be true for miking instruments. However, you can make some
pretty amazing equalization adjustments by slightly changing the angle of the capsule
to the sound source. This can be a very useful technique in capturing the optimum
sound of drum set, acoustic guitar, piano or other instruments in a live room or sound
stage. Experimentation and experience are the best teachers in getting good sounds,
so plug in!
4

P-Poping
P-Poping is that annoying pop that you can get when the microphone diaphragm gets
a blast of air from a vocalist pronouncing words with the letter “P” included. There are
a few ways to deal with the problem including using an external pop filter. Some famous
engineers have relied on an old nylon stocking over a bent clothes hanger, which actually
works very well. For a cleaner solution, try ICON PF-01 pop filter. You can also try placing
the microphone slightly off axis (on a slight angle) from the vocalist. This can often solve
the problem without using an external pop filter.
Mounting the Apollo/Artemis
Mount your Apollo/Artemis into the provided suspension mount as the diagrams
illustrated below.
-10 dB
5

Specifications
Acoustical operating principle
Directional pattern
Frequency range
Field Sensitivity (mV/Pa)
Field Sensitivity (dB re iV/Pa)
Rated Impedance
Min. load impedance
SPL
S/N ratio
Power supply voltage
Current consumption
Weight (Microphone only)
(with suspension mount)
Dimensions
Pressure gradient transducer
Cardioid
20Hz – 18KHz
23.30
-32.7
200 Ohms
1000 Ohms
126dB
83.7dB
48V +/-3V
2.9mA
0.67Kg (1.5lb)
1.09Kg (2.4lb)
50mm (dia.) x 209mm (L)
1.97” (dia.) x 8.23” (L)
Freguency response chart
Polar pattern
6

If
Check our online Help Center at http://support.iconproaudio.com/hc/en-us, for
informaon, knowledge, and downloads such as:
1. FAQ
2. Download
3. Learn More
4. Forum
Very oen you will find soluons on these pages. If you don’t find a soluon, create
a support cket at our online Help Center at the link below, and our technical support
team will assist you as soon as we can.
Navigate to http://support.iconproaudio.com/hc/en-us and then sign in to submit
a cket.
As soon as you have submitted an inquiry cket, our support team will assist you to
resolve the problem with your ICON ProAudio device as soon as possible.
To send defecve products for service:
1. Ensure the problem is not related to operaon error or external system devices.
2. Keep this owner's manual. We don't need it to repair the unit.
3. Pack the unit in its original packaging including end card and box. This is very
important. If you have lost the packaging, please make sure you have packed
the unit properly. ICON is not responsible for any damage that occurs due to
non-factory packing.
4. Ship to the ICON tech support center or the local return authorizaon. See our
service centers and distributor service points at the link below:
If you are located in US
Send the product to:
North America
Mixware, LLC –U.S. Distributor
11070 Fleetwood Street –Unit F.
Sun Valley, CA 91352; USA
Tel.: (818) 578 4030
Contact:
you are located in Hong Kong
Send the product to:
ASIA OFFICE:
Unit F, 15/F., Fu Cheung Centre,
No. 5-7 Wong Chuk Yueng
Street, Fotan, Sha Tin, N.T., Hong Kong.
www.mixware.net/help
If you are located in Europe
Send the product to:
Sound Service GmbHEuropean
HeadquarterMoriz-Seeler-Straße
3D-12489 Berlin
Telephone: +49 (0)30 707 130-0
Fax: +49 (0)30 707 130-189
E-Mail: info@sound-service.eu
5. For addional update informaon please visit our website at:
www.iconproaudio.com 7

FRANÇAIS
Introductions
Nous vous remercions pour l'achat Micro à condensateur de studio à large diaphragme
Légende série Apollo/Artemis d'ICON, Nous pensons sincèrement que ce produit vous
comblera pendant des années mais, si quelque chose ne vous convient pas, nous y nous
efforcerons d'y remédier.
Au fil de ces pages vous découvrirez une description détaillée des caractéristiques du
Apollo/Artemis , des instructions de configuration et d'utilisation étape par étape ainsi
que toutes les spécifications.
Veuillez enregistrer le produit sur notre site Web à l'aide du lien www.iconproaudio.
com/registration :
Vous trouverez également une carte de garantie ; n'oubliez pas de la remplir et de
l'envoyer afin de pouvoir être aidé en ligne sur le lien : www.iconproaudio.com. Nous
pouvons ainsi vous communiquer des informations mises à jour concernant ces produits
mais aussi sur d'autres produits ICON. Comme pour la plupart des appareils
électroniques, nous vous conseillons de conserver l'emballage original. Dans le cas très
improbable ou vous deviez renvoyer ce produit, nous réclamerions l'emballage original
(ou un équivalement raisonable).
Avec des soins appropriés, votre Apollo/Artemis fonctionnera sans problème pendant des
années. Nous vous conseillons d'enregistrer votre numéro de série dans l'espace ci-dessous
à titre de référence future.
8

Enregistrement de votre produit ICON Pro Audio sur
votre compte personnel
1. Vérifiez le numéro de série de votreappareil
Allez sur http://iconproaudio.com/registration ou numérisez le code QR cidessous.
ISaisissez le numéro de série de votre appareil et les autres informations
demandées à l'écran. Cliquez sur « Submit ».
Un message apparaîtra avec des informations sur votre appareil, telles que le
nom du modèle et son numéro de série. Cliquez sur « Register this device to my
account » ou si vous voyez un autre message, veuillez communiquer avec notre
équipe de service après-vente.
2. Ouvrez une session sur votre page de compte personnel ou inscrivez-vous
en tant que nouvel utilisateur
Utilisateur existant : Veuillez vous connecter à votre page d'utilisateurpersonnelle
en saisissant votre nom d'utilisateur et votre mot de passe.
Nouvel utilisateur : Veuillez cliquer sur « Sign Up » et remplir toutes les
informations.
3. Télécharger tous les documentsutiles
Tous les appareils enregistrés sous votre compte apparaîtront sur cette
page. Chaque produit sera répertorié avec tous ses fichiers disponibles au
téléchargement, tels que les pilotes, les micrologiciels, les modes d'emploi en
différentes langues et les progiciels, etc. Veuillez vous assurer que vous avez
téléchargé les fichiers nécessaires, tels que le pilote, avant de commencer
l'installation de l'appareil
9

Caractéristiques
Microphone à condensateur professionnel à large diaphragme pour une qualité audio
inégalée
Idéal comme microphone et support principal pour la plupart des situations
d'enregistrement différés
Configuration cardioïde pour une séparation de la source sonore et une contre-réaction
exceptionnelles
Transducteur à gradient de pression avec une capsule antichoc
Instruments vocaux et acoustiques parfaits
Fonctionnement sur alimentation fantôme externe 36-52 Volts
Pied de fixation robuste et mallette de transport en bois inclus
Corps coulé en métal ultra robuste
Composants de haute qualité et fabrication exceptionnellement robuste assurant une
longue utilisation.
-10dB
10

Utilisation du Apollo/Artemis
Mise sous tension du Apollo/Artemis
Le Apollo/Artemis est un microphone à condensateur à large diaphragme ; il doit donc
être utilisé au moyen d'une alimentation fantôme. La plupart des consoles de mixage,
des préamplificateurs externes et des enregistreurs sur disques dur utilisent une alimentation
fantôme standard. Une alimentation fantôme externe peut également être utilisée si
nécessaire. Le Apollo/Artemis reçoit une alimentation fantôme directement sur le câble
micro le reliant à la console de mixage ou d'une autre entrée micro offrant ce type
d'alimentation. L'alimentation est alors transmise avec le signal par le câble d'entrée
micro de façon inaudible. La plupart des consoles de mixage disposent d'un commutateur
permettant d'activer l'alimentation fantôme pour s'assurer que celle-ci est bien activée.
Réglage du niveau du signal
Lorsque vous connectez le micro Apollo/Artemis à l'entrée d'une console de mixage ou
d'un enregistreur, il convient de s'assurer que cette entrée est bien au niveau du micro.
Veillez également à ce que l'alimentation fantôme soit activée comme expliqué à la
section précédente « Mise sous tension du Apollo/Artemis ». La plupart des consoles
de mixage et des enregistreurs de qualité sont équipés d'une entrée micro avec réglage
de gain (généralement appelé Trim ou Gain). Ce réglage de gain permet d'optimiser le
niveau du signal micro par rapport au bruit de fond induit par l'électronique des consoles.
Un bon préamplificateur micro équipé de contrôle de gain aura un voyant d'écrêtage
(PEAK ou CLIP). Pour obtenir un bon niveau micro, placez Apollo/Artemis en face de la
source et augmentez progressivement le gain jusqu'à ce que le témoin PEAK s'allume.
Baissez ensuite le gain jusqu'à ce que le voyant reste éteint. Sur la plupart des consoles
de mixage, le résultat optimal est obtenu en réglant le gain le plus haut possible sans
que le voyant PEAK s'allume.
Placement du microphone
Pour optimiser au maximum la qualité sonore, vous devez porter une attention
particulière au placement de votre Apollo/Artemis par rapport à l'instrument ou au
chanteur que vous enregistrez. Tous les micros, et en particulier les micros unidirectionnels
ou cardioïdes, sont très sensibles à un phénomène connu sous le nom « effet de proximité ».
En termes simples, l'effet de proximité se caractérise par une variation de la réponse en
fréquence du micro en fonction de la position de la capsule par rapport à la source sonore.
Plus précisément, lorsque vous pointez un micro cardioïde en direction de la source sonore
(dans l'axe), la réponse en fréquence s'améliore ; à l'inverse, lorsque vous désaxez le
micro par rapport à la source, les graves sont plus particulièrement atténués et le son
devient plus aigu.
Pour la plupart des applications de chant, on cherchera à placer le micro directement
en face de l'artiste. La même règle peut s'appliquer pour la prise d'instruments. Cependant,
de surprenantes nuances d'égalisation peuvent être obtenues en désaxant légèrement
la capsule par rapport à la source sonore. Cela peut être une technique très utile pour
une prise optimale des sons de batterie, guitare acoustique, piano ou autres instruments
en live ou sur scène. Rien ne remplacera l'expérience dans le domaine de la prise de son ;
passez alors à la pratique !
11

P-Poping
Le P-Poping est un bruit désagréable produit par le micro lorsque le diaphragme reçoit
le souffle d'un chanteur prononçant un « P ». Il existe différentes solutions permettant
de palier à ce problème, dont le recours à un filtre anti-pop externe. Certains ingénieurs
du son parmi les plus prestigieux emploient pour cela un bon vieux bas nylon enfilé sur
un cintre plié et obtiennent d'excellents résultats. Essayez le filtre pop ICON PF-01 comme
solution simple. Vous pouvez également désaxer légèrement le micro par rapport au
chanteur (un petit angle). Cette technique peut souvent résoudre le problème sans faire
appel à un filtre anti-pop externe.
Fixation du Apollo/Artemis
Le Apollo/Artemis peut être fixé sur le pied fourni comme illustré sur le schéma
ci-dessous.
-10 dB
12

Spécifications
Acoustical operating principle
Directional pattern
Frequency range
Field Sensitivity (mV/Pa)
Field Sensitivity (dB re iV/Pa)
Rated Impedance
Min. load impedance
SPL
S/N ratio
Power supply voltage
Current consumption
Weight (Microphone only)
(with suspension mount)
Dimensions
Pressure gradient transducer
Cardioid
20Hz – 18KHz
23.30
-32.7
200 Ohms
1000 Ohms
126dB
83.7dB
48V +/-3V
2.9mA
0.67Kg (1.5lb)
1.09Kg (2.4lb)
50mm (dia.) x 209mm (L)
1.97” (dia.) x8.23 ” (L)
Frequency response chart
Polar pattern
13

Entretien et réparations
Si vous devez faire réparer votre “ ", suivre ces
instructions.
Consultez notre centre d’aide en ligne sur
http://support.iconproaudio.com/hc/en-us, pour plus d’informations, de
connaissances et de téléchargements tels que.
1. FAQ
2. Téléchargements
3. En savoir plus
4. Forum
Le plus souvent, vous trouvez des solutions sur ces pages. Si vous ne
trouvez pas une solution, demandez un ticket d’assistance à notre Service
à la clientèle en ligne (ACS) via le lien ci-dessous, et notre équipe
d’assistance technique vous apportera une aide dès que possible.
Allez à http://support.iconproaudio.com/hc/en-us, connectez-vous
pour soumettre un ticket ou cliquez sur « Submit a ticket » sans avoir à
vous connecter.
Dès réception de votre ticket, notre équipe d'assistance vous aide à
résoudre le problème que vous avez avec votre appareil ICON ProAudio.
Pour envoyer des produits défectueux pour réparation:
1. Confirmer que le problème ne provienne pas d'une erreur de
manipulation ou de périphériques externes.
2. Conserver ce manuel de l'opérateur. Nous n'en avons pas besoin pour
réparer l'unité.
3. Emballer l'unité dans son emballage original y compris la carte et la
boîte. Ceci est très important. Si vous avez perdu l'emballage, assurez-
vous de bien avoir emballé l'unité. ICON n'est pas responsable de dégât
occasionnés par un emballage qui ne soit pas d'usine.
4. Envoyer au centre de SAV d’ICON ou au bureau des renvois autorisé.
Consultez le lien cidessous pour connaître nos centres de services et
les points de service de distribution:
Apollo/Artemis
Si vous êtes à Hong Kong
Envoyer le produit à :
BUREAU EN ASIE:
Unit F, 15/F., Fu Cheung Centre,
No. 5-7 Wong Chuk Yueng Street,
Fotan,
Sha Tin, N.T., Hong Kong.
Si vous êtes à North America
Envoyer le produit à :
North America
Mixware, LLC – U.S. Distributor
11070 Fleetwood Street – Unit F.
Sun Valley, CA 91352; USA
Tel.: (818) 578 4030
Contact: www.mixware.net/help
Si vous êtes à Europe
Envoyer le produit à :
Sound Service
GmbHEuropean
HeadquarterMoriz-Seeler-Straße
3D-12489 Berlin
Telephone: +49 (0)30 707 130-0
Fax: +49 (0)30 707 130-189
E-Mail: info@sound-service.eu
5. For additional update information please visit our website at:
www.iconproaudio.com
14

DEUTSCHE
Einführung
Vielen Dank, dass Sie sich für den ICON Legend Serie Apollo / Artemis Studio
Großmembran-Kondensator-Mikrofon. Wir haben vollstes Vertrauen darin, dass
dieses Produkt Ihnen jahrelang zuverlässige Dienste leisten wird. Sollten sie aber
aus irgendwelchen Gründen nicht vollauf zufrieden sein, werden wir unser Möglichstes
tun, diesen Zustand zu beheben.
Auf den folgenden Seiten finden Sie eine detaillierte Beschreibung des Apollo/Artemis ,
eine Schritt-für-Schritt Anleitung für Setup und Betrieb, sowie sämtliche technischen
Details.
Bitte registrieren Sie das Produkt unter dem folgenden Link auf unserer Website: www.
iconproaudio.com/registration.
Sie werden außerdem eine beigelegte Garantiekarte finden. Bitte vergessen Sie nicht,
diese auszufüllen und uns zuzuschicken, damit Sie auf unseren Online- Support unter
iconproaudio zugreifen können und damit wir Ihnen aktuelle Informationen
über dieses und andere ICON-Produkte zusenden können. Wie bei den meisten
elektronischen Geräten empfehlen wir dringend, die Originalverpackung
aufzubewahren. Für den unwahrscheinlichen Fall, dass das Produkt zur Reparatur
zurückgesendet werden muss, ist die Originalverpackung (oder ein gleichwertiger
Ersatz) unbedingt erforderlich.
Mit entsprechender Pflege Sie Ihr Apollo/Artemis viele Jahre lang problemlos betreiben
können. Wir empfehlen, dass Sie Ihre Seriennummer in dieser Bedienungsanleitung
notieren, um eventuell später darauf zurückgreifen zu können.
www. .com
15

So registrieren Sie Ihr ICON Pro Audio- Produkt in
Ihrem persönlichen Konto
1. Überprüfen Sie die Seriennummer IhresGeräts
Gehen Sie zu http://iconproaudio.com/registration oder scannen
Sie den untenstehenden QR-Code
Geben Sie die Seriennummer Ihres Geräts und die anderen
erforderlichen Informationen auf dem Bildschirm ein. Klicken Sie
auf „Submit“.
Daraufhin wird eine Meldung mit den Daten Ihres Geräts wie dem
Modellnamen und der Seriennummer angezeigt. – Klicken Sie auf
„Register this device to my account“ oder wenden Sie sich unseren
Kundendienst, falls eine andere Meldung angezeigt wird
2. Melden Sie sich als bestehender Benutzer bei Ihrer
persönlichen Benutzerseite an oder registrieren Sie sich als
neuer Benutzer
Bestehender Benutzer: Melden Sie sich bei Ihrer persönlichen
Benutzerseite an, indem Sie Ihren
Benutzernamen und Ihr Passwort eingeben.
Neuer Benutzer: Klicken Sie auf „Sign Up“ und geben Sie alle
Informationen ein.
3. Laden Sie alle nützlichenMaterialien herunter
Auf dieser Seite werden alle für Ihr Konto registrierten Geräte
angezeigt. Jedes Produkt wird zusammen mit allen verfügbaren
Dateien wie Treiber, Firmware, Benutzerhandbuch in
verschiedenen Sprachen sowie Software-Bundles zum
Herunterladen aufgeführt. Stellen Sie sicher, dass Sie die
erforderlichen Dateien wie zum Beispiel Treiber heruntergeladen
haben, bevor Sie mit der Installation des Geräts beginnen.
16

Funktionen
Professionelles Großmembran-Kondensatormikrofon für einzigartige Audioqualität
Das Mikrofon kann bei den meisten Aufnahmen als Haupt- bzw. als zusätzliches
Mikrofon eingesetzt werden.
Nierencharakteristik für außergewöhnliche Isolierung der Signalquellen und
Rückkopplungsunterdrückung
Druckgradientenempfänger mit elastisch gelagerter Kapsel
Perfekte Aufnahme von Vokalisten und Instrumenten
Externe 36-52 V Phantomspeisung
Beinhaltet hoch beanspruchbare Geräteaufhängung und einen Transportkoffer aus
hölzern
Äußerst robuste Ausführung mit Metallgehäuse
Qualitativ hochwertige Bauteile und die außergewöhnlich robuste Bauweise
gewährleisten eine lange Lebensdauer.
-10dB
17

Betrieb des Apollo/Artemis
Energieversorgung des Apollo/Artemis
Das Apollo/Artemis ist ein Großmembran-Kondensatormikrofon und arbeitet mit
Phantomspeisung. Bei den meisten qualitativ hochwertigen Mischpulten,
Mikrofonverstärkern und Festplattenrekordern. ist die Phantomspeisung Standard. Fall
notwendig kann auch eine externe Phantomspannungsversorgung benutzt werden.
Das Apollo/Artemis erhält die Phantomspannung direkt über das MIC-Kabel, sobald
es an ein Mischpult oder einen anderen Anschluss mit Phantomspannung angeschlossen
wird. Die Spannungsversorgung erfolgt über den Mikrofoneingang. Die Spannung fließt
sozusagen zusammen mit dem Audiosignal durch das Kabel. Die meisten Mischpulte
verfügen über einen Schalter, mit dem die Phantomspeisung eingeschaltet wird, um vor
allem sicherzustellen, dass diese eingeschaltet ist.
Signalpegel einstellen
Wenn Sie das Apollo/Artemis an ein Mischpult oder einen Anschluss für Aufnahmen
anschließen, stellen Sie bitte sicher, dass sich der Eingang als Mikrofoneingang fungiert.
Überprüfen Sie außerdem, dass die Phantomspeisung aktiviert ist. Genauere
Informationen dazu finden Sie im vorherigen Abschnitt "Energieversorgung des
Apollo/Artemis". Die meisten Mischpulte und Aufnahmegeräte mit annehmbarer
Qualität verfügen über einen Mikrofoneingang mit Verstärkungsregelung. Die
Verstärkungsregelung soll die Menge der guten Signale in Bezug auf Geräusche, die mit
einem Mischpult verbunden sind, optimieren. Ein guter Mikrofonverstärker mit
Verstärkungsregelung verfügt außerdem über eine Peak- oder Clip-LED. Um einen guten
Signalpegel zu erhalten, stellen Sie das Apollo/Artemis vor die gewünschte akustische
Quelle und erhöhen Sie den Verstärkungsregler langsam, bis die Peak-LED aufleuchtet.
Danach drehen Sie den Trim-Regler herunter bis die LED aufhört zu leuchten. Bei den
meisten Mischpulten ist es optimal, dass der Trim-Regler soweit wie möglich
hochgeregelt wird, ohne dass die Peak-LED leuchtet.
Platzierung des Mikrofons
Um die Klangqualität zu optimieren müssen Sie darauf achten, wie Sie das
Apollo/Artemis in Bezug auf das Instrument oder den Vokalist, den Sie aufnehmen
wollen, platzieren. Alle Mikrofone, insbesondere wenn es sich um ungerichtete oder
Nierenmikrofone handelt, weißen ein Phänomen namens "Nahbesprechungseffekt" auf.
Das ist ganz einfach. Bei dem Nahbesprechungseffekt handelt es sich um einen Wechsel
des Frequenzbereiches eines Mikrofones, entsprechend der Position der Mikrofonkapsel
in Bezug zur Klangquelle. Genauer gesagt heißt das, wenn Sie ein Nierenmikrofon direkt
auf die Klangquelle halten (geradlinig), erhalten Sie den besten Frequenzbereich. Wenn
Sie das Mikrofon jedoch leicht von der Klangquelle entfernen (Ausrichtung nicht
geradlinig), nehmen Sie eine niedrige Frequenz war und der Klang des Mikrofones ist
schwächer.
18

Für die meisten Vokalaufnahmen ist es günstig, das Mikrofon direkt vor den Künstler zu
platzieren. Das Gleiche gilt für die Aufnahme von Instrumenten. Sie können jedoch einige
verblüffende Berichtigungen vornehmen, indem Sie lediglich den Winkel der Kapsel zu
der Klangquelle ändern. Diese Technik ist optimal für die Aufnahme eines Schlagzeuges,
einer Akustikgitarre, eines Klaviers oder eines beliebigen anderen Instruments bei einer
Liveaufnahmen oder einer Bühnenaufnahme. Für die Aufnahmen von guten Klängen sind
Erfahrung und Experimentierfreudigkeit wichtig, also los geht's!
Popschutz
"Pop"-Laute entstehen, wenn die Mikrofonmembran bei der Aussprache von "P"-Lauten
auf die ausgestoßene Luft des Vokalisten reagiert. Es gibt verschiedene Möglichkeiten,
dieses Problem in den Griff zu bekommen, z.B. die Verwendung eines externen
Popschutzes. Einige bekannte Ingenieure haben auf eine alte Nylonsocke vertraut, die
auf einen Kleiderbügel gezogen wurde. Diese Variante hat eigentlich ganz gut funktioniert.
Eine etwas sauberere Lösung ist der ICON PF-01-Popschutz. Sie können außerdem
versuchen, das Mikrofon in einem leichten Winkel zur Achse zum Vokalisten zu stellen.
Dies löst oft schon das Problem, ohne dass Sie einen externen Popschutz verwenden
müssen.
Montage des Apollo/Artemis
Montieren Sie den Apollo/Artemis
unter Beachtung der folgenden Schaubilder
an der mitgelieferten Halterung.
-10dB
19

Technische Daten
Acoustical operating principle
Directional pattern
Frequency range
Field Sensitivity (mV/Pa)
Field Sensitivity (dB re iV/Pa)
Rated Impedance
Min. load impedance
SPL
S/N ratio
Power supply voltage
Current consumption
Weight (Microphone only)
(with suspension mount)
Dimensions
Pressure gradient transducer
Cardioid
20Hz – 18KHz
23.30
-32.7
200 Ohms
1000 Ohms
126dB
83.7dB
48V +/-3V
2.9mA
0.67Kg (1.5lb)
1.09Kg (2.4lb)
50mm (dia.) x 209mm (L)
1.97” (dia.) x 8.23” (L)
Frequency response chart
Polar pattern
20

Wartung und Reparatur
Falls Ihr “ " repariert werden muss, befolgen Sie bitte die
nachstehenden Anweisungen.
Besuchen Sie unser Online-Hilfecenter unter http://support.iconproaudio.com/hc/en-us für
Informationen, Erfahrungen und Downloads, wie z.B.
1. FAQ
2. Herunterladen
3. Erfahren Sie mehr
4. Forum
Sie werden auf diesen Seiten sehr oft Lösungen finden. Wenn Sie keine Lösung
finden, erstellen
Sie mit unserem Online-ACS (Automatische Kundenunterstützung) ein Support-
Ticket unter folgendem Link und unser technischer Kundenservice wird Ihnen so
schnell wie möglich helfen. Rufen Sie http://support.iconproaudio.com/hc/en-us
auf und melden Sie sich zum Einreichen eines Tickets an oder klicken Sie ohne
Anmeldung auf „Submit a ticket“.Nachdem Sie ein Anfrageticket eingereicht haben,
wird Sie unser Kundendienstteam so bald wie möglich bei der Lösung des Problems
mit Ihrem iCON-Pro-Audio-Gerät unterstützen.
Einsenden von defekten Produkten zur Wartung:
1. Stellen Sie sicher, dass das Problem nicht durch einen Anwendungsfehler oder
externe Systemgeräte verursacht wird.
2. Bewahren Sie diese Bedienungsanleitung bei sich auf und schicken Sie sie nicht
mit, da sie für die Reparatur des Geräts nicht benötigt wird.
3. Packen Sie das Gerät in die Originalverpackung, einschließlich Registerkar te und
Versandkarton. Dies ist sehr wichtig. Wenn Sie die Originalverpackung verloren
haben, stellen Sie bitte sicher, dass das Gerät ordentlich verpackt ist. ICON übernimmt
keine Verantwortung für Schäden, die durch fabrikfremde Verpackung entstehen.
4. Schicken Sie das Gerät an das technische Ser vicezentrum von ICON oder an die
regionale Rücksendeadresse. Suchen Sie unsere Kundendienstcenter und
War tungsstellen der Distributoren unter dem folgenden Link:
Wenn Sie sich in Hongkong befinden
Senden Sie das Produkt an:
BÜRO ASIEN:
Unit F, 15/F., Fu Cheung Centre,
No. 5-7 Wong Chuk Yueng Street, Fotan,
Sha Tin, N.T., Hong Kong.
Wenn Sie sich in Europe befinden
Senden Sie das Produkt an:
Sound Service
GmbHEuropean
HeadquarterMoriz-Seeler-Straße
3D-12489 Berlin
Telephone: +49 (0)30 707 130-0
Fax: +49 (0)30 707 130-189
E-Mail:
Apollo/Artemis
info@sound-service.eu
Wenn Sie sich in North America befinden
Senden Sie das Produkt an:
North America
Mixware, LLC – U.S. Distributor
11070 Fleetwood Street – Unit F.
Sun Valley, CA 91352; USA
Tel.: (818) 578 4030
Contact: www.mixware.net/help
5. Für zusätzliche Informationen besuchen Sie bitte unsere Webseite unter:
www.iconproaudio.com
21

ESPAÑOL
Introducción
Gracias por haber adquirido el estudio de gran diafragma del micrófono de condensador
Apollo/Artemis de ICON. Confiamos en que este producto le brindará años de vida útil
satisfactoria. Sin embargo, si hay algo que no es de su total satisfacción, intentaremos
por todos los medios solucionar el problema.
En estas páginas, encontrará una descripción detallada de las funciones de Apollo/Artemis,
instrucciones paso a paso para su conDiagramación y uso, y una lista completa de
especificaciones.
También encontrará la tarjeta de garantía. No olvide completarla y enviarla por correo
para poder recibir soporte técnico. Debe enviarla a: www. .com. De este modo,
podremos enviarle información actualizada acerca de este y otros productos de ICON en
el futuro. Tal como sucede con la mayoría de los dispositivos electrónicos, le
recomendamos conservar el embalaje original. En el caso poco probable de que deba
devolver el producto para que reciba servicio, se requerirá que lo envíe en el embalaje
original (o un equivalente razonable).
Con el cuidado adecuado su Apollo/Artemis funcionará sin problemas por muchos años.
Le recomendamos registrar su número de serie en el espacio a continuación para futura
referencia.
Por favor registre el producto en nuestro sitio web en el siguiente enlace
www.iconproaudio.com/registration:
iconproaudio
22

Registre su producto ICON Pro Audio en su cuenta
personal
1. Verifique el número de serie de sudispositivo
Por favor vaya a http://iconproaudio.com/registration o escanee el código QR a
continuación.
Introduzca el número de serie de su dispositivo y el resto de la información
solicitada en la pantalla. Haga clic en “Submit”.
Aparecerá un mensaje que muestra la información de su dispositivo, como
el nombre del modelo y su número de serie - Haga clic en "Register this
device to my account" o si ve cualquier otro mensaje, póngase en contacto
con nuestro equipo de servicio postventa. equipo de servicio postventa.
2. Acceda a la página de su cuenta personal para un usuario existente o
regístrese como un nuevo usuario
Usuario existente: Por favor, entre en su página personal de usuario introduciendo
su nombre de usuario y contraseña.
Usuario nuevo: Por favor, haga clic en "Sign Up" y rellene toda la información.
3. Descargue todos los materialesque sean de utilidad
Todos los dispositivos registrados en su cuenta aparecerán en esta página.
Cada producto será listado junto con todos sus archivos disponibles para
su descarga, tales como controladores, firmware, manual del usuario en
diferentes idiomas y software incluido, etc. Antes de comenzar la
instalación del dispositivo, por favor, asegúrese de que ha descargado los
archivos necesarios, como el controlador
23

Micrófono de condensador profesional de diafragma grande para una calidad de
audio incomparable
Ideal como micrófono principal y de soporte para las más diferentes situaciones
de grabación
Patrón de captación cardioide para una excelente separación de fuente de sonido
y rechazo de retroalimentación
Transductor de gradiente de presión con cápsula resistente a golpes
Voces e instrumentos acústicos perfectos
Operación externa con alimentación fantasma de 36 a 52 voltios
Montaje de suspensión de alto rendimiento protector contra viento y carcasa de
madera incluidos
Fabricación ultra resistente con cuerpo de metal fundido
Los componentes de alta calidad y la fabricación excepcionalmente resistente
aseguran una vida útil prolongada.
Características
-10dB
24

Operación del Apollo/Artemis
Encendido del Apollo/Artemis
El Apollo/Artemis es un micrófono de condensador de diafragma grande y, por lo tanto,
necesita operarse por medio de la conexión a una fuente de alimentación fantasma.
La alimentación fantasma es estándar en la mayoría de los mezcladores de calidad,
preamplificadores de micrófono externo y grabadores de discos duros. Si es necesario,
también puede utilizarse una fuente de alimentación fantasma externa. El
Apollo/Artemis recibe la alimentación fantasma directamente de un cable de micrófono
cuando se lo conecta a la entrada de un mezclador o de otro micrófono que incluya una
fuente fantasma. De hecho, la alimentación se envía FUERA de la ENTRADA del
micrófono, que acompaña silenciosamente a la señal de audio. La mayoría de los
mezcladores tienen un interruptor para conectar la alimentación fantasma; por lo tanto,
asegúrese de verificar que esté encendida.
Ajuste del nivel de señal
Cuando el Apollo/Artemis se conecta a la entrada de un mezclador o de un grabador,
asegúrese de que la entrada esté al nivel del micrófono. Asimismo, asegúrese de que la
alimentación fantasma esté conectada como se explica en la sección anterior
“Encendido del Apollo/Artemis”. La mayoría de los mezcladores y de los grabadores de
calidad razonable ofrecerán una entrada de micrófono con control de recorte para
micrófono (en general llamado Trim o Gain). El objetivo del control de recorte para
micrófono es optimizar la cantidad de buena señal respecto a cualquier ruido asociado
a la electrónica de los mezcladores. Un buen preamplificador de micrófono con Trim
también tendrá un LED Peak o Clip. Para establecer un buen nivel en el micrófono,
ajuste el Apollo/Artemis delante de la fuente de sonido deseada y levante lentamente
el control de recorte para micrófono hasta que se encienda el LED Peak. Luego, baje el
control de recorte del mezclador hasta que el LED no se encienda más. En la mayoría de
los mezcladores, el ajuste ideal es que el control de recorte se aumente tanto como sea
posible sin que se encienda el LED Peak.
Ubicación del micrófono
A fin de maximizar la calidad de sonido, debe prestar especial atención a la ubicación
de su Apollo/Artemis y a cómo se lo coloca respecto del instrumento o del vocalista
con el que utilizará el micrófono. Todos los micrófonos, en especial los micrófonos
unidireccionales o los cardioides, presentan un fenómeno conocido como "efecto de
proximidad". En pocas palabras, el efecto de proximidad es un cambio resultante en la
respuesta de frecuencia de un micrófono a partir de la posición de su cápsula en
relación con la fuente de sonido. Específicamente, cuando usted apunta un micrófono
cardioide directamente a la fuente de sonido (en el eje), obtendrá la mejor respuesta
de frecuencia; no obstante, cuando comienza a apuntar el micrófono levemente hacia
afuera (fuera del eje), advertirá que la frecuencia baja caerá y que el micrófono
comenzará a sonar en forma más tenue.
25

Para la mayoría de las aplicaciones de voz, deseará colocar el micrófono directamente
delante del artista. Lo mismo puede ocurrir al utilizar micrófonos con instrumentos.
Sin embargo, puede hacer ajustes de ecualización bastante asombrosos cambiando
levemente el ángulo de la cápsula hacia la fuente de sonido. Ésta puede ser una técnica
muy útil para capturar el sonido óptimo de una batería, de una guitarra acústica, de un
piano o de otros instrumentos en una sala de grabación o en un estudio de sonido. Las
pruebas y la experiencia son los mejores maestros a la hora de obtener buenos sonidos,
por lo que ¡conéctese!
Estallidos
El estallido (P-Popping) es ese sonido molesto que puede obtener cuando el diafragma
del micrófono recibe un golpe de aire de un vocalista que pronuncia palabras con la letra
“P”. Existen algunas maneras de solucionar el problema, lo que incluye el uso de un filtro
externo para estallidos. Algunos ingenieros famosos han recurrido a una media de nylon
vieja sobre un gancho para ropa doblado, que de hecho funciona muy bien. Para una
solución más prolija, pruebe el filtro para estallidos ICON PF-01. También puede intentar
colocar el micrófono levemente fuera del eje (en un ángulo pequeño) respecto del vocalista.
En general, esto puede solucionar el problema sin utilizar un filtro externo para estallidos.
Instalación del Apollo/Artemis
Instale su Apollo/Artemis en el montaje de
suspensión provisto como muestran los
diagramas a continuación
26
-10dB

Especificaciones
27
Acoustical operating principle
Directional pattern
Frequency range
Field Sensitivity (mV/Pa)
Field Sensitivity (dB re iV/Pa)
Rated Impedance
Min. load impedance
SPL
S/N ratio
Power supply voltage
Current consumption
Weight (Microphone only)
(with suspension mount)
Dimensions
Pressure gradient transducer
Cardioid
20Hz – 18KHz
23.30
-32.7
200 Ohms
1000 Ohms
126dB
83.7dB
48V +/-3V
2.9mA
0.67Kg (1.5lb)
1.09Kg (2.4lb)
50mm (dia.) x 209mm (L)
1.97” (dia.) x 8.23” (L)
Frequency response chart
Polar pattern

Servicio
Si su “ " necesita recibir servicio, siga las instrucciones a
continuación:
Consulte nuestro centro de ayuda en línea, en
http://support.iconproaudio.com/hc/en-us, para obtener información, conocimiento
y descargas disponibles, tales como
1. Preguntas frecuentes
2. Descargar
3. Conocer más
4. Foro
Muy a menudo, encontrará soluciones en dichas páginas. Si no encuentra una
solución, cree un ticket de ayuda en nuestro ACS (Auto Customer Support - Ayuda
Automática al Usuario) en el vínculo que se encuentra a continuación. Nuestro soporte
técnico lo asistirá tan pronto como sea posible.
Ingrese en http://support.iconproaudio.com/hc/en-us y regístrese para enviar una
nota de consulta, o haga clic en “Submit a ticket” sin necesidad de registrarse.
Tan pronto como haya enviado su nota de consulta, nuestro equipo de asistencia lo
ayudará a resolver el problema con su ICON ProAudio a la mayor brevedad posible
Para enviar a reparar productos defectuosos:
1. Asegúrese de que el problema no esté relacionado con un error de operación o
dispositivos de un sistema externo.
2. Guarde este manual de propietario. Nosotros no lo necesitamos para reparar la
unidad.
3. Embale la unidad en su embalaje original, inclusive la tarjeta y la caja. Esto es muy
importante. Si perdió el embalaje, asegúrese de embalar la unidad de forma adecuada.
ICON no se responsabiliza por daños ocasionados por embalaje que no sea de fábrica.
4. Envíe la unidad al centro de soporte técnico de ICON o a la oficina local de
devolución
autorizada. Vea nuestros centros de servicios y puntos de servicio al distribuidor en el
vínculo que se encuentra a continuación:
Si se encuentra en Hong Kong
Envíe el producto a:
OFICINA ASIA:
Unit F, 15/F., Fu Cheung Centre,
No. 5-7 Wong Chuk Yueng Street, Fotan,
Sha Tin, N.T., Hong Kong.
Si se encuentra en North America
Envíe el producto a:
North America
Mixware, LLC – U.S. Distributor
11070 Fleetwood Street – Unit F.
Sun Valley, CA 91352; USA
Tel.: (818) 578 4030
Contact:
Apollo/Artemis
www.mixware.net/help
Si se encuentra en Europe
Envíe el producto a:
Sound Service
GmbHEuropean
HeadquarterMoriz-Seeler-Straße
3D-12489 Berlin
Telephone: +49 (0)30 707 130-0
Fax: +49 (0)30 707 130-189
E-Mail: info@sound-service.eu
5. For additional update information please visit our website at:
www.iconproaudio.com
28

はじめに
ICON Legend series Apollo/Artemisスタジオラージダイアフラムコンデンサーマイ
クをお買い上げいただき、ありがとうございます。弊社はお客様に本製品を末
永く御愛用いただけるものと確信いたしておりますが、万一お客様にご満足い
ただけない場合でも、ご満足いただけるよう努めて参ります。
本書には、 Apollo/Artemisの特徴、フロントパネル、サイドパネル
の詳しい解説と、設定方法、使用方法、そして主要諸元が記載されています。
また、同梱の製品保証書にご記入の上投函していただきますと、
www. .com にてオンラインサポートをご利用いただけるようになり
ます。保証書のご送付後には、本製品のほか、ICON 製品に関する最新情報をお
届けします。他の電子製品と同様、本製品につきましても御購入いただきまし
た際の梱包材一式を保管していただきますようお願い申し上げます。万が一修
理のため本製品を弊社に返送していただく必要がある場合は、製品ご購入時の
梱包材(あるいはそれと同等の梱包材)が必要となります。
本製品は、適切に整備・お手入れをしていただければ、故障することなく末永
くご利用いただけます。後日照会させていただくため、シリアルナンバーを下
欄に控えていただけますよう、お願い申し上げます。
次のリンクのサイトから製品を登録してください:www.iconproaudio.com/
registration:
iconproaudio
日本語
29

お客様のアカウントでICON Pro Audio 製品をご
登録ください
1. お使いのデバ イ スのシリアル番 号 を確認してくだ さ い
http://iconproaudio.com/registration に進むか、下のQR コードをス
キャンします。
画面に、お使いのデバイスのシリアル番号など、請求された情報を
入力します。「Submit」をクリックします。
形式番号やシリアル番号などのデバイス情報を表示したポップアッ
プウィンドウが現れます。「Register this device to my account」を
クリックします。別のメッセージが表示された場合はアフターセー
ルスサービスチームまでご連絡ください。
2. 既存ユーザー の 方は、ご自分の 個 人アカウントペ ー ジにログイ
ンします。未登 録 の方は新規ユー ザ ーとして登録し て ください。
既存ユーザーの場合: ユーザー名とパスワードを記入して、個人
ユーザーページにログインしてください。
新規ユーザーの場合: 「Sign Up」をクリックして、情報をすべ
て記入してください。
3. 役に立つ資料 を ダウンロードす る
このページのアカウントに、登録済みデバイスがすべて表示されま
す。製品ごとにドライバ、ファームウェア、各言語版のユーザーマ
ニュアル、バンドルされたソフトウェアなどが表示されるので、こ
れらをダウンロードすることができます。デバイスのインストール
を開始する前に、ドライバなどの必要なファイルをダウンロードし
ておいてください。
30

機能
超高音質プロフェッショナル大口径ダイアフラム コンデンサー マイクロホン
各種の録音場面でメイン マイクロホンおよびサポートマイクロホンとして最適
音源を確実に分離してハウリングを防止するカーディオイド ピックアップ
パターン
ショック マウント カプセルを搭載したプレッシャー グラジエント トラン
スデューサー
ボーカルやアコースティック楽器に最適
36~52ボルト外部ファンタム電源により動作
ヘビーデューティ サスペンション マウント木製ニウム製運搬ケースが付属
金属ダイキャストボディによる超高剛性構造
高品質コンポーネントを使用した寿命の長い超高剛性構造
-10dB
31

Apollo/Artemisの使用法
Apollo/Artemisの電源供給
Apollo/Artemisは大口径ダイアフラムコンデンサーマイクロホンですので、ファ
ンタム電源を接続して電源を供給する必要があります。ファンタム電源は、大
部分の高級ミキサ、アウトボード マイクロホン プリアンプ、ハードディスク
レコーダに標準装備されています。必要に応じて、外部ファンタム電源を使用
することもできます。ファンタム電源を内蔵したミキサなどのマイクロホン入
力にマイクロホンケーブルを接続すると、Apollo/Artemisにファンタム電源が直
接供給されます。電源は、音声信号に重畳されてマイクロホン入力から供給さ
れます。大部分のミキサにはファンタム電源をオンにするスイッチが装着され
ていますので、必ずそれがオンになっていることを確認してください。
信号レベルの設定
Apollo/Artemisをミキサまたはレコーダの入力に接続する際には、入力がマイク
ロホンレベルになっていることを確認してください。また、前項
「Apollo/Artemisの電源供給」で説明したように、ファンタム電源がオンになっ
ていることを確認してください。大部分の良質なミキサやレコーダには、マイ
クロホン トリム (通常、トリムまたはゲインと呼ばれる) コントロールによ
るマイクロホン入力調整機能が付属しています。マイクロホン トリムの目的
は、ミキサの電子回路で生ずるノイズに対する信号のレベルが良好になるよう
に最適化することです。トリムが装着された良質なマイクロホン プリアンプに
は、ピークLEDまたはクリップLEDが装着されています。マイクロホン レベルを
良好に設定するには、まず、希望の音源の前にApollo/Artemisをセットして、ピ
ークLEDが点灯するまでMICトリムコントロールを徐々に上げていきます。次に
、ピークLEDが点灯しなくなるまでミックス トリム コントロールを下げていき
ます。大部分のミキサでは、ピークLEDが点灯しない範囲内でできる限りトリム
コントロールを高く設定することが理想的なセッティングとなります。
マイクロホンの配置
音質を最大限に向上させるには、Apollo/Artemisの配置、すなわち、収録しよう
としている楽器やボーカリストに対してどのように配置すべきかに、十分な注
意を払ってください。あらゆるマイクロホン、特に単一指向性 (カーディオイ
ド指向性) マイクロホンでは、「近接効果」と呼ばれる現象が発生します。近
接効果とは、簡単に言えば、音源とマイクロホンカプセルとの相対位置によっ
て、マイクロホンの周波数特性が変化することです。特に、カーディオイド指
向性マイクロホンを音源に直接向けた場合 (on-axis)、最良の周波数特性が得ら
れますが、その向きをわずかにそらすと (off-axis)、低音が低下して、音が痩せ
て聞こえるようになります。
32

大部分のボーカル用途では、ボーカリストのすぐ前にマイクロホンを配置する
のが普通です。楽器の音を録る際にもこれが当てはまります。しかし、音源に
対するカプセルの角度をわずかに変化させることによって、驚異的なイコライ
ゼーション調整を行うことができます。これは、ライブな室内やサウンドステ
ージで、ドラムキット、アコースティックギター、ピアノなどの楽器の音を最
適に録音する上で非常に便利なテクニックです。良好な音を録るには、実験や
経験がものを言いますから、いろいろトライしてください。
Pポッピング
Pポッピングとは、ボーカリストがPの音が入った語を発音した際に、マイクロ
ホンのダイアフラムに息がたくさん吹き込まれて、不快なポンという音が発生
することを指しています。この対策例として、外部ポップフィルタを使用する
ことが挙げられます。著名なエンジニアの中には、針金でできたハンガーを広
げてその上にナイロンストッキングを張って使用する人がいますが、これは大
変効果的です。見栄えをよくするには、ICON PF-01ポップフィルタをお使いく
ださい。また、マイクロホンの向きを、ボーカリストの口からわずかに外れた
方向に配置してもよいでしょう。こうすれば、外部ポップフィルタを使用しな
くても問題が解決することがあります。
Apollo/Artemisの配置
下図のように、付属のサスペンショ
ンマウントにApollo/Artemisをマウン
トしてください。
-10dB
33

製品仕様
Acoustical operating principle
Directional pattern
Frequency range
Field Sensitivity (mV/Pa)
Field Sensitivity (dB re iV/Pa)
Rated Impedance
Min. load impedance
SPL
S/N ratio
Power supply voltage
Current consumption
Weight (Microphone only)
(with suspension mount)
Dimensions
Pressure gradient transducer
Cardioid
20Hz – 18KHz
23.30
-32.7
200 Ohms
1000 Ohms
126dB
83.7dB
48V +/-3V
2.9mA
0.67Kg (1.5lb)
1.09Kg (2.4lb)
50mm (dia.) x 209mm (L)
1.97” (dia.) x 8.23” (L)
Frequency response chart
Polar pattern
34

修理について
本製品の修理が必要な場合は、以下の手順に従ってください。
以下のような情報、知識、ダウンロードについては、当社のオンラインヘルプセ
ンター(http://support.iconproaudio.com/hc/en-us) でご確認ください
1. FAQ ( よくあるご質問)
2. ダウンロード
3. 詳細情報
4. フォーラム
必要な情報のほとんどが、こちらのページに記載されています。お探しの情報が
見つからない場合は、下のリンクからオンライン ACS ( 自動カスタマーサポート)
でサポートチケットを作成してください。当社のテクニカルサポートチームがお
手伝いいたします。http://support.iconproaudio.com/hc/en-us にアクセスしてサ
インインし、チケットをお送りください。ただし、「Submit a ticket」をクリッ
クするとサインインの必要はありません。
照会チケットをお送いただくと、弊社サポートチームが、ICON ProAudio デバイ
スの問題をでき限り早く解決できるようにお手伝いいたします。
2
不良品を修理・交換のために返送する場合:
1. 問題の原因が誤操作や外部システムデバイスではないことを確認してください。
2. 弊社にて修理の際、本書は不要ですので、お手元に保管してください。
3. 同梱の印刷物等や箱など、購入時の梱包材で本製品を梱包してください。梱包
材がない場合は、必ず適切な梱包材で梱包してください。工場出荷時の梱包材以
外の梱包材が原因で発生した損害について、弊社では責任を負いかねます。
4. 弊社サービスサポートセンターまたは地区内の正規サービスセンターに本製品
を送付してください。. 下のリンクから、当社のサービスセンターおよび販売店の
所在地をご覧ください:
香港にお住まいの場合は、
製品をこちらまで返送してください:
ICON (Asia) Corp:
Unit F, 15/F., Fu Cheung Centre,
No. 5-7 Wong Chuk Yueng Street, Fotan,
Sha Tin, N.T., Hong Kong.
ヨーロッパにお住まいの場合は、
製品をこちらまで返送してください:
Sound Service
GmbHEuropean
HeadquarterMoriz-Seeler-Straße
3D-12489 Berlin
Telephone: +49 (0)30 707 130-0
Fax: +49 (0)30 707 130-189
E-Mail: info@sound-service.eu
5. その他更新情報は、弊社ウェブサイト(www.iconproaudio.com)をご覧くださ
い。をご覧ください。
北米 にお住まいの場合は、
製品をこちらまで返送してください:
ICON Service Centre
611 Potomac PL Ste 102
Smyrna, 37167-5655 Tennessee.
United States
Tel.: +1 615 540 989
35

Introduzione
La ringraziamo per aver scelto ICON Legend serie Apollo/Artemis grande
studio-diaframma del microfono a condensatore Siamo sicuri che questo dispositivo le
fornirà eccellenti prestazioni per molti anni, ma nel caso in cui non sia completamente
soddisfatto del Suo acquisto ce lo segnali e faremo tutto il possibile per soddisfare le
Sue esigenze.
Le pagine che seguono elencano, in dettaglio, le caratteristiche dell'Apollo/Artemis,
istruzioni dettagliate per l'istallazione ed uso, oltre a spiegazioni esaurienti.
Registrare il prodotto sul nostro sito web al seguente link
In allegato troverà inoltre una cartolina di garanzia – si prega di compilarla ed inviarla
per posta per poter ricevere supporto tecnico on-line dal sito www.iconproaudio.com. e
ricevere informazioni aggiornate relative a questo ed altri prodotti ICON in futuro.
Come per altri dispositivi elettronici, consigliamo vivamente di conservare l'imballaggio
originale. Nel'improbabile caso che il prodotto dovesse essere restituito per una
revisione, sarà necessario utilizzare l'imballaggio originale (o un altro equivalente).
Con una cura adeguata il Suo Apollo/Artemis funzionerà perfettamente per tantissimi
anni. Si consiglia di scrivere il numero di serie nell'apposito spazio qui sotto per
riferimenti futuri.
www.iconproaudio.com/ registration:
ITALIANO
36

Registrate nel vostro account il prodotto ICON Pro
Audio acquistato.
1. Verificare il numero seriale deldispositivo
Visitare la pagina http://iconproaudio.com/registration o fare la scansione
del seguente codice QR
Inserire il numero seriale del dispositivo e le altre informazioni richieste
dalla schermata. Fare clic su “Submit”.
Comparirà un messaggio in pop-up con le informazioni relative al
dispositivo come il nome del modello e il numero seriale. Fare clic su
“Register this device to my account”. Qualora non si visualizzi alcun
messaggio, contattare la nostra assistenza post-vendita.
2. Accedere al proprio account personale se l’utente è già
registrato. In caso di primo accesso, occorrerà
registrarsi.
Utente gi?registrato: Accedere alla propria pagina personale inserendo
username e password.
Utente non registrato: Fare clic su “Sign Up” e completare con i propri dati.
3. Scaricare tutti i materialiutili
Nella presente pagina verranno visualizzati tutti i dispositivi registrati nel
proprio account. Ciascun prodotto verrà elencato insieme ai file disponibili
come driver, firmware, manuale utente in diverse lingue, software bundle e
altri materiali da scaricare. Assicurarsi di aver scaricato i file necessari
come i driver prima diprocedere all’installazione del dispositivo.
37

Caratteristiche
Microfono a condensatore a diaframma largo professionale per una qualità audio
senza limiti
Ideale come microfono principale e di supporto per le più disparate situazioni di
registrazione
Schema cardioide per eccellente separazione della sorgente audio e resistenza al
feedback
Trasduttore di pressione gradiente con capsula antishock montata
Canti perfetti e strumenti acustici
Funzionamento con alimentazione fantasma a 36-52 V esterna
Supporto sospensione resistente schermo e valigetta di legno inclusi
Struttura ultra residente con corpo pressofuso in metallo
Componenti di elevata qualità e struttura dall'eccezionale resistenza assicurano una
lunga durata.
38
-10dB

Uso dell'Apollo/Artemis
Alimentazione dell'Apollo/Artemis
L’Apollo/Artemis è un microfono a condensatore a diaframma largo e quindi, per
funzionare, ha bisogno di essere collegato a un'alimentazione fantasma.
L'alimentazione fantasma è standard sulla maggior parte dei mixer di buona qualità, sui
preamplificatori esterni e sui registratori a disco rigido. Se necessario, può anche
essere usato un alimentatore fantasma esterno. L’Apollo/Artemis riceve l'alimentazione
direttamente dal cavo microfonico, quando lo si collega ad un mixer o a un qualsiasi
altro ingresso microfonico dotato di alimentazione fantasma. L'alimentazione esce
dall'INGRESSO del microfono, procedendo parallelamente al segnale audio. Per attivare
l'alimentazione fantasma, la maggior parte dei mixer dispone di un apposito
interruttore, per cui controllate che sia stata attivata.
Regolazione del livello del segnale
Quando collegate l’Apollo/Artemis all'ingresso di un mixer o di un registratore,
accertatevi che si tratti di un ingresso a livello microfonico. Assicuratevi inoltre che
l'alimentazione fantasma sia stata attivata, come illustrato nel precedente paragrafo
“Alimentazione dell’Apollo/Artemis”. La maggior parte dei mixer e dei registratori di
qualità ragionevole dispongono di ingressi microfonici con un controllo a trimmer
(di solito chiamato Trim o Gain - Guadagno). Lo scopo di questo controllo è di
ottimizzare la quantità di buon segnale rispetto a qualsiasi rumore associato
all'elettronica del mixer. Un buon trimmer di preamplificatore microfonico deve
essere dotato di un LED di PICCO o di CLIP. Per ottenere un buon livello per il microfono,
mettete l’Apollo/Artemis di fronte alla sorgente sonora desiderata ed alzate
lentamente il trimmer di controllo sul canale fino a vedere accendersi il LED di PICCO.
A quel punto abbassatelo fino al livello in cui il LED non si accende più. Nella maggior
parte dei mixer, la regolazione ideale è quella per cui il controllo di trimmer è il più alto
possibile prima che si accenda il LED di CLIP.
Posizionamento del microfono
Per ottenere la massima qualità sonora, bisogna porre grande attenzione a dove si
posiziona l’Apollo/Artemis e a come lo si mette rispetto allo strumento o alla voce da
riprendere. Tutti i microfoni, specialmente i microfoni unidirezionali o cardioidi
esibiscono un fenomeno chiamato “effetto di prossimità”. In termini davvero semplici,
l'effetto di prossimità è il risultato del cambiamento della risposta in frequenza del
microfono in base alla distanza della sua capsula rispetto alla sorgente sonora. Quando
si punta un microfono cardioide direttamente verso la sorgente sonora (in asse), si ottiene
la miglior risposta in frequenza e, quando si comincia a puntarlo in una direzione
leggermente diversa (fuori asse), si nota che la risposta in alta frequenza diminuisce e
che il suono del microfono diventa via via con più bassi.
39

Per la maggior parte delle applicazioni per la voce, sarà preferibile posizionare il microfono
direttamente di fronte all'artista. Questo è valido anche per la ripresa degli strumenti.
Tuttavia anche modificando leggermente l'angolo della capsula rispetto alla sorgente
sonora, è possibile ottenere effetti di equalizzazione piuttosto sorprendenti. È una tecnica
davvero utile che permette di catturare il suono ottimale da batterie, chitarre acustiche,
pianoforti ed altri strumenti, sul palco o in ambienti dal vivo. Per ottenere bei suoni,
l'esperienza e gli esperimenti sono i migliori maestri, per cui datevi da fare!
P-Popping
Il “P-Popping” è quel noioso rumore di “pop” che si ottiene quando il diaframma del
microfono riceve un getto d'aria da qualcuno che pronuncia parole che comprendono
la lettera “P”. È possibile risolvere il problema in diversi modi; uno di questi è l'uso di
un filtro esterno anti-pop. Alcuni ingegneri famosi si sono affidati ad una vecchia calza
in nylon installata su di una gruccia di metallo ripiegata, un sistema che in effetti lavora
piuttosto bene. Per una soluzione più pulita, provare il filtro anti-pop ICON PF-01. Potete
anche provare a posizionare il microfono leggermente fuori asse (angolandolo leggermente)
rispetto al cantante. Spesso, potete risolvere il problema in questo modo senza l'uso
di un filtro anti-pop esterno.
Montaggio dell'Apollo/Artemis
Montare l’Apollo/Artemis nel supporto a
sospensione in dotazione come illustrato
nelle immagini seguenti.
40
-10dB

Dati tecnici
Acoustical operating principle
Directional pattern
Frequency range
Field Sensitivity (mV/Pa)
Field Sensitivity (dB re iV/Pa)
Rated Impedance
Min. load impedance
SPL
S/N ratio
Power supply voltage
Current consumption
Weight (Microphone only)
(with suspension mount)
Dimensions
Pressure gradient transducer
Cardioid
20Hz – 18KHz
23.30
-32.7
200 Ohms
1000 Ohms
126dB
83.7dB
48V +/-3V
2.9mA
0.67Kg (1.5lb)
1.09Kg (2.4lb)
50mm (dia.) x 209mm (L)
1.97” (dia.) x 8.23” (L)
Frequency response chart
Polar pattern
41

Revisione
Se il Suo " " necessita di revisione, seguire le seguenti istruzioni.
Controllare il nostro centro assistenza online a
http://support.iconproaudio.com/hc/en-us, per informazioni, formazione e download
come
1. FAQ
2. Download
3. Maggiori informazioni
4. Forum
Molto spesso si troveranno soluzioni su queste pagine. Se non si trova una soluzione,
creare un ticket di assistenza nel nostro ACS (Assistenza Clienti Automatica) online
al link seguente, e il nostro team di assistenza tecnica prester?assistenza appena
possibile.Navigare a http://support.iconproaudio.com/hc/en-us e quindi inviare un
ticket o fare clic su “Submit a ticket” senza la necessit?di registrarsi. Non appena hai
inviato una richiesta di ticket, il nostro team di assistenza ti assister?nella risoluzione
del problema con il proprio dispositivo ICON ProAudio quanto prima
Inviare i prodotti difettosi per assistenza:
1. Assicurarsi che il problema non sia dovuto ad errori da parte dell'operatore o
dispositivi di sistemi esterni.
2. Tenere con s?questo Manuale del Proprietario. Non ?necessario che accompagni il
dispositivo per la riparazione.
3. Imballare il dispositivo nell'imballaggio originale, compresi il cartone terminale e la
scatola. Questo ?molto importante. Se ha perso l'imballaggio assicurarsi che il
dispositivo sia imballato in modo idoneo. ICON non è responsabile per danni che si
possono verificare con l'uso di imballaggi non di fabbrica.
4. Spedire al centro servizio tecnico di ICON o centro servizi locale autorizzato. È
possibile trovare i nostri centri assistenza e i punti di assistenza del distributore al link
seguente:
Se ci si trova a Hong Kong
Inviare il prodotto a:
UFFICIO ASIA:
Unit F, 15/F., Fu Cheung Centre,
No. 5-7 Wong Chuk Yueng Street, Fotan,
Sha Tin, N.T., Hong Kong.
Se ci si trova a Europa
Inviare il prodotto a:
ISound Service
GmbHEuropean
HeadquarterMoriz-Seeler-Straße
3D-12489 Berlin
Telephone: +49 (0)30 707 130-0
Fax: +49 (0)30 707 130-189
E-Mail: info@sound-service.eu
Apollo/Artemis
5. For additional update information please visit our website at:
www.iconproaudio.com
Se ci si trova a North America
Inviare il prodotto a:
North America
Mixware, LLC – U.S. Distributor
11070 Fleetwood Street – Unit F.
Sun Valley, CA 91352; USA
Tel.: (818) 578 4030
Contact: www.mixware.net/help
42

M1 PD3V100-6L
-
 1
1
-
 2
2
-
 3
3
-
 4
4
-
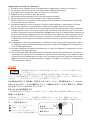 5
5
-
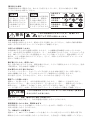 6
6
-
 7
7
-
 8
8
-
 9
9
-
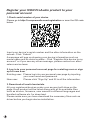 10
10
-
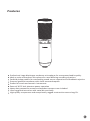 11
11
-
 12
12
-
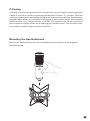 13
13
-
 14
14
-
 15
15
-
 16
16
-
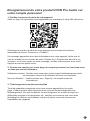 17
17
-
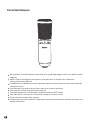 18
18
-
 19
19
-
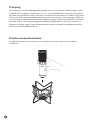 20
20
-
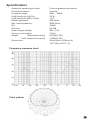 21
21
-
 22
22
-
 23
23
-
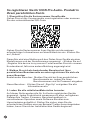 24
24
-
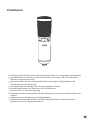 25
25
-
 26
26
-
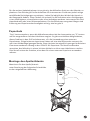 27
27
-
 28
28
-
 29
29
-
 30
30
-
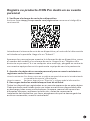 31
31
-
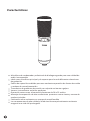 32
32
-
 33
33
-
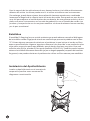 34
34
-
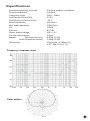 35
35
-
 36
36
-
 37
37
-
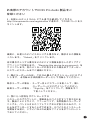 38
38
-
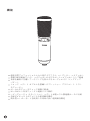 39
39
-
 40
40
-
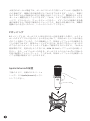 41
41
-
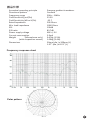 42
42
-
 43
43
-
 44
44
-
 45
45
-
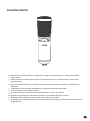 46
46
-
 47
47
-
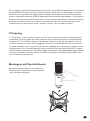 48
48
-
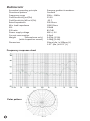 49
49
-
 50
50
-
 51
51


Icon Legend Series Studio Large Diaphragm Condenser Microphone Manual de usuario
- Categoría
- Micrófonos
- Tipo
- Manual de usuario
en otros idiomas
- français: Icon Legend Series Studio Large Diaphragm Condenser Microphone Manuel utilisateur
- italiano: Icon Legend Series Studio Large Diaphragm Condenser Microphone Manuale utente
- Deutsch: Icon Legend Series Studio Large Diaphragm Condenser Microphone Benutzerhandbuch
- 日本語: Icon Legend Series Studio Large Diaphragm Condenser Microphone ユーザーマニュアル
Artículos relacionados
Otros documentos
-
Massive 59333/17/10 Ficha de datos
-
Logitech G G933 Artemis Spectrum Wireless 7.1 Surround Gaming Headset Manual de usuario
-
-
Bernina Toolbox Bundle El manual del propietario
-
Pioneer DJ HC-CP08 El manual del propietario
-
Pioneer HDJ-HC02 El manual del propietario
-
Pioneer XPRS1182S El manual del propietario