Yamaha Tyros3 Manual de usuario
- Categoría
- Software
- Tipo
- Manual de usuario

EN
Reference Manual

2 • Tyros3 Reference Manual
Contents
1 Voices – Playing the Keyboard – 4
Voice Characteristics ..................................................................................................................................................4
Selecting GM/XG or Other Voices from the Panel ....................................................................................................5
Effect-Related Settings ...............................................................................................................................................6
Pitch-Related Settings ................................................................................................................................................9
Editing Voices (Voice Set)........................................................................................................................................11
Editing Organ Flutes Parameters..............................................................................................................................16
Creating Custom Voices (Voice Creator) .................................................................................................................17
2 Styles – Playing Rhythm and Accompaniment – 30
Selecting the Chord Fingering Type.........................................................................................................................30
Style Playback Related Settings ................................................................................................................................32
Split Point Settings................................................................................................................................................... 34
Memorizing the Original One Touch Setting ..........................................................................................................35
Creating/Editing Styles (Style Creator).....................................................................................................................36
3 Songs – Recording Your Performances and Creating Songs – 49
Editing Music Notation Settings..............................................................................................................................49
Editing Lyrics Display Settings.................................................................................................................................51
Song Playback Related Parameters (Repeat settings, Channel settings, Guide Function) ..........................................52
Creating/Editing Songs (Song Creator).................................................................................................................... 56
4 Multi Pads – Adding Musical Phrases to Your Performance – 70
Multi Pad Creating (Multi Pad Creator) .................................................................................................................. 70
Multi Pad Editing ....................................................................................................................................................72
5 Music Finder – Calling Up Ideal Setups for Your Music – 73
Creating a Set of Favorite Records............................................................................................................................ 73
Editing Records........................................................................................................................................................ 74
Saving the Record as a Single File.............................................................................................................................75
Viewing Record Information on the Internet ...........................................................................................................76
6 Registration Memory – Saving and Recalling Custom Panel Setups – 77
Disabling Recall of Specific Items (Freeze) ...............................................................................................................77
Calling Up Registration Memory Numbers in Order (Registration Sequence) .........................................................78
7 Recording Audio with the Hard Disk Recorder 80
Importing an Audio File...........................................................................................................................................80
Editing the Recorded Data....................................................................................................................................... 82
Re-recording ............................................................................................................................................................ 83
Setting the Start/End Points of the Audio ................................................................................................................86
Playlist Mode ...........................................................................................................................................................87
8 Mixing Console – Editing the Volume and Tonal Balance – 90
Editing VOL/VOICE Parameters ............................................................................................................................90
Editing FILTER Parameters.....................................................................................................................................92
Editing TUNE Parameters.......................................................................................................................................92
Editing EFFECT Parameters....................................................................................................................................93
Editing EQ Parameters.............................................................................................................................................96
Line Out Settings.....................................................................................................................................................98
9 Internet Direct Connection – Connecting the Tyros3 Directly to the Internet – 99
Registering Bookmarks of Your Favorite Pages......................................................................................................... 99
About the Internet Settings Display (BROWSER).................................................................................................101

Tyros3 Reference Manual • 3
10 Connections – Using Tyros3 with Other Devices – 102
Microphone Settings ..............................................................................................................................................102
Footswitch/Foot Controller Settings ......................................................................................................................109
MIDI Settings........................................................................................................................................................ 112
11 Utility – Making Global Settings – 120
CONFIG1.............................................................................................................................................................120
CONFIG2.............................................................................................................................................................122
MEDIA..................................................................................................................................................................123
OWNER ...............................................................................................................................................................124
SYSTEM RESET................................................................................................................................................... 125
Index 127
• The illustrations and LCD screens as shown in this manual are for instructional purposes only, and may appear somewhat different from those on
your instrument. Note that all display examples shown in this manual are in English.
• The company names and product names in this manual are the trademarks or registered trademarks of their respective companies.
Using the PDF manual
•To quickly jump to items and topics of interest, click on the desired items in the “Bookmarks” index to the left
of the main display window. (Click the “Bookmarks” tab to open the index if it is not displayed.)
• Click the page numbers that appear in this manual to go directly to the corresponding page.
• Select “Find” or “Search” from the Adobe Reader “Edit” menu and enter a keyword to locate related informa-
tion anywhere in the document.
The names and positions of menu items may vary according to the version of Adobe Reader being used.
NOTE

1
1
4 • Tyros3 Reference Manual
Voices – Playing the Keyboard –
Voices
– Playing the Keyboard –
Contents
Voice Characteristics . . . . . . . . . . . . . . . . . . . . . . . . . . . . . . . . . 4
Selecting GM/XG or Other Voices from the Panel . . . . . . . . . . 5
Effect-Related Settings . . . . . . . . . . . . . . . . . . . . . . . . . . . . . . . 6
• Setting the Touch Sensitivity of the Keyboard. . . . . . . . . . . . . . . . .6
• Selecting the Harmony/Echo type . . . . . . . . . . . . . . . . . . . . . . . . .7
Pitch-Related Settings. . . . . . . . . . . . . . . . . . . . . . . . . . . . . . . . 9
• Fine-tuning the Pitch of the Entire Instrument . . . . . . . . . . . . . . . .9
• Scale Tuning. . . . . . . . . . . . . . . . . . . . . . . . . . . . . . . . . . . . . . . . . .9
• Changing the Part Assignment of the TRANSPOSE Buttons . . . . .10
Editing Voices (Voice Set) . . . . . . . . . . . . . . . . . . . . . . . . . . . . 11
• Editable Parameters in the VOICE SET Displays . . . . . . . . . . . . . . .12
• Disabling Automatic Selection of Voice Sets (Effects, etc.). . . . . . .15
Editing Organ Flutes Parameters . . . . . . . . . . . . . . . . . . . . . . 16
Creating Custom Voices (Voice Creator). . . . . . . . . . . . . . . . . 17
• Creating Normal Voices (Custom Voice) . . . . . . . . . . . . . . . . . . . .17
• Creating Drum Voices (Custom Drum Voice) . . . . . . . . . . . . . . . .22
• Editing an Expansion Voice Bank—Library Edit . . . . . . . . . . . . . . .24
• Saving your Custom Voices to a Library—Library Save . . . . . . . . .26
• Loading a single Additional Voice to the Tyros3—Individual Load.27
• Loading an Expansion Voice Bank (Library) to the Tyros3—Library
Load. . . . . . . . . . . . . . . . . . . . . . . . . . . . . . . . . . . . . . . . . . . . . . .28
• Editing a Custom Voice on your computer—Voice Editor . . . . . . .29
The Voice type and its defining characteristics are indicated above the Voice name in the Voice Selection display.
Voice Characteristics
Live! These acoustic instrument sounds were sampled in stereo, to pro-
duce a truly authentic, rich sound—full of atmosphere and ambi-
ence.
Cool! These Voices capture the dynamic textures and subtle nuances of
electric instruments—thanks to a huge amount of memory and
some very sophisticated programming.
Sweet! These acoustic instrument sounds also benefit from Yamaha’s sophis-
ticated technology—and feature a sound so finely detailed and natu-
ral, you’ll swear you’re playing the real thing!
Drums Various drum and percussion sounds are assigned to individual keys,
letting you play the sounds from the keyboard.
SFX Various special effect sounds are assigned to individual keys, letting
you play the sounds from the keyboard.
Organ Flutes! This authentic organ Voice lets you use the Voice Set to adjust the
various footages and craft your own original organ sounds. See
page 16 for details.
MegaVoice See the Owner’s Manual.
S.Articulation! See the Owner’s Manual.
S.Articulation2! See the Owner’s Manual.

1
1
Voices – Playing the Keyboard –
Tyros3 Reference Manual • 5
The GM/XG Voices and Voices for other instruments (such as Tyros, Tyros2, etc.) cannot be directly called up from
the VOICE category selection buttons. However, they can be called up via panel operation by following the proce-
dure below.
1 Press one of the PART SELECT button to which you want to call up
the desired Voice.
2 Press one of the VOICE buttons to call up the Voice Selection display.
3 Press the [8 ▲] (UP) button to call up the Voice categories.
4 Press the [2 ▲] (P2) button to display Page 2.
5 Press the desired [A]–[J] button to call up the Voice Selection display
of GM/XG Voices, GM2 Voices, etc.
6 Select the desired Voice.
Live!Drums These are high-quality drum sounds taking full advantage of Stereo
Sampling and Dynamic Sampling.
Live!SFX These are high-quality Latin percussion sounds taking full advantage
of Stereo Sampling and Dynamic sampling. They give you a broader
and more versatile range of Latin percussion than the normal drum
Voices.
Custom! Custom Voices (including Custom Drum Voices) which you have cre-
ated by using the Custom Voice function.
CustomWA! Custom Voices (including Custom Drum Voices) which contain Wave
data.
Selecting GM/XG or Other Voices from the Panel
You can find the “Legacy” folder in this
display. This folder contains previous
Yamaha keyboards’ Voices (such as
Tyros2, Tyros, etc.) for data compatibil-
ity with other models.
NOTE
43

1
1
Voices – Playing the Keyboard –
6 • Tyros3 Reference Manual
Setting the Touch Sensitivity of the Keyboard
You can adjust the touch response of the instrument (how the sound responds to the
way you play the keys). The touch sensitivity type becomes the common setting for all
Voices.
1 Call up the operation display.
[FUNCTION] → [D] CONTROLLER → TAB [
QQ
QQ
][
WW
WW
] KEYBOARD/PANEL
2 Use the [A]/[B] buttons to select the desired parameter: INITIAL
TOUCH or AFTER TOUCH.
3 Use the [1 ▲▼]–[8 ▲▼] buttons to specify the touch response.
● 1 INITIAL TOUCH
● 2 AFTER TOUCH
Effect-Related Settings
Some Voices are purposely designed
without touch sensitivity, in order to
emulate the true characteristics of the
actual instrument (for example, conven-
tional organs, which have no touch
response).
NOTE
2
3
[1 ▲▼]/
[2 ▲▼]
TOUCH Determines the Initial Touch sensitivity setting.
HARD 2: Requires strong playing to produce high volume. Best for players
with a heavy touch.
HARD 1: Requires moderately strong playing for higher volume.
NORMAL: Standard touch response.
SOFT 1: Produces high volume with moderate playing strength.
SOFT 2: Produces relatively high volume even with light playing strength.
Best for players with a light touch.
[4 ▲▼] TOUCH OFF
LEVEL
Determines the fixed volume level when Touch is set to “OFF.”
[5 ▲▼]–
[8 ▲▼]
LEFT–RIGHT3 Turns Initial Touch on or off for each keyboard part.
[1 ▲▼]/
[2 ▲▼]
TOUCH Determines the Aftertouch sensitivity setting.
HARD: Relatively strong aftertouch pressure is needed to produce changes.
NORMAL: Produces a fairly standard aftertouch response.
SOFT: Allows you to produce relatively large changes with very light
aftertouch pressure.
[5 ▲▼]–
[8 ▲▼]
LEFT–RIGHT3 Turns Aftertouch on or off for each keyboard part.

1
1
Voices – Playing the Keyboard –
Tyros3 Reference Manual • 7
Selecting the Harmony/Echo type
You can select the desired Harmony/Echo effect from a variety of types.
1 Turn the [HARMONY/ECHO] button on.
2 Call up the operation display.
[FUNCTION] → [F] HARMONY/ECHO
3 Use the [1 ▲▼]–[3 ▲▼] buttons to select the Harmony/Echo type.
The Harmony/Echo types are divided into the following groups, depending on
the particular effect applied.
● Harmony Types
When one of the Harmony Types is selected, the Harmony effect is applied to
the note played in the right-hand section of the keyboard according to the
type selected above and the chord specified in the chord section of the key-
board shown below.
● Multi Assign Type
The Multi Assign effect automatically assigns notes played simultaneously on
the right-hand section of the keyboard to separate parts (Voices). For example,
if you play three consecutive notes, the first is played by the RIGHT 1 Voice, the
second by the RIGHT 2 Voice, and the third by the RIGHT 3 Voice. The Multi
Assign effect is not affected by the [ACMP] and LEFT part on/off status.
When the [MONO] button is turned to
on or you use the SA/SA2 Voices, the
Harmony/Echo effect may not work
properly.
NOTE
Harmony Types
These types apply the harmony effect to notes played in the right-hand section of
the keyboard according to the chord specified in the left-hand section of the key-
board. (Note that the “1+5” and “Octave” settings are not affected by the chord.)
Multi Assign Type
This type applies a special effect to chords played in the right-hand section of the
keyboard.
Echo Types
These types apply echo effects to notes played in the right-hand section of the
keyboard in time with the currently set tempo.
Split Point
(for the Voice)
LEFT Voice and chord section
for Harmony effect
RIGHT 1–3 Voices
Chord section for Style playback
and Harmony effect
Chord section for
Style playback and
Harmony effect
Split Point
Split Point
(for Style playback)
Split Point
LEFT Voice
RIGHT 1–3 Voices
NEXT PAGE

1
1
Voices – Playing the Keyboard –
8 • Tyros3 Reference Manual
● Echo Types
When one of the Echo Types is selected, the corresponding effect (echo, trem-
olo, trill) is applied to the note played in the right-hand section of the key-
board in time with the currently set tempo, regardless of the [ACMP] and the
LEFT part on/off status. Keep in mind that Trill works when you hold down two
notes on the keyboard simultaneously (last two notes if more than two notes
are held), and it plays those notes alternately.
4 Use the [4 ▲▼]–[8 ▲▼] buttons to select various Harmony/Echo set-
tings.
The available settings differ depending on the Harmony/Echo type.
[4 ▲▼] VOLUME This parameter is available for all types with the exception of “Multi Assign.” It
determines the level of the harmony/echo notes generated by the Harmony/
Echo effect.
[5 ▲▼] SPEED This parameter is only available when Echo, Tremolo, or Trill is selected in
Type above. It determines the speed of the Echo, Tremolo, and Trill effects.
[6 ▲▼] ASSIGN This parameter is available for all types with the exception of “Multi Assign.”
This lets you determine the keyboard part via which the harmony/echo notes
will be sounded.
[7 ▲▼] CHORD NOTE
ONLY
This parameter is available when one of the Harmony Types is selected. When
this is set to “ON,” the Harmony effect is applied only to the note (played in
the right-hand section of the keyboard) that belongs to a chord played in the
chord section of the keyboard.
[8 ▲▼] TOUCH LIMIT This parameter is available for all types with the exception of “Multi Assign.” It
determines the lowest velocity value at which the harmony note will sound.
This allows you to selectively apply the harmony by your playing strength, let-
ting you create harmony accents in the melody. The harmony effect is applied
when you play the key strongly (above the set value).

1
1
Voices – Playing the Keyboard –
Tyros3 Reference Manual • 9
Fine-tuning the Pitch of the Entire Instrument
You can fine-tune the pitch of the entire instrument—useful when you play the Tyros3 along with other instruments
or CD music. Please note that the Tune function does not affect the Drum Kit or SFX Kit Voices.
1 Call up the operation display.
[FUNCTION] → [A] MASTER TUNE/SCALE TUNE → TAB [
QQ
QQ
][
WW
WW
] MASTER TUNE
2 Use the [4 ▲▼]/[5 ▲▼] buttons to set the tuning, from 414.8–466.8 Hz.
Press the both 4 or 5’s [▲] and [▼] buttons simultaneously to reset the value
to the factory setting of 440.0 Hz.
Scale Tuning
You can select various scales for playing in custom tunings for specific historical periods or music genres.
1 Call up the operation display.
[FUNCTION] → [A] MASTER TUNE/SCALE TUNE → TAB [
QQ
QQ
][
WW
WW
] SCALE TUNE
2 Use the [A]/[B] buttons to select the desired scale.
● Preset Scale types
Pitch-Related Settings
2
The tuning of each note for the currently
selected scale is shown.
EQUAL The pitch range of each octave is divided equally into twelve parts,
with each half-step evenly spaced in pitch. This is the most com-
monly used tuning in music today.
PURE MAJOR, PURE
MINOR
These tunings preserve the pure mathematical intervals of each
scale, especially for triad chords (root, third, fifth). You can hear this
best in actual vocal harmonies—such as choirs and a cappella sing-
ing.
PYTHAGOREAN This scale was devised by the famous Greek philosopher and is cre-
ated from a series of perfect fifths, which are collapsed into a single
octave. The 3rd in this tuning are slightly unstable, but the 4th and
5th are beautiful and suitable for some leads.
MEAN-TONE This scale was created as an improvement on the Pythagorean scale,
by making the major third interval more “in tune.” It was especially
popular from the 16th century to the 18th century. Handel, among
others, used this scale.
WERCKMEISTER, KIRN-
BERGER
This composite scale combines the Werckmeister and Kirnberger sys-
tems, which were themselves improvements on the mean-tone and
Pythagorean scales. The main feature of this scale is that each key
has its own unique character. The scale was used extensively during
the time of Bach and Beethoven, and even now it is often used when
performing period music on the harpsichord.
ARABIC1, ARABIC2 Use these tunings when playing Arabic music.
NEXT PAGE

1
1
Voices – Playing the Keyboard –
10 • Tyros3 Reference Manual
3 Change the following settings as necessary.
Changing the Part Assignment of the TRANSPOSE Buttons
You can determine to which parts the TRANSPOSE [-]/[+] buttons are applied.
1 Call up the operation display.
[FUNCTION] → [D] CONTROLLER → TAB [
QQ
QQ
][
WW
WW
] KEYBOARD/PANEL
2 Use the [A]/[B] buttons to select “4. TRANSPOSE ASSIGN.”
3 Press the [4 ▲▼]/[5 ▲▼] buttons to select the desired transpose type.
You can confirm the setting here by viewing the pop-up window called up via
the TRANSPOSE [-]/[+] buttons.
To register the Scale Tune settings to the
Registration Memory, be sure to
checkmark the SCALE item in the REG-
ISTRATION MEMORY CONTENTS dis-
play.
NOTE
[2 ▲▼] BASE NOTE Determines the base note for each scale. When the base note is changed, the
pitch of the keyboard is transposed, yet maintains the original pitch relation-
ship between the notes.
[3 ▲▼]–
[5 ▲▼]
TUNE Select the desired note to be tuned by using the [3 ▲▼] button and tune it in
cents by using the [4 ▲▼]/[5 ▲▼] buttons.
[6 ▲▼]/
[7 ▲▼]
PART SELECT Select the part to which the Scale Tune setting is applied by using the [6
▲▼]/[7 ▲▼] buttons. Then press the [8 ▲] button to add a checkmark or
press the [8 ▼] button to remove the checkmark.
[8 ▲▼] MARK ON/OFF
KEYBOARD When this is selected, the TRANSPOSE [-]/[+] buttons affect the
pitch of keyboard played Voices, Style playback (controlled by the
performance in the chord section of the keyboard), and Multi Pad
playback (when Chord Match is on, and left-hand chords are indi-
cated)—but they do not affect Song playback.
SONG When this is selected, the TRANSPOSE [-]/[+] buttons affect only the
pitch of Song playback.
MASTER When this is selected, the TRANSPOSE [-]/[+] buttons affect the
overall pitch of the instrument.

1
1
Voices – Playing the Keyboard –
Tyros3 Reference Manual • 11
The Tyros3 has a Voice Set feature that allows you to create your own Voices by editing some parameters of the
existing Voices. Once you’ve created a Voice, you can save it as a User Voice to the USER drive or external devices
for future recall.
1 Select the desired Voice (other than an Organ Flutes Voice).
The editing method is different for the ORGAN FLUTES Voices compared to
other Voices. For instructions on editing the ORGAN FLUTES Voices, see
page 16.
2 Press the [5 ▲] (VOICE SET) button to call up the VOICE SET display.
3 Use the TAB [
QQ
QQ
][
WW
WW
] buttons to call up the relevant setting display.
For information on the available parameters in each display, see the “Editable
Parameters in the VOICE SET Displays” on page 12.
4 As necessary, use the [A]/[B] buttons to select the item (parameter) to
be edited and edit the Voice by using the [1 ▲▼]–[8 ▲▼] buttons or
sliders.
By pressing the [D] (COMPARE) button, you can compare the sound of the
edited Voice with the original (unedited) Voice
5 Press the [I] (SAVE) button to save your edited Voice as a User Voice.
Editing Voices (Voice Set)
5
3
4
The settings will be lost if you
select another Voice or turn the
power to the instrument off with-
out executing the Save operation.
CAUTION

1
1
Voices – Playing the Keyboard –
12 • Tyros3 Reference Manual
Editable Parameters in the VOICE SET Displays
The Voice Set parameters are organized into five different displays. The parameters in
each display are described separately, below.
■ COMMON Page
■ CONTROLLER Page
● 1 MODULATION
The MODULATION wheel can be used to modulate the parameters below as
well as the pitch (vibrato). Here, you can set the degree to which the MODU-
LATION wheel modulates each of the following parameters.
The available parameters differ depend-
ing on the Voice.
NOTE
[1 ▲▼] VOLUME Adjusts the volume of the current edited Voice.
[2 ▲▼]/
[3 ▲▼]
TOUCH SENSE Adjusts the touch sensitivity (velocity sensitivity), or how greatly the volume
responds to your playing strength.
[2 ▲▼] DEPTH Determines the velocity sensitivity, or how much the level of the Voice
changes in response to your playing strength (velocity).
[3 ▲▼] OFFSET Determines the amount by which received velocities are adjusted for the
actual velocity effect.
[4 ▲▼]/
[5 ▲▼]
PART OCTAVE Shifts the octave range of the edited Voice up or down in octaves. When the
edited Voice is used as any of the RIGHT 1–3 parts, the R1/R2/R3 parameter is
available; when the edited Voice is used as the LEFT part, the LEFT parameter
is available.
[6 ▲▼] MONO/POLY Determines whether the edited Voice is played monophonically or polyphoni-
cally. This setting can also be made from the VOICE EFFECT [MONO] button
on the panel.
[7 ▲▼] PORTAMENTO
TIME
Sets the portamento time (pitch transition time) when the edited Voice is set
to “MONO” above.
0
64 127
64
127
0
64 127
64
127
Actual Velocity for
tone generator
Depth=127 (twice)
Depth=64 (normal)
Depth=32 (half)
Depth=0
TOUCH SENSE DEPTH
Changes to velocity curve according to
VelDepth (with Offset set to 64)
Received Velocity
(Actual KeyOn speed)
TOUCH SENSE OFFSET
Changes to velocity curve according to
VelOffset (with Depth set to 64)
Actual Velocity for
tone generator
Received Velocity
(Actual KeyOn
speed)
Offset=96 (+64)
Offset=127 (+127)
Offset=64 (normal)
Offset=32 (-64)
Offset=0 (-127)
Depends
on offset
Depends
on offset
[2 ▲▼] FILTER Determines the degree to which the MODULATION wheel modulates the Fil-
ter Cutoff Frequency. For details about the filter, see page 13.
[3 ▲▼] AMPLITUDE Determines the degree to which the MODULATION wheel modulates the
amplitude (volume).
[5 ▲▼] LFO PMOD Determines the degree to which the MODULATION wheel modulates the
pitch, or the vibrato effect.
[6 ▲▼] LFO FMOD Determines the degree to which the MODULATION wheel modulates the Fil-
ter modulation, or the wah effect.
[7 ▲▼] LFO AMOD Determines the degree to which the MODULATION wheel modulates the
amplitude, or the tremolo effect.

1
1
Voices – Playing the Keyboard –
Tyros3 Reference Manual • 13
● 2 AFTERTOUCH
Aftertouch can be used to modulate the parameters below. Here, you can set
the degree to which Aftertouch modulates each of the following parameters.
■ SOUND Page
● FILTER
Filter is a processor that changes the timbre or tone of a sound by either block-
ing or passing a specific frequency range. The parameters below determine
the overall timbre of the sound by boosting or cutting a certain frequency
range. In addition to making the sound either brighter or mellower, Filter can
be used to produce electronic, synthesizer-like effects.
● EG
The EG (Envelope Generator) settings determine how the level of the
sound changes in time. This lets you reproduce many sound charac-
teristics of natural acoustic instruments—such as the quick attack and
decay of percussion sounds, or the long release of a sustained piano
tone.
[2 ▲▼] FILTER Determines the degree to which Aftertouch modulates the Filter Cutoff Fre-
quency. See below for details about Filter.
[3 ▲▼] AMPLITUDE Determines the degree to which Aftertouch modulates the amplitude (vol-
ume).
[5 ▲▼] LFO PMOD Determines the degree to which Aftertouch modulates the pitch, or the
vibrato effect.
[6 ▲▼] LFO FMOD Determines the degree to which Aftertouch modulates the Filter modulation,
or the wah effect.
[7 ▲▼] LFO AMOD Determines the degree to which Aftertouch modulates the amplitude, or the
tremolo effect.
[1 ▲▼] BRIGHTNESS Determines the cutoff frequency or
effective frequency range of the filter
(see diagram). Higher values result in
a brighter sound.
[2 ▲▼] HARMONIC
CONTENT
Determines the emphasis given to
the cutoff frequency (resonance), set
in BRIGHTNESS above (see diagram).
Higher values result in a more pro-
nounced effect.
Volume
These frequencies are
“passed” by the filter.
Cutoff
range
Frequency
(pitch)
Cutoff Frequency
Volume
Frequency (pitch)
Resonance
Time
Level
Key on Key off
Sustain
Level
AT TACK DECAY RELEASE
[3 ▲▼]ATTACK Determines how quickly the sound reaches its maximum level after the key is
played. The lower the value, the quicker the attack.
[4 ▲▼] DECAY Determines how quickly the sound reaches its sustain level (a slightly lower
level than maximum). The lower the value, the quicker the decay.
[5 ▲▼] RELEASE Determines how quickly the sound decays to silence after the key is released.
The lower the value, the quicker the decay.

1
1
Voices – Playing the Keyboard –
14 • Tyros3 Reference Manual
● VIBRATO
Vibrato is a quavering, vibrating sound effect that is produced by reg-
ularly modulating the pitch of the Voice.
■ EFFECT/EQ Page
● 1 REVERB DEPTH/CHORUS DEPTH/DSP DEPTH
● 2 DSP
● 3 EQ
Determines the Frequency and Gain of the Low and High EQ bands. For infor-
mation about EQ, refer to page 96.
■ HARMONY Page
Same as in the [FUNCTION] → [F] HARMONY/ECHO display. See “Selecting
the Harmony/Echo type” on page 7.
Pitch
DELAY
SPEED
DEPTH
Time
[6 ▲▼] DEPTH Determines the intensity of the Vibrato effect. Higher settings result in a more
pronounced Vibrato.
[7 ▲▼] SPEED Determines the speed of the Vibrato effect.
[8 ▲▼] DELAY Determines the amount of time that elapses between the playing of a key and
the start of the Vibrato effect. Higher settings increase the delay of the Vibrato
onset.
[1 ▲▼]/
[2 ▲▼]
REVERB DEPTH Adjusts the reverb (page 94) depth.
[3 ▲▼]/
[4 ▲▼]
CHORUS DEPTH Adjusts the chorus (page 94) depth.
[5 ▲▼] DSP ON/OFF Determines whether the DSP is on or off.
This setting can also be made from the VOICE EFFECT [DSP] button on the
panel.
[6 ▲▼] DSP DEPTH Adjusts the DSP (page 94) depth.
If you want to re-select the DSP type, you can do so in the “2 DSP” menu
explained below.
[7 ▲▼]PANEL SUSTAIN Determines the sustain level applied to the edited Voice when the VOICE
EFFECT [SUSTAIN] button on the panel is turned on.
[1 ▲▼]–
[4 ▲▼]
DSP TYPE Selects the DSP effect category and type. Select a type after selecting a cate-
gory.
[5 ▲▼]–
[8 ▲▼]
VARIATION Two variations are provided for each DSP type. Here, you can edit the VARIA-
TION on/off status and variation’s parameter value setting.
[5 ▲▼] ON/OFF Turns the DSP Variation on or off for the selected Voice. This setting can also
be made from the VOICE EFFECT [VARIATION] button on the panel. (This but-
ton is effective only when the [DSP] button is on.)
PARAMETER Displays the variation parameter. (This differs depending on the effect type
and cannot be changed.)
[6 ▲▼]
– [8 ▲▼]
VALUE Adjusts the value of the DSP variation parameter.

1
1
Voices – Playing the Keyboard –
Tyros3 Reference Manual • 15
Disabling Automatic Selection of Voice Sets (Effects, etc.)
Each Voice is linked to its default VOICE SET parameter settings. Usually these settings are automatically called up
when a Voice is selected. However, you can also disable this feature by the operation in the relevant display as
explained below.
For example, if you want to change the Voice yet keep the same Harmony effect, set the HARMONY/ECHO param-
eter to OFF (in the display explained below).
1 Call up the operation display.
[FUNCTION] → [E] REGIST SEQUENCE/FREEZE/VOICE SET → TAB [
QQ
QQ
][
WW
WW
]
VOICE SET
2 Use the [A]/[B] buttons to select a keyboard part.
3 Use the [4 ▲▼]–[7 ▲▼] buttons to enable/disable automatic calling
up of the settings (ON or OFF) independently for each parameter
group.
2
3

1
1
Voices – Playing the Keyboard –
16 • Tyros3 Reference Manual
The Organ Flute Voices selected from the [ORGAN FLUTES] button can be edited by
adjusting the footage levers, adding the attack sound, applying effect and equalizer,
etc.
■ FOOTAGE Page
Refer to the Owner’s Manual.
■ VOLUME/ATTACK Page
■ EFFECT/EQ Page
Same parameters as in the VOICE SET “EFFECT/EQ” Page explained on
page 14.
Editing Organ Flutes Parameters
After editing, go to the Voice
Selection display by pressing the
[I] (PRESETS) button and save the
setting. The settings will be lost if
you select another Voice or turn
the power to the instrument off
without executing the Save opera-
tion.
CAUTION
Same as the
FOOTAGE Page.
[1 ▲▼] VOL (Volume) Adjusts the overall volume of the Organ Flutes. The longer the graphic bar,
the greater the volume.
[2 ▲▼] RESP (Response) Affects both the attack and release (page 13) portion of the sound, increasing
or decreasing the response time of the initial swell and release, based on the
FOOTAGE controls. The higher the value, the slower the swell and release.
[3 ▲▼] VIBRATO SPEED Determines the speed of the vibrato effect controlled by the Vibrato On/Off
([F]/[G] buttons) and Vibrato Depth ([H] button).
[4 ▲▼] MODE The MODE control selects between two modes: FIRST and EACH. In the FIRST
mode, attack (percussive sound) is applied only to the first notes played and
held simultaneously; while the first notes are held, any subsequently played
notes have no attack applied. In the EACH mode, attack is applied equally to
all notes.
[5 ▲▼]–
[7 ▲▼]
4’, 2 2/3’, 2’ These determine the attack sound volume of the ORGAN FLUTE Voice. The 4’,
2-2/3’ and 2’ controls increase or reduce the volume of attack sound at the
corresponding footages. The longer the graphic bar, the greater the attack
sound volume.
[8 ▲▼] LENG (Length) Affects the attack portion of the sound producing a longer or shorter decay
immediately after the initial attack. The longer the graphic bar, the longer the
decay.

1
1
Voices – Playing the Keyboard –
Tyros3 Reference Manual • 17
The powerful Voice Creator features of the Tyros3 give you the tools to create your own original Voices. Voice Cre-
ator allows you to import your own “Wave” (audio samples in WAV or AIFF format), and assign them to the keys—
building completely new Voices with completely new sounds.
Two types of Voices can be created: Normal Voice (see below) and Drum Voice (page 22). The creating procedure
differs depending on the Voice type.
Creating Normal Voices (Custom Voice)
By importing Wave files, you can create your original Voices—not only create from scratch, but also add Waves to
the existing Voices. A Voice consists of eight elements and you need to assign Wave files to each element (more
than two Waves can be assigned to one element).
The resulting Voice is called a Custom Voice and can be selected and played in the same way as all other Tyros3
Voices.
1 Prepare the audio data you’ll be using for the new Voice.
Only WAV or AIFF format data can be used for the Voice Creator. Store the files
in a USB storage device or hard disk drive.
Creating Custom Voices (Voice Creator)
USB or HD
Wave files (WAV or AIFF)
q Import to Element(s)
(steps 1–9 below)
Tyros3
Element 8
Element 1
Wave 1 Wave 2
USB, HD or USER
NORMAL
xxxxx.UVN
xxxxx.UVN
w Edit each element and entire Voice
(steps 10–12)
e Save as a file
(step 13)
r Assign to the
Expansion Voice
Bank (step 14)
To take full advantage of the Voice Cre-
ator function, we recommend that you
install optional DIMMs.
NOTE
Notes for Available Audio Files
• This instrument cannot recognize the extension .aiff. When you use an
AIFF file, change the extension to .aif.
• Only use uncompressed files.
• Audio data used for the Voice Creator can be of any sample rate or bit res-
olution. However, all audio data of a resolution other than 16-bit is auto-
matically converted to 16-bit resolution after being loaded.
• Only use Wave data having the following frequencies: 96000 Hz, 88000
Hz, 48000 Hz, 44100 Hz, 32000 Hz, 22050 Hz or 11025 Hz. Otherwise,
the data may not play back at the correct pitch.
•Voice Creator supports and recognizes loops in the audio data, letting you
use up to one loop in each audio file. (Some sample libraries have loops
already programmed into the data; you can also use audio editing soft-
ware to program loops yourself. Keep in mind however, that multiple
loops are not supported.)
• Audio files recorded with the Hard Disk Recorder cannot be used as is
with the Voice Creator. If you want to use a Hard Disk Recorder file,
export the file in .wav data format.
NEXT PAGE

1
1
Voices – Playing the Keyboard –
18 • Tyros3 Reference Manual
2 Turn the PART SELECT [RIGHT 1] button to on, then select a Voice.
When you are creating a Custom Voice from scratch, select an “empty” Voice
from the [EXPANSION] button. If you are creating a Voice by adding Wave files
to an existing Voice, press the desired VOICE button and select the desired
Voice.
3 Press the [VOICE CREATOR] button to call up the Voice Creator.
4 Press the [G] (WAVE IMPORT) button to call up the WAVE IMPORT
menu.
5 Use the [A]–[D] and [F]–[I] buttons to select the desired Element to
which Wave file(s) will be imported.
The Key Mapping display of the selected Element will appear.
6 Select the desired Wave to be imported by following the procedure
below.
6-1 Press the [F] (ADD WAVE) button to call up the ADD WAVE display.
6-2 Press the [F] (FILE IMPORT) button.
All available .wav and .aif files will be shown.
6-3 Select the desired audio file by using the [A] –[J] buttons, then press the
[6 ▼] (IMPORT) button.
If you have selected the [PERC./SFX
KIT] category, make sure NOT to select
Drum Voice (“Drums” is displayed
above the Voice name).
NOTE
4
5
You cannot import Waves to preset Ele-
ments (instrument icon is shown).
NOTE
Double-clicking on the corresponding
[A]–[J] button here selects the file for
import, allowing you to skip steps 6-4
and 6-5 below.
NOTE
NEXT PAGE

1
1
Voices – Playing the Keyboard –
Tyros3 Reference Manual • 19
6-4 Press the [7 ▼] (OK) button.
The file properties for the audio data are shown for confirmation pur-
poses.
6-5 At the prompt, press the [F] (YES) button.
To cancel, press the [G] (NO) button.
7 Set the parameters for the imported Wave in the ADD WAVE display.
From this display, you can set a number of parameters related to how the
sound will be mapped to the keyboard.
8
[D] PROPERTY Shows the Property display (page 25).
[1 ▲▼] FIXED PITCH When this is set to ON, all keys will play the Wave sound at the same pitch.
When set to OFF, the pitch of the Wave sound changes according to the key
played, based around the original pitch (set at Center Key below).
[2 ▲▼]/
[3 ▲▼]
CENTER KEY This determines the key to which the original pitch of the sound is assigned.
When Fixed Pitch (above) is set to OFF, keys below the Center Key play the
sound progressively lower in pitch, while keys above play the sound progres-
sively higher. Normally, you’ll want to make sure that this is the same as the
original sound; for example, if the original pitch of the audio was at C3, set
Center Key to C3 for best results. When Fixed Pitch (above) is set to ON, this
has no effect. You can specify this setting directly from the keyboard by simul-
taneously holding down the [2 ▲▼] (DIRECT KEY) button and pressing the
desired key on the keyboard.
[4 ▲▼]/
[5 ▲▼]
START KEY This determines the lowest key at which the Wave will sound. Use this with
End Key (see step 10 on page 20) to set the key range for the Wave. You can
specify this setting directly from the keyboard by simultaneously holding
down the [4 ▲▼] (DIRECT KEY) button and pressing the desired key on the
keyboard.
[6 ▲▼] WAVE VOLUME This determines the playback volume for the specific Wave. Normally, this
should be set to the maximum (127); however, you can use it to adjust the
level balance among multiple sounds in the Element.
NEXT PAGE

1
1
Voices – Playing the Keyboard –
20 • Tyros3 Reference Manual
8 Execute importing by pressing the [H] (EXECUTE) button.
To cancel importing, press the [8 ▲▼] (CANCEL) button.
9 If you want to import another Wave to this Element, repeat steps 6–8.
10 Set the parameters for the currently selected Element in the KEY
MAPPING display.
11 Press the [EXIT] button to return to the WAVE IMPORT display.
If you want to edit another Element, repeat steps 5–10.
12 Press the [8 ▲▼] (VOICE SET) button and edit the Voice Set parame-
ters (page 12).
After you finish editing the Voice Set parameters, press the [EXIT] button to
show the WAVE IMPORT display again.
13 Save the created Voice as a file.
Press the [J] (SAVE) button to call up the SAVE & ASSIGN display, then press
the [G] (SAVE FILE) button to save the Voice.
If you want to save the Voice at this
point, press the [J] (SAVE) button. The
SAVE & ASSIGN display will appear.
Refer to steps 13–14 below about the
SAVE & ASSIGN display. Each time you
make some change (e.g., add a Wave to
the Element or add an Element to the
Voice), you should save the Voice.
NOTE
[G] DELETE WAVE Deletes the Wave selected with the [1 ▲▼]–[3 ▲▼] (WAVE) buttons below.
[1 ▲▼]–
[3 ▲▼]
WAVE When more than one Wave has been imported, select the desired one for
editing.
[4 ▲▼]/
[5 ▲▼]
START KEY This determines the lowest key at which the Wave will sound. Use this with
End Key (below) to set the key range for the Wave. You can specify this setting
directly from the keyboard by simultaneously holding down the [4 ▲▼]
(DIRECT KEY) button and pressing the desired key on the keyboard.
[6 ▲▼]/
[7 ▲▼]
END KEY This determines the highest key at which the Wave will sound. Use this with
Start Key (above) to set the key range for the Wave. You can specify this set-
ting directly from the keyboard by simultaneously holding down the [6 ▲▼]
(DIRECT KEY) button and pressing the desired key on the keyboard.
The created Voice will be lost if
you change to another Voice or
you turn the power off without
executing the Save operation.
Make sure to execute the Save
operation.
Saving the Voice to the USER drive is
not recommended since the USER drive
does not have much memory space—
only about 3 MB. It is better to save to
the HD or USB drive.
Do not use any special characters
(umlaut, accent, etc.) in the Voice name.
CAUTION
NOTE
NOTE
14
13
NEXT PAGE

1
1
Voices – Playing the Keyboard –
Tyros3 Reference Manual • 21
14 Assign the file (saved on step 13) to an Expansion Voice bank.
This step assigns the saved Voice to the Expansion Voice bank, letting you
select it from the [EXPANSION] button on the panel. In this step, the link
between the Expansion Voice bank and the saved Voice file is actually stored.
14-1 Press the [J] (ASSIGN BANK) button.
14-2 Select the desired location in the bank by using the [A]–[J] buttons.
14-3 Press the [6 ▼] (ASSIGN) button.
The same Voice name that you entered in the Save operation (step 13)
is selected automatically. Normally, you should keep this name.
14-4 Press the [8 ▲] (OK) button.
The Voices which have been saved and assigned are automatically loaded to
the internal memory when the power of the instrument turned on. If the Voice
is contained in a USB storage device, automatic loading may not be possible
because of the time needed to recognize the device. If this happens, copy the
Voice to another device and try it again.
15 Press the [EXIT] button.
If you want, you can continue adding waves. Repeat steps 5–14.

1
1
Voices – Playing the Keyboard –
22 • Tyros3 Reference Manual
Creating Drum Voices (Custom Drum Voice)
By assigning Wave files to each key, you can create your original Drum Voices—not only by creating the Voice from
scratch, but also by replacing specific sounds (keys) within an existing Drum Voice with Wave files and by editing
selected parameters of each key.
The resulting Voice is called a Custom Drum Voice and can be selected and played in the same way as all other
Tyros3 Voices.
1 Prepare the audio data you’ll be using for the new Voice.
Only the WAV or AIFF format data can be used for the Voice Creator. Store the
files in a USB storage device or hard disk drive.
For details on compatible audio files, refer to page 17.
2 Turn the PART SELECT [RIGHT 1] button to on, then select a Drum
Voice.
When you are creating a Custom Drum from scratch, select an “empty” drum
Voice by pressing the [EXPANSION] button, then pressing the [8 ▲] (UP) but-
ton and selecting the “CustomDrum” category. If you are creating a Drum
Voice by adding Wave files to an existing Drum Voice, press the [PERC./DRUM
KIT] button and select the desired drum Voice.
3 Press the [VOICE CREATOR] button to call up the Voice Creator.
USB or HD
Wave files (WAV or AIFF)
Tyros3
Drum Voice
USB, HD or USER
DRUM
xxxxx.UVD
xxxxx.UVD
q Import to specific key(s)
(steps 1–6 below)
w Edit the entire Drum Voice
(steps 7–9)
e Save as a file
(step 10)
r Assign to the
Expansion Voice
bank (step 10)
4
NEXT PAGE

1
1
Voices – Playing the Keyboard –
Tyros3 Reference Manual • 23
4 Press the [G] (WAVE IMPORT) button to call up the DRUM MAPPING
display.
5 Specify the key to be edited or which Wave file is to be imported.
Press the desired key on the keyboard or use the [1 ▲▼]/[2 ▲▼] (TARGET)
buttons.
6 If you want to import the Wave to the selected key, press the [F] (ADD
WAVE) button.
For details on the import procedure, refer to step 6 on page 18.
7 Set the parameters for the selected key in the DRUM MAPPING dis-
play.
6
5
10
9
[A] ALL SOUND OFF Stops all sounds.
[D] PROPERTY Shows the Property display (page 25).
[G] REMOVE WAVE Deletes the imported Wave. If you have started Voice creating based on an
existing Drum Voice, the key will return to the original sound.
[1 ▲▼]/
[2 ▲▼]
TARGET Selects a key to be edited.
[3 ▲▼] VOLUME Adjusts the volume.
[4 ▲▼]PAN Sets the stereo pan position: 0 (Random), 1 (Left)–64 (Center)–127 (Right).
[5 ▲▼] REVERB Adjusts the applied reverb effect.
[6 ▲▼] RECEIVE NOTE
OFF
Determines whether the key receives Note Off events or not. When this
parameter is set to ON, Note Off events will be received. When this is set to
OFF, Note Off events will not be received.
When the [DSP] button is on, a setting of “0” here results in no panning.
NOTE
NEXT PAGE

1
1
Voices – Playing the Keyboard –
24 • Tyros3 Reference Manual
8 Repeat steps 5–7 to edit each key.
9 Press the [8 ▲▼] (VOICE SET) button and edit the Voice Set parame-
ters (page 12).
After you finish editing the Voice Set parameters, press the [EXIT] button to
show the DRUM MAPPING display again.
10 Press the [J] (SAVE) button to call up the SAVE & ASSIGN display
Save the created Drum Voice as a file, then assign it to the Expansion Voice
Bank. For details, refer to steps 13–14 on page 20.
Editing an Expansion Voice Bank—Library Edit
This function lets you organize the Voices in the Expansion Voice bank, renaming them, changing their location
within in the bank, or even deleting them if desired.
1 Call up the operation display.
[VOICE CREATOR] → [B] LIBRARY EDIT
2 Use the TAB [
QQ
QQ
][
WW
WW
] buttons to select the desired tab page: Custom
Voice, Custom Drum or Premium.
3 Select the desired Voice in the display and use the [1 ▼]–[5 ▼] but-
tons to edit the selected Voice.
4 When you’ve finished editing, press the [EXIT] button.
The Premium page is reserved for
Voices obtained from the Internet
website. The Voices in the Premium
page cannot be edited but only deleted.
NOTE
When you reorganize Voices in this dis-
play, you are simply organizing the
paths of the Voices, not copying or
moving the Voices themselves.
NOTE
Reloading an Expansion Voice Bank
The [8 ▲] (RELOAD) button is used when the links of the Voices are broken
(an exclamation mark “!” is shown on the Voice icon). For example, when
you open this display without connecting the USB storage device which
contains the assigned Custom Voice, a “Not Found!” message appears
along with the Voice name. If this happens, connect the appropriate USB
storage device and reload the Expansion Voice bank.
While reloading, press the [VOICE CREATOR] or [EXPANSION] button calls
up the progress display.
3
See below.
Shows the property display
(page 25).

1
1
Voices – Playing the Keyboard –
Tyros3 Reference Manual • 25
Property display
When the available memory space has been taken up with large amounts of audio data, you may want to
delete large Custom Voices to create space, yet not know which Voices are large and taking up much
space. In the Property display, you can check the Memory Status (below), as well as the File Property
(name, location, size and Wave count) of the currently selected Expansion Voice.
● Memory Status
• WAVE RAM: Memory size of the optionally installed DIMMs. After installing the DIMMs, the pre-
installed memory (4 MB) is invalid and cannot be accessed. By optimizing the DIMMs, you may be
able to increase the memory capacity (depending on how fragmented the audio files are). Press the
[B] (DEFRAG) button to optimize the DIMMs.
• VOICE RAM: Size of the internal memory for the Expansion Voices. This memory cannot be expanded.
A maximum of 4,096 KB is available.
• WAVE COUNT: Total number of the wave files. A maximum of 5,120 mono files or 2,560 stereo files is
available.
• WAVEFORM COUNT: Total number of Waveforms. The term Waveform refers to a set of wave assign-
ment information. A maximum of 1,280 waveforms is available.
To close the Property display, press the [F] (OK) button.

1
1
Voices – Playing the Keyboard –
26 • Tyros3 Reference Manual
Saving your Custom Voices to a Library—Library Save
Once you’ve created some Custom Voices (including Custom Drum Voices), you’ll
want to keep them together in a Library file. Library Save lets you create a Library file
for storing your Custom Voices and keeping them organized for future use.
1 Call up the operation display.
[VOICE CREATOR] → [C] LIBRARY SAVE
2 Use the TAB [
QQ
QQ
][
WW
WW
] buttons to select the desired tab page: CUSTOM
VOICE or CUSTOM DRUM.
3 By using the [A]–[J] buttons and [1 ▲]–[8 ▲] buttons, select the
desired Voices.
You can continue to select additional Voices here, as many as desired—even a
mixture of Normal and Drum Voices. To select all Voices in all tab pages, press
the [6 ▼] (ALL) button.
4 Press the [7 ▼] (OK) button.
5 By using the TAB [
QQ
QQ
][
WW
WW
] buttons, select the destination for saving the
data.
If necessary, create a folder by pressing the [7 ▼] (FOLDER) button.
6 Press the [6 ▼] (SAVE) button.
7 Enter the desired name for the Library file and press the [8 ▲] (OK)
button.
A message appears prompting you to select the method for saving.
8 Press the [F] (ALL DATA) or [G] (ALIAS) button to save the Library
file.
To cancel, press the [H] (CANCEL) button.
The Library file contains the path of the
Custom Voices. Therefore, if you move
or delete the Voices after creating the
Library file, the Voices cannot be
recalled from the Library file.
NOTE
Even though the User drive can be
selected here, there is not enough
memory space in the drive for storing
Voice Creator data. Make sure to use
one of the other destinations.
You can check the available memory
space of the selected storage location/
device by pressing the [8 ▼] (PROP-
ERTY) button here.
NOTE
NOTE
[F] ALL DATA Saves all of the selected data to the specified location. In this operation, two
kinds of data are saved—that of Library files and the selected Custom Voices/
Custom Drum Voices. These two kinds of files are saved to the same drive but
are shown in different displays. To show the Library file, select [VOICE CRE-
ATOR] → [A] LIBRARY LOAD; To show the Custom Voices, select [VOICE CRE-
ATOR] → [D] INDIVIDUAL LOAD.
When you save the Library file using ALL DATA, you should make a new folder to save the
Library because the Custom Voices are mixed with the existing Voices in the destination drive.
NOTE

1
1
Voices – Playing the Keyboard –
Tyros3 Reference Manual • 27
Loading a single Additional Voice to the Tyros3—Individual Load
This operation allows you to load a single additional Voice (including from Custom Voices, Custom Drum Voices
and downloaded Premium Voices) to the Expansion Voice bank in the instrument for playing or editing.
1 Call up the operation display.
[VOICE CREATOR] → [D] INDIVIDUAL LOAD
2 Use the TAB [
QQ
QQ
][
WW
WW
] buttons to select the location or device containing
the desired Voice.
3 Select the desired Voice in the display.
If you select a Custom Voice/Custom Drum Voice, the Expansion Voice bank
appears.
If you select a Voice which has been downloaded from the website, loading
will automatically start and steps 4–7 are omitted.
4 By using the [A]–[J] buttons and [1 ▲]–[8 ▲] buttons, select the desti-
nation for the Voice.
5 Press the [6 ▲] (ASSIGN) button.
6 If desired, enter a name for the Voice.
If a Voice with the same name already exists in the bank, you’ll need to enter a
new name for the Voice.
7 Press the [8 ▲] (OK) button to start loading.
To cancel, press the [8 ▼] (CANCEL) button.
After the loading is finished, you can select the Voice from the [EXPANSION]
button.
[G] ALIAS Saves only Alias markers (shortcuts) of the selected data to the specified loca-
tion. This lets you save multiple Libraries of your Voice data and make multiple
folders containing different collections of your Voices, without taking up addi-
tional memory space on the drive. As long as the Voice data exists in one loca-
tion on the drive, you can save an Alias that will recall that data.
When you save a Voice to some Libraries by using ALIAS and edit the Voice, the edit you per-
form affects all Libraries which include the edited Voice.
NOTE
4
4
5
File loading may take as little as a cou-
ple of seconds or as long as a few min-
utes, depending on how much data is
contained in the Voice.
NOTE

1
1
Voices – Playing the Keyboard –
28 • Tyros3 Reference Manual
Loading an Expansion Voice Bank (Library) to the Tyros3—Library Load
This operation lets you recall the Custom Voices you’ve saved to a Library file (in Library Save on page 26), and load
them to the Tyros3.
1 Call up the operation display.
[VOICE CREATOR] → [A] LIBRARY LOAD
2 Use the TAB [
QQ
QQ
][
WW
WW
] buttons to select the location or device containing
the desired Library file.
3 By using the [A]–[J] buttons, select the desired Library file.
If the instrument does not contain Library files, the selected file is automatically
loaded. If the instrument contains Library files, a message appears prompting
you to overwrite existing Voices.
After the loading is finished, you can select the newly loaded Voices from the
[EXPANSION] button.
File loading may take several minutes,
depending on how many Voices are in
the Library and how much data they
contain. Do not turn off the power or
disconnect any devices during this
operation.
While loading, pressing the [VOICE
CREATOR] or [EXPANSION] button
calls up the progress display.
NOTE
NOTE
YES The current Custom Voice displayed in the prompt is replaced with the one in
the Library file.
YES ALL Current Custom Voices are replaced with all of the Voices in the Library file.
You can use this after replacing some selected Voices one by one by using
“YES” and replace all the rest.
NO The displayed Voice in the prompt will not be replaced.
CANCEL Cancels loading the Library file.

1
1
Voices – Playing the Keyboard –
Tyros3 Reference Manual • 29
Editing a Custom Voice on your computer—Voice Editor
Once you’ve created a Custom Voice (including Custom Drum Voice) with the Voice Creator features, you can
transfer that Voice to a computer and use the comprehensive Voice Editor software (included on the CD-ROM) to
edit all the parameters from your computer. The Voices you create can be saved to the PRESET tab page on the
Tyros3 as Custom Voices, and can be called up any time by pressing the [EXPANSION] button. After installing the
software, edit Voices by following the steps below.
1 Make sure the Tyros3 is properly connected to the computer with a
USB cable.
2 Turn the computer’s power on, then turn the Tyros3’s power on.
3 Start Voice Editor on the computer.
The Custom Voice Edit Mode display is shown in the instrument. The Voice
Editor can only be used when this display is shown.
If this display does not appear, call up this display by selecting [VOICE CRE-
ATOR] → [F] CUSTOM VOICE EDIT via PC.
4 Edit the Voice parameters on the computer to create your original
Voice.
For details, refer to the Owner’s Manual of the Voice Editor on the included
CD-ROM.
5 When you’ve finished editing, select the [SAVE & ASSIGN] menu on
the Voice Editor to save and assign the edited Voice on the Tyros3.
6 Exit the Voice Editor.
7 Select the edited Voice from the [EXPANSION] button and play it.

2
2
30 • Tyros3 Reference Manual
Styles – Playing Rhythm and Accompaniment –
Styles
– Playing Rhythm and Accompaniment –
Contents
Selecting the Chord Fingering Type . . . . . . . . . . . . . . . . . . . . 30
Style Playback Related Settings . . . . . . . . . . . . . . . . . . . . . . . 32
Split Point Settings . . . . . . . . . . . . . . . . . . . . . . . . . . . . . . . . . 34
Memorizing the Original One Touch Setting . . . . . . . . . . . . . 35
Creating/Editing Styles (Style Creator) . . . . . . . . . . . . . . . . . 36
• Realtime Recording . . . . . . . . . . . . . . . . . . . . . . . . . . . . . . . . . . .37
• Step Recording. . . . . . . . . . . . . . . . . . . . . . . . . . . . . . . . . . . . . . .40
• Style Assembly . . . . . . . . . . . . . . . . . . . . . . . . . . . . . . . . . . . . . . .40
• Editing the Rhythmic Feel. . . . . . . . . . . . . . . . . . . . . . . . . . . . . . .42
• Editing Data for Each Channel . . . . . . . . . . . . . . . . . . . . . . . . . . .44
• Making Style File Format Settings. . . . . . . . . . . . . . . . . . . . . . . . .45
Style playback can be controlled by the chords you play in the chord section of the keyboard. There are seven types
of fingering.
1 Call up the operation display.
[FUNCTION] → [C] STYLE SETTING/SPLIT POINT/CHORD FINGERING → TAB
[
QQ
QQ
][
WW
WW
] CHORD FINGERING
2 Press the [1 ▲▼]–[3 ▲▼] buttons to select a fingering.
For information on each fingering type, see page 31.
Selecting the Chord Fingering Type
Chord Tutor
If you know the name of a chord but don’t know how to play, you can have
the instrument show you the notes to play. This is the Chord Tutor function.
On the CHORD FINGERING display, specify the Chord Root and Chord Type
by using the [6 ▲▼]–[8 ▲▼] button. The notes you need to play are shown
in the display.
Depending on the chord, some notes may be omitted.
NOTE

2
2
Styles – Playing Rhythm and Accompaniment –
Tyros3 Reference Manual • 31
● Chord Fingering Types
SINGLE FINGER Makes it simple to produce orchestrated accompaniment using major, sev-
enth, minor and minor-seventh chords by pressing a minimum number of
keys on the Chord section of the keyboard. This type is available only for
Style playback.
The abbreviated chord fingerings described at right are used:
MULTI FINGER Automatically detects Single Finger or Fingered chord fingerings, so you can
use either type of fingering without having to switch fingering types.
FINGERED Lets you finger your own chords on the chord section of the keyboard, while
the instrument supplies appropriately orchestrated rhythm, bass, and chord
accompaniment in the selected Style. The Fingered type recognizes the vari-
ous chord types which are listed on the Data List available at the Yamaha
website and can be looked up using the Chord Tutor function on page 30.
FINGERED ON BASS Accepts the same fingerings as Fingered, but the lowest note played in the
Chord section of the keyboard is used as the bass note, allowing you to play
“on bass” chords. (In the Fingered more, the root of the chord is always used
as the bass note.)
FULL KEYBOARD Detects chords in the entire key range. Chords are detected in a way similar
to Fingered, even if you split the notes between your left and right hands—
for example, playing a bass note with your left hand and a chord with your
right, or by playing a chord with your left hand and a melody note with your
right.
AI FINGERED Basically the same as Fingered, with the exception that less than three notes
can be played to indicate the chords (based on the previously played chord,
etc.).
AI FULL KEYBOARD When this advanced fingering type is engaged, the instrument will automati-
cally create appropriate accompaniment while you play just about anything,
anywhere on the keyboard using both hands. You don’t have to worry about
specifying the Style chords. Although the AI Full Keyboard type is designed
to work with many songs, some arrangements may not be suitable for use
with this feature. This type is similar to Full Keyboard, with the exception that
less than three notes can be played to indicate the chords (based on the pre-
viously played chord, etc.). 9th, 11th and 13th chords cannot be played. This
type is available only for Style playback.
Cm
C
Cm
7
C
7
For a major chord, press
the root key only.
For a minor chord, simul-
taneously press the root
key and a black key to its
left.
For a seventh chord,
simultaneously press the
root key and a white key to
its left.
For a minor-seventh
chord, simultaneously
press the root key and both
a white and black key to its
left.
“AI” stands for “Artificial Intelligence.”
NOTE
“AI” stands for “Artificial Intelligence.”
NOTE

2
2
Styles – Playing Rhythm and Accompaniment –
32 • Tyros3 Reference Manual
The Tyros3 has a variety of Style playback functions which can be accessed in the display below.
1 Call up the operation display.
[FUNCTION] → [C] STYLE SETTING/SPLIT POINT/CHORD FINGERING → TAB
[
QQ
QQ
][
WW
WW
] STYLE SETTING
2 Use the [1 ▲▼]–[8 ▲▼] buttons for each setting.
Style Playback Related Settings
[1 ▲▼] STOP ACMP When [ACMP] is turned on and [SYNC START] is off, you can play chords in
the chord section of the keyboard with the Style stopped, and still hear the
accompaniment chord. In this condition—called “Stop Accompaniment”—
any valid chord fingerings are recognized and the chord root/type are shown
in the display. Here, you can determine whether the chord played in the
chord section will sound or not in the Stop Accompaniment status.
OFF: The chord played in the chord section will not sound.
STYLE: The chord played in the chord section will sound via the Voices for
the Pad part and the Bass channel of the selected Style.
FIXED: The chord played in the chord section will sound via the specified
Voice, regardless of the selected Style.
[2 ▲▼] OTS LINK TIMING This applies to the OTS Link function. This parameter determines the timing
in which the One Touch Settings change with the MAIN VARIATION [A]–[D]
change. (The [OTS LINK] button must be on.)
Real Time: One Touch Setting is immediately called up when you press a
MAIN VARIATION button.
Next Bar: One Touch Setting is called up at the next measure, after you press
a MAIN VARIATION button.
[3 ▲▼] SYNCHRO STOP
WINDOW
This determines how long you can hold a chord before the Synchro Stop
function is automatically cancelled. When the [SYNC STOP] button is turned
on and this is set to a value other than “OFF,” this is automatically cancels the
Synchro Stop function if you hold a chord for longer than the time set here.
This conveniently resets Style playback control to normal, letting you release
the keys and still have the Style play. In other words, if you release the keys
sooner than the time set here, the Synchro Stop function works.
When the selected Style contains MegaVoices, unexpected sounds may result when this is set
to “STYLE.”
NOTE
When you record a song, the chord detected by playing the Stop Accompaniment can be
recorded regardless of the setting here. Please note that both the Voice that is sounded and the
chord data will be recorded when set to “STYLE,” and only the chord data will be recorded
when set to “OFF” or “FIXED.”
NOTE

2
2
Styles – Playing Rhythm and Accompaniment –
Tyros3 Reference Manual • 33
[4 ▲▼] STYLE TOUCH Turns touch response for the Style playback on/off. When this is set to “ON,”
the Style volume changes in response to your playing strength in the chord
section of the keyboard.
[5 ▲▼]/
[6 ▲▼]
SECTION SET Determines the default section that is automatically called up when selecting
different Styles (when Style playback is stopped). When set to “OFF” and
Style playback is stopped, the active section is maintained even if the different
Style is selected. When any of the MAIN A–D sections is not included in the
Style data, the nearest section is automatically selected. For example, when
MAIN D is not contained in the selected Style, MAIN C will be called up.
[7 ▲▼] TEMPO This determines whether the tempo changes or not when you change Styles
during Style playback.
HOLD: The tempo setting of the previous Style is maintained.
RESET: The tempo changes to that of the initial default tempo for the
selected Style.
[8 ▲▼]PART ON/OFF This determines whether the Style Channel On/Off status changes or not
when you change Styles.
HOLD: The Style Channel On/Off status of the previous Style is maintained.
RESET: All Style Channels are set to On.

2
2
Styles – Playing Rhythm and Accompaniment –
34 • Tyros3 Reference Manual
These are the settings (there are three Split Points) that separate the different sections of the keyboard: the Chord
section, the LEFT part section, the RIGHT 1–2 section and RIGHT 3 section. The three Split Point settings (below) are
specified as note names.
1 Call up the operation display.
[FUNCTION] → [C] STYLE SETTING/SPLIT POINT/CHORD FINGERING → TAB
[
QQ
QQ
][
WW
WW
] SPLIT POINT
2 Set the Split Point.
Split Point Settings
Split Point (S)
Chord section
Voice RIGHT
1–2
Split Point (L) Split Point (R)
Voice LEFT
Voice
RIGHT 3
[F] Split Point (S+L) Sets the Split Point (S) and Split Point (L) to the same note. Press the [F] but-
ton and rotate the [DATA ENTRY] dial. You can also specify the Split Point
directly from the keyboard by pressing the desired key on the keyboard while
holding the [F] button.
[G] Split Point (S) Sets the each Split Point. Press one of the desired buttons and rotate the
[DATA ENTRY] dial. You can also specify the Split Point directly from the key-
board by pressing the desired key on the keyboard while holding one of the
[G]–[I] buttons.
[H] Split Point (L)
[I] Split Point (R)
[1 ▲▼]/
[2 ▲▼]
STYLE You can specify each Split Point by note name. “STYLE” indicates Split Point
(S), “LEFT” indicates Split Point (L) and “RIGHT3” indicates Split Point (R).
[3 ▲▼]/
[4 ▲▼]
LEFT
[5 ▲▼]/
[6 ▲▼]
RIGHT3
Split Point (S+L)
Chord section
+ Voice LEFT
Voice RIGHT 1–3
Split Point (L) cannot be set lower than Split Point (S), and Split Point (R) cannot be set
lower than Split Point (L).
NOTE

2
2
Styles – Playing Rhythm and Accompaniment –
Tyros3 Reference Manual • 35
You can create your own One Touch Setting setups.
1 Select the desired Style to memorize your One Touch Setting.
2 Set up the panel controls (such as Voice, effects, and so on) as
desired.
3 Press the [MEMORY] button.
4 Press one of the ONE TOUCH SETTING [1]–[4] buttons.
A message appears in the display prompting you to save the panel settings.
5 Press [F] (YES) button to call up the Style Selection display and save
the panel settings as a Style file.
Memorizing the Original One Touch Setting
34
The panel settings memorized to
each OTS button will be lost if you
change the Style or turn the power
off without executing the Save
operation.
CAUTION

2
2
Styles – Playing Rhythm and Accompaniment –
36 • Tyros3 Reference Manual
Styles are made up of fifteen different sections and each section has eight separate channels.
With the Style Creator feature, you can create a Style by separately recording the channels, or by importing pattern
data from other existing Styles. You can use one of the three different methods described below to create a Style.
The created Style can also be edited.
• Realtime Recording: This method lets you record the Style by simply playing the keyboard. See page 37.
• Step Recording: This method lets you to enter each note individually. See page 40.
• Style Assembly: This method lets you create a composite Style by combining various patterns from the internal
preset Styles or Styles you have already created. See page 40.
Call up the operation display.
[DIGITAL RECORDING] → [B] STYLE CREATOR
There are six Pages (tabs) in the Style Creator display.
• BASIC ................... Creates the basic settings of the Style. You can also
record your performance in realtime to create a new
Style (Realtime Recording). See page 37.
• ASSEMBLY ........... Mixes the various parts (channels) from preset Styles or
already created Style to create a new Style. See page 40.
• GROOVE............... Changes the rhythmic feel of your created Style. See
page 42.
• CHANNEL............. Edits data for each channel—quantizing, changing
velocity, etc. See page 44.
• PARAMETER ........ Changes the settings related for Style File Format. See
page 45.
• EDIT...................... Lets you enter notes one by one to create your Style
(Step Recording). See page 40.
Creating/Editing Styles (Style Creator)
Sections
Channels
The Style files created on the Tyros3 can
only be played back on instruments
which are compatible with SFF GE.
NOTE

2
2
Styles – Playing Rhythm and Accompaniment –
Tyros3 Reference Manual • 37
Realtime Recording
In the BASIC Page, you can create a single Style by recording the individual channels one-by-one, using realtime
recording.
1 When you want to create a Style based on an existing Style, select
the desired Style to serve as the basis for recording/editing before
call up the Style Creator display.
2 Call up the operation display.
[DIGITAL RECORDING] → [B] STYLE CREATOR
The BASIC Page is shown.
3 If you want to create a new Style from scratch, press the [C] (NEW
STYLE) button to delete all channel’s data.
4 Select the desired section (Intro, Main, Ending, etc.) for your new
Style.
First close the RECORD display by pressing the [EXIT] button. Then use the [3
▲▼]/[4 ▲▼] buttons to select the section to be recorded.
5 Use the [5 ▲▼]/[6 ▲▼] buttons to determine the length (number of
measures) of the selected section, then press the [D] (EXECUTE) but-
ton to actually enter the specified length.
Realtime Recording Characteristics—Loop Recording and Overdub Recording
● Loop Recording
Style playback repeats the rhythm patterns of several measures in a “loop,” and Style recording is also
done using loops. For example, if you start recording with a two-measure MAIN section, the two measures
are repeatedly recorded. Notes that you record will play back from the next repetition (loop), letting you
record while hearing previously recorded material.
● Overdub Recording
This method records new material to a channel already containing recorded data, without deleting the
original data. In Style recording, the recorded data is not deleted, except when using functions such as
Rhythm Clear and Delete (page 38). For example, if you start recording with a two-measure MAIN section,
the two measures are repeated many times. Notes that you record will play back from the next repetition,
letting you overdub new material to the loop while hearing previously recorded material.
When creating a Style based on an existing internal Style, overdub recording is applied only to the rhythm
channels. For all other channels (except rhythm), you need to delete the original data before recording.
You can specify the sections to be
recorded by using the Section buttons
on the panel. Refer to step 3 on
page 40.
You cannot select INTRO 4 and ENDING
4 sections directly via the panel opera-
tion.
To call up the RECORD display again,
press the [F] (REC CH) button.
NOTE
NOTE
NOTE
5
-1
5
-2
4
NEXT PAGE

2
2
Styles – Playing Rhythm and Accompaniment –
38 • Tyros3 Reference Manual
6 Specify the channel to be recorded by simultaneously holding down
the [F] (REC CH) button and pressing the appropriate numbered but-
ton, [1 ▼]–[8 ▼].
To cancel the selection, press the corresponding [1 ▼]–[8 ▼] button again.
7 Call up the Voice Selection display by using the [1 ▲]–[8 ▲] buttons
and select the desired Voice for the corresponding recording chan-
nels.
Press the [EXIT] button to close the Voice Selection display.
8 If necessary, delete a channel by simultaneously holding down the [J]
(DELETE) button and pressing the appropriate numbered button, [1
▲]–[8 ▲].
You can cancel the deletion by pressing the same numbered button again
before releasing your finger from the [J] button.
9 Start recording by pressing the STYLE CONTROL [START/STOP] but-
ton.
Playback of the specified section starts. Since the accompaniment pattern
plays back repeatedly in a loop, you can record individual sounds one by one,
listening to the previous sounds as they play. For information on recording to
channels other than the rhythm channels (RHY1, 2), refer to the section “Rules
when recording non-rhythm channels” (page 39).
7
6
Preset Organ Flute Voice can be
recorded to the RHY1 and BASS–PHR2
channels.
NOTE
Recordable Voices
• RHY1 channel: Any except your original Organ Flute, SA and SA2 Voices
are recordable.
• RHY2 channel: Only drum/SFX kits are recordable.
• BASS–PHR2 channels: Any except your original Organ Flute, drum/SFX
kits, SA and SA2 Voices are recordable.
When recording channels BASS–PHR2
based on the existing Style, you have to
delete the original data before record-
ing.
NOTE
Deleting recorded notes in the rhythm channel
When you are recording the rhythm channel (RHY1 or RHY2), you can
delete a specific instrument sound by simultaneously holding down the [E]
(RHY CLEAR) button and pressing the appropriate key on the keyboard.
Muting specific channels
You can turn off the desired channels by pressing the corresponding [1 ▼]–
[8 ▼] buttons.
NEXT PAGE

2
2
Styles – Playing Rhythm and Accompaniment –
Tyros3 Reference Manual • 39
10 To continue recording with another channel, repeat steps 6 –9.
11 Stop recording by pressing the STYLE CONTROL [START/STOP] but-
ton.
12 Press the [EXIT] button to close the RECORD display.
13 Press the [I] (SAVE) button to execute the Save operation.
The edited Style will be lost if you
change to another Style or turn
the power to the instrument off
without executing the Save opera-
tion.
CAUTION
Rules when recording non-rhythm channels
• Use only the CM7 scale tones when recording the BASS and PHRASE
channels (i.e., C, D, E, G, A, and B).
• Use only the chord tones when recording the CHORD and PAD channels
(i.e., C, E, G, and B).
Using the data recorded here, the auto accompaniment (Style playback) is
appropriately converted depending on the chord changes you make during
your performance. The chord which forms the basis for this note conversion
is called the Source Chord, and is set by default to CM7 (as in the example
illustration above).
You can change the Source Chord (its root and type) from the PARAMETER
display on page 45. Keep in mind that when you change the Source Chord
from the default CM7 to another chord, the chord notes and recom-
mended notes will also change. For details on chord notes and recom-
mended notes, see page 46.
CRC CRC
C = Chord note
C, R = Recommended note
For the INTRO and ENDING sections, any appropriate chord or chord progression can be
used.
NOTE
If you want to record the pattern with a Source Chord other than CM7, set the PLAY ROOT
and PLAY CHORD parameters on the PARAMETER Page (page 46) before recording.
NOTE

2
2
Styles – Playing Rhythm and Accompaniment –
40 • Tyros3 Reference Manual
Step Recording
In the EDIT Page, you can record notes with absolutely precise timing. This Step Recording procedure is essentially
the same as that for Song Recording (page 56) with the exception of the points listed below:
• In the Song Creator, the End Mark position can be changed freely; in the Style Creator, it cannot be changed.
This is because the length of the Style is automatically fixed, depending on the selected section. For example, if
you create a Style based on a section of four measures length, the End Mark position is automatically set to the
end of the fourth measure, and cannot be changed in the Step Recording display.
• Recording channels can be changed in the Song Creator 1-16 tab display; however, they cannot be changed in
the Style Creator. Select the recording channel in the BASIC tab display.
• In the Style Creator, the channel data can be entered and System Exclusive data can be edited (delete, copy, or
move). You can switch between the two by pressing the [F] button. However, Chord, Lyrics, and System Exclu-
sive data cannot be entered.
For instructions on Step Recording, refer to pages 56–59. For information on the EDIT display (Event List display),
refer to page 66.
Style Assembly
Style Assembly allows you to create a single Style by mixing the various patterns (channels) from existing internal
Styles.
1 Select the desired Style to serve as the basis for recording/editing
before calling up the Style Creator display.
2 Call up the operation display.
[DIGITAL RECORDING] → [B] STYLE CREATOR → TAB [
QQ
QQ
][
WW
WW
] ASSEMBLY
3 Select the desired section (Intro, Main, Ending, etc.) for your new
Style.
First call up the SECTION Selection display by pressing one of the Section but-
tons (INTRO, MAIN, ENDING, etc.) on the panel. Then change the section as
desired by using the [6 ▲▼]/[7 ▲▼] buttons and actually enter the selection
by pressing the [8 ▲] (OK) button.
You cannot select INTRO 4 and ENDING
4 sections directly via the panel opera-
tion.
NOTE
NEXT PAGE

2
2
Styles – Playing Rhythm and Accompaniment –
Tyros3 Reference Manual • 41
4 Select the channel for which you wish to replace the pattern by using
the [A]–[D] and [F]–[I] buttons. Call up the Style Selection display by
pressing the same button again. Select the Style containing the pat-
tern you want to replace in the Style Selection display.
To return to the previous screen, press the [EXIT] button after selecting the
Style.
5 Select the desired section of the newly imported Style (chosen in
step 3) by using the [2 ▲▼]/[3 ▲▼] (SECTION) buttons.
6 Select the desired channel for the section (chosen in step 5) by using
the [4 ▲▼]/[5 ▲▼] (CHANNEL) buttons.
Repeat steps 3–6 above to replace the patterns of other channels.
7 Press the [J] (SAVE) button to execute the Save operation.
6
4
5
[A]–[D],
[F]–[I] buttons
Playing the Style During Style Assembly
While you are assembling a Style, you can play back the Style and select the
method of playback. Use the [6 ▲▼]/[7 ▲▼] (PLAY TYPE) buttons in the
Style Assembly display to select the playback method.
• SOLO: Mutes all but the selected channel in the ASSEMBLY Page. Any
channels set to ON in the RECORD display on the BASIC Page are
played back simultaneously.
• ON: Plays back the selected channel in the ASSEMBLY Page. Any channels
set to other than OFF in the RECORD display on the BASIC Page are
played back simultaneously.
• OFF: Mutes the selected channel in the ASSEMBLY Page.
The edited Style will be lost if you
change to another Style or turn
the power to the instrument off
without executing the Save opera-
tion.
CAUTION

2
2
Styles – Playing Rhythm and Accompaniment –
42 • Tyros3 Reference Manual
Editing the Rhythmic Feel
1 In the GROOVE Page, use the [A]/[B] buttons to select the edit menu,
then edit the data by using the [1 ▲▼]–[8 ▲▼] buttons.
● 1 GROOVE
This lets you add swing to the music or change the “feel” of the beat by mak-
ing subtle shifts in the timing (clock) of the Style. The Groove settings are
applied to all channels of the selected Style.
3
1
1
2
[1 ▲▼]/
[2 ▲▼]
ORIGINAL BEAT Specifies the beats to which Groove timing is to be applied. In other words, if
“8 Beat” is selected, Groove timing is applied to the 8th notes; if “12 Beat” is
selected, Groove timing is applied to 8th-note triplets.
[3 ▲▼]/
[4 ▲▼]
BEAT CONVERTER Actually changes the timing of the beats (specified in the ORIGINAL BEAT
parameter above) to the selected value. For example, when ORIGINAL BEAT is
set to “8 Beat” and BEAT CONVERTER is set to “12,” all 8th notes in the sec-
tion are shifted to 8th-note triplet timing. The “16A” and “16B” Beat Con-
verter which appear when ORIGINAL BEAT is set to “12 Beat” are variations
on a basic 16th-note setting.
[5 ▲▼]/
[6 ▲▼]
SWING Produces a “swing” feel by shifting the timing of the back beats, depending
on the ORIGINAL BEAT parameter above. For example, if the specified ORIGI-
NAL BEAT value is “8 Beat”, the Swing parameter will selectively delay the
2nd, 4th, 6th, and 8th beats of each measure to create a swing feel. The set-
tings “A” through “E” produce different degrees of swing, with “A” being the
most subtle and “E” being the most pronounced.
[7 ▲▼]/
[8 ▲▼]
FINE Selects a variety of Groove “templates” to be applied to the selected section.
The “PUSH” settings cause certain beats to be played early, while “HEAVY”
settings delay the timing of certain beats. The numbered settings (2, 3, 4, 5)
determine which beats are to be affected. All beats up to the specified beat—
but not including the first beat—will be played early or delayed (for example,
the 2nd and 3rd beats, if “3” is selected). In all cases, “A” types produce min-
imum effect, “B” types produce medium effect, and “C” types produce maxi-
mum effect.
NEXT PAGE

2
2
Styles – Playing Rhythm and Accompaniment –
Tyros3 Reference Manual • 43
● 2 DYNAMICS
This changes the velocity/volume (or accent) of certain notes in the Style play-
back. The Dynamics settings are applied to each channel or all channels of the
selected Style.
2 Press the [D] (EXECUTE) button to actually enter the edits for each
display.
After the operation is completed, this button changes to “UNDO,” letting you
restore the original data if you are not satisfied with the Groove or Dynamics
results. The Undo function only has one level; only the previous operation can
be undone.
3 Press the [I] (SAVE) button to execute the Save operation.
[1 ▲▼]/
[2 ▲▼]
CHANNEL Selects the desired channel (part) to which Dynamics is to be applied.
[3 ▲▼]/
[4 ▲▼]
ACCENT TYPE Determines the type of accent applied—in other words, which notes in the
part(s) are emphasized with the Dynamics settings.
[6 ▲▼] STRENGTH Determines how strongly the selected Accent Type (above) will be applied.
The higher the value, the stronger the effect.
[7 ▲▼] EXPAND/COMP. Expands or compresses the range of velocity values. Values higher than 100%
expand the dynamic range, while values lower than 100% compress it.
[8 ▲▼] BOOST/CUT Boosts or cuts all velocity values in the selected section/channel. Values above
100% boost the overall velocity, while values below 100% reduce it.
The edited Style will be lost if you
change to another Style or turn
the power to the instrument off
without executing the Save opera-
tion.
CAUTION

2
2
Styles – Playing Rhythm and Accompaniment –
44 • Tyros3 Reference Manual
Editing Data for Each Channel
1 In the CHANNEL Page, use the [A]/[B] buttons to select the edit menu.
● 1 QUANTIZE
Same as in the Song Creator (page 64), with the exception of the two addi-
tional available parameters below.
● 2 VELOCITY CHANGE
Boosts or cuts the velocity of all notes in the specified channel, according to
the percentage specified here.
● 3 BAR COPY
This function allows data to be copied from one measure or group of measures
to another location within the specified channel.
● 4 BAR CLEAR
This function clears all data from the specified range of measures within the
selected channel.
● 5 REMOVE EVENT
This function lets you remove specific events from the selected channel.
2 Use the [1 ▲▼]/[2 ▲▼] (CHANNEL) buttons to select the channel to
be edited.
The selected channel is shown at the upper left of the display.
3 Use the [4 ▲▼]–[8 ▲▼] buttons to edit the data.
4 Press the [D] (EXECUTE) button to actually enter the edits for each
display.
After the operation is completed, this button changes to “UNDO,” letting you
restore the original data if you are not satisfied with the results of the edit. The
Undo function only has one level; only the previous operation can be undone.
5 Press the [I] (SAVE) button to execute the Save operation.
5
23
1
4
Eighth notes with swing
Sixteenth notes with swing
[4 ▲▼] TOP Specifies the first (TOP) and last (LAST) measures in the region to be copied.
[5 ▲▼] LAST
[6 ▲▼] DEST Specifies the first measure of the destination location, to which the data is to
be copied.
The edited Style will be lost if you
change to another Style or turn
the power to the instrument off
without executing the Save opera-
tion.
CAUTION

2
2
Styles – Playing Rhythm and Accompaniment –
Tyros3 Reference Manual • 45
Making Style File Format Settings
The Style File Format (SFF) combines all of Yamaha’s auto accompaniment (Style playback) know-how into a single
unified format. By using the Style Creator, you can take advantage of the power of the SFF format and freely create
your own Styles.
The chart shown below indicates the process by which the Style is played back. (This does not apply to the rhythm
track.) These parameters can be set via the Style Creator feature, in the PARAMETER Page.
Chord change via the chord section of the keyboard.
The Tyros3’s Styles are compatible with SFF GE—an enhanced format of the original
SFF with especially rich, expressive guitar parts.
1 In the PARAMETER Page, use the [A]/[B] buttons to select the edit
menu.
For details of the edit menu, see page 46.
2 Use the [1 ▲▼]/[2 ▲▼] (CHANNEL) buttons to select the channel to
be edited.
The selected channel is shown at the upper left of the display.
3 Use the [3 ▲▼]–[8 ▲▼] buttons to edit the data.
For details on editable parameters, see pages 46–48.
4 Press the [I] (SAVE) button to execute the Save operation.
Source Pattern settings—SOURCE (PLAY) ROOT/CHORD (page 46)
There are a variety of possibilities for Style playback notes, depending on
the particular root note and chord type that are selected. The Style data is
appropriately converted depending on the chord changes you make during
your performance. This basic Style data that you create with the Style Cre-
ator is referred to as the “Source Pattern.”
Note Transposition settings—NTR and NTT (page 46)
This parameter group features two parameters that determine how the
notes of the Source Pattern are to be converted in response to chord
changes.
Other settings—HIGH KEY, NOTE LIMIT and RTR (page 48)
Using the parameters of this group, you can fine-tune how Style playback
responds to the chords you play. For example, the Note Limit parameter
allows you to have the Voices of the Style sound as realistic as possible by
shifting the pitch to an authentic range—ensuring that no notes sound out-
side the natural range of the actual instrument (e.g., high bass sounds or
low piccolo sounds).
➔ ➔
The Style files created on the Tyros3 can
only be played back on instruments
which are compatible with SFF GE.
NOTE
4
23
1
The edited Style will be lost if you
change to another Style or turn
the power to the instrument off
without executing the Save opera-
tion.
CAUTION

2
2
Styles – Playing Rhythm and Accompaniment –
46 • Tyros3 Reference Manual
● 1 SOURCE (PLAY) ROOT/CHORD
These settings determine the original key of the source pattern (i.e., the key
used when recording the pattern). The default setting of CM7 (with a Source
Root of “C” and a Chord Type of “M7”), is automatically selected whenever
the preset data is deleted prior to recording a new Style, regardless of the
Source Root and Chord included in the preset data. When you change Source
Root/Chord from the default CM7 to another chord, the chord notes and rec-
ommended notes will also change, depending on the newly selected chord
type.
● 2 NTR/NTT
When NTR is set to “Root Fixed” and
NTT is set to “Bypass,” the “Source
Root” and “Source Chord” parameters
are changed to “Play Root” and “Play
Chord,” respectively. In this case, you
can change chords and hear the result-
ing sound for all channels.
This is not applied when the NTR is set
to GUITAR.
NOTE
NOTE
CRC CR CRC C RC CRC C CR CRC C CR
C
CCC CR
CCC C CR CCC C RC CRC
RCR
CR CR
C
CR CCR
C
CCR
CC
CR
RRCCC
CC RC
C
CC RC
CC
CR CC
CC
CR C CR
C
CC RC C
C
CR
CCR
CR R RC
CCR
CCC
C
CCC
C
CRC
CC
CCC C
C
CRC CR
CC
CRC CC
C
CCC
CC
CCCR
RCC
CCC
RCC
CRC CRR
C
CRC
RCC
C
CCCR CC CCR CR
CM
Cm
7
C
CM
7
7
C
(9)
C
(9)
6
Caug
Cm
6
Cm
7 7
7
Cm
b5
7
Cm
(9)
Cm
(11)
CmM
7
7
CmM
(9)
Cdim
Cdim
7
C
(9)
7
C
(13)
7
C
(b9)
7
Csus
4
C
1+8
C
1+5
C
b5
7
CM
6
Cm (9)
7
CM
(#11)
C
(#11)
7
C
(#9)
7
C aug
7
CM aug
7
C sus
4
7
CM add9
C
(b13)
7
Csus
2
When the Source Root is C:
C = Chord notes
C, R = Recommended notes
[3 ▲▼]/
[4 ▲▼]
NTR (Note Trans-
position Rule)
Determines the relative position of the root note in the chord, when con-
verted from the Source Pattern in response to chord changes.
ROOT TRANS
(Root Transpose)
When the root note is transposed, the
pitch relationship between notes is main-
tained. For example, the notes C3, E3 and
G3 in the key of C become F3, A3 and C4
when they are transposed to F. Use this
setting for channels that contain melody
lines.
ROOT FIXED The note is kept as close as possible to the
previous note range. For example, the
notes C3, E3 and G3 in the key of C
become C3, F3 and A3 when they are
transposed to F. Use this setting for chan-
nels that contain chord parts.
GUITAR This is exclusively for transposing guitar accompaniment. Notes are
transposed to approximate the chords played with natural guitar fin-
gering.
When playing
a C major
chord.
When playing
an F major
chord.
When playing
a C major
chord.
When playing
an F major
chord.
[5 ▲▼]–
[7 ▲▼]
NTT (Note Trans-
position Table)
Sets the note transposition table for the source pattern. Refer to the list on
page 47.
[8 ▲▼] NTT BASS ON/
OFF
The channel for which this is set to ON will be played back by the bass root
note, when the on-bass chord is recognized by the instrument. When the
NTR is set to GUITAR and this parameter is set to ON, only the note which is
assigned to bass will be played back by the bass root note.

2
2
Styles – Playing Rhythm and Accompaniment –
Tyros3 Reference Manual • 47
NTT (Note Transposition Table)
When the NTR is set to ROOT TRANS or ROOT FIXED
When the NTR is set to GUITAR
BYPASS When NTR is set to ROOT FIXED, the transposition table used does
not do any note conversion. When NTR is set to ROOT TRANS, the
table used only converts the notes by maintaining the pitch relation-
ship between notes.
MELODY Suitable for melody line transposition. Use this for melody channels
such as Phrase 1 and Phrase 2.
CHORD Suitable for chordal parts transposition. Use this for the Chord 1 and
Chord 2 channels, especially when they contain piano or guitar-like
chordal parts.
MELODIC MINOR When the played chord changes from a major to a minor chord, this
table lowers the third interval in the scale by a semitone. When the
chord changes from a minor to a major chord, the minor third inter-
val is raised by a semitone. Other notes are not changed. Use this for
melody channels of Sections which respond only to major/minor
chords, such as Intros and Endings
MELODIC MINOR 5th In addition to the Melodic Minor transposition above, augmented
and diminished chords affect the 5th note of the Source Pattern.
HARMONIC MINOR When the played chord changes from a major to a minor chord, this
table lowers the third and sixth intervals in the scale by a semitone.
When the chord changes from a minor to a major chord, the minor
third and flatted sixth intervals are raised by a semitone. Other notes
are not changed. Use this for chord channels of Sections which
respond only to major/minor chords, such as Intros and Endings.
HARMONIC MINOR 5th In addition to the Harmonic Minor transposition above, augmented
and diminished chords affect the 5th note of the Source pattern.
NATURAL MINOR When the played chord changes from a major to a minor chord, this
table lowers the third, sixth and seventh intervals in the scale by a
semitone. When the chord changes from a minor to a major chord,
the minor third, flatted sixth and flatted seventh intervals are raised
by a semitone. Other notes are not changed. Use this for chord
channels of Sections which respond only to a Major/minor chord
such as Intros and Endings.
NATURAL MINOR 5th In addition to the Natural Minor transposition above, augmented
and diminished chords affect the 5th note of the Source pattern.
DORIAN When the played chord changes from a major to a minor chord, this
table lowers the third and seventh intervals in the scale by a
semitone. When the chord changes from a minor to a major chord,
the minor third and flatted seventh intervals are raised by a
semitone. Other notes are not changed. Use this for chord channels
of Sections which respond only to a Major/minor chord such as
Intros and Endings.
DORIAN 5th In addition to the Dorian transposition above, augmented and
diminished chords affect the 5th note of the Source pattern.
ALL-PURPOSE This table covers both strummed- and arpeggio-played sound.
STROKE Suitable for stroke-played sound of the guitar. Some notes may
sound as if it is muted—this is normal condition when the chord is
played on guitar by stroke.
ARPEGGIO Suitable for arpeggio-played sound of the guitar. Using this table,
four notes arpeggio sounds most beautiful.

2
2
Styles – Playing Rhythm and Accompaniment –
48 • Tyros3 Reference Manual
● 3 HIGH KEY / NOTE LIMIT
● 4 RTR (Retrigger Rule)
These settings determine whether notes stop sounding or not and how they
change pitch in response to chord changes.
[4 ▲▼]/
[5 ▲▼]
HIGH KEY This sets the highest key (upper octave limit) of the note transposition for the
chord root change. Any notes calculated to be higher than the highest key
are transposed down to the next lowest octave. This setting is available only
when the NTR parameter (page 46) is set to “Root Trans.”
[6 ▲▼] NOTE LIMIT LOW These set the note range (highest and lowest notes) for Voices recorded to the
Style channels. By judicious setting of this range, you can ensure that the
Voices sound as realistic as possible—in other words, that no notes outside
the natural range are sounded (e.g., high bass sounds or low piccolo sounds).
[7 ▲▼] NOTE LIMIT HIGH
CM
C3-E3-G3
FM
F3-A3-C4
F#M
F#2-A#2-C#3
C#M
C#3-E#3-G#3
Example—When the highest key is F.
Root changes
Notes played
CM
E3-G3-C4
FM
F3-A3-C4
C#M
E#3-G#3-C#4
Example—When the lowest note is C3 and the highest is D4.
Root changes
Notes played
High Limit
Low Limit
STOP The notes stop sounding.
PITCH SHIFT The pitch of the note will bend without a new attack to match the
type of the new chord.
PITCH SHIFT TO ROOT The pitch of the note will bend without a new attack to match the
root of the new chord.
RETRIGGER The note is retriggered with a new attack at a new pitch correspond-
ing to the next chord.
RETRIGGER TO ROOT The note is retriggered with a new attack at the root note of the
next chord. However, the octave of the new note remains the same.

3
3
Tyros3 Reference Manual • 49
Songs – Recording Your Performances and Creating Songs –
Songs
– Recording Your Performances and Creating Songs –
Contents
Editing Music Notation Settings . . . . . . . . . . . . . . . . . . . . . . . 49
Editing Lyrics Display Settings . . . . . . . . . . . . . . . . . . . . . . . . 51
Song Playback Related Parameters (Repeat settings, Channel
settings, Guide Function) . . . . . . . . . . . . . . . . . . . . . . . . . . . . 52
• Keyboard and Vocal Practice Using the Guide Function . . . . . . . .53
• Playing Backing Parts with the Performance Assistant Technology 55
Creating/Editing Songs (Song Creator) . . . . . . . . . . . . . . . . . 56
• Recording Melodies (Step Recording). . . . . . . . . . . . . . . . . . . . . .56
• Recording Chords (Step Recording) . . . . . . . . . . . . . . . . . . . . . . .59
• Re-Recording a Specific Section—Punch In/Out . . . . . . . . . . . . . .61
• Editing Channel Events. . . . . . . . . . . . . . . . . . . . . . . . . . . . . . . . .63
• Editing Chord Events, Notes, System Exclusive Events and Lyrics .66
• Editing Song Position Markers . . . . . . . . . . . . . . . . . . . . . . . . . . .69
To view the music notation of the selected Song, press the [SCORE] button. You can change the notation display as
desired to suit your personal preferences. After you change the setting here, you can save the setting as a part of a
Song by accessing [DIGITAL RECORDING] → [A] SONG CREATOR → TAB [
QQ
QQ
][
WW
WW
] CHANNEL → [A]/[B] SETUP. See
page 65.
Editing Music Notation Settings
[1 ▲▼] LEFT CH Enables/disables display of the left-hand key range. Depending on other settings, this
parameter may be unavailable and may appear grayed out. If this is the case, go to the
detailed setting display (on page 50) and set the LEFT CH. parameter to any channel
except “AUTO.” Or, go to the [FUNCTION] → [B] SONG SETTING and set the LEFT CH
parameter to any channel except “OFF” (page 52). RIGHT (next parameter) and LEFT
cannot be turned off at the same time.
[2 ▲▼] RIGHT CH Enables/disables display of the right-hand key range. RIGHT and LEFT (above) cannot
be turned off at the same time.
[3 ▲▼] CHORD ON/OFF Enables/disables display of the chords. If the selected Song does not contain chord
data, chords are not displayed.

3
3
Songs – Recording Your Performances and Creating Songs –
50 • Tyros3 Reference Manual
Pressing the [8 ▲▼] (SET UP) button calls up the detailed setting display. You
can set the view type by using the [1 ▲▼]–[6 ▲▼] buttons, then press the [8
▲] (OK) button.
[4 ▲▼]LYRICS ON/OFF Enables/disables display of the lyrics. If the selected Song does not contain lyric data,
lyrics are not displayed. When the Song contains Pedal events, pressing these buttons
can display the Pedal events, instead of displaying Lyrics.
[5 ▲▼] NOTE ON/OFF Enables/disables display of the note name (pitch). The note name is indicated at the
left of the note. When the space between the notes is too small, the indication may be
moved to the top left of the note. When the Song contains Fingering events, pressing
these buttons can display the fingering, instead of displaying note names.
[6 ▲▼] COLOR ON/OFF When this is set to ON, the notes in the display appear in color (C: red, D: yellow, E:
green, F: orange, G: blue, A: purple, and B: gray).
[7 ▲▼] SIZE Determines the display resolution (or zoom level) of the notation.
[8 ▲▼] SET UP See below.
[1 ▲▼] LEFT CH Determines which MIDI channel in the Song data is used for the left-hand/right-hand
part. This setting returns to AUTO when a different Song is selected.
AUTO: The MIDI channels in the Song data for the right- and left-hand parts are
assigned automatically—setting the parts to the same channel as the channel which
is specified in the [FUNCTION] → [B] SONG SETTING (page 52).
1–16: Assigns the specified MIDI channel (1–16) to each of the left- and right-hand
parts.
OFF (LEFT CH only): No channel assignment. This disables display of the left-hand
key range.
[2 ▲▼] RIGHT CH
[3 ▲▼]/
[4 ▲▼]
KEY SIGNATURE This lets you enter key signature changes in the middle of a Song, at the stopped posi-
tion. This menu is useful when the selected Song contains no key signature settings for
displaying notation.
[5 ▲▼] QUANTIZE This gives you control over the note resolution in the notation, letting you shift or cor-
rect the timing of all displayed notes so that they line up to a particular note value.
Make sure to select the smallest note value used in the Song.
[6 ▲▼] NOTE NAME Selects the type of the note name indicated at the left of the note in the notation from
among the following three types. The settings here are available when the NOTE ON/
OFF parameter above is set to ON.
A, B, C: Note names are indicated as letters (C, D, E, F, G, A, B).
FIXED DO: Note names are indicated in solfeggio and differ depending on the
selected language.
MOVABLE DO: Note names are indicated in solfeggio according to the scale intervals,
and as such are relative to the key. The root note is indicated as Do. For example, in
the key of G major the root note of “Sol” would be indicated as “Do.” As with
“Fixed Do,” the indication differs depending on the selected language.

3
3
Songs – Recording Your Performances and Creating Songs –
Tyros3 Reference Manual • 51
To view the lyrics of the selected Song, press the [LYRICS/TEXT] button. If the selected
Song contains lyric data, you can have the lyrics shown in the display. Even if the Song
does not contain lyrics data, you can input and show the lyrics, or you can show a text
file (created on a computer, .txt file less than 60KB) in the display.
Editing Lyrics Display Settings
When the lyrics are garbled or unread-
able, you may need to change the Lyrics
Language setting from the [FUNCTION]
→ [B] SONG SETTING.
Line feed (or “carriage return”) is not
automatically done in the instrument. If
a sentence is not displayed in its
entirety because of limitations in the
screen space, execute the line feed on
your computer.
When the background picture is speci-
fied in the Song data, the BACK-
GROUND setting cannot be changed.
NOTE
NOTE
NOTE
Press [1 ▲▼]
buttons
Lyrics display Text display
Press the [5 ▲▼]/[6 ▲▼] button to
actually call up desired text file.
[1 ▲▼] TEXT/LYRICS Switches the screen between the Lyrics display (lyrics data in the Song is
shown) and the Text display (a text file created on a computer is shown).
[2 ▲▼] CLEAR (Text dis-
play only)
Clears the text from the screen (the text data itself is not erased).
[3 ▲▼]/
[4 ▲▼]
FIXED 16–PRO-
PORTIONAL 28
(Text display only)
Determines the text type (fixed or proportional) and font size. Fixed is suitable
for displaying lyrics with chord names, since the positions of chord names are
“fixed” to the corresponding lyrics. Proportional is suitable for displaying lyr-
ics without chord names or explanatory notes. The numbers 16–28 indicate
font sizes. This menu appears only when a text file is selected.
[5 ▲▼]/
[6 ▲▼]
TEXT FILE Calls up the text File Selection display. After selecting, press the [EXIT] button
to return back to the Lyrics/Text display.
[7 ▲▼]/
[8 ▲▼]
BACK GROUND Allows changing of the background picture of the Lyrics/Text display. After
making the setting, press the [EXIT] button to return back to the Lyrics/Text
display.
For information on available image files, refer to the MAIN PICTURE parameter on
page 124.
NOTE

3
3
Songs – Recording Your Performances and Creating Songs –
52 • Tyros3 Reference Manual
The Tyros3 has a variety of Song playback functions:
• Listen to (or practice along with) your favorite Song repeatedly—with Repeat Playback.
• Play back all of the Songs in a particular folder—repeatedly or at random—for your listening pleasure.
• Play back all of the Songs in all of the folders. Each of the SONG [I]–[IV] buttons has wealth of Songs—put them
all together and you’ve got a lot of music you can play repeatedly or at random.
Call up the operation display.
[FUNCTION] → [B] SONG SETTING
Song Playback Related Parameters (Repeat settings, Channel settings,
Guide Function)
[A]/[B] GUIDE MODE See page 53.
[1 ▲▼] GUIDE ON/OFF
[G] REPEAT MODE Determines the method of repeat playback.
OFF: Plays through the selected Song, then stops.
SINGLE: Plays through the selected Song repeatedly.
ALL: Continues playback through all the Songs in the specified folder repeat-
edly.
RANDOM: Continues playback at random through all the Songs in the speci-
fied folder repeatedly.
[H] REPEAT FOLDER Determines the directory in which the Songs are played in sequence when
the REPEAT MODE is set to “ALL” or “RANDOM.” Here, the directory refers to
the path memorized to each of the SONG [I]–[IV] buttons.
CURRENT: Sequentially plays all Songs in the directory containing the cur-
rently selected Song, starting with the currently selected Song.
ALL: Sequentially plays all Songs in all directories (memorized to the SONG
[I]–[IV] buttons). Playback starts with the currently selected Song, then the
remainder of the Songs in the current directory, followed by the Songs in
the other directories.
[I] PHRASE MARK
REPEAT
Phrase Mark is a pre-programmed part of some Song data, which specifies a
certain location (set of measures) in the Song. When this is on, the section
corresponding to the specified Phrase Mark number is repeatedly played
back.
[2 ▲▼] LEFT CH These parameters determine which MIDI channel in the Song data is assigned
to the Left- or Right-hand part of the Guide function and the Song Score
function.
[3 ▲▼] RIGHT CH
[4 ▲▼] AUTO CH SET When set to “ON,” this automatically sets the proper MIDI channels for the
Right- and Left hand parts pre-programmed in the commercially available
Song data. Normally, this should be set to “ON.”

3
3
Songs – Recording Your Performances and Creating Songs –
Tyros3 Reference Manual • 53
Keyboard and Vocal Practice Using the Guide Function
The Guide functions provide convenient learning and practicing tools to help you master the instrument. By press-
ing the [SCORE] button, you can have the notation of the Song displayed, showing the notes you should play and
when you should play them, for ease in learning. The Tyros3 also features convenient vocal practice tools that auto-
matically adjust the timing of Song playback to match your vocal performance (when singing into a connected
microphone.)
1 Select the desired Song for practicing the keyboard or singing.
2 Call up the setting display.
[FUNCTION] → [B] SONG SETTING
3 Use the [A]/[B] button to select the desired Guide function type.
[5 ▲▼]/
[6 ▲▼]
LYRICS LAN-
GUAGE
Determines the language of the displayed lyrics.
AUTO: When the language is specified in the Song data, the lyrics are dis-
played accordingly. When the language is not specified in the Song data,
the lyrics language is regarded as INTERNATIONAL below.
INTERNATIONAL: Handles the displayed lyrics as a western language.
JAPANESE: Handles the displayed lyrics as Japanese.
[7 ▲▼] QUICK START On some commercially available Song data, certain settings related to the
Song (such as Voice selection, volume, etc.) are recorded to the first measure,
before the actual note data. When Quick Start is set to “ON,” the Tyros3
reads all initial non-note data of the Song at the highest possible speed, then
automatically slows down to the appropriate tempo at the first note. This
allows you to start playback as quickly as possible, with a minimum pause for
reading of data.
[8 ▲▼]P.A.T. (Perfor-
mance Assistant)
See page 55.
3
4
NEXT PAGE

3
3
Songs – Recording Your Performances and Creating Songs –
54 • Tyros3 Reference Manual
There are four Guide function type: two are for keyboard practice and two are
for singing.
Guide menu for keyboard practice
• Follow Lights: When this is selected, Song playback pauses, waiting for
you to play the notes correctly. When you play the correct notes, Song
playback continues. Follow Lights was developed for the Yamaha
Clavinova series. This function is used for practicing purposes, with built-in
lamps on the keyboard indicating the notes to be played. Even though the
Tyros3 does not have these lamps, you can use the same function by fol-
lowing the indications in the displayed notation with the Song Score func-
tion.
• Any Key: With this function, you can play the melody of a Song just by
pressing a single key (any key is OK) in time with the rhythm. Song play-
back pauses and waits for you to play any key. Simply play a key on the
keyboard in time with the music and Song playback continues.
Guide menu for singing
• Karao-Key: This function lets you control the Song playback timing with
just one finger, while you sing along. This is useful for singing to your own
performance. Song playback pauses, waiting for you to sing. Simply play a
key on the keyboard (any key is fine) and Song playback continues.
• Vocal Cue Time: This function lets you practice singing with the proper
pitch. Song playback pauses, waiting for you to sing. When you sing with
proper pitch, Song playback continues.
4 Use the [1 ▲▼] button to turn the Guide function ON.
5 Call up the Score display by pressing the [SCORE] button.
6 Press the SONG [PLAY/PAUSE] button to start playback.
Practice playing the keyboard or singing, along with the Guide type selected in
step 3.
7 Press the [STOP] button to stop playback.
You can save the Guide settings as a
part of the Song data (page 65). For
Songs to which the Guide settings have
been saved, the Guide function will be
automatically turned on and the related
settings will be recalled when the Song
is selected.
NOTE

3
3
Songs – Recording Your Performances and Creating Songs –
Tyros3 Reference Manual • 55
Playing Backing Parts with the Performance Assistant Technology
This feature makes it exceptionally easy to play the backing parts along with Song
playback.
1 Select a Song.
2 Call up the operation display.
[FUNCTION] → [B] SONG SETTING
3 Press the [8 ▲▼] button to turn the [P.A.T.] (performance assistant
technology) on.
4 Press the [PLAY/PAUSE] button to start playback.
5 Play the keyboard.
The instrument automatically matches your performance on the keyboard to
the Song playback and chords, no matter what keys you play. It even changes
the sound according to the way you play. Try playing in the three different
ways below.
6 Press the [STOP] button to stop playback.
7 Press the [8 ▲▼] button to turn the [P.A.T.] off.
To use the performance assistant tech-
nology, the Song must contain chord
data. If the Song contains this data, the
current chord name will be displayed in
the Main display during Song playback,
letting you easily check whether the
Song contains chord data or not.
NOTE
● Playing the left and right
hand together (method 1).
● Playing the left and right
hand together (method 2).
● Playing the left hand and
right hand alternately.
Play three notes at the
same time with your
right hand.
Play several notes one after
the other with different fin-
gers of your right hand.
Play three notes at the
same time with your
right hand.

3
3
Songs – Recording Your Performances and Creating Songs –
56 • Tyros3 Reference Manual
To create a Song, you can compose your performance by entering it one event at a time (called “Step Recording”),
as well as recording your performance in real time (described in the Owner’s Manual). This section explains opera-
tions of Step Recording and re-recording or editing existing Song data.
Call up the operation display.
[DIGITAL RECORDING] → [A] SONG CREATOR
There are six Pages (tabs) in the Song Creator display.
• REC MODE ........... Re-records the Song. See page 61.
• CHANNEL............. Edits the Channel events. See page 63.
• CHORD................. Records the Chords and Sections with timing (page 59)
or edits them (page 67).
• 1-16...................... Records the melodies (Step Recording; see below) or
edits the recorded melodies (page 67).
• SYS/EX................. Edits the System Exclusive events. See page 67.
• LYRICS.................. Inputs/edits the lyrics. See page 68.
Recording Melodies (Step Recording)
1 Press the SONG [REC] and SONG [STOP] buttons simultaneously.
A blank Song (“New Song”) is called up for recording.
2 Call up the operation display.
[DIGITAL RECORDING] → [A] SONG CREATOR → TAB [
QQ
QQ
][
WW
WW
] 1-16
3 Press the [F] button to select the channel for recording.
4 Press the [G] (STEP REC) button to call up the STEP RECORD dis-
play.
Creating/Editing Songs (Song Creator)
3
4
NEXT PAGE

3
3
Songs – Recording Your Performances and Creating Songs –
Tyros3 Reference Manual • 57
5 Start Step Recording.
When a note is input, the location
(bar: beat: clock), note name, velocity
and length are shown as a list.
[A]/[B]/
[C]
Moves the cursor in the list.
[G] Determines the velocity (loudness) of the note to be entered. The velocity
value can be specified within a range from 1 to 127. The higher the velocity
value, the louder the sound becomes.
KBD.VEL: Actual resulting velocity
fff: 127
ff: 111
f: 95
mf: 79
mp: 63
p: 47
pp: 31
ppp: 15
[H] Determines the gate time (note length) of the note to be entered.
Normal: 80%
Tenuto: 99%
Staccato: 40%
Staccatissimo: 20%
Manual: The gate time can be set to any desired percentage by using the
[DATA ENTRY] dial.
[I] Determines the note type to be entered: normal, dotted or triplet.
[J] DELETE Deletes the selected data.
[1 ▲▼] BAR Sets the position of the note to be entered.
[2 ▲▼] BEAT
[3 ▲▼] CLOCK
[4 ▲▼]–
[8 ▲▼]
Determines the note length to be entered: whole-note, half-note, quarter-
note, eighth-note or sixteenth-note.

3
3
Songs – Recording Your Performances and Creating Songs –
58 • Tyros3 Reference Manual
In this example, keep in mind that one of the steps involves holding down a
key on the keyboard while executing the operation.
Select the Voice for recording after calling up the Step Recording display.
1 Press the [G] button to select “f.”
2 Press the [H] button to select “Tenuto.”
3 Press the [I] button to select the “dotted” note type.
4 Press the [6 ▲▼] button to select the quarter-note length.
5 Play the C3 key.
The first note is entered.
6 Press the [I] button to select the “normal” note type.
7 Press the [7 ▲▼] button to select the eight-note length.
8 Play the D3 key.
The second note is entered.
9 Press the [H] button to select “Staccato.”
10 Press the [6 ▲▼] button to select the quarter-note length.
11 Play the keys E3 and F3 in order.
The first measure has been completed.
12 Press the [6 ▲▼] button again to enter a quarter-note rest.
To enter the rest, use the [4 ▲▼]–[8 ▲▼] buttons. (Press the button once to
select the rest value, and once again to actually enter it.) A rest having the
specified note length will be entered.
13 Press the [G] button to select “mp.”
14 Press the [H] button to select “Normal.”
15 While holding G3 key on the keyboard, press the [6 ▲▼] button.
Do not release the G3 key yet. Keep holding it while executing the following
steps.
16 While holding the G3 key, press the C4 key.
Do not release the G3 and C4 keys yet. Keep holding the notes while execut-
ing the following step.
17 While holding the keys G3 and C4, press the [5 ▲▼] button.
1–5 6–8 9–11 12 13–17
Example of Step Recording—Melodies
* The numbers shown in the illustration
correspond to the following operation
step numbers.
NEXT PAGE

3
3
Songs – Recording Your Performances and Creating Songs –
Tyros3 Reference Manual • 59
18 Press the [STOP] button (or press the [C] button) to return to the top
of the Song, then hear the newly entered Song by pressing the [PLAY/
PAUSE] button.
19 Press the [EXIT] button to exit from the Step Recording display.
20 Press the [I] (SAVE) button to execute the Save operation.
Recording Chords (Step Recording)
You can record Chords and Sections (Intro, Main, Ending, and so on) one at a time with precise timing. These
instructions show how to record chord changes using the Step Record function.
1 Press the SONG [REC] and SONG [STOP] buttons simultaneously.
A blank Song (“New Song”) is called up for recording.
2 Call up the operation display.
[DIGITAL RECORDING] → [A] SONG CREATOR → TAB [
QQ
QQ
][
WW
WW
] CHORD
3 Press the [G] (STEP REC) button to call up the STEP RECORD dis-
play.
4 Start Step Recording.
The recorded Song data will be
lost if you select another Song or
turn the power to the instrument
off without executing the Save
operation.
CAUTION
3
About these buttons, refer to page 57.

3
3
Songs – Recording Your Performances and Creating Songs –
60 • Tyros3 Reference Manual
Before starting, make sure the [AUTO FILL IN] button is set to off.
1 Press the STYLE CONTROL [MAIN A] button.
2 Press the [5 ▲▼] button to select the half-note length.
3 Play the chord C, F and G in the chord section of the keyboard.
4 Press the STYLE CONTROL [BREAK] button.
5 Press the [6 ▲▼] button to select the quarter-note length.
6 Play the chords F, and G7 in the chord section of the keyboard.
7 Press the STYLE CONTROL [MAIN B] button.
CF GFG7 C
2,3
1
4 7
5,6 8,9
* The numbers shown in the illustration corre-
spond to the following operation step numbers.
Example of Step Recording—Chords
MAIN A BREAK MAIN B
2
3
1
C
F
G
5
6
4
F
G7
8
7
9
C
NEXT PAGE

3
3
Songs – Recording Your Performances and Creating Songs –
Tyros3 Reference Manual • 61
8 Press the [4 ▲▼] button to select the whole-note length.
9 Play the chord C in the chord section of the keyboard.
10 Press the [STOP] button (or press the [C] button) to return to the top
of the Song, then hear the newly entered Song by pressing the [PLAY/
PAUSE] button.
11 Press the [EXIT] button to exit from the Step Recording display.
12 Press the [F] (EXPAND) button to convert the input chord change data
into the Song data.
13 Press the [I] (SAVE) button to execute the Save operation.
Re-Recording a Specific Section—Punch In/Out
When re-recording a specific section of an already-recorded Song, use the Punch IN/OUT function. In this method,
only the data between the Punch In point and the Punch Out point is overwritten with the newly recorded data.
Keep in mind that the notes before and after the Punch In/Out points are not recorded over, although you will hear
them play back normally to guide you in the Punch In/Out timing.
1 Call up the operation display.
[DIGITAL RECORDING] → [A] SONG CREATOR → TAB [
QQ
QQ
][
WW
WW
] REC MODE
2 Determine the settings for recording.
The recorded Song data will be
lost if you select another Song or
turn the power to the instrument
off without executing the Save
operation.
CAUTION
NEXT PAGE
[1 ▲▼]–
[3 ▲▼]
REC START (Punch
In)
Determines the Punch In timing.
NORMAL: Overwrite recording starts when pressing the SONG [PLAY/PAUSE]
button or when you play the keyboard in the Synchro Standby mode.
FIRST KEY ON: The Song plays back normally, then starts overwrite record-
ing as soon as you play the keyboard.
PUNCH IN AT: The Song plays back normally up to the beginning of the indi-
cated Punch In measure, then starts overwrite recording at that point. You
can set the Punch In measure by pressing the [3 ▲▼] button.

3
3
Songs – Recording Your Performances and Creating Songs –
62 • Tyros3 Reference Manual
3 While holding the SONG [REC] button, select the desired track by
using the [1 ▲▼]–[8 ▲▼] buttons and [C]/[D] buttons.
4 Press the SONG [PLAY/PAUSE] button to start Punch In/Out record-
ing.
Play the keyboard at the Punch In point and stop recording at the Punch Out
point.
5 Press the [I] (SAVE) button to execute the Save operation.
● Examples of re-recording with various Punch In/Out settings
The Tyros3 features several different ways you use the Punch In/Out function.
The illustrations below indicate a variety of situations in which selected mea-
sures in an eight-measure phrase are re-recorded.
[4 ▲▼]–
[6 ▲▼]
REC END (Punch
Out)
Determines the Punch Out timing.
REPLACE ALL: This deletes all data after the point at which recording is
stopped.
PUNCH OUT: The Song position at which recording is stopped is regarded as
the Punch Out point. This setting maintains all data after the point at
which recording is stopped.
PUNCH OUT AT: Actual overwrite recording continues until the beginning of
the specified Punch Out measure (set with the corresponding display but-
ton), at which point recording stops and normal playback continues. This
setting maintains all data after the point at which recording is stopped.
You can set the Punch Out measure by pressing the [6 ▲▼] buttons.
[7 ▲▼]/
[8 ▲▼]
PEDAL PUNCH
IN/OUT
When this is set to ON, you can use Foot Pedal 2 to control the Punch In and
Punch Out points. While a Song is playing back, pressing (and holding) Foot
Pedal 2 instantly enables Punch In recording, while releasing the pedal stops
recording (Punch Out). You can press and release Foot Pedal 2 as often as you
want during playback to punch in/out of overwrite recording. Note that the
current function assignment of the Foot Pedal 2 is cancelled when the Pedal
Punch In/Out function is set to ON.
Pedal Punch In/Out operation may be reversed depending on the particular pedal you’ve
connected to the instrument. If necessary, change the pedal polarity to reverse the control
(page 109).
NOTE
The recorded Song data will be
lost if you select another Song or
turn the power to the instrument
off without executing the Save
operation.
CAUTION
12345678
12345
12345678
12345678
12345
12345678
12345678
12345
12345678
68
12345 7
REC START setting
REC END setting
NORMAL
REPLACE ALL
NORMAL
PUNCH OUT
NORMAL
PUNCH OUT AT=006
FIRST KEY ON
REPLACE ALL
FIRST KEY ON
PUNCH OUT
FIRST KEY ON
PUNCH OUT AT=006
PUNCH IN AT=003
REPLACE ALL
PUNCH IN AT=003
PUNCH OUT
PUNCH IN AT=003
PUNCH OUT AT=006
Original data
Start overwrite
recording *1
Start overwrite
recording *1
Start overwrite
recording *1
Play back
original data
Play back
original data
Play back
original data
Play back
original data
Play back
original data
Play back
original data
Play the keyboard to start
overwrite recording
Play the keyboard to start
overwrite recording
Play the keyboard to start
overwrite recording
Start overwrite recording
Start overwrite recording
Start overwrite recording
Stop recording *2
Stop recording *2
Stop overwrite recording/
play original data
Stop recording *2
Stop recording *2
Stop overwrite recording/
play original data
Stop recording *2
Stop recording *2
Stop overwrite recording/
play original data
Deleted
Deleted
*1 To avoid overwriting measures 1–2,
start recording from measure 3.
*2 To stop recording, press the [REC]
button at the end of measure 5.
Previously recorded data
Newly recorded data
Deleted data
Deleted

3
3
Songs – Recording Your Performances and Creating Songs –
Tyros3 Reference Manual • 63
Editing Channel Events
1 In the CHANNEL Page, use the [A]/[B] buttons to select the edit menu,
then edit the data by using the [1 ▲▼]–[8 ▲▼] buttons.
For details of the edit menu and available settings, see page 64.
2 Press the [D] (EXECUTE) button to execute the operation for the cur-
rent display.
After the operation (with the exception of the SETUP menu) is completed, this
button changes to “UNDO,” letting you restore the original data if you are not
satisfied with the operation results. The Undo function only has one level; only
the previous operation can be undone.
3 Press the [I] (SAVE) button to execute the Save operation.
3
1
1
2
The recorded Song data will be
lost if you select another Song or
turn the power to the instrument
off without executing the Save
operation.
CAUTION

3
3
Songs – Recording Your Performances and Creating Songs –
64 • Tyros3 Reference Manual
● 1 QUANTIZE
The Quantize function allows you to align the timing of all the notes in a chan-
nel. For example, if you record the musical phrase shown at right, you may not
play it with absolute precision, and your performance may have been slightly
ahead of or behind the precise timing. Quantize is a convenient way of cor-
recting for this.
● 2 DELETE
You can delete the data of the specified channel in the Song. Select the chan-
nel whose data to be deleted by using the [1 ▲▼]–[8 ▲▼] buttons, then press
the [D] (EXECUTE) button to execute the operation.
[2 ▲▼]/
[3 ▲▼]
CHANNEL Determines which MIDI channel in the Song data is to be quantized.
[4 ▲▼]–
[6 ▲▼]
SIZE Selects the quantize size (resolution). For optimum results, you should set the
Quantize size to the shortest note value in the channel. For example, if eighth
notes are the shortest in the channel, you should use eighth note as the
Quantize size.
The three Quantize settings marked with asterisks (*) are exceptionally conve-
nient, since they allow you to quantize two different note values at the same
time. For example, when the straight eighth notes and eighth notes triplet are
contained in the same channel, if you quantize by the straight eighth notes,
all notes in the channel are quantized to straight eighth notes—completely
eliminating any triplet feel. However, if you use the eighth note + eighth note
triplet setting, both the straight and triplet notes will be quantized correctly.
[7 ▲▼]/
[8 ▲▼]
STRENGTH Determines how strongly the notes will be quantized. A setting of 100% pro-
duces exact timing. If a value less than 100% is selected, notes will be moved
toward the specified quantization beats according to the specified percent-
age. Applying less than 100% quantization lets you preserve some of the
“human” feel in the recording.
After 1/8 note quantization
1/4 note
1/4 note
triplet
1/16 note
1/16 note
triplet
1/32 note
1/8 note+
1/8 note triplet*
1/16 note+
1/8 note triplet*
1/16 note+
1/16 note triplet*
1/8 note
1/8 note
triplet
Settings:
Original data
(assuming 4/4 meter)
Quantizing
strength =100
Quantizing
strength =50
Quarter-note length

3
3
Songs – Recording Your Performances and Creating Songs –
Tyros3 Reference Manual • 65
● 3 MIX
This function lets you mix the data of two channels and place the results in a
different channel. It also lets you copy the data from one channel to another.
● 4 CHANNEL TRANSPOSE
This allows you to transpose the recorded data of individual channels up or
down by a maximum of two octaves in semitone increments.
● 5 SETUP
The current settings of the Mixing Console display and other panel settings
can be recorded to the top position of the Song as the Setup data. The Mixing
Console and panel settings recorded here are automatically recalled when the
Song starts.
[2 ▲▼]/
[3 ▲▼]
SOURCE 1 Determines the MIDI channel (1–16) to be mixed. All MIDI events of the
channel specified here are copied to the destination channel.
[4 ▲▼]/
[5 ▲▼]
SOURCE 2 Determines the MIDI channel (1–16) to be mixed. Only note events of the
channel specified here are copied to the destination channel. Besides the val-
ues 1–16, there is a “COPY” setting that allows you to copy the data from
Source 1 to the destination channel.
[6 ▲▼]/
[7 ▲▼]
DESTINATION Determines the channel into which the mix or copy results will be placed.
[F] CH 1–8/CH 9–16 Toggles between the two channel displays: Channels 1–8, and Channels 9–
16.
[G] ALL CH To simultaneously set all channels to the same value, adjust the Channel
Transpose for one of the channels while holding down this button.
[1 ▲▼]–
[7 ▲▼]
SELECT Determines which playback features and functions will be automatically called
up along with the selected Song. The items selected here can be recorded
only to the top position of the Song, except for the KEYBOARD VOICE.
SONG: Records the tempo setting and all settings made from the Mixing
Console.
KEYBOARD VOICE: Records the panel settings, including the Voice selection
of the keyboard parts (RIGHT 1, 2, 3, and LEFT) and their on/off status.
Panel settings recorded here are same as the ones memorized to the One
Touch Setting. This can be recorded at any point in a Song.
SCORE SETTING: Records the settings in the Score display.
GUIDE SETTING: Records the settings of the Guide functions including the
Guide ON/OFF setting.
LYRICS SETTING: Records the settings in the Lyrics display.
MIC SETTING: Records the microphone and the Vocal Harmony settings in
the Mixing Console display.
[8 ▲] MARK ON Add or remove a checkmark to the selected item. Checked items are recorded
to the Song.
[8 ▼] MARK OFF

3
3
Songs – Recording Your Performances and Creating Songs –
66 • Tyros3 Reference Manual
Editing Chord Events, Notes, System Exclusive Events and Lyrics
You can edit the chord events, note events, system exclusive events and lyrics in the same manner on the corre-
sponding display: CHORD, 1-16, SYS/EX and LYRICS. These displays are called “Event List display” because some
events are shown in a list view.
[A]/[B] Moves the cursor up/down and select the desired event.
[C] Moves the cursor to the top (beginning of the Song).
[D]/[E] Moves the cursor left/right and select the desired parameter of the high-
lighted event.
[H] FILTER Calls up the Filter display (page 68), letting you select only the events you
wish to be shown in the event list.
[I] SAVE Press to save the edited Song.
[J] MULTI SELECT Holding this button while using the [A]/[B] buttons lets you select multiple
events.
[1 ▲▼] BAR Determines the position (bar/beat/clock) of the data. One clock is equal to 1/
1920th of a quarter note.
[2 ▲▼] BEAT
[3 ▲▼] CLOCK
[4 ▲▼]/
[5 ▲▼]
DATA ENTRY Adjusts the event value. For coarse adjustment, use the [4 ▲▼] buttons. For
fine adjustment, use the [5 ▲▼] buttons or [DATA ENTRY] dial.
[6 ▲] CUT Executes cut/copy/delete/paste operation.
[7 ▲] COPY
[7 ▼] DELETE
[8 ▲]PASTE
[6 ▼] INS (INSERT) Adds a new event.
[8 ▼] CANCEL Cancels editing and restores the original value.
Indicates the
event value.
Indicates the loca-
tion (position) of the
corresponding event.
Indicates the event
type.
See pages 67–68.
Event List display

3
3
Songs – Recording Your Performances and Creating Songs –
Tyros3 Reference Manual • 67
● Chord Events (CHORD Page)
● Note Events (1-16 Page)
● System Exclusive Events (SYS/EX. Page)
Style Style
Tempo Tempo
Chord Chord root, Chord type, On Bass Chord
Sect Style Section (Intro, Main, Fill In, Break, Ending)
OnOff On/off status for each part (channel) of the Accompaniment Style
CH.Vol Volume for each part (channel) of the Accompaniment Style
S.Vol Overall volume of the Accompaniment Style
Note The individual note of a Song. Includes the note number which cor-
responds to the key which was played, plus a velocity value based
on how hard the key is played, and the gate time value (the length
of a note).
Ctrl (Control Change) Settings to control the Voice, such as volume, pan, filter and effect
depth (edited via the Mixing Console described on page 93), etc.
Prog (Program Change) MIDI program change number for selecting a Voice.
P.Bnd (Pitch Bend) Data for changing the pitch of a Voice continuously. This event is
generated by controlling the PITCH BEND wheel.
A.T. (Aftertouch) This event is generated when pressure is applied to a key after the
note is played.
ScBar (Score Start Bar) Determines the top measure of a Song.
Tempo Determines the tempo value.
Time (Time signature) Determines the time signature.
Key (Key signature) Determines the key signature, as well as the major/minor setting, for
the music score shown on the display.
XGPrm (XG parameters) Allows you to make various detailed changes to the XG parameters.
Refer to the “MIDI Data Format” in the Data List for details. The
Data List is available at the Yamaha website.
SYS/EX. (System Exclu-
sive)
Displays the System Exclusive data in the Song. Keep in mind that
you cannot create new data or change the contents of the data
here; however, you can delete, cut, copy, and paste the data.
Meta (Meta event) Displays the SMF meta events in the Song. Keep in mind that you
cannot create new data or change the contents of the data here;
however, you can delete, cut, copy, and paste the data.
Marker (Song Position
Marker)
Displays the Song Position Marker (SPJ-01–04) in the Song. Keep in
mind that you cannot create new data or change the contents of the
data here; however, you can delete, cut, copy, and paste the data.
HDR (HDR play control) This controls Audio Song playback via Song data. This event is used
to playback a MIDI Song and Audio Song in succession; the Audio
Song cannot be synchronized to the MIDI Song playback.

3
3
Songs – Recording Your Performances and Creating Songs –
68 • Tyros3 Reference Manual
● Lyrics Events (LYRICS Page)
Name Allows you to enter the Song name.
Lyrics Allows you to enter lyrics.
Codes CR: Enters a line break in the lyrics text.
LF: Deletes the currently displayed lyrics and displays the next set of
lyrics.
Displaying Specific Types of Events
In the Event List displays, various types of events are shown. It may sometimes be difficult to pinpoint the
ones you want to edit. This is where the Filter function comes in handy. It lets you determine which event
types will be shown in the Event List displays.
1 Press the [H] (FILTER) button in the CHORD, 1-16, SYS/EX. or LYRICS displays.
2 Checkmark the desired item to be displayed.
3 Press the [EXIT] button to execute the settings.
[C] MAIN Displays all main types of events.
[D] CTRL CHG Displays all specific Control Change message events.
[E] STYLE Displays all types of Style playback related events.
[H] ALL ON Checkmarks all event types.
[I] NOTE/CHORD Selects only NOTE/CHORD data.
[J] INVERT Reverses the checkmark settings for all boxes. In other words,
this enters checkmarks to all boxes that were previously
unchecked and vice versa.
[2 ▲▼]–
[5 ▲▼]
Select and event type to be checked or unchecked.
[6 ▲]/
[7 ▲]
MARK ON Enters/removes the checkmark for the selected event type. The
checked event types can be shown on the CHORD, 1-16, SYS/EX
or LYRICS Page.
[6 ▼]/
[7 ▼]
MARK OFF

3
3
Songs – Recording Your Performances and Creating Songs –
Tyros3 Reference Manual • 69
Editing Song Position Markers
This section covers two additional Marker-related features and details. For basic information on using the Markers
for jump playback and loop playback, refer to the Owner’s Manual.
● Jump Markers
The Markers explained in the Owner’s Manual are also called “Jump Markers.” In the
Event List display, they are indicated as “SPJ-01”–”SPJ-04” (page 67). In the Event List,
they can be moved freely to other positions and can even copied to create identical
Marker numbers at other positions. When the same Marker number is contained at
different locations in the Song, the latest occurring one is used as a “Loop End
Marker” (below).
● Loop End Marker
Loop End Markers can be used for putting additional Markers in Song data, providing
even greater versatility. Creating a Loop End Marker is done within the Event List (and
not with the [SP 1]–[SP 4] buttons on the panel), by simply copying one “SPJ” Jump
Marker event to another position in the Song.
For basic information on loop playback between successive Jump Markers, refer to the
Owner’s Manual.
The examples below show how Loop End Markers can be used in Song playback.
• If the Song is playing back between the two SPJ-01 points, turning on [LOOP] will
result in a playback loop between those points.
• If the Song is playing back between the second SPJ-01 and SPJ-02 and [LOOP] is
turned on, playback jumps back to the first SPJ-01 and loops between two SPJ-01
points.
• If the Song is playing back between SPJ-02 and the second SPJ-01, turning on
[LOOP] will result in a playback loop between those points.
• If the [LOOP] button is turned on while the Song is playing back between the top
of the Song and SPJ-02, playback will loop between SPJ-01 and SPJ-02.
• If the Song is playing back between the second SPJ-01 and SPJ-03 and [LOOP] is
turned on, playback jumps back to SPJ-02 and loops between SPJ-02 and the sec-
ond SPJ-01 (Loop End Marker).
In the examples above, the actual data of the Loop End Marker is identical to the
event it was copied from—only the location of the copied Marker provides it with this
different function.
In Song playback, the markers formatted as “SPJ-xxxxx” (xxxxx: any character except
01–04 and any number of letters is OK) are handled as Loop End Markers. Since the
Event List in the Song Creator function does not let you freely name Markers, the
instructions above are recommended for creating new Markers. However, with
sequence software on a computer, you can create new Markers and assign appropri-
ate names to them. By naming Markers in this way, you can easily distinguish between
Loop End Markers and Jump Markers in the Event List.
[SPJ-01] [SPJ-01] [SPJ-02] [SPJ-03] [SPJ-04]
Top of the
song
End of the
song
Example 1
[SPJ-01] [SPJ-02] [SPJ-01] [SPJ-03] [SPJ-04]
Top of the
song
End of the
song
Example 2
Loop playback problems may occur if
successive Markers are too close to one
another.
When the effect settings of the jump
destination (the position you’re jumping
to) differ from those at the jump source,
glitches or drop-outs in the sound may
result. This is because of limitations in
the effect processors of the Tyros3.
When using the Guide function
(page 53) with jump playback, keep in
mind that the Guide indication may not
be able to stay in time with the jumps.
NOTE
NOTE
NOTE

4
4
70 • Tyros3 Reference Manual
Multi Pads – Adding Musical Phrases to Your Performance –
Multi Pads
– Adding Musical Phrases to Your Performance –
Contents
Multi Pad Creating (Multi Pad Creator) . . . . . . . . . . . . . . . . . 70
• Multi Pad Realtime Recording. . . . . . . . . . . . . . . . . . . . . . . . . . . .70
• Multi Pad Step Recording (EDIT) . . . . . . . . . . . . . . . . . . . . . . . . .71
Multi Pad Editing . . . . . . . . . . . . . . . . . . . . . . . . . . . . . . . . . . 72
This feature let you create your original Multi Pad phrases, and also allows you to edit existing Multi Pad phrases to
create your own.
Multi Pad Realtime Recording
1 Select a Multi Pad Bank to be edited or created from the display
called up when you press the MULTI PAD CONTROL [SELECT] but-
ton.
2 Press the [DIGITAL RECORDING] button.
3 Press the [C] button to call up the Multi Pad Creator display.
4 If necessary, select the desired Voice from VOICE category selection
buttons.
After selection, press the [EXIT] button to return to the previous display.
5 Select a particular Multi Pad for recording by pressing any of the [A],
[B], [F] and [G] buttons. If you want to create the Multi Pad data from
scratch, press the [C] (NEW BANK) button to call up an empty bank.
6 Press the [H] (REC) button to enter the recording standby status for
the Multi Pad selected in step 5.
Multi Pad Creating (Multi Pad Creator)
5
5
12
1110
6
13
NEXT PAGE

4
4
Multi Pads – Adding Musical Phrases to Your Performance –
Tyros3 Reference Manual • 71
7 Start recording.
Recording begins automatically as soon as you play on the keyboard.
You can also start recording by pressing the STYLE CONTROL [START/STOP]
button. This lets you record as much silence as you want before the start of the
Multi Pad phrase.
If Chord Match is set to on for the Multi Pad to be recorded, you should record
using the notes of the C major seventh scale (C, D, E, G, A and B).
8 Stop recording.
Press the [H] (STOP) button or the panel MULTI PAD CONTROL [STOP] button
or the STYLE CONTROL [START/STOP] button to stop recording when you’ve
finished playing the phrase.
9 Listen back to your newly recorded phrase, by pressing the appropri-
ate MULTI PAD button, [1]–[4]. To re-record the phrase, repeat steps
6–8.
10 Turn Repeat of each pad On or Off by using the [1 ▲▼]–[4 ▲▼] but-
tons.
If the Repeat parameter is on for the selected pad, playback of the correspond-
ing pad will continue until the MULTI PAD [STOP] button is pressed. When you
press the Multi Pads for which Repeat is turned on during Song or Style play-
back, playback will start and repeat in sync with the beat.
If the Repeat parameter is off for the selected pad, playback will end automati-
cally as soon as the end of the phrase is reached.
11 Turn Chord Match of each pad On or Off by using the [5 ▲▼]–[8 ▲▼]
buttons.
If the Chord Match parameter is on for the selected pad, the corresponding
pad is played back according to the chord specified in the chord section of the
keyboard generated by turning [ACMP] on, or specified in the LEFT Voice sec-
tion of the keyboard generated by turning [LEFT] on (when turning the
[ACMP] off).
12 Press the [D] (NAME) button, then enter a name for each Multi Pad, as
desired.
13 Press the [I] (SAVE) button, then save the Multi Pad data as a Bank
containing a set of four Pads.
Multi Pad Step Recording (EDIT)
Step Recording can be executed in the EDIT page. After selecting a Multi Pad in step 5 on page 70, press the TAB
[
WW
WW
] button to select the EDIT Page.
The EDIT page indicates the Event list, which lets you record notes with absolutely precise timing. This Step Record-
ing procedure is essentially the same as that for Song Recording (pages 56–59), with the exception of the points
listed below:
• There is no LCD button for switching channels, since Multi Pads contain data for only a single channel.
• In the Multi Pad Creator, only the channel events and System Exclusive messages can be entered. Chord and Lyr-
ics events are not available. You can switch between the two types of Event Lists by pressing the [F] button.
The SA, SA2 and Organ Flute Voices
cannot be recorded. If one of these
Voices is set for RIGHT1 part, it will be
replaced with a Piano Voice.
NOTE
CRC CRC
C = Chord note
C, R = Recommended note
Multi Pads indicated with the following
icon (hand on fretboard) are created
with Guitar NTT (page 46) to produce
the natural chord voicing of the guitar.
Because of this, if the Chord Match set-
ting is set to off, the Multi Pads may not
sound appropriately.
NOTE

4
4
Multi Pads – Adding Musical Phrases to Your Performance –
72 • Tyros3 Reference Manual
From the MULTI PAD EDIT display, you can rename, copy or delete a Multi Pad.
1 Press the MULTI PAD CONTROL [SELECT] button to call up the Multi
Pad Bank Selection display, then select a Bank to be edited.
2 Press the [8 ▼] (EDIT) button to call up the MULTI PAD EDIT display.
3 Select a particular Multi Pad to be edited by pressing any of the [A],
[B], [F] and [G] buttons.
4 Edit the selected Pad as desired.
For details on the naming and deleting procedures, refer to the Basic Opera-
tion section in the Owner’s Manual.
Multi Pad Editing
[1 ▼] NAME Changes the name of each Multi Pad.
[3 ▼] COPY Copies the Multi Pad(s). See below.
[5 ▼] DELETE Deletes the selected Multi Pads.
Copying the Multi Pad
1 Press the [3 ▼] button in step 4 above.
2 Select the Multi Pads to be copied by using the [A], [B], [F] and [G]
buttons, then press the [7 ▼] (OK) button.
The selected Multi Pad(s) is copied to the clipboard.
3 Select the destination location by using the [A], [B], [F] and [G] but-
tons. If you want to copy the selected Pad(s) to another bank, press
the [8 ▲] (UP) button to call up the Multi Pad Bank Selection display,
select the desired bank, press the [8 ▼] (EDIT) button, then select
the destination.
4 Press the [4 ▼] (PASTE) button to execute the Copy operation.

5
5
Tyros3 Reference Manual • 73
Music Finder – Calling Up Ideal Setups for Your Music –
Music Finder
– Calling Up Ideal Setups for Your Music –
Contents
Creating a Set of Favorite Records . . . . . . . . . . . . . . . . . . . . . 73
Editing Records . . . . . . . . . . . . . . . . . . . . . . . . . . . . . . . . . . . . 74
Saving the Record as a Single File. . . . . . . . . . . . . . . . . . . . . . 75
• Calling Up Music Finder Records Saved to USER/HD/USB . . . . . . .75
Viewing Record Information on the Internet. . . . . . . . . . . . . 76
As convenient as the Search function is in exploring the depths of the Music Finder records, you may want to create
a “folder” of favorite records—so you can quickly call up those styles and settings you use most often in your per-
formance.
1 Select the desired record from the MUSIC FINDER display.
2 Press the [H] (ADD TO FAVORITE) button to add the selected record to
the FAVORITE page, then press the [G] (YES) button to actually add
the record.
3 Call up the FAVORITE page by using the TAB [
QQ
QQ
][
WW
WW
] buttons, and
check to see if the record has been added.
Creating a Set of Favorite Records
You can sort the records by using the
[F] (SORT BY) button or search for
desired records by using the [6 ▲▼]
(SEARCH 1/2) buttons. For details, refer
to the Owner’s Manual.
NOTE
Deleting Records from the FAVORITE Display
1 Select the record you want to delete from the FAVORITE page.
2 Press the [H] (DELETE FROM FAVORITE) button.
2
3

5
5
Music Finder – Calling Up Ideal Setups for Your Music –
74 • Tyros3 Reference Manual
You can create a new record by editing the currently selected record. Up to 2500 records (including internal
records) can be recorded.
1 Select the desired record to be edited in the MUSIC FINDER display.
2 Press the [8 ▲▼] (RECORD EDIT) button to call up the EDIT display.
3 Edit the record as desired.
4 Enter the edits you’ve made to the record.
If you want to add the currently edited record to Music Finder as a new record,
press the [J] (NEW RECORD) button. If you want to overwrite the existing pro-
gram, press the [8 ▲] (OK) button. The record is added to the ALL display.
To cancel and quit the Edit operation, press the [8 ▼] (CANCEL) button.
Editing Records
[A] MUSIC Edits the song name/keyword. Pressing one of these buttons calls up the pop-
up window to enter the song name/keyword. To clear the entered Music/Key-
word, press the [F]/[G] (CLEAR) button.
[B] KEYWORD
[C] STYLE Changes the Style. Pressing this button calls up the Style Selection display.
After selecting the desired Style, press the [EXIT] button to return back to the
Edit display. To clear the entered Style, press the [H] (CLEAR) button.
[D] BEAT Changes the beat (time signature) of the record for search purposes.
[E] FAVORITE Selects whether the edited record is entered to the FAVORITE display or not.
[1 ▲▼] TEMPO Changes the Tempo.
[2 ▲▼] SECTIONS Selects the section that will automatically be called up set when the record is
selected. This is useful, for example, when you want to have a selected Style
automatically be set up to start with an Intro section.
[4 ▲▼]
[5 ▲▼]/
[6 ▲▼]
GENRE Selects the desired genre.
[7 ▼] GENRE NAME Creates a new genre.
[I] DELETE RECORD Deletes the currently selected record.
Keep in mind that the Beat setting made here is only for the Music Finder search function; this
does not affect the actual Beat setting of the Style itself.
NOTE

5
5
Music Finder – Calling Up Ideal Setups for Your Music –
Tyros3 Reference Manual • 75
The Music Finder feature handles all the Records including the presets and additionally created records as a single
file. Keep in mind that individual records (panel setups) cannot be handled as separate files.
1 Call up the Save display.
[MUSIC FINDER] → [7 ▲▼] FILES
2 Press the TAB [
QQ
QQ
][
WW
WW
] buttons to select the location for saving (USER/
HD/USB).
3 Press the [6 ▼] (SAVE) button to save the file.
Calling Up Music Finder Records Saved to USER/HD/USB
To call up the Music Finder records you’ve saved to USER/HD/USB, follow the instructions below.
1 Call up the File Selection display.
[MUSIC FINDER] → [7 ▲▼] FILES
2 Use the TAB [
QQ
QQ
][
WW
WW
] buttons to select USER/HD/USB.
3 Press the [A]–[J] buttons to select the desired Music Finder file.
When the file is selected, a message is displayed according to the content of
the file. Press the desired button.
Saving the Record as a Single File
[F] REPLACE All Music Finder records currently in the instrument are deleted and replaced
with the records of the selected file.
[G] APPEND The records called up are added to the record currently in the instrument.
[H] CANCEL Selecting this button aborts the operation.
Selecting “REPLACE” automatically deletes all your original records from inter-
nal memory. Make sure that all important data has been archived to another
location beforehand.
CAUTION

5
5
Music Finder – Calling Up Ideal Setups for Your Music –
76 • Tyros3 Reference Manual
This service provides information on Music Finder records that you may be interested in. It also provides song
downloads for your particular instrument as well as downloadable Music Finder records you can load to your instru-
ment. For more details about this service, go to the following website.
http://music.yamaha.com/idc/
1 Make sure that your Tyros3 is connected to the Internet, and press
the [MUSIC FINDER] button to call up the MUSIC FINDER display.
2 Select the record whose information you want to view by using the [1
▲▼]–[5 ▲▼] buttons or the [DATA ENTRY] dial.
3 Press the [J] (MUSIC FINDER +) button to open the Web page.
The information of the selected record is shown.
4 Press the [EXIT] button to exit the browser screen and return to the
MUSIC FINDER display.
Viewing Record Information on the Internet
The available contents of the Music
Finder Plus service are subject to
change.
NOTE

6
6
Tyros3 Reference Manual • 77
Registration Memory – Saving and Recalling Custom Panel Setups –
Registration Memory
– Saving and Recalling Custom Panel Setups –
Contents
Disabling Recall of Specific Items (Freeze) . . . . . . . . . . . . . . . 77
Calling Up Registration Memory Numbers in Order (Registra-
tion Sequence) . . . . . . . . . . . . . . . . . . . . . . . . . . . . . . . . . . . . 78
• Confirming the Registration Sequence Setting in the Main Display . . 79
• Saving the Registration Sequence Settings . . . . . . . . . . . . . . . . . .79
Registration Memory lets you recall all the panel setups you made with a single button press. However, there may
be times that you want certain items to remain the same, even when switching Registration Memory setups. For
example, you may want to switch Voices or effect settings while keeping the same accompaniment Style. This is
where the Freeze function comes in handy. It lets you maintain the settings of certain items and leave them
unchanged, even when selecting other Registration Memory buttons.
1 Call up the operation display.
[FUNCTION] → [E] REGIST SEQUENCE/FREEZE/VOICE SET → TAB [
QQ
QQ
][
WW
WW
]
FREEZE
2 Determine the items to be “frozen.”
Select the desired item by using the [2 ▲▼]–[7 ▲▼] buttons, then enter or
remove the checkmark by using the [8 ▲] (MARK ON)/[8 ▼] (MARK OFF) but-
tons.
3 Press the [EXIT] button to exit from the operation display.
4 Press the [FREEZE] button on the panel to turn the Freeze function
on.
Disabling Recall of Specific Items (Freeze)
2
-2
2
-1
Settings in the REGISTRATION
FREEZE display are automatically
saved to the instrument when you
exit from this display. However, if
you turn the power off without
exiting from this display, the set-
tings will be lost.
CAUTION

6
6
Registration Memory – Saving and Recalling Custom Panel Setups –
78 • Tyros3 Reference Manual
As convenient as the Registration Memory buttons are, there may be times during a performance when you want
to quickly switch between settings—without having to take your hands from the keyboard. The convenient Regis-
tration Sequence function lets you call up the eight setups in any order you specify, by simply using the TAB [
QQ
QQ
][
WW
WW
]
buttons or the pedal as you play.
1 Select the desired Registration Memory bank to program a sequence.
2 Call up the operation display.
[FUNCTION] → [E] REGIST SEQUENCE/FREEZE/VOICE SET → TAB [
QQ
QQ
][
WW
WW
] REG-
ISTRATION SEQUENCE
3 If you intend to use a pedal to switch Registration Memory settings,
specify here how the pedal will be used—to advance or to reverse
through the sequence.
Use the [C] (REGIST+ PEDAL) button to select the pedal for advancing through
the sequence.
Use the [D] (REGIST- PEDAL) button to select the pedal for reversing through
the sequence.
4 Use the [E] (SEQUENCE END) button to determine how Registration
Sequence behaves when reaching the end of the sequence.
• STOP .................... Pressing the TAB [
WW
WW
] button or the “advance” pedal has
no effect. The sequence is “stopped.”
• TOP ...................... The sequence starts again at the beginning.
• NEXT BANK ......... The sequence automatically moves to the beginning of
the next Registration Memory Bank in the same folder.
Calling Up Registration Memory Numbers in Order (Registration
Sequence)
If you assign the function to a pedal
here, the other function set in the Foot
Pedal display (page 109) becomes
invalid.
NOTE
3
4
6
Indicates the name of the currently selected
Registration Memory Bank.
NEXT PAGE

6
6
Registration Memory – Saving and Recalling Custom Panel Setups –
Tyros3 Reference Manual • 79
5 Program the Sequence order, from left to right.
Press one of the REGISTRATION MEMORY [1]–[8] buttons on the panel, then
press the [6 ▲▼] (INSERT) button to input the number.
6 Press the [F] button to turn the Registration Sequence function on.
7 Press the [EXIT] button to exit from the operation display.
Confirming the Registration Sequence Setting in the Main Display
In the Main display, you can confirm whether the Registration Memory numbers are called up according to the
sequence programmed above.
To shift the Registration Memory numbers, use the TAB [
QQ
QQ
][
WW
WW
] buttons when the Main display is shown. When
pedal operation has been set in step 3 on page 78, you can also use a pedal to select the Registration Memory
numbers in order. The pedal can be used for Registration Sequence no matter which display is called up (except for
the display in step 3 on page 78).
To return to the first Sequence, press the TAB [
QQ
QQ
] and [
WW
WW
] buttons simultaneously when the Main display is shown.
This cancels the currently selected Sequence number (the box indicator at the top right goes out). The first
Sequence will be selected by pressing one of the TAB [
QQ
QQ
][
WW
WW
] buttons or by pressing the pedal.
Saving the Registration Sequence Settings
The settings for the Sequence order and how Registration Sequence behaves when
reaching the end of the sequence (SEQUENCE END) are included as part of the Regis-
tration Memory Bank file. To store your newly programmed Registration Sequence,
save the current Registration Memory Bank file.
1 Press the REGIST BANK [+] and [-] buttons simultaneously to call up
the REGISTRATION BANK Selection display.
2 Press the [6 ▼] button to save the Bank file.
[1 ▲▼]–
[4 ▲▼]
CURSOR Moves the cursor.
[5 ▲▼] REPLACE Replaces the number at the cursor position with the currently selected Regis-
tration Memory number.
[6 ▲▼] INSERT Inserts the number of the currently selected Registration Memory number
before the cursor position.
[7 ▲▼] DELETE Deletes the number at the cursor position.
[8 ▲▼] CLEAR Deletes all numbers in the sequence.
Indicates the Registration Memory
numbers, in the order of the current
Registration Sequence.
The Registration Sequence is indicated at the
top right of the Main display, letting you confirm
the currently selected number.
Keep in mind that all Registration
Sequence data is lost when
changing Registration Memory
Banks, unless you’ve saved it with
the Registration Memory Bank
file.
CAUTION

7
7
80 • Tyros3 Reference Manual
Recording Audio with the Hard Disk Recorder
Recording Audio with the Hard Disk
Recorder
Contents
Importing an Audio File . . . . . . . . . . . . . . . . . . . . . . . . . . . . . 80
Editing the Recorded Data . . . . . . . . . . . . . . . . . . . . . . . . . . . 82
• (1) Normalize. . . . . . . . . . . . . . . . . . . . . . . . . . . . . . . . . . . . . . . .82
• (2) Adjusting the Volume . . . . . . . . . . . . . . . . . . . . . . . . . . . . . . .82
• (3) Replacing the Main/Sub Tracks . . . . . . . . . . . . . . . . . . . . . . . .82
• (4) Deleting a Track . . . . . . . . . . . . . . . . . . . . . . . . . . . . . . . . . . .82
Re-recording . . . . . . . . . . . . . . . . . . . . . . . . . . . . . . . . . . . . . . 83
• NORMAL REC / NORMAL REC (PLUS PLAYBACK) . . . . . . . . . . . . .83
• PUNCH IN OUT / PUNCH IN OUT (MERGE). . . . . . . . . . . . . . . . .84
Setting the Start/End Points of the Audio . . . . . . . . . . . . . . . 86
Playlist Mode. . . . . . . . . . . . . . . . . . . . . . . . . . . . . . . . . . . . . . 87
• Creating a Playlist. . . . . . . . . . . . . . . . . . . . . . . . . . . . . . . . . . . . .87
• Playing a Playlist. . . . . . . . . . . . . . . . . . . . . . . . . . . . . . . . . . . . . .87
• Playlist Controls . . . . . . . . . . . . . . . . . . . . . . . . . . . . . . . . . . . . . .88
In addition to letting you record audio directly with the Tyros3, the Hard Disk Recorder also allows you to import
audio data from a USB storage device to Main track. The benefits of this feature are many. For example, you can:
• Use existing audio material (commercially available samples, loops, sound effects, etc.) on the Tyros3.
• Record your performance to another device (such as on a computer or audio sequencer), add vocals and other
instruments as desired, then import the finished audio to the Tyros3.
• Export a recording made on the Tyros3 to a computer-based audio editor—giving you more comprehensive edit-
ing features and greater editing convenience—then import the audio back to the Tyros3. (See “Exporting an
Audio File” on the Owner’s Manual.)
Files which can be imported must have these characteristics:
• Stereo Wave data
• 44.1 kHz sample rate
• 16-bit resolution
•A length of less than or equal to 80 minutes
1 Insert the USB storage device (or connecting cable) to the USB TO
DEVICE terminal.
2 Press the HARD DISK RECORDER [SELECT] button to call up the
AUDIO display.
Importing an Audio File
NEXT PAGE

7
7
Recording Audio with the Hard Disk Recorder
Tyros3 Reference Manual • 81
3 Press the [8 ▼] (CHANGE MENU) button if necessary, then call up the
Import function by pressing the [7 ▼] (WAVE IMPORT) button.
4 Select the desired device as a destination by using the TAB [
QQ
QQ
][
WW
WW
]
buttons.
Generally, a USB device will show up as “USB1” in the display. When the
device is selected, all folders and audio files on the device are automatically
shown.
5 Press the [6 ▼] (IMPORT) button.
Alternately, if you desire to import only one file, you can import it by double
clicking the appropriate [A]–[J] button.
6 Select the desired audio file by using the [A]–[J] buttons.
The selected file name is highlighted. You can continue to select additional
files here, as many as desired. If multiple pages (P1, P2, ...) are shown at the
bottom, you can select files from these displays, too. After that, press the [7 ▼]
(OK) button.
7 At the prompt, press the [F] (YES) button.
Importing may take as little as a couple of seconds or as long as a few minutes,
depending on the file size, as well as the number of files you are importing.
To confirm the imported file, press the [EXIT] button to return to the AUDIO
display.
4
3
5
Do not disconnect the device
while the READ/WRITE lamp is on
or flashing. Doing so may result in
loss or corruption of the data or
malfunction of the device.
If you are importing multiple files and
you cancel Import while the operation is
in process, some of the files will be
imported and unaffected by cancelling
the operation.
If the same file name already exists, a
message appears prompting you to
overwrite. Selecting [YES] imports the
file and overwrite the Main track. The
data of Sub track will be deleted.
CAUTION
NOTE
NOTE

7
7
Recording Audio with the Hard Disk Recorder
82 • Tyros3 Reference Manual
In the display called up by pressing the HARD DISK RECORDER [SETTING] button, you can edit the recorded data.
After you finish editing, press the [I] (SAVE) button to save the edition.
(1) Normalize
Normalize raises the volume of the recorded audio to the optimum level. Use this to make the recorded audio as
loud as possible, without distortion. Technically, this operation scans the recorded file for the highest level, then
raises the volume of the entire file so that the highest peak is set to the maximum, non-distorting level. Normaliza-
tion is calculated for the loudest signal found in either channel of the stereo recording and the same gain is applied
to both channels.
1 In the VOLUME Page, press the [A] (NORMALIZE MAIN) button or [B]
(NORMALIZE SUB) button.
2 At the prompt, press the [G] (OK) button to start normalizing the
selected track.
To cancel the operation, press the [H] (CANCEL) button.
(2) Adjusting the Volume
In the VOLUME Page, use the [3 ▲▼]/[4 ▲▼] buttons or sliders to adjust the output
level of Main/Sub tracks.
(3) Replacing the Main/Sub Tracks
In the REC MODE Page, press the [D] (SWAP MAIN-SUB) button to replace the Main and Sub tracks.
(4) Deleting a Track
In the REC MODE Page, press the [F]/[G] buttons to delete the Main/Sub track.
If you want to undo the operation, press the [H] (UNDO) button just after pressing the [F] or [G] button.
Editing the Recorded Data
VOLUME Page REC MODE Page
(1)
(2)
(3)
(4)
Normalize can only be applied to a file
that has been saved. If you haven’t
saved the recorded file yet, the display
prompts you to save it before using
Normalize.
NOTE
To control overall volume of the audio
file, press the [BALANCE] button once
or twice to call up the BALANCE (2/2)
display, then use the [5] slider.
NOTE

7
7
Recording Audio with the Hard Disk Recorder
Tyros3 Reference Manual • 83
You can re-record the data which you created in the following five ways.
• Replace the whole data: NORMAL REC.....................................................See below
• Mix the recorded data: NORMAL REC (PLUS PLAYBACK)..........................See below
• Replace a certain range of the data: PUNCH IN/OUT ............................See page 84
• Overdub a certain range of the data: PUNCH IN/OUT (MERGE)............See page 84
• Merge the Main and Sub tracks to the Main track: BOUNCE
.........................................................................................See the Owner’s Manual.
NORMAL REC / NORMAL REC (PLUS PLAYBACK)
You can replace the whole audio data of a track by NORMAL or mix the audio data
with the previous one by NORMAL REC (PLUS PLAYBACK). The NORMAL REC (PLUS
PLAYBACK) method does not add any tracks but simply mixes the new recording to
the existing data. After stopping recording, the data will be erased from the stop
point.
1 Press the HARD DISK RECORDER [SELECT] button and select the
recorded file to be re-recorded from the AUDIO display.
2 Press the HARD DISK RECORDER [SETTING] button, then use the
TAB [
QQ
QQ
][
WW
WW
] buttons to select the REC MODE tab.
3 Use the [C] (TRACK SELECT) button to select the track to be re-
recorded.
4 Use the [A]/[B] buttons to select a recording method.
• Replace the whole data: NORMAL REC
• Mix the recorded data: NORMAL REC (PLUS PLAYBACK)
5 If you select “NORMAL REC (PLUS PLAYBACK),” play back the
recorded audio and practice the part that you want to overdub while
the audio is playing. Change the volume settings if necessary.
If you wish to add a keyboard-played Voice from the Tyros3, select the desired
Voice. If you wish to record your singing voice or an external instrument, con-
nect a microphone or instrument and make the appropriate settings. Adjust
the HDR Track Play and Rec Monitor levels here as desired.
6 Press the [REC] button to enable recording.
The display automatically switches to the REC MODE Page.
7 Press the [PLAY/PAUSE] button to start recording.
Play the keyboard (or sing, etc.) and record your performance.
8 When finished recording, press the [STOP] button.
After stopping recording, the data will be erased from the stop point.
Re-recording
Re-recording of the data repeatedly will
result in deterioration of the sound
quality.
NOTE
Since you will be overdubbing parts
onto this audio, it’s best to keep the first
recording simple. For example, you
may want to record just a rhythm pattern
(such as by playing back a Style) or a
simple bass riff over which you can add
other parts.
NOTE
4
3
The playback sound of the other (not re-
recorded) track is not recorded.
NOTE
NEXT PAGE

7
7
Recording Audio with the Hard Disk Recorder
84 • Tyros3 Reference Manual
9 To hear your new recording, press the [PLAY/PAUSE] button.
If you’ve made a mistake or you’re not completely satisfied with your perfor-
mance, you can undo the operation by pressing [H] (UNDO) button on the
REC MODE page.
10 Press the [I] (SAVE) button to save the recording.
PUNCH IN OUT / PUNCH IN OUT (MERGE)
This method of recording can only be used on an existing recording. It allows you to
re-record over a specific part of the already-recorded material. You can replace the
original part with the new recording by PUNCH IN/OUT, or keeping the original and
mixing it with the new by PUNCH IN/OUT (MERGE). This lets you either correct a mis-
take in the recording or overdub new parts onto the original recording.
Keep in mind that the parts before and after the Punch In/Out section are not
recorded over and remain as the original data—they play back normally to guide you
in and out of the recording.
1 Press the HARD DISK RECORDER [SELECT] button and select the
recorded file to be re-recorded from the AUDIO display.
2 Press the HARD DISK RECORDER [SETTING] button, then use the
TAB [
QQ
QQ
][
WW
WW
] buttons to select the REC MODE tab.
3 Use the [C] (TRACK SELECT) button to select the track to be re-
recorded.
4 Use the [A]/[B] buttons to select a recording method.
• Replace a certain range of the data: PUNCH IN/OUT
• Overdub a certain range of the data: PUNCH IN/OUT (MERGE)
The Hard Disk Recorder automatically
reduces the level of the previous track
by a certain, slight amount to accom-
modate the new recording. This is done
to minimize possible distortion. You
can use the Normalize effect to maxi-
mize the volume of the overall sound.
For details, see page 82.
NOTE
Keep in mind that even if you
neglect to save the recorded data
in this step, the originally
recorded file (before re-recording)
will still remain on the hard disk
drive.
CAUTION
You can re-record over only one range
at one time.
The beginning and ending of the
recorded data using the Punch In/Out
function is faded in/out automatically.
This is done to minimize possible noise
at the beginning and ending of the
recorded data. We recommend that you
specify the beginning and ending points
at sections in the data where the volume
is low.
NOTE
NOTE
Original Data
Start Recording Punch In Punch Out Stop Recording
Re-recorded Data Original Data
4
3
NEXT PAGE

7
7
Recording Audio with the Hard Disk Recorder
Tyros3 Reference Manual • 85
5 Select the desired Punch In/Out Mode, using the [1 ▲▼]/[2 ▲▼]
(MODE) buttons.
• MANUAL.............. This lets you manually execute Punch In/Out recording by using the
Hard Disk Recorder transport buttons ([REC], [PLAY/PAUSE], etc.).
• PEDAL .................. This lets you manually execute Punch In/Out recording by using a
connected footswitch to the FOOT PEDAL 2 jack.
• AUTO ................... This lets you specify the Punch In and Out points, allowing automatic
Punch In/Out recording (see below).
5
Specifying the recording range in AUTO mode
If you select AUTO as the punch in/out recording method, specify the recording range and practice the
recording by using the Rehearsal function.
1 Specify the punch in/out range by pressing the [3 ▲▼]/[5 ▲▼] (SET) buttons at the punch in/out
point during the audio song playback.
2 If you move the punch in/out point slightly, use the Nudge function.
In this Nudge function, you can move the punch in/out point slightly (even in millisecond units)
while listening to the playback.
2-1 Press the [7 ▲▼] (NUDGE) button to show the Nudge Play display.
2-2 Use the [DATA ENTRY] dial and [PREV]/[NEXT] button to move the NUDGE DATA POSITION to
the desired punch in/out position while listening to the playback (500 milliseconds loop play-
back before/after the specified point). The [DATA ENTRY] dial lets you adjust the point in sec-
onds and the [PREV]/[NEXT] buttons lets you adjust in milliseconds.
2-3 Press the [7 ▲▼] (MODE) button to select After/Before. “After” repeats 500 milliseconds after
the Nudge Data Position and “Before” repeats 500 milliseconds before the Nudge Data Posi-
tion when you playback the data in the next step.
2-4 Press the [3 ▲▼]/[5 ▲▼] (SET) button to set the moved point. To reset the point to the start/
end point of the data, press the [4 ▲▼]/[6 ▲▼] (RESET) button.
2-5 Press the [8 ▲▼] (CLOSE) button.
3 Use the REHEARSAL function to practice the recording before the actual recording.
3-1 Press the [8 ▲▼] (REHEARSAL) button. “EXECUTING” is shown above the [8 ▲▼] buttons.
3-2 Press the HARD DISK RECORDER [REC] button and press the [PLAY/PAUSE] button. The audio
song is played back repeatedly starting four seconds before the punch in point to four seconds
after the punch out point. Play the keyboard or sing the desired part in practice. In this
rehearsal function, recording is not started.
3-3 Press the HARD DISK RECORDER [STOP] button.
The smallest possible range of the Auto punch in/out function is 100 milliseconds.
NOTE
Repeat playback of the rehearsal function is automatically stopped after playing back 99 times.
NOTE
NEXT PAGE

7
7
Recording Audio with the Hard Disk Recorder
86 • Tyros3 Reference Manual
6 Record the specific part of the audio song using the one of the meth-
ods below.
Manual
Press the HARD DISK RECORDER [REC] button and press the [PLAY/PAUSE] but-
ton to engage the record mode, then press the [REC] and [PLAY/PAUSE] but-
tons simultaneously to actually record. To stop recording, press the HARD DISK
RECORDER [STOP] button. Pressing the HARD DISK RECORDER [PLAY/PAUSE]
button during recording pauses the recording.
Pedal
Press the HARD DISK RECORDER [REC] button and press the [PLAY/PAUSE] but-
ton to engage the record mode, then press and hold the footswitch. The point
at which you press the footswitch is the punch in point and the point at which
you release the pedal is the punch out point.
Auto
Press the HARD DISK RECORDER [REC] button and press the [PLAY/PAUSE] but-
ton. Recording automatically starts and stops at the specified point in “Specify-
ing the recording range in AUTO mode” on page 85. The audio song playback
automatically stops four seconds after the punch out point.
7 To hear your new recording, press the [PLAY/PAUSE] button.
If you’ve made a mistake or you’re not completely satisfied with your perfor-
mance, you can undo the operation by pressing [H] (UNDO) button on the
REC MODE page.
8 Press the [I] (SAVE) button to save the recording.
This function (within the Property window) lets you set the Start and End points for the audio file. This action is
non-destructive and affects only the playback of the data; it does not actually delete any data from the start or end
of the file.
1 Press the HARD DISK RECORDER [SELECT] button and select the
desired audio file.
2 Press the [7 ▲] (PROPERTY) button.
3 Press the [H] (START/END POINT) button.
4 Specify the Start/End point.
The operation of specifying the Start/End points is same as specifying the
punch in/out points. For instructions, see “Specifying the recording range in
AUTO mode” on page 85.
5 Press the [F] (OK) button to enter the new settings to the file.
To cancel the operation, press the [G] (CANCEL) button.
6 Exit from the Property window by pressing the [F] (OK) button.
The playback sound of the other (not re-
recorded) track is not recorded.
NOTE
Setting the Start/End Points of the Audio
When exporting a song for which the
Start/End points have been specified,
only the specified range will be
exported.
NOTE

7
7
Recording Audio with the Hard Disk Recorder
Tyros3 Reference Manual • 87
The Playlist is a convenient feature within the Hard Disk Recorder that lets you collect and organize audio files for
automatic playback in “jukebox” fashion. The Playlist mode can be active in the background (for example, when
the Main display is selected), letting you play the listed files whenever you wish during your performance.
The “Basic/Playlist” indicator at the upper left of the display shows whether the Hard Disk Recorder is set to the
Basic mode (playback of a single file) or the Playlist mode (automatic playback of multiple files).
Creating a Playlist
Once you have a number of recorded or imported audio files on the installed hard disk
drive, you can assign those files to the Playlist. The files can be put in any order and
can be entered any number of times (in other words, a single file can have multiple
instances in a Playlist).
1 Press the HARD DISK RECORDER [SELECT] button to call up the
AUDIO display.
2 Select the appropriate folder containing the desired audio files by
using the [A]–[J] buttons.
3 Press the [8 ▼] (CHANGE MENU) button if necessary, then press the
[6 ▼] (Add to PLAYLIST) button.
4 Select the desired audio file(s) by using the [A]–[J] buttons.
The selected file name is highlighted. You can continue to select additional
files here, as many as desired. If multiple pages (P1, P2, ...) are shown at the
bottom, you can select files from these displays, too.
To select all the files in the current folder, press the [6 ▼] (ALL) button.
5 Press the [7 ▼] (OK) button.
To cancel the operation, press the [8 ▼] (CANCEL) button.
6 Check the Playlist to confirm that the files have been added by press-
ing the [6 ▲] (PLAYLIST) button.
If the Playlist already has audio files, additional files are automatically put at the
end of the list. Added files are also automatically selected (checkmarked) for
playback.
7 Save the Playlist.
Press the [5 ▲▼] (PLAYLIST FILE) button, then save the Playlist to the USER
drive, installed hard disk drive or USB storage device.
Playing a Playlist
Once you’ve created and/or edited a Playlist (page 88) and you’ve enabled the Playlist mode, you can play back the
files in the list—at any time during your performance.
Keep in mind that playback of files is not instantaneous. Since the Hard Disk Recorder needs to load each file before
playing it, playback pauses roughly one or two seconds between files.
1 Press the Hard Disk Recorder [SELECT] button to call up the AUDIO
display.
2 Press the [6 ▲] (PLAYLIST) button to call up the Playlist display.
3 Press the [5 ▲▼] (PLAYLIST FILE) buttons to call up the PLAYLIST
FILE display, then select the desired Playlist by using the [A]–[J] but-
tons.
Playlist Mode
A Playlist can contain a maximum of
500 audio files.
NOTE
If you want to select all but a few of the
files in the folder, a quick method is to
use the [6 ▼] (ALL) button to select all
of the files, then use the [A]–[J] buttons
to de-select specific files.
NOTE
If you change the file icon after adding
to the Playlist, the audio file cannot be
recognized from the Playlist.
NOTE
The [SELECT] button toggles between
the Audio and Playlist displays within
the Hard Disk Recorder function.
NOTE
NEXT PAGE

7
7
Recording Audio with the Hard Disk Recorder
88 • Tyros3 Reference Manual
4 Press the [EXIT] button to return to the Playlist display.
5 Use the [7 ▲▼] buttons to select a file for playback, then actually
enter it by pressing the [8 ▼] (SELECT) button.
You can also use the [DATA ENTRY] dial to move the cursor and press the
[ENTER] button to actually select the song.
To have the files play back from the beginning of the Playlist, select the first
file. A check mark indicates the file is enabled for playback, a minus sign ( - )
indicates the file will be skipped, and an exclamation mark indicates the file
does not contain data.
6 Press the HARD DISK RECORDER [PLAY/PAUSE] button to start play-
back of the Playlist from the selected file.
While the Playlist mode is active (the indicator at the top left of the display
shows “Playlist”), the HARD DISK RECORDER [PREV]/[NEXT] buttons function
as Previous/Next controls for the Playlist. Pressing the appropriate button calls
up a pop-up window and selects the previous or next audio file in the Playlist.
7 Press the HARD DISK RECORDER [STOP] button to stop playback.
To disengage the Playlist mode, press the [6 ▲▼] (AUDIO) buttons to show
the AUDIO display and select an audio song.
Playlist Controls
Shown here is a sample Playlist display, with short explanations of the various controls.
[A] REPEAT Determines how the audio files will be played back:
[B] SORT Determines whether the audio files are sorted in ascending or descending
order by name.
[C] SHUFFLE Pressing this button randomly rearranges the order of the files.
[D] UNDO/REDO Pressing this button (Undo) cancels the last action made to the Playlist. Press-
ing it again (Redo) restores the cancelled action. Only one level of Undo/Redo
is available.
[E] EXPORT AUDIO Calls up the Export operation for exporting the selected audio file to a hard
disk drive or USB storage devices. (See “Exporting an Audio File” in the
Owner’s Manual.)
[F] PROPERTY Calls up the Property popup display which shows the file name and path of
the audio song at the cursor position.
All files are played in sequence once through to the end (no repeat).
All files are played in sequence repeatedly.
One selected file is played repeatedly.

7
7
Recording Audio with the Hard Disk Recorder
Tyros3 Reference Manual • 89
[G]–[J] Playlist navigation controls.
• [G]: Moves cursor/selection to the top of the list.
• [H]: Moves cursor/selection one page up (when there are multiple pages).
• [I]: Moves cursor/selection one page down (when there are multiple
pages).
• [J]: Moves cursor/selection to the bottom of the list (just below last entered
file).
[2 ▲▼] MOVE Up/Down Use these buttons to move the selected file to another location in the list.
[3 ▲] CUT These operations let you copy or cut and paste individual list entries. Keep in
mind that these have no effect on the actual audio data, but just entries in the
list.
Cut and Insert
1 Press the [3 ▲] (CUT) button.
2 Select the desired file entry by using the [5 ▲▼] buttons and press
the [6 ▲▼] button to actually select it. Then press the [8 ▲] (OK)
button. The entry is deleted.
3 Move the cursor to the desired location in the list (with the [7 ▲▼]
buttons) and press the [3 ▼] (INSERT) button.
Copy and Insert
1 Press the [4 ▲] (COPY) button.
2 Select the desired file entry by using the [5 ▲▼] buttons and press
the [6 ▲▼] button to actually select it. Then press the [8 ▲] (OK)
button. The entry is copied.
3 Move the cursor to the desired location in the list (with the [7 ▲▼]
buttons) and press the [3 ▼] (INSERT) button.
[3 ▼] INSERT
[4 ▲] COPY
[4 ▼] DELETE Deletes files from the Playlist. Keep in mind that this does not affect the actual
audio data, but simply deletes an entry of the file from the list.
[5 ▲▼] PLAYLIST FILE Opens the PLAYLIST FILE display. From this display, you can rename, copy,
delete or save the playlists.
[6 ▲▼] AUDIO Exits the Playlist display and calls up the Audio display.
[7 ▲▼] Up/Down Use these buttons to move the cursor in the list. Use the [DATA ENTRY] dial to
quickly move the cursor (red border) through the entries and press the
[ENTER] button.
[8 ▲] MARK Adds or removes the checkmark to/from the selected data. Only the
checkmarked files will be played. Holding this button adds (or removes) the
checkmark to (or from) all files.
[8 ▼] SELECT Actually selects the file at the cursor position.

8
8
Mixing Console – Editing the Volume and Tonal Balance –
90 • Tyros3 Reference Manual
Mixing Console
– Editing the Volume and Tonal Balance –
Contents
Editing VOL/VOICE Parameters . . . . . . . . . . . . . . . . . . . . . . . 90
• Song Auto Revoice . . . . . . . . . . . . . . . . . . . . . . . . . . . . . . . . . . . .91
Editing FILTER Parameters . . . . . . . . . . . . . . . . . . . . . . . . . . . 92
Editing TUNE Parameters . . . . . . . . . . . . . . . . . . . . . . . . . . . . 92
Editing EFFECT Parameters . . . . . . . . . . . . . . . . . . . . . . . . . . . 93
• Selecting an Effect type and Creating a User Effect . . . . . . . . . . . .93
Editing EQ Parameters . . . . . . . . . . . . . . . . . . . . . . . . . . . . . . 96
• Editing and Saving the Selected EQ . . . . . . . . . . . . . . . . . . . . . . .97
Line Out Settings. . . . . . . . . . . . . . . . . . . . . . . . . . . . . . . . . . . 98
Editing VOL/VOICE Parameters
For information on available Voices for each Style
channel, refer to page 38.
When playing GM song data, channel 10 (in the
SONG CH 9 to 16 page) can only be used for a
Drum Kit Voice.
When changing the rhythm/percussion Voice
(drum kits, etc.) of the Style and Song from the
VOICE parameter, the detailed settings related to
the drum Voice are reset, and in some cases you
may be unable to restore the original sound. In the
case of Song playback, you can restore the origi-
nal sound by returning to the beginning of the
Song and playing back from that point. In the case
of Style play, you can restore the original sound
by selecting the same Style again.
NOTE
NOTE
NOTE
[F] SONG AUTO
REVOICE
See page 91.
[G] SETUP
[C]/[H] VOICE Allows you to re-select the Voices for each part. When the Style channels are
called up, neither Organ Flutes Voices nor User Voices can be selected. When
the Song channels are called up, User Voices cannot be selected. Please note
that the Voice of the Multi Pad cannot be changed via the Mixing Console.
[D]/[I] PANPOT Determines the stereo position of the selected part (channel).
[E]/[J] VOLUME Determines the level of each part or channel, giving you fine control over the
balance of all the parts.

8
8
Mixing Console – Editing the Volume and Tonal Balance –
Tyros3 Reference Manual • 91
Song Auto Revoice
This feature lets you use the high-quality sounds of the Tyros3 to full advantage with XG-compatible song data.
When you play back any commercially available XG song data or that created on other instruments, you can use
Auto Revoice to automatically assign the specially created Voices of the Tyros3 (Live!, Cool!, etc.) instead of the con-
ventional XG Voices of the same type.
1 Press the [G] (SETUP) button in the VOL/VOICE Page of the Mixing
Console display.
The Auto Revoice Setup display is called up. On this display, you can specify
the Voice which you with to replace with the Tyros3 Voice.
2 Press the [8 ▲] (OK) button to apply your Revoice settings.
To cancel the Revoice operation, press the [8 ▼] (CANCEL) button.
3 In the VOL/VOICE Page, press the [F] button to set the SONG AUTO
REVOICE to ON.
Depending on the particular Song data,
there are some instances where Song
Auto Revoice has no effect.
NOTE
2
[1 ▲▼]–
[3 ▲▼]
VOICE NAME Selects the XG Voices to be replaced (Voices usually used when playing back).
[4 ▲▼]–
[6 ▲▼]
REVOICE TO Selects the Voices used to replace the XG Voices (when SONG AUTO REVOICE
is set to ON).
[F] ALL REVOICE Replaces all of the replaceable XG Voices with the rich and authentic Voices of
the Tyros3.
[I] BASIC REVOICE Replaces only the recommended Voices that are suitable for playing back the
song.
[J] ALL NO REVOICE All the Voices are returned to the original XG Voices.

8
8
Mixing Console – Editing the Volume and Tonal Balance –
92 • Tyros3 Reference Manual
Editing FILTER Parameters
[D]/[I] HARMONIC
CONTENT
Allows you to adjust the resonance effect (page 13) for each part.
[E]/[J] BRIGHTNESS Determines the brightness of the sound for each part by adjusting the cutoff
frequency (page 13).
Editing TUNE Parameters
[A]/[B]/
[F]/[G]
PORTAMENTO
TIME
Portamento is a function that creates a smooth transition in pitch from the
first note played on the keyboard to the next. The Portamento Time deter-
mines the pitch transition time. Higher values result in a longer pitch change
time. Setting this to “0” results in no effect. This parameter is available when
the selected keyboard part is set to Mono.
[C]/[H] PITCH BEND
RANGE
Determines the range of the PITCH BEND wheel for each keyboard part. The
range is from “0” to “12” with each step corresponding to one semitone.
[D]/[I] OCTAVE Determines the range of the pitch change in octaves, over two octaves up or
down for each keyboard part. The value set here is added to the setting via
the OCTAVE [-]/[+] buttons.
TRANSPOSE Allows you to set transposition for overall sound of the instrument (MASTER),
Song playback (SONG), or the keyboard pitch (KEYBOARD), respectively.
Please note that the “KEYBOARD” also transposes the keyboard pitch of Style
playback and the Multi Pads (since these are also affected by keyboard play in
the left-hand section).
[E]/[J] TUNING Determines the pitch of each keyboard part.
If the Pitch Bend range is set to more than 1,200 cents (1 octave) via MIDI, the pitch of some
Voices may not be raised or lowered completely.
NOTE

8
8
Mixing Console – Editing the Volume and Tonal Balance –
Tyros3 Reference Manual • 93
Selecting an Effect type and Creating a User Effect
1 Press the [F] (TYPE) button in the EFFECT Page of the Mixing Con-
sole display.
The Effect Type Selection display is called up.
Editing EFFECT Parameters
[F] TYPE Selects the desired effect type. See below.
[B]/[C]/
[G]/[H]
REVERB Adjusts the amount of the Reverb sound for each part or channel.
[D]/[I] CHORUS Adjusts the amount of the Chorus sound for each part or channel.
[E]/[J] DSP Adjusts the amount of the DSP sound for each part or channel.
2 3 4 5
6
NEXT PAGE

8
8
Mixing Console – Editing the Volume and Tonal Balance –
94 • Tyros3 Reference Manual
2 Use the [1 ▲▼]/[2 ▲▼] buttons to select the effect BLOCK.
3 Use the [3 ▲▼]/[4 ▲▼] buttons to select the part to which you want to
apply the effect.
Please note that a part cannot be selected if the selected block is REVERB,
CHORUS or DSP1.
4 Use the [5 ▲▼]/[6 ▲▼] button to select the effect CATEGORY.
5 Use the [7 ▲▼]/[8 ▲▼] button to select the effect TYPE.
6 If you want to edit the effect parameters, press the [F] button to call
up the display for editing the effect parameters.
7 If you have selected one of the DSP2–6 or 8–9 effect blocks in step 2:
You can edit its standard parameters as well as its variation parameter.
To select the standard type of parameters, press the [B] button. To select its
variation parameter, press the [E] button.
When the “Connection” parameter of
the DSP1 (selected on step 6 below) is
set to “System,” the DSP1 effect will be
applied overall to the Style and Song.
When it is set to “Insertion,” the DSP1
effect will behave as same as other DSP
blocks and be applied to only the part(s)
selected in step 3.
NOTE
Effect
Block
Effect-appli-
cable parts
Effect characteristics
REVERB All parts Reproduces the warm ambience of playing in a
concert hall or jazz club.
CHORUS All parts Produces a rich, “fat” sound as if several parts
are being played simultaneously. In addition,
other type effects (such as reverb, delay, etc.)
can also be selected in this effect block.
DSP1 STYLE PART,
SONG CHAN-
NEL 1–16
This effect is applied only to Style/Song parts.
DSP2,
DSP3,
DSP4,
DSP5,
DSP6
RIGHT 1,
RIGHT 2,
RIGHT 3, LEFT,
SONG CHAN-
NEL 1–16
Any unused DSP blocks are automatically
assigned to the appropriate parts (channels) as
needed. One DSP block is available only for one
of the keyboard parts or Song parts.
DSP7 Microphone
sound
This effect is applied to the MIC input, in addi-
tion to the Vocal Harmony effect.
DSP8,
DSP9
STYLE PART These effects are applied only to Style parts.
8
7
9
“Variation parameter” is the one which
can be turned on/off by pressing the
[VARIATION] button on the panel.
NOTE
NEXT PAGE

8
8
Mixing Console – Editing the Volume and Tonal Balance –
Tyros3 Reference Manual • 95
8 Select one of the parameters you want to edit by using the [4 ▲▼]/[5
▲▼] buttons, then adjust the value by using the [6 ▲▼]/[7 ▲▼] but-
tons.
If you have selected the REVERB, CHORUS or DSP1 effect block in step 2, you
can adjust the Effect Return Level by pressing [8 ▲▼] button.
To re-select the Effect block, category and type, use the [1 ▲▼]–[3 ▲▼] but-
tons. The re-selected effect configuration is displayed at the upper left side box
in the display.
9 Press the [I] (SAVE) button to call up the display for saving your orig-
inal effect.
10 Use the [3 ▲▼]–[6 ▲▼] buttons to select the destination for saving
the effect.
The maximum number for effects that can be saved differs depending on the
effect block.
11 Press the [I] (SAVE) button to save the effect.
When recalling the saved effect, use the same procedure as in step 5.
Keep in mind that in some cases noise
may result if you adjust the effect
parameters while playing the instru-
ment.
NOTE
10
11

8
8
Mixing Console – Editing the Volume and Tonal Balance –
96 • Tyros3 Reference Manual
Equalizer (also called “EQ”) is a sound processor that divides the frequency spectrum
into multiple bands that can be boosted or cut as required to tailor the overall fre-
quency response. Usually an equalizer is used to correct the sound from speakers to
match the special character of the room. For example, you can cut some of the low
range frequencies when playing in large spaces where the sound is too “boomy,” or
boost the high frequencies in rooms and close spaces where the sound is relatively
“dead” and free of echoes.
The Tyros3 possesses a high grade five-band digital EQ. With this function, a final
effect—tone control—can be added to the output of your instrument. You can select
one of the five preset EQ settings in the EQ display. You can even create your own cus-
tom EQ settings by adjusting the frequency bands, and save the settings to one of two
User Master EQ types.
Editing EQ Parameters
[A]/[B] TYPE Selects the desired Master EQ type. This affects the overall sound of the instru-
ment.
[F] EDIT For editing the Master EQ. See page 97.
[D]/[I] EQ HIGH Boosts or attenuates the high EQ band for each part.
[E]/[J] EQ LOW Boosts or attenuates the low EQ band for each part.
0
Bandwidth (also called “Shape” or “Q”)
Gain
Freq
(Frequency)
5 bands →
LOW
EQ1
LOWMID
EQ2
MID
EQ3
HIGHMID
EQ4
HIGH
EQ5

8
8
Mixing Console – Editing the Volume and Tonal Balance –
Tyros3 Reference Manual • 97
Editing and Saving the Selected EQ
1 Press the [F] (EDIT) button in the EQ Page of the Mixing Console dis-
play.
The MASTER EQ EDIT display is called up.
2 Use the [A]/[B] buttons to select a preset EQ type.
The set parameters of the selected EQ type are automatically shown at the bot-
tom of the display.
3 Use the [3 ▲▼]–[7 ▲▼] buttons or sliders to boost or cut each of the
five bands.
Use the [8 ▲▼] buttons to boost or cut all the five bands at the same time.
4 Adjust the Q (bandwidth) and the FREQ (center frequency) of the
band selected in step 3.
To adjust the bandwidth (also called “Shape” or “Q”), use the [1 ▲▼] buttons
or slider. The higher the value of Q, the narrower the band width.
To adjust the FREQ (center frequency), use the [2 ▲▼] buttons or slider. The
available FREQ range is different for each band.
5 Press the [H] or [I] (STORE 1 or 2) button to save the edited EQ type.
Up to two types of EQ can be created and saved. When recalling the saved EQ
type, use the same procedure as in step 2.
3
5
2
4

8
8
Mixing Console – Editing the Volume and Tonal Balance –
98 • Tyros3 Reference Manual
Line Out Settings
[F] DRUM&PERC./
PANEL
Switches the displayed menu: PANEL parts or DRUM & PERCUSSION instru-
ments.
[1 ▲▼]–
[3 ▲▼]
PART
(PANEL Page)
Selects the desired part/drum instrument.
[1 ▲▼]/
[2 ▲▼]
INSTRUMENTS
(DRUM & PER-
CUSSION Page)
[3 ▲▼] DEPEND ON PART
(DRUM & PER-
CUSSION Page)
Checking here, the selected drum instrument will be output via the jacks set
from the PANEL page at left.
[4 ▲▼] MAIN Checking here, the selected part/drum instruments will be output from LINE
OUT MAIN jacks, PHONES jacks, LOOP SEND jack, and optional speaker.
[5 ▲▼] SUB1 Checking one of these columns (jacks), the selected part/drum instruments
will be output from only the selected SUB jack(s). When you select “SUB1 &
2”, the sound will be output in stereo (SUB1: left, SUB2: right).
[6 ▲▼] SUB2
[7 ▲▼] SUB1 & 2
PANEL Page DRUM & PERCUSSION Page
Press [F]
button
When using one of the SUB Line Out settings, make sure that you’ve connected cables to the
appropriate LINE OUT SUB jacks on the rear panel. If cables are only connected to the MAIN
jacks, the sound of the Part will be output through the MAIN jacks, even if one of the SUB1/
SUB2/SUB1&2 is checkmarked.
NOTE
Only the DSP2–9 and Vocal Harmony effects can be applied to the sound output from the SUB
jacks. Other effects (Reverb, Chorus and DSP1) will not be applied. (If the “Connection”
parameter of the DSP1 is set to “Insertion”, the DSP1 will also be applied.)
NOTE

9
9
Internet Direct Connection – Connecting the Tyros3 Directly to the Internet –
Tyros3 Reference Manual • 99
Internet Direct Connection
– Connecting the Tyros3 Directly to the Internet –
Contents
Registering Bookmarks of Your Favorite Pages . . . . . . . . . . . 99
• Editing Bookmarks . . . . . . . . . . . . . . . . . . . . . . . . . . . . . . . . . . .100
About the Internet Settings Display (BROWSER) . . . . . . . . . 101
You can “bookmark” the page you’re viewing, and set up a custom link so the page can be instantly called up in
the future.
1 With the desired page currently selected, press the [4 ▲▼] (BOOK-
MARK) button. The Bookmark display appears, showing a list of the
currently saved bookmarks.
2 Call up the display for registering bookmarks by pressing the [3 ▲▼]
(ADD) button.
3 Select the position of the new bookmark by pressing the [1 ▲▼] but-
ton.
4 To save the bookmark, press the [7 ▲▼] (EXECUTE) button, or press
the [8 ▲▼] (CANCEL) button to cancel.
5 Press the [8 ▲▼] (CLOSE) button to return to the browser.
The bookmarked page can be opened by pressing the [2 ▲▼] (VIEW) button
in the Bookmark display.
Registering Bookmarks of Your Favorite Pages
2
The title of the currently selected
web page registered to the
selected bookmark is shown
below the list.
34

9
9
Internet Direct Connection – Connecting the Tyros3 Directly to the Internet –
100 • Tyros3 Reference Manual
Editing Bookmarks
From the Bookmark display, you can change the names and rearrange the order of your bookmarks, as well as
delete unnecessary bookmarks from the list.
[1 ▲▼] (UP/DOWN) Moves the selection position in the Bookmark list.
[2 ▲▼] VIEW Opens the web page of the selected bookmark.
[3 ▲▼] ADD Used when saving a bookmark (page 99).
[4 ▲▼] MOVE Changes the order of the bookmarks.
1 Select the bookmark you wish to move, then press the [4 ▲▼] (MOVE)
button.
The lower part of the display changes, letting you select the new posi-
tion for the bookmark.
2 Select the intended position by pressing the [1 ▲▼] button.
3 Move the bookmark to the selected position by pressing the [7 ▲▼]
(EXECUTE) button.
[5 ▲▼] CHANGE Changes the name of the selected bookmark. Pressing this button calls up the
display for entering characters.
[6 ▲▼] DELETE Deletes the selected bookmark from the Bookmark list.
[8 ▲▼] CLOSE Closes the Bookmark display and returns to the browser display.

9
9
Internet Direct Connection – Connecting the Tyros3 Directly to the Internet –
Tyros3 Reference Manual • 101
About the Internet Settings Display (BROWSER)
Encode Selects the character code encoding for the browser.
Home page Shows and allows editing the title of the web page registered as the
Home page.
Set current page as
Home
For details, refer to “Changing the Home Page” below.
Restore default Home Restores the home page setting.
Show images Image data and pictures in the web page are shown in the browser
when this is set to on. Image data is not shown when this is set to
off.
Time zone This determines the time setting for the browser.
Changing the Home Page
In the default condition, the top page of the special website is automatically set to be the
Home page for the browser. However, you can specify any desired page on the site to be the
Home page.
1 Open the page you wish to set as your new Home page.
2 Press the [5 ▼] (SETTING) button to call up the Internet Setting display.
3 Press the TAB [
QQ
QQ
][
WW
WW
] buttons to select the BROWSER tab.
4 Press the [1 ▼] button to select the setting “Set current page as Home.”
5 Use the [2 ▲▼]/[3 ▲▼] or [ENTER] button to actually set the selected page as your
new Home page.
6 To return to the browser, press the [7 ▲▼] (SAVE) button.
To cancel, press the [8 ▲▼] (CLOSE) button.

10
10
Connections – Using Tyros3 with Other Devices –
102 • Tyros3 Reference Manual
Connections
– Using Tyros3 with Other Devices –
Contents
Microphone Settings. . . . . . . . . . . . . . . . . . . . . . . . . . . . . . . 102
• Microphone Overall Settings . . . . . . . . . . . . . . . . . . . . . . . . . . .102
• Talk Settings . . . . . . . . . . . . . . . . . . . . . . . . . . . . . . . . . . . . . . . .105
• Editing Vocal Harmony. . . . . . . . . . . . . . . . . . . . . . . . . . . . . . . .106
Footswitch/Foot Controller Settings . . . . . . . . . . . . . . . . . . 109
• Assigning Specific Functions to Each Foot Pedal . . . . . . . . . . . . .109
MIDI Settings. . . . . . . . . . . . . . . . . . . . . . . . . . . . . . . . . . . . . 112
• MIDI SYSTEM Settings . . . . . . . . . . . . . . . . . . . . . . . . . . . . . . . .114
• MIDI Transmit Settings . . . . . . . . . . . . . . . . . . . . . . . . . . . . . . . .115
• MIDI Receive Settings. . . . . . . . . . . . . . . . . . . . . . . . . . . . . . . . .116
• Setting the Bass Note for Style Playback via MIDI Receive. . . . . .117
• Setting the Chord Type for Style Playback via MIDI Receive . . . .117
• MFC10 Settings . . . . . . . . . . . . . . . . . . . . . . . . . . . . . . . . . . . . .118
Microphone Overall Settings
1 Call up the operation display.
[MIC SETTING] → TAB [
QQ
QQ
][
WW
WW
] OVERALL SETTING
2 Use the [A], [C] and [E] (or [F], [H] and [J]) buttons to select the
parameter to be adjusted, then set the value by using the [1 ▲▼]–[8
▲▼] buttons or sliders.
For information on each parameter, see pages 103–104.
Microphone Settings
Settings in the OVERALL SETTING
Page are automatically saved to
the instrument when you exit from
the display. However, if you turn
the power off without exiting from
this display, the settings will be
lost.
CAUTION

10
10
Connections – Using Tyros3 with Other Devices –
Tyros3 Reference Manual • 103
● 3BAND EQ (selected by [A] or [F] button)
EQ (Equalizer) is a processor that divides the frequency spectrum into multiple
bands which can be boosted or cut as required to tailor the overall frequency
response. The Tyros3 features a high-grade three-band (LOW, MID and HIGH)
digital equalizer function for the microphone sound.
● NOISE GATE (selected by [C] or [H] button)
This effect mutes the input signal when the input from the microphone falls
below a specified level. This effectively cuts off extraneous noise, allowing the
desired signal (vocal, etc.) to pass.
● COMPRESSOR (selected by [C] or [H] button)
This effect holds down the output when the input signal from the microphone
exceeds a specified level. This is especially useful for smoothing out vocals that
have widely varying dynamics. It effectively “compresses” the signal, making
soft parts louder and loud parts softer.
● MIC MUTE (selected by [C] or [H] button)
● MIC VOLUME (selected by [E] or [J] buttons)
[1 ▲▼]/
[3 ▲▼]/
[5 ▲▼]
Hz Adjusts the center frequency of the corresponding band.
[2 ▲▼]/
[4 ▲▼]/
[6 ▲▼]
dB Boosts or cuts the level of the corresponding band by up to 12 dB.
[1 ▲▼] SW (Switch) This turns Noise Gate on or off.
[2 ▲▼] TH. (Threshold) This adjusts the input level at which the gate begins to open.
[3 ▲▼] SW (Switch) This turns Compressor on or off.
[4 ▲▼] TH. (Threshold) This adjusts the input level at which compression begins to be applied.
[5 ▲▼]RATIO This adjusts the compression ratio.
[6 ▲▼] OUT Adjusts the final output level.
[8 ▲▼] MIC MUTE When set to ON, the microphone sound is turned off.
[8 ▲▼] MIC VOLUME Adjusts the output volume of the microphone sound.

10
10
Connections – Using Tyros3 with Other Devices –
104 • Tyros3 Reference Manual
● VOCAL HARMONY CONTROL (selected by [E] or [J] button)
The following parameters determine how the Vocal Harmony is controlled.
[1 ▲▼]–
[3 ▲▼]
VOCODER CON-
TROL
The Vocal Harmony effect in Vocoder mode (below) is controlled by note
data—the notes you play on the keyboard and/or the notes of the song data.
This parameter lets you determine which notes are used to control the har-
mony.
[1 ▲▼] MUTE/PLAY When set to “MUTE,” the channel selected below (to control Harmony) is
muted (turned off) during keyboard performance or song playback.
[2 ▲▼] OFF/1–16 When set to “OFF,” song data control over harmony is turned off. When set to
one of the values 1–16, note data (played from a Song on the Tyros3 or exter-
nal MIDI sequencer) contained on the corresponding channel is used to con-
trol the harmony.
[3 ▲▼] KBD (Keyboard) OFF: Keyboard control over harmony is turned off.
UPPER: Notes played to the right of the split point control the harmony.
LOWER: Notes played to the left of the split point control the harmony.
[4 ▲▼] BAL. (Balance) This lets you set the balance between the lead vocal (your own voice) and
Vocal Harmony. Raising this value increases the volume of the Vocal Harmony
and decreases that of the lead vocal. When this is set to L<H63 (L: Lead Vocal,
H: Vocal Harmony), only the Vocal Harmony is output; when it is set to
L63>H, only the lead vocal is output.
[5 ▲▼] MODE (Vocal Har-
mony mode)
All of the Vocal Harmony types fall into one of three modes, which produce
harmony in different ways. The harmony effect is dependent on the selected
Vocal Harmony mode, and this parameter determines how the harmony is
applied to your voice. The three modes are described below.
AUTO: When the [ACMP] or [LEFT] is set to ON and if chord data exists in the
Song, the mode is automatically set to CHORDAL. In all other cases, the
mode is set to VOCODER.
VOCOD (Vocoder): The harmony notes are determined by the notes you
play on the keyboard and/or Song data. You can specify whether the
Vocoder effect is controlled by your keyboard performance or by the Song
data (VOCODER CONTROL parameter above).
CHORD (Chordal): The harmony notes are determined by the following
three types of chord: chords played in the chord section of the keyboard
(with the [ACMP] turned on), chords played in the LEFT Voice section of
the keyboard (with the [ACMP] turned off and the [LEFT] turned on), and
chords contained in Song data for controlling the harmony. (Not available
if the Song does not contain any chord data.)
[6 ▲▼] CHORD The following parameters determine which data in a recorded Song is used
for chord detection.
OFF: Chords are not detected from the Song data.
XF: Chords of XF format are used for the Vocal Harmony.
1–16: Chords are detected from note data in the specified Song channel.
[7 ▲▼] VOCAL RANGE Set this to obtain the most natural vocal harmony, depending on your voice.
NORM.: Normal setting.
LOW: Setting for lower voice. This setting is also appropriate for growling
and shouting.
HIGH: Setting for higher voice. This setting is also appropriate for singing
close to the microphone.

10
10
Connections – Using Tyros3 with Other Devices –
Tyros3 Reference Manual • 105
Talk Settings
This function gives you special settings for making announcements between songs, separate from the settings for
your singing performance.
1 Call up the operation display.
[MIC SETTING] → TAB [
QQ
QQ
][
WW
WW
] TALK SETTING
2 Use the [A]/[B] buttons to select the parameter to be adjusted, then
set the value by using the [1 ▲▼]–[8 ▲▼] buttons or sliders.
● 1 Talk Setting Parameters
● 2 DSP Parameters
Settings in the TALK SETTING
Page are automatically saved to
the instrument when you exit from
the display. However, if you turn
the power off without exiting from
this display, the settings will be
lost.
The settings here can be saved to USER,
HD or USB as a System Setup file:
[FUNCTION] → [I] UTILITY → TAB
[
QQ
QQ
][
WW
WW
] SYSTEM RESET. See page 126.
CAUTION
NOTE
[1 ▲▼] VOLUME This determines the output volume of the microphone sound.
[2 ▲▼]PAN This sets the stereo pan position of the microphone sound.
[4 ▲▼] REVERB DEPTH These set the depth of the reverb effects applied to the microphone sound.
[5 ▲▼] CHORUS DEPTH This sets the depth of the chorus effects applied to the microphone sound.
[6 ▲▼]/
[7 ▲▼]
TOTAL VOLUME
ATTENUATOR
This determines the amount of attenuation to be applied to the overall sound
(excepting the microphone input)—allowing you to effectively adjust the bal-
ance between your voice and the overall instrument sound.
[3 ▲▼] DSP MIC ON/OFF This turns the DSP effect applied to the microphone sound ON or OFF.
[4 ▲▼]/
[5 ▲▼]
DSP MIC TYPE This selects the type of DSP effect to be applied to the microphone sound.
[6 ▲▼] DSP MIC DEPTH This sets the depth of the DSP effect applied to the microphone sound.

10
10
Connections – Using Tyros3 with Other Devices –
106 • Tyros3 Reference Manual
Editing Vocal Harmony
This section explains briefly how to create your own Vocal Harmony types, and lists the detailed parameters for edit-
ing. Up to ten Vocal Harmony types can be created and saved.
1 Press the [VH TYPE SELECT] button to call up the VOCAL HARMONY
TYPE Selection display.
2 Select a Vocal Harmony type to be edited by using the [A]–[J] buttons.
3 Press the [8 ▼] (EDIT) button to call up the VOCAL HARMONY EDIT
display.
4 Edit the Vocal Harmony.
5 Press the [I] (SAVE) button to save your edited Vocal Harmony type.
1
2
3
5
[1 ▲▼]/
[2 ▲▼]
EFFECT TYPE Re-selects the Vocal Harmony Type.
[3 ▲▼]–
[5 ▲▼]
PARAMETER Selects the parameter you want to be edit. See page 107.
[6 ▲▼]/
[7 ▲▼]
VALUE Sets the value of the selected parameter.
[8 ▲▼] RETURN Returns to the VOCAL HARMONY TYPE Selection display.
The settings here will be lost if
you change to another Vocal Har-
mony type or you turn the power
off without executing the save
operation.
CAUTION

10
10
Connections – Using Tyros3 with Other Devices –
Tyros3 Reference Manual • 107
● Vocal Harmony Edit parameters
VOCODER TYPE Determines how the harmony notes are applied to the microphone
sound when the Harmony mode (page 104) is set to “VOCODER.”
CHORDAL TYPE Determines how the harmony notes are applied to the microphone
sound when the Harmony mode (page 104) is set to “CHORDAL.”
HARMONY GENDER
TYPE
Determines whether the gender of the harmony sound is changed
or not.
Off: The gender of the harmony sound is not changed.
Auto: The gender of the harmony sound is changed automatically.
LEAD GENDER TYPE Determines whether and how the gender of the lead vocal sound
(i.e., the direct microphone sound) will be changed. Please note that
the number of harmony notes differs depending on the selected
type. When set to Off, three harmony notes are produced. Other
settings produce two harmony notes.
Off: No gender change occurs.
Unison: No gender change occurs. You can adjust the LEAD GEN-
DER DEPTH below.
Male: The corresponding gender change is applied to the lead
vocal.
Female: The corresponding gender change is applied to the lead
vocal.
LEAD GENDER DEPTH Adjusts the degree of lead vocal gender change. This is available
when the LEAD GENDER TYPE above is set to other than Off. The
higher the value, the more “feminine” the harmony voice becomes.
The lower the value, the more “masculine” the voice.
LEAD PITCH CORRECT This parameter is only effective when the LEAD GENDER TYPE above
is set to other than Off. When Smooth or Hard is selected, the pitch
of the lead vocal is shifted in precise semitone steps.
UPPER GENDER THRESH-
OLD
Gender change will occur when the harmony pitch reaches or
exceeds the specified number of semitones above the lead vocal
pitch.
LOWER GENDER
THRESHOLD
Gender change will occur when the harmony pitch reaches or
exceeds the specified number of semitones below the lead vocal
pitch.
UPPER GENDER DEPTH Adjusts the degree of gender change applied to harmony notes
higher than the UPPER GENDER THRESHOLD. The higher the value,
the more “feminine” the harmony voice becomes. The lower the
value, the more “masculine” the voice.
LOWER GENDER DEPTH Adjusts the degree of gender change applied to harmony notes
lower than the LOWER GENDER THRESHOLD. The higher the value,
the more “feminine” the harmony voice becomes. The lower the
value, the more “masculine” the voice.
VIBRATO DEPTH Sets the depth of vibrato applied to the harmony sound. Also affects
the lead vocal sound when the LEAD GENDER TYPE above is set to
other than Off.
VIBRATO RATE Sets the speed of the vibrato effect. Also affects the lead vocal sound
when the LEAD GENDER TYPE above is set to other than Off.
VIBRATO DELAY Specifies the length of the delay before the vibrato effect begins
when a note is produced. Higher values result in a longer delay.

10
10
Connections – Using Tyros3 with Other Devices –
108 • Tyros3 Reference Manual
HARMONY 1/2/3 VOL-
UME
Sets the volume of the first (lowest), second, and third (highest) har-
mony note.
HARMONY 1/2/3 PAN Specifies the stereo (pan) position of the first (lowest), second, and
third (highest) harmony note.
Random: The stereo position of the sound will change randomly
whenever the keyboard is played. This is effective when the Har-
mony mode (page 104) is set to “VOCODER” or “CHODAL.”
L63>R–C–L<R63: A setting of L63>R pans the sound hard left,
while C is at center, and L<R63 is at hard right.
HARMONY 1/2/3
DETUNE
Detunes the first (lowest), second, and third (highest) harmony note
by the specified number of cents.
PITCH TO NOTE When this is set to “ON,” you can “play” the Voices of the Tyros3
with your voice. (The Tyros3 tracks the pitch of your voice and con-
verts it to note data for the tone generator. Keep in mind, however,
that dynamic changes in your voice do not affect the volume of the
tone generator.)
PITCH TO NOTE PART Determines which of the Tyros3 parts will be controlled by the lead
vocal when the PITCH TO NOTE parameter above is “ON.”

10
10
Connections – Using Tyros3 with Other Devices –
Tyros3 Reference Manual • 109
Assigning Specific Functions to Each Foot Pedal
The functions assigned by default to the connected footswitch or foot controller can be changed—for example, let-
ting you use the footswitch to start/stop Style playback, or use the foot controller to produce pitch bends.
1 Call up the operation display.
[FUNCTION] → [D] CONTROLLER → TAB [
QQ
QQ
][
WW
WW
] FOOT PEDAL
2 Use the [A]/[B] buttons to select one of three foot pedals to which the
function is to be assigned.
3 Use the [C]/[D] buttons to select the function to be assigned to the
pedal specified in step 2.
For information on available parameters, see pages 110–111.
4 Use the [1 ▲▼]–[8 ▲▼] buttons to set the details of the selected func-
tions (the part for which the function is applied, etc.).
The available parameters differ depending on the function selected in step 3.
5 If necessary, set the polarity of the pedal by using the [I] button.
Pedal on/off operation may differ depending on the particular pedal you’ve
connected to the Tyros3. For example, pressing down on one pedal may turn
the selected function on, while pressing a different make/brand of pedal may
turn the function off. If necessary, use this setting to reverse the operation.
Footswitch/Foot Controller Settings
2
3
5
4
You can also assign the other functions
to the pedal—punch in/out of Song/
Hard Disk Recorder (pages 61, 84) and
Registration Sequence (page 78). If you
assign multiple functions to the pedal,
the priority is: Punch in/out of Song or
Hard Disk Recorder → Registration
Sequence → Functions assigned here.
NOTE

10
10
Connections – Using Tyros3 with Other Devices –
110 • Tyros3 Reference Manual
● Assignable Pedal Functions
For functions indicated with “*”, use only the foot controller; proper operation
cannot be done with a footswitch.
S. ARTICULATION 1/2 When you use a Super Articulation Voice that has an effect assigned
to the pedal/footswitch, you can enable the effect by pressing the
pedal/footswitch. You can turn this function on or off for each key-
board part on this display.
VOLUME* Allows you to use a foot controller to control the volume. You can
turn this pedal function on or off for each part on this display.
SUSTAIN Allows you to use a pedal to control the sustain. When you press and
hold the pedal, all notes played on the keyboard have a longer sus-
tain. Releasing the pedal immediately stops (damps) any sustained
notes. You can turn this pedal function on or off for each keyboard
part on this display.
SOSTENUTO Allows you to use a pedal to control the Sostenuto effect. If you play
a note or chord on the keyboard and press the pedal while holding
the note(s), the notes will sustain as long as the pedal is held. How-
ever, all subsequent notes will not sustain. This makes it possible to
sustain a chord, for example, while other notes are played staccato.
You can turn this pedal function on or off for each keyboard part on
this display.
SOFT Allows you to use a pedal to control the Soft effect. Pressing this
pedal reduces the volume and changes the timbre of the notes you
play. This is effective only for certain appropriate Voices. You can
turn this pedal function on or off for each keyboard part on this dis-
play.
GLIDE When the pedal is pressed, the pitch changes, and then returns to
normal pitch when the pedal is released. The following parameters
can be set for this function on this display.
UP/DOWN: Determines whether the pitch change goes up (is
raised) or down (is lowered).
RANGE: Determines the range of the pitch change, in semitones.
ON SPEED: Determines the speed of the pitch change when the
pedal is pressed.
OFF SPEED: Determines the speed of the pitch change when the
pedal is released.
LEFT, RIGHT 1, 2, 3: Turns this pedal function on or off for each
keyboard part.
PORTAMENTO The portamento effect (a smooth slide between notes) can be pro-
duced while the pedal is pressed. Portamento is produced when
notes are played legato style (i.e., a note is played while the preced-
ing note is still held). The portamento time can also be adjusted
form the Mixing Console display (page 92). You can turn this pedal
function on or off for each keyboard part on this display.
PITCHBEND* Allows you to bend the pitch of notes up or down by using the
pedal. The following parameters can be set for this function on this
display.
UP/DOWN: Determines whether the pitch change goes up (is
raised) or down (is lowered).
RANGE: Determines the range of the pitch change, in semitones.
LEFT, RIGHT 1, 2, 3: Turns this pedal function on or off for each
keyboard part.
This function will not affect the Organ Flutes and Super Articulation Voices, even if they
have been assigned to the Foot Pedals.
NOTE
This function will not affect the Organ Flutes and Super Articulation Voices, even if they
have been assigned to the Foot Pedals.
NOTE

10
10
Connections – Using Tyros3 with Other Devices –
Tyros3 Reference Manual • 111
MODULATION* Applies a vibrato effect to notes played on the keyboard. You can
turn this pedal function on or off for each keyboard part on this dis-
play.
DSP VARIATION Same as the [DSP VARIATION] button on the panel.
HARMONY/ECHO Same as the [HARMONY/ECHO] button.
VOCAL HARMONY Same as the [VOCAL HARMONY] button.
TALK Same as the [TALK] button.
SCORE PAGE +/- While the Song is stopped, you can turn to the next/previous score
page (one page at a time).
LYRICS PAGE +/- While the Song is stopped, you can turn to the next/previous lyrics
page (one page at a time).
TEXT PAGE +/- You can turn to the next/previous text page (one page at a time).
HDR PLAY/PAUSE Same as the HARD DISK RECORDER [PLAY/PAUSE] button.
SONG PLAY/PAUSE Same as the SONG [PLAY/PAUSE] button.
STYLE START/STOP Same as the STYLE CONTROL [START/STOP] button.
TAP TEMPO Same as the [TAP TEMPO] button.
SYNCHRO START Same as the [SYNC START] button.
SYNCHRO STOP Same as the [SYNC STOP] button.
INTRO 1–3 Same as the INTRO [I]–[III] buttons.
MAIN A–D Same as the MAIN VARIATION [A]–[D] buttons.
FILL DOWN Plays a fill-in, which is automatically followed by the Main section of
the button on the immediate left.
FILL SELF Plays a fill-in.
FILL BREAK Plays a break.
FILL UP Plays a fill-in, which is automatically followed by the Main section of
the button on the immediate right.
ENDING1–3 Same as the ENDING/rit. [I]–[III] buttons.
FADE IN/OUT Same as the [FADE IN/OUT] button.
FINGERD/FING ON BASS The pedal alternately switches between the Fingered and On Bass
modes (page 31).
BASS HOLD While the pedal is pressed, the Accompaniment Style bass note will
be held even if the chord is changed during Style playback. If the fin-
gering is set to “FULL KEYBOARD,” the function does not work.
PERCUSSION The pedal plays a percussion instrument selected by the [4 ▲▼]–[8
▲▼] buttons. You can use the keyboard to select the desired percus-
sion instrument.
RIGHT 1 ON/OFF Same as the PART ON/OFF [RIGHT 1] button.
RIGHT 2 ON/OFF Same as the PART ON/OFF [RIGHT 2] button.
RIGHT 3 ON/OFF Same as the PART ON/OFF [RIGHT 3] button.
LEFT ON/OFF Same as the PART ON/OFF [LEFT] button.
OTS +/- Calls up the next/previous One Touch Setting.
When you select the percussion instrument by pressing a key on the keyboard, the velocity
with which you press the key determines the percussion volume.
NOTE

10
10
Connections – Using Tyros3 with Other Devices –
112 • Tyros3 Reference Manual
In this section, you can make MIDI-related settings for the Tyros3. The Tyros3 gives you a set of ten pre-pro-
grammed templates that let you instantly and easily reconfigure the instrument to match your particular MIDI
application or external device. Also, you can edit the pre-programmed templates and save up to ten of your original
templates to the USER display.
1 Call up the operation display.
[FUNCTION] → [H] MIDI
2 Select a pre-programmed template from the PRESET Page (page 113).
If you have already created your original template and saved it to the USER
Page, you can also select the template from the USER Page.
3 Press the [8 ▼] (EDIT) button to call up the MIDI display to edit the
selected template.
4 Use the TAB [
QQ
QQ
][
WW
WW
] buttons to call up the relevant setting display.
• SYSTEM................ MIDI System Settings (page 114)
• TRANSMIT ........... MIDI Transmission Settings (page 115)
• RECEIVE ............... MIDI Reception Settings (page 116)
• BASS..................... Settings for the bass note of chord for Style playback via
MIDI reception data (page 117)
• CHORD DETECT .. Settings for the chord type for Style playback via MIDI
reception data (page 117)
• MFC10.................. Settings for a connected MFC10 MIDI Foot Controller
(page 118)
5 When you’ve finished editing, press the [EXIT] button to return to the
MIDI template Selection display.
6 Press the [6 ▼] (SAVE) button to save the edited template to the
USER Page.
MIDI Settings
36
2

10
10
Connections – Using Tyros3 with Other Devices –
Tyros3 Reference Manual • 113
● Pre-programmed MIDI Templates
ALL PARTS Transmits all parts including the keyboard parts (RIGHT 1, 2, 3,
LEFT), with the exception of Song parts.
KBD & STYLE Basically the same as “ALL PARTS” with the exception of how key-
board parts are managed. The right-hand parts are handled as a
“UPPER” instead of RIGHT 1–3 and the left-hand part is handled as a
“LOWER.”
Master KBD1 In this setting, the Tyros3 functions as a “master” keyboard, playing
and controlling one or more connected tone generators or other
devices (such as a computer/sequencer).
Master KBD2 Basically the same as “Master KBD1” above, with the exception that
Aftertouch messages are not transmitted.
Clock Ext. A Playback or recording (Song, Style, Multi Pad, etc.) synchronizes
with an external MIDI clock instead of the Tyros3’s internal clock.
This template should be used when you wish to set the tempo on
the MIDI device connected to the Tyros3. Playback or recording of
the Tyros3 synchronizes with an external clock received via MIDI A.
MIDI Accord 1 MIDI accordions allow you to transmit MIDI data and play con-
nected tone generators from the keyboard and bass/chord buttons
of the accordion. This template lets you play melodies from the key-
board and control Style playback on the Tyros3 with the left-hand
buttons.
MIDI Accord 2 Basically the same as “MIDI Accord1” above, with the exception
that the chord/bass notes you play with your left hand on the MIDI
Accordion are recognized also as MIDI note events.
MIDI Pedal 1 MIDI pedal units allow you play connected tone generators with
your feet (especially convenient for playing single note bass parts).
This template lets you play/control the chord root in Style playback
with a MIDI pedal unit (connected to MIDI B only).
MIDI Pedal 2 This template lets you play the bass part for Style playback by using
a MIDI pedal unit (connected to MIDI B only).
MIDI OFF No MIDI signals are sent or received.

10
10
Connections – Using Tyros3 with Other Devices –
114 • Tyros3 Reference Manual
MIDI SYSTEM Settings
The explanations here apply to the SYSTEM Page in step 4 on page 112.
Use the [A]/[B] buttons to select the parameters (below), then set the ON/OFF status by using the [1 ▲▼]–[8 ▲▼]
buttons.
■ 1 Local Control
Turns the Local Control for each part on or off. When Local Control is set to
“ON,” the keyboard of the Tyros3 controls its own (local) internal tone gener-
ator, allowing the internal Voices to be played directly from the keyboard. If
you set Local to “OFF,” the keyboard and controllers are internally discon-
nected from the Tyros3’s tone generator section so that no sound is output
when you play the keyboard or use the controllers. For example, this allows
you to use an external MIDI sequencer to play the Tyros3’s internal Voices, and
use the Tyros3 keyboard to record notes to the external sequencer and/or play
an external tone generator.
■ 2 Clock setting, etc.
● CLOCK
Determines whether the Tyros3 is controlled by its own internal clock or a
MIDI clock signal received from an external device. INTERNAL is the normal
Clock setting when the Tyros3 is being used alone or as a master keyboard to
control external devices. If you are using the Tyros3 with an external
sequencer, MIDI computer, or other MIDI device, and you want to synchronize
it to that device, set this parameter to the appropriate setting: MIDI A, MIDI B,
USB 1, or USB 2. In this case, make sure that the external device is connected
properly (e.g., to the Tyros3’s MIDI IN terminal), and that it is properly trans-
mitting a MIDI clock signal.
● TRANSMIT CLOCK
Turns MIDI clock (F8) transmission on or off. When set to OFF, no MIDI clock
or Start/Stop data is transmitted even if a Song or Style is played back.
● RECEIVE TRANSPOSE
Determines whether or not the Tyros3’s transpose setting is applied to the
note events received by the Tyros3 via MIDI.
● START/STOP
Determines whether incoming FA (start) and FC (stop) messages affect Song
or Style playback.
■ 3 MESSAGE SW (Message Switch)
● SYS/EX.
The “Tx” setting turns MIDI transmission of MIDI System Exclusive messages
on or off. The “Rx” setting turns MIDI reception and recognition of MIDI Sys-
tem Exclusive messages generated by external equipment on or off.
● CHORD SYS/EX.
The “Tx” setting turns MIDI transmission of MIDI chord exclusive data (chord
detect. root and type) on or off. The “Rx” setting turns MIDI reception and
recognition of MIDI chord exclusive data generated by external equipment on
or off.
If the Clock is set other than INTERNAL,
the Style, Song or Multi Pad cannot be
played from the panel buttons.
NOTE

10
10
Connections – Using Tyros3 with Other Devices –
Tyros3 Reference Manual • 115
MIDI Transmit Settings
The explanations here apply to the TRANSMIT Page in step 4 on page 112. This determines which parts will be sent
as MIDI data and over which MIDI channel the data will be sent.
1 Use the [A]/[B] buttons or [1 ▲▼]/[2 ▲▼] buttons to select the part for
changing transmit settings.
With the exception of the two parts below, the configuration of the parts is the
same as those already explained elsewhere in the Owner’s Manual.
● UPPER
A keyboard part played on the right side of the keyboard from the Split Point
for the Voices (RIGHT 1, 2, and 3).
● LOWER
A keyboard part played on the left side of the keyboard from the Split Point for
the Voices. This is not affected by the on/off status of the [ACMP] button.
2 Use the [3 ▲▼] buttons to select a channel via which the selected
part will be transmitted.
3 Use the [4 ▲▼]–[8 ▲▼] button to determine the types of data to be
sent.
The following MIDI messages can be set on the TRANSMIT/RECEIVE display.
● NOTE (Note events)
● CC (Control Change)
● PC (Program Change)
● PB (Pitch Bend)
● AT (Aftertouch)
1
1 2 3
The dots corresponding to each
channel (1–16) flash briefly when-
ever any data is transmitted on the
channel(s).
If the same transmit channel is assigned
to several different parts, the transmitted
MIDI messages are merged to a single
channel—resulting in unexpected
sounds and possible glitches in the
connected MIDI device.
Protected Songs cannot be transmitted
even if the proper Song channels 1–16
are set to be transmitted.
NOTE
NOTE

10
10
Connections – Using Tyros3 with Other Devices –
116 • Tyros3 Reference Manual
MIDI Receive Settings
The explanations here apply to the RECEIVE Page in step 4 on page 112. This determines which parts will receive
MIDI data and over which MIDI channels the data will be received.
1 Use the [A]/[B] buttons or [1 ▲▼]/[2 ▲▼] buttons to select the chan-
nel to be received
The Tyros3 can receive MIDI messages over 32 channels (16 channels x 2
ports).
2 Use the [3 ▲▼] buttons to select the part via which the selected chan-
nel will be received.
With the exception of the two parts below, the configuration of the parts is the
same as those already explained elsewhere in the Owner’s Manual.
● KEYBOARD
The received note messages control the Tyros3’s keyboard performance.
● EXTRA PART 1–4
There are four parts specially reserved for receiving and playing MIDI data.
Normally, these parts are not used by the instrument itself. The Tyros3 can be
used as a 32-channel multi-timbral tone generator by using these four parts in
addition to the parts (except for the microphone sound).
3 Use the [4 ▲▼]–[8 ▲▼] button to determine the types of data to be
received.
1
1 2 3
The dots corresponding to each
channel (1–16) flash briefly when-
ever any data is received on the
channel(s).
MIDI transmission/reception via the USB terminal and MIDI terminals
The relationship between the [MIDI] terminals and the [USB] terminal which can be used for transmitting/
receiving 32 channels (16 channels x 2 ports) of the MIDI messages is as follows:
● MIDI reception ● MIDI transmission
MIDI A IN
terminal
USB
connector
MIDI B IN
terminal
MIDI A OUT
terminal
USB
connector
MIDI B OUT
terminal
Port handling
USB2USB1
Merge Merge
MIDI A 01–16 MIDI B 01–16 MIDI A 01–16 MIDI B 01–16

10
10
Connections – Using Tyros3 with Other Devices –
Tyros3 Reference Manual • 117
Setting the Bass Note for Style Playback via MIDI Receive
The explanations here apply to the BASS Page in step 4 on page 112. These settings let you determine the bass
note for Style playback, based on the note messages received via MIDI. The note on/off messages received at the
channel(s) set to “ON” are recognized as the bass note of the chord of Style playback. The bass note will be
detected regardless of the [ACMP] or split point settings. When several channels are simultaneously set to “ON,”
the bass note is detected from merged MIDI data received over the channels.
1 Use the [A]/[B] buttons to select the channel.
2 Use the [1 ▲▼]–[8 ▲▼] button to set the desired channel to ON or
OFF.
You can also set all channels to OFF by pressing the [I] (ALL OFF) button.
Setting the Chord Type for Style Playback via MIDI Receive
The explanations here apply to the CHORD DETECT Page in step 4 on page 112. These settings let you determine
the chord type for Style playback, based on the note messages received via MIDI. The note on/off messages
received at the channel(s) set to “ON” are recognized as the notes for detecting chords in Style playback. The
chords to be detected depend on the fingering type. The chord types will be detected regardless of the [ACMP] or
split point settings. When several channels are simultaneously set to “ON,” the chord type is detected from merged
MIDI data received over the channels.
The operation procedure is basically the same as that of the BASS display above.
1
2

10
10
Connections – Using Tyros3 with Other Devices –
118 • Tyros3 Reference Manual
MFC10 Settings
The explanations here apply to the MFC10 Page in step 4 on page 112.
By connecting an optional MFC10 MIDI Foot Controller to the Tyros3, you can conveniently control a wide range
of operations and functions by using your feet—perfect for changing settings and controlling the sound while you
perform live. Different functions can be assigned to each of the footswitches and up to five foot controllers
(optional) can be connected to the MFC10, for additional sound-shaping possibilities.
1 Connect the MIDI IN terminal of the MFC10 to one of the MIDI OUT ter-
minals of the Tyros3 by using a MIDI cable.
2 Set the MFC10 to the normal mode and turn the [FUNCTION] lamp of
the MFC10 on.
3 Perform steps 1–4 on page 112 to call up the MFC10 Page.
4 Set the parameters on this display as desired.
On this display, two settings (below) can be made:
• Each footswitch (F00–F29) on the MFC10 sends a note number to the
Tyros3, and the Tyros3 determines how it responds to (which function is
executed by) that note number.
• Each foot controller on the MFC10 sends control change messages over a
specific control change number to the Tyros3, and the Tyros3 determines
how it responds to (which parameter is changed by) that control change
number.
4-1 Use the [A]/[E] buttons to select “FOOTSWITCH” or “FOOT CONTROL-
LER.”
4-2 Use the [2 ▲▼]/[3 ▲▼] buttons to select a footswitch number (F00–
F29) or a foot controller number (1–5) to which the function is
assigned.
Please note that a note number is assigned to each footswitch and a
control change number is assigned to each foot controller beforehand
and you cannot change the settings.
MIDI OUTMIDI IN
MFC10
If desired, connect
additional foot control-
lers to the MFC10.
4-1
4-2 4-3 4-4
4-5
4-6
5
NEXT PAGE

10
10
Connections – Using Tyros3 with Other Devices –
Tyros3 Reference Manual • 119
4-3 Use the [4 ▲▼]–[6 ▲▼] buttons to specify the function assigned to the
footswitch (actually the note number), or the function assigned to the
foot controller (actually the control change number). About the func-
tions which can be assigned to the footswitch or foot controller, refer to
page 110.
4-4 (Only for the FOOT CONTROLLER Setting) Determine the part to which
the function assigned to the foot controller is applied by using the [7
▲▼]/[8 ▲▼] buttons.
4-5 Use the [F]/[G] buttons to determine the MIDI port which is to be used
when communicating with the MFC10.
Here, the USB port (USB1, USB2) can be selected even though the
MFC10 does not have the USB connector. This is because the computer
can be used instead of the MFC10. (The computer can transmit the
data equivalent to the data the MFC10 transmits to the Tyros3. For
details, see the bottom of the page.)
4-6 Use the [H] (CH SELECT) button to determine the MIDI channel which
is to be used when communicating with the MFC10.
5 Press the [I] (SEND MFC10 SETUP) button to send the settings here
to the MFC10.
6 Disconnect the MIDI cable from the Tyros3 and the MFC10, and con-
nect the MIDI OUT terminal of the MFC10 to the MIDI IN terminal of the
Tyros3 according to the setting above by using a MIDI cable.
7 Operate the MFC10 to confirm whether you can properly control the
Tyros3 from the MFC10 as set in step 4.
8 Press the [EXIT] button to return to the MIDI template Selection dis-
play and save the settings above to the USER tab.
Actually the pair of the footswitch num-
ber and the note number, the pair of the
foot controller number and the control
change number, and the MIDI channel
for communication set above are trans-
mitted to the MFC10.
NOTE
MIDI INMIDI OUT
MFC10
Transmitting note messages
Transmitting control change
messages
Using a computer or another MIDI instrument instead of the MFC10
The following two settings on the MFC10 Page can be saved not to the
MFC10 but to the Tyros3 as a MIDI template.
• Note number/Tyros3 function assignment pairs
• Control change number/Tyros3 parameter change assignment pairs
If you are not using an MFC10, you can have note numbers and control
change messages from any other appropriate MIDI device (such as a com-
puter, sequencer or master keyboard) control the Tyros3. Make sure to set
the appropriate channel in this display for control by the external device.

11
11
Utility – Making Global Settings –
120 • Tyros3 Reference Manual
Utility
– Making Global Settings –
Contents
CONFIG1 . . . . . . . . . . . . . . . . . . . . . . . . . . . . . . . . . . . . . . . . 120
CONFIG2 . . . . . . . . . . . . . . . . . . . . . . . . . . . . . . . . . . . . . . . . 122
MEDIA . . . . . . . . . . . . . . . . . . . . . . . . . . . . . . . . . . . . . . . . . . 123
OWNER . . . . . . . . . . . . . . . . . . . . . . . . . . . . . . . . . . . . . . . . . 124
SYSTEM RESET . . . . . . . . . . . . . . . . . . . . . . . . . . . . . . . . . . . . 125
• Factory Reset—Restoring the Factory Programmed Settings . . . .125
• Custom Reset—Saving and Recalling Your Original Settings as a Sin-
gle File . . . . . . . . . . . . . . . . . . . . . . . . . . . . . . . . . . . . . . . . . . . .126
● 1 Fade In/Out
These parameters determine the behavior when the Style or Song playback is
faded in/out by the [FADE IN/OUT] button.
● 2 Metronome
CONFIG1
Select the desired parameter:
1 Fade In/Out
2 Metronome
3 Parameter Lock
4 Ta p
[3 ▲▼]FADE IN TIME Determines the time it takes for the volume to fade in, or go from minimum
to maximum (range of 0–20.0 seconds).
[4 ▲▼]FADE OUT TIME Determines the time it takes for the volume to fade out, or go from maximum
to minimum (range of 0–20.0 seconds).
[5 ▲▼]FADE OUT HOLD
TIME
Determines the time the volume is held at 0 following the fade out (range of
0–5.0 seconds).
[2 ▲▼] VOLUME Determines the level of the metronome sound.
[3 ▲▼]–
[5 ▲▼]
SOUND Determines whether a bell accent will be sounded or not at the first beat of
each measure.
[6 ▲▼]/
[7 ▲▼]
TIME SIGNATURE Determines the time signature of the metronome sound.

11
11
Utility – Making Global Settings –
Tyros3 Reference Manual • 121
● 3 Parameter Lock
This function is used to “lock” specific parameters (effect, split point, etc.) to
make them selectable only via the panel control—in other words, instead of
being changed via Registration Memory, One Touch Setting, Music Finder, or
Song and sequence data.
Use the [1 ▲▼]–[7 ▲▼] buttons to select the desired parameter, then lock it
with the [8 ▲] (MARK ON) button.
● 4 Tap
This allows you to set the drum sound and the velocity which will sound when
the Tap function is used.
[2 ▲▼]–
[4 ▲▼]
PERCUSSION Selects the instrument.
[5 ▲▼]/
[6 ▲▼]
VELOCITY Sets the velocity.

11
11
Utility – Making Global Settings –
122 • Tyros3 Reference Manual
● 1 Speaker/AUX Out-Loop Send
● 2 Voice Category Button Options/Display-related settings
CONFIG2
Select the desired parameter:
1 Speaker/AUX Out- Loop
Send.
2 Voice Category Button
Options/Display-related
Settings
[3 ▲▼]/
[4 ▲▼]
SPEAKER Determines whether or not the optionally installed speaker will sound.
HEADPHONE SW: Speaker sounds normally, but is cut off when headphones
are inserted to the PHONES jack.
ON: Speaker sound is always on.
OFF: Speaker sound is off.
[5 ▲▼]/
[6 ▲▼]
AUX OUT/LOOP
SEND
Selects the desired output type corresponding to the AUX OUT/LOOP SEND
jack.
[1 ▲▼]/
[2 ▲▼]
Voice Category
Button Options
Determines how the Voice Selection display is opened when one of the VOICE
buttons is pressed.
OPEN & SELECT: Opens the Voice Selection display with the top (first) Voice
of the Voice category automatically selected (when one of the VOICE but-
tons is pressed).
OPEN ONLY: Opens the Voice Selection display with the currently selected
Voice (when one of the VOICE buttons is pressed).
[3 ▲▼]/
[4 ▲▼]
Display Voice
Number
Determines whether or not the Voice bank and number are shown in the
Voice Selection display. This is useful when you want to check which bank
select MSB/LSB values and program change number you need to specify
when selecting the Voice from an external MIDI device.
[5 ▲▼]/
[6 ▲▼]
Display Style
Tempo
Selects whether the default tempo of each Style is displayed above the Style
name or not in the Style Selection display.
[7 ▲▼]/
[8 ▲▼]
Popup Display
Time
Determines the time in which the pop-up windows close. (Pop-up windows
are displayed when you press buttons such as TEMPO, TRANSPOSE or UPPER
OCTAVE, etc.)
For the GS Voices, the Display Voice Number is not available (the program change numbers
are not shown).
NOTE

11
11
Utility – Making Global Settings –
Tyros3 Reference Manual • 123
You can set or execute important media-related operations for the Tyros3. The word
“media” refers to both the USB storage device and installed hard disk drive.
MEDIA
The Tyros3 is capable of formatting an
installed hard disk having a cluster size
of less than 32 Kbyte, creating a single
partition only; multiple partitions cannot
be created. However, if the installed
hard disk has been pre-formatted into
several partitions on another instru-
ment, the Tyros3 can access up to four
partitions of the hard disk.
NOTE
[A]/[B] DEVICE LIST Selects the desired media which you want to check the remaining memory
(see “PROPERTY” below) or format the media (see the Owner’s Manual).
[1 ▲▼]/
[2 ▲▼]
HARD DISK SLEEP
TIME
The hard disk unit will go into a “sleep” mode after a specified time of inactiv-
ity, both to maximize the lifetime of the hard disk and to minimize unneces-
sary mechanical noise. This parameter determines the sleep time.
[3 ▲▼]/
[4 ▲▼]
SONG AUTO
OPEN
Turns the Song Auto Open function on or off. When this is set to “ON” and
the media selected in the Device List above is inserted, the Tyros3 automati-
cally calls up the first Song in the media.
[F] PROPERTY Opens the Property display of the media selected by [A]/[B] buttons. You can
check the amount of remaining memory on the media.
[H] FORMAT Formats the media selected by [A]/[B] buttons. Refer to the Owner’s Manual.
When using the Hard Disk Recorder, HARD DISK SLEEP TIME will be set to “NEVER” automat-
ically.
NOTE
When you select a Song on a CD-ROM drive to be auto-opened, the Song may not be called
up automatically if the CD-ROM drive takes a lot of time to be recognized.
NOTE
The displayed remaining memory value is an approximate value.
NOTE

11
11
Utility – Making Global Settings –
124 • Tyros3 Reference Manual
● 1 Owner Name/Language/Main Picture
● 2 License Key
When you want to purchase data including Voices or Song, network server
authentication may be needed. This means you should register your instru-
ment to the server to use the special data on your instrument. For details on
the procedure, go to the following website.
http://music-tyros.com/
OWNER
Select the desired parameter:
1 Owner Name/Language/
Main Picture
2 License Key
[D] BACKUP Lets you backup all data on the instrument to a USB storage device. Refer to
the Owner’s Manual.
[E] RESTORE Loads the backup file from the USB storage device.
[I] OWNER NAME Lets you enter your name as the owner. The Owner name is indicated on the
opening display when you turn the power on. Refer to the Owner’s Manual.
[J] MAIN PICTURE Lets you select background picture for the Main display. You can select a pic-
ture from among various pictures provided on the Preset Page. After select-
ing, press the [EXIT] button to close the Selection display.
You can also use your original picture in the USB storage device. Make sure
the image file is bitmap file (.BMP) and no greater than 640 x 480 pixels. First
copy the desired file from USB to USER Page, then select it on the USER Page.
[4 ▲▼]/
[5 ▲▼]
LANGUAGE Determines the language used for the display messages. Once you change
this setting, all messages will be shown in the selected language.
[7 ▲▼]/
[8 ▲▼]
VERSION Displays the version number of this instrument.
The explanation about picture compatibility above applies also to the background of the Song
Lyric display (page 51).
NOTE
[E] CLEAR Deletes the license key registered in the instrument.
[I] EXPORT Exports the instrument’s ID to the USB flash memory.
[J] IMPORT Imports the license key which has been issued from the server from USB flash
memory to the instrument.
If you delete the license key, the data you bought previously will become unus-
able.
CAUTION

11
11
Utility – Making Global Settings –
Tyros3 Reference Manual • 125
There are two reset methods in the SYSTEM RESET display: Factory Reset and Custom Reset.
Factory Reset—Restoring the Factory Programmed Settings
This function lets you restore the status of the Tyros3 to the original factory settings.
1 Select the desired item to be restored by using [1 ▲▼]–[3 ▲▼] but-
tons and add a checkmark to it by pressing the [4 ▲] (MARK ON) but-
ton.
To remove the checkmark, press the [4 ▼] (MARK OFF) button.
2 Press the [D] (FACTORY RESET) button to execute the Factory Reset
operation for all checkmarked items.
SYSTEM RESET
Factory Reset
(see below)
Custom Reset
(see page 126)
SYSTEM SETUP Restores the System Setup parameters to the original factory set-
tings. Refer to the Data List for details about which parameters
belong to the System Setup.
MIDI SETUP Restores the MIDI settings including the MIDI templates on the USER
tab display to the original factory status.
USER EFFECT Restores the User Effect settings including the user effect types, user
master EQ types, user compressor types, and user vocal harmony
types created via the Mixing Console display to the original factory
settings.
MUSIC FINDER Restores the Music Finder data (all records) to the original factory
settings.
FILES & FOLDERS Deletes all files and folders stored in the USER tab display.
REGIST Temporarily deletes the current Registration Memory settings of the
selected Bank. The same can be done also by turning the [POWER]
button ON while holding the B5 key (right-most B key on the key-
board).
EXPANSION VOICE Deletes all Expansion Voices.

11
11
Utility – Making Global Settings –
126 • Tyros3 Reference Manual
Custom Reset—Saving and Recalling Your Original Settings as a Single
File
For the items below, you can save your Original Settings as a Single File for future recall.
1 Make all desired settings on the instrument.
2 Call up the operation display.
[FUNCTION] → [I] UTILITY → TAB [
QQ
QQ
][
WW
WW
] SYSTEM RESET
3 Press one of the [F]–[I] buttons to call up the relevant display for sav-
ing your data.
4 Use the TAB [
QQ
QQ
][
WW
WW
] buttons to select one of the tabs (other than the
PRESET) to which your settings will be saved.
5 Press the [6 ▼] (SAVE) button to save your file.
6 To recall your file, press the desired [F]–[I] buttons in the SYSTEM
RESET display, then select the desired file.
[F] SYSTEM SETUP
FILES
Parameters set on the various displays such as the [FUNCTION] → [I] UTILITY
and microphone setting display are handled as a single System Setup file.
Refer to the Data List for details on which parameters belong to the System
Setup.
[G] MIDI SETUP FILES The MIDI settings including the MIDI templates on the USER tab display are
handled as a single file.
[H] USER EFFECT
FILES
The User Effect settings including the user effect types, user master EQ types,
user compressor types, and user vocal harmony types created via the Mixing
Console displays are managed as a single file.
[I] MUSIC FINDER
FILES
All the preset and created records of the Music Finder are handled as a single
file.

Index
Tyros3 Reference Manual • 127
Index
Numerics
1-16 ..........................................56
3BAND EQ ..............................103
A
ACCENT TYPE ...........................43
ADD WAVE .........................18, 23
ADD WAVE display ....................19
Additional Voice ........................27
AFTER TOUCH ............................6
AFTERTOUCH ...........................13
AI FINGERED .............................31
AI FULL KEYBOARD ...................31
ALIAS ........................................27
ALL DATA ..................................26
ALL SOUND OFF .......................23
ALL-PURPOSE ............................47
AMPLITUDE ........................12–13
Any Key ....................................54
APPEND ....................................75
ARABIC1 .....................................9
ARABIC2 .....................................9
ARPEGGIO ................................47
ASSEMBLY ...........................36, 40
ASSIGN (Harmony/Echo) ............8
ASSIGN BANK ...........................21
ATTACK .....................................13
AUTO CH SET ...........................52
AUX OUT/LOOP SEND ............122
B
BAR CLEAR ................................44
BAR COPY .................................44
BASIC .................................36–37
BASS ...............................112, 117
BEAT CONVERTER .....................42
Bookmark .................................99
BOOST/CUT .............................43
BRIGHTNESS .......................13, 92
Browser ..................................101
BYPASS .....................................47
C
CENTER KEY ..............................19
CHANNEL (Song Creator) .. 56, 63
CHANNEL (Style Creator)
...................................36, 43–44
CHANNEL TRANSPOSE ............ 65
CHORD (Song Creator) ...... 56, 59
CHORD (Style Creator) .......46–47
CHORD DETECT ............. 112, 117
Chord Events ........................... 67
CHORD FINGERING ................. 30
CHORD NOTE ONLY .................. 8
CHORD SYS/EX. ..................... 114
Chord Tutor ............................. 30
CHORUS .................................. 94
CHORUS DEPTH ....................... 14
CHORUS DEPTH (Talk) ........... 105
CLOCK ................................... 114
COMMON ............................... 12
COMPARE ................................ 11
COMPRESSOR ........................ 103
CONFIG1 ............................... 120
CONFIG2 ............................... 122
CONTROLLER .............. 6, 10, 109
CONTROLLER (Voice Set) ......... 12
Cool! .......................................... 4
Custom Drum Voice ................. 22
Custom Reset ......................... 126
Custom Voice ........................... 17
CUSTOM VOICE EDIT via PC .... 29
Custom! ..................................... 5
CustomWA! ................................ 5
D
DECAY ..................................... 13
DELETE (Song Creator) ............. 64
DELETE (Style Creator) ............. 38
DELETE WAVE ........................... 20
DIGITAL RECORDING ... 36, 56, 70
DORIAN ................................... 47
DORIAN 5th ............................. 47
DRUM MAPPING display .......... 23
Drums ........................................ 4
DSP .................................... 14, 94
DSP MIC ................................ 105
DYNAMICS .............................. 43
E
Echo Types ................................. 7
EDIT ......................................... 36
EFFECT ..................................... 93
EFFECT/EQ ............................... 14
EG ............................................ 13
Encode ................................... 101
END KEY .................................. 20
Envelope Generator .................. 13
EQ ...................................... 14, 96
EQUAL ....................................... 9
Equalizer .................................. 96
Event List display ................ 40, 66
EXPAND/COMP. ....................... 43
F
Factory Reset .......................... 125
Fade In/Out ............................ 120
Favorite .................................... 73
FILE IMPORT ............................ 18
FILTER .......................... 12–13, 92
FILTER (Event List display) ......... 68
FINE ......................................... 42
Fine-tuning ................................ 9
FINGERED ................................ 31
FINGERED ON BASS ................. 31
FIXED DO ................................. 50
FIXED PITCH ............................ 19
Follow Lights ............................ 54
Foot Controller ....................... 109
FOOT PEDAL .......................... 109
FOOTAGE ................................. 16
Footswitch ............................. 109
Freeze ...................................... 77
Frequency ................................ 96
FULL KEYBOARD ....................... 31
G
Gain ......................................... 96
GLIDE ..................................... 110
GM ............................................ 5
GROOVE ............................ 36, 42
Guide ....................................... 53
GUITAR .................................... 46

Index
128 • Tyros3 Reference Manual
H
Hard Disk Recorder ...................80
HARMONIC CONTENT .......13, 92
HARMONIC MINOR ..................47
HARMONIC MINOR 5th ...........47
HARMONY ................................14
Harmony Types ...........................7
HARMONY/ECHO .......................7
Harmony/Echo type ....................7
HIGH KEY ..................................48
Home page .............................101
I
IMPORT ....................................18
INDIVIDUAL LOAD ....................27
INITIAL TOUCH ...........................6
Internet Direct Connection .......99
J
Jump Markers ...........................69
K
Karao-Key .................................54
KBD.VEL (Keyboard Velocity) .....57
KEY MAPPING display ...............20
KEY SIGNATURE ........................50
KEYBOARD (Transpose) .............10
KEYBOARD/PANEL ................6, 10
KIRNBERGER ...............................9
L
Language ................................124
Legacy ........................................5
LENG (Length) ..........................16
LFO .....................................12–13
LIBRARY EDIT ............................24
LIBRARY LOAD ..........................28
LIBRARY SAVE ............................26
License Key .............................124
Line Out ...................................98
Live! ............................................4
Live!Drums .................................5
Live!SFX ......................................5
Local Control ..........................114
LOOP ....................................... 69
Loop End Marker ..................... 69
Loop Recording ........................ 37
LYRICS ..................................... 56
Lyrics ........................................ 51
Lyrics Event .............................. 68
LYRICS LANGUAGE .................. 53
M
Main Picture ........................... 124
MASTER (Transpose) ................ 10
Master EQ ................................ 96
MASTER TUNE ........................... 9
MEAN-TONE .............................. 9
MEDIA ................................... 123
MELODIC MINOR .................... 47
MELODIC MINOR 5th .............. 47
MELODY .................................. 47
MEMORY (OTS) ....................... 35
MESSAGE SW (Message Switch)
............................................ 114
Metronome ............................ 120
MFC10 ........................... 112, 118
MIC MUTE ............................. 103
MIC SETTING ................. 102, 105
MIC VOLUME ........................ 103
Microphone ........................... 102
MIDI Settings ......................... 112
MIDI SETUP FILES ................... 126
MIDI Templates ...................... 113
MIX .......................................... 65
Mixing Console ........................ 90
MODE (Organ Flutes) .............. 16
MODE (Vocal Harmony mode) 104
MODULATION (Pedal) ........... 111
MODULATION (Voice Set) ........ 12
MONO/POLY ........................... 12
MOVABLE DO .......................... 50
Multi Assign Type ....................... 7
MULTI FINGER ......................... 31
Multi Pad ................................. 70
Multi Pad Creator ..................... 70
MULTI PAD EDIT ...................... 72
Music Finder ............................ 73
MUSIC FINDER + ...................... 76
MUSIC FINDER FILES .............. 126
Music Notation ........................ 49
N
NATURAL MINOR ..................... 47
NATURAL MINOR 5th ............... 47
NEW BANK ............................... 70
NEW STYLE .............................. 37
NOISE GATE ........................... 103
NORMAL REC ........................... 83
NORMALIZE ............................. 82
Notation .................................. 49
Note Events .............................. 67
NOTE LIMIT ............................. 48
NOTE NAME ............................ 50
Note Transposition ................... 46
NTR .......................................... 46
NTT .......................................... 46
NUDGE .................................... 85
O
OCTAVE ................................... 92
ON BASS .................................. 31
One Touch Setting ................... 35
Organ Flutes ............................ 16
Organ Flutes! ............................. 4
ORIGINAL BEAT ........................ 42
OTS LINK TIMING .................... 32
OVERALL SETTING ................. 102
Overdub Recording .................. 37
OWNER .................................. 124
Owner Name ......................... 124
P
P.A.T. ........................................ 55
PAN (Talk) .............................. 105
PAN (Voice Creator) .................. 23
PANEL SUSTAIN ........................ 14
PANPOT ................................... 90
PARAMETER (Style Creator) 36, 45
Parameter Lock ...................... 121
PART OCTAVE ........................... 12
PART ON/OFF (Style Setting) .... 33

Index
Tyros3 Reference Manual • 129
PEDAL POLARITY .....................109
PEDAL PUNCH IN/OUT .............62
Performance Assistant ...............55
PHRASE MARK REPEAT ..............52
PITCH BEND RANGE .................92
PITCH SHIFT .............................48
PITCH SHIFT TO ROOT .............48
PITCHBEND ............................110
PLAY ROOT ...............................46
Playlist ......................................87
PORTAMENTO ........................110
PORTAMENTO TIME .................92
PORTAMENTO TIME (Voice Set) 12
Premium Voices ........................27
Property ....................................25
Punch In/Out (Hard Disk Recorder)
...............................................84
Punch In/Out (Song) ................61
PURE MAJOR ...............................9
PURE MINOR ..............................9
PYTHAGOREAN ...........................9
Q
QUANTIZE ....................44, 50, 64
QUICK START ............................53
R
Realtime Recording (Multi Pad) .70
Realtime Recording (Style) ........37
REC END ...................................62
REC MODE (Hard Disk Recorder)
...............................................82
REC MODE (Song Creator) .56, 61
REC START ................................61
RECEIVE ..........................112, 116
RECEIVE NOTE OFF ...................23
RECEIVE TRANSPOSE ..............114
RECORD display ........................37
REGIST SEQUENCE/
FREEZE/VOICE SET .....15, 77–78
Registration Memory ................77
Registration Sequence ...............78
REHEARSAL ...............................85
RELEASE ....................................13
RELOAD ....................................24
REMOVE EVENT ....................... 44
REMOVE WAVE ........................ 23
REPEAT FOLDER ....................... 52
REPEAT MODE ......................... 52
REPLACE .................................. 75
RESP (Response) ....................... 16
RETRIGGER ............................... 48
RETRIGGER TO ROOT .............. 48
REVERB ............................... 23, 94
REVERB DEPTH ......................... 14
REVERB DEPTH (Talk) .............. 105
RHY CLEAR ............................... 38
ROOT FIXED ............................ 46
ROOT TRANS ........................... 46
RTR .......................................... 48
S
SAVE & ASSIGN ................. 20, 24
SCALE TUNE .............................. 9
Score ....................................... 49
SECTION SET ........................... 33
SEQUENCE END ....................... 78
SET UP (Score) ......................... 50
SETUP (Mixing Console) ........... 91
SETUP (Song Creator) .............. 65
SFF ........................................... 45
SFF GE ..................................... 45
SFX ............................................ 4
SINGLE FINGER ........................ 31
SOFT ...................................... 110
Song ........................................ 49
SONG (Transpose) ................... 10
Song Auto Revoice ................... 91
Song Creator ........................... 56
Song Position Markers .............. 69
SONG SETTING ....................... 52
SOSTENUTO .......................... 110
SOUND .................................... 13
SOURCE ROOT ........................ 46
SP (Song Position) .................... 69
SPEAKER ................................. 122
SPEED (Harmony/Echo) .............. 8
SPLIT POINT ............................ 34
START KEY ...........................19–20
Start/End Point ......................... 86
START/STOP (MIDI) ................ 114
STEP RECORD display ............... 56
Step Recording (Multi Pad) ...... 71
Step Recording (Song) ....... 56, 59
Step Recording (Style) .............. 40
STOP (RTR) .............................. 48
STOP ACMP ............................. 32
STRENGTH ............................... 43
STROKE .................................... 47
Style ......................................... 30
Style Assembly ......................... 40
Style Creator ............................ 36
Style File Format ....................... 45
STYLE SETTING ........................ 32
STYLE SETTING/SPLIT POINT/
CHORD FINGERING .. 30, 32, 34
STYLE TOUCH .......................... 33
SWAP MAIN-SUB ...................... 82
Sweet! ........................................ 4
SWING ..................................... 42
SYNCHRO STOP WINDOW ...... 32
SYS/EX. ............................ 56, 114
SYSTEM .......................... 112, 114
System Exclusive Events ............ 67
SYSTEM RESET ........................ 125
SYSTEM SETUP ....................... 125
SYSTEM SETUP FILES .............. 126
T
TALK SETTING ........................ 105
Tap ......................................... 121
TARGET .................................... 23
TEMPO (Style Setting) .............. 33
Text display .............................. 51
Time zone .............................. 101
TOTAL VOLUME ATTENUATOR
............................................ 105
TOUCH LIMIT ............................ 8
Touch response .......................... 6
TOUCH SENSE (Voice Set) ........ 12
Touch Sensitivity ........................ 6
TRACK DELETE ......................... 82
TRANSMIT ..................... 112, 115

Index
130 • Tyros3 Reference Manual
TRANSMIT CLOCK ..................114
TRANSPOSE ..............................92
TRANSPOSE ASSIGN .................10
TUNE ........................................92
TUNING ...................................92
Tuning ........................................9
U
USER EFFECT FILES ..................126
Utility ......................................120
V
VARIATION (DSP) ......................14
VELOCITY CHANGE ..................44
VH TYPE SELECT ......................106
VIBRATO ...................................14
VIBRATO SPEED ........................16
Vocal Cue Time .........................54
Vocal Harmony .......................106
VOCAL HARMONY CONTROL 104
VOCODER CONTROL .............104
Voice ...........................................4
VOICE (Mixing Console) ...........90
Voice Creator ............................17
Voice Editor ...............................29
VOICE RAM ...............................25
VOICE SET ................................15
Voice Set ...................................11
VOL (Organ Flutes) ...................16
VOL/VOICE ...............................90
VOLUME (Hard Disk Recorder) ..82
VOLUME (Harmony/Echo) ..........8
VOLUME (Mixing Console) .......90
VOLUME (Talk) .......................105
VOLUME (Voice Creator) ...........23
VOLUME (Voice Set) .................12
VOLUME/ATTACK .....................16
W
WAVE COUNT ...........................25
WAVE IMPORT (Hard Disk
Recorder) ...............................81
WAVE IMPORT (Voice Creator)
.........................................18, 23
WAVE RAM ...............................25
WAVE VOLUME ........................ 19
WAVEFORM COUNT ................ 25
WERCKMEISTER ......................... 9
X
XG ............................................. 5
-
 1
1
-
 2
2
-
 3
3
-
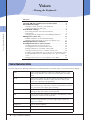 4
4
-
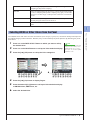 5
5
-
 6
6
-
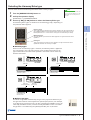 7
7
-
 8
8
-
 9
9
-
 10
10
-
 11
11
-
 12
12
-
 13
13
-
 14
14
-
 15
15
-
 16
16
-
 17
17
-
 18
18
-
 19
19
-
 20
20
-
 21
21
-
 22
22
-
 23
23
-
 24
24
-
 25
25
-
 26
26
-
 27
27
-
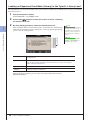 28
28
-
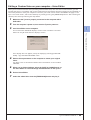 29
29
-
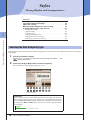 30
30
-
 31
31
-
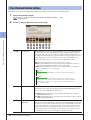 32
32
-
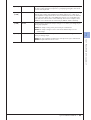 33
33
-
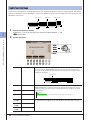 34
34
-
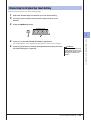 35
35
-
 36
36
-
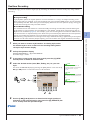 37
37
-
 38
38
-
 39
39
-
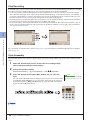 40
40
-
 41
41
-
 42
42
-
 43
43
-
 44
44
-
 45
45
-
 46
46
-
 47
47
-
 48
48
-
 49
49
-
 50
50
-
 51
51
-
 52
52
-
 53
53
-
 54
54
-
 55
55
-
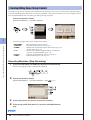 56
56
-
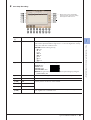 57
57
-
 58
58
-
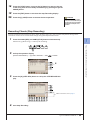 59
59
-
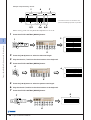 60
60
-
 61
61
-
 62
62
-
 63
63
-
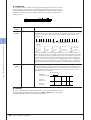 64
64
-
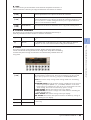 65
65
-
 66
66
-
 67
67
-
 68
68
-
 69
69
-
 70
70
-
 71
71
-
 72
72
-
 73
73
-
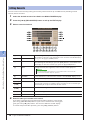 74
74
-
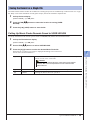 75
75
-
 76
76
-
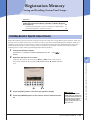 77
77
-
 78
78
-
 79
79
-
 80
80
-
 81
81
-
 82
82
-
 83
83
-
 84
84
-
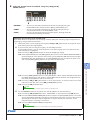 85
85
-
 86
86
-
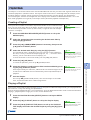 87
87
-
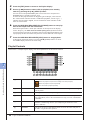 88
88
-
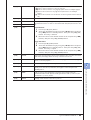 89
89
-
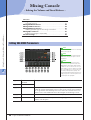 90
90
-
 91
91
-
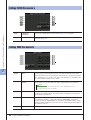 92
92
-
 93
93
-
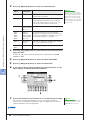 94
94
-
 95
95
-
 96
96
-
 97
97
-
 98
98
-
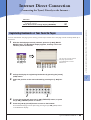 99
99
-
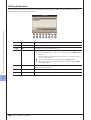 100
100
-
 101
101
-
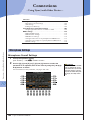 102
102
-
 103
103
-
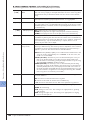 104
104
-
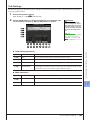 105
105
-
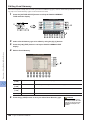 106
106
-
 107
107
-
 108
108
-
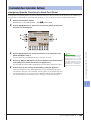 109
109
-
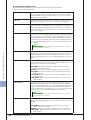 110
110
-
 111
111
-
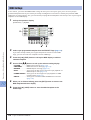 112
112
-
 113
113
-
 114
114
-
 115
115
-
 116
116
-
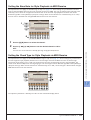 117
117
-
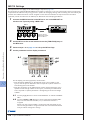 118
118
-
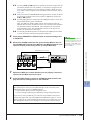 119
119
-
 120
120
-
 121
121
-
 122
122
-
 123
123
-
 124
124
-
 125
125
-
 126
126
-
 127
127
-
 128
128
-
 129
129
-
 130
130


Yamaha Tyros3 Manual de usuario
- Categoría
- Software
- Tipo
- Manual de usuario
en otros idiomas
- français: Yamaha Tyros3 Manuel utilisateur
- italiano: Yamaha Tyros3 Manuale utente
- English: Yamaha Tyros3 User manual
- Deutsch: Yamaha Tyros3 Benutzerhandbuch
- русский: Yamaha Tyros3 Руководство пользователя
- Nederlands: Yamaha Tyros3 Handleiding
- português: Yamaha Tyros3 Manual do usuário
- dansk: Yamaha Tyros3 Brugermanual
- polski: Yamaha Tyros3 Instrukcja obsługi
- čeština: Yamaha Tyros3 Uživatelský manuál
- svenska: Yamaha Tyros3 Användarmanual
- Türkçe: Yamaha Tyros3 Kullanım kılavuzu
- suomi: Yamaha Tyros3 Ohjekirja
- română: Yamaha Tyros3 Manual de utilizare
Artículos relacionados
-
Yamaha Tyros3 El manual del propietario
-
-
-
Yamaha PSR-S710 Manual de usuario
-
-
-
Yamaha PSR-S950 Manual de usuario
-
-
-
Yamaha NULL El manual del propietario