Bushnell GOLF iON 2 368850 Manual de usuario
- Categoría
- Relojes
- Tipo
- Manual de usuario
Este manual también es adecuado para

Instruction Manual
Model# 368850/368851 3-18
www.bushnellgolf.com

2
Contents Page #
Charging the Battery 3
Buttons and Functions 4
Getting Started 4
Play Golf Mode 4
Using the Play Golf Menu 4-5
Play Golf Menu Items 5
Using the Golf Menu 5
Golf Menu Items 5
Using the Main Menu 5
Main Menu Items 5-6
Accessing Updated Golf Course Data 6
Hazard Glossary 7
Warranty 8
Table of Contents

3
Care and Maintenance
The iON2 watch is durable and waterproof. To help ensure reliable operation, the following care and maintenance guidelines are recommended :
• Avoid exposing the watch to extreme environmental conditions for a prolonged period of time.
• Avoid severe impacts on the watch.
• You may clean the watch occasionally with a soft, damp cloth.
• Brush the clip contacts at the bottom of the watch regularly. Dirt build-up on the surface of the contact points may aect normal charging and data transfer. *Note: Use a soft-
bristled brush (included). Hard bristles or wire brushes may leave scratches on the watch.
• DO NOT expose the watch to strong chemicals such as gasoline and alcohol, as they will damage the watch.
• Store the watch in a dry place when it is not in use.
WARNING
Do not attempt to open the iON2. The iON2 contains a rechargeable lithium ion battery.
Risk of explosion if battery is replaced with incorrect type.
• Do not attempt to open, disassemble or service the internal battery. The battery must be replaced by a qualied technician.
• Do not crush, puncture or short the battery’s external contacts. Do not expose to temperatures above 140
o
F (60
o
C).
• Do not charge the battery if ambient temperature is over 113
o
F (45
o
C)
• Properly recycle or dispose of the battery. Do not dispose in re or water.
Legal Disclaimer
By using this product, you agree that Bushnell Outdoor Products will not be held legally responsible for any injury or damage to you or any person or property caused by the user’s
improper operation and/or poor judgment while using this product.
Note: See Limited Warranty for other limitations to our liability.
Additional Information
The Global Positioning System (GPS), a network of 32 satellites orbiting Earth, is operated and maintained by the U.S. government. This GPS device requires at least 3 satellites to be
acquired to accurately determine your position. Any change made to the system by the government could aect the accuracy and performance of this product.
Bushnell Golf GPS Website
www.bushnellgolf.com is the best online resource for all our Golf GPS product owners, including product support, FAQs, etc. It also serves as a portal to access iGolf.com GPS
course les to use with these Bushnell products. Registering your iON2 via www.bushnell.igolf.com is not required, but will ensure you have access to the latest updated GPS
course data.
CHARGING THE BATTERY
The rechargeable battery of the iON2 Watch is long lasting and provides up to 3 rounds of golf (based upon average
of 4 hours per round), or one year of use as an everyday (time only) watch. However, battery life may be reduced due
to a variety of factors (external temperature, etc). All rechargeable batteries lose their eective charge length over
time. Charging your battery when the battery level display shows “one bar remaining” will guarantee that you will be
able to make it through the entire next round.
To check your remaining battery life, press the MENU button (2, next page) and select BATTERY. To recharge the
battery, insert the watch into the charging cradle, with the charge contacts on the back of the watch lined up with the
charge pins on the left side of the cradle. Then, connect the charging cradle to an open USB port on your computer,
a powered USB hub, or smartphone AC charger. Look for the screen to display “CHARGING” to indicate that your iON2
watch is charging-make sure to connect from either the Time display (Watch mode) screen (see pg. 4) or from the
BATTERY level screen, which can be accessed from the Play Golf Menu or Main Menu (shown below, menu details on
next page).

4
1. GOLF MENU Button: From Time Display, view Golf Menu. From Play Golf mode, activate Shot Distance feature.
2. MENU Button: From Time Display, view Main Menu. From Play Golf mode, view Play Golf Menu. Press to exit any menu screen.
3. UP Button: Scrolls up through menu items.
4. SELECT Button: Selects highlighted menu item or checked option.
5. DOWN Button: Scrolls down through menu items. Press & hold (7 seconds) to turn power on/o .
GETTING STARTED
1. First, be sure the battery has a full charge. If you are using it for the rst time, it should be charged until full (battery level at 4 bars).
2. Press and hold the DOWN/POWER button (5) on the lower right side of the unit until it powers on. Press and hold DOWN/POWER again
to turn power o .
3. The iON2 will power up in “Watch Mode”, with the time and date displayed as shown above.
4. Pressing any button activates the display backlight (visible in low ambient light conditions only) for approx. 8 seconds.
PLAY GOLF MODE
1. Make sure you are outdoors, in a location with a clear view of the sky overhead, to ensure good reception of GPS satellite signals. Press
the GOLF MENU button (1). With PLAY GOLF highlighted (press UP/DOWN button (3/5) if necessary), press the SELECT button (4). The
display will show ”SEARCHING” as the iON2 looks for multiple available GPS satellite signals and locks onto them. Once locked (note that
this can take longer the rst time you use the iON2), you’ll hear beeps con rming a GPS lock, then see a list of course names.
2. Use the UP/DOWN buttons (3/5) to choose (highlight) the course you want to play from the list of nearby courses (closest course at top
of list), then press SELECT. You are now in Play Golf mode.
3. The display shows (screenshot on right): Current hole # (at upper left), Par for the hole (upper right), and
distances to the center (large number at top center), front (lower left) and back (lower right) of green.
4. Press SELECT (4) to view distances to up to 4 Hazard callouts per hole, variable depending on the most
signi cant hazards located near a speci c hole on the current course. See “Hazard Glossary” for a list of all
abbreviations used to designate various hazards. Press the SELECT button after viewing the Hazard screen(s)
to go to the Round Info screen, which shows the elapsed time and distance traveled since you began the
round (entered Play Golf mode).
5. The display will automatically advance to the next hole as you walk the course. Press the UP or DOWN button
(3/5) to manually advance to the next hole (useful for “shotgun” starts), or go back to the previous hole.
6. To use the Shot Distance feature, press the GOLF MENU button (1) while at the tee (this is your start “point A”)-
as you walk, the display will update to indicate distance from point A to your current location (“point B”). This is useful to measure the
length of your shot. Press GOLF MENU again to return to the PLAY GOLF display, press again to set a new Shot Distance starting point
(start at “0” again).
USING THE PLAY GOLF MENU
1. In PLAY GOLF Mode, press the MENU button (2) to view the PLAY GOLF MENU.
2. Select item from menu using UP/DOWN buttons to highlight it, then press SELECT button.
3. If multiple options are available for a setting, use UP/DOWN to highlight your choice, then press SELECT.
PLAY GOLF MODE
BUTTONS / FUNCTIONS
1
2
MENU
UP
3
SELECT
4
5
DOWN/
POWER
Charge Pins
Charge Contacts
TIME DISPLAY (WATCH MODE)
GOLF MENU/PLAY GOLF MODE

5
4. A solid (lled in) checkbox to the left of a setting indicates the current setting. To change it, highlight your preferred setting and press
SELECT.
5. Press MENU button to return to previous menu screen.
PLAY GOLF MENU ITEMS (From Play Golf mode, press MENU button)
• CHANGE COURSE: press SELECT, highlight a dierent golf course from list of nearby courses, then press SELECT.
• BATTERY: press SELECT button to check battery level (charge remaining, 1-4 bars icon).
• EXIT ROUND: press SELECT to stop tracking current course, end game and return to the Time display (Watch mode) screen.
USING THE GOLF MENU
1. From the Time display (Watch mode), press the GOLF MENU button (1) to view the GOLF MENU.
2. Select item from menu using UP/DOWN buttons to highlight it, then press SELECT button.
3. If multiple options are available for a setting, use UP/DOWN to highlight your choice, then press SELECT.
GOLF MENU ITEMS (From Watch mode, press GOLF MENU button)
• PLAY GOLF: from any screen, returns display to showing current hole and distances based on your current position on the course.
• TEE TIME: Tee Time is a convenience feature that allows you to set up a tee time (golf date) in advance. When a Tee Time has been
entered and the feature is set to “ON”, the iON2 will automatically enter Play Golf mode and search for local courses 7 minutes prior to
the set time. Simply select your course from the list, and enjoy your round of golf!
To set a Tee Time, select TEE TIME from the GOLF Menu (with TEE TIME highlighted, press the SELECT button). Next, press the SELECT
button, then use the UP/DOWN buttons set the desired hour. Press SELECT and repeat the same process to set minute, AM/PM, and day
of the week. After pressing SELECT for the last time, you’ll be back on the TEE TIME screen, and see that your Tee Time has been entered
into the unit’s memory. To edit the Tee Time, press SELECT and repeat the process to change the hour, minute, etc. Once the Tee Time has
been set, use the UP/DOWN buttons to turn it ON/OFF (activate/deactivate).
• SETUP: press SELECT to access the SETUP SUB-MENU, with 3 options:
1. AUTO-OFF: The Auto-O feature is designed to automatically exit Play Golf mode when the preset time has expired. When in Play
Golf mode, after the preset time has expired, the watch will automatically exit the round and return to the Home (Time) screen to
preserve battery life. To set the Auto-O time, select AUTO-OFF from the Play Golf/Setup Menu. From the set AUTO-OFF screen
use the UP/DOWN buttons to toggle the time up and down. Auto-O is always set to whatever current time duration is showing
on the set AUTO-OFF page. Time can be set between 1.5 and 9 hours, or press UP or DOWN once more at either end of the time
range to select DISABLE and turn the feature o.
2. YDS/MTRS: press SELECT. The solid (lled in) checkbox indicates the current setting (default=YARDS). To change how distances
are displayed, highlight YARDS or METERS, press SELECT.
3. BATTERY: press SELECT button to check battery condition (charge remaining, 1-4 bars icon).
USING THE MAIN MENU (From Watch mode, press MENU button)
If the iON2 is in Play Golf mode, press the MENU button (2) to enter the Golf Menu, highlight EXIT ROUND and press SELECT to return to
the Time display (Watch mode). From the Time display, press the MENU button to view the MENU (main menu) options. To view the menu
options and select your preferred settings within the Main Menu, follow the same steps as described under “Using the Golf Menu in Play Golf
Mode”. To exit the Main Menu and return to Watch mode, press the MENU button until you see the Time display.
MAIN MENU ITEMS
• BLUETOOTH: The iON2 can connect to the BUSHNELL GOLF smartphone app via Bluetooth. Once connected the app can be used congure
the iON2 (select menu options) and wirelessly update the iON2’s internal golf course database. Tee Times may also be set via the app. The
BUSHNELL GOLF app can be obtained from the Apple Store and Google Play store for iPhone and Android devices, respectively. Download
and install the app on your mobile device. Go to the mobile devices’ settings page to turn on Bluetooth, then launch the BUSHNELL GOLF
app. To connect your iON2 to the smartphone app follow the steps below:
1. On your smartphone, make sure you have Bluetooth turned on.
2. On your iON2, go to the Main Menu, enter the SETTINGS menu, then scroll down to BLUETOOTH and press SELECT.
3. Select “ON” to turn Bluetooth on.
4. Your iON2 will then give you a code. Enter that code into the smartphone app when requested.
5. Once paired correctly, your smartphone app will display a conrmation. The device is now paired with your smartphone.
• PEDOMETER: In order to track steps taken, the iON2 supports a pedometer. This uses an internal accelerometer to track the number of
steps taken. Once enabled, the pedometer screen can be accessed from the Time display (Watch mode) by pressing the DOWN button.
The Pedometer goal is the target number of steps. The goal can be set in increments of 1000 from 1,000 to 99,000 steps. The Pedometer
goal may also be congured from the smartphone app.

6
• FITNESS: The iON2 includes an odometer to track the distance traveled, time elapsed, and speed. Fitness uses GPS for its location. Once
enabled, the Fitness screen can be accessed from the Time screen using the DOWN button.
• STOPWATCH: press SELECT button to start and stop the Stopwatch (display shows elapsed time). Press UP button to reset to zero.
• TIMER: press SELECT button to start and stop the Timer (display shows countdown from set time). Press UP button to reset to the set time
After a reset, with timer not running, press SELECT button (display digits ash) then use UP/DOWN buttons to set the desired time (hours/
minutes/seconds). When the timer is running, it will begin to beep (once per second)10 seconds before the time is up. At the end of the
set time, the iON2 will beep 3x per second.
• ALARM: press SELECT button then use UP/DOWN to set the alarm hour/minute/PM or AM. After setting desired alarm time, press UP to
turn the alarm on or o.
• BATTERY: press SELECT button to check battery level (charge remaining, 1-4 bars icon).
• SETTINGS: press SELECT to access the SETTINGS SUB-MENU, with 6 options:
1. TIME: press SELECT then highlight and select from these three time/date related settings:
SET TIME: press SELECT and highlight a method:
• BY GPS: press SELECT to automatically set the time based on your current GPS location.
• MANUALLY: use the UP/DOWN buttons to enter the correct current time and date yourself.
DAYLIGHT: press SELECT and highlight current daylight savings time status for your location:
• DST ON +1
• DST OFF -1
FORMAT: press SELECT and highlight your preference for time display format:
• 12 HOUR
• 24 HOUR
2. UNITS: press SELECT. The solid (lled in) checkbox indicates the current setting (default=YARDS). To change how distances are
displayed, highlight YARDS or METERS, press SELECT.
3. LANGUAGE: The iON2 features 5 menu language settings (ENGLISH, SPANISH, GERMAN, FRENCH, ITALIAN). By default, the
user interface is in English. Press SELECT, use UP/DOWN to scroll between options on the Language menu, then press the SELECT
button to conrm your preferred (highlighted) language for all display screens.
4. SOUND: to turn o the “beep” button press conrmation sound when using the menus, select “OFF” and press SELECT.
5. ABOUT: press SELECT to display your unit’s rmware version, date of manufacture, and FCC ID#.
6. RESET: to restore the unit to all of its original settings, press SELECT, then select DEFAULT SETTINGS and conrm you want to
do this. The other two options under RESET DEVICE (CHECK UPDATE and REFORMAT) should only be used by qualied service
technicians.
ACCESSING UPDATED GOLF COURSE DATA
Your iON2 is pre-loaded with data for over 33,000 courses located worldwide. It is ready to use right out of the box, with no need to download
software or pay any membership fees.
But you might be thinking, “What if a new course opens sometime after my unit was made? Is there a way to update the database in my unit
to add it?” The answer is yes, and it’s simple to do.
Go to www.bushnellgolf.com and view the product page for any of the dierent color versions of the iON2. You’ll nd three orange links
you can click:
• How to Update Your Golf GPS with the Latest Maps
Click this link for step-by-step directions for nding and downloading new course data from iGolf.com
• Request Course Update
Click this link to go to a form you can ll out and email to iGolf to submit a course that is not included in the database, or if you nd
information (data for a hole) that is not mapped correctly on an existing course.
• Search for Available Courses on Your Bushnell Golf GPS
Click this link to search the current iGolf database to verify a course you are interested in is included.
You can also go to: https://igolf.com and click “Join Now”, ll in your contact info on the registration form then select “I Have A GPS Device”
to access course updates.
Use the provided USB cable to connect your iON2 to your PC or Mac. Once connected, the screen will display “USB MODE”.
Android and Google Play are registered trademarks of Google Inc. in the United States and other countries.
iPhone and Apple Store are trademarks of Apple Inc., registered in the U.S. and other countries.
Other names may be trademarks of their respective owners.

7
HAZARD GLOSSARY
Hazard designations are shown as abbreviations, dened as follows:
• BGB-Back Green Bunker
• BGW- Back Green Water
• CRK- Creek Layup
• CRKC- Creek Carry
• EOF- End of Fairway
• FGB- Front Green Bunker
• FGW- Front Green Water Layup
• FGWC- Front Green Water Carry
• LFB- Left Fairway Bunker
• LFW- Left Fairway Water Layup
• LFWC- Left Fairway Water Carry
• LGB- Left Green Bunker
• LGW- Left Green Water
• MFB- Middle Fairway Bunker
• MFW- Middle Fairway Water Layup
• MFWC- Middle Fairway Water Carry
• RFB- Right Fairway Bunker
• RFW- Right Fairway Water Layup
• RFWC- Right Fairway Water Carry
• RGB- Right Green Bunker
• RGW- Right Green Water

8
ONE YEAR LIMITED WARRANTY
Your Bushnell
®
iON2 is warranted to be free of defects in materials and workmanship for one year after the date of purchase. In the event of a defect
under this warranty, we will, at our option, repair or replace the product, provided that you return the product postage prepaid. This warranty does
not cover damages caused by misuse, improper handling, installation, or maintenance provided by someone other than a Bushnell Authorized
Service Department.
Any return made under this warranty must be accompanied by the items listed below:
1. A check/money order in the amount of $10.00 to cover the cost of postage and handling
2. Name and address for product return
3. An explanation of the defect
4. Proof of Date Purchased
Product should be well packed in a sturdy outside shipping carton to prevent damage in transit, to the address listed below:
IN U.S.A. Send To: IN CANADA Send To:
Bushnell Outdoor Products Bushnell Outdoor Products
Attn.: Repairs Attn.: Repairs
9200 Cody 140 Great Gulf Drive, Unit B
Overland Park, Kansas 66214 Vaughan, Ontario L4K 5W1
For products purchased outside the United States or Canada please contact your local dealer for applicable warranty information. In Europe you
may also contact Bushnell at:
Bushnell Germany GmbH
European Service Centre
Mathias-Brüggen-Str. 80
D-50827 Köln
GERMANY
Tel: +49 221 995568-0
Fax: +49 221 995568-20
This warranty gives you specific legal rights.
You may have other rights which vary from country to country.
©2018 Bushnell Outdoor Products
Industry Canada Statement
This device complies with ISED’s licence-exempt RSSs. Operation is subject to the following two conditions: (1) This device may not cause harmful interference, and (2) this device must accept
any interference received, including interference that may cause undesired operation.
Radiation Exposure Statement:
This device complies with the Industry Canada portable RF exposure limit set forth for an uncontrolled environment and is safe for the intended operation as described in this manual. Further
RF exposure reduction can be achieved if the product can be kept as far as possible from the user’s body or if the device is set to a lower output power if such function is available.

9
FCC Statement
This device complies with Part 15 of the FCC interference limits for Class B digital devices FOR HOME OR OFFICE USE. These limits are designed to provide reasonable protection against harmful
interference in a residential installation, and are more stringent than “outdoor” requirements.
Operation of this device is subject to the following conditions; (1) This device may not cause harmful interference, and (2) this device must accept any interference received, including
interference that may cause undesired operation.
This equipment generates, uses and can radiate radio frequency energy and, if not installed and used in accordance with the instructions, may cause harmful interference to radio
communications. However, there is no guarantee that interference will not occur in a particular installation. If this equipment does cause harmful interference to radio or television reception,
which can be determined by turning the equipment o and on, the user is encouraged to try to correct the interference by one or more of the following measures:
· Reorient or relocate the receiving antenna.
· Increase the separation between the equipment and receiver.
· Connect the equipment into an outlet on a circuit di erent from that to which the receiver is connected.
· Consult the dealer or an experienced radio/TV technician for help.
The device does not contain any user-serviceable parts. Repairs should only be made by an Authorized Bushnell repair center. Unauthorized repairs or modi cations could result in permanent
damage to the equipment, and will void your warranty and your authority to operate this device under Part 15 regulations.
The shielded interface cable which is provided must be used with the equipment in order to comply with the limits for a digital device pursuant to Subpart B of Part 15 of FCC Rules.
FCC ID: 2ABQG-36885
IC: 5830A-36885
Android and Google Play are registered trademarks of Google Inc. in the United States and other countries.
iPhone and Apple Store are trademarks of Apple Inc., registered in the U.S. and other countries.
Other names may be trademarks of their respective owners.
Disposal of Electric and Electronic Equipment
(Applicable in the EU and other European countries with separate collection systems)
This equipment contains electric and/or electronic parts and must therefore not be disposed of as normal household waste. Instead, it should be disposed at the
respective collection points for recycling provided by the communities. For you, this is free of charge.
If the equipment contains exchangeable (rechargeable) batteries, these too must be removed before and, if necessary, in turn be disposed of according to the
relevant regulations (see also the respective comments in this unit’s instructions).
Further information about the subject is available at your community administration, your local waste collection company, or in the store where you purchased
this equipment.
Industry Canada Statement
This device complies with ISED’s licence-exempt RSSs. Operation is subject to the following two conditions: (1) This device may not cause harmful interference, and (2) this device must accept
any interference received, including interference that may cause undesired operation.
Radiation Exposure Statement:
This device complies with the Industry Canada portable RF exposure limit set forth for an uncontrolled environment and is safe for the intended operation as described in this manual. Further
RF exposure reduction can be achieved if the product can be kept as far as possible from the user’s body or if the device is set to a lower output power if such function is available.

10
Table des matières N° de page
Chargement de la batterie 11
Boutons et fonctions 12
Prise en main 12
Mode Jouer au golf 12
Utilisation du Menu jouer au golf 13
Éléments du Menu jouer au golf 13
Utilisation du Menu golf 13
Éléments du Menu golf 13
Utilisation du Menu principal 13
Éléments du Menu principal 13-14
Accès aux données mises à jour
duparcours de golf
14
Glossaire des obstacles 15
Garantie 16
Sommaire

11
CHARGEMENT DE LA BATTERIE
La batterie rechargeable de la montre iON2 ache une grande autonomie et couvre jusqu’à 3parties de golf (pour
une moyenne de 4heures par partie), ou jusqu’à un an d’utilisation standard comme montre (uniquement pour
lire l’heure). Cependant, l’autonomie de la batterie peut être réduite en raison de diérents facteurs (température
extérieure, etc.). La charge eective de toutes les batteries rechargeables diminue au l du temps. Recharger votre
batterie dès que le niveau de charge ache «une seule barre restante» vous assurera de pouvoir terminer votre
partie.
Pour vérier le niveau de charge restante, appuyez sur MENU (2, page suivante) puis sélectionnez BATTERIE. Pour
recharger la batterie, insérez la montre dans la station de charge, en alignant le connecteur femelle situé à l’arrière
de la montre sur le connecteur mâle placé sur le côté gauche de la station. Puis, branchez la station de chargement
à un port USB libre sur votre ordinateur, à un hub USB alimenté, ou à un chargeur de smartphone CA. Attendez que
l’écran ache «EN CHARGE». Cette mention conrmera que votre montre iON2 est bien en train de se recharger.
Assurez-vous de vous connecter à partir de l’écran d’Achage de l’heure (en mode Montre) (voir page 4) ou à partir
de l’écran BATTERIE qui indique le niveau de charge et qui est accessible à partir du Menu jouer au golf ou du Menu
principal. (Voir ci-dessous, les détails du menu se trouvent à la page suivante).
Entretien et maintenance
La montre iON2 est résistante et étanche. Pour assurer un fonctionnement able, nous vous recommandons de suivre les consignes d'entretien et de maintenance suivantes:
• Évitez d'exposer la montre à des conditions environnementales extrêmes pendant une période prolongée.
• Évitez tout choc important sur la montre.
• Vous pouvez nettoyer la montre de temps à autre à l'aide d'un chion doux et humide.
• Essuyez régulièrement le connecteur femelle situé en bas de la montre. L'accumulation d'impuretés à la surface du connecteur femelle peut aecter le chargement et le transfert
de données. *Remarque: utilisez une brosse à poils doux (incluse). Les brosses à poils durs ou métalliques risquent de rayer la montre.
• N'EXPOSEZ PAS la montre à des produits chimiques puissants, comme de l'essence ou de l'alcool, car ces substances l'endommageraient.
• Rangez la montre dans un endroit sec lorsque vous ne l'utilisez pas.
ATTENTION
N'essayez pas d'ouvrir l'iON2. L'iON2 contient une batterie lithium-ion rechargeable.
Il existe un risque d'explosion si la batterie d'origine est remplacée par le mauvais type de batterie.
• N'essayez pas d'ouvrir, de démonter ou de réparer la batterie interne. La batterie doit être remplacée par un technicien qualié.
• N'écrasez pas, ne percez pas ou ne raccourcissez pas les bornes de la batterie. N'exposez pas la batterie à des températures supérieures à 60
o
C (140
o
F).
• Ne chargez pas la batterie si la température ambiante est supérieure à 45
o
C (113
o
F)
• Recyclez ou mettez la batterie au rebut conformément aux règlements en vigueur. Ne la jetez pas à l'eau ni au feu.
Limite de responsabilité
En utilisant ce produit, vous reconnaissez que BushnellOutdoorProducts ne sera pas légalement tenu responsable de tout dommage ou blessure inigé à vous ou à une autre
personne ou propriété, dû à l'utilisation incorrecte de la part de l'utilisateur et/ou à un mauvais jugement lors de l'utilisation du produit.
Remarque: veuillez consulter notre garantie limitée pour connaître les autres limites de responsabilité.
Informations supplémentaires
Le GPS (GlobalPositioningSystem), réseau de 32satellites en orbite autour de la Terre, est exploité et maintenu par le gouvernement américain. Cet appareil GPS a besoin d'acquérir
les signaux d'au moins 3satellites pour calculer votre position avec précision. Tout changement apporté au système par le gouvernement peut aecter la précision et les performances
de ce produit.
SiteWeb de BushnellGolfGPS
Le site www.bushnellgolf.com propose à tous les propriétaires de produits Golf GPS les meilleures ressources en ligne, notamment un service après-vente, une FAQ, etc.
Il donne également accès aux chiersGPS, disponibles sur iGolf.com, qui permettent aux produits Bushnell de localiser les parcours de golf. L'enregistrement de l'iON2 sur
www.bushnell.igolf.com n'est pas obligatoire, cependant il garantira votre accès aux donnéesGPS les plus récentes concernant les parcours.

12
1. MENU GOLF: À partir de l’A chage de l’heure, a chez le Menu golf. En mode Jouer au golf, activez la fonction Distance de frappe.
2. MENU: À partir de l’A chage de l’heure, allez au Menu principal. En mode Jouer au golf, a chez le Menu jouer au golf. Appuyez pour
quitter le menu.
3. HAUT: fait dé ler les éléments du menu vers le haut.
4. SÉLECT.: sélectionne l’élément du menu en surbrillance ou l’option cochée.
5. BAS: fait dé ler les éléments du menu vers le bas. Appuyez longuement (pendant 7secondes) pour allumer/éteindre la montre.
PRISE EN MAIN
6. Assurez-vous d’abord que la batterie est entièrement chargée. Si vous utilisez la montre pour la première fois, chargez entièrement labatterie
(jusqu’à ce que les 4barres du niveau de charge s’affi chent).
7. Appuyez longuement sur le bouton BAS/POWER (5) qui est situé sur le côté inférieur droit de la montre, jusqu’à ce qu’elle s’allume.
Pouréteindre la montre, répétez l’opération.
8. L’iON2s’allumera en «Mode montre», l’heure et la date s’a chant comme sur la photo ci-dessus.
9. Le fait d’appuyer sur n’importe quel bouton active le rétroéclairage de l’écran (qui est visible uniquement dans des conditions de faible
luminosité ambiante) pendant env. 8secondes.
MODE JOUER AU GOLF
1. Assurez-vous d’être à l’extérieur, dans un endroit o rant une vue dégagée du ciel, pour être sûr de bien recevoir les signaux satellites GPS.
Appuyez sur MENU GOLF (1). Marquez en surbrillance l’option JOUER AU GOLF (à l’aide des boutons HAUT/BAS (3/5) si nécessaire), puis
appuyez sur SÉLECT. (4). L’écran a chera alors «RECHERCHE EN COURS», ce qui signi e que l’iON2 est en train de rechercher des signaux
satellitesGPS disponibles pour s’y connecter. Une fois la montre connectée, vous entendrez des bips con rmant la connexion GPS, puis une
liste de parcours de golf s’a chera. (Veuillez noter que cette opération peut prendre plus de temps lors de la première utilisation de l’iON2).
2. Utilisez les boutons HAUT/BAS (3/5) pour sélectionner (mettre en surbrillance) le parcours de votre choix dans la liste de parcours disponibles
dans les environs (le plus près apparaissant en tête de la liste), puis appuyez sur SÉLECT. Vous êtes maintenant en mode Jouer au golf.
3. L’écran a che (voir la copie d’écran sur la droite): le numéro de trou actuel (en haut à gauche), le par du trou (en
haut à droite), les distances jusqu’au centre (chi re a ché en grand en plein milieu), et jusque l’avant (en bas à
gauche) et l’arrière (en bas à droite) du green.
4. Appuyez sur SÉLECT. (4) pour a cher les distances vous séparant de 4avis d’obstacles maximum par trou.
Ces dernières peuvent varier en fonction de l’emplacement des obstacles par rapport à un trou spéci que du
parcours. Reportez-vous à la section «Glossaire des obstacles» a n d’obtenir la liste des abréviations utilisées
pour désigner les divers obstacles. Appuyez sur SÉLECT. après avoir a ché les obstacles pour accéder à l’écran
Informations de la partie, qui indique le temps écoulé et la distance parcourue depuis le début de la partie
(enmode Jouer au golf).
5. À mesure que vous avancez sur le parcours, l’a chage s’actualisera automatiquement en fonction du prochain
trou à jouer. Appuyez sur les boutons HAUT ou BAS (3/5) pour passer manuellement au trou suivant (cette option
est notamment utile pour démarrer la partie) ou revenir au trou précédent.
6. Pour utiliser la fonction Distance de frappe, appuyez sur MENU GOLF (1) lorsque vous êtes au tee (votre «pointA» de départ). À mesure
que vous avancez, la distance séparant le pointA de votre position actuelle (ou «pointB») se met à jour pour re éter la distance réelle.
Cette option est utile pour mesurer la longueur de votre frappe. Appuyez à nouveau sur MENU GOLF pour revenir à l’écran JOUER AU
GOLF, puis appuyez encore une fois pour dé nir un nouveau point de départ à partir duquel vous souhaitez calculer la Distance de frappe
(recommencez à «0»).
BOUTONS/FONCTIONS
1
2
MENU
HAUT
3
SÉLECT.
4
5
BAS/
POWER
Connecteur mâle
decharge
Connecteur
femelle de charge
AFFICHAGE DE L'HEURE (MODE MONTRE)
MENU GOLF/MODE JOUER AU GOLF
MODE JOUER AU GOLF

13
UTILISATION DU MENU JOUER AU GOLF
1. En mode JOUER AU GOLF, appuyez sur MENU (2) pour acher le MENU JOUER AU GOLF.
2. Sélectionnez un élément du menu pour le mettre en surbrillance à l’aide des boutons HAUT/BAS, puis appuyez sur SÉLECT.
3. Si plusieurs options sont disponibles pour un même paramètre, mettez votre choix en surbrillance à l’aide des boutons HAUT/BAS, puis
appuyez sur SÉLECT.
4. Une case à cocher pleine (remplie) à gauche d’un paramètre indique le réglage actuel. Pour le modier, mettez en surbrillance votre réglage
préféré et appuyez sur SÉLECT.
5. Appuyez sur MENU pour revenir à l’écran du menu précédent.
ÉLEMENTS DU MENU JOUER AU GOLF (En mode Jouer au golf, appuyez sur MENU)
• CHANGER LE PARCOURS: appuyez sur SÉLECT., mettez en surbrillance un nouveau parcours de golf dans la liste des parcours à proximité,
puis appuyez à nouveau sur SÉLECT.
• BATTERIE: appuyez sur SÉLECT. pour vérier le niveau de charge restante (icône de 1à 4barres).
• QUITTER LA PARTIE : appuyez sur SÉLECT. pour arrêter le suivi du parcours actuel, terminer la partie et revenir à l’écran d’Achage
del’heure (en mode Montre).
UTILISATION DU MENU GOLF
1. À partir de l’Achage de l’heure (mode Montre), appuyez sur MENU GOLF (1) pour l’acher.
2. Sélectionnez un élément du menu pour le mettre en surbrillance à l’aide des boutons HAUT/BAS, puis appuyez sur SÉLECT.
3. Si plusieurs options sont disponibles pour un même paramètre, mettez votre choix en surbrillance à l’aide des boutons HAUT/BAS, puis
appuyez sur SÉLECT.
ÉLEMENTS DU MENU GOLF (En mode Montre, appuyez sur MENU GOLF)
• JOUER AU GOLF: ache, à partir de tout écran, le trou et les distances pertinentes en fonction de votre position actuelle sur le parcours.
• DÉPART: cette fonction pratique vous permet de dénir le départ (ou de programmer une date pour jouer au golf) à l’avance. Si le Départ
est déni et «Activé», l’iON2 passera automatiquement en mode Jouer au golf et recherchera les parcours de golf à proximité, 7minutes
avant l’heure dénie. Sélectionnez simplement votre parcours de golf dans la liste et protez de votre partie!
Pour dénir le Départ, sélectionnez DÉPARt dans le Menu GOLF (une fois le DÉPART en surbrillance, appuyez sur SÉLECT.). Ensuite, appuyez
sur SÉLECT., puis utilisez les boutons HAUT/BAS pour choisir l’heure souhaitée. Appuyez sur SÉLECT. et répétez le même processus pour
régler les minutes, les heures de la journée, et le jour de la semaine. Lorsque vous appuyez sur SÉLECT. pour la dernière fois, l’écran DÉPART
réapparaît, et vous pouvez constater que celui-ci a bien été enregistré dans la mémoire de la montre. Pour modier le Départ, appuyez sur
SÉLECT. et répétez le processus pour changer l’heure, les minutes, etc. Une fois le Départ réglé, utilisez les touches HAUT/BAS pour l’activer/
le désactiver.
• CONFIG.: appuyez sur SÉLECT. pour accéder au SOUS-MENU DE CONFIG., via 3options:
1. ARRÊT AUTOMATIQUE: la fonction Arrêt automatique est conçue pour quitter automatiquement le mode Jouer au Golf lorsque
la durée prédénie a expiré. En mode Jouer au golf, lorsque la durée prédénie a expiré, la montre quitte automatiquement la
partie et retourne à l’écran d’Accueil (autrement dit, elle ache l’heure) pour préserver la batterie. Pour dénir l’Arrêt automatique,
sélectionnez ARRÊT AUTOMATIQUE dans le menu Jouer au Golf/Cong. À partir de l’écran d’ARRÊT AUTOMATIQUE, utilisez les
boutons HAUTS/BAS pour régler l’heure. L’arrêt automatique se règle toujours à partir de la durée actuelle qui s’ache sur l’option
ARRÊT AUTOMATIQUE dénie. La durée peut être réglée pour une durée comprise entre 1,5 et 9heures. Appuyez à nouveau sur
HAUT ou BAS à la n de la durée écoulée pour sélectionner DÉSACTIVER et annuler la fonction.
2. YDS/MTRS: appuyez sur SÉLECT. La case à cocher pleine indique le paramètre actuel (valeur par défaut: YARDS). Pour changer
lemode d’achage des distances, mettez en surbrillance YARDS ou MÈTRES, puis appuyez sur SÉLECT.
3. BATTERIE: appuyez sur SÉLECT. pour vérier le niveau de charge restante (icône de 1à 4barres).
UTILISATION DU MENU PRINCIPAL (En mode Montre, appuyez sur MENU)
Si l’iON2est en mode Jouer au golf, appuyez sur MENU (2) pour entrer dans le Menu golf, surlignez QUITTER LA PARTIE et appuyez sur SÉLECT.
pour revenir à l’Achage de l’heure (mode Montre). À partir de l’Achage de l’heure, appuyez sur MENU pour en acher les options. Pour
acher les options du menu et sélectionner vos paramètres préférés dans le Menu principal, suivez les mêmes étapes que celles décrites dans
«Utilisation du Menu golf en mode Jouer au Golf». Pour quitter le Menu principal et revenir au mode Montre, appuyez sur MENU jusqu’à ce que
l’heure s’ache.
ÉLÉMENTS DU MENU PRINCIPAL
• BLUETOOTH: L’iON2 peut se connecter à l’application pour smartphone BUSHNELL GOLF via la connexion Bluetooth. Une fois la connexion
établie, l’application peut être utilisée pour congurer l’iON2 (sélectionner des options de menu) et mettre à jour sans l la base de données
interne de l’iON2 qui contient les parcours de golf. Il est également possible de dénir le Départ via l’application. L’application BUSHNELL GOLF
est disponible sur l’Apple Store et sur Google Play pour iPhone et appareils Android, respectivement. Téléchargez et installez l’application
sur votre appareil mobile. Accédez à la page des paramètres de votre appareil mobile pour activer le Bluetooth, puis lancez l’application
BUSHNELL GOLF. Pour connecter votre iON2 à l’application de smartphone, veuillez procéder comme suit:
1. Sur votre smartphone, assurez-vous que le Bluetooth est activé.
2. Sur votre iON2, accédez au Menu principal, allez dans les PARAMÈTRES, puis faites déler l’achage vers le bas jusqu’à l’option
BLUETOOTH et appuyez sur SÉLECT.

14
3. Sélectionnez «ACTIVÉ» pour activer le Bluetooth.
4. Votre iON2 achera alors un code. Saisissez ce code dans l’application du smartphone lorsque vous y êtes invité.
5. Une fois le couplage correctement eectué, l’application du smartphone achera une conrmation. L’appareil est désormais associé
à votre smartphone.
• PODOMÈTRE: la montre iON2 inclut un podomètre an de compter le nombre de pas eectués. Il utilise un accéléromètre interne pour
suivre le nombre de pas eectués. Une fois activé, l’écran du podomètre est accessible à partir de l’Achage de l’heure (mode Montre) en
appuyant sur le bouton BAS. L’objectif du podomètre est d’atteindre le nombre de pas cible. L’objectif peut être déni par incréments de
1000, de 1000 à 99000pas. L’objectif du podomètre peut également être conguré à partir de l’application du smartphone.
• EXERCICE: l’iON2comprend un odomètre qui enregistre la distance parcourue, le temps écoulé et la vitesse. La fonction Exercice utilise le
GPS pour la localisation. Une fois activée, l’option Exercice est accessible à partir de l’écran Heure, à l’aide du bouton BAS.
• CHRONOMÈTRE: appuyez sur SÉLECT. pour lancer et arrêter le chronomètre (l’achage indique le temps écoulé). Appuyez sur le bouton
HAUT pour le remettre à zéro.
• MINUTEUR: appuyez sur SÉLECT. pour lancer et arrêter le Minuteur (l’achage indique le compte à rebours jusqu’à l’heure réglée). Appuyez
sur le bouton HAUT pour revenir à l’heure réglée. Après une réinitialisation, lorsque la minuterie ne fonctionne pas, appuyez sur SÉLECT.
(les chires achés clignotent) puis utilisez les boutons HAUT/BAS pour régler l’heure souhaitée (heures/minutes/secondes). Lorsque le
minuteur est en marche, il commencera à émettre un bip (une fois par seconde), 10secondes avant que le temps ne soit écoulé. À la n du
temps déni, l’iON2émettra un bip 3fois par seconde.
• ALARME: appuyez sur SÉLECT. puis utilisez les boutons HAUT/BAS pour régler l’alarme à l’heure/minute souhaitée du matin ou de l’après-
midi. Après avoir réglé l’heure souhaitée de l’alarme, appuyez sur HAUT pour l’activer ou la désactiver.
• BATTERIE: appuyez sur SÉLECT. pour vérier le niveau de charge restante (icône de 1à 4barres).
• PARAMÈTRES: appuyez sur SÉLECT. pour accéder au SOUS-MENU DES PARAMÉTRES, via 6options:
1. HEURE: appuyez sur SÉLECT., puis mettez en surbrillance et choisissez parmi ces trois paramètres d’heure/de date:
RÉGLER L’HEURE: appuyez sur SÉLECT. et optez pour l’une des méthodes suivantes en la marquant en surbrillance:
• PAR GPS: appuyez sur SÉLECT. pour dénir automatiquement l’heure en fonction de votre position GPS actuelle.
• MANUELLEMENT: utilisez les boutons HAUT/BAS pour saisir vous-même l’heure et la date actuelles.
HEURE D’ÉTÉ: appuyez sur SÉLECT. et mettez en surbrillance le statut actuel de l’heure d’été pour votre emplacement:
• ACTIVÉE +1
• DÉSACTIVÉE -1
FORMAT: appuyez sur SÉLECT. et mettez en surbrillance le format d’achage de l’heure que vous préférez:
• 12H
• 24H
2. UNITÉS: appuyez sur SÉLECT. La case à cocher pleine indique le paramètre actuel (valeur par défaut: YARDS). Pour changer le mode
d’achage des distances, mettez en surbrillance YARDS ou MÈTRES, puis appuyez sur SÉLECT.
3. LANGUES: l’iON2 propose 5choix de langues (ANGLAIS, ESPAGNOL, ALLEMAND, FRANÇAIS et ITALIEN). Par défaut, l’interface
utilisateur est en anglais. Appuyez sur SÉLECT., utilisez les boutons HAUT/BAS pour faire déler les options du menu Langues, puis
appuyez sur SÉLECT. pour conrmer votre langue préférée d’achage (mise en surbrillance) pour tous les menus.
4. SON: pour éteindre le «bip» appuyez sur réglage du son lors de l’utilisation des menus, sélectionnez «DÉSACTIVÉ» et appuyer sur
SÉLECT.
5. À PROPOS DE: appuyez sur SÉLECT. pour acher la version de rmware, la date de fabrication et le numéro de l’ID FCC.
6. RÉINIT.: pour restaurer les paramètres d’origine de la montre, appuyez sur SÉLECT., puis sélectionnez PARAMÈTRES PAR DÉFAUT et
conrmez votre choix. Les deux autres options gurant sous RÉINIT. L’APPAREIL (RECHERCHER LES MISES À JOUR et REFORMATER)
ne doivent être utilisées que par des techniciens de maintenance qualiés.
ACCÈS AUX DONNÉES MISES À JOUR DU PARCOURS DE GOLF
Votre iON2 est pré-chargée avec des données sur plus de 33000parcours de golf situés dans le monde entier. Ces données sont immédiatement
prêtes à l’emploi, sans besoin de télécharger un logiciel ou de payer des frais d’abonnement.
Cependant, vous pourriez vous demander: «Et si un nouveau parcours de golf ouvre alors que ma montre a déjà été fabriquée? Est-il possible de
mettre à jour la base de données de l’appareil pour y ajouter ce parcours de golf?» La réponse est oui! L’opération est d’ailleurs facile àréaliser.
Rendez-vous sur www.bushnellgolf.com et achez la page produit de l’iON2 pour l’une des diérentes couleurs proposées. Vous trouverez
trois liens orange sur lesquels vous pouvez cliquer:
• Comment mettre à jour votre produit Golf GPS avec les dernières cartes
Cliquez sur ce lien pour obtenir des instructions détaillées sur la recherche et le téléchargement de nouvelles données de parcours de
golf à partir d’iGolf.com
• Demander une mise à jour des parcours de golf
Cliquez sur ce lien pour accéder à un formulaire que vous pouvez remplir et envoyer par e-mail à iGolf an de proposer un parcours de golf
ne gurant pas dans la base de données, ou si vous trouvez des informations (données relatives à un trou) cartographiées incorrectement
sur un parcours de golf existant.
• Rechercher les parcours de golf disponibles sur votre Bushnell Golf GPS
Cliquez sur ce lien pour rechercher la base de données iGolf actuelle an de vérier si un parcours qui vous intéresse est inclus.

15
Vous pouvez également vous rendre sur https://igolf.com et cliquer sur « Inscrivez-vous maintenant », indiquer vos coordonnées sur le
formulaire d’inscription, puis sélectionner «J’ai un appareil GPS» pour accéder aux mises à jour des parcours de golf.
Utilisez le câble USB fourni pour connecter votre iON2 à votre PC ou Mac. Une fois la connexion établie, l’écran achera
«MODE USB».
Android et Google Play sont des marques déposées de Google Inc. aux États-Unis et dans d’autres pays.
iPhone et Apple Store sont des marques déposées d’Apple Inc., enregistrées aux États-Unis et dans d’autres pays.
Les autres noms peuvent être des marques déposées de leurs propriétaires respectifs.
GLOSSAIRE DES DANGERS
Les désignations de danger sont indiquées par des abréviations, dénies comme suit:
• BGB-Back Green Bunker (bunker de green arrière)
• BGW- Back Green Water (eau de green arrière)
• CRK- Creek Layup (accumulation crique)
• CRKC- Creek Carry (transport crique)
• EOF- End of Fairway (n de fairway)
• FGB- Front Green Bunker (bunker de green avant)
• FGW- Front Green Water Layup (accumulation eau green avant)
• FGWC- Front Green Water Carry (accumulation eau green arrière)
• LFB- Left Fairway Bunker (bunker fairway gauche)
• LFW- Left Fairway Water Layup (accumulation eau fairway gauche)
• LFWC- Left Fairway Water Carry (transport eau fairway gauche)
• LGB- Left Green Bunker (bunker green gauche)
• LGW- Left Green Water (eau green gauche)
• MFB- Middle Fairway Bunker (bunker fairway milieu)
• MFW- Middle Fairway Water Layup (accumulation eau fairway milieu)
• MFWC- Middle Fairway Water Carry (transport eau fairway milieu)
• RFB- Right Fairway Bunker (bunker fairway droit)
• RFW- Right Fairway Water Layup (accumulation eau fairway droit)
• RFWC- Right Fairway Water Carry (transport eau fairway droit)
• RGB- Right Green Bunker (bunker green droit)
• RGW- Right Green Water (eau green droit)

16
FCC ID: 2ABQG-36885
IC: 5830A-36885
Android et Google Play sont des marques déposée de Microsoft Corporation aux États-Unis et dans d’autres pays.
iPhone et Apple Store sont des marques de commerce d’Apple Inc., déposées aux États-Unis et dans d’autres pays.
Les autres noms peuvent être les marques de fabrique de leurs propriétaires respectifs.
Traitement des déchets d’équipements électriques et électroniques
(En vigueur dans l’Union européenne et autres pays européens ayant des systèmes de collecte des déchets séparés)
Cet équipement contient des composants électriques et/ou électroniques et par conséquent ne doit pas être éliminé en n de vie avec les autres déchets ménagers.
Vous devez au contraire vous débarasser de ce produit a n qu’il soit recyclé aux points de collecte respectifs fournis par les communautés locales. Pour vous, ceci
est sans frais.
Si l’équipement contient des piles amovibles (rechargeables), celles-ci doivent également être retirées de l’équipement et, si nécessaire, être éliminées à leur tour
conformément aux règlements en vigueur (voir également les commentaires respectifs dans la notice d’utilisation de ce produit).
De plus amples renseignements à ce sujet sont disponibles auprès de votre mairie, votre compagnie de ramassage d’ordures locale, ou dans le magasin où vous avez
acheté cet équipement.
Industry Canada Statement
Le présent appareil est conforme aux CNR d’ ISED applicables aux appareils radio exempts de licence. L’exploitation est autorisée aux deux conditions suivantes: (1) le dispositif ne doit pas produire de brouillage préjudiciable, et (2) ce
dispositif doit accepter tout brouillage reçu, y compris un brouillage susceptible de provoquer un fonctionnement indésirable.
Déclaration d’exposition aux radiations:
Le produit est conforme aux limites d’exposition pour les appareils portables RF pour les Etats-Unis et le Canada établies pour un environnement non contrôlé.
Le produit est sûr pour un fonctionnement tel que décrit dans ce manuel. La réduction aux expositions RF peut être augmentée si l’appareil peut être conservé aussi loin que possible du corps de l’utilisateur ou que le dispositif est réglé sur
la puissance de sortie la plus faible si une telle fonction est disponible.
GARANTIE LIMITEE D’UN AN
Votre produit Bushnell
®
est garanti exempt de défauts de matériaux et de fabrication pendant un an à partir de la date d’achat. Encas dedéfectuosité sous garantie, nous réparons ou
remplacerons le produit, à nos frais, sous réserve que vous le retourniez avec l’a ranchissement prépayé. Cette garantie ne couvre pas les dommages causés par une mauvaise utilisation,
une mauvaise manipulation ou installation, ou l’entretien fournis pas une personne autre qu’un service de maintenance agréé par Bushnell.
Tout retour e ectué en vertu de cette garantit doit être accompagné des éléments suivants:
1. Un chèque/mandate-poste d’un montant de 10,00 $ pour couvrir les frais d’a ranchissement et de manutention.
2. Nom, adresse et numéro de téléphone de jour pour le retour du produit.
3. Une explication du défaut.
4. Une copie de votre preuve d’achat datée.
Ne pas envoyer d’accessoires (batteries, carte SD, cables), mais uniquement la produit à réparer.
Le produit doit être bien emballé dans solide un carton d’expédition pour éviter tout dommage durant le transit et expédié à l’adresse suivante:
AUX U.S.A. Envoyé à: AU CANADA Envoyé à:
Bushnell Outdoor Products Bushnell Outdoor Products
Attn.: Repairs Attn.: Repairs
9200 Cody 140 Great Gulf Drive, Unit # B
Overland Park, Kansas 66214 Vaughan, Ontario L4K 5W1
Pour les produits achetés à l’extérieur des Etats-Unis ou du Canada, veuillez contacter votre revendeur local pour obtenir les conditions degarantit applicables. En Europe, vous pouvez
également contacter Bushnell au: Bushnell Germany GmbH
Centre de service Européen
Mathias-Brüggen-Str. 80
D-50827 Köln
GERMANY
Tél: +49 221 995568-0
Fax: +49 221 995568-20
Cette garantie vous confère des droits légaux spéci ques.
Vous pouvez avoir d’autres droits qui variant d’un pays à l’autre.
©2018 Bushnell Outdoor Products

17
Contenidos N.º de
página
Carga de la pila 18
Botones y funciones 19
Primeros pasos 19
Modo Juego de Golf (Play Golf) 19
Uso del menú Juego de Golf 19-20
Elementos del menú Juego de Golf 20
Uso del Menú Golf 20
Elementos del Menú Golf 20
Uso del Menú principal 20
Elementos del Menú principal 20-21
Acceso a los datos actualizados
decampos de golf
21
Glosario de obstáculos 22
Garantía 23
Índice

18
CARGA DE LA PILA
La pila recargable del reloj iON2 es de larga duración y proporciona hasta 3 recorridos de golf (cifra basada en una
media de 4horas por recorrido) o un año de uso como un reloj de uso diario (consulta de hora solo). Sin embargo,
la duración de la pila se puede ver reducida debido a diversos factores (temperatura externa, etc). Todas las pilas
recargables pierden su duración de carga efectiva con el paso del tiempo. Cargar su pila cuando la pantalla del nivel
de pila muestre “una barra restante” le garantizará que podrá pasar la siguiente ronda completa.
Para comprobar la carga restante de la pila, pulse el botón MENÚ (2, siguiente página) y seleccione PILA. Para cargar
la pila, inserte el reloj en la base de carga con los contactos de carga de la parte posterior del reloj alineados con
las clavijas de carga de la parte izquierda de la base de carga. A continuación, conecte la base de carga a un puerto
USB del ordenador, un hub USB con alimentación o un cargador de smartphone de CA. Busque la pantalla que
muestra “CARGANDO” para indicar que su reloj iON2 se está cargando, asegúrese de conectarse desde la pantalla de
visualización de la Hora (modo Reloj) (ver la página 4) o desde la pantalla de nivel de PILA, a la que se puede acceder
desde el menú Jugar al Golf o Menú principal (los detalles del menú se muestran en la siguiente página).
Cuidado y mantenimiento
El reloj iON2 es duradero e impermeable. Para ayudar a garantizar un óptimo funcionamiento, se recomiendan las siguientes pautas de cuidado y mantenimiento:
• Evite exponer el reloj a condiciones medioambientales extremas durante un periodo de tiempo prolongado.
• Evite impactos fuertes en el reloj.
• Puede limpiar el reloj de manera ocasional con un paño suave y húmedo.
• Cepille los contactos del cargador de la parte inferior del reloj con regularidad. La acumulación de suciedad en la supercie de los puntos de contacto puede afectar a la carga y
la transferencia de datos normales. *Nota: utilice un cepillo de cerdas suaves (incluido). Los cepillos con cerdas duras o metálicas pueden dejar arañazos en el reloj.
• NO exponga el reloj a productos químicos fuertes como gasolina o alcohol, ya que lo dañarán.
• Guarde el reloj en un lugar seco mientras no esté en uso.
ADVERTENCIA
No intente abrir el iON2. El iON2 incluye una pila de ion litio recargable.
Existe riesgo de explosión si se sustituye la pila por otra de un tipo incorrecto.
• No intente abrir, desmontar ni reparar la pila interna. Solo un técnico cualicado debe cambiar la pila.
• No aplaste, agujeree o corte los contactos externos de la pila. No la exponga a temperaturas superiores a 60
o
C.
• No cargue la pila si la temperatura ambiente es mayor de 45
o
C.
• Recicle o deseche la pila correctamente. No la arroje al agua ni al fuego.
Aviso legal
Al utilizar este producto, usted acepta que Bushnell Outdoor Products no será legalmente responsable de lesiones o daños a usted ni a ninguna otra persona ni propiedad causados
por el manejo inadecuado por parte del usuario y/o un mal criterio durante el uso de este producto.
Nota: vea la Garantía limitada para conocer otras limitaciones de nuestra responsabilidad.
Información adicional
El Sistema de posicionamiento global (GPS), una red de 32 satélites en la órbita terrestre, lo opera y mantiene el gobierno de los Estados Unidos. Este dispositivo GPS necesita
la conexión con al menos 3 satélites para determinar su posición con precisión. Cualquier cambio realizado en el sistema por parte del gobierno podría afectar a la precisión y al
rendimiento de este producto.
Sitio web de Bushnell Golf GPS
www.bushnellgolf.com es el mejor recurso en línea para todos los propietarios de nuestros productos GPS de golf, incluyendo soporte de producto, preguntas frecuentes, etc. También
sirve como portal de acceso a los archivos GPS de campos de iGolf.com, que se utilizan con estos productos Bushnell. No es obligatorio registrar su iON2 en www.bushnell.igolf.com,
pero si lo hace se asegurará el acceso a los últimos datos GPS de los campos.
CARGANDO
CARGA
COMPLETADA

19
1. Botón MENÚ GOLF: Desde la pantalla Reloj, ver el Menú Golf. Desde el modo Juego de Golf, active la función Distancia del golpe.
2. Botón MENÚ: Desde la pantalla Hora, ver Menú principal. Desde el modo Juego de Golf, ver el menú Juego de Golf. Presione para salir de cualquier
pantalla de menú.
3. Botón ARRIBA: desplazarse hacia arriba a través de los elementos del menú.
4. Botón SELECCIONAR: selecciona el elemento del menú resaltado o la opción marcada.
5. Botón ABAJO: desplazarse hacia abajo a través de los elementos del menú. Pulsar y mantener pulsado (durante 7segundos) para encender y apagar.
PRIMEROS PASOS
6. En primer lugar, asegúrese de que la pila esté completamente cargada. Si lo está utilizando por primera vez, se debe cargar hasta alcanzar la carga
completa (nivel de pila con 4 barras).
7. Pulse y mantenga pulsado el botón ABAJO/ENCENDIDO (5) en el lado inferior derecho de la unidad hasta que se encienda. Pulse y mantenga pulsado
nuevamente el botón ABAJO/ENCENDIDO para apagarlo.
8. El iON2 se encenderá en el “Modo Reloj”, con la hora y la fecha visualizadas como se muestra arriba.
9. Al presionar cualquier botón, se activa la retroiluminación (visible solo en condiciones de poca luz ambiental) durante aproximadamente 8segundos.
MODO JUEGO DE GOLF (PLAY GOLF)
1. Asegúrese de estar al aire libre, en una ubicación con vista clara del cielo, para asegurar una buena recepción de las señales de los satélites GPS.
Presione el botón MENÚ GOLF (1). Con el botón JUEGO DE GOLF resaltado (presione el botón ARRIBA/ABAJO [3/5] si es necesario), presione el
botón SELECCIONAR (4). La pantalla indicará ”BUSCANDO” mientras el iON2 busca diversas señales de satélites GPS y se sintoniza con ellas. Una vez
sintonizado (tenga en cuenta que esto puede tomar más tiempo la primera vez que use el iON2), emitirá unos pitidos con rmando la correcta conexión
GPS, luego verá una lista de nombres de campos.
2. Utilice los botones ARRIBA/ABAJO (3/5) para seleccionar (resaltar) el campo en el que quiera jugar de entre la lista de campos cercanos (el más cercano
aparecerá al principio de la lista), y luego presione SELECCIONAR. Ahora está en el modo Juego de Golf.
3. La pantalla mostrará (captura de pantalla a la derecha): nº de hoyo actual (arriba a la izquierda), par del hoyo (arriba a la
derecha) y distancias al centro (número grande en la parte superior central), a la parte delantera (inferior izquierda) y a la
posterior (inferior derecha) del green.
4. Presione SELECCIONAR (4) para ver las distancias a hasta 4 indicaciones de obstáculos por hoyo, variables según los
obstáculos más signi cativos ubicados cerca de un hoyo especí co del campo actual. Consulte el “Glosario de obstáculos”
para ver una lista de todas las abreviaturas usadas para designar los diversos obstáculos. Presione el botón SELECCIONAR,
después de ver las pantallas Obstáculos, para ir a la pantalla Información de ronda que muestra el tiempo transcurrido y la
distancia recorrida desde que comenzó la ronda (desde que ingresó al modo Juego de Golf).
5. La pantalla pasará automáticamente al siguiente hoyo mientras avanza por el campo. Presione el botón ABAJO (3/5) para
avanzar manualmente al siguiente hoyo (útil para inicios de partidas en “hoyos diferentes”), o vuelva al hoyo anterior.
6. Para usar la función Distancia del golpe, presione el botón MENÚ GOLF (1) mientras está en el punto de salida (este es su
“punto A” de inicio); mientras vaya caminando, la pantalla se actualizará para indicar la distancia desde el punto A hasta su
ubicación actual (“punto B”). Esto es útil para medir el alcance del golpe. Presione el botón MENÚ GOLF nuevamente para volver a la pantalla JUEGO DE
GOLF, presione de nuevo para establecer un nuevo punto de inicio de Distancia del golpe (vuelva a comenzar en “0”).
USO DEL MENÚ JUEGO DE GOLF
1. En el modo JUEGO DE GOLF, presione el botón MENÚ (2) para ver el MENÚ JUEGO DE GOLF.
2. Seleccione el elemento del menú usando los botones ARRIBA/ABAJO para resaltarlo, y luego presione el botón SELECCIONAR.
3. Si hay varias opciones disponibles para un ajuste, use ARRIBA/ABAJO para resaltar su elección, y después presione SELECCIONAR.
BOTONES/FUNCIONES
1
2
MENÚ
ARRIBA
3
SELECCIONAR
4
5
ABAJO/
ENCENDIDO
Clavijas
decarga
Contactos
decarga
PANTALLA DE HORA (MODO RELOJ)
MENÚ GOLF/MODO JUEGO DE GOLF
MODO JUEGO DE GOLF
(PLAY GOLF)

20
4. Una casilla de vericación (rellenada) a la izquierda de una conguración indica la conguración actual. Para cambiarla, resalte su conguración preferida
y presione SELECCIONAR.
5. Presione el botón MENÚ para regresar a la pantalla del menú anterior.
ELEMENTOS DEL MENÚ JUEGO DE GOLF (Desde el modo Juego de Golf, presione el botón MENÚ)
• CAMBIAR CAMPO: presione SELECCIONAR, resalte un campo de golf diferente de la lista de campos cercanos, luego presione SELECCIONAR.
• PILA: presione el botón SELECCIONAR para comprobar el nivel de la pila (carga restante, icono con 1-4 barras).
• SALIR DEL JUEGO: presione SELECCIONAR para detener el seguimiento del campo actual, nalizar el juego y regresar a la pantalla de visualización de la
Hora (modo reloj).
USO DEL MENÚ GOLF
1. Desde la pantalla de la Hora (modo reloj), presione el botón MENÚ GOLF (1) para ver el MENÚ GOLF.
2. Seleccione el elemento del menú usando los botones ARRIBA/ABAJO para resaltarlo, y luego presione el botón SELECCIONAR.
3. Si hay varias opciones disponibles para un ajuste, use ARRIBA/ABAJO para resaltar su elección, y después presione SELECCIONAR.
ELEMENTOS DEL MENÚ GOLF (Desde el modo Reloj, presione el botón MENÚ GOLF)
• JUEGO DE GOLF: desde cualquier pantalla, regresa a la pantalla que muestra el hoyo actual y las distancias en función de su posición actual en el campo.
• SALIDA: la Salida es una función útil que le permite congurar una hora de salida (cita para jugar al golf) por adelantado. Cuando se ha introducido una
Hora de salida y la función está congurada en “ACTIVADA”, el iON2 entrará automáticamente en el modo Juego de Golf y buscará los campos locales
7minutos antes de la hora prestablecida. Simplemente, seleccione su campo en la lista y disfrute de su partida de golf.
Para denir una Hora de salida, seleccione SALIDA en el menú GOLF (con la opción SALIDA resaltada, presione el botón SELECCIONAR). A continuación,
presione el botón SELECCIONAR y use los botones ARRIBA/ABAJO para congurar la hora deseada. Presione SELECCIONAR y repita el mismo proceso
para denir los minutos, a.m./p.m. y los días de la semana. Después de presionar SELECCIONAR por última vez, volverá a la pantalla SALIDA, y podrá
ver cómo su Hora de salida ha quedado almacenada en la memoria de la unidad. Para editar la Hora de salida, presione SELECCIONAR y repita el
proceso para cambiar la hora, minuto, etc. Una vez que se haya congurado la Hora de salida, use los botones ARRIBA/ABAJO para ENCENDER/APAGAR
(activar/desactivar).
• CONFIGURACIÓN: presione SELECCIONAR para acceder al SUBMENÚ DE CONFIGURACIÓN, con 3 opciones:
1. APAGADO AUTOMÁTICO: la función de Apagado automático está diseñada para salir automáticamente del modo Juego de Golf cuando
haya pasado la hora precongurada. Mientras esté en modo Juego de Golf, después de que haya pasado la hora precongurada, el reloj saldrá
automáticamente del juego y regresará a la pantalla de Inicio (Hora) para preservar la vida de la pila. Para congurar la hora de Apagado automático,
seleccione APAGADO AUTOMÁTICO del menú Juego de Golf/Conguración. Desde la pantalla de conguración del APAGADO AUTOMÁTICO,
use los botones ARRIBA/ABAJO para cambiar la hora hacia arriba y hacia abajo. La función de Apagado automático siempre está congurada a la
duración de tiempo que gura en la página de Apagado automático. Se puede congurar en un margen de entre 1,5 y 9 horas o pulsar ARRIBA
oABAJO una vez más al nal del rango horario para seleccionar DESHABILITAR y desactiva la función.
2. YARDAS/METROS: : presione SELECCIONAR. La casilla de vericación (rellenada) indica el ajuste actual (por defecto = YARDAS). Para cambiar la
forma en que se muestran las distancias, resalte YARDAS o METROS, y presione SELECCIONAR.
3. PILA: presione el botón SELECCIONAR para vericar el estado de la pila (carga restante, icono con 1-4 barras).
USO DEL MENÚ PRINCIPAL (Desde el modo Reloj, presione el botón MENÚ)
Si el iON2 está en modo Juego de Golf, presione el botón MENÚ (2) para ingresar al Menú Golf, resalte SALIR DEL JUEGO y presione SELECCIONAR para
regresar a la pantalla de la Hora (modo reloj). Desde la pantalla de la Hora (modo reloj), presione el botón MENÚ para ver las opciones del MENÚ (menú
principal). Para ver las opciones del menú y seleccionar sus parámetros preferidos en el Menú principal, siga los mismos pasos que se describen en “Uso del
Menú Golf en el modo Juego de Golf”. Para salir del Menú principal y regresar al modo Reloj, presione el botón MENÚ hasta que vea la pantalla de la Hora.
ELEMENTOS DEL MENÚ PRINCIPAL
• BLUETOOTH: el iON2 se puede conectar a la aplicación BUSHNELL GOLF para smartphones a través de Bluetooth. Una vez conectada, la aplicación se puede
usar para congurar el iON2 (seleccione las opciones del menú) y actualice de forma inalámbrica la base de datos interna de campos de golf del iON2.
LasHoras de salida también se pueden congurar a través de la aplicación. La aplicación BUSHNELL GOLF se puede descargar de la Apple Store y de la tienda
Google Play para dispositivos iPhone y Android, respectivamente. Descargue e instale la aplicación en su dispositivo móvil. Vaya a la página de parámetros
del dispositivo móvil para activar el Bluetooth y después inicie la aplicación BUSHNELL GOLF . Para conectar el iON2 a la aplicación del smartphone, siga los
pasos que vienen a continuación:
1. En su smartphone, asegúrese de que el Bluetooth esté encendido.
2. En su iON2, vaya al Menú principal, entre en el menú PARÁMETROS y después desplácese hacia abajo hasta BLUETOOTH y presione SELECCIONAR.
3. Seleccione “ENCENDER” para activar Bluetooth.
4. A continuación, su iON2 le dará un código. Introduzca dicho código en la aplicación del smartphone cuando se lo solicite.
5. Una vez correctamente vinculados, la aplicación del smartphone mostrará una conrmación. Ahora, el dispositivo ya está emparejado con
susmartphone.
• PODÓMETRO: a n de registrar los pasos que se dan, el iON2 incluye un podómetro. Este utiliza un acelerómetro interno para registrar el número de pasos
que se dan. Una vez habilitado, se puede acceder a la pantalla del podómetro desde la pantalla de la Hora (modo reloj) presionando el botón ABAJO.
Elobjetivo del podómetro es registrar el número de pasos. El objetivo se puede jar en incrementos de 1000 desde 1000 hasta 99000. También se puede
congurar el objetivo del podómetro desde la aplicación del smartphone.

21
• ESTADO FÍSICO: el iON2 incluye un cuentakilómetros para rastrear la distancia recorrida, el tiempo transcurrido y la velocidad. Estado físico
utiliza el GPS para su ubicación. Una vez activado, se puede acceder a la pantalla Estado físico desde la pantalla de la Hora utilizando el botón ABAJO.
• CRONÓGRAFO: presione el botón SELECCIONAR para iniciar y detener el cronógrafo (la pantalla muestra el tiempo transcurrido). Presione
el botón ARRIBA para restablecer a cero.
• MINUTERO: presione el botón SELECCIONAR para iniciar y detener el Minutero (la pantalla muestra la cuenta atrás desde tiempo
establecido). Presione el botón ARRIBA para restablecer el tiempo establecido. Después de reiniciar, con el minutero apagado, presione
el botón SELECCIONAR (los dígitos de la pantalla parpadearán) y luego use los botones ARRIBA/ABAJO para congurar el tiempo deseado
(horas/minutos/segundos). Cuando use el minutero, escuchará unos pitidos (una vez por segundo) 10 segundos antes de que se acabe el
tiempo. Al nal del tiempo establecido, el iON2 pitará 3 veces por segundo.
• ALARMA: presione el botón SELECCIONAR y luego use ARRIBA/ABAJO para congurar la alarma con la hora/minuto/PM o AM deseados.
Después de congurar la hora de alarma deseada, presione ARRIBA para encender o apagar la alarma.
• PILA: presione el botón SELECCIONAR para comprobar el nivel de la pila (carga restante, icono con 1-4 barras).
• PARÁMETROS: presione SELECCIONAR para acceder al SUBMENÚ DE PARÁMETROS, con 6 opciones:
1. HORA/FECHA: presione SELECCIONAR y, a continuación, resalte y seleccione entre estos tres parámetros relacionados con la hora/fecha:
AJUSTAR HORA: presione SELECCIONAR y resalte un método:
• POR GPS: presione SELECCIONAR para ajustar automáticamente la hora en función de su ubicación actual GPS.
• MANUAL: utilice los botones ARRIBA/ABAJO para introducir usted mismo la hora y fecha actuales.
HORARIO DE VERANO: presione SELECCIONAR y resalte el estado actual del horario de verano para su ubicación:
• ON +1
• OFF -1
FORMATO: presione SELECCIONAR y resalte su preferencia de formato de visualización de la hora:
• 12 H
• 24 H
2. UNIDADES: presione SELECCIONAR. La casilla de vericación (rellenada) indica el ajuste actual (por defecto = YARDAS). Para cambiar
la forma en que se muestran las distancias, resalte YARDAS o METROS, y presione SELECCIONAR.
3. IDIOMA: el iON2 incorpora 5 parámetros de idioma de menús (INGLÉS, ESPAÑOL, ALEMÁN, FRANCÉS E ITALIANO). Por defecto, la
interfaz de usuario está en inglés. Presione SELECCIONAR, utilice ARRIBA/ABAJO para desplazarse por las opciones del menú Idioma
y después presione el botón SELECCIONAR para conrmar su idioma (resaltado) preferido para todas mostrar en todas las pantallas.
4. SONIDO: para apagar el botón “beep”, presione el sonido de conrmación cuando use los menús, seleccione “DESACTIVAR” y presione
SELECCIONAR.
5. ACERCA DE: presione SELECCIONAR para mostrar la versión de rmware de su unidad, fecha de fabricación y el n.º ID de FCC.
6. REINICIAR: para restablecer la unidad a todos sus parámetros originales, presione SELECCIONAR, luego seleccione VALORES
PREDETERMINADOS y conrme que desea proceder con el cambio. Las otras dos opciones de REINICIAR DISPOSITIVO
(COMPROBAR ACTUALIZACIONES y FORMATEAR) solo deben usarlas los técnicos de servicio cualicados.
ACCESO A LOS DATOS ACTUALIZADOS DE CAMPOS DE GOLF
Su iON2 cuenta de manera predeterminada con los datos de más de 33000 campos de todo el mundo. Está listo para usarse desde el primer
momento, sin necesidad de descargar software ni pagar ninguna cuota de abono.
Pero quizás piense: “¿Qué sucede si se inaugura un nuevo campo después de fabricarse mi unidad? ¿Hay alguna manera de actualizar la base de
datos de mi unidad para agregarlo?” La respuesta es sí, y es fácil de hacer.
Vaya a www.bushnellgolf.com y vea la página del producto para cualquiera de las diferentes versiones de color del iON2. Encontrará tres
enlaces naranjas en los que podrá hacer clic:
• Cómo actualizar su GPS de golf con los mapas más recientes
Haga clic en este enlace para obtener instrucciones detalladas y descargar datos de nuevos campos desde iGolf.com
• Solicitar actualización de campos
Haga clic en este enlace para ir a un formulario que puede completar y enviar por correo electrónico a iGolf, para enviar un campo que
no esté incluido en la base de datos, o si encuentra información (datos de un hoyo) que no se corresponde correctamente en un campo
existente.
• Busque campos disponibles en su GPS de golf de Bushnell
Haga clic en este enlace para buscar en la base de datos actual de iGolf y así vericar que su campo de interés está incluido.
También puede ir a: https://igolf.com y hacer clic en “Unirse ahora”, rellenar su información de contacto en el formulario de registro y después
seleccionar “Tengo un dispositivo GPS” para acceder a las actualizaciones de los campos.
Use el cable USB suministrado para conectar su iON2 a su PC o Mac. Una vez conectado, la pantalla mostrará “MODO USB”.
Android y Google Play son marcas registradas de Google Inc. en los EstadosUnidos y otros países.
iPhone y Apple Store son marcas comerciales de Apple Inc., registradas en EE.UU. y en otros países.
Otros nombres pueden ser marcas registradas de sus respectivos dueños.

22
GLOSARIO DE OBSTÁCULOS
Las designaciones de obstáculos se muestran en forma de abreviaturas, denidas de la siguiente manera:
• BGB – Bunker posterior al green
• BGW – Agua posterior al green
• CRK – Curso de arroyo
• CRKC – Arrastre de arroyo
• EOF – Final de calle
• FGB – Bunker frontal de green
• FGW – Arroyo de agua frontal del green
• FGWC – Arrastre de agua frontal del green
• LFB – Bunker a la izquierda de la calle
• LFW – Arroyo de agua a la izquierda de la calle
• LFWC – Arrastre de agua a la izquierda de la calle
• LGB – Bunker a la izquierda del green
• LGW – Agua a la izquierda del green
• MFB – Bunker en medio de calle
• MFW – Arroyo con agua en medio de calle
• MFWC – Arrastre de agua en medio de calle
• RFB – Bunker a la derecha de la calle
• RFW – Arroyo con agua a la derecha de la calle
• RFWC – Arrastre de agua a la derecha de la calle
• RGB – Bunker a la derecha del green
• RGW – Agua a la derecha del green

23
FCC ID: 2ABQG-36885
IC: 5830A-36885
Eliminación de equipos eléctricos y electrónicos
(Aplicable en la UE y otros países europeos con sistemas de recogida separada)
Este equipo contiene elementos eléctricos o electrónicos y por tanto no debe eliminarse con los residuos domésticos normales. En cambio, debe eliminarse en los
correspondientes puntos de recogida para reciclaje previstos por las comunidades. Para usted resultará gratuito.
Si el equipo incorpora baterías intercambiables (recargables), estas también deben retirarse antes y, si es necesario, eliminarlas de acuerdo con las regulaciones
correspondientes (consulte también los comentarios al efecto de las instrucciones de estas unidades).
La administración de su comunidad, su empresa local de recogida o la tienda en la que adquirió este equipo pueden proporcionarle información adicional sobre
este tema.
Android y Google Play son marcas comerciales registrada de Microsoft Corporation en Estados Unidos y en otros países.
iPhone y Apple Store son marcas comerciales de Apple Inc. registradas en EE. UU. y en otros países.
Otros nombres pueden ser marcas comerciales de su respectivos propietarios.
GARANTÍA LIMITADA DE UN AÑO
Bushnell
®
está garantizado como libre de defectos en materiales y mano de obra durante un año desde la fecha de compra. En caso de defecto cubierto por esta garantía, nosotros,
a nuestra discreción, repararemos o sustituiremos el producto, siempre que lo devuelva con portes pagados. Esta garantía no cubre los daños causados por mal uso, manipulación
inadecuada, instalación o mantenimiento realizados por alguien que no sea un departamento de servicio autorizado de Bushnell.
Cualquier devolución que se haga bajo garantía deberá ir acompañada de los elementos que se enumeran a continuación:
1. Un cheque o giro postal por la cantidad de 10USD para cubrir los gastos de franqueo y manipulación.
2. Nombre, dirección y número de teléfono personal para devolver el producto.
3. Una explicación del defecto.
4. Copia de su factura de compra con fecha.
No envíe accesorios (baterías, tarjetas SD, cables), únicamente el producto que deba ser reparado.
El producto debe empaquetarse bien en una caja resistente para evitar daños durante el transporte y debe enviarse a la dirección que seindica a continuación:
EN ESTADOS UNIDOS enviar a EN CANADÁ enviar a:
Bushnell Outdoor Products Bushnell Outdoor Products
Atención: Reparaciones Atención: Reparaciones
9200 Cody 140 Great Gulf Drive, Unit # B
Overland Park, Kansas 66214 Vaughan, Ontario L4K 5W1
Para los productos comprados fuera de Estados Unidos o Canadá, póngase en contacto con su distribuidor local para obtener información sobre lagarantía aplicable. En Europa también puede
ponerse en contacto con Bushnell en: Bushnell Germany GmbH
European Service Centre
Mathias-Brüggen-Str. 80
D-50827 Colonia
GERMANY
Tél: +49 221 995568-0
Fax: +49 221 995568-20
Esta garantía le otorga derechos legales especí cos.
Es posible que tenga otros derechos que varíen de un país a otro.
©2018 Bushnell Outdoor Products

24
Inhaltsverzeichnis Seite
Batterie au aden 25
Tasten und Funktionen 26
Erste Schritte 26
Play Golf-Modus 26
Verwendung des Play Golf-Menüs 27
Play Golf-Menüoption 27
Verwendung des Golf-Menüs 27
Golf-Menüoptionen 27
Verwendung des Hauptmenüs 27
Hauptmenüoptionen 28
Zugri auf aktualisierte Golfplatzdaten 29
Hindernisglossar 29
Gewährleistung 30
Inhaltsverzeichnis

25
BATTERIE AUFLADEN
Die langlebige, auadbare Batterie der iON2 Watch bietet ausreichend Ladekapazität für bis zu 3 Runden Golf
(bei angenommenen 4 Stunden pro Runde) oder für ein Jahr bei reiner Verwendung als Zeitanzeige. Die Laufzeit der
Batterie kann allerdings durch den Einuss äußerer Faktoren (Temperatur usw.) verkürzt werden. Auadbare Batterien
büßen mit der Zeit an Ladekapazität ein. Ein Auaden der Batterie, wenn die Batteriestandsanzeige noch einen Balken
anzeigt, garantiert, dass Sie die nächste komplette Runde durchstehen können.
Um sich den aktuellen Ladestand der Batterie anzeigen zu lassen,drücken Sie auf die MENU-Taste (2, nächste Seite)
und wählen Sie BATTERY. Zum Laden der Batterie platzieren Sie die Uhr in der Ladestation. Richten Sie dabei die
Ladekontakte auf der Rückseite der Uhr an den Kontakten auf der linken Seite im Ladegerät aus. Schließen Sie die
Ladestation dann an einen USB-Port an Ihrem Computer, einen angeschlossenen USB-Hub oder ein Ladegerät für
Smartphones (AC) an. Achten Sie darauf, dass auf dem Display „CHARGING“ angezeigt wird, damit Ihre iON2-Uhr
geladen wird. Stellen Sie sicher, dass die Verbindung über den Display „Zeitanzeige“ (Uhrmodus) hergestellt wird
(siehe S. 4) oder von der BATTERY-Anzeige, auf die Sie über das Play Golf-Menü oder das Hauptmenü zugreifen können
(siehe unten, Menüdetails auf der nächsten Seite).
Pege und Wartung
Die iON2 Watch ist robust und wasserdicht. Beachten Sie folgende Empfehlungen für Pege und Wartung, um einen zuverlässigen Betrieb zu gewährleisten:
• Setzen Sie die Uhr niemals über einen längeren Zeitraum extremen Bedingungen aus.
• Vermeiden Sie kräftige Stoßbelastung der Uhr.
• Sie können die Uhr von Zeit zu Zeit mit einem weichen, angefeuchteten Tuch reinigen.
• Reinigen Sie die Kontakte an der Unterseite der Uhr regelmäßig mit einer Bürste. Schmutz an den Kontaktpunkten kann den Ladevorgang und die Datenübertragung
beeinträchtigen. *Hinweis: Verwenden Sie eine weiche Bürste (im Lieferumfang enthalten). Harte Bürsten und Metallbürsten können Kratzer auf der Uhr hinterlassen.
• Die Uhr darf NICHT mit aggressiven Chemikalien wie Benzin oder Alkohol in Berührung kommen. Diese Chemikalien beschädigen die Uhr.
• Bewahren Sie die Uhr bei Nichtverwendung an einem trockenen Ort auf.
WARNUNG
Versuchen Sie nicht, die iON2 zu önen. Die iON2 enthält eine wiederauadbare Lithium-Ionen-Batterie.
Es besteht Explosionsgefahr, wenn die Batterie durch einen ungeeigneten Batterietyp ersetzt wird.
• Versuchen Sie nicht, die eingebauten Batterie zu önen, zu zerlegen oder zu warten. Der Batteriewechsel muss von einem qualizierten Techniker durchgeführt werden.
• Die außenliegenden Kontakte der Batterie dürfen nicht gequetscht oder durchstochen werden. Nicht Temperaturen über 140°F (60°C) aussetzen.
• Laden Sie die Batterie nicht auf, wenn die Umgebungstemperatur mehr als 113°F (45°C) beträgt.
• Recyceln oder entsorgen Sie die Batterie ordnungsgemäß. Er darf nicht in Wasser oder Feuer entsorgt werden.
Haftungsausschluss
Mit der Verwendung dieses Produkts erkennen Sie an, dass Bushnell Outdoor Products nicht für Verletzungen oder Schäden jeglicher Art haftet, die durch unsachgemäße Verwendung
des Produkts und/oder mangelndes Urteilvermögen des Anwenders bei der Verwendung dieses Produkts entstehen.
Hinweis: Weitere Informationen zu unserer Haftungsbeschränkung nden Sie in der eingeschränkten Garantie.
Zusätzliche Informationen
Das „Global Positioning System“ (GPS), ein Netzwerk aus 32 erdumkreisenden Satelliten, wird von der Landesregierung der USA betrieben und gewartet. Die exakte Bestimmung
Ihrer Position durch dieses GPS-Gerät muss mithilfe von mindestens 3 Satelliten erfolgen. Die Leistung und die Exaktheit dieses Produkts können durch jegliche von der Regierung
vorgenommenen Änderungen beeinusst werden.
Website von Bushnell Golf GPS
www.bushnellgolf.com bietet allen Besitzern von Golf-GPS-Produkten beste Online-Ressourcen, einschließlich Produktsupport, FAQS und mehr. Außerdem haben Sie hier Zugri
auf mit den Produkten von Bushnell kompatible GPS-Platzdateien von iGolf.com. Sie müssen die iON2 nicht auf www.bushnell.igolf.com registrieren, erhalten so aber Zugri auf
die aktuellsten GPS-Platzdaten.
LADUNG
LADEVORGANG
ABGESCHLOSSEN

26
1. GOLFMENÜ-Taste: Rufen Sie in der Zeitanzeige das Golf-Menü auf. Aktivieren Sie im Play Golf-Modus die Funktion „Schussentfernung“.
2. MENÜ-Taste: Rufen Sie in der Zeitanzeige das Hauptmenü auf. Den Play Golf-Modus können Sie im Play Golf-Menü aufrufen. Drücken,
um jedes beliebige Menüdisplay zu verlassen.
3. Taste „UP“: Durch Menüoptionen nach oben navigieren
4. Taste „SELECT“: Wählt die hervorgehobene Menüoption oder die angeklickte Option.
5. Taste „DOWN“: Durch Menüoptionen nach unten navigieren. Zum Ausschalten sieben Sekunden lang drücken.
ERSTE SCHRITTE
1. Stellen Sie zunächst sicher, dass die Batterie vollständig geladen ist. Vor der ersten Benutzung sollte er vollständig aufgeladen werden
(Batteriestand mit 4 Balken).
2. Drücken und halten Sie die DOWN/POWER-Taste (5) an der unteren rechten Seite der Geräts, bis es eingeschaltet ist. Halten Sie die
„DOWN/POWER“-Taste erneut gedrückt, um das Gerät auszuschalten.
3. Die iON2 schaltet sich im „Watch-Modus“ ein, wobei Uhrzeit und Datum wie oben gezeigt angezeigt werden.
4. Durch Drücken einer beliebigen Taste wird die Hintergrundbeleuchtung des Displays (nur bei schwachem Umgebungslicht sichtbar)
fürca. 8 Sekunden aktiviert.
PLAY GOLF-MODUS
1. Stellen Sie als nächstes sicher, dass Sie sich im Freien an einem Standort mit freier Sicht auf den Himmel be nden, um einen guten Empfang
von GPS-Satellitensignalen zu gewährleisten. Drücken Sie die Taste GOLF MENU (1). Mit PLAY GOLFhervorgehoben (drückenSiedieUP/DOWN
Taste (3/5), sofern erforderlich), drücken Sie die SELECT-Taste (4). Auf dem Display wird „SEARCHING“ angezeigt, da die iON2 nach mehreren
verfügbaren GPS-Satellitensignalen sucht und diese speichert. Einmal gesperrt (beachtenSie,dassdiesbeider ersten Verwendung des iON2
länger dauern kann), hören Sie Pieptöne, die eine GPS-Sperre bestätigen, danach sehen Sie eine Liste der Kursnamen.
2. Wählen (markieren) Sie mithilfe der UP/DOWN-Tasten, (3/5) den Platz, auf dem Sie spielen möchten, aus der Liste der nahegelegenen
Plätze (nächstliegender Platz am Anfang der Liste), und drücken Sie dann SELECT. Sie be nden sich jetzt im Play Golf-Modus.
3. Dann wird auf dem Display Folgendes angezeigt (Screenshot auf der rechten Seite): Aktuelle Lochnummer
(oben links), Par für das Loch (oben rechts) und die Entfernung zur Mitte (große Zahl oben in der Mitte),
Vorderseite (unten links) und Rückseite (unten rechts) des Grüns.
4. Drücken Sie SELECT (4), um die Entfernungen zu bis zu 4 Hindernissen pro Loch, abhängig von den wichtigsten
Hindernissen in der Nähe eines bestimmten Lochs auf dem aktuellen Kurs, aufzurufen. Im „Hindernisglossar“ nden
Sie alle Abkürzungen für die verschiedenen Hindernisse. Nachdem Sie den (die) Hindernisanzeige(n) aufgerufen
haben, drücken Sie die SELECT-Taste, um zum Round Info-Display zu gelangen, auf dem die abgelaufene Zeit und
die seit Beginn der Runde zurückgelegte Entfernung angezeigt wird (eingegebener Golf Play-Modus).
5. Das Display springt automatisch zum nächsten Loch, während Sie den Kurs abgehen. Drücken Sie die UP oder
DOWN-Taste (3/5), um manuell zum nächsten oder zum vorherigen Loch zu gelangen (praktisch für „Schnellstarts“).
6. Drücken Sie die GOLF MENU-Taste (1) während des Abschlags (dies ist Ihr Start, „Punkt A“) – beim Gehen
zeigt das Display die aktuelle Entfernung von Punkt A zu Ihrem aktuellen Standort an („Punkt B“). Dies ist nützlich, um die Länge Ihres
Schlages zu messen. Drücken Sie erneut auf GOLF MENU, um zum PLAY GOLF-Display zurückzukehren, und drücken Sie noch einmal,
um einen neuen Startpunkt für die Schlagentfernung einzustellen (beginnen Sie wieder bei „0“).
TASTEN/FUNKTIONEN
1
2
MENÜ
HOCH
3
AUSWÄHLEN
4
5
RUNTER/
EINSCHALTEN
Kontaktpins
Ladekontakte
ZEITANZEIGE (UHRMODUS)
GOLF-MENÜ/PLAY GOLF-MODUS
PLAY GOLF-MODUS

27
VERWENDUNG DES PLAY GOLF-MENÜS
1. Drücken Sie im PLAY GOLF-Modus die MENU-Taste (2), um das PLAY GOLF-MENÜ anzeigen zu lassen.
2. Wählen Sie mit Hilfe der UP/DOWN-Tasten den gewünschten Menüpunkt aus und drücken Sie dann die SELECT-Taste.
3. Wenn mehrere Optionen für eine Einstellung verfügbar sind, verwenden Sie die UP/DOWN-Taste um Ihre Auswahl zu markieren,
unddrücken Sie dann auf SELECT.
4. Ein ausgefülltes Kontrollkästchen links neben einer Einstellung zeigt die aktuelle Einstellung an. Um diese zu ändern, markieren Sie Ihre
bevorzugte Einstellung und drücken Sie SELECT.
5. Drücken Sie die MENU-Taste, um zum vorherigen Menüdisplay zurückzukehren.
PLAY GOLF-MENÜOPTIONEN (drücken Sie im Play Golf-Modus die MENU-Taste)
• KURS WECHSELN: Drücken Sie SELECT, markieren Sie einen anderen Golfplatz aus der Liste der Kurse in der Nähe und drücken Sie dann SELECT.
• BATTERIE: Drücken Sie die SELECT-Taste zum Überprüfen des Batterieladestands (Restladung, Symbol 1-4 Balken).
• RUNDE VERLASSEN: Drücken Sie SELECT, um den aktuellen Kurs anzuhalten, das Spiel zu beenden und zum Zeitanzeige-Display (Uhrmodus)
zurückzukehren.
VERWENDUNG DES GOLF-MENÜS
1. Drücken Sie in der Zeitanzeige (Uhrmodus) die Taste GOLF MENU (1), um das GOLF MENU anzusehen.
2. Wählen Sie mit Hilfe der UP/DOWN-Tasten den gewünschten Menüpunkt aus und drücken Sie dann die SELECT-Taste.
3. Wenn mehrere Optionen für eine Einstellung verfügbar sind, verwenden Sie die UP/DOWN-Taste um Ihre Auswahl zu markieren,
unddrücken Sie dann auf SELECT.
GOLF MENU-OPTIONEN (drücken Sie im Play Golf-Modus die GOLF MENU-Taste)
• PLAY GOLF: bringt Sie von jedem Display aus zurück zur Anzeige des aktuellen Lochs und der aktuellen Entfernungen basierend auf
Ihrer aktuellen Position auf dem Platz.
• TEE TIME: Tee Time ist eine praktische Funktion, mit der Sie eine Teetime (Golfstartzeit) im Voraus festlegen können. Sobald eine Startzeit
eingestellt ist und die Funktion auf „ON“ gestellt ist, wird die iON2 automatisch in den Play Golf-Modus wechseln und 7 Minuten vor der
eingestellten Zeit nach lokalen Golfplätzen suchen. Wählen Sie einfach Ihren Platz aus der Liste und genießen Sie Ihre Runde Golf!
Um eine Startzeit einzustellen, wählen Sie TEE TIME im GOLF-Menü (markieren Sie TEE TIME und drücken Sie die SELECT-Taste). Drücken
Sie als nächstes die SELECT-Taste und stellen Sie dann mit den UP/DOWN-Tasten die gewünschte Stunde ein. Drücken Sie SELECT und
wiederholen Sie den gleichen Vorgang, um Minuten, AM/PM und Wochentag einzustellen. Nachdem Sie SELECT das letzte Mal gedrückt
haben, gelangen Sie wieder auf den TEE TIME-Display und können sehen, dass Ihre Startzeit in den Gerätespeicher eingegeben wurde.
Um die Abschlagzeit zu bearbeiten, drücken Sie SELECT und wiederholen Sie den Vorgang, um die Stunde, Minute, etc. einzustellen.
Sobald die Tee Time eingestellt wurde, benutzen Sie die UP/DOWN Tasten um sie ein-/auszuschalten (aktivieren/deaktivieren).
• SETUP: Drücken Sie SELECT, um auf das SETUP-UNTERMENÜ mit 3 Optionen zuzugreifen:
1. AUTO-OFF: Mit der Funktion zum automatischen Abschalten wird der Play Golf-Modus nach Ablauf der voreingestellten Zeit automatisch
beendet. Wenn sich die Uhr im Modus „Play Golf“ bendet und die voreingestellte Zeit abgelaufen ist, wird die Runde automatisch
beendet und das Start-Display (Zeitanzeige) angezeigt, um die Laufzeit der Batterie zu verlängern. Um die automatische Abschaltung
einzustellen, wählen Sie im Play Golf/Setup-Menü die Option AUTO-OFF aus. Auf dem eingestellten AUTO-OFF-Display können Sie mit
den UP/DOWN-Tasten die Zeit einstellen. Die automatische Abschaltung ist standardmäßig auf die auf der Seite „AUTO-OFF“ angezeigte
Dauer festgelegt. Die Dauer kann auf einen Wert zwischen 1,5 und 9Stunden festgelegt werden. Drücken Sie am Anfang bzw. Ende des
Zeitbereichs noch einmal UP oder DOWN und wählen Sie DISABLE aus, um die Funktion zu deaktivieren.
2. YDS/MTRS: Drücken Sie SELECT. Das ausgefüllte Kontrollkästchen zeigt die aktuelle Einstellung an (Standard = YARDS).
UmdieAnzeige von Entfernungen zu ändern, markieren Sie YARDS oder METERund drücken Sie SELECT.
3. BATTERIE: Drücken Sie die SELECT-Taste zum Überprüfen des Batterieladestands (Restladung, Symbol 1-4 Balken).
VERWENDUNG DER HAUPTOPTIONEN (drücken Sie im Play Golf-Modus die MENU-Taste)
Wenn sich die iON2 im Play Golf-Modus bendet, drücken Sie die MENU-Taste (2), um ins Golf-Menü zu gelangen, markieren Sie EXIT ROUND
und drücken Sie SELECT, um zur Zeitanzeige (Uhrmodus) zurückzukehren. Drücken Sie in der Zeitanzeige (Uhrmodus) die MENU-Taste GOLF,
um die MENU-Optionen (Hauptmenü) anzusehen. Um die Menüoptionen anzuzeigen und die gewünschten Einstellungen im Hauptmenü
auszuwählen, befolgen Sie die gleichen Schritte wie unter „Verwendung des Golf-Menüs im Play Golf-Modus“ beschrieben. Um das Hauptmenü
zu verlassen und zum Uhrmodus zurückzukehren, drücken Sie die Taste MENU, bis die Zeitanzeige erscheint.

28
HAUPTMENÜOPTIONEN
• BLUETOOTH: Die iON2 kann sich über Bluetooth mit der BUSHNELL GOLF Smartphone-App verbinden. Sobald er verbunden ist, kann die App
dazu verwendet werden, die iON2 zu kongurieren (Menüoptionen auswählen) und die interne Golfplatz-Datenbank der iON2 drahtlos
zu aktualisieren. Teetimes können auch über die App eingestellt werden. Die BUSHNELL GOLF-App nden Sie für das iPhone im Apple Store
und auf Google Play für Android-Geräte. Laden Sie die App herunter und installieren Sie sie auf dem Mobilgerät. Aktivieren Sie in den
Einstellungen des Mobilgerätes Bluetooth und starten Sie dann die BUSHNELL GOLF App. So stellen Sie eine Verbindung zwischen der iON2
und Smartphone-App her:
1. Vergewissern Sie sich, dass Bluetooth auf dem Smartphone aktiviert ist.
2. Rufen Sie auf der iON2 das Hauptmenü auf und gehen Sie zum SETTINGS-Menü. Scrollen Sie dann nach unten zu BLUETOOTH
und drücken Sie SELECT.
3. Wählen Sie „ON“, um Bluetooth einzuschalten.
4. Ihre iON2 zeigt einen Code an. Geben Sie diesen Code nach entsprechender Auorderung in die Smartphone-App ein.
5. Nach der erfolgreichen Kopplung wird in der Smartphone-App eine Bestätigung angezeigt. Das Gerät ist nun mit dem Smartphone
verbunden.
• PEDOMETER: Die iON2 verfügt über einen Schrittzähler, der die zurückgelegten Schritte erfasst. Die zurückgelegten Schritte werden mit einem
integrierten Geschwindigkeitsmesser erfasst. Nach der Aktivierung kann der Schrittzähler über die Zeitanzeige (Uhrmodus) durch Drücken
der DOWN-Taste aufgerufen werden. Der Zielwert für den Schrittzähler ist die angestrebte Anzahl an Schritten. Der Zielwert kann in 1.000er-
Schritten auf einen Wert zwischen 1.000 und 99.000 festgelegt werden. Der Zielwert kann auch über die Smartphone-App konguriert werden.
• FITNESS: Die iON2 enthält einen Kilometerzähler, um die zurückgelegte Entfernung, die verstrichene Zeit und die Geschwindigkeit zu verfolgen.
Die Funktion „Fitness“ nutzt zur Standortbestimmung GPS. Nach der Aktivierung können Sie den Fitness-Display über das Zeit-Display mithilfe
der Taste „DOWN“ aufrufen.
• STOPWATCH: Drücken Sie die SELECT-Taste zum Starten und Stoppen der Stoppuhr (Anzeige der abgelaufenen Zeit). Drücken Sie die
UP-Taste, um auf Null zurückzusetzen.
• TIMER: Drücken Sie die SELECT-Taste zum Starten und Stoppen des Timers (Display zeigt Countdown von der eingestellten Zeit). Drücken
Sie die UP-Taste, um auf die eingestellte Zeit zurückzustellen. Nach einem Reset, bei dem der Timer nicht läuft, drücken Sie die SELECT-Taste
(Anzeigeziern blinken) und stellen Sie dann mit den UP/DOWN-Tasten die gewünschte Zeit ein (Stunden/Minuten/Sekunden). Wenn der Timer
läuft, beginnt er 10 Sekunden vor Ablauf der Zeit zu piepsen (einmal pro Sekunde). Am Ende der eingestellten Zeit piept der iON2 3x pro Sekunde.
• ALARM: Drücken Sie die SELECT-Taste, stellen Sie dann mittels UP/DOWN den Alarm für Stunde/Minute/PM oder AM ein. Nachdem Sie
die gewünschte Alarmzeit eingestellt haben, drücken Sie UP, um den Alarm ein- oder auszuschalten.
• BATTERIE: Drücken Sie die SELECT-Taste zum Überprüfen des Batterieladestands (Restladung, Symbol 1-4 Balken).
• SETTINGS: Drücken Sie SELECT, um auf das SETTINGS-UNTERMENÜ mit 6 Optionen zuzugreifen:
1. TIME: Drücken Sie SELECT und markieren und wählen Sie dann eine dieser drei zeit-/datumsbezogenen Einstellungen aus:
SET TIME: Drücken Sie SELECT und markieren Sie eine Methode:
• BY GPS: Drücken Sie SELECT, um basierend auf Ihrem aktuellen GPS-Standort die Uhrzeit automatisch festzulegen.
• MANUALLY: Benutzen Sie die UP/DOWN-Tasten, um die korrekte aktuelle Uhrzeit und das Datum selbst einzugeben.
DAYLIGHT: Drücken Sie SELECT und markieren Sie den aktuellen Sommer/Winterzeitstatus für Ihren Standort:
• DST ON +1
• DST OFF –1
FORMAT: Drücken Sie SELECT und markieren Sie Ihre Präferenz für das Zeitanzeigeformat:
• 12 STUNDEN
• 24 STUNDEN
2. UNITS: Drücken Sie SELECT. Das ausgefüllte Kontrollkästchen zeigt die aktuelle Einstellung an (Standard = YARDS). Um die Anzeige
von Entfernungen zu ändern, markieren Sie YARDS oder METERund drücken Sie SELECT.
3. LANGUAGE: Die iON2 bietet 5 Menüspracheneinstellungen (ENGLISCH, SPANISCH, DEUTSCH, FRANZÖSISCH, ITALIENISCH).
Die Benutzeroberäche ist standardmäßig in englischer Sprache. Drücken Sie SELECT und benutzen Sie UP/DOWN, um zwischen
den Optionen im Sprachenmenü zu wechseln. Drücken Sie die SELECT-Taste, um zu bestätigen und alle Menüs auf Ihre bevorzugte
(markierte) Sprache umzustellen.
4. SOUND: Um die „Piep“ -Taste auszuschalten, drücken Sie den Bestätigungston, wenn Sie die Menüs verwenden, wählen Sie OFF
und drücken Sie SELECT.
5. ABOUT: Drücken Sie SELECT, um die Firmware-Version, FCC-ID und IC-Nr. des Geräts anzuzeigen.
6. RESET: Um das Gerät auf alle ursprünglichen Einstellungen zurückzusetzen, drücken Sie SELECT, wählen Sie dann DEFAULT SETTINGS
und bestätigen Sie den Vorgang. Die anderen beiden Optionen unter RESET DEVICE (NACH UPDATES SUCHEN und NEU FORMATIEREN)
sollten nur von qualizierten Servicetechnikern verwendet werden.

29
ZUGRIFF AUF AKTUALISIERTE GOLFPLATZ-DATEN
Auf Ihrem iON2 benden sich bereits Daten für mehr als 33.000 Golfplätze weltweit. Er ist sofort einsatzbereit, ohne dass Software heruntergeladen
oder Mitgliedsbeiträge bezahlt werden müssen.
Aber vielleicht denken Sie: „Was, wenn ein neuer Golfplatz erönet wird, nachdem mein Gerät hergestellt wurde? Kann ich die Datenbank
des Geräts aktualisieren, um ihn hinzuzufügen?“ Die Antwort ist ja, und es ist ganz leicht.
Gehen Sie auf www.bushnellgolf.com und dann auf die Produktseite zur entsprechenden Farbversion der iON2. Dort gibt es drei orangefarbene
Links, auf die Sie klicken können:
• So aktualisieren Sie Ihr Golf-GPS mit den neuesten Karten
Klicken Sie auf diesen Link, um eine Schritt-für-Schritt-Anleitung zum Suchen und Herunterladen neuer Platzdaten von iGolf.com zu erhalten
• Platzaktualisierung anfordern
Klicken Sie auf diesen Link, um zu einem Formular zu gelangen, das Sie ausfüllen und an iGolf senden können, um einen Platz, der in
der Datenbank fehlt, hinzuzufügen, oder wenn Sie Informationen (Lochdaten) nden, die auf dem bestehenden Platz nicht korrekt
eingezeichnet sind.
• Suchen Sie im Bushnell Golf GPS nach verfügbaren Plätzen
Klicken Sie auf diesen Link, um in der aktuellen iGolf-Datenbank nach einem Platz zu suchen, an dem Sie interessiert sind.
Sie können auch auf https://igolf.com gehen und auf „jetzt anmelden“ klicken, im Registrierungsformular Ihre Kontaktinformationen
angeben und dann „ich habe ein GPS-Gerät“ auswählen, um auf Platzaktualisierungen zugreifen zu können.
Verwenden Sie das mitgelieferte USB-Kabel, um die iON2 mit dem PC oder Mac zu verbinden. Sobald die Verbindung
hergestellt ist, zeigtder Bildschirm „USB MODE“ an.
Android und Google Play sind eingetragene Marken von Google Inc. in den USA und anderen Ländern.
iPhone und Apple Store sind Marken von Apple Inc., registriert in den USA und anderen Ländern.
Andere Namen können Marken ihrer jeweiligen Eigentümer sein.
HINDERNISGLOSSAR
Hindernisbezeichnungen werden als Abkürzungen dargestellt, die wie folgt deniert sind:
• BGB – Grünbunker hinten
• BGW – Wasserhindernis auf dem Grün, hinten
• CRK – Bach (Layup)
• CRKC – Bach (Carry)
• EOF – Ende des Fairways
• FGB – Grünbunker vorne
• FGW – Wasserhindernis (Layup) auf dem Grün, vorne
• FGWC – Wasserhindernis (Carry) auf dem Grün, vorne
• LFB – Fairwaybunker links
• LFW – Wasserhindernis (Layup) auf dem Fairway, links
• LFWC – Wasserhindernis (Carry) auf dem Fairway, links
• LGB – Grünbunker links
• LGW – Wasserhindernis auf dem Grün, links
• MFB – Fairwaybunker mittig
• MFW – Wasserhindernis (Layup) auf dem Fairway, mittig
• MFWC – Wasserhindernis (Carry) auf dem Fairway, mittig
• RFB – Fairwaybunker rechts
• RFW – Wasserhindernis (Layup) auf dem Fairway, rechts
• RFWC – Wasserhindernis (Carry) auf dem Fairway, rechts
• RGB – Grünbunker rechts
• RGW – Wasserhindernis auf dem Grün, rechts

30
AUF EIN JAHR BESCHRÄNKTE GARANTIE
Ihr Bushnell
®
-Produkt verfügt über eine einjährige Garantie ab dem Kaufdatum auf Material- und Herstellungsfehler. Wenn ein Fehler im Sinne dieser Garantie auftritt, werden wir das
Produkt nach unserem Ermessen reparieren oder ersetzen, vorausgesetzt, Sie schicken das Produkt mit vorausbezahlten Porto zurück. Diese Garantie deckt keine Schäden ab, die durch
fehlerhafte Verwendung, unsachgemäße Handhabung oder eine von einer anderen Stelle als einem von Bushnell autorisierten Kundendienst durchgeführte Wartung hervorgerufen
wurden.
Jede Rücksendung muss gemäß dieser Garantie die nachfolgend angegebenen Komponenten bzw. Informationen enthalten:
1. Ein Scheck/eine Zahlungsanweisung in Höhe von 10,00USD für Verpackungs- und Versandkosten der Rücksendung
2. Name, Adresse und Telefonnummer für die Rücksendung des Produkts
3. Eine Beschreibung des Defekts
4. Eine Kopie Ihres Kaufbelegs mit Datum
Senden Sie kein Zubehör ein (Batterien, SD-Karten, Kabel), sondern nur das zu reparierende Produkt.
Das Produkt muss zur Vermeidung von Transportschäden sorgfältig in einem robusten Versandkarton verpackt und an folgende Adresse gesandt werden:
Adresse für die USA: Adresse für KANADA:
Bushnell Outdoor Products Bushnell Outdoor Products
Attn.: Repairs Attn.: Repairs
9200 Cody 140 Great Gulf Drive, Unit # B
Overland Park, Kansas 66214 Vaughan, Ontario L4K 5W1
Wenden Sie sich bei Produkten, die außerhalb der USA oder Kanada erworben wurden, bitte an Ihren Händler vor Ort, um die jeweils gültigen
Garantieinformationen zu erfragen. In Europa können
Sie Bushnell auch wie folgt kontaktieren:
Bushnell Germany GmbH
European Service Centre
Mathias-Brüggen-Str. 80
D-50827 Köln
GERMANY
Tel.: +49 221 995568-0
Fax: +49 (221) 995568 20
Diese Garantie gewährt Ihnen bestimmte gesetzlich verankerte Rechte.
Unter Umständen haben Sie noch weitere Rechte, die von Land zu Land variieren.
©2018 Bushnell Outdoor Products
Entsorgung von elektrischen und elektronischen Geräten
(Gültig in der EU und anderen europäischen Ländern mit getrennten Sammelsystemen)
Dieses Gerät enthält elektrische und/oder elektronische Bauteile und darf deshalb nicht im normalen Haushaltmüll entsorgt werden. Stattdessen sollte es an den
entsprechenden Sammelstellen für Recycling der jeweiligen Gemeinden abgegeben werden. Ihnen entstehen hierdurch keine Kosten.
Wenn die Ausrüstung austauschbare (wiederau adbare) Batterien enthält, müssen diese zuvor auch herausnehmen und, falls nötig, entsprechend der geltenden
Vorschriften entsorgt werden (siehe auch die jeweiligen Anmerkungen in der Anleitung dieses Produkts).
Weitere Informationen zu diesem Thema sind in Ihrer Gemeinde-/Stadtverwaltung, Ihrem regionalen Abfallentsorgungsunternehmen oder in dem Geschäft, in
dem Sie Ihr Equipment gekauft haben, erhältlich.
FCC ID: 2ABQG-36885
IC: 5830A-36885
Android und Google Play sind eingetragene Marken der Microsoft Corporation in den USA und anderen Ländern.
iPhone und Apple Store sind eingetragene Marken der Apple Inc. in den USA und anderen Ländern.
Weitere Namen können Handelsmarken der jeweiligen Besitzer sein.

31
Sommario Pagina n.
Ricarica della batteria 32
Pulsanti e funzioni 33
Per iniziare 33
Modalità Play Golf (Gioca a golf) 33
Utilizzo del menu Play Golf 33-34
Elementi menu Play Golf 34
Utilizzo del menu Golf 34
Elementi del menu Play Golf 34
Utilizzo del menu principale 34
Voci del menu principale 34-35
Accesso ai dati aggiornati del campo da golf 35
Glossario degli ostacoli 36
Garanzia 37
Sommario

32
RICARICA DELLA BATTERIA
La batteria ricaricabile dell’orologio iON2 è a lunga durata e consente di giocare no a 3 partite di golf (della durata
media di 4 ore ciascuna) o di utilizzare il dispositivo come normale orologio (solo per l’ora) per un anno. Tuttavia,
diversi fattori (temperatura esterna e così via) possono inuire sulla vita utile della batteria. In tutte le batterie
ricaricabili la durata eettiva della carica si riduce nel tempo. Caricare la batteria quando la schermata del livello
della batteria mostra “una barra rimanente” garantirà che di essere in grado di superare l’intero round successivo.
Per controllare la durata della batteria rimanente, premere il pulsante MENU (2, pagina successiva) e selezionare
BATTERY (BATTERIA). Per ricaricare la batteria, inserire il dispositivo da polso nella base di ricarica, con i contatti
posteriori del dispositivo allineati ai piedini di ricarica sul lato sinistro della base. A questo punto, collegare la base
di ricarica a una porta USB libera del computer, a un hub USB alimentato o al caricabatteria CA di uno smartphone.
Cercare la schermata per visualizzare “CHARGING” e indicare che l’orologio iON2 è in carica: assicurarsi di connettersi
dalla schermata Ora (modalità orologio) (vedi pagina 4) o dalla schermata del livello BATTERIA, a cui è possibile
accedere dal menu Play Golf o dal menu principale (vedere sotto, i dettagli del menu alla pagina successiva).
Cura e manutenzione
Il dispositivo da polso iON2 è resistente e impermeabile. Per garantirne il funzionamento adabile, si consiglia di attenersi alle seguenti istruzioni per la cura e la manutenzione:
• Evitare di esporre l'orologio a condizioni ambientali estreme per periodi prolungati.
• Evitare di sottoporre l'orologio a forti urti.
• È possibile pulire l'orologio di tanto in tanto con un panno morbido inumidito.
• Spazzolare regolarmente i contatti del morsetto nella parte inferiore dell'orologio. L’accumulo di sporcizia sulla supercie dei punti di contatto può inuire sul normale processo
di ricarica e sul trasferimento dei dati. *Nota: utilizzare uno spazzolino a setole morbide (in dotazione). Setole dure o spazzolini metallici possono graare l'orologio.
• NON esporre l'orologio a sostanze chimiche aggressive, come benzina e alcol, poiché lo danneggerebbero.
• Conservare l'orologio in un luogo asciutto quando non in uso.
AVVERTENZA
Non tentare di aprire iON2. Il dispositivo iON2 contiene una batteria ricaricabile agli ioni di litio.
Vi è rischio di esplosione nel caso in cui la batteria venga sostituita con un modello non corretto.
• Non tentare di aprire, smontare o riparare la batteria interna. La batteria deve essere sostituita da un tecnico qualicato.
• Non schiacciare, forare o cortocircuitare i contatti esterni della batteria. Non esporre a temperature al di sopra di 140
o
F (60
o
C).
• Non caricare la batteria se la temperatura ambiente è superiore a 113
o
F (45
o
C)
• Smaltire o riciclare la batteria secondo le modalità previste. Non smaltire in acqua o fuoco.
Limitazione di responsabilità legale
Mediante l'uso del prodotto, l'utilizzatore accetta che Bushnell Outdoor Products non sarà ritenuta legalmente responsabile di eventuali danni o lesioni subiti dall'utente o da altre
persone o proprietà a causa dell'utilizzo improprio e/o di scarsa perizia durante l'impiego del prodotto.
Nota: vedere garanzia limitata per altre limitazioni di responsabilità.
Informazioni aggiuntive
Il sistema di posizionamento globale (GPS, Global Positioning System), una rete di 32 satelliti in orbita intorno alla Terra, è gestito e mantenuto dal governo degli Stati Uniti. Questo
dispositivo GPS deve agganciare il segnale di almeno 3 satelliti per determinare la posizione con precisione. Qualsiasi modica apportata al sistema da parte del governo può avere
ripercussioni sull'accuratezza e sul funzionamento del presente prodotto.
Sito Web Golf GPS Bushnell
www.bushnellgolf.com è la migliore risorsa online per quanti possiedono i prodotti Golf GPS e ore assistenza prodotto, risposte alle domande più frequenti (FAQ) e così via. Inoltre,
è un portale di accesso ai le dei campi GPS iGolf.com, da utilizzare con tali prodotti Bushnell. La registrazione di iON2 tramite il sito www.bushnell.igolf.com nonèobbligatoria,
ma garantisce l'accesso ai dati GPS più aggiornati dei campi da golf.
RICARICA
CARICA
COMPLETATA

33
1. Pulsante MENU GOLF: Dalla visualizzazione dell’ora, visualizzare il menu Golf. Dalla modalità Play Golf, attiva la funzione Shot Distance.
2. Pulsante MENU: Dalla visualizzazione dell’ora, visualizzare il menu principale. Dalla modalità Play Golf, visualizza il menu Play Golf.
Premere per uscire da qualsiasi schermata del menu.
3. Pulsante SU: consente di scorrere verso l’alto le voci del menu.
4. Pulsante SELECT: seleziona la voce di menu evidenziata o l’opzione selezionata.
5. Pulsante GIÙ: consente di scorrere verso il basso le voci del menu. Tenere premuto (7 secondi) per accendere/spegnere.
PER INIZIARE
1. In primo luogo, assicurarsi che la batteria sia completamente ricaricata. In caso di primo utilizzo, dovrebbe essere completamente
ricaricata (livello batteria a 4 barre).
2. Tenere premuto il pulsante GIÙ/POWER (5) sul lato in basso a destra dell’unità no all’accensione. Tenere premuto di nuovo GIÙ/POWER
per spegnere l’alimentazione.
3. L’iON2 si accenderà in “Modalità orologio”, con l’ora e la data visualizzate come mostrato sopra.
4. Premendo qualsiasi pulsante si attiva la retroilluminazione del display (visibile solo in condizioni di scarsa illuminazione ambientale)
per ca. 8 secondi.
MODALITÀ PLAY GOLF (GIOCA A GOLF)
1. Assicurarsi di essere all’aperto e di avere una visuale sgombra del cielo sovrastante, per garantire una buona ricezione dei segnali dai
satelliti GPS. Premere il pulsante MENU GOLF (1). Con PLAY GOLF evidenziato (premere il pulsante SU/GIÙ (3/5) se necessario), premere
il pulsante SELECT (4). Il display mostrerà la scritta “SEARCHING” mentre iON2 cerca più segnali dai satelliti GPS disponibili e si aggancia
ad essi. Una volta bloccato (nota che questa operazione può richiedere più tempo la prima volta in cui si utilizza il dispositivo iON2), si
sentiranno dei segnali acustici che confermano l’aggancio al GPS, quindi verrà visualizzato un elenco di nomi dei campi.
2. Usare i pulsanti SU/GIÙ (3/5) per selezionare (evidenziare) il campo in cui si desidera giocare dalla lista dei campi vicini (il campo più
vicino è il primo) quindi premere SELECT. Ora sei in modalità Play Golf.
3. Il display mostrerà (screenshot a destra): n. buca corrente (in alto a sinistra), par della buca (in alto a sinistra) e distanze
dal centro (numero grande in alto al centro), anteriori (in basso a sinistra) e posteriori (in basso al destra) del campo.
4. Premere SELECT (4) per visualizzare le distanze da no a 4 avvisi di ostacolo per buca, variabili a seconda degli
ostacoli più rilevanti situati vicino a una speci ca buca del campo attuale. Vedere “Glossario degli ostacoli” per una
lista di tutte le abbreviazioni usate per designare i vari ostacoli. Premere il pulsante SELECT dopo aver visualizzato
le schermate Hazard per andare alla schermata Informazioni round, che mostra il tempo trascorso e la distanza
percorsa dall’inizio del round (modalità Play Golf inserita).
5. Il display avanzerà automaticamente alla buca successiva mentre si segue il percorso. Premere il pulsante SU o GIÙ
(3/5) per passare manualmente alla buca successiva (utile per le partenze “shotgun”), o tornare alla buca precedente.
6. Per utilizzare la funzione Shot Distance, premere il pulsante GOLF MENU (1) stando sul tee (questo è il punto di
inizio “punto A”) e, camminando, il display si aggiornerà per indicare la distanza dal punto A alla posizione attuale
(“punto B”). Questa funzione è utile per misurare la lunghezza del tiro. Premere di nuovo GOLF MENU per tornare
alla schermata PLAY GOLF, premere di nuovo per impostare un nuovo punto di partenza Shot Distance (iniziare di nuovo su “0”).
UTILIZZO DEL MENU PLAY GOLF
1. Nella modalità PLAY GOLF, premere il pulsante MENU (2) per visualizzare il MENU PLAY GOLF.
2. Selezionare la voce dal menu usando i pulsanti SU/GIÙ per evidenziarla, quindi premere il pulsante SELECT.
3. Se per un’impostazione sono disponibili più opzioni, usare SU/GIÙ per evidenziare l’opzione scelta, quindi premere SELECT.
PULSANTI/FUNZIONI
1
2
MENU
SU
3
SELECT
4
5
GIÙ/
POWER
Piedini di
ricarica
Contatti di ricarica
VISUALIZZAZIONE DELL'ORA
(MODALITÀ OROLOGIO)
MENU GOLF/MODALITÀ PLAY GOLF
MODALITÀ PLAY GOLF
(GIOCA A GOLF)

34
4. Una casella di controllo piena (riempita) a sinistra di un’impostazione indica l’impostazione corrente. Per cambiarlo, evidenziare
l’impostazione preferita e premere SELECT.
5. Premere il pulsante MENU per tornare indietro alla schermata del menu precedente.
VOCI DEL MENU PLAY GOLF (Dalla modalità Play Golf, premere il pulsante MENU)
• CHANGE COURSE: premere SELECT, evidenziare un campo da golf diverso dall’elenco dei percorsi vicini, quindi premere SELECT.
• BATTERY: premere il pulsante SELECT per controllare il livello della batteria (carica residua, icona 1-4 barre).
• EXIT ROUND: premere SELECT per interrompere il tracciamento del campo corrente, terminare il gioco e tornare alla schermata
divisualizzazione dell’ora (modalità orologio).
UTILIZZO DEL MENU GOLF
1. Dalla visualizzazione dell’ora (modalità orologio), premere il pulsante GOLF MENU (1) per visualizzare il MENU GOLF.
2. Selezionare la voce dal menu usando i pulsanti SU/GIÙ per evidenziarla, quindi premere il pulsante SELECT.
3. Se per un’impostazione sono disponibili più opzioni, usare SU/GIÙ per evidenziare l’opzione scelta, quindi premere SELECT.
VOCI DEL MENU GOLF (dalla modalità orologio, premere il pulsante GOLF MENU)
• PLAY GOLF: da qualsiasi schermata, ritorna al display per visualizzare la buca e le distanze attuali in base alla posizione corrente sul campo.
• TEE TIME: Tee time è un comodo sistema che consente di impostare un tea time (data del golf) in anticipo. Quando è stato inserito un
tee time e la funzione è impostata su “ON”, iON2 inserirà automaticamente la modalità Play Golf e cercherà campi locali 7 minuti prima
del tempo impostato. È suciente selezionare il campo desiderato dalla lista e poi godersi la partita!
Per impostare un tee time, selezionare TEE TIME dal menu GOLF (con TEE TIME evidenziato, premere il pulsante SELECT). Quindi, premere
il pulsante SELECT, quindi utilizzare i pulsanti SU/GIÙ e impostare l’ora desiderata. Premere SELECT e ripetere la stessa procedura per
impostare minuti, AM/PM e giorno della settimana. Dopo aver premuto SELECT per l’ultima volta, ritornando alla schermata TEETIME
èpossibile vedere che il tee time è stato inserito nella memoria dell’unità. Per modicare il Tee Time, premere SELECT e ripetere il
processo per cambiare ora, minuti, ecc. Una volta impostato Il tee time, utilizzare i pulsanti SU/GIÙ per attivarlo/disattivarlo.
• SETUP: premere SELECT per accedere al SOTTOMENU SETUP, con 3 opzioni:
1. AUTO-OFF: la funzione Auto-O (Spegnimento automatico) è stata progettata per uscire automaticamente dalla modalità Play Golf
(Gioca a golf) una volta trascorso il tempo pressato. Quando si è in modalità Play Golf (Gioca a golf), una volta scaduto il tempo
preimpostato, l’orologio esce automaticamente dalla partita e torna alla schermata iniziale (Ora) per preservare la durata della batteria.
Per impostare il tempo di spegnimento automatico, selezionare AUTO-OFF (SPEGNIMENTO AUTOMATICO) dal menu Play Golf/Setup
(Gioca a golf/Congurazione). Dalla schermata AUTO-OFF impostata, utilizzare i pulsanti SU/GIÙ per aumentare oridurre il tempo.
La funzione di spegnimento automatico viene sempre impostata alla durata attualmente visualizzata nella pagina di impostazione
AUTO-OFF (SPEGNIMENTO AUTOMATICO). L’intervallo di tempo può essere impostato tra 1,5 e 9 ore oppure è possibile premere
ancora una volta il pulsante SU o GIÙ prima o dopo l’intervallo di tempo per selezionare DISABLE e disattivare la funzione.
2. YDS/MTRS: premere SELECT. La casella piena (compilata) indica lo stato attuale (predenito=IARDE). Per cambiare la modalità di
visualizzazione delle distanze, evidenziare YARDS o METERS, premere SELECT.
3. BATTERIA: premere il pulsante SELECT per controllare le condizioni della batteria (carica residua, icona 1-4 barre).
UTILIZZANDO IL MENU PRINCIPALE (dalla modalità orologio, premere il pulsante MENU)
Se iON2 è in modalità Play Golf, premere il pulsante MENU (2) per accedere al menu Golf, evidenziare EXIT ROUND e premere SELECT per
tornare alla visualizzazione dell’ora (modalità Orologio). Dalla visualizzazione dell’ora, premere il pulsante MENU per visualizzare le opzioni
del MENU. Per visualizzare le opzioni del menu e selezionare le impostazioni preferite all’interno del menu principale, seguire gli stessi
passaggi descritti in “Utilizzo del menu Golf in modalità Play Golf”. Per uscire dal menu principale e tornare alla modalità orologio, premere
il pulsante MENU no a quando non viene visualizzata l’ora.
VOCI DEL MENU PRINCIPALE
• BLUETOOTH: iON2 può connettersi all’app BUSHNELL GOLF dello smartphone tramite Bluetooth. Una volta connessa, l’app può essere
usata per congurare iON2 (selezionare le opzioni del menu) e aggiornare via wireless il database delle partite di golf interno di iON2.
Anche tee time può essere impostato tramite l’app. È possibile ottenere l’applicazione BUSHNELL GOLF dall’Apple Store e dal Google Play
Store rispettivamente per i dispositivi iPhone e Android. Scaricare e installare l’applicazione sul dispositivo mobile. Accedere alla pagina
delle impostazioni dei dispositivi mobili per attivare il Bluetooth, quindi avviare l’applicazione BUSHNELL GOLF . Procedere come segue per
connettere iON2 all’applicazione per smartphone:
1. Assicurarsi che Bluetooth sia attivato sullo smartphone.
2. Su iON2, andare al menu principale, entrare nel menu SETTINGS, quindi scorrere verso il basso no a BLUETOOTH e premere SELECT.
3. Selezionare “ON” per attivare il Bluetooth.
4. iON2 fornirà quindi un codice. Inserire il codice nell’applicazione per smartphone quando richiesto.
5. Se l’accoppiamento viene eseguito correttamente, l’applicazione per smartphone visualizzerà una conferma. Il dispositivo è ora
accoppiato con lo smartphone.
• PEDOMETER: al ne di monitorare i passi fatti, iON2 supporta un pedometro. che utilizza un accelerometro interno per tenere traccia del
numero di passi fatti. Una volta abilitato, è possibile accedere alla schermata del pedometro dalla visualizzazione dell’ora (modalità Watch)
premendo il pulsante GIÙ. L’obiettivo del pedometro è raggiungere il numero pressato di passi. L’obiettivo può essere impostato in
incrementi di 1.000, da 1.000 a 99.000 passi. L’obiettivo del pedometro può inoltre essere congurato dall’applicazione per smartphone.

35
• FITNESS: iON2 include un contachilometri per tracciare la distanza percorsa, il tempo trascorso e la velocità. Per la funzione Fitness è
utilizzato il GPS per la posizione. Una volta attivata, è possibile accedere alla schermata Fitness dalla schermata dell’ora utilizzando il
pulsante GIÙ.
• STOPWATCH: premere il pulsante SELECT per avviare e arrestare il cronometro (il display mostra il tempo trascorso). Premere il pulsante
SU per riazzerare.
• TIMER: premere il pulsante SELECT per avviare e arrestare il timer (il display mostra il conto alla rovescia dal tempo impostato). Premere
il pulsante SU per ripristinare l’ora impostata. Dopo un reset, con il timer non in funzione, premere il pulsante SELECT (lampeggia la cifra
visualizzata), quindi utilizzare i pulsanti SU/GIÙ per impostare il tempo desiderato (ore/minuti/secondi). Quando il timer è in funzione,
inizierà a emettere un segnale acustico (una volta al secondo) 10 secondi prima che il tempo scada. Alla ne del tempo impostato, iON2
emetterà 3 beep al secondo.
• ALARM: premere il pulsante SELECT, quindi utilizzare SU/GIÙ per impostare ora/minuti/ PM o AM della sveglia. Dopo aver impostato l’ora
della sveglia desiderata, premere SU per attivare o disattivare la sveglia.
• BATTERY: premere il pulsante SELECT per controllare il livello della batteria (carica residua, icona 1-4 barre).
• SETTINGS: premere SELECT per accedere al SOTTOMENU SETTINGS, con 6 opzioni:
1. TIME: premere SELECT, quindi evidenziare e selezionare tra queste tre impostazioni relative a data/ora:
SET TIME: premere SELECT ed evidenziare un metodo:
• DA GPS: premere SELECT per impostare automaticamente l’ora secondo la posizione GPS attuale.
• MANUALLY: usare i pulsanti SU/GIÙ per inserire manualmente l’ora e la data attuali corrette.
LUCE DEL GIORNO: premere SELECT ed evidenziare lo stato dell’ora legale attuale per la propria posizione:
• DST ON +1
• DST OFF -1
FORMAT: premere SELECT ed evidenziare la scelta per il formato di visualizzazione dell’ora:
• 12 ORE
• 24 ORE
2. UNITS: premere SELECT. La casella piena (compilata) indica lo stato attuale (predenito=IARDE). Per cambiare la modalità
divisualizzazione delle distanze, evidenziare YARDS o METERS, premere SELECT.
3. LANGUAGE: iON2 possiede 5 impostazioni di lingua del menu (INGLESE, SPAGNOLO, TEDESCO, FRANCESE, ITALIANO).
Perimpostazione predenita, l’interfaccia utente è in inglese. Premere SELECT, utilizzare SU/GIÙ per scorrere le opzioni nel menu
lingue, quindi premere il pulsante SELECT per confermare la lingua preferita (evidenziata) per tutte le schermate.
4.
SOUND: per disattivare il pulsante “beep” premere il suono di conferma quando si usano i menu, selezionare “OFF” e premere SELECT.
5. ABOUT: premere SELECT per visualizzare versione del rmware, data di produzione e FCC ID#.
6. RESET: per ripristinare tutte le impostazioni iniziali dell’unità, premere SELECT, quindi selezionare DEFAULT SETTINGS
econfermare l’azione. Le altre due opzioni sotto RESET DEVICE (CHECK UPDATE E REFORMAT) dovrebbero essere usate solo da
tecnici d’assistenza qualicati.
ACCESSO AI DATI AGGIORNATI DEL CAMPO DA GOLF
iON2 è precaricato con più di 33.000 campi situati in tutto il mondo. È pronto per ‘uso appena fuori dalla scatola senza dover scaricare
software o pagare una quota d’iscrizione.
Ci si potrebbe chiedere: “Ma che succede se prima o poi apre un nuovo campo dopo che è stata creata la mia unità? C’è un modo per
aggiornare il database nella mia unità per aggiungerlo?” La risposta è sì e farlo è semplice.
Andare su www.bushnellgolf.com e vedere la pagina del prodotto per le diverse versioni di colore di iON2. Ci sono tre link arancioni su cui
fare clic:
• Come aggiornare il Golf GPS con le ultime mappe
Fare clic sul link seguente per vedere le istruzioni passo dopo passo per trovare e scaricare dati di nuovi campi da iGolf.com
• Richiedi aggiornamento campo
Fare clic sul link seguente per aprire un formulario da compilare e inviare via email a iGolf per presentare un campo non incluso nel
database, o nel caso in cui vengano trovato informazioni (dati per una buca) mappate in modo errato su un campo esistente.
• Cercare campi disponibili sul Golf GPS Bushnell
Fare clic sul link seguente per cercare il database corrente di iGolf per vericare se è incluso un determinato campo.
È possibile anche andare sul sito: https://igolf.com e fare clic su “Iscriviti ora”, inserire le informazioni di contatto sul modulo di registrazione
e selezionare “Ho un dispositivo GPS” per accedere agli aggiornamenti si campi.
Usare il cavo USB in dotazione per connettere iON2 al PC o Mac. Una volta connesso, apparirà la schermata “ MODALITÀ
(USB USB MODE)”.
Android e Google Play sono marchi registrati di Google Inc. negli Stati Uniti e in altri Paesi.
iPhone e Apple Store sono marchi commerciali di Apple Inc., registrati negli Stati Uniti e in altri Paesi.
Gli altri nomi possono essere marchi dei rispettivi proprietari.

36
GLOSSARIO DEGLI OSTACOLI
I nomi degli ostacoli sono mostrati come abbreviazioni denite come segue:
• BGB - Back Green Bunker (bunker sulla parte posteriore del green)
• BGW - Back Green Water (acqua sulla parte posteriore del green)
• CRK - Creek Layup (lay up su insenatura)
• CRKC - Creek Carry (volo su insenatura)
• EOF - End of Fairway (ne fairway)
• FGB - Front Green Bunker (bunker sulla parte frontale del green)
• FGW - Front Green Water Layup (lay up su acqua sulla parte frontale del green)
• FGWC - Front Green Water Carry (volo su acqua sulla parte frontale del green)
• LFB - Left Fairway Bunker (bunker a sinistra del fairway)
• LFW - Left Fairway Water Layup (lay up su acqua a sinistra del fairway)
• LFWC - Left Fairway Water Carry (volo su acqua a sinistra del fairway)
• LGB - Left Green Bunker (bunker sulla parte sinistra del green)
• LGW - Left Green Water (acqua sulla parte sinistra del green)
• MFB - Middle Fairway Bunker (bunker al centro del fairway)
• MFW - Middle Fairway Water Layup (lay up su acqua al centro del fairway)
• MFWC - Middle Fairway Water Carry (volo su acqua al centro del fairway)
• RFB - Right Fairway Bunker (bunker a destra del fairway)
• RFW - Right Fairway Water Layup (lay up su acqua a destra del fairway)
• RFWC - Right Fairway Water Carry (volo su acqua a destra del fairway)
• RGB - Right Green Bunker (bunker sulla parte destra del green)
• RGW - Right Green Water (acqua sulla parte destra del green)

37
GARANZIA LIMITATA DI UNO ANNO
Questo prodotto Bushnell® è garantito esente da difetti del materiale e di fabbricazione per uno anno a decorrere dalla data di acquisto. In caso di difetto durante il periodo
di garanzia, a nostra discrezione ripareremo o sostituiremo il prodotto purché sia restituito franco destinatario. Sono esclusi dalla garanzia eventuali danni causati da abuso,
maneggiamento improprio, installazione o manutenzione eseguiti da persone non autorizzate dal servizio di assistenza Bushnell.
A un prodotto restituito e coperto da questa garanzia occorre allegare quanto segue:
1. Assegno/Ordine di pagamento per l’importo di USD 10,00 per coprire i costi di spedizione.
2. Nome, indirizzo e numero di telefono raggiungibile in orario diurno per il reso del prodotto.
3. Spiegazione del difetto.
4. Copia della prova di acquisto datata.
Non inviare accessori (batterie, schede SD, cavi), ma solo il prodotto da riparare.
Il prodotto deve essere riposto in un imballaggio da spedizione robusto al ne di evitare possibili danni durante il tragitto. La spedizione deve essere e ettuata ai seguenti indirizzi:
Recapito negli STATI UNITI: Recapito in CANADA:
Bushnell Outdoor Products Bushnell Outdoor Products
Attn.: Repairs Attn.: Repairs
9200 Cody 140 Great Gulf Drive, Unit # B
Overland Park, Kansas 66214 Vaughan, Ontario L4K 5W1
Per prodotti acquistati fuori dagli Stati Uniti o dal Canada, rivolgersi al rivenditore per le clausole pertinenti della garanzia. In Europa si può anche contattare la Bushnell al
seguente recapito: Bushnell Germany GmbH
European Service Centre
Mathias-Brüggen-Str. 80
D-50827 Köln
GERMANY
Tél: +49 221 995568-0
Fax: +49 221 995568-20
Questa garanzia dà speci ci diritti legali.
Eventuali altri diritti variano da una nazione all’altra.
©2018 Bushnell Outdoor Products
Smaltimento di apparecchiature elettriche ed elettroniche
(Vigente presso i Paesi UE e altri Paesi europei con sistemi di raccolta diff erenziata dei ri uti)
Il presente apparecchio componenti elettriche e/o elettroniche e non può pertanto essere smaltito come ri uto domestico ordinario. Al contrario, dovrebbe essere
smaltito presso punti di raccolta destinati al riciclaggio, in base alle istruzioni delle amministrazioni locali. Tale operazione non prevede alcun costo per l’utente.
Qualora l’apparecchio dovesse contenere batterie (ricaricabili) sostituibili, anche queste devono essere prima rimosse e, laddove previsto, smaltite in conformità
alle normative spec che (cfr. altresì i commenti speci ci nelle presenti istruzioni sull’unità).
Per ulteriori informazioni su questa tematica, rivolgersi all’amministrazione locale, all’azienda incaricata della raccolta dei ri uti o alla rivendita presso cui è stato
acquistato l’apparecchio.
FCC ID: 2ABQG-36885
IC: 5830A-36885
Android e Google Play sono marchio registrato di Microsoft Corporation negli Stati Uniti e in altri Paesi.
iPhone e Apple Store sono marchi commerciali di Apple Inc., registrati negli Stati Uniti e in altri Paesi.
Altri nomi possono essere marchi commerciali dei rispettivi proprietari.

Customer Service: (800) 423-3537
www.bushnellgolf.com
©2018 Bushnell Outdoor Products
-
 1
1
-
 2
2
-
 3
3
-
 4
4
-
 5
5
-
 6
6
-
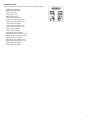 7
7
-
 8
8
-
 9
9
-
 10
10
-
 11
11
-
 12
12
-
 13
13
-
 14
14
-
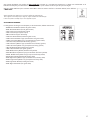 15
15
-
 16
16
-
 17
17
-
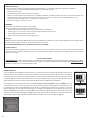 18
18
-
 19
19
-
 20
20
-
 21
21
-
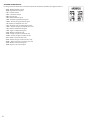 22
22
-
 23
23
-
 24
24
-
 25
25
-
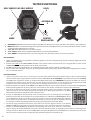 26
26
-
 27
27
-
 28
28
-
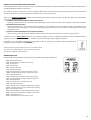 29
29
-
 30
30
-
 31
31
-
 32
32
-
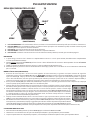 33
33
-
 34
34
-
 35
35
-
 36
36
-
 37
37
-
 38
38


Bushnell GOLF iON 2 368850 Manual de usuario
- Categoría
- Relojes
- Tipo
- Manual de usuario
- Este manual también es adecuado para

