iLuv Morning Call 3 Manual de usuario
- Categoría
- Relojes de alarma
- Tipo
- Manual de usuario

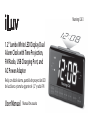
Morning Call 3
User Manual
1.2" Jumbo White LED Display Dual
Alarm Clock with Time Projection,
FM Radio, USB Charging Port, and
AC Power Adapter
Manual de usuario
Reloj con doble alarma, pantalla de proyección LED
de luz blanca y tamaño gigante de 1,2" y radio FM

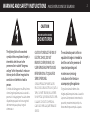
WARNING AND SAFETY INSTURCTIONS
CAUTION
The lightning ash with arrowhead
symbol, within an equilateral triangle, is
intended to alert the user to the
presence of un-insulated “dangerous
voltage” within the product’s enclosure
that may be of sucient magnitude to
constitute a risk of electric shock to
persons.
CAUTION TO REDUCE THE RISK OF
ELECTRIC SHOCK, DO NOT
REMOVE COVER (OR BACK). NO
USER-SERVICEABLE PARTS INSIDE.
REFER SERVICING TO QUALIFIED
SERVICE PERSONEL.
The exclamation point within an
equilateral triangle is intended to
alert the user to the presence of
important operating and
maintenance (servicing)
instructions in the literature
accompanying the appliance.
RISK OF ELECTRIC SHOCK
DO NOT OPEN
!
AVISO E INSTRUCCIONES DE SEGURIDAD
El símbolo del relámpago con una flecha, dentro
de un triángulo equilátero, alerta al usuario de la
presencia de "voltaje peligroso" no aislado dentro
del producto, que puede ser de una magnitud
suficiente como para que haya riesgo de
electrocutarse.
SE RUEGA PRECAUCIÓN PARA REDUCIR EL
RIESGO DE DESCARGA ELÉCTRICA. NO QUITE LA
TAPA (O LA PARTE TRASERA). EN SU INTERIOR
NO HAY PIEZAS QUE PUEDAN SER ÚTILES PARA
EL USUARIO. CONTACTE CON PERSONAL
CUALIFICADO PARA CUALQUIER TRABAJO DE
SERVICIO.
El signo de exclamación dentro de un
triángulo equilátero quiere alertar al usuario de
la presencia de importantes instrucciones de
operación y mantenimiento (servicio) en la
documentación que acompaña al aparato.
2

IMPORTANT SAFETY INSTRUCTIONS
1. All the safety and operating instructions should be read before the product is operated
2. The safety and operating instructions should be retained for future reference.
3. All warnings on the product and in the operating instructions should be adhered to.
4. All operating and use instructions should be followed.
5. Use of controls or adjustments or performance other than those specied may result in hazardous
radiation exposure.
6. Do not use this product near water or expose to rain to prevent re or shock hazard. i.e. bathtub,
washbowl, kitchen sink, laundry tub, wet basement, or swimming pool, etc.
7. Cleaning – Unplug this product from the wall outlet before cleaning. Do not use liquid cleaners or aerosol
cleaners. Clean only with a dry cloth.
8. Unplug Morning Call 3 during lightning storms or when unused for long periods of time.
9. When main plug is connected, Morning Call 3 is readily operatable. In order to disconnect Morning Call 3
completely, the main plug should be disconnected from the main socket outlet.
10. Battery shall not be exposed to excessive heat such as sunshine or re.
11. If battery is incorrectly replaced, it may cause explosion. Replace only with the same or equivalent type.
3

INSTRUCCIONES DE SEGURIDAD IMPORTANTES
1. Todas las instrucciones de seguridad y funcionamiento deben leerse antes de que se utilice el producto.
2. Se deben conservar las instrucciones de seguridad y funcionamiento en el caso de futuras consultas.
3. Se deben seguir y acatar todas las advertencias que hay en el producto y en las instrucciones de funcionamiento.
4. Se deben seguir todas las instrucciones de funcionamiento y uso.
5. El uso de controles, ajustes o procedimientos distintos de los que aquí se especican puede provocar una peligrosa
exposición a radiación.
6. No use este producto cerca del agua ni lo exponga a la lluvia para evitar incendios o riesgo de descarga eléctrica (es decir,
en lugares como la bañera, lavabo, fregadero, lavadero, sótano húmedo, piscina, etc.).
7. Limpieza: desenchufe este producto de la toma de corriente antes de limpiarlo. No use limpiadores líquidos ni aerosoles.
Límpielo solo con un paño seco.
8. Desconecte Morning Call 3 durante tormentas eléctricas o cuando no se use durante un período de tiempo prolongado.
9. Cuando el enchufe principal está conectado, Morning Call 3 está listo para su uso. Para desconectar por completo el
Morning Call 3, el enchufe principal debe estar desconectado de la toma de corriente principal.
10. La batería no debe estar expuesta a un calor excesivo como el del sol, el fuego o de un grado similar.
11. Si la batería se sustituye de forma incorrecta, puede provocar una explosión. Reemplácela solo por otra del mismo tipo o
por una equivalente.
4

ON-OFF / FLIP
PROJECTION
TIME / PRESET
RADIO / AL OFF
AL 2 / VOLTUN / HOUR TUN / MIN AL 1 / VOL
PM
BUZZER
RADIO
AL 1
BUZZER
RADIO
AL 2
Morning Call
SNOOZE / SLEEP / DIMMER
Alarm Repeat Index
1
2
3
4
5
6
7
=
=
=
=
=
=
=
Monday
Tuesday
Wednesday
Thursday
Friday
Saturday
Sunday
1-1
1-7
1-5
6-7
=
=
=
=
One day
Everyday
Every Weekday
Every Weekend
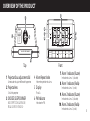
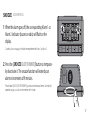
Projector focus adjustment dial
Projector lens
SNOOZE/SLEEP/DIMMER
Top Front
1
2
3
Alarm Repeat Index
Display
PM Indicator
4
5
6
Alarm 1 Indicator (Buzzer)
Alarm 1 Indicator (Radio)
Alarm 2 Indicator (Buzzer)
Alarm 2 Indicator (Radio)
7
8
9
10
OVERVIEW OF THE PRODUCT
1
5
4
2
3
6
7
8
9
10
Sintonizador de ajuste del foco del proyector
Cristal del proyector
MODO REPETICIÓN/SUSPENSIÓN/
REGULADOR DE INTENSIDAD
Índice de repetición de alarma
Pantalla
Indicador de P. M.
Indicador de alarma 1 (vibrador)
Indicador de alarma 1 (radio)
Indicador de alarma 2 (vibrador)
Indicador de alarma 2 (radio)
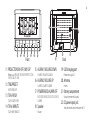
5

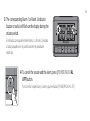
USB CHARGING
DC 5V/1.2A
6
Front Back
PROJECTION ON-OFF/180° FLIP11
12
13
14
ALARM 1/VOLUME DOWN
ALARM 2/VOLUME UP
POWER/RADIO/ALARM OFF
15
16
17
18
USB charging port
Antenna
Battery compartment
DC power input jack
19
20
21
22
ON-OFF / FLIP
PROJECTION
TIME / PRESET
RADIO / AL OFF
AL 2 / VOLTUN / HOUR TUN / MIN AL 1 / VOL
PM
BUZZER
RADIO
AL 1
BUZZER
RADIO
AL 2
Morning Call
11 12 13 14 15 16 17
18
19
20
21
22
Botón para APAGAR O ENCENDER PROYECCIÓN/
TIME/PRESET
TUN-/HOUR
TUN+/MINUTE
HORA/REINICIAR
[TUN-/HOUR]/HORA
[TUN+/MIN]/MINUTO
DAR LA VUELTA 180°
ALARMA 1/BAJAR VOLUMEN
ALARMA 2/SUBIR VOLUMEN
ENCENDIDO/RADIO/DESACTIVACIÓN DE
Speaker
Altavoz
ALARMA
Puerto de carga USB
Antena
Compartimento de la batería
Toma de entrada de alimentación de CC

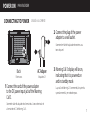
Back
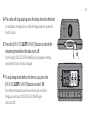
Connect the cord of the power adapter
to the DC power input jack of the Morning
Call 3.
1
Connect the plug of the power
adapter to a wall outlet.
2
Morning Call 3 display will be on,
indicating that it is powered on
and in standby mode.
3
POWER ON
CONNECTING TO POWER
AC Adaper
USB CHARGING
DC 5V/1.2A
Parte trasera
Conecte el cable del adaptador de alimentación a la toma de entrada de
alimentación de CC de Morning Call 3.
Conecte el enchufe del adaptador de corriente a una
toma de pared.
La pantalla de Morning Call 3 se encenderá, lo que indica
que está encendida y en modo de espera.
PARA ENCENDER
CONEXIÓN A LA CORRIENTE
Adaptador CA
7

1
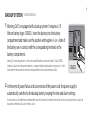
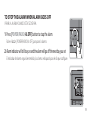
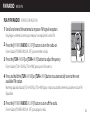
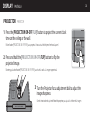
BACKUP SYSTEM
Morning Call 3 is equipped with a backup system. It requires a 3 V
lithium battery (type: CR2032). Insert the battery into the battery
compartment and make sure the positive and negative (+ or -) sides of
the battery are in contact with the corresponding terminals in the
battery compartment.
Se ri al N o. :1 FE 00 00 01
Jumbo LED Projection Alarm Clock
Model : MORCAL3ULBK
Power : DC 5V 1.2A
Backup Battery : CR2032
jWIN Electronics Corp., USA
Designed in New York
Morning Call 3
Made in China
Morning Call
CR2032
2
In the event of power failure or disconnection of the power cord, the power supply is
automatically switched to the backup battery, keeping the time and alarm settings.
SISTEMA DE RESPALDO
Morning Call 3 está equipado con un sistema de respaldo. Requiere una batería de litio de 3 V (tipo: CR2032).
Introduzca la batería en el compartimento de esta y asegúrese de que los polos positivos y negativos (+ o -) de la
batería estén en contacto con los terminales correspondientes en el compartimento de la batería.
En el caso de haya un fallo eléctrico o se desconecte el cable de alimentación, la fuente de alimentación se traslada automáticamente a la batería de
respaldo, manteniendo así los ajustes de hora y alarma.
8

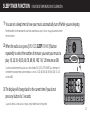
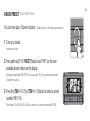
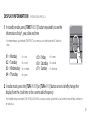
3
To open the battery compartment, use a screwdriver to detach the
screw on the compartment door.
4
When replacing the battery, do not disconnect the power adapter.
Otherwise, all clock and alarm settings will be lost.
Se ri al N o. :1 FE 00 00 01
Jumbo LED Projection Alarm Clock
Model : MORCAL3ULBK
Power : DC 5V 1.2A
Backup Battery : CR2032
jWIN Electronics Corp., USA
Designed in New York
Morning Call 3
Made in China
Morning Call
Para abrir el compartimento de la batería, use un destornillador para separar el tornillo de la tapa del
compartimento.
Cuando sustituya la batería, no desconecte el adaptador de corriente. De lo contrario, se perderán todos
los ajustes de reloj y alarma.
9

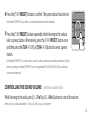
SETTING TIME
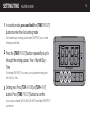
1
In standby mode, press and hold the [TIME/PRESET]
button to enter the clock setting mode.
2
3
Press the [TIME/PRESET] button repeatedly to cycle
through the setting options: Year > Month/Day >
Time
Setting year: Press [TUN-/HOUR] or [TUN+/MIN]
button. Press [TIME/PRESET] button to conrm.
ON-OFF / FLIP
PROJECTION
RADIO / AL OFF
AL 2 / VOLAL 1 / VOL
PM
BUZZER
RADIO
AL 1
BUZZER
RADIO
AL 2
Morning Call
TUN / HOUR TUN / MINTIME / PRESET
ON-OFF / FLIP
PROJECTION
PM
BUZZER
RADIO
AL 1
Morning Call
TUN / HOUR TUN / MINTIME / PRESET
AJUSTAR LA HORA
En el modo de espera, mantenga pulsado el botón [TIME/PRESET] para ir al modo
de configuración del reloj.
Pulse el botón [TIME/PRESET] varias veces para ver las opciones de configuración:
Año > Mes/Día > Hora
Ajustar año: pulsar el botón [TUN-/HOUR] o [TUN+/MIN]. Pulse el botón [TIME/PRESET]
para confirmar.
10

Month Date Conrm
4
Setting month/date: Press the [TUN-/HOUR] button to set the month and [TUN+/MIN] button to
set the date. Press and hold the [TUN-/HOUR] or [TUN+/MIN] button to move fast. Press
[TIME/PRESET] button to conrm.
i.e. 121: January 21st, 1005: October 5th
5
Setting the time: Press the [TUN-/HOUR] button to set the hour and [TUN+/ MIN] button to set
the minute. Press [TIME/PRESET] button to conrm.
ON-OFF / FLIP
PROJECTION
RADIO / AL OFF
AL 2 / VOLAL 1 / VOL
PM
BUZZER
RADIO
AL 1
BUZZER
RADIO
AL 2
Morning Call
TUN / HOUR TUN / MINTIME / PRESET
ON-OFF / FLIP
PROJECTION
RADIO / AL OFF
AL 2 / VOLAL 1 / VOL
PM
BUZZER
RADIO
AL 1
BUZZER
RADIO
AL 2
Morning Call
TUN / HOUR TUN / MINTIME / PRESET
ON-OFF / FLIP
PROJECTION
RADIO / AL OFF
AL 2 / VOLAL 1 / VOL
PM
BUZZER
RADIO
AL 1
BUZZER
RADIO
Morning Call
TUN / HOUR TUN / MINTIME / PRESET
Ajustar mes/fecha: pulse el botón [TUN-/HOUR] para configurar el mes y el botón [TUN+/MIN] para configurar la fecha. Mantenga pulsado el botón
[TUN-/HOUR] o [TUN+/MIN] para moverse con rapidez. Pulse el botón [TIME/PRESET] para confirmar
por ejemplo, 121: 21 de enero, 1005: 5 de octubre)
Ajustar hora: pulse el botón [TUN-/HOUR] para configurar la hora y el botón [TUN+/MIN] para el minuto. Pulse el botón [TIME/PRESET] para confirmar.
11

SETTING THE ALARM
SETTING ALARMS
The Morning Call 3 lets you have 2 alarm settings.
1
In standby mode, press and hold the [AL 1/Vol-] button to enter the alarm
time setting mode.
2
In the alarm setting mode, press the [AL 1/Vol-] button repeatedly to cycle through
the setting options: Alarm time > Alarm sound source > Alarm frequency
ON-OFF / FLIP
PROJECTION
RADIO / AL OFF
AL 2 / VOLAL 1 / VOL
PM
BUZZER
RADIO
AL 1
BUZZER
RADIO
Morning Call
TUN / HOUR TUN / MINTIME / PRESET
AJUSTAR LA ALARMA
AJUSTAR LAS ALARMAS
El Morning Call 3 le permite tener 2 configuraciones de alarma.
En el modo de espera, mantenga pulsado [AL 1/Vol-] para entrar en el modo de configuración de la hora de la alarma.
En el modo de configuración de alarma, pulse [AL 1/Vol-] varias veces para ver las opciones de configuración: Hora de
alarma> Fuente de sonido de alarma> Frecuencia de alarma
12

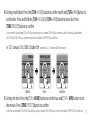
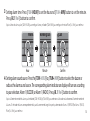
3
Setting alarm time: Press [TUN-/HOUR] to set the hour and [TUN+/MIN] button to set the minute.
Press [AL 1/Vol-] button to conrm.
4
Setting alarm sound source: Press the [TUN-/HOUR] or [TUN+/MIN] button to select the buzzer or
radio as the alarm sound source. The corresponding alarm indicator on display will turn on according
to your selection: Alarm 1 (BUZZER) or Alarm 1 (RADIO). Press [AL 1/Vol-] button to conrm.
Hour Minute Conrm
ON-OFF / FLIP
PROJECTION
RADIO / AL OFF
AL 2 / VOLAL 1 / VOL
PM
BUZZER
RADIO
AL 1
BUZZER
RADIO
AL 2
Morning Call
TUN / HOUR TUN / MINTIME / PRESET
ON-OFF / FLIP
PROJECTION
RADIO / AL OFF
AL 2 / VOLAL 1 / VOL
PM
BUZZER
RADIO
AL 1
BUZZER
RADIO
AL 2
Morning Call
TUN / HOUR TUN / MINTIME / PRESET
ON-OFF / FLIP
PROJECTION
RADIO / AL OFF
AL 2 / VOLAL 1 / VOL
PM
BUZZER
RADIO
AL 1
BUZZER
RADIO
AL 2
Morning Call
TUN / HOUR TUN / MINTIME / PRESET
Ajustar la hora de alarma: pulse [TUN-/HOUR] para configurar la hora y el botón [TUN+/MIN] para configurar el minuto. Pulse [AL 1/Vol-] para confirmar.
Ajustar la fuente de sonido de la alarma: pulse el botón [TUN-/HOUR] o [TUN+/MIN] para seleccionar la vibración o la radio como la fuente de sonido de
la alarma. El indicador de alarma correspondiente de la pantalla se encenderá según lo que haya seleccionado: Alarma 1 (VIBRADOR) o Alarma 1 (RADIO).
Pulse [AL 1/Vol-] para confirmar.
13

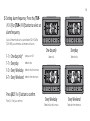
One day only
5
Setting alarm frequency: Press the [TUN-
/HOUR] or [TUN+/MIN] button to select an
alarm frequency
Press [AL 1/Vol-] button to conrm.
1-1 = One day only*
1-7 = Everyday
1-5 = Every Weekday
6-7 = Every Weekend
ON-OFF / FLIP
PROJECTION
RADIO / AL OFF
AL 2 / VOLAL 1 / VOL
PM
BUZZER
RADIO
AL 1
BUZZER
RADIO
AL 2
Morning Call
TUN / HOUR TUN / MINTIME / PRESET
Everyday
ON-OFF / FLIP
PROJECTION
RADIO / AL OFF
AL 2 / VOLAL 1 / VOL
PM
BUZZER
RADIO
AL 1
BUZZER
RADIO
AL 2
Morning Call
TUN / HOUR TUN / MINTIME / PRESET
Every Weekday
ON-OFF / FLIP
PROJECTION
RADIO / AL OFF
AL 2 / VOLAL 1 / VOL
PM
BUZZER
RADIO
AL 1
BUZZER
RADIO
AL 2
Morning Call
TUN / HOUR TUN / MINTIME / PRESET
Every Weekend
ON-OFF / FLIP
PROJECTION
RADIO / AL OFF
AL 2 / VOLAL 1 / VOL
PM
BUZZER
RADIO
AL 1
BUZZER
RADIO
AL 2
Morning Call
TUN / HOUR TUN / MINTIME / PRESET
PM
PM
Solo un día
solo para un día *
todos los días
todos los días de la semana
todos los fines de semana
Pulse [AL 1/Vol-] para confirmar.
Ajustar la frecuencia de alarma: pulse el botón [TUN-/HOUR] o
[TUN+/MIN] para seleccionar una frecuencia de alarma
Todos los días
Todos los días de la semana Todos los fines de semana
14

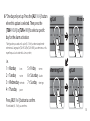
6
*One day only set up: Press the [AL 1/Vol-] button
when this option is selected. Then press the
[TUN-/HOUR] or [TUN+/MIN] to select a specic
day for the alarm activation.
i.e.
1 = Monday
2 = Tuesday
3 = Wednesday
4 = Thursday
5 = Friday
6 = Saturday
7 = Sunday
Press [AL 1/Vol-] button to conrm.
ON-OFF / FLIP
PROJECTION
AL 1 / VOL
RADIO
Morning Call
TUN / HOUR TUN / MINTIME / PRESET
ON-OFF / FLIP
PROJECTION
RADIO / AL OFF
AL 2 / VOLAL 1 / VOL
PM
BUZZER
RADIO
AL 1
BUZZER
RADIO
AL 2
Morning Call
TUN / HOUR TUN / MINTIME / PRESET
ON-OFF / FLIP
PROJECTION
RADIO / AL OFF
AL 2 / VOLAL 1 / VOL
RADIO RADIO
Morning Call
TUN / HOUR TUN / MINTIME / PRESET
ON-OFF / FLIP
PROJECTION
RADIO / AL OFF
AL 2 / VOLAL 1 / VOL
PM
BUZZER
RADIO
AL 1
BUZZER
RADIO
AL 2
Morning Call
TUN / HOUR TUN / MINTIME / PRESET
Pulse el botón [AL 1/Vol-] para confirmar.
lunes
martes
miércoles
jueves
viernes
sábado
domingo
*Configuración para solo un día: pulse [AL 1/Vol-] cuando esta opción esté
seleccionada. Luego pulse [TUN-/HOUR] o [TUN+/MIN] para seleccionar un día
específico para la activación de la alarma, es decir,
15

TURNING THE ALARMS ON OR OFF
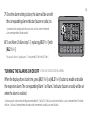
7
Once the alarm setting is done, the alarm will be on with
the corresponding alarm indicator (buzzer or radio) on.
8
To set Alarm 2 follow step 1-7, replacing [AL1/Vol-] with
[AL2/Vol+].
When the display shows clock time, press [AL 1/Vol-] or [AL 2/Vol+] button to enable or disable
the respective alarm. The corresponding Alarm 1 or Alarm 2 indicator (buzzer or radio) will be on
when the alarm is enabled.
ON-OFF / FLIP
PROJECTION
RADIO / AL OFF
AL 2 / VOLAL 1 / VOL
PM
BUZZER
RADIO
AL 1
BUZZER
RADIO
AL 2
Morning Call
TUN / HOUR TUN / MINTIME / PRESET
ACTIVACIÓN Y DESACTIVACIÓN DE ALARMAS
Cuando se realice la configuración de la alarma, esta se activará con el indicador de
alarma correspondiente (vibrador o radio).
Para ajustar la Alarma 2, siga los pasos 1-7, sustituyendo [AL1/Vol-] con [AL2/Vol+].
Cuando la pantalla muestre la hora del reloj, presione el botón [AL 1/Vol-] o [AL 2/Vol+] para habilitar o deshabilitar la alarma correspondiente. El indicador
de Alarma 1 o Alarma 2 correspondiente (vibrador o radio) se encenderá cuando la alarma esté habilitada.
16

SNOOZE / SLEEP / DIMMER
Alarm Repeat Index
1
2
3
4
5
6
7
=
=
=
=
=
=
=
Monday
Tuesday
Wednesday
Thursday
Friday
Saturday
Sunday
1-1
1-7
1-5
6-7
=
=
=
=
One day
Everyday
Every Weekday
Every Weekend
1
When the alarm goes o, the corresponding Alarm 1 or
Alarm 2 indicator (buzzer or radio) will ash on the
display.
2
Press the [SNOOZE/SLEEP/DIMMER] button to temporar-
ily deactivate it. The snooze function will extend your
alarm in increments of 9 minutes.
SNOOZE
ON-OFF / FLIP
PROJECTION
RADIO / AL OFF
AL 2 / VOLAL 1 / VOL
PM
BUZZER
RADIO
AL 1
BUZZER
RADIO
AL 2
Morning Call
TUN / HOUR TUN / MINTIME / PRESET
Cuando la alarma se apaga, el indicador correspondiente de Alarma 1 o Alarma 2
Pulse el botón [SNOOZE/SLEEP/DIMMER] para desactivarlo temporalmente. La función de
repetición alargará su alarma en incrementos de 9 minutos.
MODO REPETICIÓN
17

3
The corresponding Alarm 1 or Alarm 2 indicator
(buzzer or radio) will ash on the display during the
snooze period.
4
To cancel the snooze and the alarm, press [POWER/RADIO/AL
OFF] button.
ON-OFF / FLIP
PROJECTION
RADIO / AL OFF
AL 2 / VOLAL 1 / VOL
PM
BUZZER
RADIO
AL 1
BUZZER
RADIO
AL 2
Morning Call
TUN / HOUR TUN / MINTIME / PRESET
RADIO / AL OFF
AL 2 / VOL
BUZZER
RADIO
AL 2
El indicador correspondiente de Alarma 1 o Alarma 2 (vibrador
o radio) parpadeará en la pantalla durante el período de
repetición.
Para cancelar la repetición y la alarma, pulse el botón [POWER/RADIO/AL OFF].
PM
18

1
Press [POWER/RADIO/AL OFF] button to stop the alarm.
2
Alarm indicator will still stay on and the alarm will go o the next day you set
TO STOP THE ALARM WHEN ALARM GOES OFF
Pulse el botón [POWER/RADIO/AL OFF] para parar la alarma.
El indicador de alarma seguirá encendido y la alarma se disparará para el día que configure.
PARAR LA ALARMA CUANDO ESTA SE DISPARA
PM
ON-OFF / FLIP
PROJECTION
RADIO / AL OFF
AL 2 / VOLAL 1 / VOL
RADIO
AL 1
RADIO
AL 2
Morning Call
TUN / HOUR TUN / MINTIME / PRESET
ON-OFF / FLIP
PROJECTION
AL 2 / VOL
AL 1 / VOL
PM
BUZZER
RADIO
AL 1
Morning Call
TUN / HOUR TUN / MINTIME / PRESET
19

1
Press [AL1/Vol-] button once to disable Alarm 1 while the alarm is not
going o. Press [AL2/Vol+] button once to disable Alarm 2 while the
alarm is not going o.
2
Corresponding alarm indicator will be o and the alarm will not go o
until you enable it again.
TO DISABLE THE ALARM
Pulse el botón [AL1/Vol-] una vez para deshabilitar la Alarma 1 cuando esta no se
dispare. Pulse el botón [AL2/Vol +] una vez para deshabilitar la alarma 2 cuando esta no
se dispare.
El indicador de alarma correspondiente estará apagado y la alarma no se disparará
hasta que la vuelva a habilitar.
DESHABILITAR LA ALARMA
ON-OFF / FLIP
PROJECTION
RADIO / AL OFF
AL 2 / VOLAL 1 / VOL
RADIO
AL 1
RADIO
AL 2
Morning Call
TUN / HOUR TUN / MINTIME / PRESET
ON-OFF / FLIP
PROJECTION
AL 1 / VOL
PM
BUZZER
RADIO
AL 1
Morning Call
TUN / HOUR TUN / MINTIME / PRESET
20

SLEEP TIMER FUNCTION
1
You can set a sleep timer to have your music automatically turn o while you are sleeping
3
The display will change back to the current time if you do not
press any button for 3 seconds.
2
When the radio is on, press [SNOOZE/SLEEP/DIMMER] button
repeatedly to select the number of minutes you want your music to
play: 10, 20, 30, 40, 50, 60, 70, 80, 90, 100, 110, 120 minutes or 00).
ON-OFF / FLIP
PROJECTION
RADIO / AL OFF
AL 2 / VOLAL 1 / VOL
PM
BUZZER
RADIO
AL 1
BUZZER
RADIO
AL 2
Morning Call
TUN / HOUR TUN / MINTIME / PRESET
SNOOZE / SLEEP / DIMMER
Alarm Repeat Index
1
2
3
4
5
6
7
=
=
=
=
=
=
=
Monday
Tuesday
Wednesday
Thursday
Friday
Saturday
Sunday
1-1
1-7
1-5
6-7
=
=
=
=
One day
Everyday
Every Weekday
Every Weekend
FUNCIÓN DE TEMPORIZADOR DE SUSPENSIÓN
Puede establecer un temporizador de suspensión automático para que la música se apague automáticamente
mientras duerme.
La pantalla volverá a la hora actual si no pulsa ningún botón durante 3 segundos.
Cuando la radio está encendida, pulse varias veces el botón [SNOOZE/SLEEP/DIMMER] para seleccionar el
número de minutos que desea que se reproduzca su música: 10, 20, 30, 40, 50, 60, 70, 80, 90, 100, 110, 120
minutos o 00).
21

4
The radio will stop playing once the sleep timer has nished.
5
Press the [SNOOZE/SLEEP/DIMMER] button to check the
remaining time before the radio turns o.
6
To stop sleep mode before the time is out, press the
[SNOOZE/SLEEP/DIMMER] button to select ‘00’.
ON-OFF / FLIP
PROJECTION
RADIO / AL OFF
AL 2 / VOLAL 1 / VOL
PM
BUZZER
RADIO
AL 1
BUZZER
RADIO
AL 2
Morning Call
SNOOZE / SLEEP / DIMMER
Alarm Repeat Index
1
2
3
4
5
6
7
=
=
=
=
=
=
=
Monday
Tuesday
Wednesday
Thursday
Friday
Saturday
Sunday
1-1
1-7
1-5
6-7
=
=
=
=
One day
Everyday
Every Weekday
Every Weekend
TUN / HOUR TUN / MINTIME / PRESET
La radio dejará de reproducirse cuando el temporizador de suspensión
haya finalizado.
Pulse el botón [SNOOZE/SLEEP/DIMMER] para comprobar el tiempo
que queda hasta que la radio se apague.
Para detener el modo de suspensión antes de que se acabe el
tiempo, pulse el botón [SNOOZE/SLEEP/DIMMER] para
seleccionar '00'.
22

FM RADIO
1
Unroll and extend the antenna to improve FM signal reception.
2
Press the [POWER/RADIO/AL OFF] button to turn the radio on.
3
Press the [TUN-/HOUR] or [TUN+/MIN] button to adjust frequency.
4
Press and hold the [TUN-/HOUR] or [TUN+/MIN] button to automatically tune to the next
available FM station.
5
Press the [POWER/RADIO/AL OFF] button to turn o the radio.
PLAY FM RADIO
RADIO / AL OFF
AL 2 / VOL
RADIO
ON-OFF / FLIP
PROJECTION
RADIO / AL OFF
AL 2 / VOLAL 1 / VOL
BUZZER
RADIO
AL 1
BUZZER
RADIO
AL 2
Morning Call
TUN / HOUR TUN / MINTIME / PRESET
PM
RADIO FM
Despliegue y extienda la antena para mejorar la recepción de la señal FM.
Pulse el botón [POWER/RADIO/AL OFF] para encender la radio.
Pulse el botón [TUN-/HOUR] o [TUN+/MIN] para ajustar la frecuencia.
Mantenga pulsado el botón [TUN-/HOUR] o [TUN+/MIN] para sintonizar automáticamente la próxima estación FM
disponible.
Pulse el botón [POWER/RADIO/AL OFF] para apagar la radio.
REPRODUCIR RADIO FM
23

1
Tune to a station.
You can store up to 10 preset stations.
2
Press and hold [TIME/PRESET] button until “P01” (or the next
available preset) shows on the display.
3
Press the [TUN-/HOUR] or [TUN+/MIN] button to select a preset
number (P01-P10).
RADIO PRESET
ON-OFF / FLIP
PROJECTION
RADIO
AL 1
Morning Call
TUN / HOUR TUN / MINTIME / PRESET
ON-OFF / FLIP
PROJECTION
RADIO / AL OFF
AL 2 / VOLAL 1 / VOL
PM
BUZZER
RADIO
AL 1
BUZZER
RADIO
AL 2
Morning Call
TUN / HOUR TUN / MINTIME / PRESET
Sintonice una estación.
Puede guardar hasta 10 estaciones presintonizadas.
Mantenga pulsado el botón [TIME/PRESET] hasta que aparezca "P01" (o la siguiente presintonización
disponible) en la pantalla.
Pulse el botón [TUN-/HOUR] o [TUN+/MIN] para seleccionar un número presintonizado (P01-P10).
RADIOS PRESINTONIZADAS
24
23

4
Press the [TIME/PRESET] button to conrm. The preset station has been set.
5
Press the [TIME/PRESET] button repeatedly while listening to the radio to
select a preset station. Alternatively, press the [TIME/PRESET] button once
and then press the [TUN-/HOUR] or [TUN+/MIN] button to select a preset
station.
While listening to the radio, press [AL 1/Vol-] or [AL 2/Vol+] button to control the volume.
CONTROLLING THE SOUND VOLUME
ON-OFF / FLIP
PROJECTION
Morning Call
TUN / HOUR TUN / MINTIME / PRESET
Pulse el botón [TIME/PRESET] para confirmar. La estación presintonizada se habrá establecido.
Pulse el botón [TIME/PRESET] varias veces mientras escucha la radio para seleccionar una emisora presintonizada. De forma
alternativa, puede pulsar el botón [TIME/PRESET] una vez y luego el botón [TUN-/HOUR] o [TUN+/MIN] para seleccionar
una emisora presintonizada.
Mientras escucha la radio, pulse el botón [AL 1/Vol-] o [AL 2/Vol +] para ajustar el volumen.
CONTROLAR EL VOLUMEN DE SONIDO
25

DISPLAY
1
Press the [PROJECTION ON-OFF/FLIP] button to project the current clock
time on the ceiling or the wall.
2
Press and hold the [PROJECTION ON-OFF/FLIP] button to ip the
projected image.
3
Turn the Projector focus adjustment dial to adjust the
image sharpness.
PROJECTOR
ON-OFF / FLIP
PROJECTION
PM
BUZZER
RADIO
AL 1
TUN / HOUR TUN / MIN
SNOOZE / SLEEP / DIMMER
Alarm Repeat Index
1
2
3
4
5
6
7
=
=
=
=
=
=
=
Monday
Tuesday
Wednesday
Thursday
Friday
Saturday
Sunday
1-1
1-7
1-5
6-7
=
=
=
=
One day
Everyday
Every Weekday
Every Weekend
PANTALLA
Pulse el botón [PROJECTION ON-OFF/FLIP] para proyectar la hora actual del reloj en el techo o la pared.
Mantenga pulsado el botón [PROJECTION ON-OFF/FLIP] para darle la vuelta a la imagen proyectada.
Gire el sintonizador de ajuste del foco del proyector para ajustar la nitidez de la imagen.
PROYECTOR
26

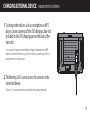
1
In standby mode, press [TIME/PRESET] button repeatedly to see the
information of day*, year, date and time
d1 = Monday
d2 = Tuesday
d3 = Wednesday
d4 = Thursday
2
In radio mode, press the [TUN-/HOUR] or [TUN+/MIN] button once to briey change the
display from the clock time to the current radio frequency.
d5 = Friday
d6 = Saturday
d7 = Sunday
DISPLAY INFORMATION
ON-OFF / FLIP
PROJECTION
BUZZER
RADIO
AL 1
Morning Call
TUN / HOUR TUN / MINTIME / PRESET
d1 = lunes
d2 = martes
d3 = miércoles
d4 = jueves
En el modo de espera, pulse el botón [TIME/PRESET] varias veces para ver la información del día*, año, fecha
y hora
En el modo de radio, pulse el botón [TUN-/HOUR] o [TUN+/MIN] una vez para cambiar rápidamente la visualización de la hora del reloj a la frecuencia
de radio actual.
d5 = viernes
d6 = sábado
d7 = domingo
INFORMACIÓN EN PANTALLA
27

1
In standby mode, press the [SNOOZE/SLEEP/DIMMER]
button to change the brightness level of the display: low,
high or o.
2
Default setting of the dimmer level is “low”
DISPLAY DIMMER
SNOOZE / SLEEP / DIMMER
Alarm Repeat Index
1
2
3
4
5
6
7
=
=
=
=
=
=
=
Monday
Tuesday
Wednesday
Thursday
Friday
Saturday
Sunday
1-1
1-7
1-5
6-7
=
=
=
=
One day
Everyday
Every Weekday
Every Weekend
En el modo de espera, pulse el botón [SNOOZE/SLEEP/DIMMER] para cambiar el nivel de brillo de
la pantalla: bajo, alto o apagado.
La configuración predeterminada del nivel de regulación de intensidad es "baja".
REGULADOR DE INTENSIDAD DE PANTALLA
28

USB CHARGING
DC 5V/1.2A
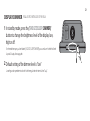
CHARGING EXTERNAL DEVICE
1
To charge other devices such as smartphone or MP3
player, connect one end of the USB charging cable (not
included) to the USB charging port on the back of the
main unit
2
The Morning Call 3 cannot access the contents in the
connected device.
CARGAR DISPOSITIVO EXTERNO
Para cargar otros dispositivos, como teléfonos inteligentes o reproductores de MP3,
conecte un extremo del cable de carga USB (no incluido) al puerto de carga USB, en la
parte posterior de la unidad principal.
El Morning Call 3 no puede acceder a los contenidos del dispositivo conectado.
29

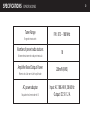
Tuner Range
SPECIFICATIONS
Number of preset radio stations
Amplifier Rated Output Power
AC power adaptor
FM: 87.5 – 108 MHz
10
200mW (RMS)
Input: AC 100-240 V, 50/60 Hz
Output: DC 5V 1.2 A
Rango de sintonización
ESPECIFICACIONES
Número de estaciones de radio presintonizadas
Potencia de salida nominal del amplificador
Adaptador de alimentación de CA
30

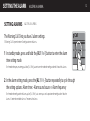
If you have any question or need support, please contact us by visiting http://support.iLuv.com or
call customer service department at 1-866-807-5946.
CUSTOMER SUPPORT
Si tiene alguna pregunta o necesita ayuda, póngase en contacto con nosotros visitando http://support.iLuv.com o llame
al departamento de servicio de atención al cliente al 1-866-807-5946.
Atención al cliente
31

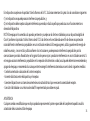
This device complies with Part 15 of the FCC Rules. Operation is subject to the following two conditions:
(1) this device may not cause harmful interference, and
(2) this device must accept any interference received, including interference that may cause undesired operation.
NOTE: This equipment has been tested and found to comply with the limits for a Class B digital device, pursuant to Part 15 of the FCC
Rules. These limits are designed to provide reasonable protection against harmful interference in a residential installation. This
equipment generates, uses and can radiate radio frequency energy and, if not installed and used in accordance with the instructions,
may cause harmful interference to radio communications. However, there is no guarantee that interference will not occur in a
particular installation. If this equipment does cause harmful interference to radio or television reception, which can be determined by
turning the equipment o and on, the user is encouraged to try to correct the interference by one or more of the following
measures:
- Reorient or relocate the receiving antenna.
- Increase the separation between the equipment and receiver.
- Connect the equipment into an outlet on a circuit dierent from that to which the receiver is connected.
- Consult the dealer or an experienced radio/TV technician for help.
WARNING Changes or modications not expressly approved by the party responsible for compliance could void the user's authority
to operate the equipment
RADIO / AL OFF
AL 2 / VOLAL 1 / VOL
RADIO
AL 2
Morning Call
COMPLIANCE WITH FCC REGULATION
Cumplimiento de la normativa de la FCC
32

RADIO / AL OFF
AL 2 / VOLAL 1 / VOL
Morning Call
Este dispositivo cumple con el apartado 15 de las Normas de la FCC. Su funcionamiento está sujeto a las dos condiciones siguientes:
(1) este dispositivo no puede provocar interferencias perjudiciales, y
(2) este dispositivo debe aceptar cualquier interferencia que reciba, incluida aquella que pueda causar un funcionamiento no
deseado del dispositivo.
NOTA: Este equipo se ha sometido a las pruebas pertinentes y cumple con los límites establecidos para un dispositivo digital de
Clase B, conforme al apartado 15 de las Normas de la FCC. Estos límites se han establecido con el n de ofrecer una protección
razonable frente a interferencias perjudiciales en una instalación residencial. Este equipo genera, utiliza y puede emitir energía de
radio frecuencia y, si no se instala y utiliza conforme a las instrucciones, puede provocar interferencias perjudiciales para las
comunicaciones por radio. No obstante, no hay garantía de que no vayan a producirse interferencias en una instalación concreta. Si
este equipo ocasiona interferencias perjudiciales en la recepción de la televisión o radio, lo cual puede determinarse encendiendo y
apagando el equipo, se recomienda al usuario que intente corregir la interferencia tomando una o más de las siguientes medidas:
- Cambie la orientación o ubicación de la antena receptora.
- Aumente la distancia entre el dispositivo y el receptor.
- Conecte el dispositivo en una toma de corriente de un circuito distinto al que se encuentra conectado el receptor.
- Consulte al distribuidor o a un técnico de radio/TV experimentado para obtener ayuda.
ADVERTENCIA
Cualquier cambio o modicación que no haya aprobado expresamente la parte responsable del cumplimiento podría anular la
autorización del usuario de utilizar el equipo.
33

RADIO / AL OFF
AL 2 / VOLAL 1 / VOL
BUZZER
RADIO
AL 2
Morning Call
34

RADIO / AL OFF
AL 2 / VOLAL 1 / VOL
BUZZER
RADIO
AL 2
Morning Call
iLuv Creative Technology
2 Harbor Park Drive
Port Washington, NY 11050
35

-
 1
1
-
 2
2
-
 3
3
-
 4
4
-
 5
5
-
 6
6
-
 7
7
-
 8
8
-
 9
9
-
 10
10
-
 11
11
-
 12
12
-
 13
13
-
 14
14
-
 15
15
-
 16
16
-
 17
17
-
 18
18
-
 19
19
-
 20
20
-
 21
21
-
 22
22
-
 23
23
-
 24
24
-
 25
25
-
 26
26
-
 27
27
-
 28
28
-
 29
29
-
 30
30
-
 31
31
-
 32
32
-
 33
33
-
 34
34
-
 35
35
-
 36
36


iLuv Morning Call 3 Manual de usuario
- Categoría
- Relojes de alarma
- Tipo
- Manual de usuario
en otros idiomas
- English: iLuv Morning Call 3 User manual
Artículos relacionados
Otros documentos
-
Thomson CP300T El manual del propietario
-
Sunstech MORNINGV2 Guía del usuario
-
Roadstar CLR-2477 Manual de usuario
-
Lenco CR-12BK El manual del propietario
-
 NEW ONE CR128 UK El manual del propietario
-
-
Roadstar CLR-1966/CR Manual de usuario
-
-
Geemarc SB200ss Guía del usuario
