Pro Team 107303 Instrucciones de operación
- Categoría
- Aspiradoras
- Tipo
- Instrucciones de operación

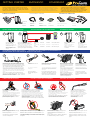
CARTON CONTENTS: CONTENIDO de CARTON: CONTENU DE L’EMBALLAGE:
Vacuum Unit
Aspiradora
Aspirateur
This quick start guide has basic information for the use and
safe operation of this machine. However, the owner’s manual
has important, detailed information. Carefully read both before
starting your new ProTeam vacuum.
GETTING STARTED EMPEZANDO COMMENCER
QUICK START INSTRUCTIONS: INSTRUCCIONES DE INICIO RÁPIDO: DÉMARRAGE RAPIDE :
Esta guía de inicio rápido contiene información básica sobre el uso
y funcionamiento seguro de esta máquina. Sin embargo, el manual
del propietario tiene información importante y detallada. Léalos
cuidadosamente antes de comenzar a usar la aspiradora ProTeam.
Ce guide de démarrage rapide contient tous les renseignements
de base sur l’utilisation et le fonctionnement de cet appareil en
toute sécurité. Toutefois, tous ces renseignements se retrouvent plus
en détail dans manuel d’instructions. Lire attentivement les deux
documents avant d’utiliser un aspirateur ProTeam neuf.
Vacuum Hose
Manguera de la
aspiradora
Tuyau souple
d’aspiration
Accessory Kit Box
Caja con juego de accesorios
Trousse d’accessoires
Power Cord
Cable de
alimentación
Cordon d’alimentation
électrique
Literature Kit
Folletos
Documentation
Accessories
Accesorios
Accessoires
Unlatch 3 clamps on top of
unit and remove cap.
Destrabe los 3 sujetadores que
están en la parte superior de la
unidad y retire la tapa..
Ouvrez les 3 attaches sur le
dessus de l’appareil et retirez le
couvercle.
1
Push the hose into the
cap opening.
Presione la manguera en el
orificio de la tapa.
Insérer le tuyau souple dans
l’ouverture sur le couvercle.
4
ATTACHING WAND AND TOOLS: CONEXIÓN DE LOS TUBOS Y LAS HERRAMIENTAS:
INSTALLATION DE LA RALLONGE DE TUYAU ET DES OUTILS:
REVIEW the SAFETY LABEL on the vacuum. For
additional safety information, read the vacuum
owner’s manual.
REVISE la ETIQUETA DE SEGURIDAD de la aspiradora.
Para obtener información de seguridad adicional, lea
el manual del propietario de la aspiradora.
LIRE L’ÉTIQUETTE DE SÉCURITÉ de l’aspirateur. Pour
plus de renseignements sur la sécurité, consulter le
manuel d’instruction de l’appareil.
SAFETY INSTRUCTIONS: INSTRUCCIONES DE SEGURIDAD: MESURES DE SÉCURITÉ:
DO NOT vacuum liquids or expose the vacuum to rain or water.
DO NOT use the vacuum outdoors or on wet surfaces.
DO NOT handle the vacuum or plug with wet hands.
NO aspire líquidos ni exponga la aspiradora a la lluvia o al agua.
NO use la aspiradora en exteriores ni en superficies húmedas.
NO manipule la aspiradora ni la enchufe con las manos húmedas.
NE PAS aspirer de débris liquides ni exposer l’aspirateur à la pluie
ou aux projections d’eau.
NE PAS utiliser l’aspirateur à l’extérieur ou sur une surface trempée.
NE PAS manier l’aspirateur ou la fiche lorsqu’on a les mains mouillées.
DO NOT vacuum flammable or combustible
materials or anything that is burning or smoking,
such as cigarettes, matches or hot ashes.
NO aspire materiales inflamables o combustibles ni ningún
tipo de material ardiente o humeante, como cigarrillos,
fósforos o cenizas calientes.
NE PAS aspirer des matières inflammables ou combustibles
ou tout autre débris enflammé ou fumant comme des
cigarettes, des allumettes ou de la cendre chaude.
DO NOT vacuum with a frayed, worn or
damaged cord. Do not modify the vacuum
plug. Use the extension cord provided.
NO aspire si el cable está pelado, desgastado o
dañado. No modifique el enchufe de la aspiradora.
Use el cable de extensión que se proporciona.
NE PAS utiliser l’aspirateur si le cordon
d’alimentation électrique est effiloché,
usé ou endommagé.
ALWAYS hold the plug, not the cord, when plug-
ging in or unplugging the vacuum.
SIEMPRE sostenga el enchufe cuando conecte o
desconecte la aspiradora.
TOUJOURS brancher ou débrancher l’aspirateur
en tenant le cordon par la fiche.
DO NOT pull or carry the vacuum by the cord or use
the cord as a handle.
NO transporte la aspiradora con el cable ni tire de éste;
tampoco debe usarlo como manilla.
NE PAS tirer ou transporter l’aspirateur par le cordon
d’alimentation électrique, ni utiliser ce dernier comme
poignée.
1
Plug the power cord into the wall. Turn
the unit on, and proceed with vacuum-
ing. The on/off switch is conveniently
located on the waist belt of the back-
pack vacuums.
Enchufe el cable de alimentación al toma-
corriente de pared. Encienda la unidad
y comience a aspirar. El interruptor de
encendido/apagado está ubicado conveni-
entemente en la correa de la cintura de las
aspiradoras tipo mochila.
Branchez le cordon d’alimentation sur
une prise murale. Mettez l’aspirateur
en marche et effectuez le travail. Le
commutateur marche/arrêt se situe sur
leceinturon de l’aspirateur dorsal.
4
Draw the top of the wand in
toward your waist and twist at
the waist walking backward or
forward, in a side-to-side motion.
Girando la cintura, aspire con un
movimiento de lado a lado mientras
camina hacia atrás o hacia delante.
Il suffit de tourner les hanches
et d’imposer un mouvement alter-
natif d’un côté à l’autre et d’avant
en arrière.
5
Check to make sure the filters are in place
and have not shifted during shipping.
Asegúrese de que los filtros estén en su lugar
y no se hayan movido durante el envío.
S’assurer que les filtres sont bien en place et
qu’ils n’ont pas été déplacés lors du transport.
Dome Filter
Filtro de domo
Dôme filtrant
Cloth Filter
Filtro de tela
Filtre à tissus
Intercept Micro® Filter
Intercept Micro® Filter
Micro filtre Intercept
®
#100331 866.888.2168
NO COMBUSTIBLES!
¡NINGUNOS COMBUSTIBLES!
AUCUN COMBUSTIBLE !
NO LIQUIDS!
¡NINGUNOS LIQUIDOS!
AUCUNS LIQUIDES !
698
sq. in.
pulgadas cuadradas
po
2
4503
sq. cm
cuadrados cm
cm
2
INTERCEPT MICRO
®
GENUINE / AUTÉNTICA / VÉRITABLE
Replacement Filters / Filtros de repuesto / Filtres de rechange
The American Lung Association does not endorse products.
ProTeam, Intercept Micro, Super CoachVac, CoachVac, and MegaVac
are trademarks and registered trademarks of ProTeam, Inc. © 2006-2011 ProTeam, Inc.
All Rights Reserved
. ProTeam, Intercept Micro,
Super CoachVac, CoachVac, y MegaVac
son marcas comerciales y marcas registradas de ProTeam, Inc. © 2006-2011
ProTeam, Inc. Todos los derechos reservados. ProTeam, Intercept Micro,
Super CoachVac, CoachVac, et MegaVac
sont des marques commerciales et
marques déposéesde ProTeam, Inc © 2006-2011 ProTeam, Inc Tous droits réservés.
Super Coach Pro
®
2
Replace filters and cap. Relatch
3 clamps.
Vuelva a colocar la tapa y a
trabar los 3 sujetadores.
Replacez le couvercle et fermez
les 3 attaches.
3
Turn off the unit before unplugging. Unplug the unit
from the outlet before servicing.
Apague la unidad antes de desenchufarla. Desenchufe
la unidad del tomacorriente antes de realizar el
mantenimiento.
Éteindre l’aspirateur avant de le débrancher. L’appareil doit
être débranché avant de procéder à son entretien.
Fasten the ends of the wands together, untwist cuff from end
of wand and slide onto other wand half. Find the notch on the
inside of the wand and the groove on the outside of the wand -
they must align. Insert the wand end by aligning the notch and
grove. To tighten into position twist wand cuff to the right.
Sujete los extremos de los tubos, desenrosque el puño del extremo
del tubo y deslice sobre la otra mitad del tubo. Localice la ranura
en el interior del tubo y la muesca en el exterior del tubo – deben
estar alineados. Inserte el extremo del tubo alineando la ranura y la
muesca. Para ajustar en la posición, gire el puño del tubo hacia la
derecha.
Pour raccorder le tube-rallonge, dévissez le manchon puis faites
glisser une section du tube-rallonge sur l’autre. La coche à l’intérieur
du manche et la fente à l’extérieur doivent être alignées. Pour fixer en
place, tournez le manchon vers la droite.
2
Twist the wand into the end
of the hose.
Gire el tubo en el extremo de
la manguera.
Faire pivoter la rallonge
autour du tuyau souple pour
l’y insérer.
3
Attach the floor tool to end of wand. Align
the brass ring with the groove on the floor
tool to ensure a secure fit.
Conecte la herramienta de piso al extremo del
tubo. Alinee el aro de bronce con la muesca
en la herramienta de piso para garantizar un
ajuste seguro.
Insérer l’embout à plancher dans l’extrémité
de la rallonge. Aligner la bague en laiton avec
la démarcation sur l’embout à plancher pour
s’assurer que l’ensemble soit solidement fixé.
Do not tie extension cord and power cord together. Doing so will result
in damage to both cords and will not be covered under warranty.
No amarre el cable de extensión junto con el de alimentación. Esto puede
dañar ambos cables y no contará con la cobertura de la garantía.
Ne pas attacher la rallonge et le cordon d’alimentation électrique ensemble,
ce qui risque d’endommager les deux cordons et contrevenir aux exigences
de la garantie.
HEPA Exhaust
Filter
Filtro de escape
HEPA
Filtre HEPA
Cuff

www.pro-team.com [email protected] 866.888.2168
The American Lung Association
does not endorse products.
To replace the Intercept Micro Filter, slide filter into
Cloth Filter and secure into vacuum body.
Para cambiar el filtro Intercept Micro
Filter, colóquelo en el filtro de tela y fíjelo
al cuerpo de la aspiradora.
Pour remettre le microfiltre Intercept
en place, glisser ce dernier dans le filtre
à tissus et le fixer solidement dans le corps
de l’aspirateur.
Pull the top piece of the Dome Filter off and remove
the foam media. Shake it out, rinse it, and let it air dry
thoroughly.
Saque la pieza superior del filtro de domo y saque el medio
de espuma. Sacúdalo, enjuáguelo y déjelo secar al aire por
completo.
Séparer la partie supérieure du dôme filtrant et retirer le filtre
en mousse. Secouer et rincer ce dernier, puis le laisser sécher
entièrement.
To inspect or replace the HEPA filter, depress the raised portion of tab on filter
door (A). Then pivot the door away from the vacuum body. Grasp the plastic
housing on the HEPA filter and remove from vacuum (B). To replace the filter
door, align the 2 tabs to the housing and press in place, then push upward. Be
sure to snap the locking tabs of spring finger behind tab on housing. You should
hear an audible “click” if connected correctly.
Para revisar o reemplazar el filtro HEPA, presione la parte elevada de la lengüeta que
está en la puerta del filtro (A). Luego, haga girar la puerta alejándola del cuerpo de
la aspiradora. Tome el alojamiento de plástico sobre el filtro HEPA y retírela de la aspi-
radora (B). Para volver a colocar la puerta del filtro, alinee las 2 engüetas con el alo-
jamiento y presione en su lugar, luego rote hacia arriba. Asegúrese de cerrar bien las
lengüetas de seguridad del dedo del resorte detrás de la lengüeta sobre el alojamiento.
Debería escuchar un “clic” audible si están correctamente instaladas.
Pour vérifier ou remplacer le filtre HEPA, appuyez sur la languette située sur la porte du filtre
(A). Puis faites pivoter la porte. Agrippez le compartiment en plastique du filtre et retirez
le filtre (B). Pour remplacer la porte du filtre, alignez et appuyez sur les 2 languettes, puis
faites pivoter vers le haut. Assurezvous que les languettes de verrouillage du doigt ressort
sont bien enclenchées. Vous entendrez un « clic » si elles sont bien enclenchées.
MAINTAINING YOUR VACUUM MANTENER LA ASPIRADORA
ENTRETIEN DE L’ASPIRATEUR
FILTER MAINTENANCE: MANTENIMIENTO DEL FILTRO: ENTRETIEN DES FILTRES:
USE ONLY GENUINE PROTEAM FILTERS TO ENSURE
OPTIMAL PERFORMANCE, IMPROVED INDOOR AIR
QUALITY AND MAINTAIN A VALID VACUUM WAR-
RANTY.
DOME FILTER FILTRO DE DOMO DÔME FILTRANT
INTERCEPT MICRO FILTER INTERCEPT MICRO FILTER MICROFILTRE INTERCEPT
EMPTY and INSPECT the Intercept Micro Filter every time
you start and finish vacuuming. Replace the filter if neces-
sary. A clogged and dirty filter restricts airflow and results in
overheating and reduced suction.
VACÍE e INSPECCIONE el filtro Intercept Micro Filter cada vez
que comience y termine de aspirar; cambie el filtro si fuese
necesario. Un filtro obstruido y sucio restringe el flujo de aire y
provoca sobrecalentamiento y menor succión.
VIDER et INSPECTER le microfiltre Intercept chaque fois avant
de commencer à passer l’aspirateur et après l’avoir passé.
Remplacer le filtre si nécessaire. Un filtre obstrué ou souillé
restreint le débit d’air et provoque la surchauffe de l’appareil
et diminue la qualité d’aspiration.
Once a week, or as necessary, clean or replace the Dome Filter.
First, remove the Intercept Micro Filter and Cloth Filter. Reach
into the vacuum body and twist dome filter from motor.
Una vez a la semana, o según sea necesario, limpie o cambie el
filtro de domo. Primero, retire el filtro Intercept Micro Filter y el filtro
de tela. Meta la mano en el cuerpo de la aspiradora y gire el filtro
de domo para sacarlo del motor.
Une fois par semaine, ou lorsque c’est nécessaire, nettoyer ou
remplacer le dôme filtrant. Retirer d’abord le microfiltre Intercept
et le filtre à tissus. Insérer ensuite la main à l’intérieur du corps de
l’aspirateur, saisir le filtre et le tourner pour le séparer du moteur
et l’extraire.
HEPA EXHAUST FILTERS
FILTRO DE ESCAPE HEPA
FILTRE HEPA
POST THIS INFORMATION FOR REFERENCE NEAR THE LOCATION YOU STORE THE VACUUM.
COLOQUE ESTA INFORMACIÓN DE REFERENCIA CERCA DE LA UBICACIÓN DONDE GUARDA LA ASPIRADORA.
AFFICHER CES INDICATIONS BIEN EN VUE À PROXIMITÉ DE L’ESPACE DE RANGEMENT DE L’ASPIRATEUR.
SP6859-1 9/13
USE SÓLO FILTROS DE REPUESTO PROTEAM GENUINOS
PARA GARANTIZAR UN RENDIMIENTO ÓPTIMO, OBTENER
UNA MEJOR CALIDAD DE AIRE EN EL INTERIOR Y MANTENER
VÁLIDA LA GARANTÍA DE LA ASPIRADORA.
#100331 866.888.2168
NO COMBUSTIBLES!
¡NINGUNOS COMBUSTIBLES!
AUCUN COMBUSTIBLE !
NO LIQUIDS!
¡NINGUNOS LIQUIDOS!
AUCUNS LIQUIDES !
698
sq. in.
pulgadas cuadradas
po
2
4503
sq. cm
cuadrados cm
cm
2
INTERCEPT MICRO
®
GENUINE / AUTÉNTICA / VÉRITABLE
Replacement Filters / Filtros de repuesto / Filtres de rechange
The American Lung Association does not endorse products.
ProTeam, Intercept Micro, Super CoachVac, CoachVac, and MegaVac
are trademarks and registered trademarks of ProTeam, Inc. © 2006-2011 ProTeam, Inc.
All Rights Reserved
. ProTeam, Intercept Micro,
Super CoachVac, CoachVac, y MegaVac
son marcas comerciales y marcas registradas de ProTeam, Inc. © 2006-2011
ProTeam, Inc. Todos los derechos reservados. ProTeam, Intercept Micro,
Super CoachVac, CoachVac, et MegaVac
sont des marques commerciales et
marques déposéesde ProTeam, Inc © 2006-2011 ProTeam, Inc Tous droits réservés.
Super Coach Pro
®
N’UTILISER QUE LES FILTRES PROTEAM AUTHENTIQUES AFIN
D’ASSURER LE RENDEMENT APPROPRIÉ DE L’ASPIRATEUR,
D’AMÉLIORER LA QUALITÉ DE L’AIR INTÉRIEURE ET DE
MAINTENIR LA GARANTIE DE L’ASPIRATEUR EN VIGUEUR.
BA
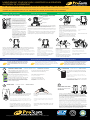
WEARING THE VACUUM: USO DE LA ASPIRADORA: MISE EN PLACE DE L’ASPIRATEUR DORSAL:
Connect the waist strap.
Conecte las correas de la
cintura.
Attacher la courroie de taille.
4
Adjust the shoulder straps so that the unit fits
comfortably, with the weight concentrated on
your hips.
Ajuste las correas de los hombros para que la
unidad se acomode bien, pero con el peso siempre
concentrado en las caderas.
Ajuster les courroies d’épaule de sorte que l’appareil
repose en tout confort, tout en s’assurant que le
poids soit concentré sur les hanches.
6
Thread the extension cord through cord
holder on the waistbelt.
Enrolle el cable de extensión a través
portacable en la correa de la cintura.
Enfiler la rallonge dans la boucle de fixation
de la courroie de taille.
8
1
Once a month, or as necessary, hand or machine wash
the cloth filter and let it AIR dry. DO NOT PUT IT IN THE
DRYER.
Una vez al mes, o según sea necesario, lave a mano o a
máquina el filtro de tela y déjelo secar al aire. NO LO COLO-
QUE EN LA SECADORA.
Une fois par mois, ou lorsque c’est nécessaire, laver à la main
ou à la machine le filtre à tissus et le laisser sécher à l’air libre.
NE PAS LE METTRE À LA SÉCHEUSE.
CLOTH FILTER FILTRO DE TELA FILTRE À TISSUS
#100331 866.888.2168
NO COMBUSTIBLES!
¡NINGUNOS COMBUSTIBLES!
AUCUN COMBUSTIBLE !
NO LIQUIDS!
¡NINGUNOS LIQUIDOS!
AUCUNS LIQUIDES !
698
sq. in.
pulgadas cuadradas
po
2
4503
sq. cm
cuadrados cm
cm
2
INTERCEPT MICRO
®
GENUINE / AUTÉNTICA / VÉRITABLE
Replacement Filters / Filtros de repuesto / Filtres de rechange
The American Lung Association does not endorse products.
ProTeam, Intercept Micro, Super CoachVac, CoachVac, and MegaVac
are trademarks and registered trademarks of ProTeam, Inc. © 2006-2011 ProTeam, Inc.
All Rights Reserved
. ProTeam, Intercept Micro,
Super CoachVac, CoachVac, y MegaVac
son marcas comerciales y marcas registradas de ProTeam, Inc. © 2006-2011
ProTeam, Inc. Todos los derechos reservados. ProTeam, Intercept Micro,
Super CoachVac, CoachVac, et MegaVac
sont des marques commerciales et
marques déposéesde ProTeam, Inc © 2006-2011 ProTeam, Inc Tous droits réservés.
Super Coach Pro
®
2
3
4
To move the upper harness, loosen the tensioning straps. Then using a #3 Phillips
screwdriver, unthread the screw from the unit. It is located in center of upper har-
ness. The upper pad should be secured by screwing it all the way in.
Para mover el arnés superior, aflojar las correas tensoras. Luego, utilizando un destornil-
lador Phillips # 3, desenroscar el tornillo de la unidad. Se encuentra en el centro de
arnés superior. La plataforma superior debe ser garantizado por atornillarlo todo hacia
adentro.
Pour déplacer le faisceau supérieur, desserrer les sangles de tension. Puis à l’aide d’un
tournevis cruciforme n ° 3, dévisser la vis de l’appareil. Il est situé dans le centre de
harnais supérieure. Le pavé supérieur doit être fixé par vissage tout le chemin po.
Tensioning Straps
Upper Harness
Pivoting Bar
Harness Height Adjustments
HARNESS HEIGHT ADJUSTMENT HARNESS HEIGHT ADJUSTMENT HARNESS HEIGHT ADJUSTMENT
Upper harness should sit between shoul-
der blades for most comfortable fit. The
unit was shipped with the upper harness
in the middle position. If you are a tall
user, you will need to move the position
up. If you are a shorter user, you will need
to move the position down (See side view
of vacuum and harness to the left).
El arnés superior debe apoyar entre los
omóplatos para tener un calce más confort-
able. La unidad fue despachada con el
arnés superior en la posición media. Si usted
es alto, tendrá que mover la posición hacia
arriba. Si no es tan alto, tendrá que mover
la posición hacia abajo (Ver vista lateral de
aspiradora y arnés.)
Pour un confort optimal, le harnais supéri-
eur devrait reposer entre les omoplates. Sur
cet appareil, le harnais est présentement à
la position médiane. Si vous êtes une per-
sonne de grande taille, remontez le harnais.
Si vous êtes une personne de plus petite
taille, baissez le harnais (voir l’aspirateur et
le harnais vus de côté.)
Tighten the waist belt by grabbing the ends of the straps and pulling them toward each
other and then directly outward from the center of the body. It is very important that the
weight of the unit be concentrated on your hips rather than your shoulders.
Ajuste la correa de cintura tomando los extremos de las correas y tirando de cada extremo hacia el
otro y luego directamente hacia afuera desde el centro del cuerpo. Es muy importante que el peso de
la unidad se concentre en sus caderas y no en sus hombros.
Resserrez la ceinture en agrippant les extrémités des courroies et en les tirant l’une vers l’autre, puis
vers l’extérieur. Il est très important que le poids de l’appareil repose sur vos hanches plutôt que vos
épaules.
5
1
2
Connect the sternum strap and slide the
strap up or down on the sewn-in wire sup-
port for the best fit.
Enganche la hebilla de la correa del esternón
y deslice la correa hacia arriba o abajo sobre
el soporte de alambre cosido para obtener el
mejor calce.
Pour un ajustement optimal, fermez la boucle
de la courroie de sternum et glissez la courroie
ers le haut ou le bas sur le support tallique.
7
Adjustable
Harness
Locations
Loosen the shoulder straps and the waist belt.
Lift the vacuum and slide your arms through the
straps. The upper harness can also be adjusted by
tightening or loosening the upper harness buckles
for a custom fit.
Afloje las correas de los hombros y las correas de la
cintura. Levante la aspiradora y meta los brazos entre
las correas. El arnés superior también puede ajustarse
ajustando o aflojando sus hebillas para tener un calce
personalizado.
Desserrer les courroies d’épaule et de taille. Soulever
l’aspirateur et glisser les bras dans les courroies pour
placer l’aspirateur sur le dos. Pour un ajustement
sur mesure, resserrez ou desserrez les boucles sur le
harnais.
3
Upper
Harness
Buckle
Transcripción de documentos
GETTING STARTED EMPEZANDO COMMENCER This quick start guide has basic information for the use and safe operation of this machine. However, the owner’s manual has important, detailed information. Carefully read both before starting your new ProTeam vacuum. CARTON CONTENTS: Ce guide de démarrage rapide contient tous les renseignements de base sur l’utilisation et le fonctionnement de cet appareil en toute sécurité. Toutefois, tous ces renseignements se retrouvent plus en détail dans manuel d’instructions. Lire attentivement les deux documents avant d’utiliser un aspirateur ProTeam neuf. Esta guía de inicio rápido contiene información básica sobre el uso y funcionamiento seguro de esta máquina. Sin embargo, el manual del propietario tiene información importante y detallada. Léalos cuidadosamente antes de comenzar a usar la aspiradora ProTeam. CONTENIDO de CARTON: CONTENU DE L’EMBALLAGE: Vacuum Unit Vacuum Hose Power Cord Literature Kit Accessory Kit Box Accessories Aspiradora Manguera de la aspiradora Cable de alimentación Folletos Caja con juego de accesorios Accesorios Aspirateur Tuyau souple d’aspiration Cordon d’alimentation électrique Documentation Trousse d’accessoires Accessoires QUICK START INSTRUCTIONS: INSTRUCCIONES DE INICIO RÁPIDO: DÉMARRAGE RAPIDE : 2 1 3 4 GENU I NE / AU T ÉNT I C A / V ÉRI TABLE I N T ER C EP T M I C R O ® Replacement Filters / Filtros de repuesto / Filtres de rechange 698 4503 sq. in. pulgadas cuadradas po2 sq. cm cuadrados cm cm2 Super Coach Pro® The American Lung Association does not endorse products. NO COMBUSTIBLES! ¡NINGUNOS COMBUSTIBLES! AUCUN COMBUSTIBLE ! NO LIQUIDS! ¡NINGUNOS LIQUIDOS! AUCUNS LIQUIDES ! ProTeam, Intercept Micro, Super CoachVac, CoachVac, and MegaVac are trademarks and registered trademarks of ProTeam, Inc. © 2006-2011 ProTeam, Inc. All Rights Reserved. ProTeam, Intercept Micro, Super CoachVac, CoachVac, y MegaVac son marcas comerciales y marcas registradas de ProTeam, Inc. © 2006-2011 ProTeam, Inc. Todos los derechos reservados. ProTeam, Intercept Micro, Super CoachVac, CoachVac, et MegaVac sont des marques commerciales et marques déposéesde ProTeam, Inc © 2006-2011 ProTeam, Inc Tous droits réservés. #100331 866.888.2168 Unlatch 3 clamps on top of unit and remove cap. Check to make sure the filters are in place and have not shifted during shipping. HEPA Exhaust Filter Dome Filter Cloth Filter Intercept Micro® Filter Replace filters and cap. Relatch 3 clamps. Push the hose into the cap opening. Destrabe los 3 sujetadores que están en la parte superior de la unidad y retire la tapa.. Asegúrese de que los filtros estén en su lugar y no se hayan movido durante el envío. Filtro de escape HEPA Filtro de domo Filtro de tela Intercept Micro® Filter Vuelva a colocar la tapa y a trabar los 3 sujetadores. Presione la manguera en el orificio de la tapa. S’assurer que les filtres sont bien en place et qu’ils n’ont pas été déplacés lors du transport. Filtre HEPA Dôme filtrant Filtre à tissus Micro filtre Intercept® Replacez le couvercle et fermez les 3 attaches. Insérer le tuyau souple dans l’ouverture sur le couvercle. Ouvrez les 3 attaches sur le dessus de l’appareil et retirez le couvercle. ATTACHING WAND AND TOOLS: CONEXIÓN DE LOS TUBOS Y LAS HERRAMIENTAS: INSTALLATION DE LA RALLONGE DE TUYAU ET DES OUTILS: 1 3 2 Cuff 5 4 Fasten the ends of the wands together, untwist cuff from end of wand and slide onto other wand half. Find the notch on the inside of the wand and the groove on the outside of the wand they must align. Insert the wand end by aligning the notch and grove. To tighten into position twist wand cuff to the right. Twist the wand into the end of the hose. Attach the floor tool to end of wand. Align the brass ring with the groove on the floor tool to ensure a secure fit. Plug the power cord into the wall. Turn the unit on, and proceed with vacuuming. The on/off switch is conveniently located on the waist belt of the backpack vacuums. Draw the top of the wand in toward your waist and twist at the waist walking backward or forward, in a side-to-side motion. Sujete los extremos de los tubos, desenrosque el puño del extremo del tubo y deslice sobre la otra mitad del tubo. Localice la ranura en el interior del tubo y la muesca en el exterior del tubo – deben estar alineados. Inserte el extremo del tubo alineando la ranura y la muesca. Para ajustar en la posición, gire el puño del tubo hacia la derecha. Gire el tubo en el extremo de la manguera. Conecte la herramienta de piso al extremo del tubo. Alinee el aro de bronce con la muesca en la herramienta de piso para garantizar un ajuste seguro. Girando la cintura, aspire con un movimiento de lado a lado mientras camina hacia atrás o hacia delante. Faire pivoter la rallonge autour du tuyau souple pour l’y insérer. Insérer l’embout à plancher dans l’extrémité de la rallonge. Aligner la bague en laiton avec la démarcation sur l’embout à plancher pour s’assurer que l’ensemble soit solidement fixé. Enchufe el cable de alimentación al tomacorriente de pared. Encienda la unidad y comience a aspirar. El interruptor de encendido/apagado está ubicado convenientemente en la correa de la cintura de las aspiradoras tipo mochila. Pour raccorder le tube-rallonge, dévissez le manchon puis faites glisser une section du tube-rallonge sur l’autre. La coche à l’intérieur du manche et la fente à l’extérieur doivent être alignées. Pour fixer en place, tournez le manchon vers la droite. SAFETY INSTRUCTIONS: INSTRUCCIONES DE SEGURIDAD: Branchez le cordon d’alimentation sur une prise murale. Mettez l’aspirateur en marche et effectuez le travail. Le commutateur marche/arrêt se situe sur leceinturon de l’aspirateur dorsal. Il suffit de tourner les hanches et d’imposer un mouvement alternatif d’un côté à l’autre et d’avant en arrière. MESURES DE SÉCURITÉ: REVIEW the SAFETY LABEL on the vacuum. For additional safety information, read the vacuum owner’s manual. DO NOT vacuum liquids or expose the vacuum to rain or water. DO NOT use the vacuum outdoors or on wet surfaces. DO NOT handle the vacuum or plug with wet hands. DO NOT vacuum flammable or combustible materials or anything that is burning or smoking, such as cigarettes, matches or hot ashes. DO NOT vacuum with a frayed, worn or damaged cord. Do not modify the vacuum plug. Use the extension cord provided. REVISE la ETIQUETA DE SEGURIDAD de la aspiradora. Para obtener información de seguridad adicional, lea el manual del propietario de la aspiradora. NO aspire líquidos ni exponga la aspiradora a la lluvia o al agua. NO use la aspiradora en exteriores ni en superficies húmedas. NO manipule la aspiradora ni la enchufe con las manos húmedas. NO aspire materiales inflamables o combustibles ni ningún tipo de material ardiente o humeante, como cigarrillos, fósforos o cenizas calientes. NO aspire si el cable está pelado, desgastado o dañado. No modifique el enchufe de la aspiradora. Use el cable de extensión que se proporciona. LIRE L’ÉTIQUETTE DE SÉCURITÉ de l’aspirateur. Pour plus de renseignements sur la sécurité, consulter le manuel d’instruction de l’appareil. NE PAS aspirer de débris liquides ni exposer l’aspirateur à la pluie ou aux projections d’eau. NE PAS utiliser l’aspirateur à l’extérieur ou sur une surface trempée. NE PAS manier l’aspirateur ou la fiche lorsqu’on a les mains mouillées. NE PAS aspirer des matières inflammables ou combustibles ou tout autre débris enflammé ou fumant comme des cigarettes, des allumettes ou de la cendre chaude. NE PAS utiliser l’aspirateur si le cordon d’alimentation électrique est effiloché, usé ou endommagé. ALWAYS hold the plug, not the cord, when plugging in or unplugging the vacuum. Do not tie extension cord and power cord together. Doing so will result in damage to both cords and will not be covered under warranty. Turn off the unit before unplugging. Unplug the unit from the outlet before servicing. DO NOT pull or carry the vacuum by the cord or use the cord as a handle. SIEMPRE sostenga el enchufe cuando conecte o desconecte la aspiradora. No amarre el cable de extensión junto con el de alimentación. Esto puede dañar ambos cables y no contará con la cobertura de la garantía. NO transporte la aspiradora con el cable ni tire de éste; tampoco debe usarlo como manilla. TOUJOURS brancher ou débrancher l’aspirateur en tenant le cordon par la fiche. Ne pas attacher la rallonge et le cordon d’alimentation électrique ensemble, ce qui risque d’endommager les deux cordons et contrevenir aux exigences de la garantie. Apague la unidad antes de desenchufarla. Desenchufe la unidad del tomacorriente antes de realizar el mantenimiento. Éteindre l’aspirateur avant de le débrancher. L’appareil doit être débranché avant de procéder à son entretien. NE PAS tirer ou transporter l’aspirateur par le cordon d’alimentation électrique, ni utiliser ce dernier comme poignée. MAINTAINING YOUR VACUUM MANTENER LA ASPIRADORA ENTRETIEN DE L’ASPIRATEUR POST THIS INFORMATION FOR REFERENCE NEAR THE LOCATION YOU STORE THE VACUUM. COLOQUE ESTA INFORMACIÓN DE REFERENCIA CERCA DE LA UBICACIÓN DONDE GUARDA LA ASPIRADORA. AFFICHER CES INDICATIONS BIEN EN VUE À PROXIMITÉ DE L’ESPACE DE RANGEMENT DE L’ASPIRATEUR. WEARING THE VACUUM: HARNESS HEIGHT ADJUSTMENT USO DE LA ASPIRADORA: HARNESS HEIGHT ADJUSTMENT MISE EN PLACE DE L’ASPIRATEUR DORSAL: Upper Harness Buckle HARNESS HEIGHT ADJUSTMENT Upper Harness 1 Upper harness should sit between shoulder blades for most comfortable fit. The unit was shipped with the upper harness in the middle position. If you are a tall user, you will need to move the position up. If you are a shorter user, you will need to move the position down (See side view Adjustable of vacuum and harness to the left). Harness Locations El arnés superior debe apoyar entre los omóplatos para tener un calce más confortable. La unidad fue despachada con el arnés superior en la posición media. Si usted es alto, tendrá que mover la posición hacia arriba. Si no es tan alto, tendrá que mover la posición hacia abajo (Ver vista lateral de aspiradora y arnés.) Pour un confort optimal, le harnais supérieur devrait reposer entre les omoplates. Sur cet appareil, le harnais est présentement à la position médiane. Si vous êtes une personne de grande taille, remontez le harnais. Si vous êtes une personne de plus petite taille, baissez le harnais (voir l’aspirateur et le harnais vus de côté.) 2 4 3 Harness Height Adjustments Tensioning Straps Pivoting Bar To move the upper harness, loosen the tensioning straps. Then using a #3 Phillips screwdriver, unthread the screw from the unit. It is located in center of upper harness. The upper pad should be secured by screwing it all the way in. Para mover el arnés superior, aflojar las correas tensoras. Luego, utilizando un destornillador Phillips # 3, desenroscar el tornillo de la unidad. Se encuentra en el centro de arnés superior. La plataforma superior debe ser garantizado por atornillarlo todo hacia adentro. Pour déplacer le faisceau supérieur, desserrer les sangles de tension. Puis à l’aide d’un tournevis cruciforme n ° 3, dévisser la vis de l’appareil. Il est situé dans le centre de harnais supérieure. Le pavé supérieur doit être fixé par vissage tout le chemin po. 6 5 Loosen the shoulder straps and the waist belt. Lift the vacuum and slide your arms through the straps. The upper harness can also be adjusted by tightening or loosening the upper harness buckles for a custom fit. Connect the waist strap. Afloje las correas de los hombros y las correas de la cintura. Levante la aspiradora y meta los brazos entre las correas. El arnés superior también puede ajustarse ajustando o aflojando sus hebillas para tener un calce personalizado. Conecte las correas de la cintura. Desserrer les courroies d’épaule et de taille. Soulever l’aspirateur et glisser les bras dans les courroies pour placer l’aspirateur sur le dos. Pour un ajustement sur mesure, resserrez ou desserrez les boucles sur le harnais. Attacher la courroie de taille. 7 8 Tighten the waist belt by grabbing the ends of the straps and pulling them toward each other and then directly outward from the center of the body. It is very important that the weight of the unit be concentrated on your hips rather than your shoulders. Adjust the shoulder straps so that the unit fits comfortably, with the weight concentrated on your hips. Connect the sternum strap and slide the strap up or down on the sewn-in wire support for the best fit. Thread the extension cord through cord holder on the waistbelt. Ajuste la correa de cintura tomando los extremos de las correas y tirando de cada extremo hacia el otro y luego directamente hacia afuera desde el centro del cuerpo. Es muy importante que el peso de la unidad se concentre en sus caderas y no en sus hombros. Ajuste las correas de los hombros para que la unidad se acomode bien, pero con el peso siempre concentrado en las caderas. Enrolle el cable de extensión a través portacable en la correa de la cintura. Resserrez la ceinture en agrippant les extrémités des courroies et en les tirant l’une vers l’autre, puis vers l’extérieur. Il est très important que le poids de l’appareil repose sur vos hanches plutôt que vos épaules. Ajuster les courroies d’épaule de sorte que l’appareil repose en tout confort, tout en s’assurant que le poids soit concentré sur les hanches. Enganche la hebilla de la correa del esternón y deslice la correa hacia arriba o abajo sobre el soporte de alambre cosido para obtener el mejor calce. FILTER MAINTENANCE: MANTENIMIENTO DEL FILTRO: USE ONLY GENUINE PROTEAM FILTERS TO ENSURE OPTIMAL PERFORMANCE, IMPROVED INDOOR AIR QUALITY AND MAINTAIN A VALID VACUUM WARRANTY. 1 INTERCEPT MICRO FILTER ENTRETIEN DES FILTRES: USE SÓLO FILTROS DE REPUESTO PROTEAM GENUINOS PARA GARANTIZAR UN RENDIMIENTO ÓPTIMO, OBTENER UNA MEJOR CALIDAD DE AIRE EN EL INTERIOR Y MANTENER VÁLIDA LA GARANTÍA DE LA ASPIRADORA. INTERCEPT MICRO FILTER MICROFILTRE INTERCEPT EMPTY and INSPECT the Intercept Micro Filter every time you start and finish vacuuming. Replace the filter if necessary. A clogged and dirty filter restricts airflow and results in overheating and reduced suction. To replace the Intercept Micro Filter, slide filter into Cloth Filter and secure into vacuum body. VACÍE e INSPECCIONE el filtro Intercept Micro Filter cada vez que comience y termine de aspirar; cambie el filtro si fuese necesario. Un filtro obstruido y sucio restringe el flujo de aire y provoca sobrecalentamiento y menor succión. Para cambiar el filtro Intercept Micro Filter, colóquelo en el filtro de tela y fíjelo al cuerpo de la aspiradora. VIDER et INSPECTER le microfiltre Intercept chaque fois avant de commencer à passer l’aspirateur et après l’avoir passé. Remplacer le filtre si nécessaire. Un filtre obstrué ou souillé restreint le débit d’air et provoque la surchauffe de l’appareil et diminue la qualité d’aspiration. Pour remettre le microfiltre Intercept en place, glisser ce dernier dans le filtre à tissus et le fixer solidement dans le corps de l’aspirateur. Enfiler la rallonge dans la boucle de fixation de la courroie de taille. Pour un ajustement optimal, fermez la boucle de la courroie de sternum et glissez la courroie ers le haut ou le bas sur le support tallique. N’UTILISER QUE LES FILTRES PROTEAM AUTHENTIQUES AFIN D’ASSURER LE RENDEMENT APPROPRIÉ DE L’ASPIRATEUR, D’AMÉLIORER LA QUALITÉ DE L’AIR INTÉRIEURE ET DE MAINTENIR LA GARANTIE DE L’ASPIRATEUR EN VIGUEUR. 2 CLOTH FILTER Filtro de tela FILTRE À TISSUS Once a month, or as necessary, hand or machine wash the cloth filter and let it AIR dry. DO NOT PUT IT IN THE DRYER. G E N UIN E / AUTÉ N TIC A / V É RITAB L E I N T E R CE P T MI CR O ® Replacement Filters / Filtros de repuesto / Filtres de rechange GENUINE / AUTÉNTICA / VÉRITABLE 698 4503 sq. in. pulgadas cuadradas po2 sq. cm cuadrados cm cm2 Super Coach Pro® Una vez al mes, o según sea necesario, lave a mano o a máquina el filtro de tela y déjelo secar al aire. NO LO COLOQUE EN LA SECADORA. The American Lung Association does not endorse products. NO COMBUSTIBLES! ¡NINGUNOS COMBUSTIBLES! AUCUN COMBUSTIBLE ! NO LIQUIDS! ¡NINGUNOS LIQUIDOS! AUCUNS LIQUIDES ! ProTeam, Intercept Micro, Super CoachVac, CoachVac, and MegaVac are trademarks and registered trademarks of ProTeam, Inc. © 2006-2011 ProTeam, Inc. All Rights Reserved. ProTeam, Intercept Micro, Super CoachVac, CoachVac, y MegaVac son marcas comerciales y marcas registradas de ProTeam, Inc. © 2006-2011 ProTeam, Inc. Todos los derechos reservados. ProTeam, Intercept Micro, Super CoachVac, CoachVac, et MegaVac sont des marques commerciales et marques déposéesde ProTeam, Inc © 2006-2011 ProTeam, Inc Tous droits réservés. #100331 866.888.2168 I NT E RC E P T M I C RO ® Replacement Filters / Filtros de repuesto / Filtres de rechange 698 4503 sq. in. pulgadas cuadradas po2 sq. cm cuadrados cm cm2 Super Coach Pro® The American Lung Association does not endorse products. NO COMBUSTIBLES! ¡NINGUNOS COMBUSTIBLES! AUCUN COMBUSTIBLE ! NO LIQUIDS! ¡NINGUNOS LIQUIDOS! AUCUNS LIQUIDES ! ProTeam, Intercept Micro, Super CoachVac, CoachVac, and MegaVac are trademarks and registered trademarks of ProTeam, Inc. © 2006-2011 ProTeam, Inc. All Rights Reserved. ProTeam, Intercept Micro, Super CoachVac, CoachVac, y MegaVac son marcas comerciales y marcas registradas de ProTeam, Inc. © 2006-2011 ProTeam, Inc. Todos los derechos reservados. ProTeam, Intercept Micro, Super CoachVac, CoachVac, et MegaVac sont des marques commerciales et marques déposéesde ProTeam, Inc © 2006-2011 ProTeam, Inc Tous droits réservés. #100331 3 866.888.2168 DOME FILTER FILTRO DE DOMO Une fois par mois, ou lorsque c’est nécessaire, laver à la main ou à la machine le filtre à tissus et le laisser sécher à l’air libre. NE PAS LE METTRE À LA SÉCHEUSE. 4 DÔME FILTRANT HEPA EXHAUST FILTERS FILTRO DE ESCAPE HEPA FILTRE HEPA A B Once a week, or as necessary, clean or replace the Dome Filter. First, remove the Intercept Micro Filter and Cloth Filter. Reach into the vacuum body and twist dome filter from motor. Pull the top piece of the Dome Filter off and remove the foam media. Shake it out, rinse it, and let it air dry thoroughly. To inspect or replace the HEPA filter, depress the raised portion of tab on filter door (A). Then pivot the door away from the vacuum body. Grasp the plastic housing on the HEPA filter and remove from vacuum (B). To replace the filter door, align the 2 tabs to the housing and press in place, then push upward. Be sure to snap the locking tabs of spring finger behind tab on housing. You should hear an audible “click” if connected correctly. Una vez a la semana, o según sea necesario, limpie o cambie el filtro de domo. Primero, retire el filtro Intercept Micro Filter y el filtro de tela. Meta la mano en el cuerpo de la aspiradora y gire el filtro de domo para sacarlo del motor. Saque la pieza superior del filtro de domo y saque el medio de espuma. Sacúdalo, enjuáguelo y déjelo secar al aire por completo. Une fois par semaine, ou lorsque c’est nécessaire, nettoyer ou remplacer le dôme filtrant. Retirer d’abord le microfiltre Intercept et le filtre à tissus. Insérer ensuite la main à l’intérieur du corps de l’aspirateur, saisir le filtre et le tourner pour le séparer du moteur et l’extraire. Séparer la partie supérieure du dôme filtrant et retirer le filtre en mousse. Secouer et rincer ce dernier, puis le laisser sécher entièrement. Para revisar o reemplazar el filtro HEPA, presione la parte elevada de la lengüeta que está en la puerta del filtro (A). Luego, haga girar la puerta alejándola del cuerpo de la aspiradora. Tome el alojamiento de plástico sobre el filtro HEPA y retírela de la aspiradora (B). Para volver a colocar la puerta del filtro, alinee las 2 engüetas con el alojamiento y presione en su lugar, luego rote hacia arriba. Asegúrese de cerrar bien las lengüetas de seguridad del dedo del resorte detrás de la lengüeta sobre el alojamiento. Debería escuchar un “clic” audible si están correctamente instaladas. www.pro-team.com [email protected] 866.888.2168 Pour vérifier ou remplacer le filtre HEPA, appuyez sur la languette située sur la porte du filtre (A). Puis faites pivoter la porte. Agrippez le compartiment en plastique du filtre et retirez le filtre (B). Pour remplacer la porte du filtre, alignez et appuyez sur les 2 languettes, puis faites pivoter vers le haut. Assurezvous que les languettes de verrouillage du doigt ressort sont bien enclenchées. Vous entendrez un « clic » si elles sont bien enclenchées. The American Lung Association does not endorse products. SP6859-1 9/13-
 1
1
-
 2
2


Pro Team 107303 Instrucciones de operación
- Categoría
- Aspiradoras
- Tipo
- Instrucciones de operación
en otros idiomas
- français: Pro Team 107303 Mode d'emploi
- English: Pro Team 107303 Operating instructions
Artículos relacionados
Otros documentos
-
Prolux pt_qvpb Manual de usuario
-
ProTeam 105892 Manual de usuario
-
ProTeam 107118 Guía de instalación
-
-
Emerson ProTeam Super CoachVac Guía de inicio rápido
-
-
ProTeam Super Coach Pro 10 Manual de usuario
-
-
-