Danby DDR070BDPWDB El manual del propietario
- Categoría
- Deshumidificadores
- Tipo
- El manual del propietario

DANBY PRODUCTS LIMITED, ONTARIO, CANADA N1H 6Z9
DANBY PRODUCTS INC., FINDLAY, OHIO, USA 45840
OWNER’S MANUAL
MANUEL DU PROPRIÉTAIRE
MANUAL DEL PROPIETARIO
DEHUMIDIFIER
Owner’s Manual...............................1 - 9
DÉSHUMIDIFICATEUR
Manuel du propriétaire.................10 - 18
DESHUMIDIFICADOR
Manual del propietario.................19 - 27
MODEL • MODÈLE • MODELO
DDR070BDPWDB
2018.01.24

Welcome
Welcome to the Danby family. We are proud of our quality products and we believe in
dependable service. We suggest that you read this owner’s manual before plugging in your new
appliance as it contains important operation information, safety information, troubleshooting and
maintenance tips to ensure the reliability and longevity of your appliance.
Visit www.Danby.com to access self service tools, FAQs and much more. For additional assistance
call 1-800-263-2629.
Note the information below; you will need this information to obtain service under warranty.
You must provide the original purchase receipt to validate your warranty and receive service.
Model Number: _________________________________________________
Serial Number: _________________________________________________
Date of Purchase: _______________________________________________
Need Help?
Before you call for service, here are a few things you can do to help us serve you better.
Read this owner’s manual:
It contains instructions to help you use and maintain your appliance properly.
If you receive a damaged appliance:
Immediately contact the retailer or builder that sold you the appliance.
Save time and money:
Check the troubleshooting section at the end of this manual before calling. This section
will help you solve common problems that may occur.
1-800-26- Danby
(1-800-263-2629)
1

SAFETY REQUIREMENTS
This appliance is not intended for use by persons
(including children) whose physical, sensory or
mental capabilities may be different or reduced,
or who lack experience or knowledge, unless such
persons receive supervision or training to operate
the appliance by a person responsible for their
safety.
Children should be supervised to ensure that they
do not play with the appliance.
To avoid risk of electric shock, do not operate this
dehumidifi er in an area that is likely to accumulate
standing water. If this condition develops, disconnect
the power supply before stepping into the water.
Do not store or use combustible materials such as
gasoline or other fl ammable vapors or liquids in the
vicinity of this or any other appliance.
Do not insert fi ngers or other objects into grills or
openings in the appliance.
Do not cover or block the intake and exhaust
openings.
Do not operate the appliance without the fi lter
installed.
Do not operate the appliance near heat sources.
This appliance is intended for indoor, residential
applications only. Do not use this dehumidifi er
outdoors. Do not use this dehumidifi er for
commercial or industrial applications.
GROUNDING INSTRUCTIONS
This appliance must be grounded. Grounding
reduces the risk of electrical shock by providing an
escape wire for the electrical current.
This appliance has a cord that has a grounding
wire with a 3-prong plug. The power cord must be
plugged into an outlet that is properly grounded.
If the outlet is a 2-prong wall outlet, it must be
replaced with a properly grounded 3-prong wall
outlet. The serial rating plate indicates the voltage
and frequency the appliance is designed for.
WARNING - Improper use of the grounding
plug can result in a risk of electric shock.
Consult a qualifi ed electrician or service agent
if the grounding instructions are not completely
understood, or if doubt exists as to whether the
appliance is properly grounded.
Do not connect the appliance to extension cords,
adapters or together with another appliance in the
same wall outlet.
Do not splice the power cord. Do not under any
circumstances cut or remove the third ground prong
from the power cord.
If the power supply cord is damaged, it must be
replaced by the manufacturer, its service agent or
similar qualifi ed person in order to avoid hazard.
Important Safety Information
READ AND FOLLOW ALL SAFETY INSTRUCTIONS
2
SAVE THESE INSTRUCTIONS!

OPERATING INSTRUCTIONS
LOCATION
• Place the dehumidifi er on a smooth, level fl oor
that is strong enough to support the appliance
with a full bucket of water.
• To maintain effi ciency, operate the appliance
in an enclosed area. Keep nearby doors and
windows closed.
• Maintain a minimum clearance of 20 cm (8
inches) on the sides and back of the appliance
and 40 cm (16 inches) on the top of the
appliance to allow for proper air circulation.
• The recommended ambient operating
temperature is between 5°C (41°F) and 35°C
(95°F).
• Do not force rollers to move over carpeting as
the appliance may tip over and spill water.
• Any time the appliance is placed on its back or
side, it must be allowed to stand upright for 6
hours before plugging in to avoid damage to
internal components.
3
FEATURES
Front
1. Control Panel
2. Handles (both sides)
3. Water Bucket
4. Water Level Indicator
Back
1. Air Outlet
2. Air Filter
3. Continuous Drain Outlet
4. Power Cord Storage Band
5. Power Cord
3
2
1
4
1
2
3
4
5

OPERATING INSTRUCTIONS
4
CONTROL PANEL
1. Defrost Indicator Light
• The defrost indicator light will illuminate
when frost has accumulated on the interior
of the appliance. This can indicate that
the ambient temperature is too cold. The
dehumidifying function will cease until the
frost has melted.
2. Full Bucket Indicator Light
• The full bucket indicator light will illuminate
when the bucket is full of water. Empty the
bucket to resume regular functioning.
3. Display
• The display will show the set humidity, the
ambient humidity or the timer function.
• The humidity can be set between 35-85% in
5% increments. For drier air, set the humidity
to a lower number. For damper air, set the
humidity to a higher number.
• The ambient humidity display is accurate
within +/- 5%.
4. Pump Button and Indicator Light
• Use this button to activate the drain pump.
The indicator light will illuminate when the
pump is active.
5. Smart Dehumidify Button and Indicator Light
• Use this button to activate smart dehumidify
mode. Smart dehumidify mode will
automatically set the humidity and fan speed
based on the ambient temperature and
humidity. The indicator light will illuminate
when smart dehumidify is active.
6. Filter Button and Indicator Light
• The fi lter light will illuminate when the fi lter
needs to be cleaned. Press the fi lter button
once the fi lter has been cleaned to return to
regular functioning.
7. Continuous Mode Button and Indicator Light
• Press this button to activate continuous mode.
This will run the dehumidifying function
continuously. The indicator light will turn on
when continuous mode is active.
8. Fan Button and Indicator Light
• Press this button to set the fan speed to low
or high. If the indicator light is off, the fan is
set to low speed. If the indicator light is on,
the fan is set to high speed.
9. Timer Button and Indicator Lights
• Use this button to set the timer function.
10. Up and Down Arrows
• The up and down arrows can adjust the set
humidity or the timer setting.
11. Power Button
• Use this button to turn the appliance on or
off.
1
2
3
4 5 6 7
8 9
10
11

OPERATING INSTRUCTIONS
5
TIMER FUNCTION
Auto On Function
1. Press the timer button until the auto on indicator
light illuminates.
2. Use the up and down arrows to select the
desired amount of time before the appliance
should turn on. The up and down arrows
will add or subtract 30 minutes of time up to
10 hours, then at 1 hour increments up to a
maximum of 24 hours.
3. The time selected will appear on the display
panel and will count down until the appliance
turns on.
Auto Off Function
1. Press the timer button until the auto off indicator
light illuminates.
2. Use the up and down arrows to select the
desired amount of time before the appliance
should turn on. The up and down arrows
will add or subtract 30 minutes of time up to
10 hours, then at 1 hour increments up to a
maximum of 24 hours.
3. The time selected will appear on the display
panel and will count down until the appliance
turns off.
Using Auto On and Auto Off Simultaneously
The auto on and auto off functions can be used at
the same time by fi rst setting one and then the other.
Both indicator lights will illuminate and the display
will count down to the appliance either turning off
or on, whichever function was set fi rst.
Note: The timer will not cycle the appliance on and
off indefi nitely. The auto on and auto off timers will
function one time and then the appliance will return
to regular functioning.
Turning the appliance off, pressing the default
button on the remote or unplugging the appliance
will clear all memory settings, including the timer.
WATER REMOVAL
There are three ways to remove collected water
from the appliance.
1. Water Bucket
The dehumidifi er will automatically collect
condensed water in the water bucket. When the
bucket is full, the compressor and fan will turn off
and the full bucket indicator light will turn on. The
display will show “P2”.
To empty the bucket, gently remove it from the
appliance by gripping both sides and pulling
outward. Be cautious when removing the bucket, it
will be full and can be heavy.
Do not place the water bucket directly on the fl oor.
The bottom of the bucket is uneven and it will fall
over and spill water.
Empty the bucket and replace it in the appliance.
The dehumidifi er will not function without the bucket
installed.
Note: When removing the bucket, the pump arm
for the drain pump may fall down. It must be gently
pushed upward back into the correct position before
replacing the bucket.

OPERATING INSTRUCTIONS
6
WATER REMOVAL
2. Continuous Drain
Water can be removed from the appliance using the
continuous drain and a standard garden hose (not
provided).
Before using any automatic drain functions,
check that all drain ports are clean and free of
debris. There is one drain port inside the bucket
compartment of the appliance, remove the bucket
to see it. There is one drain port on the back of the
appliance where the drain hose attaches. All drain
ports should be cleaned with a pipe cleaner prior to
use.
Note: Do not clean the drain ports with anything
more rigid than a pipe cleaner as this can damage
the appliance.
Note: If the drain ports are clogged or dirty it
can cause water to leak from the bottom of the
appliance.
Remove the cover from the continuous drain outlet
and attach the female threaded end of the garden
hose to the back of the appliance. Direct the other
end of the garden hose to a bucket or fl oor drain.
Ensure that the garden hose is not bent and goes
straight down from the back of the appliance. The
continuous drain is only activated by gravity so any
bends or upward motion in the hose will stop the
water from draining.
The garden hose should be cut so that it is no more
than 1.8 m (6 feet) long. If the drain hose is too
long water may not drain completely which can
lead to stagnant water and mildew build up inside
the hose.
WATER REMOVAL
3. Pump Drain
If the continuous drain is inconvenient, water can be
removed from the appliance using the pump drain.
When using the pump, the appliance will fi rst fi ll the
bucket with water and then the pump arm will pump
water from the bucket through the drain and out the
hose.
Remove the cover from the pump drain outlet and
attach the provided drain hose. Direct the other end
of the hose to a drain. Press the pump button to
activate the pump function. When the bucket is full,
the pump will begin to work.
Ensure that the drain hose is not bent, this can stop
the water from draining correctly and overwork the
pump.
Do not connect the provided hose together with
another hose. The maximum length of the pump
drain hose should be no more than 4.6 m (15 feet).
If the drain hose is too long water may not drain
completely which can lead to stagnant water and
mildew build up inside the hose.
When using the pump drain, the water bucket
should be emptied every few days to ensure that the
water in the bucket does not become stagnant or
grow mildew.

CARE & MAINTENANCE
AIR FILTER
The air fi lter should be cleaned approximately every
2 weeks. The air fi lter may require more frequent
cleaning if there is signifi cant dander or fur in the
air.
Approximately every two weeks, the fi lter indicator
light on the control panel will illuminate as a
reminder to clean the fi lter. Follow the steps below
to clean the fi lter and return the appliance to normal
functioning.
1. The air fi lter is located behind the rear intake
grill. To remove the air fi lter, grasp the fi lter tab
on the bottom of the grill and slide it downward.
2. Use a vacuum cleaner with a soft brush
attachment to remove any large debris or dust
build up from the air fi lter.
3. Wash the fi lter in lukewarm, soapy water, below
40°C (104°F), or use a neutral cleaning agent.
4. Rinse the fi lter with clean water and dry
thoroughly before reinstalling in the appliance.
5. Press the fi lter button on the control panel to
resume normal functioning.
Note: Do not operate the appliance without the air
fi lter installed.
ERROR CODES
If the display panel shows any of the below error
codes, unplug the appliance, let it stand for 5-10
minutes and then plug it back in. If the error
persists, call for service.
AS - Humidity sensor error
ES - Temperature sensor error
P2 - Full bucket
E3 - Sensor malfunction
Eb - Bucket removed or not in the correct position
EC - Cooling system error or sensor error
CLEANING
To avoid possible electric shock, ensure that the
appliance is unplugged before performing any
cleaning or maintenance.
The outside of the appliance can be wiped clean
with a soft cloth or with a lukewarm, damp cloth if
necessary.
Do not use gasoline, benzene, thinner or any
other chemicals to clean this appliance as these
substances can cause damage to the fi nish and
deformation of plastic parts.
Never pour water directly onto the appliance as this
will cause deterioration of electrical components
and wiring insulation.
Ensure that the drain ports on the interior of the
appliance and the drain ports on the back of the
appliance are free of dirt and calcium build up.
END OF SEASON CARE
Before removing the appliance from service for the
year, operate the appliance on high fan mode for
half a day to ensure that the inside of the appliance
is dry. This will help avoid the growth of mold or
mildew inside the appliance. Ensure the fi lter is
clean and dry. Store the appliance covered in a dry
location.
DISPOSAL
This appliance may not be treated as regular
household waste, it should be taken to the
appropriate waste collection point for recycling of
electrical components. Check for local regulatory
compliance regarding approved and safe disposal
of this appliance.
7

TROUBLESHOOTING
Danby Consumer Care: 1-800-263-2629
Hours of operation:
Monday to Thursday 8:30 am - 6:00 pm Eastern Standard Time
Friday 8:30 am - 4:00 pm Eastern Standard Time
Information in this manual is subject to change without notice.
PROBLEM POSSIBLE CAUSE
Appliance will not operate • Plug is not fully inserted into the wall outlet
• Blown fuse or circuit breaker
• Ambient humidity is lower than the set humidity
• Bucket is full or is not in the proper position
Insuffi cient dehumidifying • Air fi lter is dirty
• Blocked air fl ow
• Appliance size is too small for application
• Ambient humidity is lower than the set humidity
Noise • Air fi lter is dirty
• Bucket is not in proper position
• Floor surface is not level
Odors • Formation of mold or mildew on internal wet surfaces
• Place an algaecide tablet in the water bucket
Water on fl oor • Hose connection is loose
• Drain cover has been removed
Frost build up • When ambient temperature is below 5°C (41°F) frost may form
• Switch the appliance to fan only mode until the frost melts
8

LIMITED IN-HOME APPLIANCE WARRANTY
This quality product is warranted to be free from manufacturer’s defects in material and workmanship, provided that the unit is used under the normal operating
conditions intended by the manufacturer.
This warranty is available only to the person to whom the unit was originally sold by Danby Products Limited (Canada) or Danby Products Inc. (U.S.A.) (hereafter
“Danby”) or by an authorized distributor of Danby, and is non-transferable.
TERMS OF WARRANTY
Plastic parts, are warranted for thirty (30) days only from purchase date, with no extensions provided.
First Year
During the rst twelve (12) months, any functional parts of this product found to be defective, will be repaired or replaced, at warrantor’s
option, at no charge to the ORIGINAL purchaser.
To obtain
Danby reserves the right to limit the boundaries of “In Home Service” to the proximity of an Authorized Service Depot. Any app liance
Service
requiring service outside the limited boundaries of “In Home Service” , it will be the consumer’s responsibility to transport the appliance (at
their own expense) to the original retailer (point of purchase) or a service depot for repair. See “Boundaries of In Home Serv ice” below.
Contact your dealer from whom your unit was purchased, or contact your nearest authorized Danby service depot, where service
must be performed by a qualied service technician.
If service is performed on the units by anyone other than an authorized service depot, or the unit is used for commercial appli cation, all
obligations of Danby under this warranty shall be void.
Boundaries of
If the appliance is installed in a location that is 100 kilometers (62 miles) or more from the nearest service center your unit must be
In Home Service
delivered to the nearest authorized Danby Service Depot, as service must only be performed by a technician qualied and certif ied for
warranty service by Danby. Transportation charges to and from the service location are not protected by this warranty and are t he
responsibility of the purchaser.
Nothing within this warranty shall imply that Danby will be responsible or liable for any spoilage or damage to food or other c ontents of this appliance, whether due
to any defect of the appliance, or its use, whether proper or improper.
EXCLUSIONS
Save as herein provided, Danby, there are no other warranties, conditions, representations or guarantees, express or implied, m ade or intended by Danby or its
authorized distributors and all other warranties, conditions, representations or guarantees, including any warranties, conditio ns, representations or guarantees
under any Sale of Goods Act or like legislation or statue is hereby expressly excluded. Save as herein provided, Danby shall no t be responsible for any damages
to persons or property, including the unit itself, howsoever caused or any consequential damages arising from the malfunction o f the unit and by the purchase of
the unit, the purchaser does hereby agree to indemnify and hold harmless Danby from any claim for damages to persons or propert y caused by the unit.
GENERAL PROVISIONS
No warranty or insurance herein contained or set out shall apply when damage or repair is caused by any of the following:
1) Power failure.
2) Damage in transit or when moving the appliance.
3) Improper power supply such as low voltage, defective house wiring or inadequate fuses.
4) Accident, alteration, abuse or misuse of the appliance such as inadequate air circulation in the room or abnormal operating con ditions
(extremely high or low room temperature).
5) Use for commercial or industrial purposes (ie. If the appliance is not installed in a domestic residence).
6) Fire, water damage, theft, war, riot, hostility, acts of God such as hurricanes, oods etc.
7) Service calls resulting in customer education.
8) Improper Installation (ie. Building-in of a free standing appliance or using an appliance outdoors that is not approved for out door application).
Proof of purchase date will be required for warranty claims; so, please retain bills of sale. In the event warranty service is required, present this document to our
AUTHORIZED SERVICE DEPOT.
Danby Products Limited
PO Box 1778, Guelph, Ontario, Canada N1H 6Z9
Telephone: (519) 837-0920 FAX: (519) 837-0449
Danby Products Inc.
PO Box 669, Findlay, Ohio, U.S.A. 45840
Telephone: (419) 425-8627 FAX: (419) 425-8629
04/09
1-800-263-2629
Warranty Service
In-home
Transportation charges to and from the service location are not protected by this warranty and are the responsibility of the purchaser.
During the first twenty four (24) months, any functional parts of this product found to be defective, will be repaired
or replaced, at warrantor’s option, at no charge to the original purchaser.
Contact the dealer where the unit was purchased, or contact the nearest authorized Danby service depot, where
service must be performed by a qualified service technician. If service is performed on the unit by anyone other
than an authorized service depot, all obligations of Danby under this warranty shall be void.
It is the responsibility of the purchaser to transport the appliance to the nearest authorized service depot.
First 24 months
To obtain service
LIMITED “CARRY IN” WARRANTY
This quality product is warranted to be free from manufacturer’s defects in material and workmanship, provided that the unit is used
under the normal operating conditions intended by the manufacturer.
This warranty is available only to the person to whom the unit was originally sold by Danby Products Limited (Canada) or Danby
Products Inc. (U.S.A.) (hereafter “Danby”) or by an authorized distributor of Danby, and is non-transferable.
TERMS OF WARRANTY
Plastic parts are warranted for thirty (30) days from the date of purchase, with no extensions provided.
Nothing within this warranty shall imply that Danby will be responsible or liable for any spoilage or damage to food or other
contents of this appliance, whether due to any defect of the appliance, or its use, whether proper or improper.
EXCLUSIONS
Save as herein provided, by Danby, there are no other warranties, conditions, representations or guarantees, express or implied, made
or intended by Danby or its authorized distributors and all other warranties, conditions, representations or guarantees, including any
warranties, conditions, representations or guarantees under any Sale of Goods Act or like legislation or statute is hereby expressly
excluded. Save as herein provided, Danby shall not be responsible for any damages to persons or property, including the unit itself,
howsoever caused or any consequential damages arising from the malfunction of the unit and by the purchase of the unit, the
purchaser does hereby agree to indemnify and hold harmless Danby from any claim for damages to persons or property caused by
the unit.
GENERAL PROVISIONS
No warranty or insurance herein contained or set out shall apply when damage or repair is caused by any of the following:
1) Power failure.
2) Damage in transit or when moving the appliance.
3) Improper power supply such as low voltage, defective house wiring or inadequate fuses.
4) Accident, alteration, abuse or misuse of the appliance such as inadequate air circulation in the room or abnormal operating
conditions (ie. extremely high or low room temperature).
5) Use for commercial or industrial purposes (ie. If the appliance is not installed in a domestic residence).
6) Fire, water damage, theft, war, riot, hostility, acts of God such as hurricanes, floods etc.
7) Service calls resulting in customer education.
8) Improper Installation (ie. Building-in of a free standing appliance or using an appliance outdoors that is not approved for outdoor
application, including but not limited to: garages, patios, porches or anywhere that is not properly insulated or climate controlled).
Proof of purchase date will be required for warranty claims; retain bills of sale. In the event that warranty service is required, present
the proof of purchase to our authorized service depot.
Warranty Service
Carry In
Danby Products Limited
PO Box 1778, Guelph, Ontario, Canada N1H 6Z9
Telephone: (519) 837-0920 FAX: (519) 837-0449
Danby Products Inc.
PO Box 669, Findlay, Ohio, U.S.A. 45840
Telephone: (419) 425-8627 FAX: (419) 425-8629
1-800-263-2629
04/17

10
Bienvenue
Bienvenue à la famille Danby. Nous sommes fi ers de la qualité de nos produits et nous croyons
en le service fi able. Nous vous suggérons de lire ce manual d’utilisation avant de brancher
votre nouvel appareil car il contient des informations inportantes sur l’utilisation, la sécurité, le
dépannage et la maintenance, afi n d’assurer la fi abilité et la longévité de votre appareil.
Visitez www.Danby.com pour accéder aux outils d’autoservice, aux FAQ et bien plus encore. Pour
obtenir de l’aide supplémentaire, composez 1-800-263-2629.
Notez les informations ci-dessous; Vous aurez besoin de cette information pour obtenir un
service sous garantie.
Vous devez fournir le reçu d’achat original pour valider votre garantie et recevoir le service.
Numéro de modèle: _____________________________________________
Numéro de serie: _______________________________________________
Date d’achat: __________________________________________________
Besoin d’assistance?
Avant d’appeler pour service, voici quelques choses que vous pouvez faire pour nous
aider à mieux vous servir.
Lire ce manuel du propriétaire:
Il contient des instructions pour vous aider à utiliser et à maintenir votre appareil
correctement.
Si vous recevez un appareil endommagé:
Contactez immédiatement le revendeur ou l’entrepreneur qui vous a vendu l’appareil.
Gagnez du temps et de l’argent:
Avant d’appeler pour service, consultez la section de dépannage à la fi n de ce manuel.
Cette section vous aidera à résoudre les problèmes courants pouvant survenir.
1-800-26- Danby
(1-800-263-2629)

EXIGENCES DE SÉCURITÉ
Cet appareil n’est pas destiné à être utilisé par
des personnes (y compris des enfants) dont les
capacités physiques, sensorielles ou mentales
peuvent être différentes ou réduites, ou qui n’ont
pas d’expérience ou de connaissances, à moins
que ces personnes ne soient surveillées ou formées
pour faire fonctionner l’appareil par une personne
responsable de leur sécurité.
Les enfants devraient être surveillés pour s’assurer
qu’ils ne jouent pas avec l’appareil.
Pour éviter tout risque de choc électrique, ne
pas utiliser ce déshumidifi cateur dans une zone
susceptible d’accumuler de l’eau stagnante. Si cette
condition se développe, débranchez l’alimentation
avant de pénétrer dans l’eau.
Ne pas stocker ou utiliser des matériaux
combustibles tels que de l’essence ou d’autres
vapeurs ou liquides infl ammables à proximité de ce
ou d’un autre appareil.
Ne pas insérer de doigts ou d’autres objets dans
des grilles ou des ouvertures dans l’appareil.
Ne pas couvrir ou bloquer les ouvertures
d’admission et d’échappement.
N’utilisez pas l’appareil sans le fi ltre installé.
N’utilisez pas l’appareil à proximité de sources de
chaleur.
Cet appareil est destiné uniquement à des
applications résidentielles et intérieures. N’utilisez
pas ce déshumidifi cateur à l’extérieur. N’utilisez
pas ce déshumidifi cateur pour des applications
commerciales ou industrielles.
INSTRUCTIONS DE MISE À LA TERRE
Cet appareil doit être mis à la terre. La mise à
la terre réduit le risque de choc électrique en
fournissant un câble d’échappement pour le courant
électrique.
Cet appareil possède un cordon doté d’un fi l de
mise à la terre avec une fi che à 3 broches. Le
cordon d’alimentation doit être branché sur une
prise correctement mise à la terre. Si la sortie
est une prise murale à 2 broches, elle doit être
remplacée par une prise murale à 3 broches
correctement mise à la terre. La plaque signalétique
en série indique la tension et la fréquence
auxquelles l’appareil est conçu.
AVERTISSEMENT - L’utilisation incorrecte de la
fi che de mise à la terre peut entraîner un risque
d’électrocution. Consultez un électricien qualifi é
ou un agent de service si les instructions de mise
à la terre ne sont pas complètement comprises, ou
s’il existe un doute quant à savoir si l’appareil est
correctement mis à la terre.
Ne branchez pas l’appareil à des rallonges, des
adaptateurs ou à un autre appareil dans la même
prise murale.
Ne pas épisser le cordon d’alimentation. Ne coupez
ou retirez en aucun cas la troisième broche du
cordon d’alimentation.
Si le cordon d’alimentation est endommagé, il
doit être remplacé par le fabricant, son agent de
maintenance ou une personne qualifi ée similaire
afi n d’éviter tout risque.
Informations importantes de sécurité
LIRE ET SUIVRE TOUTES LES INSTRUCTIONS DE SÉCURITÉ
11
GARDEZ CES INSTRUCTIONS!

INSTRUCTIONS D’UTILISATION
EMPLACEMENT
• Placez le déshumidifi cateur sur un plancher
lisse et plat qui est assez solide pour supporter
l’appareil avec un seau complet d’eau.
• Pour maintenir l’effi cacité, faites fonctionner
l’appareil dans une zone fermée. Gardez les
portes et les fenêtres fermées à proximité.
• Maintenir un dégagement minimum de 20 cm
(8 pouces) sur les côtés et l’arrière de l’appareil
et 40 cm (16 pouces) sur le dessus de l’appareil
pour permettre une circulation d’air appropriée.
• La température de fonctionnement ambiante
recommandée est comprise entre 5°C (41°F) et
35°C (95°F).
• Ne pas forcer les rouleaux à se déplacer sur
les moquettes car l’appareil peut basculer et
renverser de l’eau.
• Chaque fois que l’appareil est placé sur son dos
ou sur son côté, il doit pouvoir se tenir debout
pendant 6 heures avant de brancher pour éviter
d’endommager les composants internes.
12
CARACTÉRISTIQUES
Avant
1. Panneau de contrôle
2. Poignées (des deux côtés)
3. Seau d’eau
4. Indicateur de niveau d’eau
Arrière
1. Sortie d’air
2. Filtre à air
3. Prise de vidange continue
4. Bande de stockage du cordon d’alimentation
5. Cordon d’alimentation
3
2
1
4
1
2
3
4
5

INSTRUCTIONS D’UTILISATION
13
PANNEAU DE CONTRÔLE
1. Voyant lumineux de dégivrage
• Le témoin de dégivrage s’allume lorsque
le givre s’est accumulé à l’intérieur de
l’appareil. Cela peut indiquer que la
température ambiante est trop froide. La
fonction de déshumidifi cation cessera
jusqu’à ce que le givre ait fondu.
2. Voyant lumineux de seau plein
• Le voyant du seau complet s’allume lorsque
le seau est plein d’eau. Videz le seau pour
reprendre le fonctionnement régulier.
3. Écran d’affi chage
• L’affi chage indique l’humidité défi nie,
l’humidité ambiante ou la fonction de
minuterie.
• L’humidité peut être réglée entre 35-85%
par incréments de 5%. Pour un air plus sec,
régler l’humidité à un nombre inférieur.
Pour l’air amortisseur, régler l’humidité à un
nombre plus élevé.
• L’affi chage de l’humidité ambiante est précis
entre +/-5%.
4. Bouton de pompe et voyant lumineux
• Utilisez ce bouton pour activer la pompe
de vidange. Le témoin lumineux s’allume
lorsque la pompe est active.
5. Déshumidifi cation intelligente et voyant
lumineux
• Utilisez ce bouton pour activer le mode
de déshumidifi cation intelligent. Le
mode de déshumidifi cation intelligent
défi nit automatiquement l’humidité et la
vitesse du ventilateur en fonction de la
température ambiante et de l’humidité.
Le témoin lumineux s’allume lorsque le
déshumidifi cation intelligent est activé.
6. Bouton de fi ltre et voyant lumineux
• La lumière du fi ltre s’allume lorsque le fi ltre
doit être nettoyé. Appuyez sur le bouton de
fi ltre une fois que le fi ltre a été nettoyé pour
revenir au fonctionnement régulier.
7. Bouton de mode continu et voyant lumineux
• Appuyez sur ce bouton pour activer le
mode continu. Cela entraînera en continu
la fonction de déshumidifi cation. Le voyant
s’allume lorsque le mode continu est activé.
8. Bouton de ventilateur et voyant lumineux
• Appuyez sur cette touche pour régler la
vitesse du ventilateur à faible ou à haute. Si
le témoin lumineux est éteint, le ventilateur
est réglé à faible vitesse. Si le témoin
lumineux est allumé, le ventilateur est réglé
sur une vitesse élevée.
9. Bouton de minuterie et voyants lumineux
• Utilisez ce bouton pour régler la fonction de
minuterie.
10. Flèches haut et bas
• Les fl èches haut et bas peuvent ajuster
l’humidité défi nie ou le réglage de la
minuterie.
11. Bouton d’alimentation
• Utilisez ce bouton pour allumer ou éteindre
l’appareil.
1
2
3
4 5 6 7
8 9
10
11

INSTRUCTIONS D’UTILISATION
14
ELIMINATION D’EAU
Il existe trois façons d’éliminer l’eau collectée de
l’appareil.
1. Seau d’eau
Le déshumidifi cateur collectera automatiquement
l’eau condensée dans le seau d’eau. Lorsque le seau
est plein, le compresseur et le ventilateur s’éteignent
et le voyant du seau complet s’allume. L’écran
affi che “P2”.
Pour vider le seau, retirez-le doucement de
l’appareil en agrippant les deux côtés et en tirant
vers l’extérieur. Soyez prudent lors de l’enlèvement
du seau, il sera plein et peut être lourd.
Ne placez pas le seau à eau directement sur le sol.
Le fond du seau est inégal et il tombera et déversera
de l’eau.
Videz le seau et remettez-le dans l’appareil. Le
déshumidifi cateur ne fonctionnera pas sans le godet
installé.
Remarque: Lorsque vous retirez le seau, le bras de
pompe pour la pompe de vidange peut tomber. Il
doit être repoussé doucement vers le haut dans la
position correcte avant de remplacer le seau.
FONCTION DE MINUTERIE
Fonction d’activation automatique
1. Appuyez sur le bouton de la minuterie jusqu’à
ce que le voyant d’activation automatique
s’allume.
2. Utilisez les fl èches haut et bas pour sélectionner
la durée souhaitée avant que l’appareil ne
s’allume. Les fl èches haut et bas ajouteront ou
soustracteront 30 minutes de temps jusqu’à
10 heures, puis à des incréments de 1 heure
jusqu’à un maximum de 24 heures.
3. L’heure sélectionnée apparaîtra sur le panneau
d’affi chage et débutera jusqu’à ce que
l’appareil s’allume.
Fonction de désactivation automatique
1. Appuyez sur le bouton de la minuterie jusqu’à
ce que le témoin de désactivation automatique
s’allume.
2. Utilisez les fl èches haut et bas pour sélectionner
la durée souhaitée avant que l’appareil ne
s’allume. Les fl èches haut et bas ajouteront ou
soustracteront 30 minutes de temps jusqu’à
10 heures, puis à des incréments de 1 heure
jusqu’à un maximum de 24 heures.
3. L’heure sélectionnée apparaîtra sur le panneau
d’affi chage et débutera jusqu’à ce que
l’appareil s’éteigne.
Utilisation automatique activée et désactivée
simultanément
Les fonctions d’activation automatique et de
désactivation automatique peuvent être utilisées
simultanément en réglant d’abord l’une puis l’autre.
Les deux voyants lumineux s’allument et l’affi chage
décompte vers le bas pour que l’appareil soit éteint
ou allumé, quelle que soit la fonction réglée en
premier.
Remarque: La minuterie ne met pas l’appareil sous
tension et hors tension indéfi niment. Les minuteries
auto activées et désactivées fonctionneront une fois,
puis l’appareil revient à un fonctionnement régulier.
Si vous éteignez l’appareil, appuyez sur le bouton
par défaut de la télécommande ou débranchez
l’appareil pour effacer tous les paramètres de la
mémoire, y compris la minuterie.

INSTRUCTIONS D’UTILISATION
15
ELIMINATION D’EAU
2. Drain continu
L’eau peut être retirée de l’appareil à l’aide du
drain continu et d’un tuyau d’arrosage standard
(non fourni).
Avant d’utiliser des fonctions de vidange
automatique, vérifi ez que tous les orifi ces de
vidange sont propres et exempts de débris. Il y a un
orifi ce de vidange dans le compartiment à godets
de l’appareil, retirez le seau pour le voir. Il y a un
port de vidange à l’arrière de l’appareil où le tuyau
de vidange se fi xe. Tous les orifi ces de vidange
doivent être nettoyés avec un cure-pipe avant
utilisation.
Remarque: Ne nettoyez pas les orifi ces de vidange
avec un élément plus rigide qu’un nettoyeur
de canalisation car cela pourrait endommager
l’appareil.
Remarque: Si les orifi ces de vidange sont obstrués
ou sales, l’eau risque de fuir du bas de l’appareil.
Retirez le couvercle de la sortie de vidange
continue et fi xez l’extrémité fi letée femelle du tuyau
d’arrosage à l’arrière de l’appareil. Dirigez l’autre
extrémité du tuyau d’arrosage vers un seau ou un
drain de plancher.
Assurez-vous que le tuyau d’arrosage n’est pas plié
et descend droit de l’arrière de l’appareil. Le drain
continu n’est activé que par gravité, de sorte que les
virages ou le mouvement vers le haut dans le tuyau
empêchent l’évacuation de l’eau.
Le tuyau d’arrosage doit être coupé afi n qu’il
ne dépasse pas 1.8 m (6 pieds) de long. Si le
tuyau de vidange est trop long, l’eau peut ne pas
s’effondrer complètement, ce qui peut entraîner une
accumulation d’eau stagnante et de la moisissure
dans le tuyau.
ELIMINATION D’EAU
3. Vidange de pompe
Si le drain continu est gênant, l’eau peut être retirée
de l’appareil à l’aide du drain de la pompe.
Lors de l’utilisation de la pompe, l’appareil remplit
d’abord le seau avec de l’eau, puis le bras de
pompe pompe l’eau du seau dans le drain et le
tuyau.
Retirez le couvercle de la sortie de vidange de la
pompe et fi xez le tuyau de vidange fourni. Dirigez
l’autre extrémité du tuyau vers un drain. Appuyez
sur le bouton de la pompe pour activer la fonction
de la pompe. Lorsque le seau est plein, la pompe
commencera à fonctionner.
Assurez-vous que le tuyau de vidange n’est
pas plié, cela peut empêcher l’eau de s’écouler
correctement et de surcharger la pompe.
Ne raccordez pas le tuyau fourni avec un autre
tuyau. La longueur maximale du tuyau de vidange
de la pompe ne doit pas dépasser 4.6 m (15
pieds). Si le tuyau de vidange est trop long, l’eau
peut ne pas s’effondrer complètement, ce qui peut
entraîner une accumulation d’eau stagnante et de la
moisissure dans le tuyau.
Lorsque vous utilisez le drain de la pompe, le godet
d’eau doit être vidé tous les jours pour s’assurer
que l’eau dans le seau ne stagne pas ou que la
moisissure augmente.

SOINS ET MAINTENANCE
FILTRE À AIR
Le fi ltre à air doit être nettoyé environ toutes les 2
semaines. Le fi ltre à air peut nécessiter un nettoyage
plus fréquent si il y a un choc important ou de la
fourrure dans l’air.
Environ toutes les deux semaines, le voyant du fi ltre
sur le panneau de commande s’allume comme un
rappel pour nettoyer le fi ltre. Suivez les étapes ci-
dessous pour nettoyer le fi ltre et retournez l’appareil
au fonctionnement normal.
1. Le fi ltre à air est situé derrière la grille
d’admission arrière. Pour retirer le fi ltre à air,
saisissez la languette du fi ltre au bas de la grille
et faites-la glisser vers le bas.
2. Utilisez un aspirateur avec une brosse douce
pour enlever les grands débris ou la poussière
du fi ltre à air.
3. Lavez le fi ltre dans de l’eau tiède savonneuse,
inférieure à 40°C (104°F), ou utilisez un agent
de nettoyage neutre.
4. Rincez le fi ltre avec de l’eau propre et séchez
bien avant de le réinstaller dans l’appareil.
5. Appuyez sur le bouton de fi ltrage sur le
panneau de commande pour reprendre le
fonctionnement normal.
Remarque: Ne faites pas fonctionner l’appareil sans
le fi ltre à air installé.
CODES D’ERREUR
Si le panneau d’affi chage affi che l’un des codes
d’erreur ci-dessous, débranchez l’appareil, laissez
reposer pendant 5 à 10 minutes, puis rallumez-le.
Si l’erreur persiste, appelez pour le service.
AS - Erreur du capteur d’humidité
ES - Erreur du capteur de température
P2 - Seau plein
E3 - Dysfonctionnement du capteur
Eb - Seau enlevé ou non dans la position correcte
EC - Erreur du système de refroidissement ou erreur
du capteur
NETTOYAGE
Pour éviter tout risque d’électrocution, assurez-vous
que l’appareil est débranché avant d’effectuer un
nettoyage ou une maintenance.
L’extérieur de l’appareil peut être nettoyé avec un
chiffon doux ou avec un chiffon tiède et humide si
nécessaire.
N’utilisez pas d’essence, de benzène, de diluant
ou d’autres produits chimiques pour nettoyer cet
appareil car ces substances peuvent endommager
l’enduit et la déformation des pièces en plastique.
Ne versez jamais d’eau directement sur l’appareil,
car cela entraînera une détérioration des
composants électriques et de l’isolation des câbles.
Assurez-vous que les orifi ces de vidange à
l’intérieur de l’appareil et les orifi ces de vidange
à l’arrière de l’appareil sont exempts de saleté et
d’accumulation de calcium.
SOINS POUR LA FIN DE SAISON
Avant de retirer l’appareil du service pour l’année,
faites fonctionner l’appareil sur le mode ventilateur
élevé pendant une demi-journée pour vous assurer
que l’intérieur de l’appareil est sec. Cela aidera
à éviter la croissance de la moisissure ou de la
moisissure à l’intérieur de l’appareil. Assurez-vous
que le fi ltre est propre et sec. Rangez l’appareil
dans un endroit sec.
ÉLIMINATION
Cet appareil ne doit pas être considéré comme un
ordures ménagères, mais il doit être pris au point
approprié de collecte des déchets pour le recyclage
des composants électriques. Vérifi ez la conformité
réglementaire locale concernant l’élimination
approuvée et sûre de cet appareil.
16

DÉPANNAGE
PROBLÈME CAUSE POSSIBLE
L’appareil ne fonctionnera pas • La fi che n’est pas complètement insérée dans la prise murale
•
• Fusible souffl é ou disjoncteur
•
• L’humidité ambiante est inférieure à l’humidité défi nie
•
• Seau est plein ou pas dans la bonne position
Déshumidifi cation insuffi sante • Le fi ltre à air est sale
•
• Flux d’air bloqué
•
• La taille de l’appareil est trop petite pour l’application
•
• L’humidité ambiante est inférieure à l’humidité défi nie
Bruit • Le fi ltre à air est sale
•
• Seau n’est pas en bonne position
•
• La surface du plancher n’est pas de niveau
Odeurs • Formation de moisissure sur des surfaces intérieures humides
•
• Placer un comprimé d’algaïcide dans le seau à eau
L’eau sur le sol • Le raccord du tuyau est desserré
•
• Le couvercle de drainage a été retiré
Accumulation de givre • Lorsque la température ambiante est inférieure à 5°C (41°F), la
gelée peut se former
•
• Mettez l’appareil en mode ventilateur uniquement jusqu’à ce que
le givre fond
17
Danby soins du consommateur: 1-800-263-2629
Heures d’ouverture:
Lundi à Jeudi 8 h 30 à 18 h, heure normale de l’Est
Vendredi de 8 h 30 à 16 h, heure normale de l’Est
Les informations contenues dans ce manuel sont sujettes à modifi cation sans préavis.

LIMITED IN-HOME APPLIANCE WARRANTY
This quality product is warranted to be free from manufacturer’s defects in material and workmanship, provided that the unit is used under the normal operating
conditions intended by the manufacturer.
This warranty is available only to the person to whom the unit was originally sold by Danby Products Limited (Canada) or Danby Products Inc. (U.S.A.) (hereafter
“Danby”) or by an authorized distributor of Danby, and is non-transferable.
TERMS OF WARRANTY
Plastic parts, are warranted for thirty (30) days only from purchase date, with no extensions provided.
First Year
During the rst twelve (12) months, any functional parts of this product found to be defective, will be repaired or replaced, at warrantor’s
option, at no charge to the ORIGINAL purchaser.
To obtain
Danby reserves the right to limit the boundaries of “In Home Service” to the proximity of an Authorized Service Depot. Any app liance
Service
requiring service outside the limited boundaries of “In Home Service” , it will be the consumer’s responsibility to transport the appliance (at
their own expense) to the original retailer (point of purchase) or a service depot for repair. See “Boundaries of In Home Serv ice” below.
Contact your dealer from whom your unit was purchased, or contact your nearest authorized Danby service depot, where service
must be performed by a qualied service technician.
If service is performed on the units by anyone other than an authorized service depot, or the unit is used for commercial appli cation, all
obligations of Danby under this warranty shall be void.
Boundaries of
If the appliance is installed in a location that is 100 kilometers (62 miles) or more from the nearest service center your unit must be
In Home Service
delivered to the nearest authorized Danby Service Depot, as service must only be performed by a technician qualied and certif ied for
warranty service by Danby. Transportation charges to and from the service location are not protected by this warranty and are t he
responsibility of the purchaser.
Nothing within this warranty shall imply that Danby will be responsible or liable for any spoilage or damage to food or other c ontents of this appliance, whether due
to any defect of the appliance, or its use, whether proper or improper.
EXCLUSIONS
Save as herein provided, Danby, there are no other warranties, conditions, representations or guarantees, express or implied, m ade or intended by Danby or its
authorized distributors and all other warranties, conditions, representations or guarantees, including any warranties, conditio ns, representations or guarantees
under any Sale of Goods Act or like legislation or statue is hereby expressly excluded. Save as herein provided, Danby shall no t be responsible for any damages
to persons or property, including the unit itself, howsoever caused or any consequential damages arising from the malfunction o f the unit and by the purchase of
the unit, the purchaser does hereby agree to indemnify and hold harmless Danby from any claim for damages to persons or propert y caused by the unit.
GENERAL PROVISIONS
No warranty or insurance herein contained or set out shall apply when damage or repair is caused by any of the following:
1) Power failure.
2) Damage in transit or when moving the appliance.
3) Improper power supply such as low voltage, defective house wiring or inadequate fuses.
4) Accident, alteration, abuse or misuse of the appliance such as inadequate air circulation in the room or abnormal operating con ditions
(extremely high or low room temperature).
5) Use for commercial or industrial purposes (ie. If the appliance is not installed in a domestic residence).
6) Fire, water damage, theft, war, riot, hostility, acts of God such as hurricanes, oods etc.
7) Service calls resulting in customer education.
8) Improper Installation (ie. Building-in of a free standing appliance or using an appliance outdoors that is not approved for out door application).
Proof of purchase date will be required for warranty claims; so, please retain bills of sale. In the event warranty service is required, present this document to our
AUTHORIZED SERVICE DEPOT.
Danby Products Limited
PO Box 1778, Guelph, Ontario, Canada N1H 6Z9
Telephone: (519) 837-0920 FAX: (519) 837-0449
Danby Products Inc.
PO Box 669, Findlay, Ohio, U.S.A. 45840
Telephone: (419) 425-8627 FAX: (419) 425-8629
04/09
1-800-263-2629
Warranty Service
In-home
Les frais de transport entre votre domicile et le lieu de l'entretien ne sont pas couverts par la présente garantie et doivent être
acquittés par l'acheteur.
Pendant les premiers vingt quatre (24) mois, toutes les pièces fonctionnelles de ce produit qui s’avèrent
défectueuses seront réparées ou remplacées, selon le choix du garant, sans frais à l’acheteur initial.
Contactez le revendeur où l'appareil a été acheté ou contactez le dépôt de service Danby autorisé le plus
proche, où le service doit être effectué par un technicien de service qualifié. Si le service est effectué sur
l'appareil par une personne autre qu'un dépôt de service autorisé, toutes les obligations de Danby en vertu de
cette garantie seront annulées.
Il est de la responsabilité de l'acheteur de transporter l'appareil vers le dépôt de service agréé le plus proche.
Premiers 24 mois
Pour obtenir un
service
GARANTIE LIMITÉE “EN ATELIER”
Cet appareil de qualité est garanti exempt de tout vice de matière première et de fabrication, s’il est utilisé dans les conditions normales
recommandées par le fabricant.
Cette garantie n’est offerte qu’à l’acheteur initial de l’appareil vendu par Danby Products Limited (Canada) ou Danby Products Inc.
(E.- U.A.) (ci-après « Danby ») ou par l’un des ses distributeurs agréés et elle ne peut être transférée.
CONDITIONS
Les pièces en plastique sont garanties pendant trente (30) jours seulement à partir de la date de l’achat, sans aucune prolongation
prévue.
Aucune partie de la garantie ne prévoit implicitement que le fabricant sera tenu responsable des dommages subis par les aliments ou
d’autres types de contenu, qu’ils soient causés par la défectuosité de l’appareil ou par son usage adéquat ou inadéquat.
EXCLUSIONS
En vertu de la présente, il n’existe aucune autre garantie, condition ou représentation, qu’elle soit exprimée ou tacite, de façon
manifeste ou intentionnelle, par Danby ou ses distributeurs agréés. De même, sont exclues toutes les autres garanties, conditions ou
représentations, y compris les garanties, conditions ou représentations en vertu de toute loi régissant la vente de produits ou de toute
autre législation ou règlement semblables. En vertu de la présente, Danby ne peut être tenue responsable en cas de blessures
corporelles ou des dégâts matériels, y compris à l’appareil, quelle qu’en soit les causes. Danby ne peut pas être tenue responsable
des dommages indirects dus au fonctionnement défectueux de l’appareil. En achetant l’appareil, l’acheteur accepte de mettre à
couvert et de dégager Danby de toute responsabilité en cas de réclamation pour toute blessure corporelle ou tout dégât matériel
causé par cet appareil.
CONDITIONS GÉNÉRALES
La garantie ou assurance ci-dessus ne s’applique pas si les dégâts ou réparations sont dus aux cas suivants:
1) Panne de courant.
2) Dommage subis pendant le transport ou le déplacement de l’appareil.
3) Alimentation électrique incorrecte (tension faible, câblage défectueux, fusibles incorrects).
4) Accident, modification, emploi abusif ou incorrect de l’appareil tel qu'une circulation d'air inadéquate dans la pièce ou des
conditions de fonctionnement anormales (température extrêmement élevée ou basse).
5) Utilisation dans un but commercial ou industriel (à savoir, si l'appareil n'est pas installé dans un domicile résidentiel).
6) Incendie, dommages causés par l’eau, vol, guerre, émeute, hostilités, cas de force majeure (ouragan, inondation, etc.).
7) Visites d’un technicien pour expliquer le fonctionnement de l’appareil au propriétaire.
8) Installation inappropriée (par exemple, encastrement d'un appareil autoportant, ou utilisation extérieure d'un appareil non conçu à
cet effet, y compris, mais sans s'y limiter: les garages, les patios, les porches ou ailleurs qui ne sont pas correctement isolés ou
climatisés).
La preuve de la date d'achat sera requise pour les réclamations de garantie; Conserver les factures de vente. Dans le cas où un
service de garantie est requis, présentez la preuve d'achat à notre dépôt de service agréé.
Service sous garantie
En Atelier
Danby Products Limited
PO Box 1778, Guelph, Ontario, Canada N1H 6Z9
Téléphone : (519) 837-0920 Télécopieur: (519) 837-0449
Danby Products Inc.
PO Box 669, Findlay, Ohio, U.S.A. 45840
Téléphone: (419) 425-8627 Télécopieur: (419) 425-8629
1-800-263-2629
04/17

1-800-26- Danby
(1-800-263-2629)
Bienvenido
Bienvenido a la familia Danby. Estamos orgullosos de nuestros productos de calidad y creemos en
un servicio confi able. Sugerimos que lea este manual del propietario antes de conectar el nuevo
aparato ya que contiene información importante sobre la operación, información de seguridad,
solución de problemas y consejos de mantenimiento para garantizar la fi abilidad y longevidad de
su electrodoméstico.
Visite www.Danby.com para acceder a herramientas de autoservicio, preguntas frecuentes y
mucho más. Para asistencia adicional, llame al 1-800-263-2629.
Tenga en cuenta la información siguiente; Necesitará esta información para obtener un servicio
bajo garantía.
Debe proporcionar el recibo de compra original para validar su garantía y recibir servicio.
Número de modelo: _____________________________________________
Número de serie: _______________________________________________
Fecha de compra: _______________________________________________
Necesitas ayuda?
Antes de llamar al servicio, aquí hay algunas cosas que puede hacer para ayudarnos a
servirle mejor.
Lea este manual del propietario:
Contiene instrucciones para ayudarle a usar y mantener su aparato correctamente.
Si recibe un aparato dañado:
Inmediatamente póngase en contacto con el minorista o el constructor que le vendió el
aparato.
Ahorre tiempo y dinero:
Consulte la sección de solución de problemas al fi nal de este manual antes de llamar. Esta
sección le ayudará a resolver problemas comunes que pueden ocurrir.
19

REQUERIMIENTOS DE SEGURIDAD
Este aparato no está diseñado para ser utilizado
por personas (incluyendo niños) cuyas capacidades
físicas, sensoriales o mentales sean diferentes
o reducidas, o que carezcan de experiencia o
conocimiento, a menos que dichas personas
reciban supervisión o entrenamiento para operar
el aparato por una persona responsable de su la
seguridad.
Los niños deben ser supervisados para asegurarse
de que no juegan con el aparato.
Para evitar el riesgo de descarga eléctrica, no
utilice este deshumidifi cador en un área que pueda
acumular agua estancada. Si se desarrolla esta
condición, desconecte la fuente de alimentación
antes de entrar en el agua.
No almacene ni utilice materiales combustibles
tales como gasolina u otros vapores o líquidos
infl amables cerca de este o de cualquier otro
aparato.
No introduzca los dedos u otros objetos en las
parrillas o aberturas del aparato.
No cubra ni bloquee las aberturas de admisión y
de escape.
No opere el aparato sin el fi ltro instalado.
No utilice el aparato cerca de fuentes de calor.
Este aparato está destinado únicamente a
aplicaciones interiores y residenciales. No utilice
este deshumidifi cador en exteriores. No utilice este
deshumidifi cador para aplicaciones comerciales o
industriales.
INSTRUCCIONES DE CONEXION A TIERRA
Este aparato debe estar conectado a tierra. La
puesta a tierra reduce el riesgo de descarga
eléctrica proporcionando un cable de escape para
la corriente eléctrica.
Este aparato tiene un cable que tiene un cable de
conexión a tierra con un enchufe de 3 clavijas. El
cable de alimentación debe estar enchufado en
un tomacorriente que esté debidamente conectado
a tierra. Si el tomacorriente es un tomacorriente
de dos clavijas, debe ser reemplazado por un
tomacorriente de 3 clavijas con conexión a tierra
adecuada. La placa de características en serie
indica el voltaje y la frecuencia para los que está
diseñado el artefacto.
ADVERTENCIA - El uso incorrecto del enchufe
de conexión a tierra puede ocasionar un riesgo
de descarga eléctrica. Consulte a un electricista
califi cado o agente de servicio si las instrucciones
de conexión a tierra no se entienden completamente
o si existe duda sobre si el aparato está
debidamente conectado a tierra.
No conecte el aparato a cables de extensión,
adaptadores o junto con otro aparato en la misma
toma de corriente.
No empalme el cable de alimentación. No corte ni
extraiga en ningún caso la tercera clavija de tierra
del cable de alimentación.
Si el cable de alimentación está dañado, debe
ser reemplazado por el fabricante, su agente de
servicio o persona califi cada similar para evitar
riesgos.
Informacion de Seguridad Importante
LEA Y SIGA TODAS LAS INSTRUCCIONES DE SEGURIDAD
20
¡GUARDA ESTAS INSTRUCCIONES!

21
INSTRUCCIONES DE OPERACIÓN
UBICACIÓN
• Coloque el deshumidifi cador en un piso liso y
nivelado que sea lo sufi cientemente fuerte para
sostener el aparato con un cubo lleno de agua.
• Para mantener la efi ciencia, haga funcionar
el aparato en un lugar cerrado. Mantenga las
puertas y ventanas cercanas cerradas.
• Mantenga una distancia mínima de 20 cm (8
pulgadas) en los laterales y la parte posterior
del aparato y de 40 cm (16 pulgadas) en la
parte superior del aparato para permitir una
circulación adecuada del aire.
• La temperatura de funcionamiento ambiente
recomendada está entre 5°C (41°F) y 35°C
(95°F).
• No fuerce los rodillos para moverse sobre
alfombras ya que el aparato puede volcarse y
derramar agua.
• Siempre que se coloque el aparato en la parte
posterior o lateral, se debe permitir que se
mantenga erguido durante 6 horas antes de
enchufarlo para evitar daños a los componentes
internos.
CARACTERISTICAS
Frente
1. Panel de control
2. Manijas (ambos lados)
3. Cubo de agua
4. Indicador de nivel de agua
Espalda
1. Salida de aire
2. Filtro de aire
3. Salida de drenaje continua
4. Banda de almacenamiento del cable de
alimentación
5. Cable de alimentación
3
2
1
4
1
2
3
4
5

22
INSTRUCCIONES DE OPERACIÓN
PANEL DE CONTROL
1. Luz indicadora de descongelación
• La luz indicadora de descongelación se
ilumina cuando se ha acumulado escarcha
en el interior del aparato. Esto puede indicar
que la temperatura ambiente es demasiado
fría. La función de deshumidifi cación cesará
hasta que se derrita la helada.
2. Luz indicadora de cubo completo
• La luz indicadora de cubo completo se
iluminará cuando el cubo esté lleno de
agua. Vacíe el cubo para reanudar el
funcionamiento normal.
3. Pantalla
• La pantalla mostrará la humedad ajustada,
la humedad ambiente o la función del
temporizador.
• La humedad se puede ajustar entre 35-85%
en incrementos del 5%. Para un aire más
seco, ajuste la humedad a un número más
bajo. Para el aire del amortiguador, ajuste la
humedad a un número más alto.
• La visualización de la humedad ambiental es
precisa dentro de +/-5%.
4. Botón de la bomba y luz indicadora
• Utilice este botón para activar la bomba
de drenaje. La luz indicadora se iluminará
cuando la bomba esté activa.
5. Botón de deshumidifi cación inteligente y luz
indicadora
• Utilice este botón para activar el modo
de deshumidifi cación inteligente. El modo
de deshumidifi cación inteligente ajustará
automáticamente la velocidad de la
humedad y del ventilador en función de
la temperatura ambiente y la humedad.
La luz indicadora se iluminará cuando el
deshumidifi cador inteligente esté activo.
6. Botón del fi ltro y luz indicadora
• La luz del fi ltro se iluminará cuando el fi ltro
necesite ser limpiado. Presione el botón del
fi ltro una vez que el fi ltro ha sido limpiado
para volver al funcionamiento normal.
7. Botón de modo continuo y luz indicadora
• Pulse este botón para activar el modo
continuo. Esto ejecutará la función de
deshumidifi cación continuamente. La luz
indicadora se encenderá cuando el modo
continuo esté activo.
8. Botón del ventilador y luz indicadora
• Presione este botón para ajustar la velocidad
del ventilador a baja o alta. Si el indicador
luminoso está apagado, el ventilador está
ajustado a baja velocidad. Si el indicador
luminoso está encendido, el ventilador se
ajusta a alta velocidad.
9. Botón del temporizador y luz indicadora
• Utilice este botón para ajustar la función del
temporizador.
10. Flechas arriba y abajo
• Las fl echas arriba y abajo pueden ajustar
la humedad ajustada o el ajuste del
temporizador.
11. Botón de encendido
• Utilice este botón para encender o apagar el
aparato.
1
2
3
4 5 6 7
8 9
10
11

23
FUNCIÓN DEL TEMPORIZADOR
Función encendido automático
1. Pulse el botón del temporizador hasta que
se ilumine la luz indicadora de encendido
automático.
2. Utilice las fl echas arriba y abajo para
seleccionar la cantidad de tiempo deseada
antes de encender el aparato. Las fl echas hacia
arriba y hacia abajo sumarán o restarán 30
minutos de tiempo hasta 10 horas, luego a
incrementos de 1 hora hasta un máximo de 24
horas.
3. La hora seleccionada aparecerá en el panel de
visualización y contará hasta que el aparato se
encienda.
Función de apagado automático
1. Presione el botón del temporizador hasta que se
ilumine el indicador de apagado automático.
2. Utilice las fl echas arriba y abajo para
seleccionar la cantidad de tiempo deseada
antes de encender el aparato. Las fl echas hacia
arriba y hacia abajo sumarán o restarán 30
minutos de tiempo hasta 10 horas, luego a
incrementos de 1 hora hasta un máximo de 24
horas.
3. El tiempo seleccionado aparecerá en el panel de
visualización y contará hasta que el aparato se
apague.
Uso automático de encendido y apagado
simultáneamente
Las funciones de encendido automático y apagado
automático se pueden utilizar al mismo tiempo,
ajustando primero una y luego la otra. Ambas luces
indicadoras se iluminarán y la pantalla contará
hasta que el aparato se apague o se encienda, sea
cual sea la función que haya sido confi gurada en
primer lugar.
Nota: El temporizador no encenderá y apagará
el aparato indefi nidamente. Los temporizadores
auto on y auto off funcionarán una vez y luego el
aparato volverá a su funcionamiento normal.
Apagando el aparato, presionando el botón por
defecto del mando a distancia o desenchufando el
aparato se borrarán todos los ajustes de memoria,
incluido el temporizador.
REMOCION DE AGUA
Hay dos formas de eliminar el agua recogida del
aparato.
1. Cubo de agua
El deshumidifi cador automáticamente recogerá
agua condensada en el cubo de agua. Cuando
el cubo esté lleno, el compresor y el ventilador se
apagarán y la luz indicadora de cubo completo se
encenderá.
Para vaciar el cubo, retírelo suavemente del
aparato apretando ambos lados y tirando hacia
afuera. Tenga cuidado al retirar el cubo, estará
lleno y puede ser pesado.
No coloque el cubo de agua directamente en el
suelo. El fondo del cubo es desigual y se caerá y
derramará el agua.
Vacíe el cubo y vuelva a colocarlo en el aparato.
El deshumidifi cador no funcionará sin el cubo
instalado.
Nota: Al retirar el cubo, el brazo de la bomba de
drenaje puede caerse. Debe empujar suavemente
hacia arriba de nuevo en la posición correcta antes
de reemplazar el cubo.
INSTRUCCIONES DE OPERACIÓN

24
REMOCION DE AGUA
2. Drenaje Continuo
El agua se puede retirar del aparato usando
el drenaje continuo y una manguera de jardín
estándar (no suministrada).
Antes de usar cualquier función de drenaje
automático, verifi que que todos los puertos de
drenaje estén limpios y libres de residuos. Hay un
puerto de drenaje dentro del compartimento de la
cubeta del aparato, retire el cucharón para verlo.
Hay un puerto de drenaje en la parte posterior del
aparato donde se conecta la manguera de drenaje.
Todos los puertos de drenaje deben limpiarse con
un limpiador de tuberías antes de su uso.
Nota: No limpie los puertos de drenaje con algo
más rígido que un limpiador de tuberías ya que
esto puede dañar el aparato.
Nota: Si los puertos de drenaje están obstruidos o
sucios, puede ocasionar fugas de agua desde el
fondo del aparato.
Retire la cubierta de la salida de drenaje continua
y fi je el extremo roscado hembra de la manguera
de jardín a la parte posterior del aparato. Dirija el
otro extremo de la manguera de jardín a un cubo o
desagüe del piso.
Asegúrese de que la manguera de jardín no está
doblada y va hacia abajo desde la parte posterior
del aparato. El drenaje continuo sólo se activa por
gravedad, por lo que cualquier curva o movimiento
ascendente en la manguera impedirá que el agua
se drene.
La manguera de jardín debe ser cortada de modo
que no mida más de 1,8 m (6 pies) de largo. Si la
manguera de drenaje es demasiado larga, el agua
puede no drenarse por completo, lo que puede
provocar que el agua estancada y el moho se
acumulen dentro de la manguera.
REMOCION DE AGUA
3. Drenaje de la bomba
Si el drenaje continuo es inconveniente, el agua
puede ser retirada del aparato usando el drenaje
de la bomba.
Al utilizar la bomba, el aparato primero llenará
el cubo de agua y luego el brazo de la bomba
bombeará agua del cubo a través del drenaje y
hacia fuera de la manguera.
Retire la cubierta de la salida de drenaje de
la bomba y coloque la manguera de desagüe
suministrada. Dirija el otro extremo de la manguera
a un desagüe. Presione el botón de la bomba para
activar la función de la bomba. Cuando el cubo
está lleno, la bomba comenzará a trabajar.
Asegúrese de que la manguera de desagüe no esté
doblada, esto puede impedir que el agua se drene
correctamente y sobrecargar la bomba.
No conecte la manguera suministrada junto
con otra manguera. La longitud máxima de la
manguera de drenaje de la bomba no debe ser
mayor de 4,6 m (15 pies). Si la manguera de
drenaje es demasiado larga, el agua puede no
drenarse por completo, lo que puede provocar que
el agua estancada y el moho se acumulen dentro de
la manguera.
Cuando se utiliza el drenaje de la bomba, el
cubo de agua debe vaciarse cada pocos días
para asegurarse de que el agua en el cubo no se
estancan o crecen el moho.
INSTRUCCIONES DE OPERACIÓN

CUIDADO Y MANTENIMIENTO
FILTRO DE AIRE
El fi ltro de aire debe limpiarse aproximadamente
cada 2 semanas. El fi ltro de aire puede requerir
una limpieza más frecuente si hay caspa o pelaje
en el aire.
Aproximadamente cada dos semanas, la luz
indicadora del fi ltro en el panel de control se
iluminará como un recordatorio para limpiar el
fi ltro. Siga los pasos que se indican a continuación
para limpiar el fi ltro y volver a ponerlo en
funcionamiento normal.
1. El fi ltro de aire se encuentra detrás de la rejilla
de admisión trasera. Para quitar el fi ltro de aire,
sujete la lengüeta del fi ltro en la parte inferior
de la parrilla y deslícela hacia abajo.
2. Utilice una aspiradora con un accesorio de
cepillo suave para eliminar los residuos grandes
o acumulación de polvo del fi ltro de aire.
3. Lave el fi ltro en agua jabonosa tibia, por debajo
de 40°C (104°F), o use un agente de limpieza
neutro.
4. Enjuague el fi ltro con agua limpia y séquelo
completamente antes de volver a instalarlo en el
aparato.
5. Pulse el botón de fi ltro en el panel de control
para reanudar el funcionamiento normal.
Nota: No utilice el aparato sin el fi ltro de aire
instalado.
CÓDIGOS DE ERROR
Si el panel de visualización muestra alguno de los
siguientes códigos de error, desenchufe el aparato,
deje reposar durante 5-10 minutos y vuelva a
enchufarlo. Si el error persiste, llame al servicio
técnico.
AS - Error del sensor de humedad
ES - Error del sensor de temperatura
P2 - Cubo completo
E3 - Funcionamiento incorrecto del sensor
Eb - El cucharón quitado o no en la posición
correcta
EC - Error del sistema de refrigeración o error del
sensor
LIMPIEZA
Para evitar posibles descargas eléctricas, asegúrese
de que el aparato esté desenchufado antes de
realizar cualquier limpieza o mantenimiento.
El exterior del aparato se puede limpiar con un
paño suave o con un paño tibio y húmedo si es
necesario.
No utilice gasolina, benceno, diluyente o cualquier
otro producto químico para limpiar este aparato ya
que estas sustancias pueden dañar el acabado y la
deformación de las piezas de plástico.
Nunca vierta agua directamente sobre el
aparato ya que esto causará el deterioro de
los componentes eléctricos y el aislamiento del
cableado.
Asegúrese de que los puertos de drenaje en el
interior del artefacto y los puertos de drenaje en la
parte posterior del electrodoméstico estén libres de
suciedad y acumulación de calcio.
CUIDADO PARA EL FINAL DE LA TEMPORADA
Antes de poner el aparato en servicio durante el
año, haga funcionar el aparato en modo ventilador
durante medio día para asegurarse de que el
interior del aparato esté seco. Esto ayudará a evitar
el crecimiento de moho o moho dentro del aparato.
Asegúrese de que el fi ltro esté limpio y seco.
Guarde el aparato cubierto en un lugar seco.
DISPOSICIÓN
Este aparato no puede ser tratado como un residuo
doméstico normal, sino que debe ser llevado al
punto de recogida de residuos apropiado para el
reciclaje de componentes eléctricos. Compruebe la
conformidad reglamentaria local con respecto a la
eliminación aprobada y segura de este aparato.
25

SOLUCIÓN DE PROBLEMAS
PROBLEMA CAUSA POSIBLE
El aparato no funcionará • El enchufe no está completamente insertado en la toma de
corriente de la pared
• Fusible fundido o disyuntor
• La humedad ambiente es menor que la humedad ajustada
• El cubo está lleno o no está en la posición correcta
Insufi ciente deshumidifi cación • El fi ltro de aire está sucio
• Flujo de aire bloqueado
• El tamaño del dispositivo es demasiado pequeño para la
aplicación
• La humedad ambiente es menor que la humedad ajustada
Ruido • El fi ltro de aire está sucio
• El cucharón no está en la posición adecuada
• Superfi cie del piso no nivelada
Olores • Formación de moho o moho en superfi cies mojadas internas
• Coloque una tableta algicida en el cubo de agua
Agua en el piso • La conexión de la manguera está suelta
• Se ha quitado la tapa del drenaje
Acumulación de escarcha • Cuando la temperatura ambiente es inferior a 5°C (41°F) puede
formarse escarcha
• Cambie el aparato al modo ventilador sólo hasta que se derrita
el hielo
26
Danby cuidado del consumidor: 1-800-263-2629
Horas de operación:
Lunes a Jueves 8:30 am - 6:00 pm Hora estándar del este
Viernes 8:30 am - 4:00 pm Hora estándar del este
La información de este manual está sujeta a cambios sin previo aviso.

LIMITED IN-HOME APPLIANCE WARRANTY
This quality product is warranted to be free from manufacturer’s defects in material and workmanship, provided that the unit is used under the normal operating
conditions intended by the manufacturer.
This warranty is available only to the person to whom the unit was originally sold by Danby Products Limited (Canada) or Danby Products Inc. (U.S.A.) (hereafter
“Danby”) or by an authorized distributor of Danby, and is non-transferable.
TERMS OF WARRANTY
Plastic parts, are warranted for thirty (30) days only from purchase date, with no extensions provided.
First Year
During the rst twelve (12) months, any functional parts of this product found to be defective, will be repaired or replaced, at warrantor’s
option, at no charge to the ORIGINAL purchaser.
To obtain
Danby reserves the right to limit the boundaries of “In Home Service” to the proximity of an Authorized Service Depot. Any app liance
Service
requiring service outside the limited boundaries of “In Home Service” , it will be the consumer’s responsibility to transport the appliance (at
their own expense) to the original retailer (point of purchase) or a service depot for repair. See “Boundaries of In Home Serv ice” below.
Contact your dealer from whom your unit was purchased, or contact your nearest authorized Danby service depot, where service
must be performed by a qualied service technician.
If service is performed on the units by anyone other than an authorized service depot, or the unit is used for commercial appli cation, all
obligations of Danby under this warranty shall be void.
Boundaries of
If the appliance is installed in a location that is 100 kilometers (62 miles) or more from the nearest service center your unit must be
In Home Service
delivered to the nearest authorized Danby Service Depot, as service must only be performed by a technician qualied and certif ied for
warranty service by Danby. Transportation charges to and from the service location are not protected by this warranty and are t he
responsibility of the purchaser.
Nothing within this warranty shall imply that Danby will be responsible or liable for any spoilage or damage to food or other c ontents of this appliance, whether due
to any defect of the appliance, or its use, whether proper or improper.
EXCLUSIONS
Save as herein provided, Danby, there are no other warranties, conditions, representations or guarantees, express or implied, m ade or intended by Danby or its
authorized distributors and all other warranties, conditions, representations or guarantees, including any warranties, conditio ns, representations or guarantees
under any Sale of Goods Act or like legislation or statue is hereby expressly excluded. Save as herein provided, Danby shall no t be responsible for any damages
to persons or property, including the unit itself, howsoever caused or any consequential damages arising from the malfunction o f the unit and by the purchase of
the unit, the purchaser does hereby agree to indemnify and hold harmless Danby from any claim for damages to persons or propert y caused by the unit.
GENERAL PROVISIONS
No warranty or insurance herein contained or set out shall apply when damage or repair is caused by any of the following:
1) Power failure.
2) Damage in transit or when moving the appliance.
3) Improper power supply such as low voltage, defective house wiring or inadequate fuses.
4) Accident, alteration, abuse or misuse of the appliance such as inadequate air circulation in the room or abnormal operating con ditions
(extremely high or low room temperature).
5) Use for commercial or industrial purposes (ie. If the appliance is not installed in a domestic residence).
6) Fire, water damage, theft, war, riot, hostility, acts of God such as hurricanes, oods etc.
7) Service calls resulting in customer education.
8) Improper Installation (ie. Building-in of a free standing appliance or using an appliance outdoors that is not approved for out door application).
Proof of purchase date will be required for warranty claims; so, please retain bills of sale. In the event warranty service is required, present this document to our
AUTHORIZED SERVICE DEPOT.
Danby Products Limited
PO Box 1778, Guelph, Ontario, Canada N1H 6Z9
Telephone: (519) 837-0920 FAX: (519) 837-0449
Danby Products Inc.
PO Box 669, Findlay, Ohio, U.S.A. 45840
Telephone: (419) 425-8627 FAX: (419) 425-8629
04/09
1-800-263-2629
Warranty Service
In-home
Durante los primeros veinticuatro (24) meses, cualquier parte en buen estado de este producto que resulte
defectuosa, incluyendo cualquier sistema sellado, será reparado o reemplazado, a opción del fabricante, sin
cargo para el comprador original.
Póngase en contacto con el distribuidor donde adquirió el electrodoméstico o póngase en contacto con el
centro de servicio autorizado más cercano de Danby, donde el servicio debe ser realizado por un técnico
cualificado. Si el servicio es realizado por cualquier persona que no sea un depósito de servicio autorizado,
todas las obligaciones de Danby bajo esta garantía serán nulas.
Es responsabilidad del comprador transportar el aparato al centro de servicio autorizado más cercano.
Primeros 24 meses
Para obtener servicio
GARANTÍA LIMITADA “ACARREADO SOLAMENTE”
Este producto de calidad está garantizado contra defectos de fabricación, incluyendo partes y mano de obra, siempre y cuando la
unidad se utilice bajo las condiciones normales de funcionamiento para las que fue diseñado.
Esta garantía está solamente disponible para la persona que haya comprado originalmente esta unidad directamente de Danby
Products Limited (Canada) o Danby Products Inc. (U.S.A.) (en adelante “Danby”) o uno de sus distribuidores autorizados, y no es
transferible.
CONDICIONES DE LA GARANTÍA
Las piezas plásticas, se autorizan por treinta (30) días solamente a partir de la fecha de la compra, sin las extensiones
proporcionadas.
Nada dentro de esta garantía implica que Danby será responsable por cualquier daño que hayan sufrido los alimentos u otros
contenidos de este aparato, ya sea debido a un defecto del aparato, o su uso, adecuado o inadecuado.
EXCLUSIONES
Salvo lo aquí indicado por Danby, no existen otras garantías, condiciones o representaciones, explícitas o implícitas, concretas o
intencionales por parte de Danby o sus distribuidores autorizados y todas las demás garantías, condiciones o representaciones,
incluyendo cualquier garantía, condiciones o representaciones bajo cualquier Acta de Venta de Productos o legislación o estatuto
similar, quedan de esta forma expresamente excluidas. Salvo lo aquí indicado, Danby no serán responsables por ningún daño a
personas o bienes, incluyendo la propia unidad, sin importar su causa, o de ningún daño indirecto causado por el desperfecto de la
unidad, y al comprar esta unidad, el comprador acepta por la presente, indemnizar y proteger a Danby contra cualquier reclamo
por daños a personas o bienes causados por la unidad.
CONDICIONES GENERALES
No se considerará ninguna de estas garantías o seguros cuando el daño o la necesidad de reparación sea el producto de los
siguientes casos:
1) Falla del suministro eléctrico.
2) Daños en tránsito o durante el transporte de la unidad.
3) Alimentación incorrecta, como bajo voltaje, instalación eléctrica defectuosa o fusibles inadecuados.
4) Accidente, modificación, abuso o uso incorrecto del artefacto, tal como insuficiente ventilación del ambiente o condiciones de
operación anormales (temperatura ambiente extremadamente alta o baja).
5) Utilización comercial o industrial (v.g., si el electrodoméstico no está instalado en una vivienda particular).
6) Incendio, daños por agua, robo, guerra, disturbios, hostilidades, actos de fuerza mayor como huracanes, inundaciones, etc.
7) Pedidos de servicio debido a desinformación del usuario.
8) Instalación inadecuada (v.g., instalación de un electrodoméstico independiente o uso de un aparato al aire libre que no esté
aprobado para aplicaciones en exteriores, incluyendo pero no limitado a: garajes, patios, porches o cualquier lugar que no esté bien
aislado o controlado por el clima).
Se requerirá una prueba de la fecha de compra para reclamaciones de garantía; conservar las facturas de venta. En el caso de que
se requiera servicio de garantía, presente el comprobante de compra a nuestro depósito de servicio autorizado.
Servicio de Garantía
Acarreado Solamente
Danby Products Limited
PO Box 1778, Guelph, Ontario, Canada N1H 6Z9
Telephone: (519) 837-0920 FAX: (519) 837-0449
Danby Products Inc.
PO Box 669, Findlay, Ohio, U.S.A. 45840
Telephone: (419) 425-8627 FAX: (419) 425-8629
1-800-263-2629
04/17
Los cargos de transporte desde y hacia el lugar de servicio no están protegidos por esta garantía y son responsabilidad del
comprador.

NOTES / REMARQUES / NOTAS :
__________________________________________________________________________________________
__________________________________________________________________________________________
__________________________________________________________________________________________
__________________________________________________________________________________________
__________________________________________________________________________________________
__________________________________________________________________________________________
__________________________________________________________________________________________
__________________________________________________________________________________________
__________________________________________________________________________________________
__________________________________________________________________________________________
__________________________________________________________________________________________
__________________________________________________________________________________________
__________________________________________________________________________________________
__________________________________________________________________________________________
__________________________________________________________________________________________
__________________________________________________________________________________________
__________________________________________________________________________________________
__________________________________________________________________________________________
__________________________________________________________________________________________
__________________________________________________________________________________________
__________________________________________________________________________________________
__________________________________________________________________________________________

MODEL • MODÈLE • MODELO
Printed in China
Imprimé en Chine
Impreso en China
Danby Products Limited, Guelph, ON, Canada N1H 6Z9
Danby Products Inc., Findlay, Ohio, USA 45840
MODEL • MODÈLE • MODELO
DDR070BDPWDB
-
 1
1
-
 2
2
-
 3
3
-
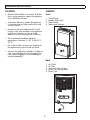 4
4
-
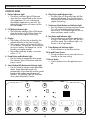 5
5
-
 6
6
-
 7
7
-
 8
8
-
 9
9
-
 10
10
-
 11
11
-
 12
12
-
 13
13
-
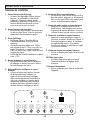 14
14
-
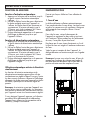 15
15
-
 16
16
-
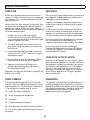 17
17
-
 18
18
-
 19
19
-
 20
20
-
 21
21
-
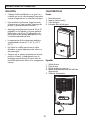 22
22
-
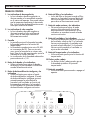 23
23
-
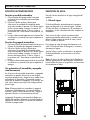 24
24
-
 25
25
-
 26
26
-
 27
27
-
 28
28
-
 29
29
-
 30
30
-
 31
31
-
 32
32


Danby DDR070BDPWDB El manual del propietario
- Categoría
- Deshumidificadores
- Tipo
- El manual del propietario
en otros idiomas
- français: Danby DDR070BDPWDB Le manuel du propriétaire
- English: Danby DDR070BDPWDB Owner's manual
Artículos relacionados
-
Danby DDR050BGWDB El manual del propietario
-
Danby DDR060BMPWDB El manual del propietario
-
-
-
Danby DDR045BDWDB El manual del propietario
-
-
Danby DDR050BLPBDB El manual del propietario
-
Danby DDR050BLPBDB-ME El manual del propietario
-
-