Pioneer DEH-P6700MP Manual de usuario
- Categoría
- Reproductores de CD
- Tipo
- Manual de usuario
Este manual también es adecuado para


Thank you for buying this Pioneer product.
Please read through these operating instructions so you will know how to operate
your model properly. After you have finished reading the instructions, keep this man-
ual in a safe place for future reference.
Before You Start
About this unit 4
About this manual 4
About the illumination color 4
In case of trouble 4
Features 4
About WMA 5
Use and care of the remote control 5
Installing the battery 5
Using the remote control 6
Protecting your unit from theft 6
Removing the front panel 6
Attaching the front panel 6
Whats What
Head unit 7
Remote control 8
Power ON/OFF
Turning the unit on 9
Selecting a source 9
Turning the unit off 9
Tuner
Listening to the radio 10
Introduction of advanced tuner
operation 11
Storing and recalling broadcast
frequencies 11
Tuning in strong signals 11
Storing the strongest broadcast
frequencies 12
RDS
Introduction of RDS operation 13
Switching the RDS display 13
Selecting alternative frequencies 13
Using PI Seek 14
Using Auto PI Seek for preset
stations 14
Limiting stations to regional
programming 14
Receiving traffic announcements 15
Using news program interruption 15
Receiving PTY alarm broadcasts 16
PTY list 16
Built-in CD Player
Playing a CD 17
Introduction of advanced built-in CD player
operation 18
Repeating play 18
Playing tracks in a random order 18
Scanning tracks of a CD 18
Pausing CD playback 19
Using compression and BMX 19
Selecting the search method 19
Searching every 10 tracks in the current
disc 20
Using disc title functions 20
Entering disc titles 20
Displaying disc titles 21
Using CD TEXT functions 21
Displaying titles on CD TEXT
discs 21
Scrolling titles in the display 21
MP3/WMA/WAV Player
Playing MP3/WMA/WAV 22
Introduction of advanced built-in CD player
(MP3/WMA/WAV) operation 24
Repeating play 24
Playing tracks in a random order 24
Scanning folders and tracks 25
Pausing MP3/WMA/WAV playback 25
Selecting the search method 25
Searching every 10 tracks in the current
folder 26
Using compression and BMX 26
Displaying text information on MP3/WMA
disc 26
Contents
En
2

Displaying text information on WAV disc 27
Scrolling text information in the display 27
Multi-CD Player
Playing a CD 28
50-disc multi-CD player 28
Introduction of advanced multi-CD player
operation 29
Repeating play 29
Playing tracks in a random order 29
Scanning CDs and tracks 30
Pausing CD playback 30
Using ITS playlists 30
Creating a playlist with ITS
programming 30
Playback from your ITS playlist 31
Erasing a track from your ITS
playlist 31
Erasing a CD from your ITS
playlist 32
Using disc title functions 32
Entering disc titles 32
Displaying disc titles 33
Using CD TEXT functions 33
Displaying titles on CD TEXT
discs 33
Scrolling titles in the display 33
Using compression and bass emphasis 33
Audio Adjustments
Introduction of audio adjustments 34
Compensating for equalizer curves (EQ-
EX) 34
Using balance adjustment 35
Using the equalizer 35
Recalling equalizer curves 35
Adjusting equalizer curves 35
Fine-adjusting equalizer curve 36
Adjusting bass and treble 36
Adjusting bass and treble level 36
Selecting bass frequency 37
Selecting treble frequency 37
Adjusting loudness 37
Using subwoofer output 37
Turning a subwoofer on/off 37
Adjusting subwoofer settings 38
Using nonfading output 38
Adjusting nonfading output level 38
Using the high pass filter 38
Adjusting source levels 39
Initial Settings
Adjusting initial settings 40
Setting the FM tuning step 40
Switching Auto PI Seek 40
Switching the warning tone 40
Switching the auxiliary setting 41
Setting the rear output and subwoofer
controller 41
Other Functions
Switching the display illumination 42
Switching the button illumination 42
Using the AUX source 42
Selecting AUX as the source 42
Setting the AUX title 42
Additional Information
Understanding built-in CD player error
messages 44
Sound muting 44
CD player and care 44
CD-R/CD-RW discs 45
MP3, WMA and WAV files 45
MP3 additional information 46
WMA additional information 46
WAV additional information 46
About folders and MP3/WMA/WAV files 47
Terms 48
Specifications 50
En
3
English
Contents

About this unit
The tuner frequencies on this unit are allo-
cated for use in Western Europe, Asia, the
Middle East, Africa and Oceania. Use in other
areas may result in poor reception. The RDS
(radio data system) function operates only in
areas with FM stations broadcasting RDS sig-
nals.
CAUTION
! Do not allow this unit to come into contact
with liquids. Electrical shock could result.
Also, this unit damage, smoke, and overheat
could result from contact with liquids.
! A CLASS 1 LASER PRODUCT label is affixed
to the bottom of this unit.
CLASS 1
LASER PRODUCT
! The Pioneer CarStereo-Pass is for use only in
Germany.
! Keep this manual handy as a reference for op-
erating procedures and precautions.
! Always keep the volume low enough so that
you can hear sounds from outside the vehicle.
! Protect this unit from moisture.
! If the battery is disconnected or discharged,
the preset memory will be erased and must be
reprogrammed.
About this manual
This unit features a number of sophisticated
functions ensuring superior reception and op-
eration. All the functions have been designed
for the easiest possible use, but many are not
self-explanatory. This operation manual will
help you benefit fully from this unit s potential
and to maximize your listening enjoyment.
We recommend that you familiarize yourself
with the functions and their operation by read-
ing through the manual before you begin
using this unit. It is especially important that
you read and observe WARNINGs and CAU-
TIONs in this manual.
About the illumination color
This unit features multi-color illumination.
When the unit is turned on, the buttons and
display illuminate in rainbow colors. To select
a particular illumination color, see Switching
the display illumination on page 42.
In case of trouble
Should this product fail to operate properly,
contact your dealer or nearest authorized Pio-
neer Service Station.
Features
CD playback
Music CD/CD-R/CD-RW playback is possible.
MP3 file playback
You can play back MP3 files recorded on CD-
ROM/CD-R/CD-RW (ISO9660 Level 1/Level 2
standard recordings).
Before You Start
En
4
Section
01

! Supply of this product only conveys a li-
cense for private, non-commercial use and
does not convey a license nor imply any
right to use this product in any commercial
(i.e. revenue-generating) real time broad-
casting (terrestrial, satellite, cable and/or
any other media), broadcasting/streaming
via internet, intranets and/or other net-
works or in other electronic content distri-
bution systems, such as pay-audio or
audio-on-demand applications. An inde-
pendent license for such use is required.
For details, please visit
http://www.mp3licensing.com.
WMA file playback
You can play back WMA files recorded on CD-
ROM/CD-R/CD-RW (ISO9660 Level 1/Level 2
standard recordings).
WAV file playback
You can play back WAV files recorded on CD-
ROM/CD-R/CD-RW (Linear PCM (LPCM)/MS
ADPCM recordings).
About WMA
The Windows Media" logo printed on the box
indicates that this unit can play back WMA
data.
WMA is short for Windows Media" Audio
and refers to an audio compression technol-
ogy that is developed by Microsoft Corpora-
tion. WMA data can be encoded by using
Windows Media Player version 7 or later.
Microsoft, Windows Media, and the Windows
logo are trademarks, or registered trademarks
of Microsoft Corporation in the United States
and/or other countries.
Notes
! Depending on the version of Windows Media
Player used to encode WMA files, album
names and other text information may not be
correctly displayed.
! There may be a slight delay when starting
playback of WMA files encoded with image
data.
Use and care of the remote
control
Installing the battery
Slide the tray out on the back of the remote
control and insert the battery with the plus (+)
and minus () poles pointing in the proper di-
rection.
WARNING
Keep the battery out of the reach of children.
Should the battery be swallowed, immediately
consult a doctor.
CAUTION
! Use only one CR2025 (3 V) lithium battery.
! Remove the battery if the remote control is not
used for a month or longer.
Before You Start
En
5
English
Section
01

! Do not recharge, disassemble, heat or dispose
of the battery in fire.
! Do not handle the battery with metallic tools.
! Do not store the battery with metallic materi-
als.
! In the event of battery leakage, wipe the re-
mote control completely clean and install a
new battery.
! When disposing of used batteries, please
comply with governmental regulations or en-
vironmental public institutions rules that
apply in your country/area.
Using the remote control
Point the remote control in the direction of the
front panel to operate.
Important
! Do not store the remote control in high tem-
peratures or direct sunlight.
! The remote control may not function properly
in direct sunlight.
! Do not let the remote control fall onto the
floor, where it may become jammed under the
brake or accelerator pedal.
Protecting your unit from
theft
The front panel can be detached from the
head unit and stored in the protective case
provided to discourage theft.
! If the front panel is not detached from the
head unit within five seconds of turning off
the ignition, a warning tone will sound.
! You can turn off the warning tone. See
Switching the warning tone on page 40.
Important
! Never use force or grip the display and the
buttons too tightly when removing or attach-
ing.
! Avoid subjecting the front panel to excessive
shocks.
! Keep the front panel out of direct sunlight and
high temperatures.
Removing the front panel
1 Press OPEN to open the front panel.
2 Grip the left side of the front panel and
pull it gently outward.
Take care not to grip it too tightly or to drop
the front panel and protect it from contact
with water or other fluids to prevent perma-
nent damage.
3 Put the front panel into the protective
case provided for safe keeping.
Attaching the front panel
% Replace the front panel by holding it
upright to the unit and clipping it securely
into the mounting hooks.
Before You Start
En
6
Section
01

Head unit
1 TA button
Press to turn traffic announcements func-
tion on or off.
Press and hold to turn NEWS function on or
off.
2 EQ button
Press to select various equalizer curves.
3 FUNCTION button
Press to select functions.
4 OPEN button
Press to open the front panel.
5 a/b/c/d buttons
Press to do manual seek tuning, fast for-
ward, reverse and track search controls.
Also used for controlling functions.
6 SW button
Press to directly select subwoofer setting
menu. See Using subwoofer output on page
37. Press and hold to select EQ-EX setting
menu. See Compensating for equalizer
curves (EQ-EX) on page 34.
7 AUDIO button
Press to select various sound quality con-
trols.
8 BAND button
Press to select among three FM bands and
MW/LW bands and to cancel the control
mode of functions.
9 16 buttons
Press for preset tuning and disc number
search when using a multi-CD player.
a SOURCE button
This unit is turned on by selecting a source.
Press to cycle through all the available
sources.
b ILLUMINATION button
Press to change the button illumination and
the display illumination.
c DISPLAY button
Press to select different displays.
d VOLUME
When you press VOLUME, it extends out-
ward so that it becomes easier to turn. To re-
tract VOLUME, press it again. Rotate it to
increase or decrease the volume.
Whats What
En
7
English
Section
02

Remote control
Operation is the same as when using the but-
tons on the head unit. See the explanation of
the head unit about the operation of each but-
ton with the exception of ATT, which is ex-
plained below.
d PAUSE button
Press to turn pause on or off.
e CD button
Press to select the built-in or multi-CD
player as the source.
f TUNER button
Press to select the tuner as the source.
g ATT button
Press to quickly lower the volume level, by
about 90%. Press once more to return to the
original volume level.
h VOLUME button
Press to increase or decrease the volume.
g
5
7
e
3
d
f
8
h
Whats What
En
8
Section
02

Turning the unit on
% Press SOURCE to turn the unit on.
When you select a source the unit is turned
on.
Selecting a source
You can select a source you want to listen to.
To switch to the built-in CD player, load a disc
in the unit (refer to page 17).
1 When using the head unit, press
SOURCE to select a source.
Press SOURCE repeatedly to switch between
the following sources:
Built-in CD playerTelevisionTuner
Multi-CD playerExternal unit 1Exter-
nal unit 2AUX
2 When using the remote control, press
TUNER or CD to select a source.
Press each button repeatedly to switch be-
tween the following sources:
TUNER: TunerTelevisionSources off
CD: Built-in CD playerMulti-CD player
Sources off
Notes
! In the following cases, the sound source will
not change:
When there is no unit corresponding to the
selected source connected to this unit.
When there is no disc in the unit.
When there is no magazine in the multi-
CD player.
When the AUX (auxiliary input) is set to off
(refer to page 41).
! External unit refers to a Pioneer product (such
as one available in the future) that, although
incompatible as a source, enables control of
basic functions by this unit. Two external units
can be controlled by this unit. When two exter-
nal units are connected, the allocation of
them to external unit 1 or external unit 2 is
automatically set by this unit.
! When this units blue/white lead is connected
to the vehicles auto-antenna relay control
terminal, the vehicles antenna extends when
this units source is turned on. To retract the
antenna, turn the source off.
Turning the unit off
% Press SOURCE and hold until the unit
turns off.
Power ON/OFF
En
9
English
Section
03

Listening to the radio
These are the basic steps necessary to operate
the radio. More advanced tuner operation is
explained starting on the next page.
This units AF (alternative frequencies search)
function can be turned on and off. AF should
be off for normal tuning operation (refer to
page 13).
1 Band indicator
Shows which band the radio is tuned to,
MW, LW or FM.
2 Frequency indicator
Shows to which frequency the tuner is
tuned.
3 Stereo (5) indicator
Shows that the frequency selected is being
broadcast in stereo.
4 Preset number indicator
Shows which preset has been selected.
1 Press SOURCE to select the tuner.
Press SOURCE until tuner is selected as the
source.
2 Use VOLUME to adjust the sound level.
Rotate it to increase or decrease the volume.
3 Press BAND to select a band.
Press BAND until the desired band is dis-
played, F1, F2, F3 for FM or MW/LW.
4 To perform manual tuning, briefly press
c or d.
The frequencies move up or down step by
step.
5 To perform seek tuning, press and hold
c or d for about one second and release.
The tuner will scan the frequencies until a
broadcast strong enough for good reception is
found.
# You can cancel seek tuning by briefly pressing
either c or d.
# If you press and hold c or d you can skip sta-
tions. Seek tuning starts as soon as you release
the button.
Note
When the frequency selected is being broadcast
in stereo the stereo (5) indicator will light.
Tuner
En
10
Section
04

Introduction of advanced
tuner operation
1 Function display
Shows the function status.
2 LOC indicator
Shows when local seek tuning is on.
3 Preset number indicator
Shows which preset has been selected.
% Press FUNCTION to display the function
names.
Press FUNCTION repeatedly to switch be-
tween the following functions:
BSM (best stations memory)REG (regional)
LOCAL (local seek tuning)TA (traffic an-
nouncement standby)AF (alternative fre-
quencies search)NEWS (news program
interruption)
# To return to the frequency display, press
BAND.
# If MW/LW band is selected, you can only se-
lect BSM or LOCAL.
Note
If you do not operate the function within about 30
seconds, the display is automatically returned to
the frequency display.
Storing and recalling
broadcast frequencies
If you press any of the preset tuning buttons
16 you can easily store up to six broadcast
frequencies for later recall with the touch of a
button.
% When you find a frequency that you
want to store in memory press one of pre-
set tuning buttons 16 and hold until the
preset number stops flashing.
The number you have pressed will flash in the
preset number indicator and then remain lit.
The selected radio station frequency has been
stored in memory.
The next time you press the same preset tun-
ing button the radio station frequency is re-
called from memory.
Notes
! Up to 18 FM stations, six for each of the three
FM bands, and six MW/LW stations can be
stored in memory.
! You can also use a and b to recall radio sta-
tion frequencies assigned to preset tuning
buttons 16.
Tuning in strong signals
Local seek tuning lets you tune in only those
radio stations with sufficiently strong signals
for good reception.
1 Press FUNCTION to select LOCAL.
Press FUNCTION until LOCAL appears in the
display.
2 Press a to turn local seek tuning on.
Local seek sensitivity (e.g., LOCAL 2) appears
in the display.
Tuner
En
11
English
Section
04

3 Press c or d to set the sensitivity.
There are four levels of sensitivity for FM and
two levels for MW/LW:
FM: LOCAL 1LOCAL 2LOCAL 3
LOCAL 4
MW/LW: LOCAL 1LOCAL 2
The LOCAL 4 setting allows reception of only
the strongest stations, while lower settings let
you receive progressively weaker stations.
4 When you want to return to normal
seek tuning, press b to turn local seek tun-
ing off.
LOCAL:OFF appears in the display.
Storing the strongest
broadcast frequencies
BSM (best stations memory) lets you automa-
tically store the six strongest broadcast fre-
quencies under preset tuning buttons 16 and
once stored there you can tune in to those fre-
quencies with the touch of a button.
1 Press FUNCTION to select BSM.
Press FUNCTION until BSM appears in the
display.
2 Press a to turn BSM on.
BSM begins to flash. While BSM is flashing
the six strongest broadcast frequencies will be
stored under preset tuning buttons 16 in the
order of their signal strength. When finished,
BSM stops flashing.
# To cancel the storage process, press b.
Note
Storing broadcast frequencies with BSM may re-
place broadcast frequencies you have saved
using buttons 16.
Tuner
En
12
Section
04

Introduction of RDS operation
RDS (radio data system) is a system for provid-
ing information along with FM broadcasts.
This inaudible information provides such fea-
tures as program service name, program type,
traffic announcement standby and automatic
tuning, intended to aid radio listeners in find-
ing and is tuning in to a desired station.
1 TP (
) indicator
Shows when a TP station is tuned in.
2 News (
) indicator
Shows when the set news program is re-
ceived.
3 Program service name
Shows the name of broadcast program.
% Press FUNCTION to display the function
names.
Press FUNCTION repeatedly to switch be-
tween the following functions:
BSM (best stations memory)REG (regional)
LOCAL (local seek tuning)TA (traffic an-
nouncement standby)AF (alternative fre-
quencies search)NEWS (news program
interruption)
# To return to the frequency display, press
BAND.
# If MW/LW band is selected, you can only se-
lect BSM or LOCAL.
Notes
! If you do not operate the function within about
30 seconds, the display is automatically re-
turned to the frequency display.
! RDS service may not be provided by all sta-
tions.
! RDS functions such as AF and TA are only ac-
tive when your radio is tuned to an RDS
station.
Switching the RDS display
When you tune in an RDS station its program
service name is displayed. If you want to know
the frequency you can.
% Press DISPLAY.
Press DISPLAY repeatedly to switch between
the following settings:
Program service namePTY information
Frequency
PTY (program type ID code) information is
listed on page 16.
# PTY information and the frequency of the cur-
rent station appears on the display for eight sec-
onds.
# If a PTY code of zero is received from a station,
NONE is displayed. This indicates that the station
has not defined its program contents.
# If the signal is too weak for this unit to pick up
the PTY code, NO PTY is displayed.
Selecting alternative
frequencies
If you are listening to a broadcast and the re-
ception becomes weak or there are other pro-
blems, the unit will automatically search for a
different station in the same network which is
broadcasting a stronger signal.
RDS
En
13
English
Section
05

! AF is on as a default.
1 Press FUNCTION to select AF.
Press FUNCTION until AF appears in the dis-
play.
2 Press a to turn AF on.
Press a and AF :ON is displayed.
3 Press b to turn AF off.
Press b and AF :OFF is displayed.
Notes
! Only RDS stations are tuned in during seek
tuning or BSM when AF is on.
! When you recall a preset station, the tuner
may update the preset station with a new fre-
quency from the stations AF list. (This is only
available when using presets on the F1 or F2
bands.) No preset number appears on the dis-
play if the RDS data for the station received
differs from that for the originally stored sta-
tion.
! Sound may be temporarily interrupted by an-
other program during an AF frequency
search.
! AF can be turned on or off independently for
each FM band.
Using PI Seek
If the unit fails to find a suitable alternative fre-
quency, or if you are listening to a broadcast
and the reception becomes weak, the unit will
automatically search for a different station
with the same programming. During the
search, PI SEEK is displayed and the output is
muted. The muting is discontinued after com-
pletion of the PI Seek, whether or not a differ-
ent station is found.
Using Auto PI Seek for preset
stations
When preset stations cannot be recalled, as
when travelling long distances, the unit can
be set to perform PI Seek during preset recall.
! The default setting for Auto PI Seek is off.
See Switching Auto PI Seek on page 40.
Limiting stations to regional
programming
When AF is used to automatically retune fre-
quencies, the regional function limits the se-
lection to stations broadcasting regional
programs.
1 Press FUNCTION to select REG.
Press FUNCTION until REG appears in the dis-
play.
2 Press a to turn the regional function
on.
Press a and REG :ON is displayed.
3 Press b to turn the regional function
off.
Press b and REG :OFF is displayed.
Notes
! Regional programming and regional networks
are organized differently depending on the
country (i.e., they may change according to
the hour, state or broadcast area).
! The preset number may disappear on the dis-
play if the tuner tunes in a regional station
which differs from the originally set station.
! The regional function can be turned on or off
independently for each FM band.
RDS
En
14
Section
05

Receiving traffic
announcements
TA (traffic announcement standby) lets you re-
ceive traffic announcements automatically, no
matter what source you are listening to. TA
can be activated for both a TP station (a sta-
tion that broadcasts traffic information) or an
enhanced other networks TP station (a station
carrying information which cross-references
TP stations).
1 Tune in a TP or enhanced other net-
works TP station.
When you are tuned into a TP or enhanced
other networks TP station the TP (
) indica-
tor will light.
2 Press TA to turn traffic announcement
standby on.
Press TA and TA ON appears in the display.
The tuner will stand-by for traffic announce-
ments.
# To turn traffic announcements standby off,
press TA again.
3 Use VOLUME to adjust the TA volume
when a traffic announcement begins.
Rotate it to increase or decrease the volume.
The newly set volume is stored in memory and
recalled for subsequent traffic announce-
ments.
4 Press TA while a traffic announcement
is being received to cancel the announce-
ment.
The tuner returns to the original source but re-
mains in the standby mode until TA is pressed
again.
# You can also cancel the announcement by
pressing SOURCE, BAND, a, b, c or d while a
traffic announcement is being received.
Notes
! You can also turn the TA function on or off in
the menu that appears with the pressing of
FUNCTION.
! The system switches back to the original
source following traffic announcement recep-
tion.
! Only TP and enhanced other networks TP sta-
tions are tuned in during seek tuning or BSM
when TA is on.
Using news program
interruption
When a news program is broadcast from a
PTY code news station the unit can switch
from any station to the news broadcast sta-
tion. When the news program ends, reception
of the previous program resumes.
% Press TA and hold to turn on news pro-
gram interruption.
Press TA until NEWS ON appears in the dis-
play.
# To turn off news program interruption, press
TA and hold until NEWS OFF appears in the dis-
play.
# A news program can be cancelled by pressing
TA.
# You can also cancel the news program by
pressing SOURCE, BAND, a, b, c or d while a
news program is being received.
Note
You can also turn on or off news program in the
menu that appears with the pressing of
FUNCTION.
RDS
En
15
English
Section
05

Receiving PTY alarm
broadcasts
PTY alarm is a special PTY code for announce-
ments regarding emergencies such as natural
disasters. When the tuner receives the radio
alarm code, ALARM appears on the display
and the volume adjusts to the TA volume.
When the station stops broadcasting the
emergency announcement, the system re-
turns to the previous source.
! An emergency announcement can be can-
celled by pressing TA.
! You can also cancel an emergency an-
nouncement by pressing SOURCE, BAND,
a, b, c or d.
PTY list
Specific Type of program
NEWS News
AFFAIRS Current affairs
INFO General information and advice
SPORT Sports
WEATHER Weather reports/meteorological infor-
mation
FINANCE Stock market reports, commerce,
trading, etc.
POP MUS Popular music
ROCK MUS Contemporary modern music
EASY MUS Easy listening music
OTH MUS Non-categorized music
JAZZ Jazz
COUNTRY Country music
NAT MUS National music
OLDIES Oldies music, golden oldies
FOLK MUS Folk music
L. CLASS Light classical music
Specific Type of program
CLASSIC Serious classical music
EDUCATE Educational programs
DRAMA All radio plays and serials
CULTURE National or regional culture
SCIENCE Nature, science and technology
VARIED Light entertainment
CHILDREN Childrens
SOCIAL Social affairs
RELIGION Religious affairs or services
PHONE IN Phone In
TOURING Travel programs, not for announce-
ments about traffic problems
LEISURE Hobbies and recreational activities
DOCUMENT Documentaries
RDS
En
16
Section
05

Playing a CD
These are the basic steps necessary to play a
CD with your built-in CD player. More ad-
vanced CD operation is explained starting on
the next page.
1 Play time indicator
Shows the elapsed playing time of the cur-
rent track.
2 Track number indicator
Shows the track currently playing.
1 Press OPEN to open the front panel.
CD loading slot appears.
# After a CD has been inserted, press SOURCE
to select the built-in CD player.
2 Insert a CD into the CD loading slot.
Playback will automatically start.
CD loading slot
EJECT button
# You can eject a CD by pressing EJECT.
# To avoid a malfunction, make sure that no
metal object comes into contact with the term-
inals when the front panel is open.
3 Close the front panel.
4 Use VOLUME to adjust the sound level.
Rotate it to increase or decrease the volume.
5 To perform fast forward or reverse,
press and hold c or d.
# If you select ROUGH, pressing and holding c
or d enables you to search every 10 tracks in the
current disc. (Refer to Selecting the search meth-
od on page 19.)
6 To skip back or forward to another
track, press c or d.
Pressing d skips to the start of the next track.
Pressing c once skips to the start of the cur-
rent track. Pressing again will skip to the pre-
vious track.
Notes
! The built-in CD player plays one, standard, 12-
cm or 8-cm (single) CD at a time. Do not use
an adapter when playing 8-cm CDs.
! Do not insert anything other than a CD into
the CD loading slot.
! If you cannot insert a disc completely or if
after you insert a disc the disc does not play,
check that the label side of the disc is up.
Press EJECT to eject the disc, and check the
disc for damage before inserting it again.
! If an error message such as ERROR-11 is dis-
played, refer to Understanding built-in CD
player error messages on page 44.
! When a CD TEXT disc is inserted, the disc and
track titles begin to scroll to the left auto-
matically.
Built-in CD Player
En
17
English
Section
06

Introduction of advanced
built-in CD player operation
1 Function display
Shows the function status.
2 RPT indicator
Shows when repeat play is turned on.
% Press FUNCTION to display the function
names.
Press FUNCTION repeatedly to switch be-
tween the following functions:
RPT (repeat play)RDM (random play)
SCAN (scan play)PAUSE (pause)COMP
(compression and BMX)FF/REV (search
method)
# To return to the playback display, press BAND.
Note
If you do not operate the function within about 30
seconds, the display is automatically returned to
the playback display.
Repeating play
Repeat play lets you hear the same track or
disc over again.
1 Press FUNCTION to select RPT.
Press FUNCTION until RPT appears in the dis-
play.
2 Press c or d to select the repeat range.
This switches you to the selected setting.
! RPT:DSC Repeat the current disc
! RPT:TRK Repeat just the current track
Note
If you perform track search or fast forward/re-
verse during TRK, the repeat play range changes
to DSC.
Playing tracks in a random
order
Random play lets you play back tracks on the
CD in a random order.
1 Press FUNCTION to select RDM.
Press FUNCTION until RDM appears in the
display.
2 Press a to turn random play on.
RDM :ON appears in the display. Tracks will
play in a random order.
3 Press b to turn random play off.
RDM :OFF appears in the display. Tracks will
continue to play in order.
Scanning tracks of a CD
Scan play lets you hear the first 10 seconds of
each track on the CD.
1 Press FUNCTION to select SCAN.
Press FUNCTION until SCAN appears in the
display.
2 Press a to turn scan play on.
SCAN :ON appears in the display. The first 10
seconds of each track is played.
Built-in CD Player
En
18
Section
06

3 When you find the desired track press
b to turn scan play off.
SCAN :OFF appears in the display. The track
will continue to play.
# If the display has automatically returned to
the playback display, select SCAN again by press-
ing FUNCTION.
Note
After scanning of a CD is finished, normal play-
back of the tracks will begin again.
Pausing CD playback
Pause lets you temporarily stop playback of
the CD.
1 Press FUNCTION to select PAUSE.
Press FUNCTION until PAUSE appears in the
display.
2 Press a to turn pause on.
PAUSE:ON appears in the display. Play of the
current track pauses.
3 Press b to turn pause off.
PAUSE:OFF appears in the display. Play will re-
sume at the same point that you turned pause
on.
Note
You can also turn pause on or off by pressing
PAUSE.
Using compression and BMX
Using the COMP (compression) and BMX
functions let you adjust the sound playback
quality of this player. Each of the functions
have a two-step adjustment. The COMP func-
tion balances the output of louder and softer
sounds at higher volumes. BMX controls
sound reverberations to give playback a fuller
sound. Listen to each of the effects as you se-
lect through them and use the one that best
enhances the playback of the track or CD that
you are listening to.
1 Press FUNCTION to select COMP.
Press FUNCTION until COMP appears in the
display.
2 Press a or b to select your favorite set-
ting.
Press a or b repeatedly to switch between the
following settings:
COMP OFFCOMP 1COMP 2
COMP OFFBMX 1BMX 2
Selecting the search method
You can switch the search method between
fast forward/reverse and searching every 10
tracks.
1 Press FUNCTION to select FF/REV.
Press FUNCTION until FF/REV appears in the
display.
# If the search method ROUGH has been pre-
viously selected, ROUGH will be displayed.
2 Press c or d to select the search meth-
od.
Press c or d until the desired search method
appears in the display.
! FF/REV Fast forward and reverse
! ROUGH Searching every 10 tracks
Built-in CD Player
En
19
English
Section
06

Searching every 10 tracks in
the current disc
If a disc contains over 10 tracks, you can
search every 10 tracks. When a disc contains
a lot of tracks, you can roughly search for the
track you want to play.
1 Select the search method ROUGH.
Refer to Selecting the search method on the
previous page.
2 Press and hold c or d to search every
10 tracks on a disc.
# If a disc contains less than 10 tracks, pressing
and holding d recalls the last track of the disc.
Also, if the remaining number of tracks after
searching every 10 tracks is less than 10, press-
ing and holding d recalls the last track of the
disc.
# If a disc contains less than 10 tracks, pressing
and holding c recalls the first track of the disc.
Also, if the remaining number of tracks after
searching every 10 tracks is less than 10, press-
ing and holding c recalls the first track of the
disc.
Using disc title functions
You can input CD titles and display the title.
The next time you insert a CD for which you
have entered a title, the title of that CD will be
displayed.
Entering disc titles
Use the disc title input feature to store up to
48 CD titles in the unit. Each title can be up to
8 characters long.
1 Play the CD that you want to enter a
title for.
2 Press FUNCTION and hold until TITLE IN
appears in the display.
# When playing a CD TEXT disc, you cannot
switch to TITLE IN. The disc title will have already
been recorded on a CD TEXT disc.
3 Press a or b to select a letter of the al-
phabet.
Each press of a will display a letter of the al-
phabet in A B C ... X Y Z, numbers and sym-
bols in 1 2 3 ... > [ ] order. Each press of b will
display a letter in the reverse order, such as Z
Y X ... C B A order.
4 Press d to move the cursor to the next
character position.
When the letter you want is displayed, press d
to move the cursor to the next position and
then select the next letter. Press c to move
backwards in the display.
5 Move the cursor to the last position by
pressing d after entering the title.
When you press d one more time, the entered
title is stored in memory.
6 Press BAND to return to the playback
display.
Notes
! Titles remain in memory, even after the disc
has been removed from the unit, and are re-
called when the disc is reinserted.
! After data for 48 discs has been stored in
memory, data for a new disc will overwrite the
oldest one.
! If you connect a multi-CD player, you can
input disc titles for up to 100 discs.
Built-in CD Player
En
20
Section
06

Displaying disc titles
You can display the title of any disc that has
had a disc title entered.
% Press DISPLAY.
Press DISPLAY repeatedly to switch between
the following settings:
Play timeDISC TTL (disc title)
When you select DISC TTL, the title of the cur-
rently playing disc is shown in the display.
# If no title has been entered for the currently
playing disc, NO TITLE is displayed.
Using CD TEXT functions
Some discs have certain information encoded
on the disc during manufacture. These discs
may contain such information as the CD title,
track title, artists name and playback time
and are called CD TEXT discs. Only these spe-
cially encoded CD TEXT discs support the
functions listed below.
Displaying titles on CD TEXT discs
% Press DISPLAY.
Press DISPLAY repeatedly to switch between
the following settings:
Play timeDISC TTL (disc title)ART NAME
(disc artist name)TRK TTL (track title)
ART NAME (track artist name)
# If specific information has not been recorded
on a CD TEXT disc, NO XXXX will be displayed
(e.g., NO T-TTL).
Scrolling titles in the display
This unit can display the first 8 letters only of
DISC TTL, ART NAME, TRK TTL and
ART NAME. When the recorded information is
longer than 8 letters, you can scroll the text to
the left so that the rest of the title can be seen.
% Press DISPLAY and hold until the title
begins to scroll to the left.
The rest of the title will appear in the dis-
play.
Built-in CD Player
En
21
English
Section
06

Playing MP3/WMA/WAV
These are the basic steps necessary to play an
MP3/WMA/WAV with your built-in CD player.
More advanced MP3/WMA/WAV operation is
explained starting on page 24.
1 MP3 indicator
Shows when the MP3 file is playing.
2 WMA indicator
Shows when the WMA file is playing.
3 Track number indicator
Shows the track (file) currently playing.
! If a track number 100 to 199 is selected,
d on the left of the track number indica-
tor will light.
! If a track number 200 or more is selected,
d on the left of the track number indica-
tor will blink.
4 Play time indicator
Shows the elapsed playing time of the cur-
rent track (file).
5 Folder number indicator
Shows the number of folder currently play-
ing.
1 Press OPEN to open the front panel.
CD loading slot appears.
# After a CD-ROM has been inserted, press
SOURCE to select the built-in CD player.
2 Insert a CD-ROM into the CD loading
slot.
Playback will automatically start.
CD loading slot
EJECT button
# You can eject a CD-ROM by pressing EJECT.
# To avoid a malfunction, make sure that no
metal object comes into contact with the term-
inals when the front panel is open.
3 Close the front panel.
4 Use VOLUME to adjust the sound level.
Rotate it to increase or decrease the volume.
5 Press a or b to select a folder.
# You cannot select a folder that does not have
an MP3/WMA/WAV file recorded in it.
# To return to folder 01 (ROOT), press and hold
BAND. However, if folder 01 (ROOT) contains no
files, playback commences with folder 02.
6 To perform fast forward or reverse,
press and hold c or d.
# This is fast forward and reverse operation only
for the file being played. This operation is can-
celed when the previous or next file is reached.
# If you select ROUGH, pressing and holding c
or d enables you to search every 10 tracks in the
current folder. (Refer to Selecting the search meth-
od on page 25.)
MP3/WMA/WAV Player
En
22
Section
07

7 To skip back or forward to another
track, press c or d.
Pressing d skips to the start of the next track.
Pressing c once skips to the start of the cur-
rent track. Pressing again will skip to the pre-
vious track.
Notes
! When playing discs with MP3/WMA/WAV files
and audio data (CD-DA) such as CD-EXTRA
and MIXED-MODE CDs, both types can be
played only by switching mode between MP3/
WMA/WAV and CD-DA with BAND.
! If you have switched between playback of
MP3/WMA/WAV files and audio data (CD-DA),
playback starts at the first track on the disc.
! The built-in CD player can play back an MP3/
WMA/WAV file recorded on CD-ROM. (Refer
to page 45 for files that can be played back.)
! Do not insert anything other than a CD into
the CD loading slot.
! There is sometimes a delay between starting
up CD playback and the sound being issued.
When being read in, FRMTREAD is displayed.
! If you cannot insert a disc completely or if
after you insert a disc the disc does not play,
check that the label side of the disc is up.
Press EJECT to eject the disc, and check the
disc for damage before inserting it again.
! Playback is carried out in order of file number.
Folders are skipped if they contain no files. (If
folder 01 (ROOT) contains no files, playback
commences with folder 02.)
! When playing back files recorded as VBR
(variable bit rate) files, the play time will not be
correctly displayed if fast forward or reverse
operations are used.
! If the inserted disc contains no files that can
be played back, NO AUDIO is displayed.
! If the inserted disc contains WMA files that
are protected by digital rights management
(DRM) , SKIPPED is displayed while the pro-
tected file is skipped.
! If all the files on the inserted disc are secured
by DRM, PROTECT is displayed.
! There is no sound on fast forward or reverse.
! If an error message such as ERROR-11 is dis-
played, refer to Understanding built-in CD
player error messages on page 44.
! When an MP3/WMA/WAV disc is inserted,
folder name and file name begin to scroll to
the left automatically.
MP3/WMA/WAV Player
En
23
English
Section
07

Introduction of advanced
built-in CD player (MP3/
WMA/WAV) operation
1 Function display
Shows the function status.
2 RPT indicator
Shows when repeat range is selected to cur-
rent track (file).
% Press FUNCTION to display the function
names.
Press FUNCTION repeatedly to switch be-
tween the following functions:
RPT (repeat play)RDM (random play)
SCAN (scan play)PAUSE (pause)COMP
(compression and BMX)FF/REV (search
method)
# To return to the playback display, press BAND.
Note
If you do not operate the function within about 30
seconds, the display is automatically returned to
the playback display.
Repeating play
For MP3/WMA/WAV playback, there are three
repeat play ranges: FLD (folder repeat), TRK
(one-track repeat) and DSC (repeat all tracks).
1 Press FUNCTION to select RPT.
Press FUNCTION until RPT appears in the dis-
play.
2 Press c or d to select the repeat range.
Press c or d until the desired repeat range ap-
pears in the display.
! FLD Repeat the current folder
! TRK Repeat just the current track
! DSC Repeat all tracks
Notes
! If you select another folder during repeat play,
the repeat play range changes to DSC.
! If you perform track search or fast forward/re-
verse during TRK, the repeat play range
changes to FLD.
! When FLD is selected, it is not possible to play
back a subfolder of that folder.
Playing tracks in a random
order
Random play lets you play back tracks in a
random order within the repeat range, FLD
and DSC.
1 Select the repeat range.
Refer to Repeating play on this page.
2 Press FUNCTION to select RDM.
Press FUNCTION until RDM appears in the
display.
3 Press a to turn random play on.
RDM :ON appears in the display. Tracks will
play in a random order within the previously
selected FLD or DSC ranges.
4 Press b to turn random play off.
RDM :OFF appears in the display. Tracks will
continue to play in order.
MP3/WMA/WAV Player
En
24
Section
07

Note
If you turn random play on during FLD and then
return to the playback display, FRDM appears in
the display.
Scanning folders and tracks
While you are using FLD, the beginning of
each track in the selected folder plays for
about 10 seconds. When you are using DSC,
the beginning of the first track of each folder
is played for about 10 seconds.
1 Select the repeat range.
Refer to Repeating play on the previous page.
2 Press FUNCTION to select SCAN.
Press FUNCTION until SCAN appears in the
display.
3 Press a to turn scan play on.
SCAN :ON appears in the display. The first 10
seconds of each track of the current folder (or
the first track of each folder) is played.
4 When you find the desired track (or
folder) press b to turn scan play off.
SCAN :OFF appears in the display. The track
(or folder) will continue to play.
# If the display has automatically returned to
the playback display, select SCAN again by press-
ing FUNCTION.
Notes
! After track or folder scanning is finished, nor-
mal playback of the tracks will begin again.
! If you turn scan play on during FLD and then
return to the playback display, FSCN appears
in the display.
Pausing MP3/WMA/WAV
playback
Pause lets you temporarily stop playback of
the MP3/WMA/WAV.
1 Press FUNCTION to select PAUSE.
Press FUNCTION until PAUSE appears in the
display.
2 Press a to turn pause on.
PAUSE:ON appears in the display. Play of the
current track pauses.
3 Press b to turn pause off.
PAUSE:OFF appears in the display. Play will re-
sume at the same point that you turned pause
on.
Note
You can also turn pause on or off by pressing
PAUSE.
Selecting the search method
You can switch the search method between
fast forward/reverse and searching every 10
tracks.
1 Press FUNCTION to select FF/REV.
Press FUNCTION until FF/REV appears in the
display.
# If the search method ROUGH has been pre-
viously selected, ROUGH will be displayed.
2 Press c or d to select the search meth-
od.
Press c or d until the desired search method
appears in the display.
! FF/REV Fast forward and reverse
! ROUGH Searching every 10 tracks
MP3/WMA/WAV Player
En
25
English
Section
07

Searching every 10 tracks in
the current folder
If the current folder contains over 10 tracks,
you can search every 10 tracks. When one
folder contains a lot of tracks, you can roughly
search for the track you want to play.
1 Select the search method ROUGH.
Refer to Selecting the search method on the
previous page.
2 Press and hold c or d to search every
10 tracks in the current folder.
# If the current folder contains less than 10
tracks, pressing and holding d recalls the last
track of the folder. Also, if the remaining number
of tracks after searching every 10 tracks is less
than 10, pressing and holding d recalls the last
track of the folder.
# If the current folder contains less than 10
tracks, pressing and holding c recalls the first
track of the folder. Also, if the remaining number
of tracks after searching every 10 tracks is less
than 10, pressing and holding c recalls the first
track of the folder.
Using compression and BMX
Using the COMP (compression) and BMX
functions let you adjust the sound playback
quality of this player. Each of the functions
have a two-step adjustment. The COMP func-
tion balances the output of louder and softer
sounds at higher volumes. BMX controls
sound reverberations to give playback a fuller
sound. Listen to each of the effects as you se-
lect through them and use the one that best
enhances the playback of the track or CD that
you are listening to.
1 Press FUNCTION to select COMP.
Press FUNCTION until COMP appears in the
display.
2 Press a or b to select your favorite set-
ting.
Press a or b repeatedly to switch between the
following settings:
COMP OFFCOMP 1COMP 2
COMP OFFBMX 1BMX 2
Displaying text information
on MP3/WMA disc
Text information recorded on a MP3/WMA
disc can be displayed.
% Press DISPLAY.
Press DISPLAY repeatedly to switch between
the following settings:
Play timeFOLDER (folder name)FILE (file
name)TRK TTL (track title)ART NAME (ar-
tist name)ALBM TTL (album title)
COMMENT (comment)Bit rate
# When playing back MP3 files recorded as VBR
(variable bit rate) files, the bit rate value is not dis-
played even after switching to bit rate.
# When playing back WMA files recorded as
VBR files, the average bit rate is displayed.
# If specific information has not been recorded
on an MP3/WMA disc, NO XXXX will be dis-
played (e.g., NO NAME).
# Depending on the version of Windows Media
Player used to encode WMA files, album names
and other text information may not be correctly
displayed.
MP3/WMA/WAV Player
En
26
Section
07

Displaying text
information on WAV disc
You can display text information recorded on a
WAV disc.
% Press DISPLAY.
Press DISPLAY repeatedly to switch between
the following settings:
Play timeFOLDER (folder name)FILE (file
name)Sampling frequency
# Sampling frequency may not display all digits
(e.g. 22.0 KHZ is displayed when the sampling
frequency is 22.05 kHz).
Scrolling text information
in the display
This unit can display the first 8 letters only of
FOLDER, FILE, TRK TTL, ART NAME,
ALBM TTL and COMMENT. When the re-
corded information is longer than 8 letters,
you can scroll the text to the left so that the
rest of the text information can be seen.
% Press DISPLAY and hold until the text
information begins to scroll to the left.
The rest of the text information will appear in
the display.
Note
Unlike MP3 and WMA file format, WAV files dis-
play only folder name and file name.
MP3/WMA/WAV Player
En
27
English
Section
07

Playing a CD
You can use this unit to control a multi-CD
player, which is sold separately.
These are the basic steps necessary to play a
CD with your multi-CD player. More advanced
CD operation is explained starting on the next
page.
1 Disc number indicator
Shows the disc currently playing.
2 Play time indicator
Shows the elapsed playing time of the cur-
rent track.
3 Track number indicator
Shows the track currently playing.
1 Press SOURCE to select the multi-CD
player.
Press SOURCE until multi-CD is selected as
the source.
2 Use VOLUME to adjust the sound level.
Rotate it to increase or decrease the volume.
3 Select a disc you want to listen to with
the 16 buttons.
For discs located at 1 to 6, press the corre-
sponding button number.
If you want to select a disc located at 7 to 12,
press and hold the corresponding numbers,
such as 1 for disc 7, until the disc number ap-
pears in the display.
# You can also sequentially select a disc by
pressing a/b.
4 To perform fast forward or reverse,
press and hold c or d.
5 To skip back or forward to another
track, press c or d.
Pressing d skips to the start of the next track.
Pressing c once skips to the start of the cur-
rent track. Pressing again will skip to the pre-
vious track.
Notes
! When the multi-CD player performs the pre-
paratory operations, READY is displayed.
! If an error message such as ERROR-11 is dis-
played, refer to the multi-CD player owners
manual.
! If there are no discs in the multi-CD player ma-
gazine, NO DISC is displayed.
! When you select a CD TEXT disc on a CD TEXT
compatible multi-CD player, the disc and track
titles begin to scroll to the left auto-
matically.
50-disc multi-CD player
Only those functions described in this manual
are supported for 50-disc multi-CD players.
Multi-CD Player
En
28
Section
08

Introduction of advanced
multi-CD player operation
1 Function display
Shows the function status.
2 RPT indicator
Shows when repeat range is selected to cur-
rent track.
% Press FUNCTION to display the function
names.
Press FUNCTION repeatedly to switch be-
tween the following functions:
RPT (repeat play)RDM (random play)
SCAN (scan play)ITS-P (ITS play)PAUSE
(pause)COMP (compression and DBE)
# To return to the playback display, press BAND.
Note
If you do not operate the function within about 30
seconds, the display is automatically returned to
the playback display.
Repeating play
There are three repeat play ranges for the
multi-CD player: MCD (multi-CD player re-
peat), TRK (one-track repeat) and DSC (disc re-
peat).
1 Press FUNCTION to select RPT.
Press FUNCTION until RPT appears in the dis-
play.
2 Press c or d to select the repeat range.
Press c or d until the desired repeat range ap-
pears in the display.
! MCD Repeat all discs in the multi-CD
player
! TRK Repeat just the current track
! DSC Repeat the current disc
Notes
! If you select other discs during repeat play,
the repeat play range changes to MCD.
! If you perform track search or fast forward/re-
verse during TRK, the repeat play range
changes to DSC.
Playing tracks in a random
order
Random play lets you play back tracks in a
random order within the repeat range, MCD
and DSC.
1 Select the repeat range.
Refer to Repeating play on this page.
2 Press FUNCTION to select RDM.
Press FUNCTION until RDM appears in the
display.
3 Press a to turn random play on.
RDM :ON appears in the display. Tracks will
play in a random order within the previously
selected MCD or DSC ranges.
4 Press b to turn random play off.
RDM :OFF appears in the display. Tracks will
continue to play in order.
Multi-CD Player
En
29
English
Section
08

Note
If you turn random play on during DSC and then
return to the playback display, DRDM appears in
the display.
Scanning CDs and tracks
While you are using DSC, the beginning of
each track on the selected disc plays for about
10 seconds. When you are using MCD, the be-
ginning of the first track of each disc is played
for about 10 seconds.
1 Select the repeat range.
Refer to Repeating play on the previous page.
2 Press FUNCTION to select SCAN.
Press FUNCTION until SCAN appears in the
display.
3 Press a to turn scan play on.
SCAN :ON appears in the display. The first 10
seconds of each track of the current disc (or
the first track of each disc) is played.
4 When you find the desired track (or
disc) press b to turn scan play off.
SCAN :OFF appears in the display. The track
(or disc) will continue to play.
# If the display has automatically returned to
the playback display, select SCAN again by press-
ing FUNCTION.
Notes
! After track or disc scanning is finished, nor-
mal playback of the tracks will begin again.
! If you turn scan play on during DSC and then
return to the playback display, DSCN appears
in the display.
Pausing CD playback
Pause lets you temporarily stop playback of
the CD.
1 Press FUNCTION to select PAUSE.
Press FUNCTION until PAUSE appears in the
display.
2 Press a to turn pause on.
PAUSE:ON appears in the display. Play of the
current track pauses.
3 Press b to turn pause off.
PAUSE:OFF appears in the display. Play will re-
sume at the same point that you turned pause
on.
Note
You can also turn pause on or off by pressing
PAUSE.
Using ITS playlists
ITS (instant track selection) lets you make a
playlist of favorite tracks from those in the
multi-CD player magazine. After you have
added your favorite tracks to the playlist you
can turn on ITS play and play just those selec-
tions.
Creating a playlist with ITS
programming
You can use ITS to enter and play back up to
99 tracks per disc, up to 100 discs (with the
disc titles). (With multi-CD players sold before
the CDX-P1250 and CDX-P650, up to 24 tracks
can be stored in the playlist.)
1 Play a CD that you want to program.
Press a or b to select the CD.
Multi-CD Player
En
30
Section
08

2 Press FUNCTION and hold until TITLE IN
appears in the display, then press
FUNCTION to select ITS.
After TITLE IN is displayed, press FUNCTION
repeatedly, the following functions appear in
the display:
TITLE IN (disc title input)ITS (ITS program-
ming)
3 Select the desired track by pressing c
or d.
4 Press a to store the currently playing
track in the playlist.
ITS IN is displayed briefly and the currently
playing selection is added to your playlist. The
display then shows ITS again.
5 Press BAND to return to the playback
display.
Note
After data for 100 discs has been stored in mem-
ory, data for a new disc will overwrite the oldest
one.
Playback from your ITS playlist
ITS play lets you listen to the tracks that you
have entered into your ITS playlist. When you
turn on ITS play, tracks from your ITS playlist
in the multi-CD player will begin to play.
1 Select the repeat range.
Refer to Repeating play on page 29.
2 Press FUNCTION to select ITS-P.
Press FUNCTION until ITS-P appears in the
display.
3 Press a to turn ITS play on.
ITS-P:ON appears in the display. Playback be-
gins of those tracks from your playlist within
the previously selected MCD or DSC ranges.
# If no tracks in the current range are pro-
grammed for ITS play then EMPTY is displayed.
4 Press b to turn ITS play off.
ITS-P:OFF appears in the display. Playback will
continue in normal order from the currently
playing track and CD.
Erasing a track from your ITS
playlist
When you want to delete a track from your ITS
playlist, you can if ITS play is on.
If ITS play is already on, skip to step 2. If ITS
play is not already on, press FUNCTION.
1 Play the CD with the track you want to
delete from your ITS playlist, and turn ITS
play on.
Refer to Playback from your ITS playlist on this
page.
2 Press FUNCTION and hold until TITLE IN
appears in the display, then press
FUNCTION to select ITS.
After TITLE IN is displayed, press FUNCTION
until ITS appears in the display.
3 Select the desired track by pressing c
or d.
4 Press b to erase the track from your ITS
playlist.
The currently playing selection is erased from
your ITS playlist and playback of the next track
from your ITS playlist begins.
# If there are no tracks from your playlist in the
current range, EMPTY is displayed and normal
play resumes.
5 Press BAND to return to the playback
display.
Multi-CD Player
En
31
English
Section
08

Erasing a CD from your ITS playlist
When you want to delete all tracks of a CD
from your ITS playlist, you can if ITS play is off.
1 Play the CD that you want to delete.
Press a or b to select the CD.
2 Press FUNCTION and hold until TITLE IN
appears in the display, then press
FUNCTION to select ITS.
After TITLE IN is displayed, press FUNCTION
until ITS appears in the display.
3 Press b to erase all tracks on the cur-
rently playing CD from your ITS playlist.
All tracks on the currently playing CD are
erased from your playlist and ITS CLR is dis-
played.
4 Press BAND to return to the playback
display.
Using disc title functions
You can input CD titles and display the titles.
Then you can easily search for and play a de-
sired disc.
Entering disc titles
Use the disc title input feature to store up to
100 CD titles (with ITS playlist) into the multi-
CD player. Each title can be up to 8 characters
long.
1 Play the CD that you want to enter a
title for.
Press a or b to select the CD.
2 Press FUNCTION and hold until TITLE IN
appears in the display.
After TITLE IN is displayed, press FUNCTION
repeatedly, the following functions appear in
the display:
TITLE IN (disc title input)ITS (ITS program-
ming)
# When playing a CD TEXT disc on a CD TEXT
compatible multi-CD player, you cannot switch to
TITLE IN. The disc title will have already been re-
corded on a CD TEXT disc.
3 Press a or b to select a letter of the al-
phabet.
Each press of a will display a letter of the al-
phabet in A B C ... X Y Z, numbers and sym-
bols in 1 2 3 ... > [ ] order. Each press of b will
display a letter in the reverse order, such as Z
Y X ... C B A order.
4 Press d to move the cursor to the next
character position.
When the letter you want is displayed, press d
to move the cursor to the next position and
then select the next letter. Press c to move
backwards in the display.
5 Move the cursor to the last position by
pressing d after entering the title.
When you press d one more time, the entered
title is stored in memory.
6 Press BAND to return to the playback
display.
Notes
! Titles remain in memory, even after the disc
has been removed from the magazine, and
are recalled when the disc is reinserted.
Multi-CD Player
En
32
Section
08

! After data for 100 discs has been stored in
memory, data for a new disc will overwrite the
oldest one.
Displaying disc titles
You can display the title of any disc that has
had a disc title entered.
% Press DISPLAY.
Press DISPLAY repeatedly to switch between
the following settings:
Play timeDISC TTL (disc title)
When you select DISC TTL, the title of the cur-
rently playing disc is shown in the display.
# If no title has been entered for the currently
playing disc, NO TITLE is displayed.
Using CD TEXT functions
You can use these functions only with a CD
TEXT compatible multi-CD player.
Some discs have certain information encoded
on the disc during manufacture. These discs
may contain such information as the CD title,
track title, artists name and playback time
and are called CD TEXT discs. Only these spe-
cially encoded CD TEXT discs support the
functions listed below.
Displaying titles on CD TEXT discs
% Press DISPLAY.
Press DISPLAY repeatedly to switch between
the following settings:
Play timeDISC TTL (disc title)ART NAME
(disc artist name)TRK TTL (track title)
ART NAME (track artist name)
# If specific information has not been recorded
on a CD TEXT disc, NO XXXX will be displayed
(e.g., NO T-TTL).
Scrolling titles in the display
This unit can display the first 8 letters only of
DISC TTL, ART NAME, TRK TTL and
ART NAME. When the recorded information is
longer than 8 letters, you can scroll the text to
the left so that the rest of the title can be seen.
% Press DISPLAY and hold until the title
begins to scroll to the left.
The rest of the title will appear in the dis-
play.
Using compression and
bass emphasis
You can use these functions only with a multi-
CD player that supports them.
Using COMP (compression) and DBE (dy-
namic bass emphasis) functions lets you ad-
just the sound playback quality of the multi-
CD player. Each of the functions has a two-
step adjustment. The COMP function balances
the output of louder and softer sounds at high-
er volumes. DBE boosts bass levels to give
playback a fuller sound. Listen to each of the
effects as you select them and use the one
that best enhances the playback of the track
or CD that you are listening to.
1 Press FUNCTION to select COMP.
Press FUNCTION until COMP appears in the
display.
# If the multi-CD player does not support
COMP/DBE, NO COMP is displayed when you at-
tempt to select it.
2 Press a or b to select your favorite set-
ting.
Press a or b repeatedly to switch between the
following settings:
COMP OFFCOMP 1COMP 2
COMP OFFDBE 1DBE 2
Multi-CD Player
En
33
English
Section
08

Introduction of audio
adjustments
1 CUSTOM indicator
Shows when custom equalizer curve is cur-
rently selected.
2 Equalizer curve
Shows which equalizer preset is currently
selected.
3 Audio display
Shows the audio adjustments status.
4 SW indicator
Shows when the subwoofer output is turned
on.
5 EQ-EX indicator
Appears in the display when EQ-EX function
can be activated.
6 LOUD indicator
Appears in the display when loudness is
turned on.
% Press AUDIO to display the audio func-
tion names.
Press AUDIO repeatedly to switch between
the following audio functions:
FAD (balance adjustment)EQ (equalizer
curve adjustment)BASS (bass and treble
level adjustment)LOUD (loudness)
SUB, W (subwoofer on/off setting)/NOFAD
(non fading output on/off setting)80: 0 (sub-
woofer setting)/NOFAD (non fading output
setting)HPF (high pass filter)SLA (source
level adjustment)
# If EQ-EX function has been selected and only
when EQ-EX is turned on and CUSTOM is se-
lected as the equalizer curve, you can switch to
BASS.
# When the subwoofer controller setting is only
P/O:FUL, you cannot switch to SUB, W. (Refer to
page 41.)
# You can select the 80: 0 only when subwoofer
output is turned on in the SUB, W.
# When the subwoofer controller setting is only
P/O:FUL, you can switch to the nonfading output
on/off setting. (Refer to page 41.)
# You can select the nonfading output setting
only when nonfading output is turned on in the
nonfading output on/off setting.
# When selecting the FM tuner as the source,
you cannot switch to SLA.
# To return to the display of each source, press
BAND.
Note
If you do not operate the audio function within
about 30 seconds, the display is automatically re-
turned to the source display.
Compensating for
equalizer curves (EQ-EX)
The EQ-EX function smoothes the effects of
each equalizer curve. Furthermore, you can
adjust bass and treble for each source when
CUSTOM curve is selected.
% Press and hold SW to turn EQ-EX on.
EQ-EX:ON appears in the display. EQ-EX is
now on.
# To turn EQ-EX off, press and hold SW.
# If you do not operate the EQ-EX within about 8
seconds, the EQ-EX function is cancelled auto-
matically.
Audio Adjustments
En
34
Section
09

Using balance adjustment
You can select a fader/balance setting that
provides an ideal listening environment in all
occupied seats.
1 Press AUDIO to select FAD.
Press AUDIO until FAD appears in the display.
# If the balance setting has been previously ad-
justed, BAL will be displayed.
2 Press a or b to adjust front/rear speak-
er balance.
Each press of a or b moves the front/rear
speaker balance towards the front or the rear.
FAD :F15 FAD :R15 is displayed as the front/
rear speaker balance moves from front to rear.
# FAD : 0 is the proper setting when only two
speakers are used.
3 Press c or d to adjust left/right speaker
balance.
When you press c or d, BAL : 0 is displayed.
Each press of c or d moves the left/right
speaker balance towards the left or the right.
BAL :L9 BAL :R9 is displayed as the left/right
speaker balance moves from left to right.
Using the equalizer
The equalizer lets you adjust the equalization
to match car interior acoustic characteristics
as desired.
Recalling equalizer curves
There are six stored equalizer curves which
you can easily recall at any time. Here is a list
of the equalizer curves:
Display Equalizer curve
SPR-BASS Super bass
POWERFUL Powerful
Display Equalizer curve
NATURAL Natural
VOCAL Vocal
CUSTOM Custom
EQ FLAT Flat
! CUSTOM is an adjusted equalizer curve
that you create.
! A separate CUSTOM curve can be created
for each source. (The built-in CD player and
the multi-CD player are set to the same
equalizer adjustment setting automati-
cally.) If you make adjustments, the equali-
zer curve settings will be memorized in
CUSTOM.
! When EQ FLAT is selected no supplement
or correction is made to the sound. This is
useful to check the effect of the equalizer
curves by switching alternatively between
EQ FLAT and a set equalizer curve.
% Press EQ to select the equalizer.
Press EQ repeatedly to switch between the fol-
lowing equalizers:
SPR-BASSPOWERFULNATURAL
VOCALCUSTOMEQ FLAT
Adjusting equalizer curves
You can adjust the currently selected equalizer
curve setting as desired. Adjusted equalizer
curve settings are memorized in CUSTOM.
1 Press AUDIO to select EQ.
Press AUDIO until EQ appears in the display.
2 Press c or d to select the equalizer
band to adjust.
Each press of c or d selects equalizer bands
in the following order:
EQ-L (low)EQ-M (mid)EQ-H (high)
Audio Adjustments
En
35
English
Section
09

3 Press a or b to adjust the level of the
equalizer band.
Each press of a or b increases or decreases
the level of the equalization band.
+6 6 is displayed as the level is increased
or decreased.
# You can then select another band and adjust
the level.
Note
If you make adjustments when a curve other than
CUSTOM is selected, the newly adjusted curve
will replace the previous curve. Then a new curve
with CUSTOM appears on the display while se-
lecting the equalizer curve.
Fine-adjusting equalizer curve
You can adjust the center frequency and the Q
factor (curve characteristics) of each currently
selected curve band (EQ-L/EQ-M/EQ-H).
Level (dB)
Center frequency
Q=2N
Q=2W
Frequency (Hz)
1 Press AUDIO and hold until frequency
and the Q factor (e.g., F- 80:Q1W) appears
in the display.
2 Press AUDIO to select the desired band
for adjustment.
LowMidHigh
3 Press c or d to select the desired fre-
quency.
Press c or d until the desired frequency ap-
pears in the display.
Low: 4080100160 (Hz)
Mid: 2005001k2k (Hz)
High: 3k8k10k12k (Hz)
4 Press a or b to select the desired Q fac-
tor.
Press a or b until the desired Q factor ap-
pears in the display.
2N1N1W2W
Note
If you make adjustments when a curve other than
CUSTOM is selected, the newly adjusted curve
will replace the previous curve. Then a new curve
with CUSTOM appears on the display while se-
lecting the equalizer curve.
Adjusting bass and treble
You can adjust bass and treble settings.
! If EQ-EX function has been selected and
EQ-EX turned on and CUSTOM selected as
the equalizer curve, you can adjust bass
and treble settings.
Adjusting bass and treble level
You can adjust the bass and treble level.
1 Press AUDIO to select BASS.
Press AUDIO until BASS appears in the dis-
play.
# If the treble level has been previously ad-
justed, Treble will be displayed.
2 Press c or d to select bass or treble.
Press c and BASS is displayed. Press d and
Treble is displayed.
Audio Adjustments
En
36
Section
09

3 Press a or b to adjust the level.
Each press of a or b increases or decreases
the selected bass or treble level. +6 6 is dis-
played as the level is increased or decreased.
Selecting bass frequency
You can select the bass frequency for level ad-
justment.
1 Press AUDIO and hold until frequency
and the Q factor (e.g., F- 80:Q1W) appears
in the display.
2 Press AUDIO to select B.
Press AUDIO until B appears in the display.
3 Press c or d to select the desired fre-
quency.
Press c or d until the desired frequency ap-
pears in the display.
4063100160 (Hz)
Selecting treble frequency
You can select the treble frequency for level
adjustment.
1 Press AUDIO and hold until frequency
and the Q factor (e.g., F- 80:Q1W) appears
in the display.
2 Press AUDIO to select T.
Press AUDIO until T appears in the display.
3 Press c or d to select the desired fre-
quency.
Press c or d until the desired frequency ap-
pears in the display.
2k4k6k10k (Hz)
Adjusting loudness
Loudness compensates for deficiencies in the
low- and high-sound ranges at low volume.
1 Press AUDIO to select LOUD.
Press AUDIO until LOUD appears in the dis-
play.
2 Press a to turn loudness on.
Loudness level (e.g., LOUD :MID) appears in
the display.
3 Press c or d to select a desired level.
Each press of c or d selects level in the fol-
lowing order:
LOW (low)MID (mid)HI (high)
4 Press b to turn loudness off.
LOUD :OFF appears in the display.
Using subwoofer output
Turning a subwoofer on/off
This unit is equipped with a subwoofer output
which can be turned on or off.
1 Press AUDIO to select SUB, W.
Press AUDIO until SUB, W appears in the dis-
play.
# You can also select the subwoofer setting
menu by pressing SW on the unit.
# When the subwoofer controller setting is
P/O:FUL, you cannot select SUB, W.
2 Press a to turn subwoofer output on.
Sub W.:NOR appears in the display. Subwoo-
fer output is now on.
# If the subwoofer output phase has been set to
the reverse, Sub W.:REV will be displayed.
# To turn subwoofer output off, press b.
Audio Adjustments
En
37
English
Section
09

3 Press c or d to select the phase of sub-
woofer output.
Press c to select reverse phase and Rev. ap-
pears in the display. Press d to select normal
phase and Normal appears in the display.
Adjusting subwoofer settings
When the subwoofer output is on, you can ad-
just the cut-off frequency and the output level
of the subwoofer.
1 Press AUDIO to select 80: 0.
Press AUDIO until 80: 0 appears in the dis-
play.
# When the subwoofer output is on, you can se-
lect 80: 0.
# If the subwoofer setting has been previously
adjusted, the frequency of that previously se-
lected will be displayed instead of 80.
# You can also select the subwoofer setting
menu by pressing SW on the unit.
2 Press c or d to select cut-off frequency.
Each press of c or d selects cut-off frequen-
cies in the following order:
5080125 (Hz)
Only frequencies lower than those in the se-
lected range are outputted from the subwoo-
fer.
3 Press a or b to adjust the output level
of the subwoofer.
Each press of a or b increases or decreases
the level of the subwoofer. +6 6 is displayed
as the level is increased or decreased.
Using nonfading output
When the nonfading output setting is on, the
audio signal does not pass through this units
low pass filter (for the subwoofer), but is out-
putted through the RCA output.
1 Press AUDIO to select nonfading output
on/off setting.
Press AUDIO until NOFAD:ON appears in the
display.
# When the subwoofer controller setting is only
P/O:FUL, you can switch to the nonfading output
on/off setting. (Refer to page 41.)
2 Press a to turn nonfading output on.
NOFAD:ON appears in the display. Nonfading
output is now on.
# To turn nonfading output off, press b.
Adjusting nonfading output level
When the nonfading output is on, you can ad-
just the level of nonfading output.
1 Press AUDIO to select nonfading output
setting.
Press AUDIO until NOFAD: 0 appears in the
display.
2 Press a or b to adjust the nonfading
output level.
Each press of a or b increases or decreases
the level of the nonfading output. +6 6 is
displayed as the level is increased or
decreased.
Using the high pass filter
When you do not want low sounds from the
subwoofer output frequency range to play
from the front or rear speakers, turn on the
HPF (high pass filter). Only frequencies higher
than those in the selected range are outputted
from the front or rear speakers.
1 Press AUDIO to select HPF.
Press AUDIO until HPF appears in the display.
Audio Adjustments
En
38
Section
09

2 Press a to turn high pass filter on.
HPF: 80 appears in the display. High pass filter
is now on.
# If the high pass filter has been previously ad-
justed, the frequency of that previously selected
will be displayed instead of HPF: 80.
# To turn high pass filter off, press b.
3 Press c or d to select cut-off frequency.
Each press of c or d selects cut-off frequen-
cies in the following order:
5080125 (Hz)
Only frequencies higher than those in the se-
lected range are outputted from the front or
rear speakers.
Adjusting source levels
SLA (source level adjustment) lets you adjust
the volume level of each source to prevent ra-
dical changes in volume when switching be-
tween sources.
! Settings are based on the FM tuner volume
level, which remains unchanged.
1 Compare the FM tuner volume level
with the level of the source you wish to ad-
just.
2 Press AUDIO to select SLA.
Press AUDIO until SLA appears in the display.
3 Press a or b to adjust the source vo-
lume.
Each press of a or b increases or decreases
the source volume.
SLA : +4 SLA : 4 is displayed as the source
volume is increased or decreased.
Notes
! Since the FM tuner volume is the control, it is
not possible to apply source level adjustments
to the FM tuner.
! The MW/LW tuner volume level can also be
adjusted with source level adjustments.
! The built-in CD player and the multi-CD player
are set to the same source level adjustment
volume automatically.
! External unit 1 and external unit 2 are set to
the same source level adjustment volume
automatically.
Audio Adjustments
En
39
English
Section
09

Adjusting initial settings
Initial settings lets you perform initial setup of
different settings for this unit.
1 Function display
Shows the function status.
1 Press SOURCE and hold until the unit
turns off.
2 Press FUNCTION and hold until function
name appears in the display.
3 Press FUNCTION to select one of the in-
itial settings.
Press FUNCTION repeatedly to switch be-
tween the following settings:
FM (FM tuning step)A-PI (auto PI seek)
WARN (warning tone)AUX (auxiliary
input)R-SP (rear output and subwoofer con-
troller)
Use the following instructions to operate each
particular setting.
# To cancel initial settings, press BAND.
# You can also cancel initial settings by holding
down FUNCTION until the unit turns off.
Setting the FM tuning step
Normally the FM tuning step employed by
seek tuning is 50 kHz. When AF or TA is on,
the tuning step automatically changes to 100
kHz. It may be preferable to set the tuning step
to 50 kHz when AF is on.
1 Press FUNCTION to select FM.
Press FUNCTION repeatedly until FM appears
in the display.
2 Press c or d to select the FM tuning
step.
Pressing c or d will switch the FM tuning
step between 50 kHz and 100 kHz while AF or
TA is on. The selected FM tuning step will ap-
pear in the display.
Note
The tuning step remains at 50 kHz during manual
tuning.
Switching Auto PI Seek
The unit can automatically search for a differ-
ent station with the same programming, even
during preset recall.
1 Press FUNCTION to select A-PI.
Press FUNCTION repeatedly until A-PI ap-
pears in the display.
2 Press a or b to turn A-PI on or off.
Pressing a or b will turn A-PI on or off and
that status will be displayed (e.g., A-PI :ON).
Switching the warning tone
If the front panel is not detached from the
head unit within five seconds of turning off the
ignition, a warning tone will sound. You can
turn off the warning tone.
1 Press FUNCTION to select WARN.
Press FUNCTION repeatedly until WARN ap-
pears in the display.
Initial Settings
En
40
Section
10

2 Press a or b to turn WARN on or off.
Pressing a or b will turn WARN on or off and
that status will be displayed (e.g.,
WARN :ON).
Switching the auxiliary setting
It is possible to use auxiliary equipment with
this unit. Activate the auxiliary setting when
using auxiliary equipment connected to this
unit.
1 Press FUNCTION to select AUX.
Press FUNCTION repeatedly until AUX ap-
pears in the display.
2 Press a or b to turn AUX on or off.
Pressing a or b will turn AUX on or off and
that status will be displayed (e.g.,
AUX :ON).
Setting the rear output and
subwoofer controller
This units rear output (rear speaker leads out-
put) can be used for full-range speaker
(R-SP : FUL) or subwoofer (R-SP : S/W) con-
nection. If you switch the rear output setting
to the R-SP : S/W, you can connect a rear
speaker lead directly to a subwoofer without
using an auxiliary amp.
Initially, the unit is set for rear full-range speak-
er connection (R-SP : FUL). When rear output
is connected to full range speakers (when
R-SP : FUL is selected), you can connect the
RCA subwoofer output to a subwoofer. In this
case, you can select whether to use the sub-
woofer controllers (low pass filter, phase)
built-in P/O:S/W or the auxiliary P/O:FUL.
1 Press FUNCTION to select R-SP.
Press FUNCTION repeatedly until R-SP ap-
pears in the display.
2 Press a or b to switch the rear output
setting.
Pressing a or b will switch between
R-SP : FUL (full-range speaker) and R-SP : S/W
(subwoofer) and that status will be displayed.
# When no subwoofer is connected to the rear
output, select R-SP : FUL.
# When a subwoofer is connected to the rear
output, set for subwoofer R-SP : S/W.
# When the rear output setting is R-SP : S/W,
you cannot change the subwoofer controller.
3 Press c or d to switch the subwoofer
output or non fading output.
Pressing c or d will switch between P/O:S/W
and P/O:FUL and that status will be displayed.
Notes
! Even if you change this setting, there is no
output unless you turn the nonfading output
(refer to Using nonfading output on page 38)
or subwoofer output (refer to Using subwoofer
output on page 37) in the audio menu on.
! If you change the subwoofer controller, sub-
woofer output and nonfading output in the
audio menu return to the factory settings.
Initial Settings
En
41
English
Section
10

Switching the display
illumination
You can change the color of the display illumi-
nation.
% Press ILLUMINATION.
ILL:CHG appears in the display.
Each time you press ILLUMINATION the color
changes:
RAINBOW(rainbow)WHITE(white)
SKYBLUE(sky blue)O-Blue(ocean blue)
DEEPBLUE(deep blue)PINK(pink)RED
(red)AMBER(amber)ORANGE(orange)
GREEN(green)P-GREEN(pure green)
Note
RAINBOW setting cycles continuously through
all the colors.
Switching the button
illumination
You can change the color of the button illumi-
nation.
1 Press ILLUMINATION and hold until
KEY:CHG appears in the display.
2 Press ILLUMINATION to select a button
illumination color.
Each time you press ILLUMINATION the color
changes:
WHITE(white)SKYBLUE(sky blue)O-Blue
(ocean blue)DEEPBLUE(deep blue)PINK
(pink)RED(red)AMBER(amber)
ORANGE(orange)GREEN(green)
P-GREEN(pure green)
Notes
! When the color of the display illumination is
set to RAINBOW, the button illumination is
changed to RAINBOW simultaneously. If you
want to change the button illumination,
change the display illumination to colors
other than RAINBOW, and then operate the
button illumination function.
! It is not possible to swich from the display illu-
mination setting to the button illumination
setting directly. First press BAND to return to
the normal display, then try again.
Using the AUX source
An IP-BUS-RCA Interconnector such as the
CD-RB20/CD-RB10 (sold separately) lets you
connect this unit to auxiliary equipment fea-
turing RCA output. For more details, refer to
the IP-BUS-RCA Interconnector owners man-
ual.
Selecting AUX as the source
% Press SOURCE to select AUX as the
source.
Press SOURCE until AUX appears in the dis-
play.
# If the auxiliary setting is not turned on, AUX
cannot be selected. For more details, see Switch-
ing the auxiliary setting on the previous page.
Setting the AUX title
The title displayed for the AUX source can be
changed.
1 After you have selected AUX as the
source, press FUNCTION and hold until
TITLE IN appears in the display.
Other Functions
En
42
Section
11

2 Press a or b to select a letter of the al-
phabet.
Each press of a will display a letter of the al-
phabet in A B C ... X Y Z, numbers and sym-
bols in 1 2 3 ... > [ ] order. Each press of b will
display a letter in the reverse order, such as Z
Y X ... C B A order.
3 Press d to move the cursor to the next
character position.
When the letter you want is displayed, press d
to move the cursor to the next position and
then select the next letter. Press c to move
backwards in the display.
4 Move the cursor to the last position by
pressing d after entering the title.
When you press d one more time, the entered
title is stored in memory.
5 Press BAND to return to the playback
display.
Other Functions
En
43
English
Section
11

Understanding built-in CD
player error messages
When you contact your dealer or your nearest
Pioneer Service Center, be sure to record the
error message.
Message Cause Action
ERROR-11, 12,
17, 30
Dirty disc Clean disc.
ERROR-11, 12,
17, 30
Scratched disc Replace disc.
ERROR-15 The inserted disc
does not contain
any data
Replace disc.
ERROR-10, 11,
12, 15, 17, 30,
A0
Electrical or me-
chanical
Turn the ignition
ON and OFF, or
switch to a differ-
ent source, then
back to the CD
player.
ERROR-22, 23 The CD format
cannot be played
back
Replace disc.
ERROR-44 All tracks are
skip tracks
Replace disc.
HEAT CD player over-
heated
Turn off the CD
player until the CD
player cools down.
Sound muting
Sound from this unit is muted automatically in
the following cases:
! When a call is made or received using a
cellular telephone connected to this unit.
! When the voice guidance is output from a
Pioneer navigation unit connected to this
unit.
The sound is turned off, MUTE is displayed
and no audio adjustments, except volume con-
trol, are possible. Operation returns to normal
when the phone connection or the voice gui-
dance is ended.
CD player and care
! Use only CDs that have either of the two
Compact Disc Digital Audio marks as
shown below.
! Use only normal, round CDs. If you insert ir-
regular, non-round, shaped CDs they may
jam in the CD player or not play properly.
! Check all CDs for cracks, scratches or
warping before playing. CDs that have
cracks, scratches or are warped may not
play properly. Do not use such discs.
! Avoid touching the recorded (non-printed)
surface when handling the disc.
! Store discs in their cases when not in use.
! Keep discs out of direct sunlight and do
not expose the discs to high temperatures.
! Do not attach labels, write on or apply che-
micals to the surface of the discs.
! To clean a CD, wipe the disc with a soft
cloth outward from the center.
Additional Information
En
44
Appendix

! If the heater is used in cold weather, moist-
ure may form on components inside the
CD player. Condensation may cause the CD
player to malfunction. If you think that con-
densation is a problem turn off the CD
player for an hour or so to allow it to dry
out and wipe any damp discs with a soft
cloth to remove the moisture.
! Road shocks may interrupt CD playback.
CD-R/CD-RW discs
! When CD-R/CD-RW discs are used, play-
back is possible only for discs which have
been finalized.
! It may not be possible to play back CD-R/
CD-RW discs recorded on a music CD re-
corder or a personal computer because of
disc characteristics, scratches or dirt on
the disc, or dirt, condensation, etc., on the
lens of this unit.
! Playback of discs recorded on a personal
computer may not be possible, depending
on the application settings and the environ-
ment. Please record with the correct for-
mat. (For details, contact the manufacturer
of the application.)
! Playback of CD-R/CD-RW discs may be-
come impossible in case of direct exposure
to sunlight, high temperatures, or the sto-
rage conditions in the vehicle.
! Titles and other text information recorded
on a CD-R/CD-RW disc may not be dis-
played by this unit (in the case of audio
data (CD-DA)).
! This unit conforms to the track skip func-
tion of the CD-R/CD-RW disc. The tracks
containing the track skip information are
skipped automatically (in case of audio
data (CD-DA)).
! If you insert a CD-RW disc into this unit,
time to playback will be longer than when
you insert a conventional CD or CD-R disc.
! Read the precautions with CD-R/CD-RW
discs before using them.
MP3, WMA and WAV files
! MP3 is short for MPEG Audio Layer 3 and
refers to an audio compression technology
standard.
! WMA is short for Windows Media" Audio
and refers to an audio compression tech-
nology that is developed by Microsoft Cor-
poration. WMA data can be encoded by
using Windows Media Player version 7 or
later.
! This unit plays back WMA files encoded by
Windows Media Player version 7, 7.1, 8 and
9.
! WAV is short for waveform. It is a standard
audio file format for Windows
®
.
! Depending on the version of Windows
Media Player used to encode WMA files,
album names and other text information
may not be correctly displayed.
! There may be a slight delay when starting
playback of WMA files encoded with image
data.
! This unit allows playback of MP3/WMA/
WAV files on CD-ROM, CD-R and CD-RW
discs. Disc recordings compatible with
level 1 and level 2 of ISO9660 and with the
Romeo and Joliet file system can be played
back.
! It is possible to play back multi-session
compatible recorded discs.
! MP3/WMA/WAV files are not compatible
with packet write data transfer.
! The maximum number of characters which
can be displayed for a file name, including
the extension (.mp3, .wma or .wav), is 64,
from the first character.
! The maximum number of characters which
can be displayed for a folder name is 64.
! In case of files recorded according to the
Romeo file system, only the first 64 charac-
ters can be displayed.
Additional Information
En
45
English
Appendix

! When playing discs with MP3/WMA/WAV
files and audio data (CD-DA) such as CD-
EXTRA and MIXED-MODE CDs, both types
can be played only by switching mode be-
tween MP3/WMA/WAV and CD-DA.
! The folder selection sequence for playback
and other operations becomes the writing
sequence used by the writing software. For
this reason, the expected sequence at the
time of playback may not coincide with the
actual playback sequence. However, there
also is some writing software which per-
mits setting of the playback order.
! Some audio CDs contain tracks that merge
into one another without a pause. When
these discs are converted to MP3/WMA/
WAV files and burned to a CD-R/CD-RW/
CD-ROM, the files will be played back on
this player with a short pause between
each one, regardless of the length of the
pause between tracks on the original audio
CD.
Important
! When naming an MP3/WMA/WAV file, add
the corresponding filename extension (.mp3,
.wma or .wav).
! This unit plays back files with the filename ex-
tension (.mp3, .wma or .wav) as an MP3/
WMA/WAV file. To prevent noise and malfunc-
tions, do not use these extensions for files
other than MP3/WMA/WAV files.
MP3 additional information
! Files are compatible with the ID3 Tag Ver.
1.0, 1.1, 2.2, 2.3 and 2.4 formats for display
of album (disc title), track (track title), artist
(track artist) and comments. Ver. 2.x of ID3
Tag is given priority when both Ver. 1.x and
Ver. 2.x exist.
! The emphasis function is valid only when
MP3 files of 32, 44.1 and 48 kHz frequen-
cies are played back. (16, 22.05, 24, 32,
44.1, 48 kHz sampling frequencies can be
played back.)
! There is no m3u playlist compatibility.
! There is no compatibility with the MP3i
(MP3 interactive) or mp3 PRO formats.
! The sound quality of MP3 files generally be-
comes better with an increased bit rate.
This unit can play recordings with bit rates
from 8 kbps to 320 kbps, but in order to be
able to enjoy sound of a certain quality, we
recommend using only discs recorded with
a bit rate of at least 128 kbps.
WMA additional information
! WMA is short for Windows Media" Audio
and refers to an audio compression tech-
nology that is developed by Microsoft Cor-
poration. WMA data can be encoded by
using Windows Media Player version 7 or
later.
! You can only play back WMA files in the fre-
quencies 32, 44.1 and 48 kHz.
! The sound quality of WMA files generally
becomes better with an increased bit rate.
This unit can play recordings with bit rates
from 48 kbps to 320 kbps (CBR) or from 48
kbps to 384 kbps (VBR), but in order to be
able to enjoy sound of a certain quality, we
recommend using discs recorded with a
higher bit rate.
! This unit doesnt support the following for-
mats.
Windows Media Audio 9 Professional
(5.1ch)
Windows Media Audio 9 Lossless
Windows Media Audio 9 Voice
WAV additional information
! This unit plays back WAV files encoded in
Linear PCM (LPCM) format or MS ADPCM
format.
Additional Information
En
46
Appendix

! You can only play back WAV files in the fre-
quencies 16, 22.05, 24, 32, 44.1 and 48 kHz
(LPCM), or 22.05 and 44.1 kHz (MS
ADPCM). The sampling frequency shown
in the display may be rounded.
! The sound quality of WAV files generally be-
comes better with a larger number of quan-
tization bits. This unit can play recordings
with 8 and 16 (LPCM) or 4 (MS ADPCM)
quantization bits, but in order to be able to
enjoy sound of a certain quality, we recom-
mend using discs recorded with the larger
number of quantization bits.
About folders and MP3/
WMA/WAV files
! An outline of a CD-ROM with MP3/WMA/
WAV files on it is shown below. Subfolders
are shown as folders in the folder currently
selected.
1
2
3
1 First level
2 Second level
3 Third level
Notes
! This unit assigns folder numbers. The user
can not assign folder numbers.
! It is not possible to check folders that do not
include MP3/WMA/WAV files. (These folders
will be skipped without displaying the folder
number.)
! MP3/WMA/WAV files in up to 8 tiers of folders
can be played back. However, there is a delay
in the start of playback on discs with numer-
ous tiers. For this reason we recommend
creating discs with no more than 2 tiers.
! It is possible to play back up to 99 folders on
one disc.
Additional Information
En
47
English
Appendix

Terms
Bit rate
This expresses data volume per second, or bps
units (bits per second). The higher the rate,
the more information is available to reproduce
the sound. Using the same encoding method
(such as MP3), the higher the rate, the better
the sound.
ID3 tag
This is a method of embedding track-related
information in an MP3 file. This embedded in-
formation can include the track title, the ar-
tists name, the album title, the music genre,
the year of production, comments and other
data. The contents can be freely edited using
software with ID3 Tag editing functions.
Although the tags are restricted as to the num-
ber of characters, the information can be
viewed when the track is played back.
ISO9660 format
This is the international standard for the for-
mat logic of CD-ROM folders and files. For the
ISO9660 format, there are regulations for the
following two levels.
Level 1:
The file name is in 8.3 format (the name con-
sists of up to 8 characters, half-byte English
capital letters and half-byte numerals and the
_ sign, with a file-extension of three charac-
ters).
Level 2:
The file name can have up to 31 characters (in-
cluding the separation mark . and a file ex-
tension). Each folder contains less than 8
hierarchies.
Extended formats
Joliet:
File names can have up to 64 characters.
Romeo:
File names can have up to 128 characters.
Linear PCM (LPCM)/Pulse code
modulation
This stands for linear pulse code modulation,
which is the signal recording system used for
music CDs and DVDs.
m3u
Playlists created using the WINAMP soft-
ware have a playlist file extension (.m3u).
MP3
MP3 is short for MPEG Audio Layer 3. It is an
audio compression standard set by a working
group (MPEG) of the ISO (International Stan-
dards Organization). MP3 is able to compress
audio data to about 1/10th the level of a con-
ventional disc.
MS ADPCM
This stands for Microsoft adaptive differential
pulse code modulation, which is the signal re-
cording system used for the multimedia soft-
ware of Microsoft Corporation.
Multi-session
Multi-session is a recording method that al-
lows additional data to be recorded later.
When recording data on a CD-ROM, CD-R or
CD-RW, etc., all data from beginning to end is
treated as a single unit or session. Multi-ses-
sion is a method of recording more than 2 ses-
sions on one disc.
Number of quantization bits
The sound quality of WAV files generally be-
comes better with a larger number of quanti-
zation bits. This unit can play recordings with
8 and 16 (LPCM) or 4 (MS ADPCM) quantiza-
tion bits, but in order to be able to enjoy sound
of a certain quality, we recommend using
discs recorded with the larger number of
quantization bits.
Additional Information
En
48
Appendix

Packet write
This is a general term for a method of writing
on CD-R, etc., at the time required for a file,
just as is done with files on floppy or hard
discs.
VBR
VBR is short for variable bit rate. Generally
speaking CBR (constant bit rate) is more
widely used. But by flexibly adjusting the bit
rate according to the needs of audio compres-
sion, it is possible to achieve compression-
priority sound quality.
WAV
WAV is short for waveform. It is a standard
audio file format for Windows
®
.
WMA
WMA is short for Windows Media" Audio
and refers to an audio compression technol-
ogy that is developed by Microsoft Corpora-
tion. WMA data can be encoded by using
Windows Media Player version 7 or later.
Microsoft, Windows Media, and the Windows
logo are trademarks, or registered trademarks
of Microsoft Corporation in the United States
and/or other countries.
Additional Information
En
49
English
Appendix

Specifications
General
Power source ............................. 14.4 V DC (10.8 15.1 V al-
lowable)
Grounding system ................... Negative type
Max. current consumption
..................................................... 10.0 A
Dimensions (W × H × D):
DIN
Chassis ..................... 178 × 50 × 157 mm
Nose ........................... 188 × 58 × 20 mm
D
Chassis ..................... 178 × 50 × 162 mm
Nose ........................... 170 × 46 × 15 mm
Weight .......................................... 1.4 kg
Audio
Maximum power output ....... 50 W × 4
50 W × 2/4 W +70W×1/2
W (for subwoofer)
Continuous power output ...27 W × 4 (DIN 45324,
+B=14.4 V)
Load impedance ...................... 4 W (4 8 W allowable)
Preout max output level/output impedance
..................................................... 2.2 V/1 kW
Equalizer (3-Band Parametric Equalizer):
Low
Frequency ................ 40/80/100/160 Hz
Q Factor .................... 0.35/0.59/0.95/1.15 (+6 dB
when boosted)
Gain ............................ ±12dB
Mid
Frequency ................ 200/500/1k/2k Hz
Q Factor .................... 0.35/0.59/0.95/1.15 (+6 dB
when boosted)
Gain ............................ ±12dB
High
Frequency ................ 3.15k/8k/10k/12.5k Hz
Q Factor .................... 0.35/0.59/0.95/1.15 (+6 dB
when boosted)
Gain ............................ ±12dB
Loudness contour:
Low ....................................... +3.5 dB (100 Hz), +3 dB (10
kHz)
Mid ....................................... +10 dB (100 Hz), +6.5 dB
(10 kHz)
High ..................................... +11 dB (100 Hz), +11 dB
(10 kHz)
(volume: 30 dB)
Tone controls:
Bass
Frequency ................ 40/63/100/160 Hz
Gain ............................ ±12dB
Treble
Frequency ................ 2.5k/4k/6.3k/10k Hz
Gain ............................ ±12dB
HPF:
Frequency .......................... 50/80/125 Hz
Slope .................................... 12 dB/oct
Subwoofer:
Frequency .......................... 50/80/125 Hz
Slope .................................... 18 dB/oct
Gain ...................................... ±12dB
Phase .................................. Normal/Reverse
CD player
System .......................................... Compact disc audio system
Usable discs .............................. Compact disc
Signal format:
Sampling frequency ..... 44.1 kHz
Number of quantization bits
........................................... 16; linear
Frequency characteristics ... 5 20,000 Hz (±1 dB)
Signal-to-noise ratio ............... 94 dB (1 kHz) (IEC-A net-
work)
Dynamic range ......................... 92 dB (1 kHz)
Number of channels .............. 2 (stereo)
MP3 decoding format ........... MPEG-1 & 2 Audio Layer 3
WMA decoding format ......... Ver. 7, 8 & 9
WAV signal format .................. Linear PCM & MS ADPCM
FM tuner
Frequency range ...................... 87.5 108.0 MHz
Usable sensitivity ..................... 8 dBf (0.7 µV/75 W, mono,
S/N: 30 dB)
50 dB quieting sensitivity ..... 10 dBf (0.9 µV/75 W, mono)
Signal-to-noise ratio ............... 75 dB (IEC-A network)
Distortion ..................................... 0.3 % (at 65 dBf, 1 kHz,
stereo)
0.1 % (at 65 dBf, 1 kHz,
mono)
Frequency response ............... 30 15,000 Hz (±3 dB)
Stereo separation .................... 45 dB (at 65 dBf, 1 kHz)
Selectivity .................................... 80 dB (±200 kHz)
MW tuner
Frequency range ...................... 531 1,602 kHz (9 kHz)
Usable sensitivity ..................... 18 µV (S/N: 20 dB)
Signal-to-noise ratio ............... 65 dB (IEC-A network)
Additional Information
En
50
Appendix

LW tuner
Frequency range ...................... 153 281 kHz
Usable sensitivity ..................... 30 µV (S/N: 20 dB)
Signal-to-noise ratio ............... 65 dB (IEC-A network)
Note
Specifications and the design are subject to pos-
sible modifications without notice due to im-
provements.
Additional Information
En
51
English
Appendix

Gracias por haber comprado este producto Pioneer.
Lea con detenimiento estas instrucciones sobre el funcionamiento del aparato,
para que pueda dar el mejor uso posible a su modelo. Una vez que las haya leído,
guarde este manual en un lugar seguro para consultarlo en el futuro.
Antes de comenzar
Acerca de esta unidad 55
Acerca de este manual 55
Acerca de la iluminación en color 55
En caso de problemas 55
Características 56
Acerca de WMA 56
Uso y cuidado del mando a distancia 57
Instalación de la batería 57
Uso del mando a distancia 57
Protección del producto contra robo 57
Extracción de la carátula 58
Colocación de la carátula 58
Qué es cada cosa
Unidad principal 59
Mando a distancia 60
Encendido y apagado
Encendido de la unidad 61
Selección de una fuente 61
Apagado de la unidad 61
Sintonizador
Para escuchar la radio 62
Introducción a las funciones avanzadas del
sintonizador 63
Almacenamiento y llamada de
frecuencias 63
Sintonización de señales fuertes 63
Almacenamiento de las frecuencias de radio
más fuertes 64
RDS
Introducción a la operación RDS 65
Cambio de la visualización RDS 65
Selección de frecuencias alternativas 66
Uso de la búsqueda PI 66
Uso de la búsqueda PI automática
para emisoras presintonizadas 66
Limitación de las emisoras para
programación regional 66
Recepción de anuncios de tráfico 67
Uso de la interrupción por programa de
noticias 67
Recepción de transmisiones de alarma
PTY 68
Lista PTY 68
Reproductor de CD incorporado
Reproducción de un CD 69
Introducción a las funciones avanzadas del
reproductor de CD incorporado 70
Repetición de reproducción 70
Reproducción de las pistas en un orden
aleatorio 70
Exploración de las pistas de un CD 70
Pausa de la reproducción de un CD 71
Uso de la compresión y BMX 71
Selección del método de búsqueda 71
Búsqueda cada 10 pistas en el disco
actual 72
Uso de las funciones de títulos de discos 72
Ingreso de títulos de discos 72
Visualización de los títulos 73
Uso de las funciones CD TEXT 73
Visualización de títulos de discos CD
TEXT 73
Desplazamiento de títulos en el
display 73
Reproductor de MP3/WMA/WAV
Reproducción de ficheros MP3/WMA/
WAV 74
Introducción a las funciones avanzadas del
reproductor de CD incorporado (MP3/
WMA/WAV) 76
Repetición de reproducción 76
Reproducción de las pistas en un orden
aleatorio 76
Exploración de carpetas y pistas 77
Contenido
Es
52

Pausa de la reproducción de un MP3/WMA/
WAV 77
Selección del método de búsqueda 78
Búsqueda cada 10 pistas en la carpeta
actual 78
Uso de la compresión y BMX 78
Visualización de información de texto de un
disco MP3/WMA 79
Visualización de información de texto de un
disco WAV 79
Desplazamiento de información de texto en
el display 79
Reproductor de CD múltiple
Reproducción de un CD 80
Reproductor de CD múltiple de 50
discos 80
Introducción a las funciones avanzadas del
reproductor de CD múltiple 81
Repetición de reproducción 81
Reproducción de las pistas en un orden
aleatorio 81
Exploración de CD y pistas 82
Pausa de la reproducción de un CD 82
Uso de listas de reproducción ITS 83
Creación de una lista de reproducción
con la programación ITS 83
Reproducción de la lista de
reproducción ITS 83
Borrado de una pista de la lista de
reproducción ITS 84
Borrado de un CD de la lista de
reproducción ITS 84
Uso de las funciones de títulos de discos 84
Ingreso de títulos de discos 84
Visualización de los títulos 85
Uso de las funciones CD TEXT 85
Visualización de títulos de discos CD
TEXT 86
Desplazamiento de títulos en el
display 86
Uso de la compresión y del enfatizador de
graves 86
Ajustes de audio
Introducción a los ajustes de audio 87
Compensación de las curvas de ecualización
(EQ-EX) 87
Uso del ajuste del balance 88
Uso del ecualizador 88
Llamada de las curvas de
ecualización 88
Ajuste de las curvas de
ecualización 88
Ajuste preciso de las curvas de
ecualización 89
Ajuste de graves y agudos 90
Ajuste del nivel de graves y
agudos 90
Selección de la frecuencia de
graves 90
Selección de la frecuencia de
agudos 90
Ajuste de la sonoridad 90
Uso de la salida de subgraves 91
Activación y desactivación de
subgraves 91
Configuración de los ajustes de
subgraves 91
Uso de la salida sin atenuación 91
Ajuste del nivel de la salida sin
atenuación 92
Uso del filtro de paso alto 92
Ajuste de los niveles de la fuente 92
Ajustes iniciales
Configuración de los ajustes iniciales 94
Ajuste del paso de sintonía de FM 94
Cambio de la búsqueda PI automática 94
Cambio del tono de advertencia 95
Cambio del ajuste de un equipo auxiliar 95
Es
53
Español
Contenido

Ajuste de la salida posterior y del controlador
de subgraves 95
Otras funciones
Cambio de la iluminación del display 97
Cambio de la iluminación de los
botones 97
Uso de la fuente AUX 97
Selección de AUX como la fuente 97
Ajuste del título del equipo
auxiliar 97
Información adicional
Comprensión de los mensajes de error del
reproductor de CD incorporado 99
Silenciamiento del sonido 99
Reproductor de CD y cuidados 99
Discos CD-R/CD-RW 100
Ficheros MP3, WMA y WAV 100
Información adicional sobre
MP3 101
Información adicional sobre
WMA 102
Información adicional sobre
WAV 102
Acerca de las carpetas y los ficheros MP3/
WMA/WAV 102
Glosario 104
Especificaciones 106
Contenido
Es
54

Acerca de esta unidad
Las frecuencias del sintonizador de esta uni-
dad están asignadas para su uso en Europa
Occidental, Asia, Medio Oriente, África y
Oceanía. El uso en otras áreas puede causar
una recepción deficiente. La función RDS (sis-
tema de datos de radio) opera sólo en áreas
con emisoras de FM que trasmiten señales de
RDS.
PRECAUCIÓN
! No permita que esta unidad entre en contacto
con líquidos, ya que ello puede producir una
descarga eléctrica. Además, el contacto con
líquidos puede causar daños en la unidad,
humo y recalentamiento.
! Hay pegada una etiqueta CLASS 1 LASER
PRODUCT en la parte inferior de esta unidad.
CLASS 1
LASER PRODUCT
! El CarStereo-Pass Pioneer es para usarse sólo
en Alemania.
! Conserve este manual a mano para que
pueda consultar los procedimientos de opera-
ción y las precauciones cuando sea necesa-
rio.
! Mantenga siempre el volumen lo suficiente-
mente bajo como para que pueda escuchar
los sonidos que provienen del exterior del
vehículo.
! Proteja esta unidad de la humedad.
! Si se desconecta o se descarga la batería, la
memoria preajustada se borrará y deberá
reprogramarla.
Acerca de este manual
Esta unidad incluye diversas funciones sofisti-
cadas que garantizan una recepción y un fun-
cionamiento de calidad superior. Por sus
características de diseño, todas las funciones
se pueden usar con gran facilidad; sin embar-
go, muchas de ellas necesitan una explica-
ción. Este manual le ayudará a aprovechar
todo el potencial que ofrece esta unidad y a
disfrutar al máximo del placer de escuchar
música.
Recomendamos que se familiarice con las
funciones y su operación, leyendo el manual
antes de comenzar a usar esta unidad. Es par-
ticularmente importante que lea y tenga en
cuenta los mensajes de ADVERTENCIA y
PRECAUCIÓN en este manual.
Acerca de la iluminación en
color
Esta unidad ofrece iluminación en varios colo-
res.
Cuando la unidad está encendida, los botones
y el display se iluminan en los colores del arco
iris. Para seleccionar un color específico para
la iluminación, consulte Cambio de la ilumina-
ción del display en la página 97.
En caso de problemas
En caso de que este producto no funcione co-
rrectamente, comuníquese con su concesio-
nario o el Servicio técnico oficial Pioneer más
próximo a su domicilio.
Antes de comenzar
Es
55
Sección
Español
01

Características
Reproducción de CD
Se pueden reproducir discos compactos de
música, CD-R y CD-RW.
Reproducción de ficheros MP3
Se pueden reproducir ficheros MP3 grabados
en CD-ROM/CD-R/CD-RW (grabaciones según
la norma ISO9660 Nivel 1/Nivel 2).
! La venta de este producto sólo otorga una
licencia para su uso privado, no comercial.
No otorga ninguna licencia ni concede nin-
gún derecho a utilizar este producto en
transmisiones comerciales (es decir, lucra-
tivas) en tiempo real (terrestres, vía satélite,
por cable y/o por cualquier otro medio),
transmisiones/streaming por internet, in-
tranets y/u otras redes o en otros sistemas
de distribución de contenido electrónico,
como por ejemplo, aplicaciones de audio
pago (pay-audio) o a solicitud (audio-on-de-
mand). Se necesita una licencia indepen-
diente para su uso comercial. Para obtener
más información, visite el sitio
http://www.mp3licensing.com.
Reproducción de ficheros WMA
Se pueden reproducir ficheros WMA grabados
en CD-ROM/CD-R/CD-RW (grabaciones según
la norma ISO9660 Nivel 1/Nivel 2).
Reproducción de ficheros WAV
Se pueden reproducir ficheros WAV grabados
en CD-ROM/CD-R/CD-RW (grabaciones en
formatos LPCM (PCM lineal) o MS
ADPCM).
Acerca de WMA
El logo de Windows Media" impreso en la
caja indica que esta unidad puede reproducir
datos WMA.
WMA es la abreviatura de Windows Media"
Audio y alude a una tecnología de compre-
sión de audio desarrollada por Microsoft Cor-
poration. Los datos WMA se pueden codificar
utilizando Windows Media Player versión 7 o
posterior.
Microsoft, Windows Media y el logo de Win-
dows son marcas comerciales o registradas
de Microsoft Corporation en los EE.UU. y/o en
otros países.
Notas
! Según la versión de Windows Media Player
utilizada para codificar los ficheros WMA, es
posible que no se visualicen correctamente
los nombres de álbumes y demás información
de texto.
! Es posible que ocurra un pequeño retardo al
iniciar la reproducción de ficheros WMA codi-
ficados con datos de imagen.
Antes de comenzar
Es
56
Sección
01

Uso y cuidado del mando a
distancia
Instalación de la batería
Deslice y extraiga la bandeja de la parte poste-
rior del mando a distancia y coloque la batería
con los polos positivo (+) y negativo ()enla
dirección correcta.
ADVERTENCIA
Mantenga la batería fuera del alcance de los
niños. En caso de ingestión accidental, consulte
a un médico de inmediato.
PRECAUCIÓN
! Utilice una sola batería de litio CR2025 (3 V).
! Extraiga la batería si no piensa utilizar el
mando a distancia durante un mes o más
tiempo.
! No recargue, desarme, caliente ni arroje la ba-
tería al fuego.
! No manipule la batería con herramientas me-
tálicas.
! No guarde la batería con materiales metáli-
cos.
! En el caso de que se produzca una fuga de
fluido de la batería, limpie completamente el
mando a distancia e instale una batería
nueva.
! Al descartar las baterías usadas, cumpla con
los reglamentos gubernamentales o las nor-
mas de las instituciones públicas ambientales
pertinentes, aplicables en su país/zona.
Uso del mando a distancia
Apunte el mando a distancia hacia la carátula
para utilizarlo.
Importante
! No guarde el mando a distancia en lugares ex-
puestos a altas temperaturas o a la luz solar
directa.
! Es posible que el mando a distancia no fun-
cione correctamente si lo expone a la luz solar
directa.
! No deje caer el mando a distancia al piso, ya
que puede quedar atascado debajo del freno
o del acelerador.
Protección del producto
contra robo
La carátula se puede extraer de la unidad prin-
cipal y se almacenar en su carcasa protectora
proveída como una medida antirrobo.
! Si no se extrae la carátula de la unidad
principal dentro de los cinco segundos des-
pués de desconectar la llave de encendido
del automóvil, se emitirá un tono de adver-
tencia.
! Se puede desactivar el tono de advertencia.
Consulte Cambio del tono de advertencia en
la página 95.
Importante
! Nunca presione ni sujete la visualización y los
botones con fuerza excesiva al extraer o colo-
car la carátula.
! Evite someter la carátula a impactos excesi-
vos.
! Mantenga la carátula fuera del alcance de la
luz solar directa y no la exponga a altas tem-
peraturas.
Antes de comenzar
Es
57
Sección
Español
01

Extracción de la carátula
1 Presione OPEN para abrir la carátula.
2 Sujete el lado izquierdo de la carátula y
retírela con cuidado.
No sujete la carátula con fuerza ni permita
que se le caiga. Evite que entre en contacto
con agua u otros líquidos para que no sufra
daños permanentes.
3 Coloque la carátula en la carcasa pro-
tectora provista para guardarla de manera
segura.
Colocación de la carátula
% Vuelva a colocar la carátula; para ello,
sosténgala verticalmente con respecto a la
unidad y hágala encajar firmemente en los
ganchos de montaje.
Antes de comenzar
Es
58
Sección
01

Unidad principal
1 Botón TA
Presione este botón para activar o desacti-
var la función de anuncios de tráfico.
Presione este botón y manténgalo presiona-
do para activar o desactivar la función
NEWS.
2 Botón EQ
Presione este botón para seleccionar las di-
versas curvas de ecualización.
3 Botón FUNCTION
Presione este botón para seleccionar las
funciones.
4 Botón OPEN
Presione este botón para abrir la carátula.
5 Botones a/b/c/d
Presione estos botones para utilizar los con-
troles de sintonización por búsqueda ma-
nual, avance rápido, retroceso y búsqueda
de pista. También se usan para controlar las
funciones.
6 Botón SW
Presione para seleccionar directamente el
menú de ajuste de subgraves. Consulte Uso
de la salida de subgraves en la página 91.
Presione y mantenga presionado para selec-
cionar el menú de ajustes de EQ-EX. Con-
sulte Compensación de las curvas de
ecualización (EQ-EX) en la página 87.
7 Botón AUDIO
Presione este botón para seleccionar los di-
versos controles de calidad del sonido.
8 Botón BAND
Presione este botón para seleccionar entre
tres bandas FM y las bandas MW/LW, y para
cancelar el modo de control de funciones.
9 Botones 16
Presione estos botones para el ajuste de
presintonías y la búsqueda de número de
disco al utilizar el reproductor de CD múlti-
ple.
a Botón SOURCE
Esta unidad se enciende al seleccionar una
fuente. Presione este botón para visualizar
todas las fuentes disponibles.
b Botón ILLUMINATION
Presione para cambiar la iluminación de los
botones y la iluminación del display.
Qué es cada cosa
Es
59
Sección
Español
02

c Botón DISPLAY
Presione este botón para seleccionar las di-
ferentes visualizaciones.
d VOLUME
Cuando presiona VOLUME, el control so-
bresale de manera tal que resulta más fácil
hacerlo girar. Para retraer VOLUME, vuelva
a presionarlo. Haga girar el control para au-
mentar o disminuir el volumen.
Mando a distancia
Las funciones se utilizan de la misma manera
que al usar los botones de la unidad principal.
Consulte la explicación de la unidad principal
acerca del uso de cada botón, con excepción
de ATT, que se explica a continuación.
d Botón PAUSE
Presione este botón para activar o desacti-
var la pausa.
e Botón CD
Presione este botón para seleccionar el re-
productor de CD incorporado o el reproduc-
tor de CD múltiple como la fuente.
f Botón TUNER
Presione este botón para seleccionar el sin-
tonizador como la fuente.
g Botón ATT
Presione este botón para disminuir rápida-
mente el nivel de volumen alrededor del
90%. Presiónelo una vez más para volver al
nivel de volumen original.
h Botón VOLUME
Presione este botón para aumentar o dismi-
nuir el volumen.
g
5
7
e
3
d
f
8
h
Qué es cada cosa
Es
60
Sección
02

Encendido de la unidad
% Presione SOURCE para encender la uni-
dad.
Cuando se selecciona una fuente, la unidad
se enciende.
Selección de una fuente
Puede seleccionar la fuente que desea escu-
char. Para cambiar al reproductor de CD incor-
porado, coloque un disco en la unidad
(consulte la página 69).
1 Al utilizar la unidad principal, presione
SOURCE para seleccionar una fuente.
Presione SOURCE repetidamente para cam-
biar entre las siguientes fuentes:
Reproductor de CD incorporadoTelevi-
sorSintonizadorReproductor de CD
múltipleUnidad externa 1Unidad ex-
terna 2AUX
2 Al utilizar el mando a distancia, presio-
ne TUNER o CD para seleccionar una fuen-
te.
Presione cada botón repetidamente para cam-
biar entre las siguientes fuentes:
TUNER: SintonizadorTelevisorFuentes
desactivadas
CD: Reproductor de CD incorporadoRe-
productor de CD múltiple Fuentes desac-
tivadas
Notas
! En los siguientes casos, la fuente sonora no
cambiará:
Cuando la fuente seleccionada no está co-
nectada a esta unidad.
Cuando no hay un disco cargado en la uni-
dad.
Cuando no hay un cargador en el repro-
ductor de CD múltiple.
Cuando AUX (entrada auxiliar) está desac-
tivada (consulte la página 95).
! Por unidad externa se entiende un producto
Pioneer (como el que pueda estar disponible
en el futuro) que, si bien es incompatible
como fuente, permite que este sistema con-
trole funciones básicas. Este sistema puede
controlar dos unidades externas. Cuando se
conectan dos unidades externas, el sistema
las asigna automáticamente a la unidad exter-
na 1 ó 2.
! Si el cable azul/blanco de esta unidad está co-
nectado al control del terminal de antena del
vehículo, la antena se extiende cuando se en-
ciende el equipo. Para retraer la antena, apa-
gue el equipo.
Apagado de la unidad
% Presione SOURCE y mantenga presiona-
do hasta que se apague la unidad.
Encendido y apagado
Es
61
Sección
Español
03

Para escuchar la radio
A continuación se indican los pasos básicos
necesarios para hacer funcionar la radio. En
la página siguiente se explican las funciones
más avanzadas del sintonizador y cómo utili-
zarlas.
Se puede activar y desactivar la función AF
(búsqueda de frecuencias alternativas) de esta
unidad. Se debe desactivar la función AF para
la sintonización normal (consulte la página
66).
1 Indicador de banda
Muestra en qué banda está sintonizada la
radio: MW, LW o FM.
2 Indicador de frecuencia
Muestra la frecuencia en que la radio está
sintonizada.
3 Indicador de estéreo (5)
Muestra que la frecuencia seleccionada se
está transmitiendo en estéreo.
4 Indicador del número de presintonía
Muestra la memoria seleccionada.
1 Presione SOURCE para seleccionar el
sintonizador.
Presione SOURCE hasta seleccionar el sintoni-
zador como la fuente.
2 Utilice VOLUME para ajustar el nivel de
sonido.
Haga girar el control para aumentar o dismi-
nuir el volumen.
3 Presione BAND para seleccionar una
banda.
Presione BAND hasta que visualice la banda
deseada: F1, F2, F3 para FM o MW/LW.
4 Para utilizar la sintonización manual,
presione brevemente c o d.
Las frecuencias aumentan o disminuyen paso
a paso.
5 Para utilizar la sintonización por bús-
queda, presione c o d y mantenga presio-
nado durante aproximadamente un
segundo, y libere el botón.
El sintonizador explorará las frecuencias hasta
que encuentre una emisora con señales de su-
ficiente intensidad como para asegurar una
buena recepción.
# Se puede cancelar la sintonización por bús-
queda presionando brevemente c o d.
# Si presiona c o d y mantiene presionado,
podrá saltar las emisoras. La sintonización por
búsqueda comienza inmediatamente después de
que libera el botón.
Nota
Cuando la frecuencia seleccionada se está trans-
mitiendo en estéreo, el indicador de estéreo (5)
se ilumina.
Sintonizador
Es
62
Sección
04

Introducción a las funciones
avanzadas del sintonizador
1 Visualización de función
Muestra el estado de la función.
2 Indicador LOC
Aparece cuando la sintonización por bús-
queda local está activada.
3 Indicador del número de presintonía
Muestra la memoria seleccionada.
% Presione FUNCTION para visualizar los
nombres de las funciones.
Presione FUNCTION repetidamente para cam-
biar entre las siguientes funciones:
BSM (memoria de las mejores emisoras)
REG (regional)LOCAL (sintonización por
búsqueda local)TA (espera por anuncio de
tráfico)AF (búsqueda de frecuencias alter-
nativas)NEWS (interrupción por programa
de noticias)
# Para volver a la visualización de la frecuencia,
presione BAND.
# Si se elige la banda MW/LW, sólo se puede se-
leccionar BSM o LOCAL.
Nota
Si no se utiliza la función en unos 30 segundos,
el display volverá automáticamente a la visualiza-
ción de la frecuencia.
Almacenamiento y llamada
de frecuencias
Si se presiona cualquiera de los botones de
ajuste de presintonías 16, se pueden almace-
nar con facilidad hasta seis frecuencias de
emisoras para llamarlas con posterioridad pre-
sionando un solo botón.
% Cuando encuentre la frecuencia que
desea almacenar en la memoria, presione
uno de los botones de ajuste de presinto-
nías 16 y manténgalo presionado hasta
que el número de presintonía deje de des-
tellar.
El número seleccionado destellará en el indi-
cador del número de presintonía y quedará ilu-
minado. Se ha almacenado en la memoria la
frecuencia de la emisora de radio selecciona-
da.
La próxima vez que presione el mismo botón
de ajuste de presintonías, la memoria recorda-
rá la frecuencia de la emisora.
Notas
! Se pueden almacenar en la memoria hasta 18
emisoras FM, seis por cada una de las tres
bandas FM, y seis emisoras MW/LW.
! También se pueden usar los botones a y b
para llamar las frecuencias de las emisoras
de radio asignadas a los botones de ajuste de
presintonías 16.
Sintonización de señales
fuertes
La sintonización por búsqueda local le permite
sintonizar sólo las emisoras de radio con seña-
les lo suficientemente fuertes como para ase-
gurar una buena recepción.
Sintonizador
Es
63
Sección
Español
04

1 Presione FUNCTION para seleccionar
LOCAL.
Presione FUNCTION hasta que LOCAL aparez-
ca en el display.
2 Presione a para activar la sintonización
por búsqueda local.
La sensibilidad de búsqueda local (p. ej.,
LOCAL 2) aparece en el display.
3 Presione c o d para ajustar la sensibili-
dad.
Hay cuatro niveles de sensibilidad para FM y
dos niveles para MW/LW:
FM: LOCAL 1LOCAL 2LOCAL 3
LOCAL 4
MW/LW: LOCAL 1LOCAL 2
El ajuste LOCAL 4 sólo permite recibir las emi-
soras con las señales más fuertes, mientras
que los ajustes más bajos permiten recibir de
manera progresiva las emisoras con las seña-
les más débiles.
4 Cuando desee volver a la sintonización
por búsqueda normal, presione b para de-
sactivar la sintonización por búsqueda
local.
LOCAL:OFF aparece en el display.
Almacenamiento de las
frecuencias de radio más
fuertes
La función BSM (memoria de las mejores emi-
soras) le permite almacenar automáticamente
seis frecuencias de las emisoras más fuertes
en los botones de ajuste de presintonías 16.
Una vez almacenadas, podrá sintonizar esas
frecuencias presionando un solo botón.
1 Presione FUNCTION para seleccionar
BSM.
Presione FUNCTION hasta que BSM aparezca
en el display.
2 Presione a para activar la función BSM.
BSM comienza a destellar. Mientras BSM está
destellando, las seis frecuencias de las emiso-
ras más fuertes se almacenarán en los boto-
nes de ajuste de presintonías 16, ordenadas
según la intensidad de las señales. Una vez fi-
nalizada la operación, BSM deja de destellar.
# Para cancelar el proceso de almacenamiento,
presione b.
Nota
Al almacenar frecuencias con la función BSM, se
pueden reemplazar las frecuencias que ha alma-
cenado con los botones 16.
Sintonizador
Es
64
Sección
04

Introducción a la operación
RDS
RDS (sistema de datos de radio) es un sistema
que ofrece información junto con las transmi-
siones FM. Esta información no audible brinda
funciones tales como nombre del servicio de
programa, tipo de programa, espera por anun-
cio de tráfico y sintonización automática, a fin
de ayudar a los radioescuchas a encontrar y
sintonizar la emisora deseada.
1 Indicador TP (
)
Aparece cuando una emisora TP está sinto-
nizada.
2 Indicador de noticias (
)
Aparece cuando se recibe el programa de
noticias definido.
3 Nombre del servicio de programa
Muestra el nombre del programa que se
está transmitiendo.
% Presione FUNCTION para visualizar los
nombres de las funciones.
Presione FUNCTION repetidamente para cam-
biar entre las siguientes funciones:
BSM (memoria de las mejores emisoras)
REG (regional)LOCAL (sintonización por
búsqueda local)TA (espera por anuncio de
tráfico)AF (búsqueda de frecuencias alter-
nativas)NEWS (interrupción por programa
de noticias)
# Para volver a la visualización de la frecuencia,
presione BAND.
# Si se elige la banda MW/LW, sólo se puede se-
leccionar BSM o LOCAL.
Notas
! Si no se utiliza la función en unos 30 segun-
dos, el display volverá automáticamente a la
visualización de la frecuencia.
! Es posible que no todas las emisoras suminis-
tren el servicio RDS.
! Las funciones RDS como AF y TA sólo se acti-
van cuando la radio está sintonizada en una
emisora RDS.
Cambio de la visualización
RDS
Cuando se sintoniza una emisora RDS, se vi-
sualiza el nombre del servicio de programa.
Puede ver la frecuencia que está sintonizada,
si así lo desea.
% Presione DISPLAY.
Presione DISPLAY repetidamente para cam-
biar entre los siguientes ajustes:
Nombre del servicio de programaInforma-
ción PTYFrecuencia
En la página 68 se indica la información PTY
(código de identificación de tipo de progra-
ma).
# La información PTY y la frecuencia de la emi-
sora actual aparecen en el display durante ocho
segundos.
# Si se recibe un código PTY cero de una emiso-
ra, se visualiza NONE. Esto indica que la emisora
no ha definido el contenido del programa.
# Si una señal es muy débil para que esta uni-
dad capte el código PTY, se visualiza NO PTY.
RDS
Es
65
Sección
Español
05

Selección de frecuencias
alternativas
Si está escuchando una transmisión y la re-
cepción se debilita o se producen otros proble-
mas, la unidad buscará automáticamente una
emisora diferente en la misma red que esté
transmitiendo una señal más fuerte.
! Normalmente se deja la función AF activa-
da.
1 Presione FUNCTION para seleccionar AF.
Presione FUNCTION hasta que AF aparezca
en el display.
2 Presione a para activar AF.
Presione a y se visualiza AF :ON.
3 Presione b para desactivar AF.
Presione b y se visualiza AF :OFF.
Notas
! Sólo se sintonizan las emisoras RDS durante
la sintonización por búsqueda o BSM cuando
la función AF está activada.
! Cuando se llama una emisora presintonizada,
el sintonizador puede actualizarla con una
nueva frecuencia de la lista AF de emisoras.
(Esta función sólo está disponible al utilizar
las memorias en las bandas F1 o F2.) No apa-
recerá ningún número de presintonía en el
display si los datos RDS de la emisora recibi-
da son diferentes de los datos de la estación
almacenada originalmente.
! Otro programa puede interrumpir temporal-
mente el sonido durante la búsqueda de una
frecuencia AF.
! La función AF se puede activar y desactivar en
forma independiente por cada banda FM.
Uso de la búsqueda PI
Si la unidad no encuentra una frecuencia al-
ternativa adecuada, o si usted está escuchan-
do una transmisión y la recepción se debilita,
la unidad buscará automáticamente otra emi-
sora con la misma programación. Durante la
búsqueda, se visualiza PI SEEK y la salida se
silencia. El silenciamiento queda sin efecto
una vez finalizada la búsqueda PI, al margen
de que se haya encontrado o no una emisora
diferente.
Uso de la búsqueda PI automática
para emisoras presintonizadas
Cuando no se pueden llamar las emisoras pre-
sintonizadas, como por ejemplo, al realizar via-
jes largos, se puede ajustar la unidad para
realizar la búsqueda PI durante la llamada de
las emisoras presintonizadas.
! El ajuste predefinido de la función de bús-
queda PI automática es desactivado. Con-
sulte Cambio de la búsqueda PI automática
en la página 94.
Limitación de las emisoras para
programación regional
Cuando se usa la función AF para resintonizar
frecuencias automáticamente, la función re-
gional limita la selección a las emisoras que
transmiten programas regionales.
1 Presione FUNCTION para seleccionar
REG.
Presione FUNCTION hasta que REG aparezca
en el display.
2 Presione a para activar la función re-
gional.
Presione a y se visualiza REG :ON.
3 Presione b para desactivar la función
regional.
Presione b y se visualiza REG :OFF.
RDS
Es
66
Sección
05

Notas
! La programación regional y las redes regiona-
les se organizan de distinta manera según el
país (es decir, pueden cambiar de acuerdo
con la hora, el estado o la provincia de que se
trate, o el área de transmisión).
! El número de presintonía puede desaparecer
del display si se sintoniza una emisora regio-
nal que es diferente de la emisora almacena-
da originalmente.
! La función regional se puede activar o desacti-
var en forma independiente por cada banda
FM.
Recepción de anuncios de
tráfico
La función TA (espera por anuncio de tráfico)
le permite recibir anuncios de tráfico automá-
ticamente, al margen de la fuente que esté es-
cuchando. La función TA se puede activar
tanto para una emisora TP (una emisora que
transmite información de tráfico) como para
una emisora TP de otra red realzada (una emi-
sora que brinda información que remite a emi-
soras TP).
1 Sintonice una emisora TP o la emisora
TP de otra red realzada.
Cuando se está sintonizado en una emisora
TP o en una emisora TP de otra red realzada,
el indicador TP (
) se ilumina.
2 Presione TA para activar la espera por
anuncio de tráfico.
Presione TA y TA ON aparece en el display. El
sintonizador esperará los anuncios de tráfico.
# Para desactivar la espera por anuncio de tráfi-
co, vuelva a presionar TA.
3 Utilice VOLUME para ajustar el volu-
men de TA cuando comienza un anuncio de
tráfico.
Haga girar el control para aumentar o dismi-
nuir el volumen.
El volumen recién ajustado se almacena en la
memoria y se usa para los siguientes anun-
cios de tráfico.
4 Presione TA mientras se está recibiendo
el anuncio de tráfico para cancelarlo.
El sintonizador vuelve a la fuente original pero
sigue en el modo de espera hasta que se vuel-
va a presionar TA.
# También se puede cancelar el anuncio de trá-
fico presionando SOURCE, BAND, a, b, c o d
mientras se lo está recibiendo.
Notas
! También se puede activar o desactivar la fun-
ción TA en el menú que aparece presionando
FUNCTION.
! El sistema cambia de nuevo a la fuente origi-
nal después de la recepción del anuncio de
tráfico.
! Sólo se sintonizan las emisoras TP y las emi-
soras TP de otra red realzada durante la sinto-
nización por búsqueda o BSM cuando la
función TA está activada.
Uso de la interrupción por
programa de noticias
Cuando se transmite un programa de noticias
de una emisora de noticias con código PTY, la
unidad puede cambiar de cualquier emisora a
la emisora que transmite las noticias. Cuando
finaliza el programa de noticias, se reanuda la
recepción del programa anterior.
RDS
Es
67
Sección
Español
05

% Presione TA y mantenga presionado
para activar la interrupción por programa
de noticias.
Presione TA hasta que NEWS ON aparezca en
el display.
# Para desactivar la interrupción por programa
de noticias, presione TA y mantenga presionado
hasta que NEWS OFF aparezca en el display.
# Se puede cancelar un programa de noticias
presionando TA.
# También se puede cancelar el programa de
noticias presionando SOURCE, BAND, a, b, c o
d mientras lo está recibiendo.
Nota
También se puede activar o desactivar un progra-
ma de noticias en el menú que aparece presio-
nando FUNCTION.
Recepción de transmisiones
de alarma PTY
La alarma PTY es un código PTY especial para
anuncios de emergencias tales como un de-
sastre natural. Cuando el sintonizador recibe
el código de alarma de radio, ALARM aparece
en el display y el volumen se ajusta según el
volumen de TA. Cuando la emisora deja de
transmitir el anuncio de emergencia, el siste-
ma vuelve a la fuente anterior.
! Se puede cancelar un anuncio de emer-
gencia presionando TA.
! También se puede cancelar un anuncio de
emergencia presionando SOURCE, BAND,
a, b, c o d.
Lista PTY
Específico Tipo de programa
NEWS Noticias
AFFAIRS Temas de actualidad
Específico Tipo de programa
INFO Información general y consejos
SPORT Programas deportivos
WEATHER Informes del tiempo/Información me-
teorológica
FINANCE Informes del mercado de valores, co-
mercio, transacciones, etc.
POP MUS Música popular
ROCK MUS Música moderna contemporánea
EASY MUS Música de ambiente
OTH MUS Música alternativa
JAZZ Jazz
COUNTRY Música Country
NAT MUS Música nacional
OLDIES Música antigua y de la Edad de Oro
FOLK MUS Música folklórica
L. CLASS Música clásica ligera
CLASSIC Música clásica de concierto
EDUCATE Programas educativos
DRAMA Todas las obras y seriales de radio
CULTURE Cultura nacional o regional
SCIENCE Naturaleza, ciencia y tecnología
VARIED Entretenimiento ligero
CHILDREN Programas infantiles
SOCIAL Temas sociales
RELIGION Programas o servicios de asuntos reli-
giosos
PHONE IN Entrada por teléfono
TOURING Programas de viaje, sin anuncios de
problemas de tráfico
LEISURE Pasatiempos favoritos y actividades
recreativas
DOCUMENT Programas documentales
RDS
Es
68
Sección
05

Reproducción de un CD
A continuación se indican los pasos básicos
necesarios para reproducir un CD con el re-
productor de CD incorporado. A partir de la
página siguiente se explican las funciones
más avanzadas del reproductor.
1 Indicador de tiempo de reproducción
Muestra el tiempo transcurrido de reproduc-
ción de la pista actual.
2 Indicador de número de pista
Muestra la pista que se está reproduciendo
actualmente.
1 Presione OPEN para abrir la carátula.
Aparece la ranura de carga de CD.
# Después de colocar un CD, presione SOURCE
para seleccionar el reproductor de CD incorpora-
do.
2 Introduzca un CD por la ranura de carga
de CD.
La reproducción comenzará automáticamen-
te.
Ranura de carga de CD
Botón EJECT
# Se puede expulsar un CD presionando EJECT.
# Para evitar una falla de funcionamiento, ase-
gúrese de que ningún objeto metálico entre en
contacto con los terminales cuando la carátula
está abierta.
3 Cierre la carátula.
4 Utilice VOLUME para ajustar el nivel de
sonido.
Haga girar el control para aumentar o dismi-
nuir el volumen.
5 Para realizar el avance rápido o retroce-
so, presione c o d y mantenga presionado.
# Si selecciona el método de búsqueda
ROUGH, al presionar c o d y mantener presiona-
do podrá buscar una pista cada 10 pistas en el
disco actual. (Consulte Selección del método de
búsqueda en la página 71.)
6 Para saltar y retroceder o avanzar hasta
otra pista, presione c o d.
Al presionar d se salta al comienzo de la si-
guiente pista. Al presionar una vez el botón c,
se salta al comienzo de la pista actual. Si se
vuelve a pulsar este botón, se saltará a la pista
anterior.
Notas
! El reproductor de CD incorporado tiene capa-
cidad para un solo CD estándar de 12 cm u 8
cm (simple) por vez. No utilice un adaptador
al reproducir discos de 8 cm.
! No coloque ningún otro elemento que no sea
un CD en la ranura de carga de CD.
! Si no se puede introducir un disco por com-
pleto o si después de hacerlo, el disco no se
reproduce, compruebe que el lado de la eti-
queta del disco esté hacia arriba. Presione
EJECT para expulsar el disco y verifique si pre-
senta daños antes de volver a introducirlo.
! Si aparece un mensaje de error como
ERROR-11, consulte Comprensión de los men-
sajes de error del reproductor de CD incorpora-
do en la página 99.
! Cuando se coloca un disco CD TEXT, los títu-
los del disco y de las pistas comienzan a des-
plazarse automáticamente hacia la
izquierda.
Reproductor de CD
incorporado
Es
69
Sección
Español
06

Introducción a las funciones
avanzadas del reproductor
de CD incorporado
1 Visualización de función
Muestra el estado de la función.
2 Indicador RPT
Aparece cuando la repetición de reproduc-
ción está activada.
% Presione FUNCTION para visualizar los
nombres de las funciones.
Presione FUNCTION repetidamente para cam-
biar entre las siguientes funciones:
RPT (repetición de reproducción)RDM (re-
producción aleatoria)SCAN (reproducción
con exploración)PAUSE (pausa)COMP
(compresión y BMX)FF/REV (método de
búsqueda)
# Para volver a la visualización de reproducción,
presione BAND.
Nota
Si no se utiliza la función en unos 30 segundos,
el display volverá automáticamente a la visualiza-
ción de reproducción.
Repetición de reproducción
La repetición de reproducción le permite escu-
char la misma pista o disco de nuevo.
1 Presione FUNCTION para seleccionar
RPT.
Presione FUNCTION hasta que RPT aparezca
en el display.
2 Presione c o d para seleccionar la
gama de repetición.
Se cambia al ajuste seleccionado.
! RPT:DSC Repite el disco actual
! RPT:TRK Sólo repite la pista actual
Nota
Si se realiza una búsqueda de pistas o el avance
rápido/retroceso durante la repetición TRK,la
gama de repetición cambia a DSC.
Reproducción de las pistas
en un orden aleatorio
La reproducción aleatoria le permite reprodu-
cir las pistas del CD en un orden aleatorio.
1 Presione FUNCTION para seleccionar
RDM.
Presione FUNCTION hasta que RDM aparezca
en el display.
2 Presione a para activar la reproducción
aleatoria.
RDM :ON aparece en el display. Las pistas se
reproducirán en un orden aleatorio.
3 Presione b para desactivar la reproduc-
ción aleatoria.
RDM :OFF aparece en el display. La reproduc-
ción de las pistas continuará en el orden
normal.
Exploración de las pistas de
un CD
La reproducción con exploración le permite
escuchar los primeros 10 segundos de cada
pista de un CD.
1 Presione FUNCTION para seleccionar
SCAN.
Presione FUNCTION hasta que SCAN aparez-
ca en el display.
2 Presione a para activar la reproducción
con exploración.
SCAN :ON aparece en el display. Se reproduci-
rán los primeros 10 segundos de cada pista.
Reproductor de CD
incorporado
Es
70
Sección
06

3 Cuando encuentre la pista deseada,
presione b para desactivar la reproducción
con exploración.
SCAN :OFF aparece en el display. La pista se
continuará reproduciendo.
# Si el display vuelve automáticamente a la vi-
sualización de reproducción, seleccione SCAN
de nuevo presionando FUNCTION.
Nota
Una vez finalizada la exploración del CD, volverá
a comenzar la reproducción normal de las
pistas.
Pausa de la reproducción
de un CD
La pausa le permite detener temporalmente la
reproducción del CD.
1 Presione FUNCTION para seleccionar
PAUSE.
Presione FUNCTION hasta que PAUSE aparez-
ca en el display.
2 Presione a para activar la pausa.
PAUSE:ON aparece en el display. Se detiene
temporalmente la reproducción de la pista ac-
tual.
3 Presione b para desactivar la pausa.
PAUSE:OFF aparece en el display. La repro-
ducción se reanudará desde el mismo lugar
donde se activó la pausa.
Nota
También se puede activar o desactivar la pausa
presionando PAUSE.
Uso de la compresión y BMX
El uso de las funciones COMP (compresión) y
BMX le permiten ajustar la calidad de repro-
ducción de sonido de este reproductor. Cada
una de las funciones tiene un ajuste de dos
pasos. La función COMP equilibra la salida de
los sonidos más fuertes y más suaves a volú-
menes altos. La función BMX permite contro-
lar las reverberaciones para proporcionar un
sonido de reproducción más completo. Escu-
che cada uno de los efectos a medida que los
selecciona y utilice la función que realce
mejor la reproducción de la pista o del CD que
está escuchando.
1 Presione FUNCTION para seleccionar
COMP.
Presione FUNCTION hasta que COMP aparez-
ca en el display.
2 Presione a o b para seleccionar el ajus-
te favorito.
Presione a o b repetidamente para cambiar
entre los siguientes ajustes:
COMP OFFCOMP 1COMP 2
COMP OFFBMX 1BMX 2
Selección del método de
búsqueda
Se puede cambiar el método de búsqueda
entre las opciones de avance rápido/retroceso
y búsqueda cada 10 pistas.
1 Presione FUNCTION para seleccionar
FF/REV.
Presione FUNCTION hasta que FF/REV apa-
rezca en el display.
# Si se seleccionó anteriormente el método de
búsqueda ROUGH, se visualizará ROUGH.
2 Presione c o d para seleccionar el mé-
todo de búsqueda.
Presione c o d hasta que el método de bús-
queda deseado aparezca en el display.
! FF/REV Avance rápido y retroceso
! ROUGH Búsqueda cada 10 pistas
Reproductor de CD
incorporado
Es
71
Sección
Español
06

Búsqueda cada 10 pistas en
el disco actual
Si un disco tiene más de 10 pistas, se puede
hacer la búsqueda cada 10 pistas. Cuando un
disco tiene muchas pistas, se puede realizar
una búsqueda aproximada de la pista que se
desea reproducir.
1 Seleccione el método de búsqueda
ROUGH.
Consulte Selección del método de búsqueda en
la página anterior.
2 Presione c o d y mantenga presionado
para buscar una pista cada 10 pistas en un
disco.
# Si un disco tiene menos de 10 pistas, al pre-
sionar d y mantener presionado se llama la últi-
ma pista del disco. También si después de
realizar una búsqueda cada 10 pistas, quedan
menos de 10, al presionar d y mantener presio-
nado se llama la última pista del disco.
# Si un disco tiene menos de 10 pistas, al pre-
sionar c y mantener presionado se llama la pri-
mera pista del disco. También si después de
realizar una búsqueda cada 10 pistas, quedan
menos de 10, al presionar c y mantener presio-
nado se llama la primera pista del disco.
Uso de las funciones de
títulos de discos
Se pueden ingresar títulos de CD y visualizar-
los. La próxima vez que se coloque un CD
cuyo título se haya ingresado, se visualizará el
título de ese CD.
Ingreso de títulos de discos
Utilice la función de ingreso de títulos de dis-
cos para almacenar hasta 48 títulos de CD en
la unidad. Cada título puede tener una longi-
tud de hasta 8 caracteres.
1 Reproduzca el CD cuyo título desea in-
gresar.
2 Presione FUNCTION y mantenga presio-
nado hasta que TITLE IN aparezca en el dis-
play.
# Al reproducir un disco CD TEXT, no se podrá
cambiar a TITLE IN. El título del disco ya estará
grabado en el disco CD TEXT.
3 Presione a o b para seleccionar una
letra del alfabeto.
Cada vez que se presiona a, se visualizará
una letra del alfabeto en orden ascendente A
B C ... X Y Z, y los números y símbolos en el
orden de 1 2 3 ... > [ ]. Cada vez que se presio-
na b, se visualizará una letra en el orden inver-
so, tal como Z Y X ... C B A.
4 Presione d para mover el cursor a la
próxima posición de carácter.
Cuando se visualice la letra deseada, presione
d para mover el cursor a la próxima posición y
seleccione la próxima letra. Presione c para
mover el cursor hacia atrás en el display.
5 Mueva el cursor a la última posición
presionando d después de ingresar el
título.
Al presionar d una vez más, el título ingresa-
do se almacena en la memoria.
6 Presione BAND para volver a la visuali-
zación de reproducción.
Notas
! Los títulos se conservan en la memoria, aun
después de que se quita el disco de la unidad,
y se llaman cuando se vuelve a colocar el
disco correspondiente.
! Después que los datos para 48 discos han
sido almacenados en la memoria, los datos
para un nuevo disco se sobreponen a los
datos más antiguos.
! Si conecta un reproductor de CD múltiple,
podrá ingresar los títulos de hasta 100 discos.
Reproductor de CD
incorporado
Es
72
Sección
06

Visualización de los títulos
Se puede visualizar el título de cualquier disco
que haya sido almacenado con un título.
% Presione DISPLAY.
Presione DISPLAY repetidamente para cam-
biar entre los siguientes ajustes:
Tiempo de reproducciónDISC TTL (título del
disco)
Cuando se selecciona DISC TTL, se visualiza
en el display el título del disco que se está re-
produciendo actualmente.
# Si no se ha ingresado ningún título para el
disco, se visualizará NO TITLE.
Uso de las funciones CD TEXT
Algunos discos contienen información que
viene codificada de fábrica. Estos discos pue-
den contener información tal como el título
del CD, el título de la pista, el nombre del artis-
ta y el tiempo de reproducción, y se denomi-
nan discos CD TEXT. Sólo estos discos
especialmente codificados son compatibles
con las funciones que se indican a continua-
ción.
Visualización de títulos de
discos CD TEXT
% Presione DISPLAY.
Presione DISPLAY repetidamente para cam-
biar entre los siguientes ajustes:
Tiempo de reproducciónDISC TTL (título del
disco)ART NAME (nombre del artista del
disco)TRK TTL (título de la pista)
ART NAME (nombre del artista de la pista)
# Si determinada información no se grabó en
un disco CD TEXT, se visualizará NO XXXX (p. ej.,
NO T-TTL).
Desplazamiento de títulos en el
display
Esta unidad sólo permite visualizar las prime-
ras 8 letras de DISC TTL, ART NAME, TRK TTL
y ART NAME. Cuando la información grabada
tiene más de 8 letras, se puede desplazar el
texto hacia la izquierda para que se pueda ver
el resto del título.
% Presione DISPLAY y mantenga presio-
nado hasta que el título comience a despla-
zarse hacia la izquierda.
El resto del título aparecerá en el display.
Reproductor de CD
incorporado
Es
73
Sección
Español
06

Reproducción de ficheros
MP3/WMA/WAV
A continuación se indican los pasos básicos
necesarios para reproducir un MP3/WMA/
WAV con el reproductor de CD incorporado.
En la página 76 se explican las funciones más
avanzadas y cómo utilizarlas.
1 Indicador MP3
Aparece cuando se está reproduciendo un
fichero MP3.
2 Indicador WMA
Aparece cuando se está reproduciendo un
fichero WMA.
3 Indicador de número de pista
Muestra la pista (fichero) que se está repro-
duciendo actualmente.
! Si se selecciona un número de pista del
100 al 199, se iluminará d a la izquierda
del indicador de número de pista.
! Si se selecciona un número de pista 200
o superior, d destellará a la izquierda del
indicador de número de pista.
4 Indicador de tiempo de reproducción
Muestra el tiempo transcurrido de reproduc-
ción de la pista (fichero) actual.
5 Indicador del número de carpeta
Muestra el número de la carpeta que se
está reproduciendo.
1 Presione OPEN para abrir la carátula.
Aparece la ranura de carga de CD.
# Después de colocar un CD-ROM, presione
SOURCE para seleccionar el reproductor de CD
incorporado.
2 Introduzca un CD-ROM por la ranura de
carga de CD.
La reproducción comenzará automáticamen-
te.
Ranura de carga de CD
Botón EJECT
# Se puede expulsar un CD-ROM presionando
EJECT.
# Para evitar una falla de funcionamiento, ase-
gúrese de que ningún objeto metálico entre en
contacto con los terminales cuando la carátula
está abierta.
3 Cierre la carátula.
4 Utilice VOLUME para ajustar el nivel de
sonido.
Haga girar el control para aumentar o dismi-
nuir el volumen.
5 Presione a o b para seleccionar una
carpeta.
# No se puede seleccionar una carpeta que no
tenga un fichero MP3/WMA/WAV grabado.
# Para volver a la carpeta 01 (RAÍZ), presione
BAND y mantenga presionado. Sin embargo, si
la carpeta 01 (RAÍZ) no contiene ficheros, la re-
producción comenzará con la carpeta 02.
Reproductor de MP3/
WMA/WAV
Es
74
Sección
07

6 Para realizar el avance rápido o retroce-
so, presione c o d y mantenga presionado.
# El avance rápido y retroceso sólo funcionan
con el fichero que se está reproduciendo. La ope-
ración se cancela cuando se llega al fichero ante-
rior o al siguiente.
# Si selecciona el método de búsqueda
ROUGH, al presionar c o d y mantener presiona-
do podrá buscar una pista cada 10 pistas en la
carpeta actual. (Consulte Selección del método de
búsqueda en la página 78.)
7 Para saltar y retroceder o avanzar hasta
otra pista, presione c o d.
Al presionar d se salta al comienzo de la si-
guiente pista. Al presionar una vez el botón c,
se salta al comienzo de la pista actual. Si se
vuelve a pulsar este botón, se saltará a la pista
anterior.
Notas
! Al reproducir discos con ficheros MP3/WMA/
WAV y datos de audio (CD-DA), tales como
CD-EXTRA y CD de MODO MIXTO (MIXED-
MODE CD), los dos tipos de discos se pueden
reproducir sólo si se cambia el modo entre
MP3/WMA/WAV y CD-DA con BAND.
! Si se cambia entre la reproducción de fiche-
ros MP3/WMA/WAV y datos de audio (CD-
DA), la reproducción comienza en la primera
pista del disco.
! El reproductor de CD incorporado puede re-
producir ficheros MP3/WMA/WAV grabados
en un CD-ROM. (Consulte la página 100,
donde encontrará información sobre los fiche-
ros que se pueden reproducir.)
! No coloque ningún otro elemento que no sea
un CD en la ranura de carga de CD.
! A veces se produce una demora entre el co-
mienzo de la reproducción de un CD y la emi-
sión del sonido. Durante la lectura inicial, se
visualiza FRMTREAD.
! Si no se puede introducir un disco por com-
pleto o si después de hacerlo, el disco no se
reproduce, compruebe que el lado de la eti-
queta del disco esté hacia arriba. Presione
EJECT para expulsar el disco y verifique si pre-
senta daños antes de volver a introducirlo.
! Los discos se reproducen en el orden del nú-
mero de fichero. Se saltan las carpetas que no
tienen ficheros. (Si la carpeta 01 (RAÍZ) no
contiene ficheros, la reproducción comenzará
con la carpeta 02.)
! Al reproducir ficheros grabados como VBR
(velocidad de grabación variable), el tiempo
de reproducción no se visualizará correcta-
mente si se utilizan las funciones de avance
rápido o retroceso.
! Si el disco que se ha colocado no contiene fi-
cheros que se puedan reproducir, se visualiza
NO AUDIO.
! Si el disco que se ha colocado en el reproduc-
tor contiene ficheros WMA protegidos con el
sistema de gestión de derechos digitales
(DRM), se visualizará SKIPPED mientras se
salta el fichero protegido.
! Si todos los ficheros del disco están protegi-
dos con el sistema DRM, se visualizará
PROTECT.
! Cuando se utilizan las funciones de avance rá-
pido o retroceso no se emite sonido.
! Si aparece un mensaje de error como
ERROR-11, consulte Comprensión de los men-
sajes de error del reproductor de CD incorpora-
do en la página 99.
! Cuando se coloca un disco MP3/WMA/WAV,
el nombre de la carpeta y el del fichero co-
mienzan a desplazarse automáticamente
hacia la izquierda.
Reproductor de MP3/
WMA/WAV
Es
75
Sección
Español
07

Introducción a las funciones
avanzadas del reproductor
de CD incorporado (MP3/
WMA/WAV)
1 Visualización de función
Muestra el estado de la función.
2 Indicador RPT
Aparece cuando se selecciona la gama de
repetición para la pista (fichero) actual.
% Presione FUNCTION para visualizar los
nombres de las funciones.
Presione FUNCTION repetidamente para cam-
biar entre las siguientes funciones:
RPT (repetición de reproducción)RDM (re-
producción aleatoria)SCAN (reproducción
con exploración)PAUSE (pausa)COMP
(compresión y BMX)FF/REV (método de
búsqueda)
# Para volver a la visualización de reproducción,
presione BAND.
Nota
Si no se utiliza la función en unos 30 segundos,
el display volverá automáticamente a la visualiza-
ción de reproducción.
Repetición de reproducción
Para reproducción de MP3/WMA/WAV, hay
tres gamas de repetición de reproducción:
FLD (repetición de carpeta), TRK (repetición
de una sola pista) y DSC (repetición de todas
las pistas).
1 Presione FUNCTION para seleccionar
RPT.
Presione FUNCTION hasta que RPT aparezca
en el display.
2 Presione c o d para seleccionar la
gama de repetición.
Presione c o d hasta que la gama de repeti-
ción deseada aparezca en el display.
! FLD Repite la carpeta actual
! TRK Sólo repite la pista actual
! DSC Repite todas las pistas
Notas
! Si se selecciona otra carpeta durante la repeti-
ción de reproducción, la gama de repetición
cambia a DSC.
! Si se realiza una búsqueda de pistas o el avan-
ce rápido/retroceso durante la repetición TRK,
la gama de repetición cambia a FLD.
! Cuando se selecciona FLD, no se puede repro-
ducir una subcarpeta de esa carpeta.
Reproducción de las pistas
en un orden aleatorio
La reproducción aleatoria le permite reprodu-
cir las pistas en un orden aleatorio dentro de
la gama de repetición FLD y DSC.
1 Seleccione la gama de repetición.
Consulte Repetición de reproducción en esta
página.
2 Presione FUNCTION para seleccionar
RDM.
Presione FUNCTION hasta que RDM aparezca
en el display.
Reproductor de MP3/
WMA/WAV
Es
76
Sección
07

3 Presione a para activar la reproducción
aleatoria.
RDM :ON aparece en el display. Las pistas se
reproducirán en un orden aleatorio en la
gama de repetición FLD o DSC seleccionada
con anterioridad.
4 Presione b para desactivar la reproduc-
ción aleatoria.
RDM :OFF aparece en el display. La reproduc-
ción de las pistas continuará en el orden nor-
mal.
Nota
Si se activa la reproducción aleatoria en FLD yse
vuelve a la visualización de reproducción, FRDM
aparecerá en el display.
Exploración de carpetas y
pistas
Cuando esté usando FLD, el comienzo de
cada pista de la carpeta seleccionada se re-
produce durante alrededor de 10 segundos.
Cuando esté usando DSC, el comienzo de la
primera pista de cada carpeta se reproduce
durante alrededor de 10 segundos.
1 Seleccione la gama de repetición.
Consulte Repetición de reproducción en la pági-
na anterior.
2 Presione FUNCTION para seleccionar
SCAN.
Presione FUNCTION hasta que SCAN aparez-
ca en el display.
3 Presione a para activar la reproducción
con exploración.
SCAN :ON aparece en el display. Se reproduci-
rán los primeros 10 segundos de cada pista de
la carpeta actual (o la primera pista de cada
carpeta).
4 Cuando encuentre la pista (o la carpeta)
deseada, presione b para desactivar la re-
producción con exploración.
SCAN :OFF aparece en el display. La pista (o
carpeta) se continuará reproduciendo.
# Si el display vuelve automáticamente a la vi-
sualización de reproducción, seleccione SCAN
de nuevo presionando FUNCTION.
Notas
! Una vez finalizada la exploración de pistas o
carpetas, volverá a comenzar la reproducción
normal de las pistas.
! Si se activa la reproducción con exploración
en FLD y se vuelve a la visualización de repro-
ducción, FSCN aparecerá en el display.
Pausa de la reproducción
de un MP3/WMA/WAV
La pausa le permite detener temporalmente la
reproducción del MP3/WMA/WAV.
1 Presione FUNCTION para seleccionar
PAUSE.
Presione FUNCTION hasta que PAUSE aparez-
ca en el display.
2 Presione a para activar la pausa.
PAUSE:ON aparece en el display. Se detiene
temporalmente la reproducción de la pista ac-
tual.
3 Presione b para desactivar la pausa.
PAUSE:OFF aparece en el display. La repro-
ducción se reanudará desde el mismo lugar
donde se activó la pausa.
Reproductor de MP3/
WMA/WAV
Es
77
Sección
Español
07

Nota
También se puede activar o desactivar la pausa
presionando PAUSE.
Selección del método de
búsqueda
Se puede cambiar el método de búsqueda
entre las opciones de avance rápido/retroceso
y búsqueda cada 10 pistas.
1 Presione FUNCTION para seleccionar
FF/REV.
Presione FUNCTION hasta que FF/REV apa-
rezca en el display.
# Si se seleccionó anteriormente el método de
búsqueda ROUGH, se visualizará ROUGH.
2 Presione c o d para seleccionar el mé-
todo de búsqueda.
Presione c o d hasta que el método de bús-
queda deseado aparezca en el display.
! FF/REV Avance rápido y retroceso
! ROUGH Búsqueda cada 10 pistas
Búsqueda cada 10 pistas en
la carpeta actual
Si la carpeta actual tiene más de 10 pistas, se
puede hacer la búsqueda cada 10 pistas.
Cuando la carpeta tiene muchas pistas, se
puede realizar una búsqueda aproximada de
la pista que se desea reproducir.
1 Seleccione el método de búsqueda
ROUGH.
Consulte Selección del método de búsqueda en
esta página.
2 Presione c o d y mantenga presionado
para buscar una pista cada 10 pistas en la
carpeta actual.
# Si la carpeta actual tiene menos de 10 pistas,
al presionar d y mantener presionado se llama la
última pista de la carpeta. También si después de
realizar una búsqueda cada 10 pistas, quedan
menos de 10 pistas, al presionar d y mantener
presionado se llama la última pista de la carpeta.
# Si la carpeta actual tiene menos de 10 pistas,
al presionar c y mantener presionado se llama la
primera pista de la carpeta. También si después
de realizar una búsqueda cada 10 pistas, quedan
menos de 10 pistas, al presionar c y mantener
presionado se llama la primera pista de la
carpeta.
Uso de la compresión y BMX
El uso de las funciones COMP (compresión) y
BMX le permiten ajustar la calidad de repro-
ducción de sonido de este reproductor. Cada
una de las funciones tiene un ajuste de dos
pasos. La función COMP equilibra la salida de
los sonidos más fuertes y más suaves a volú-
menes altos. La función BMX permite contro-
lar las reverberaciones para proporcionar un
sonido de reproducción más completo. Escu-
che cada uno de los efectos a medida que los
selecciona y utilice la función que realce
mejor la reproducción de la pista o del CD que
está escuchando.
1 Presione FUNCTION para seleccionar
COMP.
Presione FUNCTION hasta que COMP aparez-
ca en el display.
2 Presione a o b para seleccionar el ajus-
te favorito.
Presione a o b repetidamente para cambiar
entre los siguientes ajustes:
Reproductor de MP3/
WMA/WAV
Es
78
Sección
07

COMP OFFCOMP 1COMP 2
COMP OFFBMX 1BMX 2
Visualización de información
de texto de un disco MP3/WMA
Se puede visualizar la información de texto
grabada en un disco MP3/WMA.
% Presione DISPLAY.
Presione DISPLAY repetidamente para cam-
biar entre los siguientes ajustes:
Tiempo de reproducciónFOLDER (nombre
de la carpeta)FILE (nombre del fichero)
TRK TTL (título de la pista)ART NAME
(nombre del artista)ALBM TTL (título del
álbum)COMMENT (comentarios)Veloci-
dad de grabación
# Al reproducir ficheros MP3 grabados como
VBR (velocidad de grabación variable), el valor de
la velocidad de grabación no se visualiza aunque
luego se cambie a la velocidad de grabación.
# Al reproducir ficheros WMA grabados como
VBR, se visualiza la velocidad de grabación pro-
medio.
# Si determinada información no se grabó en
un disco MP3/WMA, se visualizará NO XXXX (p.
ej., NO NAME).
# Según la versión de Windows Media Player
utilizada para codificar los ficheros WMA, es po-
sible que no se visualicen correctamente los
nombres de álbumes y demás información de
texto.
Visualización de información
de texto de un disco WAV
Se puede visualizar la información de texto
grabada en un disco WAV.
% Presione DISPLAY.
Presione DISPLAY repetidamente para cam-
biar entre los siguientes ajustes:
Tiempo de reproducciónFOLDER (nombre
de la carpeta)FILE (nombre del fichero)fre-
cuencia de muestreo
# Es posible que no se visualicen todos los dígi-
tos de la frecuencia de muestreo (p. ej., se visuali-
za 22.0 KHZ cuando la frecuencia de muestreo
es de 22,05 kHz).
Desplazamiento de
información de texto en el
display
Esta unidad sólo permite visualizar las prime-
ras 8 letras de FOLDER, FILE, TRK TTL,
ART NAME, ALBM TTL y COMMENT. Cuando
la información grabada tiene más de 8 letras,
se puede desplazar el texto hacia la izquierda
para que se pueda ver el resto de la informa-
ción de texto.
% Presione DISPLAY y mantenga presio-
nado hasta que la información de texto co-
mience a desplazarse hacia la izquierda.
El resto de la información de texto aparecerá
en el display.
Nota
A diferencia de los ficheros MP3 y WMA, con los
ficheros WAV sólo puede visualizarse el nombre
de la carpeta y el nombre del fichero.
Reproductor de MP3/
WMA/WAV
Es
79
Sección
Español
07

Reproducción de un CD
Se puede usar esta unidad para controlar un re-
productor de CD múltiple, que se vende por se-
parado.
A continuación se indican los pasos básicos
necesarios para reproducir un CD con el re-
productor de CD múltiple. En la página si-
guiente se explican las funciones más
avanzadas del reproductor y cómo utilizarlas.
1 Indicador de número de disco
Muestra el disco que se está reproduciendo
actualmente.
2 Indicador de tiempo de reproducción
Muestra el tiempo transcurrido de reproduc-
ción de la pista actual.
3 Indicador de número de pista
Muestra la pista que se está reproduciendo
actualmente.
1 Presione SOURCE para seleccionar el re-
productor de CD múltiple.
Presione SOURCE hasta seleccionar el repro-
ductor de CD múltiple como la fuente.
2 Utilice VOLUME para ajustar el nivel de
sonido.
Haga girar el control para aumentar o dismi-
nuir el volumen.
3 Seleccione el disco que desea escuchar
con los botones 16.
Para los discos ubicados en 1 a 6, presione el
número del botón correspondiente.
Si desea seleccionar un disco ubicado en 7 a
12, presione el número correspondiente, como
por ejemplo, 1 para 7, y mantenga presionado
hasta que el número del disco aparezca en el
display.
# También se puede seleccionar un disco con-
secutivamente presionando a/b.
4 Para realizar el avance rápido o retroce-
so, presione c o d y mantenga presionado.
5 Para saltar y retroceder o avanzar hasta
otra pista, presione c o d.
Al presionar d se salta al comienzo de la si-
guiente pista. Al presionar una vez el botón c,
se salta al comienzo de la pista actual. Si se
vuelve a pulsar este botón, se saltará a la pista
anterior.
Notas
! Mientras el reproductor de CD múltiple realiza
las funciones preparatorias, se visualiza
READY.
! Si aparece un mensaje de error como
ERROR-11, consulte el manual de instruccio-
nes del reproductor de CD múltiple.
! Si no hay discos en el cargador de CD del re-
productor de CD múltiple, se visualiza
NO DISC.
! Cuando se selecciona un disco CD TEXT en
un reproductor de CD múltiple compatible,
los títulos del disco y de las pistas comienzan
a desplazarse automáticamente hacia la
izquierda.
Reproductor de CD
múltiple de 50 discos
Sólo las funciones descritas en este manual
son compatibles con los reproductores de CD
múltiple de 50 discos.
Reproductor de CD
múltiple
Es
80
Sección
08

Introducción a las
funciones avanzadas del
reproductor de CD múltiple
1 Visualización de función
Muestra el estado de la función.
2 Indicador RPT
Aparece cuando se selecciona la gama de
repetición para la pista actual.
% Presione FUNCTION para visualizar los
nombres de las funciones.
Presione FUNCTION repetidamente para cam-
biar entre las siguientes funciones:
RPT (repetición de reproducción)RDM (re-
producción aleatoria)SCAN (reproducción
con exploración)ITS-P (reproducción ITS)
PAUSE (pausa)COMP (compresión y
DBE)
# Para volver a la visualización de reproducción,
presione BAND.
Nota
Si no se utiliza la función en unos 30 segundos,
el display volverá automáticamente a la visualiza-
ción de reproducción.
Repetición de reproducción
Hay tres gamas de repetición en el reproduc-
tor de CD múltiple: MCD (repetición de todos
los discos en el reproductor de CD múltiple),
TRK (repetición de una sola pista) y DSC (repe-
tición de disco).
1 Presione FUNCTION para seleccionar
RPT.
Presione FUNCTION hasta que RPT aparezca
en el display.
2 Presione c o d para seleccionar la
gama de repetición.
Presione c o d hasta que la gama de repeti-
ción deseada aparezca en el display.
! MCD Repite todos los discos que se en-
cuentran en el reproductor de CD múltiple
! TRK Sólo repite la pista actual
! DSC Repite el disco actual
Notas
! Si se seleccionan otros discos durante la repe-
tición de reproducción, la gama de repetición
cambia a MCD.
! Si se realiza una búsqueda de pistas o el avan-
ce rápido/retroceso durante la repetición TRK,
la gama de repetición cambia a DSC.
Reproducción de las pistas
en un orden aleatorio
La reproducción aleatoria le permite reprodu-
cir las pistas en un orden aleatorio dentro de
la gama de repetición MCD y DSC.
1 Seleccione la gama de repetición.
Consulte Repetición de reproducción en esta
página.
2 Presione FUNCTION para seleccionar
RDM.
Presione FUNCTION hasta que RDM aparezca
en el display.
Reproductor de CD
múltiple
Es
81
Sección
Español
08

3 Presione a para activar la reproducción
aleatoria.
RDM :ON aparece en el display. Las pistas se
reproducirán en un orden aleatorio en la
gama de repetición MCD o DSC seleccionada
con anterioridad.
4 Presione b para desactivar la reproduc-
ción aleatoria.
RDM :OFF aparece en el display. La reproduc-
ción de las pistas continuará en el orden nor-
mal.
Nota
Si se activa la reproducción aleatoria en DSC yse
vuelve a la visualización de reproducción, DRDM
aparecerá en el display.
Exploración de CD y pistas
Cuando esté usando DSC, el comienzo de
cada pista de la carpeta seleccionada se re-
produce durante alrededor de 10 segundos.
Cuando esté usando MCD, el comienzo de la
primera pista de cada carpeta se reproduce
durante alrededor de 10 segundos.
1 Seleccione la gama de repetición.
Consulte Repetición de reproducción en la pági-
na anterior.
2 Presione FUNCTION para seleccionar
SCAN.
Presione FUNCTION hasta que SCAN aparez-
ca en el display.
3 Presione a para activar la reproducción
con exploración.
SCAN :ON aparece en el display. Se reproduci-
rán los primeros 10 segundos de cada pista
del disco actual (o la primera pista de cada
disco).
4 Cuando encuentre la pista (o el disco)
deseada(o), presione b para desactivar la
exploración.
SCAN :OFF aparece en el display. La pista (o el
disco) se continuará reproduciendo.
# Si el display vuelve automáticamente a la vi-
sualización de reproducción, seleccione SCAN
de nuevo presionando FUNCTION.
Notas
! Una vez finalizada la exploración de pistas o
discos, volverá a comenzar la reproducción
normal de las pistas.
! Si se activa la reproducción con exploración
en DSC y se vuelve a la visualización de repro-
ducción, DSCN aparecerá en el display.
Pausa de la reproducción
de un CD
La pausa le permite detener temporalmente la
reproducción del CD.
1 Presione FUNCTION para seleccionar
PAUSE.
Presione FUNCTION hasta que PAUSE aparez-
ca en el display.
2 Presione a para activar la pausa.
PAUSE:ON aparece en el display. Se detiene
temporalmente la reproducción de la pista ac-
tual.
3 Presione b para desactivar la pausa.
PAUSE:OFF aparece en el display. La repro-
ducción se reanudará desde el mismo lugar
donde se activó la pausa.
Nota
También se puede activar o desactivar la pausa
presionando PAUSE.
Reproductor de CD
múltiple
Es
82
Sección
08

Uso de listas de
reproducción ITS
La función ITS (selección instantánea de
pista) le permite crear una lista de reproduc-
ción de sus pistas favoritas de los discos que
se encuentran en el cargador del reproductor
de CD múltiple. Después de añadir sus pistas
favoritas a la lista de reproducción, puede acti-
var la reproducción ITS y reproducir sólo las
pistas seleccionadas.
Creación de una lista de
reproducción con la
programación ITS
Se puede utilizar la función ITS para ingresar y
reproducir hasta 99 pistas por disco y hasta
100 discos (con los títulos de los discos). (Con
los reproductores de CD múltiple anteriores a
los modelos CDX-P1250 y CDX-P650, se pue-
den almacenar hasta 24 pistas en la lista de
reproducción.)
1 Reproduzca el CD que desea progra-
mar.
Presione a o b para seleccionar el CD.
2 Presione FUNCTION y mantenga presio-
nado hasta que TITLE IN aparezca en el dis-
play, y presione FUNCTION para seleccionar
ITS.
Después de que visualice TITLE IN, presione
FUNCTION repetidamente y aparecerán en el
display las siguientes funciones:
TITLE IN (ingreso de títulos de discos)ITS
(programación ITS)
3 Seleccione la pista deseada presionan-
do c o d.
4 Presione a para almacenar la pista que
se está reproduciendo actualmente en la
lista de reproducción.
Se visualiza ITS IN por un momento y se agre-
ga la pista actual a la lista de reproducción. El
display muestra nuevamente ITS.
5 Presione BAND para volver a la visuali-
zación de reproducción.
Nota
Después que los datos para 100 discos han sido
almacenados en la memoria, los datos para un
nuevo disco se sobreponen a los datos más anti-
guos.
Reproducción de la lista de
reproducción ITS
La reproducción ITS le permite escuchar las
pistas que ha ingresado en su lista de repro-
ducción ITS. Cuando activa la reproducción
ITS, se comenzarán a reproducir las pistas de
la lista de reproducción ITS en el reproductor
de CD múltiple.
1 Seleccione la gama de repetición.
Consulte Repetición de reproducción en la pági-
na 81.
2 Presione FUNCTION para seleccionar
ITS-P.
Presione FUNCTION hasta que ITS-P aparezca
en el display.
3 Presione a para activar la reproducción
ITS.
ITS-P:ON aparece en el display. La reproduc-
ción de las pistas de la lista comienza en la
gama de repetición MCD o DSC seleccionada
con anterioridad.
# Si no hay pistas programadas en la gama de
repetición actual, se visualiza EMPTY.
Reproductor de CD
múltiple
Es
83
Sección
Español
08

4 Presione b para desactivar la reproduc-
ción ITS.
ITS-P:OFF aparece en el display. La reproduc-
ción continuará en el orden normal desde la
pista y el CD que se estén reproduciendo.
Borrado de una pista de la lista
de reproducción ITS
Cuando se desea borrar una pista de la lista
de reproducción ITS, se puede hacer si la re-
producción ITS está activada.
Si la reproducción ITS ya está activada, vaya al
paso 2. Si la reproducción ITS todavía no está
activada, presione FUNCTION.
1 Reproduzca el CD que tiene la pista que
desea borrar de la lista de reproducción ITS
y active la reproducción ITS.
Consulte Reproducción de la lista de reproduc-
ción ITS en la página anterior.
2 Presione FUNCTION y mantenga presio-
nado hasta que TITLE IN aparezca en el dis-
play, y presione FUNCTION para seleccionar
ITS.
Después de que visualice TITLE IN, presione
FUNCTION hasta que ITS aparezca en el dis-
play.
3 Seleccione la pista deseada presionan-
do c o d.
4 Presione b para borrar la pista de la
lista de reproducción ITS.
La pista que se está reproduciendo se borra
de la lista de reproducción ITS y comienza la
reproducción de la próxima pista de la lista.
# Si no hay pistas de la lista de reproducción en
la gama actual, se visualiza EMPTY y se reanuda
la reproducción normal.
5 Presione BAND para volver a la visuali-
zación de reproducción.
Borrado de un CD de la lista de
reproducción ITS
Cuando se desea borrar todas las pistas de un
CD de la lista de reproducción ITS, se puede
hacer si la reproducción ITS está desactivada.
1 Reproduzca el CD que desea borrar.
Presione a o b para seleccionar el CD.
2 Presione FUNCTION y mantenga presio-
nado hasta que TITLE IN aparezca en el dis-
play, y presione FUNCTION para seleccionar
ITS.
Después de que visualice TITLE IN, presione
FUNCTION hasta que ITS aparezca en el dis-
play.
3 Presione b para borrar todas las pistas
del CD que se está reproduciendo de la
lista de reproducción ITS.
Todas las pistas del CD que se está reprodu-
ciendo se borran de la lista de reproducción y
se visualiza ITS CLR.
4 Presione BAND para volver a la visuali-
zación de reproducción.
Uso de las funciones de
títulos de discos
Se pueden ingresar títulos de CD y visualizar-
los. De esta manera, se puede buscar y selec-
cionar con facilidad el disco deseado.
Ingreso de títulos de discos
Utilice la función de ingreso de títulos de dis-
cos para almacenar hasta 100 títulos de CD
(con la lista de reproducción ITS) en el repro-
ductor de CD múltiple. Cada título puede
tener una longitud de hasta 8 caracteres.
Reproductor de CD
múltiple
Es
84
Sección
08

1 Reproduzca el CD cuyo título desea in-
gresar.
Presione a o b para seleccionar el CD.
2 Presione FUNCTION y mantenga presio-
nado hasta que TITLE IN aparezca en el dis-
play.
Después de que visualice TITLE IN, presione
FUNCTION repetidamente y aparecerán en el
display las siguientes funciones:
TITLE IN (ingreso de títulos de discos)ITS
(programación ITS)
# Al reproducir un disco CD TEXT en un repro-
ductor de CD múltiple compatible con este tipo
de disco, no podrá cambiar a TITLE IN. El título
del disco ya estará grabado en el disco CD TEXT.
3 Presione a o b para seleccionar una
letra del alfabeto.
Cada vez que se presiona a, se visualizará
una letra del alfabeto en orden ascendente A
B C ... X Y Z, y los números y símbolos en el
orden de 1 2 3 ... > [ ]. Cada vez que se presio-
na b, se visualizará una letra en el orden inver-
so, tal como Z Y X ... C B A.
4 Presione d para mover el cursor a la
próxima posición de carácter.
Cuando se visualice la letra deseada, presione
d para mover el cursor a la próxima posición y
seleccione la próxima letra. Presione c para
mover el cursor hacia atrás en el display.
5 Mueva el cursor a la última posición
presionando d después de ingresar el
título.
Al presionar d una vez más, el título ingresa-
do se almacena en la memoria.
6 Presione BAND para volver a la visuali-
zación de reproducción.
Notas
! Los títulos se conservan en la memoria, aun
después de que se quitan los discos del car-
gador y se llaman cuando se vuelven a colo-
car los discos correspondientes.
! Después que los datos para 100 discos han
sido almacenados en la memoria, los datos
para un nuevo disco se sobreponen a los
datos más antiguos.
Visualización de los títulos
Se puede visualizar el título de cualquier disco
que haya sido almacenado con un título.
% Presione DISPLAY.
Presione DISPLAY repetidamente para cam-
biar entre los siguientes ajustes:
Tiempo de reproducciónDISC TTL (título del
disco)
Cuando se selecciona DISC TTL, se visualiza
en el display el título del disco que se está re-
produciendo actualmente.
# Si no se ha ingresado ningún título para el
disco, se visualizará NO TITLE.
Uso de las funciones CD TEXT
Estas funciones sólo se pueden usar con un re-
productor de CD múltiple compatible con CD
TEXT.
Algunos discos contienen información que
viene codificada de fábrica. Estos discos pue-
den contener información tal como el título
del CD, el título de la pista, el nombre del artis-
ta y el tiempo de reproducción, y se denomi-
nan discos CD TEXT. Sólo estos discos
especialmente codificados son compatibles
con las funciones que se indican a continua-
ción.
Reproductor de CD
múltiple
Es
85
Sección
Español
08

Visualización de títulos de
discos CD TEXT
% Presione DISPLAY.
Presione DISPLAY repetidamente para cam-
biar entre los siguientes ajustes:
Tiempo de reproducciónDISC TTL (título del
disco)ART NAME (nombre del artista del
disco)TRK TTL (título de la pista)
ART NAME (nombre del artista de la pista)
# Si determinada información no se grabó en
un disco CD TEXT, se visualizará NO XXXX (p. ej.,
NO T-TTL).
Desplazamiento de títulos en el
display
Esta unidad sólo permite visualizar las prime-
ras 8 letras de DISC TTL, ART NAME, TRK TTL
y ART NAME. Cuando la información grabada
tiene más de 8 letras, se puede desplazar el
texto hacia la izquierda para que se pueda ver
el resto del título.
% Presione DISPLAY y mantenga presio-
nado hasta que el título comience a despla-
zarse hacia la izquierda.
El resto del título aparecerá en el display.
Uso de la compresión y del
enfatizador de graves
Estas funciones sólo se pueden usar con un re-
productor de CD múltiple compatible con ellas.
El uso de las funciones COMP (compresión) y
DBE (enfatizador dinámico de graves) le per-
mite ajustar la calidad sonora que ofrece el re-
productor de CD múltiple. Cada una de las
funciones tiene un ajuste de dos pasos. La
función COMP equilibra la salida de los soni-
dos más fuertes y más suaves a volúmenes
altos. La función DBE intensifica los niveles
de graves para proporcionar un sonido de re-
producción más completo. Escuche cada uno
de los efectos a medida que los selecciona y
utilice la función que realce mejor la reproduc-
ción de la pista o del CD que está escuchan-
do.
1 Presione FUNCTION para seleccionar
COMP.
Presione FUNCTION hasta que COMP aparez-
ca en el display.
# Si el reproductor de CD múltiple no es compa-
tible con la función COMP/DBE, se visualiza
NO COMP cuando se intenta seleccionar la fun-
ción.
2 Presione a o b para seleccionar el ajus-
te favorito.
Presione a o b repetidamente para cambiar
entre los siguientes ajustes:
COMP OFFCOMP 1COMP 2
COMP OFFDBE 1DBE 2
Reproductor de CD
múltiple
Es
86
Sección
08

Introducción a los ajustes
de audio
1 Indicador CUSTOM
Aparece cuando se selecciona la curva de
ecualización personalizada.
2 Curva de ecualización
Muestra el ecualizador preajustado selec-
cionado.
3 Visualización de audio
Muestra el estado de los ajustes de audio.
4 Indicador SW
Aparece cuando la salida de subgraves está
activada.
5 Indicador EQ-EX
Aparece en el display cuando se puede acti-
var la función EQ-EX.
6 Indicador LOUD
Aparece en el display cuando se activa la
sonoridad.
% Presione AUDIO para visualizar los
nombres de las funciones de audio.
Presione AUDIO repetidamente para cambiar
entre las siguientes funciones de audio:
FAD (ajuste del balance)EQ (ajuste de la
curva de ecualización)BASS (ajuste del nivel
de graves y agudos)LOUD (sonoridad)
SUB, W (ajuste de subgraves activado/de-
sactivado)/NOFAD (ajuste de la salida sin ate-
nuación activado/desactivado)80: 0 (ajuste
de subgraves)/NOFAD (ajuste de la salida sin
atenuación)HPF (filtro de paso alto)SLA
(ajuste del nivel de fuente)
# Si se ha seleccionado la función EQ-EX y sólo
cuando EQ-EX está activada y se selecciona
CUSTOM como la curva de ecualización, se
podrá cambiar a BASS.
# Cuando el ajuste del controlador de subgraves
es sólo P/O:FUL, no se podrá cambiar a SUB, W.
(Consulte la página 95.)
# Se puede seleccionar 80: 0 sólo cuando la sa-
lida de subgraves se activa en la función SUB, W.
# Cuando el ajuste del controlador de subgraves
es sólo P/O:FUL, se podrá cambiar al ajuste de la
salida sin atenuación activado/desactivado. (Con-
sulte la página 95.)
# Se puede seleccionar el ajuste de la salida sin
atenuación sólo cuando la salida sin atenuación
se activa en el ajuste de activado/desactivado.
# Cuando se seleccione el sintonizador de FM
como fuente, no se puede cambiar a SLA.
# Para volver a la visualización de cada fuente,
presione BAND.
Nota
Si no se utiliza la función de audio en unos 30 se-
gundos, el display volverá automáticamente a la
visualización de la fuente.
Compensación de las curvas
de ecualización (EQ-EX)
La función EQ-EX nivela los efectos de cada
curva de ecualización. Además, se pueden
ajustar los graves y agudos de cada fuente
cuando se selecciona la curva CUSTOM.
% Presione SW y mantenga presionado
para activar la función EQ-EX.
EQ-EX:ON aparece en el display. Se activará
la función EQ-EX.
# Para desactivar la función EQ-EX, presione
SW y mantenga presionado.
# Si no se utiliza la función EQ-EX en unos 8 se-
gundos, ésta se cancelará automáticamente.
Ajustes de audio
Es
87
Sección
Español
09

Uso del ajuste del balance
Se puede seleccionar el ajuste de fader/balan-
ce que proporciona un entorno de audio ideal
en todos los asientos ocupados.
1 Presione AUDIO para seleccionar FAD.
Presione AUDIO hasta que FAD aparezca en
el display.
# Si el balance se ajustó con anterioridad, se vi-
sualizará BAL.
2 Presione a o b para ajustar el balance
entre los altavoces delanteros/traseros.
Cada vez que se presiona a o b, se mueve el
balance entre los altavoces delanteros/trase-
ros hacia adelante o hacia atrás.
Se visualiza FAD :F15 FAD :R15 mientras el
balance entre los altavoces delanteros/trase-
ros se mueve desde adelante hacia atrás.
# FAD : 0 es el ajuste apropiado cuando se
usan sólo dos altavoces.
3 Presione c o d para ajustar el balance
entre los altavoces izquierdos/derechos.
Cuando se presiona c o d, se visualiza
BAL : 0. Cada vez que se presiona c o d,se
mueve el balance entre los altavoces izquier-
dos/derechos hacia la izquierda o hacia la de-
recha.
Se visualiza BAL :L9 BAL :R9 mientras se
mueve el balance entre los altavoces izquier-
dos/derechos desde la izquierda hacia la
derecha.
Uso del ecualizador
El ecualizador le permite ajustar la ecualiza-
ción de acuerdo con las características acústi-
cas del interior del automóvil.
Llamada de las curvas de
ecualización
Hay seis tipos de curvas de ecualización me-
morizadas que se pueden llamar con facilidad
en cualquier momento. A continuación se
ofrece una lista de estas curvas de ecualiza-
ción:
Visualización Curva de ecualización
SPR-BASS Supergraves
POWERFUL Potente
NATURAL Natural
VOCAL Vocal
CUSTOM Personalizada
EQ FLAT Plana
! CUSTOM es una curva de ecualización
ajustada creada por el usuario.
! Se puede crear una curva CUSTOM sepa-
rada por cada fuente. (El lector de CD in-
corporado y el lector de CD múltiple se
fijan al mismo ajuste de ecualización auto-
máticamente). Si hace ajustes, la configu-
ración de la curva de ecualización se
memorizará en CUSTOM.
! Cuando se selecciona EQ FLAT,nosein-
troduce ningún suplemento o corrección al
sonido. Esto es útil para verificar el efecto
de las curvas de ecualización cambiándose
alternativamente entre EQ FLAT y otra
curva de ecualización definida.
% Presione EQ para seleccionar el ecuali-
zador.
Presione EQ repetidamente para cambiar
entre las siguientes opciones:
SPR-BASSPOWERFULNATURAL
VOCALCUSTOMEQ FLAT
Ajuste de las curvas de
ecualización
Puede configurar el ajuste de la curva de
ecualización seleccionado según lo desee. Los
ajustes de la curva de ecualización configura-
dos se memorizan en CUSTOM.
Ajustes de audio
Es
88
Sección
09

1 Presione AUDIO para seleccionar EQ.
Presione AUDIO hasta que EQ aparezca en el
display.
2 Presione c o d para seleccionar la
banda a ajustar.
Cada vez que se presiona c o d, se cambia
entre las bandas en el siguiente orden:
EQ-L (bajo)EQ-M (medio)EQ-H (alto)
3 Presione a o b para ajustar el nivel de
la banda de ecualización.
Cada vez que se presiona a o b, se aumenta
o disminuye el nivel de la banda.
Se visualiza +6 6 mientras se aumenta o
disminuye el nivel.
# Se puede seleccionar otra banda y ajustar su
nivel.
Nota
Si se realizan ajustes cuando hay seleccionada
una curva distinta a CUSTOM, la curva recién
ajustada reemplazará a la anterior. Aparecerá
una nueva curva con CUSTOM en el display
mientras se selecciona la curva de ecualización.
Ajuste preciso de las curvas de
ecualización
Se puede ajustar la frecuencia central y el fac-
tor Q (características de las curvas) de cada
banda de curvas seleccionada (EQ-L/EQ-M/
EQ-H).
Nivel (dB)
Frecuencia central
Q=2N
Q=2W
Frecuencia (Hz)
1 Presione AUDIO y mantenga presiona-
do hasta que la frecuencia y el factor Q (p.
ej., F- 80:Q1W) aparezcan en el display.
2 Presione AUDIO para seleccionar la
banda deseada para el ajuste.
BajaMediaAlta
3 Presione c o d para seleccionar la fre-
cuencia deseada.
Presione c o d hasta que la frecuencia desea-
da aparezca en el display.
Baja: 4080100160 (Hz)
Media: 2005001k2k (Hz)
Alta: 3k8k10k12k (Hz)
4 Presione a o b para seleccionar el fac-
tor Q deseado.
Presione a o b hasta que el factor Q deseado
aparezca en el display.
2N1N1W2W
Nota
Si se realizan ajustes cuando hay seleccionada
una curva distinta a CUSTOM, la curva recién
ajustada reemplazará a la anterior. Aparecerá
una nueva curva con CUSTOM en el display
mientras se selecciona la curva de
ecualización.
Ajustes de audio
Es
89
Sección
Español
09

Ajuste de graves y agudos
Se pueden configurar los ajustes de graves y
agudos.
! Si se ha seleccionado la función EQ-EX,
esta función está activada y se selecciona
CUSTOM como la curva de ecualización,
se podrán configurar los ajustes de graves
y agudos.
Ajuste del nivel de graves y agudos
Se puede ajustar el nivel de graves y agudos.
1 Presione AUDIO para seleccionar BASS.
Presione AUDIO hasta que BASS aparezca en
el display.
# Si el nivel de agudos se ha ajustado con ante-
rioridad, se visualizará Treble.
2 Presione c o d para seleccionar graves
o agudos.
Presione c y se visualiza BASS. Presione d y
se visualiza Treble.
3 Presione a o b para ajustar el nivel.
Cada vez que se presiona a o b, se aumenta
o disminuye el nivel seleccionado de graves o
agudos. Se visualiza +6 6 mientras se au-
menta o disminuye el nivel.
Selección de la frecuencia de
graves
Se puede seleccionar la frecuencia de graves
para el ajuste del nivel.
1 Presione AUDIO y mantenga presiona-
do hasta que la frecuencia y el factor Q (p.
ej., F- 80:Q1W) aparezcan en el display.
2 Presione AUDIO para seleccionar B.
Presione AUDIO hasta que B aparezca en el
display.
3 Presione c o d para seleccionar la fre-
cuencia deseada.
Presione c o d hasta que la frecuencia desea-
da aparezca en el display.
4063100160 (Hz)
Selección de la frecuencia de
agudos
Se puede seleccionar la frecuencia de agudos
para el ajuste del nivel.
1 Presione AUDIO y mantenga presiona-
do hasta que la frecuencia y el factor Q (p.
ej., F- 80:Q1W) aparezcan en el display.
2 Presione AUDIO para seleccionar T.
Presione AUDIO hasta que T aparezca en el
display.
3 Presione c o d para seleccionar la fre-
cuencia deseada.
Presione c o d hasta que la frecuencia desea-
da aparezca en el display.
2k4k6k10k (Hz)
Ajuste de la sonoridad
La sonoridad compensa las deficiencias en
las gamas de sonido bajas y altas cuando se
escucha a un volumen bajo.
1 Presione AUDIO para seleccionar LOUD.
Presione AUDIO hasta que LOUD aparezca
en el display.
2 Presione a para activar la sonoridad.
El nivel de sonoridad (p. ej., LOUD :MID) apa-
rece en el display.
Ajustes de audio
Es
90
Sección
09

3 Presione c o d para seleccionar el nivel
deseado.
Cada vez que se presiona c o d, se selecciona
el nivel en el siguiente orden:
LOW (bajo)MID (medio)HI (alto)
4 Presione b para desactivar la sonori-
dad.
LOUD :OFF aparece en el display.
Uso de la salida de subgraves
Activación y desactivación de
subgraves
Esta unidad está equipada con una salida de
subgraves que se puede activar o desactivar.
1 Presione AUDIO para seleccionar
SUB, W.
Presione AUDIO hasta que SUB, W aparezca
en el display.
# También puede seleccionar el menú de ajus-
tes de subgraves presionando SW en la unidad.
# Cuando el ajuste del controlador de subgraves
es P/O:FUL, no se puede seleccionar SUB, W.
2 Presione a para activar la salida de sub-
graves.
Sub W.:NOR aparece en el display. Se activa
la salida de subgraves.
# Si la salida de subgraves se ha definido en la
fase inversa, se visualizará Sub W.:REV.
# Para desactivar la salida de subgraves, presio-
ne b.
3 Presione c o d para seleccionar la fase
de la salida de subgraves.
Presione c para seleccionar la fase inversa y
Rev. aparece en el display. Presione d para se-
leccionar la fase normal y Normal aparece en
el display.
Configuración de los ajustes de
subgraves
Cuando la salida de subgraves está activada,
se puede ajustar la frecuencia de corte y el
nivel de salida del altavoz de subgraves.
1 Presione AUDIO para seleccionar 80: 0.
Presione AUDIO hasta que 80: 0 aparezca en
el display.
# Cuando la salida de subgraves está activada,
se puede seleccionar 80: 0.
# Si se ha configurado un ajuste de subgraves
con anterioridad, se visualizará la frecuencia se-
leccionada previamente en lugar de 80.
# También puede seleccionar el menú de ajus-
tes de subgraves presionando SW en la unidad.
2 Presione c o d para seleccionar la fre-
cuencia de corte.
Cada vez que se presiona c o d, se selecciona
la frecuencia de corte en el siguiente orden:
5080125 (Hz)
Sólo las frecuencias más bajas que aquéllas
en la gama seleccionada se generan por el al-
tavoz de subgraves.
3 Presione a o b para ajustar el nivel de
salida del altavoz de subgraves.
Cada vez que se presiona a o b, se aumenta
o disminuye el nivel del altavoz de subgraves.
Se visualiza +6 6 mientras se aumenta o
disminuye el nivel.
Uso de la salida sin atenuación
Cuando la salida sin atenuación está activada,
la señal de audio no pasa por el filtro de paso
bajo (para el altavoz de subgraves) de esta uni-
dad, sino que se genera a través de la salida
RCA.
Ajustes de audio
Es
91
Sección
Español
09

1 Utilice AUDIO para seleccionar el ajuste
de la salida sin atenuación activado/desac-
tivado.
Presione AUDIO hasta que NOFAD:ON apa-
rezca en el display.
# Cuando el ajuste del controlador de subgraves
es sólo P/O:FUL, se podrá cambiar al ajuste de la
salida sin atenuación activado/desactivado. (Con-
sulte la página 95.)
2 Presione a para activar la salida sin ate-
nuación.
NOFAD:ON aparece en el display. Se activa la
salida sin atenuación.
# Para desactivar la salida sin atenuación, pre-
sione b.
Ajuste del nivel de la salida sin
atenuación
Cuando la salida sin atenuación está activada,
se puede ajustar el nivel de la salida sin ate-
nuación.
1 Utilice AUDIO para seleccionar el ajuste
de la salida sin atenuación.
Presione AUDIO hasta que NOFAD: 0 aparez-
ca en el display.
2 Presione a o b para ajustar el nivel de
salida sin atenuación.
Cada vez que se presiona a o b, se aumenta
o disminuye el nivel de salida sin atenuación.
Se visualiza +6 6 mientras se aumenta o
disminuye el nivel.
Uso del filtro de paso alto
Cuando no desea que se generen los sonidos
bajos de la gama de frecuencias de salida de
subgraves a través de los altavoces delanteros
o traseros, active el filtro de paso alto (HPF).
Sólo las frecuencias más altas que aquéllas
en la gama seleccionada se generan a través
de los altavoces delanteros o traseros.
1 Presione AUDIO para seleccionar HPF.
Presione AUDIO hasta que HPF aparezca en
el display.
2 Presione a para activar el filtro de paso
alto.
HPF: 80 aparece en el display. Se activa el fil-
tro de paso alto.
# Si el filtro de paso alto se ha ajustado con an-
terioridad, se visualizará la frecuencia previamen-
te seleccionada en lugar de HPF: 80.
# Para desactivar el filtro de paso alto, presione
b.
3 Presione c o d para seleccionar la fre-
cuencia de corte.
Cada vez que se presiona c o d, se selecciona
la frecuencia de corte en el siguiente orden:
5080125 (Hz)
Sólo las frecuencias más altas que aquéllas
en la gama seleccionada se generan a través
de los altavoces delanteros o traseros.
Ajuste de los niveles de la
fuente
La función SLA (ajuste del nivel de fuente) le
permite ajustar el nivel de volumen de cada
fuente para evitar cambios radicales en el vo-
lumen cuando se cambia entre las fuentes.
! Los ajustes se basan en el nivel de volumen
del sintonizador de FM, que se mantiene
inalterado.
1 Compare el nivel de volumen del sinto-
nizador de FM con el de la fuente que
desea ajustar.
Ajustes de audio
Es
92
Sección
09

2 Presione AUDIO para seleccionar SLA.
Presione AUDIO hasta que SLA aparezca en
el display.
3 Presione a o b para ajustar el volumen
de la fuente.
Cada vez que se presiona a o b, se aumenta
o disminuye el volumen de la fuente.
Se visualiza SLA : +4 SLA : 4 mientras se
aumenta o disminuye el volumen de la fuente.
Notas
! Como el volumen del sintonizador de FM es el
control, no es posible aplicarle los ajustes del
nivel de fuente al sintonizador.
! El nivel del volumen del sintonizador de MW/
LW también se puede ajustar con el ajuste del
nivel de fuente.
! El reproductor de CD incorporado y el repro-
ductor de CD múltiple se definen automática-
mente con el mismo ajuste del nivel de
fuente.
! La unidad externa 1 y la unidad externa 2 se
definen automáticamente con el mismo ajus-
te del nivel de fuente.
Ajustes de audio
Es
93
Sección
Español
09

Configuración de los
ajustes iniciales
Se puede realizar la configuración inicial de
los diferentes ajustes de esta unidad.
1 Visualización de función
Muestra el estado de la función.
1 Presione SOURCE y mantenga presiona-
do hasta que se apague la unidad.
2 Presione FUNCTION y mantenga presio-
nado hasta que el nombre de la función
aparezca en el display.
3 Presione FUNCTION para seleccionar
uno de los ajustes iniciales.
Presione FUNCTION repetidamente para cam-
biar entre los siguientes ajustes:
FM (paso de sintonía de FM)A-PI (búsqueda
PI automática)WARN (tono de advertencia)
AUX (entrada auxiliar)R-SP (salida poste-
rior y controlador de subgraves)
Siga las instrucciones que se indican a conti-
nuación para operar cada ajuste en particular.
# Para cancelar los ajustes iniciales, presione
BAND.
# También se pueden cancelar los ajustes ini-
ciales presionando FUNCTION hasta que se apa-
gue la unidad.
Ajuste del paso de sintonía
de FM
Normalmente, el paso de sintonía de FM que
utiliza la sintonización por búsqueda es de 50
kHz. Cuando la función AF o TA está activada,
el paso de sintonía cambia automáticamente
a 100 kHz. Puede ser conveniente ajustar el
paso de sintonía a 50 kHz cuando la función
AF está activada.
1 Presione FUNCTION para seleccionar
FM.
Presione FUNCTION repetidamente hasta que
FM aparezca en el display.
2 Presione c o d para seleccionar el paso
de sintonía de FM.
Al presionar c o d se cambiará el paso de sin-
tonía de FM entre 50 kHz y 100 kHz mientras
la función AF o TA está activada. El paso de
sintonía de FM seleccionado aparecerá en el
display.
Nota
El paso de sintonía es de 50 kHz durante la sinto-
nización manual.
Cambio de la búsqueda PI
automática
La unidad puede buscar automáticamente
una emisora diferente con el mismo progra-
ma, aun durante la llamada de emisoras pre-
sintonizadas.
1 Presione FUNCTION para seleccionar
A-PI.
Presione FUNCTION repetidamente hasta que
A-PI aparezca en el display.
Ajustes iniciales
Es
94
Sección
10

2 Presione a o b para activar o desacti-
var A-PI.
Al presionar a o b se activará o desactivará
A-PI y se visualizará en el display el estado co-
rrespondiente (p. ej., A-PI :ON).
Cambio del tono de
advertencia
Si no se extrae la carátula de la unidad princi-
pal dentro de los cinco segundos después de
desconectar la llave de encendido del auto-
móvil, se emitirá un tono de advertencia. Se
puede desactivar el tono de advertencia.
1 Presione FUNCTION para seleccionar
WARN.
Presione FUNCTION repetidamente hasta que
WARN aparezca en el display.
2 Presione a o b para activar o desacti-
var WARN.
Al presionar a o b se activará o desactivará
WARN y se visualizará en el display el estado
correspondiente (p. ej., WARN :ON).
Cambio del ajuste de un
equipo auxiliar
Se puede utilizar un equipo auxiliar con esta
unidad. Active el ajuste auxiliar al utilizar un
equipo auxiliar conectado a esta unidad.
1 Presione FUNCTION para seleccionar
AUX.
Presione FUNCTION repetidamente hasta que
AUX aparezca en el display.
2 Presione a o b para activar o desacti-
var AUX.
Al presionar a o b se activará o desactivará
AUX y se visualizará en el display el estado co-
rrespondiente (p. ej., AUX :ON).
Ajuste de la salida posterior y
del controlador de subgraves
La salida posterior de esta unidad (salida de
cables de altavoces traseros) se puede usar
para la conexión de altavoces de toda la gama
(R-SP : FUL) o subgraves (R-SP : S/W). Si se
cambia el ajuste de la salida posterior a
R-SP : S/W, se podrá conectar el cable de alta-
voces traseros directamente al altavoz de sub-
graves sin necesidad de usar un amplificador
auxiliar.
La unidad viene ajustada para la conexión de
altavoces traseros de toda la gama
(R-SP : FUL). Cuando se conectan las salidas
posteriores a altavoces de toda la gama (cuan-
do se selecciona R-SP : FUL), se puede co-
nectar la salida RCA de subgraves a un
altavoz de subgraves. En este caso, puede
optar por usar la función P/O:S/W incorpora-
da (fase del filtro de paso bajo) del controlador
de subgraves o la función P/O:FUL auxiliar.
1 Presione FUNCTION para seleccionar
R-SP.
Presione FUNCTION repetidamente hasta que
R-SP aparezca en el display.
2 Presione a o b para cambiar el ajuste
de la salida posterior.
Al presionar a o b se cambiará entre
R-SP : FUL (altavoz de toda la gama) y
R-SP : S/W (altavoz de subgraves), y se visuali-
zará en el display el estado correspondiente.
# Cuando no se conecta el altavoz de subgraves
a la salida posterior, seleccione R-SP : FUL.
Ajustes iniciales
Es
95
Sección
Español
10

# Cuando se conecta el altavoz de subgraves a
la salida posterior, seleccione R-SP : S/W para el
altavoz.
# Cuando el ajuste de la salida posterior es
R-SP : S/W, no se puede cambiar el controlador
de subgraves.
3 Presione c o d para cambiar la salida
de subgraves o la salida sin atenuación.
Al presionar c o d se cambiará entre
P/O:S/W y P/O:FUL, y se visualizará en el dis-
play el estado correspondiente.
Notas
! Aun cuando se cambie este ajuste, no habrá
ninguna salida a menos que se active la sali-
da sin atenuación (consulte Uso de la salida
sin atenuación en la página 91) o la salida de
subgraves (consulte Uso de la salida de sub-
graves en la página 91) en el menú de audio.
! Si se cambia el controlador de subgraves, se
restablecerán los valores de fábrica de la sali-
da de subgraves y la salida sin atenuación en
el menú de audio.
Ajustes iniciales
Es
96
Sección
10

Cambio de la iluminación
del display
Se puede cambiar el color de la iluminación
del display.
% Presione ILLUMINATION.
ILL:CHG aparece en el display.
Cada vez que presione ILLUMINATION cam-
biará el color:
RAINBOW(arco iris)WHITE(blanco)
SKYBLUE(azul cielo)O-Blue(azul océano)
DEEPBLUE(azul marino)PINK(rosa)RED
(rojo)AMBER(ámbar)ORANGE(naranja)
GREEN(verde)P-GREEN(verde puro)
Nota
El ajuste RAINBOW va pasando de manera conti-
nua por cada uno de los colores.
Cambio de la iluminación
de los botones
Se puede cambiar el color de la iluminación
de los botones.
1 Presione ILLUMINATION y mantenga
presionado hasta que KEY:CHG aparezca
en el display.
2 Presione ILLUMINATION para seleccio-
nar un color de iluminación de los botones.
Cada vez que presione ILLUMINATION cam-
biará el color:
WHITE(blanco)SKYBLUE(azul cielo)
O-Blue(azul océano)DEEPBLUE(azul ma-
rino)PINK(rosa)RED(rojo)AMBER
(ámbar)ORANGE(naranja)GREEN(verde)
P-GREEN(verde puro)
Notas
! Si el color de la iluminación del display está
establecido en RAINBOW, la iluminación de
los botones cambia a RAINBOW simultánea-
mente. Si desea cambiar la iluminación de los
botones, cambie la iluminación del display a
un color que no seaRAINBOW y, a continua-
ción, utilice la función de iluminación de los
botones.
! No se puede pasar directamente desde el
ajuste de iluminación del display al de ilumi-
nación de los botones. Primero presione
BAND para volver al display normal y, a conti-
nuación, intente nuevamente.
Uso de la fuente AUX
Un interconector IP-BUS-RCA tal como el CD-
RB20/CD-RB10 (que se vende por separado) le
permite conectar esta unidad a un equipo au-
xiliar con salida RCA. Para más información,
consulte el manual de instrucciones del inter-
conector de IP-BUS-RCA.
Selección de AUX como la fuente
% Presione SOURCE para seleccionar AUX
como la fuente.
Presione SOURCE hasta que AUX aparezca
en el display.
# Si no se activa el ajuste de la fuente auxiliar,
no se podrá seleccionar AUX. Para más informa-
ción, consulte Cambio del ajuste de un equipo au-
xiliar en la página 95.
Ajuste del título del equipo
auxiliar
Se puede cambiar el título que se visualiza
para la fuente AUX.
Otras funciones
Es
97
Sección
Español
11

1 Después de seleccionar AUX como la
fuente, presione FUNCTION y mantenga
presionado hasta que TITLE IN aparezca en
el display.
2 Presione a o b para seleccionar una
letra del alfabeto.
Cada vez que se presiona a, se visualizará
una letra del alfabeto en orden ascendente A
B C ... X Y Z, y los números y símbolos en el
orden de 1 2 3 ... > [ ]. Cada vez que se presio-
na b, se visualizará una letra en el orden inver-
so, tal como Z Y X ... C B A.
3 Presione d para mover el cursor a la
próxima posición de carácter.
Cuando se visualice la letra deseada, presione
d para mover el cursor a la próxima posición y
seleccione la próxima letra. Presione c para
mover el cursor hacia atrás en el display.
4 Mueva el cursor a la última posición
presionando d después de ingresar el
título.
Al presionar d una vez más, el título ingresa-
do se almacena en la memoria.
5 Presione BAND para volver a la visuali-
zación de reproducción.
Otras funciones
Es
98
Sección
11

Comprensión de los
mensajes de error del
reproductor de CD
incorporado
Al comunicarse con su concesionario o el Ser-
vicio Técnico Oficial de Pioneer más próximo
a su domicilio, asegúrese de tener escrito el
mensaje de error.
Mensaje Causa Acción
ERROR-11, 12,
17, 30
Disco sucio Limpie el disco.
ERROR-11, 12,
17, 30
Disco rayado Reemplace el
disco.
ERROR-15 El disco inser-
tado no contiene
datos
Reemplace el
disco.
ERROR-10, 11,
12, 15, 17, 30,
A0
Problema eléctri-
co o mecánico
Cambie la llave de
encendido del
automóvil entre las
posiciones de acti-
vación y desactiva-
ción, o cambie a
una fuente diferen-
te, y después vuel-
va a activar el
reproductor de CD.
ERROR-22, 23 No se puede re-
producir el for-
mato del CD
Reemplace el
disco.
ERROR-44 Se saltan todas
las pistas
Reemplace el
disco.
HEAT Recalentamiento
del reproductor
de CD
Apague el repro-
ductor de CD y es-
pere que se enfríe.
Silenciamiento del sonido
El sonido de esta unidad se silencia automáti-
camente en los siguientes casos:
! Cuando se realiza o recibe una llamada
con un teléfono móvil conectado a esta uni-
dad.
! Cuando funciona el sistema de orientación
por voz de la unidad de navegación Pioneer
contectada a esta unidad.
El sonido se desactiva, se visualiza MUTE yno
se puede ajustar el audio, salvo el control del
volumen. La operación vuelve a su estado nor-
mal cuando se termina la llamada telefónica o
la orientación por voz.
Reproductor de CD y cuidados
! Sólo utilice discos compactos que tengan
una de las marcas Compact Disc Digital
Audio que se muestran a continuación.
! Sólo utilice discos compactos normales y
redondos. Si se coloca un CD de otra
forma y no redondo, es posible que el CD
se atasque en el reproductor o que no se
reproduzca correctamente.
! Revise todos los discos compactos para ver
si están agrietados, rayados o torcidos
antes de reproducirlos. Es posible que los
CD que se encuentran en estas condicio-
nes no se reproduzcan correctamente. No
utilice estos discos.
! Evite tocar la superficie grabada (sin impre-
sión) cuando maneje los discos.
! Almacene los discos en sus cajas cuando
no los utilice.
Información adicional
Es
99
Apéndice
Español

! Mantenga los discos fuera del alcance de
la luz solar directa y no los exponga a altas
temperaturas.
! No fije etiquetas, no escriba ni aplique sus-
tancias químicas en la superficie de los
discos.
! Para limpiar un CD, pásele un paño suave
desde el centro hacia afuera.
! Si se usa un calefactor cuando hace frío,
se puede condensar humedad en las pie-
zas internas del reproductor de CD. La hu-
medad condensada puede causar una falla
del reproductor. En caso de que esto ocu-
rra, apague el reproductor de CD durante
alrededor de una hora para permitir que el
reproductor se seque y limpie los discos
húmedos con un paño suave para eliminar
la humedad.
! Las vibraciones en las carreteras pueden
interrumpir la reproducción de un CD.
Discos CD-R/CD-RW
! Cuando se utilizan discos CD-R/CD-RW,
sólo se pueden reproducir los discos finali-
zados.
! Es posible que no se puedan reproducir los
discos CD-R/CD-RW grabados en un gra-
bador de CD de música o una PC debido a
sus características, por las rayaduras o la
suciedad que pueda tener el disco, o por la
suciedad, condensación, etc. acumulada
en la lente del producto.
! Es posible que no se puedan reproducir los
discos grabados en una PC por los ajustes
de la aplicación y el entorno utilizados.
Grabe los discos con el formato correcto.
(Para obtener información, póngase en
contacto con el fabricante de la aplica-
ción.)
! Puede resultar imposible reproducir los dis-
cos CD-R/CD-RW en caso de exposición a
la luz solar directa, altas temperaturas o de-
bido a las condiciones de almacenamiento
en el vehículo.
! Es posible que no se puedan visualizar los
títulos y demás información de texto graba-
dos en un disco CD-R/CD-RW en esta uni-
dad (en el caso de datos de audio (CD-
DA)).
! Esta unidad es compatible con la función
de salto de pista de discos CD-R/CD-RW.
Las pistas con información de salto de
pista se saltan automáticamente (en el
caso de datos de audio (CD-DA)).
! Si se coloca un disco CD-RW en esta uni-
dad, el tiempo de reproducción será mayor
que el de un disco CD o CD-R convencio-
nal.
! Lea las precauciones que se incluyen con
los discos CD-R/CD-RW antes de
utilizarlos.
Ficheros MP3, WMA y WAV
! MP3 es la abreviatura de MPEG Audio
Layer 3 y alude a una norma de tecnología
de compresión de audio.
! WMA es la abreviatura de Windows
Media" Audio y alude a una tecnología
de compresión de audio desarrollada por
Microsoft Corporation. Los datos WMA se
pueden codificar utilizando Windows
Media Player versión 7 o posterior.
! Esta unidad reproduce ficheros WMA codi-
ficados con Windows Media Player versión
7, 7.1, 8 y 9.
! WAV es la abreviatura de waveform y
alude a un formato de fichero de audio es-
tándar para Windows
®
.
Información adicional
Es
100
Apéndice

! Según la versión de Windows Media Pla-
yer utilizada para codificar los ficheros
WMA, es posible que no se visualicen co-
rrectamente los nombres de álbumes y
demás información de texto.
! Es posible que ocurra un pequeño retardo
al iniciar la reproducción de ficheros WMA
codificados con datos de imagen.
! Esta unidad permite reproducir ficheros
MP3/WMA/WAV en discos CD-ROM, CD-R
y CD-RW. También se pueden reproducir
grabaciones de discos compatibles con los
niveles 1 y 2 de la norma ISO9660, y con el
sistema de archivo Romeo y Joliet.
! Se pueden reproducir discos grabados
compatibles con el formato multi-sesión.
! Los ficheros MP3/WMA/WAV no son com-
patibles con la transferencia de datos en
formato Packet Write.
! Se pueden visualizar, como máximo, 64 ca-
racteres del nombre de un fichero, incluida
la extensión (.mp3, .wma o .wav), contados
desde el primer carácter.
! Se pueden visualizar, como máximo, 64 ca-
racteres del nombre de una carpeta.
! En el caso de los ficheros grabados con el
sistema Romeo, sólo se pueden visualizar
los primeros 64 caracteres.
! Al reproducir discos con ficheros MP3/
WMA/WAV y datos de audio (CD-DA), tales
como CD-EXTRA y CD de MODO MIXTO
(MIXED-MODE CD), los dos tipos de discos
se pueden reproducir sólo si se cambia el
modo entre MP3/WMA/WAV y CD-DA.
! La secuencia de selección de la carpeta
que se desea reproducir y las demás opera-
ciones constituyen la secuencia de escritu-
ra que utiliza el programa de escritura. Por
este motivo, la secuencia esperada en el
momento de la reproducción puede no
coincidir con la secuencia de reproducción
real. Sin embargo, hay algunos programas
de escritura que permiten definir el orden
de la reproducción.
! Algunos CD de audio contienen pistas que
se fusionan entre sí sin una pausa. Si estos
discos se convierten a ficheros MP3/WMA/
WAV y se copian en un CD-R/CD-RW/CD-
ROM, los ficheros se reproducirán en este
reproductor con una breve pausa entre
ellos, al margen de la duración de la pausa
entre las pistas del CD original.
Importante
! Al escribir el nombre de un fichero MP3,
WMA o WAV, añada la extensión correspon-
diente (.mp3, .wma o .wav).
! Esta unidad reproduce los ficheros con la ex-
tensión (.mp3, .wma o .wav) como fichero
MP3, WMA o WAV. Para evitar que se genere
ruido y se produzcan fallas de funcionamien-
to, no utilice esta extensión para otros fiche-
ros que no sean ficheros MP3, WMA o WAV.
Información adicional sobre MP3
! Los ficheros son compatibles con los for-
matos de etiqueta ID3 Ver. 1.0, 1.1, 2.2, 2.3 y
2.4 que permiten visualizar el álbum (título
del disco), la pista (título de la pista), el ar-
tista (artista de la pista) y comentarios. Las
versiones 2.x de la etiqueta ID3 tienen prio-
ridad cuando coexisten las versiones 1.x y
2.x.
! El enfatizador funciona sólo cuando se re-
producen ficheros MP3 con frecuencias de
32; 44,1 y 48 kHz. (Se pueden reproducir
frecuencias de muestreo de 16; 22,05; 24;
32; 44,1; 48 kHz.)
! No existe compatibilidad con la lista de re-
producción m3u.
! No existe compatibilidad con los formatos
MP3i (MP3 interactivo) y mp3 PRO.
Información adicional
Es
101
Apéndice
Español

! La calidad del sonido de los ficheros MP3
suele ser mejor cuando se utilizan velocida-
des de grabación superiores. Esta unidad
puede reproducir grabaciones con veloci-
dades de 8 kbps a 320 kbps, pero para
poder disfrutar de una determinada calidad
de sonido, se recomienda utilizar sólo los
discos grabados con una velocidad de 128
kbps, como mínimo.
Información adicional sobre WMA
! WMA es la abreviatura de Windows
Media" Audio y alude a una tecnología
de compresión de audio desarrollada por
Microsoft Corporation. Los datos WMA se
pueden codificar utilizando Windows
Media Player versión 7 o posterior.
! Sólo se pueden reproducir ficheros WMA
en las frecuencias de 32; 44,1 y 48 kHz.
! La calidad del sonido de los ficheros WMA
suele ser mejor cuando se utilizan velocida-
des de grabación superiores. Esta unidad
puede reproducir grabaciones con veloci-
dades de 48 kbps a 320 kbps (CBR) o de 48
kbps a 384 kbps (VBR), pero para poder dis-
frutar de una determinada calidad de soni-
do, se recomienda utilizar los discos
grabados con una velocidad mayor.
! Esta unidad no es compatible con los si-
guientes formatos.
Windows Media Audio 9 Professional
(5.1 canales)
Windows Media Audio 9 Lossless
Windows Media Audio 9 Voice
Información adicional sobre WAV
! Esta unidad reproduce ficheros WAV codifi-
cados en los formatos LPCM (PCM lineal)
o MS ADPCM.
! Sólo se pueden reproducir ficheros WAV
en las frecuencias de 16; 22,05; 24; 32; 44,1
y 48 kHz (LPCM) o de 22,05 y 44,1 kHz (MS
ADPCM). Puede redondearse la frecuencia
de muestreo que se visualiza en el display.
! La calidad del sonido de los ficheros WAV
suele ser mejor cuando se utiliza una gran
cantidad de bits de cuantificación. Esta
unidad puede reproducir grabaciones con
8 y 16 bits de cuantificación (LPCM) o con
4 bits de cuantificación (MS ADPCM), pero
para poder disfrutar de una determinada
calidad de sonido, se recomienda utilizar
discos grabados con la mayor cantidad de
bits de cuantificación.
Acerca de las carpetas y los
ficheros MP3/WMA/WAV
! A continuación se ilustra un esquema de
un CD-ROM con ficheros MP3/WMA/WAV.
Las subcarpetas se muestran como carpe-
tas de la carpeta seleccionada.
Información adicional
Es
102
Apéndice

1
2
3
1 Primer nivel
2 Segundo nivel
3 Tercer nivel
Notas
! Esta unidad asigna los números de carpetas.
El usuario no puede asignarlos.
! No se pueden revisar las carpetas que no tie-
nen ficheros MP3/WMA/WAV. (Se saltarán
estas carpetas sin mostrar su número.)
! Se pueden reproducir ficheros MP3/WMA/
WAV en carpetas de hasta 8 niveles. Sin em-
bargo, el comienzo de la reproducción demo-
ra cuando los discos tienen muchos niveles.
Por este motivo, se recomienda crear discos
con no más de 2 niveles.
! Se pueden reproducir hasta 99 carpetas de un
disco.
Información adicional
Es
103
Apéndice
Español

Glosario
Etiqueta ID3
Es un método para incorporar información re-
lacionada con las pistas en un fichero MP3.
Esta información incorporada puede consistir
en el título de la pista, el nombre del artista, el
título del álbum, el género musical, el año de
producción, comentarios y otros datos. El con-
tenido se puede editar libremente utilizando
programas con funciones de edición de eti-
quetas ID3. Si bien las etiquetas están limi-
tadas en la cantidad de caracteres, se puede
visualizar la información cuando se reproduce
la pista.
Formato ISO9660
Es la norma internacional para la lógica del
formato de las carpetas y los ficheros de un
CD-ROM. Respecto de este formato, existen
reglas para los siguientes dos niveles.
Nivel 1:
Para el nombre del fichero se utiliza un forma-
to 8,3 (el nombre consta de hasta 8 caracteres,
mayúsculas en inglés de medio byte, números
de medio byte y el signo _, con una exten-
sión de tres caracteres).
Nivel 2:
El nombre del fichero puede tener hasta 31 ca-
racteres (incluido el signo . y la extensión del
fichero). Cada carpeta contiene menos de 8 je-
rarquías.
Formatos extendidos
Joliet:
Los nombres de los ficheros pueden tener
hasta 64 caracteres.
Romeo:
Los nombres de los ficheros pueden tener
hasta 128 caracteres.
m3u
Las listas de reproducción creadas con el pro-
grama WINAMP tienen la extensión (.m3u).
MP3
MP3 es la abreviatura de MPEG Audio Layer
3. Es una norma de compresión de audio de-
finida por un grupo de trabajo (MPEG) de la
ISO (Organización Internacional de Normaliza-
ción). El MP3 puede comprimir los datos de
audio hasta aproximadamente una décima
parte del nivel de un disco convencional.
MS ADPCM
Esta sigla significa Microsoft Adaptive Diffe-
rential Pulse Code Modulation (modulación
adaptativa diferencial de códigos de impulso
Microsoft) y representa el sistema de graba-
ción de señal que se utiliza para los progra-
mas de multimedia de Microsoft Corporation.
Multi-sesión
La multi-sesión es un método de grabación
que permite grabar datos adicionales en otro
momento. Al grabar datos en un CD-ROM,
CD-R o CD-RW, etc., se considera a todos los
datos desde el comienzo hasta el final como
una sola unidad o sesión. Este método permi-
te grabar más de 2 sesiones en un solo disco.
Número de bits de cuantificación
La calidad del sonido de los ficheros WAV
suele ser mejor cuando se utiliza una gran
cantidad de bits de cuantificación. Esta uni-
dad puede reproducir grabaciones con 8 y 16
bits de cuantificación (LPCM) o con 4 bits de
cuantificación (MS ADPCM), pero para poder
disfrutar de una determinada calidad de soni-
do, se recomienda utilizar discos grabados
con la mayor cantidad de bits de cuantifica-
ción.
Packet Write
Es un término general que se refiere a un mé-
todo para escribir ficheros en un CD-R, etc.,
en el momento necesario, al igual que en el
caso de los ficheros que se escriben en un dis-
kette o en el disco duro.
Información adicional
Es
104
Apéndice

PCM lineal (LPCM)/Modulación de
códigos de impulso
Esta sigla significa Linear Pulse Code Modu-
lation (modulación lineal de códigos de im-
pulso) y representa el sistema de grabación de
señal que se utiliza para discos DVD y CD de
música.
VBR
VBR es la abreviatura de velocidad de graba-
ción variable. En general, se utiliza mucho
más la velocidad de grabación constante
(CBR). Pero al ajustar con flexibilidad la veloci-
dad de grabación de acuerdo con las necesi-
dades de compresión de audio, se puede
lograr un nivel de calidad del sonido con prio-
ridades de compresión.
Velocidad de grabación
Expresa el volumen de datos por segundo o
unidades bps (bits por segundo). Cuanto
mayor sea la velocidad, más información
habrá para reproducir el sonido. Si se utiliza el
mismo método de codificación (tal como
MP3), cuanto mayor sea la velocidad, la cali-
dad del sonido será superior.
WAV
WAV es la abreviatura de waveform y alude a
un formato de fichero de audio estándar para
Windows
®
.
WMA
WMA es la abreviatura de Windows Media"
Audio y alude a una tecnología de compre-
sión de audio desarrollada por Microsoft Cor-
poration. Los datos WMA se pueden codificar
utilizando Windows Media Player versión 7 o
posterior.
Microsoft, Windows Media y el logo de Win-
dows son marcas comerciales o registradas
de Microsoft Corporation en los EE.UU. y/o en
otros países.
Información adicional
Es
105
Apéndice
Español

Especificaciones
Generales
Fuente de alimentación ........ 14,4 V CC (10,8 15,1 V per-
misible)
Sistema de conexión a tierra
..................................................... Tipo negativo
Consumo máximo de corriente
..................................................... 10,0 A
Dimensiones (An × Al × Pr):
DIN
Bastidor .................... 178 × 50 × 157 mm
Cara anterior .......... 188 × 58 × 20 mm
D
Bastidor .................... 178 × 50 × 162 mm
Cara anterior .......... 170 × 46 × 15 mm
Peso ............................................... 1,4 kg
Audio
Potencia de salida máxima
..................................................... 50 W × 4
50 W × 2/4 W +70W×1/2
W (para altavoz de subgra-
ves)
Salida de potencia continua
..................................................... 27 W × 4 (DIN 45324,
+B=14,4 V)
Impedancia de carga ............. 4 W (4 8 W permisible)
Nivel de salida máx. del preamplificador (Pre-out)/impe-
dancia de salida ....................... 2,2 V/1 kW
Ecualizador (ecualizador paramétrico de 3 bandas):
Baja
Frecuencia .............. 40/80/100/160 Hz
Factor Q .................... 0,35/0,59/0,95/1,15 (+6 dB
si intensificado)
Ganancia ................. ±12 dB
Media
Frecuencia .............. 200/500/1k/2k Hz
Factor Q .................... 0,35/0,59/0,95/1,15 (+6 dB
si intensificado)
Ganancia ................. ±12 dB
Alta
Frecuencia .............. 3,15k/8k/10k/12,5k Hz
Factor Q .................... 0,35/0,59/0,95/1,15 (+6 dB
si intensificado)
Ganancia ................. ±12 dB
Contorno de sonoridad:
Bajo ...................................... +3,5 dB (100 Hz), +3 dB (10
kHz)
Medio .................................. +10 dB (100 Hz), +6,5 dB
(10 kHz)
Alto ....................................... +11 dB (100 Hz), +11 dB
(10 kHz)
(volumen: 30 dB)
Controles de tono:
Graves
Frecuencia .............. 40/63/100/160 Hz
Ganancia ................. ±12 dB
Agudos
Frecuencia .............. 2,5k/4k/6,3k/10k Hz
Ganancia ................. ±12 dB
HPF:
Frecuencia ........................ 50/80/125 Hz
Pendiente .......................... 12 dB/oct.
Altavoz de subgraves:
Frecuencia ........................ 50/80/125 Hz
Pendiente .......................... 18 dB/oct.
Ganancia ........................... ±12 dB
Fase ...................................... Normal/Inversa
Reproductor de CD
Sistema ........................................ Sistema de audio de discos
compactos
Discos utilizables .................... Disco compacto
Formato de la señal:
Frecuencia de muestreo
........................................... 44,1 kHz
Número de bits de cuantificación
........................................... 16; lineal
Características de la frecuencia
..................................................... 5 20.000 Hz (±1 dB)
Relación de señal a ruido .... 94 dB (1 kHz) (red IEC-A)
Gama dinámica ........................ 92 dB (1 kHz)
Número de canales ................ 2 (estéreo)
Formato de decodificación MP3
..................................................... MPEG-1 & 2 Audio Layer 3
Formato de decodificación WMA
..................................................... Ver. 7, 8 & 9
Formato de señal WAV ......... PCM lineal & MS ADPCM
Sintonizador de FM
Gama de frecuencias ............ 87,5 108 MHz
Sensibilidad utilizable ........... 8 dBf (0,7 µV/75 W, mono,
Señal/ruido: 30 dB)
Umbral de silenciamiento a 50 dB
..................................................... 10 dBf (0,9 µV/75 W, mono)
Relación de señal a ruido .... 75 dB (red IEC-A)
Distorsión .................................... 0,3 % (a 65 dBf, 1 kHz, esté-
reo)
0,1 % (a 65 dBf, 1 kHz,
mono)
Respuesta de frecuencia ..... 30 15.000 Hz (±3 dB)
Información adicional
Es
106
Apéndice

Separación estéreo ................. 45 dB (a 65 dBf, 1 kHz)
Selectividad ................................ 80 dB (±200 kHz)
Sintonizador de MW
Gama de frecuencias ............ 531 1.602 kHz (9 kHz)
Sensibilidad utilizable ........... 18 µV (Señal/ruido: 20 dB)
Relación de señal a ruido .... 65 dB (red IEC-A)
Sintonizador de LW
Gama de frecuencias ............ 153 281 kHz
Sensibilidad utilizable ........... 30 µV (Señal/ruido: 20 dB)
Relación de señal a ruido .... 65 dB (red IEC-A)
Nota
Las especificaciones y el diseño están sujetos a
posibles modificaciones sin previo aviso.
Información adicional
Es
107
Apéndice
Español

PIONEER CORPORATION
4-1, MEGURO 1-CHOME, MEGURO-KU, TOKYO 153-8654, JAPAN
PIONEER ELECTRONICS (USA) INC.
P.O. Box 1540, Long Beach, California 90801-1540, U.S.A.
TEL: (800) 421-1404
PIONEER EUROPE NV
Haven 1087, Keetberglaan 1, B-9120 Melsele, Belgium
TEL: (0) 3/570.05.11
PIONEER ELECTRONICS ASIACENTRE PTE. LTD.
253 Alexandra Road, #04-01, Singapore 159936
TEL: 65-6472-7555
PIONEER ELECTRONICS AUSTRALIA PTY. LTD.
178-184 Boundary Road, Braeside, Victoria 3195, Australia
TEL: (03) 9586-6300
PIONEER ELECTRONICS OF CANADA, INC.
300 Allstate Parkway, Markham, Ontario L3R OP2, Canada
TEL: 1-877-283-5901
PIONEER ELECTRONICS DE MEXICO, S.A. de C.V.
Blvd.Manuel Avila Camacho 138 10 piso
Col.Lomas de Chapultepec, Mexico, D.F. 11000
TEL: 55-9178-4270
HÒ¡ýPlø
=lø : ð-qïµ44_13
ûq : (02) 2521-3588
HÒûP/Plø
/]w/ÎLFm-Ã
9901-6¤
ûq : (0852) 2848-6488
Published by Pioneer Corporation.
Copyright © 2004 by Pioneer Corporation.
All rights reserved.
Publicado por Pioneer Corporation.
Copyright © 2004 por Pioneer
Corporation. Todos los derechos
reservados.
Printed in
Impreso en
<CRD3959-A/JS> EW
<KNNZX> <04K00000>
-
 1
1
-
 2
2
-
 3
3
-
 4
4
-
 5
5
-
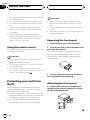 6
6
-
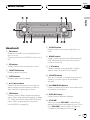 7
7
-
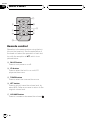 8
8
-
 9
9
-
 10
10
-
 11
11
-
 12
12
-
 13
13
-
 14
14
-
 15
15
-
 16
16
-
 17
17
-
 18
18
-
 19
19
-
 20
20
-
 21
21
-
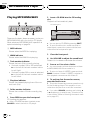 22
22
-
 23
23
-
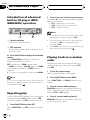 24
24
-
 25
25
-
 26
26
-
 27
27
-
 28
28
-
 29
29
-
 30
30
-
 31
31
-
 32
32
-
 33
33
-
 34
34
-
 35
35
-
 36
36
-
 37
37
-
 38
38
-
 39
39
-
 40
40
-
 41
41
-
 42
42
-
 43
43
-
 44
44
-
 45
45
-
 46
46
-
 47
47
-
 48
48
-
 49
49
-
 50
50
-
 51
51
-
 52
52
-
 53
53
-
 54
54
-
 55
55
-
 56
56
-
 57
57
-
 58
58
-
 59
59
-
 60
60
-
 61
61
-
 62
62
-
 63
63
-
 64
64
-
 65
65
-
 66
66
-
 67
67
-
 68
68
-
 69
69
-
 70
70
-
 71
71
-
 72
72
-
 73
73
-
 74
74
-
 75
75
-
 76
76
-
 77
77
-
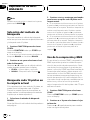 78
78
-
 79
79
-
 80
80
-
 81
81
-
 82
82
-
 83
83
-
 84
84
-
 85
85
-
 86
86
-
 87
87
-
 88
88
-
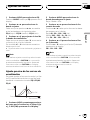 89
89
-
 90
90
-
 91
91
-
 92
92
-
 93
93
-
 94
94
-
 95
95
-
 96
96
-
 97
97
-
 98
98
-
 99
99
-
 100
100
-
 101
101
-
 102
102
-
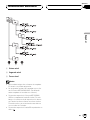 103
103
-
 104
104
-
 105
105
-
 106
106
-
 107
107
-
 108
108


Pioneer DEH-P6700MP Manual de usuario
- Categoría
- Reproductores de CD
- Tipo
- Manual de usuario
- Este manual también es adecuado para
en otros idiomas
- English: Pioneer DEH-P6700MP User manual
Artículos relacionados
-
Pioneer MP3 Player DEH-4700MP Manual de usuario
-
Pioneer deh-p5630mp Manual de usuario
-
-
-
-
-
-
Pioneer DEH-P40MP Manual de usuario
-
-