Devialet Gecko Wall Mount for Phantom I Manual de usuario
- Tipo
- Manual de usuario


Gecko is an invention from Devialet,
Ingénierie Acoustique de France,
the most awarded company in
audio technologies.
Made in France
ENGLISH

3
Any unauthorized modification could compromise your safety and prevent the
device from being used as intended.
If you experience any problems, please consult an expert.
For your safety, make sure that a disconnecting device (switch or circuit breaker)
is installed and easily accessible.
In a thunderstorm, turn off the power supply.
Make sure that your electrical installation complies with all the electrical standards
applicable in your country.
— Make sure that the wall on which the Gecko wall mount is to be installed is level,
smooth and vertical.
— Make sure that the wall on which the Gecko wall mount is to be installed is not
damaged and is able to support 22 lbs. at the fixing point.
— Only use the screws and dowels provided by DEVIALET for fitting the GECKO.
— For each mount type, use the screw and dowel combination stated below.
— When drilling into the wall, make sure that the drill bit has the correct diameter
and is suitable for the mount.
— It is important that the screws are secured to the wall properly to ensure that
the device is held in place.
— Installation should always be carried out by two people.
To avoid the risk of falling, fire and electrocution,
please read the following instructions carefully.

4
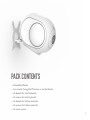
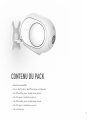
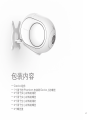
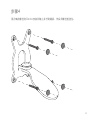
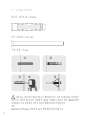
PACK CONTENTS
— Assembled Gecko
— 1x screw for fixing the Phantom on to the Gecko
— 4x dowels for solid materials
— 4x screws for solid materials
— 4x dowels for hollow materials
— 4x screws for hollow materials
— 4x screw covers

5
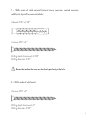
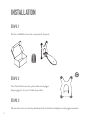
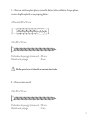
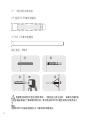
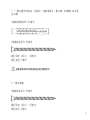
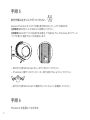
To fix the Gecko to the wall, place the drilling
markings on the wall with the aid of the product.
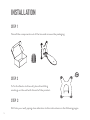
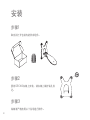
INSTALLATION
Take all the components out of the box and remove the packaging.
Drill into your wall, paying close attention to the instructions on the following pages.
STEP 1
STEP 2
STEP 3

6
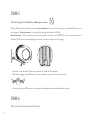
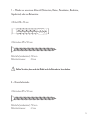
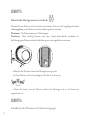
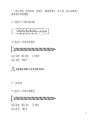
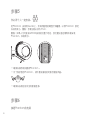
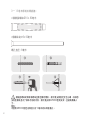
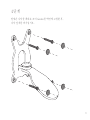
1 — Walls made of solid material (natural stone, concrete, aerated concrete,
solid brick, drywall) or concrete blocks:
4 dowels 5/16” x 2 1/4”
4 screws 3/16” x 2 ”
Drilling depth (minimum): 2 3/8”
Drilling diameter: 5/16”
Ensure that neither the screw nor the dowel spins freely in the hole.
2 — Walls made of solid wood:
4 screws 3/16” x 2”
Drilling depth (minimum): 2”
Drilling diameter: 3/32”

7
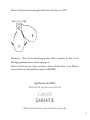
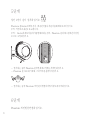
3 — 1/2” drywall :
4 dowels 3/8” x 2”
4 screws 3/16” x 2”
Drilling diameter: 5/16”
Ensure that neither the screw nor the dowel spins freely in the hole. Do not fix to hollow
brick. If you do not feel confident or have not understood the contents of this manual, do not
fit the Gecko wall mount and seek the help of a professional.
Attention:
Do not fix the Gecko to a wall made of drywall less than 1/2 inch thick.

8
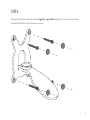
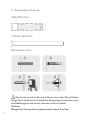
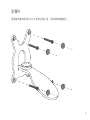
Screw the Gecko onto the wall as tightly as possible using the correct screws, then
conceal the latter with the screw covers.
STEP 4

9
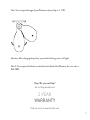
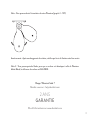
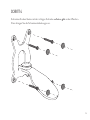
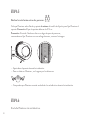
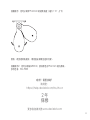
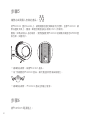
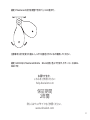
Place the Phantom on the Gecko, then tighten the screw provided as far as it will go in order
to lock the Phantom on its mount. Attention: The prescribed tightening torque is 44 lb-in.
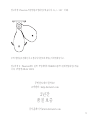
Attention: If people are going to be walking under the GECKO, we recommend fixing the
Phantom in place using a steel wire as shown in the image.
— Make sure that you keep hold of the Phantom during the procedure.
— To avoid damaging your Phantom, do not handle it by the speakers.
— Make sure that the Phantom is not plugged in during fitting.
Plug in your Phantom.
STEP 5
STEP 6
Installation should always be carried out by two people.

10
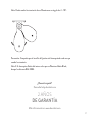
Note: You can adjust the angle of your Phantom as desired (up to +/- 110°).
Note 2: You can paint the Gecko to match the matte black of the Phantom; the color code is
RAL 9005.
Oops! Do you need help?
Go to: help.devialet.com
Find out more at www.devialet.com
2-YEAR
WARRANTY
Attention: After changing the position, ensure that the fixing screw is still tight.

Gecko est une invention Devialet,
Ingénierie Acoustique de France,
l’entreprise la plus primée au monde pour
ses technologies d’excellence dans le son.
Fabriqué en France
FRANÇAIS

12
Toute modification non autorisée pourrait compromettre votre sécurité ainsi qu’une
utilisation normale de l’appareil.
En cas de problème, veuillez consulter un expert.
Pour votre sécurité, assurez-vous qu’un dispositif de sectionnement (interrupteur ou
disjoncteur) est installé et facilement accessible.
En cas d’orage, couper le courant.
Assurez-vous que votre installation électrique respecte toutes les normes électriques
applicables dans votre pays.
— Assurez-vous que le mur sur lequel le support mural Gecko sera installé est plan,
lisse et vertical.
— Assurez-vous que le mur sur lequel le support mural Gecko sera installé est non
détérioré, et qu’il est capable de soutenir 10 kg par point de fixation.
— Utilisez uniquement les vis et chevilles fournies par DEVIALET pour le montage
de GECKO.
— Pour chaque type de support, utilisez la combinaison VIS+CHEVILLE indiquée
ci-dessous.
— Au moment de percer le mur, assurez-vous que le foret est au bon diamètre et
adapté au support.
— Veillez à correctement visser les vis sur le mur pour assurer le maintien.
— Faites toujours l’installation à deux personnes.
Pour éviter tout risque de chute, incendie et électrocution,
veuillez vous assurer que les instructions suivantes sont bien comprises.

13
CONTENU DU PACK
— Gecko assemblé
— 1x vis de fixation de Phantom sur Gecko
— 4x Chevilles pour matériaux pleins
— 4x Vis pour matériaux pleins
— 4x Chevilles pour matériaux creux
— 4x Vis pour matériaux creux
— 4x caches vis

14
Pour fixer Gecko au mur, placez des marquages
de perçage sur le mur à l’aide du produit.
INSTALLATION
Sortez et déballez tous les composants du pack.
Percez votre mur en suivant précisément les instructions indiquées sur les pages suivantes.
ÉTAPE 1
ÉTAPE 2
ÉTAPE 3

15
1 — Murs en matériau plein (pierre naturelle, béton, béton cellulaire, brique pleine,
carreau de plâtre plein) ou en parpaing béton :
4 Chevilles Ø8 x 52 mm
4 Vis Ø5 x 50 mm
Profondeur de perçage (minimum) : 60 mm
Diamètre de perçage : 8 mm
Vérifier que ni la vis ni la cheville ne tournent dans le vide.
2 — Murs en bois massif :
4 Vis Ø5 x 50 mm
Profondeur de perçage (minimum) : 50 mm
Diamètre de perçage : 2 mm

16
3 — Plaques de plâtre de 13 mm :
4 Chevilles Ø10 x 50 mm
4 Vis M5 x 50 mm
Diamètre de perçage : 8 mm
Vérifier que ni la vis ni la cheville ne tournent dans le vide. Ne pas fixer sur brique creuse.
Si vous n’êtes pas sûr de vous ou si vous n’avez pas compris le contenu de cette notice, ne montez
pas le support mural Gecko et adressez-vous à un professionnel.
Avertissement :
ne pas fixer Gecko sur un mur en plaque de plâtre de moins de 13 mm d’épaisseur.

17
Visser au maximum le Gecko sur le mur avec les bonnes vis puis les recouvrir avec
les caches vis.
ÉTAPE 4

18
Placez Phantom sur Gecko puis vissez au maximum avec la vis fournie pour verrouiller Phantom sur
son support. Avertissement : Le couple de serrage doit être de 5 N.m.
Avertissement : S’il est prévu que des personnes circulent sous GECKO, nous recommandons la
fixation de Phantom via une élingue en acier, comme montré dans l’image.
— Assurez-vous de tenir Phantom pendant la durée de l’opération.
— Afin de protéger votre Phantom, ne le manipulez pas par les hauts-parleurs.
— Assurez-vous que Phantom ne soit pas électriquement branché pendant la pose.
Branchez électriquement Phantom
ÉTAPE 5
ÉTAPE 6
Faites toujours l’installation à deux personnes.

19
Note : Vous pouvez choisir l’orientation de votre Phantom (jusqu’à +/- 110°)
Note 2 : Vous pouvez peindre Gecko pour que sa couleur soit identique à celle de Phantom
Matte Black; la référence de couleur est RAL 9005
Ooops ! Besoin d’aide ?
Rendez-vous sur : help.devialet.com
Plus d’informations sur www.devialet.com
2 ANS
GARANTIE
Avertissement : Après un changement de rotation, vérifiez que la vis de fixation reste bien serrée.

Gecko ist ein Produkt aus dem Hause
Devialet, Ingénierie Acoustique de
France, das aufgrund seiner
herausragenden Sound Innovationen
am häufigsten ausgezeichnete
Unternehmen der Welt.
Hergestellt in Frankreich
DEUTSCH

21
Jegliche Abweichung von dieser Anleitung kann Ihre Sicherheit sowie die
ordnungsgemäße Funktion des Gerätes beeinträchtigen.
Bei Problemen kontaktieren Sie bitte eine Fachkraft.
Beachten Sie zu Ihrer Sicherheit bitte, dass ein Sicherungskasten (Stopp-Schalter
oder Trennschalter) vorhanden und leicht zugänglich ist.
Trennen Sie bei Gewitter bitte das Gerät vom Strom.
Überprüfen Sie bitte, ob Ihre Elektrik alle geltenden Vorgaben in Ihrem Land
erfüllt.
— Versichern Sie sich bitte, dass die Wand, an der die Wandhalterung für den
Gecko befestigt wird, gerade, glatt und vertikal ist.
— Versichern Sie sich bitte, dass die Wand, an der die Wandhalterung für den Geko
befestigt wird, nicht beschädigt ist und 10 kg pro Befestigungspunkt tragen kann.
— Verwenden Sie ausschließlich die Schrauben und Dübel, die Ihnen von DEVIALET
für die Befestigung des Gecko zur Verfügung gestellt wurden.
— Für jeden Befestigungstyp verwenden Sie bitte die unten angegebene Kombination
von SCHRAUBE und DÜBEL.
— Bevor Sie das Loch in die Wand bohren, überprüfen Sie bitte, ob der Bohrer den
richtigen Durchmesser hat und passend für die Halterung ist.
— Drehen Sie die Schraube richtig in die Wand ein, damit die Halterung fest angebracht ist.
— Führen Sie die Montage immer zu zweit durch.
Zur Vermeidung von Stürzen, Feuern oder Stromschlägen, lesen Sie bitte
die folgenden Anwendungshinweise sorgfältig durch.

22
BEINHALTETES MATERIAL
— Gecko montiert
— 1x Befestigungsschraube für den Phantom auf dem Gecko
— 4x Dübel für massive Materialien
— 4x Schrauben für massive Materialien
— 4x Dübel für hohle Materialien
— 4x Schrauben für hohle Materialien
— 4x Schraubenabdeckungen

23
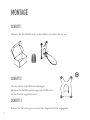
Um den Gecko an der Wand zu befestigen,
platzieren Sie die Bohrmarkierungen auf der Wand, an
der das Produkt angebracht wird.
MONTAGE
Nehmen Sie alle Zubehörteile aus dem Paket und packen Sie sie aus.
Bohren Sie die Löcher genau wie auf den folgenden Seiten angegeben.
SCHRITT 1
SCHRITT 2
SCHRITT 3

24
1 — Wände aus massivem Material (Naturstein, Beton, Porenbeton, Backstein,
Gipskarton) oder aus Betonstein :
4 Dübel Ø8 x 52 mm
4 Schrauben Ø5 x 50 mm
Bohrtiefe (mindestens) : 60 mm
Bohrdurchmesser : 8 mm
Stellen Sie sicher, dass weder der Dübel noch die Schraube ins Leere drehen.
2 — Massivholzwände :
4 Schrauben Ø5 x 50 mm
Bohrtiefe (mindestens) : 50 mm
Bohrdurchmesser : 2 mm

25
3 — Gipskartonplatten 13 mm dick :
4 Dübel Ø10 x 50mm
4 Schrauben M5 x 50 mm
Bohrdurchmesser : 8 mm
Stellen Sie sicher, dass weder der Dübel noch die Schraube ins Leere drehen. Nicht auf Hohlsteinen
befestigen. Wenn Sie sich nicht sicher sind oder die Inhalte dieser Anleitung nicht genau verstanden haben, montieren
Sie die Wandhalterung für den Gecko bitte nicht, sondern wenden Sie sich an eine Fachkraft.
Warnhinweis :
Befestigen Sie den Gecko niemals auf einer Gipskartonwand mit weniger als 13 mm Stärke.

26
Schrauben Sie den Gecko mit der richtigen Schraube so fest es geht an der Wand an.
Dann bringen Sie die Schraubenabdeckungen an.
SCHRITT 4

27
Platzieren Sie den Phantom auf dem Gecko und schrauben Sie ihn mit der beigefügten Schraube
so fest es geht an, um den Phantom auf seiner Halterung fest zu verankern.
Warnhinweis : Der Drehmoment muss 5 Nm betragen.
Warnhinweis : Wenn zukünftig Personen unter dem Gecko hindurchlaufen, empfehlen wir,
die Befestigung des Phantom mit einer Stahlhalterung, wie unten abgebildet, vorzunehmen.
— Halten Sie den Phantom während der Montage immer gut fest.
— Um Ihren Phantom nicht zu beschädigen, halten Sie ihn nicht an den
— Achten Sie darauf, dass der Phantom während der Montage nicht an das Stromnetz
angeschlossen ist.
Schließen Sie den Phantom an die Stromversorgung an.
SCHRITT 5
SCHRITT 6
Führen Sie die Montage immer zu zweit durch.

28
Hinweis: Sie können die Ausrichtung Ihres Phantom wählen (bis zu +/- 110°)
Hinweis 2: Sie können den Gecko anstreichen, damit er dieselbe Farbe wie der Phantom
schwarz matt hat; die Farbspezifikation hierfür ist RAL 9005.
Ups! Brauchen Sie Hilfe?
Gehen Sie auf: help.devialet.com/hc/de
Weitere Informationen auf www.devialet.com/de-de
2 JAHRE
GARANTIE
Warnhinweis : Wenn Sie die Ausrichtung geändert haben, überprüfen Sie bitte, ob die
Befestigungsschraube immer noch fest angezogen ist.

Gecko es una creación de Devialet,
Ingénierie Acoustique de France, la
empresa más galardonada del mundo
por la excelencia de su tecnología
sonora.
Fabricado en Francia
ESPAÑOL

30
Toda modificación no autorizada podría comprometer su seguridad y el
funcionamiento del aparato.
Ante cualquier problema, consulte con un experto.
Para su seguridad, compruebe que su instalación eléctrica cuenta con un dispositivo de
desconexión (interruptor automático o disyuntor) de fácil acceso.
En caso de tormenta, corte la corriente.
Compruebe que su instalación eléctrica cumple con la normativa eléctrica
vigente en su país.
— Compruebe que la pared en la que vaya a instalar el soporte de pared Gecko sea
plana, lisa y vertical.
— Compruebe que la pared en la que vaya a instalar el soporte de pared Gecko no
esté dañada y pueda soportar 10 kg por punto de fijación.
— Utilice exclusivamente los tornillos y tacos de DEVIALET incluidos con el kit de
montaje de GECKO.
— En función del tipo de pared, elija una de las COMBINACIONES DE TORNILLOS
Y TACOS que se indican a continuación.
— Antes de taladrar la pared, compruebe que la broca sea del diámetro y el tipo
adecuado.
— Compruebe que los tornillos estén correctamente fijados a la pared para
garantizar una buena sujeción.
— Realice la instalación entre dos personas.
Para evitar cualquier riesgo de caída, incendio y electrocución,
lea con atención las instrucciones siguientes.

31
CONTENIDO DEL KIT
— Gecko (premontado)
— 1 tornillo de fijación (para fijar Phantom a Gecko)
— 4 tacos para materiales macizos
— 4 tornillos para materiales macizos
— 4 tacos para materiales huecos
— 4 tornillos para materiales huecos
— 4 tapones embellecedores

32
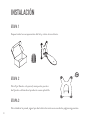
Para fijar Gecko a la pared, marque los puntos
de fijación utilizando el producto como plantilla.
INSTALACIÓN
Saque todos los componentes del kit y retire el envoltorio.
Para taladrar la pared, siga al pie de la letra las instrucciones de las páginas siguientes.
ETAPA 1
ETAPA 2
ETAPA 3

33
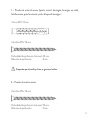
1 — Paredes de material macizo (piedra natural, hormigón, hormigón en celda,
ladrillo macizo, panel macizo de yeso) o bloque de hormigón :
4 tacos Ø8 × 52 mm
4 tornillos Ø5 x 50 mm
Profundidad de perforación (mínimo): 60 mm
Diámetro de perforación : 8 mm
Comprobar que el tornillo y el taco no giren en el orificio.
2 — Paredes de madera maciza
4 tornillos Ø5 x 50 mm
Profundidad de perforación (mínimo): 50 mm
Diámetro de perforación : 2 mm

34
3 — Paredes de yeso de tipo Pladur de 13mm
4 tacos Ø10 × 50 mm
4 tornillos M5 × 50 mm
Diámetro de perforación: 8 mm
Comprobar que el tornillo y el taco no giren en el orificio. No fijar en ladrillo perforado.
Si no está seguro de haber entendido bien la información de este manual, no instale el soporte
de pared Gecko y acuda a un profesional.
Precaución:
No fijar Gecko en paredes de yeso de tipo Pladur de menos de 13 mm de espesor.

35
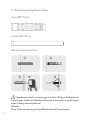
Fije Gecko a la pared con los tornillos adecuados, apriételos al máximo y colóqueles
los tapones embellecedores.
ETAPA 4

36
Coloque Phantom sobre Gecko y apriete al máximo el tornillo de fijación para fijar Phantom al
soporte. Precaución: El par de apriete debe ser de 5 N · m.
Precaución: Si instala Gecko en alto en un lugar de paso de personas,
recomendamos fijar Phantom con una eslinga de acero, como en la imagen.
— Sujete bien el aparato durante la instalación.
— Para no dañar su Phantom , no lo agarre por los altavoces.
— Compruebe que Phantom no esté enchufado a la red eléctrica durante la instalación.
Enchufe Phantom a la red eléctrica.
ETAPA 5
ETAPA 6
Realice la instalación entre dos personas.

37
Nota: Puede cambiar la orientación de su Phantom en un ángulo de +/- 110°.
Nota 2: Si desea pintar Gecko del mismo color que su Phantom Matte Black,
busque la referencia RAL 9005.
¿Necesita ayuda?
Consulte help.devialet.com
Más información en www.devialet.com
2 AÑOS
DE GARANTÍA
Precaución: Compruebe que el tornillo de fijación esté bien apretado cada vez que
cambie la orientación.

Gecko é uma invenção da Devialet,
Ingénierie Acoustique de France,
a empresa mais premiada do mundo
pelas suas tecnologias de excelência
no campo do som
Fabricado em França
PORTUGUÊS

39
Quaisquer modificações não autorizadas podem comprometer a sua segurança e a
utilização normal do dispositivo.
Em caso de problemas, consulte um especialista.
Para sua segurança, certifique-se de que um dispositivo de isolamento (interruptor
ou disjuntor) está instalado e pode ser acedido facilmente.
No caso de uma tempestade, desligue a corrente elétrica.
Certifique-se de que a sua instalação eléctrica respeita todas as normas eléctricas
aplicáveis no seu país.
— Certifique-se de que a parede de instalação do suporte do Gecko é plana, uniforme
e vertical.
— Certifique-se de que a parede de instalação do suporte do GECKO
não está danificada e que pode suportar 10 kg por ponto de fixação
— Utilize apenas os parafusos e buchas fornecidos pela DEVIALET na montagem
do GECKO.
— Para cada tipo de suporte utilize a combinação de PARAFUSO+BUCHA
representada abaixo.
— Ao perfurar a parede, certifique-se de que a broca possui o diâmetro correto e
encaixa no suporte.
— Certifique-se cuidadosamente de que os parafusos estão devidamente
aparafusados e fixos na parede.
— Faça sempre a instalação na companhia de uma segunda pessoa.
Para evitar qualquer risco de queda, incêndio ou eletrocussão,
por favor certifique-se de que compreende as seguintes instruções.

40
CONTEÚDO DA EMBALAGEM
— Gecko já montado
— 1x Parafuso de fixação do Phantom no Gecko
— 4x Buchas para materiais sólidos
— 4x Parafusos para materiais sólidos
— 4x Buchas para materiais ocos
— 4x Parafusos para materiais ocos
— 4x Tampas de rosca

41
Para fixar o Gecko coloque as marcas de
perfuração na parede usando o próprio produto.
INSTALAÇÃO
Remova e desembale todos os componentes da embalagem.
Perfure a parede de acordo com as instruções nas páginas seguintes.
PASSO1
PASSO2
PASSO3

42
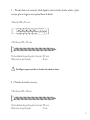
1 — Paredes feitas de material sólido (pedra natural, betão, betão celular, tijolo
maciço, placas de gesso maciço) ou bloco de betão:
4 Buchas Ø8 x 52 mm
4 Parafusos Ø5 x 50 mm
Profundidade de perfuração (mínima): 60 mm
Diâmetro de perfuração : 8 mm
Certifique-se que o parafuso e a bucha não rodam no vácuo.
2 — Paredes de madeira maciça:
4 Parafusos Ø5 x 50mm
Profundidade de perfuração (mínima): 50 mm
Diâmetro de perfuração : 2 mm

43
3 — Placa de gesso cartonado de 13 mm:
4 Buchas Ø10 x 50mm
4 Parafusos M5 x 50mm
Diâmetro de perfuração: 8mm
Certifique-se que o parafuso e a bucha não rodam no vácuo. Não fixar em tijolo oco.
Caso não se sinta confiante ou se não compreendeu as instruções neste manual, não monte o
suporte de parede do Geck oe consulte um profissional.
Aviso:
Não fixar o Gecko a uma parede de gesso cartonado de espessura inferior a 13 mm.

44
Aparafuse o Gecko na parede o máximo possível com os parafusos corretos
e cubra-os com as tampas de rosca.
PASSO4

45
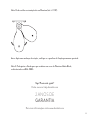
Coloque o Phantom no Gecko, de seguida aperte o máximo possível com o parafuso fornecido
para fixar o Phantom no suporte. Aviso: o binário de aperto deve ser de 5 N.m.
Aviso: Em caso de utilização do GECKO, recomendamos que o Phantom seja fiaxdo com uma
funda de aço, como representado na figura.
— Certifique-se de que segura bem o Phantom durante toda a operação.
— Para proteger o seu Phantom , não o manuseie através dos altifalantes.
— Certifique-se de que o Phantom não está ligado à eletricidade durante a instalação.
Ligar o Phantom à eletricidade.
PASSO5
PASSO6
Faça sempre a instalação na companhia de uma segunda pessoa.

46
Nota: Pode escolher a orientação do seu Phantom (até +/- 110°).
Nota 2: Pode pintar o Gecko para que combine com a cor do Phantom Matte Black;
a referênciade coré RAL 9005.
Ups! Precisa de ajuda?
Visite-nos em: help.devialet.com
Para mais informações visite www.devialet.com
2 ANOS DE
GARANTIA
Aviso: Após uma mudança de rotação, verifique se o parafuso de fixação permanece apertado.

Gecko 是法国声学工业品牌 Devialet 的
发明, Devialet 也是世界上因音响技
术的卓越成就而获奖最多的公司。
法国制造
简体中文

48
任何未经授权的改动都可能危及您的安全和设备的正常使用。
如有问题,请咨询专家。
为了您的安全,请确保安装了断电装置(开关或断路器)并且便于使用。
如遇暴风雨,请关闭电源。
确保您的电路连接符合您所在国家/地区的所有适用电力标准。
— 确保安装GECKO壁挂支架的墙壁平滑垂直。
— 确保安装GECKO壁挂支架的墙壁没有损坏,并且每个固定点能够支撑
10公斤。
— 仅使用DEVIALET提供的螺丝和销钉来安装GECKO。
— 对于各种类型的支撑墙面,请使用下面显示的螺丝和销钉组合。
— 钻墙时,确保钻头的直径正确并适用于墙面。
— 务必以正确方式拧紧墙壁上的螺丝以确保固定。
— 务必两个人一起安装。
为避免坠落、起火和触电的危险,请确保充分理解以下说明。

49
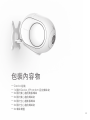
包装内容
— Gecko 组件
— 1个用于把 Phantom 安装到Gecko上的螺丝
— 4个用于实心材料的销钉
— 4个用于实心材料的螺丝
— 4个用于空心材料的销钉
— 4个用于空心材料的螺丝
— 4个螺丝盖

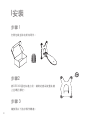
50
要将GECKO在墙上安装,请在墙上做好钻孔标
记。
安装
取出并打开包装内的所有组件。
钻墙请严格按照以下说明进行操作。
步骤1
步骤2
步骤3

51
1 —实心材料(天然石材,混凝土,蜂窝混凝土,实心砖,实心石膏砖)
或混凝土块的墙壁:
4 个直径8 x 52毫米的销钉
4个直径5 x 50毫米的螺丝
钻孔深度(最小值):60 毫米
钻孔直径:8毫米
检查螺丝和销钉不会在空隙中转动。
2 — 实木墙:
4个直径5 x 50毫米的螺丝
钻孔深度(最小值):50 毫米
钻孔直径:2毫米

52
3 — 13毫米的石膏板墙:
4 个直径10x 50毫米的销钉
4 个M5 x 50毫米的螺丝
钻孔直径:8毫米
检查螺丝和销钉不会在空隙中转动。 不要在空心砖上安装。 如果您不确定自
己能正确安装或不了解本提示的内容,请不要安装GECKO壁挂支架并咨询专业人
士。
警告:
不要将GECKO安装在厚度小于13毫米的石膏板墙上。

53
用正确的螺丝将Gecko安装到墙上并拧到最紧,然后用螺丝盖盖住。
步骤4

54
把Phantom 安装到Gecko上,然后用随附的螺丝拧到最紧,以将Phantom 锁定
在其支架上。警告:拧紧扭矩必须为5 N.m.
警告:如果人们可能在GECKO安装的位置下经过,我们建议通过钢制吊索安装
Phantom,如图所示。
— 确保在操作期间握紧Phantom 。
— 为了保护您的Phantom ,请不要在搬动的时候手握扬声器。
— 确保在安装过程中没有接通电源。
接通Phantom的电源
步骤5
步骤6
务必两个人一起安装。

55
温馨提示:您可以调节Phantom 的旋转角度(最大 110°上下)
温馨提示2:您可以粉刷GECKO,使其颜色与Phantom 哑光黑或。
参考色号:RAL 9005
哎呀!需要协助?
请浏览:
https://help.devialet.com/hc/zh-cn
更多信息请浏览www.devialet.com
2 年
保修
警告:改变旋转角度后,请检查安装螺丝是否拧紧。

Gecko 是法國音響工程 Devialet 的發明
Devialet 是在音訊領域中最卓越與創新
的企業
法國製造
繁體中文

57
任何未經授權的更換都可能危及您的安全以及設備的正常使用。
如有任何問題,請聯繫專業人士。
為了您的安全,請確保安裝了電氣斷開裝置(開關或斷路器),且此裝置
位於顯眼便於操作的位置。
如遇暴風雨,請關閉電源。
請確保您的電力裝置是符合您所在國家/地區的適用電力標準。
— 請確保安裝GECKO壁掛支架時,牆壁是平整,
光滑且垂直的。
— 請確保安裝GECKO壁掛支架時,牆壁並無損壞且每個固定點可以支撐
10 公斤。
— 僅限於DEVIALET指定的螺絲釘和膨脹螺絲來安裝GECKO。
— 依照不同類型的支架,請依照以下標示的螺絲釘+膨脹螺絲組合使用。
— 鑽牆時,請確保鑽頭的直徑正確並適合支架。
— 請務必正確地栓緊螺絲釘,以確保產品固定在牆壁上。
— 請務必由兩個人安裝此產品。
為避免掉落,起火和觸電的風險,請確保了解以下的指示說明。

58
包裝內容物
— Gecko 組裝
— 1x用於Gecko上Phantom 固定螺絲釘
— 4x用於實心牆的膨脹螺絲
— 4x用於實心牆的螺絲釘
— 4x用於空心牆膨脹螺絲
— 4x用於空心牆的螺絲釘
— 4x 螺絲飾蓋

59
將GECKO固定在牆上前,請將此產品放置在牆
上並鑽孔標記。
I安裝
打開包裝並取出所有零件。
請按照以下指示操作鑽牆。
步驟 1
步驟2
步驟 3

60
1 — 實心牆(天然石材,混凝土,加氣混凝土,實心磚,石膏磚) 或水泥
空心磚:
4個膨脹螺絲Ø8 x 52毫米
4個螺絲釘Ø5 x 50毫米
鑽孔深度(最小) : 60毫米
鑽孔直徑 : 8毫米
請檢查螺絲釘和膨漲螺絲並無空轉的情形。
2 — 實木板牆:
4個螺絲釘Ø5 x 50毫米
鑽孔深度(最小) : 50毫米
鑽孔直徑 : 2毫米

61
3 — 13 毫米厚的石膏板牆 :
4 個膨脹螺絲Ø10 x 50毫米
4個螺絲釘M5x 50毫米
鑽孔直徑 : 8毫米
請檢查螺絲釘和膨漲螺絲並無空轉的情形。請不要安裝固定於空心磚。如果您
沒有把握或是不了解本手冊的內容,請不要安裝GECKO壁掛支架,並諮詢專業人
士。
警告:
不要將GECKO固定在厚度小於13毫米的石膏板牆上。

62
用適當的螺絲釘將Gecko 栓緊在牆上後,再用螺絲飾蓋蓋上。
步驟4

63
將Phantom 置於Gecko上,請用隨附的固定螺絲釘用力栓緊,並將Phantom 鎖
緊在壁掛支架上。 警告:螺栓的緊固扭矩必須為5 N.m (牛頓米).
警告:如果安裝在人多的場所 ,我們建議使用Phantom 的鋼製吊索固定GECKO壁
掛支架,如圖所示。
— 請確保安裝時,拿穩Phantom 產品。
— 為了保護您的Phantom 產品,請不要直接用音箱去移動它。
— 請確保安裝時, Phantom 產品並無插上電源。
將Phantom 電源插上。
步驟5
步骤6
請務必由兩個人安裝此產品。

64
注意:您可以選擇Phantom 的旋轉方向(角度最大值+/- 110度)
注意2:您可以替GECKO塗上與Phantom Matte Black相同的顏色;
顏色代碼RAL 9005
哎呀! 需要協助?
請造訪:
help.devialet.com
更多詳情請上網: https://www.devialet.com/zh-tw/
2年
保固
警告:調整旋轉方向後,請檢查固定螺絲釘是否鬆動。

Gecko 는 뛰어난 사운드 테크놀로지로 세계에서
인정받는 프랑스 음향 공학의 대표기업 Devialet 가
발명한 제품입니다.
Made in France
한국의

66
허가 없이 제품을 변형하는 경우 사용자의 안전과 제품의 정상적인
사용을 저해할 수 있습니다.
문제가 있는 경우 전문가와 상의하시기 바랍니다.
안전을 위해 스위치나 누전차단기 위치를 미리 확인하십시오.
뇌우 시 전원 플러그를 분리합니다. 사용자의 전기 설비는 해당 국가의
전기설비기술기준에 부합하여야 합니다.
— GECKO를 설치할 벽면이 평평하며 매끄럽고, 수직인지 확인하십시오.
— GECKO를 설치할 벽면은 손상이 없어야 하며, 고정점마다 10 kg을 지
탱할 수 있어야 합니다.
— GECKO Phantom 설치에는 반드시 DEVIALET에서 제공하는 칼브
럭과나사만 사용하시기 바랍니다.
— GECKO Phantom 를 설치할 벽면 재질에 따라 사용 설명서에 제시된
칼브럭과 나사 조합을 사용하십시오.
— 벽면에 구멍을 뚫기 전, 드릴 날의 크기와 종류가 벽 재질에부합하는
지 확인하십시오.
— 제품의 안정적인 설치를 위해 나사를 벽면에 확실하게 고정하십시오.
— 성인 2인이 같이 설치하십시오.
낙하로 인한 파손, 화재 또는 감전의 위험을 방지하기 위해,
설치 전에 아래의 주의사항을 충분히 숙지하시기 바랍니다.

67
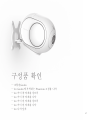
구성품 확인
— 조립된Gecko
— 1x Gecko에 부착하는 Phantom 고정용 나사
— 4x 속이 찬 자재용 칼브럭
— 4x 속이 찬 자재용 나사
— 4x 속이 빈 자재용 칼브럭
— 4x 속이 빈 자재용 나사
— 4x 나사 덮개

68
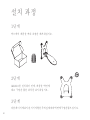
GECKO를 설치하기 전에, 제품을 벽면에
대고 구멍을 뚫을 위치를 표시하십시오.
설치 과정
박스에서 제품을 꺼내 포장을 제거하십시오.
다음 페이지에 표시된 지시 사항을 주의 깊게 따라 벽면에 구멍을뚫으십시오.
1단계
2단계
3단계

69
1 — 속이 찬 자재로 된 벽면 (천연 석재, 콘크리트, 다공질 콘크리트, 일
반벽돌, 단단한 석고타일) 또는 콘크리트 블럭:
칼브럭 4개 Ø8 x 52 mm
나사 4개 Ø5 x 50 mm
구멍 깊이 (최소) : 60 mm
구멍 직경 : 8 mm
나사 또는 칼브럭이 헛돌지 않는지 확인하십시오.
2 — 원목 벽면:
나사 4개 Ø5 x 50 mm
구멍 깊이 (최소) : 50 mm
구멍 직경 : 2 mm

70
3 — 13 mm 석고보드 :
칼브럭 4개 Ø10 x 50mm
나사 4개 M5 x 50 mm
구멍 직경 : 8 mm
나사 또는 칼브럭이 헛돌지 않는지 확인하십시오. 속이 빈 벽돌에는 설치하지
마십시오. 확신이 없거나 이 설명서의 내용을 이해하기 어려운 경우 GECKO벽면
거치대를스스로 설치하지 마시고 전문가에게문의하시기바랍니다.
주의:
GECKO를두께13mm 미만의석고보드벽면에설치하지마십시오.

71
알맞은 나사를 최대로 조여 Gecko를 벽면에 고정한 후,
나사 덮개를 씌우십시오.
4단계

72
Phantom 를Gecko위에놓은후, 제공된전용나사를이용해최대로조이십시오.
주의: 적정토크값은5 N.m입니다.
주의: Gecko아래로사용자가통행해야하는경우, Phantom 를아래그림과같이강철
로프로 고정하십시오.
— 설치하는 동안 Phantom 를안전하게고정했는지확인하십시오.
— Phantom 를 보호하기위해, 스피커부분을잡지마십시오.
— 설치하는 동안 Phantom 의전원이연결되어있지않도록주의하십시오.
Phantom 의전원을연결하십시오.
5단계
6단계
성인 2인이 같이 설치하십시오.

73
참고사항: Phantom 의방향을조정하실수있습니다. (+/- 110°이내)
참고사항 2: Phantom매트 블랙 색상에맞추어GECKO를커스텀페인팅하실수있습
니다. (색상번호RAL 9005)
무엇을도와드릴까요?
고객센터: help.devialet.com
공식홈페이지www.devialet.com
2년간
품질 보증
주의:방향을조정하신후,고정나사가잘조여져있는지확인하십시오.

音に関わる卓越した技術で世界を
リ ー ド す る フ ラ ン ス の オ ー デ ィ オ・
メーカー、Devialet社が開発した
Gecko
メ ー ド・イ ン・フ ラ ン ス
日本の

75
許可なく改造した場合、ユーザーの安全および器具の性能が危険にさらされ
るおそれがあります。
問題が発生した場合は、専門業者にご相談ください。
安全のため、スイッチまたはブレーカーが手の届く位置にあることを確認して
くだ さい 。
雷雨や暴風雨のときはスイッチを切ってください。
電気製品(本製品)を設置する際は、お使いになる国の電化製品規格に適合
していることを確 認してください。
— 壁掛けGECKOを取り付ける面が、 垂直で平らであることを確認してくださ
い。
— 壁掛け GECKOを取り付ける壁に傷みがなく、接着部が10kgの負荷に耐
えら れ るこ とを 確 認 してくだ さ い 。
— GECKOの組み立て用に付属されているDEVIALET社のねじとボードアン
カーのみを使用してください。
— 壁掛けには、以下に記載されている「ねじとボルト」の組み合わせを守っ
てくだ さい 。
— 壁に穴を開ける際は、ドリルが直径の大きさと壁掛けに適していることを
確 認 してくだ さい 。
— 壁にねじを取り付ける際は、しっかりと固定してください。
— 取付作業は必ず二人で行ってください。
落下、火災、感電を防ぐために、下記の注意事項をしっかりとお読
みください 。

76
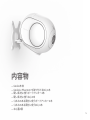
内容物
— Gecko本体
— GeckoにPhantom を取り付けるねじ1本
— 硬い素材に使うボードアンカー4本
— 硬い素材に使うねじ4本
— くぼみのある素材に使うボードアンカー4本
— くぼみのある素材に使うねじ4本
— ねじ蓋4個

77
GECKOを壁に取り付ける際は、穴を開ける
場所に本製品を使って目印をつけてください。
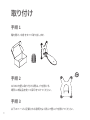
取り付 け
箱を開け、中身をすべて取り出します。
以下のページに記載される説明をよく読んで壁に穴を開けてください。
手順 1
手順 2
手順 3

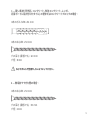
78
1 — 硬い素材 (天然石、コンクリート、気泡コンクリート、レンガ、
石膏ボードに貼り付けたタイル) の壁またはコンクリートブロックの場合 :
4本のボルトØ8 x 52 mm
4本のねじØ5 x 50 mm
穴の深さ (最低でも) : 60 mm
穴径 : 8mm
ね じ や ボ ル ト が 空 回 りし な い よう にしてくだ さ い 。
2 — 無垢材でできた壁の場合 :
4本のねじØ5 x 50 mm
穴の深さ (最低でも) : 50 mm
穴径 : 2mm

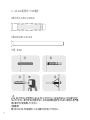
79
3 —13 mm石膏ボードの場合 :
4本のボルト Ø10 x 50mm
4本のねじM5 x 50 mm
穴径 : 8mm
ねじやボルトが空回りしないようにしてください。くぼみがあるレンガに取り付け
ないでください。取付方法に自信がない、または記載内容が分からない場合は、専門業
者 に 取 り 付 け を 依 頼 してくだ さ い 。
注意事項:
厚さが13ミリ以下の石膏ボードには取り付けないでください。

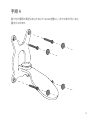
80
取り付け場所の素材に応じたねじで Geckoを壁にしっかりと取り付け、ねじ
蓋をかぶせます。
手順 4

81
GeckoにPhantom をつけて、付属の取付用のねじでしっかりと締めます。
注意事項:締め付けトルクは5N.m.を使用してください。
注意事項:GECKO下で人の往来がある場合、下の図のように、Phantom をワイヤース
リングを使って固定することをお勧めします。
— 取り付ける際はPhantom をしっかりと持っていてください。
— Phantom に傷がつくので、スピーカー部分は持たないようにしてください。
— 取り付ける際はPhantom の電源が入っていないことを確認してください。
Phantom を電源につなぎます。
手順 5
手順 6
取付作業は必ず二人で行ってください。

82
補足:Phantom の向きを調整できます(+/-110度まで)。
補足:GECKOは、PhantomのMatte Blackと同じ色にできます。カラーコードはRAL
9005です。
お 困りです か 。
こちらをご参 照くだ さい :
help.devialet.com
詳 しくは ウェブ サ イト をご 参 照くだ さ い 。
www.devialet.com
保証期間
2年間
注意事項:向きを変えた後は、しっかりと固定されているか確認してください。
-
 1
1
-
 2
2
-
 3
3
-
 4
4
-
 5
5
-
 6
6
-
 7
7
-
 8
8
-
 9
9
-
 10
10
-
 11
11
-
 12
12
-
 13
13
-
 14
14
-
 15
15
-
 16
16
-
 17
17
-
 18
18
-
 19
19
-
 20
20
-
 21
21
-
 22
22
-
 23
23
-
 24
24
-
 25
25
-
 26
26
-
 27
27
-
 28
28
-
 29
29
-
 30
30
-
 31
31
-
 32
32
-
 33
33
-
 34
34
-
 35
35
-
 36
36
-
 37
37
-
 38
38
-
 39
39
-
 40
40
-
 41
41
-
 42
42
-
 43
43
-
 44
44
-
 45
45
-
 46
46
-
 47
47
-
 48
48
-
 49
49
-
 50
50
-
 51
51
-
 52
52
-
 53
53
-
 54
54
-
 55
55
-
 56
56
-
 57
57
-
 58
58
-
 59
59
-
 60
60
-
 61
61
-
 62
62
-
 63
63
-
 64
64
-
 65
65
-
 66
66
-
 67
67
-
 68
68
-
 69
69
-
 70
70
-
 71
71
-
 72
72
-
 73
73
-
 74
74
-
 75
75
-
 76
76
-
 77
77
-
 78
78
-
 79
79
-
 80
80
-
 81
81
-
 82
82


Devialet Gecko Wall Mount for Phantom I Manual de usuario
- Tipo
- Manual de usuario
en otros idiomas
Otros documentos
-
Drilling Dione Manual de usuario
-
Black & Decker DE40 Manual de usuario
-
 Oregon Scientific ATC Series ATC Gecko Manual de usuario
-
Gecko in.k330 Techbook
-
Gecko in.k300 Techbook
-
-
-
-
-
