Char Griller 3338 El manual del propietario
- Categoría
- Barbacoas
- Tipo
- El manual del propietario

OM 3338 E A.3
Contents of this manual are Trademarked and Copyrighted by Char-Griller
®
| A&J Manufacturing
Using the information contained in this manual without consent of Char-Griller
®
and/or A&J Manufacturing is strictly prohibited.
OWNER’S MANUAL
3-BURNER OUTDOOR STOVE
Model #3338
• Never operate this appliance unattended.
• Never operate this appliance within 10 ft
(3.0 m) of any structure, combustible
material or other gas cylinder.
• Never operate this appliance within 25 ft
(7.5 m) of any ammable liquid.
• Heated liquids remain at
scalding temperatures long after
the cooking process.
Failure to follow these instructions could
result in re, explosion or burn hazards
which could cause property damage,
personal injury or death.
Danger
• Never touch cooking appliances
until liquids have cooled to 115°F
(45°C) or less.
• If a re should occur, keep away from the
appliance and immediately call your re
department. Do not attempt to extinguish
an oil or a grease re with water.
Keep your receipt with this manual for Warranty.
CUSTOMER SERVICE
1-912-638-4724
Service@CharGriller.com

This Page Intentionally
Left Blank

TABLE OF CONTENTS
Safety Warnings & Warranty............................... A-1
Assembly Instructions ..................................... B-1
Product Usage .................................................. C-1
Accessories ....................................................... D-1
If you smell gas:
1. Shut off gas to the appliance.
2. Extinguish any open ame.
3. If odor continues, keep away from the
appliance and immediately call your
gas supplier or re department.
Failure to follow these instructions
could result in re or explosion
which could cause property damage,
personal injury or death.
1. Do not store or use gasoline or other
ammable liquids or vapors in the
vicinity of this or any other appliance.
2. An LP cylinder not connected for use
shall not be stored in the vicinity of this
or any other appliance.
Danger Warning
Wa rning
For Outdoor Use Only.

A-1
An LP cylinder is required for operation. This outdoor stove is not intended for
commercial use.
SAVE THESE INSTRUCTIONS FOR FUTURE REFERENCE. IF YOU ARE ASSEMBLING
THIS UNIT FOR SOMEONE ELSE, GIVE THIS MANUAL TO HIM OR HER TO SAVE FOR
FUTURE REFERENCE.
WARNING:
Improper installation, adjustment, alteration, service, or maintenance could cause injury or property
damage. Read the installation, operation, and maintenance instructions thoroughly before assembling
or servicing this outdoor stove. Failure to follow these instructions could result in re or explosion that
could cause property damage, personal injury, or death.
DANGER:
DO NOT use outdoor stove for indoor cooking or heating. TOXIC fumes can accumulate and cause
asphyxiation. Do not use in or on boats or recreational vehicles.
WARNING:
Accessible parts may be very hot. Keep young children away. Read the instruction literature before
using the outdoor stove. The use of unauthorized parts can create unsafe conditions and environment.
NOTE: The use and installation of this outdoor stove must conform to local codes or, in absence of
local codes, the Natural Gas and Propane Installation Code, CSA B149.1, or the Propane Storage
and Handling Code,CSA B149.2, or the National Fuel Gas Code, ANSI Z223.1/NFPA 54, Storage and
Handling of Liqueed Petroleum Gases, ANSI/NFPA 58.
IMPORTANT NOTICE: Read all instructions prior to assembly and use. Read and understand all
warnings and precautions prior to operating your outdoor stove.
READ ALL SAFETY WARNINGS AND INSTRUCTIONS CAREFULLY BEFORE
ASSEMBLING AND OPERATING YOUR OUTDOOR STOVE
IMPORTANT SAFETY WARNINGS
WARNING:
FUELS USED IN LIQUEFIED PROPANE GAS APPLIANCES, AND THE PRODUCTS OF COMBUSTION OF SUCH FUELS, CAN EXPOSE YOU TO
CHEMICALS INCLUDING BENZENE, WHICH IS KNOWN TO THE STATE OF CALIFORNIA TO CAUSE CANCER AND CAUSE BIRTH DEFECTS OR OTHER
REPRODUCTIVE HARM. For more information go to: www.P65Warnings.ca.gov.
ADVERTENCIA: LOS COMBUSTIBLES USADOS EN EQUIPOS PARA LICUAR GAS PROPANO, ASÍ COMO LOS PRODUCTOS DE SU COMBUSTIÓN,
PUEDEN EXPONERTE A SUSTANCIAS QUÍMICAS, ENTRE ELLAS EL BENCENO, QUE EL ESTADO DE CALIFORNIA RECONOCE COMO CAUSA DE CÁNCER
Y DE MALFORMACIONES CONGÉNITAS Y OTROS DAÑOS AL SISTEMA REPRODUCTOR. Para más información, visite www.P65Warnings.ca.gov

A-2
Read the following instructions carefully and be sure your outdoor stove is properly
assembled, installed and maintained. Failure to follow these instructions may result in
serious bodily injury and/or property damage. If you have any questions concerning
assembly or operation, consult your dealer or LP gas company.
• While in-use, always place the outdoor stove and LP cylinder on at level ground. Outdoor stove
can be used with 20lb LP cylinder. This appliance is designed to operate at an inlet pressure of:
11 inches water column.
• Purchase LP cylinders only with these required measurements: 12” (30.5 cm) (diameter) x 18”
(45.7 cm) (tall) with 20lb (9kg) capacity.
• DO NOT move the outdoor stove during use.
• DO NOT attempt to disconnect any gas ttings while outdoor stove is in use.
• DO NOT use LP cylinder if the cylinder and/or valve are damaged, rusty, or dented as this may be
hazardous. Contact your supplier to have it checked.
• DO NOT lean over an open outdoor stove and be mindful of hands/ngers near the edge of the
cooking area.
• Should a re occur, turn off all gas burners, close the lid (if available), and stand back until re is out.
• Should ames go out while in operation, turn off all gas valves and leave lid open
(if available). Return to outdoor stove after ve (5) minutes and try to relight the burners – follow
lighting instructions.
• Keep children and pets away from outdoor stove when in use. Some parts of the outdoor stove will
become very hot.
• When cleaning the valves and burners, be careful not to stretch the valve orices or burner ports.
• Move gas hoses as far away as possible from hot surfaces and dripping hot grease.
• Gas may still be present in a cylinder that appears to be empty. Adhere to proper transportation/
storage of the LP cylinder at all times.
• If gas is leaking from LP cylinder, move away from LP cylinder immediately and call your gas
supplier or re department. DO NOT try to address problem yourself.
• DO NOT use a ame to check for gas leaks.
• DO check for gas leaks and any obstructions to burners before use. This is especially important
after a period of storage or non-use.
• The exible hose should be changed whenever it is damaged or cracked or by expiration date
printed on the tubing. Or, change hose every ve (5) years.
• Always connect or replace cylinder in a well-ventilated area, and never in the presence of a ame,
spark or heat source.
• Outdoor stove must be kept away from ammable materials.
• Turn off gas supply at LP cylinder after use.
• DO NOT alter this outdoor stove in any manner.
• DO NOT touch metal parts of outdoor stove until it has completely cooled (about 45 minutes) to
avoid burns, unless you are wearing protective gear (BBQ mittens, pot holders, etc.).
• Note, parts sealed by manufacturer or its agent must not be altered.
• When assembling the outdoor stove, position the exible hose to prevent twisting
and/or entanglement.
• Stay away from any source of ignition when changing LP cylinder.
• When assembling the outdoor stove, do not obstruct ventilation openings of outdoor stove’s
container compartment. Char-Griller
®
reserves the right to make minor technical adjustments
to the device.

A-3
• This outdoor stove is only intended for heating water (not oil or grease).
1. Never ll the LP cylinder beyond 80% full, as this may result in a re and cause serious injury
or death.
2. DO NOT store a spare LP cylinder under or near this outdoor stove, and:
3. If the instructions in 1 and 2 are not followed exactly, a re causing death or serious injury
may occur.
CAUTION
• This outdoor stove is for use with propane gas only (LP cylinder not included).
• Never attempt to attach this outdoor stove to the self-contained propane system of a camper trailer,
motor home, or house.
• The LP cylinder must be constructed and marked in accordance with the specications for LP
cylinders of the U.S. Department of Transportation (DOT) CFR 49., or the Standard for Cylinders,
Spheres and Tubes for the Transportation of Dangerous Goods, CAN/CSA-B339.
• The LP cylinder must be provided with a listed overlling prevention device.
• The LP cylinder must be provided with a cylinder connection device compatible with the connection
for outdoor cooking outdoor stoves.
• This gas outdoor stove is not intended for use on recreation vehicles and/or boats.
• DO NOT use outdoor stove unless it is completely assembled and all parts are securely fastened
and tightened.
• Keep all combustible items and surfaces at least 10 ft (3.05 M) away from outdoor stove at all times.
• DO NOT use this outdoor stove or any gas product near unprotected combustible constructions.
• DO NOT use in an explosive atmosphere. Keep outdoor stove area clear and free from combustible
materials, gasoline and other ammable vapors and liquids.
• Never keep a lled LP cylinder in a hot car or car trunk. Heat will cause gas pressure to increase,
which may open relief valve and allow gas to escape.
• Keep outdoor stove’s valve compartment, burners and circulating air passages clean. Inspect
outdoor stove before each use.
• Storage of an outdoor stove indoors is permissible only if the LP cylinder is disconnected and
removed from the outdoor stove.
• LP cylinders must be stored outdoors out of the reach of children and shall not be stored in a
building, garage, or other enclosed area.
• The LP cylinder must be arranged for vapor withdrawal.
• If the LP cylinder used is in excess of 2.2 lb. (1.00 kg) propane capacity, it must include a collar to
protect the LP cylinder valve.
WARNING
• This outdoor stove is for outside use only, and should not be used in a building, garage, or any other
enclosed area.
• The use of alcohol, prescription or non-prescription drugs may impair the operator’s ability to
properly assemble or safely operate the outdoor stove.
• Always open outdoor stove lid (if available) slowly and carefully as heat and steam trapped within
the outdoor stove may result in a severe burn or cause other bodily harm.
• Always place outdoor stove on a stable, noncombustible surface far away from combustibles. An
asphalt or blacktop surface may not be acceptable for this purpose.
• The outdoor stove shall not be used on or under any apartment or condominium balcony or deck.

A-4
• DO NOT leave a lit gas outdoor stove unattended. Keep children and pets away from outdoor stove
at all times.
• DO NOT place outdoor stove on any type of tabletop surface.
• DO NOT use outdoor stove in high winds.
• Disconnect the LP cylinder by rst turning off valve on top of the cylinder, turn off burner valves, then
disconnect regulator from valve on propane tank by turning plastic connector counterclockwise.
• Avoid burning of or impact with the outdoor stove to prevent spillage or splashing of hot
cooking liquid.
• Never drop food or accessories into hot cooking liquid. Lower accessories and food slowly into
the cooking liquid in order to prevent splashing or overow. When removing food from the outdoor
stove, care shall be taken to avoid burns from hot cooking liquids.
• DO NOT place empty cooking vessel on the outdoor stove while in operation. Use caution when
placing anything in cooking vessel while the outdoor stove is in operation.
• Never overll the cooking vessel with water.
• DO NOT operate with legs in the folded position. This stove is only intended to operate freestanding
with the legs fully extended and locked into position.
• This outdoor stove is not intended for and should never be used as a heater.
• Never use a cooking vessel larger than the capacity and diameter recommended by the
manufacturer (no larger than 10 in. in diameter).
• Place dust cap on LP cylinder valve outlet whenever the LP cylinder is not in use. Only install the
type of dust cap on the LP cylinder valve outlet that is provided with the LP cylinder valve. Other
types of caps or plugs may result in leakage of propane.
DANGER
• Liquid propane (LP) gas is ammable and hazardous if handled improperly. Know its characteristics
before using any propane product.
• Propane Characteristics: ammable, explosive under pressure, heavier than air and settles in pools
and low areas.
• In its natural state, propane has no odor. For your safety, an odorant has been added.
• Contact with propane can cause freeze burns to skin.
• Never use an LP cylinder with a damaged body, valve, collar or footing.
• Dented or rusted LP cylinders may be hazardous and should be checked by your propane
gas supplier.
• Use caution when assembling and operating your outdoor stove to avoid scrapes or cuts from
sharp edges.
• Use caution when moving outdoor stove to prevent strains.
• Never move outdoor stove when it is in use or hot. Allow the cooking vessel to cool to 115°F (45°C)
before moving or storing.
• To protect against bacteria that could cause illness, keep all meats refrigerated and thaw in
refrigerator or microwave. Keep raw meats separate from other foods, and wash everything that
comes in contact with raw meat.
• Cook meat thoroughly, and refrigerate leftovers immediately.
• Use a calibrated food thermometer and the USDA guidelines to ensure that meat, poultry, seafood,
and other cooked foods reach a safe minimum internal temperature.
• Have a re extinguisher near at all times. Maintain and check your re extinguisher regularly.

A-5
*** STOP! CALL FIRST! ***
Do NOT Return Product to Store.
This outdoor stove has been made according to the highest of quality standards. If you have any
questions not addressed in this manual, or, if you need a replacement part(s), please contact Char-
Griller
®
Customer Service via phone at 1-912-638-4724 (USA) or via email at Service@CharGriller.com.
To ensure a quick and accurate resolution, please locate and record your outdoor stove’s serial number
prior to reaching out.
REGISTER YOUR OUTDOOR STOVE:
To take full advantage of the Char-Griller
®
warranty be sure to register your
outdoor stove by visiting www.CharGriller.com/Register or calling Customer
Service at 1-912-638-4724.
Registration provides important protections:
1. In the extremely unlikely event of a product recall, Char-Griller
®
can easily
contact you and rectify the issue.
2. If a warrantied part is broken or missing, Char-Griller
®
can send you the needed parts promptly.
NOTE: You will need your model #, serial number, and a copy of the original sales receipt
when registering.
Document Your Serial Number HERE:
(Serial number is located on the back of the outdoor stove body or on the leg.)
_________________________
(SERIAL #)
(example)

A-6
SURFACE RUST IS NOT CONSIDERED A MANUFACTURING OR MATERIALS DEFECT
Char-Griller
®
outdoor stoves are made of steel, and, if exposed to the elements, rust will occur naturally. Please
refer to the section entitled, “Usage” to review how to care for your outdoor stove properly.
Surface issues such as scratches, dents, corrosion, or discoloring caused by heat, abrasive cleaners, or rust are
NOT covered under warranty.
Warranties are for the replacement of defective parts only. Char-Griller
®
is not responsible for damage resulting
from accident, alteration, misuse, abuse, hostile environments, improper installation, and installation not in
accordance with local codes of service of unit.
Excluded Under ALL Warranties
Paint; Surface Rust; Heat Damage; Incorrect Parts ordered by customer, including shipping; Worn Parts; Missing
or damaged parts not reported within two (2) months of purchase date; Defective parts not reported within one (1)
year of purchase date; Fading grill cover.
*NOTE: For warranty claims, photos and prepaid return of the item in question may be required. Misuse, abuse, or
commercial use nullies all warranties.
Charcoal / Pellet / Kamado Grills
Grill - Hood and Body
(excludes removable Ash Pan)
5 years from date of purchase for rust
through / burn through
Ash Pan and Defective Parts
1 year from date of purchase
Gas Grills / Outdoor Stoves
Grill Hood and Main Burner Tubes
(excludes Side Burner)
5 years from date of purchase for rust
through / burn through
Grill Body and Side Burner
and Defective Parts
1 year from date of purchase
Griddles
All Defective Parts 1 year from date of purchase
Dual Fuel Grills (Gas & Charcoal)
Charcoal Grill - Hood and Bottom and Gas
Grill Hood (TOP half) and Main Burner Tubes
(excludes Ash Pan and Side Burner)
5 years from date of purchase for rust
through / burn through
Ash Pan and Defective Parts and Gas Grill
Body (BOTTOM half) and Side Burner
1 year from date of purchase
Parts, Accessories, and Grill Covers 1 year from date of purchase
(seam tears only for covers)
WARRANTY INFORMATION
A COPY OF THE DATED PROOF OF PURCHASE (RECEIPT) IS REQUIRED WHEN REGISTERING OR
SUBMITTING A WARRANTY* CLAIM. PLEASE RETAIN A COPY OF THE RECEIPT FOR YOUR RECORDS.
Char-Griller
®
will replace any defective part of its grillers/smokers, under warranty, as outlined below.
PLEASE READ THIS INFORMATION IN DETAIL AND IF YOU HAVE ANY QUESTIONS CONTACT CUSTOMER
SERVICE AT 1-912-638-4724 OR [email protected].

B-1
ASSEMBLY INSTRUCTIONS
1
2
4
3
5
6
7
8
9
11
10
13
14
16
17
18
19
12
18
15
20
21
5
12

B-2
PARTS LIST
HARDWARE NEEDED
Tools Needed: Phillips Head Screwdriver and/or a 7/16” Nut Driver.
**NOTE: DO NOT fully tighten any bolts until instructed to do so. Tightening
stoo soon may prohibit parts from tting together. All hex nuts should be on the
inside of the outdoor stove unless stated otherwise. Unpack all contents in a well
cleared and padded area.**
Estimated Time: 15 minutes
Hardware Pack #551172
Part No. Description Photo QTY
1/4-20 x 1/2” HEX BOLT 8
A
Item QTY Part Name
1 1 WIND SCREEN
2 1 STOVE GRATE
3 1 STOVE GRATE HOLDING BRACKET
4 1 STOVE GRATE HOOK
5 2 SIDE HANDLE
6 3 BURNER ASSEMBLY
7 3 BURNER AIR DAMPER
8 1 RIGHT SIDE SHELF
9 1 STOVE BODY
10 1 LOGO PLATE
11 1 CONTROL PANEL
12 2 RIGHT LEG ASSEMBLY
13 4 LEG ADJUSTER SCREW
14 1 BODY HEAT DEFLECTOR
15 1 HOSE VALVE REGULATOR ASSEMBLY
16 3 KNOB
17 3 KNOB BEZEL
18 2 LEFT LEG ASSEMBLY
19 3 IGNITER
20 1 IGNITION CHAIN
21 1 LEFT SIDE SHELF

B-3
STEP 1
18
12
12
18
PRESS TO RELEASE

B-4
STEP 2
x8
A
A
A
A
A
A
A
A
A
5
5

B-5
STEP 3
STEP 4A
8
21
1

B-6
STEP 4B
STEP 4C
1
1
1

B-7
STEP 5
To ensure sturdy assembly,
tighten all BOLTS.
STEP 6
FULLY
ASSEMBLED
16
16
16

B-8
STEP 1A
FOLDING YOUR
OUTDOOR STOVE
STEP 1B
1
1

B-9
STEP 2
STEP 1C
1
8
21
LATCH SECURELY

B-10
STEP 3
FOLD ‘N GO
12
18
PRESS TO RELEASE

C-1
OPERATING INSTRUCTIONS
Setting Up
This appliance is designed for use outdoors, away from any ammable materials. It is important
that there are no overhead obstructions and that there is a minimum distance of 36 inches (90 cm)
from the side or rear of the appliance. Maintain a minimum 10 ft. clearance to objects that can catch re
or sources of ignition, such as: pilot lights on water heaters, live electrical appliances, etc. It is important
that the ventilation openings of the appliance are not obstructed.
The appliance must be used on a level, stable surface. The appliance should be protected from direct
drafts and positioned or protected against water exposure (e.g. rain). DO NOT move appliance while
hot, and do not leave unattended during operation.
Protect LP cylinder from direct sunlight and keep away from heat sources exceeding 122°F (50° C).
DO NOT move appliance while hot, and do not leave unattended during operation. Position LP cylinder
such that hose is not bent, twisted, subject to tension, or touching any hot parts of appliance.
D
O
N
O
T
O
P
E
R
A
T
E
W
I
T
H
L
E
G
S
F
O
L
D
E
D
36 INCHES
(90 CM)
N
O
O
V
E
R
H
E
A
D
O
B
S
T
R
U
C
T
I
O
N
CAUTION
CAUTION
HOT
DO NOT MOVE
DO NOT MOVE

C-2
NEVER EXCEED 650°F BECAUSE THIS WILL DAMAGE THE FINISH AND
CONTRIBUTE TO RUST. PAINT IS NOT WARRANTED AND WILL REQUIRE TOUCH-UP.
THIS UNIT IS NOT WARRANTED AGAINST RUST.
CAUTION:
1. All cleaning and maintenance should be done when the outdoor stove is cool and the fuel
supply is DISCONNECTED.
2. Do NOT clean any outdoor stove part in a self-cleaning oven as the extreme heat will damage
the nish.
3. Do NOT enlarge valve orices or burner ports when cleaning the valve or the burners.
NOTICES:
1. This outdoor stove should be thoroughly cleaned, inspected, and seasoned on a
regular basis.
2. Abrasive cleaners will damage this product.
3. NEVER use oven cleaner on any part of this outdoor stove.
BEFORE EACH USE:
1. Ensure outdoor stove area is clean and free of any combustible materials like: gasoline, lighter uid,
or any other ammable vapors or liquids.
2. DO NOT obstruct the ow of the combustion of LP gas and the ventilation of air.
3. Keep the ventilation opening(s) of the LP cylinder area free and clear of debris.
4. Visually check the burner ames to make sure outdoor stove is working properly.
5. See sections below for proper cleaning and maintenance instructions.
6. Check for obstructions of airow to the burners. Spiders, insects, and webs can clog the burner
tubes. A clogged burner can lead to a re.

C-3
Regulator and Hose
Regulator and Hose are supplied with the outdoor stove. If a replacement is necessary, please visit
CharGriller.com or call our Customer Service department at 1-912-638-4724. DO NOT use replacement
parts that are not intended for this outdoor stove. It is recommended that the regulator is changed within
10 years of the date of manufacture.
The use of the wrong regulator or hose is unsafe. Always check that you have the correct items before
operating the outdoor stove.
The hose used must conform to the relevant standard for the country of use. A
worn or damaged hose
must be replaced immediately. Ensure the hose is properly connected to the gas grill and free of any
obstructions, kinks, and/or entanglements.
Connecting the Hose to the Outdoor Stove
Before connecting the hose, ensure that there is no debris caught in the head of the LP cylinder,
regulator, burner, and burner ports. Spiders and insects can nest within and clog the burner at the
orice. Clogged burner tubes can result in re and severely damage the outdoor stove.
Clean burner holes with a heavy-duty pipe cleaner.
If the hose is replaced it must be secured to the outdoor stove and regulator connections with hose
clips. Disconnect the regulator from the cylinder (according to the directions supplied with the regulator)
when the outdoor stove is not in use.
The outdoor stove must be used in a well-ventilated area. DO NOT obstruct the ow of combustion air
to the burner when in use. ONLY USE THIS APPLIANCE OUTDOORS.
Connecting the Gas Cylinder
to the Outdoor Stove
This outdoor stove is only suited for use with low-pressure propane
gas tted with the appropriate low-pressure regulator via a exible
hose. The hose should be secured to the regulator and the outdoor
stove with hose clips. WARNING: Position the LP cylinder at a
minimum distance of 10” (25,4 cm) from the outdoor stove so as to
avoid a tipping hazard.
1. Ensure all control knobs are in the OFF position.
2. Verify that the LP cylinder valve is closed by turning the handle on
the LP cylinder valve clockwise until it stops.
3. Remove the protective cap from the LP cylinder valve nozzle.
4. Hold the regulator in a straight line with the LP cylinder valve
nozzle so the connection does not cross thread.
5. Insert regulator nipple into the LP cylinder valve nozzle opening.
6. Hand-tighten coupling nut in a clockwise direction.
Do not use tools!
7. Perform a Leak Test. (See Leak Testing section of this manual).
GAS OPERATION
10”
Tank Position

C-4
** BEFORE USE CHECK FOR LEAKS **
Never check for leaks with a naked eye. Always use a soapy water solution.
NOTE: Before starting the stove, check for leaks. To prevent a re or an explosion hazard when testing
for a leak, ensure the regulator valve is securely fastened to the burner and the LP cylinder
.
Always perform the “Leak Test” as described below before lighting the outdoor stove or each time the
LP cylinder is connected for use.
• DO NOT smoke or allow other sources of ignition in the area while conducting a leak test.
• Conduct leak test outdoors in a well-ventilated area.
• DO NOT use matches, lighters, or a ame to check for leaks.
• DO NOT use outdoor stove until any and all leaks are corrected. If leak persists, disconnect
propane supply and call Customer Service at 1-912-638-4724, or contact your local gas appliance
service/supplier.
Leak Test
1. In a spray bottle mix 1-2 Tbsp (15-30mL) solution, 1 part dish washing soap, 3 parts water.
2. Ensure control valves/burner knobs are in the OFF position and the regulator is securely connected.
3. Open LP cylinder valve completely by turning wheel counterclockwise.
4. Apply the solution to the hose, gas valve, regulator, and LP cylinder.
5. If bubbles form and grow on any of the tested components, there is a leak in the component.
No bubbles mean no leaks.
6. If a leak has been identied, please re-secure/tighten all components and retest starting
with steps 2-5. If leak persists, disconnect LP cylinder and call Char-Griller
®
Customer Service
at 1-912-638-4724, or contact your local gas appliance service/supplier.

C-5
Leveling the Outdoor Stove
For safe operation, your outdoor stove must be level. If your outdoor surface is slightly out of level, use
the adjustable feet at the bottom of each leg to correct. Turning the adjustable feet counterclockwise will
raise the leg and clockwise will lower.
2
1

C-6
Lighting Instructions
When lighting, keep your face and body as far away from burners as possible and never lean over
outdoor stove surface. If outdoor stove does not light immediately or goes out during operation, turn all
burner knobs to the OFF position and wait 5 minutes for gas to clear before attempting to relight.
Failure to do so may result in an explosive are-up, which can cause serious bodily injury or death.
After achieving a successful lighting and prior to rst use, allow the outdoor stove to run on HI for
at least 15 minutes. This process will ensure no performance issues and allow the outdoor stove to
self-clean and sanitize.
Main Burners
Your Char-Griller
®
outdoor stove is equipped with three (3) individual
cast-aluminum burners. Each is controlled and lit by their own individual
knob and integrated ignition.
1. Make sure all burner knobs are in OFF position.
2. Open valve on LP cylinder by turning wheel counterclockwise.
3. To ignite a burner, push in and rotate knob counterclockwise towards
“HI” until you hear a loud click and the burner ignites. If burner does
not light immediately, turn burner OFF, wait 5 minutes for gas to clear
and repeat Step 3.
4. Repeat for all desired burners. Light only burners intended for use.
5. Adjust knobs to desired cooking setting.
After lighting, observe burner ame and make sure all burner ports are lit.
Shutting off Burners
1. Turn knob(s) clockwise to LOW position, then push in and turn to OFF. Never force knob without
pushing in, as this can damage valve and knob.
2. Promptly close LP cylinder valve by turning wheel clockwise.

C-7
Lighting Burner with
a Match
1. Make sure all burner knobs are in OFF position.
2. Open valve on LP cylinder.
3. Locate ignition chain on the side of the outdoor stove
and install match. Light match.
4. Push in and rotate knob counterclockwise to
“HI” position.
5. Using ignition chain, place ame though outdoor
stove grate near burner ports. Burner should
light immediately.
6. Adjust knobs to desired cooking settings.
7. If burner does not light immediately, turn burner OFF,
wait 5 minutes for gas to clear, and repeat starting at Step 3.
Adjusting The Flame Using Air-to-Gas Ratio
Your outdoor stove requires the right amount of air to gas ow for even heating. Set correctly, the burner
ame will be BLUE. NOTE: A touch of orange/yellow at the ame tips is ne. Flame adjusters are used
to regulate the air ow.
Typically, higher temperature require the ame adjusters to be more open while with lower temperatures
they will be more closed. Adjust as necessary.
Light the outdoor stove and set
the burner to “HI”. If the ame
is very yellow or not consistent,
the ame adjuster needs to be
opened to allow MORE air to
reach the burner.
Light the outdoor stove and set
the burner midway between “HI”
and “LOW”. If the ame is yellow
or not consistent, the ame
adjuster needs to be partially
closed to allow LESS air to
reach the burner.
Light the outdoor stove and set
the burner to “LOW”. If the ame
is yellow or sputtering, the ame
adjuster needs to be fully closed
to allow not allow ANY air to
reach the burner.
FULLY OPEN PARTIALLY CLOSED FULLY CLOSED
Burner Ports
Ignition Chain

C-8
Observe Flame
Height When Lit
Flame should be blue and yellow in color and
approximately 1/2 in. - 1 in. (1.2 cm - 2.54 cm) tall on
HI setting.
Temperature Management
Manage desired heat for cooking by adjusting burner knobs from LOW to HI. Weather conditions may
cause heat uctuations and require more heat in cold and/or windy conditions. Different types and
amounts of food will also impact your temperature management and distribution. Being aware of all
elements will help ensure optimal gas appliance performance and desired cooking results.
Disconnecting the
LP Cylinder
1. Turn all control knobs to the OFF position.
2. Turn the wheel on the LP cylinder clockwise until it stops.
3. Turn coupling nut on regulator in a counterclockwise direction
until the regulator is released from the threaded LP cylinder
valve nozzle.
4. Place the protective cap over LP cylinder gas nozzle.
LP Cylinder
The LP cylinder should not be dropped or handled roughly! If the appliance is not in use, it is
recommended to disconnect the LP cylinder. Replace the protective cap on the LP cylinder after
disconnecting the LP cylinder from the appliance.
LP cylinders must be stored outdoors in an upright position and out of the reach of children. The LP
cylinder must never be stored where temperatures can reach or exceed 122°F (50° C). Do not
store the LP cylinder near ames, pilot lights or other sources of ignition. DO NOT SMOKE NEAR
AN LP CYLINDER.
Again, this outdoor stove is designed for outdoor use only and away from any ammable materials.
Ensure there are no overhead obstructions and no objects/barriers are within 36 inches (90 cm) of the
outdoor stove. Ventilation openings of the outdoor stove should not be obstructed at any time. The
outdoor stove must be used on a level, stable surface, positioned away from direct drafts and protected
against water exposure (e.g. rain).
Parts sealed by the manufacturer or its agent must not be altered by the user.
No modications should be made to any part of this outdoor stove. Repairs and
maintenance should only be carried out by a registered service engineer or technician.
High
Low

C-9
CARE & MAINTENANCE
When you are nished cooking, turn off all burners and allow to cool.
When performing cleaning and maintenance of the burners, always ensure burner ports are properly
aligned with valve openings after reinstalling on the outdoor stove. See gure for correct alignment.
Once cool, clean your outdoor stove with a rag, soap and water. To protect and prevent rust, lightly
coat the cooking grates with axseed or other vegetable oil. Continued cleaning and care are the key to
ensuring a long life for your Char-Griller
®
Outdoor Stove.
Outdoor Stove Cover
Extend the life of your outdoor stove by using a Char-Griller
®
Custom Fit cover to protect it from the
elements. Weather resistant polyester material protects against birds, dust, wind, rain and snow.
(Model# 3375)
0.5"

D-1
Original All-Purpose
BBQ Rub
Pairs well with all types
of meat and sh
Char-Griller
®
Trucker Hat
Cotton-poly blended front
Nylon mesh back
Adjustable snapback closure
One Size Fits Most
Tank Cover
Weather Resistant
Nylon Velcro
Elastic at Top and Bottom
Cover Only
*Tank Not Included
Custom Fit Cover
Weather Resistant
Protects Grill Finish
Folding Probe
Thermometer
Stainless steel
fast-read probe accurately
measures temperature
Easily switch from °F to °C
Auto ON/OFF feature for
extended battery life
Model #3375
Model #6304
Char-Griller
®
Grill Glove
Heat resistant
Non-slip Silicone grip
Covers the forearm
Wear on Left or Right hand
Model #8860
Model #70100
Model #9955
Model #85501
FOR MORE
SCAN
FAVORITE ACCESSORIES
FOR THE FULL LINE OF ACCESSORIES VISIT CHARGRILLER.COM

This Page Intentionally
Left Blank

This Page Intentionally
Left Blank

P.O. Box 30864
Sea Island, GA 31561
1-912-638-4724
www.CharGriller.com
Service@CharGriller.com

OM 3338 S A.3
COCINA DE 3 HORNALLAS
PARA EL AIRE LIBRE
Modelo #3338
MANUAL DEL PROPIETARIO
El contenido de este manual está registrado y los derechos de autor son propiedad de Char-Griller
®
| A&J Manufacturing.
El uso de la información contenida en este manual sin el consentimiento de Char-Griller
®
y/o A&J Manufacturing está estrictamente prohibido.
• Nunca opere esta unidad si
está desatendida.
• Nunca opere esta unidad dentro de 10 ft
(3.0 m) de cualquier estructura, material
combustible u otro cilindro de gas.
• Nunca opere esta unidad dentro de 25 ft
(7.5 m) de cualquier líquido inamable.
• Los líquidos calentados se mantienen a
temperaturas hirvientes mucho después
del proceso de cocción.
El no seguir estas instrucciones puede
resultar en peligros de incendio, explosión o
quemaduras que pueden causar daños a la
propiedad, lesiones personales o la muerte.
Peligro
• Nunca toque las unidades de cocina
hasta que los líquidos se hayan enfriado
a 115° F (45° C) o menos.
• Si se produjera un incendio, manténgase
alejado del aparato y llame de inmediato
a su departamento de bomberos. No
intentes extinguir un aceite o una grasa
se incendian con agua.
Mantenga su recibo junto con este manual
para fines de la garantía.
SERVICIO AL CLIENTE
1-912-638-4724
Service@CharGriller.com

Esta Página Ha Sido
Intencionalmente Ha Dejado
En Blanco

TABLA DE CONTENIDO
Advertencias de seguridad y garantía ............ A-1
Instrucciones de montaje ................................. B-1
Uso del producto ............................................... C-1
Recetas ............................................................... D-1
Accesorios ......................................................... E-1
Si siente olor a gas:
1. Cierre el gas al aparato.
2. Apague cualquier llama abierta.
3. Abra la tapa.
4. Si sigue sintiendo el olor, manténgase
alejado del aparato y llame a su
proveedor de gas o al departamento
de bomberos.
1. No almacene ni use gasolina u otros
líquidos o vapores inamables cerca
de este o cualquier otro aparato.
2. No debe almacenarse un tanque de LP
que no esté conectado para ser usado
cerca de este o cualquier otro aparato.
Peligro Advertencia
Advertencia
Únicamente para uso en exteriores.
El no seguir estas instrucciones puede
resultar en peligros de incendio,
explosión o quemaduras que pueden
causar daños a la propiedad, lesiones
personales o la muerte.

A-1
El cilindro de GLP para la operación. Esta estufa a gas no está pensada para su
uso comercial.
GUARDE ESTAS INSTRUCCIONES PARA SU REFERENCIA EN EL FUTURO. SI ESTÁ
ENSAMBLANDO ESTA UNIDAD PARA ALGUIEN MÁS, DELE ESTE MANUAL PARA QUE
LO GUARDEN PARA SU REFERENCIA EN EL FUTURO.
ADVERTENCIA:
La instalación, el ajuste, la alteración o mantenimiento inapropiado pueden causar lesiones o daños a
las propiedades. Lea las instrucciones de instalación, operación y mantenimiento completamente antes
de ensamblar o realizar mantenimiento a este equipo. El no seguir estas instrucciones puede resultar
en un incendio o explosión que pueden causar daños a la propiedad, lesiones personales o la muerte.
PELIGRO:
NO utilice la estufa a gas para dar calefacción o cocinar en interiores. Pueden acumularse vapores
TÓXICOS y causar asxia. No usar en botes ni vehículos recreacionales.
ADVERTENCIA:
Las partes accesibles pueden calentarse mucho. Mantenga a sus niños pequeños alejados. Lea
los documentos de instrucción antes de utilizar la unidad. El uso de partes no autorizadas puede
crearcondiciones o un ambiente inseguro.
NOTA: El uso e instalación de este aparato debe cumplir con los códigos locales o, en ausencia
de códigos locales, el Código de instalación de gas natural y propano, CSA B149.1, o el Código de
almacenamiento y manipulación de propano, CSA B149.2, o el Código nacional de combustible Código
de gas, ANSI Z223.1 / NFPA 54, Almacenamiento y manipulación de gases licuados de petróleo, ANSI /
NFPA 58
AVISO IMPORTANTE: Lea todas las instrucciones antes del ensamblaje y el uso. Lea y entienda todas
las advertencias y precauciones antes de operar su estufa.
LEA CUIDADOSAMENTE TODAS LAS ADVERTENCIAS E INSTRUCCIONES DE
SEGURIDAD ANTES DE ENSAMBLAR Y OPERAR SU ESTUFA
ADVERTENCIAS DE
SEGURIDAD IMPORTANTES
WARNING:
FUELS USED IN LIQUEFIED PROPANE GAS APPLIANCES, AND THE PRODUCTS OF COMBUSTION OF SUCH FUELS, CAN EXPOSE YOU TO
CHEMICALS INCLUDING BENZENE, WHICH IS KNOWN TO THE STATE OF CALIFORNIA TO CAUSE CANCER AND CAUSE BIRTH DEFECTS OR OTHER
REPRODUCTIVE HARM. For more information go to: www.P65Warnings.ca.gov.
ADVERTENCIA: LOS COMBUSTIBLES USADOS EN EQUIPOS PARA LICUAR GAS PROPANO, ASÍ COMO LOS PRODUCTOS DE SU COMBUSTIÓN,
PUEDEN EXPONERTE A SUSTANCIAS QUÍMICAS, ENTRE ELLAS EL BENCENO, QUE EL ESTADO DE CALIFORNIA RECONOCE COMO CAUSA DE CÁNCER
Y DE MALFORMACIONES CONGÉNITAS Y OTROS DAÑOS AL SISTEMA REPRODUCTOR. Para más información, visite www.P65Warnings.ca.gov

A-2
Lea las siguientes instrucciones cuidadosamente y asegúrese de que su estufa esté
ensamblada, instalada y mantenida adecuadamente. El no seguir estas instrucciones
puede resultar en lesiones corporales severas y/o en daños a la propiedad. Si tiene
alguna pregunta sobre el ensamblaje o la operación, consulte a su proveedor o a su
compañía de gas.
• Cuando esté en uso, siempre coloque la unidad y el cilindro de gas en un nivel plano sobre el
suelo. La estufa puede ser utilizada con un cilindro de gas de 20lb. Esta estufa está diseñada para
funcionar a una presión de entrada de: columna de agua de 11 pulgadas.
• Compre cilindros LP solamente con estas medidas requeridas: 12 ”(30.5 cm) (diámetro) x 18”
(45.7 cm) (alto) con capacidad de 20 lb (9 kg).
• NO mueva la unidad durante su uso.
• NO intente desconectar ninguna de las piezas del gas mientras la estufa está en uso.
• NO utilice un cilindro de gas si el cilindro o la válvula están dañados, oxidados o abollados, ya que
esto puede ser peligroso. Contacte a su proveedor para revisarlos.
• NO se incline sobre una estufa abierta y tenga cuidado con sus manos/dedos cerca del borde del
área de cocina.
• Si ocurriese un incendio, cierre todos los fogones de gas, cierre la tapa, y aléjese de la estufa hasta
que se hayan apagado las llamas
• Si se apagan las llamas mientras está en operación, cierre todas las válvulas de gas y deje la tapa
abierta. Regrese a la estufa tras cinco minutos y trate de volver a encender los fogones – siguiendo
las instrucciones de encendido.
• Mantenga a los niños y mascotas alejados de la estufa cuando esté en uso. Algunas partes de la
estufa pueden calentarse mucho.
• Cuando limpie las válvulas y los fogones, tenga cuidado de no estirar los oricios de las válvulas ni
los puertos de los fogones.
• Aleje tanto como sea posible las mangueras del gas de las supercies calientes y de la grasa
caliente que gotee.
• Puede haber gas en un cilindro que aparente estar vacío. Adhiérase al transporte/almacenamiento
adecuado del cilindro en todo momento.
• Si hay gas escapando de un cilindro, aléjese inmediatamente del cilindro y llame a su proveedor de
gas o al departamento de bomberos. NO trate de abordar el problema usted mismo.
• NO utilice llamas para revisar si hay fugas de gas.
• REVISE si hay fugas de gas o cualquier obstrucción en los fogones antes de su uso. Esto es
particularmente importante tras un periodo de almacenamiento e inactividad.
• El tubo exible debe ser cambiado cuando se dañe o se agriete, o antes de la fecha de vencimiento
impresa en el tubo. O, cambie el tubo cada cinco (5) años.
• Siempre conecte o reemplace los cilindros en un área bien ventilada, y nunca donde haya una
llama, chispa o fuente de calor.
• La estufa debe mantenerse alejada de materiales inamables.
• Cierre el suministro en el contenedor de gas tras su uso.
• No altere esta estufa de ninguna manera.
• No toque las partes metálicas de la estufa hasta que se haya enfriado completamente (alrededor
de 45 minutos) para evitar quemaduras, a menos que lleve equipo protector (guantes de estufa
soportes para ollas, etc.).

A-3
• Tenga en cuenta que las partes selladas por el fabricante o su agente no deben ser alteradas.
• Cuando ensamble la estufa, posicione el tubo conector exible de manera que esté protegido
contra torceduras.
• Manténgase alejado de cualquier fuente de ignición cuando cambie el contenedor del gas.
• Cuando ensamble la estufa, no obstruya las aperturas de ventilación del compartimento contenedor
de la estufa. Nos reservamos el derecho de hacerle ajustes técnicos menores al dispositivo.
• Este aparato está diseñado únicamente para calentar agua (no aceite ni grasa).
1. Nunca llene el cilindro por encima del 80% de su capacidad. No seguir la información de arriba
exactamente puede resultar en un incendio que cause la muerte o lesiones graves.
2. No almacene un cilindro de gas de repuesto debajo o cerca de esta unidad, y:
3. Si no se siguen exactamente las instrucciones de 1 y 2, se producirá un incendio que provocará la
muerte o lesiones graves.puede ocurrir
PRECAUCIÓN
• La estufa es para su uso únicamente con gas propano (el cilindro de gas no está incluido).
• Nunca intente conectar esta estufa al sistema de propano propio de un tráiler de acampada, de una
casa móvil o de una casa.
• El cilindro de propano líquido debe estar construido y marcado de acuerdo con las especicaciones
para cilindros de propano líquido del Departamento de Transporte de EE. UU. (DOT) CFR 49.,
o la Norma para cilindros, esferas y tubos para el transporte de mercancías peligrosas, CAN /
CSA-B339
• El cilindro de suministro de gas debe estar provisto de un dispositivo contra
sobrellenado autorizado.
• El cilindro de suministro de gas debe estar provisto de un dispositivo de conexión para el cilindro
compatible con la conexión para electrodomésticos de cocina en exteriores.
• Esta estufa no está pensada para su uso en vehículos y/o botes recreativos.
• No utilice la estufa a menos que esté completamente ensamblada y todas las partes estén
ajustadas y colocadas de manera segura.
• El aparato no se debe usar en ni debajo de ningún balcón o terraza de un apartamento
o condominio.
• Mantenga todos los artículos y supercies combustibles alejadas al menos 10ft (3.05m) de la estufa
en todo momento.
• NO utilice esta estufa ni ningún producto a gas cerca de construcciones combustibles
sin protección.
• No utilizar en una atmósfera explosiva. Mantenga el área de la estufa limpia y libre de materiales
combustibles, gasolina y demás vapores y líquidos inamables.
• Nunca guarde un contenedor lleno en un auto o cajuela caliente. El calor causará que la presión del
gas aumente, lo que puede abrir la válvula de descargue y permitir que el gas escape.
• Mantenga el compartimento de válvulas, los fogones y los canales de circulación de aire limpios.
Inspeccione la estufa antes de cada uso.
• Los cilindros de LP deben almacenarse al aire libre fuera del alcance de los niños y no deben
almacenarse en un edicio, garaje u otra área cerrada.

A-4
• El cilindro de propano líquido debe disponerse para la extracción de vapor.
• Si el cilindro de propano líquido utilizado tiene una capacidad de propano superior a 2,2 lb (1,00
kg), debe incluir un collar para proteger la válvula del cilindro de propano.
ADVERTENCIA
• Esta estufa es para su uso únicamente en exteriores, y no debe ser utilizada en ningún edicio,
garaje, ni ninguna otra área encerrada.
• El consumo de alcohol o de drogas con o sin receta puede afectar la capacidad del operador de
ensamblar adecuadamente u operar seguramente la estufa.
• Siempre abra la tapa de la estufa lenta y cuidadosamente, ya que el calor y vapor atrapados en la
estufa pueden quemarlo severamente.
• Coloque siempre la estufa en una supercie dura y nivelada, lejos de combustibles. Las supercies
de asfalto o aglomerado pueden no ser aceptables para este propósito.
• No deje la estufa desatendida. Mantenga a los niños y mascotas lejos de la estufa en
todo momento.
• No coloque la estufa en ninguna supercie sobre una mesa.
• No utilice la estufa cuando haya vientos fuertes.
• Desconecte el tanque de propano cerrando primero la válvula en la parte superior del tanque, cierre
las válvulas de los fogones, luego desconecte el regulador de la válvula en el tanque de propano
girando el conector plástico en el sentido contrario de las agujas del reloj. Desatornille utilizando el
perno en la plataforma inferior para liberar el tanque para su retiro.
• Evite quemar o golpear el aparato para evitar derrames o salpicaduras de líquido de
cocción caliente.
• Nunca deje caer alimentos o accesorios en líquido de cocción caliente. Baje los accesorios y los
alimentos lentamente en el líquido de cocción para evitar salpicaduras o derrames. Al retirar los
alimentos del electrodoméstico, se debe tener cuidado de evitar quemaduras por los líquidos de
cocción calientes.
• NO coloque recipientes de cocción vacíos sobre el aparato mientras esté en funcionamiento.
Tenga cuidado al colocar cualquier cosa en el recipiente de cocción mientras el aparato está
en funcionamiento.
• Nunca llene demasiado el recipiente de cocción con agua.
• Este aparato no está diseñado y nunca debe usarse como calentador.
• Nunca use un recipiente para cocinar con una capacidad y diámetro mayores a los recomendados
por el fabricante (no más de 10 pulgadas de diámetro).
• Coloque la tapa contra el polvo en la salida de la válvula del cilindro de propano líquido siempre que
no se use el cilindro de propano líquido. Instale únicamente el tipo de tapa guardapolvo en la salida
de la válvula del cilindro LP que se proporciona con la válvula del cilindro LP. Otros tipos de tapones
o tapones pueden provocar una fuga de propano.
PELIGRO
• El gas de propano líquido es inamable y peligroso si se maneja inadecuadamente. Conozca sus
características antes de utilizar cualquier producto de propano
• Características del propano: inamable, explosivo bajo presión, más pesado que el aire y se asienta
en piscinas y áreas bajas.
• En su estado natural, el propano no tiene aroma. Por su seguridad, se ha añadido un aroma.

A-5
• El contacto con propano puede causar quemaduras por congelación en la piel.
• Nunca utilice un cilindro de propano con un cuerpo, válvula, collar o base dañada.
• Los cilindros de propano abollados u oxidados pueden ser peligrosos y deben ser revisados por su
proveedor de gas propano.
• Sea precavido cuando ensamble u opere su estufa para evitar arañazos o cortes por los
bordes alados.
• Sea precavido cuando mueva la estufa para evitar esguinces o torceduras.
• Nunca mueva la estufa cuando esté en uso o caliente.
• Asegúrese de vaciar la bandeja de grasa tras cada uso una vez esté completamente enfriada.
• Para protegerse contra bacterias que pueden causar enfermedades, mantenga todas las carnes
refrigeradas y descongélelas en un refrigerador o microondas. Mantenga las carnes crudas
separadas de otros alimentos, y lave todo lo que entre en contacto con carne cruda.
• Cocine la carne completamente, y refrigere las sobras inmediatamente.
• Utilice un termómetro de alimentos calibrado y las pautas de la USDA para asegurar que
las carnes, las aves, los mariscos y demás alimentos cocinados lleguen a una temperatura
mínima segura.
• Siempre tenga un extinguidor cerca. Mantenga y revise su extinguidor regularmente.

A-6
*** ¡DETÉNGASE! ¡LLAME A PRIMERO! ***
NO Devuelva El Producto A La Tienda.
Esta estufa se ha creado siguiendo las normas de calidad más altas. Si tiene preguntas que este
manual no aborda o si necesita piezas, llame a nuestro Departamento de Atención al Cliente
al 1-912-638-4724 (EE.UU.) o escríbale un correo electrónico a Char-Griller
®
al: Service@CharGriller.
com y tenga su número de serie a mano.
REGISTRE SU ESTUFA:
Para aprovechar la garantía de Char-Griller
®
al máximo, asegúrese de registrar
su estufa visitando www.CharGriller.com/Register o llame al departamento
de Servicio al Cliente al 1-912-638-4724.
Registrarse le aporta protecciones importantes:
1. Char-Griller
®
puede contactarlo fácilmente y recticar el problema en el caso
extremadamente improbable que deba retirarse el producto del mercado.
2. Si una pieza garantizada está rota o le falta, podemos enviarle las piezas
necesarias inmediatamente.
NOTA: Para registrarse, necesitará su número de modelo, número de serie y una copia del recibo de
compra original.
Documente su modelo de estufa y números de serie AQUÍ:
(Puede encontrar el modelo y el número de serie en la parte trasera de la carcasa de la estufa o en la pata)
_________________________
(NO. DE SERIE)
(ejemplo)

A-7
Parrillas de carbón / Gránulos / Kamado
Parrilla - cubierta y cuerpo
(excluye la bandeja de ceniza retirable)
5 años desde la fecha de compra por
corrosión por óxido o quemadura.
Bandeja de ceniza y partes defectuosas
1 año desde la fecha de compra
Parrillas a Gas / Estufas Al Aire Libre
Cubierta de la estufa y tubos principales de los
fogones (excluye el fogón lateral)
5 años desde la fecha de compra por
corrosión por óxido o quemadura.
Cuerpo de la estufa, fogón lateral y partes defectuosas 1 año desde la fecha de compra
Planchas
Todas las partes defectuosas 1 año desde la fecha de compra
Parrillas de Doble Combustible (Gas y Carbón)
Parrilla de carbón - Cubierta y fondo, y cubierta de la estufa
a gas (mitad SUPERIOR) y tubos del fogón principal
(excluye la bandeja de ceniza y el fogón lateral)
5 años desde la fecha de compra por
corrosión por óxido o quemadura.
Bandeja de ceniza, partes defectuosas, cuerpo de la
estufa a gas (mitad INFERIOR) y fogón lateral
1 año desde la fecha de compra
Partes, Accesorios y Fundas de las Parrillas 1 año desde la fecha de compra
(rasgaduras de costuras únicamente
para las fundas)
LA OXIDACIÓN SUPERFICIAL NO SE CONSIDERA UN DEFECTO DE FABRICACIÓN O DE MATERIALES
Las estufas Char-Griller
®
están fabricadas de acero y la oxidación ocurrirá naturalmente si se exponen a los elementos.
Consulte la sección titulada “Uso” para repasar cómo cuidar su estufa adecuadamente.
Estas garantías NO cubren problemas superciales, como raspones, abolladuras, corrosión o decoloración por calor,
limpiadores abrasivos y sustancias químicas, oxidación supercial o decoloración de las supercies de acero.
Las garantías son únicamente para reemplazar piezas defectuosas. Char-Griller
®
no se hace responsable de los daños
causados por accidentes, alteraciones, mal uso, abuso, ambientes hostiles, instalación incorrecta e instalación que no
satisfaga los códigos locales de servicio para la unidad.
Se excluye bajo TODAS las garantías
Pintura; óxido de supercie; daño causado por el calor; piezas incorrectas que el cliente haya pedido, incluyendo el
envío; piezas desgastadas; piezas faltantes o dañadas que no se reporten dentro de los dos (2) meses después de la
fecha de compra; piezas defectuosas que no se reporten dentro de un (1) año de la fecha de compra; descoloración de
la cubierta de la estufa.
*NOTA: Se pueden requerir fotos y el retorno prepago del artículo en cuestión para presentar reclamos de garantía.
El mal uso, abuso o uso comercial invalida todas las garantías.
SE NECESITA UNA COPIA DEL COMPROBANTE DE COMPRA CON FECHA (RECIBO) PARA REGISTRARSE O
PRESENTAR UN RECLAMO DE GARANTÍA*. CONSERVE UNA COPIA DEL RECIBO PARA SUS REGISTROS.
Char-Griller
®
reemplazará cualquier pieza defectuosa de sus estufas/ahumadores, bajo garantía, según se describe de abajo.
LEA ESTA INFORMACIÓN DETENIDAMENTE Y COMUNÍQUESE CON EL DEPARTAMENTO DE SERVICIO AL CLIENTE
MARCANDO 912-638-4724 O ESCRIBIENDO A SER[email protected]. SI TIENE ALGUNA PREGUNTA.
INFORMACIÓN DE GARANTÍA

B-1
1
2
4
3
5
6
7
8
9
11
10
13
14
16
17
18
19
12
18
15
20
21
5
12
INSTRUCCIONES
DE ENSAMBLAJE

B-2
Paquete de Ferretería #551172
Elemento Descripción Foto Cantidad
PERNO HEXAGONAL, 1/4 -20 X 1/2” 8
A
LISTA DE PARTES
Elemento Cantidad Nombre de la Parte
1 1 PARABRISAS
2 1 REJILLA DE COCINA
3 1 SOPORTE DE REJILLA DE COCINA
4 1 GANCHO DE REJILLA DE COCINA
5 2 MANGO LATERAL
6 3 MONTAJE DE QUEMADOR
7 3 REGULADOR DE AIRE PARA QUEMADOR
8 1 REPISA LATERAL DERECHA
9 1 ARMAZÓN EXTERIOR DE LA COCINA
10 1 PLACA DE LOGO
11 1 PANEL DE CONTROL
12 2 MONTAJE DE PATA DERECHA
13 4 TORNILLO DE AJUSTE DE LA PATA
14 1 DEFLECTOR DE CALOR DEL CUERPO
15 1 CONJUNTO DE REGULADOR DE VÁLVULA DE MANGUERA
16 3 PERILLA
17 3 BISEL DE PERILLA
18 2 MONTAJE DE PATA IZQUIERDA
19 3 ENCENDEDOR
20 1 CADENA DE ENCENDIDO
21 1 REPISA LATERAL IZQUIERDA
FERRETERÍA Y
HERRAMIENTAS NECESARIAS
Herramientas Necesarias: Destornillador de cabeza Phillips y/o destornillador de 7/16”.
**NOTA: NO ajuste completamente ningún perno hasta que se le indiquen. Ajustarlos al principio
puede impedir que las piezas encajen. Todas las tuercas hexagonales deben estar en el interior
de la cocina a menos que se indique lo contrario. Desembale todo el contenido en un área bien
despejada y acolchada.**
Tiempo Estimado: 15 minutos

B-3
PASO 1
18
12
12
18
PRESIONE PARA LIBERAR

B-4
PASO 2
x8
A
A
A
A
A
A
A
A
A
5
5

B-5
PASO 3
PASO 4A
8
21
1

B-6
PASO 4B
PASO 4C
1
1
1

B-7
PASO 5
PASO 6
Para garantizar un montaje resistente,
apriete todos los TORNILLOS.
TOTALMENTE
MONTADA
16
16
16

B-8
PASO 1A
DOBLAR SU ESTUFA
DE AIRE LIBRE
PASO 1B
1
1

B-9
PASO 2
PASO 1C
1
8
21
ACOPLAR DE MANERA SEGURA

B-10
PASO 3
DOBLAR Y LISTO
12
18
PRESIONE PARA LIBERAR

C-1
Montaje
Esta unidad está diseñada para su uso en exteriores, alejada de cualquier material inamable. Es
importante que no haya obstrucciones en la parte superior y que haya una distancia mínima de 36 pulgadas
(90 cm) desde el lado o la parte trasera de la unidad. Mantenga un área de 10 ft libre de objetos que puedan
incendiarse o de fuentes de ignición tales como luces piloto de calentadores de agua, electrodomésticos
encendidos, etc. Es importante que las aperturas para ventilación de la unidad no sean obstruidas.
Esta unidad debe ser utilizada en una supercie nivelada y estable. La unidad debe estar protegida de
corrientes de aire directas y posicionada o protegida contra la penetración directa de cualquier goteo de
agua (por ejemplo, la lluvia). No mueva la estufa mientras está caliente, y no la deje desatendida durante su
operación.
Proteja el cilindro de gas de la luz del sol directa y manténgalo alejado de fuentes de calor a un máximo de
122ºF (50º C). No mueva la estufa mientras está caliente, y no la deje desatendida durante su operación.
Posicione el cilindro de gas de forma tal que la manguera no se doble, tuerza, tensione ni toque ninguna
parte caliente de la unidad.
N
O
O
P
E
R
A
R
C
O
N
L
A
S
P
I
E
R
N
A
S
D
O
B
L
A
D
A
S
36 PULGADAS
(90 CM)
A
R
R
I
B
A
S
I
N
O
B
S
T
R
U
C
C
I
O
N
E
S
PRECAUCIÓN
PRECAUCIÓN
CALIENTE
NO MOVER
NO MOVER
INSTRUCCIONES DE OPERACIÓN

C-2
NUNCA EXCEDA LOS 650º F PORQUE ESTO DAÑARÁ EL ACABADO Y CONTRIBUIRÁ LA OXIDACIÓN.
LA PINTURA NO ESTÁ CUBIERTA POR LA GARANTÍA Y REQUERIRÁ DE UN RETOQUE. ESTA UNIDAD
NO TIENE GARANTÍA CONTRA EL ÓXIDO
PRECAUCIÓN:
1. Toda limpieza y mantenimiento debe ser realizado cuando la estufa esté fría y el suministro de
combustible DESCONECTADO.
2. NO limpie ninguna parte de la estufa en un horno de auto-limpieza ya que el calor extremo dañará
el acabado.
3. NO agrande los oricios de las válvulas ni los puertos de los fogones cuando limpie las válvulas
o los fogones.
AVISOS:
1. Esta estufa debe ser limpiada, inspeccionada y curada completamente de manera regular.
2. Los limpiadores abrasivos dañarán este producto.
3. NUNCA utilice limpiador de hornos en ninguna parte de esta estufa.
ANTES DE CADA USO:
1. Asegúrese de que el área de la estufa esté limpia y libre de cualquier material combustible como
gasolina, uido de encendedores o cualquier otro líquido o vapor inamable.
2. NO obstruya el ujo de combustión del gas ni la ventilación de aire.
3. Mantenga las aperturas de ventilación del área del tanque de gas libres de cualquier escombro.
4. Revise visualmente las llamas del fogón para asegurarse de que la estufa funciona correctamente.
5. Vea las instrucciones de abajo para las instrucciones de limpieza y mantenimiento correctas.
6. Revise en busca de obstrucciones del ujo de aire en los fogones. Las arañas, insectos y telas pueden
atascar los tubos de los fogones. Un fogón atascado puede causar un incendio.

C-3
Regulador y Manguera
El regulador y la manguera están provistos con la unidad. Si se necesita de un reemplazo, por favor visite
chargriller.com o llame a nuestro departamento de servicio al cliente al 912-638-4724. NO utilice partes de
reemplazo que no estén pensadas para esta parrilla. La expectativa de vida del regulador está estimada en
10 años. Se recomienda que el regulador sea cambiado dentro de 10 años desde la fecha de fabricación.
El uso del regulador o manguera inadecuado no es seguro; siempre revise que tiene los artículos correctos
antes de operar la unidad.
La manguera utilizada debe cumplir con los estándares relevantes del país de uso. Una manguera
desgastada o dañada debe reemplazarse. Asegúrese de que la manguera no esté obstruida, doblada, o en
contacto con alguna parte de la parrilla distinta al punto de conexión.
Cómo Conectar la Manguera a la Unidad
Antes de la conexión, asegúrese de que no haya escombros atrapados en la cabeza del cilindro de gas, del
regulador, de los fogones ni de los puertos de los fogones. Las arañas y los insectos pueden anidar dentro
del tubo venturi/fogón en el oricio. Un fogón atascado puede causar un incendio debajo de la unidad.
Limpie los agujeros de los fogones con un limpia tuberías industrial.
Si se reemplaza la manguera, esta debe ser asegurada a la unidad y a las conexiones del regulador
con abrazaderas. Desconecte el regulador del cilindro (de acuerdo con las instrucciones provistas con el
regulador) cuando la unidad no esté en uso.
La unidad debe ser utilizada en un área bien ventilada. No obstruya el ujo de aire para la combustión al
fogón cuando esté en uso. UTILICE ESTA UNIDAD ÚNICAMENTE EN EXTERIORES.
Cómo Conectar el Cilindro
de Gas a la Estufa
Esta unidad solo es apta para su uso con gas propano a baja presión
dotados con el regulador de baja presión apropiado mediante una
manguera exible. La manguera debe estar asegurada al regulador y la
unidad con abrazaderas. ADVERTENCIA: Coloque el cilindro de propano
líquido a una distancia mínima de 10 ”(25,4 cm) de la estufa al aire libre
para evitar un riesgo de vuelco.
1. Asegúrese de que todas las perillas de control estén en la posición
de APAGADO y verique que la válvula del cilindro de gas esté
cerrada girando la perilla de la válvula del cilindro de gas en el
sentido de las agujas del reloj hasta que se detenga.
2. Retire la tapa protectora de la boquilla de la válvula del
cilindro de gas.
3. Sostenga el regulador en línea recta con la boquilla de la válvula del
cilindro de gas para que la conexión no se cruce.
4. Inserte la boquilla del regulador en la apertura de la boquilla de la
válvula del cilindro de gas.
5. Ajuste la tuerca de empalme con la mano en dirección de las agujas del reloj.
¡No use herramientas!
6. Realice una prueba de fugas. (Ver la sección Prueba de Fugas de este manual).
OPERACIÓN DEL GAS
25,4 cm
Posición del Tanque

C-4
** ANTES DE USAR, REVISE SI HAY FUGAS **
Nunca revise si hay fugas únicamente con la vista. Utilice siempre una solución de agua enjabonada.
NOTA: Antes de encender la parrilla, revise si hay fugas. Asegúrese de que la válvula del regulador esté
ajustada seguramente al fogón y al cilindro para prevenir el riesgo de explosión o incendio cuando revise si
hay fugas.
Realice siempre la “prueba de fugas” según se describe abajo antes de encender la parrilla, o cada vez que
el cilindro se conecte para su uso.
• No fume ni permita que haya otras fuentes de ignición en el área mientras realiza una prueba de fugas.
• Realice la prueba de fugas en exteriores, en un área bien ventilada.
• No utilice cerillos, encendedores o llamas para revisar si hay fugas.
• No utilice la parrilla hasta que se hayan corregido todas las fugas. Si no puede detener una fuga,
desconecte el suministro de propano. Llame a un técnico de servicio de gas o a su proveedor local de
gas propano.
Prueba de Fugas
1. En un atomizador mezcle una solución entre 6 y 9 ml, 1 parte de jabón para vajillas, 3 partes de agua.
2. Asegúrese de que las perillas de control de las válvulas/fogones estén en posición de apagado y que el
regulador esté conectado de manera segura.
3. Abra la válvula del cilindro de gas completamente girando la rueda contra las agujas del reloj.
4. Aplique la solución en la manera, la válvula de gas, el regulador y el cilindro.
5. Si se forman burbujas en cualquiera de los componentes probados, hay una fuga en el componente.
Que no haya burbujas quiere decir que no hay fugas.
6. Si ha identicado una fuga, por favor vuelva a realizar la prueba con los pasos 2 al 5. Si la fuga persiste,
llame al servicio al cliente, 912-638-4724 o consulte su manual de propietario sobre cómo reemplazar o
reparar los componentes de la parrilla.

C-5
Nivele la estufa al aire libre
Para una operación segura, su estufa al aire libre debe estar nivelada. Si la supercie exterior está
ligeramente fuera de nivel, use los pies ajustables en la parte inferior de cada pata para corregirla. Al
girar los pies ajustables en sentido contrario a las agujas del reloj, la pata se elevará, y en sentido de
las agujas del reloj, bajará.
2
1

C-6
Instrucciones de Encendido
Su parrilla de Char-Griller
®
está equipada con dos zonas de calor individuales, todas controladas por
su propio fogón a gas. Esto le da una exibilidad óptima para cocinar múltiples tipos de alimentos en una
sola supercie.
Cuando la encienda, mantenga su rostro y cuerpo tan alejados de los fogones como sea posible y nunca
se incline sobre la supercie de la parrilla. Si la parrilla no se enciende entre 3 y 5 segundos, apáguela
y espere 5 minutos para que el gas se disipe antes de intentar volver a encenderla. El no hacerlo puede
resultar en una conagración explosiva, que puede causar serias lesiones corporales o la muerte. Una
vez esté encendida, pero antes de cocinar en la parrilla por primera vez, deje que la parrilla se aclimate
durante 15 minutos. Este calor limpia las partes internas de la parrilla
de cualquier cosa con la que pueda haber tenido contacto durante la
fabricación y el envío.
NOTA: Antes del primer uso, es importante que cure su parrilla para
asegurar el desempeño óptimo y una vida larga para su parrilla de
Char-Griller
®
(ver las direcciones de curado/mantenimiento provistas
en este manual).
Fogones Principales
Lea todas las instrucciones y advertencias antes de encenderla.
1. Asegúrese de que no haya obstrucciones al ujo del aire hacia la
unidad de gas. Las arañas y los insectos pueden anidar dentro del
tubo del fogón y atascarlo. Un tubo atascado puede causar incendios debajo de la unidad.
2. Para encender un fogón, presione la perilla de control del fogón para
iniciar el ujo de gas.
3. Gire la perilla de control contra las agujas del reloj para activar el piloto.
Si el fogón no se enciende dentro de 5 segundos, APAGUE el fogón, espere 5 minutos a que el gas se
disipe y repita el procedimiento.
4. Ajuste la temperatura al nivel deseado.
Tras encenderlos, observe las llamas de los fogones y asegúrese que todos los puertos del fogón
estén encendidos.
NOTA DE PRE-CALENTADO: NUNCA PRE-CALIENTE SU PLANCHA A FUEGO ALTO, YA QUE PUEDE
CAUSAR DAÑO A LA SUPERFICIE DE LA ESTUFA, Y NUNCA DEJE SU PLANCHA DESATENDIDA.
Un pre-calentado apropiado asegurará el mejor desempeño de cocción para su estufa. Siempre pre-
caliente su estufa en la función media o media-baja durante 5 minutos, y luego cámbielo a fuego alto o al
nivel de temperatura deseado.
Si la llama de un fogón se apaga durante la operación, cierre el paso del gas en el panel de control y en la
válvula del cilindro de gas. Deje que el gas se disipe por 5 minutos antes de volver a encenderla. Limpie la
estufa luego de cada uso. NO utilice limpiadores abrasivos o inamables, ya que dañan las partes y pueden
causar un incendio.
Cómo Apagar los Fogones
1. Gire las perillas en el sentido de las agujas del reloj a la posición de “HI,” luego presiónela y gírela hasta
“OFF.” Nunca fuerce la perilla sin presionarla, ya que esto puede dañar la válvula y la perilla.
2. Cierre rápidamente la válvula del cilindro de gas.

C-7
Cómo Encender un
Fogón con un Cerillo
1. Asegúrese de que todas las perillas estén en posición
de APAGADO.
2. Abra la válvula en el cilindro de gas.
3. Presione y gire la perilla contra las agujas del reloj a la
posición de “HI.”
4. Coloque el cerillo en la cadena de encendido instalado
al lado de la estructura de la parrilla. Una vez el cerillo
esté encendido, ponga la llama en la apertura en el
lado izquierdo del cuerpo cerca de los puertos del
fogón. El fogón debería encenderse inmediatamente.
5. Ajuste las perillas a las funciones de
cocción deseadas.
Ajuste la llama usando la proporción aire-gas
Para calentar de forma pareja, su estufa al aire libre necesita la cantidad adecuada de aire para el ujo
de gas. Si se ajusta correctamente, la llama del quemador será AZUL. NOTA: un toque anaranjado/
amarillo en las puntas de la llama es normal. Los ajustadores de llama se usan para regular el ujo
de aire.
Generalmente, una temperatura más alta requiere que los ajustadores de llama estén más abiertos
mientras que con temperaturas más bajas, estarán más cerrados. Ajústelos según sea necesario.
Encienda la estufa al aire
libre y regule la hornalla en “HI”.
Si la llama es muy amarilla o
no es consistente, debe abrir
el ajustador de llama para
permitir que entre MÁS aire
al quemador.
Encienda la estufa al aire libre
y regule la hornalla a la mitad,
entre “HI” y “LOW”. Si la llama
es amarilla o no es consistente,
el ajustador de llama debe
estar parcialmente cerrado para
permitir que entre MENOS aire
al quemador.
Encienda la estufa al aire
libre y regule la hornalla en
“LOW”. Si la llama es amarilla
o chisporrotea, el ajustador de
llama debe estar completamente
cerrado para no permitir que
llegue aire al quemador.
COMPLETAMENTE ABIERTO PARCIALMENTE CERRADO COMPLETAMENTE CERRADO
Puertos
de quemador
Cadena de Encendido

C-8
Observe la altura
de la llama cuando
esté encendid
La llama debe tener un color azul y amarillo y debe
tener entre 1/2 in. - 1 in. (1.2 cm - 2.54 cm) de alto
en la función “HI”.
Manejo de la Temperatura
Maneje el calor ajustando lasperilla del fogón desde bajo hasta medio para mantener el calor deseado para
las condiciones de la cocción. La condición del clima impactará las uctuaciones de calor de su estufa. Más
calor será necesario en condiciones frías y con viento. Los distintos tipos y cantidades de comida también
impactarán el manejo y distribución de la temperatura. Asegúrese de considerar estos elementos cuando
cocine para una experiencia óptima con su estufa.
Cómo Desconectar el
Cilindro de GLP
1. CIERRE todas las perillas de control y asegúrese de que la estufa
esté fría.
2. Desconecte el regulador de la línea del gas desatornillando la
boquilla, luego desatornille el tanque del regulador
3. Coloque la tapa protectora sobre el tanque de gas.
El Cilindro de GLP
¡El cilindro de GLP no debe dejarse caer ni ser manejado con brusquedad! Si la unidad no está en uso, el
cilindro debe ser desconectado. Remplace la tapa protectora del cilindro luego de desconectar el cilindro de
la unidad.
Los cilindros deben ser almacenados en exteriores en posición vertical y fuera del alcance de los niños.
El cilindro nunca debe ser almacenado donde las temperaturas puedan exceder los 122°F (50° C). No
almacene el cilindro cerca de llamas, pilotos de encendido o demás fuentes de ignición. NO FUME CERCA
DEL CILINDRO DE GAS.
De nuevo, esta unidad está diseñada únicamente para su uso en exteriores y alejada de materiales
inamables. Es importante que no haya obstrucciones sobre esta y que haya una distancia mínima de
36 pulgadas (90cm) desde el costado o la parte trasera de la unidad. Es importante que las aperturas de
ventilación de la unidad no sean obstruidas. La parrilla debe ser utilizada sobre una supercie nivelada y
estable. La unidad debe estar protegida de las corrientes de aire directas y posicionada o protegida contra la
penetración directa de cualquier goteo de agua (por ejemplo, la lluvia).
Las partes selladas por el fabricante o su agente no deben ser alteradas por el usuario. No deben
hacerse modicaciones a ninguna parte de esta unidad, y las reparaciones y el mantenimiento debe
ser efectuado únicamente por un ingeniero o técnico de servicio registrado.
Alta
Baja

C-9
CUIDADO Y MANTENIMIENTO
Cuando termine de cocinar, apague todos los quemadores y deje que se enfríe.
Al realizar la limpieza y el mantenimiento de los quemadores, asegúrese siempre de que los puertos
de los quemadores estén correctamente alineados con las aberturas de las válvulas después de
reinstalarlos en la estufa exterior. Consulte la gura para ver la alineación correcta.
Una vez que se enfríe, limpie su estufa al aire libre con un trapo, jabón y agua. Para proteger y
prevenir el óxido, cubra ligeramente las rejillas de cocción con aceite de lino u otro aceite vegetal.
La limpieza y el cuidado continuos son la clave para garantizar una larga vida útil de su estufa al
aire libre Char-Griller
®
.
Cubierta de la estufa al aire libre
Prolongue la vida de su estufa al aire libre usando una cubierta Char-Griller
®
Custom Fit para protegerla
de las inclemencias del tiempo. El material de poliéster resistente a la intemperie protege contra los
pájaros, el polvo, el viento, la lluvia y la nieve. (Modelo n.º 3375)
1,27 cm

Esta Página Ha Sido
Intencionalmente Ha Dejado
En Blanco

D-1
Condimento original
para todo tipo
de barbacoas
Acompaña bien todo tipo de
carnes y pescados
Gorra Char-Griller
®
Frente hecho en mezcla de
algodón y poliéster con malla de
nylon en la parte posterior
Cierre ajustable a presión
Un tamaño que se adapta a todos
Cubierta a la Medida
Resistente al Clima
Protege el Acabado de la Parrilla
Termómetro de
sensor plegable
El sensor de acero inoxidable
para lectura rápida mide con
precisión la temperatura
Se cambia fácilmente de °F a °C
Función de ENCENDIDO/
APAGADO automático para una
mayor duración de la batería
Modelo #3375
Modelo #6304
Guantes para asador
Char-Griller
®
Resistente a las altas
temperaturas
Agarre de silicona antideslizante
Cubre el antebrazo
Se puede usar en la mano
derecha o izquierda
Modelo #8860
Modelo #70100
Modelo #9955
Modelo #85501
ACCESORIOS FAVORITOS
PARA VER TODOS LOS ACCESORIOS VISITE A CHARGRILLER.COM
PARA VER MÁS!
¡ESCANEE
EL CÓDIGO
Cobertor para el tanque
Resistente a la intemperie
Velcro de nylon
Elástico en la parte
superior e inferior
Cobertor solamente
*El tanque no viene incluido

P.O. Box 30864
Sea Island, GA 31561
1-912-638-4724
www.CharGriller.com
Service@CharGriller.com
-
 1
1
-
 2
2
-
 3
3
-
 4
4
-
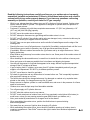 5
5
-
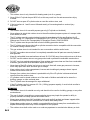 6
6
-
 7
7
-
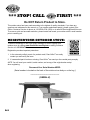 8
8
-
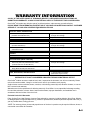 9
9
-
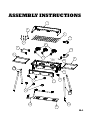 10
10
-
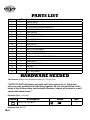 11
11
-
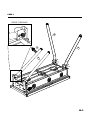 12
12
-
 13
13
-
 14
14
-
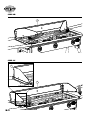 15
15
-
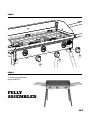 16
16
-
 17
17
-
 18
18
-
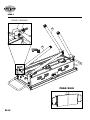 19
19
-
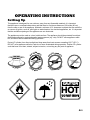 20
20
-
 21
21
-
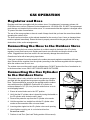 22
22
-
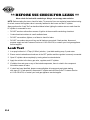 23
23
-
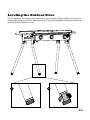 24
24
-
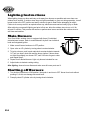 25
25
-
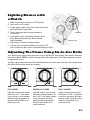 26
26
-
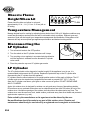 27
27
-
 28
28
-
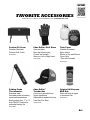 29
29
-
 30
30
-
 31
31
-
 32
32
-
 33
33
-
 34
34
-
 35
35
-
 36
36
-
 37
37
-
 38
38
-
 39
39
-
 40
40
-
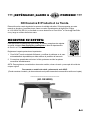 41
41
-
 42
42
-
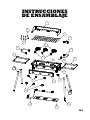 43
43
-
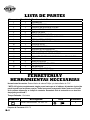 44
44
-
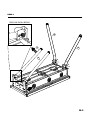 45
45
-
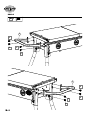 46
46
-
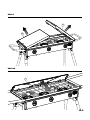 47
47
-
 48
48
-
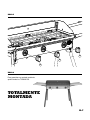 49
49
-
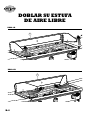 50
50
-
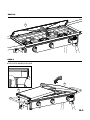 51
51
-
 52
52
-
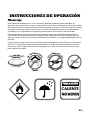 53
53
-
 54
54
-
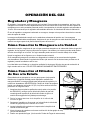 55
55
-
 56
56
-
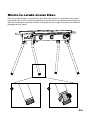 57
57
-
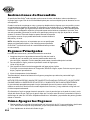 58
58
-
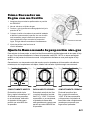 59
59
-
 60
60
-
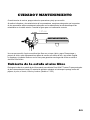 61
61
-
 62
62
-
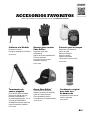 63
63
-
 64
64


Char Griller 3338 El manual del propietario
- Categoría
- Barbacoas
- Tipo
- El manual del propietario
En otros idiomas
- English: Char Griller 3338 Owner's manual
Documentos relacionados

Otros documentos
-
 Hampton Bay PG139HDS Guía de instalación
-
Coleman 9944 Series El manual del propietario
-
Coleman 9944-851 El manual del propietario
-
-
-
 Gas One B-5100 Manual de usuario
-
 Blue Rhino GCT803W Manual de usuario
-
Sunbeam 9949A050T Manual de usuario
-
Broil King 920254 El manual del propietario
-


