Kichler Lighting 42372NILED Manual de usuario
- Tipo
- Manual de usuario

INSTALLATION INSTRUCTIONS
Model 42372LED / CP157138
WARNING:
• This xture is intended for installation in accordance with the
National Electric Code (NEC) and all local code specications.
If you are not familiar with code requirements, installation by a
certied electrician is recommended.
• This lighting xture is suitable for indoor use, dry or damp
locations.
• The LED light output is strong enough to injure human eyes.
Precautions must be taken to prevent looking directly at the
LED’s with unaided eyes for more than a few seconds.
DIMMING: This LED xture is compatible with most standard
incandescent dimmers, LED dimmers, and electronic low voltage
dimmers. For optimal performance, an electronic low voltage
dimmer should be used.
CLEANING: Always be certain that electric current is turned o
before cleaning.
• Only a soft damp cloth should be used. Harsh cleaning
products may damage the nish.
CAUTION – RISK OF SHOCK – Disconnect Power at the main
circuit breaker panel or main fuse box before starting and during
the installation.
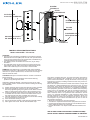
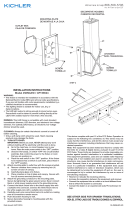
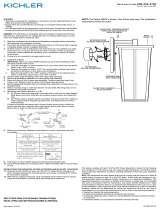
1) Attach mounting plate to outlet box with the screws provided.
2) Attach the grounding conductor to the mounting plate.
Secure by tightening the green ground screw. Never connect
black or white power supply wires to the grounding screw.
3) Connect the black xture wire to the black supply wire with
a suitable wire connector. Connect the white xture wire to
the white supply wire with a suitable wire connector.
4) Carefully push wire connections back into outlet box making
sure all connections remain secure.
5) Push decorative housing to wall.
6) Secure decorative housing to wall with the provided screws.
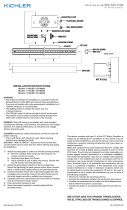
7) Place glass over studs. Secure with threaded caps.
OUTLET BOX
CAJA DE CONEXION
Date Issued: 08/30/2017
IS-42372LED-US
We’re here to help 866-558-5706
Hrs: M-F 9am to 5pm EST
SEE OTHER SIDE FOR SPANISH TRANSLATIONS.
VEA EL OTRO LADO DE TRADUCCIONES AL ESPAÑOL.
This device complies with part 15 of the FCC Rules. Operation is
subject to the following two conditions: (1) This device may not
cause harmful interference, and (2) this device must accept any
interference received, including interference that may cause un-
desired operation.
Note: This equipment has been tested and found to comply with
the limits for a Class B digital device, pursuant to part 15 of the
FCC Rules. These limits are designed to provide reasonable pro-
tection against harmful interference in a residential installation.
This equipment generates, uses and can radiate radio frequency
energy and, if not installed and used in accordance with the in-
structions, may cause harmful interference to radio communica-
tions. However, there is no guarantee that interference will not
occur in a particular installation. If this equipment does cause
harmful interference to radio or television reception, which can
be determined by turning the equipment o and on, the user is
encouraged to try to correct the interference by one or more of
the following measures:
• Reorient or relocate the receiving antenna.
• Increase the separation between the equipment and receiver.
• Connect the equipment into an outlet on a circuit dierent from
that to which the receiver is connected.
• Consult the dealer or an experienced radio/TV technician for
help.
SCREW
TORNILLO
STUD
ESPARRAGO
THREADED CAP
TAPA ROSCADA
GLASS
VIDRIO
THREADED CAP
TAPA ROSCADA
SCREW
TORNILLO
MOUNTING PLATE
DE MONTAJE A LA

Date Issued: 08/30/17
IS-42372LED-US
SEE OTHER SIDE FOR ENGLISH TRANSLATIONS.
VEA EL OTRO LADO DE TRADUCCIONES AL INGLÉS.
INSTRUCCIONES DE INSTALACIÓN
Modelo 42372LED / CP157138
ADVERTENCIA:
• Este artefacto está diseñado para instalarse conforme al
Código Nacional de Electricidad (NEC, por sus siglas en
inglés) y a todas las especicaciones de códigos locales. Si
no está familiarizado con los requisitos del código, se reco-
mienda que la instalación la realice un electricista certicado.
• Este accesorio de iluminación es adecuado para uso en
interiores, seco o húmedo ubicaciones.
• La luz LED que se obtiene es sucientemente fuerte como
para dañar los ojos. Deben tomarse precauciones para
prevenir mirar directamente la luz LED sin protección por más
de unos cuantos segundos.
REGULACIÓN DE INTENSIDAD DE LUZ: Este artefacto LED es
compatible con la mayoría de los reguladores de intensidad
incandescentes estándares, los reguladores de intensidad LED,
y los reguladores de intensidad de bajo voltaje electrónicos.
Para un desempeño óptimo, debería usarse un regulador de
intensidad de bajo voltaje electrónico.
LIMPIEZA: Asegúrese siempre de que la corriente eléctrica esté
apagada antes de limpiar.
• Debe usarse solamente una tela húmeda y suave. Productos
de limpieza abrasivos pueden dañar el acabado.
PRECAUCIÓN – RIESGO DE DESCARGA ELÉCTRICA – Desco-
necte la electricidad en el panel principal del interruptor
automático o caja principal de fusibles antes de comenzar y
durante la instalación.
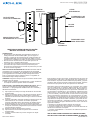
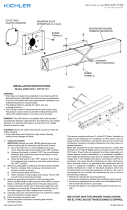
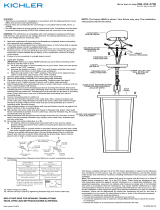
1) Fije la placa de montaje a la caja de salida con los tornillos
suministrados.
2) Sujete el conductor de tierra a la placa de montaje. Asegure
apretando el tornillo de tierra verde. Nunca conecte los
alambres de alimentación eléctrica negro o blanco al tornillo
de tierra.
3) Conecte el alambre negro del artefacto al alambre negro de
alimentación con un conector de alambre apropiado.
Conecte el alambre blanco del artefacto al alambre blanco
de alimentación con un conector de alambre apropiado.
4) Empuje cuidadosamente las conexiones de cable dentro de
la caja de conexiones, asegurándose que todas las conexio
nes permanecen seguras.
5) Empuje la cubierta ornamental a la pared.
6) Fije la cubierta ornamental a la pared con los tornillos
suministrados.
7) Coloque el vidrio sobre los pernos. Asegure con tapas
roscadas.
We’re here to help 866-558-5706
Hrs: M-F 9am to 5pm EST
Este artefacto cumple con la parte 15 de las Normas de la FCC. El
funcionamiento está sujeto a las siguientes dos condiciones: (1)
Este artefacto no puede causar interferencia perjudicial, y (2) este
artefacto debe aceptar cualquier interferencia recibida, inclusive
interferencia que puede causar una operación no deseada.
Nota: Este equipo ha sido probado y se comprobó que cumple
con los límites para un artefacto digital Clase B, de conformi-
dad con la parte 15 de las Normas de la FCC. Estos límites es-
tán diseñados para proporcionar una protección razonable con-
tra interferencia perjudicial en una instalación residencial. Este
equipo genera, usa y puede radiar energía de radio frecuencia
y, si no se instala y usa de acuerdo con las instrucciones, puede
causar interferencia perjudicial a las comunicaciones de radio.
Sin embargo, no hay garantía que la interferencia no ocurrirá en
una instalación en particular. Si este equipo sí causa interferencia
perjudicial a la recepción de radio o televisión, que puede ser de-
terminado encendiendo y apagando el equipo, se alienta al usu-
ario a que trate de corregir la interferencia con una o más de las
siguientes medidas:
• Reoriente o cambie de lugar la antena de recepción.
• Aumente la separación entre el equipo y el receptor.
• Conecte el equipo en un receptáculo en un circuito diferente de
donde está conectado el receptor.
• Consulte al distribuidor o a un técnico de radio/TV experimen-
tado para ayuda.
SCREW
TORNILLO
STUD
ESPARRAGO
THREADED CAP
TAPA ROSCADA
THREADED CAP
TAPA ROSCADA
SCREW
TORNILLO
GLASS
VIDRIO
OUTLET BOX
CAJA DE CONEXION
MOUNTING PLATE
DE MONTAJE A LA CAJA

INSTALLATION INSTRUCTIONS
Model 42372LED / CP157138
WARNING:
• This xture is intended for installation in accordance with the
National Electric Code (NEC) and all local code specications.
If you are not familiar with code requirements, installation by a
certied electrician is recommended.
• This lighting xture is suitable for indoor use, dry or
damp locations.
• The LED light output is strong enough to injure human eyes.
Precautions must be taken to prevent looking directly at the
LED’s with unaided eyes for more than a few seconds.
DIMMING: This LED xture is compatible with most standard
incandescent dimmers, LED dimmers, and electronic low voltage
dimmers. For optimal performance, an electronic low voltage
dimmer should be used.
CLEANING: Always be certain that electric current is turned o
before cleaning.
• Only a soft damp cloth should be used. Harsh cleaning
products may damage the nish.
CAUTION – RISK OF SHOCK – Disconnect Power at the main
circuit breaker panel or main fuse box before starting and
during the installation.
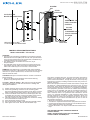
1) Attach mounting plate to outlet box with the screws provided.
2) Attach the grounding conductor to the mounting plate.
Secure by tightening the green ground screw. Never connect
black or white power supply wires to the grounding screw.
3) Connect the black xture wire to the black supply wire with
a suitable wire connector. Connect the white xture wire to
the white supply wire with a suitable wire connector.
4) Carefully push wire connections back into outlet box making
sure all connections remain secure.
5) Push decorative housing to wall.
6) Secure decorative housing to wall with the provided screws.
7) Place glass over studs. Secure with threaded caps.
OUTLET BOX
BOITE DE JONCTION
Date Issued: 08/30/2017
IS-42372LED-CB
We’re here to help 866-558-5706
Hrs: M-F 9am to 5pm EST
SEE OTHER SIDE FOR CANADIAN FRENCH
TRANSLATIONS.
VOIR L’AUTRE CÔTÉ POUR LES CANADIENS
TRADUCTIONS EN FRANÇAIS.
This device complies with part 15 of the FCC Rules. Operation is
subject to the following two conditions: (1) This device may not
cause harmful interference, and (2) this device must accept any
interference received, including interference that may cause un-
desired operation.
Note: This equipment has been tested and found to comply with
the limits for a Class B digital device, pursuant to part 15 of the
FCC Rules. These limits are designed to provide reasonable pro-
tection against harmful interference in a residential installation.
This equipment generates, uses and can radiate radio frequency
energy and, if not installed and used in accordance with the in-
structions, may cause harmful interference to radio communica-
tions. However, there is no guarantee that interference will not
occur in a particular installation. If this equipment does cause
harmful interference to radio or television reception, which can
be determined by turning the equipment o and on, the user is
encouraged to try to correct the interference by one or more of
the following measures:
• Reorient or relocate the receiving antenna.
• Increase the separation between the equipment and receiver.
• Connect the equipment into an outlet on a circuit dierent from
that to which the receiver is connected.
• Consult the dealer or an experienced radio/TV technician for
help.
SCREW
VIS
STUD
GOUJON
GLASS
VERRE
THREADED CAP
CAPU CHONS
FILETES
SCREW
GOUJON
THREADED CAP
CAPU CHONS
FILETES
MOUNTING PLATE
LA PLAQUE DE MONTAGE

Date Issued: 08/30/17 IS-42372LED-CB
SEE OTHER SIDE FOR ENGLISH TRANSLATIONS.
VOIR L’AUTRE COTE DES TRADUCTIONS EN ANGLAIS.
INSTRUCTIONS D’INSTALLATION
Modèle 42372LED / CP157138
AVERTISSEMENT:
• Ce luminaire doit être installé conformément aux codes
d’électricité nationaux (NEC) et satisfaire toutes les
spécifications des codes locaux. Si vous ne connaissez
pas les exigences de ces codes, il est recommandé de
confier l’installation à un électricien certifié.
• Cet appareil d’éclairage est adapté pour l’utilisation à
l’intérieur, les endroits secs ou humides.
• L’intensité de la lumière des LED peut endommager les
yeux. Prendre toutes les précautions nécessaires pour ne
pas regarder directement dans les LED sans protection
pendant plusieurs secondes.
GRADATION:
• Ce luminaire LED est compatible avec la plupart des
gradateurs standard à incandescence, gradateurs LED, et
gradateurs électroniques a basse tension. Pour une
performance optimale, utiliser un gradateur électronique à
basse tension.
NETTOYAGE:
• Toujours veiller à ce que le courant électrique soit coupé
avant de nettoyer.
• Utiliser uniquement un chiffon doux humidifié. Les
produits de nettoyage trop puissants peuvent endommag
er la finition.
ATTENTION – RISQUE DE DÉCHARGES ÉLECTRIQUES –
Couper le courant au niveau du panneau du disjoncteur du
circuit principal ou de la boîte à fusibles principale avant de
procéder à l’installation.
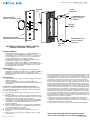
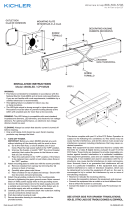
1) Fixer la plaque de montage sur la boîte à prises avec les
vis (fournies).
2) Fixer le conducteur de terre à la sangle de fixation. Fixer
en serrant la vis de terre verte. Ne jamais connecter les fils
d’alimentation noirs ou blanc à la vis de terre.
3) Connecter le fil noir du luminaire au fil noir d’alimentation
à l’aide d’un connecteur approprié. Connecter le fil blanc
du luminaire au fil blanc d’alimentation avec un con
necteur approprié.
4) Empuje cuidadosamente las conexiones de cable dentro
de la caja de conexiones, asegurándose que todas las
conexiones permanecen seguras.
5) Pousser le boîtier décoratif vers le mur.
6) Sécuriser le boîtier décoratif sur le mur avec les vis
fournies.
7) Placer le verre sur les goujons. Bloquer avec des capu
chons filetés.
We’re here to help 866-558-5706
Hrs: M-F 9am to 5pm EST
Cet appareil est conforme à la section 15 de la réglementation de la
FCC. L’exploitation est soumise aux deux conditions suivantes : (1)
Cet équipement ne doit pas causer d’interférences nuisibles, et (2)
cet équipement doit accepter toute interférence reçue, y compris les
interférences risquant d’engendrer un fonctionnement indésirable.
Remarque: Des tests ont conrmé que ce matériel respecte les lim-
ites d’un dispositif numérique de catégorie B, en vertu de la section
15 de la réglementation de la FCC. Ces limites ont été conçues pour
fournir une protection raisonnable contre le brouillage nuisible d’une
installation résidentielle. Cet équipement génère, utilise et peut ray-
onner de l’énergie radiofréquence et, s’il n’est pas installé et utilisé
selon les instructions, peut causer de l’interférence nuisible aux com-
munications de radio. Cependant, il est néanmoins possible qu’il y
ait de l’interférence dans une installation en particulier. Si cet équipe-
ment cause du brouillage nuisible à la réception du signal de radio
ou de télévision, ce qui peut être déterminé en éteignant puis en ral-
lumant l’appareil, l’usager peut essayer de corriger l’interférence en
appliquant une des mesures suivantes :
• Réorienter l’antenne de réception ou changer son emplacement.
• Augmenter la distance séparant l’équipement et le récepteur.
• Brancher le matériel dans la prise de courant d’un circuit diérent
de celui auquel le récepteur est branché.
• Consulter le revendeur ou un technicien radio/télé d’expérience.
SCREW
VIS
STUD
GOUJON
THREADED CAP
CAPU CHONS
FILETES
THREADED CAP
CAPU CHONS
FILETES
SCREW
VIS
GLASS
VERRE
OUTLET BOX
BOITE DE JONCTION
MOUNTING PLATE
LA PLAQUE DE MONTAJE
-
 1
1
-
 2
2
-
 3
3
-
 4
4


Kichler Lighting 42372NILED Manual de usuario
- Tipo
- Manual de usuario
en otros idiomas
Artículos relacionados
-
 Kichler Lighting 11146NILED Manual de usuario
-
 Kichler Lighting 45656CHLED Manual de usuario
-
 Kichler Lighting 45657CHLED Manual de usuario
-
 Kichler Lighting 45658CHLED Manual de usuario
-
 Kichler Lighting 49623BKTLED Manual de usuario
-
 Kichler Lighting 49626BKTLED Manual de usuario
-
 Kichler Lighting 10790NILED Manual de usuario


