
PEX CLAMP TOOL – THREE HANDLE
#865895
The PEX Clamp Tool will assemble 3/8", 1/2", 5/8", 3/4" and 1" stainless steel PEX clamps.
When used properly, closed Oetiker clamps meet ASTM F2098 Specication
INSTRUCTION GUIDE
CONNECTION ASSEMBLY
Cut the tube so that a clean, straight end is provided.
Slide the clamp over the tube end. Insert the tting into
the tubing until the shoulder of the tting contacts the
tubing end. Position the clamp 1/8" to 1/4" (3.2 to 6.4 mm) from the cut end of the tubing.
Place the opened jaws of the PEX Clamp Tool over the raised ear of the clamp. Check to be sure that the
clamp is still properly positioned. Compress the tool handles until the rst “click” is felt. The clamp is now
locked to the tubing. Compress the tool handles to complete the assembly. Note: The PEX Clamp Tool will
not release until the assembly is completed.
CA865895INSTv3
DISTRI
BUTED
BY RELIANCE WORLDWIDE
CORPORATION 2727 Paces Ferry Road SE,
Building II, Suite 1800,
Atlanta, GA 30339
T +1 877 700 4242
United States: Oetiker, Inc.
6317 Euclid Street,
Marlette, Michigan 48453
T +1 800 959 0398
Info.us.marlette@oetiker.com
www.oetiker.com
TOOL CARE
When used and maintained properly the PEX
Clamp Tool will provide years of trouble free service.
Failure to provide basic tool care and maintenance
will cause excess wear and possible premature
failure. The following should be adhered to in order
to maintain proper tool operation and Warranty
coverage.
• Do not use the PEX Clamp Tool for any
purpose other than to assemble clamps.
• Lubricate the tool head, spring and ratchet
mechanism once every thirty days with light
lubricating oil, if tool operation becomes
sluggish and after cleaning.
• Clean tool periodically to remove rust and dirt.
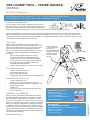
CALIBRATION CHECK
• Close handle to stop point
• Insert gage into jaw gap
• Gage must stop at no-go
• If gage goes beyond this point re-calibrate tool
CALIBRATION PROCEDURE
• Loosen adjustment nut
• Place “Go” portion of gage into jaw gap
• Rotate eccentric stud counter clockwise until
jaws contact gage
• Tighten nut
• Check tool with gage the rst and last crimp
of each job site.
WARRANTY INFORMATION
When properly maintained and used as intended,
the PEX Clamp Tool is warranted against materials
and manufacturing defects for a period of 1 year
from date of purchase. This Warranty does not cover
defects or damage arising from improper installation,
lack of or improper maintenance, improper storage
or handling, ordinary wear and tear, misuse, abuse,
accident or use with unauthorized products or parts.
Liability is limited to repair or replacement of tool or
component parts which are determined defective as
covered by this Warranty.
US Patent # 8,312,755
IN THE EVENT OF
A JAM, COMPRESS
HANDLES TO
RELIEVE PRESSURE
ON RATCHET, PULL
RELEASE LEVER
IN DIRECTION OF
ARROW
GAGE

HERRAMIENTA DE SUJECIÓN PARA
ABRAZADERAS PEX (DE TRES MANGOS N.° 865895)
La herramienta de sujeción para abrazaderas PEX monta abrazaderas PEX de acero inoxidable de 3/8", 1/2", 5/8", 3/4" y 1".
Cuando se utilizan en forma adecuada, las abrazaderas Oetiker cerradas cumplen con las especicaciones de ASTM F2098.
GUÍA DE INSTRUCCIONES
MONTAJE DE CONEXIONES
Corte el tubo para que el extremo quede limpio y recto.
Deslice la abrazadera sobre el extremo del tubo. Inserte el
accesorio dentro del tubo hasta que el reborde del accesorio
haga contacto con el extremo del tubo. Coloque la abrazadera
a 1/8" a 1/4" (3,2 a 6,4 mm) del extremo cortado del tubo.
Ubique las mordazas abiertas de la herramienta de sujeción para abrazaderas PEX sobre la oreja levantada de la abrazadera.
Asegúrese de vericar que la abrazadera aún esté en la posición correcta. Apriete los mangos de la herramienta hasta que
haga el primer “clic”. La abrazadera ahora está jada al tubo. Apriete el mango de la herramienta para completar el montaje.
Nota: La herramienta de sujeción para abrazaderas PEX no se liberará hasta que se haya completado el montaje.
CA865895INSTv3
DISTRI
BUIDO POR
RELIANCE WORLWIDE CORPORATION
2727 Paces Ferry Road SE,
Building II, Suite 1800,
Atlanta, GA 30339
T +1 877 700 4242
United States: Oetiker, Inc.
6317 Euclid Street,
Marlette, Michigan 48453
T +1 800 959 0398
Info.us.marlette@oetiker.com
www.oetiker.com
CUIDADO DE LA HERRAMIENTA
Si se utiliza y mantiene en forma correcta, la herramienta
de sujeción para abrazaderas PEX ofrece años de servicio
sin problemas. No realizar el mantenimiento ni observar
los cuidados básicos de la herramienta provocará un
desgaste excesivo y una posible falla prematura. Para que
la herramienta funcione correctamente y se mantenga la
cobertura de la garantía, debe cumplir con las siguientes
indicaciones.
• No utilice la herramienta de sujeción para abrazaderas
PEX para ningún otro n que no sea montar abrazaderas.
• Lubrique la parte superior de la herramienta, el resorte
y el mecanismo de trinquete cada treinta días con aceite
lubricante suave si la herramienta comienza a funcionar
más lenta y después de limpiarla.
• Limpie la herramienta periódicamente para eliminar el
óxido y la suciedad.
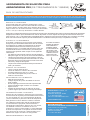
CONTROL DEL CALIBRADO
• Cierre el mango hasta el tope.
• Inserte el calibre en el hueco de la mordaza.
• El calibre debe hacer tope en no pasa.
• Si el calibre sobrepasa este punto, vuelva a
calibrar la herramienta.
PROCEDIMIENTO DE CALIBRACIÓN
• Aoje la tuerca de ajuste.
• Coloque la parte de “pasa” del calibre en el hueco
de la mordaza.
• Gire el espárrago excéntrico hacia la izquierda hasta
que las mordazas hagan contacto con el calibre.
• Ajuste la tuerca.
• Verique la herramienta con el calibre en el primer
y último engarce que realice en cada lugar de trabajo.
INFORMACIÓN SOBRE LA GARANTÍA
Siempre que se mantenga y utilice de la forma prevista,
la herramienta de sujeción para abrazaderas PEX cuenta
con una garantía de 1 año contra defectos de fábrica
y de los materiales, a partir de la fecha de adquisición.
Esta garantía no cubre defectos ni daños causados
por instalación inadecuada, falta de mantenimiento
o mantenimiento inapropiado, almacenamiento o
manipulación inadecuados, deterioro por uso normal,
uso indebido o abusivo, accidentes ni uso con
productos o piezas no autorizadas. La responsabilidad
se limita a la reparación o reemplazo de la herramienta
o de piezas que la componen y determinadas como
defectuosas, según se cubran en esta garantía.
Patente estadounidense N.° 8.312.755
ASTM F 2098
MADE IN USA.
CLOSE HANDLE
TO STOP POINT
INSERT GAGE
INTO JAW GAP
GAGE MUST
STOP AT NO-GO
IF GAGE GOES
BEYOND THIS POINT
RE-CALIBRATE TOOL
NO-GO
•
•
•
•
APRETAR
AFLOJAR
TUERCA DE
AJUSTE
ESPÁRRAGO
EXCÉNTRICO
GIRE HACIA LA IZQUIERDA PARA
REDUCIR EL HUECO
GIRE HACIA LA DERECHA P
ARA
AMPLIAR EL HUECO
EN CASO DE ATASCO,
APRIETE EL MANGO
PARA LIBERAR LA
PRESIÓN SOBRE
EL MECANISMO DE
TRINQUETE, TIRE
DE LA PALANCA DE
LIBERACIÓN EN LA
DIRECCIÓN QUE
INDICA LA FLECHA.
CALIBRE
-
 1
1
-
 2
2

