Yamaha TSX-B15 El manual del propietario
- Categoría
- Relojes de alarma
- Tipo
- El manual del propietario

LV
OWNER'S MANUAL
MANUAL DE INSTRUCCIONES
En Es

i En
1 To assure the finest performance, please read this
manual carefully. Keep it in a safe place for future
reference.
2 Install this unit in a well ventilated, cool, dry, clean
place - away from direct sunlight, heat sources,
vibration, dust, moisture and cold. For proper
ventilation, allow the following minimum clearances.
Top: 15 cm (6 in)
Rear: 10 cm (4 in)
Sides: 10 cm (4 in)
3 Locate this unit away from other electrical
appliances, motors, or transformers to avoid
humming sounds.
4 Do not expose this unit to sudden temperature
changes from cold to hot, and do not locate this unit
in an environment with high humidity (i.e. a room
with a humidifier) to prevent condensation inside this
unit, which may cause an electrical shock, fire,
damage to this unit, and/or personal injury.
5 Avoid installing this unit where foreign object may
fall onto this unit and/or this unit may be exposed to
liquid dripping or splashing. On the top of this unit,
do not place:
– Other components, as they may cause damage
and/or discoloration on the surface of this unit.
– Burning objects (i.e. candles), as they may cause
fire, damage to this unit, and/or personal injury.
– Containers with liquid in them, as they may fall
and liquid may cause electrical shock to the user
and/or damage to this unit.
6 Do not cover this unit with a newspaper, tablecloth,
curtain, etc. in order not to obstruct heat radiation. If
the temperature inside this unit rises, it may cause
fire, damage to this unit, and/or personal injury.
7 Do not plug in this unit to a wall outlet until all
connections are complete.
8 Do not operate this unit upside-down. It may
overheat, possibly causing damage.
9 Do not use force on switches, knobs and/or cords.
10 When disconnecting the power cable from the wall
outlet, grasp the plug; do not pull the cable.
11 Do not clean this unit with chemical solvents; this
might damage the finish. Use a clean, dry cloth.
12 Only voltage specified on this unit must be used.
Using this unit with a higher voltage than specified is
dangerous and may cause fire, damage to this unit,
and/or personal injury. Yamaha will not be held
responsible for any damage resulting from use of this
unit with a voltage other than specified.
13 To prevent damage by lightning, keep the power
cable disconnected from a wall outlet or this unit
during a lightning storm.
14 Do not attempt to modify or fix this unit. Contact
qualified Yamaha service personnel when any
service is needed. The cabinet should never be
opened for any reasons.
15 When not planning to use this unit for long periods of
time (i.e. vacation), disconnect the AC power plug
from the wall outlet.
16 Be sure to read the “TROUBLESHOOTING” section
on common operating errors before concluding that
this unit is faulty.
17 Before moving this unit, press to set the system to
off, and disconnect the AC power plug from the wall
outlet.
18 Condensation will form when the surrounding
temperature changes suddenly. Disconnect the power
cable from the outlet, then leave this unit alone.
19 When using this unit for a long time, this unit may
become warm. Turn the system off, then leave this
unit alone for cooling.
20 Install this unit near the wall outlet and where the AC
power plug can be reached easily.
21 Be sure to use the AC adaptor supplied with this unit.
Using an AC adaptor other than the one provided
may cause fire or damage to this unit.
CAUTION: READ THIS BEFORE OPERATING YOUR UNIT.
This unit is not disconnected from the AC power source
as long as it is connected to the wall outlet, even if this
unit itself is turned off by . In this state, this unit is
designed to consume a very small quantity of power.
WARNING
TO REDUCE THE RISK OF FIRE OR ELECTRIC
SHOCK, DO NOT EXPOSE THIS UNIT TO RAIN OR
MOISTURE.
• This unit’s speakers use magnets. Do not place items
that are sensitive to magnetism, such as CRT-type TVs,
clocks, credit cards, floppy disks, etc., on or beside this
unit.
• There is a chance that placing this unit too close to a
CRT-based (Braun tube) TV set might impair picture
color. Should this happen, move this unit away from the
TV set.
Do not use this unit within 22 cm (9 inches) of persons
with a heart pacemaker implant or defibrillator implant.
Radio waves may affect electro-medical devices.
Do not use this unit near medical devices or inside
medical facilities.

1 En
En
PREPARATION
NAMES OF PARTS AND THEIR FUNCTIONS .................................................................................... 2
BASIC FUNCTIONS................................................................................................................................... 4
LISTENING TO FM STATIONS .............................................................................................................. 6
LISTENING TO MUSIC FROM YOUR Bluetooth DEVICE ................................................................ 7
LISTENING TO EXTERNAL SOURCES ............................................................................................. 10
CHARGING WITH THE USB PORT .................................................................................................... 10
TROUBLESHOOTING ............................................................................................................................ 11
SPECIFICATIONS ................................................................................................................................... 13
■ Features
– Playback of Bluetooth devices, FM radio, and external devices with an AUX connector.
– Setting alarm using an FM radio.
– Supplying power to smartphones, tablets, etc. via USB port on the rear panel.
– Rich sound by 5cm full-range custom speaker and DSP (Digital Signal Processor) made by Yamaha.
– Enhanced treble and thick mid/bass, even when playing a compressed audio source, such as MP3, etc.
(Music Enhancer)
• indicates precautions for use of the unit and its feature limitations.
• indicates supplementary explanations for better use.
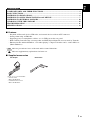
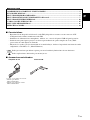
■ Supplied accessories
Note
y
AC adaptor FM antenna
DC 12 V, 1.5 A, model number:
• Taiwan model
MU18-D120150-A1
• South East Asian model
MU18-D120150-C5
CONTENTS

2 En
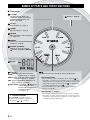
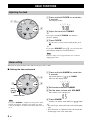
■ Top panel
NAMES OF PARTS AND THEIR FUNCTIONS
G Display
H Indicators
(Alarm): Lights when the alarm
function is on (☞ page 4).
RADIO: Lights when the radio is selected
as an input source (☞ page 6).
AUX: Lights when AUX is selected as an
input source (☞ page 10).
(Bluetooth):Lights when ( ) Bluetooth
is selected as an input
source or during Bluetooth
pairing/connection
(☞ page 7, 9).
J
Press to turn on the system or enter standby mode.
Eco Standby mode
• This can reduce power consumption. Press and hold for
more than 3 seconds to set the system to power saving mode.
All the indicators and display turn off, and Bluetooth operation,
audio playback, input via buttons except are disabled. To
cancel Eco Standby mode, press .
• Even in standby mode or Eco Standby mode, the alarm
function is available.
Auto Standby (☞ page 5)
• This unit has a function that automatically activates standby
mode when no audio signal is input from a connecting device,
or when the connecting device is playing at a low volume for a
certain period (about 20 minutes).
y Dimmer function
Press CLOCK repeatedly to set the
brightness of the display and indicators.
3 (brightest) 2 1 (darkest)
I Grille (☞ page 3)
A VOLUME
Controls volume. When you
control the volume, the volume
level will be displayed on the
display for a while.
B CLOCK
Sets the clock (☞ page 4).
C ALARM
Sets the alarm (☞ page 4).
D TUNING
Adjust the time or radio frequency
(☞ page 4, 6).
E PRESET
Stores up to five favorite FM radio
stations (☞ page 6).
F SOURCE (PAIRING)
Selects an input source from
(Bluetooth), AUX, or RADIO.

NAMES OF PARTS AND THEIR FUNCTIONS
3 En
En
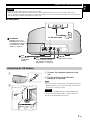
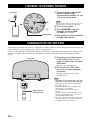
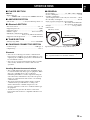
■ Rear panel
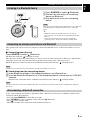
A grille is attached to this product to protect the speakers.
• Since the grille cloth is made of soft material, it can be easily damaged, so do not scratch it with a sharp object.
• Do not overstress the grille cloth. If it is overstressed, it will become contorted and damaged. This may cause damage to
the speakers. Be careful when handling the grille cloth.
Connecting the FM antenna
A Connect the supplied antenna to the
unit.
B Pin the antenna where the best
reception is obtained.
• Be sure to stretch out the antenna as the illustration shows.
• If FM reception is poor, change the height or direction of
the antenna, or relocate the unit.
If you listen to an FM radio station while USB charging,
noise may interfere with the radio reception. In this case,
disconnect the USB cable from the unit.
Caution
K CHARGING
Supplies 5 V/1 A to a
portable device, such as
a smartphone, when it is
connected with a USB
cable. (☞ page 10)
L 12 V
Connect the
supplied AC
adaptor.
M AUX
Connect external devices
with ø3.5mm stereo mini
plug cables. (☞ page 10)
N FM ANT
FM antenna terminal
To AC wall outlet
A
B
Note
Caution

4 En
OPERATION
This unit can play back the radio and emit beeps at the set time.
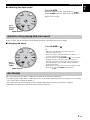
■ Setting the time and sound
BASIC FUNCTIONS
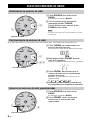
Adjusting the clock
A Press and hold CLOCK for more than
2 seconds.
The display flashes.
B Adjust the time with TUNING.
y
If you press and hold TUNING, the numbers
advance quickly.
C Press CLOCK.
If you want to cancel clock setting mode, press
.
y
If you press PRESET in step B, you can select the
time display method (12 hours/24 hours).
The time settings are lost approximately one week after
unplugging the unit.
Alarm setting
A Press and hold ALARM for more than
2 seconds.
The alarm indicator ( ), the RADIO
indicator and display flash.
B
Set the alarm time with
TUNING
.
C Set the alarm volume with VOLUME.
The volume level is displayed.
D Press ALARM.
Alarm is set and the alarm indicator ( ) lights.
y
• The alarm type of this unit is the radio and beeping
only.
• The radio turns on 3 minutes before the alarm time
and beeping starts at the alarm time.
If you press ALARM to complete the setting of the alarm
without changing the alarm time and volume, the alarm
setting mode will be cancelled and the alarm will not be set
to on.
A
,
C
B
Note
A
,
D
C
B
RADIO indicator
Alarm
indicator
()
Note

BASIC FUNCTIONS
5 En
En
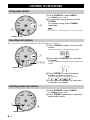
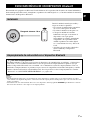
■ Switching the alarm on/off
At the set time, alarm sound plays back. During playback, operations below are available.
■ Stopping the alarm
The system automatically enters standby mode under the following circumstance.
• No audio signal is input from a connecting device or when the connecting device is playing at a low volume
for a certain period (about 20 minutes).
• If no operation is performed for more than 8 hours while music is being played back or stopped.
• Disconnect the Bluetooth connection from the Bluetooth device.
Press ALARM.
When the alarm is on, the alarm indicator ( )
and the RADIO indicator light and the alarm time is
displayed for a while.
Alarm
indicator
()
RADIO indicator
Operations during playing back alarm sound
Press ALARM or .
y
• Unless you stop the alarm, the alarm stops after
60 minutes automatically.
• When you stop the alarm, the alarm time setting, etc., is
saved for convenient use next time.
• Press any button except ALARM and once to stop the
beeping, and twice to stop the radio source (snooze
function). 4 minutes after the radio source is stopped, it
will start fading in again and after another minute the
beeping will resume.
• When the snooze function is activated, the display, alarm
indicator ( ) and RADIO indicator flash.
RADIO indicator
Alarm
indicator
()
Auto Standby

6 En
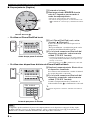
You can store up to five favorite FM radio stations with the preset function.
LISTENING TO FM STATIONS
Tuning radio stations
A Press SOURCE to select RADIO.
The RADIO indicator lights.
B For automatic tuning, press and hold
TUNING.
For manual tuning, press TUNING
repeatedly.
If you tune into a station manually, the sound is monaural.
Presetting radio stations
A Press TUNING to select a favorite radio
station.
The radio frequency is displayed temporally.
B Press and hold PRESET for more than
2 seconds.
The preset number is displayed on the display and
flashes.
C Press PRESET to select the preset
number you want to store to.
The preset number is displayed as follows:
P1
P2 P3 P4 P5 P1
D Press and hold PRESET for more than
2 seconds to complete.
Selecting preset radio stations
A Press SOURCE to select RADIO.
The RADIO indicator lights.
B Press PRESET repeatedly to select the
preset radio station.
A
B
RADIO indicator
Note
A
B
,
C
,
D
RADIO indicator
B
A
RADIO indicator

En
7 En
This unit provides Bluetooth functionality. You can enjoy wireless music playback from your Bluetooth device
(smartphone, digital audio player, etc.). Please also refer to the owner’s manual of your Bluetooth device.
• This unit can be paired with up to four connecting devices. When pairing with the fifth device has succeeded, pairing data for
the device with the oldest connection date will be deleted.
• If this unit is connected via Bluetooth to another device, press and hold SOURCE to disconnect the Bluetooth connection
before you perform the pairing operation.
LISTENING TO MUSIC FROM YOUR Bluetooth DEVICE
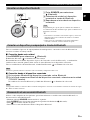
Installation
Install in a stable place, being careful of
the following points:
• Do not place on top of steel or other
metal plates.
• Do not cover with a cloth, etc.
• Install in the same room as the device
with which signals are to be exchanged
(Bluetooth profile A2DP compatible
smartphone, digital audio player, etc.)
within a direct line-of-sight distance of
10 m (33 ft).
• Make sure there are no obstacles
between this unit and the Bluetooth
device.
Within 10 m (33 ft)
Pairing this unit with your Bluetooth device
y What is pairing?
Pairing is an operation that registers the communicating device (subsequently called “the connecting
device”) with this unit. You will need to perform the pairing operation the first time you use your Bluetooth
device with this unit, or if the pairing settings have been deleted. Once pairing has been completed,
subsequent reconnection will be easy even after the Bluetooth connection is disconnected. If pairing is not
successful, refer to the item “Bluetooth” in “TROUBLESHOOTING” (☞ page 12).
Note

LISTENING TO MUSIC FROM YOUR Bluetooth DEVICE
8 En
■ Pairing (Registration)
– If using an iPhone/iPad/iPod touch
– If using other than an iPhone/iPad/iPod touch
A
Turn on the system.
B Press and hold SOURCE for more than
2 seconds to enter paring mode.
• Pairing mode lasts for 5 minutes.
• In paring mode, the Bluetooth indicator ( ) will light in
orange and blue alternately.
C On your iPhone/iPad/iPod touch, turn
[Settings] [Bluetooth] on.
The Bluetooth connection list will appear in
[Devices].
(This procedure or display may differ depending
on the type of your iPhone/iPad/iPod touch.)
D From the Bluetooth connection list of the
connecting device, choose this unit
(TSX-B15 Yamaha).
• When pairing has been completed, your iPhone/iPad/
iPod touch will indicate “Connected”.
• The Bluetooth indicator ( ) will light in blue.
C Perform Bluetooth pairing on the
connecting device.
For details, refer to the owner’s manual of the
connecting device.
D From the Bluetooth connection list of the
connecting device, choose this unit
(TSX-B15 Yamaha).
When pairing has been completed, the Bluetooth
indicator ( ) will light in blue.
y
If you are prompted for a passkey, enter the numerals “0000”.
B
A
Bluetooth indicator ( )
TSX-B15 Yamaha
C
D
Within about 5 minutes
TSX-B15 Yamaha
PIN 0000
123
456
789
0
C
D
Within about 5 minutes
Check that the pairing process on the connecting device has been completed. If the pairing process fails,
start over from step B. For details, see the connecting device’s operating instructions.
Note

LISTENING TO MUSIC FROM YOUR Bluetooth DEVICE
9 En
En
Once pairing with a device has been completed, connecting with that device via Bluetooth will be easy next
time.
■ Connecting from this unit
Press SOURCE to select (Bluetooth).
The Bluetooth indicator ( ) will light in orange.
This unit will search for the connecting device that was most recently connected via Bluetooth, and will then
establish a connection (You must first turn on the Bluetooth setting of the connecting device).
When the Bluetooth connection has been established, the Bluetooth indicator ( ) will light in blue.
Yamaha does not guarantee all connections between this unit and Bluetooth device.
■ Connecting from the connecting device
A In the Bluetooth settings of the connecting device, turn Bluetooth on.
B From the Bluetooth connection list of the connecting device, choose this unit (TSX-B15
Yamaha).
The Bluetooth connection will be established, and the Bluetooth indicator ( ) will light in blue.
Bluetooth connections cannot be established from the connecting device when this unit is in Eco Standby mode. Turn the
system on.
If any of the following operations are performed while a Bluetooth connection is established, the Bluetooth
connection will be disconnected.
• Press and hold SOURCE for more than 2 seconds.
• Press SOURCE to select a playback source other than (Bluetooth).
• Press to enter standby mode.
• Disconnect the Bluetooth connection from the Bluetooth device.
Listening to a Bluetooth device
A
Press
SOURCE
to select (Bluetooth).
B Connect this unit and your connecting
device via Bluetooth.
C Play back music from your connecting
device.
Take care that the volume setting of this unit is not too high. We
recommend that you adjust the volume on the connecting
device.
y
• While the system is in standby mode, if you connect a
Bluetooth device to the unit, the system will automatically
turn on.
• If you disconnect the Bluetooth connection from the
connecting device, the system will enter standby mode.
Connecting an already-paired device via Bluetooth
A
Note
Note
Note
Disconnecting a Bluetooth connection

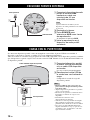
10 En
Connecting a portable device such as a smartphone or tablet computer to the USB port on this unit charges the
connected device (power supply of up to 5 V/1 A is supported).
Prepare a USB cable that is compatible with the portable device and confirm that the device is supported for
charging via USB connection before use. In addition, read the documentation provided with the portable
device.
LISTENING TO EXTERNAL SOURCES
A Connect your portable audio
device to AUX using a
commercially available 3.5 mm
(1/8 in) mini plug cable.
Turn down the volume of this unit and your
portable audio device before connection.
B Turn on the system.
C Press SOURCE to set the
playback source to AUX.
The AUX indicator lights.
D
Start playback on the connected
portable audio device.
CHARGING WITH THE USB PORT
A
Connect your portable device
to the USB port on this unit
using a commercially available
USB cable.
Charging automatically starts.
B Disconnect the USB cable
from the unit when charging
completes.
Check the charging status on the
portable device.
• The USB port is for charging use only. The
USB port does not support audio playback.
• Charging may not be possible depending on
the portable device.
• In Eco Standby mode, power supply stops,
and charging is not available.
• This unit does not function as memory
storage.
• Yamaha will not be held responsible for any
damage to the portable device or data loss
occurred while using this unit.
• Disconnect the USB cable immediately after
charging completes, since power continues to
be supplied to the connected device.
A
C
B
Rear panel
AUX indicator
Note
USB cable from
portable device
Rear panel
Note

11 En
En
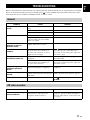
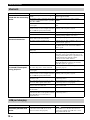
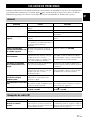
Refer to the table below if the unit does not operate properly. If the problem you are experiencing is not listed
below, or if the instruction below does not help, press to enter standby mode, disconnect the power cable,
and contact the nearest authorized Yamaha dealer or service center.
TROUBLESHOOTING
General
Problem Cause Solution
The speakers make no
sound.
The volume may be set to the minimum
level.
Adjust the volume level.
The source may be incorrect. Select the correct source.
The unit is setting the alarm. Press ALARM to complete the alarm setting.
Sound suddenly turns off.
Auto Standby function is enabled. Turn on the system and play the source again.
Since the connecting device outputs at a
very low volume, the Auto Standby
function is enabled.
Raise the volume of the connecting device.
Sound is cracked/
distorted or there is
abnormal noise.
Input source volume is excessive, or
volume of this unit is excessive.
Adjust the volume with VOLUME.
The unit does not operate
properly.
The unit may have received a strong
electrical shock such as lightning or
excessive static electricity, or power
supply may have dropped.
Press to enter standby mode and
disconnect the power cable. Wait about
30 seconds, reconnect the power cable, and
turn on the system.
The system turns on but
immediately shuts off.
The power cable may be connected
improperly.
Make sure the power cable is plugged into the
wall outlet firmly.
The unit may have received a strong
electrical shock such as lightning or
excessive static electricity.
Disconnect the power cable. Wait about
30 seconds, reconnect the power cable, and
turn on the system.
A digital or high-frequency
equipment produces
noises.
The unit may be placed too close to the
digital or high-frequency equipment.
Place the unit farther away from the
equipment.
The clock setting has been
cleared.
The unit is left more than one week after
you disconnect the power cable from the
wall outlet.
Plug the power cable into the wall outlet
firmly, and set the clock again (☞ page 4).
The clock flashes.
The unit is setting CLOCK or ALARM. Press to cancel setting CLOCK or
ALARM.
FM radio reception
Problem Cause Solution
Too much noise during
stereo broadcast.
The radio station you selected may be far
from your area, or the radio wave
reception is weak in your area.
Try manual tuning to improve the signal
quality (☞ page 6) or change the height or
direction of the antenna, or relocate the unit
(☞ page 3).

TROUBLESHOOTING
12 En
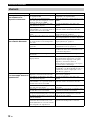
Bluetooth
Problem Cause Solution
Cannot make this unit
paired with the connecting
device.
The connecting device does not support
A2DP.
Perform pairing operations with a device
which supports A2DP.
The passkey of the connecting device that
you want to pair with this unit is a passkey
other than “0000”.
Use a connecting device with a passkey
“0000”.
This unit and the connecting device are
too far apart.
Move the connecting device closer to this
unit.
There is a device (microwave oven,
wireless LAN, etc.) that outputs signals in
the 2.4 GHz frequency band nearby.
Move this unit away from the device that is
emitting radio-frequency signals.
The unit is in standby mode.
Turn the unit on and perform paring (
☞
page 8).
Another Bluetooth device is connected. Terminate current Bluetooth connection, and
perform pairing with the new device.
Cannot establish a
Bluetooth connection.
This unit is not registered on the connecting
device’s Blue too th connection list.
Perform pairing operations again (☞ page 7).
The unit is in Eco Standby mode. Turn the unit on, then establish a Bluetooth
connection (☞ page 9).
Another Bluetooth device is connected. Terminate current Bluetooth connection, then
establish a Bluetooth connection with that
device again.
The Bluetooth function of the device is
turned off.
Turn on the Bluetooth function of the device.
The pairing information has been deleted. Perform pairing again (☞ page 7).
This unit can be paired with four devices. If
pairing with the fifth device is performed, the
pairing information with the earliest
connection date will be deleted.
Delete any pairing history of TSX-B15 on the
iPhone/iPad/iPod touch, then pair with the
TSX-B15 again (☞ page 8).
No sound is produced or
the sound is interrupted
during playback.
The Bluetooth connection of this unit with
the connecting device is disconnected.
Perform Bluetooth connection operations
again (☞ page 9).
This unit and the connecting device are
too far apart.
Move the connecting device closer to this
unit.
There is a device (microwave oven,
wireless LAN, etc.) that outputs signals in
the 2.4 GHz frequency band nearby.
Move this unit away from the device that is
emitting radio-frequency signals.
The connecting device’s Bluetooth
function is off.
Turn on the Bluetooth function of the
connecting device.
The connecting device is not set to send
Bluetooth audio signals to this unit.
Check that the Bluetooth function of the
connecting device is set properly.
The pairing setting of the connecting
device is not set to this unit.
Set the pairing setting of the connecting
device to this unit.
The connecting device’s volume is set to
the minimum.
Increase the volume level.
The connecting device is connected to
more than two Bluetooth speakers and this
unit (TSX-B15) is not selected as a
playback device.
Select this unit as a playback device for the
connecting device.
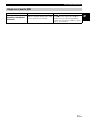
USB port charging
Problem Cause Solution
Cannot charge the
connected portable USB
device.
An incompatible USB device is connected
to the unit. Or the USB device is not
connected to this unit properly.
Press to enter standby mode, and reconnect
the USB device to the unit. If it does not
resolve the problem, the USB device is not
chargeable with the unit.

13 En
En
■ PLAYER SECTION
AUX IN
• Input connector
............STEREO L/R: 3.5 mm (1/8 in) STEREO mini Jack
■ AMPLIFIER SECTION
• Driver unit .........................5 cm (2 in) full-range driver × 2
■ Bluetooth SECTION
• Bluetooth version.....................................................Ver. 3.0
• Supported protocols....................................................A2DP
• Supported codecs.......................................................... SBC
• Wireless output.........................................Bluetooth Class 2
• Maximum communication distance
...................................... 10 m (33 ft) (without obstructions)
• Supported contents protection .................. SCMS-T method
■ TUNER SECTION
• Tuning range (FM) .................................87.5 to 108.0 MHz
■ CHARGING CONNECTOR SECTION
• Connector type ................................................. USB type A
• Output rating............................................................5 V/1 A
■ GENERAL
• Power Supply........................... AC 100 to 240 V, 50/60 Hz
• Power consumption .....................................................11 W
• Standby consumption
(Clock displayed, Bluetooth ready for connection) ....1.0 W
• Eco Standby consumption ..........................................0.2 W
• Time of power management (Auto Standby)
................................................ No sound: about 20 minutes
.................................................No operation: about 8 hours
• Weight......................................................... 0.9 kg (2.0 lbs.)
• Dimensions
Specifications are subject to change without notice.
Bluetooth
• Bluetooth is a technology for wireless communication
between devices within an area of about 10 meters (33 ft)
employing the 2.4 GHz frequency band, a band which can
be used without a license.
• Bluetooth is a registered trademark of the Bluetooth SIG
and is used by Yamaha in accordance with a license
agreement.
Handling Bluetooth communications
• The 2.4 GHz band used by Bluetooth compatible devices
is a radio band shared by many types of equipment. While
Bluetooth compatible devices use a technology
minimizing the influence of other components using the
same radio band, such influence may reduce the speed or
distance of communications and in some cases interrupt
communications.
• The speed of signal transfer and the distance at which
communication is possible differs according to the
distance between the communicating devices, the
presence of obstacles, radio wave conditions and the type
of equipment.
• Yamaha does not guarantee all wireless connections
between this unit and devices compatible with Bluetooth
function.
SPECIFICATIONS
180 mm (7-1/8 in)
200 mm (7-7/8 in)
100 mm
(3-7/8 in)
iPad, iPhone, and iPod touch are trademarks of Apple
Inc., registered in the U.S. and other countries.

i Es
1 Para asegurar el mejor rendimiento de este aparato,
lea atentamente este manual. Y luego guárdelo en un
lugar seguro para poder consultarlo en el futuro en
caso de ser necesario.
2 Instale esta unidad en un lugar bien ventilado, fresco,
seco y limpio, alejado de la luz directa del sol,
fuentes de calor, vibración, polvo, humedad y frío.
Para una adecuada ventilación, permita que el equipo
tenga el siguiente espacio libre mínimo:
Arriba: 15 cm
Atrás: 10 cm
A los lados: 10 cm
3 Coloque este aparato lejos de otros aparatos
eléctricos, motores o transformadores, para evitar así
los ruidos de zumbido.
4 No exponga este aparato a cambios bruscos de
temperaturas, del frío al calor, ni lo coloque en
lugares muy húmedos (una habitación con
deshumidificador, por ejemplo), para impedir así que
se forme condensación en su interior, lo que podría
causar una descarga eléctrica, un incendio, daños en
el aparato y/o lesiones a las personas.
5 Evite instalar este aparato en un lugar donde puedan
caerle encima objetos extraños y/o donde quede
expuesto al goteo o a la salpicadura de líquidos.
Encima de este aparato no ponga:
– Otros componentes, porque pueden causar daños
y/o decoloración en la superficie de este aparato.
– Objetos con fuego (velas, por ejemplo), porque
pueden causar un incendio, daños en el aparato y/
o lesiones a las personas.
– Recipientes con líquidos, porque pueden caerse y
derramar el líquido, causando descargas
eléctricas al usuario y/o dañando el aparato.
6 No tape este aparato con un periódico, mantel,
cortina, etc. para no impedir el escape del calor. Si
aumenta la temperatura en el interior del aparato, esto
puede causar un incendio, daños en el aparato y/o
lesiones a las personas.
7 No enchufe este aparato a una toma de corriente hasta
después de haber terminado todas las conexiones.
8 No ponga el aparato al revés. Podría recalentarse y
posiblemente causar daños.
9 No utilice una fuerza excesiva con los conmutadores,
los controles y/o los cables.
10 Cuando desconecte el cable de alimentación de la
toma de corriente, sujete la clavija y tire de ella; no
tire del propio cable.
11 No limpie este aparato con disolventes químicos
porque podría estropear el acabado. Utilice un paño
limpio y seco para limpiar el aparato.
12 Utilice solamente la tensión especificada en este
aparato. Utilizar el aparato con una tensión superior a
la especificada resulta peligroso y puede producir un
incendio, daños en el aparato y/o lesiones a las
personas. Yamaha no se hará responsable de ningún
daño debido al uso de este aparato con una tensión
diferente de la especificada.
13 Para impedir daños debidos a relámpagos, desconecte
el cable de alimentación y antenas externas de la
toma de corriente durante una tormenta eléctrica.
14 No intente modificar ni arreglar este aparato. Póngase
en contacto con el personal de servicio Yamaha
cualificado cuando necesite realizar alguna
reparación. La caja no deberá abrirse nunca por
ninguna razón.
15 Cuando no piense utilizar este aparato durante mucho
tiempo (cuando se ausente de casa por vacaciones,
por ejemplo) desconecte el cable de alimentación de
la toma de corriente.
16 Asegúrese de leer la sección “SOLUCIÓN DE
PROBLEMAS” antes de dar por concluido que su
aparato está averiado.
17 Antes de trasladar este aparato, pulse para activar
el sistema y, a continuación, desconecte el cable de
alimentación CA de la toma de corriente.
18 La condensación se formará cuando cambie de
repente la temperatura ambiental. Desconecte en este
caso el cable de alimentación de la toma de corriente
y no utilice el aparato.
19 El aparato se calentará cuando la utilice durante
mucho tiempo. Desactive el sistema y, a
continuación, no utilice la unidad para dejar que se
enfríe.
20 Instale este aparato cerca de la toma de CA y donde
se pueda alcanzar fácilmente la clavija de
alimentación.
21 Asegúrese de utilizar el adaptador de CA
suministrado con esta unidad. La utilización de un
adaptador de CA diferente del suministrado puede
causar un incendio o daños en esta unidad.
PRECAUCIÓN: LEA LAS INDICACIONES SIGUIENTES ANTES DE
UTILIZAR ESTE APARATO
Este aparato no se desconecta de la fuente de
alimentación de CA si está conectada a una toma de
corriente, aunque la propia aparato esté apagada con .
En este estado, este aparato ha sido diseñada para que
consuma un cantidad de corriente muy pequeña.
ADVERTENCIA
PARA REDUCIR EL RIESGO DE INCENDIO O
DESCARGA ELÉCTRICA, NO EXPONGA ESTE
APARATO A LA LLUVIA NI A LA HUMEDAD.
• Los altavoces de esta unidad utilizan imanes. No
coloque objetos sensibles al magnetismo, como
televisores con tubo de rayos catódicos, relojes, tarjetas
de crédito, disquetes etc., encima o al lado de esta
unidad.
• Si se instala la unidad demasiado cerca de un televisor
con tubo de rayos catódicos, la calidad del color podría
verse perjudicada. En este caso, aleje el sistema del
televisor.
No utilice esta unidad a menos de 22 cm de personas que
tengan implantado un marcapasos o un defribilador.
Las ondas de radio pueden afectar a los dispositivos
médicos electrónicos.
No utilice esta unidad cerca de dispositivos médicos o en
el interior de instalaciones médicas.

1 Es
Es
PREPARATION
NOMBRES DE LAS PARTES Y SUS FUNCIONES .............................................................................. 2
FUNCIONES BÁSICAS.............................................................................................................................. 4
ESCUCHAR EMISORAS DE RADIO......................................................................................................6
ESCUCHAR MÚSICA DE UN DISPOSITIVO Bluetooth ...................................................................... 7
ESCUCHAR FUENTES EXTERNAS..................................................................................................... 10
CARGA CON EL PUERTO USB ............................................................................................................ 10
SOLUCIÓN DE PROBLEMAS ............................................................................................................... 11
ESPECIFICACIONES.............................................................................................................................. 14
■ Características
– Reproducción de dispositivos Bluetooth, radio FM y dispositivos externos con un conector AUX.
– Configuración de alarmas usando una radio FM.
– Suministro de alimentación a smartphones, tabletas, etc. a través del puerto USB del panel posterior.
– Sonido de una gran riqueza gracias a un altavoz personalizado de gama completa de 5 cm y DSP
(procesador de señal digital) de Yamaha.
– Mejora de los agudos y mayor intensidad de los medios/bajos, incluso al reproducir una fuente de audio
comprimida, como MP3, etc. (Music Enhancer)
• Indica precauciones que deben seguirse para usar la unidad y limitaciones de sus funciones.
• Indica explicaciones adicionales para un mejor uso.
■ Accesorios suministrados
Nota
y
Adaptador de CA Antena de FM
12 V CC, 1,5 A, número de modelo:
• Modelo para Taiwán
MU18-D120150-A1
• Modelo para el Sudeste asiático
MU18-D120150-C5
CONTENIDO

2 Es
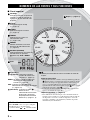
■ Panel superior
NOMBRES DE LAS PARTES Y SUS FUNCIONES
A VOLUME
Controla el volumen. Al ajustar el
volumen, el nivel de volumen se
muestra en el visor durante unos
instantes.
B CLOCK
Permite configurar el reloj
(☞ página 4).
C ALARM
Permite configurar la alarma
(☞ página 4).
D TUNING
Permite ajustar la hora o la
frecuencia de radio
(☞ página 4, 6).
E PRESET
Permite almacenar hasta cinco
emisoras de radio FM favoritas
(☞ página 6).
F SOURCE (PAIRING)
Permite seleccionar una fuente de
entrada entre las opciones
(Bluetooth), AUX o RADIO.
G Visor
H Indicadores
(Alarma): se ilumina cuando la
función de alarma está
activada (☞ página 4).
RADIO: se ilumina cuando la radio está
seleccionada como fuente de
entrada (☞ página 6).
AUX: se ilumina cuando AUX está
seleccionada como fuente de entrada
(☞ página 10).
(Bluetooth): se ilumina cuando ( )
Bluetooth está
seleccionado como fuente
de entrada o durante el
emparejamiento/conexión
Bluetooth (☞ página 7, 9).
J
Púlselo para encender el sistema o acceder al modo de
espera.
Modo de espera Eco
• Esto puede reducir el consumo de energía. Mantenga pulsado
durante más de 3 segundos para poner el sistema en modo
de ahorro de energía. Se apagarán todos los indicadores y el
visor, y no podrán utilizarse las operaciones Bluetooth, la
reproducción de audio ni los botones excepto . Para cancelar
el modo de espera Eco, pulse .
• La función de alarma también está disponible en el modo de
espera y en el modo de espera Eco.
Reposo automático (☞ página 5)
• Esta unidad tiene una función que activa automáticamente el
modo de espera cuando no se recibe ninguna señal de audio de
un dispositivo conectado o cuando el dispositivo conectado
reproduce contenidos a un volumen bajo durante un periodo
determinado (unos 20 minutos).
y Función de atenuación
Pulse CLOCK varias veces para configurar
el brillo del visor y los indicadores.
3 (máximo brillo) 2 1 (mínimo brillo)
I Rejilla (☞ página 3)

NOMBRES DE LAS PARTES Y SUS FUNCIONES
3 Es
Es
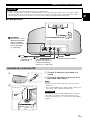
■ Panel posterior
La rejilla está colocada en este producto para proteger los altavoces.
• Como la tela de la rejilla está hecha de un material frágil, es fácil que sufra daños. Evite tocarla con un objeto afilado.
• No sobrecargue la tela de la rejilla. En caso de carga excesiva, perderá su forma original y sufrirá desperfectos. Este
deterioro puede causar daños en los altavoces. Tenga mucho cuidado al manipular la tela de la rejilla.
Conexión de la antena de FM
A Conecte la antena suministrada a la
unidad.
B Coloque la antena en la posición en la
que reciba mejor señal.
• Asegúrese de extender la antena tal y como muestra la
ilustración.
• Si la recepción FM es mala, cambie la altura o la dirección
de la antena, o bien cambie la unidad de sitio.
Si escucha una emisora de radio FM mientras se realiza la
carga USB, es posible que cierto ruido interfiera con la
recepción de radio. En ese caso, desconecte el cable USB de
la unidad.
Precaución
K CHARGING
Alimenta con 5 V/1 A
dispositivos portátiles,
como smartphones,
cuando se conectan
con un cable USB.
(☞ página 10)
L 12 V
Conecte el
adaptador de CA
suministrado.
M AUX
Conecte dispositivos
externos con cables con
miniclavija estéreo de
ø3,5 mm. (☞ página 10)
N FM ANT
Terminal de antena de FM
A la toma de pared de CA
A
B
Nota
Precaución

4 Es
OPERATION
Esta unidad puede reproducir la radio y emitir pitidos a la hora programada.
■ Ajuste de la hora y del sonido
FUNCIONES BÁSICAS
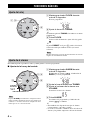
Ajuste del reloj
A Mantenga pulsado CLOCK durante
más de 2 segundos.
El visor parpadeará.
B Ajuste la hora con TUNING.
y
Si mantiene pulsado TUNING, los números avanzan
rápidamente.
C Pulse CLOCK.
Si desea salir del modo de ajuste del reloj, pulse
.
y
Si pulsa PRESET en el paso B, puede seleccionar
el método usado para indicar la hora (12 horas/
24 horas).
El ajuste del tiempo se pierde aproximadamente una semana
después de desenchufar la unidad.
Ajuste de la alarma
A Mantenga pulsado ALARM durante
más de 2 segundos.
El indicador de alarma ( ), el indicador de
RADIO y el visor parpadearán.
B
Ajuste la hora de alarma con
TUNING
.
C Ajuste el volumen de la alarma con
VOLUME.
Se muestra el nivel de volumen.
D Pulse ALARM.
La alarma está programada y el indicador de
alarma ( ) se ilumina.
y
• Esta unidad solo dispone de un tipo de alarma,
concretamente, con radio y pitidos.
• La radio se enciende 3 minutos antes de la hora de
alarma y los pitidos empiezan a la hora de alarma.
Si pulsa ALARM para finalizar la configuración de la
alarma sin haber modificado la hora de la alarma ni el
volumen, se cancelará el modo de configuración de la
alarma pero no se activará la alarma.
A
,
C
B
Nota
A
,
D
C
B
Indicador de RADIO
Indicador
de alarma
()
Nota

FUNCIONES BÁSICAS
5 Es
Es
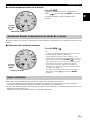
■ Activación/Desactivación de la alarma
A la hora ajustada, se reproduce el sonido de la alarma. Durante la reproducción, las siguientes operaciones son
posibles.
■ Detención del sonido de la alarma
El sistema accede automáticamente al modo de espera en las siguientes situaciones:
• No se recibe ninguna señal de audio de un dispositivo conectado o el dispositivo conectado reproduce
contenidos a un volumen bajo durante un periodo determinado (unos 20 minutos).
• Si no se ha realizado ninguna operación durante más de 8 horas mientras se está reproduciendo música o sin
ninguna reproducción en curso.
• Desconecte la conexión Bluetooth desde el dispositivo Bluetooth.
Pulse ALARM.
Cuando la alarma está activada, el indicador de
alarma ( ) y el indicador de RADIO se iluminan
y la hora de alarma se muestra durante unos
instantes.
Indicador
de alarma
()
Indicador de RADIO
Operaciones durante la reproducción del sonido de la alarma
Pulse ALARM o .
y
• A menos que usted detenga la alarma, la alarma se detiene
automáticamente después de 60 minutos.
• Cuando detiene la alarma, el ajuste de tiempo y otras
configuraciones se guardan para poder utilizarlos otra vez.
• Pulse cualquier botón excepto ALARM y una vez para
detener los pitidos y dos veces para detener la fuente de
radio (función de repetición). 4 minutos después de
detener la fuente de radio, empezará a reanudarse la
reproducción y cuando haya pasado otro minuto volverán
a escucharse los pitidos.
• Si la función de repetición está activada, la pantalla, el
indicador de alarma ( ) y el indicador RADIO
parpadean.
Indicador de RADIO
Indicador
de alarma
()
Reposo automático

6 Es
Es posible almacenar hasta cinco emisoras de radio FM favoritas con la función de presintonización.
ESCUCHAR EMISORAS DE RADIO
Sintonización de emisoras de radio
A Pulse SOURCE para seleccionar
RADIO.
Se iluminará el indicador RADIO.
B Para la sintonización automática,
mantenga pulsado TUNING.
Para la sintonización manual, pulse
TUNING varias veces.
Si sintoniza una emisora de radio manualmente, el sonido
es monoaural.
Presintonización de emisoras de radio
A Pulse TUNING para seleccionar una
emisora de radio favorita.
Se mostrará la frecuencia de radio durante unos instantes.
B Mantenga pulsado PRESET durante
más de 2 segundos.
Aparecerá el número de memoria en el visor y parpadeará.
C Pulse PRESET para seleccionar el
número de memoria en el que desea
guardar la emisora.
El número de memorización se muestra de la
siguiente forma:
P1
P2
P3
P4
P5
P1
D
Mantenga pulsado
PRESET
durante más
de 2 segundos para completar la operación.
Selección de emisoras de radio presintonizadas
A Pulse SOURCE para seleccionar
RADIO.
Se iluminará el indicador RADIO.
B Pulse PRESET varias veces para
seleccionar la emisora de radio
memorizada.
A
B
Indicador de RADIO
Nota
A
B
,
C
,
D
Indicador de RADIO
B
A
Indicador de RADIO

Es
7 Es
Esta unidad está equipada con Bluetooth. Puede disfrutar de la reproducción de música de forma inalámbrica
desde un dispositivo Bluetooth (smartphone, reproductor de audio digital, etc.). Consulte también el manual de
instrucciones del dispositivo Bluetooth.
• Esta unidad puede emparejarse con un máximo de cuatro dispositivos. Cuando el proceso de emparejamiento se realiza
correctamente con un quinto dispositivo, se borran los datos de emparejamiento del dispositivo que se ha conectado hace más
tiempo a la unidad.
• Si la unidad está conectada mediante Bluetooth a otro dispositivo, mantenga pulsado SOURCE para finalizar la conexión
Bluetooth antes de llevar a cabo el proceso de emparejamiento.
ESCUCHAR MÚSICA DE UN DISPOSITIVO Bluetooth
Instalación
Instale la unidad en un lugar estable y
tenga en cuenta lo siguiente:
• No coloque la unidad sobre superficies
de acero o sobre placas de metal.
• No cubra la unidad con un paño, etc.
• Coloque la unidad en la misma
habitación en la que se encuentre el
dispositivo con el que quiere
intercambiar las señales (smartphone
compatible con el perfil Bluetooth
A2DP, reproductor de audio digital,
etc.) a una distancia recta y directa de
10 m.
• Asegúrese de que no hay obstáculos
entre la unidad y el dispositivo
Bluetooth.
Rango de alcance: 10 m
Emparejamiento de esta unidad con el dispositivo Bluetooth
y ¿Qué es el emparejamiento?
El emparejamiento es un proceso que registra el dispositivo de comunicación (en adelante, “el dispositivo
conectado”) con esta unidad. Deberá llevar a cabo la operación de emparejamiento la primera vez que
utilice el dispositivo B luetooth con esta unidad o si se eliminan los ajustes de emparejamiento. Una vez
finalizado el emparejamiento, la próxima vez que conecte el componente será mucho más rápido y sencillo,
incluso si ha desconectado la conexión Bluetooth. Si no logra llevar a cabo el emparejamiento, consulte
“Bluetooth” en “SOLUCIÓN DE PROBLEMAS” (☞ página 12).
Nota

ESCUCHAR MÚSICA DE UN DISPOSITIVO Bluetooth
8 Es
■ Emparejamiento (Registro)
– Si utiliza un iPhone/iPad/iPod touch
– Si utiliza otros dispositivos distintos de iPhone/iPad/iPod touch
A
Encienda el sistema.
B Mantenga pulsado SOURCE durante
más de 2 segundos para acceder al
modo de emparejamiento.
• El modo de emparejamiento dura 5 minutos.
• En el modo de emparejamiento, el indicador Bluetooth
( ) se ilumina de color naranja y azul alternativamente.
C En el iPhone/iPad/iPod touch, active
[Ajustes]
[Bluetooth].
La lista de conexiones Bluetooth aparecerá en
[Dispositivos].
(Este procedimiento o visualización puede variar
en función del iPhone/iPad/iPod touch.)
D En la lista de conexiones Bluetooth del
dispositivo conectado, seleccione esta
unidad (TSX-B15 Yamaha).
• Cuando haya finalizado el proceso de emparejamiento,
en la pantalla del iPhone/iPad/iPod touch aparecerá el
mensaje “Conectado”.
• El indicador Bluetooth ( ) se iluminará de color azul.
C Realice el emparejamiento Bluetooth en
el dispositivo conectado.
Para obtener más información, consulte el manual
de uso del dispositivo conectado.
D En la lista de conexiones Bluetooth del
dispositivo conectado, seleccione esta
unidad (TSX-B15 Yamaha).
Cuando el emparejamiento haya terminado, el
indicador Bluetooth ( ) se iluminará de color azul.
y
Si el sistema le pide una contraseña, introduzca los números
“0000”.
B
A
Indicador Bluetooth ()
TSX-B15 Yamaha
C
D
Antes de que pasen 5 minutos
TSX-B15 Yamaha
PIN 0000
123
456
789
0
C
D
Antes de que pasen 5 minutos
Compruebe que ha terminado el proceso de emparejamiento en el dispositivo conectado. Si hay algún
problema durante el proceso de emparejamiento, vuelva a empezar desde el paso B. Para obtener más
información, consulte el manual de instrucciones del dispositivo conectado.
Nota

ESCUCHAR MÚSICA DE UN DISPOSITIVO Bluetooth
9 Es
Es
Una vez concluido el proceso de emparejamiento de un dispositivo, conectarlo a través de Bluetooth en
sucesivas ocasiones será muy sencillo.
■ Conexión desde esta unidad
Pulse SOURCE para seleccionar (Bluetooth).
El indicador Bluet ooth ( ) se iluminará de color naranja.
Esta unidad buscará el último dispositivo al que se ha conectado a través de Bluetooth y, a continuación,
establecerá una conexión (primero debe activar el ajuste Bluetooth en el dispositivo conectado).
Una vez establecida la conexión Bluetooth, el indicador Bluetooth ( ) se iluminará de color azul.
Yamaha no garantiza todas las conexiones entre esta unidad y el dispositivo Bluetooth.
■ Conexión desde el dispositivo conectado
A En los ajustes Bluetooth del dispositivo conectado, active Bluetooth.
B En la lista de conexiones Bluetooth del dispositivo conectado, seleccione esta unidad
(TSX-B15 Yamaha).
Se establecerá la conexión Bluetooth y el indicador Bluetooth ( ) se iluminará de color azul.
No se pueden establecer conexiones Bluetooth desde el dispositivo conectado si esta unidad se encuentra en el modo de espera
Eco. Debe encender el sistema.
Si lleva a cabo cualquiera de las siguientes operaciones mientras se establece una conexión Bluetooth, se
desconectará la conexión Bluetooth.
• Mantiene pulsado SOURCE durante más de 2 segundos.
•Pulsa SOURCE para seleccionar una fuente de reproducción distinta de (Bluetooth).
• Pulsa para acceder al modo de espera.
• Desconecta la conexión Bluetooth desde el dispositivo Bluetooth.
Escuchar un dispositivo Bluetooth
A
Pulse
SOURCE
para seleccionar
(Bluetooth).
B Conecte esta unidad y el dispositivo
conectado a través de Bluetooth.
C Reproduzca música desde su dispositivo
conectado.
Tenga cuidado para que el ajuste de volumen de la unidad no
sea demasiado alto. Recomendamos que ajuste el volumen en el
dispositivo conectado.
y
• Si el sistema se encuentra en el modo de espera y conecta un
dispositivo Bluet ooth a la unidad, el sistema se encenderá
automáticamente.
• Si desconecta la conexión Bluetooth desde el dispositivo
conectado, el sistema accederá al modo de espera.
Conectar un dispositivo ya emparejado a través de Bluetooth
A
Nota
Nota
Nota
Desconexión de una conexión Bluetooth

10 Es
Si conecta un dispositivo portátil, como un smartphone o una tablet, al puerto USB de esta unidad, el
dispositivo conectado se cargará (se admite 5 V/1 A de alimentación máxima).
Antes de realizar la conexión, tenga preparado un cable USB compatible con el dispositivo portátil y confirme
que el dispositivo se puede cargar a través de una conexión USB. Además, lea la documentación incluida con
el dispositivo portátil.
ESCUCHAR FUENTES EXTERNAS
A Conecte el dispositivo de audio
portátil al terminal AUX
mediante un cable con
miniclavija de 3,5 mm
disponible en tiendas.
Baje el volumen de la unidad y el del
dispositivo de audio portátil antes de realizar
la conexión.
B Encienda el sistema.
C Pulse SOURCE para
seleccionar AUX como fuente
de reproducción.
Se iluminará el indicador AUX.
D
Inicie la reproducción en el
dispositivo de audio portátil
conectado.
CARGA CON EL PUERTO USB
A Conecte el dispositivo portátil
al puerto USB de esta unidad
con un cable USB disponible
en tiendas.
La carga se inicia automáticamente.
B Desconecte el cable USB de
la unidad una vez finalizada la
carga.
Compruebe el estado de carga del
dispositivo portátil.
• El puerto USB solo sirve para carga, no
para conexiones. El puerto USB no permite
reproducir audio.
• Algunos dispositivos portátiles no se pueden
cargar con este método.
• En el modo de espera Eco, la alimentación se
interrumpe y la función de carga no está
disponible.
• Esta unidad no funciona como
almacenamiento de memoria.
• Yamaha no se hará responsable de cualquier
daño producido en el dispositivo portátil o
pérdida de datos durante el uso de esta unidad.
• Desconecte el cable USB inmediatamente
después de finalizar la carga, ya que una vez
concluida la carga, el dispositivo conectado
sigue recibiendo corriente.
A
C
B
Panel posterior
Indicador AUX
Nota
Cable USB del dispositivo portátil
Panel posterior
Nota

11 Es
Es
Consulte la tabla inferior si la unidad no funciona correctamente. Si el problema no aparece en la siguiente lista
o las instrucciones siguientes no le ayudan, pulse para acceder al modo de espera, desconecte el cable de
alimentación y póngase en contacto con el centro de servicio o distribuidor de Yamaha más cercano.
SOLUCIÓN DE PROBLEMAS
General
Problema Causa Solución
Los altavoces no suenan.
Es posible que el volumen esté ajustado al
mínimo.
Ajuste el nivel del volumen.
Es posible que la fuente no sea la correcta. Seleccione la fuente correcta.
La unidad está configurando la alarma. Pulse ALARM para finalizar la configuración
de la alarma.
El sonido se apaga de
repente.
La función Reposo automático está
activada.
Encienda el sistema y reproduzca la fuente de
nuevo.
Como el dispositivo conectado reproduce
los contenidos a un volumen muy bajo, se
ha activado la función Reposo
automático.
Suba el volumen del dispositivo conectado.
Suenan chasquidos,
suena distorsionado o hay
un sonido anormal.
El volumen de la fuente de entrada es
excesivo o el volumen de esta unidad es
excesivo.
Ajuste el volumen con VOLUME.
La unidad no funciona
correctamente.
Es posible que la unidad haya recibido
una fuerte descarga eléctrica, como por
ejemplo, de un rayo o excesiva
electricidad estática, o es posible que se
haya caído el suministro eléctrico.
Pulse para acceder al modo de espera y
desconecte el cable de alimentación. Espere
unos 30 segundos, vuelva a conectar el cable
de alimentación y encienda el sistema.
El sistema se enciende
pero inmediatamente se
apaga.
Es posible que el cable de alimentación
esté conectado indebidamente.
Asegúrese de que el cable de alimentación
está conectado a la toma de corriente de pared
con firmeza.
Es posible que la unidad haya recibido
una fuerte descarga eléctrica, como por
ejemplo, de un rayo o excesiva
electricidad estática.
Desconecte el cable de alimentación. Espere
unos 30 segundos, vuelva a conectar el cable
de alimentación y encienda el sistema.
Un equipo de alta
frecuencia o digital
produce ruido.
Es posible que la unidad esté situada
demasiado cerca del equipo de alta
frecuencia o digital.
Aleje la unidad del equipo.
Se ha borrado el ajuste del
reloj.
Se ha dejado la unidad más de una semana
sin conexión al cable de alimentación de
la toma de corriente de pared.
Conecte el cable de alimentación en la toma
de corriente de pared con firmeza y ajuste de
nuevo el reloj (☞ página 4).
El reloj parpadea.
La unidad está configurando las opciones
CLOCK o ALARM.
Pulse para cancelar la configuración de
CLOCK o ALARM.
Recepción de radio FM
Problema Causa Solución
Hay demasiado ruido
durante la emisión
estéreo.
Es posible que la emisora de radio que ha
seleccionado se encuentre alejada de su
zona, o que la recepción de ondas de radio
sea muy débil en su zona.
Intente la sintonización manual para mejorar
la calidad de la señal (☞ página 6), cambie la
altura o la orientación de la antena o cambie la
unidad de sitio (☞ página 3).

SOLUCIÓN DE PROBLEMAS
12 Es
Bluetooth
Problema Causa Solución
No se puede emparejar
esta unidad con el
dispositivo conectado.
El dispositivo conectado no es compatible
con el perfil A2DP.
Solo puede emparejar dispositivos
compatibles con el perfil A2DP.
La clave de acceso del dispositivo
conectado que desea emparejar con esta
unidad es diferente de “0000”.
Utilice un dispositivo con una clave de acceso
“0000”.
Esta unidad y el dispositivo conectado
están demasiado alejados.
Acerque el dispositivo conectado a esta
unidad.
Hay un dispositivo cerca (horno microondas,
LAN inalámbrica, etc.) que emite señales en
la banda de frecuencia de 2,4 GHz.
Aleje esta unidad del dispositivo que está
emitiendo señales de frecuencia de radio.
La unidad se encuentra en el modo de
espera.
Encienda la unidad y realice el
emparejamiento (☞ página 8).
Hay otro dispositivo Bluetooth conectado.
Finalice la conexión
Bluetooth
actual y lleve a
cabo el emparejamiento con el nuevo dispositivo.
No se puede establecer
una conexión Bluetooth.
Esta unidad no está registrada en la lista
de conexiones Bluetooth del dispositivo
conectado.
Vuelva a realizar el proceso de
emparejamiento (☞ página 7).
La unidad se encuentra en el modo de
espera Eco.
Encienda la unidad y, después, establezca una
conexión Bluetooth (☞ página 9).
Hay otro dispositivo Bluetooth conectado. Finalice la conexión Bluetooth actual y
establezca de nuevo una conexión Bluetooth
con el mismo dispositivo.
La función Bluetooth del dispositivo está
desactivada.
Active la función Bluetooth del dispositivo.
Se ha eliminado la información de
emparejamiento.
Vuelva a realizar el emparejamiento (
☞
página 7)
Esta unidad puede emparejarse con cuatro
dispositivos. Si lo empareja con un quinto
dispositivo, se borran los datos de
emparejamiento del dispositivo con el que se
ha conectado hace más tiempo.
Borre cualquier historial de emparejamiento
del TSX-B15 con iPhone/iPad/iPod touch y, a
continuación, vuelva a emparejarlo con el
TSX-B15 (☞ página 8).
No se emite ningún sonido
o se interrumpe durante la
reproducción.
La conexión Bluetooth de esta unidad con el
dispositivo conectado está desconectada.
Vuelva a realizar el proceso de conexión
Bluetooth (☞ página 9).
Esta unidad y el dispositivo conectado
están demasiado alejados.
Acerque el dispositivo conectado a esta
unidad.
Hay un dispositivo cerca (horno microondas,
LAN inalámbrica, etc.) que emite señales en
la banda de frecuencia de 2,4 GHz.
Aleje esta unidad del dispositivo que está
emitiendo señales de frecuencia de radio.
La función Bluetooth del dispositivo
conectado está desactivada.
Active la función Bluetooth del dispositivo
conectado.
El dispositivo conectado no envía señales
de audio Bluetooth a esta unidad.
Verifique que la función
Bluetooth
del dispositivo
conectado esté ajustada correctamente.
Esta unidad no está configurada en los ajustes
de emparejamiento del dispositivo conectado.
Configure esta unidad en los ajustes de
emparejamiento del dispositivo conectado.
El volumen del dispositivo conectado está
ajustado al mínimo.
Suba el nivel de volumen.
El dispositivo conectado está conectado a
más de dos altavoces Bluetooth y esta
unidad (TSX-B15) no está seleccionada
como dispositivo de reproducción.
Seleccione esta unidad como dispositivo de
reproducción del dispositivo conectado.

SOLUCIÓN DE PROBLEMAS
13 Es
Es
Carga con el puerto USB
Problema Causa Solución
No es posible cargar el
dispositivo USB portátil
conectado.
Ha conectado a la unidad un dispositivo
USB no compatible. El dispositivo USB
no está conectado correctamente.
Pulse para acceder al modo de espera y
vuelva a conectar el dispositivo USB a la
unidad. Si esto no soluciona el problema,
significa que el dispositivo USB no se puede
cargar con esta unidad.

14 Es
■ SECCIÓN DEL REPRODUCTOR
AUX IN
• Conector de Entrada
.................... ESTÉREO I/D: 3,5 mm Minitoma ESTÉREO
■ SECCIÓN DEL AMPLIFICADOR
• Unidad del transductor
........................ Transductor de gama completa de 5 cm × 2
■ SECCIÓN Bluetooth
• Versión de Bluetooth ...............................................Ver. 3.0
• Protocolos admitidos ..................................................A2DP
• Códecs admitidos..........................................................SBC
• Salida inalámbrica ................................... Bluetooth Clase 2
• Distancia máxima de comunicación
...................................................... 10 m (sin obstrucciones)
• Protección de contenido admitido ............Método SCMS-T
■ SECCIÓN DEL SINTONIZADOR
• Intervalo de sintonización (FM) .............. 87,5 - 108,0 MHz
■ SECCIÓN DEL CONECTOR DE
CARGA
• Tipo de conector................................................USB tipo A
• Salida nominal.........................................................5 V/1 A
■ GENERALIDADES
• Alimentación....................De 100 V a 240 V CA, 50/60 Hz
• Consumo de energía eléctrica......................................11 W
• Consumo en modo de espera (visualización del reloj,
Bluetooth listo para conexión) ....................................1,0 W
• Consumo en modo de espera Eco...............................0,2 W
• Tiempo de gestión de la alimentación (Auto Standby)
.................................................Sin sonido: unos 20 minutos
...............................................Sin operaciones: unas 8 horas
• Peso............................................................................ 0,9 kg
• Dimensiones
Las especificaciones están sujetas a cambios sin previo aviso.
Bluetooth
• Bluetooth es una tecnología para la comunicación
inalámbrica entre dispositivos situados en un área de unos
10 metros que emplean la banda de frecuencia de
2,4 GHz, una banda que puede usarse sin licencia.
• Bluetooth es una marca registrada de Bluetooth SIG, y
Yamaha la usa según un convenio de licencia.
Manejo de las comunicaciones Bluetooth
• La banda de 2,4 GHz usada por aparatos compatibles con
Bluetooth es una banda de radio compartida por muchos
equipos diferentes.
Aunque los aparatos compatibles con Bluetooth usan una
tecnología que minimiza la influencia de otros
componentes que usan la misma banda de radio, tal
influencia puede reducir la velocidad o la distancia de
comunicación, y en algunos casos pueden hasta
interrumpir las comunicaciones.
• La velocidad de transferencia de las señales y la distancia
a la que se puede hacer la comunicación cambia según la
distancia entre los aparatos de comunicación, la presencia
de obstáculos, las condiciones de las ondas de radio y el
tipo del equipo.
• Yamaha no garantiza todas las conexiones inalámbricas
entre esta unidad y dispositivos compatibles con la
función Bluetooth.
ESPECIFICACIONES
180 mm
200 mm
100 mm
iPad, iPhone y iPod touch son marcas comerciales de
Apple Inc. registradas en Estados Unidos y en otros
países.


© 2014 Yamaha Corporation Printed in China ZN35290
-
 1
1
-
 2
2
-
 3
3
-
 4
4
-
 5
5
-
 6
6
-
 7
7
-
 8
8
-
 9
9
-
 10
10
-
 11
11
-
 12
12
-
 13
13
-
 14
14
-
 15
15
-
 16
16
-
 17
17
-
 18
18
-
 19
19
-
 20
20
-
 21
21
-
 22
22
-
 23
23
-
 24
24
-
 25
25
-
 26
26
-
 27
27
-
 28
28
-
 29
29
-
 30
30
-
 31
31
-
 32
32


Yamaha TSX-B15 El manual del propietario
- Categoría
- Relojes de alarma
- Tipo
- El manual del propietario
en otros idiomas
- English: Yamaha TSX-B15 Owner's manual
Artículos relacionados
-
Yamaha TSX-B15 El manual del propietario
-
Yamaha TSX-B15 LIGHT GREEN Manual de usuario
-
-
Yamaha TSX-14 El manual del propietario
-
Yamaha TSX-B15D El manual del propietario
-
-
-
Yamaha TSX-B235 El manual del propietario
-