
Instrucciones De Ensamblaje
Assembly Instructions
MODEL/MODELO
ARC120_018M
WM.COM
www.medalsports.com877-472-4296

English Español
This product is covered by a limited warranty that is
effective for 90 days from the date of purchase. If, during
the limited warranty period, a part is found to be
defective or breaks, we will offer replacement parts at
no cost to you, the customer. The only exceptions to the
warranty include mainframes, table tops, playing
surfaces, batteries or tools.
The above warranty will not apply in cases of damages
due to improper usage, alteration, misuse, abuse,
accidental damage or neglect.
This Limited Warranty gives you specific legal rights and
you may also have other rights vary from one State
(province) to another.
A PURCHASE RECEIPT (or other proof of purchase) will
be required before any warranty service is initiated. For
all requests for warranty service, please feel free to
contact our Consumer Service Department.
Please be aware of your product’s Limited Warranty for
the return/refund policy from the store, We, at Medal
Sports, cannot handle the product which is out of
product’s limited warranty since we only provide
available parts. Thank you!
PLEASE CONTACT US BEFORE RETURNING THE
PRODUCT TO THE STORE!
Este producto está cubierto por una garantía efectiva
de 90 días a partir de la fecha de su compra. Durante el
periódo límite de la garantía, si una parte defectuosa o
quebrada es encontrada, nosotros ofreceremos una
reparación o un reemplazo de la partes sin ningún costo
para ud, nuestro cliente. Las únicas excepciones de la
garantía incluyen unidad principals, tableros de mesa,
superficies, pilas o herramientas.
La susodicha garantía no se aplicará en los casos de
daños y perjuicios debido al uso impropio, la alteración,
el mal uso, el abuso, el daño accidental o la negligencia.
Esta garantía limitada le da a usted derechos legales
específicos, usted también puede tener otros derechos
que varían de un estado (provincia) a otro.
EL RECIBO DE LA COMPRA (U otra prueba de compra)
sería requerida antes que cualquier servicio de garantía
fuera iniciada. Para todo pedido por servicio de
garantía, por favor siéntase libre de ponerse en contacto
con nuestro Departamento de Servicio de Consumidor.
Por favor tenga atención sobre el Límite de Garantía de
su producto de la política de vuelta/reembolsa desde la
tienda, Nosotros, Medal Sports, no podemos manejar el
producto que está fuera del límite de garantía ya que
proporcionamos solamente partes disponibles. ¡Gracias!
¡POR FAVOR PÓNGASE EN CONTACTO CON
NOSOTROS ANTES DE DEVOLVER EL PRODUCTO A LA
TIENDA!
GARANTÍA LIMITA DE 90 DIASLIMITED 90 DAYS WARRANTY
MD SPORTS
877-472-4296
ARC120_018M 1 (Continúe en la siguiente página.)(Continued on the next page.) www.medalsports.com
www.medalsports.com
DO NOT RETURN TO STORE NO DEVOLVERLO A LA TIENDA
WE ARE READY
TO HELP
ESTAMOS LISTOS
PARA AYUDAR
Customer Service
Toll Free
Servicio al Cliente
Llamados gratuitos
Please Contact Por favor Contacto
Mon.-Fri.,
9:00 a.m. to 5:00 p.m. EST
Lunes a Viernes,
9:00 a.m. a 5:00 p.m. ET
For additional resources and
Frequently Asked Questions,
please visit us at
Por mayor información y
preguntas frecuentes, favor
visitarnos en

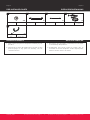
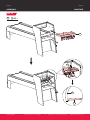
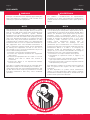
Power Tools: Set to Low Torque
/ Herramientas eléctricas:
Establecer bajo par de torsión
High Torque Over Tightened
/ Alto par más estrictas
This product is intended for INDOOR use only.
Please do not sit, climb or lean on the product.
Please do not drag the product when moving it in
order to avoid damaging the legs.
Please only use spray furniture polish to clean the
exterior surfaces of the product.
This is not a child's toy, adult supervision is required
for children playing this game.
1.
2.
3.
4.
5.
Este producto está destinado para el uso INTERIOR
solamente.
Por favor no sientes, subas o inclínes el producto.
Por favor no arrastres el producto cuando está
moviendo para evitar el daño sobre las piernas.
Por favor use solamente spray para muebles para
limpiar la superficie exterior del producto.
Esto no es un juguete de niños, se requieren la
supervisión adulta para niños cuando esté jugando al
juego.
1.
2.
3.
4.
5.
English Español
HERRAMIENTAS NECESARIASTOOLS REQUIRED
- Not Included
- Not Included
- Included
RECOMMENDED RECOMENDADO
IMPORTANT NOTICE! ¡AVISO IMPORTANTE!
Adult Assembly Required.
CHOKING HAZARD - This item contains small parts.
Not suitable for children under 3 years.
El ensamblaje debe ser realizado por un adulto.
PELIGRO DE ASFIXIA - Este artículo contiene piezas
pequeñas. No es apto para niños menores de 3 años de
edad.
WARNING ADVERTENCIA
Phillips Screwdriver
Standard (Flat Head
Screwdriver)
Allen Key
Electric Screwdrivers may be helpful
during assembly; however, please set a low
torque and use extreme caution.
Los destornilladores eléctricos pueden ser
de gran ayuda durante el ensamblado; sin
embargo, por favor ajuste el par de giro
bajo y sea extremadamente precavido.
Destornillador Phillips
Destornillador de Cabeza
Plana
Llave Allen
- No incluido
- No incluido
- Incluido
059 www.medalsports.com2 (Continúe en la siguiente página.)(Continued on the next page.)
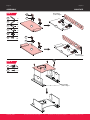
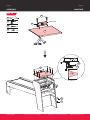
X4
At least 4 adults needed
Se necesitan al menos 4
adultos
No children in assembly
area
No deben estar los niños
en el area de ensamble
Keep away from pets in
assembly area
Mantener alejados a los
animales domesticos del
area de ensamble
Do not use or keep
product outdoors. For
indoor use only. No
wet/humid conditions.
No usar o guardar el
producto en el exterior.
Solo para uso en interior.
No utilizar ni guardar el
producto en lugares
humedos o mojados

ARC120_018M www.medalsports.com3 (Continúe en la siguiente página.)(Continued on the next page.)
English Español
IDENTIFICADOR DE PIEZASPARTS IDENTIFIER
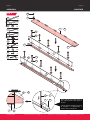
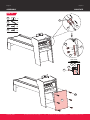
Top Rail - A
Riel Superior - A
1
x1
FOR FIG. 1
PART NUMBER
NÚMERO DE PIEZA
FIG NUMBER
NÚMERO DE FIG
QUANTITY
CANTIDAD
NOMBRE DE PIEZA
PART
PIEZA
PART NAME
End Apron Delantal de Punta
5
x1
FOR FIG. 2
Top Rail - B Riel Superior - B
2
x1
FOR FIG. 1
Right Front Leg
Pierna Delantera
Dcha
3
x1
FOR FIG. 1
Left Front Leg
Pierna Delantera
Izda
4
x1
FOR FIG. 1
Top Rail - D
(Control Switch)
Riel Superior - D
(Interruptor
de Control)
9
x1
FOR FIG. 3
Right Side Apron
Delantal
Lateral Dcha
6
x1
FOR FIG. 3
Left Side Apron
Delantal
Lateral Izda
7
x1
FOR FIG. 3
Top Rail - C Riel Superior - C
8
x1
FOR FIG. 3
FOR FIG. 6FOR FIG. 4 FOR FIG. 5 FOR FIG. 6
FOR FIG. 7FOR FIG. 6 FOR FIG. 7
Ball Return Board
Tablero de
Retorno de Bola
12
x2
Bottom Panel Panel del Fondo
13
x1
Playfield - A
Campo del
Juego - A
10
x1
Apron Corner
Delantales de
Rincón
11
x1
Support Board - A
Tablero de
Soporte - A
14
x4
Support Board
with Sensor
Tablero de
Soporte con Sensor
15
x1
FOR FIG. 7
FOR FIG. 10FOR FIG. 9 FOR FIG. 10
FOR FIG. 14FOR FIG. 12 FOR FIG. 12
FOR FIG. 10
Support Board - B
Tablero de
Soporte - B
16
x1
Support Board - C
Tablero de
Soporte - C
17
x1
Playfield-B
Campo del
Juego - B
21
x1
FOR FIG. 9
Goal Box
Board
Tablero de Caja
de Gol
18
x1
FOR FIG. 8
19
x1
FOR FIG. 18
Back Board - A
Tablero
Trasero - A
Support Board - D
Tablero de
Soporte - D
20
x2
FOR FIG. 9
Right Back Panel
Panel posterior
derecho
24
x1
Back Board - B
Tablero
Trasero - B
25
x1
Connecting Board
Tablero de
Conexión
22
x2
Left Back Panel
Panel posterior
izquierdo
23
x1
Support Board - E
Tablero de
Soporte - E
26
x2
Bottom Board Tablero del Fondo
27
x1
FOR FIG. 12
Support Board - F
Tablero de
Soporte - F
28
x2
LED
Face Plate
Placa Frontal
de LED
29
x1

Bowling Ball - Red
Bola de Bolos
- Rojo
42
x1
Bowling Ball
- Yellow
Bola de Bolos
- Amarillo
43
x1
ARC120_018M www.medalsports.com4 (Continúe en la siguiente página.)(Continued on the next page.)
English Español
IDENTIFICADOR DE PIEZASPARTS IDENTIFIER
Top Rail
Corner
Rincón de Riel
Superior
34
x2
FOR FIG. 19
Bowling Pin Set Pino del Boliche
36
x10
FOR FIG. 14
Support Board - G
Tablero de
Soporte - G
35
x1
FOR FIG. 9
Metal Connecter
Conectador
Metálico
38
x1
FOR FIG. 9
Support Board - H
Tablero de
Soporte - H
39
x4
FOR FIG. 4
40
x1
FOR FIG. 17
Adapter Adaptador
Plastic Corner Esquina plástica
41
x1
FOR FIG. 18
“L” Bracket
Corchete “L”
37
x12
FOR FIG. 1, 3, 7
Pin Housing
Carcasa de bolos
30
x1
FOR FIG. 14
Top Panel
Panel Superior
31
x1
FOR FIG. 16
Electronic Scorer
Marcador
Electrónico
32
x1
FOR FIG. 16
Back Board - C
Tablero
Trasero - C
33
x1
FOR FIG. 17
ACCESORIOSACCESSORIES
HARDWAREHARDWARE
FOR FIG. 3
FOR FIG.17, 19
3.5x28mm
Screw
Tornillo
3.5x28mm
A5
x64
FOR FIG. 2, 4, 5, 6, 8,
9, 10, 12, 17
T3x12mm
Screw
Tornillo
T3x12mm
A9
x10
Wing Bolt
Perno de
Ala
A10
x4
A11
x4
M6x21mm
Butterfly Bolt
Perno de
Mariposa
M6x21mm
Allen Key Llave Allen
A12
x1
4x32mm Flat
Head Screw
Tornillo de Cabeza
Plana 4x32mm
A6
x10
FOR FIG. 4, 16
M3x8mm
Bolt
Cerrojo
M3x8mm
A7
x10
FOR FIG. 14
T4x12mm
Screw
Tornillo
T4x12mm
A8
x54
FOR FIG. 1, 3, 5, 7, 8, 9, 16
M6x24mm
Bolt
Perno
M6x24mm
A2
x22
FOR FIG. 9, 11, 13, 14
M6 Washer
Arandela
M6
A3
x32
FOR FIG. 3, 9, 11, 13, 14
M6 Spring
Lock Washer
Arandela de
Cerradura
de Resorte M6
A4
x22
FOR FIG. 9, 11, 13, 14
M6x32mm
Bolt
Perno
M6x32mm
A1
x10
FOR FIG. 18 FOR FIG. 15

ARC120_018M www.medalsports.com5 (Continúe en la siguiente página.)(Continued on the next page.)
English Español
PIEZAS PREINSTALADASPRE-INSTALLED PARTS
ANTES DE MONTARBEFORE ASSEMBLY
M6 Nut
Tuerca M6
P1
x36
FOR FIG. 3, 10
LED Light - A Luz LED - A
P2
x1
FOR FIG. 14
LED Light - B Luz LED - B
P3
x1
FOR FIG. 14
Scoring Sensor
Wire
Cable del Sensor
de Marcador
P5
x1
FOR FIG. 7
Control Switch Interruptor de
Control
P4
x1
FOR FIG. 3
Find a clean, level place to begin the assembly of your
product.
Verify that you have all listed parts as shown on the
part list pages. If any parts are missing, call our
customer service.
1.
2.
Encuentre un lugar limpio y nivelado para comenzar
el ensamblaje del producto.
Compruebe que tenga todas las piezas que se
muestran en la lista de piezas. Si falta alguna pieza,
llame a nuestro servicio al cliente.
1.
2.

MONTAJEASSEMBLY
ARC120_018M www.medalsports.com6 (Continúe en la siguiente página.)(Continued on the next page.)
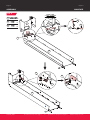
English Español
FIG. 1
x1
2
1
x1
x1
4
x16
A8
37
x4
x1
3
A8
37
3
FIG. 2
5
x1
A5
x4
4
A8
37
Black Side
/ Lado Negro
2
4
A8
Black Side
/ Lado Negro
1
A8
3
Black Side
/ Lado Negro
5
A5
3
4

P4
A1
A3
7
9
MONTAJEASSEMBLY
ARC120_018M www.medalsports.com7 (Continúe en la siguiente página.)(Continued on the next page.)
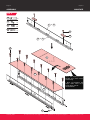
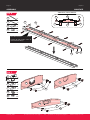
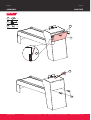
English Español
Note: Follow the instructions in
the figure below and align as
shown.
/ Nota: Siga las instrucciones en
la imagen a continuación y
alinee como se muestra.
TOP VIEW
/ VISTA SUPERIOR
FIG. 3
6
x1
7
x1
x16
P1
x1
8
9
x1
P4
x1
x2
37
x10
A1
x10
A3
x4
A8
Pre-installed
Pre-installed
x1
A12
7 6&
P1
A8
37
P1
A1
A3
6
8
9 8&
7 6&
9 8&
7 6&

MONTAJEASSEMBLY
ARC120_018M www.medalsports.com8 (Continúe en la siguiente página.)(Continued on the next page.)
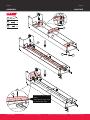
English Español
FIG. 4
10
x1
x4
39
x14
A5
x4
A6
Note: The playing surface
should face down when
assembling.
/ Nota: La superficie del
juego debe estar boca
hacia abajo cuando
ensamblando.
39
A6
6 7&
8 9&
6
7
10
10
P4
A5

MONTAJEASSEMBLY
ARC120_018M www.medalsports.com9 (Continúe en la siguiente página.)(Continued on the next page.)
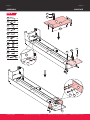
English Español
FIG. 5
11
x1
x4
A5
x4
A8
11
10
5
BACK VIEW
/ VISTA TRASERA
5
10
11
11
5
10
10
A5
6
6
A8
37

SIDE VIEW / VISTA LATERAL
12 12
13
14
A5 A5
12
12
13
14
A5
Note: Black side is facing down.
/ Nota: El lado negro tiene la
cara mirando abajo.
FIG. 6
MONTAJEASSEMBLY
ARC120_018M www.medalsports.com10 (Continúe en la siguiente página.)(Continued on the next page.)
English Español
x1
13
12
x2
x8
A5
14
x4
FIG. 7
x1
P5
x1
16
15
x1
17
x1
x6
37
A8
x12
Pre-installed
16
37
A8
37
A8
17
P5
15
37
A8

MONTAJEASSEMBLY
ARC120_018M www.medalsports.com11 (Continúe en la siguiente página.)(Continued on the next page.)
English Español
FIG. 8
x6
A5
18
16
x1
A8
x12
17
17
A8
A8
P4
P5
18
Note: Black side is facing
down.
/ Nota: El lado negro tiene
la cara mirando abajo.
A5
15
A5

MONTAJEASSEMBLY
ARC120_018M www.medalsports.com12 (Continúe en la siguiente página.)(Continued on the next page.)
English Español
FIG. 9
x1
21
20
x2
x1
35
x6
A2
x6
A3
x6
A4
38
x1
x8
A5
x4
A8
x2
22
x1
A12
38
A5
A8
20
21
A5
A8
21
A5
22
A2
A3
A4
22
5
35
A5

MONTAJEASSEMBLY
ARC120_018M www.medalsports.com13 (Continúe en la siguiente página.)(Continued on the next page.)
English Español
FIG. 10
x1
24
23
x1
x20
P1
x1
25
x6
A5
FIG. 11A
FIG. 11
x8
A3
x8
A4
x1
A12
A2
x8
A5
P1
P1
A5
23
24
P1
25
Pre-installed
23
25
24

MONTAJEASSEMBLY
ARC120_018M www.medalsports.com14 (Continúe en la siguiente página.)(Continued on the next page.)
English Español
FIG. 11B
FIG. 11C
FIG. 12
x1
27
x2
28
26
x2
A5
x8
A3
A4
A2
22
20
A3
A4
A2
26
A5
Note: Black EVA side facing up.
/ Nota: El lado negro EVA tiene
la cara mirando arriba.
27
28
A5

MONTAJEASSEMBLY
ARC120_018M www.medalsports.com15 (Continúe en la siguiente página.)(Continued on the next page.)
English Español
FIG. 13
x4
A3
A2
x4
x1
A12
A4
x4
SIDE VIEW
/ VISTA LATERAL
27
12
13
12
12 12
13
27
27
A3
23
A4
A2
27
27

MONTAJEASSEMBLY
ARC120_018M www.medalsports.com16 (Continúe en la siguiente página.)(Continued on the next page.)
English Español
FIG. 14
29
x1
P2
x1
x1
P3
x1
30
36
x10
A2
x4
x4
A3
x4
A4
x10
A7
x1
A12
Pre-installed
Pre-installed
29
P2
P3
A3
A4
A2
P4
P5
30
36
A7
36
36
29

A11
x4
MONTAJEASSEMBLY
ARC120_018M www.medalsports.com17 (Continúe en la siguiente página.)(Continued on the next page.)
English Español
FIG. 15
30
A11
30
29
30

x1
32
31
x1
x2
A8
A6
x6
MONTAJEASSEMBLY
ARC120_018M www.medalsports.com18 (Continúe en la siguiente página.)(Continued on the next page.)
English Español
FIG. 16
A8
DC 6.5V 3A
32
31
31
A6
P4
P5
Electronic Scorer
/ Marcador Electrónico
32
30
P3
P2

MONTAJEASSEMBLY
ARC120_018M www.medalsports.com19 (Continúe en la siguiente página.)(Continued on the next page.)
English Español
FIG. 17
32
P5
x1
33
x1
40
x6
A5
x2
A9
40
A9
40
23
23
A5
33
P4
P4
P5
A9
TOP VIEW
/ VISTA SUPERIOR

MONTAJEASSEMBLY
ARC120_018M www.medalsports.com20 (Continúe en la siguiente página.)(Continued on the next page.)
English Español
FIG. 18
x1
19
x4
A10
41
x1
19
19
A10
A10
41

MONTAJEASSEMBLY
ARC120_018M www.medalsports.com21 (Continúe en la siguiente página.)(Continued on the next page.)
English Español
DIAGRAMA DE CONEXIÓN ELECTRÓNICAELECTRONIC CONNECTIONS DIAGRAM
FIG. 19
34
x2
A9
x8
A9
34
START
ON/OFF/SELECT
Electronic Scorer
/ Marcador Electrónico
32
30
P4
P5
P3
P2
41
32

MANERAS DE JUGARHOW TO PLAY
ARC120_018M www.medalsports.com22 (Continúe en la siguiente página.)(Continued on the next page.)
English Español
1. After being electrified, the PLAYER1 single player mode is
the default mode and the boot sound effect is played.
The indicator light of PlAYER1 goes on and the bowling balls
are reset.
2. Press the “ON/OFF SELECT” button to select the single
player mode or the two-player mode.
3. Press the "START" button to start the game.
4. Player 1 with the red ball, Player 2 with the yellow ball.
Throw the ball only when the red indicator on the left side
of the screen goes off. The throwing will not score when
the red indicator is on.
Note: If the electronic scoring device has no operation for 5
minutes, it will enter the sleep mode. By restarting the game,
you need to press the “ON/OFF SELECT” button again.
Scoring rules:
The scores of each game cover 10 matches, and each match
has 2 opportunities of bowling. Each game may have the
following three situations:
1. Miss - In any case, one fails to knock down 10 bottles in two
bowlings in one frame, the score of the knockout bottles
displayed.
2. Spare - If the first bowling in one frame fails to knock down
all the balls and the second bowling knocks down the rest
of the balls, then it is called the spare, expressed by the
symbol “(/)”. The score of a spare is 10 points, plus the
number of bottles that the player knocks down the next
time, for example: if the next bowling scores 3 points,
then the spare scores 13 points. The cumulative score is
automatically calculated and displayed on the rightmost
frame of the LCD screen.
3. Strike - When the first bowling in each frame knocks down
all the balls, then it is called the strike, expressed as the
symbol “(X)”. The score of a strike is 10 points, plus the
number of bottles that the player knocks down in the next
two bowlings, for example: if the next two bowlings are
a spare, then the total score for the strike is 10+10; if the next
two bowlings are both strikes, then the total score is
10+10+10; if the next two bowlings are a strike and 4 points
respectively, then the total score is 10+10+4; if the tenth
match is a strike, then two consecutive bowlings are
required, and the scores will be added to the total score.
A perfect game with consecutive strikes scores 300 points.
Scores comparison display:
PLAY1>PLAY2, the sound of Player 1 winning will occur.
PLAY2>PLAY1, the sound of Player 2 winning will occur.
PLAY1=PLAY2, the sound of a tied game will occur.
Caution: Do not “Throw” the ball at the target board as
damage may occur. Correct and safe operation is to always
“roll” the ball along the run way.
1. Tras conectarse, el modo JUGADOR 1 para un solo jugador
es el modo predeterminado y se reproduce el efecto de
sonido de arranque. La luz indicadora de JUGADOR 1
continúa y los bolos se reajustan.
2. Pulsar el botón “SELECCIONAR ENCENDIDO/APAGADO”
para seleccionar el modo
de un solo jugador o
el modo de
dos jugadores.
3. Pulsar el botón “COMENZAR” para comenzar el juego.
4. Jugador 1 con la bola roja, Jugador 2 con la bola amarilla.
Tire la bola únicamente cuando el indicador rojo a la
izquierda de la pantalla se apague. Por más que tire, no
marcará mientras el indicador rojo esté encendido.
Nota: Si el marcador electrónico está inoperativo durante 5
minutos, entrará en el modo de reposo. Al reiniciar el juego,
debe pulsar de nuevo el botón
"SELECCIONAR ENCENDIDO/APAGADO".
Reglas de puntuación:
Las puntuaciones en cada juego cubren 10 partidas, y cada
partida tiene 2 oportunidades de jugar a los bolos. Cada
juego debe contar con las siguientes tres situaciones:
1. Fallo -
Cualquier caso en el que uno no pueda tirar 10 botellas
en dos bolos en una tirada, se muestra la puntuación de las
botellas tiradas.
2. Semipleno -
Si el primer bolo en una tirada no derriba todos
los bolos y el segundo bolo derriba el resto de los bolos, se
denomina semipleno, expresado con el símbolo "(/)".
La puntuación de un semipleno es de 10 puntos, más el número
de bolos que el jugador tira la próxima vez, por ejemplo: si la
siguiente tirada obtiene 3 puntos, el semipleno anota 13 puntos.
La puntuación acumulada se calcula automáticamente y se
muestra en la parte más a la derecha de la pantalla LCD.
3. Pleno -
Cuando el primer bolo en cada tirada derriba todos los
bolos, se llama pleno, expresado con el símbolo "(X)".
La puntuación de una pleno es de 10 puntos, además del
número de bolos que el jugador derriba en las siguientes dos
tiradas, por ejemplo: si las siguientes dos tiradas son un pleno,
entonces la puntuación total del pleno es 10 + 10; si las siguientes
dos tiradas son dos plenos, entonces la puntuación total es
10 + 10 + 10; si las siguientes dos tiradas son plenos y 4 puntos
respectivamente, entonces la puntuación total es 10 + 10 + 4; si la
décima tirada es un pleno, se requieren dos tiradas consecutivos,
y las puntuaciones se añadirán a la puntuación total. Un juego
perfecto con plenos consecutivos obtiene 300 puntos.
Exposición de comparación de puntos:
PLAY1>PLAY2, producirá el sonido del ganador de Jugador 1
PLAY2>PLAY1, producirá el sonido del ganador de Jugador 2
PLAY1=PLAY2, producirá el sonido del partido empatado.
Precaución: No "Lanzar" la pelota en el tablero de blanco
que se podría dañar. El funcionamiento correcto y seguro es
siempre en "rollo" la pelota en el camino de ejecución.

RENUNCIADISCLAIMER
ARC120_018M www.medalsports.com23 (La ultima página)(The last page)
English Español
Changes or modifications not expressly approved by the
party responsible for compliance could void the user’s
authority to operate the equipment.
Los cambios o modificaciones no expresamente
aprobado por la parte responsable del cumplimiento
podrían anular la autoridad del usuario para operar el
equipo.
WARNING ADVERTENCIA
This equipment has been tested and found to comply
with the limits for a Class B digital device, pursuant to
Part 15 of the FCC Rules. These limits are designed to
provide reasonable protection against harmful
interference in a residential installation. This equipment
generates, uses and can radiate radio frequency energy
and, if not installed and used in accordance with the
instructions, may cause harmful interference to radio
communications. However, there is no guarantee that
interference will not occur in a particular installation. If
this equipment does cause harmful interference to
radio or television reception, which can be determined
by turning the equipment off and on, the user is
encouraged to try to correct the interference by one or
more of the following measures:
Este equipo ha sido probado y encontrado para cumplir
con los límites para el dispositivo digital de Clase B, de
conformidad con la Parte 15 de las Reglas de FCC. Estos
límites son diseñados para proporcionar protección
razonable contra la interferencia dañosa en una
instalación residencial. Este equipo genera, usa y podría
irradiar la energía de radiofrecuencia y, si no fuera
instalado y usado conforme con las instrucciones,
podría causar interferencia dañosa para la
comunicación de radio. Sin embargo, no está
garantizado que la interferencia no ocurrirá en una
instalación particular. Si este equipo realmente causado
interferencia dañosa a la radio o la recepción de
televisión, podría ser determinada por girando el
equipo off y on, el usuario está animado de corregir la
interferencia por una o más siguientes medidas:
This device complies with the part 15 of the FCC rules.
Operation is subject to the following two conditions:
(1) This device may not cause harmful interference, and
(2) This device must accept any interference received,
including interference that may cause undesired
operation.
Este dispositivo cumple con la parte 15 de las reglas de
FCC. La operación está sujeta a las dos condiciones
siguientes:
(1) Este dispositivo no podría causar interferencia
dañosa, y (2) Este dispositivo debe aceptar cualquier
interferencia recibida, incluyendo la interferencia que
podría causar operación indeseada.
NOTE NOTA
Reoriente o recoloque la antena de recepción.
Incremente la separación entre el equipo y el
receptor.
Conecte el equipo a una salida del circuito diferente
que el que está conectado con el receptor.
Consulte el proveedor o un técnico experienciado de
radio/televisión por ayudas
•
•
•
•
Reorient or relocate the receiving antenna.
Increase the separation between the equipment
and receiver.
Connect the equipment into an outlet on a circuit
different from that to which the receiver is
connected.
Consult the dealer or an experienced radio/TV
technician for help.
•
•
•
•

www.medalsports.com
-
 1
1
-
 2
2
-
 3
3
-
 4
4
-
 5
5
-
 6
6
-
 7
7
-
 8
8
-
 9
9
-
 10
10
-
 11
11
-
 12
12
-
 13
13
-
 14
14
-
 15
15
-
 16
16
-
 17
17
-
 18
18
-
 19
19
-
 20
20
-
 21
21
-
 22
22
-
 23
23
-
 24
24
-
 25
25


en otros idiomas
- English: MD Sports ARC120_018M User manual
Artículos relacionados
-
MD Sports AC287Y20001 Instrucciones de operación
-
MD Sports TT409Y19003 Manual de usuario
-
-
-
-
-
-
-
-
Barrington AC232Y20001 Manual de usuario