Sylvania 6432GG El manual del propietario
- Tipo
- El manual del propietario

OWNER'S MANUAL
6432GG
TO RECEIVE DIGITAL SIGNAL
YOU MUST CONNECT ANTENNA

WARNING:
TO REDUCE THE RISK OF FIRE OR ELECTRIC SHOCK, DO NOT EXPOSE THIS APPLI-
ANCE TO RAIN OR MOISTURE.
CAUTION
CAUTION: TO REDUCE THE RISK OF ELEC-
TRIC SHOCK, DO NOT REMOVE COVER (OR SACK).
NO USER SERVICEABLE PARTS INSIDE. REFER
SERVICING TO QUALIFIED SERVICE PERSONNEL
The important note is Iocaled on the rear of the cabinet.
_IL HIS SYMBOL INDICATES THAT DANGER-
OUS VOLTAGE CONSTITUTING A RiSK OF
ELECTRIC SHOCK IS PRESENT WITHIN
THiS UNI_
,_ THIS SYMBOL INDICATES THAT THERE
ARE IMPORTANT OPERATING AND MAIN-
TENANCE iNSTRUCTIONS iN THE LITERA=
TURE ACCOMPANYING THE APPLIANCE.
I READ INSTRACTIONS - All the safety and operating
instructions should be read before the at_piiance is operat-
ed
2 RETAIN iNSTRUCTiONS - The salty and operating
instructions should be retained for future _eierence
3 HEED WARNINGS - All warnings on the appliance and in
the operating instructions shouid be adhered to
4 FOLLOW iNSTRUCTiONS - All operating and use instruc-
tions shouEd be followed
5 CLEANING - Unplug TV from the wail outlet before clean-
_Rg Do not use liquid cle_ne£8 oF aerosol cleaners¸ Use
damp cloth for c_eaning
EXCEPTION: A ploduct that is meant for unintelrupted
8eivtce arid, tha_ for some speei_c r_ason, sHch as the
possibi_by of the loss of an authorization code for a CATV
conver te_, is not intended to be unplugged by the user fo_
cleanin_ or any other purpose, may exclude _h£ reference
to unplugging the appliance in the cleaning description
otherwise _equired in item 5
6 ATTACHMENTS - Do not use attachmen_ not _eeommend-
ed by the TV manufacture_ as _hey may cause hazards¸
7 WATER AND MOISTURE - Do not use this TV near water,
_ example, near a bath tub, wash bowl kitchen _nk, o_
I_undry _ub, in _ wet base_Y_er_, or near _ swimming poo_
and the like
8 ACCESSORIES - Do not place this TV on an unstable
cart, _and, tripod, bracket, o_ table The TV may fa_l, caus-
_r_gserious i_ury _o _omeone, and _eriou$ damage to the
appliance Use o_t]y with a cart, stand, tripod, bracket, or
table reeomr_ended by the manufacturer, or so_d with the
TV
Any mou_ting of the appliance should follow the manulac-
tureCs i_ructioqs 8r_d shelled use a pORTABLEC_RTWA_NIN_
moHnti_ accessoFy leeommended by
the manufacturen An appliance and
ca_t combination should be moved
with care¸ Ouic_ stops, excessive
fore, _d uneven £u_faces m_ cause
the appliance and cart combination to
ovel_ul_
AMEUBLES - Cat appareN ne doit , _OL__*WR_,EMENT_<_,RLF"_NTF_
_treplac_ qua SUI Uflmeuble (avec *PP*REIL_T_EL__r'_'_T_
OU 8_n$ FOU_etleS)FeCOI_I_and_ par
_efabficanLSivous l'instai_ez_ur un
meubie a roulettes,d6placez [es
deu× eRsem_les avee pi_caution Un
arr_tb_usque, l'uti[isationd'une force
excessive e_des surfaces iri_gu_i_les
risquentde d_stabi[ise_l'ensembie etde lerenversen
9 VENTILATION - Slotsa_d openings in the cabinet and the
back el bottom ale provided foFver_til_tioRand to ensure
reliableoperation ofthe TV and to p_otectitfrom overheat-
ing, these openings must not be blocked or covered¸ The
opemngs should never be bJocked by piaolngthe TV on a
bed, sofa,rug,or othe_ simila_surface¸ThisTV should
never be p_aced neaF OF oval _ radiato_ OF be_ register
This TV should not be placed ina bui]tqninsta_lationsuch
as a boo,case oF rack unless plo_3eFvefltilationisprovided
or the manufacturer'siRBtIUC_iOnShave been _dhered to
I0 POWER SOURCES -This TV shouid be operated only
from the type of powe_ source indicatedon the marking
_abel ifyou are not sure ofthe type of power supply to
yOUF home, con su_ yoHr appli_f_ce de_eF el localpowel
company¸ Fo_ TVs intended too_erate from batterypower,
or other souice_, refer_o_he opela_ing instructions
11 GROUNDING OR POLARiZATiON -This TV isequipped
witha polarizeda_lemating-cu_ent linep_ug(a p_ug having
one b_ade wider than the other)¸This p]u9 wi_[fitintothe
power outleton_y one way This isa safetyfeature¸ifyou
are unable to inse_tthe p_ug f_]_lyintothe outlet,try revers-
ing the p_ug ifthe plug should stillfailtofit,contact your
electricianto _eplace your obsolete outlet¸Do not defeat
the safety purpose of the polarized plug
12 POWER-CORD PROTECTION - Power-supply co_ds
should be routed £o that they are not Nke_yto be walked
on or pinched by items placed upon o[ against them, pay-
ing par ticu_ar attention to colds at plugs, convenience
receptacles, and the point where they exit from the appli-
ance
EN

$2898A
13 OUTDOOR ANTNNA GROUNDING - if an outside anten-
na o_ cable system is connected to the TV, be sure the
antenna el cable system is grounded so as to provide
some protection against voltage su[ges and built-up static
cha[ges ArticJe 810 01 the National E_ectricaE Code,
AN Sb'N FPA No 70, p[ovides information with respect to
proper grounding of the mast and supporting structure,
grounding of the leadqn wi_e to an antenna discharge unit,
size of grounding conductors, _ocation of antenna-dis-
charge unit, connection to grounding e_ect_odes, and
lequilements for the grounding electlode (Fig A)
14 LIGHTNING - For added protection fo_ this TV _eceiver
during a Hghtning storm, or when it is left unattended and
unused for long pe#ods of time, unplug it from the wa_l
outlet and diSConnect the antenna or cable system This
will p[event damage to the TV due to light ning and power-
]iRe surges
15 POWER LINES - An outside antenna syslem should not
be located in the vicinity of overhead power lines o[ other
electdc _ight of power circuits, o_ where it can fall into such
powe_ lines or ci_cu_s When installing an outside antenna
system, extlelne cale should be taken to keep from touch-
ing such power lines or circuits as contact with them might
be fata_
16 OVERLOADING - Do not ova#cad wall outlets and exten-
sion co{ds as this can {esult in a risk of fi{e or electric
shock
17 OBJECT AND LIQUID ENTRY - Never push objects of
any kind into this TV through openings as they may touch
dangerous vo_t_ge points or short out parts that could
_esult in a fi_e or electric shock Never spil_ liquid of any
kind on the TV
18 SERVICING - Do not attempt to service this TV yourself
as open]n_ or refporing covels may expose you to dan-
gerous voltage or other hazards Refer al_ servicing to
qualified service pe[sonnel
_NECSECTION_I02n
_N_C_R_2_0 P_RTH_
19 DAMAGE REQURING SERVICE - Unplug this TV from the
wan outlet and _efe_ servicing to qualified service person-
ne_ under the following conditions:
a When the powe_ supply cord or plug is damaged or
frayed
b if liquid has been spilled, or obfects have fallen into the
TW
c If the TV has been exposed to rain or water
d If the TV does not operate no_mally by following the
operating instructions Adjust on_y those conifers that
are covered by the opelating instructions, as implopel
adjustment of other controls may result in damage and
win often _equire extensive wo_k by a qualified techni-
cian to _esto_e the TV to its normal operation
e If the TV has been d_opped o[ damaged in any way
f When the TV exhibits a distinct change in performance,
this indicates a need fo[ service
20 REPLACEMENT PARTS - When _eplacement parts a_e
iequiled, be sure the selvice technician uses leplacement
parts specified by the manufacturer that have the same
charac4edstics as the original part Unauthorized substitu-
tions may _esult in fire, electric shock, iniury to persons o_
other hazards
21 SAFETY CHECK - Upon completion of any service or
repaks to this TV, ask the _wice techn_ian to perform
routine safety checks to determine that the TV is in p[oper
operating condition
22 HEAT - This TV p[oduct should be situated away from heat
sources such as {adiators, heat registers, stoves, or other
p_oducts (including amplifiers) that p_oduce heat
d)
IJJ
69
Z
0
EN

SURPUED AC_ESSQR|ES ....
•Owner's Manual • Remotecontrol unit
(1EMN21392) (BE601UE)
• Batteries
("AA" x 2)
•if you need to replace these accessories, please refer to the PART NO, above the illustrations and call our
help line mentioned on the front page.
• Depending on your antenna aystem, you may need different types of Combiners (Mixer) or Separator
(Splitter). Contact your local electronics store for these items.
• Place your TV in a Joom with adequate ventilation.
• Keep your TV set away horn sources of direct heat, such as heat registers or direct sunlight.
• Do not place your TV on soft surfaces, such as rugs or blankets.
• Leave enough room for air to circulate around the bottom, top and back of the set.
PCC WARNING: This equipment may generate or use radio frequency energy. Changes or modifications ]
to this,equipment may cause harmful interference unless the modifications are expressly approved in the
J
owners manual_ The user could lose tl_e authority to operate this equipment if an unauthorized change or
modification is rnade_
CAUTION_ TO PBEVENT ELECTBIC SHOCK, MATCH WIDE BLADE (_P PLDG T_ WIDE SLOT, PULLY
INSER_L
ATTENTION_ PODR EVlTER bEB CH©C ELECTRIQUES, INTR©DUIBE bA LAME bA PL_JS LARGE
DE bA PICHE DANS LA BORNE C_RREBPONDANTE DE LA PRISE ET P©USSEB JDSQU'AU POND_
A NOTE ABOUT BECYCLENG_ Batteries should never be throwr_ away or incinerated but disposed of in
accordance with your local regulations concerning chemical wastes_
Note to CATV system insta//er_
This reminder _ provided to ca//the CATV system insta//er_ attentton to Art/de 829-49 of the NEC that
provide_ guide/ine_ for proper grounding an_ th par ticu/a,_ s_pe¢ifie_that the cab/e ground shou/d be
connected to the grounding _y_tom of the building as ¢/o_e to the point of cable entry as pra¢ticaL
The serial number of this product may be found on the back of the TV. No o_hers bave the same serial num_
ber as yours_ You should record tbe number and other vi_al information here and retain _his book as a perma_
_en_ record of your purchase _oaid identification in case of _hef_
Model No_ Date of Purchase
Sedal No. Dealer Phone No.
Dealer Puchase from Dealer Address
EN

, DTV/TV/CATV
This TV lets you easily switch TV(NTSC) and DTV(ATSC) with the remote conh oLThis feature enables you
to simply view from conventional analog TV to Standard Definition TV. High Definition TV. You can also con- _..
nect this TV to CATV if you have a CATV box.
° Program Information Display (DTV) u.
You can display the title, contents and o_her information of the current DTV program on the screen, co
z
° Auto Preset Channel O
This TV can automatically scan and memorize the channels receivable in your residential area. This feature _,
eliminates the need of a difficult setting procedure.
° V-CHIP O
This feature lets you set the viewing limitations to prevent your children from watching inappropriate programs.
Q.
° Closed Caption Decoder _
This TV contains the built-in Closed Caption Decoder that displays text across the screen. It allows you to
read the dialogue of a TV program or other information in the Closed Caption-supported programs, r_
° MTS/SAP Tuner O
This feature allows you to select with the remote control your desired audio language.
° Auto Shut Off Function O
O
The power of the main unit is automatically turned off when there has been no signal or key input for more ,4[
than 15 minutes.
, Sleep Timer
This feature will automatically turn off the pov_er of the main unit at a present time.
, On-Screen Function Display (ENGLISH/SPANISH/FRENCH)
This feature lets you select the language displayed in the MENU screen from ENGLISH. SPANISH or
FRENCH.
, Stereo Sound Function
, Full-Function Remote Control
, PLL Frequency Synthesized Tuning
° S-VIDEO Input
, Front / Rear AV Input
, Component VIDEO Input
, Rear Digital Audio Output
EN

)NTENTS
IMPORTANT SAFEGUARDS ............................................................ 2
SUPPLIED ACCESSORIES ............................................................. 4
PRECAUTIONS ...................................................................... 4
FEATURES ......................................................................... 5
PREPARATION FOR USE ................................................... 7
CONNECTION ....................................................................... 7
ANTENNA/BASIC CABLE CONNECTION .............................................. 7
CONNECTION TO CABLE/SATELLITE BOX ............................................ 8
COMPONENT CONNECTION ...................................................... 8
EXTERNAL CONNECTION ........................................................ 9
USING FRONT A/V CONNECTION .................................................. 10
DIGITAL AUDIO CONNECTION ..................................................... 10
INSTALLING THE BATTERIES .......................................................... 11
BATTERY PRECAUTIONS ......................................................... 11
FUNCTIONS .............................................................. 12
REMOTE CONTROL AND FRONT PANEL FUNCTION ........................................ 12
WATCHING TV ............................................................ 13
INITIAL SETTINGS ................................................................... 13
SWITCHING ANALOG MODE/DIGITAL MODE .............................................. 15
CHANNEL SELECTION ............................................................... 15
VOLUME ADJUSTMENT .............................................................. 16
SWITCHING AUDIO .................................................................. 16
SCREEN INFORMATION .............................................................. 17
SWITCHING EXTERNAL INPUT ......................................................... 18
OPTIONAL SETTINGS ...................................................... 19
SLEEP TIMER ...................................................................... 19
MENU SCREEN ..................................................................... 19
PICTURE ADJUSTMENT .............................................................. 20
CLOSED CAPTION ................................................................... 21
V-CHIP ............................................................................ 24
CHANGING THE SCREEN DISPLAY MODE ................................................ 27
OTHER SETTINGS ......................................................... 28
AUTO PRESET CH ................................................................... 28
CHANNEL ADD/DELETE .............................................................. 30
LANGUAGE SELECTION .............................................................. 31
D. S. ]Z ............................................................................ 32
TIME ZONE ........................................................................ 33
MISCELLANEOUS ......................................................... 34
TROUBLESHOOTING GUIDE ........................................................... 34
GLOSSARY ........................................................................ 36
MAINTENANCE ..................................................................... 36
SPECIFiCATiONS .......................................................... 37
SYMBOLS USED IN THIS MANUAL
The following is the description for the symbols used in this manual.
: Settings only for the analog mode
_- : Settings only for the digital mode
: Common settings for the anabg mode and digital mode
EN

FOR USE
This section describes how to connect this TV to reception and other sources.
[ANTENNA / BASIC CABLE CONNECTION]
1} When connecth_q TV to antenna
Connect the RF cable or antenna cable on your home outlet to the ANT. IN jack of this TV.
2} When connecth_q TV to basic cable {without box}
Connect the RF cable or incoming cable on your home outlet to the ANT. IN iack of this TV.
I,U
09
O
Z
O
Q,.
Z
I,U
z
0
0
AT_te_na 8elemo_
,ifne_essa_)
"COMME_CI_t_L_LE
NOTES:
• For youl oaf_ty and to avoid damages to the unit unplug the _ntenn_ cabl÷ ftonl the ANT INjack before moving the unit
• If you use an antenna in order to receive analog TV, the same antenna generally will work for DTV reception.
Outdoor or attic antennas will be mor_ effective than set-top versions.
• Some c_b]e channels c_nnot be viewed when the TV is connected to _n _eri_] _ntenn_ because DTV progl_m doe_ not cowl a]]
cable channels You can watch them by °witching to the o_ble cennected to OAT V
• To e_oily switch b_t_en _ntenn_ _nd c_bl wife., you O_I) [4_lo))_e 'Antenn_ _lector"oomfoetci_lly _wil_bl_
_Once connections are completed, turn on the TV and begin initial setup.
Channel scanning is necessary for the TV to memorize all available channels in your a_ea if using antenna
or basic cable./Refer to "INITIAL SETTINGS" on page 13.)
EN

[CONNECTION TO CABLE/SATELLITE BOX]
1) Connect the antenna cable on yOLHhome outlet to the input jack of the CABLE/SATELLITE box.
2) Bse the corresponding cable to connect the ANT. IN jack of this TV and the output jack of the
CABLE/SATELLITE box.
*Required cables in 2) and connecting methods differ depending on the CABLE/SATELLITE box. For more
information, please contact the store where you purchased the CABLE/SATELLITE box or neaJby electdc
appliance stores.
;M 1 orSATELLITEBox
f _
¢ i ....
] _ r_ out _ ....
Rea! of _hi_ l V
CABLES NOT INCLUDED
[COMPONENT CONNECTION]
1) This is the best method to connect this TV to video devices with the component output jack, such as DVD
player, etc. It can minimize the deterioration of image quality.
Bse the component cable [commercially available) for connection.
CABLES NOT INCLUDED
NOTE:
T_is TV can only a_pt a 4801 pnt_daced) vld÷o _lgnaL
EN

[EXTERNAL CONNECTION]
When usinq the Audio/Video cables
1) This is the general method to connect this TV to video devices with the video or audio output iacks, such
as VCR etc.
When the audio iack of video devices is monaural, connect this TV to the AUDIO L iack.
•CABLES NOT INCLU[}ED
Rear of this TV
I,U
_D
O
LL
z
O
LLJ
&,
When usinq the S-Video cable
1) This is how to connect this TV to the video devices with the S-VIDEO OUT jack. You can expect better pic-
ture qual_ty than the normal video cable connection.
Use the S-video cable (commercially available) for connectfon.
•CABLES NOT INCLUDED
Rear of this TV
NOTE:
ffyou connect tothe S VIDEO:ack andthe VIDEO:ack at th÷sam÷ tim÷ S-wd_oconn÷ctl_n w#l )lave priority
EN

[USING FRONT A/V CONNECTION]
1) This [s how to use the A/V jack [nfront of this TV and connect to external devices.
This is useful when you use game playing devices etc.
When the audio jack of external devices is monaural, connect this TV to the AUDIO L jack.
TOVIDEO
OUTPUT
_,CABLES NOT INCLUDED
[DIGITAL AUDIO CONNECTION]
1) If you connect this TV to the digital-supported audio devices, you can enjoy mucl_ more of the digital
broadcasting progJams with the reeling of being at a Hve program.
Use the digital audio coaxial cable (commercially available) for connection.
E×
ir_uk ifAi AUlN_
MD t]eck DAT de(k etc
._ CABLES NOT INCLUDED
Dolby t_i_it al decoder
Rear of _is TV
[ I]13o#_ Manufactured under license from Dolby Laboratories. "Dolby" and the doub[e-D symbol are bade- I
1
oi e i _* _ marks of Dolby Laboratories.
1
EN

o@o®o@
Install two AA batteries (supplied) motch#_g the
polarity indicated inside battery compadmeot of
the remote conlrol.
[BATTERY PRECAUTIONS]
• Be sure to follow the correct polarity as indicated in the battery compartment.
Reversed batteries may cause damage to the device.
• Do not mix different types of batteries together (e.g. Alkaline and Carbon-Zinc) or old batteries with fresh
ones.
• If the device is not to be used for a long period of time, remove the batteries to prevent damage or iniury
from possible battery leakage.
• Do not try to recharge batteries not intended to be rechaJged; they can overheat and rupture.
Features of digital broadcasting
Digital broadcasting uses the newest broadcasting technology such as compression of audio and video
signals and provides much more improved image and sound quality than analog broadcasting. For image
quality, digital broadcasting have realized the High Definition Television (HDTV) that can display sharper
and finer images than Standard Definition TMevision (SDTV) with double scanning lines, and can adopt
the 16:9 wide screen tormat that fits more to range of human vision.
For audio quality, digital broadcasting offers the 5.1ch surround broadcasl to give you the feeling of bMng
at a stadium or a theater.
In addition, digital broadcasting enables to broadcast 2 or 3 proglams of Standard Definition Television
(SDTV}, which is the analog television format, at the same time by I channel This feature has made the
program planning more diversified. In addition, digital broadca_ing has overcome problems experienced
with analog television such as ghosting or interference wi_h digital _echnolog_
I,U
0
I,L
z
0
I,U
&,
Minor channel of digital broadcasting
In digital broadcasting, the selected channM can have the sub channel It is called the minor channel
Though the minor channel programs provide a little poorer image quality _han the High Definition
Television (HDTV} programs, thay have such an advantage as it will not move back other programs even
when a sport relay is extended.
EN

ii;!;!;!;!iii ii iiiii iii!!!ii
iFi.cTIo.
POWER button
To turn TV on/off
Cilannel number buttons (p15)
-IENT button (p15)
Toconfirm the command of
channel numberbuttons
OH A/V buttons (p13)
To select channels and move up/down
through menu items
MENU button (p19)
To display on-screen menu
INPUT SELECT button (p18)
To select TV or external input mode
(to access camcorders, games, etc.)
SLEEP button (p19)
To turn the power off automatically
at preset time
AUDIO button (p16)
, Analog mode (TV)
To select audio mode
Digital mode (DTV)
To select audio language
DTV/TV button (p15)
To switch between digital mode (DTV)
and analog mode
INFO button (p17)
• Analog mode (TV)
To display channel No.
• Digital mode (DTV)
To display channel information
CHANNEL RETURN button (p15)
To return to previously viewed channel
+100 button (p15)
• CATV
To enter the channel number for 100
or higher channels
• Digital mode (DTV)
To select the minor channel
MUTE button (p16)
-- VOL A/V buttons (p13)
To adjust volume, and to change settings
/to move to next screen for menu items
AUDIO L/R input jacks (plO)_
VIDEO input jack (plO)_
_MENU button (p19)
TO view on-sc[een menu
_VOLUME z_/V buttons (p13)
To adiust volume
......... _ .... T O
Infrared Sensor Window
To receive the infrared rays
transmitted from the remote
¢ontJol
EN

WATCHING TV
This section describes the initial settings when you
first turn on the power after purchase. The initial
setting items are shown below.
NOTE:
B_ SUI_ that alltel?l_a or Cab]_ Is Cotll_¢t_d pfopel]y b_fot_
plugging th÷ power cord
oLANGUAGE SELECTION
You can select the menu language displayed on
the screen among English, Spanish and French.
• D,S.T, (Daylight Saving Time)
You can set the air time display for digital broad-
casting. When you set this function to ON, the
date information adiusled for the area set by TIME
ZONE will be adjusted to the one added by anoth-
er 1 hour. In addition, the time difference will be
adjusted as follows: 2 a.m. on first Sunday in April
to 3 a.m., 1 hour ahead, and 2 a.m. on last
Sunday in October to 1 a.m., 1 hour behind.
•TIME ZONE
The EPG information in digital broadcasting is
adjusted based on the area set in TIME ZONE.
• AUTO PRESET CH (TV/DTV)
(When using antenna)
The channeb broadcasted in TV and DTV are
automatically scanned and memorized. Only the
receivable channels in the area where this TV is
used will be memorized.
oAUTO PRESET CH (CATV)
(When using basic cable)
The channels broadcasted in CATV are automati-
cally scanned and memorized.
CH t./v
oj (2p c_
(_:} @") (_)
O00Cb
-VOL A/V
1 Select your language.
When you first turn on the power, the following
screen is displayed.
SELECTL_NCU_eE
ENeUSH NB(TpBESSi
ESPaqOL DEPUE&PRESlO1E,
FRaq§AI8 ApRt&PRESSEZ_
• At initial language screen,
press [OH _,] for English.
press [CH v] for Spanish.
press [VOL L] for French.
The next menu will be displayed in the selected
language after you press the button.
2 Using [VOL A/XT], set "D.S.T. (Daylight Saving)"
to [ON].
I PLEASE_ONNEOT AN]_NIA TO
THEUNIT
2 SET Up 11qEI1EM8 Wlllq
&'TANDTBUTTOlS
• D _ T (Daylght _a_l__ [o1]
lIME ZONE _ ]
AUTOpR&£ETOHm/DI_j
AUTOpRS_ETOH_¢AT_
3 Using [OH t./_], select "TIME ZONE".
I PLEASE_ONNEOT AN]_NIA TO
THEUNIT
2 SET Up 11qEI1EM8 Wlllq
&'TANDTBUTTOlS
• ]]MEZONE _ ]
AUTOpRS_ETOHm/Dl_j
AUTOpRS_ETOH_¢AT_
• Every time you press [VOL z_FT], the area will
be switched as below.
[ALASKA]
, ]
[HAWAII] [ATLANTIC]
[PACIFIC] [EASTERN]
[MOUNTAIN] _ [CENTRAL]
• Set your area.
NOTE:
YOUmust set 'D ,_ _ ,and 'TtME ZO_ E,,_fere pre_et_lg
(5
z
3:
0
d)
Z
0
F--
o
L_
EN

4 Set the AUTO PRESET CH.
NOTES;
• ff 'DS T (DayJJght Saving], and 'TIME ZONE' s_not seL
you cannot sM_ct _4UTO PRESET CH !
• Mako sut_ if t)?o TV Jscot_t_octed to al_tot_l_a or ca_o
When antonna ssconnectod, soJect _UTO PRESET CH
(TV/D TV)" at tho pfocodut_ b_low Whon connoctod to
OATV_ s_l_ct ¼UTO pRESET CH (CATV)'
Here describes the case for searching and
memorizing channels for TV/DTV.
• Using [OH _./_], select "AUTO PRESET
I PLEBECOhlEOT_]ENIA _
TileUNI,
2 _ETUp]NEI]EM_wrN
t£TAND?IUTTO_8
D&T ID_llght_1 pN]
• AU_ pREqET_Hmq)]_
AU_ pRESETOHtCAT_
• When you press [VOL _], the cbannel scanning
in both analog and digital modes will automati-
caly stad.
_L_pRE_ETCH0_DTY
IIIIIIIIIIIIIIII
• When scanning is completed, the memorized
smallest channel will be displayed.
NOTES:
• Tho Init_a]AUTO PRESET CH fdnctlon can b_ e_ocuted for
eithol TV_DTV ol CATV onJy onco If you want to scan boO?
TV/DTV and CATV_you neod to solect '_HANNEL SET'In
tho MENU scmon to scan and momo_izo other channols aftor
Initial prosottlng is comoloto_ (Rotor to paso 28 )
• Youcan oxlt tho hlstsa]AUTO PRESET monu by pressing
[MENU]
• When you press [MENU] while scanning tho scanning is
_ntet_uptod a_d t)_ofoen_o_ized sfoaJJ_st charlene] _sd_s
played
• Ifyoupross [POWER], OIo powor w#l b_ tumod off _?ol?
OIo scannhlg is not compl_tod, Initial AUTO PRESET OH
s_ oo_?JsdJspJayod evoty tJfho you turt_ o_ th_ powe
• Whon no channo] can b_ f_coJvod byAUTO PRESET CH
_qO TV SIGNALS" G dJspJayod oil tho _c ootl
EN

You can easily switch the TV (NTSC) and DTV
(ATSC) with the remote control and enjoy viewing the
High Definition TV pJogJams as well as the Standard
Definition TV progJams with simple operation.
_DTV/TV
1 Press [DTV/TV] on the remote control.
• The analog mode and digital mode switch alter-
nately.
• When you press [DTVrrv] in external input.
the analog mode and digital mode will be
switched.
NOTE:
Th foflo_ang >creen is displayed while _witching the mode
You can select the channel by using either [CH _./v]
or Channel number buttons. How to select the
channel in each wa, isshown below.
Channel
number
buttons i
dENT _
CHA/T _
GO
CHANNEL
RETURN
+100
O00CJ
I Using [OH _./v]
• Using [CH A/V], change the channel.
• When you press [CHANNEL RETURN], the
previously selected channel will be selected.
• Same operation is available with [OH h./v] on
the front panel of the main unit.
2 Using Channel number buttons
°When you select a channel from I to 99. press
the channel number you want to view with
Channel number buttons. The selected chan-
nel will be displayed.
• When you select a channel larger than 100,
press [+100] first. Then use channel number
buttons to press the lower 2 digits.
• To seal_h the minor channel of the major chan-
nel currently viewed in DTV. press [+100]. If you
know the minor channel while viewing the major
channel with 1-digit channel number, p_ss the
major channel number and press [dENT]. Then.
press the minor channel number you want to
view. In case the major channel number is 2
digits, press the major channel number and
press the minor channel number directl_ If you
press [-/ENT] after pressing the 2-digit major
channel number, the smalle_ minor channel will
be selected.
°When you press [CHANNEL RETURN], the
previously selected channel will be selected.
NOTE:
In th_ DTV broadcasting on_ ch_l?l)el _ometlf?)_s bto_cQ_ts
multlpl_ pfogl_ms depending on the _# dine In this c_s_ the
m_ll) c)?_f?l?_l IC c_lled fb_Jor C))al)l)el al)d the sub c_l_l)l)el f_
called mh_or channel
z
0
EN

_QLUME ADdUSTM
This section describes how to adiust the volume
when viewing TV. The MUTE function, wMch is use-
ful when you have a vJslor or a phone call, wJl be
also described.
CP_
0000
,VOL A/V
MUTE
1 Using [VOL AFT]
• You can adjust the audio volume with [VOL z2_7].
• The volume bar is displayed at the bottom of
the screen when adjusting the volume.
• Same operation is availabJe with [VOL AFT] on
the front panM of the main unit.
VCLUMf
IIIIIIIIIIIIIIII
2 Ush_g [MUTE]
• Press [MUTE] on the remote contrM to mute
the sound.
The colored volume bar is displayed on the
screen while muting.
This section describes how to swtch the audio in
the analog mode and how to swtch the audio lan-
guage in the digital mode.
Switch the audio.
• Every time you press [AUDIO], the audio will
be switched as below,
IN]
e]
[L_ N°]
MAIN :Outputs main-audio
SAP : Outputs second audio channel
MONO : Outputs mono-audio
Switch the audio language,
• When you press [AUDIO], the currently selected
language and the number of received languages
will be displayed on the scleen.
Audio
v(iuMf
IIIIIIIIIIIIIIII
• To release the MUTE status, press [MUTE]
again or press [VOL AFT].
• Every time you press [AUDIO], the language
will be switched.
Languages you can switch differ depending
on the receiving broadcast.
NOTE:
E/en ffyou ptoss [AUDIO] In oxtema] inpuL th÷ audio w#]no_
_ _l[ch÷d
EN

You can display the currently selected channel
number or other information such as the audio
mode on the screen for checking.
C-9 _3" '_INFO
m
In the analog mode, the currently selected channel
number and the audio mode are displayed.
1 Display the channel number and the audio
mode.
• Press [INFO] on the remote contJoL
The currently selected channel number and the
audio mode are displayed at the top right of the
screen.
m
In the digital mode, the detailed information for the
currently selected channel such as the program
guide b dbplayed.
Display the detailed information for the channel.
• Every time you press [INFO], the display mode
will be switched as below.
I c,.V,,
L,.,.,_o_]
• The following information is displayed in the
INP01 mode.
(1) Channel number
(2) Channel title
(3) Program title (max. 2 lines displayed)
(4) Audio language ("OTHER" is displayed when
the audio language cannot be acquired, or
the acquired languages are other than ENG-
LISH, SPANISH or FRENCH.)
(5) Program air time
(2} (1)
(3) (S)
(5
:z
3:
0
• To clear the display, press [INFO] again.
• The following screens are displayed when con-
necting to external devices:
1) When using video cable for connection
• The program guide added to the displayed
information in the INF01 mode is displayed Jn
the INP02 mode.
2) When using component video cable for con-
nection
NOTES:
• When th_ ptogl_nl guide is displayed in more than 6/il?_
use [VOL z_/_7] and scro# for reading
• _lo description provided' i_ di_p/ay÷d when th÷ progranl
guide is not provid÷d
• Whil_ th÷ information is displayed in the INF02 nlod÷ th÷
CLOSED CAPTtON fur_ction i_ interrupte¢l
EN

When you connecl external devices including a
video cassette recorder and home audio system,
you can easily switch the input mode with the
remote COntrol.
INPUTSELECT _ _:;._
• When you press [INFO], the current external
input mode will be displayed at the top right of
the screen.
1) When usinl VIDEO-t INPUT jack
_DDI
2) When using VIDEO-2 INPUT jack
1 Switch the input mode.
, When you press [iNPUT SELECT] on the
remote control, the input mode will be switched
as below.
TV channel
VIDEO1 or S-VIDEO (Rear)
VIDEO2 (F_ont)
COMPONENT
* To use the VIDEO-1 INPUT jacks on the rear of
the TV. select "VIDE01 ".
(If you use the S-VIDEO jack, "S-VIDEO" is dis-
played.)
° To use the jacks on the front of the TV, select
"VIDE02".
• To use the COMPONENT VIDEO INPUT jacks
on the rear of the TV, select "COMPONENT".
3) When using COMPONENT VIDEO INPUT
jack
4) When usinc S-VIDEO INPUT jack
$ VIDEO
EN

SETTINGS
The SLEEP TIMER function will automatically turn
off the power of the unit at a preset time.
_SLEEP
1 Use SLEEP TIMER.
• Press [SLEEP] on the remote control
• The setting display for SLEEP TIMER is shown
in the screen.
2 Set the timer.
•Ever/time you press [SLEEP], the time
increases by 10 minutes.
• You can set the timer up to 90 minutes.
• After setting, you can check the remained time
per 1 minute by pressing [SLEEP].
NOTES:
• whet? you d]scot_t)oct the ui)]t fton_ tho AC out]÷t ot whon o
power _2]]ute OCCUto,t)l _]o p :inlet oett#lg W]]]bo col)
ce]od
• To concol tho sloop tim÷s; pe_ [SLEEP] op_otedly unt#
'SLEEp O' is di_p]oyed
• Th_ S]÷op TInl÷r co:ring diop]oy wl]] outon)otico]]y di_oppeo
otter 10 8o¢ol)d8
This section describes the overview of the menu
screen dispbyed when you press [MENU]. For
more details, see the reference page tot each item.
The menu screen consists of the function setting
items below.
• PIC_JRE
O_NNEL6ET
IB4GIS_p_IR_
_'OHIP_ETUp
O_TION[OFFI
DTWETUP
•PICTURE
You can adjust the picture quality (BRIGHT, CON-
TRAST, COLOR, TINT, SHARPNESS].
(Refer to "PICTURE ADJUSTMENT" on page 20.)
• CHANNEL SET
You can automatically scan the receivable chan-
nels and add or delete the channel as necessary.
(RefeJ to "AUTO PRESET CH" on page 28.)
• ENG/ESP/FRA
You can change the language (ENGLISH, SPAN-
ISH, FRENCH] displayed in the menu screen.
]Refer to "LANGUAGE SELECTION" on page 31.)
•V-CHIP SET UP
You can set the viewing limitations.
(Refer to "V-CHIP" on page 24.)
• CAPTION
You can change the display foJmat for CLOSED
CAPTION, which displays the dialogue of a TV
program or other information across the screen.
(Refer to "CLOSED CAPTION" on page 21 .)
• DTV SET UP _
You can set the screen display or CAPTION in the
DTV mode.
(Refer to "CHANGING THE SCREEN DISPLAY
MODE" on page 27.)
NOTES:
• _TV SET UP"con be disp]oyed only il) the DTV rood÷
• TO f?lOVe tO t_ flOff?lOI 5x:feell, _r_8 f_E_U]
09
0
Z
F-
F-
IM
J
z
0
F-
0
EN

You can adiust the brightness, contJast, color, tint
and sharpness of the picture.
CHAiT-
MENU 0_}00
,VOL AIV
1 Display the menu screen.
• Press [MENU].
The tollowin{ menu screen is displayed.
, FICTURE
CHANNELSET
[ENeI_8_Rm
_¢HIPSETUp
_P 30_pFFJ
DWSETU_
2 Select "PICTURE".
• Using [OH A/_], select "PICTURE" and press
[VOL L] to confirm.
, FICTURE
eH_NNEL'_T
[ENeI_8_Rm
_¢HIPSETUp
_P 30_pFFJ
DWSETU_
• The adjustment bar for picture quality item is
displayed in the screen.
[t BRIGHT [+]
DDDDDDDIDBBBDDD
3 Adjust the picture quality.
• Using [OH A/V], select the picture quality item
you wan_ to adju_.
[_RI_HT]
[CONTRAST]
I
[CO_OR]
[TI_T]
SHARPNESS]
BRIGHT
_.: To increase brightness
_: To decrease brightness
CONTRAST
A: To increase contrast
V:To decrease contrast
COLOR
_.: To brilliant
_: To pale
TINT
A: To green
T: To purple
SHARPNESS
A: To clear
T: To soft
• Using [VOL AFT], adjust the picture quality.
NOTES:
• 7}1_ display will dlsapp÷a automadca M aft_l 10 seconds
ul_le_8 y_u press a butto_
•Magl?etlsm ftonl i?eatby app#allces al?d sp_ak_ls might
affect t)l÷ co/ol of th_ TV plctul_ ff this happ_t_s press
[POWER] to tdlll Off th÷ TV alld tdlll It oil again a_t#r about
_0 n3_nute&
EN

You can view specially labeled (cc) TV progJams,
movies, news and prerecorded [apes, etc. with
either a dialogue caption or text display added to
the program.
You can also change the font size and font style of
the caption in the digital broadcasting.
CH h./v
MENU
VOL L/_7
1 Display the menu screen.
• Press [MENU].
The followin, menu screen is displayed.
PICTURE
CHftNNEL SET
[ENG]_SP _RA
V_HIp SETUp
CAP]]ON [OFF]
D]_/SET Up
2 Select "CAPTION".
• Using [CH h./_], select "CAPTION".
PICTURE 1
CHO4NNEL8F
[£N6]_SPTP_
¥_HIP 8_ UP
DI_8El Up
3 Switch the CAPTION mode.
• When you press [VOL LFT], CAPTION will be
switched as below.
[O_F]
[c2]
I
['_i]
[CAPTION MODE (C1_ C2)]
• CAPTKPN1 (C1)
Displays standard closed captions [what a char-
acter is saying).
• CAPTION2 (C2)
Displays foreign language closed captions (for-
eign language words showing what a character
is saying}.
• There are three display modes according to
programs:
Paint-on mode: Displays input characters on the
screen immediately.
Pop-on mode : Once characters are stored in
memon/, _hey are displayed all
a_ once.
Roll-up mode : Displays the characters continu-
ously by scrolling (max. 4 lines).
[TEXT MODE (T1,T2)]
• TEXTt (Tt) and TEXT2 (T2) display half-
screen text by scrolling (such as a channel
guide, schedule or announcement).
4 To exit the menu, press [MENU].
NOTES:
• If the closed caption is not btoadca_t÷d nothing I_ dlspl_y÷d
• W)l_n your 13/f_oeive_ _ _p_cl_l Oft_ct8 pl_yb_cII _lgn_l
p e , Search Slow and Stlll_ flora a VCR _ wd_o output
channel (CH8 or CH4), th÷ TV may not display #le collect
c_ption or text
• Oapt_ons and te_ts may not match the TV voice exactly
• It_tetf_n_ n_y c_u_e th_ o/o_d _pt_on _y_tem not to
function prop_l_
• Th÷ caption or tevt c)l_t_ct_ will not b_ displayed whil_ th_
m_nu display or functions d_splay Is shown
• If _ bl_d, box _pp_fB on th_ 8_f_n, thi_ n_n_ that th_
TV I_ set to TEXT mod_ T_ cl_a _¢reen _el_ct CAPTION
rcl t ro2'r Of roFFr
Display the menu screen.
• Press [MENU].
The followin{ menuscreen is displayed.
_.plCq_lRE
CHANNEL8ZT
V¢HIPS_TUp
CAPTFJN_FFI
DI_ _ETUp
z
F--
tD
,,,J
z
0
C-
&.
0
EN

2 Select "DTV SET UP".
* Using [OH A/_], select "DTV SET UP".
* Press [VOL A].
The foiiowin( screen is displayed.
. DWBSFt_y[LEITEBBOX]
DWC¢
D_,4D@igtt8_hg] [(_]
llME_NE [_L_SKN
3 Select "DTVCC".
* Using [OH _,/T], select "DTVCC".
NOTE:
CAPTtON SERVICE you can sw#ch differs d÷pendmg on th÷
broadcast d_6cfsptlon
5 Use "USER SETTING".
* The "USER SETTING" function lets you
change the caption size and [ont style.
* Using ION h./v], select "USER SETTING".
* Press [VOL A] and set "USER SETTING" to
"ON".
6 Set each item.
*When "USER SETTING" is set to "ON", you
can set the toilowing items.
* Press [VOL A].
The tollowin( screen is displayed.
. _PTDN _ER_4Cl DFF]
U8ER8EITi_ pFF]
CAPTION8iZE _iDDLE]
FO_ 81_LF L_1"LEI_
¢H_R_CTEREDeE[NO_EJ
FOREOP_i£' [&%iD]
FORE¢OLOq [_4_E]
B_CKOOLOR tBL_¢_J
4 Select "CAPTION SERVICE".
* When you press [VOL AFT], you can sw_tch
CAPTION as below. Select CAPTION SERVICE
you want to use.
[o_F]
[SERVICE116]
[SERVICE2/6]
[SERVICE316]
[SERVICE416]
[SIERVICES/6]
[SERV_CE_/6]
* Using [CH _J_], select the item you want to
set.
*You can switch the setting tot each item with
[VOL LFT].
* The setting description for each item is sl_own
below.
[CAPTION SIZE]
Text size of the displayed capiion can be
switched as below.
DLE]
E]
LL]
EN

[FONT STYLE]
Font style of the displayed caption can be
switched as below.
[S"=_TYLE1/8]
[STYLE2t8]
[STYLE318]
[STYLE4tE]
[STYLESIS]
[STYLE618]
[STYLE718]
[STY LE818]
[CHARACTER EDGE]
Text edging of the displayed caption can be
switched as below.
[NONE]
[RAISED]
[DEPRESSED]
[UNIFORM]
[SHADOW LEFT]
[SHADOW RIGHT]
[FORE OPACITY]
Text opacity of the displayed caption can be
switched as below.
ID]
I [TRANS_ UCENT]
L [FLASH]
[FORE COLOR]
Text color of the displayed caption can be
switched as below.
[TRANSPARENT]
[W_ITE]
[BL_CK]
[R_D]
[GR_EN]
[BLIUE]
[YELLOW]
[MAGENTA]
[CYAN]
[BACK OPACITY]
Background opacity of the displayed caption can
be switched as below.
CENT]
HI
[BACK COLOR]
Background color of _he displayed caption can
be switched as below.
I
[TRANSPARENT]
$
[W_JTE]
[BL_CK]
[a_D]
[GR_EN]
[BLUE]
[YELLOW]
[NAGENTA]
[CYAN]
Z
F-
F-
UJ
u)
.J
z
O
F-
_L
O
EN

You can settheviewinglimitationstopreventyour
childrenfromwatchinginappropriateprograms
includingdisagreeableexpressionand description.
The viewinglimitationsselfortheprogram can be
releasedby enteringtheaccess code.
Channel
number
buttons
OH h,/v
VOLL
I Displaythe menu screen.
, Press [MENU].
The tollowinc menu screen is displayed.
_-PICTURE
CHANNEL'_ET
[B_GI_SP_R_
V¢HIpSETUp
_PTDN DFFI
D_SETUP
3 Enter the access code.
* Use Channel number buttons and enter the
4-digg number.
° When you have not set up your access code,
enter O000.
° When the access code is correct, the following
"V-CHIP SET UP" screen is displayed.
See thefollowingdescriptionforsettingeach
item.
[] TV RATING
4 Displaythe "TV RATING"screen.
, Using [CH _./_], select "TV RATING".
Press[VOL z_].
2 Select "V-CHIP SET UP".
* Using [CH A/V], select "V-CHIP SET UP".
5 Set uTV RATING".
*Using [CH h,/v], select the rating.
*Press [VOL A].
The access code entry screen is displayed.
<Selection>
*TV-Y :
°TV-Y7 :
*T_G:
*T_PG:
°T_14:
°T_MA:
<Rating Category Explanations>
Appropriate for all childJen
Appropriate for children seven
and older
General Audience
Parental Guidance suggested
Unsuitable for children under 14
Mature audience only
EN

6 Set "BLOCK" or "VIEW".
• Press [VOL A] and set to "BLOCK" or "VIEW"
for the retin( without sub caret )nes.
W_7( ) [VlP,_I
T_Pe(DLS_ [BLOCK2
T_ 14 (DL_¥ [BLOCK]
T_4#( L£% [BLOCK]
5 Set "MPAA RATING".
• Using the [CH A/V], select the rating.
NP_cJ
N_vcJ
N_17 NP_iJ
rail
• For the rating with sub categories, they are dis-
played by pressing [VOL L] twice.
Press [OH ,ida] and select the rating. Then press
[VOL L] and set to "BLOCK" or "VIEW".
<Selection> <Rating Category Explanations>
• TV-Y7
FV : Fantasy Violence
• TV-PG / TV-14 / TV-MA :
D : Suggestive Dialog
(TV-PG, TV-14 only}
L : Coarse Language
S : Sexual Situation
V : Violence
7 To exit the menu, press [MENU].
[] MPAA RATING
4 Display the I'MPAA RATING" screen.
• Using [CH A/V], select "MPAA RATING".
• Press [VOL A].
TVRA_NG
_ Mp_A R_TING
CHANGE O)DE
<Selection>
oG:
opG:
• PG-13 :
oR:
• NC-17 :
oX:
<Rating Category Explanations>
General Audience
Parental Guidance suggested
Unsuitable tot children under
13
Restricted: under 17 requires
accompanying paJeet or adult
guaJdian
No one under 17 admitted
Mature audience only
6 Set "BLOCK" or "VIEW".
• Press [VOL A] and set to IIBLOCK'I or IIVIEWll,
NP_cJ
[&ocK]
NGI7 [_LOCK]
[&OCK]
7 To exit the menu, press [MENU].
NOTES:
fol TV RATING and MPAA RATING
• you c_l?t?ot acces_ the sotup m_t?u whet? the '_ROTECTE-D
PROGRAM by "nlessag_ _pp÷_rs You n_ed to mow to
_? u_?_ocked c)_n_?_l to _cc_88 the _etup n_t?u
• When you select _ fating and sot It to 'BLOCK" the higher
ratings wlfl b_ blocked automatically 771÷lower f_tlng_ will
be awilabl_ for vl#wln#
• When you _et the ]ow_st fating to 'VIE_! _]] oth÷r fatlng_
Will automatlca M b# awll_bl÷ for vl#wln#
69
0
J
z
0
0
EN

[] CHANGE CODE
4 Display the "CHANGE CODE" screen.
• Using [OH h./_], select "CHANGE CODE".
MpAARA]l_
_ OH_(_EO_3E
• Press [VOL A].
5 Change the access code.
• Use Channel number buttons on the remote
control and enter the NEW CODE (4-digit).
• Enter code again in CONFIRM CODE box.
NEW€ODE
CONFIRMCODE
6 To exit the menu, press [MENU].
NOTES:
• Make suse to enter the exact _ame_n÷w code h? the 'CON
FtRM CODE ' space as one in the 'NEW CODE" space ff
they a e different, the ?dEW CODE' space is clealed fol
e÷nter#lg
• yourpetsot_a] access code w]]] be eg_sod alTd etom to the
detault (0000) when a powel _,i)ure occul_ or when you tull
off the power using a w_]] switch Ifyou folgot the code,
t#_pJtlg the power cord for l f__e¢ot]d_ to reotore th acceo8
code to OCd3?
EN

2 types of display modes can be selected in the digi-
tal mode.
You can select your favorite display mode and enioy
the program.
MENU _OOO
-VOL A/V
1 Display the menu screen.
• Press [MENU].
The fMIowin, menu screen is displayed.
_-PICTURE 1
¢HO4NNEL8F
¥_HIP 8_ UP
¢_PllON [OFF]
DI_8El Vp
2 Select "DTV SET UP".
• Using [CH A/_], select "DTV SET UP".
3 Select the display mode.
• Every time you press [VOL zd_7],
"LETTERBOX" and "ZOOM" will be switched
airernatel_A
LETTERBOX ZOOM
[LETTERBOX]
Display the digRabsupported progJam in full-
screen.
Black borders will spread in the upper and
lower screen,
[ZOOM]
Enlarge and display the center area of the digRal-
supported progJam.
The right and left sMe of image will be cut off.
4 To exit the menu, press [MENU].
NOTE:
YOUnl_y no t _wltch the 'ill,play mod_ ,tl_p_t_,tllllg ot_ the pro
_f_f9
z
LU
,,,J
z
0
Q..
0
• When you press [VOL A], the menu screen will
be displayed as below.
EN

rHER SETTINGS
If you switch wires (e.g. between antenna and
CATV) or if you move the TV to a different area
after the intiM setting, you wil need to perform
AUTO PRESET CH again. This function lets you
easily select the receivable channels with [CH A/V]
and the TV memorizes tbem even if you switch
wir@s.
CH_/T
MENU
VOLA
4 ForTV channels
° Using [OH h./_], select
"AUTO PRESET CH(TV)".
, Press [VOL A].
Scanning and memorizing the channels auto-
maficaly starts.
NOTE:
• Mako s_re if tho TV IS cotmoctod to at_tetltla Or ¢ab]o.
When aorial antenna is connocted, s_/oct "AUTO PRE.
SET CH (TV)" or "(TV/DTV)" at _top 4. Whon conn_ctod
to CATV, _oloct "AUTO pRESET CH (CATV)"
6
When scanning TV or CATV only
1 Select analog mode by pressing [DTV[TV].
2 Display the menu screen.
° Press [MENU].
The folowin( menu screen is displayed.
_PICTUnE
CH_NNELSET
V¢HIpIETUp
_PTDN[OFFI
3 Select "CHANNEL SET".
* Using [CH _,/T], select "CHANNEL SET".
* When the scanning and memorizing are com-
pleted, the memorized smallest cbannM in the
analog broadcasting will be displayed.
4 For CATV channels
, Using [CH JtJV], select "AUTO PRESET
CH(CATV)".
* Press [VOL A].
Scanning and memorizing the channels auto-
matically stairs.
I _LE0 PRESETCHI_¢I
IIIIIIIIIIIIIIII
* When the scanning and memorizing are com-
pleted, the memorized smalest channel in the
CATV will be displayed.
* Press [VOL A].
EN

10 '
When scanning DTV only
1 Select digital mode by pressing [DTV/TV].
2 Display the menu scleen.
• Press [MENU].
The folowin, menu screen is displayed.
PICTURE
CH_NELSET
[ENt]_SP_RA
WHIP SETUp
CaP]ION[OFF]
D_VSETUp
3 Select "CHANNEL SET".
* Using [CH A/V], select "CHANNEL SET".
PICTURE
_ CHftNNELSET
[£NtI_SP_RA
¥_HIp SETUp
CAplloN [OFF]
Dl_ 8_T Up
° Press [VOL A].
4 Using [CH h./v], select "AUTO PRESET
CH(DTV)".
When scanning both TV and DTV at the same time
* yo Uca_ 8ooess _his men_ lrom both modes
(analog / digital).
Display the menu screen and select
"CHANNEL SET".
° Press [MENU] and select "CHANNEL SET"
using tON h./T].
PIC_nE
_ O_NNEL6ET
IENGIS_F_R_
v OHIp_ETUp
O_llON pFFI
DTWETUp
* Press [VOL A].
2 Using [CH A/_], select "AUTO PRESET
_DD13ELETE_Dl_)
_UTOPRESETtHai)W)
_ _UTOpRE_ETCHr_plY)
_UTOPRE%TCH!_lY
, Press [VOL A].
Scanning and memorizing the channMs auto-
malicaly starts.
63
(5
Z
C-
¢0
3:
0
* Press [VOL L].
Scanning and memorizing the channels auto-
maticaly 5tarts.
* When the scanning and memorizing are com-
pleted, the memorized smallest channel in the
digtal broadcasting will be displayed.
_L_PRESETCH_D_V
IIIIIIIIIIIIIIII
° When the scanning and memorizing are com-
pleted, the memorized smallest channel in the
analog broadcasting will be displayed. If no
analog channel is memorized, the memorized
smallest channel [n tbe dig[tM broadcasting will
be displayed.
NOTES:
• ffyou pf÷ss [POWER] or [MENU] whll_ s_ttlng AUTO PRE
SET OH AUTO PRESET CH s_ttlng will b_ c_ncel_d
• ff th÷l_ Is no TV _gllal Input, 'NO TV SIGNALS" will _ppe_r
Ot_ the display _fter t))_ cotbpl_ti_ll of _l)l?el _c_l)l)if)g
NOT_81_tC_LI
EN

The CHANNEL ADD/DELETE function lets you add
the channel that was not added by the AUTO PRE-
SET CH function due to the bad reception status at
the initial setting. You can also delete the unneces-
sary cbannels.
CH h./_
MENU
VOLA/V
4 Select "ADD/DELETE".
°Using [OH A/_], select "ADD/DELETE".
•Press [VOL A].
5 Select the channel you want to add or delete.
• Using [OH h./_] or Channel number buttons,
select the channel
m _
1 Select analog mode by pressing [DTVfTV].
2 Display the menu screen.
•Press [MENU].
The followin( menu screen is displayed.
• PICTURE
CHANNELSET
V¢HIpSETUp
_PT)3NpFFI
•Select "ADD" or "DELETE" with [VOL AFT].
• Color of channel numbers displayed at the right
top of the screen
Blue/Green: The selected channel will be added.
Pink/Red: The selected channel will be deleted.
6 To exit the menu, press [MENU].
3 Select "CHANNEL SET".
• Using [OH h./_ ], select "CHANNEL SET".
Select digital mode by pressing [DTV/TV].
2 Display the menu screen.
• Press [MENU].
The following menu screen is displayed.
,Press [VOL A].
The following CHANNEL SET screen is dis-
played.
3 Select "CHANNEL SET".
•Using [CH A/V], select "CHANNEL SET".
•Press [VOL A].
EN

4 Select "ADD/DELETE(DTV)".
• Using [CH A/t'], select "ADD/DELETE(DTV)".
_ AD_DELET_D]Y
AUTOPREr_TOH_D_
AUTOPREr_TCHtWply
AUTOPRESETOHtCAT_
• Press [VOL A].
5 Select the channel you want to add or delete.
• Using [CN A/t'] orChannel number buttons,
select the channel
• Select "ADD" or "DELETE" with [VOL zd_7].
• Color of channel numbers displayed at the right
top of the screen
NOTE:
Blue/Green: The selected channel will be added.
Pink/Red: The selected channel will be deleted.
6 To exit the menu, press [MENU].
NOTES:
• Them_nu w#ldisappear automatsca#yafter about 10 sec
ol?ds
• In th_ dsgsta/mod_(DTV),you can add ol del_t_ charm÷Is
only fat Major chann÷l
You can change the language used on the menu
screen. ENGLISH, SPANISH or FRENCH can be
selected.
Ho_t7to change the language in the menu screen
shown below.
CH h./T =
MENU OOOC
_VOL AIV
1 Display the menu screen.
• Press [MENU].
The followin_ menu screen is displayed.
_.PIC_RE
CHANNELSET
[E4GI_gP_R_
V¢HIpSETUp
_PT_JNpFFI
D]_ %T Up
2 Select "ENG/ESP/FRA".
• Using [CH h,/T], select "]ENG]/ESP/FRA".
pIC1JRE
CHANNEL'_ET
V¢HIPSETUp
_PTDN pFFI
D]_ _ETUp
• EveW time you press [VOL AFT], the language
will be switched as below. Select the language.
[E_lish)]
I [ESP(_o')]
3 To exit the menu, press [MENU].
63
(5
z
C-
I,U
¢0
I,M
I
0
EN

Ailerthe initialsettingyou setwhen you firstturned
on thepower,you can settheD.S._ [Daylight
SavingTime] again.When you setthisfunctionto
ON, theclockwillautomaticallymove foi_ardone
hourat2:00 a.m on the firstSunday inApriland
move back one hour at2:00a.m on thelast
Sunday inOctober.
CNA/_
MENU
®:7
VOLA/V
3 Select "DISIT. (Daylight Saving)".
• Using [CH A/_], select "DISIT.(Daylight Saving]".
4 Set "D.S.T. (Daylight Saving)".
• Using [VOL z_/_7], set to "ON" or "OFF".
1 Display the menu screen.
• Press [MENU].
The tollowinc menu screen is displayed.
. PICTURE
CHANNELSET
V¢HIpSETUp
_PT)ONpFFJ
DWSETUP
To exit the menu, press [MENU].
NOTE:
Wh_slyou set _ S I_to "OFF', th_ d_te alld tim÷ IIItomlatlot_
ad)u_t_dfor theaf_a set by 'TIME ZONE' i_ displayed
2 Select "DTV SET UP".
• Using [CH A/_], select "DTV SET UP".
• When you press [VOL z_], the following menu
screen is displayed.
_-DWClSFL_y[LE]TERBOX]
DWC¢
EN

If you move the TV to a different area after the ini-
tim setting you set when you first turned on the
power, you can set the area again.
MENU OOOC)
_VOL A/V
1 Display the menu screen.
• Press [MENU].
The fMlowin, menu screen is displayed.
_- pICTURE 1
¢HO4NNEL8F
¥_HIP 8_ UP
GAP]ION [OFF]
DI_8EIIJp
2 Select "DTV SET UP".
• Using [CH A/_], select "DTV SET UP ".
• When you press [VOL A], the followin 9 menu
screen is displayed,
_D_YBI@L_y[LE_TERBO×]
TIMEZgNE [_L_K_]
3 Select "TIME ZONE".
• Using [OH A/T], select "TIME ZONE".
DWBI8pL_y[LBTERBOX]
D]_¢¢
D&T4B@ight8_v_g] [ONJ
_ ]IMEONE [_b_SK_I
4 SMect your "TIME ZONE".
• When you use [VOL A/_7], the TIME ZONE will
be switched as below.
[ALAISKA]
[HA_AH]
[PA_FIC]
[HOUNTAIN]
f
[CENTRAL]
it
[EASTERN]
t
[ATk/_NT[C]
• Based on the world standaJd time information
acquired from digital broadcasting, the time dif-
ference will be adiusted as below.
ALASKA -9 hours
HAWAII -10 hours
PACIFIC -8 hours
MOUNTAIN -7 hours
CENTRAL -6 hours
EASTERN -5 hours
ATLANTIC -4 hours
t_
(5
z
I,,g
¢0
I,M
I
O
To exit the menu, press [MENU].
EN

ii!i!i !!!!ii!ii!ii!i ilili! i !i!i ii!ii!ii! il
M'SCELLA"EOOS
Before calling for service, check the following chart again.
No power • Be sure the Power cord is connected to outlet.
• g a power failure occurs, unplug the, power cord for 30
minutes to allow the unit to reset itself.
No picture or sound • Check if the power is on.
• Check the outlet connection.
• Check the antenna or cable connection to the main unit.
• When the outside antenna is used, check the wire condi-
tion and connection.
• Try to view other channels. It may be the problem on the
broadcasting station.
• Turn off the power and wait for about 1 minute, then turn
it on again.
No color • Check the antenna or cable connection to the main unit.
• When the outside antenna is used, check the wire condi-
tion and connection.
• Try to view other channels. I1may be the problem on the
broadcasting station.
• Adiust the color in the MENU screen.
Sound OK, Picture Poor • Check the antenna or cable connection 1othe main unit.
• When the outside antenna is used, check the wire condi-
tion and connection.
• Electric waves may be Jntedered due 1othe electric appli-
ances, etc. nearb)y..
• Adjust CONTRAST and BRIGHT in the MENU screen.
• Try to view other channels. I1may be the problem on the
broadcasting station.
Picture Distorted • When the outside antenna is used, check the wire condi-
tion and connection.
• Try to view other channels. It may be the problem on the
broadcasting station.
Weak Picture • Check the antenna or cable connection to the main unit.
• When the outside antenna is used, check the wire condi-
tion and connection.
• Ad ust CONTRAST and BRIGHT in the MENU screen.
Try to vew other channe s. t may be the prob em on the
broadcasting station.
Lines or Streaks in Picture • When the outside antenna is used, check the wire condi-
tion and connection.
• Electric waves may be interfered due to the electric appli-
ances, etc. nearby.
• Try to view other channels. It may be the problem on the
broadcasting station.
Picture blurred • When the outside antenna is used, check the wire condi-
tion and connection.
• Try to view other channels. It may be the problem on the
broadcasting station.
Ghosts in picture • Check the antenna or cable connection to the main unit.
• When the outside antenna is used, check the wire condi-
tion and connection.
• Electric waves may be interfered due to the electric appli-
ances, etc. nearby.
• Try to view other channels. It may be the problem on the
broadcasting station.
EN

_l_li, | _,1=4*ll _1,,II
Bars on screen • When the outside antenna is used, check the wire condi-
tion and connection.
• Electric waves may be interfered due to the e[ectdc appli-
ances, etc. nearby.
Picture roils vertically • When the outside antenna is used, check the wire condi-
tion and connection.
• Electric waves may be interfered due to the e[ectdc appli-
ances, etc. nearby.
• Try to view other channels, g may be the problem on the
broadcasting station.
Different color maJks on screen • Move the TV apart from electric appliances nearby. Turn
off the power and wait for about 30 minutes, then turn it
on again.
• Try to view other channels, g may be the problem on the
broadcasting station.
Poor reception on some channels • Check the antenna or cable connection to the main unit.
• When the outside antenna is used, check the wire condi-
tion and connection.
• Electric waves may be interfered due to the electric appli-
ances, etc. nearby.
• Try to view other channels. It may be the problem on the
broadcasting station.
Picture OK, sound poor • Electric waves may be interfered due to the electric appli-
ances, etc. nearby.
• Try to view other channels, g may be the problem on the
broadcasting station.
Remote control doesn't work • Check the antenna or cable connection to the main unit.
• Check the battery life of the remote control.
• Check if there is an obstacle between the sensor and the
remote control
• Test the signal outplut. If OK, thenpcossible remote sensor
trouble. (Refer to "lR SIGNAL CHECK" on page 36.)
Problems on Closed Caption
Misspelled captions are displayed. • Closed captioning production corn[3anies may broadcast
programs wBthout correcting the mlsspe]hng m a live
broadcast.
Caplions are not entirely displayed, or • Capltions that are delayed a few seconds behind the actual
captions are delayed behind the dim- dialogue are common for I_vebroadcasts. Most captioning
Iogue. production companies can dis_playa dialogue to a maximum
of 220 words per minute. If a dialogue exceeds that rate,
selective editing is used to insure that the captions remain
up-to-date with the currenl TV screen dialogue.
Captions aJe displayed as a wMte box. • When electric waves are interfered due to buildings,
No caption is displayed in the Closed weather conditions etc., incomplete captions may be dis-
Caption-supported program. • layed.
_Broadcasting station may shorten the program to insert
the advertisement. The closed caption decoder cannot
read the information of the shortened program.
No caption is displayed when playing • The videotape may be illegally copied, or the caption sig-
the videotape containing captions, na] may fail to be read while coping.
Black box is displayed in the screen. • [TEXT] mode is selected for caption. Select [C1 ], [C2] or
[OFF].
d_
0
W
z
,.,J
,.J
W
0
EN

ATSO
Acronym that stands for Advanced
Television Systems Committee
and the name ot the digital broad-
casting standard in the United
States.
High Definition TV (HDTV)
Ultimate digital format tbat pro-
duces high Jesolution and high
picture quality.
Letterbox
Letterbox refers to the format dis-
playing a wide-screen picture on a
standard 4:3 aspect ra_io televi-
sion screen with black ban above
and below. It is used to maintain
the aspect ratio of tbe original
SOUrCe such as a motion picture,
(16:9 or wider).
NTSC
Acronym that stands for National
Television Systems Committee
and the name of the current ana-
log broadcasting standard used in
the United States.
SAP
(Secondary Audio Program)
Second-audio channel delivered
sepaJately from main-audio chan-
nel. This audio channel is used as
an aRernate in bilingual broad-
casting.
Standard Definition TV (SDTV)
Standard digital format that is sim-
ilar to the NTSC picture quality.
S-Video output
It deliveJs independently each sig-
nal of color(C) and luminance (Y)
to TV as video signals, so that
higher-quality picture will be
gained.
M_
• Wipe the front panel and other exterior surfaces of
the TV with a soft cloth immersed in lukewarm
_teaterand wrung dry.
• Never use a solvent or alcohol. Do not spray insec-
ticide liquid near the TV. Such chemicals may
cause damage and discoloration to the exposed
sudaoes.
Wipe the picture tube ot the TV with a sol1 cloth.
Before cleaning tbe picture tube, disconnect the
power cord.
• Should your unit become inoperative, do not try to
correct the problem by yourself.There are no
userserviceable parts inside. Turn off, unplug _he
power cord and please call our help line mectioned
on the front page, to locate an Authorized Service
Cecte_
If the remote conlrol doesn't work properly, You can
test if the remote conlrol sends out the infrared sig-
nal with AM radio or a digital camera (including built-
in camera of cellular phone). It will help to define the
cause of malfunction.
• With an AM radio: _
Tune a AM radio to a band with
no broadcasting. Press a button
on remote conhol toward the
radio. Sound v411be fluttering
when you press any key and the
radio Jeceives tbe signal. This
means the remote conhol unit is
working.
• With a digital camera (including buiR-
in camera of cellular phone):
Direct a digital camera to remote con-
trol, press and hold a button on remote
control. If Jrdrared light appears
through digital camera, the remote is
working.
EN

Television system: NTSC-M
Closed Caption
System:
Channel coverage
VHF:
UHF:
DTV:
CATV:
Tuning System
Channel access:
TV Standard
S-Video input:
Video input:
Audio input:
§15.119/FCC
2 13
14-69
2 69
2 -13, A-W,
W+l _ W+84,
A-5 - A-l, 5A
Channel frequency
synthesized tuning system
Direct access keyboard,
programmable
scan and up/down
Sound output: 2W, 8 ohm x 2
o _ .' eh
Remote conlrol: Digital encoded
Operating
temperature:
Power [equirements:
Powe_ consumption
(Maximum):
Picture tube:
Dimensions:
Terminals Weight:
Antenna input: VHF/UHF/DTV/CATV
75 ohm unbalanced
(F-type)
Mini DIN 4-pin jack
RCA connector x 2
(1 x Front/ 1x Rear)
RCA connector x 4
(2 {L/R} x Front/2 (L/R) x Rea 0
Coaxial digital audio output:
One pin jack, 500mmVpp {75 ohm}
Component Video/Audio input
One pin jack {Y) / lVpp (75 ohm)
RCA connector x 2 (L/R)
Stereo Sound System
2 speakers
infrared light system
5C to 4OC
(41F to 104F)
AC12OV, 6OHz
140W
32"
H :26-3/16" (665mm)
W: 33-7/16" (849mm)
D : 21-1/4" (540ram)
112.4 Ibs. (51kg)
69
Z
O
u.
O
UJ
a.
, Designs and specifications are subjeci to change without notice and without our legal obligation.
, If there is a discrepancy belween languages, the default language will be English.
EN

SYLVANIA
LiMiTED WARRANTY
FUNAi CORE will repair this product, free of charge in the USA in the event of de_ect in materials or workmanship
as follows:
DURATION:
PARTS: FUNAI CORE wdl provide parts to replace defective parts without charge for one (1) yea_ from the
date o] original _etail purchase. Two (2) yea_s fo_ Picture Tube. Certain parts a_e excluded from this
warr&l/tv.
LABOR: FUNAi CORE will provide tile label witbout chalge fol a period of ninety (90) days from tile date of
original retail purchase.
LIMITS AND EXCLUSIONS:
THIS WARRANTY IS EXTENDED ONLY TO THE ORIGINAL RETAIL PURCHASER. A PURCHASE RECEIPT OR
OTHER PROOF OF ORIGINAL RETAIL PURCHASE WILL BE REQUIRED TOGETHER WITH THE PRODUCT TO
OBTAIN SERVICE UNDER THIS WARRANTY.
This walranty shah not be extended to any other person or transferee.
This warranty is void and o] no effect if any serial numbers on the product are aEtered, replaced, defaced, missing or
if service was attempted by an unauthorized service center.This limited warranty does not apply to any product not
purchased and used in the United States.
This warranty only covels failures due to defects in material or workmanship which occurs during normal use. It does
not cover damage which occurs in shipment, failures which are caused by repairs, alterations or product not supplied
by FUNAI CORR, or damage which results from accident, misuse, abuse, mishandling, misapplication, alteration,
faulty installation, improper maintenance, commercial use such as hotel, _ental o_ office use of this product or dam-
age which results from fire, flood, lightning or other a¢_s of God.
THIS WARRANTY DOES NOT COVER PACKING MATERIALS, ANY ACCESSORIES (EXCEPT REMOTE CON-
TROLt, ANY COSMETIC PARTS, COMPLETE ASSEMBLY PARTS, DEMO OR FLOOR MODELS.
FUNAI CORR AND ITS REPRESENTATIVES OR AGENTS SHALL IN NO EVENT BE LIABLE FOR ANY GENERAL,
INDIRECT OR CONSEQUENTIAL DAMAGES ARISING QUT OF OR OCCASIONED BY THE USE OF OR THE
INABILITY TO USE THIS PRODUCq_ THIS WARRANTY IS MADE IN LIEU OF ALL OTHER WARRANTIES,
EXPRESS OR IMPLIED, AND OF ALL OTHER LIABILITIES ON THE PART OF FUNAI, ALL OTHER WARRANTIES
INCLUDING THE WARRANTY OF MERCHANTABILITY AND FITNESS FOR A PARTICULAR PURPOSE, ARE
HEREBY DISCLAIMED BY FUNAI AND ITS REPRESENTATIVES IN THE UNITED STATES.
ALL WARRANTY INSPECTIONS AND REPAIRS MUST BE PERFORMED BY AN AUTHORIZED SERVICE CENTER.
THIS WARRANTY IS ONLY VALID WHEN THE UNIT IS CARRIED4N TO AN AUTHORIZED SERVICE CENTER.
THE PRODUCT MUST BE ACCOMPANIED BY A COPY OF THE ORIGINAL RETAIL PURCHASE RECEIPT. IF NO
PROOF OF PURCHASE IS ATTACHED, THE WARRANTY WILL NOT BE HONORED AND REPAIRS COSTS WILL
BE CHARGED.
IMPORTANT:
THESLIMITED WARRANTY GIVES YOU SPECIFIC LEGAL RIGHTS YOU MAY HAVE OTHER REGHTSTHAT VARY FROM
STATETO STATE IF, AT ANY TIME DURING THE WARRANTY PERIOD, YOU ARE UNABLE TO OBTAIN SATISFACTION
WITH THE REPAIR OF THIS PRODUCT, PLEASE CONTACT FUNAi CORR
ATTENTION:
FUNAI CORR RESERVES THE RIGHT TO MODIFY ANY DESIGN OF THIS PRODUCT
WITHOUT PRIOR NOTICE.
To locate your nearest AUTHORIZED SERVICE CENTER or for general service inquiries,
please contact us at :
FUNAI CORPORATION
Customer Service
Tel :1-800-605-8453
http://www.SyivaniaConsumerElectronics.com
19900 Van Ness Avenue, Torrance, CA 90501
1EMN21392 PrintedinMalaysia
L4905UF "_ _'_ _'_

MANUAL DEL USUARIO
6432GG
PARA RECIBIR SEi_IAL DIGITAL
DEBE CONECTAR LA ANTENA

ADVERTENCIA:
PARA REDUCIR EL RIESGO DE INCENDI© O CHO©UE ELECTRIC©, NO EXPONGA ESTE
EQUIPO A LA LLUVIA O HUMEDAD.
PRECAUCION
PRECAUCiON:PARAREDUCIRELRESGODE
CHEQUE ELECTRICO, NO RETIRE LA CUBIERTA (O PARTE
POSTERIOR) NO EXISTEN PARTES REPARABLES PeR EL
USUARiO EN EL INTERIOR. LAS REPARACIONES DEBEN
REALIZARSE PeR PERSONAL DE SERVICIO CALIFICADO
La note importante est& ¢ituada en la parte trasera del gabinete.
ESTE SiMBOLO INDICA QUE DENTRO DE
ESTA UNIDAD SE ENCUENTRA PRESENTE
VOLTAJE PEUGROSO QUE CONSTITUYE UN
RFESGO DE CHEQUE ELECTRFCO
ESTE SJlvlBOLO INDICA QUE EXISTEN
IMPORTANTES INSTRUCCIONES DE
OPERACION Y MANTENIMIENTO EN LA
UTERATURA QUE ACOMPANA ESTE
APARATO
re_i]Iade_3emovei_ ¢or_cuid_do Las pae_das re_3er_i_as,
[a lue rza £×cesJva y le_ s_er]JcJes ]r_egu_er_ pueden
causer que eEequipe y la ca_eti_la se vc4teen de lade
9 VENTILACION - Las tenures y abertu_as en e_gabinete y
el_ _a_arte posteHol o infe[io_ se ]3[oporc_or_an£ala fines
de ventiIaci6n, pare _segur_r la ope_ci6n confiab_ede _a
unidad y para protegefla centre e_£obrecalentamiento;
estas abe¢tu{as no debe{&n b_oquearseo cubrilse Las
ebertulas no debei_n b_oquearse nunca a_coveter la
unidad sobte una came, sofA,alfombra u otta supe_ficie
sinlilat Este un)dad no debel_ colocar_ nunca cetoa o
sobre un _adiador o registre de calefacciSn Esta unidad no
debei_ co_oca[se en t_nainsta_¢iSfl integfada, come un
liblelo o estantena, a mergesque se proporcione venti-
laci6n ap_opi_da o _ hayan seguido _asinst_ucciones de_
fabdcante
10 FUENTES DE ENERGIA - Esta tmidad deb# ope_a_set_n_-
camente con el ripe de fuente de energia que se indies er_
_a_tiqueta de marcaje Si no esta seguro de_ripe de fuente
de ene_g_aque usa en el hogan, consu_tecon e_distribuidor
de_equi_o o con le com_aRia local de energi_ el_ctdca
Papaunidades disei_adas papafuncionar con picas,u otras
fuentes, ¢onsu_te _asinst[ucc_ones de opelaci6n respecti-
vas
11CONEXION A TERRA O POLARIZAC_ON - Esta unidad
est_ equipade con un er_chufe #o_arizade de cor{ieRte
eltema (un eRchufe que tiene urgelamina it/A_ aRcha que
_aotra) Este ettchufe 8e co_ect_ al tomacordente de urta
sole forma Esta es una ca[_cterfstica de segudda# Si no
puede insettar completanlente el erto_lufe _)f_e__om_cof{i-
ente, intente dar vuelta al enchufe Si aQn asl el enchufe
no entla, comumquese con su electdcista pa{a que ieelm
p_aceel tomaco_riente obsolete No anu_eel p_op6sito de
seguridad del conector a tierra poladzad&
12 PROTECCION DEL CABLE DE ALIMENTACIQN - Los
cables de alimentaci6n el6ctdca deben colocarse de tal
fo_ma que no se p]sen o queden ap]astados per objetos
co]ocados conlla elves;pleste atenci6n especial a _c_s
cables conec4ados a tomacordentes y a_Iugaf de deride
salen del equipo
ES

FIGURAA
EJEM_O DE CON_N ATIERRA DEIJ_ ANTENA
SEGON EL _DIGO NA¢IOf_AL DE ELECTRICIDA_
$2898A
13 CONKXION A TERRA DE LA ANTENA AL AIRE UBRE -
Si Ull_ arll_I1 a ext_ll_a o ul9 s]stelrl_ de cabl_ est_ ool_¢-
tado al equipo, asegO_ese de que la aniena o el sistema
de cabJe e_t_ conectado a tie_ra, para propo_cionar aJgo
de protecci6n contra sobretensiones de voJtaie y la acu-
mulaci6n de ca_gas est_ticas KEa_ticulo 810 del c6digo
nacional el_ctdco, ANSVNFPA No 70 propo[ciona info[-
lTtacioll COil lespecto _ ]a ooll_x]on a tieila de] poste y _a
eslluclt_l_ de £opor to, ]_ coI/ex]ol_ a tieIla de[ a[ambre
principal de ur_a unidad de descarga de antena, el tama_o
de ]QSCOllductore_ de _aCollexiorl a tierl_ y _aCQf_exiof_
del electro_o de conexiGn a flerla (Fig A)
14 RELAMPAGOS - Para protecci6n adicional de esla ur_idad
dU ra_lle GilatorRlel3t_ OORIe]_l rlp_gos, o oual_do _1o8e
use durante lalgos periodos, descor/ectela del tomacorli-
ent_ Y descof_ecle ]Ra_llel3 a 0 e] si£tema de ¢_ble ES_O
evitar_ dai_os al unidad debido a sobrete_lsi6n en la_
hneas de aIlo volt_je o rei_lrlpagos
5 LINEAS DE ALTO VOLTAJE - El sistema de antene exteri-
or i_o debei_ eslar ubicado cerca de lineas de alto voltaje
t_OtrOS ¢[r¢_JitO_ de _UZelecll]ca o de el_el_}la, o dollde
pueda ¢aer sobre dichos circuilos o lineas de a_to vo]tafe
A_ i_lsla[al ul/Sis_el Ila de al_te_18 _xt_rn_, 8e _]e_3e teller
CUidado e×_leli/o pRr_ _1o_ocal _osCilCu_Q$ o ]_rleas de
alto vo_taie ya que el contacto con ellos podda set fetal
6 SOBREOARGA - NO sob[eca_gue los lomacorrienies y los
cables de e×ten£i6n ya que esto podna resultar en riesgo
de incendio o choque el_ctrico
17 INTRODUCCION DE OBJKTOS Y LIOUIDOS - Nunca
i_serte obfelos de ningdn tipo en es_a unidad a t_av_s de
las aberiuras, ya que poddan locar puntos de voitale peli-
grosos o h_oel corto circlJit o coil olios cof_/pollerlles q/ie
godrian [esu_ta_ en incendio o choque _lectrico Nunca
derlame liquidos de r/inguna clase sobre la ul_idad
18 REPARACiON ES - No trate de _eparar esta ur_idad usted
lili£1£o, ya que a_iii o l_lir_i ]_s _ubier_s puede exponel-
Io a voltaJes peligrosos u olios riesgos Remita todas _as
leparaciones al personal de set vicio calificado
DEENER_I_rNEC_RTICUtO 2_0P_RTEH_
19 DANOS QUE REQUiEREN REPARACION - Desconecte
esta ur_idad dei tomacorrienle y _efiera la _epa_aci6n a
personal calificado bajo las siguientes condiciones:
a Cuando el ¢abJe de alimentaci6n o enchufe esl_ da_a-
do o ra_o
b Si se ha derramado liquido o ban caido obfelos denlro
de la unidad
c Si _a unidad se ha expueslo a _luvia o agua
d Si Faunidad no opera norma_mente al seguir Fasinstru-
ciones de opelacion Ajust_ s_]o los oor_tro_es que _e
c_lble_ e_ [as ]nstrucc]oRes _]e ope i_¢]of/, y_ q/le el
_l/isle ]Rcolr_to de olios ¢ORIIOI_S podr _a lesu_ta_ e_/
da_os y con ffecuencia requer_r_ trabaio inlensivo con
url t_¢nioo ca[il]cado p_ra le_aurar ]_ ope raci6R i/olin al
de la unidad
e Si _a unidad se ha ca_o o da_ado de cualquier fo_ma
f C_Rdo ]_ Lf_ida_] tallest ra t_r_cambio ev]de_le e_/e_
ltf_cior_aR/ie_lo, e_o i_dic_ que _ecesita lep_ ra¢i6_
20 RKPUESTOS - Cuando se requ_eren _epuestos,
aseqt)le_ de qt_e e_ IecR]CO de rep_r8o]0_/Use repuestos
especificados pot eEfabricante o que tengan las mismas
caracterf_icas que la parle original Las substituciones no
autor]zad¢¢s pu_def/lesuIta_ e_/if/oe Rdio, C_/oq_e elect r_co,
]es]o_/es a pe£son_ U _ro_ pe]igr o$
21 VERIFICAC_ON DE SKGURIDAD - Despues de com_eta_
le _e_araci6n de _sta unidad, pida a116cni¢o de se_vicio
qu8 tea[ice velil]¢ac]o_e$ de se_urid_d _r_ deterl_il/al
que ]_ urlidarJ _ e_c_e_l_ _r_ COf_dio]o_es de op_raoi_r_
apropiada
22 CALOR - E_a t_nklad deberA situarse _ejos de fuentes de
c_lor ¢o1_o lad]_dore_, _e_]stro_ de ca]e f_cci6_, e_u_ u
otros aparalos (incluso ampliflcadores) que p_oduzcan
K
63
<[
L_
t--
Z
O
O.
_m
ES

• Manual del usuarle • Unidad de control remoto • Pilas
(1EMN21392) (NE601 UE) ("AA" x 2)
• Si necesita cambiar estos accesorios, consu]te el NO. de PIEZA encima de la figura y ]lame a nuestra linea
de asistencia menclenado en la pagina delantera.
• Dependiendo del sistema de su antena, es posible que necesite diferentes tipos de combinadores (mezclado-
ra) o separadores (divisor). Comuniquese con ]a tienda local de elect r6nica para adquirir estos arhcu]os.
, Coloque elTV en una habitaci6n sLr[icientemente ventilada.
° Mantengalo alejado de fuentes de calor, como aparatos de calefacci6n, o de la acci6n direcla del sol.
° No coloque el TV sobre superficies blandas, como a_fornbfillas o mantas.
° Deje suficiente espacio para que circule el aire akededor del equipo.
ADVERTENCIA DE LA FOC: Este equ[po puede generar o util[zar energia de radiofrecuenc[a. Los
cambles o modificaciones del equipo pueden causar serias inteflerencias si dichos cambios o
modificaciones no ban sido expresamente aprobados en el manual del usuario. El usuario podra perder la
autofidad para operar este equipo si efe,ct_a una modiflcacion o camble no autofizado.
PRECAUCION: PARA EVITAR CHOQUES ELECTRICOS, CONECTE LA LAMINA ANCHA DEL
ENCHUFE EN LA RANURA ANCHA DE LA TOMA DE CORRIENTE; INSERTE P©R COMPLET©.
NOTA £OBRE RECIOLADO: Las pilas no deben tirarse o incine_rse, sino descarta_e de acuerdo con
laS normativas locales concernient_$ a desecho$ quimico_.
Nora para el lestalacler del sistema CATV:
Este recordatorio _e proporclena para que el instaledor de/elslema CATV pre_te atenclen a/ Artleulo
920-40 de/NEC el cuel proporclena pauta_ para una correcta conexlen a tlerra _ en particuler, espeelfi-
ca que le conexlen a tlerra de/cable debe e_tar conectada el sletema de tlerra de/ediflele, tan cerca el
punle de entrada de/cable como sea pr_ctico.
Podra encontrar el nt]mero de serie correspondiente en la parle trasera de la unidad. Ninguna otra unidad
fiene el mismo ntJmero de serie que la suya. Debera registrar aqL_iel n_mero y otra intorrnaci6n importante, y
conservar este libro como regis_ro permanente de su compra para ayudarle a idenfificar la unidad en caso de
robo. LOS nt)mero$ d_ serle no 9@ coN_ervan erl el archivo.
Modelo nt3m. J Fecha de compra
Nt3m. de serie / Telefono de la tienda
Tienda donde se compr6 Direcci0n de la tienda
ES

• DTV/TV/CATV
Este TV le permite cambiar facilmente entre TV(NTSC) y DTV(ATSC) con el mando a distancia. Con esta
funci6n se puede vet la televisi6n anal6gica convencional como televisi6n de definici6n estandaJ o de alta
ddinici6n. Tambien se puede conectm a la CATV, si dispone de caja de CATV.
• Pantalla de informaci6n de programas (DTV)
Se puede mostJar en la pantalla el fltulo, los contenidos y otra informaci6n acerca del programa DTV que se
esta viendo.
• Canal de preajuste autom_tico
Este TV puede buscar y memogzar automaticamente los canales que se reciban. Con esta funci6n se elim-
ina la necesidad de Ilevar a cabo complicados procedimientos de ajuste.
• V-CHIP
Es_a funcJ6n le per mite establecer una serie de lirni_aoiones de cara a evitar que los nitros puedan vet de_er-
minados progJamas.
• Descodificador de subtgulos
Este TV dispone de descodificador de subtitulos incorporado que muestra el texto en la pantalla. Le permite
leer los dialogos de un programa de TV o cualquier otra intormacion en los progJamas que disponen de esta
funcidn de subtitulos.
• Sintonizador MTS/$AP
Mediante esta funci6n puede seleccionaJ el idioma deseado con el mando a distancia.
• Funcidn de apagado au_om,_tico
El equipo se apaga autoraaticamente cuando no hay sepal de la antena o se toca ning_n boron du_nte
mas de 15 rainutos.
• Temporizador de apagado au_om_tico
Le permite apagar la unidad automaticamente a una hora determinada.
• Idioma de pantalla (ING£ES/ESPA[_O£/FRANCES)
Esta funci6n le perrnite seleccionar el idioma que se visualiza en la pantalla de menQ entJe INGLES,
ESPANOL o FRANCES.
• Funci6n de sonido est6reo
• Mando a distanoia con todas las funoiones
• Sintonizacidn sintetizada de frecuencia PLL
• Entrada S-VIDEO
• Entrada audiovisual frontal/trasera
• Toma de entrada VIDEO componente
• Salida de audio digital trasera
63
,€
0
B
UJ
O
,<
,<
O
¢0
ELl
z
0
<[
0
UJ
0.
0
r_
0
¢0
ELl
0
0
<(
ES

IMPORTANTE PARA SU SEGURIDAD ..................................................... 2
ACCESORIOS SUMINISTRADOS ........................................................ 4
PRECAUCIONES ..................................................................... 4
CARACTERJSTICAS .................................................................. 5
PREPARAClON PARA EL USO ................................................ 7
CONEXION ......................................................................... 7
CONEXION DE ANTENA/CABLE B,_SICO ............................................. 7
CONEXION CON CAJA DE CONVERTIDOR/CAJA DE SATELITE ........................... 8
CONEXION DE COMPONENTE ..................................................... 8
CONEXlON EXTERNA ............................................................ 9
USO DE CONEXION A/V FRONTAL ................................................. 10
CONEXlON DE AUDIO DIGITAL .................................................... 10
INSTALACION DE LAS PEAS .......................................................... 11
PRECAUCIONES RELACIONADAS CON LAS PILAS .................................... 11
FUNClONES .............................................................. 12
FUNCIONES DEL MANDO A DISTANCIA Y EL PANEL FRONTAL ............................... 12
PARA MIRAR TV ........................................................... 13
PREAJUSTE INICIAL ................................................................. 13
CAMBIO DEL MODO ANALOGICO/DIGITAL ................................................ 15
SELECCION DE CANAL ............................................................... 15
AJURTE DEL VOLUMEN .............................................................. 16
CAMBIO DEL MODO DE AUDIO ........................................................ 16
INFORMACION DE PANTALLA .......................................................... 17
SELECCION DE LA ENTRADA EXTERNA ................................................. 18
AJUSTES OPCJONALES .................................................... 19
TEMPORIZADOR DE APAGADG AUTOM,_,TICO ............................................. 19
PANTALLA DE MEN0 ................................................................. 19
AJUSTE DE LA IMAGEN .............................................................. 20
SURTITULOS ....................................................................... 21
VCHIP ............................................................................ 24
CAMBIO DEL MODO DE VISUALIZACION DE PANTALLA ..................................... 27
OTROS AJUSTES ......................................................... 28
PREA. AUTO CA..................................................................... 28
AGREGAR/BORRAR CANALES ......................................................... 30
SELECCION DE IDIOMA .............................................................. 31
HORA DE VERANO .................................................................. 32
HUSO HGRARIG .................................................................... 33
VARIOS ................................................................. 34
GUIA DE LOCALIZACION DE PROBLEMAS ................................................ 34
GLOSARIO ......................................................................... 36
MANTENIMIENTO ................................................................... 36
ESPEClFICACIONE$ ....................................................... 37
SJMBOLOS EMPLEADOS EN ESTE MANUAL
A continuaci6n se describen los sfmbMos utilizados en este manual:
:_ : Ajustes solo para el rnodo anal6gico
: Ajustes sMo para el rnodo digital
: Ajustes comunes para el modo analdgico y digital
ES

PARA EL USO
En esta secci6n se describe c6mo hay que conectar este TV a fuentes receptoras y otJas.
[CONEXION DE ANTENA/CABLE B/_,SICO]
1/Cuando se conecta el TV a la antena
Conecte el cable RF o cable de la antena de televisi6n de su casa a la toma ANT.IN del TV.
2/ Cuando se conecta el TV al cable basico/sin caia/
Conecie el cable RF o cable de la antena de television de su casa a la toma ANT.IN ctelTV.
O
,.J
W
z
'O
U
W
0
,z_
NOTA:
• para su seguridad y con oh)ere de ev#af pOSlble8 dal_8 en la unidad deselz'hut# el cable de antel_ de la toma ANT IN antes de mov#rla
• Si utiliza una antena para mcibir TV analdgica, la misma ant_na parmitild racibir la DTV
Lax antanas axteriora_ o an el techo _er_n m_ afactiva_ qua la var_iona_ ancima del aparato da TV
• A]@UI?O8 c&l?alos do cable I?o puedel) V_fS cual?do la TV oot_ conectada a una antena porque el pfo@l_n_ DTV no ttal)elf)ite rode8
los c_nal÷s de cable Puede wrlo_ cambiande al came conectado al CATV (TV cabl_}
• pafa cambiar fadlm÷tlte entre los cabl_e de _l)tel]a y de oabl_ puede compfar un rselecter de Antena" de venta ell los co_?_eydo8
*Una vez hechas las conexiones, encienda el TV y empiece con los ajusies iniciales.
La exploraci6n de canales es necesaria para que el TV memorice redes los canales disponibles en su regi6n
si utiliza la antena o cable basico. (Consulte el "PREAJUSTES INICIAL" en la pagina 13.)
ES

[CONEX]ON CON CAJA DE CONVERTIDOR/CAJA DE SATELLITE]
1) Conecte el cable de la antena de la toma de su casa al conector de entrada de la caja de
CABLE/SATELITE.
2) Util[ce el cable correspondiente para conectar la toma ANT. IN del TV y la clav[ia de saHda a la caia de
CABLE/SATELITE.
*Los cables requer[dos en 2) y los metodos de conexi6n difieren segun la caia CABLE/SATELLITE. Para
mas [nformaci6n, p6ngase en contacto con el establecimiento donde adqu[fi6 la caia de CABLE/SATELITE
u otro establecimiento similar.
_t/O SEIt/¢i bvEN IOS OABIE$
_arte tr_sera del _V
[CONEXION DE OOMPONENTE]
1) Este es el mejor mOodo para conectar el TV a los equipos de video con la claviia de salida del compo-
nente, como el reproductor de DVD, etc. Asi se minimiza el detefioro de la calidad de [magen.
Para la conexi6n utilice el cable del componente (comercialmente disponible).
A_DIOIHPUT
_OSEINCLUYENLOSCABLES
NOTA:
E>te TV >ore pu_d÷ aceptar >_¢)a] de vfd÷o (entrelazada) de 480i
ES

[CONEXION EXTERNA]
Cuando se usan los cables de Audio/Video
1) Este es el metodo general para conectar el TV a aparatos de video, como por ejemplo una videograbadora,
mediante las tomas de salida de audio o video.
Cuando el conector audio de los equipos de video sea monoaural, conecte el TV a la claviia AUDIO L.
VIDEO.1 IN_UT__
AUDIO INPUf
Parle trasera del TV
Cuando se use el cable S-Video
1) C6mo conectar el TV a los aparatos de video co[) la toma de salida S-VIDEO. Obtendra una calidad de
imagen mejor que con la conexi6n normal de cable de video.
PaJa realizar la conexion, ufilice el cable S-video (comercialmente disponible).
O
d_
,.J
W
z
'O
W
a.
E×,
DVD/VCR
• NO $E SUMINISTRAN LOS CABLES
Parte trasera delTV
NOTA:
Si _e cot_÷ct_ _1 nllsmo tl_nlpo al correcter S VIDEO y _1conector VIDEO set_ I_ conexlon d_l S video In que t_t_g_ _rlorld_,;I
ES

[USO DE DONEXION A/V FRONTAL]
1) Esta es la forma de usar el conector A/V situado en la parte frontal del TV paJa realizar conexiones con
los equipos extemos.
Este es ufil cuando usted usa dispositivos de juego etc.
Cuando el conector audio de los equipos extemos sea monoaural, conecte el TV a la claviia AUDIO L.
Parle frontal del FV
[DONEXION DE AUDIO DIGITAL]
1) Si conecta el TV a aparatos de audio digitales, podra disffutar mucho rnas de los programas de emision
digital, pues tendra la sensaci6n de estar viendo el prograrna en directo.
Para realizaJ la conexi6n, utilice el cable coaxial audio digital (comercialmente disponible).
Ex_
MD _eck_ bAT deck_ e_
P_te t_s_a del TV
D_scDdificador Dolby Di_ilal
[OEt_ Fabdcado baio licencia de Dolby Laboratories. "Dolby" y el simbolo de la doble D son marcas I
1
Di _ i • __ comerciales de Dolby Laboratories.
l
ES

o@o®o@
Coloque las dos pilas AA suminislJadas haciendo
coincidir la polaridad indicada den_ro del compar-
timen_o del mando a di_ancia.
[PRECAUCIONES RELACIONADAS CON LAS PILAS]
• Aseggrese de respetar la polaridad correcta como se indica en el comparlimiento de las pilas. Si invierte las
pilas puede causar dai'_oal dispositivo.
• No combine tipos diferentes de pilas. (pot ej., Alcalinas y Carb6n-Zinc) o pilas usadas con pilas nuevas.
• Si el dispositivo no se usara pot un periodo largo, se deben retirar las pilas para evitar dai'_os o lesiones
causadas pot el posib[e derrarne del &cido en su interior.
• No [ntente recargar pilas que no estan disei'_adas para ese fin, ya que pueden sobrecalentaJse y agrietarse.
Caracteristicas de la radiodifusi6n digital
La radiodifusi6n digital emplea la m_s avanzada tecnologJa de transrnisi6n para la compresi6n de las
seiiales de audio y v_eo, proporcionando una calidad de imagen y sonido muy supedores a la de la
transmisi6n analegica. En cuanto a la calidad de imagen, la i_diodif usi6n digital ha desarrollado la tele-
visi6n de alta definici6n o HDTV (High Definition Television) que ofrece unas [m_genes mucho mas finas
y detalladas que la televisi6n e_ndar o SDTV (Standard Definition Television), con el done de lineas de
exploraci6n, pudiendo adoptar el formato de pantalla 16:9 que raejor se aju_a al alcance de la visi6n
humana.
En Io que respecta a la calidad audio, la radiodifusi6n digital ofrece Lm sonido envolvente con 5,1 canales
que da ]a serlsacien a] egpectador de encontrarge en un estad[o O Un teat]o.
Adem_s, la radiodifusien digital perraite transmitir 2 6 3 prograraas de te[evisi6n de definici6n estandar
(SDTV), qL_ees el formato de la televisi6n anal6gica, al mismo tierapo por 1 canal. Esta caracteristica ha
)ermitido realizar una p[aniflcaci6n de programas mas dive_ificada. Ademas, la radiodifusi6n digital ha
Iogrado superar prob[emas que sufre la te[evisi6n anal6gica, como las imageries fantasraa o las interfer-
encias con la tecnologia digital.
O
,,,J
W
.¢
z
'O
.¢
I,IJ
&,
Canal menor de la radiodifusi6n digital
En la radiodifusi6n digital, el canal seleccionado puede teneJ un subcanal. Se le conoce como el canal
ITlenoE Aunque los progr_mas de este canal menor ofr®ceN una ca]idad de imagelq un pOCO peor gue Io9
prograrnas de la televisi6n de alta definici6n (HDTV), tienen la ventaja de que no retgar&n otros progra-
rnas, [ncluso cuando se ala_tle una retransmisi6n deportiva.
ES

iil;!;!;!;!iii!;ii ii iiiii iii!!!ii
iF .clo.E
FUNC|ONES BELMAN LPANEL FRO
Bot6n POWER
Para encendery apagar el TV
Botones de Numero de canal (p&g.15)
Boron -/ENT (p&g.15)
Para confirmar la orden de
losbotones de NQmerode canal
Botones CH _./v (p&g.13)
Para seleccionar los canales y
desplazarse hacia aJriba y abajo a
traves de los elementos de los menus
Boron MENU (pag.19)
Para rnostrar el menQ en pantalla
Boron INPUT SELECT (pag.18)
Para seleccionar el modo de TV o
de entrada extema (acceso a
videoc&maJas, videoconsolas, etc.)
Boron SLEEP (p&g.19)
Para apagar autom_ticamente el
aparato a la hora prefijada
Boron AUDIO (p&g.16)
. Modo analogico (TV)
PaJa seleccionar el modo audio
• Modo digital (DTV)
Para seleccionar el idioma de audio
Bot6n DTV/TV (p&g.15)
Para cambiar entre el modo digital
(DTV) y el modo anal6gico
Bot6n INFO (pag.17)
• Modo anal6gico (TV)
PaJa mo_trar el n0mero de canal
• Modo digital (DTV)
PaJa mostrar la informacion de[ canal
Rot6n CHANNEL RETURN (pAg.15)
Bot6n +100 (pag.15)
• CATV
Para introducir el n0mero de canal
100 u otros m&s altos
• Modo digital (DTV)
Rata seleccionar el canal menor
Bot6n MUTE (p_g.16)
-- Boron VOL A/V (pag.13)
Para aiustar el volumen y cambiar los
ajustedpara pasar a la siguiente pan-
talla y tenet acceso a los elementos de
los menus
Conectores de entrada
AUDIO L/R (pag.lO)
Conector de entrada VIDEO
(pkg. 1o)
_Bot6n MENU (p&g.19)
Para ver el men0 en pantalla
_BotonesVOLUME A/_7 (p&g.13)
Para aiustar el volumen
m --o
Sensor de Infi'ari'ojos
Para recibir los rayos infrar-
rojos hasmitidos desde el
mando a distancia
ES

MIRAR TV
En esta secci6n se describen los ajustes iniciales
cuando ge enciende por prirnera vez el equipo tras
su compra. [vlasabajo se muestran los elementos
de dichos ajusles.
• SELEOCION DE IDIOMA
Puede se[eccionaJ el idioma del rnenu que aparece
en la pantalia entre inglBs, espai'_ol y frances.
• HORA DE VERANO
Skve para ajustaJ la pantalla de la hora local
transmitida digitalmente. Cuando esta funci6n
esta en ON, la informaciCn de fecha de la zona
seleccionada por el HUSO HORARIO se ajustara
con la hora affadida. Adernas, la diferencia horaria
se ajustaJ_ del siguiente rnodo: las 2 a.m. del
pdmer domingo de abril pasaran a ser las 3 a.rn.,
una hora mas; y las 2 a.m. del Qltimo domingo de
octubre pasaran a set la 1 a.rn., es decir, una
hOr_ m@nos.
* HUSO HORARIO
La informaci6n EPG de la transmisiCn digital se
ajusta bas&ndose en la zona establecida en el
HUSO HORARIO.
PREA, AUTO CA. (TV/DTV)
(Usando antena)
Los canales emifidos en TV y DTV se buscan y
memorizan autom&ticamente. Solo quedar&n
memorizados los canales que se puedan recibir
@n la zona @n dond@ S@ Use @1TV.
oPREA, AUTO CA, (CATV)
(Usando cable b4,sico)
Los canales emitidos en CATV se buscan y mem-
odzan autom&ticamente.
CHAIr
C4D_
OOOO
VOL L/_7
1 Seleccione su idioma.
Cuando encienda pot primera vez el equipo, se
mostrara la siguiente panta[la.
SELE_TL_NCL_eE
ENeUSH NEXT:PRES_I
ESP_OL DEPU_&PRESIO_EV
FR_I8 _pRE&PRESSEZ_
• En la Pantal[a de Idioma Inicial,
presione [CH A] para el INGLES.
pre,sione [OH "_] para el ESPANOL
pre,sione [VOL L] para el FRANCES.
El men_i siguiente aparecera en el idioma selec-
cionado despues de presionar el bot6n.
2 Con [VOL AFT], ponga la "HORA DE VERANO"
en "ON".
i OgNEClEL__17_ _ b_
L_D4D
20gNFI_URELOSELFMENTO_
OgNLO_BOTO_E_&Vy_
• HOR_DEVER_NO [0_I
HU_ HORARIO _ ]
PREAALTOO_ICA_VI
3 Con [CH _./_], se[eccione "HUSO HORARIO".
i OgNEClEL__17_ _ b_
L_D4D
20gNFI_URELOSELFMENTO_
OgNLO_BOTO_E_&Vy_'
HOR_DEVER_NO [ONJ
• HU_HORARIO _ ]
PREAALTOO_ICA_VI
• Cada vez que presione [VOL LFT], cambiara
la zona como s@ iBdica a col_tinuacion.
[HAWAII [ATL,&NTICO]
f
[PACJF[CO] [ORIENTAL]
$ f
[HONTANA] _ [CENTRAL]
• S@l@ccione Su zoB_.
NOTA:
• Debe a]ustal '_IORA DE VERANO"y _IUSO HORARIO r
[,,-
z_
d)
UJ
z
0
5
ES

4 Ajuste del PREA. AUTO CA.
NOTAS:
HORARtO', no podia solocclonar o] _°REA AUTO CA t
• Aso_ut_se qu_ e] TV ost_ conoct_do a] c_b]o de anton_
Cu_ndo ]_ _n_on_ e_t_ con_ct_d_ so]eccfono _°REA
AUTO OA (TV/D TV) rcon o] slguiente procodsmionto
Coandoost_con÷c_adoa]CATVsol_ccson÷rpREAAUTO
CA (GATV)
Aqui se describe el caso de la busqueda y
memodzaci6n de canales para TV/DTV.
, Con [OH _./_], seleccione "PREA. AUTO
I 09NE¢]_LA_A ALA
LIIID_O
2 09NFIOUnELO_ELFME_O_
CO_L03BOTONE8_W¥'_
HOqAOEVBq_O pNJ
HUSOHORATIO [flb_]
PRE__L_ 04_IOA_
* Cuando presione [VOL L], se iniciara
automaficamente la exploraci6n de canales
tanto e[ modo digital como en e[ anal6gico.
PREA_JTOCA_/1)TV)
IIIIIIIIIIIIIIII
* Cuando se haya terrninado la exploraci6n, se
mostra_a el canal memorizado m&s pequei'_o.
NOTAS:
• L_ funciSn initial PREA AUTO CA pued_ _J_cut_rse t_nto
p_l_ TV/D TV como CATV _olo un_ vez $1 d_s_ _xplol_r
t_nto TV/DTV como CATV d_be se]_cclon_r rCANAL PRER'
• pue_ #_lll de] nl_l?u pREA AUTO u_ll_o [MENU]
expJo_cidn, _t_ 8_ _nt_tl_mp#_ foo_t_ndose el c_n_] n)_8
p_quef?o n)omor_z_do
pREA AUTO CA en el nlonlenlo qu_ el?ci_ndG I?U_V_
• Si no se pu_d_ I_¢lbll nlngun c_l)_] i,)_dl_nt_ el PREA
AUTO CA #e nlosl_Gl_ ell l_pGniGll_ l_ '_VOHAY $E_L
DE TV"
_ H_Y_EN_DETV
ES

Se puede cambiaJ facilmente entre TV (NTSC) y
DTV (ATSC) con el mando a distancia y disfrutar
de los programas de la televisi6n de alta definici6n,
asi come de los de la de definici6n estandar con
una simple operaci6n.
oDTV/TV
CO _ ®D
1 Presione [DTV/TV] del mando a distancia.
• Se pasaJ6 altemativamente del rhode anal6gico
al digital.
• Cuando presione [DTV/TV] en la entrada
externa, se cambiar& entJe el rhode anal6gico
y el digital.
NOTA:
El camblo d_l modo analoglco al digital pued_ Ilevar unos
Mion#_8 quo so ostd cambsando de modo se mostsar_ J_
s,gulm]t# p_nta]]_
Puede seleccionar el canal usando bien [CH hJ'_] o
los botones de N0mero de canal. A continuaci6n se
muestlal_ los dos rhodes do hacerlo.
Bolones de
NQmero de
canal
-lENT _ • CHANNEL
OH A/_ = RETURN
*+100
C:] CD CD C2
1 Usando [CH h./V]
• Cambie el canal usando [OH h./_f].
• Cuando presione ]CHANNEL RETURN], se
seleccionar& el canal anteriormente seleccionado.
• En el panel frontal de la unidad principal se
encuentra disponible la misma operaci6n con
[ON h,/_].
2 Usando los botones de N_mero de canal
• Si desea seleccionar un canal del 1 al 99, pre-
sione SU ngmero con los botones de NiJmero
de canal. Se mostrala el canal seleccionado.
• Si desea ver un canal superior al 1O0, presione
primero [+100]. Despues use los botones de
NLimero de canal para introducir los dos _lti-
rues d_itos.
• pal_, buscar el canal menor del canal mayor
que est6 viendo actualmente en DTV, presione
[+100]. Si conoce el canal menor mientras que
est& viendo el canal mayor con N_mero de
canal de 1 digito, pre,sione el n0mero de canal
mayor y [-/ENT]. A continuaci6n, p_sione el
n0mero de canal monet que de,e@ VeL En case
de que el n_mero del canal mayor sea de 2
dig[tos, presione el numero de canal mayor y el
del canal menor directamente. Si presiona
[-/ENT] despues de presionar el nurnero de
canal mayor de 2 d_itos, se seleccionara el
canal rrle[/or m_ pequeno.
• Si presiona [CHANNEL RETURN], se selec-
cionara el canal seleccionado con a_erioridad.
,¢
oofno _n_] P3enol:
ES

En esta secci6n se describe el modo de ajustar el
vMumen cuando se est& viendo M TV.Tambien se
describe la funci6n MUTE, la cual resulta muy tJti[
cuando se fiene una visita o se recibe una lamada
de teMtono.
,VOLA/V
MUTE
1 Uso [VOL AFT]
• Se puede aiustar el volume[) de sonido con
[VOL AFF].
• AI aiustar el volume[l, se mostrara M barra de
progreso en M parle i_ferior de M pantala.
• En el panel frontal del TV podra reMizar la
misma operacion con [VOL AFT].
V(LUMEN
IIIIIIIIIIIIIIII
2 Uso [MUTE]
• Presione [MUTE] dM mando a distancia para
qutar el soMdo.
Mientras que se tiene activada la funcion de
siMncio, en ]a pantala se moslard la baHa de
volurrleD coloreada.
V(I UMEN
IIIIIIIIIIIIIIII
• Para IiberaJ el estado MUTE, vuMva a presionar
[MUTE] o presione [VOL AFT].
En esta secci6n se describe el modo de cambiaJ el
sistema de audio en el modo anM6gico y como
sMeccionaJ el idioma de audio en el modo digital.
U
Cambio de audio.
• Cada vez que presione [AUDIO], &ste cam-
biara como se indica a continuaciSn.
P]
[L_ NOI
MAIN :Saca elaudioprincipal
SAP : SaGa el 9egu[Ido canal de audio
MONO: SaGa elaudioen mono
Cambio delidiomade audio.
• Si se presiona [AUDIO], se mostraran en la
pantalla el idioma actuMmente seleccionado y
el numero de idiomas recibidos.
Idioma de
audio
• Cada vez clue presione [AUDIO], se cambiara
el idioma.
, LOS idiomas que se pueden seleccionar difieren
dependiendo de la emisi6n que se reciba.
NOTA:
_/aU_fO DO S@ CQt?_bfQtQ it?C/USO @1_ el CQSO d_ qU_ _fe_lOI)_
[AUDIO] en I_ entrad_ ext_tl)a
ES

Con esta funci6n se puede visualizaJ en la panlalla
el n0mero de canal seleccionado u otra informaci6n
como el modo de audio para su comprobaci6n.
INFO
m
En el modo anal6gico, se muest ra el n0mero de
canal seleccionado y el modo de audio.
1 Visualizaci6n del n_imerode canal y el r_odo de audio.
• Presione [INFO] del mando a distancia.
El n0mero de canal seleccionado y el modo de
audio apareceran en la parte superior derecha
de la pantalla.
• Para borrar la pantalla, presione nuevamente
[INFO].
• Ouando 5@con@cten @quipos @xt@rnosS@
mostraran las siguientes pantallas:
1) Cuando se use el cable de video para la
conexion
M
En el modo digital, se mostrara la informaci6n
detallada para el canal actualmente seleccionado,
como la guia de programaci6n.
1 Visualizaci6n de Lainformaci6n detallada para el canal.
• Cada vez que presione [INFO], el modo de
visualizaci6n cambiara como se describe a
continuacion.
APAGADA]
_ [IN_OZ]
• En el modo INFO1 aparecera la siguiente infor-
maci6n.
(1) N0mero de canal
(2) Titulo del canal
(3) Titulo del programa (se muestra un maximo
de 2 lineas)
(4) Idioma audio (se muestra "OTRO" cuando
no se puede obtener el idioma o los que se
consiguen no son el INGLES, ESPANOL o
FRANCES.)
(5) Hora del programa
(2)
• La guia de programaci6n anadida a la informa-
ci6n visualizada en el modo INFOt se muestra
en el modo INFO2.
>
t_
ct
<
t_
2) Cuando se use el cable de video componente
para la conexi6n
NOTA$:
• Cu_l_do/a _ula d_ progfat?)aol6t_ ocup_ n)a8 d_ G/P?_a&
utbce [VOL _./_] para d_splazarse pot el t_xto
• Ap_t_cota el *?)or ]_ajo 'No so proporofol?_ d_scMpcfol_ r
_ual?do tlo haya guJa d_ pfogfafbacldl?
• Mmnlas qu_ se I'lu_stm/a infolmaclon en el nlodo INF02
_ inI#rrunlp_l_ /a 6Jn@@ld_ SUBTiTUL05
ES

$ELE_I6N OE LA ENSBA_ EXTEBNA
S[ se conectan equipos externos, [ncluyendo
grabadores de video y sistemas de cine en casa,
se podra seleccionar f_cilmen_e el modo de en_ra-
da con el mando a distancia.
Q:} C© CD
CsQGo @
•Si presiona [INFO], se mostraJA el raodo de
entrada externa actual en la parle superior
derecha de la pantalla.
1) Si usa el conector VIDEO-1 INPUT
2) Si usa el conector VIDEO-2 INPUT
1 Selecci6n del modo de entrada.
• S[ se presiona [INPUT SELECT] del mando a
distancia, se cambiar6 el modo de entrada
oomo se mues_ra a continuacion.
======='1.
Canal deTV
AUX1 oVIDEO-S (Tr_se_a)
AUX2 (Frontal)
$
COMPONENTES
3) Si usa el conector COMPONENT VIDEO
INPUT
4) Si usa el conector S-VIDEO INPUT
•PaJa usar losconectoresVIDEO-I INPUT de la
parletraseFadelTV, seleccione"AUXI ".
(SiufilizaelconectorS-VIDEO, se visualiza
"VIDEO-S".]
•Para usar losconectoresde laparlefrontaldel
TV, seleccione"AUX2".
•Para usar losconectoresCOMPONENT
VIDEO INPUT de lapade traseradelTV,
seleccione"COMPONENTES".
ES

]USTES OPCIONALES
La funci6n TEMPORIZADOR DE APAGADO
AUTOM,_,TICO apagar& automaticamente M cord-
ente de la unidad a una hera determinada.
°SLEEP
1 Use del TEMPORIZADOR DE APAGADO
AUTOM,_,TICO.
• Presione [SLEEP] del mando a distancia.
• Se mostrara la pantalla paJa el ajuste dM TEM-
PORIZADOR DE APAGADO AUTOMP,TICO.
2 Ajuste del tempodzador.
• Cada vez que presione ]SLEEP], la hera
aumentara 10 minutes.
• El tempodzador se puede ajustar hasta 90
minutes.
• Despues de ajustado, podra verfficar el tiempo
restante en minutes presionando [SLEEP].
NOTAS:
• S] descot)octa ]_ ul?]d_d de] tof_Jaoot_]el_te o o] so produce
UI? f_]]o et? ]_ oorr]et?te, oe o_l?oo]_t_ e] _juote do] tet?)po
iz_dor de _p_gado _utom_tico
• afa o_t?co]_ o] te_)potfz_dor do ap_@_do _uto_t]co, pge
sione opetidam÷nto[SLEEP]haotaqueaparozca
rREPOSAR 0
• La panta]la dol temporizadol d÷ apagado autom_tico d÷sa
pamcord autom_ticam÷nte tta_ 10 segundos
Esta secci6n describe el resumen de la pantalla de
ment] que se muest ra al presionar ]MENU]. Para
m&s detalles, yea la p_,gina de referencia de cada
demento.
La pantalla de ment] esta formada per los elemen-
[os que se muestr_n a CODtiDUaCi6FL
• IM_qEN
DIN_LPREp
_USTEDE_0HIP
TI_JLO[<IF]
IN_T_b_C_ND]V
IMAGEN
Pma aiusta_ la calidad de imagen (CLARIDAD,
CONTRASTE, COLOR, MATIZ, AGUDEZA).
(Vea el apartado "AJUSTE DE LA IMAGEN" en la
pagina 20.)
• CANAL PREP
Para buscar autom&ticamente los canales que se
pueden recibir, y agregar o borrar los que se
necesiten.
(Vea el apartado "PREA. AUTO CA." en la pagina 28.)
ESP/FRA/ENG
Para cambia_ el idiorna (ESPAiqOL, FRANCES,
INGLES) que se muestra en la pantalla de menu.
(Yea el apa_tado "SELECCION DE IDIOMA" en la
p&gina 31.)
• AJUSTE DE V-CHIP
Pma ajusta_ las limitaciones de visi6n.
(Vea "V-CHIP" en la pagina 24.)
,TITULO
Para cambiar el tormato de visualizaci6n del
SUBTJTULOS que muestran los di&logos de un
prog_arna de TV u otra informaci6n en la pantalla.
(Vea el apartado "SUBTJTULOS" en la pagina 21 .)
INSTALACION DTV _
Para aiustar la visualizaci6n de la pantalla o el
TITULO en el mode DTV.
(Vea el al_a_tado "CAMBIO DEL MODe DE VISU-
ALIZACION DE PANTALLA" en la pagina 27.)
NOTAS:
• L_ 'INSTALACIC_N DTV' _olo _ pu._de vel en _1 n_odo DTV
• P_a ir _ I_ p_ntall_ nolm_l, pelion÷ [MENU]
¢0
UJ
-J
z
0
U
Q.
0
u)
UJ
I'-
O3
--j
ES

Con esta funci6n se puede aiustaJ la claridad,
contra_e, colo_ mafiz y agudeza de la imagen.
CH_/T
MENU
oooo
VOLAIV
1 Visualizaci6n de la pantalla de menu.
• Presione [MENU].
Se visualizara la siguiente pantalla de menu.
2 Selecci6n de IIIMAGEN".
• Mediante [CH A/_], seleccione "IMAGEN" y
presione en [VOL z_] para confirmaJ su selec-
ci6n.
• En la pantalla aparecera la barra de aiuste del
elemento de la calidad de imagen.
t] ctARIOA0 [4
BBBBDDDIDBBBBDD
3 Aiuste de la calidad de imagen.
• Con [CH h./v], seleccione el elemento de calidad
de imagen que desee aiustar.
[CLARIDAD]
f
[CONTRAETE]
[CO_OR]
[M_TIZ]
[_EZA]
CLARIDAD
_.: Para aumentar la claddad
_: PaJa disminuir la claridad
CONTRASTE
_.: PaJa aumentar el coniraste
_: PaJa disminuir el contraste
COLOR
_.: M&s brillante
_: MAs pAlido
MATIZ
A: Mas verde
'_: M&s po pura
AGUDEZA
A: M&s claror
T: M_s suave
• Con [VOL z:d_7],aiuste la calidad de imagen.
NOTAS:
• L_ p_nt_//_ d_8_p_focel_ autonl_Oo_nlonto d_spu_s d_ 10
8_£_undos _ n_enos qu_ so prosfone un boron
• E/*n_gn_tl_n_o ptoc_d_nt_ d_ o/ectrodo#_t_co_ o _/t_voce_
que 8e enouon_n oe_ o_no8 pued_ _f_ot_ _/ co/or d_ /_ _n_
_n d_ 73/ Sr ocu_f_er_ osfo _p_gue o/TV pfe_on_ndo
[POWER] y vuelw _ encend_iIo d_ nuevo d=spu_ d_ unos
30 m_nuto&
ES

Podra veJ pehcuMs, noficias, programas de TV, etc.
especiMmente idenfificados (cc) ya sea con subtP
tMos del di_logo o con visualizaci6n de texto agre-
gados al programa.
Con el si_ema de radiod[fusi6n digital, tambien podr&
cambiar el tamaho, el estilo de la fuen_ de los t_ulos.
CH h./v
MENU
VOLA/V
OOOO
1 VisuMizaci6n de M pantMM de men&
• Presione [MENU].
Se visualizara la siguiente pantMla de menu.
2 Selecci6n de "TITULO".
• Con [OH A/V], seleccione "TITULO".
1_6EN
CA_LPREP
_JU81_DEV@HIP
>TffULqOF_
INSTA_¢I6NDW
3 Cambio al modo TiTULO.
• AI presionar [VOL L/_], TiTULO cambiara
col-no se muestra a con_inuaci6n.
[O_F]
[¢1]
[MODO DE TiTULO (01, C2)]
• TITUL01 (01)
Muestra los subtitulos estandar (Io que dice cada
personaie).
• TITUL02 (C2)
Muestra los subEtulos en un idioma extranjero
(pMabras en el idioma extraniero que muestran
Io que dice cada personaje).
• Hay tres modos de visuMizaci6n de acuerdo
con lOS pro_ramas:
Modo Paint-on: Muestra inmediatamente los
caracteres de entrada en la
pantMM.
Modo Pop-on : Una vez que se han guaJdado
los caracteres en M memoria,
se muestran todos a M vez.
Modo Roll-up : Muestra Io_ caracteres avanzando
de forma continua (m_x. 4 IMea_).
[MODO DE TEXTO (T1,T2)]
• TEXT01 (T1) y TEXT02 (T2) muestran el texto
en media pantMla desplazandMo (como una
guia, programaci6n o informaci6n de canal].
4 Para salir dM menQ, presione [MENU].
NOTAS:
• _1 ]_ emlslol_ quo 8_ ost_ fo¢lbfol_do i_o tl_tTo subt_td]os no
• Ou_t_do e] _v' f_¢_b_ u_?_ _of_] d_ fopfoduco_o_? COl) otocto8
÷_pecsal_sI_sd_c_t,bdsqued_,c_ma_aI_nt_e_magencon
golad_) d_] canal d_ sallda de video d_l VOR (OH3 o OH4),
÷]TVpodll_de]a d_ mostra ol titu]oo t_xtoco__cto
• Los t[tuJos y toxtos puode_? _?o _o#?c_d_f do fot_9_ o_ct_ co_
]_s Voco&
• L_8 #?torf_r_t_c_8 puodot7 pfovoc_ q_ e] s_stem_ d_ _bt[
• LO_ caract_es d_ _os titulos o los toxt_s n_ so m_strargn m_om
tra_ que so estdn we_do _spanta_las d_ menu _ d_ func_nes
el TV est_ ajust_do pata el nlodo TEXTO p_t_ borr_ ]_
p_llt_]]_ sel_cclot_÷ TITUL O rc1r rc2', 0 rOFF_
VisuMizaci6n de M pantMla de menu.
• Presione [MENU].
Se visualizarA la siguiente pantalla de men&
_-I_GEN
C_NALPREp
*_USTEDEVCHIP
TffULO[O=F]
IN_TAL_C_NDT_
¢o
W
z
0
0
69
W
I'-
09
ES

2 Selecci6n de "INSTALACION DTV".
* Con [CH hjlt], seleccione "INSTALACI()N DTV".
, Presione [VOL A].
Se mostrar& la siguiente pantalla.
• p_NT_L_DT_[_NCHOBLEGN]
HORADEVER_NO p_
HL6OHOR_RIO _SK_]
3 Selecci6n de "DTVCC".
* Con [OH A/_], seleccione "DTVCC".
ded_Iad_scrspddnd_la emmlon
5 Uso de "CONFIG. USUARID".
* La funci6n "CONFIG. USUARID" le permite
cambiar el tamaho y el estilo de fuente del titulo.
* Con [OH h./v], seleccione "CONFIG. USUARID".
° Presione [VOL A] y ponga "CONFIG. USUARID"
en "ON",
6 Aiuste de cada elemento.
, Cuando "CONFIG. USUARID" este puesto en
"ON", podra ajustar los siguientes elementos.
° Presione [VOL A].
Se mostrara [a siguiente pantaiia.
4 Seleccion de "SERV[O[O TITULO".
° AI presionar [VOL A/V] podra cambiar el TITU-
LO como se muestra mas abajo. Seleccione el
SERVICIO TITULO que desee usar.
[SIR_EII6]
[SNRVE2/6]
[S[RVE3/6]
[SIRVE4/6]
[S[RVE_/6]
..._E6/6]
° Con [CH h./v], seleccione e[ elemento que desee
ajU_al:
° Puede cambiar la configuraci6n de cada uno
de los elementos con [VOL AFT].
° A continuac[6n se muesha la descdpci6n de
los ajustes de estos elementos.
[TAMAI_O TITULO]
E[ tamai_o de[ texto deltitulo mosh ado se puede
cambiar del siguiente modo.
[MF_ANO]
I [GRACDE]
I [PEQ_ E_O ]
ES

[ESTILO FUENTE]
Se puede cambiar el estilo de fuente del htuIo
mostrado de la siguiente torma.
[ESTILOI/8
[ESTBLO2/8
[ESTBLO3/8
[EST|LO418
lEST|LOS18
[ESTILO618
[ESTgLOT/8
[_O8/8
[BORDE CARACTER]
Se puede cambiar el borde de los caracteres del
t_ulo mostrado de la siguiente forma.
[NINGUNO]
f
[ELEVADO]
f
[HONDHDO]
[UIqIFORHE]
[SOHBRA IZQ,]
[SOMBRA DER.]
[OPACO ADELANTE]
Se puede cambiar la opacidad del texto del titulo
mostrado de la sigubnte torma.
[REL_ ENA]
[TRANS_UCIDA]
LLO]
[COLOR ADELANTE]
Se pued6 cambiar el color del texto del htulo
mostrado de la siguiente torma.
ARENTE]
I 'W°'
_ [CYAN]
[OPACO ATR,_S]
Se puede cambiar la opacidad del rondo del htu-
Io mostrado de la siguiente forma.
_IU NA]
CIDA]
LLO]
[COLOR FONDO]
Se puede cambiar el color de rondodel titulo
mostrado de la siguiente forma.
_A RANS_ARENTE]
[BLANCO]
[NE_RO]
[R'_JO]
[VE_DE]
[A%U L]
[AMA RLLO]
[MAGENTA]
N]
co
LU
,..J
z
O
o.
O
e)
&,U
1-.
(/3
ES

Permite que los padres ÷viten que sus niffos vean
programas de televisi6n que contienen material
inapropiado, incluyendo expresiones y descrip-
ciones desagradables. Se pueden cancelar las lim-
itaciones de programas establecidas introduciendo
el c6digo de acceso.
Bo_oRes de,
NOmero de
o_nal
CHA/T
MENU
VOLL
Visualizaci6n de la pantalla de meno.
° Pres[one [MENU].
Se visualizara la siguiente pantalla de ment).
3 Introducci6n de[ c6digo de acceso.
* Con los botches de N_mero de canal [ntro-
duzca el n(_mero de 4 d_itos.
° Si todavia no ha configurado su c6digo de
acceso, introduzca 0000.
° Cuando el c6digo de acceso sea el con ecto,
se mostrara la siguiente pantalla de "AJUSTE
DE V-CHIP".
Para reaHzm el aiuste de cada uno de los ele-
mentos yea la s[gu[ente descrJpci6n.
[] CLASE DETV
4 Visualizaci6n de la pantalla "CLASE DE TV".
, Con [OHJt./_], seleccione"CLASE DETV".
Pres[one [VOL A].
2 Selecci6n de "AJUSTE DE ',/-CHIP".
, Con [CH A/V], seleccione "AJUSTE DE V-CHIP".
* Pres[one [VOL A].
Se raostrar6 la pantaHa de JntJoducci6n del
codJgo de acceso.
CODIGODE ACCE80
5 Aiuste de "CLASE DE TV".
* Con [CH h./_], seleccione [a clase.
.]_y _IRAR]
]_?r )_IRAR]
]_POf )_IRAR]
1_14f )_IRAR]
<Selecci6n>
, TV-Y :
, TV-Y7 :
, TV-G :
, TV-PG :
° TV-14 :
, TV-MA :
<Explicaci6n de la categoria>
Apropiado para n[hos de todas
las edades
Apropiado para n[i_os de 7 o
m&s aflos
Publico general
Se Jecom[enda la presenc[a
de los padres
No adecuado para nihos de
menos de 14 aSos
Solo para adultos
ES

6 Ajuste de "BLOQ." o "MIRAR".
• Presione [VOL A] y ajuste "BLOQ." o "MIRAR"
para la clase sin subcategodas.
5 Ajuste de "CLASE DE MPAA".
• Con [CH h.f_], sMeccione M clase.
_IIR_F]
Ned7 _IR_F]
• El_ M clase CO[) stJb_egorias, se mues_ran
presionando dos veces [VOL A]. Presione
[OH A/V] y sMeccione la clase. Despues pre-
sione [VOL A] y ajuste "BLOQ." o "MIRAR".
<Seleccidn> <ExplicaciSn de la categona>
• TV-Y7
FV : Fantasia violencia
• TV-PG / TV-14 / TVoMA :
D : Dialogos provocativos
(solo TV-PG, TV-14)
L : Lenguaje vulgar
S : Escenas de carActer sexual
V : ViMencia
7 Para sMir dM menu, presione [MENU].
[] CLASE DE MPAA
4 Visualizacidn de M pantalla "CLASE DE MPAA".
• Con [CH_._], seleccione"CLASE DE MPAA".
• Presione [VOLA].
<SelecciSn> <Explicaci6n de la categoria>
• G : Publico generM
• PG : Se recomienda la presencia
de los padres
• PG-13 : No adecuado para nii_os de
menos de 13 aisles
• R : Restringido; los menores de
17 anos necesitan de la pres-
encia de los padres o alg(Jn
aduito
• NC-17 : Prohibido para menores de 17
aisles
• X : S61o para aduitos
6 Ajuste de "BLOQ." o "MIRAR"
• Presione [VOL ,6,]y ajuste "BLOQ." o "MIRAR".
_IR_F]
[&0el
N_17 [&0QI
[&001
7 Para salir dM menQ, presione [MENU].
NOTAS:
,o_f_ ]_ CLASE DE TV y CLASE DE MPAA
• NO So pu_d_ _ccedof _] *?_tlr_ d_ _)u_t÷_ cu_l_do _p_f_co
el mensaje '_°ROGRAMA PROHtBtDO po_ 't Papa pod_r
_cced_r debeta p_s_r _ un canal d_sbloque_do
• Cuando selecclon_ una c]_s_ y ]_ pong_ ell '_£LO0. '! se
b]oque_f_n autom&bc_mente ]as closes qua esten pot _n_
nl_ L_S qu÷ qu_d_n pot d_ba)o e_taf _n d_sponlb]÷ s paf_
pod_r wll_&
• Cuando s÷lacclona una cla_e y la ponga en "MIRAR't el
t#sto d_ cJ_o_ e_t_f_f_ _utot?_t_c_n_o _t_ d_pof_i_es p_t_
ve_
W
-I
z
0
0
09
W
09
ES

[] CAMBIAR CODIGO
4 Visualizaci6n de la pantalla "CAMBIAR CODIGO".
• Con [OH h.f_], sMeccione "CAMBIAR CODIGO".
ObeSEDEW
Ob_£E DEMp_A
_ 0_BIAR _0£1G0
•Pre,sione[VOL A].
5 Cambio del c6digo de acceso.
• Con los botones de NLimero de canal del
mando a distancia, introduzca el CODIGO
NUEVO de 4 digitos.
• Vuelva a JntroducMo en el cuadro CODIGO
CONFIRMADO.
¢ODI_ONUEVO
CODIOO ¢ONFIRMADO
6 Para salir dM menu, presione [MENU].
NOTAS:
• AsegOros÷ do introduc# ÷xact_monte el mGmo nuevo codi.
go _n el o_pacio do 'OODIGO CONFIRMADO" qu÷ ol intso
ducido on "OOD;GO NUEVO' Si fder_ diforonte, so bos _f_
el e_pac]o paf_ 'CODiGO NUEVO"cOn el f#?d que vuMva
a intloduciHo
• S] so pfoduco un f_]]o on ]_ cotHonto o _] ]a dooconeota do]
enchute, so boff_rd o] cddigo poroon_] de _ccoso voMendo
a] valor predetelminado (0000) Si oMda el codigo, dos.
enciluf_ o] c_b]o do] ton_coff]ento dut_nte un porlodo de
10 sogundos p_ra fecupora el cddigo do acceoo predoter
nlinado 0000
ES

En el modo digRal se pueden seleccionar 2 fipos
de modo de visuMizaci6n.
Puede seleccionar su modo favorito y disfrutar del
programa.
CoG)Go
CH h./v
MENU 0 C) 0 679
oVOL A/V
I Visualizacion de la pantalla de rnenO.
• Presione [MENU].
Se visualizaJ a la siguiente pantalla de menQ.
Ik_GEN I
CANAL PRE_
[ESPI'FP_ING
_JUS]_ DEV_ HIP
TgUL_OF_]
IN_TAb_CIClN DJS]
2 Selecci6n de "INSTALACION DTV".
• Con [CH h.f_], seleccione "INSTALACION DTV".
3 SeMcci6n del modo de visualizaci6n.
• Cada vez que presione [VOL Z_FT]se cam-
bima alternativamente entre "ANCHO BUZON"
y "ZOOM".
ANCNO BUZON ZOOM
[ANOHO BUZON] w
,-I
Muestra el programa digital en pantalla completa. '_
z
Los bordes en negro se ampliar&n en la 0
parte superior e inferior de la pantalla.
[ZOOM]
Amplia y muestJa ia zona centJal dM programa co
digital _--
Sever& cortada la parte derecha e izquierda
de la imagen. "m
4 Para salir del menu, presione [MENU].
NOTA:
Oependl_ndo d_lpfogram_, podna no s_r neces_ne t_l]er
que camblar el modo d_ wsuahzacldtl
• Cuando presione [VOL A], la pantalla de menu
se mostraJa oomo se indica a oontinuaci6n.
p_TAL_ DT4_NCHOBUZ6NJ
D_VO:
HOR_DEVER_NO [_]
HU_ HO_R_3 [AL_K_]
ES

rROS AJUSTES
Si conmuta los canales (por eiemplo entre la ante-
nay CATV] o si mueve el TV a una regi6n distinta
despues del ajuste inicial, sela necesario volver a
hacer PREA. AUTO CA. Esta funcion permite
seleccionar f&cilrnente los canales sintonizables
con [OH h,/v] y el TV los memoriza incluso si con-
muta cables.
CHA/T
MENU
MOLL
4 Para canales de TV
, Con [ON h./v], seleccione "PREA. AUTO
CA.(TV]".
° Presione [VOL A].
Se JnicJaraautomaficamente la b0squeda y
memorizaci6n de los canales.
NOTA:
• A_gQ#e$_ q#e el TV e_t#J ¢onect_do a la antena o
cabl& Cuando e_f_ ¢or_ctada la antena, _eleccione
"PREA. AUTO CA.(TV)" o (TV/DTV)" _n el pa_o 4.
Cuando e_t& conectado al CATV, _eleccione
"pREA.AUTO CA (CATV)"
m?
Cuando explore solo TV o CATV
Seleccione el modo anal6gico presionando
[DTV/TV].
2 Visuatzacion de la pantala de men&
, Presione [MENU].
Se visualizara la siguiente panlala de menu.
3 Selecci6n de "CANAL PREP.".
, Con [CH A/V], seleccione "CANAL PRER".
° Cuando finatce este proceso, se mostrar_ el
canal mas pequei_o memodzado de la emisi6n
anal6gica.
4 Para canales de CATV
* Con [CH A/_], seleccione "PREA. AUTO
CA.(CATV)".
_6nEG_R_0RR_n
ptE_ _UT0C__q
pBE__UT0_(C_]YI
!C_Wd_da UI® @nil_
* Presione [VOL A].
Se iniciara automaticamente la busqueda y
memorizacion de los canales.
IIIIIIIIIIIIIIII
° Cuando finalice este proceso, se moslara el
canal mas pequei_o memorizado dd CATV.
, Presione [VOL A].
ES

m
Cuando explores61oDTV
I SMeocione elmodo digitalpresionando[DTWTV].
2 Visualizaci6nde M pantalMde men&
•PJesione[MENU].
Se visualizara la siguienlepantalM de menQ.
I_6EN 1
¢_N_LPREP
[£SpIr_P_ING
NUS]_ DE ¥_ HIP
TgUL_OF_]
INSTAb_CI6NDI_
3 Selecci6n de "CANAL PRER".
• Con [CH A/V], seleccione "CANAL PRER".
Cuando explore ambos TV y DTV M mismo tiempo
* Puede acceder aeste meRQeR &mbosmodos
(analbgico/diglal).
1 Visuatzaci6n de M panlala de menu y selecci6n
de "CANAL PREP.".
• Presione [MENU] y seleccione "CANAL PRER"
con [OH hJlt].
IM_qEN
_UST£DE_0HIP
TI_JLO[O_F]
IN6TAL_0_ND_V
• Presione [VOL A].
2 Con [OH _./v], seleccione "PREA. AUTO
• Presione [VOL A].
4 Con [OH h./_], sMeccione "PREA. AUTO
CA.(DTV)".
_ pR_ _UTO/A !DTVI
PR_ _UTO/A !C_T_
!_TV d_4r_Jrauro_ _in
• PJesione [VOL L].
Se JnicJaJaaulom&ficamente M b0squeda y
n_emorJzaci6n de los canales.
• Cuando haya finMizado la exploraci6n y M
mernorizaci6n, se visuatzara el canal inferior
memorizado de la emisi6n digital.
_Gtf6_t4_OtRAt(DTVl
PRE__UTO_D_V_
. pRf_ _UTO_ mt,t)T_q
pRD__UTOC_iC_Dq
!¢_V derr_Hr:_ @rm
• Presione [VOL A].
Se inicia r& autom_ticamente la bosqueda y
memodzaci6n de los canMes.
ptE_UTOC_K_D_VI
IIIIIIIIIIIIIIII
• Cuando finMice este proceso, se mostrara el
canal mas pequeno memorizado de la emisi6n
analogica. Si no se rnemoriza ningun canal
anal6gico, se visuatza_ el canal inferior raem-
orizado de la emisi6n digital.
NOTAS:
• Si presiona [POWER] o [MENU] nlientla_ _sta #_van_o a
cabo el PREA _UTO 0,4, s_ cancelar_ _icha oper_cibn d_
p÷oJuste de c_nal÷s
•_ no h_y entt_d_ de oefla/d_TV tr_ I_ fill_/Iz_cioll do /_
_ H_Y _E_L DE _r
NOH_ySfN_LDfIV
L_J
p-
(D
0
p-
0
ES

La funci6n AGREGAR/BQRRAR CANALES le per-
mite agJegar algCEncanal que no se hubiera ai_adi-
do durante el proceso de PREA. AUTO CA. debido
a un mal estado de recepcion durante los aiustes
iniciales. Igualmente, se pueden eliminaJ canMes
que no se necesiten.
CNA/_
MENU
®:7
VOLA/V
4 Seiecci6n de "AGREGAR/BORRAR".
• Con [CN h./v], seleccione "AGREGAR/BOR-
RAR".
• Presione [VOL A].
5 Seleccion del canal que se desea agJegaJ o borraJ:
• Con [ON h./v] o los botches de N_mero de
canal, seleccione el canal
m
1 SMeccione el modo anal6gico presionando
[DTV/TV].
2 Visualizaci6n de la pantMia de menu.
• Presi0ne [MENU].
Se visualizarA la siguiente pantalla de menu.
3 Selecci6n de "CANAL PRER".
• Con [CH A/V], sMeccione "CANAL PRER".
• Seleccione "AGREGAR" o "BORRAR" con
[VOL L/_7].
• Color de los nQmeros de canal mostrados en la
parte superior derecha de la pant alia
AzuVVerde: Se agregara el canal seleccionado.
Rosa/Rojo: Se borrara el canal sMeccionado.
6 Para salir del menO, presione [MENU].
Q
Seleccione el modo digit aI presionando [DTVITV].
2 Visualizaci6n de la pantalia de mei%L
• Presione [MENU].
Se visuMizma la siguiente pantMla de men_L
• Presione [VOL A].
Aparecer_ la siguiente pantalM de CANAL
PRER.
3 Selecci6n de "CANAL PRER".
• Con [CH A/V], seleccione "CANAL PRER".
• Presione [VOL A].
ES

/
4 Selecci6n de "AGREGAR/BORRAR(DTV)".
, Con [OH _.iV ], sebccione "AGREGAR/BOR-
RAR(DTV)".
• Presione [VOL A].
5 Selecci6n del canal que se desea agJegar o borrar.
• Con [CH h./_] o los botones de N_mero de
canal, sMeccione el canal.
• Seleccione "AGREGAR" o "BORRAR" con
[VOL L#7].
• Color de los n(_meros de canal rnostrados en la
parte superior derecha de la pantMla
NOTA:
Azul/Verd_ Se agregara el canal _eleccio_6o.
Ro_a/Rojo Se borrat_ el canal _eleccionado
6 Para salir dM merit), presione [MENU].
NOTAS:
• El re÷n6 d_sapat#ce_aautom&tscargent_d_pubs d_ unos
l Os_gundo&
• En el modo digital (DTV/,podfa agl_gar o borrar canal.s
80]0pata el cana/ fgayoK
Se puede cambiaJ el idioma empleado en la pant311a
men& Las opciones posibles son INGLES. ESPAFIOL
o FRANCES.
A continuaci6n se muestra el modo de hacedo.
MENU O00C
,VOL AIV
Visualizaci6n de la pantalla de merit).
• Presione[MENU].
Se mostJar& la siguiente pantMla de ment).
• I_GEN
C_NALPBEp
[EgP]FR_N6
AUSTEDEVCHIP
TffULO[O=F]
INSTAL_CFINDTV
2 Selecci@/de "[ESP]/FRA/ENG".
• Con [CH hJ_], sMeccione "[ES PI/F RA/ENG".
I_GEN
C_NALPBEp
• [EgP]FR_N6
AUSTEDEVCHIP
TffULO[O=F]
INSTAL_CFINDTV
• Cada vez que presione [VOL Z_FT]se cam-
biaJa de idioma como se muestra mas abajo.
SMeccione el idioma deseado.
SPANOL)]
_NCIES)]
_ [ENG(tINGLES)]
3 PaJa salir del menu. presione [MENU].
i-
e)
0
0
ES

Despues de realizar los aiustes inJciales al encen-
der pot primera vez la cordente, podra estabJecer
de nuevo la HORA DE VERANO. Cuando esta fun-
cion esta en ON. el reloi avanza automaticalYlenle
una hora alas 2:00 a.m. del ulfilno domingo de
octubre.
CH h./T
MENU,
VOLAIV
3 Selecci6n de "HORA DE VERANQ".
, Con [OH h./v], seleccione "HORA DE VERA-
NO".
4 Selecci6n de "HORA DE VERANO".
• Con [VOL A/V], seleccione "ON" u "OFF".
1 Visualizaci6n de la pantalla de merit).
, Presione [MENU].
Se visualizar2, la siguiente pantalla de men0.
5 Para salir del men(L presione [MENU].
NOTA:
cld_ en el 'NUSOHORARIO'
2 Selecci6n de "INSTALACION DTV".
• A . • ,,
Con [CH /_], selecco e INSTALACION DTV.
, Cuando presione [VOL A], la pantalla de ment)
se mostrar& como se [ndica a continuaci6n.
_-p_NT_Lb¢DTVI,,NCHOBLE_ ]
D_(:(:
_gR_DEVEP,_NO I t
HLeOHO_RIO I_L_qK_I
ES

Si mueve el TV a un lugar diferente despues de
haber IMvado a cabo los ajustes iniciales al encen-
der por priraera vez el aparato, tendr& que volver a
coMigurar el huso horatio.
CH h./v
MENU
QD C© QD
-VOL A/V
1 VisuMizaci6n de la pantMla de men&
• Presione [MENU].
Se visualiZal a la siguienie pantalla de men&
1_6EN l
CANAL pREp
[ESPI'FP_ING
_JIJS]_ DEV_ HIP
TgUL_OF_]
INSTAb_CI6NDI_
2 Selecci6n de "INSTALACION DTV".
• Con [CH Am], selecdone "INSTALACION DTV".
• Cuando presione [VOL A], la pantalh de men_
se mostraJa como se indica a continuaci6n.
• p_T_L_ D?4_NOHOBLZONj
D_VO:
HOR_DEVER_NO pNJ
3 SeMcci6n de "HUSO HORARIO".
• Con [OH h./v], seleccione "HUSO HORARIO".
p_NT_LL_DT_[,_CHO8LEVI
HOR_DEVER_NO pNJ
_"HL60 HOR_RIO [_L_SK_]
4 Selecd6n de su "HUSO HORARIO".
• Cuando presione [VOL AFT], el MUSO
HORARIO cambiar_& como se indica a conlin-
uaci6n.
[ALASKA]
[NAtAl]
[IPACIRCO]
[MONTANA]
[CENTRAL]
[ORIENTAL]
[ATLA_ITICO]
• Basandose en la informaci6n horada eslandar
rnundial adquirida mediante la radiodifusi6n
digital, la di_rencia horaria se aiustara del
siguiente raodo.
ALASKA -9 horas
HAWAI -10 horas
PACiFICO -8 horas
MONTAi_A -7 horas
CENTRAL -6 horas
ORIENTAL -5 horas
ATLANTICO -4 horas
Para salir del ment_, presione [MENU].
63
W
I'-
63
,-3
O
O
ES

Antes de Ilamar al servicio t@cnico, compruebe una vez m&s el siguiente cuadro.
" " I']'11't11"1
No hay cou iente * Aseg_lrese de que el cable de alimentaci6n est', enchu-
lado eRe[ ton_acorrierlte
• Si se produce un fallo de corriente, desenchufe el cable
de alJmentaci6n durante 30 minutos para permitir que [a
unidad se reinicie pot si misma
No hay imagen o sonido - Compruebe que esta encendida la corriente
• Compruebe la conexi6n del tomacorfiente.
• Compruebe la antena o el cable de conexi6n de la
unidad principal¸
• Si esta usando Ll_t _t_te_t ex_erior_ compruebe el estado
del cable asi como el de la conexi6n
• Trate de vet otros C;A_ales. Puede que Sea un problema
de la emisora gue esta sintonizando
• Apague la corrlen_e_ espere aproximadamen_e 1 miRuto
y enciendala de nuevo
No hay color • Compruebe la antena o la conexi6n del cable que va a la
unidad principal¸
• Si esta usando una antena exterior, compruebe el estado
del cable asi como el de la conexi6n
• Trate de vet o_ros ca_ales. Puede que Sea UR prob[ema
de la emisora que esta sintonizando
• Ajuste el color en la pantalla MENU¸
E[ sonido es collecto, [a imagenes • Compruebe la antena o la conexion del cable que va a la
deficiente unidad principal¸
• Si esta usando u_a _t_te_fft exterior_ compruebe e[ estado
del cable asi como el de la conexi6n
• Las ondas electricas pueden verse intedefidas debido a
la excesiva pro×imidad de algt)n elect rodom&stico.
• Auste el CONTRASTE y la CLARIDAD en la pantalla
_ENU
• Trate de vet o_ros ca_lales Puede que sea UR prob[ema
de la emisora que esta sintonizando
[magen distolsionada • Siesta usando una antena exterior, compruebe el estado
del cable asi como el de la conexi6n
• Trate de vet o_ros ca_lales. Puede que Sea UR prob[ema
de la emisora que esta sintonizando
[magen d@bi[ • Compruebe la antena o la conexion del cable que va a la
unidad principal¸
• Si esta usando una antena exterior, compruebe el estado
del cable asi como el de la conexi6n
• Aiust e el CONTRASTE y la CkARIDAD en la pantalla MENU¸
• Trate de vet otros ca_lales Puede que Sea UR problema
de la emisora que esta sintonizando
Lin_as O rayons en IEI imElge[/ • Si es_a usaRdo Una arlte_la ex_erior_ compruebe el estado
del cable asi como el de la conexi6n
• Las ondas el6ctricas pueden verse intefleridas debido a
la excesiva proximidad de algtin elect rodomestico.
• Trate de vet o_ros ca_lales. Puede que Sea UR prob[ema
de la emisora que esta sintonizando
[mag_n borrosa • Si esta us_lRdo U_Ia arlte_la ex_erior_ compruebe el estado
del cable asi como el de la conexi6n
• Trate de vet o_ros canales Puede que Sea UR prob[ema
de la emisora que esta sintonizando
[mag÷nes tantasma • Compruebe la antena o la conexi6n del cable que va a la
unidad principal¸
• Si esta us_Rdo Una a_lte_la ex_erior_ compruebe el est ado
del cable asi como el de la conexi6n
• Las ondas electricas pueden verse intefleridas debido a
la excesiva proximidad de algtin elect rodomestico.
• Trate de vet o_ros ca_lales. Puede que Sea UR prob[ema
de la emisora que esta sintonizando
ES

I1";11'111"i
Banes en la pantalla - Siesta usando una antena exterior, compruebe el estedo
del cable asi como el de le conexi6n
• Las ondas ei+_ctricas pueden verse intederidas debido e
le excesiva proximided de elgt]n electrodomestico
La imagen se despiaze velticalmente • SiestA usando una antena exterior compruebe el estedo
de cabeas comoe de econex6n.
• Las ondas e[ectdcas pueden verse intederidas debido e
[e excesiva proximided de algt]n eiectrodom6stico
• Trete de ver otros canaies. Puede que see un probieme
de la emisora que est& sintonizando
Marcas de oho colol en la pant alia • Aleje el TV de cuaiquier elect rodomestico qua pueda
baber cercano Apague [a corriente, espere unos 30 min-
utos y vuelva a encender[a
• Trete de ver otros canales. Puede que see un probleme
de la emisora que estA sintonizando
Recepci6n defectuosa de algunos • Compruebe le antena o la conexion del cable que va a la
canales • unidad principal
Si esta usando una antena exterior, compruebe el estedo
del cable asi corno el de la conexi6n.
• Las ondas electdcas pueden verse intederidas debido e
la excesiva proximidad de elg_]n electrodom6stico
• Trete de ver otros canales. Puede que sea un probleme
de la emisora que esta sintonizando
La imagen es coil ecta, el sonido es • Las ondas el+_ctdcas pueden verse intederidas debido e
deficiente la excesiva proximidad de alg_]n electrodomestico
• Trete de ver otros canales. Puede que see un probleme
de la emisora que estA sintonizando
El mando a dist ancia no funciona • Compruebe la entena o la conexion del cable que va ale
unided principal.
• Compruebe el estedo de las piles
• Compruebe que no haya obstaculos entre el sensor y el
mando a distancia.
• Haga una prueba de salida de sehal Si est& bien,,,Ruede
heber un fallo del sensor a distancia (Consulte el VERI-
FICACION DE LA SEPAL DE INFRARROJOS" en la
p_gina 36.)
Problemas con los Subtitulos
Se ven subtituios con elroles ortogl;_fi _ • En Jas emisiones en directo, las empresas encargadas
cos de reMizar los subtitulos pueden emifir programas sin
una correcci6n ortogr_fica previa
No se van los subtitulos pol compieto, • En Jas emisiones en directo es normal que los su[)tituJos
o ap_alecen rat res;ldos con lespeeto ;1[ vayan retrasados UNO_ segunrJo_ con respecto e los dial =
dialogo ogos reales. La mayorie de empresas que se dedican a
la producci6n de subtitulos pueden mostrar los di&logos
a un maximo de 220 palabras pot minuto. Si el dialogo
excede esta velocidad se utilize une edici6n selective
pare asegurar que os subt tu os permanecen actua za+
dos con respecto el dialogo que se esta viendo en cede
momento.
Los subtitulos epalecen como un • Cuando las ondes electricas se yen intederidas debido e
recuadlo blenco No se yen los subtitu+ edificios condiciones meteorol6gicas, etc se podrien
lOS en los plo_l_lr}_s que Si los tier}el} vet OS subt tu os de una orma ncomp eta
• ha estaci6n emisore puede ecortar los programes pare
inserter anuncios. El descodificador de subtitulo_ no
puede leer la inforrnaci6n de los progremes acortedos.
No subtitulos al cinta
• La cinta de video puede ser una co)pie iiegal o la sebel
se vefl
poner
una
de los subtitulos podrie haber fallado durente el procesode video que los tiene
de copiado
• Estb, seieccionado el modo EXTO pare los subtitulos
Seve un lecuadro negro en la pantalla Se ecc one Cl , C2 o OF [iF]
d)
O
r_
X
ES

GI.,,QSABIQ
Ancho buz6n
E[ ancho buz6n se refiere al for-
mato gue muest_ una ima_en
alargada en la panfalla de tele=
visi6n con una proporcidn estan-
dar 4:3 y con espacios en negro
pot su parte superior e inferio_ Se
LIsa para mantener la propo[cidn
de la fuente original, como puede
ser una peiicula de cine (16:9 o
m_,sancho).
ATSC
Acl6nimo de Advanced Television
Systems Commitee y nombre del
estandar de radiodifusi6n digital
en Estados Unidos.
ii[i[i[ii_ _i(iiiiiiiiiiiiiiiiiiiiiiiiiiiiiJj[i[iiIIIIiiiiiiiiiiiiiiiiiiiiiiiiiiiiiiiiiiiiiiiiiiiiiiiiiiiiiiiiiiiiiiii
NTSC
Acr6nimo de National Television
Systems Commitee y nombre del
est&ndar de radiodifusi6n ana[6gi-
co actual empleado en Estados
Unidos.
Salida S-Video
PropoJciona independientemente
la serial de color (C) y la de lumi-
nancia (Y) al TV como seriales de
video, con Io que se obtiene una
mayor calidad de imagen.
TV de alta definicidn
(HDTV o High DefinitionTV)
01timo formato digital que produce
una a[ta resolucidn y calidad de
imagen.
TV de definicidn est_ndar
(SDTV o Standard Definition TV)
Formato digital est&ndar cuya cal-
idad es similar a la imagen NTSC.
SAP
(Secondary Audio Program)
Canal de audio secundario que se
ofrece apaJte del canal de audio
principal Este canal se usa como
alternafiva en las emisiones bil-
ing_Jes.
• Limpie el pane[ frontal y el resto de superficies
exteriores del TV con un pario suave empapado en
agua tibia y totalmente escurrido.
• No utilice nunca disolventes o alcohol. No use
inrecticidas en aerosol cerca de[ TV. Los agente5
quimicos que contienen podrian provocar darios y
la decoloraci6n de las superficies expuestas.
Limpie el tubo de imagen del TV con un p ai_o suave.
Antes de hacedo, desconecte el cable de la cord-
en{@.
= = , ,= , 0
• Si su TV se esh opea, no intente reparado usted
mismo. Dentro de[ equipo no hay piezas clue
puedan arreglar los usuarios. Apague[o,
desconectelo de la corriente y Ilame al numero de
telefono que aparece en la portada para Ioca[izar
al Centro de Servicio Autorizado.
Si el mando a distancia tiene prob[emas, pruebe si
el mando a distancia envia la serial de infrarroios a
la _adio AM o una cama_a digital (incluyendo la
camara integ_ada en un telefono ce[ular). Ayuda_& a
determinar la causa del real funcionamiento.
• Con una radio AM:
Sintonice una radio AM a una ___.
handa sin emisoras. PreoJone LIB
boron en e[ mando a distancia
hacia la radio. El sonido se
escuchara con interrnitencia cuan-
do presione una tecla y la radio
reciba la sei_a[. Esto signiflca que
la unidad del mando a distancia
esta funcionando.
@
• Con una cAmara digital
(incluyendo la camara integrada en un
telefono celula r):
Apunte una camara digital hacia el
mando a distancia y mantenga pre-
sionado un boron en el mando a dis-
tancia. Si aparece una luz de infrarro-
ios en la camara digital, el mando a
distancia esta funcionando.
ES

E PEC,F,CAC,O.ES
Sistema de televisi6n: NTSC-M
TV estandaJ
Sistema de
subtitulos narrativos:
eama d@ canal@s
VHF:
UHF:
DTV:
CATV:
Sistema de sintonizaci6n:
Acceso de canal:
Terminal@9
Enlrada de antena:
§15.119/FCC
2 13
14-69
2 69
2 -13, A-W,
W+I _ W+84,
A°5 _ A-t, 5A
Sistema de sintonizaci6n
sintetizada de frecuencia de
canales
Teclado de accego dhecto,
programable para barddo
arriba/abajo
VHF/UHF/CATV/DTV
75 ohmios desequilibrado
(tipo F)
Enhada S-Video: Toma de 4 patillas Mini DIN
Entrada de video: Conector RCA x 2
(1 frontal / I trasero)
Entrada de audio: Conector RCA x 4
(2 (L/R) x frontal / 2 ([JR) x traseros)
Salida digital coaxial de audio:
Toma de una patilla, 500 mmVpp (75 ohmios)
Enhada de video/audio componente
Una toma de patiiia (Y) / tVpp (75 ohmios)
Dos tomas de patiila (Cb/Cr) / 700mVpp (75ohmic,s)
Conector RCA x 2 (L/R)
Sistema de sonido estereo
2 aRavoces
Saiida de sonido: 2W, 8 ohmios x 2
Mando a distancia: Sistema de infrarrojos con
Temperatura de
funcionamiento:
Requisitos electdcos:
Consumo elect rico
(maximo):
Tubo de imagen:
Dimensiones:
Peso:
codificaci6n digital
5'C a 40_C
(41'F a 104'F)
CAde120V, 60Hz
140W
32 pulg.
AI : 26-3/16 pulg. (665mm)
An :33-7/16 pulg. (849mm)
Prof: 21-1/4 pulg. (540ram)
112,4 Ibs. (51kg)
I,U
z
O
I#.
W
a.
I,U
• El diseho y las especificaciones est_n sujetos a cambios sin previo aviso y sin obligaci6n legal.
• Si hay una diferencia entre idiomag, el idioma bagico sera el ingl6s.
ES

SYLVANIA
GARANTEA LIMITADA
FUNAI CORE reparara este producto libre de cargos en los EE.UU. de Am6_ica, en caso de defectos en los
r_/ateriales u obra de mar_o_ de _a 8ig uiel/_ mar_e_:
DURACION:
Partes: FUNAI CORE proveera ]as partes necesanas para _eemp]aza_ ]as piezas defectuosas sin ningt]n
cargo durante un (1) aho a parti_ de la fecha de la oompra o_iginal al mEnodsta. Dos (2) ahos para eF
Tuba Cat6dEco. Ciertas partes quedan exciuidas de esta garantla.
Maria de obra: FUNAI CORE proveera la mano de obra necesa_ia sin cargos par L_nperiodo de noventa (90) dias a
partir de la fecha de compra originaE aEminorista.
LIMITES Y EXCLUSIONES:
ESTA GARANTiA ES EXTE NSIVA SOLAMENTE AL COMPRADOR ORIGINAL DEL MINORISTA. UN RECIBO DE
COMPRA U OTRA PRUEBA DE LA COMPRA ORIGINAL SER,_ REQUERIDA JUNTO CON EL PRODUCTO PARA
OBTENER SERVICIO CUBIE RTO PaR ESTA GARANTiA.
Esta garantla no sera extendida a ninguna otra pelsona o cesionario.
Esta garant_a queda anulada y no tendra eiecto si cualquie_ n0mero se_iaEdel p_oducto es alte_ado, reemplazado,
muti_ado o faltante, o si un centlo de servicio no autorizado intenta realizar reparaciones. Esta garantla limitada no
es apEicab[e a ct_aEquie_producto que no haya s[do oomprado y usado en los Estados Unidos de Am6rica.
Es_a garantla solamente cubre fallas debido a delectos en los materiales omano de obla que hayan ooulrido
dural/re el usa {_or{r_&ldel ploducto. Pal _otal/to {_octibre danos ooulridos durarlte su tra{_spor re, o f_Has causadas
par su reparaoi6n, aEteraoi6n o productos no provJstos par FUNAI CORPORATION, o danos que resulten de
accidentes, r_/aEusa, abuso, rnaEtrato, usa indebido, alteraoi6n, instaEaci6n deiectuosa, mantenimiento inoolrecto, usa
0_{ £1ercia] corl/o e{3 ]io_eles_ re{3ta u o ficil/as_ o danos coma co{3secL_el3 cia de ill cell dio_ il%l{_daoi61/, rayos L_ arras
casos d_ fuerza maYol.
ESTA GARANTIA NO CUBRE LOS MATERIALES DE EM PAQUE, NINGUN ACCES©RIO (EXCEPTO EL
CONTROL REMOTO), NINGUNA PARTE COSMETICA, PARTES COMPLETAS DE MONTA3E, DEMOSTRACION
O MODELOS DE EXHIBICION.
FUNAI CORE Y SUS REPRESENTANTES O AGENTES NO SERAN SOMETIDOS BAJO NINGUN CONCEPTO A
NINGUNA RESPONSABILIDAD PaR DAllas GENERALES, INDIRECTOS O COMa CONSECUENCIA,
ORIGINADOS U OCASIONADOS PaR EL usa O LA INCAPACIDAD DE USAR ESTE PRODUCTO. ESTA
GARANTIA ES EMITIDA EN LUGAR DE CUALOUIER OTRA GARANTIA, EXPRESA O IMPLICITA, Y DE
CUALQUIER OTRA RESPONSABILIDAD DE PARTE DE FUNAL CUALOUIER OTRA GARANTIA INCLUYENDO
LA GARANTIA DE COMERCIAUZACION, Y APTITUD PARA UN O£JETIVO EN PARTICULAR, QUEDA PaR LA
PRESENTE RECHAZADA PaR FUNAI Y SUS REPRESENTANTES EN LOS ESTADOS UNIDOS DE AMERICA.
CUALQUIER INSPECCION Y REPARACION BAJO GARANTIA DEBERA SER REAUZADA PaR EL CENTRO DE
SERVICIO AUTORIZADO. ESTA GARANTIA ES VALiDA CUANDO EL APARATO ES LLEVADO A UN CENTRO DE
SERVICIO AUTQRIZADO.
EL PRODUCTO DEBERA LLEGAR ACOMPANADO PaR UNA COPIA DEL RECIBO ORIGINAL DE COMPRA. SI
NO SE AGREGA NINGUN COMPROBANTE DE LA COMPRA, LA GARANTIA NO TENDRA VALiDEZ Y LOS
GASTOS DE REPARACION SERAN CARGADOS AL CL_ENTE.
IMPORTANTE:
ESTA GARANTIA LIM ITADA LE OTORGA A USTED DERECHOS LEGALES ESPECIALES. POSIBLEMENTE
USTED TENGA OTF_)S DERECHOS CUE VARIAN DE ACUERDO AL ESTADO EN QUE VIVE. SI, EN
CUALQUIER MOMENTa DURANTE EL PERIODO DE GARANTIA USTED SE VE IMPEDIDO DE SENTIRSE
SATISFECHO CON LA REPARACI©N DE ESTE PRODUCTO, PaR FAVOR CONTACTE A FUNAI CORE
ATENClON:
FUNAI CORE SE RESERVA EL DERECHO A MODIFICAR CUALQUIER PARTE DEL
DISENO DE ESTE PRODUCTO SIN PREVIO AVISO.
Para Iocalizar su CENTRO DE SERVICIO AUTORIZADO mas cercano o para preguntas
generales de servicio, par favor ponte en contacto con nosotros a
FUNAI CORPORATION
Servicio al Cliente
Tel :1-800-605-8453
http:Hwww.Syl vaniaConsu merElectronics.com
19900 Van Ness Avenue, Torrance, CA 90501
L4905UF
-
 1
1
-
 2
2
-
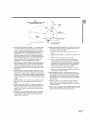 3
3
-
 4
4
-
 5
5
-
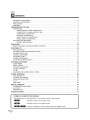 6
6
-
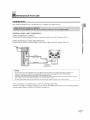 7
7
-
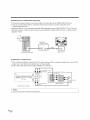 8
8
-
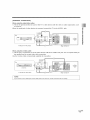 9
9
-
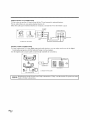 10
10
-
 11
11
-
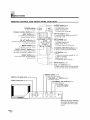 12
12
-
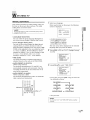 13
13
-
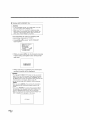 14
14
-
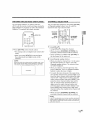 15
15
-
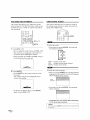 16
16
-
 17
17
-
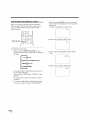 18
18
-
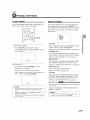 19
19
-
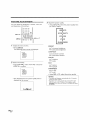 20
20
-
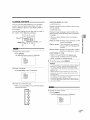 21
21
-
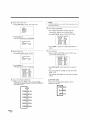 22
22
-
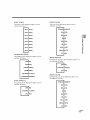 23
23
-
 24
24
-
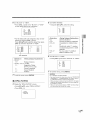 25
25
-
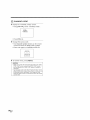 26
26
-
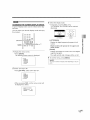 27
27
-
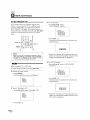 28
28
-
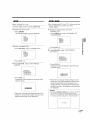 29
29
-
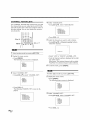 30
30
-
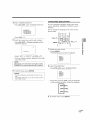 31
31
-
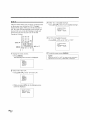 32
32
-
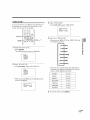 33
33
-
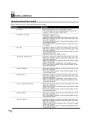 34
34
-
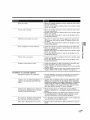 35
35
-
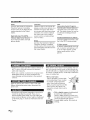 36
36
-
 37
37
-
 38
38
-
 39
39
-
 40
40
-
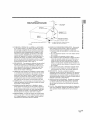 41
41
-
 42
42
-
 43
43
-
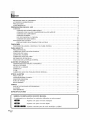 44
44
-
 45
45
-
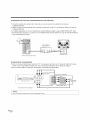 46
46
-
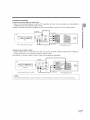 47
47
-
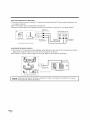 48
48
-
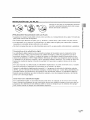 49
49
-
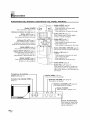 50
50
-
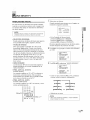 51
51
-
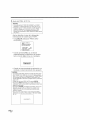 52
52
-
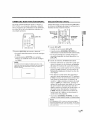 53
53
-
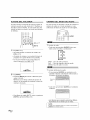 54
54
-
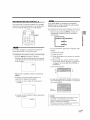 55
55
-
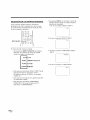 56
56
-
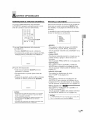 57
57
-
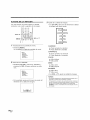 58
58
-
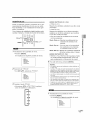 59
59
-
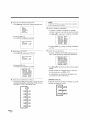 60
60
-
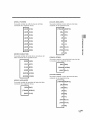 61
61
-
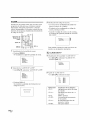 62
62
-
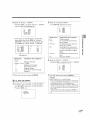 63
63
-
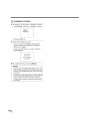 64
64
-
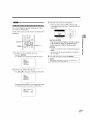 65
65
-
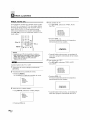 66
66
-
 67
67
-
 68
68
-
 69
69
-
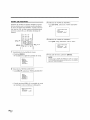 70
70
-
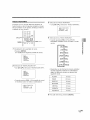 71
71
-
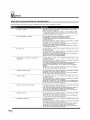 72
72
-
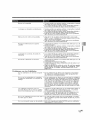 73
73
-
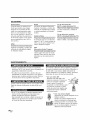 74
74
-
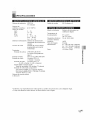 75
75
-
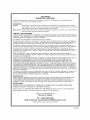 76
76


Sylvania 6432GG El manual del propietario
- Tipo
- El manual del propietario
en otros idiomas
- English: Sylvania 6432GG Owner's manual
Artículos relacionados
-
Sylvania 6427GFF El manual del propietario
-
-
-
-
-
-
-
-