Hampton Bay 19708-000 Instrucciones de operación
- Tipo
- Instrucciones de operación

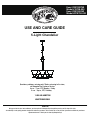
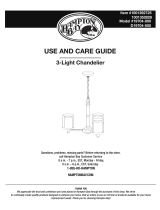
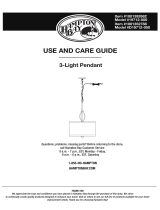
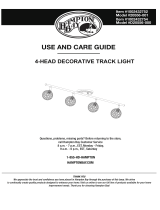
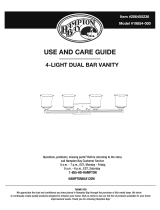
USE AND CARE GUIDE
Item #1001392759
Model #19708-000
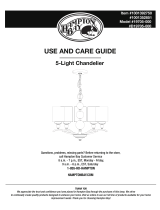
5-Light Chandelier
THANK YOU
to continually create quality products designed to enhance your home. Visit us online to see our full line of products available for your home
improvement needs. Thank you for choosing Hampton Bay!
We appreciate the trust and condence you have placed in Hampton Bay through the purchase of this lamp. We strive
Questions, problems, missing parts? Before returning to the store,
call Hampton Bay Customer Service
8 a.m. - 7 p.m., EST, Monday - Friday,
1-855-HD-HAMPTON
HAMPTONBAY.COM
9 a.m. - 6 p.m., EST, Saturday
Item #1001353163
Model #D19708-000

2
Table of Contents
Table of Contents . . . . . . . . . . . . . . . . . . . . . . . . . . . . . . . . . . . 2
Safety Information . . . . . . . . . . . . . . . . . . . . . . . . . . . . . . . . . . 2
Warranty . . . . . . . . . . . . . . . . . . . . . . . . . . . . . . . . . . . . . . . . . . 2
Pre-Installation . . . . . . . . . . . . . . . . . . . . . . . . . . . . . . . . . . . . . 3
Tools Required . . . . . . . . . . . . . . . . . . . . . . . . . . . . . . . . . . . . 3
Hardware Included . . . . . . . . . . . . . . . . . . . . . . . . . . . . . . . . . 3
Installation
. . . . . . . . . . . . . . . . . . . . . . . . . . . . . . . . . . . . . . . . 5
Care and Cleaning . . . . . . . . . . . . . . . . . . . . . . . . . . . . . . . . . . 6
Warranty
ONE YEAR MANUFACTURER WARRANTY
WHAT IS COVERED
The manufacturer warrants this unit to be free from defects in materials and workmanship for a period of one (1) year from date of purchase.
This warranty applies only to the original consumer purchaser and only to products used in normal use and service. If this product is found to be
defective, the manufacturer’s only obligation, and your exclusive remedy, is the repair or replacement of the product at the manufacturer’s
discretion, provided that the product has not been damaged through misuse, abuse, accident, modifications, alterations, neglect, or mishandling.
This warranty shall not apply to any product that is found to have been improperly installed, setup, or used in any way not in accordance with the
instructions supplied with the product. This warranty shall not apply to a failure of the product as a result of an accident, misuse, abuse,
negligence, alteration, faulty installation, or any other failure not relating to faulty material or workmanship.
This warranty shall not apply to the finish on any portion of the product, such as surface and/or weathering, as this is considered normal wear
and tear.
WHAT IS NOT COVERED
Package Contents
. . . . . . . . . . . . . . . . . . . . . . . . . . . 4. . . . . .
Troubleshooting
. . . . . . . . . . . . . . . . . . . . . . . . . . . . . . . . . . 6 . .
The manufacturer does not warrant and specifically disclaims any warranty, whether express or implied, of fitness for a particular purpose,
other than the warranty contained herein. The manufacturer specifically disclaims any liability and shall not be liable for any consequential
or incidental loss or damage, including but not limited to any labor/ expense costs involved in the replacement or repair of said product.
Contact the Customer Service Team at 1-855-HD-HAMPTON or visit www.hamptonbay.com.
Safety Information
WARNING: RISK OF ELECTRIC SHOCK. Before starting the
installation, disconnect the power by turning off the circuit
breaker or by removing the appropriate fuse at the fuse
prevent electrical shock.
WARNING:
Inspect the wire insulation for any cuts,
abrasions, or exposed copper that may have resulted
during shipping. If there is a defect in the wire, do not
attempt installation. Please call our Customer Service
Team at 1-855-HD-HAMPTON.
box. Turning the power off at the switch is not sufficient to

3
HAMPTONBAY.COM
Please contact 1-855-HD-HAMPTON for further assistance.
Pre-Installation
Read all instructions before assembling.
To avoid damaging this product, assemble it on a soft, non-abrasive, surface such as a carpet or cardboard.
Keep the receipt and these instructions for proof of purchase.
□
□
□
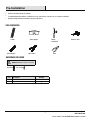
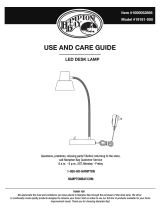
TOOLS REQUIRED
HARDWARE INCLUDED
NOTE: Hardware not shown to actual size.
AA
ytitnauQnoitpircseDtraP
AA
2
Junction Box Screw
BB
Wire Connector
3
Ladder Safety goggles
Phillips
screwdriver
Wire Strippers
Wire cutters
Pliers
Electrical Tape
BB

4
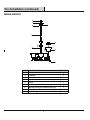
Pre-Installation (continued)
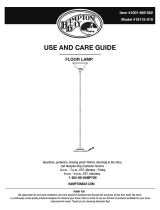
PACKAGE CONTENTS
Center Tube
A
1
Lamp BodyB
5
Shade C
D
1
5
ytitnauQnoitpircseDtraP
Socket Ring (preassembled to Lamp Body (B))
E
Canopy
1
F
1
G
Chain (preassembled to screw collar (I))
1
H
Mounting Bracket (preassembled to canopy (E))
1
I
Canopy Nut (preassembled to screw collar (I))
1
Screw Collar (preassembled to mounting bracket (G))
E
F
G
I
H
D
C
A
B

5 HAMPTONBAY.COM
Please contact 1-855-HD-HAMPTON for further assistance.
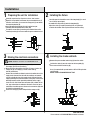
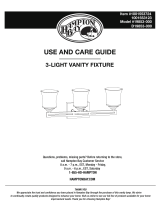
Installation
3
Making the electrical connections
4
Installing the shade and bulb
Remove the preassembled socket ring (D) from the socket.
Position the shade (C) over the socket on the lamp body (B),
then secure with the socket ring (D).
Uses (5) standard bulbs up to 60 watts or CFL or LED equivalent
(not included).
DO NOT EXCEED RECOMMENDED WATTAGE.
Make the connections to a 120V AC 60Hz circuit.
NOTE:
1
Preparing the unit for installation
Installing the xture
2
Adjust the chain (F) length by removing links at a point best
suited for the location and required distance from the ceiling.
Attach the chain (F) through the canopy nut (H) and
the canopy (E) to the screw collar (I).
Weave the wires through the chain links (F) every 3 inches, the
canopy nut (H), the canopy (E) and the screw collar (I)
into the junction box.
Connect the cord with the ribbed surface to the white wire of the
supply circuit. Connect the half with the markings and smooth
surface to the black wire of the supply circuit. Connect the bare
copper grounding wire from the xture, to the green screw on the
mounting bracket and the grounding conductor of the supply
circuit. Use U.L./CSA Listed wire connectors (BB) suitable for the
size, type and number of conductors. No loose strands or loose
connections should be present. Secure wire connectors (BB) with
U.L./CSA Listed electrical tape.
Secure the canopy (E) to the ceiling with the canopy nut (H).
Assemble the center tube (A) onto the lamp body (B).
Carefully open the chandelier arms of the lamp body (B) so each
arm is evenly spaced apart.
BB
I
H
E
F
Carefully unpack and lay all parts on a clean, level surface.
Open the rst quicklink and remove the preassembled chain (F)
from the screw collar (I), unscrew the canopy nut (H) and detach
the mounting bracket (G).
Install the mounting bracket (G) to the junction box (not
included) with two junction box screws (AA).
Thread the screw collar (I) onto the preassembled tube on the
mounting bracket (G) and secure with the preassembled hex nut.
I
G
AA
E
I
F
G
H
A
B
F
B
C
D

Care and Cleaning
Clean the unit with a soft, dry cloth.
Do not use any cleaners with chemicals, solvents, or harsh abrasives.
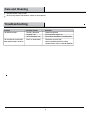
Troubleshooting
6
Possible Causes
The bulb will not light.
The bulb is burned out.
There is an exposed wire.
Replace the light bulb.
The power is off.
Ensure the power supply is on.
The circuit breaker is off.
Ensure the circuit breaker is in the ON position.
The fuse blows or circuit breaker
blows when the light is turned on.
Discontinue use of the lamp.
Contact a qualified electrician or call the
Customer Service Team at 1-855-HD-HAMPTON.
Solutions
Problem

Retain this manual for future use.
Questions, problems, missing parts? Before returning to the store,
call Hampton Bay Customer Service
8 a.m. - 7 p.m., EST, Monday - Friday,
1-855-HD-HAMPTON
HAMPTONBAY.COM
9 a.m. - 6 p.m., EST, Saturday

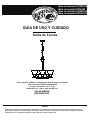
Araña de 5 luces
Núm. de artículo 1001392759
Núm. de modelo 19708-000
GUÍA DE USO Y CUIDADO
1-855-HD-HAMPTON
¿Tiene preguntas, problemas o faltan piezas? Antes de regresar a la tienda,
llame a Servicio al Cliente de Hampton Bay
de lunes a viernes de 8 a.m. a 7 p.m.,
sábado de 9 a.m. a 6 p.m., hora local del Este
HAMPTONBAY.COM
GRACIAS
Apreciamos la conanza que ha depositado en Hampton Bay por la compra de estas unidades de iluminación. Nos esforzamos por crear
continuamente productos de calidad diseñados para mejorar su hogar. Visítenos en internet para ver nuestra línea completa de productos
disponibles para sus necesidades de mejorar su hogar. ¡Gracias por elegir a Hampton Bay!
Núm. de artículo 1001353163
Núm. de modelo D19708-000

2
Información de seguridad
ADVERTENCIA: RIESGO DE DESCARGA ELÉCTRICA. Antes
de comenzar la instalación, desconecte la electricidad en el
interruptor de circuitos o caja de fusibles. No basta con
apagar el interruptor para evitar descargas eléctricas.
Garantía
GARANTÍA DE UN AÑO DEL FABRICANTE
QUÉ CUBRE
El fabricante garantiza esta unidad contra defectos de materiales y de mano de obra por un período de un (1) año a contar de la fecha
de compra.
Esta garantía aplica sólo al consumidor comprador original y sólo a productos que han tenido un uso y servicio normal. Si este producto
tiene fallas, la única obligación del fabricante, y el único recurso del consumidor, será la reparación o el reemplazo del producto, a discreción
del fabricante, siempre que el producto no haya cambiado como consecuencia de su mal uso, abuso, accidente, modicaciones, alteraciones,
abandono o maltrato. Esta garantía no aplica a ningún producto que haya sido instalado o montado indebidamente, o utilizado de una manera
que no aparezca indicada en las instrucciones que vienen con el producto. Esta garantía no aplicará a un producto cuya falla se deba a accidente,
mal uso, abuso, abandono, alteración, instalación defectuosa o cualquier otra falla que no se relacione con defectos de materiales o de mano de
obra. Esta garantía no aplicará al acabado de ninguna parte del producto, por ejemplo la supercie, ni al desgaste producido por los elementos,
ya que esto se considera un desgaste normal.
QUÉ NO CUBRE
El fabricante no garantiza y especícamente niega ofrecer una garantía, explícita o implícita, de que el producto sea apropiado para un propósito
en particular, fuera del contenido en esta garantía. El fabricante especícamente niega tener responsabilidad, y no se hará responsable de
cualquier pérdida o daño consiguiente o secundario, que incluya pero no se limite a cualquier costo de mano de obra o gastos incurridos para
reemplazar o reparar el producto en cuestión.
Llame al Equipo de Atención al Cliente al 1-855-HD-HAMPTON o visite www.hamptonbay.com.
ADVERTENCIA:
Revise el aislamiento del hilo para
conrmar que durante el transporte no se haya cortado
o raspado, o que no tenga cobre expuesto. Si el hilo
tiene algún defecto, no proceda con el ensamblaje.
Llame a nuestro equipo de atención al cliente al
1-855-HD-HAMPTON.
Índice . . . . . . . . . . . . . . . . . . . . . . . . . . . . . . . . . . . . . 2
Información de seguridad . . . . . . . . . . . . . . . . . . . . . . . . . . . . 2
Garantía. . . . . . . . . . . . . . . . . . . . . . . . . . . . . . . . . . . . . . . . . . . 2
Previo al ensamblaje . . . . . . . . . . . . . . . . . . . . . . . . . . . . . . . . 3
Herramientas requeridas. . . . . . . . . . . . . . . . . . . . . . . . . . . . . . 3
Accesorios de montaje incluido s . . . . . . . . . . . . . . . . . . . . . 3
Instalación
. . . . . . . . . . . . . . . . . . . . . . . . . . . . . . . . . . . . . . . . 5
Cuidado y limpieza . . . . . . . . . . . . . . . . . . . . . . . . . . . . . . . . . . 6
Contenido del empaque
. . . . . . . . . . . . . . . . . . . . . . . . . . . 4 .
Resolución de problemas
. . . . . . . . . . . . . . . . . . . . . . . . . . . . . .6
Índice

3
□
□
□
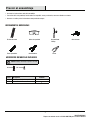
HERRAMIENTAS NECESARIAS
ACCESORIOS DE MONTAJE INCLUIDOS
AA
AA
2
Tornillo para la caja de empalme
BB
Conector de hilos
3
Escalera de mano
Gafas de seguridad
Destornillador
Phillips
Cortaalambres
Pinzas
Cinta aislante
Pinzas pelacables
BB
HAMPTONBAY.COM
Póngase en contacto con el 1-855-HD-HAMPTON para asistencia adicional.
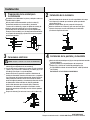
Lea todas las instrucciones antes del ensamblaje.
Para evitar dañar este producto, ármelo sobre una supercie suave y no abrasiva, como una alfombra o cartones.
Conserve su recibo y estas instrucciones como prueba de compra.
CantidadDescripciónPieza
Previor al ensamblaje
NOTA: El equipo de montaje no aparece a escala.

4
CONTENIDO DEL EMPAQUE
Vástago central
A
1
Cuerpo de la lámparaB
5
Pantalla C
D
1
5
Anillo del portalámparas (previamente montado en el
Cuerpo de la lámpara (B))
E
Cubierta
1
F 1
G
Cadena (previamente montada en el aro roscable (I))
1
H
Soporte de montaje (previamente montado en la
cubierta (E))
1
I
Tuerca de la cubierta (previamente montada en el
aro roscable (I))
1
Aro roscable (previamente montado en el soporte
de montaje (G))
E
F
G
I
H
D
C
A
B
Cantidad
Descripción
Pieza
Pre-instalación (continuación)

5
Instalación
3
Conexiones eléctricas
4
Instalación de la pantalla y la bombilla
Retire el anillo del portalámparas (D) que viene previamente montado
en el portalámparas.
Ponga la pantalla (C) en el portalámparas del cuerpo de la
lámpara (B), y ajústela con el anillo del portalámparas (D).
Usa (5) bombillas estándar de hasta 60 W o CFL, o LED equivalente
(no incluidas).
NO EXCEDA EL VATAJE MÁXIMO RECOMENDADO.
Haga las conexiones a un circuito de 120V AC 60Hz.
NOTA:
1
Preparación de la unidad para
Instalación de la luminaria
2
Quite los eslabones de la cadena (F) que sean necesarios para
ajustarla al largo que sea más conveniente para la ubicación
y la distancia requerida del techo.
Inserte la cadena (F) por la tuerca de la cubierta (H) y la
cubierta (E) para engancharla al aro roscable (I).
Pase los hilos por los eslabones de la cadena (F) cada 3 pulgadas
(aprox. 8 cm), la tuerca de la cubierta (H), la cubierta (E) y el aro
roscable (I) hasta llegar a la caja de empalme.
Conecte el hilo con la supercie acanalada al hilo blanco del
circuito de alimentación. Conecte el hilo con marcas y supercie
lisa al hilo negro del circuito de alimentación. Conecte el hilo de
cobre pelado para conexión a tierra de la luminaria al tornillo
verde del soporte de montaje y al conductor de tierra del circuito
de alimentación. Utilice conectores de hilo (BB) aprobados
por U.L./CSA adecuados para el tamaño, tipo y número de
conductores. No deberían quedar hilos o conexiones sueltos.
Asegure los conectores de hilo (BB) con cinta aislante aprobada
por U.L./CSA.
Asegure la cubierta (E) al techo con la tuerca de la cubierta (H).
Monte el vástago central (A) en el cuerpo de la lámpara (B).
Abra delicadamente los brazos de la araña separándolos del cuerpo
de la lámpara (B) de modo que cada brazo quede separado del
otro en forma pareja.
A
B
Desembale con cuidado todas las piezas y colóquelas sobre una
supercie limpia y plana.
Abra el primer eslabón desmontable y retire la cadena (F)
previamente montada en el aro roscable (I), destornille
la tuerca de la cubierta (H) y separe el soporte de montaje (G).
Instale el soporte de montaje (G) en la caja de empalme
(no incluida) con los dos tornillos de la caja de empalme (AA).
Enrosque el aro roscable (I) en el vástago previamente montado
en el soporte de montaje (G) y ajústelo con la tuerca hexagonal
previamente montada.
I
G
AA
E
I
F
G
H
F
la instalación
BB
I
H
E
F
B
C
D
HAMPTONBAY.COM
Póngase en contacto con el 1-855-HD-HAMPTON para asistencia adicional.

6
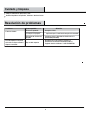
Cuidado y limpieza
Limpie la unidad con un paño suave y seco.
No utilice limpiadores con químicos, solventes o abrasivos fuertes.
Resolución de problemas
Problema
Causa posible
El foco no alumbra.
El foco está quemado.
Hay un cable expuesto.
Reemplace el foco.
La energía está apagada.
Asegúrese de que el suministro de energía esté encendido.
El disyuntor de circuito está
apagado.
Asegúrese de que el disyuntor de circuito esté en la
posición ON (encendido).
El fusible explota o el disyuntor
de circuito se dispara cuando la
lámpara se enciende.
Discontinúe el uso de la lámpara. Póngase en
contacto con un electricista calicado o llame al
Equipo de Servicio al Cliente al
1-855-HD-HAMPTON
.
Solución

1-855-HD-HAMPTON
Conserve este manual para uso futuro.
¿Tiene preguntas, problemas o faltan piezas? Antes de regresar a la tienda,
llame a Servicio al Cliente de Hampton Bay
de lunes a viernes de 8 a.m. a 7 p.m.,
sábado de 9 a.m. a 6 p.m., hora local del Este.
HAMPTONBAY.COM
-
 1
1
-
 2
2
-
 3
3
-
 4
4
-
 5
5
-
 6
6
-
 7
7
-
 8
8
-
 9
9
-
 10
10
-
 11
11
-
 12
12
-
 13
13
-
 14
14


Hampton Bay 19708-000 Instrucciones de operación
- Tipo
- Instrucciones de operación
En otros idiomas
Documentos relacionados
-
 Hampton Bay 19706-000 Guía de instalación
-
 Hampton Bay 19704-000 Instrucciones de operación
-
 Hampton Bay 19712-000 Instrucciones de operación
-
 Hampton Bay 20556-001 Instrucciones de operación
-
 Hampton Bay 19705-000 Instrucciones de operación
-
 Catalina Lighting 19181-000 Manual de usuario
-
 Hampton Bay 18115-010 Guía de instalación
-
 Hampton Bay 19853-000 Instrucciones de operación
-
 Hampton Bay 19854-000 Guía de instalación
-
Hampton Bay GS-W041401BN Guía del usuario


