Printed in China
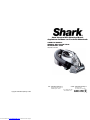
Model V15Z
9
ONE (1) YEAR LIMITED WARRANTY
EURO-PRO Operating LLC warrants this product to be free from defects in material and
workmanship for a period of one (1) year from the date of the original purchase, when utilized for
normal household use, subject to the following conditions, exclusions and exceptions.
If your appliance fails to operate properly while in use under normal household conditions within
the warranty period, return the complete appliance and accessories, freight prepaid to
In US: EURO-PRO Operating LLC, 94 Main Mill Street, Door 16, Plattsburgh, NY 12901
In Canada: EURO-PRO Operating LLC, 4400 Bois Franc, St. Laurent, QC, H4S 1A7
If the appliance is found by EURO-PRO to be defective in material or workmanship, EURO-PRO
will repair or replace it free of charge. Proof of purchase date and $ 9.95 to cover the cost of return
shipping and handling must be included. *
Non-durable parts including, without limitation, dust cup filters, filters, brushes and electrical parts
which normally require replacement are specifically excluded from warranty
.
The liability of EURO-PRO Operating LLCis limited solely to the cost of the repair or replacement
of the unit at our option. This warranty does not cover normal wear of parts and does not apply to
any unit that has been tampered with or used for commercial purposes. This limited warranty does
not cover damage caused by misuse, abuse, negligent handling or damage due to faulty
packaging or mishandling in transit. This warranty does not cover damage or defects caused by
or resulting from damages from shipping or repairs, service or alterations to the product or any of
its parts, which have been performed by a repair person not authorized by EURO-PRO Operating
LLC.
This warranty is extended to the original purchaser of the unit and excludes all other legal and/or
conventional warranties. The responsibility of EURO-PRO Operating LLCif any, is limited to the
specific obligations expressly assumed by it under the terms of the limited warranty. In no event is
EURO-PRO Operating LLC liable for incidental or consequential damages of any nature
whatsoever. Some states do not permit the exclusion or limitation of incidental or consequential
damages, so the above may not apply to you.
This warranty gives you specific legal rights, and you may also have other rights which vary from
state to state or province to province.
*Important: Carefully pack item to avoid damage in shipping. Be sure to include proof of
purchase date and to attach tag to item before packing with your name, complete address
and phone number with a note giving purchase information, model number and what you
believe is the problem with item. We recommend you insure the package (as damage in
shipping is not covered by your warranty). Mark the outside of your package “ATTENTION
CUSTOMER SERVICE”. WE are constantly striving to improve our products, therefore the
specifications contained herein are subject to change without notice.
------------------------------------------------------------------------------------------
OWNERSHIP REGISTRATION CARD
FOR CANADIAN CONSUMERS ONLY
Please fill out and mail the product registration card within ten (10) days of purchase. The
registration will enable us to contact you in the unlikely event of a product safety notification. By
returning this card you acknowledge to have read and understood the instructions for use, and
warnings set forth in the accompanying instructions. Return to:
EURO-PRO Operating LLC, 4400 BOIS FRANC, ST. LAURENT, QUEBEC, H4S 1A7
______________________________________________________________________
Appliance model
______________________________________________________________________
Date purchased Name of store
______________________________________________________________________
Owner’s name
______________________________________________________________________
Address City Prov. Postal Code
Model V15Z
PRECAUCIONES IMPORTANTES DE SEGURIDAD
CONSERVAR ESTAS INSTRUCCIONES
Sólo para Uso Doméstico
10
Rev. 11/07
Cuando se usa la aspiradora de mano Shark con escobilla motorizada se deben
tomar precauciones básicas de seguridad, incluyendo las siguientes:
ADVERTENCIA: Para reducir el riesgo de choque eléctrico, este artefacto tiene un enchufe
polarizado (una espiga es más ancha que la otra) y entra en un tomacorriente polarizado sólo
en una forma. Si no entra completamente, inviértalo. Si aún así no entra, llamar a un electricista
calificado para que instale un tomacorriente adecuado. No modificar el enchufe en forma
alguna.
1. Leer todas las instrucciones antes de
usar la aspiradora de mano Shark.
2. Usar la aspiradora sólo para lo que está
diseñada.
3. Para evitar choques eléctricos, no
sumergir parte alguna de este artefacto
en agua u otros líquidos.
4. Nunca desenchufar la aspiradora jalando
el cordón, hágalo jalando del enchufe.
5. No permitir que el cordón haga contacto
con superficies calientes.
6. No pasar la aspiradora sobre el cordón.
7. No operar la aspiradora si el cordón
o el enchufe están dañados; tampoco
cuando la aspiradora o cualquiera de
sus componentes se ha caído o dañado.
Para evitar el riesgo de choque eléctrico,
no desarmar ni intentar reparar la
aspiradora, devuélvala a EURO-PRO
Operating LLC para su revisión y
reparación (refiérase a la garantía). El
reensamblaje o reparación inadecuados
pueden causar choque eléctrico o
lesiones a las personas cuando se use.
8. Se requiere supervisión estrecha
cuando los niños usan cualquier artefacto
o cuando se opere cerca de ellos. No
dejar la aspiradora desatendida cuando
esté enchufada.
9. Mantener el cabello, ropa suelta, dedos y
todas las partes de su cuerpo alejadas de
las aberturas y piezas movibles.
10. No usar la aspiradora para recoger
líquidos inflamables o combustibles como
gasolina, ni usarla en áreas donde estos
materiales estén presentes.
11. No usar la aspiradora para recoger
materiales ardientes o humeantes como
cigarrillos, fósforos, cerillos o cenizas
calientes.
12. Tener cuidado especial cuando aspire
escaleras.
13. No usar la aspiradora sin el filtro en el
contenedor de polvo.
14. Este artefacto está diseñado sólo para
uso doméstico. Siga todas las
instrucciones en este manual.
Para reducir los riesgos de incendio, choque
eléctrico o lesiones:
• No dejar la aspiradora de mano enchufada
cuando no esté en uso ni cuando se le dé
servicio.
• No permitir que se use como juguete. Poner
atención cuando la usen los niños o se use
cerca de ellos, de mascotas o de plantas.
• Use sólo como se indica en este manual.
Sólo use los accesorios recomendados por
el fabricante.
• No jalar del cordón ni lo use como asa para
cargar la aspiradora, no jalar el cordón sobre
bordes o esquinas filosas. Mantener el
cordón alejado de superficies calientes.
• Sólo usar cordones de extensión aprobados
por UL o CUL de 15 amperios, los de menor
capacidad se pueden recalentar. Tenga
cuidado de extender el cordón de modo que
no puedan jalarlo o tropezarse con él
accidentalmente.
• Antes de enchufar o desenchufar la
aspiradora del tomacorriente, siempre
apagarla poniendo el interruptor en “OFF”.
• No jalar del cordón para desenchufar,
hacerlo del enchufe.
• No manipular el enchufe o la unidad con
las manos mojadas, ni operarla con los pies
descalzos.
• No introducir objetos en las aberturas del
artefacto, ni hacerlo funcionar si alguna
abertura está obstruida y mantenerla limpia,
sin acumulaciones de polvo, pelusas, pelos o
cualquier otro cosa que obstruya el flujo de
aire.
• Guardar el artefacto en un área interior fresca
y seca.
• Mantener el área de trabajo bien iluminada.
• No sumergir el artefacto en agua u otros
líquidos.
• Mantener el extremo de la manguera, tubos
de extensión y otras aberturas alejadas de
su cara y del cuerpo.
• Sólo usar la aspiradora en superficies secas.
• La conexión a corriente de voltaje
inadecuado puede dañar el motor y
posiblemente causar lesiones al usuario. El
voltaje está indicado en el rótulo de
especificaciones.


 1
1
 2
2
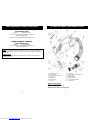 3
3
 4
4
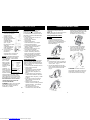 5
5
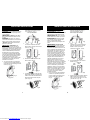 6
6
 7
7
 8
8
 9
9
 10
10


