QUICK START INSTRUCTIONS
OPERATION
QUICK START INSTRUCTIONS
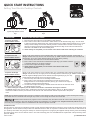
Setting Your Electric Cooktop Controls
p/n 318203400 REV B
1. Place correctly sized cookware on the radiant surface element.
2. Push in and turn the surface control knob in either direction to the desired setting (Fig. 1). Turn the knob
to adjust the setting if desired. Start most cooking operations on a higher setting and then turn to a lower
setting to nish cooking. Each surface element provides a constant amount of heat at each setting. A
glowing red surface heating area extending beyond the bottom edge of the cookware indicates the
cookware is too small for the surface heating area.
3. When cooking has completed, turn the surface control knob to OFF before removing the cookware.
To Operate the Single
Surface Radiant Element
IMPORTANT NOTES:
The instructions on this page are intended to provide a quick reference ONLY. Read all the instructions in the Use & Care Guide before using
this appliance. The Use & Care Guide provides more detailed instructions that are required to understand all of the functions and features of
your Cooktop. Also before using the glass cooktop for the rst time,protect it by applying the supplied cooktop cleaning cream and bung
the surface clean with a soft non-abrasive cloth or non-scratch cleaning pad. Visit www.sears.com for replacement cooktop cleaning cream
(Item No. 40079).
Typical Single Element Controls
Fig. 1
®
Typical Dual or Bridge Element Controls
Fig. 2
Off L2 3 4 Med 6 7 8 Hio
Sim
E
i
t
h
e
r
d
i
r
e
c
t
i
o
n
Multi SingleOff Hi 6 4 2 Lo Lo 2 4 6 HiSim Sim
E
i
t
h
e
r
d
i
r
e
c
t
i
o
n
6”
1200W
318198810
Warmer Zone
100W
318198804
BRIDGE
800/1800W
318??????
9”/12”
1700/2700W
316216600
9”
3000W
316??????
HOTSURFACE
To Operate the Dual
Surface Radiant Element
6”
1200W
318198810
Warmer Zone
100W
318198804
BRIDGE
800/1800W
318??????
9”/12”
1700/2700W
316216600
9”
3000W
316??????
HOTSURFACE
Words on the control knob are used to indicate which coil of the dual radiant element will heat (Fig. 2).
“Single” indicates that only the inner coil will heat (Fig. 3). “Multi” indicates that both inner and outer coils
will heat (Fig. 4). You may switch between settings at any time during cooking.
1. Place correctly sized cookware on the dual surface element.
(Fig. 3) (Fig. 4)
2. Push in and turn the control knob counterclockwise (See Fig. 3) for smaller cookware
or clockwise (See Fig. 4) for larger cookware.
3. Turn the knob to adjust the setting if needed.
4. When cooking has completed, turn the surface control knob to OFF before
removing the cookware.
To Operate the Bridge
Surface Radiant Element
Words on the control knob are used to indicate which coil of the Bridge radiant element will heat (Fig. 2).
“Single” indicates that only the single portion of the Bridge element will heat (Fig. 5). “Multi” indicates that
NOTE: The Hot Surface Indicator light will come on when the control knob is turned on and will continue to glow until the glass cooktop
has cooled down to a moderate level. The light may remain on even though the controls are turned OFF.
Radiant surface elements may appear to have cooled after they have been turned o. A hot surface indicator light will
come on and will continue to glow until the glass cooktop has cooled down to a moderate level. The glass surface may still be hot and
burns may occur if the glass surface is touched before the indicator light has turned o.
both the single and Bridge portions of the element will heat together (Fig. 6). You may
switch between these settings at any time during cooking.
1. Place correctly sized cookware on the Bridge surface element.
2. Push in and turn the control knob counterclockwise to heat the portion of the
Bridge element for normal shaped cookware (See Fig. 5) or clockwise for larger or
rectangular shaped cookware (See Fig. 6).
3. Turn the knob to adjust the setting if needed. Please note that not all cookware will t
the Bridge element correctly.
4. When cooking has completed, turn the surface control knob to OFF before removing the cookware.
The BRIDGE element may also be used in combination with the left rear single element (See Fig. 7). Because these ele-
ments have 2 dierent controls, one element can be used to cook while the other element may be used to keep food
warm.
6”
1200W
318198810
Warmer Zone
100W
318198804
BRIDGE
800/1800W
318??????
9”/12”
1700/2700W
316216600
9”
3000W
316??????
H
OTSURFACE
(Fig. 5)
(Fig. 6)
(Fig. 7)
Printed in China

INSTRUCCIONES DE INICIO RÁPIDO
FUNCIONAMIENTO
INSTRUCCIONES DE INICIO RÁPIDO
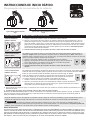
Programación de los controles de la cubierta
1. Coloque el utensilio de tamaño correcto en el elemento superior radiante.
2. Oprima y gire la perilla de control superior en cualquier dirección el ajuste deseado (Fig. 1). Gire la
perilla para regular el ajuste, si lo desea. Comience la mayoría de las operaciones de cocción en un
ajuste más elevado y luego gire a un ajuste más bajo para terminar de cocinar. Cada elemento superior
proporciona una cantidad constante de calor en cada ajuste. Si el área de calor de color rojo radiante
se extiende más allá del borde inferior del utensilio signica que ese utensilio es demasiado pequeño
para el área de calefacción del elemento.
3. Cuando termine de cocinar, gire la perilla de control a ‘OFF’ antes de retirar el utensilio.
Typical Single Element Controls
Fig. 1
®
Typical Dual or Bridge Element Controls
Fig. 2
Off L2 3 4 Med 6 7 8 Hio
Sim
G
i
r
e
l
a
p
e
r
i
l
l
a
e
n
c
u
a
l
q
u
i
e
r
Q
d
i
r
e
c
c
i
ó
n
G
i
r
e
l
a
p
e
r
i
l
l
a
e
n
c
u
a
l
q
u
i
e
r
Q
d
i
r
e
c
c
i
ó
n
Multi Single
Off Hi 6 4 2 Lo Lo 2 4 6 Hi
Sim Sim
6”
1200W
318198810
Warmer Zone
100W
318198804
BRIDGE
800/1800W
318??????
9”/12”
1700/2700W
316216600
9”
3000W
316??????
HOTSURFACE
6”
1200W
318198810
Warmer Zone
100W
318198804
BRIDGE
800/1800W
318??????
9”/12”
1700/2700W
316216600
9”
3000W
316??????
HOTSURFACE
Las palabras en el perilla de control se usan para indicar que serpentín del elemento radiante doble se
calentará. “Single” indica que solamente el serpentín interior se calentará (Fig. 3). “Multi” indica que se
calentarán tanto el serpentín exterior como el interior (Fig.4). Usted puede cambiar cualquiera de estos dos
ajustes en cualquier momento mientras esté cocinando.
1. Coloque el utensilio de tamaño correcto en el elemento superior radiante.
2. Oprima y gire la perilla de control a la izquierda (Ver Fig. 3) para un utensilio de
cocina más pequeño o a la derecha (Ver Fig. 4) para un utensilio más grande.
3. Gire la perilla para regular el ajuste, si lo desea.
4. Cuando termine de cocinar, gire la perilla de control a ‘OFF’ antes de retirar el
utensilio.
Las palabras de funcionamiento del elemento de Puente se encuentran en el perilla de control. Estas palabras
indican la dirección en que debe girarse la perilla de control cuando se usa el elemento de Puente. “Single”
NOTA: El indicador luminoso de supercie se encenderá cuando la perilla de control sea encendida y, seguirá encendido hasta que la
supercie de la plancha de cocinar halla enfriado. La luz seguirá encendida aún cuando los controles hallan sido APAGADOS.
ATENCION
Los elementos irradiantes parecieran haberse enfriado una vez que se han apagado. Un indicador luminoso se
encenderá y se mantendrá encendido hasta que la supercie de la cocina halla enfriado a un nivel moderado. La supercie podría estar
caliente y causar quemaduras si es tocada antes que el indicador luminoso se halla apagado.
indica que sólo la porción sencilla del elemento de Puente se calentará (Fig. 5). “Multi”
indica que ambas, la porción sencilla y la porción de Puente del elemento se calentarán
a un mismo tiempo (Fig. 6). Usted puede cambiar para usar cualquiera de estos ajustes
en cualquier momento cuando esté cocinando con el elemento de Puente.
1. Coloque el utensilio de tamaño correcto en el elemento superior radiante.
2. Oprima y gire la perilla de control a la izquierda para calentar la porción del elemento
de Puente para un utensilio de cocina normal (Ver Fig. 5) o gírela a la derecha para utensilios
más grandes o de forma rectangular (Ver Fig. 6).
6”
1200W
318198810
Warmer Zone
100W
318198804
BRIDGE
800/1800W
318??????
9”/12”
1700/2700W
316216600
9”
3000W
316??????
HOTSURFACE
3. Gire la perilla para regular el ajuste, si lo desea. Por favor sírvase notar que no todos los utensilios calzarán correctamente en el
elemento de Puente.
4. Cuando termine de cocinar, gire la perilla de control a ‘OFF’ antes de retirar el utensilio.
El elemento de PUENTE también puede ser usado en combinación con el elemento sencillo trasero izquierdo (Ver Fig. 7). Debido a
que estos elementos tienen 2 controles diferentes, un elemento puede ser usado para cocinar mientras que el otro elemento puede ser
usado para mantener el alimento caliente.
(Fig. 5)
(Fig. 6)
(Fig. 7)
(Fig. 3) (Fig. 4)
Uso de los Elementos
Radiantes Sencillos
Uso de los del Elemento
Radiantes Doble
Uso de los del Elemento
Radiantes de Puente
NOTAS IMPORTANTES:
Las instrucciones en esta página estan pensadas y redactadas para proporcionar SOLAMENTE una referencia rápida. Lea todas las instruc-
ciones en el manual del usuario antes de usar este electrodoméstico. El manual del usuario proporciona instrucciones más detalladas que se
requieren para entender todas las funciones y características de su Cubierta. Antes de usar su cubierta de cristal por la primera vez, proté-
jala aplicando la crema de limpieza provista y puliendo la supercie limpia con un paño no abrasivo suave o con una esponja de limpieza
anti-rasguños. Visite www.sears.com para el reemplazo de la crema de la limpiadora (artículo No. 40079).
-
 1
1
-
 2
2