
UM175CE
Wireless USB Modem
User Manual

1
TABLE OF CONTENTS
CHAPTER 1
BEFORE USING UM175CE ..............................................3
ABOUT THIS USER MANUAL ............................................................4
PRODUCT OVERVIEW ......................................................................4
WHAT’S INSIDE THE PRODUCT PACKAGE .......................................4
INTRODUCTION TO WIRELESS UM175CE USB MODEM ..................5
PRODUCT FEATURES ........................................................................6
PRODUCT HANDLING ......................................................................7
CONFIGURATION .............................................................................7
CHAPTER 2
INSTALLATION AND SETUP ............................................9
THE QUICKLINK MOBILE SETUP PROGRAM ..................................11
THE QUICKLINK MOBILE SETUP WIZARD ......................................13
CHAPTER 3
USING QUICKLINK MOBILE ..........................................17
FEATURES ......................................................................................18
GETTING STARTED .........................................................................19
CONNECTING .................................................................................20
USING DIAL UP CONNECTIONS .....................................................23
CHAPTER 4
QUICKLINK MOBILE PREFERENCES .............................25
WWAN SPECIFIC SETTINGS ...........................................................26
GENERAL PREFERENCES ...............................................................30
ADDITIONAL FEATURES ................................................................32
CHAPTER 5
INSTALLING UM175CE .................................................39
PRECAUTIONS ...............................................................................40
RECOMMENDED SYSTEM REQUIREMENTS .................................40
INSTALLING SOFTWARE ...............................................................41
UNPLUGGING OR EJECTING THE DEVICE .....................................42
USB MODEM EXTENSION CABLE ..................................................44

2
CHAPTER 6
REGULATORY AND SAFETY INFORMATION .................47
REGULATORY NOTICES .................................................................48
OPERATING CONDITIONS .............................................................48
WARNINGS AND CAUTIONS .........................................................49
SAFETY PRECAUTIONS ................................................................51
CHAPTER 7
APPENDIX ....................................................................53
GLOSSARY .....................................................................................54
SPECIFIC ABSORPTION RATES (SAR) .............................................57
SAFETY INFORMATION FOR RF EXPOSURE ...................................59
12 MONTH LIMITED WARRANTY ..................................................61
TABLE OF CONTENTS

ABOUT THIS USER MANUAL
PRODUCT OVERVIEW
WHAT’S INSIDE THE PRODUCT PACKAGE
INTRODUCTION TO WIRELESS UM175CE
USB MODEM
PRODUCT FEATURES
PRODUCT HANDLING
CONFIGURATION
CHAPTER 1
BEFORE USING
UM175CE

4
BEFORE USING UM175CE
4
■
ABOUT THIS USER MANUAL
You will find all the information you need to install and
use the UM175CE in this user manual. Before using the
UM175CE, you must properly install the QuickLink Mobile by
closely following the installation instructions.
INSTRUCTIONS
•
Install the QuickLink Mobile BEFORE inserting the
UM175CE USB Device into your PC. The installation soft-
ware is included in the product package. Insert the CD
into your CD-ROM drive. Installation may take a few min-
utes.
•
It is highly recommended that you read the safety precau-
tions described in this manual before using the UM175CE.
■
PRODUCT OVERVIEW
Thank you for purchasing the Centennial Wireless UM175CE
USB Modem. The UM175CE is a 3G wireless device that
enables high-speed wireless communication from your PC.
The UM175CE is simple to install and use.
■
WHAT’S INSIDE THE PRODUCT PACKAGE
The following items are included in the product package.
If any of the items listed below are missing, please contact
the retail location where you purchased the product.
•
UM175CE Wireless USB Modem
•
Installation CD that contains software and this user manual
•
USB Modem Extension Cable
•
Quick Start Guide
ABOUT THIS USER
MANUAL

5
BEFORE USING UM175CE
■
INTRODUCTION TO WIRELESS UM175CE USB
MODEM
The Centennial Wireless UM175CE is designed for your PC’s
USB port, which is available in most models. The UM175CE
can be used to access the Internet, your company’s intranet,
or you can use it to send and receive email. It is extremely
useful when you are away from the office, on the road, or
wherever a wireline Internet access is not readily available.
INTRODUCTION TO
UM175CE USB MODEM
USB Connector
External Antenna
Booster Jack
(on the left side)
LED status
indicator *
Release button
* Blue light: Connected to PC and detected to network
Red light: Connected to PC but out of service status

6
BEFORE USING UM175CE
■
PRODUCT FEATURES
•
Power management: The UM175CE utilizes power man-
agement and system overhead reduction functions pro-
vided by the USB interface for maximum power savings.
•
Antenna design: Efficient, innovative internal antenna
design optimizes data transfer rate and sensitivity to net-
work signals.
•
Extension Y Cable connector: Simply insert the USB con-
nector into the USB port of your computer to deliver a
power boost, increased RF performance, and to solve
clearance issues.
•
USB Modem that supports Type A USB Port interface.
•
Supports North American PCS (1900 MHz) and Cellular
(800 MHz) bands.
•
Utilizes QUALCOMM MSM6800A chip set.
•
Supports 3G network technologies.
•
Average Data Rate: 3.1 Mbps download; 1.8 Mbps upload.
•
Supports Windows 2000 and XP and Vista systems with
installed host software and driver.
•
Compatible with Mac OS X 10.4.X (Tiger) or 10.5.X
(Leopard) or higher.
•
Provides Centennial Wireless BroadbandAccess and
NetworkAccess service (where available).
PRODUCT FEATURES

7
BEFORE USING UM175CE
■
PRODUCT HANDLING
1
Do not put any adhesive label on the USB connector. It
may leave a sticky residue that can cause problems inside
the PC USB port.
2
The UM175CE USB device should easily slide into the USB
port. Do not force the UM175CE into the USB port as it
may cause damage to the modem and/or the port.
3
Keep the UM175CE in a dry and clean place. (Storage
temperature: -22°F to 149°F [- 30°C to 65°C]). Keep your
device away from liquids, dust and excessive heat.
■
CONFIGURATION
To use the UM175CE, you should first install the software
included in the installation CD and configure the UM175CE
USB device. See the next section for more information on
software installation and USB device configuration.
BEFORE USING UM175CE
PRODUCT HANDLING

8
MEMO

CHAPTER 2
INSTALLATION AND
SETUP
THE QUICKLINK MOBILE SETUP PROGRAM
THE QUICKLINK MOBILE SETUP WIZARD

10
INSTALLATION AND SETUP
10
This section will guide you through the installation and
setup process for QuickLink Mobile. Before getting started,
you should become familiar with the documentation that
came with your wireless device.
CD'S
You purchased a UM175CE, there is only one CD that con-
tains QuickLink Mobile and USB modem drivers.
@
Important: If using a USB device, QuickLink Mobile software
must be installed before you insert the USB device into the
computer for the first time. Only after the software has been
installed can Windows successfully install and configure the
USB device.
GETTING STARTED
Follow these steps to install QuickLink Mobile:
1
Turn on your computer and close all applications.
2
Insert the CD-ROM into your CD drive.
3
If set up does not automatically start, click the Start but-
ton on the taskbar and choose Run. Type D:\Start (where
D is the letter of your CD-ROM drive) and click OK.
4
Follow the steps in the next section.
GETTING STARTED

11
INSTALLATION AND SETUP
■
THE QUICKLINK MOBILE SETUP PROGRAM
STEP 1: Click the QuickLink Mobile setup program. The
“Welcome” screen appears. Click the “Next” button to con-
tinue with the installation process.
STEP 2: After the Welcome screen you will see the QuickLink
Mobile License Agreement. In order to install and use this
product you must agree with the terms of this agreement.
Select “I agree with this software license agreement”, then
click the “Next” button to continue. If you do not agree
with this agreement, click the “Cancel” button to exit.
THE QUICKLINK MOBILE
SETUP PROGRAM

12
INSTALLATION AND SETUP
STEP 3: You are now ready to select the location on your
computer where the QuickLink Mobile should be installed. It
is recommended that you do not modify the default destina-
tion folder. Click the “Next” button to continue.
STEP 4: During this step the components of the QuickLink
Mobile product are being installed onto your computer.
Installation will occur to the destination folder specified in
Step 3 above.
THE QUICKLINK MOBILE
SETUP PROGRAM

13
INSTALLATION AND SETUP
STEP 5: Installation is now complete. Click the “Finish” but-
ton to leave the QuickLink Mobile setup program and to
begin using your new software.
The setup program will automatically create a QuickLink
Mobile shortcut on your desktop.
■
THE QUICKLINK MOBILE SETUP WIZARD
After you have successfully completed the installation
process of QuickLink Mobile, you are ready to start the
program and begin your initial setup. The steps in the
Setup Wizard are critical to the proper operation of
QuickLink Mobile.
STEP 1: Click the “Start” button, select the Programs menu
and choose the Access Manager menu item to start the
Access Manager program.
THE QUICKLINK MOBILE
SETUP PROGRAM

14
INSTALLATION AND SETUP
STEP 2: The first time you open QuickLink Mobile, the Setup
Wizard will run automatically. The Welcome screen will
appear.
If you have an Internet connection, it is recommended that
you check to see if you are running the latest version of
QuickLink Mobile. Click the “Check for Updates” button to
perform this check.
Click “Next” to continue.
STEP 3: USB device users would insert their USB device now,
and wait for Windows to detect and install drivers for the
device.
THE QUICKLINK MOBILE
SETUP WIZARD

15
INSTALLATION AND SETUP
@
FOR HANDSET USERS: If you selected USB (to connect a
phone) and have not already installed the data cable drivers
supplied with the cable, you must install them now. To install
the data cable drivers click the “Cancel” button below to
exit the Setup Wizard and then refer to the documentation
included with the cable. Plug the data cable into your wireless
phone and then plug the cable into your computer.
THE QUICKLINK MOBILE
SETUP WIZARD

16
INSTALLATION AND SETUP
If the USB device is detected, you will see the following
screen.
STEP 4: The detection and configuration process for your
wireless device is now complete. In this step you can elect
to run QuickLink Mobile automatically every time you start
your computer. To do so, check the “Run QuickLink Mobile
at Startup” checkbox. Click the “Finish” button when com-
plete.
Please familiarize yourself with the information in the
“Using QuickLink Mobile” and “Connecting to the Internet”
sections of this guide.
THE QUICKLINK MOBILE
SETUP WIZARD

CHAPTER 3
USING
QUICKLINK MOBILE
FEATURES
GETTING STARTED
CONNECTING
USING DIAL UP CONNECTIONS

18
USING QUICKLINK MOBILE
■
FEATURES
WWAN (WIRELESS WIDE AREA NETWORK,
1XEV-DO/1XRTT/CDMA) SPECIFIC FEATURES:
•
Configures your PC to use your wireless device as a
modem.
• Creates an Centennial EVDO-1x Data connection.
• Copy utility to create wireless copies of your dial-up con
-
nections, if supported by your device.
• Signal strength and battery level display for most USB
Modem.
• Features a test function for your WWAN device.
@
A WWAN capable device is required to use the WWAN
features. Individual WWAN features are also device
dependent as described in the WWAN section above.
OTHER FEATURES
•
QuickLink Mobile can also be used to launch all of your
dial-up networking connections, if desired.
• QuickLink Mobile can launch your browser, e-mail client,
VPN or a program of your choice upon connection.
• The application logs connections used, duration and bytes
sent and received.
• See the section “Additional Features” for more informa
-
tion about the features of QuickLink Mobile.
FEATURES

19
USING QUICKLINK MOBILE
GETTING STARTED
■
GETTING STARTED
Double click on the QuickLink Mobile icon on your
desktop or click on the Windows Start menu and
select QuickLink Mobile from the list of Programs.
ABOUT THE WIRELESS NETWORKS VIEW
By default, QuickLink Mobile opens to the “Networks” view.
The Networks view displays all currently available network
connections.
At a glance you can see the signal strength and battery level.
Select “Refresh Networks” from the “Tools” menu to update
the information in this panel. Your current connection state
and the elapsed time of the connection are displayed along
the bottom of the status bar.
If your expected connection does not appear or if you con-
nected your wireless phone and cable, or inserted your
Wireless Internet Card after starting QuickLink Mobile,
select “Refresh Networks” from the “Tools” menu. This will
cause QuickLink Mobile to look for your wireless device(s)
and verify network availability.

20
USING QUICKLINK MOBILE
If you change phones or Wireless Internet Cards, you will
need to run the Setup Wizard again. To do this make sure
that your phone and cable are connected, then select “Run
Wizard” from the “Tools” menu.
■
CONNECTING
Once your WWAN device is properly configured, connecting
to the Internet is as simple as selecting the network connec-
tion type shown in the list and clicking the connect button.
1
Select Centennial EVDO-1x Data
2
Click the “Connect” button when it becomes enabled.
Once connected, the “Connect” button will change to
“Disconnect”. Simply click this to end your current connec
-
tion. To connect to any other network shown, select it, and
then select “Connect”.
THE STATUS BAR
Information regarding your current network connection can
be seen in the status bar along the bottom of the QuickLink
Mobile interface. For more information on this status bar,
see the section “The Status Bar” in the “Additional Features”
section.
@
If you are using a WWAN (1xEV-DO/1xRTT/CDMA) device that
supports the Centennial Wireless dial-up data service and you
made wireless copies of your dial-up accounts, they will also
appear. See the section “Creating Wireless Copies of your
Dial-Up Connections”. Optionally you can have all dial-up
connections appear in QuickLink Mobile and use it to launch
any dial-up networking connection.
@
CONNECTING

21
USING QUICKLINK MOBILE
@
NOTE: The first time you connect with the Centennial EVDO-
1x Data connection, a connectivity warning message will
appear. You have the option to suppress these warning
messages when they are displayed.
QuickLink Mobile will display status information at the
bottom during the connection process as well as while con-
nected. When not connected, the status text will display
“Not connected” for the currently selected network. The
timer will display “00:00:00”. Once connected, the status
text will display “Connected” and the elapsed timer will
begin to run. When a connection is active, its name will
appear as bold text.
The pop up status can be turned off, if desired, by selecting
“Tools”, “Preferences”, “Options” tab, un-checking “Show
popup status windows by tray”. Right clicking on the tray
icon provides various options and double clicking on it will
always show the application. Placing your cursor on it will
display the current connection status.
Based on your preferences, your browser or e-mail or VPN
program can be launched automatically, or you can launch
whatever software you want to use. To determine if all con
-
nections appear in the drop down list or only your wireless
ones.
@
NOTE: Always use QuickLink Mobile when connecting via
BroadbandAccess or NetworkAccess.
At any time during your connection you can check your cur-
rent connection speed and throughput stats in the Statistics
tab of the Session Information window.
CONNECTING

22
USING QUICKLINK MOBILE
To see this window, select “Statistics” from the “Session”
menu.
The Session Information window will also contain a My
Computer tab and a Statistics tab. The My Computer tab
contains detailed information about your computer. This
information is helpful when troubleshooting a problem.
If you are using the Centennial EVDO-1x Data connection
and the call fails when you try to connect, with QuickLink
Mobile returning to its idle state, you should try to connect
again. If you feel you may have incorrectly entered your
wireless device number during initial setup, select “Tools”,
“Run Wizard”.
DORMANCY:
Centennial EVDO-1x data sessions become dormant if you
are not sending or receiving any data. As soon as you
resume sending or receiving data, the data session will
return to an active state.
CONNECTING

23
USING QUICKLINK MOBILE
■
USING DIAL UP CONNECTIONS
This section is only applicable if you are using a WWAN
Device that supports dial-up connections.
You can make wireless copies of existing dial up accounts on
your system. This will wirelessly enable them and allow you
to connect to them wirelessly.
To launch the copy utility, select “Options”, “Dial-up
Accounts” then “Copy”.
Click on the connection or connections you want to copy
and click on the “OK” button.
The new connection will have a suffix of “(Wireless)” and
will be set to use your wireless phone as the modem. If the
utility is unable to automatically recognize your existing
area code and telephone number, the existing number will
be displayed, and you will be prompted to enter the area
code and number. The utility configures the new wireless
connections to always dial 11 digits, so that they will work
locally and also in other digital data coverage areas.
USING DIAL UP
CONNECTIONS

24
USING QUICKLINK MOBILE
If it is determined that the connection might benefit by
further optimization, an additional connection with a
“(Wireless Optimized)” suffix, will also be created. This
connection may connect faster. If you have trouble with the
“(Wireless Optimized)” connection, you can delete it from
your dial-up networking folder and use the “(Wireless)”
connection.
TO DELETE CONNECTIONS:
Windows XP users can access Dial-Up Networking from
QuickLink Mobile by selecting “Options”, “Control Panels”,
“Network and Dial-up Connections”, right click on the
desired connection and select “Delete”.
USING DIAL UP
CONNECTIONS

CHAPTER 4
QUICKLINK MOBILE
PREFERENCES
WWAN SPECIFIC SETTINGS
GENERAL PREFERENCES
ADDITIONAL FEATURES

26
PREFERENCES
■
WWAN SPECIFIC SETTINGS
WWAN PREFERENCES
To access the WWAN preferences, click on the “Options”
menu, then “Preferences...”.
WWAN OPTIONS
•
The “Set Options...” Button: This is used to set various
WWAN connection settings. See below.
•
Automatically Connect: If desired, you can select to have
QuickLink Mobile automatically connect at application
startup.
•
Show non-wireless accounts in list: If you select this
option all of your dial up accounts will appear in Quick-
Link Mobile’s list of accounts, allowing you to use
QuickLink Mobile to launch them instead of Dial-Up
Networking. With this option unchecked, the only con-
nections that are displayed in QuickLink Mobile’s list of
WWAN SPECIFIC
SETTINGS

27
PREFERENCES
accounts, are the Centennial EVDO-1x Data, (depend-
ing on your wireless phone/device capabilities) and any
Wireless connections you have created, manually or with
the Copy Accounts Wizard.
•
Do not prompt for user name and password: If you are
only using the Centennial EVDO-1x Data connection, this
setting has no effect. If you created Wireless connections
to dial into other networks or have existing connections
you are going to launch using QuickLink Mobile, checking
this option will skip the screen that normally asks for your
user name and password. For this to work you will have
had to connect previously, successfully saving your user
name and password.
THE “SET OPTIONS” BUTTON & ITS DIALOG
THE CONNECT TAB
When you select the “Set Options” button from the
WWAN Preferences screen (page 26), the following options
will appear (Options > Preferences > WWAN tab > Set
Options . . .) :
WWAN SPECIFIC
SETTINGS

28
PREFERENCES
•
Do not open my browser: With this option selected, when
you connect to a WWAN network, QuickLink Mobile will
not automatically launch your default web browser.
•
Open my browser to my default home page: With this
option selected, when you connect to a WWAN network
(Centennial EVDO-1x Data), QuickLink Mobile will auto-
matically launch your default web browser and your
home page will load.
•
Open my browser to this URL: With this option selected,
when you connect to a WWAN network (Centennial
EVDO-1x Data), QuickLink Mobile will automatically
launch your default web browser but do it in such a way
that the URL you specify will load instead of your home
page.
•
Turn off graphics: If you select this it will turn off graphics
in Internet Explorer.
With these options off, web pages will load faster but you
will have to right click and select “show picture” for any
pictures you want to see. With the added performance of
the internet accelerator software when using the Centennial
EVDO-1x Data connection, most users prefer to see graph
-
ics and have audio support, so the default setting for both
options is unchecked.
•
Run program on connection: This allows you to automati-
cally run a program when you use QuickLink Mobile to
connect to a WWAN network. Select the browse button,
, to browse to the desired application you want to run
when you connect to a WWAN network using QuickLink
Mobile. The application will run for all WWAN connec-
tions made from QuickLink Mobile.
WWAN SPECIFIC
SETTINGS

29
PREFERENCES
THE VPN TAB
The following options appear on the VPN tab (Options >
Preferences > WWAN tab > Set Options. . . > VPN tab) :
•
VPN Client: QuickLink Mobile automatically detects if
certain VPN clients like Microsoft, Cisco, CheckPoint, etc,
are installed on the computer and allows you to select the
one you wish to use. Check with your network administra-
tor to setup your VPN connection.
If the VPN client you wish to use does not appear in the list,
you can select Other VPN Application.
•
Other VPN Application: This allows running a VPN pro-
gram when QuickLink Mobile connects to a network.
Enter the full path to an executable, or select the browse
button, , to find the path to the desired application.
WWAN SPECIFIC
SETTINGS

30
PREFERENCES
■
GENERAL PREFERENCES
OPTIONS TAB
To access the Options tab, click on the“Preferences” menu.
•
Minimize application into tray: With this option selected,
when you minimize QuickLink Mobile, instead of taking
up space in your taskbar, it will just disappear. You can
get it back by double clicking on the tray icon. Or, you
can right click in the icon and select “Show Application.”
You can minimize the main window of Access Manager by
selecting the minimize icon in the upper right corner of
the main window.
•
Show popup status windows by tray: Displays small
popup sliding windows in the lower right corner of the
screen when connections are made, and when network
connections are lost.
GENERAL PREFERENCES

31
PREFERENCES
•
Run QuickLink Mobile at Startup: Automatically launches
QuickLink Mobile whenever you start your computer.
UPDATES TAB
To access the Updates preferences, click on the “Options”
menu, then “Preferences...” and select the “Updates” tab.
This feature allows QuickLink Mobile to automatically check
for software updates. If you are using EVDO-1x Data an
update is available, you will be notified of its size and
approximate download times if using Centennial EVDO-1x
Data.
You will be given the choice to download or cancel. If you
select download, you will be presented with a display that
shows the progress as the update is downloading with the
option to cancel if desired. You do not need to download
the updates wirelessly; you can use any connection to the
Internet.
GENERAL PREFERENCES

32
PREFERENCES
@
NOTE: If you download the updates wirelessly, normal usage
charges apply.
You can allow the software to automatically check for
updates, daily, weekly (default), or monthly. It only checks
when the application is running and when it detects that you
are connected and able to access to the Internet. If desired,
you can select “Manually” and the software will only check
for updates when you select “Update Now” (pictured on the
previous page), or when you select, from QuickLink Mobile’s
main screen, “Help”, “Check for Updates”.
■
ADDITIONAL FEATURES
In addition to the basic features mentioned in previous
sections, QuickLink Mobile has also the additional features
listed below.
THE STATUS BAR
The details of your current connection can be seen in the
status bar at the bottom of the QuickLink Mobile interface.
This status bar is always visible when the interface is fully
expanded.
CONNECTION STATUS
The text on the status bar reflects your current state. During
an active connection, this text will change to “Connected”.
If you are not connected, it will display “Not Connected”.
ADDITIONAL FEATURES

33
PREFERENCES
WWAN WIRELESS INTERNET CARD STATUS AREA
The text can change to the following:
• Device not inserted: Your WWAN Wireless Internet Card is
removed from the computer.
• Device not activated: Your Wireless Internet Card needs to
be activated. Select “Activation” from the Tools menu.
COVERAGE
For Wireless Internet Cards, an icon will display if you are in
Centennial EVDO-1x Data coverage. Hover the mouse to see
the tool tip showing the name of the current network.
THROUGHPUT
The amount of data that you have sent and received since
the current network connection was initiated can be seen by
holding the mouse over the green up and down arrows on
the left side of the status bar.
BATTERY LEVEL
The current battery level of your mobile phone appears on
the left side of the status bar.
ELAPSED TIME
The amount of time that has elapsed since the current net-
work connection was initiated is tracked on the lower left
side of the status bar.
ADDITIONAL FEATURES

34
PREFERENCES
THE SESSION MENU
•
Connect / Disconnect: You can connect or disconnect the
wireless networks.
•
Log: This provides a concise session log of your network
activity. Click on a column heading to sort the log. This
window also displays the total number of sessions as well
as the total time connected.
The information displayed in the Usage log can be custom
-
ized using the controls that appear just below the list.
To view only the connection history of a specific network
type, check the “Selected connection” checkbox and select
the desired type from the drop-down list. To view only the
connections made during a specific interval, check the “Date
range” checkbox and specify the date in the “From:” and
ADDITIONAL FEATURES

35
PREFERENCES
“To:” fields.
To export this log as a CSV file, click the Export button that is
immediately above the log. To clear the log, press the Clear
button. Note that clearing the log cannot be undone.
•
Statistics: If you selected to detect and install Centennial
during installation, there will be a Wireless statistics tab
with additional information and tools that are helpful
in the event any troubleshooting of the connection is
required. You can view key statistics including bandwidth
and your IP address information, release your IP address,
renew your IP address. If you selected to detect and
install a WWAN device during installation, there will be
a Statistics tab that will show data speeds during a ses-
sion when using the WWAN device. There is also a “My
Computer” tab; this tab has key information about your
computer that may be helpful in troubleshooting any
problems that may occur. It also has the option of e-mail-
ing Centennial Wireless Technical Support.
•
Close: Exit the application.
THE TOOLS MENU
•
Refresh Networks: This causes QuickLink Mobile to verify
connected devices and to scan for available Networks.
Use this feature if you connected your equipment after
launching QuickLink Mobile. Pressing the F6 function key
can also access this option.
•
Test WWAN Device: Retrieve and display detailed infor-
mation about your WWAN device (Wireless phone and
cable or 1xEV-DO/1xRTT/CDMA Wireless Internet Card)
such as manufacturer, model, version, etc. Furthermore,
you can view the current battery (not with Wireless
ADDITIONAL FEATURES

36
PREFERENCES
Internet Cards) and signal strengths. This information can
be valuable when troubleshooting a problem.
•
Run Wizard: Runs the Setup Wizard again. Useful if you
need to reconfigure QuickLink Mobile to use a new
mobile handset or Wireless Internet Card.
•
Activation: Programs the phone number, MIN, and SID to
the Wireless Internet Card.
•
Centennial EVDO-1x Data Setup: Please contact the ser-
vice provider for details.
ADDITIONAL FEATURES

37
PREFERENCES
THE OPTIONS MENU
•
Control Panels: From this menu you have access to your
systems “Modem”, “Network and Dial-Up Connections”,
and “Internet” control panels. You can also see all control
panels by selecting “All”.
•
Dial-Up Accounts: Add, edit, or copy wireless dial-up
accounts.
− Add Wireless: This is used to create a wireless dial-up
connection from scratch.
− Add Other: This is used to create a regular dial-up con
-
nection from scratch.
−
Edit: This is used to edit properties of any dial-up con-
nection.
−
Copy: See section on Using Dial-Up Connections.
•
Power ON / Power OFF: This is used to power the on/off
Wireless Internet Card.
•
Preferences: This is used to select preferences for set-
tings related with connection. Please see WWAN Specific
Settings for details.
•
Always on Top: When checked, the QuickLink Mobile win-
dow displays in front of all other open application win-
dows, even if another window is placed over QuickLink
Mobile Software window.
ADDITIONAL FEATURES

38
PREFERENCES
THE “INTERNET” BUTTON
Launches the default web browser on your computer.
THE “EMAIL” BUTTON
Launches the default email application on your computer.
THE HELP MENU
Displays a variety of help options available to you. Click this
button to find assistance with a problem, to explore the
full range of Centennial Wireless and services, or to contact
Centennial Wireless.
•
Contents: Launches this help file. You can also access this
help file from your installation CD.
•
Check for Updates: Can be used with any connection to
the Internet to check for software updates for QuickLink
Mobile. Note: If downloading an update wirelessly, nor-
mal usage charges apply.
•
Centennial Home Page: Takes you to the Centennial
Wireless home page that contains information about
wireless devices, useful tips and hardware manuals.
•
Customer Service: This option will attempt to launch your
mail client with the default address to e-mail Centennial
Wireless Support.
•
About QuickLink Mobile: Displays the software version.
ADDITIONAL FEATURES

CHAPTER 5
INSTALLING UM175CE
PRECAUTIONS
RECOMMENDED SYSTEM REQUIREMENTS
INSTALLING SOFTWARE
UNPLUGGING OR EJECTING THE DEVICE
USB MODEM EXTENSION CABLE

40
INSTALLING UM175CE INSTALLING UM175CE
INSTALLING UM175CE INSTALLING UM175CE
■
PRECAUTIONS
1
DO NOT insert the UM175CE before installing the soft-
ware on the computer. When you complete the software
installation, the system will prompt you to insert the
UM175CE into the USB port.
2
Once the modem has been inserted into the PC, do not
remove it without first completing the unplugging/ejec-
tion process.
■
RECOMMENDED SYSTEM REQUIREMENTS
To successfully install and use the UM175CE USB device in
your PC, the following system specifications are required:
Item Required Specification
•
Operating system Windows® Vista / Windows® XP /
Mac OS X 10.4.X or higher
•
Connection Type A USB port
•
Processor 166MHz or faster
•
Disk drive CD-ROM
•
Memory 32 MB
•
Disk space 30MB
* The UM175CE is useful for Pocket PCs that include a USB port.
Voice service is not supported.
PRECAUTIONS

INSTALLING UM175CE INSTALLING UM175CE
41
INSTALLING UM175CE INSTALLING UM175CE
■
INSTALLING SOFTWARE
INSTALLATION
•
If you install QuickLink Mobile, it will install the USB
Driver for the UM175CE. Follow the instructions from
QuickLink Mobile for installation.
WARNINGS!
•
Make sure to complete the unplugging/ejection process
BEFORE removing the UM175CE. If you remove the device
improperly, it may be damaged. (For further informatin
on unplugging/ejection process, please refer to pages 54-
55.)
•
Before inserting the UM175CE into your PC’s USB port,
remove the Installation CD from the CD-ROM drive.
NOTES
•
If you have inserted the device properly, Windows will
inform you of the new hardware. Wait until Windows
completes the “Found New Hardware” task. In Windows
XP, several tool tips similar to the “Found New Hardware”
function will appear and disappear in the system tray
automatically. In Windows Vista, several tool tips simi-
lar to the “Installing device driver software” function
will appear and disappear in the system tray automati-
cally. Once hardware detection is complete, you will be
prompted to start activation.
INSTALLING SOFTWARE

42
INSTALLING UM175CE INSTALLING UM175CE
INSTALLING UM175CE INSTALLING UM175CE
•
It is normal to hear a short beep sound each time you
insert or remove the UM175CE. It is an audible notifica-
tion that your PC recognizes the new hardware.
■
UNPLUGGING OR EJECTING THE DEVICE
Make sure to complete the unplug/eject process on your
computer BEFORE removing the UM175CE from your PC. If
you remove the USB device improperly, it may be damaged.
•
WINDOWS
When disconnecting the UM175CE from the computer,
close all windows and quit all running applications that
are stored on the device and double click the Unplug/Eject
Hardware icon in the System tray.
Windows 2000 Windows XP Vista
System Tray
Unplug / Eject Hardware icon
UNPLUGGING OR
EJECTING THE DEVICE

INSTALLING UM175CE INSTALLING UM175CE
43
INSTALLING UM175CE INSTALLING UM175CE
When you press the Unplug/Eject icon in the system tray, the
pop-up window will appear.
Click the [Stop] button. Now, you can remove the UM175CE
from your PC.
•
MACINTOSH
When disconnecting a USB mass device from the com
-
puter, close all windows and quit all running applica-
tions that are stored on the device. Drag the device’s icon
(Mac OS9 – ; Mac OS X – ) into the trash (Mac OS9 –
; Mac OS 10 – ) to dismount it from the Desktop prior
to unplugging the device from the USB port or Hub.
@
When removing the UM175CE, always grip the top and
bottom of the modem and push/pull carefully.
UNPLUGGING OR
EJECTING THE DEVICE

44
INSTALLING UM175CE INSTALLING UM175CE
INSTALLING UM175CE INSTALLING UM175CE
■
USB MODEM EXTENSION CABLE
The UM175CE USB Modem package includes an extension
USB Y-shaped cable. Although the cable is not required for
use with your UM175CE modem, it offers increased perfor-
mance for your UM175CE modem under certain operating
conditions. Simply insert the USB connector into the USB
port of your computing device to deliver power boost,
increased RF performance, and to solve clearance issues.
USING THE USB MODEM EXTENSION CABLE:
1
Plug the single end of the Y-shaped cable into the
UM175CE Modem. [A]
2
Depending on the condition you are trying to solve
(power boost, increased RF performance, or clearance
issues), plug either one of the two connected ends of
the USB modem extension cable into the Type A USB
port(s) on your computer. [B]
@
The USB modem extension cable connector labeled #1, is
the primary data power cable used to either extend the
UM175CE modem away from your computer allowing you to
locate the modem in a more optimum signal location or solve
any computer USB port clearance issues. The USB modem
extension cable connector labeled #2, is a power boost cable
and must be used with connector #1 to provide the modem
up to 1Amp of current for use in weaker signal areas.
A
B
#1
#2
USB MODEM
EXTENSION CABLE

INSTALLING UM175CE INSTALLING UM175CE
45
INSTALLING UM175CE INSTALLING UM175CE
3
The device is connected to and powered by the com-
puter as soon as the USB cable is plugged properly into
the appropriate Type A USB port(s).
4
Launch QuickLink Mobile and click Connect.
INSTALLING UM175CE
USB MODEM
EXTENSION CABLE

46
MEMO

CHAPTER 6
REGULATORY
AND
SAFETY INFORMATION
REGULATORY NOTICES
OPERATING CONDITIONS
WARNINGS AND CAUTIONS
SAFETY PRECAUTIONS

48
■
REGULATORY NOTICES
UM175CE complies with Parts 15, 22, and 24 of the FCC
rules. It has been tested with a typical personal computer
with a USB port. This USB device must not be co-located or
operated in conjunction with any other antenna or transmit-
ter. If you use this USB device in any other configuration, the
FCC RF Exposure compliance limit can be exceeded.
■
OPERATING CONDITIONS
1
This device may not cause harmful interference must
accept any interference received, including interference
that may cause undesirable operations.
2
The manufacturer stipulates that the antenna should be
more than 1.5 cm (0.60”) from by-standers and 1.0cm
(0.39”) from the user.
REGULATORY NOTICES
REGULATORY AND SAFETY
INFORMATIONS

49
■
WARNINGS AND CAUTIONS
1
Modifying or changing this USB device without express
authorization can nullify compliance with RF exposure
guidelines.
2
This USB device has been tested and found to comply
with the limits pursuant to Part 15, 22, and 24 of the FCC
Rules. These limits are designed to provide reasonable
protection against harmful interference when appro-
priately installed. This USB device generates, uses, and
can radiate radio frequency and, if not installed and
used according to the instructions provided, it may cause
harmful interference to radio communication. However,
there is no guarantee that interference will not occur in
any particular installation.
3
If this USB device does cause harmful interference with
radio or television signals (determine this by turning the
USB device off and on), attempt to correct the interfer-
ence by trying one or more of the following:
•
Reorient or relocate the antenna.
•
Increase the separation between the USB device and
receiver.
•
Connect the USB device into an outlet on a circuit dif-
ferent from that to which the receiver is connected.
•
Consult the dealer or an experienced radio/TV techni-
cian for help.
4
This USB device does not exceed the Class B limits for
radio noise emissions from digital apparatus as set out
in the interference causing equipment standard entitled
“Digital Apparatus”, ICES-003 of the Department of
Communications.
WARNINGS AND
CAUTIONS
REGULATORY AND SAFETY
INFORMATIONS

50
5
If you have purchased this product under a United States
Government contract, it shall be subject to restrictions
as set forth in subparagraph (C)(1)(ii) of Defense Federal
Acquisitions Regulations (DFARs) Section 252.227-7013
for Department of Defense contracts, and as set forth in
Federal Acquisitions Regulations (FARs) Section 52.227-
19 for civilian agency contracts or any successor regula-
tions. If further government regulations apply, it is your
responsibility to ensure compliance with such regula-
tions.
* WARNING: This product contains a chemical known to the
State of California to cause cancer.
* WARNING: This product contains a chemical known to the
State of California to cause birth defects or
other reproductive harm.
REGULATORY AND SAFETY
INFORMATIONS
WARNINGS AND
CAUTIONS

51
■
SAFETY PRECAUTIONS
1
Data transmission and reception cannot be guaranteed
because of the nature of wireless communications. Data
can be delayed, corrupted or lost during transmission.
Even though it is quite rare that significant data delay
or loss occurs if the USB device is used in a normal man-
ner, this USB device should not be used in cases that data
transmission or reception failure could result in damage
of any kind to the user or another party, including but
not limited to personal injury, death or loss of personal
property. UTStarcom bears no responsibility for damages
or losses of any kind resulting from delays or errors in
data transmission using the USB device, or for failure of
the USB device to transmit or receive such data.
2
Do not use this USB device in areas where blasting is in
progress, where explosive atmospheres may be present,
near medical equipment, life support equipment, or
any equipment which may be susceptible to any form
of radio interference. Turn off this USB device in these
areas, since it can transmit signals that could interfere
with this equipment.
3
Do not use this USB device in any aircraft whether the
aircraft is on the ground or in flight. Make sure to turn
off this USB device in aircraft. If used in an aircraft, it can
transmit signals that could interfere with various aircraft
systems.
4
Do not use this USB device while driving a car, since it
can distract the driver. In some area, using the communi-
cation device while driving a car is illegal.
REGULATORY AND SAFETY
INFORMATIONS
SAFETY PRECAUTIONS

52
MEMO

CHAPTER 7
APPENDIX
GLOSSARY
SPECIFIC ABSORPTION RATES (SAR)
SAFETY INFORMATION FOR RF
EXPOSURE
12 MONTH LIMITED WARRANTY

54
APPENDIX
■
GLOSSARY
Analog Coverage
An area where analog service is available. Analog phones
usually indicate signal strength on an indicator in the
phone’s display when receiving an analog signal.
Browser
The software that allows you to view the Internet; contains
navigator commands such as forward and back; examples
include Netscape, Microsoft Explorer. A Web browser in your
computer requests HTML files from Web servers and takes
you to the Internet sites you wish to visit, by linking your
computer’s IP address to a site’s IP address.
COM PORT (communications port)
A connector for a communications interface, usually, a serial
port.
Data
Information kept in databases, on an intranet, on the
Internet, etc.
Driver
Software that controls a device.
Inactivity Time-Out
A stoppage in a connection, which usually occurs after a
period of time elapses, without activity. Time-out settings
are usually determined by the network.
APPENDIX
GLOSSARY

55
APPENDIX
Internet
A cooperatively run, globally distributed collection of com
-
puter networks that exchange information via a common
set of rules for exchanging data (Transfer Control Protocol/
Internet Protocol or TCP/IP).
Intranet
An intranet is a web site created by a business, which posts
its own company information in a secure part of the Internet
that only employees or other authorized users can reach.
Intranets are generally protected by firewalls.
Kbps
Kilobits per second.
Kilobyte (KB)
1024 bits (Approximately 1/2 page of plain text)
Modem
Hardware that translates and transmits data over wire-line
or wireless.
Package Minutes
Package minutes are those minutes included in the cost of a
monthly service plan. Once the packaged minutes have been
exhausted, additional airtime charges apply. Please refer to
Plans and Pricing for more information, details and offers
in your area.
Packet Switching
Packet-switching messages are divided into packets or pieces
before transmission over one or more routes and are reas
-
sembled at their destination.
APPENDIX
GLOSSARY

56
APPENDIX
POP3 e-mail
Protocol used by ISP’s mail servers to manage e-mail for
subscribers. E-mail clients such as Microsoft Outlook support
POP3.
Proxy Settings
A specific I.P. address that allows access to a secured enter
-
prise network. The proxy settings provide directions to a
computer so that it can locate an address and access infor-
mation and services, which exist at that location.
Search Engine
A program that receives a user’s search request, compares
it to the entries in the index, and returns results to help the
user find relevant information.
Serial Port
A connector on a computer used to connect peripherals,
which communicate using a serial protocol.
Serial/Data Cable
A wire that connects two serial ports carrying data to one
another.
Transmission Speed
The rate at which data is sent over a communications line,
usually measured in kilobits (kbps).
USB Cable
A wire connecting two USB ports carrying data to one another.
USB Port
A connector on a computer to connect peripherals using USB
(Universal Serial Bus) protocol.
APPENDIX
GLOSSARY

57
APPENDIX
■
SPECIFIC ABSORPTION RATES (SAR)
Maximum: SAR 1.19 W/kg CDMA835 Body
SAR 0.854 W/kg PCS1900 Body
THIS MODEL PHONE MEETS THE GOVERNMENT’S
REQUIREMENTS FOR EXPOSURE TO RADIO WAVES.
Your wireless phone is a radio transmitter and receiver.
It is designed and manufactured not to exceed the emis
-
sion limits for exposure to radiofrequency (RF) energy set
by the Federal Communications Commission of the U.S.
Government. These limits are part of comprehensive guide-
lines and establish permitted levels of RF energy for the
general population. The guidelines are based on standards
that were developed by independent scientific organiza-
tions through periodic and thorough evaluation of scientific
studies. The standards include a substantial safety margin
designed to assure the safety of all persons, regardless
of age and health. The exposure standard for wireless
mobile phones employs a unit of measurement known as
the Specific Absorption Rate, or SAR. The SAR limit set by
the FCC is 1.6 W/kg. *
Tests for SAR are conducted with the phone transmitting
at its highest certified power level in all tested frequency
bands. Although the SAR is determined at the highest certi
-
fied power level, the actual SAR level of the phone while
operating can be well below the maximum value. This is
because the phone is designed to operate at multiple power
levels so as to use only the power required to reach the net-
work. In general, the closer you are to a wireless base station
antenna, the lower the power output. Before a phone model
is available for sale to the public, it must be tested and certi-
fied to the FCC that it does not exceed the limit established
APPENDIX
SPECIFIC ABSORPTION
RATES (SAR)

58
APPENDIX
by the government adopted requirement for safe exposure.
The tests are performed in positions and locations (e.g., at
the ear and worn on the body) as required by the FCC for
each model. The highest SAR value for this model phone
when tested for use when worn on the body, as described
in this user guide, is 1.19 W/Kg. (Body-worn measurements
differ among phone models, depending upon available
accessories and FCC requirements). While there may be
differences between the SAR levels of various phones and
at various positions, they all meet the government require-
ment for safe exposure. The FCC has granted an Equipment
Authorization for this model phone with all reported SAR
levels evaluated as in compliance with the FCC RF exposure
guidelines. SAR information on this model phone is on file
with the FCC and can be found under the Display Grant
section of http://www.fcc.gov/ oet/fccid after searching on
FCC ID: PP4PX-700.
Additional information on Specific Absorption Rates (SAR)
can be found on the Cellular Telecommunications Industry
Asso-ciation (CTIA) web-site at http://www.wow-com.com.
* In the United States and Canada, the SAR limit for mobile
phones used by the public is 1.6 watts/kg (W/kg) averaged
over one gram of tissue. The standard incorporates a sub-
stantial margin of safety to give additional protection for
the public and to account for any variations in measure
-
ments.
SPECIFIC ABSORPTION
RATES (SAR)
APPENDIX

59
APPENDIX
■
SAFETY INFORMATION FOR RF EXPOSURE
BODY WORN OPERATION
This device was tested in multiple notebook computer
configurations with USB port configurations for typical
near-body operations with the back of the USB Modem
kept 20mm from the body. To maintain compliance with
FCC RF exposure requirements, it can be used in notebook
computers with substantially similar physical dimensions,
construction, electrical and RF characteristics, and that main-
tain a minimum 20mm separation distance between the
user’s body and the back of the USB Modem, including the
antenna. The antenna(s) used for this USB Modem must not
be co-located or must not operate in conjunction with any
other antenna or transmitter within a host device.
SAFETY INFORMATION
SAFETY INFORMATION FOR FIXED WIRELESS TERMINALS
POTENTIALLY EXPLOSIVE ATMOSPHERES
Turn your phone OFF when in any area with a potentially
explosive atmosphere and obey all signs and instructions.
Sparks in such areas could cause an explosion or fire result
-
ing in bodily injury or even death.
INTERFERENCE TO MEDICAL DEVICES
Certain electronic equipment may be shielded against RF
signal from your wireless phone. (Pacemakers, Hearing Aids,
and so on). Turn your phone OFF in health care facilities
when any regulations posted in these areas instruct you to
do so. RF signals may affect improperly installed or inad-
equately shielded electronic system in motor vehicles.
SAFETY INFORMATION
FOR RF EXPOSURE
APPENDIX

60
APPENDIX
EXPOSURE TO RF ENERGY
Use only the supplied or an approved replacement antenna.
Do not touch the antenna unnecessarily when the phone is
in use. Do not move the antenna close to, or couching any
exposed part of the body when making a call.
FCC COMPLIANCE INFORMATION
This device complies with Part 15 of FCC Rules.
Operation is subject to the following two conditions:
(1) This device may not cause harmful interference, and
(2) This device must accept any interference received.
This includes interference that may cause undesired
operation.
SAFETY INFORMATION
FOR RF EXPOSURE
APPENDIX

61
APPENDIX
■
12 MONTH LIMITED WARRANTY
UTStarcom Personal Communications (the Company) war-
rants to the original retail purchaser of this UTStarcom
Wireless Data Card, that should this product or any part
thereof during normal consumer usage and conditions, be
proven defective in material or workmanship that results
in product failure within the first twelve (12) month period
from the date of purchase, such defect(s) will be repaired
or replaced (with new or rebuilt parts) at the Company’s
option, without charge for parts or labor directly related to
the defect(s).
The antenna, keypad, display, rechargeable battery and bat
-
tery charger, if included, are similarly warranted for twelve
(12) months from date of purchase.
This Warranty extends only to consumers who purchase the
product in the United States or Canada and it is not transfer
-
able or assignable.
This Warranty does not apply to:
(a) Product subjected to abnormal use or conditions, acci
-
dent, mishandling, neglect, unauthorized alteration,
misuse, improper installation or repair or improper stor-
age;
(b) Product whose mechanical serial number or electronic
serial number has been removed, altered or defaced.
(c) Damage from exposure to moisture, humidity, excessive
temperatures or extreme environmental conditions;
(d) Damage resulting from connection to, or use of any
accessory or other product not approved or authorized
by the Company;
12 MONTH LIMITED
WARRANTY

62
APPENDIX
(e) Defects in appearance, cosmetic, decorative or structural
items such as framing and non-operative parts;
(f) Product damaged from external causes such as fire,
flooding, dirt, sand, weather conditions, battery leak
-
age, blown fuse, theft or improper usage of any electri-
cal source.
The Company disclaims liability for removal or reinstallation
of the product, for geographic coverage, for inadequate sig
-
nal reception by the antenna or for communications range
or operation of the cellular system as a whole.
When sending your wireless device to UTStarcom Personal
Communications for repair or service, please note that any
personal data or software stored on the device may be
inadvertently erased or altered. Therefore, we strongly rec
-
ommend you make a back up copy of all data and software
contained on your device before submitting it for repair or
service. This includes all contact lists, downloads (i.e. third-
party software applications, ringtones, games and graphics)
and any other data added to your device. In addition, if your
wireless device utilizes a SIM or Multimedia card, please
remove the card before submitting the device and store for
later use when your device is returned, UTStarcom Personal
Communications is not responsible for and does not guar-
antee restoration of any third-party software, personal
information or memory data contained in, stored on, or
integrated with any wireless device, whether under warran-
ty or not, returned to UTStarcom Personal Communications
for repair or service.
To obtain repairs or replacement within the terms of this
Warranty, the product should be delivered with proof of
12 MONTH LIMITED
WARRANTY

63
APPENDIX
Warranty coverage (e.g. dated bill of sale), the consumer’s
return address, daytime phone number and/or fax number
and complete description of the problem, transportation
prepaid, to the Company at the address shown below or to
the place of purchase for repair or replacement processing.
In addition, for reference to an authorized Warranty station
in your area, you may telephone in the United States (800)
229-1235, and in Canada (800) 465-9672 (in Ontario call
416-695-3060).
THE EXTENT OF THE COMPANY’S LIABILITY UNDER THIS
WARRANTY IS LIMITED TO THE REPAIR OR REPLACEMENT
PROVIDED ABOVE AND, IN NO EVENT, SHALL THE COM-
PANY’S LAIBILITY EXCEED THE PURCHASE PRICE PAID BY
PURCHASER FOR THE PRODUCT.
ANY IMPLIED WARRANTIES, INCLUDING ANY IMPLIED WAR
-
RANTY OF MERCHANTABILITY OR FITNESS FOR A PAR-
TICULAR PURPOSE, SHALL BE LIMITED TO THE DURATION
OF THIS WRITTEN WARRANTY. ANY ACTION FOR BREACH
OF ANY WARRANTY MUST BE BROUGHT WITHIN A PERIOD
OF 18 MONTHS FROM DATE OF ORIGINAL PURCHASE. IN
NO CASE SHALL THE COMPANY BE LIABLE FOR AN SPECIAL
CONSEQUENTIAL OR INCIDENTAL DAMAGES FOR BREACH
OF THIS OR ANY OTHER WARRANTY, EXPRESS OR IMPLIED,
WHATSOEVER. THE COMPANY SHALL NOT BE LIABLE FOR
THE DELAY IN RENDERING SERVICE UNDER THIS WARRANTY
OR LOSS OF USE DURING THE TIME THE PRODUCT IS BEING
REPAIRED OR REPLACED.
No person or representative is authorized to assume for the
Company any liability other than expressed herein in con
-
nection with the sale of this product.
12 MONTH LIMITED
WARRANTY

64
APPENDIX
Some states or provinces do not allow limitations on how
long an implied warranty lasts or the exclusion or limitation
of incidental or consequential damage so the above limita-
tion or exclusions may not apply to you. This Warranty gives
you specific legal rights, and you may also have other rights,
which vary from state to state or province to province.
IN USA: UTStarcom Personal Communications
555 Wireless Blvd.
Hauppauge, NY 11788
(800) 229-1235
IN CANADA: UTStarcom Canada Company
5155 Spectrum Way, Unit #5
Mississauga, Ontario L4W 5A1
(800) 465-9672
12 MONTH LIMITED
WARRANTY

UM175CE
Módem USB inalámbrico
Manual de usuario

1
INDICE
CAPITULO 1
ANTES DE USAR EL UM175CE .......................................3
ACERCA DE ESTE MANUAL DE USUARIO .......................................4
VISTA GENERAL DEL PRODUCTO ....................................................4
CONTENIDO DEL PAQUETE ..............................................................4
INTRODUCCION AL MODEM USB INALAMBRICO UM175CE ..........5
CARACTERISTICAS DEL PRODUCTO ................................................6
MANEJO DEL PRODUCTO ................................................................7
CONFIGURACION .............................................................................7
CAPITULO 2
INSTALACION Y AJUSTES ...............................................9
INSTALACION DEL PROGRAMA QUICKLINK MOVIL .....................11
GUIA DE INSTALACION DEL PROGRAMA QUICKLINK MOVIL .........13
CAPITULO 3
USANDOEL QUICKLINK MOVIL ....................................17
CARACTERISTICAS .........................................................................18
EMPEZANDO ..................................................................................19
CONECTANDO ................................................................................20
USANDO CONEXIONES TELEFONICAS ..........................................23
CAPITULO 4
PREFERENCIAS DEQUICKLINK MOVIL .........................25
AJUSTES ESPECIFICOS DE WWAN .................................................26
PREFERENCIAS GENERALES ..........................................................30
FUNCIONES ADICIONALES ............................................................32
CAPITULO 5
INSTALANDO EL UM175CE ..........................................39
PRECAUCIONES .............................................................................40
REQUERIMIENTOS DEL SISTEMA RECOMENDADOS ....................40
INSTALANDO EL SOFTWARE .........................................................41
DESCONECTANDO O REMOVIENDO EL DISPOSITIVO ......................42
CABLE DE EXTENSION PARA EL MODEM USB ..............................44

2
CAPITULO 6
REGULACIONES E INFORMACION DE SEGURIDAD .....47
AVISOS DE SEGURIDAD ...............................................................48
CONDICIONES DE OPERACION ......................................................48
AVISOS Y PECAUCIONES ...............................................................49
PECAUCIONES DE SEGURIDAD .....................................................51
CAPITULO 7
APENDICE .....................................................................53
GLOSARIO ......................................................................................54
TASA DE ABSORCION ESPECIFICA (SAR) ......................................57
INFORMACION DE SEGURIDAD PARA EXPOSICIÓN A RF ...................... 59
GARANTIA LIMITADA DE 12 MESES .............................................61
INDICE

ACERCA DE ESTE MANUAL
VISTA GENERAL DEL PRODUCTO
CONTENIDO DEL PAQUETE
INTRODUCCION AL MODEM USB
INHALAMBRICO UM175CE
CARACTERISTICAS DEL PRODUCTO
MANEJO DEL PRODUCTO
CONFIGURACION
CAPITULO 1
ANTES DE USAR EL
UM175CE

4
ANTES DE USARL EL UM175CE
4
■
ACERCA DE ESTE MANUAL DE USUARIO
En este manual encontrará toda la información necesaria
para instalar y usar el UM175CE. Antes de usar el dispositi-
vo, usted debe instalar adecuadamente el QuickLink Móvil
siguiendo cuidadosamente las instrucciones de instalación.
INSTRUCCIONES
•
Instale el QuickLink Móvil ANTES de insertar el dispositivo
USB UM175CE en su PC. El software de instalación está
incluído en paquete del producto. Inserte el CD en la
unidad de disco de su computador. La instalación tomará
algunos minutos.
•
Es muy recomendable leer las precauciones de seguridad
descritas en éste manual antes de usar el UM175CE.
■
VISTA GENERAL DEL PRODUCTO
Gracias por la compra del módem USB inalámbrico
Centennial UM175CE. Este es un dispositivo inalámbrico
3G que permite comunicación de alta velocidad con su PC.
El UM175CE es simple de instalar y usar.
■
CONTENIDO DEL PAQUETE
La siguiente lista describe lo que incluye el paquete. Si algu-
no de los artículos listados está faltando, por favor contacte
la tienda donde efectuó la compra.
•
Módem inalámbrico UM175CE
• CD de instalación que contiene el software y manual de
usuario.
• Cable de extensión para el módem USB
• Guía rápida de inicio.
ACERCA DE ESTE
MANUAL DE USUARIO

5
ANTES DE USARL EL UM175CE
■
INTRODUCCION AL MODEM USB INALAMBRICO
UM175CE
Este módem Centennial UM175CE está diseñado para el
puerto USB de su PC, el cual está disponible en la mayoría
de los modelos. El UM175CE puede ser usado para accesar el
Internet, la intranet de su compañía, o para enviar y recibir
correos electrónicos. Es extremadamente útil cuando se está
por fuera de la oficina., de viaje, o donde quiera que una
línea de acceso al Internet no esté disponible.
INTRODUCCION AL
MODEM USB UM175CE
Conector USB
Antena externa.
Conector de expansión
(Lado izquierdo)
LED indicador
De estado *
Botón para abrir
* Luz azul: Conectado al PC y red detectada.
Luz roja: Conectado al PC pero en estado fuera de servicio.

6
ANTES DE USARL EL UM175CE
■
CARACTERISTICAS DEL PRODUCTO
•
Manejo de corriente: El UM175CE usa funciones de mane-
jo de corriente y reducción de sobrecalentamiento del
sistema proporcionadas por la interface USB para máximo
ahorro de energía.
• Diseño de antena: Antena interna diseñada de manera
eficiente e innovadora la cual optimiza la transferencia de
datos y la sensibilidad a las señales de la red.
• Cable de extensión con conector Y: Simplemente inserte el
conector USB en el puerto de su computador para expan
-
dir su potencia e incrementar el desempeño RF y resolver
problemas de ubicación.
• Módem USB que soporta puerto de interface Tipo A.
• Soporta banda 1900 Mhz así como también 800 Mhz.
• Utiliza procesador Qualcomm MSM6800A.
• Soporta tecnología de red 3G.
• Velocidad promedio de datos: 3.1 Mbps bajada, 1.8 Mbps
subida.
• Compatible con sistemas operativos Windows 2000, XP y
Vista.
• Compatible con sistema operativo MAC X 10.4X (Tigre) o
10.5.X (Leopardo) o mayor.
• Ofrece acceso de alta velocidad en la red Centennial
(donde esté disponible)
CARACTERISTICAS DEL
PRODUCTO

7
ANTES DE USARL EL UM175CE
■
MANEJO DEL PRODUCTO
1
No usar ninguna etiqueta adhesiva en el conector USB
de la unidad. Podría dejar residuos adherentes que
pueden causar problemas dentro del puerto USB del PC.
2
El terminal USB UM175CE debe encajar de manera fácil
en el puerto USB. Al conectarlo este no debe ser forzado
ya que podría causar daños al módem o al puerto USB.
3
Mantenga el UM175CE en un lugar seco y limpio.
(Temperatura de almacenamiento: -22°F a 149°F [-30°C
a 65°C]). Mantenga el dispositivo alejado de líquidos,
polvo y calor excesivo.
■
CONFIGURACION
Para usar el UM175CE, primero debe instalar el software
incluido en el CD de instalación y luego configurar el dispo-
sitivo. Ver la siguiente sección para más información sobre la
instalación y configuración del terminal.
MANEJO DEL PRODUCTO

8
MEMO

CAPITULO 2
INSTALACION Y
AJUSTES
INSTALACION DEL PROGRAMA
QUICKLINK MOVIL
GUIA DE INSTALACION DEL
PROGRAMA QUICKLINK MOVIL

10
INSTALACION Y AJUSTES
10
Esta sección lo guiará en el proceso de instalación y ajustes
del QuickLink Móvil. Antes de empezar, usted debería fami-
liarizarse con la documentación incluida con su dispositivo
inalámbrico.
CD´S
Usted ha comprado un UM175CE, hay un solo CD que contie-
ne el QuickLink Móvil y los instaladores del módem USB.
*
Importante: Si va a usar el dispositivo USB, el software de
“Quicklink Móvil” debe ser instalado antes de insertar por
primera vez el dispositivo USB en el PC. Solamente después de
la instalación del módem Windows podrá instalar y configurar
exitosamente el dispositivo USB.
EMPEZANDO
Siga los siguientes pasos para instalar QuickLink Móvil:
1
Encienda su PC y cierre todas las aplicaciones
2
Inserte el CD en la unidad de disco.
3
Si la instalación no inicia automáticamente, haga click en
el menú de inicio y seleccione ejecutar. Escriba: D:\inicio
(Donde D es la letra correspondiente a la unidad de
disco) y haga click en OK.
4
Siga los pasos de la siguiente sección.
EMPEZANDO

11
INSTALACION Y AJUSTES
■
INSTALACION DEL PROGRAMA QUICKLINK MOVIL
PASO 1: Presione doble click en el instalador del programa
“QuickLink Móvil”. La pantalla de bienvenida aparecerá.
Seleccione “siguiente” para continuar con el proceso de
instalación.
PASO 2: Después de la pantalla de bienvenida usted verá
las condiciones de la licencia. Para poder instalar y usar este
producto es necesario estar de acuerdo con los terminos de
la licencia. Seleccione “Estoy de acuerdo con esta licencia”,
luego presione “Siguiente” para continuar. Si no está de
acuerdo con esta licencia, presione “Cancelar” para salir.
INSTALACION DEL
PROGRAMA QUICKLINK
MOVIL

12
INSTALACION Y AJUSTES
PASO 3: Ahora está listo para seleccionar la ruta en su PC
donde desea instalar este software. Se recomienda seguir
el destino usado por defecto. Presione “Siguiente” para
continuar.
PASO 4: Durante este paso los componentes del “QuickLink
Móvil” estarán siendo instalados en su PC.
La instalación será efectuada en el folder especificado como
destino en el paso 3.
INSTALACION DEL
PROGRAMA QUICKLINK
MOVIL

13
INSTALACION Y AJUSTES
PASO 5: La instalación está ahora terminada. Presione el
botón “Terminar” para salir del proceso de instalación e
iniciar el uso del nuevo software.
El programa de instalación creará automáticamente un
icono de acceso directo en el escritorio del computador.
■
GUIA DE INSTALACION DEL PROGRAMA QUICKLINK
MOVIL
Luego de haber terminado exitosamente el proceso de insta-
lación de QuickLink Móvil usted puede usar el programa e
iniciar su ajuste inicial. Los pasos en la Guía de Instalación
son críticos para la debida operación del QuickLink Móvil.
PASO 1
: Seleccione el botón de “inicio”, seleccione el
menú de programas y escoja el menú de “Administrador de
Acceso” para iniciar el programa.
GUIA DE INSTALACION
DEL PROGRAMA
QUICKLINK MOVIL

14
INSTALACION Y AJUSTES
PASO 2: La primera vez que QuickLink es abierto, la guía de
instalación correrá automáticamente. La pantalla de bienve-
nida aparecerá.
Si dispone de conexión a Internet, es recomendable que veri-
fique si la versión de QuickLink Móvil que usted está usando
es la más actualizada. Presione la opción de “Verificar actua-
lizaciones” para cerciorarse.
Presione “Siguiente” para continuar.
PASO 3
: El dispositivo USB debería ser insertado ahora y
esperar por Windows para que efectúe la detección e insta-
lación del dispositivo.
GUIA DE INSTALACION
DEL PROGRAMA
QUICKLINK MOVIL

15
INSTALACION Y AJUSTES
*
PARA USUARIOS DE TELEFONOS: Si selecciona USB (para
conectar el teléfono) y no ha instalado el cable suplido,
debe hacerlo ahora. Para esto presione la opción “Cancelar”
indicado en la figura abajo para salir del proceso de
instalación y luego refiérase a la documentación incluida con
el cable. Conéctelo a su teléfono celular y luego conecte el
otro extremo del cable a su computador.
GUIA DE INSTALACION
DEL PROGRAMA
QUICKLINK MOVIL

16
INSTALACION Y AJUSTES
Si el dispositivo USB es detectado, verá la siguiente pantalla:
PASO 4 El proceso de detección y configuración de su
dispositivo inalámbrico está ahora terminado. En este paso
puede elegir ejecutar QuickLink Móvil automáticamente
cada vez que inicie su computador. Para hacerlo, seleccione
“Ejecutar QuickLink Móvil al iniciar sesión”. Presione el
botón “Terminar” cuando haya terminado.
Por favor familiarícese con la información en las secciones
de la guía “Usando el QuickLink Móvil” y “Conectándose al
Internet”.
GUIA DE INSTALACION
DEL PROGRAMA
QUICKLINK MOVIL

CAPITULO 3
USANDO
EL QUICKLINK MOVIL
CARACATERISTICAS
COMENZANDO
CONECTANDO
USANDO CONEXIONES TELEFONICAS.

18
USANDO EL QUICKLINK MOVIL
■
CARACTERISTICAS
WWAN (RED INHALAMBRICA DE AREA ANCHA,1XEV-DO/
1XRTT/CDMA) CARACTERISTICAS ESPECIFICAS:
•
Configura su PC para usar su dispositivo inalámbrico como
un módem.
• Crea una conexión de datos EVDO-1x Centennial
• Utilidad de copia para crear copias de sus conexiones
inalámbricas de marcación telefónica, si están soportadas
por su dispositivo.
• Indicador de fuerza de señal y nivel de batería.
• Incluye una función de prueba de su dispositivo WWAN
*
Un dispositivo WWAN es necesario para usar características
de WWAN. Funciones individuales también son dependientes
del dispositivo como se indica en la sección arriba.
OTRAS FUNCIONES:
•
QuickLink Móvil puede también ser usado para accesar
todas las conexiones telefónicas de red, si así se desea.
• QuickLink Móvil puede accesar su navegador, cliente de
correo electrónico, VPN (Red Virtual Privada por sus siglas
en inglés) o el programa de su preferencia una vez se
conecta.
• La aplicación graba registros de conexiones usadas, dura
-
ción y bytes enviados y recibidos.
• Ver sección “Funciones adicionales” para más información
acerca del QuickLink Móvil.
CARACTERISTICAS

19
USANDO EL QUICKLINK MOVIL
EMPEZANDO
■
EMPEZANDO
Presione doble click en el ícono QuickLink Móvil de
su escritorio o presione click en el menú de inicio
de Windows y seleccione QuickLink Móvil de la lista
de programas.
ACERCA DE LA VISTA DE REDES INHALAMBRICAS
Por defecto, QuickLink Móvil abre la vista de “redes” dispo-
nibles. Esta indica todas las conexiones de red disponibles.
A simple vista usted puede ver la fuerza de señal y nivel
de la batería. Seleccione “Refrescar redes” desde el menú
de “Herramientas” para actualizar la información en este
panel. El estado actual de su conexión y el tiempo de esta
son mostrados junto con la barra de estado.
Si la conexión esperada no aparece o si usted conectó su
terminal inalámbrico y cable, o insertó su tarjeta de Internet
inalámbrico después de iniciar QuickLink Móvil, seleccione
“Refrescar redes” desde el menú de “Herramientas”. Esto
hará que QuickLink Móvil busque por su dispositivo y verifi-
que la disponibilidad de la red.
*
Si usted cambia el teléfono o de tarjeta inalámbrica de acceso
a Internet, deberá instalar nuevamente la aplicación. Para
ello, asegúrese que su teléfono y cable estén conectados,
luego selección “Ejecutar instalación” del menú de “Herra-
mientas”.

20
USANDO EL QUICKLINK MOVIL
■
CONECTANDO
Una vez su dispositivo WWAN está propiamente configura-
do, conectarlo al Internet es tan simple como seleccionar el
tipo de conexión de red mostrado en la lista y presionar click
en el botón de conexión.
1
Seleccione Datos EVDO-1x Centennial
2
Presione click en el botón “Conectar” cuando esté dispo-
nible.
Una vez conectado, el botón “Conectar” cambiará a “Des-
conectar”. Simplemente presione click para finalizar la
sesión actual. Para conectarse a alguna otra red mostrada,
selecciónela, y luego presione “Conectar”.
LA BARRA DE ESTADO
La información referente a su conexión actual de red puede
ser observada en la barra de estado junto al botón de inter-
face de QuickLink Móvil. Para mayor información referente a
la barra de estado, vea la “La barra de estado” en la sección
“Funciones Adicionales”.
*
Si usted está usando un dispositivo WWAN (1xEV-DO/1xRTT/
CDMA) que soporte el servicio de datos de marcación
telefónica de Centennial y usted ha efectuado copias de sus
cuentas, estas deberán aparecer. Vea la sección “Creando
copias de sus cuentas inalámbricas de conexión telefónica”.
Opcionalmente, es posible hacer que todas las conexiones
aparezcan en QuickLink Móvil y usar esta aplicación para
conectarse con cualquiera de ellas.
*
Nota: La primera vez que realice una conexión de datos con
el servicio EVDO de Centennial, un anuncio de conectividad
aparecerá. Usted tiene la opción de cerrar estos mensajes
cuando ellos aparezcan.
CONECTANDO

21
USANDO EL QUICKLINK MOVIL
QuickLink Móvil mostrará su información de estado en la
parte inferior durante el proceso de conexión así como a
lo largo de ella. Cuando no haya conexión, se indicará “No
conectado” para la red seleccionada. El contador indicará
“00:00:00”. Una vez conectado, se indicará “Conectado” y el
contador será iniciado. Cuando una conexión esté activa, su
nombre aparecerá en letra negrilla.
Las ventanas de anuncio (pop ups) pueden ser desactivadas
en caso deseado, seleccionando “Herramientas-Preferencias-
Opciones” remover la selección en la opción “Mostrar aler
-
tas de estado en la bandeja de Windows”. Presione click
derecho en el ícono de la bandeja para ver las opciones o
presione click derecho para accesar la aplicación. Al poner el
cursor justo encima de ella mostrará el estado actual.
Basado en sus preferencias, su programa de navegador,
correo electrónico o VPN puede ser accesado automática
-
mente, o usted puede escoger el programa deseado. Para
determinar si todas las conexiones aparecen en la lista o solo
las inalámbricas.
*
Nota: Siempre use QuickLink Móvil cuando se conecte vía
conexión de alta velocidad con acceso por red.
En cualquier momento durante su conexión usted puede
revisar su velocidad actual y estadísticas de transferencia
en el menú “Estadísticas” de la ventana de información de
sesión.
CONNECTING

22
USANDO EL QUICKLINK MOVIL
Para ver esta ventana seleccione “Estadísticas” desde el
menú de “Sesión”
Esta ventana de información de sesión también contie-
ne un menú para “Mi Computador” y “Estadísticas”. “Mi
Computador” contiene información detallada acerca de su
PC. Esta información es útil para resolver problemas en caso
requerido.
Si usted está usando una conexión de datos EVDO-1x
Centennial y la llamada falla al ser generada, inténtelo de
nuevo una vez el QuickLink Móvil retome su estado de repo
-
so. Si usted piensa que equivocadamente ingreso su núme-
ro telefónico en el dispositivo, seleccione “Herramientas’
Ejecutar instalación”.
MODO DORMIDO:
Las sesiones de datos pasan a estado “Dormido” si no
hay transferencia de datos siendo realizada. En cuanto se
retome el envío/recepción de datos, la sesión retornará a un
estado activo.
CONECTANDO

23
USANDO EL QUICKLINK MOVIL
■
USANDO CONEXIONES TELEFONICAS
Esta sección solo aplica si usted está usando un dispositivo
WWAN que soporte marcación telefónica.
Usted puede hacer copias de conexiones ya existentes en
su sistema. Esto las habilitará para que se pueda conectar a
ellas inalámbricamente.
Para accesar la utilidad de copia selecciones “Opciones-
Cuentas-Copiar”
Presione click en la conexión o conexiones que desea copiar
y luego presione el botón OK.
La nueva conexión tendrá el sufijo (Inalámbrica) y será ajus-
tada para usar su celular como módem. Si la aplicación no
logra reconocer automáticamente su código de área existen-
te y número telefónico, el número existente será mostrado
y se le indicará que debe ingresar estos datos. Esta utilidad
configura las nuevas conexiones inalámbricas y siempre
marca 11 dígitos de tal suerte que trabajen localmente al
igual que también en otras áreas.
Si se determina que la conexión puede beneficiarse de
optimización adicional, esta será creada con el sufijo
USANDO CONEXIONES
TELEFONICAS

24
USANDO EL QUICKLINK MOVIL
(Inalámbrica optimizada). Tal conexión podría ser más rápi-
da. Si tiene problemas con alguna conexión de este tipo,
puede borrarla y usar la conexión (Inalámbrica).
PARA BORRAR CONEXIONES:
Los usuarios de Windows XP pueden accesar “Conexión a
Redes” del menú de opciones del QuickLink Móvil seleccio-
nando “Panel de Control-Conexiones de red y telefónicas”.
Presionar click derecho en la conexión deseada y luego
“Borrar”.
USANDO CONEXIONES
TELEFONICAS

CAPITULO 4
PREFERENCIAS DE
QUICKLINK MOVIL
AJUSTES ESPECIFICOS DE WWAN
PREFERENCIAS GENERALES
CARACTERISTICAS ADICIONALES

26
PREFERENCIAS
■
AJUSTES ESPECIFICOS DE WWAN
PREFERENCIAS DE WWAN
Para accesar las preferencias de WWAN, presione en el menú
de “Opciones-Preferencias”
OPCIONES WWAN
•
El botón de “Ajuste de Opciones”: Es usado para cambiar
los ajustes de las conexiones WWAN. Ver abajo.
•
Conectar automáticamente: Si se desea, es posible hacer
que QuickLink Móvil se conecte automáticamente al
iniciar la aplicación.
•
Listar conexiones no inalámbricas: Si esta opción es selec-
cionada todas sus conexiones telefónicas serán listadas
por QuickLink Móvil, permitiendo así que sean accesadas
por este medio en vez del marcador de conexiones de
Windows. Si esta opción no es seleccionada las únicas
conexiones que son mostradas serán Datos Centennial
AJUSTES ESPECIFICOS DE
WWAN

27
PREFERENCIAS
EVDO-1x (dependiendo de la capacidad de su terminal
celular) y alguna otra conexión inalámbrica creada o
copiada.
•
No pedir nombre de usuario y contraseña: Si usted está
solo usando la conexión de datos Centennial EVDO-1x,
este ajuste no surge ningún efecto. Si usted ha creado
conexiones para marcar a otras redes o tiene conexiones
existentes para accesar usando QuickLink Móvil, seleccio-
nar esta opción se saltará la pantalla que usualmente pide
nombre de usuario y contraseña. Para que esto funciones,
ya debe haber usado esta conexión anteriormente, exito-
samente guardando su credenciales de acceso.
EL BOTON DE “OPCIONES DE AJUSTE” Y SUS DIALOGOS
EL MENU DE “CONECTAR”
Cuando se selecciona “Opciones de ajuste” de la pantalla
de preferencias de WWAN (página 26), las siguientes opcio-
nes aparecerán (Opciones-Preferencias: WWAN-Ajustar
Opciones) :
AJUSTES ESPECIFICOS
DE WWAN

28
PREFERENCIAS
•
No abrir mi navegador: Con esta opción es seleccionada,
cuando se conecta a una red WWAN, “QucikLink Móvil”
no abrirá automáticamente su navegador.
•
Abrir mi navegador con mi página predeterminada:Con
esta opción seleccionada, cuando se conecta a una red
WWAN (Centennial EVDO-1x), “QucikLink Mobile” abrirá
automáticamente su navegador y la página predetermi-
nada será cargada.
•
Abrir mi navegador con este URL: Con esta opción selec-
cionada, cuando se conecta a una red WWAN (Centennial
EVDO-1x), “QucikLink Mobile” abrirá automáticamente su
navegador pero la página a cargar será la que usted espe-
cifique en vez de la página predeterminada por defecto.
•
Apagar gráficos: Si esta opción es seleccionada los gráfi-
cos de Internet Explorer no serán descargados.
Con estas opciones apagadas, las páginas web cargarán más
rápido pero será necesario presionar click derecho y seleccio
-
nar “Mostrar gráfico” para cada imagen que se desea ver.
Con el software adicional de rendimiento del acelerador de
internet al usar la conexión de datos Centennial EVDO-1x, la
mayoría de los usuarios prefieren ver el soporte de gráficos y
video, por lo cual el valor por defecto de ambas opciones no
es seleccionado.
•
Correr programas en conexión: Esta opción permite correr
un programa automáticamente cuando QuickLink Móvil
es usado para conectarse a una red WWAN. Seleccione el
botón del navegador , para accesar la aplicación que
desea ejecutar cuando la conexión sea establecida. La
aplicación correrá para todas las conexiones hechas con
QuickLink Móvil.
AJUSTES ESPECIFICOS DE
WWAN

29
PREFERENCIAS
LA OPCION VPN (RED PRIVADA VIRTUAL)
Las siguientes opciones aparecerán en la opción de VPN
(Opciones > Preferencias > WWAN > Ajustar Opciones...>
VPN):
•
Cliente VPN: QuickLink Móvil automáticamente detecta
si ciertos clientes VPN como Microsoft, Cisco, CheckPoint,
etc., están instalados en el PC y le permite seleccionar el
que desea usar. Contacte a su administrador de red para
configurar su conexión VPN.
Si el cliente VPN deseado no aparece en la lista, usted puede
seleccionar otra aplicación de este tipo.
•
Otra aplicación VPN: Esta opción permite ejecutar un
programa VPN cuando QuickLink Móvil se conecta a una
red. Ingrese la ruta a un ejecutable, o seleccione el botón
de navegación, , para encontrar la ruta de la aplica-
ción deseada.
AJUSTES ESPECIFICOS
DE WWAN

30
PREFERENCIAS
■
PREFERENCIAS GENERALES
MENU OPCIONES
Para accesar el menú de opciones, haga click en “Preferencias”
•
Minimizar aplicación en la bandeja: Con esta opción selec-
cionada, cuando usted minimiza QuickLink Móvil, en vez
de tomar espacio en la barra de tareas, este desaparecerá.
Se puede recuperar haciendo doble click en el icono de la
bandeja. O es posible presionar click derecho en el icono
y seleccionar “Mostrar aplicación”. Usted puede minimi-
zar la ventana principal del administrador de acceso selec-
cionando el icono de minimizar en la esquina superior
derecha de dicha ventana.
•
Mostrar estado de ventanas de anuncio en la bandeja
de Windows: Muestra pequeñas ventanas deslizadoras
de anuncio en la esquina inferior derecha de la ventana
cuando las conexiones son hechas, y cuando las conexio-
nes son perdidas.
PREFERENCIAS
GENERALES

31
PREFERENCIAS
•
Ejecutar QuickLink Móvil al inicio: Ejecuta automática-
mente QuickLink Móvil cada vez que el PC es encendido.
OPCION DE ACTUALIZACIONES
Para accesar las preferencias de actualizaciones, seleccione
los menús “Opciones-Preferencias-Actualizaciones”.
Esta función le permite a QuickLink Móvil revisar automáti-
camente actualizaciones de software. Si usted está usando
una conexión EVDO y la actualización está disponible, usted
será notificado del tamaño del archivo y el tiempo aproxi-
mado de la descarga.
Tendrá la opción de descargar o cancelar. Si selecciona
descargar, una barra de progreso será indicada con la opción
de cancelar si así lo desea. La actualización no está solo
disponible vía conexión inalámbrica. Puede usar cualquier
tipo de conexión a internet.
PREFERENCIAS
GENERALES

32
PREFERENCIAS
*
NOTA: Las descargas de actualizaciones vía inalámbrica están
sujetas a cargos de uso.
El software puede configurarse para revisar por actualizacio-
nes diariamente, semanalmente (por defecto), o mensual-
mente. La revisión es efectuada únicamente cuando la
aplicación esta en uso y cuando ha detectado conexión que
permite el acceso al Internet. Si se desea, se puede seleccio-
nar “Manualmente” de tal suerte que la revisión solo será
realizada cuando se presione la opción “Actualizar ahora”
(descrita en la página anterior), o cuando usted seleccio-
na de la pantalla principal del QuickLink Móvil “Ayuda”,
“Revisar actualización”.
■
FUNCIONES ADICIONALES
En adición a las funciones básicas mencionadas en las seccio-
nes anteriores, QuickLink Móvil ofrece las siguientes funcio-
nes.
BARRA DE ESTADO
Los detalles de su conexión actual pueden ser vistos en
la barra de estado en la parte inferior de la interface del
QuickLink Móvil.
ESTADO DE LA CONEXION
El texto en la barra de la conexión refleja su estado actual.
Durante una conexión activa, este texto cambiará a
“Conectado”. Si usted no está conectado, indicará “No conec-
tado”.
FUNCIONES
ADICIONALES

33
PREFERENCIAS
AREA DE ESTADO DE LA TARJETA INALAMBRICA DE
INTERNET WWAN
El texto puede cambiar a:
• Dispositivo no insertado: Su tarjeta inalámbrica de Inter-
net WWAN está removida de su computador
• Dispositivo no activado: Su tarjeta inalámbrica de Internet
requiere activación. Seleccione “Activación” desde el
menú de “Herramientas”.
COBERTURA
Para tarjetas inalámbricas, un icono será mostrado si usted
está en una zona de cubrimiento de datos Centennial EVDO.
Mueva el ratón del PC para ver el aviso de la herramienta
mostrando el nombre de la red actual.
TRANSFERENCIA
La cantidad de datos enviada y recibida desde el inicio de la
conexión puede ser vista al presionar el ratón del PC sobre
las flechas verdes arriba/abajo, en el costado izquierdo de la
barra de estado.
NIVEL DE BATERIA
El nivel actual de la batería de su dispositivo móvil aparece
en el costado izquierdo de la barra de estado.
TIEMPO DE CONEXION
La cantidad de tiempo transcurrido desde que la conexión
con la red fue iniciada es registrada en la parte inferior
izquierda de la barra de estado.
FUNCIONES
ADICIONALES

34
PREFERENCIAS
EL MENU SESION
•
Conectar/Desconectar: Usted puede conectarse o desco-
nectarse de la red.
•
Registro: Ofrece un registro conciso de la actividad en la
red. Presione click en esta opción para filtrar los registros.
Esta ventana también muestra el número total de sesiones
al igual que el tiempo de conexión total.
La información mostrada en el registro de uso puede ser
personalizada usando los controles que aparecen debajo
de la lista.
Para ver solamente el historial de conexión de un tipo
específico de red, presione “Conexión seleccionada” para
el tipo deseado de la lista disponible. Para ver solamente
las conexiones hechas durante un intervalo específico, selec-
FUNCIONES
ADICIONALES

35
PREFERENCIAS
cione “Rango de fecha” y especifique la fecha en las casillas
“Desde” y “Hasta”.
Para exportar este registro como un archivo CVS, haga click
en el botón “Exportar” el cual está justo encima de la opción
de Registro. Para borrarlo, presione el botón “Borrar”. Esta
operación no puede ser reversada.
•
Estadísticas: Si usted seleccionó detectar e instalar
Centennial durante la instalación, habrá una opción de
“Estadísticas” con información adicional y herramientas
que son útiles en el evento de resolver algún problema
relacionado con la conexión. La información como ancho
de banda, y su información de dirección IP, liberar IP y
renovar IP están disponibles. Si usted seleccionó detectar
e instalar un dispositivo WWAN durante la instalación,
habrá una opción de estadísticas que mostrará veloci-
dades de de datos durante una sesión cuando se usa un
dispositivo WWAN. También está disponible la opción “Mi
Computador”: esta ofrece información clave acerca de su
computador que puede ser útil en el evento de resolver
algún problema que pueda surgir. Igualmente incluye
la opción de contactar vía correo electrónico al soporte
técnico de Centennial Wireless.
EL MENU HERRAMIENTAS
•
Refrescar redes: Esta opción hace que QuickLink Móvil
verifique los dispositivos conectados y busque las redes
disponibles. Use esta función si conectó su equipo luego
de ejecutar QuickLink Móvil. La tecla de función F6
también accesa esta opción al ser presionada.
•
Probar dispositivo WWAN: Retoma y muestra información
detallada acerca de su dispositivo WWAN (bien sea teléfo-
FUNCIONES
ADICIONALES

36
PREFERENCIAS
no celular y cable o tarjeta inalámbrica de Internet 1x-EV-
DO/1XRTT/CDMA) tal como fabricante, modelo, versión,
etc. Adicionalmente, puede ver el nivel actual de señal y
batería (este último no aplica para tarjetas). Esta informa-
ción puede resultar útil para la resolución de problemas
de conexión.
•
Ejecutar instalador: Ejecuta nuevamente el programa de
instalación. Es útil si se necesita reconfigurar QuickLink
Móvil para usar un nuevo celular o tarjeta.
•
Activación: Programa el número telefónico, MIN y SID en
la tarjeta.
FUNCIONES
ADICIONALES

37
PREFERENCIAS
•
Configuración de datos EVDO-1x Centennial: Por favor
contacte al proveedor de servicios para detalles.
EL MENU OPCIONES
•
Paneles de control: Desde este menú usted puede accesar
los paneles de control de su sistema “Módem”, “Red y
conexiones telefónicas” e “Internet”. También puede
seleccionar “Todos” para ver todos los paneles disponi-
bles.
•
Cuentas de marcado telefónico: Adiciona, edita o copia
cuentas de marcado telefónico.
− Adicionar inalámbrica
: Usado para crear conexiones
inalámbricas nuevas de marcado telefónico.
− Adicionar otro: Usado para crear conexiones regulares
nuevas de marcado telefónico.
− Editar
: Usado para editar las propiedades de una
conexión ya creada.
−
Copiar: Ver sección Usando conexiones de marcado tele-
fónico.
•
Encendido/Apagado: Usado para encender/apagar la
Tarjeta de datos.
•
Preferencias: Usado para seleccionar las preferencia para
ajustes relacionados con la conexión. Vea Ajustes específi-
cos de WWAN para más detalles.
•
Siempre arriba: Cuando es seleccionada, la ventana del
QuickLink Móvil se muestra en frente de todas las demás
aplicaciones de Windows incluso si alguna otra ventana
esta puesta sobre QuickLink Móvil.
FUNCIONES
ADICIONALES

38
PREFERENCIAS
EL BOTON “INTERNET”
Accesa el navegador de Internet establecido por defecto en
su PC.
EL BOTON “EMAIL”
Accesa la aplicación de correo electrónico establecida por
defecto en su PC.
EL MENU AYUDA
Muestra una variedad de opciones de ayuda disponibles a
usted. Presione este botón para buscar asistencia con algún
problema, para explorar el rango de Centennial Wireless y
sus servicios, o ponerse en contacto con ellos.
•
Contenidos: Accesa este archivo de ayuda. Usted también
puede accesar este archivo de ayuda desde la instalación
del CD.
•
Revisar actualizaciones: Puede ser usado con cualquier
conexión de Internet para revisar si existe alguna actua-
lización de QuickLink Móvil disponible. Nota: Cargos de
conexión aplican a la descarga de actualizaciones vía
inalámbrica.
•
Página de inicio Centennial: Abre la página de inicio de
Centennial la cual contiene información acerca de disposi-
tivos inalámbricos, notas de ayuda y manuales.
•
Servicio al cliente: Esta opción intentará abrir su cliente
de correo electrónico usando por defecto como destinata-
rio el correo electrónico de Centennial Wireless.
•
Acerca de QuickLink Móvil: Muestra la versión de soft-
ware de la aplicación.
FUNCIONES
ADICIONALES

CAPITULO 5
INSTALANDO EL
UM175CE
PRECAUCIONES
REQUERIMIENTOS DEL SISTEMA
RECOMENDADOS
INSTALANDO EL SOFTWARE
DESCONECTANDO O REMOVIENDO EL
DISPOSITIVO
CABLE DE EXTENSION PARA EL MODEM
USB

40
INSTALANDO EL UM175CE INSTALANDO EL UM175CE
INSTALANDO EL UM175CE INSTALANDO EL UM175CE
■
PRECAUCIONES
1
NO inserte el UM175CE antes de instalar el SW en el PC.
Cuando la instalación haya culminado, el sistema le pedi-
rá insertar el UM175Ce en el puerto USB.
2
Una vez el módem haya sido insertado en el PC, no lo
remueva sin antes seguir el proceso de Windows de
remover el dispositivo.
■
REQUERIMIENTOS DEL SISTEMA RECOMENDADOS
Para una instalación exitosa y uso del dispositivo USB
UM175CE en su PC, tenga en cuenta las siguientes recomen-
daciones des sistema:
Item Requerimiento
•
Sistema operativo Windows® Vista / XP /
Mac X 10.4.X o superior
•
Conexión Puerto USB tipo A
•
Procesador 166MHz o superior
•
Unidad de disco CD-ROM
•
Memoria 32 MB
•
Espacio de disco 30MB
* El UM175CE es útil para PC’s de bolsillo con puerto USB inclui
-
do. Servicio de voz no soportado.
PRECAUCIONES

INSTALANDO EL UM175CE INSTALANDO EL UM175CE
41
INSTALANDO EL UM175CE INSTALANDO EL UM175CE
■
INSTALANDO EL SOFTWARE
INSTALLATION
•
Si usted instala QuickLink Móvil, los archivos USB del
UM175CE serán puestos en el sistema operativo. Siga las
instrucciones de instalación.
PRECAUCIONES
•
Asegúrese de seguir el proceso de Windows de desco-
nexión del dispositivo ANTES de removerlo. Si este es
desconectado indebidamente, se puede dañar. (Para
información adicional refiérase a las páginas 54-55.
• Antes de insertar el UM175CE es el puerto USB de su PC,
retire el CE de instalación de la unidad de CD.
NOTAS:
•
Si el dispositivo es insertado apropiadamente, Windows
le notificará que un nuevo Hardware ha sido detectado.
Espera hasta que el proceso “Nuevo Hardware detec-
tado” sea terminado. En Windows XP, este proceso se
lleva acabo de manera automática y se indica como
“Nuevo hardware detectado”. En Windows vista el proce-
so es igualmente automático y ventanas de anuncio de
“Instalando software de nuevo dispositivo” aparecerán
y desaparecerán en la ventana del sistema. Una vez esta
detección es terminada, se le anunciará que inicie la acti-
vación.
INSTALANDO EL
SOFTWARE

42
INSTALANDO EL UM175CE INSTALANDO EL UM175CE
INSTALANDO EL UM175CE INSTALANDO EL UM175CE
•
Es normal escuchar un tono corto de alerta cada vez que
el UM175CE es insertado o removido. Esto es una indi-
cación auditiva notificando que su PC ha reconocido un
nuevo dispositivo.
■
DESCONECTANDO O REMOVIENDO EL DISPOSITIVO
Asegúrese de seguir el proceso de desconexión ANTES de
remover el UM175CE de su PC. Removerlo indebidamente
puede dañar el dispositivo.
•
WINDOWS
Cuando desconecte el UM175CE de su PC, cierre todas
las ventanas y salga de todas las aplicaciones que estén
siendo ejecutadas por el módem. Presione doble click en
la opción de desconectar dispositivo de la bandeja del
sistema.
Windows 2000 Windows XP Vista
Bandeja del sistema
Icono de desconexión de
dispositivos
DESCONECTANDO
O REMOVIENDO EL
DISPOSITIVO

INSTALANDO EL UM175CE INSTALANDO EL UM175CE
43
INSTALANDO EL UM175CE INSTALANDO EL UM175CE
Cuando presiona el icono de desconexión en la bandeja del
sistema, la siguiente ventana de anuncio aparecerá:
Presione el botón [Parar]. Ahora, puede remover el UM175CE
de su PC.
•
MACINTOSH
Cuando desconecte el dispositivo USB de su PC, cierre todas
las ventanas y salga de todas las aplicaciones que estén
siendo ejecutadas por el módem. Arrastre el icono (Mac
OS9 –
; Mac OS X – ) a la bandeja de basura para
desconectarlo del sistema antes de removerlo físicamente de
puerto USB.
*
Para remover el UM175CE, siempre sostenga la parte superior
e inferior y retírelo cuidadosamente.
DESCONECTANDO
O REMOVIENDO EL
DISPOSITIVO

44
INSTALANDO EL UM175CE INSTALANDO EL UM175CE
INSTALANDO EL UM175CE INSTALANDO EL UM175CE
■
CABLE DE EXTENSION PARA EL MODEM USB
El paquete del módem UM175CE incluye un cable de exten-
sión en forma de Y. Aunque este cable de extensión o es
requerido para el uso del dispositivo, ofrece condiciones de
rendimiento optimizadas bajo ciertas condiciones de opera-
ción. Simplemente inserte el conector USB en el puerto de su
PC para incrementar su potencia, incrementar rendimiento
de RF y resolver problemas de acceso.
USANDO EL CABLE DE EXTENSION PARA EL MODEM USB
1
Inserte el extremo sencillo del cable Y al módem USB
(Figura A abajo).
2
Dependiendo de la conexión que se desee (incremen-
tar potencia, incrementar rendimiento de RF o resolver
problemas de acceso), conecte uno de los dos conectores
del extremo doble al puerto USB de su PC (Figura B abajo)
*
El conector del cable de extensión USB marcado como #1, es
el cable primario de alimentación de corriente usado para
extender el alcance del módem, permitiendo su ubicación en
un sitio de mejor señal o mejor acceso. El conector marcado
como #2, es para incrementar la alimentación de corriente y
debe ser usado en conjunto con el conector #1 para ofrecerle
a módem hasta 1 amperio de corriente para su uso en zonas
de baja señal.
A
B
#1
#2
CABLE DE EXTENSION
PARA EL MODEM USB

INSTALANDO EL UM175CE INSTALANDO EL UM175CE
45
INSTALANDO EL UM175CE INSTALANDO EL UM175CE
3
El dispositivo es conectado a y alimentado por el PC tan
pronto el cable USB es insertado apropiadamente a un
puerto USB Tipo A.
4
Ejecute el QucikLink Móvil y haga click en “Conectar”.
USB MODEM
EXTENSION CABLE

46
MEMO

CAPITULO 6
REGULACIONES E
INFORMACION DE
SEGURIDAD
AVISOS DE SEGURIDAD
CONDICIONES DE OPERACION
AVISOS Y PECAUCIONES

48
REGULACIONES E INFORMACION
DE SEGURIDAD
REGULACIONES E INFORMACION
DE SEGURIDAD
REGULACIONES E INFORMACION
DE SEGURIDAD
REGULACIONES E INFORMACION
DE SEGURIDAD
■
AVISOS DE SEGURIDAD
El UM175CE cumple con las partes 15.22. y 24 de las regu-
laciones de la FCC. Ha sido probado con puertos USB de
PC típicos. Este dispositivo USB no debe ser manipulado ni
puesto en conjunto con otra antena transmisora. Usar este
dispositivo bajo cualquier otra configuración, podría exceder
el límite de cumplimiento de exposición RF de la FCC.
■
CONDICIONES DE OPERACION
1
Para que este dispositivo no cause interferencia perju-
dicial, no debe recibirla, incluyendo interferencia que
pueda causar operaciones indeseables.
2
El fabricante estipula que la antena debe estar a más de
1.5cm (0.60”) de personas alrededor y 1.0cm (0.39”) del
usuario.
AVISOS DE SEGURIDAD

REGULACIONES E INFORMACION
DE SEGURIDAD
REGULACIONES E INFORMACION
DE SEGURIDAD
49
REGULACIONES E INFORMACION
DE SEGURIDAD
REGULACIONES E INFORMACION
DE SEGURIDAD
■
AVISOS Y PECAUCIONES
1
La alteración y modificación de este dispositivo sin previa
autorización puede anular el cumplimiento de las guías
de exposición RF.
2
Este dispositivo USB ha sido probado y encontrado que
cumple con los limites de las partes 15,22, y 24 de las
regulaciones de la FCC. Estos límites están diseñados
para ofrecer protección razonable contra interferencia
perjudicial cuando se instala adecuadamente. Este dispo-
sitivo USB genera, usa, y puede emitir radio frecuencia y,
si no es instalado y usado de acuerdo con las instruccio-
nes indicadas, puede causar interferencia perjudicial a
radio comunicación. Sin embargo, no hay garantía que
la interferencia no llegara a ocurrir bajo alguna instala-
ción particular.
3
Si este dispositivo USB causa interferencia con señales de
radio o televisión (se puede determinar apagando/pren-
diendo el dispositivo), intente algunas de las siguientes
opciones:
•
Reorientar o relocalizar la antena.
•
Incremente la separación entre el dispositivo USB y el
receptor.
•
Conecte el dispositivo USB en un toma corriente
distinto al toma usado por el receptor.
•
Consulte a un técnico experimentado en reparación
de radio/TV.
4
Este dispositivo USB no excede los límites de Clase B para
emisiones de ruido de radio de aparatos digitales como
están definidos en el estándar “Aparatos Digitales”,
ICES-003 del Departamento de Comunicaciones.
AVISOS Y
PECAUCIONES

50
REGULACIONES E INFORMACION
DE SEGURIDAD
REGULACIONES E INFORMACION
DE SEGURIDAD
REGULACIONES E INFORMACION
DE SEGURIDAD
REGULACIONES E INFORMACION
DE SEGURIDAD
5
Si usted ha comprado este producto bajo contrato
protegido por el gobierno de los Estados Unidos, está
sujeto a las restricciones especificadas en el subpárrafo
(C) (1) (ii) de las DFARs (Regulaciones de Adquisición de
la Defensa Federal) sección 252.227-7013 para contratos
del Departamento de Defensa, y también especificados
por las FARs (Regulaciones para Adquisiciones Federales)
sección 52.227-19 para contratos de agencias civiles o
alguna regulación sucesora. Si aplicaran regulaciones
gubernamentales adicionales, es su responsabilidad
asegurar el cumplimiento de tales.
* PRECAUCION: Este producto contiene un químico conoci-
do en el estado de California como asociado
a causar de cáncer.
* PRECAUCION: Este producto contiene un químico conoci
-
do en el estado de California como asociado
a causas de defectos de nacimiento u otros
daños reproductivos.
AVISOS Y
PECAUCIONES

REGULACIONES E INFORMACION
DE SEGURIDAD
REGULACIONES E INFORMACION
DE SEGURIDAD
51
REGULACIONES E INFORMACION
DE SEGURIDAD
REGULACIONES E INFORMACION
DE SEGURIDAD
■
PECAUCIONES DE SEGURIDAD
1
La recepción y transmisión de datos no pueden ser
garantizadas debido a la naturaleza de las comunicacio-
nes inalámbricas. Los datos pueden ser retrasados, estar
corruptos o pueden perderse en la transmisión. Aunque
es bastante inusual que un retraso significativo de datos
ocurra bajo condiciones de uso normal de este módem
USB, este no debería ser usado en caso que la falla de la
recepción o transmisión de datos pueda resultar en daño
alguno del usuario u otra persona, incluyendo pero
no limitado a, lesiones personales, muerte o pérdida
de propiedad personal. UTStarcom no asume ninguna
responsabilidad por daños o pérdidas de ningún tipo
que resulten en los retrasos o errores en la transmi-
sión de datos usando el dispositivo USB, o por fallos
del dispositivo en la transmisión o recepción de dichos
datos.
2
No use este dispositivo USB en áreas donde hay demo-
liciones en progreso, atmósferas explosivas, cerca a
equipos médicos, equipo para salvar vidas, o algún otro
equipo que sea susceptible a cualquier forma de inter-
ferencia. Apague este dispositivo USB en tales áreas, ya
que puede transmitir señales que pueden interferir con
estos equipos.
3
No use este dispositivo USB en aviones estando en tierra
o en vuelo. Asegúrese de apagarlo. Si se llegara a usar,
puede transmitir señales que pudieran interferir con
sistemas del avión.
4
No use este dispositivo USB mientras conduce un auto-
móvil. En algunas áreas el uso de dispositivos de comuni-
cación al conducir es ilegal.
PECAUCIONES DE
SEGURIDAD

52
MEMO

CAPITULO 7
APENDICE
GLOSARIO
TASA DE ABSORCION ESPECIFICA
(SAR)
INFORMACION DE SEGURIDAD PARA
EXPOSICION A RF
GARANTIA LIMITADA DE 12 MESES

54
APENDICE
■
GLOSARIO
Ajustes de proxy
Dirección IP específica que permite accesar una red segura.
Estos ajustes ofrecen direcciones de un PC que pueden ser
localizados y así accesar la información servicio, los cuales
existen en ese destino.
Cable serial de datos
Cable que conecta dos puertos seriales llevando datos entre
ellos.
Cable USB
Cable conector de dos puertos USB que transporta datos
entre ellos.
Cobertura análoga
Area donde el servicio análogo está disponible. Teléfonos
análogos usualmente indican la fuerza de la señal en un
indicador en la pantalla del terminal cuando la señal análo
-
ga está disponible.
Correo electrónico POP3
Protocolo usado por proveedores de servicio de correo para
administrar el correo electrónico de los usuarios. Clientes de
correo como por ejemplo Microsoft Outlook soportan esta
opción.
Datos
Información mantenida en bases de datos, o en el Internet,
intranet, etc.
Intercambio de paquetes
Los mensajes son divididos en paquetes o piezas de infor
-
mación antes de ser transmitidos en una o más rutas y luego
reagrupados en su destino.
GLOSARIO

55
APENDICE
Instalador
Software que controla un dispositivo
Internet
Una red global de computadores globalmente distribuida
que intercambia información vía reglas de datos comunes
(Protocolo de control de transferencia/Protocolo Internet
TCP/IP)
Intranet
Sitio web creado por compañias, el cual publica información
corporativa en un sitio seguro disponible solo para emplea
-
dos o usuarios autorizados. Está usualmente protegido por
cortafuegos (Firewalls).
Kbps
Kilobits por segundo
Kilobyte (KB)
1024 bits (Aproximadamente ½ página de texto)
Módem
Hardware que traduce y transmite datos sobre una línea de
alambre o inalámbrica.
Motor de búsqueda
Programa que recibe solicitudes de búsqueda de usuarios,
las compara con un índice y entrega resultados para ayudar
al usuario final encontrar información relevante.
Navegador
El software que le permite ver el Internet; contiene coman
-
dos de navegador tales como atrás, adelante; ejemplos
incluyen Netscape, Internet Explorer. Un navegador web en
su PC requiere archivos HTML de servidores web y lleva su
GLOSARIO

56
APENDICE
PC a sitios del Internet que usted desea visitar mediante el
enlace de la dirección IP de su PC con la dirección IP del sitio
deseado.
Paquete de minutos
Los minutos incluidos en el costo de un plan se servicio
mensual. Una vez los minutos hayan sido consumidos, cargos
adicionales de consumo aplicarán. Por favor revise Planes
y Precios para más información relacionada a los detalles y
ofertas en su área.
Puerto de Comunicaciones
Conector para interface de comunicaciones, usualmente un
puerto serial.
Puerto serial
Conector en un PC usado para conectar periféricos, los cuales
se comunican usando un protocolo serial.
Puerto USB
Conector de computador que conecta periféricos usando
protocolo USB (Bus Serial Universal).
Tiempo de inactividad
Es una pausa en la conexión, la cual usualmente ocurre
después de un periodo sin transferencia de datos. Los ajustes
de este tiempo están determinados por la red.
Velocidad de transmisión
Tasa a la cual los datos son enviados sobre una línea de
comunicación, medido usualmente en kilobits (Kbps).
GLOSARIO

57
APENDICE
■
TASA DE ABSORCION ESPECIFICA (SAR)
Máximo: SAR 1.19 W/kg CDMA835 Cuerpo
SAR 0.854 W/kg PCS1900 Cuerpo
ESTE MODELO CUMPLE CON LOS REQUERIMIENTOS GUBER-
NAMENTALES ACERCA DE LA EXPOSICION A RADIO ONDAS
Su teléfono celular es un receptor y transmisor de radio. Está
diseñado para no exceder los límites de emisión de energía
de radio frecuencia (RF) establecidos por la Comisión Federal
de Comunicaciones de los Estados Unidos (FCC). Estos límites
forman parte de lineamientos de niveles de energía de RF
permitidos y establecidos para el mundo en general. Tales
lineamientos están basados en estándares desarrollados por
organizaciones científicas independientes fundamentados en
estudios científicos periódicos y completamente evaluados.
Los estándares incluyen un margen sustancial de precaución
diseñado para garantizar la seguridad de cualquier persona
independiente de su edad o condición de salud.
La exposición estándar para teléfonos móviles emplea una
unidad de medida conocida como la Tasa de Absorción
Específica, o SAR. El límite de SAR establecido por la FCC es
1.6 w/kg. *
Las pruebas de SAR son efectuadas con el teléfono transmi
-
tiendo a su máximo nivel de potencia certificado en todas
las bandas soportadas. Aunque el SAR es determinado usan-
do el máximo nivel de potencia certificado, el nivel real de
SAR del teléfono mientras está operando puede estar por
debajo del máximo valor. Esto es debido a que está diseñado
para operar a múltiples niveles de potencia de tal suerte
que logre conexión a la red solamente con la potencia
requerida. En general, entre más cercano esté el teléfono a
la antena de la estación base, más baja será la potencia de
salida. Antes de que un modelo de teléfono esté disponible
TASA DE ABSORCION
ESPECIFICA SAR

58
APENDICE
para la venta al público, este debe ser probado y certificado
por la FCC de que no excede los límites establecidos por el
gobierno para ser usado de manera segura. Las pruebas son
efectuadas en diferentes posiciones y ubicaciones tal como
es requerido por la FCC para cada modelo. El valor más alto
de la Tasa de Absorción Especifica (SAR) probado para este
modelo al cargarlo en el cuerpo, como se describe en esta
guía de usuario, es 1.19 W/Kg. (Los valores medidos en un
teléfono al ser llevado en el cuerpo varían entre sí depen-
diendo de los accesorios y de los requerimientos de la FCC).
Aunque existen diferencias entre los valores SAR de distintos
terminales en posiciones diferentes, todos ellos cumplen con
las regulaciones gubernamentales para su uso seguro.
La FCC ha emitido una Autorización de Equipo para este
modelo con todos los valores de SAR evaluados en cumpli
-
miento con los lineamientos de la FCC para exposición a
RF. La información de SAR para este modelo está registrada
en los archivos de la FCC y puede ser encontrado en: http://
www.fcc.gov/oet/fccid buscando el número de autorización
PP4PX-700.
Información adicional referente a la Tasa de Absorción
Específica (SAR) puede ser encontrada en el sitio web de la
Asociación de Internet y Telecomunicaciones Celulares (CTIA)
http://www.wow-com.com.
* En los Estados Unidos y Canadá, el límite de SAR para
teléfonos móviles usados por el público es 1.6 vatios por
kilogramo (W/Kg) promediados por cada gramo de tejido.
El estándar incorpora un margen sustancial de seguridad
para brindar protección adicional al público considerando
alguna posible variación en la medición
TASA DE ABSORCION
ESPECIFICA SAR

59
APENDICE
■
INFORMACION DE SEGURIDAD PARA EXPOSICIÓN A RF
FUNCIONAMIENTO CERCANO AL CUERPO
Este dispositivo fue probado en múltiples computadores
portátiles con configuración de puerto USB para una utili-
zación común cercana al cuerpo, con la parte posterior del
modem mantenida a 2 cm del cuerpo.
Para cumplir con los requisitos de la FCC para exposición a
RF, este puede ser usado en computadores portátiles con
dimensiones físicas substancialmente similares, construc
-
ción, características eléctricas y RF, y que mantengan una
separación mínima de 2 cm entre el cuerpo del usuario y la
parte posterior del Modem USB, incluyendo la antena. La
antena(s) usada por este Modem USB no debe ser colocada
o funcionar en conjunto con cualquier otra antena o trans-
misor dentro de un dispositivo anfitrión,
INFORMACION DE SEGURIDAD
INFORMACION DE SEGURIDAD PARA TERMINALES INALAM-
BRICAS FIJAS ATMOSFERA POTENCIALMENTE EXPLOSIVAS
Apague el teléfono cuando se encuentre en un área con
atmosfera potencialmente explosivas y obedezca todas las
señales e instrucciones. Chispas en dichas áreas podrían
causar una explosión o fuego resultando en lesiones perso
-
nales o incluso la muerte.
INTERFERENCIA CON DISPOSITVOS MEDICOS
Ciertos equipos electrónicos pueden ser protegidos de
la señal RF de su teléfono celular. (Marcapasos, Ayudas
Auditivas, y demás). Apague su teléfono en lugares de
asistencia médica cuando así sea indicado. Señales de RF
podrían afectar sistemas electrónicos mal instalados o aisla-
dos inapropiadamente en vehículos motores.
INFORMACION DE
SEGURIDAD PARA
EXPOSICIÓN A RF

60
APENDICE
EXPOSICION A ENERGIA RF
Use solamente la antena provista o repuestos aprobados.
No toque la antena innecesariamente cuando el teléfono
está siendo usado. No mueva la antena cerca a, o toque
alguna parte expuesta del cuerpo durante una llamada.
INFORMACION DE CUMPLIMIENTO DE LA FCC
Este equipo cumple con la Parte 15 del reglamento de la
FCC.
La operación está sujeta a las siguientes dos condiciones:
(1) Este equipo no causa interferencia perjudicial, y
(2) Este equipo debe aceptar cualquier interferencia recibi
-
da. Incluyendo interferencia que pueda causar funciona-
miento no deseado.
INFORMACION DE
SEGURIDAD PARA
EXPOSICIÓN A RF

61
APENDICE
■
GARANTIA LIMITADA DE 12 MESES
UTStarcom Personal Communications (la empresa) garantiza
al comprador minorista original de esta Tarjeta de Datos
Inalámbrica UTStarcom que en caso de que este producto o
cualquiera de sus piezas, bajo condiciones de uso normal del
consumidor, tuviera algún defecto que resultada en la falla
del producto, tanto en el material como en la mano de obra,
dentro de un plazo de 12 meses a partir de la compra origi-
nal, dichos defectos serán reparados o reemplazados (con
piezas nuevas o reacondicionadas) a criterio de la empresa,
sin cargo alguno por las piezas o la mano de obra relaciona-
da directamente con los defectos.
La antena, el teclado, la pantalla, la batería recargable y el
cargador de la batería, si está incluido, también tienen una
garantía de 12 meses a partir de la fecha de compra.
Esta garantía se extiende solamente a los consumidores que
hayan comprado este producto en los Estados unidos o en
Canadá y no es transferible ni puede cederse.
Esta Garantía no es válida si:
(a) El producto se somete a uso o condiciones anormales,
accidente, maltrato, descuido, alteración no autorizada,
uso incorrecto, instalación o reparación inadecuada o
almacenamiento inadecuado.
(b) El número de serie mecánico o número de serie del
producto ha sido removido, alterado o desfigurado.
(c) Los daños han sido originados por la exposición a la
condensación, humedad, temperaturas excesivas, o
condiciones ambientales extremas.
(d) Los daños resultan de la conexión a, o el uso de cual
-
quier accesorio u otro producto no aprobado o autoriza-
do por la empresa.
GARANTIA LIMITADA
DE 12 MESES

62
APENDICE
(e) Se trata de defectos de apariencia, cosmética, elementos
decorativos o estructurales como el armazón o piezas no
operativas.
(f) El producto fue dañado por causas externas, como
incendio, inundación, polvo, arena, condiciones climáti-
cas, filtración de la batería, fusible fundido, robo o uso
inadecuado de cualquier fuente eléctrica.
La empresa no se hace responsable por el retiro o la reins-
talación del producto, la cobertura geográfica, la recepción
inadecuada de la señal, el alcance de las comunicaciones o el
funcionamiento del sistema celular en conjunto.
Cuando envíe su teléfono celular a UTStarcom Personal
Communications para reparación o servicio, tenga en cuenta
que datos personales o aplicaciones almacenadas en el
terminal pueden ser borrados o alterados inadvertidamente.
Por lo tanto le recomendamos hacer una copia de seguridad
de todos los datos y aplicaciones incluidas en el terminal
antes de enviarlo a servicio o reparación. Esto incluye toda
la lista de contactos, descargas (por ejemplo aplicaciones de
software de terceros, tonos de timbre, juegos y gráficos) y
cualquier otro tipo de datos que haya agregado a su teléfo-
no celular. Adicionalmente, si su teléfono utiliza una tarjeta
SIM o multimedia, debe retirarla antes de enviarlo su equipo
para usarla nuevamente cuando le sea devuelto. UTStarcom
Personal Communications no se hace responsable y no
garantiza la restauración de software de terceros, informa-
ción personal, o datos de memoria contenidos, almacenados
o integrados en ningún dispositivo inalámbrico, estando o
no cubierto por garantía, que se envíe a UTStarcom Personal
Communications para reparación o servicio.
GARANTIA LIMITADA
DE 12 MESES

63
APENDICE
Para obtener reparaciones o el reemplazo dentro de los
términos de esta Garantía, el producto debe entregarse,
previo pago de los gastos de transporte, con la dirección
remitente del consumidor, el número de teléfono y/o el
número de fax y la descripción completa del problema,
junto con una prueba de la cobertura de Garantía (por
ejemplo, factura de compra con fecha) a la dirección de la
Empresa que se indica a continuación o al lugar de compra
para su procesamiento de reparación o reemplazo.
Además, para conocer cuál es el centro autorizado de
Garantía en su área de residencia, puede llamar al (800) 229-
1235 en los Estados Unidos y al (800) 465-9672 en Canadá
(en Ontario, llame al 416-695-3060).
EL GRADO DE RESPONSABILIDAD DE LA EMPRESA EN
VIRTUD DE ESTA GARANTÍA SE LIMITA A LA REPARACIÓN
O REEMPLAZO ANTES DISPUESTOS Y, EN NINGÚN CASO,
LA OBLIGACIÓN DE LA EMPRESA SUPERARÁ EL PRECIO DE
COMPRA QUE PAGÓ EL COMPRADOR POR EL PRODUCTO.
TODAS LAS GARANTÍAS IMPLÍCITAS, INCLUIDAS LAS
GARANTÍAS IMPLÍCITAS DE COMERCIABILIDAD O
CAPACIDAD DE CUMPLIR CON UN PROPÓSITO EN
PARTICULAR, SE LIMITARÁN A LA DURACIÓN DE ESTA
GARANTÍA ESCRITA. TODA ACCIÓN POR INCUMPLIMIENTO
DE ALGUNA GARANTÍA SE DEBERÁ PRESENTAR DENTRO
DE UN PERIODO DE 18 MESES A PARTIR DE LA FECHA
DE COMPRA ORIGINAL. EN NINGÚN CASO LA EMPRESA
SERÁ RESPONSABLE POR CUALQUIER DAÑO ESPECIAL,
INCIDENTAL O INDIRECTO DEBIDO AL INCUMPLIMIENTO
DE ÉSTA O DE CUALQUIER OTRA GARANTÍA, EXPRESA O
IMPLÍCITA. LA EMPRESA NO SERÁ RESPONSABLE POR EL
RETRASO EN LA PRESTACIÓN DEL SERVICIO EN VIRTUD DE
GARANTIA LIMITADA
DE 12 MESES

64
APENDICE
ESTA GARANTÍA O POR LA PÉRDIDA DE USO DURANTE EL
TIEMPO DE REPARACIÓN O REEMPLAZO DEL PRODUCTO.
Ninguna persona o representante está autorizado a asumir
responsabilidad alguna en nombre de la Empresa más allá
de la expresada en este documento en relación con la venta
de este producto.
Algunos estados o provincias no permiten limitaciones
sobre la duración de una garantía implícita ni la exclusión o
limitación de los daños incidentales o indirectos, de modo
que es posible que la limitación o exclusión antes indicada
no le corresponda. Esta Garantía le otorga derechos legales
específicos y también es posible que tenga otros derechos
que varían según el estado o la provincia.
EN LOS ESTADOS UNIDOS:
UTStarcom Personal Communications
555 Wireless Blvd.
Hauppauge, NY 11788
(800) 229-1235
EN CANADÁ:
UTStarcom Canada Company
5155 Spectrum Way, Unit # 5
Mississauga, Ontario L4W 5A1
(800) 465-9672
GARANTIA LIMITADA
DE 12 MESES
-
 1
1
-
 2
2
-
 3
3
-
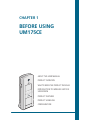 4
4
-
 5
5
-
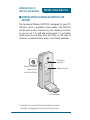 6
6
-
 7
7
-
 8
8
-
 9
9
-
 10
10
-
 11
11
-
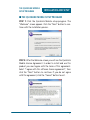 12
12
-
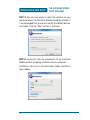 13
13
-
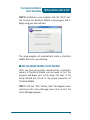 14
14
-
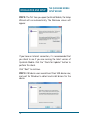 15
15
-
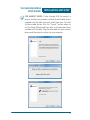 16
16
-
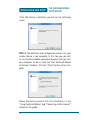 17
17
-
 18
18
-
 19
19
-
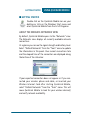 20
20
-
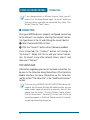 21
21
-
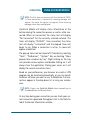 22
22
-
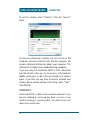 23
23
-
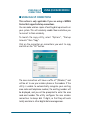 24
24
-
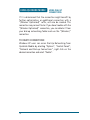 25
25
-
 26
26
-
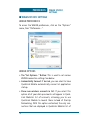 27
27
-
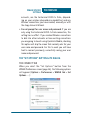 28
28
-
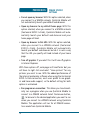 29
29
-
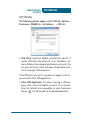 30
30
-
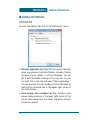 31
31
-
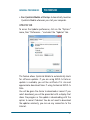 32
32
-
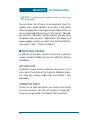 33
33
-
 34
34
-
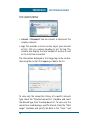 35
35
-
 36
36
-
 37
37
-
 38
38
-
 39
39
-
 40
40
-
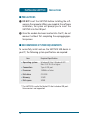 41
41
-
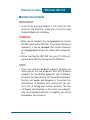 42
42
-
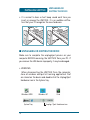 43
43
-
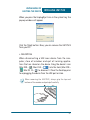 44
44
-
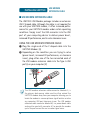 45
45
-
 46
46
-
 47
47
-
 48
48
-
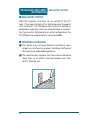 49
49
-
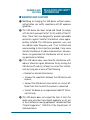 50
50
-
 51
51
-
 52
52
-
 53
53
-
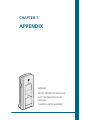 54
54
-
 55
55
-
 56
56
-
 57
57
-
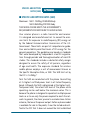 58
58
-
 59
59
-
 60
60
-
 61
61
-
 62
62
-
 63
63
-
 64
64
-
 65
65
-
 66
66
-
 67
67
-
 68
68
-
 69
69
-
 70
70
-
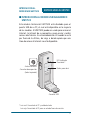 71
71
-
 72
72
-
 73
73
-
 74
74
-
 75
75
-
 76
76
-
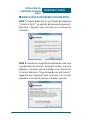 77
77
-
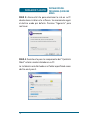 78
78
-
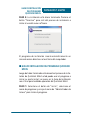 79
79
-
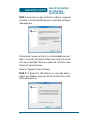 80
80
-
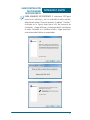 81
81
-
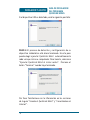 82
82
-
 83
83
-
 84
84
-
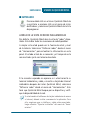 85
85
-
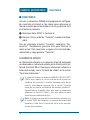 86
86
-
 87
87
-
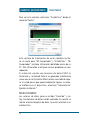 88
88
-
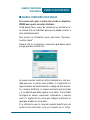 89
89
-
 90
90
-
 91
91
-
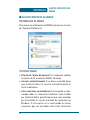 92
92
-
 93
93
-
 94
94
-
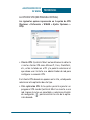 95
95
-
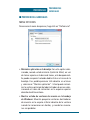 96
96
-
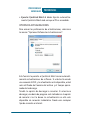 97
97
-
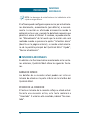 98
98
-
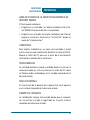 99
99
-
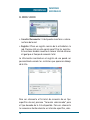 100
100
-
 101
101
-
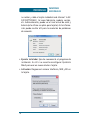 102
102
-
 103
103
-
 104
104
-
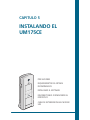 105
105
-
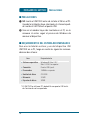 106
106
-
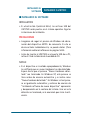 107
107
-
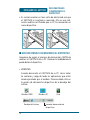 108
108
-
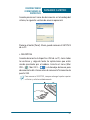 109
109
-
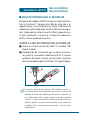 110
110
-
 111
111
-
 112
112
-
 113
113
-
 114
114
-
 115
115
-
 116
116
-
 117
117
-
 118
118
-
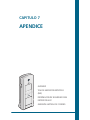 119
119
-
 120
120
-
 121
121
-
 122
122
-
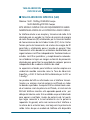 123
123
-
 124
124
-
 125
125
-
 126
126
-
 127
127
-
 128
128
-
 129
129
-
 130
130


En otros idiomas
- English: UTStarcom UM175CE User manual
Otros documentos
-
Hager TRC270 Guía de inicio rápido
-
Stanley STHT1-77342 Manual de usuario
-
-
-
-
-
-
-
Philips PPX2230/EU Product Datasheet
-
Philips PPX2340/EU Product Datasheet