Conair HC701 Manual de usuario
- Categoría
- Cortapelos
- Tipo
- Manual de usuario
Este manual también es adecuado para

I
MPORTANT SAFETY
INSTRUCTIONS
When using electrical appliances, especially when
children are present, basic safety precautions
should always be followed, including the following:
READ ALL INSTRUCTIONS
BEFORE USING
KEEP AWAY FROM WATER
DANGER — any appliance is electri-
cally live, even when the switch is off.
To reduce the risk of death or injury by electric
shock:
1. Unplug this appliance before cleaning.
2. Do not place or store appliance where it can fall or
be pulled into a tub or sink.
3. Do not use while bathing or in a shower.
4. Do not place in, or drop into, water or other liquid.
5. Do not reach for an appliance that has fallen into
water. Unplug immediately.
6. Always unplug this appliance from electrical outlet
immediately after using.
DO NOT REACH
INTO THE WATER
WARNING — To reduce risk of burns,
electrocution, fire, or injury to persons:
1. This appliance should never be left unattended
when plugged in. Do not pull, twist, or wrap line cord
around appliance.
2. This appliance should not be used by, on, or near
children or individuals with certain disabilities.
3. Use this appliance only for its intended purpose as
described in this manual. Do not use attachments not
recommended by the manufacturer. Do not use an
extension cord to operate this appliance.
4. Never operate appliance if it has a damaged
cord or plug, or if it is not working properly, if it has
been dropped or damaged, or dropped into water.
Return appliance to a service center for examination
and repair.
5. Keep cord away from heated surfaces.
6. Never drop or insert any object into any opening on
this appliance.
7. Do not place appliance on any surface while it is
operating.
8. Do not use this appliance with a damaged or bro-
ken comb or with teeth missing from the blades, as
injury may occur. Before use, make certain blades are
aligned properly. (See “Care of your Clippers.”)
9. Do not operate outdoors or where aerosol
(spray) products are being used or oxygen is
being administered.
10. Never operate the appliance with the air openings
blocked or while on a soft surface, such as a bed or
couch, where the air openings may be blocked. Keep
the air openings free of lint, hair, and the like.
11. Always attach plug to appliance first, then to
outlet. To disconnect, turn all controls to “OFF”;
remove plug from outlet.
12. Avoid skin contact with moving blades.
13. Check for tangles or kinks in the cord. If the cord
does become tangled during use, turn unit off and
straighten cord before operating.
SAVE THESE
INSTRUCTIONS
OPERATING
INSTRUCTIONS
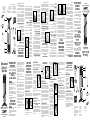
Your new Infiniti by Conair® Haircut Kit has everything
you need to achieve professional haircuts, at home.
It’s 100% stainless steel blade provides longer last-
ing performance and is sharpened using 3D etching
process for an exceptional cutting edge. Also included
are: 1 cutting guide for 28 various lengths (3 to 30mm,
in 1mm increments), 1 precision guide provides 5 dif-
ferent positions (.5 to 2.5mm), thinning system, on/off
button, LCD display for selected length, power level,
battery charge level, charging stand, adaptor cord,
scissors, comb, cleaning brush, lubricating oil, barber
cape, neck brush and 3 styling clips.
CHARGING THE CLIPPER
Before using the clipper for the first time, make sure
clipper is in the off position and charge for 2 hours.
The charging cord can be put in the stand. (Fig. 1)
1. Plug the adaptor into the AC outlet.
2. Place the clipper in the stand.
3. When fully charged, you will be able to use the
clipper for up to 45 minutes.
USING DIRECT PLUG-IN
Plug the end of the line cord into the clipper and plug
adaptor into an AC outlet. (Fig. 2) (If the battery is very
weak, wait about 1 minute, then turn on clipper).
USING THE COMB GUIDES
IMPORTANT: Always attach the comb guide BEFORE
turning the clipper on, and turn the clipper off to
change guides.
Your kit includes
two separate guide
combs.
1. cutting guide for
28 different lengths,
from 3mm-30mm in
1-mm increments.
2. precision cutting
guide for 5 different
lengths, from 0.5mm – 2.5mm.
The comb guide is very practical and guarantees an
even cut.
To attach a comb guide, first adjust the cutting guide
length to 3mm on the LCD display and push the guide
down until you hear a “click”. (Fig. 3)
STARTING AND USING
Push the ON/OFF button. The comb guide is automati-
cally put in its 3mm position.
USING THE 3mm-30mm COMB GUIDE
(comes on unit)
The cutting length can be set using the 2 buttons with
arrow pointing up/arrow pointing down. Pressing one
of these two buttons will stop the motor and move the
comb guide. Once the cutting length is selected, press
the ON/OFF button again to confirm the length and to
restart the motor.
USING THE 0.5mm-2.5mm
PRECISION CUTTING GUIDE
Adjusting the preci-
sion guide comb is a
manual operation. You
do not push the two
buttons and the LCD
is left to read 3mm.
To adjust the pre- ci-
sion guide, you man-
ually move the slide
switch located on top
of the guide to your desired length.
SWITCH SETTINGS
SMART MOTOR TECHNOLOGY
Your Conair Infiniti haircutting unit provides you
with a choice of three different power settings. 1)
Pushing the “On” switch one time sets the unit into
the “low” mode for easy or light cutting situations. 2)
Pushing the “On” switch a second time sets the unit
into “high” mode for heavy or more difficult cutting
situations. 3) Pushing the “On” switch a third time
sets the unit into “Auto” mode for the exclusive SMT
(Smart Motor Technology) that automatically senses
when cutting especially “thick” areas of hair and will
increase power to easily cut through these tough
parts. The power level indicator shows the power
increase.
TO TURN THE CLIPPER OFF
Press the ON/OFF button for more than 2 seconds, the
unit will shut down completely and the comb guide
will return to its original position; or press the ON/OFF
button for less than 2 seconds, 4 position setting:
low/high/auto with smart motor technology/off-only
the mortor will turn off, the display will remain lit for
15 seconds. After 15 seconds you will still have 5 min-
utes to change the cutting length. After 5 minutes, the
clipper turns itself off and the cutting guide remains
in the position last used.
To remove the comb
guide, first adjust
the cutting guide
length to 3mm on
the LCD display and
push the guide up
using your thumbs
and holding it on
either side. (Fig. 4)
CUTTING
TECHNIQUES
AND ADVICE FROM THE EXPERTS
• Use the clipper on clean, dry hair.
• To familiarize yourself
with the clipper, begin with
the comb guide for a longer
cut, then, if you want a
shorter cut, lower the comb
guide. You will soon know
the lengths of each cutting
guide setting from 3mm
to 30mm.
• Always move the clip-
per against the direction
of hair growth. Begin at
the nape. Place the guide
on the scalp and move the
clipper toward the crown
of your head. Move your
clipper slowly, pointing the
teeth of the guide slightly
upward. Keep the clipper in
contact with your head at
all times. (Fig. 5)
• For the crown of the
head, move from front to
back, that is, from your
forehead to the crown of
your head.
• For the finishing touches, that is, around the nape
and sideburns, use the clipper without a comb guide.
Turn your clipper over and move it from top to bot-
tom. (Fig. 6)
• If you want a length greater than 30 mm, or if
you are experienced, you can create ‘comb’ or
‘finger’ cuts:
- Work without a comb guide.
- Take up a small section of hair with a comb or in
your fingers.
- Move the comb or your fingers along the section of
hair to the desired length.
- Cut your hair along the comb or your fingers.
- Remove the cut hair using a comb and check the
evenness of the cut regularly. (Fig. 7)
USING THE THINNING SYSTEM
Switch the clipper to the ‘THIN’ position. The thinning
guide is in front of the blades. This technique allows
you to thin out hair to make styling easier. The tech-
nique is particularly good for the crown of the head
where hair is usually thicker. To thin you hair, take a
section of hair (rest your little and ring fingers on your
scalp, using the middle and index fingers to set the
length), hold 1 to 2 cm below the cutting length. Then,
using the clipper cut the section of hair steeply and at
an angle to create a saw-toothed ‘edge’.
USER MAINTENANCE
CARE OF YOUR CLIPPERS
MAINTENANCE OF THE BLADE
Remove the cutting guide after each use. Cleaning
the clipper blades regularly will maintain their
optimal performance.
REMOVEABLE BLADES
To make cleaning easier,
the Infiniti™ by Conair
®
clipper blades can be
removed. Make sure the
clipper is turned off. Hold
the clipper with the blades
pointing up and remove
them by pressing the top of
the blade. (Fig. 8) Brush the blades using the cleaning
brush to remove any hair.
SELF-LUBRICATING BLADES
The blades of your clipper have a reservoir pad that
dispenses the amount of oil necessary for your clip-
per to operate properly, every time. It is nevertheless
recommended that you occasionally refill, when you
notice the clipper isn’t performing as well. Remove
the blades as described above. Carefully squeeze a
few drops of Conair oil onto the pad.
Then put the blades back on the clipper. Conair oil is
specially formulated for clippers, it will not evaporate
or slow the blades down. You can get new blades
when these are worn or damaged.
Instruction & Styling Guide
Model HC701
™
®
Advanced
Haircut
System
Fig.1 Fig.2
Fig.3
Fig.5
Fig.7
Fig.6
Fig.8
Fig.4
1. 1 comb guide for 28 various
lengths (3 to 30mm, in 1mm
increments)
2. 1 precision guide provides 5 dif-
ferent positions (0.5 to 2.5mm)
3. stainless steel blade with 3D
etching sharpening process
4. thinning system
5. on/off button
6. Up/down comb
guide controls
7. charging stand
8. adaptor
9. scissors
10. barber comb
11. cleaning brush
12. lubricating oil
13. barber cape
14. neck brush
15. 3 styling clips
9
8
2
7
6
1
5
4
3
15
13
12
14
10
11
MEDIDAS DE SEGURIDAD
IMPORTANTES
Cuando se usan aparatos eléctricos, especial-
mente en la presencia de niños, siempre se deben
tomar precauciones básicas de seguridad, entre las
cuales las siguientes:
LEA TODAS LAS
INSTRUCCIONES ANTES
DE USARLO
MANTENGA EL APARATO
ALEJADO DEL AGUA
PELIGRO — Cualquier electrodomésti-
co permanece eléctricamente activo, incluso cuando
el interruptor está apagado. Para reducir el riesgo de
muerte o herida por descarga:
1. Desconecte el aparato antes de limpiarlo.
2. No coloque ni guarde el aparato donde pueda
caer o ser empujado a una bañera o un lavabo.
3. No lo use mientras se está bañando o tomando
una ducha.
4. No coloque el aparato ni lo deje caer al agua
u otro líquido.
5. No intente de alcanzar un aparato que ha caído
al agua. Desconéctelo inmediatamente.
6. Siempre desconecte el aparato inmediatamente
después de usarlo
NO TRATE DE
ALCANZAR EL
APARATO EN EL AGUA
ADVERTENCIA — Para reducir el
riesgo de quemaduras, electrocución, incendio o lesio-
nes personales:
1. Nunca deje este aparato desatendido mientras está
conectado. No jale, doble o enrolle el cable alrededor
del aparato.
2. Este aparato no debería ser usado por, sobre o cerca
de niños o personas con alguna discapacidad.
3. Use este aparato únicamente con el propósito para
el cual fue diseñado y tal como se describe en este
manual. Sólo use accesorios recomendados por el
fabricante.
4. Nunca utilice el aparato si el cable o la clavija están
dañados, si no funciona correctamente, si ha caído, si
está dañado o si ha caído al agua. Llévelo a un centro de
servicio autorizado para que lo examinen y lo reparen.
5. Mantenga el cable alejado de superficies calientes.
6. Nunca deje caer ni inserte un objeto en ninguna de
las aberturas.
7. No coloque el aparato en ninguna superficie mientras
está funcionando.
8. No use este aparato con un peine accesorio roto o
lastimado o si le faltan dientes a la cuchilla. Esto podría
provocar una herida. Asegúrese que las cuchillas estén
correctamente alineadas antes de usarlo (véase la sec-
ción “Instrucciones de mantenimiento”).
9. No utilice este aparato al aire libre, ni donde se están
usando productos en aerosol (spray) o donde se está
administrando oxígeno.
10. Nunca bloquee las aberturas de aire o coloque el
aparato en una superficie blanda, como una cama o un
sofá, donde se puedan obstruir. Mantenga las aberturas
libres de pelusas, cabellos y elementos similares.
11. Siempre conecte el cable al aparato antes de conec-
tarlo a la toma de corriente. Para desconectarlo, coloque
todos los ajustes en la posición “Apagado” (OFF), luego
desenchufe el cable.
12. Evite que las cuchillas toquen la piel cuando
están moviendo.
13. Siempre asegúrese que el cable del aparato no
esté enredado. Si el cable se enreda o se enrolla mien-
tras está usando el aparato, apáguelo inmediatamente
y enderece el cable antes de volverlo a usar.
GUARDE ESTAS
INSTRUCCIONES
INSTRUCCIONES
DE USO
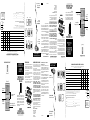
Su conjunto de peluquería Infiniti™ de Conair®
tiene todo lo que usted necesita para lograr cortes
de cabello profesionales en su casa. Las cuchillas de
la cortadora son hechas 100% de acero inoxidable
para mayor durabilidad y se afilan automáticamente
por medio de un proceso de grabado tridimensional
que las deja muy tajantes. Las características de la
cortadora incluyen: un botón de encendido/apagado,
una pantalla digital que muestra el ajuste de recorte
escogido, un indicador de potencia y un indicador del
nivel de carga. Su conjunto también incluye un guía
que logra 28 posiciones de recorte (de 3 a 30 mm, en
incrementos de 1mm), un guía de precisión que logra
5 largos de recorte (de 0,5 a 2,5 mm), un sistema de
entresacar, una base de carga, un adaptador, tijeras,
un peine, un cepillo de limpieza, aceite lubricante, una
capa de barbero, un
COMO CARGAR LA CORTADORA
Antes de usar su cortadora por primera vez, asegúrese
que esté apagada (OFF) y póngala a cargar durante
unas 2 horas. El cable del adaptador puede conec-
tarse directamente a la base de carga (Fig.1).
1. Conecte el adaptador a una toma de corriente.
2. Ponga la cortadora en la base de carga.
3. Se podrá usar la cortadora sin cable durante 45
minutos cuando esté completamente cargada.
COMO USAR LA CORTADORA CON CABLE
Conecte el cable del adaptador directamente a la cor-
tadora y conecte el adaptador a una toma de corriente
(Fig2). Si la batería está muy baja, espere un minuto
antes de encender el aparato.
COMO INSTALAR LOS GUÍAS
IMPORTANTE: Siempre instale el guía ANTES de
encender el aparato y siempre apague el apara-
to antes de cambiar el guía. Su conjunto incluye
dos guías:
1. Un guía para lograr 28 largos de recorte, desde
3mm a 30mm en incrementos de 1mm.
2. Un guía para lograr 5 largos de recorte precisos,
desde 0,5mm hasta 2,5mm.
Los guías son muy convenientes, pues le permiten
lograr recortes uniformes.
Antes de instalar el guía,
ajuste lo largo del recorte
hasta 3mm (en la pantalla
digital), luego ensarte el
guía encima de las cuchil-
las, presionando hasta oír
un click (Fig.3).
OPERACIÓN
Oprima el botón de encendido/apagado. El ajuste de
lo largo del recorte se pondrá automáticamente en la
posición 3mm.
UTILIZAR EL GUÍA 3mm-30mm
(integrado)
Se puede ajustar lo largo del recorte usando el botón
con flechas. Oprimir una de las flechas apaga el motor
y ajusta la posición del guía. Después de escoger
lo largo del recorte, oprima el botón de encendido/
apagado otra vez para confirmar su selección y volver
a encender el motor.
UTILIZAR EL GUÍA 0,5MM-2,5MM
PARA RECORTES PRECISOS
Este guía se ajusta manual-
mente. Deje 3mm en la pan-
talla y no utilice los botones
con flechas para cambiar
lo largo del recorte. Para
cambiar lo largo del recorte,
mueva el botón ubicado
sobre el guía hasta alcanzar
la posición deseada.
AJUSTE AUTOMÁTICO DE POTENCIA
SMART MOTOR TECHNOLOGY (SMT)
Su conjunto de peluquería Infiniti
™
de Conair
®
le permite escoger entre 3 niveles de potencia:
1) Oprimir el botón de
encendido una vez activa
la potencia baja, ideal
para recortes fáciles o
cuando se corta poco
pelo. 2) Oprimir el botón
de encendido una segun-
da vez activa la potencia
alta, ideal para recortes
difíciles o cuando se corta mucho pelo. 3) Oprimir el
botón de encendido una tercera vez activa el ajuste
automático de potencia SMT.La exclusiva tecnología
SMT percibe cuando la cortadora está haciendo fuer-
za para cortar el pelo espeso e incrementa la potencia
del motor automáticamente para facilitar el cortado. El
indicador de potencia indica el incremento.
COMO APAGAR LA CORTADORA
Oprima el botón de encendido/apagado durante más
de 2 segundos. Esto apagará completamente el
aparato y la posición del guía regresará al inicio.
Si desea apagar la cortadora sin que la posición
del guía regrese al inicio (3mm), oprima el botón de
encendido/apagado (botón con 4 posiciones Bajo/
Alto/Auto con SMT y Apagado) durante menos de 2
segundos. La pantalla quedará encendida durante 15
segundos y tendrá 5 minutos para cambiar el ajuste
de lo largo del recorte. Después de 5 minutos, la
cortadora se apagará completamente y el guía per-
manecerá en la última posición escogida.
Para remover el guía, ajuste lo largo del recorte a
3mm y jale el guía hacia arriba, manteniendo el
mismo mientras lo empuja con el pulgar (Fig.4).
TÉCNICAS DE RECORTE Y
CONSEJOS DE LOS EXPERTOS
• Utilice la cortadora en el pelo limpio y seco.
• Utilice un ajuste de recorte más largo que el
deseado hasta familiarizarse con la cortadora.
Podrá volver a acortar su pelo después, escogiendo
un ajuste menor. Aprenderá muy rápidamente a
utilizar todos los ajustes, desde 3mm hasta 30mm.
• Siempre mueva la cor-
tadora en la dirección
del crecimiento del pelo.
Empiece en la nuca.
Ponga el guía directa-
mente sobre el cuero
cabelludo y suba la
cortadora hacia la coro-
nilla. Mueva la cortadora
lentamente, con los dientes del guía apuntando
ligeramente hacia arriba. Mantenga la cortadora en
contacto permanente con la cabeza (Fig.5).
• Para cortar la coronilla,
mueva la cortadora desde
la frente hasta atrás.
• Para realizar los toques
finales en la nuca y las
patillas, utilice la corta-
dora sin guía. Voltee la
cortadora y muévala de
arriba por abajo (Fig.6).
• Si desea un ajuste de
recorte superior a 30mm
o si usted tiene experi-
encia, puede usar una
técnica de recorte con
peine o dedos (Fig.7):
- Trabaje sin guía.
- Coja una pequeña sección de pelo entre sus dedos
o con un peine.
- Deslice los dedos o el peine hacia las puntas, hasta
el nivel deseado.
- Corte el cabello por encima del peine o de los dedos.
- Peine el cabello a medida que lo corta para asegu-
rarse que quedé uniforme.
COMO USAR EL SISTEMA DE
ENTRESACAR
Escoja la posición “THIN”. Esto pondrá en marcha el
guía de desgastar ubicado frente a las cuchillas. El
sistema de entresacar vuelve el pelo menos tupido, lo
cual es particularmente útil cuando se corta el pelo en
la coronilla, donde siempre es más espeso. Coja una
mecha de pelo entre sus dedos índice y corazón (apoy-
ando el anular y el meñique en la cabeza) y deslice los
dedos hacia las puntas, hasta dejar 1 a 2 centímetros.
Corte el pelo manteniendo la cortadora a un ángulo
empinado para lograr un efecto de puntas dentadas.
INSTRUCCIONES DE
MANTENIMIENTO
CUIDADO DE SU CORTADORA
LIMPIEZA DE LAS CUCHILLAS
Saque el guía después de cada uso. Limpie las cuchillas
regularmente para asegurar un desempeño óptimo.
CUCHILLAS EXTRAÍBLES
Las cuchillas de la cortadora Infiniti
™
de Conair
®
son
extraíbles para facilitar la
limpieza. Antes de extraer
las cuchillas, asegúrese
que la cortadora esté
apagada. Mantenga la
cortadora con las cuchillas
apuntando hacia arriba y
empuje la parte superior de
las cuchillas hasta sacarlas
(Fig.8). Limpie las mismas con el cepillo de limpieza
provisto, luego regréselas en su lugar.
CUCHILLAS AUTOLUBRIFICANTES
Su cortadora está equipada de un tampón lubrificante
incorporado que lubrica las cuchillas permanente-
mente para asegurar un desempeño óptimo. Se
aconseja rellenar el tampón cuando sea necesario.
Cuando le parece que la cortadora no está funciona-
ndo de manera óptima, saque las cuchillas como se
indicó anteriormente y ponga unas cuantas gotas del
aceite lubricante de Conair sobre el tampón. Regrese
las cuchillas en su lugar.
El aceite lubricante de Conair fue especialmente dis-
eñado para las cortadoras de pelo. No se evaporará o
reducirá la velocidad de las cuchillas.
Cuando sea necesario cambiar las cuchillas, pida cuchil-
las de repuesto usando el formulario de pedido adjunto.
Instrucciones & Guía de Recorte
Modelo HC701
™
®
Sistema de
Recorte de Pelo
Avanzado
Fig.1
Fig.2
Fig.5
Fig.7
Fig.6
Fig.8
Fig.4
1. Guía para lograr 28 largos de
recorte (de 3 a 30mm, en incre-
mentos de 1mm)
2. Guía de precisión con 5 posiciones
(de 0,5 a 2,5mm)
3. Cuchilla de acero inoxidable con
proceso de grabado tridimensional
4. Sistema de entresacar
5. Botón de encendido/apagado
6. Botones de ajuste de lo
largo del recorte
7. Base de carga
8. Adaptador
9. Tijeras
10. Peine de barbero
11. Cepillo de limpieza
12. Aceite lubricante
13. Capa de barbero
14. Cepillo para el cuello
15. 3 pinzas
9
8
2
7
6
1
5
4
3
15
13
12
14
10
11
Fig.3

WARNING:
IF YOU THINK
THE POWER IS OFF
WHEN THE SWITCH
IS OFF,
YOU'RE WRONG.
KEEP AWAY FROM
WATER
Everyone knows that electricity and water
are a dangerous combination. But did you
know that an electric appliance is still
electrically alive even if the switch is off? If
the plug is in, the power is on. So when you
are not using your appliances, keep them
unplugged.
ALWAYS UNPLUG
SMALL APPLIANCES
Public Service ad from Association of Home Appliance
Manufacturers and Underwriters Laboratories, Inc.
LIMITED FIVE YEAR WARRANTY
Conair will repair or replace (at our option) your unit
free of charge for 60 months from the date of pur-
chase if the appliance is defective in workmanship
or materials.
To obtain service under this warranty, return the defective
product to the service center listed below that is nearest
you, together with your purchase receipt and $3.00 for
postage and handling. California residents need only pro-
vide proof of purchase and should call 1-800-366-0937 for
shipping instructions. In the absence of a purchase receipt,
the warranty period shall be 60 months from the date of
manufacture.
ANY IMPLIED WARRANTIES, OBLIGATIONS, OR
LIABILITIES, INCLUDING BUT NOT LIMITED TO THE
IMPLIED WARRANTY OF MERCHANTABILITY AND
FITNESS FOR A PARTICULAR PURPOSE, SHALL
BE LIMITED IN DURATION TO THE 60 MONTH
DURATION OF THIS WRITTEN, LIMITED WARRANTY.
Some states do not allow limitations on how long an
implied warranty lasts, so the above limitations may
not apply to you.
IN NO EVENT SHALL CONAIR BE LIABLE FOR
ANY SPECIAL, INCIDENTAL, OR CONSEQUENTIAL
DAMAGES FOR BREACH OF THIS OR ANY OTHER
WARRANTY, EXPRESS OR IMPLIED, WHATSOEVER.
Some states do not allow the exclusion or limitation
of special, incidental, or consequential damages, so
the above limitation may not apply to you.
This warranty gives you specific legal rights, and you
may also have other rights, which vary from state
to state.
©2006 Conair Corporation
Service Center
Conair Corporation
Service Department
7475 North Glen
Harbor Blvd.
Glendale, AZ 85307
Once again, thanks for buying a
Conair product.
Your Conair
®
clipper blades are made of high
carbon stainless steel. They are engineered
for precise, professional results. If blades feel
like they are pulling or grabbing hair, it means
they are losing their sharpness and should be
replaced as soon as possible.
Attachment combs should also be replaced if
they are lost or broken. It is easier to cut hair
with the accuracy of a pro when the neces-
sary tools are at your fingertips.
Conair makes a variety of accessories
for different haircut kits. If your haircut kit
does not include them, you may want to
consider adding them to your professional
haircutting tools.
Styling clips hold hair in place when you are
sectioning hair. A styling comb makes it easy
to taper or cut hair at an angle. A barber cape
ensures a comfortable and neat haircut and
a convenient storage case keeps all your
essentials in one place.
06PG10085 IB-6806
Model
BLD-HC701
Model
comb-2
.5mm-2.5mm
Model HCNB-1
Model CAPE-1
Model SC- 1
Model CLP- 1
Model
comb-1
3mm-30mm
HAIRCUT KIT REPLACEMENT PARTS & ACCESSORIES ORDER FORM
Pricing in effect through June 1, 2008. Orders postmarked after this date
will be accepted, and the customer will be notified if pricing has changed.
ITEM PART # PRICE QUANTITY AMOUNT
Subtotal
*Sales Tax
TOTAL
Mail to:
Conair Corporation
Service Department
150 Milford Road
East Windsor, NJ 08520-9730
Enclose check or money order made payable to Conair. (We cannot accept cash, stamps or C.O.D. orders.) CT, IL, AZ, and
PA residents should add applicable state sales tax. Minimum order of $10.00 or a $2.00 handling charge will be added to order.
All prices include handling and return postage. Prices are subject to change without notice.
Prices are valid only for shipments within the Continental United States. Please allow 4-6 weeks for delivery.
To avoid delays, please print clearly.
We must have a street address, as UPS cannot deliver to a P.O. box.
NAME____________________________________________________________________________
ADDRESS __________________________________________ APT. _______________________
CITY _______________________________________________ STATE _______ ZIP ___________
TELEPHONE ( ) _ _ _ _ _ _ _ _ _ _ _ _ _ _ _ _ _ _ _ _ _ _ _ _ _ _ _ (We call only if we have a question about your order.)
For information on other Conair® haircut kit parts call: 1-800-3-CONAIR.
Clipper Blade BLD-HC701 $6.50
Comb 1 HC701-3mm $4.00
Comb 2 HC701-5mm $4.00
Neck Brush HCNB-1 $1.50
Barber Cape Cape-1 $5.00
Lubricating Oil HC Oil $2.00
Scissors SC-1 $2.00
Styling Clips CLP-1 $1.50
CUT HERE
NI-MH BATTERIES
This clipper has Nickel-Metal Hydride batteries. In
an effort to protect the environment, these batteries
should be removed and properly disposed of when the
unit is no longer operating. To remove the battery block
for disposal or recovery, follow these instructions:
1. First, unplug the clipper. Remove the 3 screws on
the back, 2 at the top and 1 at the bottom.
2. Open the clipper and remove the batteries using
wire cutters.
3. To protect the environment, do not dispose of your
batteries with your ordinary household waste. For
more details on recovery of materials and waste treat-
ment facilities, please contact the waste disposal ser-
vices in your region
TRY OUR OTHER NEW INFINITI
™
BY CONAIR
®
PRODUCTS
Dryers
Models 213
and 207
Straighteners
Models CS31
and CS32
Curling Irons
Models CD107,
CD108 and CD109
Switch settings
Low, High, Auto, Off
Battery
charging
level
Power
Level
HC701 LCD INTERFACE
Scale: 1:1
Scale: 4:1
Selected Cutting
length in mm
Model HC OIL
ADVERTENCIA:
SI CREE QUE NO HAY
CORRIENTE,
SE EQUIVOCA
MANTENGA ESTE
APARATO ALEJADO
DEL AGUA
Todos saben que la combinación de elec-
tricidad y de agua es peligrosa. Pero ¿Sabe
usted que un aparato eléctrico está eléctri-
camente activo aún cuando el interruptor
está apagado? Si la clavija está conectada,
hay corriente. De modo que cuando no use
sus aparatos electrodomésticos, manténga-
los desconectados.
SIEMPRE
DESCONECTE LOS
APARATOS PEQUEÑOS
Un Aviso Público de la Asociación de los Fabricantes de
Electrodomésticos y de Underwriters Laboratories, Inc.
GARANTÍA LIMITADA POR CINCO AÑOS
Conair reparará o remplazará (a su opción) su
aparato sin cargo por un período de 60 meses a partir
de la fecha de compra si presenta defectos de mano
de obra o en los materiales.
Para obtener servicio técnico bajo esta garantía, lleve
o mande su aparato al Centro de Servicio indicado
a continuación, junto con su recibo de compra y un
cheque de $3,00US por gastos de envío y manejo.
Los residentes de California sólo necesitan dar una
prueba de compra y deben llamar al 1-800-366-
0937 para recibir instrucciones de envío. En ausencia
del recibo de compra, el período de garantía será de
60 meses a partir de la fecha de fabricación.
CUALQUIER GARANTÍA, OBLIGACIÓN O
RESPONSABILIDAD IMPLÍCITAS, INCLUYENDO
PERO NO LIMITADAS A LA GARANTÍA IMPLÍCITA
DE COMERCIABILIDAD Y APTITUD PARA UN
PROPÓSITO ESPECÍFICO, ESTARÁN LIMITADAS
POR LOS 60 MESES DE LA PRESENTE GARANTÍA
ESCRITA. Algunos Estados no permiten limitaciones
sobre la duración de una garantía implícita, de modo
que las limitaciones mencionadas pueden no regir
para usted.
CONAIR NO SERÁ RESPONSABLE EN NINGÚN
CASO POR ALGÚN DAÑO ESPECIAL, INCIDENTAL
O CONSECUENTE DEBIDO AL INCUMPLIMIENTO DE
ESTA O DE CUALQUIER OTRA GARANTÍA, EXPRESA
O IMPLÍCITA. Algunos Estados no permiten la exclu-
sión o limitación de daños especiales, incidentales o
consecuentes, de modo que las limitaciones mencio-
nadas pueden no regir para usted.
Esta garantía le otorga derechos legales específicos
y usted puede tener otros derechos que varían de un
Estado a otro.
©2006 Conair Corporation
Centro de Servicio
Conair Corporation
Service Department
7475 North Glen
Harbor Blvd.
Glendale, AZ 85307
Nuevamente, gracias por comprar un
producto de Conair
Las cuchillas de su cortadora son de acero
inoxidable y brindan resultados precisos y
profesionales. Si siente que las cuchillas tiro-
nean o enganchan el pelo, significa que están
perdiendo el filo y debe reemplazarlas lo más
pronto posible.
También se deben cambiar los peines acceso-
rios si se pierden o se dañan. Es más fácil cor-
tar el pelo con exactitud profesional cuando se
tienen las herramientas adecuadas.
Conair también fabrica una variedad de
accesorios para cortar el cabello. Si su con-
junto para recorte no los incluye, los puede
ordenar por separado.
Las pinzas sostienen el cabello mientras
lo está seccionando. El peine de modelar
permite contornear o cortar el cabello en
ángulo. La capa de peluquero asegura un
corte confortable y limpio y la cómoda caja de
almacenamiento guarda todo sus accesorios
en el mismo lugar.
06PG10085 IB-6806
Modelo
BLD-HC701
Modelo
comb-2
.5mm-2.5mm
Modelo HCNB-1
Modelo CAPE-1
Modelo SC- 1
Modelo CLP- 1
Modelo
comb-1
3mm-30mm
FORMULARIO DE PEDIDO PARA PARTES DE REPUESTO Y ACCESORIOS
Precios válidos hasta el 1ero de junio del 2008. Aceptaremos los pedidos después de esa fecha
y notificaremos los clientes si los precios han cambiado.
ITEM PART # PRICE QUANTITY AMOUNT
Subtotal
Impuestos
a la venta*
TOTAL
Enviar a:
Conair Corporation
Service Department
150 Milford Road
East Windsor, NJ 08520-9730
Incluya un cheque o giro postal a la orden de Conair (no podemos aceptar dinero en efectivo, estampillas, ni pedidos con pago con entrega). Los residentes de CT, IL, AZ
y PA deben sumar al subtotal el impuesto estatal a las ventas que corresponda. Pedido mínimo de $10,00US o de lo contrario se sumará al pedido $2,00US por gastos
administrativos. Todos los precios incluyen gastos administrativos y franqueo de envío. Los precios están sujetos a cambio sin previo aviso. Estos precios son
válidos únicamente para los envíos en la parte continental de los Estados Unidos La entrega demora entre 4 y 6 semanas.
Para evitar demoras, por favor escriba claramente. Necesitamos una dirección
completa ya que US no puede hacer entregas en casillas postales.
NOMBRE ______________________________________________________________________________________________
DIRECCIÓN ________________________________________ APTO. ____________________________________________
CIUDAD ____________________________________________ ESTADO _____ CÓDIGO POSTAL _____________________
TELÉFONO ( )_ _ _ _ _ _ _ _ _ _ _ _ _ _ _ _ _ _ _ _ _ _ _ _ _ _ _ _ _ _ _ _ _ _ _ _ _ _ _ _ _ _ _ _ _ _ _ _ (sólo le llamaremos si tengamos alguna pregunta sobre su pedido)
Para información sobre otras partes de los conjuntos de Conair®, llame 1-800-3-CONAIR
Cuchilla para cortar el cabello BLD-HC701 $6.50
Guía 1 HC701-3mm $4.00
Guía 2 HC701-5mm $4.00
Cepillo para el cuello HCNB-1 $1.50
Capa de barbero Cape-1 $5.00
Aceite lubricante HC Oil $2.00
Tijeras SC-1 $2.00
Pinzas CLP-1 $1.50
CORTE AQUT
BATERÍAS DE NI-MH
Su cortadora contiene baterías de Hidruro Metálico de
Níquel. A fin de proteger el medio ambiente, estas bat-
erías deberían ser recogidas y recicladas de manera
adecuada al fin de su vida útil. Siga los pasos siguien-
tes para remover las baterías:
1. Desconecte el aparato. Saque los 3 tornillos ubica-
dos en la parte trasera del aparato, los 2 tornillos de
encima y el tornillo de abajo.
2. Abra el aparato y saque las baterías, cortando los
alambres con un cortador de alambre.
3. No tire las baterías con el resto de la basura. Co-
muníquese con las autoridades locales para conseguir
información sobre el reciclaje de las baterías.
PRUEBE OTROS PRODUCTOS
INFINITI
™
DE CONAIR
®
Secadores
Modelos 213 y 207
Planchas de Alisar
Modelos CS31 and CS32
Tenacillas de Rizar
Modelos CD107,
CD108 and CD109
Indicador de la función
escogida Bajo, Alto, Auto
Indicador
del nivel
de carga
Indicador de
potencia
PANTALLA DIGITAL DEL HC107
Escala: 1:1
Escala: 1:4
Largo de recorte
escogido
Modelo HC OIL
Transcripción de documentos
1. 1 comb guide for 28 various lengths (3 to 30mm, in 1mm increments) 2. 1 precision guide provides 5 different positions (0.5 to 2.5mm) 3. stainless steel blade with 3D etching sharpening process 4. thinning system 5. on/off button 6. Up/down comb guide controls 7. charging stand 8. adaptor 9. scissors 10. barber comb 11. cleaning brush 12. lubricating oil 13. barber cape 14. neck brush 15. 3 styling clips 14 7 13 9 12 15 11 6 10 8 5 MEDIDAS DE SEGURIDAD ADVERTENCIA Sistema de IMPORTANTES Recorte de Pelo Avanzado Cuando se usan aparatos eléctricos, especialmente en la presencia de niños, siempre se deben tomar precauciones básicas de seguridad, entre las cuales las siguientes: LEA TODAS LAS INSTRUCCIONES ANTES DE USARLO MANTENGA EL APARATO ALEJADO DEL AGUA PELIGRO ™ — Cualquier electrodoméstico permanece eléctricamente activo, incluso cuando el interruptor está apagado. Para reducir el riesgo de muerte o herida por descarga: 1. Desconecte el aparato antes de limpiarlo. 2. No coloque ni guarde el aparato donde pueda caer o ser empujado a una bañera o un lavabo. 3. No lo use mientras se está bañando o tomando una ducha. 4. No coloque el aparato ni lo deje caer al agua u otro líquido. 5. No intente de alcanzar un aparato que ha caído al agua. Desconéctelo inmediatamente. 6. Siempre desconecte el aparato inmediatamente después de usarlo Fig.7 The blades of your clipper have a reservoir pad that dispenses the amount of oil necessary for your clipper to operate properly, every time. It is nevertheless recommended that you occasionally refill, when you notice the clipper isn’t performing as well. Remove the blades as described above. Carefully squeeze a few drops of Conair oil onto the pad. SELF-LUBRICATING BLADES To make cleaning easier, the Infiniti™ by Conair® clipper blades can be removed. Make sure the clipper is turned off. Hold the clipper with the blades pointing up and remove them by pressing the top of Fig.8 the blade. (Fig. 8) Brush the blades using the cleaning brush to remove any hair. REMOVEABLE BLADES 4 3 1 ® • For the crown of the head, move from front to back, that is, from your forehead to the crown of your head. Then put the blades back on the clipper. Conair oil is specially formulated for clippers, it will not evaporate or slow the blades down. You can get new blades when these are worn or damaged. Fig.6 Fig.5 Switch the clipper to the ‘THIN’ position. The thinning guide is in front of the blades. This technique allows you to thin out hair to make styling easier. The technique is particularly good for the crown of the head where hair is usually thicker. To thin you hair, take a section of hair (rest your little and ring fingers on your scalp, using the middle and index fingers to set the length), hold 1 to 2 cm below the cutting length. Then, using the clipper cut the section of hair steeply and at an angle to create a saw-toothed ‘edge’. USING THE THINNING SYSTEM - Remove the cut hair using a comb and check the evenness of the cut regularly. (Fig. 7) Antes de usar su cortadora por primera vez, asegúrese que esté apagada (OFF) y póngala a cargar durante unas 2 horas. El cable del adaptador puede conectarse directamente a la base de carga (Fig.1). 13. Siempre asegúrese que el cable del aparato no esté enredado. Si el cable se enreda o se enrolla mientras está usando el aparato, apáguelo inmediatamente y enderece el cable antes de volverlo a usar. GUARDE ESTAS INSTRUCCIONES INSTRUCCIONES DE USO Su conjunto de peluquería Infiniti™ de Conair® tiene todo lo que usted necesita para lograr cortes de cabello profesionales en su casa. Las cuchillas de la cortadora son hechas 100% de acero inoxidable para mayor durabilidad y se afilan automáticamente por medio de un proceso de grabado tridimensional que las deja muy tajantes. Las características de la cortadora incluyen: un botón de encendido/apagado, una pantalla digital que muestra el ajuste de recorte escogido, un indicador de potencia y un indicador del nivel de carga. Su conjunto también incluye un guía que logra 28 posiciones de recorte (de 3 a 30 mm, en incrementos de 1mm), un guía de precisión que logra 5 largos de recorte (de 0,5 a 2,5 mm), un sistema de entresacar, una base de carga, un adaptador, tijeras, un peine, un cepillo de limpieza, aceite lubricante, una capa de barbero, un COMO CARGAR LA CORTADORA CUTTING TECHNIQUES AND ADVICE FROM THE EXPERTS Remove the cutting guide after each use. Cleaning the clipper blades regularly will maintain their optimal performance. 2 CARE OF YOUR CLIPPERS MAINTENANCE OF THE BLADE USER MAINTENANCE Instrucciones & Guía de Recorte 1. Conecte el adaptador a una toma de corriente. 2. Ponga la cortadora en la base de carga. 3. Se podrá usar la cortadora sin cable durante 45 minutos cuando esté completamente cargada. Press the ON/OFF button for more than 2 seconds, the unit will shut down completely and the comb guide will return to its original position; or press the ON/OFF button for less than 2 seconds, 4 position setting: low/high/auto with smart motor technology/off-only the mortor will turn off, the display will remain lit for 15 seconds. After 15 seconds you will still have 5 minutes to change the cutting length. After 5 minutes, the clipper turns itself off and the cutting guide remains in the position last used. • To familiarize yourself with the clipper, begin with the comb guide for a longer cut, then, if you want a shorter cut, lower the comb guide. You will soon know the lengths of each cutting guide setting from 3mm to 30mm. • Always move the clipper against the direction of hair growth. Begin at the nape. Place the guide on the scalp and move the clipper toward the crown of your head. Move your clipper slowly, pointing the teeth of the guide slightly upward. Keep the clipper in contact with your head at all times. (Fig. 5) • Use the clipper on clean, dry hair. • For the finishing touches, that is, around the nape and sideburns, use the clipper without a comb guide. Turn your clipper over and move it from top to bottom. (Fig. 6) • If you want a length greater than 30 mm, or if you are experienced, you can create ‘comb’ or ‘finger’ cuts: - Work without a comb guide. - Take up a small section of hair with a comb or in your fingers. - Move the comb or your fingers along the section of hair to the desired length. - Cut your hair along the comb or your fingers. Fig.4 UTILIZAR EL GUÍA 3mm-30mm (integrado) Se puede ajustar lo largo del recorte usando el botón con flechas. Oprimir una de las flechas apaga el motor y ajusta la posición del guía. Después de escoger lo largo del recorte, oprima el botón de encendido/ apagado otra vez para confirmar su selección y volver a encender el motor. UTILIZAR EL GUÍA 0,5MM-2,5MM PARA RECORTES PRECISOS COMO USAR LA CORTADORA CON CABLE Conecte el cable del adaptador directamente a la cortadora y conecte el adaptador a una toma de corriente (Fig2). Si la batería está muy baja, espere un minuto antes de encender el aparato. Este guía se ajusta manualmente. Deje 3mm en la pantalla y no utilice los botones con flechas para cambiar lo largo del recorte. Para cambiar lo largo del recorte, mueva el botón ubicado sobre el guía hasta alcanzar la posición deseada. COMO INSTALAR LOS GUÍAS IMPORTANTE: Siempre instale el guía ANTES de encender el aparato y siempre apague el aparato antes de cambiar el guía. Su conjunto incluye dos guías: 1. Un guía para lograr 28 largos de recorte, desde 3mm a 30mm en incrementos de 1mm. 2. Un guía para lograr 5 largos de recorte precisos, desde 0,5mm hasta 2,5mm. Los guías son muy convenientes, pues le permiten lograr recortes uniformes. Antes de instalar el guía, ajuste lo largo del recorte hasta 3mm (en la pantalla digital), luego ensarte el guía encima de las cuchillas, presionando hasta oír un click (Fig.3). Fig.3 OPERACIÓN Oprima el botón de encendido/apagado. El ajuste de lo largo del recorte se pondrá automáticamente en la posición 3mm. AJUSTE AUTOMÁTICO DE POTENCIA SMART MOTOR TECHNOLOGY (SMT) Su conjunto de peluquería Infiniti™ de Conair® le permite escoger entre 3 niveles de potencia: 1) Oprimir el botón de Fig.4 encendido una vez activa la potencia baja, ideal para recortes fáciles o cuando se corta poco pelo. 2) Oprimir el botón de encendido una segunda vez activa la potencia alta, ideal para recortes difíciles o cuando se corta mucho pelo. 3) Oprimir el botón de encendido una tercera vez activa el ajuste automático de potencia SMT.La exclusiva tecnología SMT percibe cuando la cortadora está haciendo fuerza para cortar el pelo espeso e incrementa la potencia del motor automáticamente para facilitar el cortado. El indicador de potencia indica el incremento. The cutting length can be set using the 2 buttons with arrow pointing up/arrow pointing down. Pressing one of these two buttons will stop the motor and move the comb guide. Once the cutting length is selected, press the ON/OFF button again to confirm the length and to restart the motor. ci- To remove the comb guide, first adjust the cutting guide length to 3mm on the LCD display and push the guide up using your thumbs and holding it on either side. (Fig. 4) Fig.2 Fig.2 TO TURN THE CLIPPER OFF Your Conair Infiniti haircutting unit provides you with a choice of three different power settings. 1) Pushing the “On” switch one time sets the unit into the “low” mode for easy or light cutting situations. 2) Pushing the “On” switch a second time sets the unit into “high” mode for heavy or more difficult cutting situations. 3) Pushing the “On” switch a third time sets the unit into “Auto” mode for the exclusive SMT (Smart Motor Technology) that automatically senses when cutting especially “thick” areas of hair and will increase power to easily cut through these tough parts. The power level indicator shows the power increase. SWITCH SETTINGS SMART MOTOR TECHNOLOGY Adjusting the precision guide comb is a manual operation. You do not push the two buttons and the LCD is left to read 3mm. To adjust the presion guide, you manually move the slide switch located on top of the guide to your desired length. USING THE 0.5mm-2.5mm PRECISION CUTTING GUIDE Fig.1 1. Plug the adaptor into the AC outlet. 2. Place the clipper in the stand. 3. When fully charged, you will be able to use the clipper for up to 45 minutes. Fig.1 USING THE 3mm-30mm COMB GUIDE (comes on unit) Push the ON/OFF button. The comb guide is automatically put in its 3mm position. STARTING AND USING COMO APAGAR LA CORTADORA Oprima el botón de encendido/apagado durante más de 2 segundos. Esto apagará completamente el aparato y la posición del guía regresará al inicio. Si desea apagar la cortadora sin que la posición del guía regrese al inicio (3mm), oprima el botón de encendido/apagado (botón con 4 posiciones Bajo/ Alto/Auto con SMT y Apagado) durante menos de 2 segundos. La pantalla quedará encendida durante 15 segundos y tendrá 5 minutos para cambiar el ajuste de lo largo del recorte. Después de 5 minutos, la cortadora se apagará completamente y el guía permanecerá en la última posición escogida. Para remover el guía, ajuste lo largo del recorte a 3mm y jale el guía hacia arriba, manteniendo el mismo mientras lo empuja con el pulgar (Fig.4). TÉCNICAS DE RECORTE Y CONSEJOS DE LOS EXPERTOS • Utilice la cortadora en el pelo limpio y seco. • Utilice un ajuste de recorte más largo que el deseado hasta familiarizarse con la cortadora. Podrá volver a acortar su pelo después, escogiendo un ajuste menor. Aprenderá muy rápidamente a utilizar todos los ajustes, desde 3mm hasta 30mm. • Siempre mueva la cortadora en la dirección del crecimiento del pelo. Empiece en la nuca. Ponga el guía directamente sobre el cuero cabelludo y suba la Fig.5 cortadora hacia la coronilla. Mueva la cortadora lentamente, con los dientes del guía apuntando ligeramente hacia arriba. Mantenga la cortadora en contacto permanente con la cabeza (Fig.5). Before using the clipper for the first time, make sure clipper is in the off position and charge for 2 hours. The charging cord can be put in the stand. (Fig. 1) CHARGING THE CLIPPER IMPORTANT: Always attach the comb guide BEFORE turning the clipper on, and turn the clipper off to change guides. Fig.3 Your kit includes two separate guide combs. 1. cutting guide for 28 different lengths, from 3mm-30mm in 1-mm increments. 2. precision cutting guide for 5 different lengths, from 0.5mm – 2.5mm. The comb guide is very practical and guarantees an even cut. To attach a comb guide, first adjust the cutting guide length to 3mm on the LCD display and push the guide down until you hear a “click”. (Fig. 3) USING THE COMB GUIDES Plug the end of the line cord into the clipper and plug adaptor into an AC outlet. (Fig. 2) (If the battery is very weak, wait about 1 minute, then turn on clipper). USING DIRECT PLUG-IN — Para reducir el riesgo de quemaduras, electrocución, incendio o lesiones personales: 1. Nunca deje este aparato desatendido mientras está conectado. No jale, doble o enrolle el cable alrededor del aparato. 2. Este aparato no debería ser usado por, sobre o cerca de niños o personas con alguna discapacidad. 3. Use este aparato únicamente con el propósito para el cual fue diseñado y tal como se describe en este manual. Sólo use accesorios recomendados por el fabricante. 4. Nunca utilice el aparato si el cable o la clavija están dañados, si no funciona correctamente, si ha caído, si está dañado o si ha caído al agua. Llévelo a un centro de servicio autorizado para que lo examinen y lo reparen. 5. Mantenga el cable alejado de superficies calientes. 6. Nunca deje caer ni inserte un objeto en ninguna de las aberturas. 7. No coloque el aparato en ninguna superficie mientras está funcionando. 8. No use este aparato con un peine accesorio roto o lastimado o si le faltan dientes a la cuchilla. Esto podría provocar una herida. Asegúrese que las cuchillas estén correctamente alineadas antes de usarlo (véase la sección “Instrucciones de mantenimiento”). 9. No utilice este aparato al aire libre, ni donde se están usando productos en aerosol (spray) o donde se está administrando oxígeno. 10. Nunca bloquee las aberturas de aire o coloque el aparato en una superficie blanda, como una cama o un sofá, donde se puedan obstruir. Mantenga las aberturas libres de pelusas, cabellos y elementos similares. 11. Siempre conecte el cable al aparato antes de conectarlo a la toma de corriente. Para desconectarlo, coloque todos los ajustes en la posición “Apagado” (OFF), luego desenchufe el cable. 12. Evite que las cuchillas toquen la piel cuando están moviendo. • Para cortar la coronilla, mueva la cortadora desde la frente hasta atrás. INSTRUCCIONES DE MANTENIMIENTO Fig.6 • Para realizar los toques finales en la nuca y las patillas, utilice la cortadora sin guía. Voltee la cortadora y muévala de arriba por abajo (Fig.6). • Si desea un ajuste de recorte superior a 30mm o si usted tiene experiencia, puede usar una técnica de recorte con peine o dedos (Fig.7): 8. Do not use this appliance with a damaged or broken comb or with teeth missing from the blades, as injury may occur. Before use, make certain blades are aligned properly. (See “Care of your Clippers.”) 9. Do not operate outdoors or where aerosol (spray) products are being used or oxygen is being administered. 10. Never operate the appliance with the air openings blocked or while on a soft surface, such as a bed or couch, where the air openings may be blocked. Keep the air openings free of lint, hair, and the like. 11. Always attach plug to appliance first, then to outlet. To disconnect, turn all controls to “OFF”; remove plug from outlet. 12. Avoid skin contact with moving blades. 13. Check for tangles or kinks in the cord. If the cord does become tangled during use, turn unit off and straighten cord before operating. Your new Infiniti by Conair® Haircut Kit has everything you need to achieve professional haircuts, at home. It’s 100% stainless steel blade provides longer lasting performance and is sharpened using 3D etching process for an exceptional cutting edge. Also included are: 1 cutting guide for 28 various lengths (3 to 30mm, in 1mm increments), 1 precision guide provides 5 different positions (.5 to 2.5mm), thinning system, on/off button, LCD display for selected length, power level, battery charge level, charging stand, adaptor cord, scissors, comb, cleaning brush, lubricating oil, barber cape, neck brush and 3 styling clips. SAVE THESE INSTRUCTIONS OPERATING INSTRUCTIONS NO TRATE DE ALCANZAR EL APARATO EN EL AGUA CUIDADO DE SU CORTADORA LIMPIEZA DE LAS CUCHILLAS 1. This appliance should never be left unattended when plugged in. Do not pull, twist, or wrap line cord around appliance. 2. This appliance should not be used by, on, or near children or individuals with certain disabilities. WARNING — To reduce risk of burns, electrocution, fire, or injury to persons: children are present, basic safety precautions should always be followed, including the following: 3. Use this appliance only for its intended purpose as described in this manual. Do not use attachments not recommended by the manufacturer. Do not use an extension cord to operate this appliance. 4. Never operate appliance if it has a damaged cord or plug, or if it is not working properly, if it has been dropped or damaged, or dropped into water. Return appliance to a service center for examination and repair. 5. Keep cord away from heated surfaces. 6. Never drop or insert any object into any opening on this appliance. 7. Do not place appliance on any surface while it is operating. Modelo HC701 Model HC701 Instruction & Styling Guide ® ™ DO NOT REACH INTO THE WATER 6. Always unplug this appliance from electrical outlet immediately after using. any appliance is electrically live, even when the switch is off. To reduce the risk of death or injury by electric shock: 1. Unplug this appliance before cleaning. 2. Do not place or store appliance where it can fall or be pulled into a tub or sink. 3. Do not use while bathing or in a shower. 4. Do not place in, or drop into, water or other liquid. 5. Do not reach for an appliance that has fallen into water. Unplug immediately. DANGER — READ ALL INSTRUCTIONS BEFORE USING KEEP AWAY FROM WATER Advanced Haircut System IMPORTANT SAFETY INSTRUCTIONS When using electrical appliances, especially when 1 3 2 4 Saque el guía después de cada uso. Limpie las cuchillas regularmente para asegurar un desempeño óptimo. CUCHILLAS EXTRAÍBLES Fig.7 - Trabaje sin guía. - Coja una pequeña sección de pelo entre sus dedos o con un peine. - Deslice los dedos o el peine hacia las puntas, hasta el nivel deseado. - Corte el cabello por encima del peine o de los dedos. - Peine el cabello a medida que lo corta para asegurarse que quedé uniforme. COMO USAR EL SISTEMA DE ENTRESACAR Escoja la posición “THIN”. Esto pondrá en marcha el guía de desgastar ubicado frente a las cuchillas. El sistema de entresacar vuelve el pelo menos tupido, lo cual es particularmente útil cuando se corta el pelo en la coronilla, donde siempre es más espeso. Coja una mecha de pelo entre sus dedos índice y corazón (apoyando el anular y el meñique en la cabeza) y deslice los dedos hacia las puntas, hasta dejar 1 a 2 centímetros. Corte el pelo manteniendo la cortadora a un ángulo empinado para lograr un efecto de puntas dentadas. Las cuchillas de la cortadora Infiniti™ de Conair® son extraíbles para facilitar la limpieza. Antes de extraer las cuchillas, asegúrese que la cortadora esté apagada. Mantenga la cortadora con las cuchillas apuntando hacia arriba y empuje la parte superior de Fig.8 las cuchillas hasta sacarlas (Fig.8). Limpie las mismas con el cepillo de limpieza provisto, luego regréselas en su lugar. 5 8 10 6 9 11 12 CUCHILLAS AUTOLUBRIFICANTES Su cortadora está equipada de un tampón lubrificante incorporado que lubrica las cuchillas permanentemente para asegurar un desempeño óptimo. Se aconseja rellenar el tampón cuando sea necesario. Cuando le parece que la cortadora no está funcionando de manera óptima, saque las cuchillas como se indicó anteriormente y ponga unas cuantas gotas del aceite lubricante de Conair sobre el tampón. Regrese las cuchillas en su lugar. El aceite lubricante de Conair fue especialmente diseñado para las cortadoras de pelo. No se evaporará o reducirá la velocidad de las cuchillas. Cuando sea necesario cambiar las cuchillas, pida cuchillas de repuesto usando el formulario de pedido adjunto. 15 13 7 14 1. Guía para lograr 28 largos de recorte (de 3 a 30mm, en incrementos de 1mm) 2. Guía de precisión con 5 posiciones (de 0,5 a 2,5mm) 3. Cuchilla de acero inoxidable con proceso de grabado tridimensional 4. Sistema de entresacar 5. Botón de encendido/apagado 6. Botones de ajuste de lo largo del recorte 7. Base de carga 8. Adaptador 9. Tijeras 10. Peine de barbero 11. Cepillo de limpieza 12. Aceite lubricante 13. Capa de barbero 14. Cepillo para el cuello 15. 3 pinzas 06PG10085 LIMITED FIVE YEAR WARRANTY Mail to: NAME____________________________________________________________________________ Straighteners Models CS31 and CS32 To avoid delays, please print clearly. We must have a street address, as UPS cannot deliver to a P.O. box. Model HCNB-1 Dryers Models 213 and 207 Model BLD-HC701 Model HC OIL Model CAPE-1 Model comb-2 .5mm-2.5mm Model comb-1 3mm-30mm TOTAL *Sales Tax Enclose check or money order made payable to Conair. (We cannot accept cash, stamps or C.O.D. orders.) CT, IL, AZ, and PA residents should add applicable state sales tax. Minimum order of $10.00 or a $2.00 handling charge will be added to order. All prices include handling and return postage. Prices are subject to change without notice. Prices are valid only for shipments within the Continental United States. Please allow 4-6 weeks for delivery. Subtotal $1.50 CLP-1 Styling Clips $2.00 SC-1 Scissors $2.00 HC Oil Lubricating Oil $5.00 Cape-1 Barber Cape $1.50 HCNB-1 Neck Brush $4.00 HC701-5mm Comb 2 $4.00 HC701-3mm Comb 1 $6.50 BLD-HC701 Clipper Blade ITEM TRY OUR OTHER NEW INFINITI™ BY CONAIR® PRODUCTS CUT HERE NI-MH BATTERIES Modelo HCNB-1 Modelo comb-1 3mm-30mm Modelo CAPE-1 Modelo comb-2 .5mm-2.5mm Modelo HC OIL Planchas de Alisar Modelos CS31 and CS32 HC701 LCD INTERFACE Modelo BLD-HC701 Scale: 1:1 This clipper has Nickel-Metal Hydride batteries. In an effort to protect the environment, these batteries should be removed and properly disposed of when the unit is no longer operating. To remove the battery block for disposal or recovery, follow these instructions: 1. First, unplug the clipper. Remove the 3 screws on the back, 2 at the top and 1 at the bottom. 2. Open the clipper and remove the batteries using wire cutters. 3. To protect the environment, do not dispose of your batteries with your ordinary household waste. For more details on recovery of materials and waste treatment facilities, please contact the waste disposal services in your region WARNING: IF YOU THINK THE POWER IS OFF WHEN THE SWITCH IS OFF, YOU'RE WRONG. FORMULARIO DE PEDIDO PARA PARTES DE REPUESTO Y ACCESORIOS Precios válidos hasta el 1ero de junio del 2008. Aceptaremos los pedidos después de esa fecha y notificaremos los clientes si los precios han cambiado. ITEM Secadores Modelos 213 y 207 Scale: 4:1 PRUEBE OTROS PRODUCTOS INFINITI™ DE CONAIR® PART # PRICE Cuchilla para cortar el cabello BLD-HC701 $6.50 Guía 1 HC701-3mm $4.00 Guía 2 HC701-5mm $4.00 Cepillo para el cuello HCNB-1 $1.50 Capa de barbero Cape-1 $5.00 Aceite lubricante HC Oil $2.00 Tijeras SC-1 $2.00 Pinzas CLP-1 $1.50 Incluya un cheque o giro postal a la orden de Conair (no podemos aceptar dinero en efectivo, estampillas, ni pedidos con pago con entrega). Los residentes de CT, IL, AZ y PA deben sumar al subtotal el impuesto estatal a las ventas que corresponda. Pedido mínimo de $10,00US o de lo contrario se sumará al pedido $2,00US por gastos administrativos. Todos los precios incluyen gastos administrativos y franqueo de envío. Los precios están sujetos a cambio sin previo aviso. Estos precios son válidos únicamente para los envíos en la parte continental de los Estados Unidos La entrega demora entre 4 y 6 semanas. Para evitar demoras, por favor escriba claramente. Necesitamos una dirección completa ya que US no puede hacer entregas en casillas postales. QUANTITY AMOUNT Subtotal Impuestos a la venta* TOTAL NOMBRE ______________________________________________________________________________________________ Modelo CLP- 1 Modelo SC- 1 DIRECCIÓN ________________________________________ APTO. ____________________________________________ CIUDAD ____________________________________________ ESTADO _____ CÓDIGO POSTAL _____________________ TELÉFONO ( )________________________________________________ (sólo le llamaremos si tengamos alguna pregunta sobre su pedido) Para información sobre otras partes de los conjuntos de Conair®, llame 1-800-3-CONAIR ©2006 Conair Corporation Centro de Servicio Conair Corporation Service Department 7475 North Glen Harbor Blvd. Glendale, AZ 85307 KEEP AWAY FROM WATER Once again, thanks for buying a Conair product. Your Conair® clipper blades are made of high carbon stainless steel. They are engineered for precise, professional results. If blades feel like they are pulling or grabbing hair, it means they are losing their sharpness and should be replaced as soon as possible. Attachment combs should also be replaced if they are lost or broken. It is easier to cut hair with the accuracy of a pro when the necessary tools are at your fingertips. Conair makes a variety of accessories for different haircut kits. If your haircut kit does not include them, you may want to consider adding them to your professional haircutting tools. Styling clips hold hair in place when you are sectioning hair. A styling comb makes it easy to taper or cut hair at an angle. A barber cape ensures a comfortable and neat haircut and a convenient storage case keeps all your essentials in one place. ADDRESS __________________________________________ APT. _______________________ Model SC- 1 3. No tire las baterías con el resto de la basura. Comuníquese con las autoridades locales para conseguir información sobre el reciclaje de las baterías. Power Level Model CLP- 1 2. Abra el aparato y saque las baterías, cortando los alambres con un cortador de alambre. Selected Cutting length in mm Conair Corporation Service Department 150 Milford Road East Windsor, NJ 08520-9730 CITY _______________________________________________ STATE _______ ZIP ___________ PART # PRICE QUANTITY AMOUNT Pricing in effect through June 1, 2008. Orders postmarked after this date will be accepted, and the customer will be notified if pricing has changed. HAIRCUT KIT REPLACEMENT PARTS & ACCESSORIES ORDER FORM Un Aviso Público de la Asociación de los Fabricantes de Electrodomésticos y de Underwriters Laboratories, Inc. 1. Desconecte el aparato. Saque los 3 tornillos ubicados en la parte trasera del aparato, los 2 tornillos de encima y el tornillo de abajo. Nuevamente, gracias por comprar un producto de Conair Las cuchillas de su cortadora son de acero inoxidable y brindan resultados precisos y profesionales. Si siente que las cuchillas tironean o enganchan el pelo, significa que están perdiendo el filo y debe reemplazarlas lo más pronto posible. También se deben cambiar los peines accesorios si se pierden o se dañan. Es más fácil cortar el pelo con exactitud profesional cuando se tienen las herramientas adecuadas. Conair también fabrica una variedad de accesorios para cortar el cabello. Si su conjunto para recorte no los incluye, los puede ordenar por separado. Las pinzas sostienen el cabello mientras lo está seccionando. El peine de modelar permite contornear o cortar el cabello en ángulo. La capa de peluquero asegura un corte confortable y limpio y la cómoda caja de almacenamiento guarda todo sus accesorios en el mismo lugar. Conair will repair or replace (at our option) your unit free of charge for 60 months from the date of purchase if the appliance is defective in workmanship or materials. To obtain service under this warranty, return the defective product to the service center listed below that is nearest you, together with your purchase receipt and $3.00 for postage and handling. California residents need only provide proof of purchase and should call 1-800-366-0937 for shipping instructions. In the absence of a purchase receipt, the warranty period shall be 60 months from the date of manufacture. ANY IMPLIED WARRANTIES, OBLIGATIONS, OR LIABILITIES, INCLUDING BUT NOT LIMITED TO THE IMPLIED WARRANTY OF MERCHANTABILITY AND FITNESS FOR A PARTICULAR PURPOSE, SHALL BE LIMITED IN DURATION TO THE 60 MONTH DURATION OF THIS WRITTEN, LIMITED WARRANTY. Some states do not allow limitations on how long an implied warranty lasts, so the above limitations may not apply to you. IN NO EVENT SHALL CONAIR BE LIABLE FOR ANY SPECIAL, INCIDENTAL, OR CONSEQUENTIAL DAMAGES FOR BREACH OF THIS OR ANY OTHER WARRANTY, EXPRESS OR IMPLIED, WHATSOEVER. Some states do not allow the exclusion or limitation of special, incidental, or consequential damages, so the above limitation may not apply to you. This warranty gives you specific legal rights, and you may also have other rights, which vary from state to state. TELEPHONE ( ) ___________________________ (We call only if we have a question about your order.) For information on other Conair® haircut kit parts call: 1-800-3-CONAIR. SIEMPRE DESCONECTE LOS APARATOS PEQUEÑOS Su cortadora contiene baterías de Hidruro Metálico de Níquel. A fin de proteger el medio ambiente, estas baterías deberían ser recogidas y recicladas de manera adecuada al fin de su vida útil. Siga los pasos siguientes para remover las baterías: Conair reparará o remplazará (a su opción) su aparato sin cargo por un período de 60 meses a partir de la fecha de compra si presenta defectos de mano de obra o en los materiales. Para obtener servicio técnico bajo esta garantía, lleve o mande su aparato al Centro de Servicio indicado a continuación, junto con su recibo de compra y un cheque de $3,00US por gastos de envío y manejo. Los residentes de California sólo necesitan dar una prueba de compra y deben llamar al 1-800-3660937 para recibir instrucciones de envío. En ausencia del recibo de compra, el período de garantía será de 60 meses a partir de la fecha de fabricación. CUALQUIER GARANTÍA, OBLIGACIÓN O RESPONSABILIDAD IMPLÍCITAS, INCLUYENDO PERO NO LIMITADAS A LA GARANTÍA IMPLÍCITA DE COMERCIABILIDAD Y APTITUD PARA UN PROPÓSITO ESPECÍFICO, ESTARÁN LIMITADAS POR LOS 60 MESES DE LA PRESENTE GARANTÍA ESCRITA. Algunos Estados no permiten limitaciones sobre la duración de una garantía implícita, de modo que las limitaciones mencionadas pueden no regir para usted. CONAIR NO SERÁ RESPONSABLE EN NINGÚN CASO POR ALGÚN DAÑO ESPECIAL, INCIDENTAL O CONSECUENTE DEBIDO AL INCUMPLIMIENTO DE ESTA O DE CUALQUIER OTRA GARANTÍA, EXPRESA O IMPLÍCITA. Algunos Estados no permiten la exclusión o limitación de daños especiales, incidentales o consecuentes, de modo que las limitaciones mencionadas pueden no regir para usted. Esta garantía le otorga derechos legales específicos y usted puede tener otros derechos que varían de un Estado a otro. Battery charging level ©2006 Conair Corporation Service Center Indicador de la función escogida Bajo, Alto, Auto Todos saben que la combinación de electricidad y de agua es peligrosa. Pero ¿Sabe usted que un aparato eléctrico está eléctricamente activo aún cuando el interruptor está apagado? Si la clavija está conectada, hay corriente. De modo que cuando no use sus aparatos electrodomésticos, manténgalos desconectados. Everyone knows that electricity and water are a dangerous combination. But did you know that an electric appliance is still electrically alive even if the switch is off? If the plug is in, the power is on. So when you are not using your appliances, keep them unplugged. Curling Irons Models CD107, CD108 and CD109 Largo de recorte escogido ALWAYS UNPLUG SMALL APPLIANCES Indicador de potencia GARANTÍA LIMITADA POR CINCO AÑOS Switch settings Low, High, Auto, Off IB-6806 MANTENGA ESTE APARATO ALEJADO DEL AGUA Escala: 1:4 Indicador del nivel de carga Conair Corporation Service Department 7475 North Glen Harbor Blvd. Glendale, AZ 85307 Escala: 1:1 Public Service ad from Association of Home Appliance Manufacturers and Underwriters Laboratories, Inc. ADVERTENCIA: SI CREE QUE NO HAY CORRIENTE, SE EQUIVOCA BATERÍAS DE NI-MH CORTE AQUT PANTALLA DIGITAL DEL HC107 06PG10085 IB-6806 Tenacillas de Rizar Modelos CD107, CD108 and CD109 Enviar a: Conair Corporation Service Department 150 Milford Road East Windsor, NJ 08520-9730-
 1
1
-
 2
2


Conair HC701 Manual de usuario
- Categoría
- Cortapelos
- Tipo
- Manual de usuario
- Este manual también es adecuado para
en otros idiomas
- English: Conair HC701 User manual
Artículos relacionados
-
Conair HC900RN Manual de usuario
-
Conair THE CHOPPER HCT420CSC Manual de usuario
-
Conair HCT570GBV Instrucciones de operación
-
Conair HC221 Manual de usuario
-
Conair 200 Manual de usuario
-
Conair HC244NGBV Manual de usuario
-
-
-
-