Avid Technology SPEED DIAL 7 Installation and Operation Instructions
- Categoría
- Bicicletas
- Tipo
- Installation and Operation Instructions

L
EVER INSTALLATION
I
MPORT
ANT!
ONLY BRAKES DESIGNATED FOR DIRECT-PULL LEVERS SUCH AS THE SINGLE DIGIT®
U
LTIMATE,
S
I
NGLE
DI
GIT
® SL, 7, 5 A
ND
3 B
RAKES CAN BE USED WITH
AV
ID LEVERS
. IF
YOU HAVE ANY
QUESTIONS
CONCERNING
COMPATIBILITY OF LEVERS AND BRAKES
, CONTACT YOUR
PROFESSIONAL BIKE DEALER
.
F
O
LLOW THESE INSTRUCTIONS CAREFULLY
. IF
YOU DO NOT UNDERSTAND THE INSTRUCTIONS
,
H
AVE THE INSTALLATION DONE BY A PROFESSIONAL BIKE MECHANIC
.
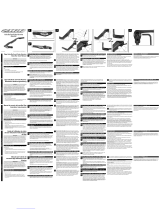
1
INSTALL THE LEVER
Slide the lever onto the bar to the proper position. Tighten the clamp bolt. Tighten
C
lamp Bolt to: 4 - 5 Nm (30-40 in-lb)
2 SET
THE REACH
If you have smaller hands, you can adjust the reach of the lever by adjusting the
reach adjustment screw
.
3 SET
SPEED DIAL
B
efore setting the brake cable length, turn the Speed Dial adjusting thumbscrew so
it is in the middle of the range. After installation, adjust the knob for the exact brake
feel that you want.
4 SET A
DJUSTER BARREL
B
efore installing the cable, adjust the barrel adjuster about half way out. Make sure
that the barrel slot lines up with the slot in the body.
5 INSTALL CABLE
Feed the cable through the housing to the brake and install the cable end into the link.
6
A
TTA
CH CABLE T
O
BRAKE
F
ollow the installation instructions for your specific brake. Refer to these instructions
for torque specifications and brake setup. Tighten mounting bolt to manufacturer’s
specs.
IN
STALLATION
TO
OLS
NE
EDED
: 2M
M AND
5M
M HEX WRENCHES
,
T
ORQUE
WRENCH
A
ND C
ABLE C
UTTERS
.
2
1
7
A
DJUST BARREL
U
se the barrel adjuster to take up any slack in the cable.
8
TEST THE SYSTEM
With two fingers, squeeze the brake lever firmly about a dozen times to ensure the
c
ables are seated properly and operate smoothly
. Make sure the cable has not
s
lipped at the cable anchor bolt. Re-torque if necessary.
I
MPORTANT NOTE FOR CABLE ACTUATED DISC BRAKES: A
FTER THE CABLE IS
ANCHORED
, CHECK TO BE SURE THERE IS NO MORE THAN 20MM (3/4 IN.) OF EXCESS CABLE
B
EYOND THE ANCHOR BOLT
. TR
IM AS NECESSARY
.
SPEED DIAL®
The primary feature that sets these levers apart is the patented Speed Dial
Adjustable Leverage function.
T
his design allows you to dial in whatever feel you
want, from a soft feel (greater modulation) to a firmer feel, or anywhere in between.
This adjustment can be done without any tools.
ABIDEXTROUS CLAMP BOLT
The Avid clamp bolt is uniquely designed to thread through the clamp in either
d
irection.
The bonus? If for some reason one side of the body becomes stripped,
you can simply thread the bolt through the other way.
TE
CH
TI
PS
/MA
INTENANCE
1. To keep your levers creak-free and operating smoothly, place a drop of light-
weight oil on both sides of the cable link at the cross dowel.
2
. Loose lever blade? Use a 2mm hex wrench to check the pivot pin set screw
.
EXTENT OF LIMITED WARRANTY
SRAM warrants its products to be free from defects in materials or workmanship for
a
period of two years after original purchase.
This warranty only applies to the
original owner and is not transferable. Claims under this warranty must be made
through the retailer where the bicycle or the SRAM component was purchased.
O
riginal proof of purchase is required.
LOCAL LAW
This warranty statement gives the customer specific legal rights.
T
he customer may
a
lso have other rights which vary from state to state (USA), from province to
province (Canada), and from country to country elsewhere in the world.
4
3
5
T
o
the extent that this warranty statement is inconsistent with the local law
, this warranty
shall be deemed modified to be consistent with such law, under such local law, certain
disclaimers and limitations of this warranty statement may apply to the customer. For
example, some states in the United States of
A
merica, as well as some governments
outside of the United States (including provinces in Canada) may:
a.
P
reclude the disclaimers and limitations of this warranty state ment from limiting
the statutory rights of the consumer (e.g. United Kingdom).
b. Otherwise restrict the ability of a manufacturer to enforce such disclaimers or limitations.
L
IMITATIONS OF LIABILITY
To the extent allowed by local law, except for the obligations specifically set forth in
this warranty statement, In no event Shall SRAM or its third party supplies be liable
for direct, indirect, special, incidental, or consequential damages.
LIMITATIONS OF WARRANTY
•
This warranty does not apply to products that have not been correctly installed
and/or adjusted according to the respective SRAM technical installation manual.
The SRAM installation manuals can be found online at www.SRAM.com,
w
ww.rockshox.com or www.avidbike.com.
•
This warranty does not apply to damage to the product caused by a crash,
impact, abuse of the product, non-compliance with manufacturers specifications of
usage or any other circumstances in which the product has been subjected to
f
orces or loads beyond its design.
• This warranty does not apply when the product has been modified.
• This warranty does not apply when the serial number or production code has
b
een deliberately altered, defaced or removed.
• This warranty does not apply to normal wear and tear. Wear and tear parts are subject to
damage as a result of normal use, failure to service according to SRAM recommendations
a
nd/or riding or installation in conditions or applications other than recommended.
Wear and tear parts are identified as: Dust seals, Bushings, Air sealing o-rings, Glide rings,
Rubber moving part, Foam rings, Rear shock mounting hardware and main seals, Stripped
t
hreads/bolts (aluminium, titanium, magnesium or steel), Upper tubes (stanchions), Brake
sleeves, Brake pads, Chains, Sprockets, Cassettes, Shifter and brake cables (inner and
outer), Handlebar grips, Shifter grips, Jockey wheels, Disc brake rotors, Tools.
•
This warranty shall not cover damages caused by the use of parts of dif
ferent
manufacturers.
• This warranty shall not cover damages caused by the use of parts that are not
c
ompatible, suitable and/or authorized by SRAM for use with SRAM components.
6
7
SRAM WARRANTY
SPEED DIAL
®
7/SL
I
NSTALLATION
A
ND
O
PERATION INSTRUCTIONS
S
RAM C
O
RPORATION
•
O
C
TOBER
9
5-5309-722-000, R
E
V
.
B
4 - 5 Nm (30-40 in-lb)
Slots
m
ounting bolt
8
IMPORTANT
Brakes are a safety-critical item on a bicycle. Improper set-up or use of
brakes can result in loss of control or an accident, which could lead to a
severe injury.
Avid brakes are a performance product that offer increased
stopping power over standard brakes. It’
s
your responsibility to learn
and understand proper braking techniques.
Consult the owner
’
s manual for your bicycle and a professional bike
dealer. Practice your riding and braking techniques on a flat and level
surface prior to aggressive riding.
The effectiveness of braking is dependent on many conditions over
which Avid has no control including the speed of the bicycle, type and
condition of the riding surface, braking lever force, proper installation
and maintenance of brakes, cables, levers, brake pads, the condition of
the bike, weight of the rider, proper braking techniques, weather, terrain,
and a variety of other factors.
Avid brakes and levers are not intended for use on any motorized
bicycle or vehicle.
A
ny such use could result in a serious personal injury
.
A
LWAYS RIDE UNDER CONTROL.
R
emember, it takes longer to stop in wet conditions. To reduce the
possibility of an accident and minimize trail erosion, you should avoid
locking-up your wheels.
S
RAM Corporation
1
333 North Kingsbury • 4th Floor • Chicago, Illinois 60622
1–312–664–8800 • fax 1–312–664–8826
Website: www.avidbike.com Email: [email protected]
Speed Dial
®
S
ofter
F
irmer
Tech Tips/Maintenance
Oil here
(
Don’t forget the other side)
Abidextrous Clamp Bolt
1
2
MONTAGE DER HEBEL
W
ICHTIG!
MIT AVID-HEBELN KÖNNEN AUSSCHLIEßLICH BREMSEN VERWENDET WERDEN, DIE SICH FÜR
DI
RECT
-PU
LL
-HE
BEL EIGNEN
, B
EISPIELSWEISE DIE
MO
DELLE
SI
NGLE
DI
GIT
® UL
TIMATE
,
S
INGLE
DIGIT ®
SL, 7, 5
UND 3
. W
ENN SIE FRAGEN ZUR KOMPATIBILITÄT VON HEBELN UND
BREMSEN HABEN, ERKUNDIGEN SIE SICH BEI IHREM FAHRRAD-FACHHÄNDLER.
B
EFOLGEN
SI
E DIESE
AN
LEITUNG SORGFÄLTIG
.
W
E
NN
SI
E DIE
AN
WEISUNGEN NICHT VERSTEHEN
,
LASSEN SIE DIE MONTAGE VON EINEM QUALIFIZIERTEN FAHRRADMECHANIKER VORNEHMEN.
1
HEBEL
MONTIEREN
Schieben Sie den Hebel auf dem Lenker in die gewünschte Position. Ziehen Sie die
Klemmschraube an. Anzugsmoment der Klemmschraube: 4 - 5 Nm.
2 REICHWEITE EINSTELLEN
Wenn Sie kleinere Hände haben, können Sie die Reichweite der Hebel mit der
Reichweiten-Inbusschraube einstellen.
3 SPEED DIAL EINSTELLEN
Bevor Sie die Bremszuglänge festlegen, drehen Sie den Speed Dial-Einstellknopf in
die Mitte des Einstellbereichs. Nach der Montage können Sie mit dem Knopf das
gewünschte Ansprechverhalten der Bremse einstellen.
4 ZUGSPANNUNG EINSTELLEN
Bevor Sie den Zug montieren, drehen Sie die Zugspannungs-Einstellschraube bis zur
Hälfte heraus. Stellen Sie sicher, dass der Schlitz der Einstellschraube und der Schlitz
im Hebelkörpers übereinander liegen.
5 BREMSZUG MONTIEREN
Schieben Sie den Zug durch die Zughülle zur Bremse, und montieren Sie das
Zugende in der Aufnahme.
6 BREMSZUG MIT BREMSE VERBINDEN
Befolgen Sie die Montageanweisungen für Ihre Bremse. Beachten Sie die Anweisungen
hinsichtlich der vorgegebenen Anzugsmomente und der Einstellung der Bremsen.
Ziehen Sie die Befestigungsschraube gemäß den Herstelleranweisungen an.
7 ZUGSPANNUNG EINSTELLEN
Verwenden Sie den Zugspannungs-Einsteller, um den Bremszug bei Bedarf zu spannen.
ER
FORDERLICHE
EI
NBAUWERKZEUGE
: 2- U
ND
5-M
M
-IN
BUSSCHLÜSSEL
,
D
REHMOMENTSCHLÜSSEL UND SPEZIALZANGE FÜR ZÜGE
8 SYSTEM
T
ESTEN
Ziehen Sie den Bremshebel ungefähr ein Dutzend mal mit zwei Fingern fest an, um
sicherzustellen, dass die Züge ordnungsgemäß positioniert sind und einwandfrei
funktionieren. V
ergewissern Sie sich, dass der Zug an der Zugbefestigungsschraube
nicht durchrutscht. Ziehen Sie die Zugfestigungsschraube bei Bedarf nach.
WICHTIGER HINWEIS FÜR MECHANISCH BETÄTIGTE SCHEIBENBREMSEN:
V
ERGEWISSERN SIE SICH NACH DEM BEFESTIGEN DES BREMSZUGS, DASS DIESER NICHT UM
MEHR
ALS
20 MM
ÜBER
D
IE
A
NKERSCHRAUBE
HINAUSSTEHT
.
A
NDERNFALLS MÜSSEN SIE DEN
BR
EMSZUG
KÜRZEN
.
S
PEED DIAL®
Das wichtigste Merkmal, das die Hebel auszeichnet, ist die patentierte Speed Dial-
Hebelkrafteinstellung. Diese Konstruktion erlaubt es Ihnen, das
Ansprechverhalten
von einer weichen Einstellung mit größerer Modulierung bis zur straf
f
sten
Einstellung stufenlos einzustellen. Diese Einstellung kann ohne W
e
rkzeug erfolgen.
ZWEISEITIGE KLEMMSCHRAUBE VON AVID
Die Avid-Klemmschraube ist eine spezielle Entwicklung, die von zwei Seiten in den
Klemmkörper eingeschraubt werden kann. Der Vorteil? Wenn eine Seite des
Körpers überdreht wurde, können Sie die Schraube einfach aus der anderen
Richtung einschrauben.
T
ECHNISCHE TIPPS/ WARTUNG
1. Damit Ihre Hebel stets geräuschlos und einwandfrei funktionieren, geben Sie
einen Tropfen Leichtöl auf beide Seiten der Zugaufnahme am Querführungsbolzen.
2. Ist der Hebelgrif
f
locker? Verwenden Sie einen 2-mm-Inbusschlüssel, um die
Einstellschraube des Gelenkbolzens zu überprüfen.
G
ARANTIEUMFANG
SRAM garantiert vom Erstkaufdatum an für zwei Jahre, dass das Produkt frei von Mängeln in
Material oder Verarbeitung ist. Diese Gewährleistung kann nur vom Erstkäufer in Anspruch
genommen werden und ist nicht übertragbar. Ansprüche aus dieser Gewährleistung sind über
den Händler, bei dem das Fahrrad oder die SRAM-Komponente erworben wurde, geltend zu
machen. Der Kaufbeleg muss im Original vorgelegt werden.
LOKALE GESETZGEBUNG
Diese Gewährleistung räumt Ihnen spezifische Rechte ein. Je nach Bundesland (USA), Provinz
(Kanada) oder Ihrem Wohnland verfügen Sie möglicherweise über weitere Rechte.
Die Gewährleistung ist in dem Maße, in dem sie von der lokalen Gesetzgebung abweicht, in
Übereinstimmung mit der geltenden Gesetzgebung zu bringen. Der jeweiligen lokalen
Gesetzgebung unterliegen möglicherweise Ausschlüsse und Einschränkungen aus dieser
Gewährleistung. Für bestimmte Bundesstaaten der USA sowie einige Länder außerhalb der
USA (einschließlich von Kanadischen Provinzen) gilt beispielsweise Folgendes:
a. Die Ausschlüsse und Einschränkungen in dieser Gewährleistung dürfen die gesetzlich
festgelegten Rechte des Verbrauchers nicht beeinträchtigen (z.B. Großbritannien).
b. Andernfalls sind derartige Ausschlüsse und Einschränkungen unwirksam.
HAFTUNGSBESCHRÄNKUNG
Im nach der örtlichen Gesetzgebung zulässigen Maße und mit Ausnahme der in der vorliegenden
Gewährleistung ausdrücklich dargelegten Verpflichtungen schließen SRAM bzw. seine Lieferanten
jegliche Haftung für direkte, indirekte, spezielle, zufällige oder Folgeschäden aus.
GEWÄHRLEISTUNGSAUSSCHLUSS
• Die Garantie gilt nicht für Produkte, die nicht fachgerecht bzw. nicht gemäß den
Montageanleitungen von SRAM montiert und/oder eingestellt wurden. Die SRAM-
Montageanleitungen finden Sie im Internet unter www.SRAM.com, www.rockshox.com oder
www.avidbike.com.
• Diese Garantie gilt nicht bei Schäden am Produkt infolge von Unfällen, Stürzen oder
missbräuchlicher Nutzung, Nichtbeachtung der Herstellerangaben oder sonstiger Umstände,
unter denen das Produkt nicht bestimmungsgemäßen Belastungen oder Kräften ausgesetzt
wurde.
- Bei Veränderungen am Produkt erlischt der Gewährleistungsanspruch.
- Der Gewährleistungsanspruch erlischt ebenfalls, wenn die Seriennummer bzw. der
Herstellungscode verändert, unkenntlich gemacht oder entfernt wurde.
- Normaler Verschleiß und Abnutzung sind von der Gewährleistung ausgeschlossen. Zum
normalen Verschleiß von Komponenten kann es infolge des sachgemäßen Gebrauchs, der
Nichteinhaltung von Empfehlungen von SRAM und/oder von Fahren unter anderen als den
empfohlenen Bedingungen kommen.
Folgende Komponenten unterliegen dem „normalen V
erschleiß":
Staubdichtungen,
Buchsen, Luftschließende O-Ringe, Gleitringe, Bewegliche Teile aus Gummi,
Schaumgummiringe, Federelemente und -Hauptlager, Obere Rohre (Tauchrohre) am
Hinterbau, Überdrehte Gewinde/Schrauben, Bremshebelüberzüge (Überdrehte
Gewinde/Schrauben), Bremsbeläge, Ketten, Kettenräder, Kassetten, Schalt- und Bremszüge,
Lenkergriffe (Innen- und Außenzüge), Schaltgriffe, Spannrollen, Bremsscheiben, Werkzeug
- Schäden, die von Fremdbauteilen verursacht werden, sind von der Gewährleistung
ausgeschlossen.
- Schäden infolge der Verwendung von Teilen, die nicht kompatibel oder geeignet sind bzw.
nicht von SRAM für die Verwendung mit SRAM-Komponenten autorisiert wurden, sind von der
Gewährleistung ausgeschlossen.
SRAM WARRANTY
W
ICHTIG
Die Bremsen wirken sich direkt auf die Sicherheit Ihres Fahrrads aus.
W
enn die Bremsen falsch eingestellt oder abgenutzt sind, können Sie
die Kontrolle über das Fahrrad verlieren, sodass es zu Unfällen und
schweren Verletzungen kommen kann.
A
vid-Bremsen sind ein Hochleistungsprodukt, das im V
ergleich zu
herkömmlichen Bremsen eine höhere Bremskraft bietet. Machen Sie
s
ich daher mit der richtigen Bremstechnik vertraut.
Lesen Sie in der Bedienungsanleitung zu Ihrem Fahrrad nach, und
e
rkundigen Sie sich bei Ihrem Händler
. Üben Sie die Bremstechniken auf
ebener, gerader Strecke, bevor Sie in anspruchsvollerem Gelände fahren.
Die W
irksamkeit der Bremsen hängt von zahlreichen Faktoren ab, auf die
Avid keinen Einfluss nehmen kann. Dazu zählen die Fahrgeschwindigkeit,
Art und Zustand des Untergrundes, Bremshebelkraft, ordnungsgemäße
Montage und Wartung der Bremsen, Bremszüge, Hebel, Bremsbeläge,
Zustand des Fahrrads, Fahrergewicht, ordnungsgemäße Bremstechnik,
Wetter, Gelände und zahlreiche weitere Faktoren.
Avid-Bremsen und -Hebel dürfen nicht für motorisierte Fahrräder oder
Fahrzeuge verwendet werden. In diesem Fall besteht das Risiko von
erheblichen Verletzungen.
F
AHREN SIE STETS KONTROLLIERT.
Beachten Sie, dass sich bei Nässe der Bremsweg verlängert.
V
ermeiden Sie das Blockieren der Räder, um Unfällen vorzubeugen
und den Untergrund nicht zu stark zu belasten.
SRAM Corporation
1333 North Kingsbury • 4th Floor • Chicago, Illinois 60622
1–312–664–8800 • fax 1–312–664–8826
Website: www.avidbike.com Email: [email protected]
INSTALACIÓN DE LA MANETA
IMPORTANTE!
CON LAS MANETAS AVID SÓLO PUEDEN UTILIZARSE FRENOS DISEÑADOS PARA MANETAS DE
TRACCIÓN DIRECTA
, COMO LOS FRENOS SINGLE DIGIT® ULTIMATE, SINGLE DIGIT® SL, 7, 5 Y 3.
S
I TIENE ALGUNA PREGUNTA SOBRE LA COMPATIBILIDAD DE LAS MANETAS Y LOS FRENOS, CONTACTE
CON SU CONCESIONARIO DE BICICLETAS
.
S
IGA DETENIDAMENTE ESTAS INSTRUCCIONES. SI NO COMPRENDE LAS INSTRUCCIONES, ENCARGUE
LA INSTALACIÓN A UN MECÁNICO DE BICICLETAS
.
1 INSTALE LA MANETA.
Deslice la maneta a lo largo del manillar hasta encontrar la posición adecuada.
Apriete el tornillo de sujeción. Apriete el tornillo de presión con un par de: 4 – 5 Nm
2 FIJE EL ALCANCE.
Si tiene las manos más pequeñas, puede ajustar el alcance de la maneta ajustando
el tornillo hexagonal de alcance.
3
AJUSTE EL
MANDO SPEED DIAL.
Antes de ajustar la longitud del cable de freno, gire el tornillo de ajuste del Speed
Dial hasta colocarlo en el punto medio de la escala. Tras la instalación, ajuste el
mando hasta conseguir el tacto exacto que desee en el freno.
4 FIJE EL
T
AMBOR DE
AJUSTE.
Antes de instalar el cable, gradúe el ajustador del tambor a la mitad de recorrido
aproximadamente. Asegúrese de que la ranura del tambor quede alineada con la
del cuerpo.
5 INST
ALE EL
CABLE.
Haga pasar el cable a través de la vaina hasta llegar al freno, y coloque el extremo
de cable en la articulación.
6 SUJETE EL CABLE AL FRENO
Siga las instrucciones de instalación para su freno concreto. Consulte en estas
instrucciones las especificaciones de par y la configuración del freno.
Apriete el
perno de montaje siguiendo las especificaciones del fabricante.
HERRAMIENTAS DE INSTALACIÓN NECESARIAS LLAVE DINAMOMÉTRICA:
L
LA
VES
A
LLEN DE 2 Y 5 MM Y PELACABLES.
7 AJUSTE EL TAMBOR
Utilice el ajustador del tambor para eliminar cualquier holgura en el cable.
8 PRUEBE EL
SISTEMA.
Con dos dedos, accione firmemente la maneta del freno una docena de veces para
verificar que los cables están bien asentados y que funcionan con suavidad.
V
erifique que el cable no se ha deslizado por su perno de anclaje. Si es necesario,
vuelva a apretar.
NOTA IMPORTANTE PARA FRENOS DE DISCO ACCIONADOS POR CABLE:
UNA VEZ ANCLADO EL CABLE, ASEGÚRESE DE QUE NO QUEDEN MÁS DE 20 MM DE CABLE
SOBRANTE MÁS ALLÁ DEL TORNILLO DE ANCLAJE
. RECÓRTELO SI ES NECESARIO.
SPEED DIAL
®
La principal característica que diferencia a estas manetas es la función patentada de
palanca ajustable Speed Dial. Este diseño permite ajustar en el dial el tacto que se
desee, desde uno suave (mayor modulación) hasta otro más duro, o cualquier posición
intermedia. Este ajuste puede realizarse sin necesidad de utilizar ninguna herramienta.
TORNILLO DE PRESIÓN AMBIDEXTRO
El tornillo de presión
A
vid tiene un diseño especial que permite enroscarlo en la
abrazadera en cualquier dirección. ¿Qué ventaja tiene esto? Que si, por algún
motivo, uno de los lados del cuerpo se pasase de rosca, bastará con enroscar el
tornillo en el otro sentido.
RECOMENDACIONES TÉCNICAS/ MANTENIMIENTO
1. Para mantener las manetas sin chirridos y funcionando con suavidad, aplique
una gota de aceite ligero a ambos lados de la conexión del cable, en la tuerca
pasante.
2. ¿Está floja la hoja de la maneta? Utilice una llave
Allen de 2 mm para comprobar
el tornillo de ajuste del pasador de pivote.
SRAM garantiza durante un período de dos años a partir de la fecha de compra original que sus
productos carecen de defectos de materiales o de fabricación. Esta garantía sólo se aplica al
propietario original y es intransferible. Las reclamaciones efectuadas en virtud de esta garantía
deben hacerse a través del distribuidor en el que se adquirió la bicicleta o el componente de SRAM.
Se requerirá prueba de compra.
LEGISLACIÓN LOCAL
Esta declaración de garantía confiere derechos legales específicos al cliente. El cliente podría
también gozar de otros derechos que varían según el estado (en los Estados Unidos de
América), la provincia (en Canadá), o el país en cualquier otro lugar del mundo.
Hasta donde se establezca que esta declaración de garantía contraviene las leyes locales, se
considerará modificada para acatar las leyes locales. Bajo dichas leyes locales, puede que
algunas de las renuncias de responsabilidad y limitaciones estipuladas en esta declaración de
garantía se apliquen al cliente. Por ejemplo, algunos estados de los Estados Unidos de
América, así como ciertas entidades gubernamentales fuera de los Estados Unidos (incluidas
las provincias de Canadá) pueden:
a. Evitar que las renuncias y limitaciones de esta declaración de garantía limiten los
derechos legales del consumidor (por ejemplo, en el Reino Unido).
b. Restringir de otro modo la capacidad de un fabricante para hacer cumplir dichas
renuncias o limitaciones.
LIMITACIONES DE RESPONSABILIDAD
Hasta el punto permitido por la ley local, excepto en el caso de las obligaciones expuestas
específicamente en esta declaración de garantía, en ningún caso SRAM o sus proveedores
serán responsables de daños directos, indirectos, especiales, fortuitos o emergentes.
LIMITACIONES DE LA GARANTÍA
• Esta garantía no se aplicará a aquellos productos que no hayan sido correctamente
instalados y ajustados conforme al correspondiente manual de instalación que proporciona
SRAM. Los manuales de instalación de SRAM se pueden encontrar en Internet, en
www.avidbike.com, www.sram.com o www.rockshox.com.
• Esta garantía no cubre los daños que pueda sufrir el producto como consecuencia de
accidentes, impactos, utilización indebida, incumplimiento de las especificaciones del
fabricante o cualquier otra circunstancia en la que el producto haya sido sometido a fuerzas o
cargas para las que no ha sido diseñado.
• Esta garantía no se aplicará cuando se haya modificado el producto.
• Esta garantía no se aplicará cuando el número de serie o el código de producción se hayan
modificado, desfigurado o eliminado intencionadamente.
• Esta garantía no se aplicará en caso de desgaste y deterioro normal por el uso. Las piezas
que pueden sufrir desgaste y deterioro están expuestas a sufrir daños como resultado de un
uso normal, de no llevar a cabo el mantenimiento siguiendo las recomendaciones de SRAM o
de un uso o instalación en condiciones o aplicaciones distintas a las recomendadas.
Éstas son, en particular, las piezas que se considera pueden sufrir desgaste y deterioro:
Guardapolvos, Cojinetes, Juntas tóricas de estanqueidad, Anillos de deslizamiento, Piezas
móviles de caucho, Anillos de espuma, Tornillería de montaje del amortiguador trasero y juntas
principales, Tubos superiores (montantes), Roscas y pernos sin revestimiento (aluminio,
titanio, magnesio o acero), Manguitos de frenos, Pastillas de freno, Cadenas, Ruedas
dentadas, Casetes, Cables de cambio y de freno (interiores y exteriores), Puños del manillar,
Palanca de cambios, Poleas tensoras, Rotores de frenos de disco, Herramientas.
- Esta garantía no cubrirá los daños provocados por el uso de piezas de distintos fabricantes.
- Esta garantía no cubrirá los daños provocados por el uso de piezas no compatibles,
adecuadas o autorizadas por SRAM para el uso con componentes de SRAM.
Garantía SRAM
IMPORTANTE
Los frenos son un componente esencial para la seguridad de una
bicicleta. Una utilización o ajuste inadecuados de los frenos pueden
provocar un accidente o la pérdida del control de la bicicleta, y
ocasionar graves lesiones.
Los frenos
Avid son un producto de alto rendimiento que ofrece mayor
potencia de frenada que los frenos convencionales. Es responsabilidad
suya entender las técnicas de frenado adecuadas y aprender a utilizarlas.
Consulte el manual de usuario de su bicicleta y acuda a una tienda de
bicicletas especializada. Antes de montar de manera más agresiva,
practique sus técnicas de conducción y frenado sobre una superficie
plana y nivelada.
La eficacia del frenado depende de muchos factores sobre los que Avid
no tiene ningún control, como la velocidad de la bicicleta, el tipo de
firme y su estado, la fuerza ejercida sobre la maneta de frenos, la
correcta instalación y mantenimiento de los frenos, cables, manetas y
pastillas de frenos, el estado de la bicicleta, el peso del ciclista, la
utilización de una técnica de frenado adecuada, la meteorología o el
tipo de terreno, entre otros muchos factores.
Los frenos y manetas de freno Avid no están diseñados para utilizarse
en ningún tipo de bicicleta o vehículo motorizados. Su empleo en este
tipo de vehículos puede llegar a provocar lesiones graves.
MANTENGA SIEMPRE EL CONTROL DE SU BICICLETA.
No olvide que cuando el firme está húmedo se tarda más en frenar.
Para reducir la posibilidad de accidente y minimizar la erosión del
terreno, evite clavar las ruedas al frenar.
SRAM Corporation
1333 North Kingsbury • 4th Floor • Chicago, Illinois 60622
1–312–664–8800 • fax 1–312–664–8826
W
ebsite: www
.avidbike.com Email: [email protected]
La página se está cargando...
Transcripción de documentos
1 4 - 5 Nm (30-40 in-lb) 2 3 5 6 SPEED DIAL 7/SL ® INSTALLATION AND OPERATION INSTRUCTIONS 4 mounting bolt Slots SRAM CORPORATION • OCTOBER 95-5309-722-000, REV. B Speed Dial® 7 Abidextrous Clamp Bolt Tech Tips/Maintenance 1 Oil here (Don’t forget the other side) Softer Firmer 2 8 IMPORTANT Brakes are a safety-critical item on a bicycle. Improper set-up or use of brakes can result in loss of control or an accident, which could lead to a severe injury. Avid brakes are a performance product that offer increased stopping power over standard brakes. It’s your responsibility to learn and understand proper braking techniques. Consult the owner’s manual for your bicycle and a professional bike dealer. Practice your riding and braking techniques on a flat and level surface prior to aggressive riding. The effectiveness of braking is dependent on many conditions over which Avid has no control including the speed of the bicycle, type and condition of the riding surface, braking lever force, proper installation and maintenance of brakes, cables, levers, brake pads, the condition of the bike, weight of the rider, proper braking techniques, weather, terrain, and a variety of other factors. Avid brakes and levers are not intended for use on any motorized bicycle or vehicle. Any such use could result in a serious personal injury. ALWAYS RIDE UNDER CONTROL. Remember, it takes longer to stop in wet conditions. To reduce the possibility of an accident and minimize trail erosion, you should avoid locking-up your wheels. LEVER INSTALLATION IMPORTANT! ONLY BRAKES DESIGNATED FOR DIRECT-PULL LEVERS SUCH AS THE SINGLE DIGIT® ULTIMATE, SINGLE DIGIT® SL, 7, 5 AND 3 BRAKES CAN BE USED WITH AVID LEVERS. IF YOU HAVE ANY QUESTIONS CONCERNING COMPATIBILITY OF LEVERS AND BRAKES, CONTACT YOUR PROFESSIONAL BIKE DEALER. FOLLOW THESE INSTRUCTIONS CAREFULLY. IF YOU DO NOT UNDERSTAND THE INSTRUCTIONS, HAVE THE INSTALLATION DONE BY A PROFESSIONAL BIKE MECHANIC. INSTALLATION TOOLS NEEDED: 2MM AND 5MM HEX WRENCHES, TORQUE WRENCH AND CABLE CUTTERS. 1 INSTALL THE LEVER Slide the lever onto the bar to the proper position. Tighten the clamp bolt. Tighten Clamp Bolt to: 4 - 5 Nm (30-40 in-lb) 2 SET THE REACH If you have smaller hands, you can adjust the reach of the lever by adjusting the reach adjustment screw. 3 SET SPEED DIAL Before setting the brake cable length, turn the Speed Dial adjusting thumbscrew so it is in the middle of the range. After installation, adjust the knob for the exact brake feel that you want. 4 SET ADJUSTER BARREL Before installing the cable, adjust the barrel adjuster about half way out. Make sure that the barrel slot lines up with the slot in the body. 5 INSTALL CABLE Feed the cable through the housing to the brake and install the cable end into the link. SRAM Corporation 1333 North Kingsbury • 4th Floor • Chicago, Illinois 60622 1–312–664–8800 • fax 1–312–664–8826 Website: www.avidbike.com Email: [email protected] WICHTIG 6 ATTACH CABLE TO BRAKE Follow the installation instructions for your specific brake. Refer to these instructions for torque specifications and brake setup. Tighten mounting bolt to manufacturer’s specs. MONTAGE DER HEBEL WICHTIG! Die Bremsen wirken sich direkt auf die Sicherheit Ihres Fahrrads aus. Wenn die Bremsen falsch eingestellt oder abgenutzt sind, können Sie die Kontrolle über das Fahrrad verlieren, sodass es zu Unfällen und schweren Verletzungen kommen kann. MIT AVID-HEBELN KÖNNEN AUSSCHLIEßLICH BREMSEN VERWENDET WERDEN, DIE SICH FÜR DIRECT-PULL-HEBEL EIGNEN, BEISPIELSWEISE DIE MODELLE SINGLE DIGIT® ULTIMATE, SINGLE DIGIT ® SL, 7, 5 UND 3. WENN SIE FRAGEN ZUR KOMPATIBILITÄT VON HEBELN UND BREMSEN HABEN, ERKUNDIGEN SIE SICH BEI IHREM FAHRRAD-FACHHÄNDLER. Avid-Bremsen sind ein Hochleistungsprodukt, das im Vergleich zu herkömmlichen Bremsen eine höhere Bremskraft bietet. Machen Sie sich daher mit der richtigen Bremstechnik vertraut. BEFOLGEN SIE DIESE ANLEITUNG SORGFÄLTIG. WENN SIE DIE ANWEISUNGEN NICHT VERSTEHEN, LASSEN SIE DIE MONTAGE VON EINEM QUALIFIZIERTEN FAHRRADMECHANIKER VORNEHMEN. Lesen Sie in der Bedienungsanleitung zu Ihrem Fahrrad nach, und erkundigen Sie sich bei Ihrem Händler. Üben Sie die Bremstechniken auf ebener, gerader Strecke, bevor Sie in anspruchsvollerem Gelände fahren. Die Wirksamkeit der Bremsen hängt von zahlreichen Faktoren ab, auf die Avid keinen Einfluss nehmen kann. Dazu zählen die Fahrgeschwindigkeit, Art und Zustand des Untergrundes, Bremshebelkraft, ordnungsgemäße Montage und Wartung der Bremsen, Bremszüge, Hebel, Bremsbeläge, Zustand des Fahrrads, Fahrergewicht, ordnungsgemäße Bremstechnik, Wetter, Gelände und zahlreiche weitere Faktoren. Avid-Bremsen und -Hebel dürfen nicht für motorisierte Fahrräder oder Fahrzeuge verwendet werden. In diesem Fall besteht das Risiko von erheblichen Verletzungen. FAHREN SIE STETS KONTROLLIERT. Beachten Sie, dass sich bei Nässe der Bremsweg verlängert. Vermeiden Sie das Blockieren der Räder, um Unfällen vorzubeugen und den Untergrund nicht zu stark zu belasten. ERFORDERLICHE EINBAUWERKZEUGE: 2- UND 5-MM-INBUSSCHLÜSSEL, DREHMOMENTSCHLÜSSEL UND SPEZIALZANGE FÜR ZÜGE 1 HEBEL MONTIEREN Schieben Sie den Hebel auf dem Lenker in die gewünschte Position. Ziehen Sie die Klemmschraube an. Anzugsmoment der Klemmschraube: 4 - 5 Nm. 2 REICHWEITE EINSTELLEN Wenn Sie kleinere Hände haben, können Sie die Reichweite der Hebel mit der Reichweiten-Inbusschraube einstellen. 3 SPEED DIAL EINSTELLEN Bevor Sie die Bremszuglänge festlegen, drehen Sie den Speed Dial-Einstellknopf in die Mitte des Einstellbereichs. Nach der Montage können Sie mit dem Knopf das gewünschte Ansprechverhalten der Bremse einstellen. 4 ZUGSPANNUNG EINSTELLEN Bevor Sie den Zug montieren, drehen Sie die Zugspannungs-Einstellschraube bis zur Hälfte heraus. Stellen Sie sicher, dass der Schlitz der Einstellschraube und der Schlitz im Hebelkörpers übereinander liegen. 5 BREMSZUG MONTIEREN Schieben Sie den Zug durch die Zughülle zur Bremse, und montieren Sie das Zugende in der Aufnahme. SRAM Corporation 1333 North Kingsbury • 4th Floor • Chicago, Illinois 60622 1–312–664–8800 • fax 1–312–664–8826 Website: www.avidbike.com Email: [email protected] 6 BREMSZUG MIT BREMSE VERBINDEN Befolgen Sie die Montageanweisungen für Ihre Bremse. Beachten Sie die Anweisungen hinsichtlich der vorgegebenen Anzugsmomente und der Einstellung der Bremsen. Ziehen Sie die Befestigungsschraube gemäß den Herstelleranweisungen an. 7 ZUGSPANNUNG EINSTELLEN Verwenden Sie den Zugspannungs-Einsteller, um den Bremszug bei Bedarf zu spannen. IMPORTANTE Los frenos son un componente esencial para la seguridad de una bicicleta. Una utilización o ajuste inadecuados de los frenos pueden provocar un accidente o la pérdida del control de la bicicleta, y ocasionar graves lesiones. Los frenos Avid son un producto de alto rendimiento que ofrece mayor potencia de frenada que los frenos convencionales. Es responsabilidad suya entender las técnicas de frenado adecuadas y aprender a utilizarlas. Consulte el manual de usuario de su bicicleta y acuda a una tienda de bicicletas especializada. Antes de montar de manera más agresiva, practique sus técnicas de conducción y frenado sobre una superficie plana y nivelada. La eficacia del frenado depende de muchos factores sobre los que Avid no tiene ningún control, como la velocidad de la bicicleta, el tipo de firme y su estado, la fuerza ejercida sobre la maneta de frenos, la correcta instalación y mantenimiento de los frenos, cables, manetas y pastillas de frenos, el estado de la bicicleta, el peso del ciclista, la utilización de una técnica de frenado adecuada, la meteorología o el tipo de terreno, entre otros muchos factores. Los frenos y manetas de freno Avid no están diseñados para utilizarse en ningún tipo de bicicleta o vehículo motorizados. Su empleo en este tipo de vehículos puede llegar a provocar lesiones graves. MANTENGA SIEMPRE EL CONTROL DE SU BICICLETA. No olvide que cuando el firme está húmedo se tarda más en frenar. Para reducir la posibilidad de accidente y minimizar la erosión del terreno, evite clavar las ruedas al frenar. INSTALACIÓN DE LA MANETA IMPORTANTE! CON LAS MANETAS AVID SÓLO PUEDEN UTILIZARSE FRENOS DISEÑADOS PARA MANETAS DE TRACCIÓN DIRECTA, COMO LOS FRENOS SINGLE DIGIT® ULTIMATE, SINGLE DIGIT® SL, 7, 5 Y 3. SI TIENE ALGUNA PREGUNTA SOBRE LA COMPATIBILIDAD DE LAS MANETAS Y LOS FRENOS, CONTACTE CON SU CONCESIONARIO DE BICICLETAS. SIGA DETENIDAMENTE ESTAS INSTRUCCIONES. SI NO COMPRENDE LAS INSTRUCCIONES, ENCARGUE LA INSTALACIÓN A UN MECÁNICO DE BICICLETAS. HERRAMIENTAS DE INSTALACIÓN NECESARIAS LLAVE DINAMOMÉTRICA: LLAVES ALLEN DE 2 Y 5 MM Y PELACABLES. 1 INSTALE LA MANETA. Deslice la maneta a lo largo del manillar hasta encontrar la posición adecuada. Apriete el tornillo de sujeción. Apriete el tornillo de presión con un par de: 4 – 5 Nm 2 FIJE EL ALCANCE. Si tiene las manos más pequeñas, puede ajustar el alcance de la maneta ajustando el tornillo hexagonal de alcance. 3 AJUSTE EL MANDO SPEED DIAL. Antes de ajustar la longitud del cable de freno, gire el tornillo de ajuste del Speed Dial hasta colocarlo en el punto medio de la escala. Tras la instalación, ajuste el mando hasta conseguir el tacto exacto que desee en el freno. 4 FIJE EL TAMBOR DE AJUSTE. Antes de instalar el cable, gradúe el ajustador del tambor a la mitad de recorrido aproximadamente. Asegúrese de que la ranura del tambor quede alineada con la del cuerpo. 5 INSTALE EL CABLE. Haga pasar el cable a través de la vaina hasta llegar al freno, y coloque el extremo de cable en la articulación. SRAM Corporation 1333 North Kingsbury • 4th Floor • Chicago, Illinois 60622 1–312–664–8800 • fax 1–312–664–8826 Website: www.avidbike.com Email: [email protected] 6 SUJETE EL CABLE AL FRENO Siga las instrucciones de instalación para su freno concreto. Consulte en estas instrucciones las especificaciones de par y la configuración del freno. Apriete el perno de montaje siguiendo las especificaciones del fabricante. 7 ADJUST BARREL Use the barrel adjuster to take up any slack in the cable. 8 TEST THE SYSTEM With two fingers, squeeze the brake lever firmly about a dozen times to ensure the cables are seated properly and operate smoothly. Make sure the cable has not slipped at the cable anchor bolt. Re-torque if necessary. IMPORTANT NOTE FOR CABLE ACTUATED DISC BRAKES: AFTER THE CABLE IS ANCHORED, CHECK TO BE SURE THERE IS NO MORE THAN 20MM (3/4 IN.) OF EXCESS CABLE BEYOND THE ANCHOR BOLT. TRIM AS NECESSARY. SPEED DIAL® The primary feature that sets these levers apart is the patented Speed Dial Adjustable Leverage function. This design allows you to dial in whatever feel you want, from a soft feel (greater modulation) to a firmer feel, or anywhere in between. This adjustment can be done without any tools. ABIDEXTROUS CLAMP BOLT The Avid clamp bolt is uniquely designed to thread through the clamp in either direction. The bonus? If for some reason one side of the body becomes stripped, you can simply thread the bolt through the other way. TECH TIPS/MAINTENANCE 1. To keep your levers creak-free and operating smoothly, place a drop of lightweight oil on both sides of the cable link at the cross dowel. 2. Loose lever blade? Use a 2mm hex wrench to check the pivot pin set screw. SRAM WARRANTY EXTENT OF LIMITED WARRANTY To the extent that this warranty statement is inconsistent with the local law, this warranty shall be deemed modified to be consistent with such law, under such local law, certain disclaimers and limitations of this warranty statement may apply to the customer. For example, some states in the United States of America, as well as some governments outside of the United States (including provinces in Canada) may: a. Preclude the disclaimers and limitations of this warranty state ment from limiting the statutory rights of the consumer (e.g. United Kingdom). b. Otherwise restrict the ability of a manufacturer to enforce such disclaimers or limitations. LIMITATIONS OF LIABILITY To the extent allowed by local law, except for the obligations specifically set forth in this warranty statement, In no event Shall SRAM or its third party supplies be liable for direct, indirect, special, incidental, or consequential damages. LIMITATIONS OF WARRANTY • This warranty does not apply to products that have not been correctly installed and/or adjusted according to the respective SRAM technical installation manual. The SRAM installation manuals can be found online at www.SRAM.com, www.rockshox.com or www.avidbike.com. • This warranty does not apply to damage to the product caused by a crash, impact, abuse of the product, non-compliance with manufacturers specifications of usage or any other circumstances in which the product has been subjected to forces or loads beyond its design. • This warranty does not apply when the product has been modified. • This warranty does not apply when the serial number or production code has been deliberately altered, defaced or removed. • This warranty does not apply to normal wear and tear. Wear and tear parts are subject to damage as a result of normal use, failure to service according to SRAM recommendations and/or riding or installation in conditions or applications other than recommended. SRAM warrants its products to be free from defects in materials or workmanship for a period of two years after original purchase. This warranty only applies to the original owner and is not transferable. Claims under this warranty must be made through the retailer where the bicycle or the SRAM component was purchased. Original proof of purchase is required. Wear and tear parts are identified as: Dust seals, Bushings, Air sealing o-rings, Glide rings, Rubber moving part, Foam rings, Rear shock mounting hardware and main seals, Stripped threads/bolts (aluminium, titanium, magnesium or steel), Upper tubes (stanchions), Brake sleeves, Brake pads, Chains, Sprockets, Cassettes, Shifter and brake cables (inner and outer), Handlebar grips, Shifter grips, Jockey wheels, Disc brake rotors, Tools. LOCAL LAW This warranty statement gives the customer specific legal rights. The customer may also have other rights which vary from state to state (USA), from province to province (Canada), and from country to country elsewhere in the world. • This warranty shall not cover damages caused by the use of parts of different manufacturers. • This warranty shall not cover damages caused by the use of parts that are not compatible, suitable and/or authorized by SRAM for use with SRAM components. 8 SYSTEM TESTEN Ziehen Sie den Bremshebel ungefähr ein Dutzend mal mit zwei Fingern fest an, um sicherzustellen, dass die Züge ordnungsgemäß positioniert sind und einwandfrei funktionieren. Vergewissern Sie sich, dass der Zug an der Zugbefestigungsschraube nicht durchrutscht. Ziehen Sie die Zugfestigungsschraube bei Bedarf nach. Gewährleistung. Für bestimmte Bundesstaaten der USA sowie einige Länder außerhalb der USA (einschließlich von Kanadischen Provinzen) gilt beispielsweise Folgendes: WICHTIGER HINWEIS FÜR MECHANISCH BETÄTIGTE SCHEIBENBREMSEN: VERGEWISSERN SIE SICH NACH DEM BEFESTIGEN DES BREMSZUGS, DASS DIESER NICHT UM MEHR ALS 20 MM ÜBER DIE ANKERSCHRAUBE HINAUSSTEHT. ANDERNFALLS MÜSSEN SIE DEN BREMSZUG KÜRZEN. HAFTUNGSBESCHRÄNKUNG SPEED DIAL® Das wichtigste Merkmal, das die Hebel auszeichnet, ist die patentierte Speed DialHebelkrafteinstellung. Diese Konstruktion erlaubt es Ihnen, das Ansprechverhalten von einer weichen Einstellung mit größerer Modulierung bis zur straffsten Einstellung stufenlos einzustellen. Diese Einstellung kann ohne Werkzeug erfolgen. ZWEISEITIGE KLEMMSCHRAUBE VON AVID Die Avid-Klemmschraube ist eine spezielle Entwicklung, die von zwei Seiten in den Klemmkörper eingeschraubt werden kann. Der Vorteil? Wenn eine Seite des Körpers überdreht wurde, können Sie die Schraube einfach aus der anderen Richtung einschrauben. TECHNISCHE TIPPS/ WARTUNG 1. Damit Ihre Hebel stets geräuschlos und einwandfrei funktionieren, geben Sie einen Tropfen Leichtöl auf beide Seiten der Zugaufnahme am Querführungsbolzen. 2. Ist der Hebelgriff locker? Verwenden Sie einen 2-mm-Inbusschlüssel, um die Einstellschraube des Gelenkbolzens zu überprüfen. SRAM WARRANTY GARANTIEUMFANG SRAM garantiert vom Erstkaufdatum an für zwei Jahre, dass das Produkt frei von Mängeln in Material oder Verarbeitung ist. Diese Gewährleistung kann nur vom Erstkäufer in Anspruch genommen werden und ist nicht übertragbar. Ansprüche aus dieser Gewährleistung sind über den Händler, bei dem das Fahrrad oder die SRAM-Komponente erworben wurde, geltend zu machen. Der Kaufbeleg muss im Original vorgelegt werden. a. Die Ausschlüsse und Einschränkungen in dieser Gewährleistung dürfen die gesetzlich festgelegten Rechte des Verbrauchers nicht beeinträchtigen (z.B. Großbritannien). b. Andernfalls sind derartige Ausschlüsse und Einschränkungen unwirksam. Im nach der örtlichen Gesetzgebung zulässigen Maße und mit Ausnahme der in der vorliegenden Gewährleistung ausdrücklich dargelegten Verpflichtungen schließen SRAM bzw. seine Lieferanten jegliche Haftung für direkte, indirekte, spezielle, zufällige oder Folgeschäden aus. GEWÄHRLEISTUNGSAUSSCHLUSS • Die Garantie gilt nicht für Produkte, die nicht fachgerecht bzw. nicht gemäß den Montageanleitungen von SRAM montiert und/oder eingestellt wurden. Die SRAMMontageanleitungen finden Sie im Internet unter www.SRAM.com, www.rockshox.com oder www.avidbike.com. • Diese Garantie gilt nicht bei Schäden am Produkt infolge von Unfällen, Stürzen oder missbräuchlicher Nutzung, Nichtbeachtung der Herstellerangaben oder sonstiger Umstände, unter denen das Produkt nicht bestimmungsgemäßen Belastungen oder Kräften ausgesetzt wurde. - Bei Veränderungen am Produkt erlischt der Gewährleistungsanspruch. - Der Gewährleistungsanspruch erlischt ebenfalls, wenn die Seriennummer bzw. der Herstellungscode verändert, unkenntlich gemacht oder entfernt wurde. - Normaler Verschleiß und Abnutzung sind von der Gewährleistung ausgeschlossen. Zum normalen Verschleiß von Komponenten kann es infolge des sachgemäßen Gebrauchs, der Nichteinhaltung von Empfehlungen von SRAM und/oder von Fahren unter anderen als den empfohlenen Bedingungen kommen. Folgende Komponenten unterliegen dem „normalen Verschleiß": Staubdichtungen, Buchsen, Luftschließende O-Ringe, Gleitringe, Bewegliche Teile aus Gummi, Schaumgummiringe, Federelemente und -Hauptlager, Obere Rohre (Tauchrohre) am Hinterbau, Überdrehte Gewinde/Schrauben, Bremshebelüberzüge (Überdrehte Gewinde/Schrauben), Bremsbeläge, Ketten, Kettenräder, Kassetten, Schalt- und Bremszüge, Lenkergriffe (Innen- und Außenzüge), Schaltgriffe, Spannrollen, Bremsscheiben, Werkzeug - Schäden, die von Fremdbauteilen verursacht werden, sind von der Gewährleistung ausgeschlossen. - Schäden infolge der Verwendung von Teilen, die nicht kompatibel oder geeignet sind bzw. nicht von SRAM für die Verwendung mit SRAM-Komponenten autorisiert wurden, sind von der Gewährleistung ausgeschlossen. LOKALE GESETZGEBUNG Diese Gewährleistung räumt Ihnen spezifische Rechte ein. Je nach Bundesland (USA), Provinz (Kanada) oder Ihrem Wohnland verfügen Sie möglicherweise über weitere Rechte. Die Gewährleistung ist in dem Maße, in dem sie von der lokalen Gesetzgebung abweicht, in Übereinstimmung mit der geltenden Gesetzgebung zu bringen. Der jeweiligen lokalen Gesetzgebung unterliegen möglicherweise Ausschlüsse und Einschränkungen aus dieser 7 AJUSTE EL TAMBOR Utilice el ajustador del tambor para eliminar cualquier holgura en el cable. 8 PRUEBE EL SISTEMA. Con dos dedos, accione firmemente la maneta del freno una docena de veces para verificar que los cables están bien asentados y que funcionan con suavidad. Verifique que el cable no se ha deslizado por su perno de anclaje. Si es necesario, vuelva a apretar. NOTA IMPORTANTE PARA FRENOS DE DISCO ACCIONADOS POR CABLE: UNA VEZ ANCLADO EL CABLE, ASEGÚRESE DE QUE NO QUEDEN MÁS DE 20 MM DE CABLE SOBRANTE MÁS ALLÁ DEL TORNILLO DE ANCLAJE. RECÓRTELO SI ES NECESARIO. SPEED DIAL® La principal característica que diferencia a estas manetas es la función patentada de palanca ajustable Speed Dial. Este diseño permite ajustar en el dial el tacto que se desee, desde uno suave (mayor modulación) hasta otro más duro, o cualquier posición intermedia. Este ajuste puede realizarse sin necesidad de utilizar ninguna herramienta. TORNILLO DE PRESIÓN AMBIDEXTRO El tornillo de presión Avid tiene un diseño especial que permite enroscarlo en la abrazadera en cualquier dirección. ¿Qué ventaja tiene esto? Que si, por algún motivo, uno de los lados del cuerpo se pasase de rosca, bastará con enroscar el tornillo en el otro sentido. RECOMENDACIONES TÉCNICAS/ MANTENIMIENTO 1. Para mantener las manetas sin chirridos y funcionando con suavidad, aplique una gota de aceite ligero a ambos lados de la conexión del cable, en la tuerca pasante. 2. ¿Está floja la hoja de la maneta? Utilice una llave Allen de 2 mm para comprobar el tornillo de ajuste del pasador de pivote. Garantía SRAM SRAM garantiza durante un período de dos años a partir de la fecha de compra original que sus productos carecen de defectos de materiales o de fabricación. Esta garantía sólo se aplica al propietario original y es intransferible. Las reclamaciones efectuadas en virtud de esta garantía deben hacerse a través del distribuidor en el que se adquirió la bicicleta o el componente de SRAM. Se requerirá prueba de compra. LEGISLACIÓN LOCAL Esta declaración de garantía confiere derechos legales específicos al cliente. El cliente podría también gozar de otros derechos que varían según el estado (en los Estados Unidos de América), la provincia (en Canadá), o el país en cualquier otro lugar del mundo. Hasta donde se establezca que esta declaración de garantía contraviene las leyes locales, se considerará modificada para acatar las leyes locales. Bajo dichas leyes locales, puede que algunas de las renuncias de responsabilidad y limitaciones estipuladas en esta declaración de garantía se apliquen al cliente. Por ejemplo, algunos estados de los Estados Unidos de América, así como ciertas entidades gubernamentales fuera de los Estados Unidos (incluidas las provincias de Canadá) pueden: a. Evitar que las renuncias y limitaciones de esta declaración de garantía limiten los derechos legales del consumidor (por ejemplo, en el Reino Unido). b. Restringir de otro modo la capacidad de un fabricante para hacer cumplir dichas renuncias o limitaciones. LIMITACIONES DE RESPONSABILIDAD Hasta el punto permitido por la ley local, excepto en el caso de las obligaciones expuestas específicamente en esta declaración de garantía, en ningún caso SRAM o sus proveedores serán responsables de daños directos, indirectos, especiales, fortuitos o emergentes. LIMITACIONES DE LA GARANTÍA • Esta garantía no se aplicará a aquellos productos que no hayan sido correctamente instalados y ajustados conforme al correspondiente manual de instalación que proporciona SRAM. Los manuales de instalación de SRAM se pueden encontrar en Internet, en www.avidbike.com, www.sram.com o www.rockshox.com. • Esta garantía no cubre los daños que pueda sufrir el producto como consecuencia de accidentes, impactos, utilización indebida, incumplimiento de las especificaciones del fabricante o cualquier otra circunstancia en la que el producto haya sido sometido a fuerzas o cargas para las que no ha sido diseñado. • Esta garantía no se aplicará cuando se haya modificado el producto. • Esta garantía no se aplicará cuando el número de serie o el código de producción se hayan modificado, desfigurado o eliminado intencionadamente. • Esta garantía no se aplicará en caso de desgaste y deterioro normal por el uso. Las piezas que pueden sufrir desgaste y deterioro están expuestas a sufrir daños como resultado de un uso normal, de no llevar a cabo el mantenimiento siguiendo las recomendaciones de SRAM o de un uso o instalación en condiciones o aplicaciones distintas a las recomendadas. Éstas son, en particular, las piezas que se considera pueden sufrir desgaste y deterioro: Guardapolvos, Cojinetes, Juntas tóricas de estanqueidad, Anillos de deslizamiento, Piezas móviles de caucho, Anillos de espuma, Tornillería de montaje del amortiguador trasero y juntas principales, Tubos superiores (montantes), Roscas y pernos sin revestimiento (aluminio, titanio, magnesio o acero), Manguitos de frenos, Pastillas de freno, Cadenas, Ruedas dentadas, Casetes, Cables de cambio y de freno (interiores y exteriores), Puños del manillar, Palanca de cambios, Poleas tensoras, Rotores de frenos de disco, Herramientas. - Esta garantía no cubrirá los daños provocados por el uso de piezas de distintos fabricantes. - Esta garantía no cubrirá los daños provocados por el uso de piezas no compatibles, adecuadas o autorizadas por SRAM para el uso con componentes de SRAM.-
 1
1
-
 2
2


Avid Technology SPEED DIAL 7 Installation and Operation Instructions
- Categoría
- Bicicletas
- Tipo
- Installation and Operation Instructions
en otros idiomas
- français: Avid Technology SPEED DIAL 7
- italiano: Avid Technology SPEED DIAL 7
- English: Avid Technology SPEED DIAL 7
- Deutsch: Avid Technology SPEED DIAL 7
- Nederlands: Avid Technology SPEED DIAL 7
- português: Avid Technology SPEED DIAL 7
Artículos relacionados
Otros documentos
-
DAHON AVID JUICY THREE El manual del propietario
-
 Rock Shox GPS Manual de usuario
-
SRAM AVID JUICY FIVE Manual de usuario
-
RockShox REBA Manual de usuario
-
 TREK BIKES ROCKSHOX BOXXER El manual del propietario
-
SRAM MTB Manual de usuario
-
Puky 4420/4421/4422 - LS-PRO 16 El manual del propietario
-
-
Tacx Auxiliar de treino Tacx NEO 2T Smart Manual de usuario
-
 Zipp Vuka Bul Manual de usuario


