Klarstein Hot Spot Crystal IR Infrared Heater Manual de usuario
- Categoría
- Calentadores espaciales
- Tipo
- Manual de usuario

10032942 10032943
Hot Spot Crystal IR
Infrarot-Heizung
Infrared Heater
Chauffage à infrarouge
Calentador infrarrojo
Stufa a infrarossi
Hinweis: Das Gerät eigent sich nicht zur Nutzung
als primäre Heizquelle.
Note: The device is not suitable for use as a
primary heat source.
Remarque : l‘appareil ne convient pas en tant que
source principale de chauffage.
Nota: il dispositivo non è idoneo ad essere
utilizzato come fonte di riscaldamento primaria.
Advertencia: el aparato no es apto para utilizar
como fuente de calefacción primaria.


3
DE
Technische Daten 3
Sicherheitshinweise 4
Lieferumfang 6
Montage 8
Bedienung 10
Fernbedienung, Batteriewechsel 13
Reinigung und Pege 14
Technische Parameter 15
Hinweise zur Entsorgung 16
Sehr geehrter Kunde,
wir gratulieren Ihnen zum Erwerb Ihres Gerätes. Lesen
Sie die folgenden Hinweise sorgfältig durch und befol-
gen Sie diese, um möglichen Schäden vorzubeugen.
Für Schäden, die durch Missachtung der Hinweise und
unsachgemäßen Gebrauch entstehen, übernehmen wir
keine Haftung.
Scannen Sie den QR-Code, um Zugriff auf die aktuellste
Bedienungsanleitung und weitere Informationen rund um
das Produkt zu erhalten.
INHALT
TECHNISCHE DATEN
Artikelnummer 10032942 10032943
Leistung 850 W
Stromversorgung 220-240 V~ 50/60 Hz
Einstellbare Temperatur 5 bis 40 °C
Schutzart IP 24
Abmessungen (HxBxT) 122x47x2,8 cm

4
DE
SICHERHEITSHINWEISE
Lesen und befolgen Sie die folgenden Sicherheitshinweise, selbst wenn Sie sich mit
dem Gerät vertraut fühlen. Bewahren Sie die Bedienungsanleitung zum künftigen
Nachschlagen auf. Bei der Verwendung eines elektrischen Gerätes müssen die
Sicherheitshinweise befolgt werden, einschließlich der Folgenden:
• Verwenden Sie ausschließlich die Spannung, die auf dem Typenschild des Gerätes
angegeben ist.
• Behindern Sie den Luftstrom am Luftein- oder -auslass in keiner Weise, da das
Gerät überhitzen und zu einer Brandgefahr werden kann.
• Verdecken Sie die Lüftungsschlitze und die Luftein- und -ausgänge nicht, indem Sie
das Gerät an eine Fläche stellen. Alle Gegenstände müssen mindestens 1 Meter
Abstand nach vorne, zu den Seiten und nach hinten haben.
• Stellen Sie das Gerät nicht in der Nähe einer Wärmequelle auf.
• Betreiben Sie das Gerät nicht in einer Umgebung, in der Benzin, Farbe oder andere
leicht entzündliche Stoffe gelagert werden.
• Dieses Gerät wird während der Benutzung heiß. Lassen Sie nackte Haut nicht die
heißen Oberäche berühren.
• Vor dem Bewegen ausschalten und abkühlen lassen.
• Verwenden Sie das Gerät nicht, um Wäsche zu trocknen.
• Führen Sie keine Fremdkörper und Metallgegenstände in das Innere des Gerätes
oder die Lüftungsschlitze ein, da dies zu einem Stromschlag, Brand oder einer
Gerätebeschädigung kommen kann.
• Das Gerät nicht in Flüssigkeiten tauchen oder in das Geräteinnere Wasser laufen
lassen, da dies zu einer Stromschlaggefahr führt.
• Betreiben Sie das Gerät nicht mit einem beschädigten Netzkabel, Netzstecker,
nachdem das Gerät eine Fehlfunktion hatte, fallen gelassen wurde oder in
irgendeiner Weise beschädigt wurde. Geben Sie das Gerät dem Elektrofachmann
zur Untersuchung, elektrischen oder mechanischen Justierung, Wartung oder
Reparatur.
• Bedienen Sie das Gerät nicht mit nassen Händen.
• Der häugste Grund für eine Überhitzung ist die Ablagerung von Staub und Fusseln
am Gerät. Gewährleisten Sie, dass diese Ablagerungen regelmäßig entfernt
werden, indem Sie den Netzstecker ziehen und die Luftöffnungen und den Grill
saugen.
• Vor dem Reinigen immer den Netzstecker ziehen. Zur Reinigung keine Scheuermittel
verwenden. Mit einem feuchten (nicht nassen) Tuch reinigen, das nur in eine
Seifenlauge getaucht wurde.
• Schließen Sie das Gerät nicht an die Stromversorgung an, bevor es vollständig
zusammengebaut wurde.
• Das Gerät ist nicht für den Außengebrauch bestimmt.
• Verwenden Sie das Gerät nicht in der unmittelbaren Umgebung eines Bades, einer
Dusche, eines Schwimmbeckens oder anderer Flüssigkeiten.
• Immer in der aufrechten Lage betreiben.
• Vor dem Bewegen ausschalten und abkühlen lassen.

5
DE
• Nicht mit einem aufgewickelten Kabel betreiben, da sich mit hoher
Wahrscheinlichkeit Wärme bildet und ausreicht, um eine Gefahr darzustellen.
• Die Verwendung eines Verlängerungskabels wird bei diesem Gerät nicht
empfohlen.
• Ziehen Sie nicht den Netzstecker, bevor das Gerät ausgeschaltet ist.
• Ziehen Sie nicht den Netzstecker aus der Steckdose, indem Sie am Netzkabel
ziehen. Immer am Stecker anfassen.
• Ziehen Sie den Netzstecker, wenn das Gerät nicht in Benutzung ist.
• Dieses Gerät eignet sich nicht zur Benutzung auf Langhaarteppichen oder
Flokativorlegern.
• Lassen Sie das Netzkabel während des Betriebs nicht mit heißen Oberächen in
Berührung kommen.
• Verlegen Sie das Netzkabel nicht unter Teppichen, Vorlegern, Läufern usw. Legen
Sie das Netzkabel außerhalb von Gehbereichen, so dass niemand darüber
stolpert.
• Das Netzkabel nicht verdrehen, verbiegen oder um das Gerät wickeln, da dies
dazu führt, dass die Kabelisolierung schwächer wird und bricht. Achten Sie immer
darauf, dass das gesamte Netzkabel von der Kabelaufwicklung abgewickelt ist.
• Nicht im Freien oder auf einem nassen Untergrund stehend verwenden.
• Nicht einlagern, solange das Gerät noch warm ist.
• Dieses Gerät eignet sich nicht zur Benutzung durch kleine Kinder oder gebrechliche
Personen ohne Betreuung.
• Kleine Kinder müssen beaufsichtigt werden, so dass sie mit dem Gerät nicht spielen.
• Das Gerät darf nicht unter Wandsteckdosenanschlüssen betrieben werden.
• Verwenden Sie das Gerät nicht mit einer Programmierung, Zeitschaltuhr oder
einem anderen Gerät, das die Heizung ein- oder ausschaltet. Es besteht eine
Brandgefahr, wenn die Heizung abgedeckt wurde oder falsch aufgestellt wurde.
• Die Heizung nicht abdecken! Überlastungsgefahr!
• Um die Gefahr eines Stromschlags zu vermeiden, das Gerät und das Netzkabel
nicht in Wasser tauchen, dem Regen, der Feuchtigkeit oder anderen Flüssigkeit
aussetzen, als der, die zum Betrieb des Geräts notwendig sind.
• Das Schutzgitter gewährt kleinen Kindern und gebrechlichen Personen keinen
vollständigen Schutz.
• Wenn das Netzkabel beschädigt ist, muss es von einem qualizierten Elektriker
ersetzt werden, um Gefahren abzuwenden.
• Verwenden Sie das Gerät nur zu dem vorbestimmten Zweck, wie in der
Bedienungsanleitung beschrieben.
• Jeder andere Gebrauch wird nicht empfohlen und kann zu einem Brand, einem
Stromschlag oder einer anderen Personenverletzung führen.
• Das Gerät ist nur für den Hausgebrauch und nicht für geschäftliche oder industrielle
Zwecke bestimmt.

6
DE
LIEFERUMFANG
Heizkörper
Fernbedienung

7
DE
Montagematerial
Bezeichnung Zeichnung Menge
Wandhalterung 2
Unterlegscheibe
2
Mutter
2
Abstandshalter
2
Dübel
4
Schraube
4

8
DE
MONTAGE
Markieren Sie an der Wand die Bohrlocher. Folgende Mindestabstande mussen
eingehalten werden:
Zur Decke 50 cm
Zum Boden 15 cm
Seitlich 10 cm
Warnung! Es besteht die Gefahr eines Stromschlags.
Der horizontale Abstand zu Duschen, Badewannen, Waschbecken
etc. muss mindestens 60 cm betragen.
A (mm) B (mm) C (mm) D (mm)
282 250 650 300
Bohren Sie die Locher. Der Bohrer muss einen Durchmesser von 8 mm haben. Die
Bohrtiefe betragt 50 mm. Setzen Sie die mitgelieferten Dübel ein.

9
DE
Schrauben Sie die Wandhalterungen wie abgebildet an die Wand. Verwenden
Sie die mitgelieferten Schrauben.
1. Setzen Sie die Unterlegscheiben auf das obere Gewinde.
2. Schrauben Sie die Muttern ca. 5 mm weit auf das obere Gewinde.
3. Schrauben Sie die Abstandshalter auf die unteren Gewinde.
Hängen Sie das Gerät mit den oberen Gewinden auf die Wandhalterungen. Die
Unterlegscheiben müssen sich auf den Innenseiten der Wandhalterungen benden.

10
DE
1. Schrauben Sie die Mutter mit einem 12 mm Schraubenschlüssel fest.
2. Justieren Sie den Wandkontakt, indem Sie die Abstandshalter ein oder aus drehen.
Die Abstandshalter der unteren Befestigung müssen sicher an der Wand anliegen.
3. Verbinden Sie den Netzstecker mit einer geeigneten Steckdose.
Die Montage ist abgeschlossen.
BEDIENUNG
Bedienelemente
1 Anzeige „Kindersicherung"
2 Anzeige „niedrige Heizstufe"
3 Anzeige „hohe Heizstufe"
4 Aktueller Wochentag
5 Hauptanzeige
6 Aktive Wochentage
7 Modus-Anzeige
( P,- W -oder S-Modus)
8 Stundenanzeige
9 Anzeige „nicht aktive Stunden"
10 Anzeige „aktive Stunden"
11 Bedientasten

11
DE
Aktuellen Wochentag und aktuelle Uhrzeit einstellen
Wenn Sie das Gerät einschalten, ist der P-Modus aktiviert. Im P-Modus können
Sie den Wochentag und die Uhrzeit einstellen. Im P-Modus ndet kein Heizbetrieb
statt.
1. Ändern Sie den eingestellten Wochentag, indem Sie die Taste SET für 5 Sekunden
gedrückt halten. Ein Durchlauf der Wochentage beginnt Lassen Sie die Taste los,
wenn der richtige Wochentag aueuchtet.
Der eingestellte Wochentag wird durch die Zahlen in der oberen Zeile angegeben.
1 Montag
2 Dienstag
3 Mittwoch
4 Donnerstag
5 Freitag
6 Samstag
7 Sonntag
2. Ändern Sie die eingestellte Stunde, indem Sie die Taste MODE für 5 Sekunden
gedrückt halten. Ein Durchlauf der Stunden beginnt. Lassen Sie die Taste los, wenn
der richtige Stunde angezeigt wird.
3. Ändern Sie die eingestellte Minute, indem Sie die Taste MIN für 5 Sekunden
gedrückt halten. Ein Durchlauf der Minuten beginnt. Lassen Sie die Taste los, wenn
der richtige Minute angezeigt wird.
Wochenprogramm einstellen
Im W -Modus können Sie das Wochenprogramm einstellen. An den eingestellten
Wochentagen und eingestellten Tagesstunden schattet sich die volle Heizleistung ein.
1. Drücken Sie die Taste SET, um in den W-Modus zu gelangen (Modusanzeige W
leuchtet).
2. Wählen Sie durch Drücken der Taste MODE die Wochentage, in denen das
Heizprogramm aktiviert werden soll. Sie können zwischen einem einzelnen Tag,
allen Tagen, oder einer von Werk aus eingestellten Kombinationen von Tagen
wählen. Die Wochentage, an denen das Programm Heizprogramm aktiviert
wird, sind mit dem Indikator für aktive Wochentage (4) markiert. Folgende
Kombinationen können eingestellt werden: (1), (2), (3), (4), (5), (6), (1, 3, 5),
(2, 4, 6), (6, 1). (1, 2, 3), (4, s, 6), (1, 2, 3, 4, 5, 6, 7), (1, 2, 3, 4, s), (1, 2, 3, 4,
5, 6), (7).
3. Wählen Sie durch Drücken der Tasten ∧ und ∨ die Tagesstunden, an denen geheizt
werden soll. Sie können aus verschiedenen, werkseitig eingestellten Kombinationen
von Stunden wählen (von 0-24 Stunden).
Hinweis: Sie konnen die Stundenauswahl fur 10 Sekunden nach dem Aktivieren des
W-Modus vornehmen. Sollten Sie danach die Stunden einstellen wollen, verlassen Sie
kurz den W-Modus, indem Sie die Taste SET drucken. Kehren Sie unmittelbar danach in
den W-Modus zuruck, indem Sie erneut die Taste SET drucken.

12
DE
4. An jedem Stundenindikator (6) bendet sich ein lndikator, ob in dieser Stunde
geheizt wird (8/oben) oder ob in dieser Stunde nicht geheizt wird (9/unten).
5. Hinweis: Das Wochenprogramm ist nur alctiviert, wenn sich das Produkt im
W-Modus bendet.
Automatischer Modus/Soll-Temperatur halten
Im S-Modus wird eine vorgegebene Soll-Temperatur gehalten.
1. Drucken Sie die Taste SET, um in den S-Modus zu gelangen. (Modus-lndikator S
leuchtet).
In der Hauptanzeige wird links die aktuelle Raumtemperatur angezeigt. Rechts in der
Anzeige wird die eingestellte Soll-Temperatur angezeigt.
2. Stellen Sie rnit den Tasten ∧ und ∨ die Soll-Ternperatur ein.
• Wenn die Raumtemperatur gleich der Solltemperatur ist, schaltet sich der
Heizbetrieb aus.
• Wenn die Raumtemperatur auf unter 2 °C der Soll-Temperatur abfallt, schaltet sich
der schwache Heizbetrieb ein (lndikator fur schwache Heizleistung (9) leuchtet
auf).
• Wenn die Raumtemperatur auf unter 4 °C der Soll-Temperatur abfallt, schaltet sich
der starke Heizbetrieb ein (lndlkator fur starke Heizleistung (10) leuchtet auf).
Heizbetrieb manuell starten
Sie konnen bei Bedarf den Heizbetrieb mit schwacher oder starker Heizleistung manuell
starten.
1. Druck.en Sie die Taste SET, um in den S-Modus zu gelangen. (Modus-lndikator S
leuchtet).
2. Starten Sie den Heizbetrieb, indem Sie die Taste
drucken. Drucken Sie erneut die
Taste , um zwischen schwacher und starker Heizleistung zu wechseln. Mit welcher
Heizleistung aktuell geheizt wird konnen Sie an den lndikatoren fur schwache
Heizleistung (9) und starke Heizleistung (10) ablesen.
3. Um den manuell gestarteten Heizvorgatng zu beenden, dri.icken Sie die Taste SET,
um den P-Modus zu verlassen.
Abschalt-Countdown aktivieren.
Im S-Modus können Sie einen Countdown einstellen, nach dessen Ablauf der
Heizvorgang automatisch abgeschaltet wird.
1. Drücken Sie die Taste MODE, um den aktuellen Countdown anzuzeigen (rechts in
der Hauptanzeige).
Hinweis: Nach 10 Sekunden ohne Eingabe schaltet die Hauptanzeige zurück zur
Anzeige von Raum- und Soll-Temperatur.
2. Drücken Sie die Taste MODE, um den Countdown um eine Stunde zu verlängern.
Kindersicherung
Um ein versehentliches Bedienen durch Kinder zu verhindern, können Sie eine
Kindersicherung aktivieren. Bel aktivierter Kindersicherung reagiert das Produkt nicht auf
Tastendrücke.
• Schalten Sie die Kindersicherung ein oder aus, indem Sie die Taste
für 5

13
DE
Sekunden gedrückt halten.
• Wenn die Kindersicherung aktiviert Ist, leuchtet der Indikator für die
Kindersicherung (11).
FERNBEDIENUNG, BATTERIEWECHSEL
Kindersicherung
Bedienung per Fernbedienung
Ziehen Sie vor der ersten Verwendung
Isolierfolie aus dem Batteriefach der
Fernbedienung. Die Fernbedienunaverfügt
über eine zusätzliche Taste
. mit welcher
die Kindersicherung ein- oder ausgeschaltet
wird.
Mit der Fernbedienung lassen der aktuelle
Wochentag und die Zeit sich nicht
einstellen.

14
DE
Warnung: Gefahr eines Stromschlags
Ziehen Sie vor der Reinigung des Staubbehälters den Netzstecker.
REINIGUNG UND PFLEGE
• Warten Sie vor der Reinigung, bis das Gerät abgekühlt ist und ziehen Sie den
Netzstecker.
• Verwenden Sie keine Schleif- und Lösungsmittel. Wischen Sie das Produkt mit
einem weichen, feuchten Tuch ab.
• Sie müssen die Ober äche regelmäßig von Staub befreien.
• Das Waschen und Einlegen des Gerätes in Wasser ist verboten!
• Wenn Sie die Heizung für längere Zeit nicht benutzen, wischen Sie sie ab und
bewahren Sie das Gerät in der Verpackung auf.
• Das Gerät sollte in einem trockenen, belüfteten Raum aufgestellt werden.
Vermeiden Sie hohe Luftfeuchtigkeit und mechanische Einwirkungen auf das
Gerät.

15
DE
TECHNISCHE PARAMETER
Modellkennung(en) 10032942, 10032943
Angabe Symbol Wert Einheit Angabe Einheit
Wärmeleistung Nur bei elektrischen Speicher-Einzelraumheizgeräten:
Art der Regelung der Wärmezufuhr
Nennwärmeleistung P
nom
0,85
kW Manuelle Regelung der Wärmezufuhr
mit integriertem Thermostat
nein
Mindestwärmeleistung
(Richtwert)
P
min
0,85
kW Manuelle Regelung der Wärmezufuhr
mit Rückmeldung der Raum- und/
oder Außentemperatur
nein
Maximale kontinuierliche
Wärmeleistung
P
max
0,85
kW Elektronische Regelung der Wärmezufuhr
mit Rückmeldung der Raum- und/
oder Außentemperatur
nein
Hilfsstromverbrauch
Wärmeabgabe mit Gebläseunterstützung nein
Bei Nennwärmeleistung
(Ventilator-Motor)
el
max
n.a.
kW
Art der Wärmeleistung/Raumtemperaturkontrolle
Bei Mindestwärmeleistung
(Ventilator-Motor)
el
min
n.a.
kW Einstuge Wärmeleistung, keine
Raumtemperaturkontrolle
nein
Im Bereitschaftszustand el
SB
0,0008
kW Zwei oder mehr manuell einstellbare
Stufen, keine Raumtemperaturkontrolle
nein
Raumtemperaturkontrolle mit
mechanischem Thermostat
nein
Mit elektronischer Raumtemperaturkontrolle nein
Mit elektronischer Raumtemperaturkontrolle
und Tageszeitregelung
nein
Mit elektronischer Raumtemperaturkontrolle
und Wochentagsregelung
ja
Sonstige Regelungsoptionen
Raumtemperaturkontrolle mit Präsenzerkennung nein
Raumtemperaturkontrolle mit
Erkennung offener Fenster
nein
Mit Fernbedienungsoption nein
Mit adaptiver Regelung des Heizbeginns ja
Mit Betriebszeitbegrenzung nein
Mit Schwarzkugelsensor nein
Kontaktangaben Chal-Tec GmbH, Wallstraße 16, 10179, Berlin, Deutschland

16
DE
HINWEISE ZUR ENTSORGUNG
Bendet sich die linke Abbildung (durchgestrichene Mülltonne
auf Rädern) auf dem Produkt, gilt die Europäische Richtlinie
2012/19/EU. Diese Produkte dürfen nicht mit dem normalen
Hausmüll entsorgt werden. Informieren Sie sich über die örtlichen
Regelungen zur getrennten Sammlung elektrischer und elektronischer
Gerätschaften. Richten Sie sich nach den örtlichen Regelungen
und entsorgen Sie Altgeräte nicht über den Hausmüll. Durch die
regelkonforme Entsorgung der Altgeräte werden Umwelt und
die Gesundheit Ihrer Mitmenschen vor möglichen negativen
Konsequenzen geschützt. Materialrecycling hilft, den Verbrauch von
Rohstoffen zu verringern.
Konformitätserklärung
Hersteller: Chal-Tec GmbH, Wallstraße 16, 10179 Berlin
Dieses Produkt entspricht den folgenden Europäischen Richtlinien:
2009/125/EG (ErP)
2011/65/EU (RoHS)
2014/30/EU (EMV)
2014/35/EU (LVD)

17
EN
Technical Data 17
Safety Instructions 18
Scope of Supply 20
Installation 22
Operation 24
Cleannig and Care 27
technical parameters 28
Disposal Considerations 29
CONTENTS
TECHNICAL DATA
Item number 10032942 10032943
Power 850 W
Power supply 220-240 V~ 50/60 Hz
Adjustable temperature 5 - 40 °C
Protection class IP 24
Measurements (HxWxD) 122x47x2,8 cm
Dear Customer,
Congratulations on purchasing this equipment. Please
read this manual carefully and take care of the following
hints to avoid damages. Any failure caused by ignoring
the mentioned items and cautions mentioned in the
instruction manual are not covered by our warranty and
any liability. Scan the QR code to get access to the latest
user manual and other information about the product.

18
EN
SAFETY INSTRUCTIONS
Read and follow all the instructions in this manual, even if you feel familiar with the unit.
Keep the instruction manual for future reference. When using an electrical device, the
safety instructions must be followed, including the following:
• Only use the voltage indicated on the nameplate of the heater.
• Do not obstruct the airow at the air inlet or outlet in any way as the unit may
overheat and become a re hazard.
• Do not cover the ventilation slots or the air inlets and outlets by placing the unit
against a surface. All objects must be at least 1 meter away from the front, sides,
and rear.
• Do not place the appliance near a heat source.
• Do not operate the unit in an environment where petrol, paint or other easily
ammable substances are stored.
• This equipment will become hot during use. Do not allow bare skin to touch the hot
surface.
• Switch off and allow to cool before moving.
• Do not use the appliance to dry laundry.
• Do not insert foreign objects or metal objects into the interior of the appliance or the
ventilation slots as this may result in electric shock, re or damage to the appliance.
• Do not immerse the appliance in liquid or allow water to run inside as this may
result in electric shock.
• Do not operate the equipment with a damaged power cord, plug, or socket after
the equipment has malfunctioned, been dropped, or is damaged in any way. Refer
the product to an authorized electrician for inspection, electrical or mechanical
adjustment, maintenance, or repair.
• Do not operate the equipment with wet hands.
• The most common cause of overheating is the buildup of dust and lint on the
product. Ensure that these deposits are regularly removed by pulling the power plug
and vacuuming the air vents and grill.
• Always unplug the appliance before cleaning. Do not use abrasive cleaners for
cleaning. Clean with a damp (not wet) cloth that has only been dipped in soapy
water.
• Do not connect the appliance to the power supply until it has been fully assembled.
• The unit is not intended for outdoor use.
• Do not use the unit in the immediate vicinity of a bath, shower, swimming pool or
other liquid.
• Always operate in an upright position.
• Switch off and allow to cool before moving.
• Do not operate with a coiled cable as heat is highly likely to form and is sufcient to
constitute a hazard.

19
EN
• The use of an extension cord is not recommended for this unit.
• Do not unplug the power cord until the power is turned off.
• Do not unplug the power cord from the outlet by pulling on the power cord. Always
touch the plug.
• Disconnect the power plug when the unit is not in use.
• This appliance is not suitable for use on long hair carpets or ocative rugs.
• Do not allow the power cord to come into contact with hot surfaces during
operation.
• Do not install the power cord under carpets, rugs, runners, etc. Place the power
cord outside walking areas so that no one can trip over it.
• Do not twist, bend, or wrap the power cord around the product as this may cause
the cord insulation to weaken and break. Always ensure that the entire power cord
is unwound from the cable winder.
• Do not use outdoors or on a wet surface.
• Do not store while the unit is still warm.
• This equipment is not intended for use by small children or inrm persons without
care.
• Young children must be supervised so that they do not play with the device.
• The unit must not be operated under wall outlets.
• Do not use the appliance with any programming, timer or other device that switches
the heater on or off. There is a risk of re if the heater is covered or incorrectly
installed.
• Do not cover the heater! Danger of overload!
• To avoid the risk of electric shock, do not immerse the appliance and power cord in
water, rain, moisture or liquids other than those required to operate the appliance.
• The safety guard does not provide complete protection for small children and inrm
persons.
• If the power cord is damaged, it must be replaced by a qualied electrician to
prevent hazards.
• Use the device only for the intended purpose as described in the operating
instructions.
• Any other use is not recommended and may result in re, electric shock, or other
personal injury.
• This equipment is intended for domestic use only and not for commercial or
industrial use.

20
EN
SCOPE OF SUPPLY
Heater body
Remote control

21
EN
Mounting material
Name Illustration Quantity
Wandhalterung 2
Unterlegscheibe
2
Mutter
2
Abstandshalter
2
Dübel
4
Schraube
4

22
EN
INSTALLATION
Mark the drill holes on the wall. The following minimum distances must be observed:
To the ceiling 50 cm
To the oor 15 cm
To the sides 10 cm
Warning! Risk of electic schock
The horizontal distance to showers, bathtubs, washbasins
etc. must be at least 60 cm.
A (mm) B (mm) C (mm) D (mm)
282 250 650 300
Drill the holes. The drill must have a diameter of 8 mm. The drilling depth is 50 mm. Insert
the supplied dowels.

23
EN
Screw the wall brackets to the wall as shown. Use
the supplied screws.
1. Place the washers on the upper thread.
2. Screw the spacers onto the lower threads..
3. Hang the product with the upper threads on the wall brackets. The washers must be
located on the inside of the wall brackets.

24
EN
1. Tighten the nut with a 12-mm spanner.
2. Adjust the wall contact by turning the spacers on or off. The spacers of the lower
fastening must lie securely against the wall.
3. Connect the mains plug to a suitable socket.
The installation is nished!
OPERATION
Control panel
1 Childlock indicator
2 Low heating level indicator
3 High heating level" indicator
4 Current day of the week
5 Main display
6 Active weekdays
7 Mode display( P, W or S mode)
8 Hour display
9 Displaying: inactive hours
10 Displaying: active hours"
11 Operating buttons

25
EN
Setting the current day of the week and time
When you turn on the unit, P mode is activated. In P mode, you can
set the day of the week and the time. In P mode there is no heating operation
instead of.
1. Change the day of the week by pressing and holding the SET button for 5 seconds.
Let go of the button when the correct day of the week lights up.
The day of the week is indicated by the numbers in the upper line.
1 Monday
2 Tuesday
3 Wednesday
4 Thursday
5 Friday
6 Saturday
7 Sunday
2. Change the set hour by pressing and holding the MODE button for 5 seconds. A
run of the hours begins. Release the button when the correct hour is displayed..
3. Change the set minute by pressing and holding the MIN button for 5 seconds. A run
of minutes begins. Release the button when the correct minute is displayed.
Setting the weekly program
In W mode, you can set the weekly program. On the set days of the week and set hours
of the day, the full heating capacity is shaded.
1. Press the SET button to enter W mode (W mode indicator lights up).
2. Select the days of the week on which the heating program is to be activated by
pressing the MODE button. You can choose between a single day, all days, or a
combination of days set at the factory. The days of the week on which the heating
program is activated are marked with the indicator for active weekdays (4). The
following combinations can be set. (1), (2), (3), (4), (5), (6), (1, 3, 5), (2, 4, 6),
(6, 1). (1, 2, 3), (4, s, 6), (1, 2, 3, 4, 5, 6, 7), (1, 2, 3, 4, s), (1, 2, 3, 4, 5, 6), (7).
3. Press the keys ∧ and ∨ to select the hours of the day when you want to heat. You
can choose from various factory-set combinations of hours (from 0-24 hours).
Note: You can select the hours for 10 seconds after activating the W mode. If you then
want to set the hours, briey exit W mode by pressing the SET key. Return to W mode
immediately afterwards by pressing the SET button again.
4. On each hour indicator (6) there is an indicator whether heating is in this hour (8/
up) or whether heating is not in this hour (9/down).
5. Note: The weekly program is only activated if the product is in the W mode.

26
EN
Automatic mode/setpoint temperature maintenance
1. In S mode, a preset target temperature is maintained.
Press the SET button to enter the S mode. (Mode indicator S lights up).
The current room temperature is displayed on the left of the main display. The set t
arget temperature is shown on the right of the display.
• Set the target literature using the keys ∧ and ∨.
• If the room temperature is equal to the setpoint temperature, the heating mode
switches off.
• If the room temperature drops below 2 -c of the setpoint temperature, the weak
heating mode is switched on (low heat indicator (9) lights up).
If the room temperature drops below 4 -c of the setpoint temperature, the strong heating
operation is switched on (indicator for strong heating power (10) lights up).
Starting heating operation manually
If required, you can start heating operation manually with low or high heating power.
1. Press the SET button to enter the S mode. (Mode indicator S lights up).
2. Start the heating mode by pressing the key
. Press the button again to switch
between low and high heating power. The current heating capacity can be seen
from the indicators for low heating capacity (9) and high heating capacity (10).
3. To end the manually started heating process, press the SET key to exit P mode.
Start switch-off timer
In S mode, you can set a countdown after which the heating process is automatically
switched off.
1. Press the MODE button to display the current countdown (right in the main display).
Note: After 10 seconds without input, the main display returns to the display of room
and setpoint temperature.
2. Press the MODE button to extend the countdown by one hour.
Childlock
To prevent accidental operation by children, you can activate a childlock. When
childlock is activated, the product does not respond at the touch of a button.
• Press and hold the button
for 5 seconds to turn the childlock on or off.
• When the childlock is activated, the childlock indicator (11) lights up.

27
EN
CLEANNIG AND CARE
• Before cleaning the item wait when it cools down and plug out
• Do not use abrasives and solvents. Wipe the product with soft wet cloth
• It is necessary to remove dust from the surface regularly
• Washing the item and placing it in water is forbidden!
• If you are going not to use heater for long time, wipe it surface and put the item in
color box.
• It should be placed in dry ventilated room. Avoid high humidity and mechanical
impact on the item.
Warning: Danger of electric shock
Unplug the power cord before cleaning.

TECHNICAL PARAMETERS
Model identier(s): 10032942, 10032943
Item Symbol Value Unit Item Unit
Heat output Type of heat input, for electric storage
local space heaters only
Nominal heat output P
nom
0.85
kW manual heat charge control,
with integrated thermostat
NO
Minimum heat output
(indicative)
P
min
0.85
kW manual heat charge control with room
and/or outdoor temperature feedback
NO
Maximum continuous
heat output
P
max
0.85
kW electronic heat charge control with room
and/or outdoor temperature feedback
NO
Auxiliary electricity consumption
fan assisted heat output NO
At nominal heat output
(fan motor)
el
max
N/A kW
Type of heat output/room temperature control
At minimum heat output
(fan motor)
el
min
N/A kW single stage heat output and no
room temperature control
NO
In standby mode el
SB
0.0008 kW Two or more manual stages, no
room temperature control
NO
with mechanic thermostat room
temperature control
NO
with electronic room temperature control NO
electronic room temperature
control plus day timer
NO
electronic room temperature
control plus week timer
YES
Other control options (multiple selections possible)
room temperature control, with
presence detection
NO
room temperature control, with
open window detection
NO
with distance control option NO
with adaptive start control YES
with working time limitation NO
with black bulb sensor NO
Contact details Chal-Tec GmbH, Wallstraße 16, 10179, Berlin, Germany

DISPOSAL CONSIDERATIONS
According to the European waste regulation 2012/19/EU this
symbol on the product or on its packaging indicates that this product
may not be treated as household waste. Instead it should be taken
to the appropriate collection point for the recycling of electrical
and electronic equipment. By ensuring this product is disposed of
correctly, you will help prevent potential negative consequences
for the environment and human health, which could otherwise be
caused by inappropriate waste handling of this product. For more
detailed information about recycling of this product, please contact
your local council or your household waste disposal service.
Declaration of Conformity
Producer: Chal-Tec GmbH, Wallstraße 16, 10179 Berlin. Germany
This product is conform to the following European Directives:
2009/125/EG (ErP)
2011/65/EU (RoHS)
2014/30/EU (EMC)
2014/35/EU (LVD)

30
EN

31
FR
Fiche technique 31
Consignes de sécurité 32
Contenu de l‘emballage 34
Montage 36
Utilisation 38
Télécommande et remplacement des piles 41
Nettoyage et entretien 42
Fiche de données produit 43
Informations sur le recyclage 44
Chère cliente, cher client,
Toutes nos félicitations pour l’acquisition de ce nouvel
appareil. Veuillez lire attentivement et respecter les ins-
tructions de ce mode d’emploi an d’éviter d’éventuels
dommages. Nous ne saurions être tenus pour responsa-
bles des dommages dus au non-respect des consignes et
à la mauvaise utilisation de l’appareil. Scannez le QR-
Code pour obtenir la dernière version du mode d‘emploi
et à d‘autres informations concernant le produit.
SOMMAIRE
FICHE TECHNIQUE
Numéro d'article 10032942 10032943
Puissance 850 W
Alimentation 220-240 V~ 50/60 Hz
Température réglable de 5 à 40 °C
Norme de protection IP 24
Dimensions (HxLxP) 122x47x2,8 cm

32
FR
CONSIGNES DE SÉCURITÉ
Lisez et suivez les consignes de sécurité ci-dessous, même si vous vous sentez familiarisé
avec l‘appareil. Conservez le mode d‘emploi pour référence ultérieure. Lors de
l‘utilisation d‘un appareil électrique, les consignes de sécurité doivent être respectées, y
compris les suivantes :
• Utilisez uniquement la tension indiquée sur la plaque signalétique de l‘appareil.
• N‘obstruez pas la circulation d’air à l’entrée ou à la sortie, car l’appareil risque de
surchauffer et de présenter un risque d’incendie.
• Ne recouvrez pas les fentes d‘aération et les entrées et sorties d‘air en plaçant
l‘unité contre une surface. Tous les objets doivent être à au moins 1 mètre de
l‘avant, des côtés et du dos de l‘appareil.
• Ne placez pas l‘appareil près d‘une source de chaleur.
• N‘utilisez pas l‘appareil dans un environnement où de l‘essence, de la peinture ou
d‘autres substances facilement inammables sont stockées.
• Cet appareil devient chaud pendant l’utilisation. Ne laissez pas la peau nue entrer
en contact avec les surfaces chaudes.
• Éteignez et laissez refroidir l‘appareil avant de le déplacer.
• N‘utilisez pas l‘appareil pour sécher le linge.
• N‘insérez pas de corps étrangers ou d‘objets métalliques à l‘intérieur de l‘appareil
ou des ouvertures d‘aération, car cela pourrait provoquer un choc électrique, un
incendie ou endommager l‘appareil.
• N‘immergez pas l‘appareil dans des liquides et n‘en laissez pas pénétrer à
l‘intérieur de l‘appareil, car cela pourrait provoquer un choc électrique.
• N‘utilisez pas l‘appareil avec un cordon d‘alimentation ou une prise d‘alimentation
endommagés, après un dysfonctionnement, une chute ou un dégât quelconque.
Conez l‘appareil à un électricien pour examen, réglage électrique ou mécanique,
entretien ou réparation.
• N‘utilisez pas l‘appareil avec les mains mouillées.
• La cause la plus courante de surchauffe est l‘accumulation de poussière et de
peluches sur l’appareil. Assurez-vous que ces dépôts sont éliminés régulièrement
en débranchant la che d‘alimentation pour aspirer les ouvertures et la grille
d‘aération.
• Débranchez toujours l‘appareil avant de le nettoyer. N‘utilisez pas de produits
abrasifs pour le nettoyage. Nettoyez l‘appareil avec un chiffon humide (pas
mouillé) trempé dans une solution savonneuse.
• Ne connectez pas l‘appareil à l‘alimentation avant l‘assemblage complet.
• L‘appareil n‘est pas conçu pour être utilisé à l‘extérieur.
• N‘utilisez pas l‘appareil à proximité immédiate d‘une baignoire, d‘une douche,
d‘une piscine ou d‘autres liquides.
• Utilisez toujours l‘appareil en position verticale.
• Éteignez-le et laissez-le refroidir avant de le déplacer.
• Ne faites pas fonctionner l‘appareil avec le câble enroulé car il est très probable
que de la chaleur se dégage en quantité sufsante pour présenter un danger
• L‘utilisation d‘une rallonge n‘est pas recommandée pour cet appareil.
• Ne débranchez pas le cordon d’alimentation avant d‘avoir éteint l’appareil.

33
FR
• Ne débranchez pas l‘alimentation en tirant sur le cordon. Tenez toujours la che.
• Débranchez la che d‘alimentation lorsque l‘appareil n‘est pas utilisé.
• Cet appareil ne doit pas être utilisé sur un tapis à poils longs ou okati.
• Ne laissez pas le cordon d’alimentation entrer en contact avec des surfaces
chaudes pendant le fonctionnement.
• Ne faites pas passer le cordon d‘alimentation sous un tapis, un paillasson, une
moquette, etc. Placez le cordon d‘alimentation hors des lieux de passage an que
personne ne trébuche dessus.
• Ne tordez pas, ne pliez pas et n’enroulez pas le cordon d’alimentation autour de
l’appareil, car cela risquerait d’affaiblir l’isolation du câble et de le casser. Vériez
toujours que le cordon d‘alimentation est entièrement déroulé.
• Ne pas utiliser à l‘extérieur ou sur une surface humide.
• Ne pas ranger l’appareil encore chaud.
• Cet appareil ne convient pas aux jeunes enfants ou aux personnes handicapées
non accompagnées.
• Les enfants en bas âge doivent être surveillés an qu’ils ne jouent pas avec
l’appareil.
• L‘appareil ne doit pas être installé sous une prise murale.
• N‘utilisez pas l‘appareil avec une programmation, une minuterie ou tout autre
appareil qui allume ou éteint le chauffage à distance. Il y a risque d‘incendie si
l‘appareil a été recouvert ou est mal installé.
• Ne couvrez pas le radiateur ! Risque de surcharge !
• An de réduire les risques d‘électrocution, ne pas immerger l‘appareil et le cordon
d‘alimentation dans l‘eau ni les exposer à la pluie, à l‘humidité ou à tout autre
liquide que ceux nécessaires pour faire fonctionner l‘appareil.
• La grille de protection ne garantit pas une protection complète des nourrissons et
personnes handicapées.
• Si le cordon d‘alimentation est endommagé, il doit être remplacé par un électricien
qualié pour éviter tout danger.
• N‘utilisez l‘appareil qu‘aux ns prévues et décrites dans le mode d‘emploi.
• Toute autre utilisation est déconseillée et peut provoquer un incendie, une
électrocution ou d‘autres blessures.
• L‘appareil est destiné à un usage domestique uniquement et non à des ns
professionnelles ou industrielles.

34
FR
CONTENU DE L‘EMBALLAGE
Radiateur
Télécommande

35
FR
Matériel de montage
Description Illustration Quantité
Support mural 2
Rondelle
2
Ecrou
2
Entretoise
2
Cheville
4
Vis
4

36
FR
MONTAGE
Marquez les perçages sur le mur. Les distances minimales suivantes doivent être
respectées:
Du plafond 50 cm
Du sol 15 cm
Sur les côtés 10 cm
Mise en garde ! Il existe un risque d'électrocution
La distance horizontale entre les douches, les baignoires,
les lavabos, etc. doit être d'au moins 60 cm.
A (mm) B (mm) C (mm) D (mm)
282 250 650 300
Percez les trous. Utilisez un foret de diamètre 8 mm. La profondeur de perçage est de
50 mm. Insérez les chevilles fournies.

37
FR
Vissez les supports muraux au mur comme indiqué. Utilisez les vis fournies.
1. Placez les rondelles sur le letage supérieur.
2. Vissez les écrous d'environ 5 mm sur le letage supérieur.
3. Vissez les entretoises sur les letages inférieurs.
Accrochez l'appareil avec les letages supérieurs sur les supports muraux. Les
rondelles doivent être à l'intérieur des supports muraux.

38
FR
1. Serrez l’écrou avec une clé de 12 mm.
2. Ajustez le contact du mur en vissant ou dévissant les entretoises Les entretoises de la
xation inférieure doivent reposer fermement contre le mur.
3. Connectez la che d’alimentation à une prise secteur appropriée
Le montage est terminé.
UTILISATION
Eléments de commande
1 Témoin de "verrouillage parental"
2 Témoin de "chauffage basse
puissance"
3 Témoin de "chauffage haute
puissance"
4 Jour de la semaine actuel
5 Afchage principal
6 Jours de semaine actifs
7 Afchage du mode
8 (Mode P, W ou S)
9 Afchage des heures
10 Afchage des "heures actives"
11 Touches de commande

39
FR
Réglage du jour de la semaine et de l'heure
Lorsque vous allumez l'appareil, le mode P est activé. En mode P, vous pouvez dénir le
jour de la semaine et l'heure. En mode P, aucun chauffage n'est produit.
1. Changez le jour de la semaine en appuyant sur le bouton SET pendant 5 secondes.
Les jours de semaine sont parcourus. Relâchez le bouton lorsque le jour correct de
la semaine est activé.
Le jour déni de la semaine est indiqué par les chiffres dans la ligne supérieure.
1 Lundi
2 Mardi
3 Mercredi
4 Jeudi
5 Vendredi
6 Samedi
7 Dimanche
2. Modiez l'heure en appuyant sur le bouton MODE pendant 5 secondes. Un
balayage des heures commence. Relâchez le bouton lorsque l'heure correcte est
afchée.
3. Modiez les minutes en maintenant le bouton MIN enfoncé pendant 5 secondes.
Un balayage de minutes commence. Relâchez le bouton lorsque les minutes
correctes sont afchées.
Programmation hebdomadaire
En mode W, vous pouvez dénir le programme hebdomadaire. Aux jours dénis de la
semaine et aux heures dénies de la journée, le chauffage s'allume.
1. Appuyez sur le bouton SET pour accéder au mode W (le témoin du mode W
s’allume).
2. Appuyez sur le bouton MODE pour sélectionner les jours de la semaine pendant
lesquels le programme de chauffage doit être activé. Vous pouvez choisir entre une
seule journée, tous les jours ou une combinaison de jours prédénie. Les jours de
la semaine pendant lesquels le programme de chauffage du programme est activé
sont signalés par l'indicateur des jours actifs de la semaine (4). Vous pouvez choisir
parmi les combinaisons suivantes : (1), (2), (3), (4), (5), (6), (1, 3, 5), (2, 4, 6), (6,
1). (1, 2, 3), (4, s, 6), (1, 2, 3, 4, 5, 6, 7), (1, 2, 3, 4, s), (1, 2, 3, 4, 5, 6), (7).
3. Appuyez sur les boutons ∧ et ∨ pour sélectionner les heures de la journée que vous
souhaitez chauffer. Vous pouvez choisir parmi plusieurs combinaisons d'heures
prédénies (de 0 à 24 heures).
Remarque : Vous pouvez dénir la sélection des heures pendant 10 secondes après
l'activation du mode W. Si vous souhaitez régler les heures après ce délai, quittez
brièvement le mode W en appuyant sur le bouton SET. Revenez immédiatement au
mode W en appuyant à nouveau sur le bouton SET
4. Pour chaque heure (6), un indicateur précise si le chauffage est activé (8 /

40
FR
au-dessus) ou s'il n'y aura pas de chauffage activé pendant cette heure (9 / au-
dessous).
5. Remarque : le programme hebdomadaire est activé uniquement lorsque le produit
est en mode W.
Mode automatique /maintien d'une température cible
En mode S, une température cible prédéterminée est maintenue.
1. Appuyez sur le bouton SET pour accéder au mode S. (L'indicateur de mode S
s'allume).
Sur l'écran principal, la température ambiante actuelle est afchée à gauche. Sur la
droite de l'écran, la température cible dénie est afchée.
• Si la température ambiante est égale à la température dénie, le chauffage s’éteint.
• Lorsque la température de la pièce descend en dessous de 2°C de la température
dénie, le mode basse température s’allume (le témoin de basse température (9)
s’allume).
• Lorsque la température de la pièce tombe en dessous de 4 ° C de la température
dénie, le mode de chauffage élevé s’active (l’indicateur de température élevée
(10) s'allume.
Démarrer manuellement le chauffage
Si nécessaire, vous pouvez démarrer manuellement le chauffage avec une puissance
faible ou élevée.
1. Appuyez sur le bouton SET pour accéder au mode S. (L'indicateur de mode S
s'allume).
2. Démarrez le chauffage en appuyant sur la touche
. Appuyez à nouveau sur
le bouton , pour basculer entre les puissances basse et élevée. Les indicateurs
de faible puissance calorique (9) et de puissance calorique élevée (10) vous
indiquent le mode en cours d'utilisation.
3. Pour quitter le mode de chauffage manuel, appuyez sur le bouton SET pour quitter
le mode P.
Activation de la minuterie d'arrêt.
En mode S, vous pouvez dénir un compte à rebours au bout duquel le chauffage est
automatiquement désactivé.
1. Appuyez sur le bouton MODE pour afcher le compte à rebours en cours (sur le
côté droit de l'écran principal.
Remarque : Après 10 secondes sans entrée, l'afchage principal retourne à l'afchage
de la température ambiante et de la température cible.
2. Appuyez sur le bouton MODE pour prolonger le compte à rebours d'une heure.
Verrouillage parental
Pour éviter une utilisation accidentelle par des enfants, vous pouvez activer le
verrouillage parental. Si le verrouillage parental est activé, le produit ne répondra pas
aux commandes.
• Activez ou désactivez le verrouillage parental en appuyant sur le bouton
pendant
5 secondes.

41
FR
• Lorsque le verrouillage parental est activé, le témoin correspondant s’allume (11).
TÉLÉCOMMANDE ET REMPLACEMENT DES PILES
Verrouillage parental
Utilisation avec la télécommande
Retirez la feuille isolante du compartiment à
piles de la télécommande avant la première
utilisation. La télécommande possède un
bouton supplémentaire
. avec lequel vous
pouvez activer ou désactiver le verrouillage
parental.
Avec la télécommande, vous ne pouvez
pas régler le jour actuel de la semaine et
l'heure.

42
FR
Mise en garde : risque de choc électrique
Débranche z toujours la che secteur avant de nettoyer le bac à
poussière.
NETTOYAGE ET ENTRETIEN
• Avant de nettoyer l'appareil, attendez qu'il refroidisse et débranchez le cordon
d’alimentation.
• N'utilisez pas de produits abrasifs ou de solvants. Essuyez le produit avec un
chiffon doux et humide.
• Vous devez régulièrement retirer la poussière de la surface.
• Il est interdit de laver l'appareil à l'eau et de l'y plonger !
• Si vous n'utilisez pas le radiateur pendant une longue période, essuyez-le et
rangez-le dans son emballage.
• L'appareil doit être installé dans un endroit sec et ventilé. Evitez l'humidité et les
contraintes mécaniques élevées sur l'appareil.

43
FR
FICHE DE DONNÉES PRODUIT
Référence (s) du produit 10032942, 10032943
Donnée Symbole Valeur Unité Donnée Unité
Puissance calorique Uniquement pour les radiateurs électriques à
accumulation : Type de régulation de l'apport de chaleur
Puissance calorique
nominale
Pnom 0,85 kW Régulation manuelle de l'apport de
chaleur avec thermostat intégré
non
Puissance calorique
minimale (indicative)
Pmin 0,85 kW Régulation manuelle de l'apport de
chaleur avec indication de la température
de la pièce et/ou de l'extérieur
non
Puissance maximale
continue de chauffage
Pmax,c 0,85 kW Régulation électronique de l'apport de
chaleur avec indication de la température
de la pièce et/ou de l'extérieur
non
Consommation de courant auxiliaire
Apport de chaleur assisté par ventilateur non
A puissance calorique
nominale (moteur
de ventilateur)
elmax
n.c
kW
Type de chauffage/contrôle de la
température de la pièce
A puissance calorique
minimale (moteur
de ventilateur)
elmin
n.c
kW Chauffage à une seule vitesse, pas de
contrôle de la température ambiante
non
En mode veille elSB
0,0008
kW Deux vitesses ou plus réglables manuellement,
pas de contrôle de la température ambiante
non
Contrôle de la température ambiante
par thermostat mécanique
non
Contrôle électronique de la
température ambiante
non
Contrôle électronique de la température
ambiante et régulation par jour
non
Contrôle électronique de la température
ambiante et régulation par semaine
oui
Autres options de régulation
Contrôle de la température ambiante
avec détection de présence
non
Contrôle de la température ambiante
avec détection de fenêtre ouverte
non
Avec option télécommande non
Avec contrôle du démarrage du chauffage oui
Avec limitation de la durée de fonctionnement non
Avec globe noir capteur de température non
Coordonnées de contact Chal-Tec GmbH, Wallstraße 16, 10179, Berlin, Allemagne

44
FR
INFORMATIONS SUR LE RECYCLAGE
Vous trouverez sur le produit l’image ci-contre (une poubelle sur
roues, barrée d‘une croix), ce qui indique que le produit se trouve
soumis à la directive européenne 2012/19/UE. Renseignez-vous sur
les dispositions en vigueur dans votre région concernant la collecte
séparée des appareils électriques et électroniques. Respectez-les
et ne jetez pas les appareils usagés avec les ordures ménagères.
La mise en rebut correcte du produit usagé permet de préserver
l’environnement et la santé. Le recyclage des matériaux contribue à
la préservation des ressources naturelles.
Déclaration de conformité
Fabricant : Chal-Tec GmbH, Wallstraße 16, 10179 Berlin
Ce produit est conforme aux directives européennes suivantes :
2009/125/CE (ErP)
2011/65/UE (RoHS)
2014/30/UE (CEM)
2014/35/UE (LVD)

45
ES
Datos técnicos 45
Indicaciones de seguridad 46
Envío 48
Montaje 50
Funcionamiento 52
Mando a distancia, cambio de pilas 55
Limpieza y cuidado 56
Hoja de datos del producto 57
Retirada del aparato 58
Estimado cliente:
Le felicitamos por la adquisición de este producto. Lea
atentamente el siguiente manual y siga cuidadosamente
las instrucciones de uso con el n de evitar posibles da-
ños. La empresa no se responsabiliza de los daños oca-
sionados por un uso indebido del producto o por haber
desatendido las indicaciones de seguridad. Escanee el
código QR para obtener acceso al manual de usuario
más reciente y otra información sobre el producto:
ÍNDICE
DATOS TÉCNICOS
Número de artículo 10032942 10032943
Potencia 850 W
Alimentación 220-240 V~ 50/60 Hz
Temperatura ajustable 5 - 40 °C
Grado de protección IP 24
Dimensiones (AnchoxAltoxLargo) 122x47x2,8 cm

46
ES
INDICACIONES DE SEGURIDAD
Lea y siga las siguientes indicaciones de seguridad, incluso cuando ya se haya
familiarizado con el aparato. Conserve este manual de instrucciones para futuras
consultas. Cuando utilice dispositivos eléctricos, debe seguir las indicaciones de
seguridad, incluidas las siguientes:
• Utilice exclusivamente la tensión que aparece especicada en la placa técnica del
aparato.
• No obstruya la corriente de aire en las salidas y entradas de aire de ningún modo,
ya que el aparato puede sobrecalentarse y provocar un incendio.
• Cuando coloque el aparato en una supercie, no cubra las ranuras de ventilación
ni las salidas y entradas de aire. Todos los objetos deben situarse como mínimo a 1
metro de distancia hacia los lados y hacia delante y atrás.
• No coloque el aparato cerca de fuentes de calor.
• No ponga el aparato en marcha en un entorno donde se almacene gasolina,
pintura u otras sustancias fácilmente inamables.
• El aparato alcanza temperaturas elevadas durante su uso. No toque las supercies
calientes con la piel desnuda.
• Antes de transportar el aparato, apáguelo y deje que se enfríe.
• No utilice el aparato para secar ropa.
• No introduzca ningún objeto extraño ni metálico en el interior del aparato ni en
las ranuras de ventilación, ya que podría provocar una descarga eléctrica, un
incendio o una avería del aparato.
• No sumerja el aparato en líquidos ni introduzca líquidos en el interior del aparato,
ya que podría provocar una descarga eléctrica.
• No utilice el aparato si el cable de alimentación o el enchufe está dañado, si el
aparato presenta algún fallo en el funcionamiento o avería, o si se ha dejado caer
el aparato. En ese caso, contacte con un electricista para que realice un ajuste,
mantenimiento o reparación eléctrica o mecánica.
• No manipule el aparato con las manos mojadas.
• El motivo más frecuente de sobrecalentamiento es el almacenamiento de polvo
y pelusas en el aparato. Asegúrese de retirar con frecuencia los sedimentos
desconectando el enchufe y aspirando las ranuras de ventilación y la rejilla.
• Desconecte siempre el enchufe antes de limpiar el aparato. No utilice productos
abrasivos para la limpieza. Limpie el aparato con un paño húmedo (no mojado)
empapado solo en agua con jabón.
• Conecte el aparato a una fuente de alimentación una vez que esté completamente
montado.
• El aparato no es apto para uso en exteriores.
• No utilice el aparato cerca de baños, duchas, piscinas u otros lugares con agua o
cualquier otro líquido.
• Ponga el aparato en marcha solo en un lugar estable.
• Antes de transportar el aparato, apáguelo y deje que se enfríe.
• No ponga el aparato en marcha con el cable enrollado, ya que puede producirse
acumulación de calor, lo que representaría un riesgo.
• No se recomienda utilizar un cable alargador con este aparato.

47
ES
• No desconecte el enchufe de la toma de corriente si no ha apagado primero el
aparato.
• Nunca desconecte el enchufe tirando el cable de alimentación, sino del cuerpo del
enchufe.
• Cuando no utilice el aparato, desconecte el enchufe de la toma de corriente.
• El aparato no es apto para su uso sobre alfombras de pelo ni felpudos.
• No deje que el cable de alimentación entre en contacto con supercies calientes.
• No coloque el cable de alimentación bajo alfombras ni mantas. Mantenga el
cable de alimentación alejado de zonas de paso para evitar que alguien se
tropiece.
• No doble, gire ni enrolle el cable alrededor del aparato, podría provocar
una debilitación del aislamiento del cable y su posterior rotura. Asegúrese de
desenrollar completamente el cable de alimentación.
• No utilice el aparato al aire libre ni sobre una supercie húmeda.
• No guarde el aparato mientras está caliente.
• Los niños y las personas con discapacidad no pueden utilizar el aparato, salvo que
estén bajo supervisión.
• Los niños pequeños deberán estar vigilados para evitar que jueguen con el
aparato.
• No instale el aparato debajo de una toma de corriente.
• No utilice el aparato con un dispositivo de programación, temporizador, control
remoto o cualquier otro dispositivo que encienda o apague automáticamente
el radiador. De lo contrario, existe riesgo de incendio si cubre o instala
incorrectamente el aparato.
• No cubra el aparato. ¡Existe riesgo de sobrecarga!
• Para evitar el riesgo de una descarga eléctrica, no sumerja el aparato ni el cable
de alimentación en agua ni lo exponga a la lluvia, humedad u otros líquidos
excepto que estos sean necesarios para el funcionamiento del aparato.
• La rejilla de protección no garantiza una protección completa para niños pequeños
y personas ancianas.
• Si el cable de alimentación está dañado, deberá ser reparado por un electricista
cualicado para evitar riesgos.
• Utilice el aparato solamente según se describe en estas instrucciones.
• Cualquier otro uso no está recomendado y puede provocar un incendio, una
descarga eléctrica y daños personales.
• El aparato solamente es apto para uso doméstico, no para uso comercio o
industrial.

48
ES
ENVÍO
Aparato
Mando a distancia

49
ES
Material de montaje
Description Imagen Cantidad
Soporte de pared 2
Arandela
2
Tuerca
2
Distanciador
2
Taco
4
Tornillo
4

50
ES
MONTAJE
Marque en la pared los oricios de perforación. Respete las siguientes distancias
mínimas:
Hacia el techo 50 cm
Hacia el suelo 15 cm
A los lados 10 cm
Advertencia: Existe riesgo de una descarga eléctrica
La distancia horizontal hacia las duchas, bañeras,
lavabos, etc. es de 60 cm mínimo.
A (mm) B (mm) C (mm) D (mm)
282 250 650 300
Taladre los oricios. La broca debe tener un diámetro de 8 mm. La profundidad de
perforación debe ser de 50 mm. Inserte los tacos suministrados.

51
ES
Atornille los soportes de pared como se indica en la imagen. Para ello, utilice
los tornillos suministrados.
1. Coloque las arandelas en las roscas superiores.
2. Enrosque las tuercas aprox. 5 mm en las roscas superiores.
3. Enrosque los distanciadores en las roscas inferiores. Cuelgue el aparato con las
roscas superiores en el soporte de pared.
Las arandelas deben ubicarse en la parte interior de los soportes de pared.

52
ES
1. Atornille las tuercas con una llave de 12 mm.
2. Ajuste el contacto con la pared aojando o apretando más los distanciadores. Los
distanciadores en el soporte inferior deben quedar ajustados contra la pared.
3. Conecte el enchufe a una toma de corriente adecuada.
El aparato está montado.
FUNCIONAMIENTO
Elementos de control
1 Indicador del mecanismo de
bloqueo
2 Indicador del nivel de potencia baja
3 Indicador del nivel de potencia alta
4 Día de la semana
5 Indicador principal
6 Días de la semana activos
7 Modos del indicador (P, W o S)
8 Indicador de horas
9 Indicador de horas no activas
10 Indicador de horas activas
11 Botones de control

53
ES
Congurar el día de la semana y la hora actual
Al encender el aparato, se activa el modo P. En modo P puede congurar el día de la
semana y la hora. Sin embargo, no puede elegir la potencia de calefacción en este
modo.
1. Mantenga pulsado el botón SET durante 5 segundos para cambiar el día de la
semana congurado. Empezará una rotación de los días de la semana. Suelte el
botón cuando se ilumine el día de la semana deseado.
El número en la la superior indicará el día de la semana elegido.
1 Lunes
2 Martes
3 Miércoles
4 Jueves
5 Viernes
6 Sábado
7 Domingo
2. Mantenga pulsado el botón SET durante 5 segundos para cambiar la hora.
Empezará una rotación de horas. Suelte el botón cuando se ilumine la hora
deseada.
3. Mantenga pulsado el botón SET durante 5 segundos para cambiar los minutos.
Empezará una rotación de minutos. Suelte el botón cuando se iluminen los minutos
deseados.
Congurar el programa semanal
Puede congurar el programa semanal en modo W. La potencia de calefacción total se
enciende en los días de la semana y a las horas elegidos
1. Pulse el botón SET para entrar al modo W (se ilumina el indicador del modo W).
2. Pulse varias veces el botón MODE para elegir el día de la semana cuando tiene
que activarse el programa de calefacción. Puede elegir entre 1 día, todos los días
o una combinación de días prestablecida. Los días de la semana cuando se tiene
que activar el programa de calefacción se indicarán mediante el indicador (4)
como días de la semana activos. Puede congurar la siguiente combinación: (1),
(2), (3), (4), (5), (6), (1, 3, 5), (2, 4, 6), (6, 1). (1, 2, 3), (4, s, 6), (1, 2, 3, 4, 5,
6, 7), (1, 2, 3, 4, s), (1, 2, 3, 4, 5, 6), (7).
3. Con la ayuda de los botones ∧ et ∨ elija las horas cuando se tiene que activar la
calefacción. Puede elegir entre las diferentes combinaciones de horas (de 0 a 24
horas).
Atención: Puede seleccionar las horas 10 segundos después de activar el modo W. Si
desea seleccionar las horas después, debe pulsar el botón SET y abandonar por un
tiempo breve el modo W. Regrese inmediatamente después al modo W pulsando el
botón SET.
4. En cada indicador de hora (6) se encuentra un indicador que muestra si a esta

54
ES
hora se activará la calefacción (8/arriba) o no se activará la calefacción (9/
abajo).
5. Atención: el programa semanal solamente se activa si el aparato está en modo W.
Modo automático/Mantener la temperatura indicada
El modo S mantiene la temperatura previamente elegida.
1. Pulse el botón SET para acceder al modo S. (Se ilumina el indicador del modo S).
El indicador principal muestra a la izquierda la temperatura ambiente actual y a la
derecha, la temperatura elegida.
2. Elija la temperatura deseada con los botones ∧ y ∨.
• Cuando la temperatura ambiente es igual que la temperatura elegida, el programa
de calefacción se apaga.
• Cuando la temperatura ambiente baja 2 °C por debajo de la temperatura
indicada, se activa la calefacción de potencia baja (se ilumina el indicador de
potencia baja (9)).
• Cuando la temperatura ambiente baja 4 °C por debajo de la temperatura
indicada, se activa la calefacción de potencia alta (se ilumina el indicador de
potencia alta (10).
Iniciar manualmente el programa de calefacción
Puede iniciar manualmente el programa de potencia baja o alta, según la necesidad.
1. Pulse el botón SET para acceder al modo S. (Se ilumina el indicador del modo S).
2. Para iniciar la calefacción, pulse el botón
. Vuelva a pulsar el botón , para
elegir entre la calefacción de potencia baja o alta. El indicador en la pantalla
muestra si ha elegido la calefacción de baja potencia (9) o la calefacción de alta
potencia (10).
3. Para nalizar la calefacción activada manualmente, pulse el botón SET para salir
del modo P.
Activar el apagado automático
En modo S, puede congurar una cuenta regresiva después de la que el aparato se
apagará automáticamente.
1. Pulse el botón MODE para visualizar la cuenta regresiva (a la derecha del
indicador principal).
Atención: Si no pulsa ningún botón en el transcurso de 10 segundos, el indicador
principal vuelve a mostrar las temperaturas ambiente y la elegida.
2. Pulse el botón MODE para prolongar 1 h más la cuenta regresiva.
Mecanismo de bloqueo
Puede activar el mecanismo de bloqueo para evitar que los niños realicen sin querer
cambios en la conguración. Cuando el mecanismo de bloqueo está activado, el
aparato no reacciona cuando se pulsan botones.
• Para activar o desactivar el mecanismo de bloqueo, mantenga pulsado durante 5
segundos el botón
.
• Cuando el mecanismo de bloqueo está activado, se ilumina el indicador del
mecanismo de bloqueo (11).

55
ES
MANDO A DISTANCIA, CAMBIO DE PILAS
Mecanismo de bloqueo
Control mediante el mando a distancia
Antes de utilizar el mando a distancia por
primera vez, retire la lengüeta de plástico.
El mando a distancia cuenta con un botón
adicional
. que activa y desactiva el
mecanismo de bloqueo.
No se puede congurar el día de la
semana actual y la hora con el mando a
distancia
.

56
ES
Advertencia: riesgo de una descarga eléctrica
Desenchufe el aparato antes de limpiar el recipiente para el polvo.
LIMPIEZA Y CUIDADO
• Antes de limpiar el aparato, desconéctelo de la toma de corriente y espere hasta
que se enfríe.
• No utilice productos de limpieza abrasivos o disolventes. Limpie el aparato con
un paño suave y húmedo.
• Limpie regularmente el polvo de la super cie.
• No limpie ni sumerja el aparato en agua.
• Si no va a utilizar el aparato durante un periodo largo de tiempo, límpielo y
guárdelo en su embalaje.
• Guarde el aparato en un lugar seco y ventilado. Evite espacios con gran
humedad y no exponga el aparato a golpes o caídas.

57
ES
HOJA DE DATOS DEL PRODUCTO
Denominación del modelo 10032942, 10032943
Dato Símbolo Valor Unidad Dato Unidad
Potencia térmica Solo con disposítivos de acumulación de calor
eléctricos para abastecimiento local: Tipo de
regulación del abastecimiento de calor
Potencia térmica nominal Pnom 0,85 kW Regulación manual del abastecimiento
de calor con termostato integrado:
no
Potencia térmica mínima
(valor orientativo)
Pmin 0,85 kW Regulación manual de abastecimiento de calor
con aviso de temperatura ambiente y/o exterior
no
Potencia térmica
continua máxima
Pmax,c 0,85 kW Regulación electrónica de abastecimiento
de calor con aviso de temperatura
ambiente y/o exterior
no
Consumo de corriente auxiliar
Disípación de calor con ventilación auxiliar no
Con potencia térmica
nominal (Motor
del ventilador)
elmax n.a. kW
Tipo de potencia térmica/control
de temperatura ambiente
Con potencia térmica mínima
(Motor del ventilador)
elmin n.a. kW Potencia térmica de un solo nivel, sín
control de temperatura ambiente
no
En modo de espera elSB 0,0008 kW Dos o más niveles regulables manualmente,
sín control de temperatura ambiente
no
Control de temperatura ambiente
con termostato mecánico
no
Con control electrónico de
temperatura ambiente
no
Con control de temperatura ambiente
y regulación del momento del día
no
Con control de temperatura ambiente
y regulación del día de la semana
sí
Otras opciones de regulación
Control de temperatura ambiente
con detección de presencia
no
Control de temperatura ambiente con
detección de ventanas abiertas
no
Con opción de control remoto no
Con regulación adaptable del
comienzo de la calefacción
sí
Con limitación de tiempo de funcionamiento no
Con sensor de bulbo negro no
Información de contacto Chal-Tec GmbH, Wallstraße 16, 10179, Berlín (Alemania)

58
ES
RETIRADA DEL APARATO
Si el aparato lleva adherida la ilustración de la izquierda (el
contenedor de basura tachado), entonces rige la directiva europea
2012/19/UE. Este producto no debe arrojarse a un contenedor de
basura común. Infórmese sobre las leyes territoriales que regulan la
recogida separada de aparatos eléctricos y electrónicos. Respete
las leyes territoriales y no arroje aparatos viejos al cubo de la
basura doméstica. Una retirada de aparatos conforme a las leyes
contribuye a proteger el medio ambiente y a las personas a su
alrededor frente a posibles consecuencias perjudiciales para la
salud. El reciclaje ayuda a reducir el consumo de materias primas.
Declaración de conformidad
Fabricante: Chal-Tec GmbH, Wallstraße 16, 10179 Berlín.
Este producto cumple con las siguientes directivas europeas:
2009/125/CE (ErP)
2011/65/UE (refundición RoHS)
2014/30/UE (EMC)
2014/35/UE (baja tensión)

59
IT
Dati tecnici 59
Avvertenze di sicurezza 60
Volume di consegna 62
Montaggio 64
Utilizzo 66
Telecomando, sostituzione batteria 69
Pulizia e manutenzione 70
Scheda informativa del prodotto 71
Smaltimento 72
Gentile Cliente,
La ringraziamo per aver acquistato il dispositivo. La
preghiamo di leggere attentamente le seguenti istruzioni
per l’uso e di seguirle per evitare possibili danni tecnici.
Non ci assumiamo alcuna responsabilità per danni
scaturiti da una mancata osservazione delle avvertenze
di sicurezza e da un uso improprio del dispositivo.
INDICE
DATI TECNICI
Numero articolo 10032942 10032943
Potenza 850 W
Alimentazione 220-240 V~ 50/60 Hz
Temperatura impostabile Da 5 a 40 °C
Tipo di protezione IP 24
Dimensioni (AxLxP) 122x47x2,8 cm

60
IT
AVVERTENZE DI SICUREZZA
Leggere e rispettare le seguenti avvertenze di sicurezza, anche se si ha condenza con
il dispositivo. Conservare il manuale d’uso per future consultazioni. Durante l’utilizzo di
un dispositivo elettrico devono essere seguite le avvertenze di sicurezza, incluso quanto
segue:
• Utilizzare solo tensione corrispondente a quella indicata sulla targhetta del
dispositivo.
• Non bloccare le fessure di ventilazione, le aperture di aspirazione e fuoriuscita
dell’aria in nessun modo, in quanto ciò potrebbe causare il surriscaldamento del
dispositivo e pericolo d’incendio.
• Non coprire le fessure di ventilazione, le aperture di aspirazione e fuoriuscita
dell’aria, posizionandolo su una supercie piana. Tutti gli oggetti devono trovarsi
ad almeno 1 metro di distanza su tutti i lati.
• Non posizionare il dispositivo vicino a fonti di calore.
• Non utilizzare il dispositivo in ambienti in cui vengono stoccati benzina, vernici o
altri materiali facilmente inammabili.
• Questo dispositivo diventa estremamente caldo durante il funzionamento. Non
lasciare che la pelle entri in contatto con le superci bollenti. Spegnere il dispositivo
e farlo raffreddare prima di spostarlo.
• Non utilizzare il dispositivo per asciugare biancheria.
• Non inserire corpi estranei e oggetti metallici all’interno del dispositivo o nelle
fessure di ventilazione, in quanto potrebbero risultare folgorazioni, incendi o
danneggiamenti al dispositivo.
• Non immergere il dispositivo in liquidi e non lasciare penetrare liquidi al suo
interno, in quanto potrebbero risultare folgorazioni.
• Non toccare il dispositivo se è caduto in acqua. Spegnere la corrente di tutta la
casa e staccare immediatamente la spina.
• Non utilizzare il dispositivo con cavo o spina danneggiati, dopo un
malfunzionamento, dopo che è stato fatto cadere o è stato danneggiato in
qualunque modo. Far ispezionare il dispositivo a un elettricista per eseguire
eventuali regolazioni elettriche o meccaniche, manutenzione o riparazioni.
• Non utilizzare il dispositivo con le mani bagnate.
• La causa principale di surriscaldamento è l’accumulo di polvere e peluzzi sul
dispositivo. Assicurarsi di rimuovere regolarmente questi depositi staccando la
spina e aspirando le aperture di ventilazione e la griglia.
• Staccare sempre la spina prima di pulire il dispositivo. Non utilizzare prodotti
abrasivi per la pulizia. Pulire con un panno inumidito (non bagnato) con una
soluzione a base di sapone.
• Non collegare il dispositivo alla rete elettrica prima di averlo montato e assemblato
completamente.
• Il dispositivo non è adatto all’uso all’aperto.
• Non utilizzare il dispositivo nelle immediate vicinanze di bagni, docce, piscine o
altri liquidi.
• Utilizzarlo sempre in verticale.
• Spegnere il dispositivo e farlo raffreddare prima di spostarlo.

61
IT
• Non utilizzare il dispositivo con il cavo arrotolato, in quanto potrebbe accumularsi
calore e ciò è sufciente a rappresentare un pericolo.
• Non si consiglia l’utilizzo di una prolunga.
• Non staccare la spina prima di spegnere il dispositivo.
• Non scollegare la spina tirando dal cavo, ma impugnando sempre la spina stessa.
• Staccare la spina se il dispositivo non viene utilizzato
• Questo dispositivo non è adatto all’utilizzo su tappeti a pelo lungo e superci in
occato.
• Non lasciare che durante il funzionamento il cavo di alimentazione entri in contatto
con superci bollenti.
• Non far passare il cavo di alimentazione sotto a tappeti, passatoie, ecc.
Posizionare il cavo al di fuori di zone di passaggio, in modo che non ci si possa
inciampare.
• Non arrotolare, piegare o avvolgere il cavo di alimentazione intorno al dispositivo,
in quanto ciò comporta l’indebolimento dell’isolamento e una possibile rottura.
Assicurarsi di srotolare sempre completamente il cavo.
• Non utilizzare all’aperto o su fondi bagnati.
• Non stoccare il dispositivo nché è caldo.
• Questo dispositivo non deve essere utilizzato da bambini o persone che
necessitano tutela senza il dovuto controllo.
• Tenere sotto controllo i bambini piccoli, in modo che non giochino con il dispositivo.
• Non utilizzare il dispositivo sotto a prese di corrente a parete.
• Non utilizzare il dispositivo con una programmazione, un timer o altri dispositivi
che attivano e spengono il dispositivo. Si corre il rischio di incendi, se il dispositivo
è stato coperto o posizionato erroneamente.
• Non coprire il dispositivo! Pericolo di sovraccarico!
• Per evitare il rischio di folgorazioni, non immergere dispositivo e cavo di
alimentazione in acqua, non esporli a pioggia, umidità o altri liquidi, escluso quello
necessario per il funzionamento.
• La griglia protettiva non è sufciente alla protezione di bambini e persone che
necessitano di tutela.
• Se il cavo di alimentazione è danneggiato, deve essere sostituito da un elettricista,
in modo da evitare pericoli.
• Utilizzare il dispositivo solo secondo gli scopi previsti, come indicato nel manuale
d’uso.
• Si sconsiglia ogni tipo di utilizzo diverso, in quanto potrebbero risultare incendi,
folgorazioni o lesioni di altro tipo.
• Il dispositivo è adatto solo all’uso casalingo e non commerciale o industriale.

62
IT
VOLUME DI CONSEGNA
Dispositivo
Telecomando

63
IT
Materiale di montaggio
Descrizione Immagine Quantità
Supporto a parete 2
Rondella
2
Dado
2
Distanziatore
2
Tassello
4
Vite
4

64
IT
MONTAGGIO
Segnare la posizione dei fori sulla parete. Devono essere mantenute le seguenti
distanze minime:
Dal softto 50 cm
Dal pavimento 15 cm
Sui lati 10 cm
Avvertenza: Pericolo di scosse elettriche
La distanza orizzontale da docce, vasche, lavandini,
ecc. deve essere di almeno 60 cm.
A (mm) B (mm) C (mm) D (mm)
282 250 650 300
Realizzare i fori. Il trapano deve avere una punta del diametro di 8 mm. La profondità
dei fori deve essere di 50 mm. Inserire i tasselli inclusi in consegna.

65
IT
Avvitare i supporti a parete come mostrato in immagine. Utilizzare le viti incluse
in consegna.
1. Mettere la rondella sulla lettatura superiore.
2. Avvitare il dado sulla lettatura per circa 5 mm.
3. Avvitare i distanziatori sulle lettature inferiori.
Agganciare il dispositivo alle lettature superiori dei supporti a parete. Le rondelle
devono trovarsi sul lato interno dei supporti a parete.

66
IT
1. Avvitare i dadi con una chiave da 12 mm.
2. Regolare il contatto alla parete ruotando i distanziatori verso l’interno o l’esterno.
3. Collegare la spina a una presa elettrica adatta.
Il montaggio è concluso.
UTILIZZO
Elementi di controllo
1 Indicazione “Sicura per i bambini”
2 Indicazione “Livello riscaldante
basso”
3 Indicazione “Livello riscaldante alto”
4 Giorno della settimana attuale
5 Indicazione principale
6 Giorni della settimana attivi
7 Indicazione di modalità (modalità
P, W o S)
8 Indicazione oraria
9 Indicazione “Ore non attive”
10 Indicazione “Ore attive”
11 Tasti di controllo

67
IT
Impostare giorno della settimana e ora attuali
Quando si accende il dispositivo, viene attivata la modalità P. In modalità P è possibile
impostare giorno della settimana e ora. In modalità P non è attiva la funzione
riscaldante.
1. Modicare il giorno della settimana impostato premendo SET per 5 secondi. I
giorni della settimana vengono mostrati e basta lasciare andare il tasto quando
compare il giorno corretto.
Il giorno della settimana impostato viene indicato dalle cifre in alto:
1 Lunedì
2 Martedì
3 Mercoledì
4 Giovedì
5 Venerdì
6 Sabato
7 Domenica
1. Modicare l’ora impostata premendo MODE per 5 secondi. Le ore vengono
mostrate e basta lasciare andare il tasto quando compare l’ora corretta.
2. Modicare i minuti impostati premendo MIN per 5 secondi. I minuti vengono
mostrati e basta lasciare andare il tasto quando compaiono i minuti corretti
Impostare il programma settimanale
In modalità W è possibile impostare il programma settimanale. Nei giorni e alle ore
impostati viene attivata la massima potenza riscaldante.
1. Premere SET per passare in modalità W (si accende l’indicazione di modalità W).
2. Selezionare i giorni della settimana in cui deve essere attivato il programma
riscaldante con il tasto MODE. È possibile selezionare un singolo giorno, tutti i
giorni o una combinazione di giorni predenita in fabbrica. I giorni della settimana
in cui viene attivato il programma riscaldante sono segnati dall’indicatore per giorni
della settimana attivi (4). Possono essere impostate le seguenti combinazioni: (1),
(2), (3), (4), (5), (6), (1, 3, 5), (2, 4, 6), (6, 1). (1, 2, 3), (4, s, 6), (1, 2, 3, 4, 5,
6, 7), (1, 2, 3, 4, s), (1, 2, 3, 4, 5, 6), (7).
3. Con i tasti ∧ e ∨ selezionare le ore in cui riscaldare. È possibile scegliere tra
diverse ore impostate in fabbrica (da 0 a 24 ore).
Nota: la selezione delle ore è possibile per 10 secondi dopo l’attivazione della
modalità W. Se si desidera impostare le ore in seguito, abbandonare brevemente la
modalità W premendo SET. Ritornare poi subito in modalità W premendo di nuovo SET.
4. Su ogni indicatore orario (6) si trova un indicatore che dice se in quest’ora viene
riscaldato (8/in alto) oppure no (9/in basso).
5. Nota: il programma settimanale è attivo solo se il prodotto si trova in modalità W.

68
IT
Modalità automatica e mantenimento della temperatura da raggiungere
In modalità S viene mantenuta una temperatura da raggiungere impostata.
1. Premere SET per passare in modalità S (si illumina l’indicatore di modalità S)
Nell’indicazione principale viene indicata a sinistra l’attuale temperatura della stanza. A
destra viene indicata la temperatura da raggiungere.
2. Impostare la temperatura da raggiungere con ∧ e ∨.
• Se la temperatura della stanza corrisponde a quella da raggiungere, il
riscaldamento si spegne.
• Se la temperatura della stanza scende di 2 °C sotto alla temperatura da
raggiungere, si attiva il livello riscaldante basso (si illumina l’indicatore per la
potenza riscaldante bassa (9)).
• Se la temperatura della stanza scende di 4 °C sotto alla temperatura da
raggiungere, si attiva il livello riscaldante alto (si illumina l’indicatore per la
potenza riscaldante alta (10).
Avviare manualmente la funzione riscaldante
Se necessario, è possibile attivare manualmente la funzione riscaldante alta e bassa.
1. Premere SET per passare in modalità S (si illumina l’indicatore di modalità S).
2. Avviare la funzione riscaldante premendo
. Premere di nuovo , per passare da
potenza elevata a bassa. La potenza riscaldante impostata è riconoscibile dagli
indicatori per livello basso (9) e alto (10).
3. Per terminare la funzione riscaldante attivata manualmente, premere SET per
abbandonare la modalità P.
Attivare il conto alla rovescia per lo spegnimento
In modalità S è possibile impostare un conto alla rovescia, allo scadere del quale la
funzione riscaldante viene spenta automaticamente.
1. Premere MODE per mostrare il conto alla rovescia attuale (a destra
nell’indicazione principale).
Avvertenza: se non vengono inseriti valori per 10 secondi, l’indicazione principale
torna a mostrare temperatura della stanza e temperatura da raggiungere.
2. Premere MODE per prolungare di un’ora il contro alla rovescia.
Blocco sicurezza bambini
Per evitare un utilizzo indesiderato da parte di bambini, è possibile attivare l’apposita
sicura. Quando viene attivata, i tasti del dispositivo non reagiscono
• Attivare o disattivare la sicura per bambini premendo per 5 secondi il tasto
.
• Quando la sicura per bambini è attiva, l’indicatore (11) si illumina.

69
IT
TELECOMANDO, SOSTITUZIONE BATTERIA
Blocco di sicurezza
Utilizzo con il telecomando
Prima del primo utilizzo, rimuovere la
pellicola isolante dal vano delle batterie del
telecomando. Il telecomando è dotato di
un altro tasto
. per attivare e disattivare la
sicura per i bambini.
Con il telecomando non è possibile
impostare giorno e ora correnti.
.

70
IT
Avvertenza: pericolo di folgorazione
Staccare la spina prima di pulire il contenitore della polvere.
PULIZIA E MANUTENZIONE
• Prima della pulizia, attendere che il dispositivo si sia raffreddato e staccare la
spina.
• Non utilizzare solventi o prodotti abrasivi. Pulire il dispositivo con un panno
morbido inumidito.
• Rimuovere regolarmente la polvere dalle super ci.
• Vietato immergere il dispositivo in acqua e lavarlo!
• Se il dispositivo non viene utilizzato per lunghi periodi, pulirlo e conservarlo
nell’imballaggio originale.
• Posizionare il dispositivo in locali asciutti e ben ventilati. Evitare umidità e in ussi
meccanici sul dispositivo.

71
IT
PARAMETRI TECNICI
Identicazione del modello (i) 10032942, 10032943
Indicazione Simbolo Valore Unità Indicazione Unità
Potenza termica Solo per gli apparecchi per il riscaldamento
d'ambiente locale elettrici ad accumulo:
Tipo di controllo dell´apporto termico
Potenza termica nominale Pnom
0,85
kW Controllo manuale del carico termico
con termostato integrato
no
Potenza termica minima
(valore indicativo)
Pmin
0,85
kW Controllo manuale del carico termico
con riscontro della temperatura
ambiente e/o esterna
no
Potenza termica
massima continua
Pmax,c
0,85
kW Controllo elettronico del carico termico
con riscontro della temperatura
ambiente e/o esterna
no
Consumo di elettricità ausiliaria
Potenza termica con supporto del ventilatore no
Per la potenza termica
nominale (Motore
del ventilatore)
elmax
n.d.
kW
Tipo di potenza termica / controllo
della temperatura ambiente
Per la potenza termica
minima (Motore
del ventilatore)
elmin
n.d.
kW Potenza termica di un solo livello, senza
controllo della temperatura ambiente
no
In modalità di attesa elSB
0,0008
kW Due o più livelli impostabili manualmente,
senza controllo della temperatura ambiente
no
Con controllo della temperatura ambiente
tramite termostato meccanico
no
Con controllo elettronico della
temperatura ambiente
no
Controllo elettronico della temperatura
ambiente e timer giornaliero
no
Controllo elettronico della temperatura
ambiente e timer settimanale
si
Altre opzioni di controllo
Controllo della temperatura ambiente
con rilevamento di presenza
no
Controllo della temperatura ambiente
con rilevamento di nestre aperte
no
Con opzione telecomando no
Con controllo di avvio adattabile sì
Con limitazione del tempo di funzionamento no
Con sensore lampada nero no
Informazioni di contatto Chal-Tec GmbH, Wallstraße 16, 10179, Berlino, Germania

72
IT
SMALTIMENTO
Se sul prodotto è presente la gura a sinistra (il bidone dei riuti
con le ruote), si applica la direttiva europea 2012/19/UE. Questi
prodotti non possono essere smaltiti con i riuti normali. Informarsi
sulle disposizioni vigenti per la raccolta di dispositivi elettrici ed
elettronici. Attenersi alle disposizioni vigenti e non smaltire i vecchi
dispositivi con i riuti domestici. Grazie al corretto smaltimento dei
vecchi dispositivi si tutela il pianeta e la salute delle disposizioni
vigenti e non smaltire i vecchi dispositivi con i riuti domestici. Grazie
al corretto smaltimento dei vecchi dispositivi si tutela il pianeta e la
salute delle persone da possibili conseguenze negative. Il riciclo di
materiali aiuta a diminuire il consumo di materie prime
Dichiarazione di conformità
Produttore:
Chal-Tec GmbH, Wallstraße 16, 10179 Berlino, Germania.
Questo prodotto è conforme alle seguenti direttive europee:
2009/125/CE (ErP)
2011/65/UE (RoHS)
2014/30/UE (EMC)
2014/35/UE (LVD)


Transcripción de documentos
Hot Spot Crystal IR Infrarot-Heizung Infrared Heater Chauffage à infrarouge Calentador infrarrojo Stufa a infrarossi 10032942 10032943 Hinweis: Das Gerät eigent sich nicht zur Nutzung als primäre Heizquelle. Note: The device is not suitable for use as a primary heat source. Remarque : l‘appareil ne convient pas en tant que source principale de chauffage. Nota: il dispositivo non è idoneo ad essere utilizzato come fonte di riscaldamento primaria. Advertencia: el aparato no es apto para utilizar como fuente de calefacción primaria. DE Sehr geehrter Kunde, wir gratulieren Ihnen zum Erwerb Ihres Gerätes. Lesen Sie die folgenden Hinweise sorgfältig durch und befolgen Sie diese, um möglichen Schäden vorzubeugen. Für Schäden, die durch Missachtung der Hinweise und unsachgemäßen Gebrauch entstehen, übernehmen wir keine Haftung. Scannen Sie den QR-Code, um Zugriff auf die aktuellste Bedienungsanleitung und weitere Informationen rund um das Produkt zu erhalten. INHALT Technische Daten 3 Sicherheitshinweise 4 Lieferumfang 6 Montage 8 Bedienung 10 Fernbedienung, Batteriewechsel 13 Reinigung und Pflege 14 Technische Parameter 15 Hinweise zur Entsorgung 16 TECHNISCHE DATEN Artikelnummer Leistung Stromversorgung Einstellbare Temperatur Schutzart Abmessungen (HxBxT) 10032942 10032943 850 W 220-240 V~ 50/60 Hz 5 bis 40 °C IP 24 122x47x2,8 cm 3 DE SICHERHEITSHINWEISE Lesen und befolgen Sie die folgenden Sicherheitshinweise, selbst wenn Sie sich mit dem Gerät vertraut fühlen. Bewahren Sie die Bedienungsanleitung zum künftigen Nachschlagen auf. Bei der Verwendung eines elektrischen Gerätes müssen die Sicherheitshinweise befolgt werden, einschließlich der Folgenden: • Verwenden Sie ausschließlich die Spannung, die auf dem Typenschild des Gerätes angegeben ist. • Behindern Sie den Luftstrom am Luftein- oder -auslass in keiner Weise, da das Gerät überhitzen und zu einer Brandgefahr werden kann. • Verdecken Sie die Lüftungsschlitze und die Luftein- und -ausgänge nicht, indem Sie das Gerät an eine Fläche stellen. Alle Gegenstände müssen mindestens 1 Meter Abstand nach vorne, zu den Seiten und nach hinten haben. • Stellen Sie das Gerät nicht in der Nähe einer Wärmequelle auf. • Betreiben Sie das Gerät nicht in einer Umgebung, in der Benzin, Farbe oder andere leicht entzündliche Stoffe gelagert werden. • Dieses Gerät wird während der Benutzung heiß. Lassen Sie nackte Haut nicht die heißen Oberfläche berühren. • Vor dem Bewegen ausschalten und abkühlen lassen. • Verwenden Sie das Gerät nicht, um Wäsche zu trocknen. • Führen Sie keine Fremdkörper und Metallgegenstände in das Innere des Gerätes oder die Lüftungsschlitze ein, da dies zu einem Stromschlag, Brand oder einer Gerätebeschädigung kommen kann. • Das Gerät nicht in Flüssigkeiten tauchen oder in das Geräteinnere Wasser laufen lassen, da dies zu einer Stromschlaggefahr führt. • Betreiben Sie das Gerät nicht mit einem beschädigten Netzkabel, Netzstecker, nachdem das Gerät eine Fehlfunktion hatte, fallen gelassen wurde oder in irgendeiner Weise beschädigt wurde. Geben Sie das Gerät dem Elektrofachmann zur Untersuchung, elektrischen oder mechanischen Justierung, Wartung oder Reparatur. • Bedienen Sie das Gerät nicht mit nassen Händen. • Der häufigste Grund für eine Überhitzung ist die Ablagerung von Staub und Fusseln am Gerät. Gewährleisten Sie, dass diese Ablagerungen regelmäßig entfernt werden, indem Sie den Netzstecker ziehen und die Luftöffnungen und den Grill saugen. • Vor dem Reinigen immer den Netzstecker ziehen. Zur Reinigung keine Scheuermittel verwenden. Mit einem feuchten (nicht nassen) Tuch reinigen, das nur in eine Seifenlauge getaucht wurde. • Schließen Sie das Gerät nicht an die Stromversorgung an, bevor es vollständig zusammengebaut wurde. • Das Gerät ist nicht für den Außengebrauch bestimmt. • Verwenden Sie das Gerät nicht in der unmittelbaren Umgebung eines Bades, einer Dusche, eines Schwimmbeckens oder anderer Flüssigkeiten. • Immer in der aufrechten Lage betreiben. • Vor dem Bewegen ausschalten und abkühlen lassen. 4 DE • Nicht mit einem aufgewickelten Kabel betreiben, da sich mit hoher Wahrscheinlichkeit Wärme bildet und ausreicht, um eine Gefahr darzustellen. • Die Verwendung eines Verlängerungskabels wird bei diesem Gerät nicht empfohlen. • Ziehen Sie nicht den Netzstecker, bevor das Gerät ausgeschaltet ist. • Ziehen Sie nicht den Netzstecker aus der Steckdose, indem Sie am Netzkabel ziehen. Immer am Stecker anfassen. • Ziehen Sie den Netzstecker, wenn das Gerät nicht in Benutzung ist. • Dieses Gerät eignet sich nicht zur Benutzung auf Langhaarteppichen oder Flokativorlegern. • Lassen Sie das Netzkabel während des Betriebs nicht mit heißen Oberflächen in Berührung kommen. • Verlegen Sie das Netzkabel nicht unter Teppichen, Vorlegern, Läufern usw. Legen Sie das Netzkabel außerhalb von Gehbereichen, so dass niemand darüber stolpert. • Das Netzkabel nicht verdrehen, verbiegen oder um das Gerät wickeln, da dies dazu führt, dass die Kabelisolierung schwächer wird und bricht. Achten Sie immer darauf, dass das gesamte Netzkabel von der Kabelaufwicklung abgewickelt ist. • Nicht im Freien oder auf einem nassen Untergrund stehend verwenden. • Nicht einlagern, solange das Gerät noch warm ist. • Dieses Gerät eignet sich nicht zur Benutzung durch kleine Kinder oder gebrechliche Personen ohne Betreuung. • Kleine Kinder müssen beaufsichtigt werden, so dass sie mit dem Gerät nicht spielen. • Das Gerät darf nicht unter Wandsteckdosenanschlüssen betrieben werden. • Verwenden Sie das Gerät nicht mit einer Programmierung, Zeitschaltuhr oder einem anderen Gerät, das die Heizung ein- oder ausschaltet. Es besteht eine Brandgefahr, wenn die Heizung abgedeckt wurde oder falsch aufgestellt wurde. • Die Heizung nicht abdecken! Überlastungsgefahr! • Um die Gefahr eines Stromschlags zu vermeiden, das Gerät und das Netzkabel nicht in Wasser tauchen, dem Regen, der Feuchtigkeit oder anderen Flüssigkeit aussetzen, als der, die zum Betrieb des Geräts notwendig sind. • Das Schutzgitter gewährt kleinen Kindern und gebrechlichen Personen keinen vollständigen Schutz. • Wenn das Netzkabel beschädigt ist, muss es von einem qualifizierten Elektriker ersetzt werden, um Gefahren abzuwenden. • Verwenden Sie das Gerät nur zu dem vorbestimmten Zweck, wie in der Bedienungsanleitung beschrieben. • Jeder andere Gebrauch wird nicht empfohlen und kann zu einem Brand, einem Stromschlag oder einer anderen Personenverletzung führen. • Das Gerät ist nur für den Hausgebrauch und nicht für geschäftliche oder industrielle Zwecke bestimmt. 5 DE LIEFERUMFANG Heizkörper Fernbedienung 6 DE Montagematerial Bezeichnung Zeichnung Menge Wandhalterung 2 Unterlegscheibe 2 Mutter 2 Abstandshalter 2 Dübel 4 Schraube 4 7 DE MONTAGE Markieren Sie an der Wand die Bohrlocher. Folgende Mindestabstande mussen eingehalten werden: Zur Decke Zum Boden Seitlich 50 cm 15 cm 10 cm Warnung! Es besteht die Gefahr eines Stromschlags. Der horizontale Abstand zu Duschen, Badewannen, Waschbecken etc. muss mindestens 60 cm betragen. A (mm) B (mm) C (mm) D (mm) 282 250 650 300 Bohren Sie die Locher. Der Bohrer muss einen Durchmesser von 8 mm haben. Die Bohrtiefe betragt 50 mm. Setzen Sie die mitgelieferten Dübel ein. 8 DE Schrauben Sie die Wandhalterungen wie abgebildet an die Wand. Verwenden Sie die mitgelieferten Schrauben. 1. Setzen Sie die Unterlegscheiben auf das obere Gewinde. 2. Schrauben Sie die Muttern ca. 5 mm weit auf das obere Gewinde. 3. Schrauben Sie die Abstandshalter auf die unteren Gewinde. Hängen Sie das Gerät mit den oberen Gewinden auf die Wandhalterungen. Die Unterlegscheiben müssen sich auf den Innenseiten der Wandhalterungen befinden. 9 DE 1. Schrauben Sie die Mutter mit einem 12 mm Schraubenschlüssel fest. 2. Justieren Sie den Wandkontakt, indem Sie die Abstandshalter ein oder aus drehen. Die Abstandshalter der unteren Befestigung müssen sicher an der Wand anliegen. 3. Verbinden Sie den Netzstecker mit einer geeigneten Steckdose. Die Montage ist abgeschlossen. BEDIENUNG Bedienelemente 1 2 3 4 5 6 10 Anzeige „Kindersicherung" Anzeige „niedrige Heizstufe" Anzeige „hohe Heizstufe" Aktueller Wochentag Hauptanzeige Aktive Wochentage 7 Modus-Anzeige ( P,- W -oder S-Modus) 8 Stundenanzeige 9 Anzeige „nicht aktive Stunden" 10 Anzeige „aktive Stunden" 11 Bedientasten DE Aktuellen Wochentag und aktuelle Uhrzeit einstellen Wenn Sie das Gerät einschalten, ist der P-Modus aktiviert. Im P-Modus können Sie den Wochentag und die Uhrzeit einstellen. Im P-Modus findet kein Heizbetrieb statt. 1. Ändern Sie den eingestellten Wochentag, indem Sie die Taste SET für 5 Sekunden gedrückt halten. Ein Durchlauf der Wochentage beginnt Lassen Sie die Taste los, wenn der richtige Wochentag aufleuchtet. Der eingestellte Wochentag wird durch die Zahlen in der oberen Zeile angegeben. 1 2 3 4 5 6 7 Montag Dienstag Mittwoch Donnerstag Freitag Samstag Sonntag 2. Ändern Sie die eingestellte Stunde, indem Sie die Taste MODE für 5 Sekunden gedrückt halten. Ein Durchlauf der Stunden beginnt. Lassen Sie die Taste los, wenn der richtige Stunde angezeigt wird. 3. Ändern Sie die eingestellte Minute, indem Sie die Taste MIN für 5 Sekunden gedrückt halten. Ein Durchlauf der Minuten beginnt. Lassen Sie die Taste los, wenn der richtige Minute angezeigt wird. Wochenprogramm einstellen Im W -Modus können Sie das Wochenprogramm einstellen. An den eingestellten Wochentagen und eingestellten Tagesstunden schattet sich die volle Heizleistung ein. 1. Drücken Sie die Taste SET, um in den W-Modus zu gelangen (Modusanzeige W leuchtet). 2. Wählen Sie durch Drücken der Taste MODE die Wochentage, in denen das Heizprogramm aktiviert werden soll. Sie können zwischen einem einzelnen Tag, allen Tagen, oder einer von Werk aus eingestellten Kombinationen von Tagen wählen. Die Wochentage, an denen das Programm Heizprogramm aktiviert wird, sind mit dem Indikator für aktive Wochentage (4) markiert. Folgende Kombinationen können eingestellt werden: (1), (2), (3), (4), (5), (6), (1, 3, 5), (2, 4, 6), (6, 1). (1, 2, 3), (4, s, 6), (1, 2, 3, 4, 5, 6, 7), (1, 2, 3, 4, s), (1, 2, 3, 4, 5, 6), (7). 3. Wählen Sie durch Drücken der Tasten ∧ und ∨ die Tagesstunden, an denen geheizt werden soll. Sie können aus verschiedenen, werkseitig eingestellten Kombinationen von Stunden wählen (von 0-24 Stunden). Hinweis: Sie konnen die Stundenauswahl fur 10 Sekunden nach dem Aktivieren des W-Modus vornehmen. Sollten Sie danach die Stunden einstellen wollen, verlassen Sie kurz den W-Modus, indem Sie die Taste SET drucken. Kehren Sie unmittelbar danach in den W-Modus zuruck, indem Sie erneut die Taste SET drucken. 11 DE 4. An jedem Stundenindikator (6) befindet sich ein lndikator, ob in dieser Stunde geheizt wird (8/oben) oder ob in dieser Stunde nicht geheizt wird (9/unten). 5. Hinweis: Das Wochenprogramm ist nur alctiviert, wenn sich das Produkt im W-Modus befindet. Automatischer Modus/Soll-Temperatur halten Im S-Modus wird eine vorgegebene Soll-Temperatur gehalten. 1. Drucken Sie die Taste SET, um in den S-Modus zu gelangen. (Modus-lndikator S leuchtet). In der Hauptanzeige wird links die aktuelle Raumtemperatur angezeigt. Rechts in der Anzeige wird die eingestellte Soll-Temperatur angezeigt. 2. Stellen Sie rnit den Tasten ∧ und ∨ die Soll-Ternperatur ein. • Wenn die Raumtemperatur gleich der Solltemperatur ist, schaltet sich der Heizbetrieb aus. • Wenn die Raumtemperatur auf unter 2 °C der Soll-Temperatur abfallt, schaltet sich der schwache Heizbetrieb ein (lndikator fur schwache Heizleistung (9) leuchtet auf). • Wenn die Raumtemperatur auf unter 4 °C der Soll-Temperatur abfallt, schaltet sich der starke Heizbetrieb ein (lndlkator fur starke Heizleistung (10) leuchtet auf). Heizbetrieb manuell starten Sie konnen bei Bedarf den Heizbetrieb mit schwacher oder starker Heizleistung manuell starten. 1. Druck.en Sie die Taste SET, um in den S-Modus zu gelangen. (Modus-lndikator S leuchtet). 2. Starten Sie den Heizbetrieb, indem Sie die Taste drucken. Drucken Sie erneut die Taste , um zwischen schwacher und starker Heizleistung zu wechseln. Mit welcher Heizleistung aktuell geheizt wird konnen Sie an den lndikatoren fur schwache Heizleistung (9) und starke Heizleistung (10) ablesen. 3. Um den manuell gestarteten Heizvorgatng zu beenden, dri.icken Sie die Taste SET, um den P-Modus zu verlassen. Abschalt-Countdown aktivieren. Im S-Modus können Sie einen Countdown einstellen, nach dessen Ablauf der Heizvorgang automatisch abgeschaltet wird. 1. Drücken Sie die Taste MODE, um den aktuellen Countdown anzuzeigen (rechts in der Hauptanzeige). Hinweis: Nach 10 Sekunden ohne Eingabe schaltet die Hauptanzeige zurück zur Anzeige von Raum- und Soll-Temperatur. 2. Drücken Sie die Taste MODE, um den Countdown um eine Stunde zu verlängern. Kindersicherung Um ein versehentliches Bedienen durch Kinder zu verhindern, können Sie eine Kindersicherung aktivieren. Bel aktivierter Kindersicherung reagiert das Produkt nicht auf Tastendrücke. • Schalten Sie die Kindersicherung ein oder aus, indem Sie die Taste für 5 12 DE Sekunden gedrückt halten. • Wenn die Kindersicherung aktiviert Ist, leuchtet der Indikator für die Kindersicherung (11). FERNBEDIENUNG, BATTERIEWECHSEL Bedienung per Fernbedienung Ziehen Sie vor der ersten Verwendung Isolierfolie aus dem Batteriefach der Fernbedienung. Die Fernbedienunaverfügt über eine zusätzliche Taste . mit welcher die Kindersicherung ein- oder ausgeschaltet wird. Mit der Fernbedienung lassen der aktuelle Wochentag und die Zeit sich nicht einstellen. Kindersicherung 13 DE REINIGUNG UND PFLEGE Warnung: Gefahr eines Stromschlags Ziehen Sie vor der Reinigung des Staubbehälters den Netzstecker. • Warten Sie vor der Reinigung, bis das Gerät abgekühlt ist und ziehen Sie den Netzstecker. • Verwenden Sie keine Schleif- und Lösungsmittel. Wischen Sie das Produkt mit einem weichen, feuchten Tuch ab. • Sie müssen die Oberfläche regelmäßig von Staub befreien. • Das Waschen und Einlegen des Gerätes in Wasser ist verboten! • Wenn Sie die Heizung für längere Zeit nicht benutzen, wischen Sie sie ab und bewahren Sie das Gerät in der Verpackung auf. • Das Gerät sollte in einem trockenen, belüfteten Raum aufgestellt werden. Vermeiden Sie hohe Luftfeuchtigkeit und mechanische Einwirkungen auf das Gerät. 14 DE TECHNISCHE PARAMETER Modellkennung(en) 10032942, 10032943 Angabe Symbol Wert Einheit Wärmeleistung Angabe Einheit Nur bei elektrischen Speicher-Einzelraumheizgeräten: Art der Regelung der Wärmezufuhr Nennwärmeleistung Pnom 0,85 kW Manuelle Regelung der Wärmezufuhr mit integriertem Thermostat nein Mindestwärmeleistung (Richtwert) Pmin 0,85 kW Manuelle Regelung der Wärmezufuhr mit Rückmeldung der Raum- und/ oder Außentemperatur nein Maximale kontinuierliche Wärmeleistung Pmax 0,85 kW Elektronische Regelung der Wärmezufuhr mit Rückmeldung der Raum- und/ oder Außentemperatur nein Wärmeabgabe mit Gebläseunterstützung nein Bei Nennwärmeleistung (Ventilator-Motor) elmax n.a. kW Art der Wärmeleistung/Raumtemperaturkontrolle Bei Mindestwärmeleistung (Ventilator-Motor) elmin n.a. kW Einstufige Wärmeleistung, keine Raumtemperaturkontrolle nein Im Bereitschaftszustand elSB 0,0008 kW Zwei oder mehr manuell einstellbare Stufen, keine Raumtemperaturkontrolle nein Raumtemperaturkontrolle mit mechanischem Thermostat nein Mit elektronischer Raumtemperaturkontrolle nein Mit elektronischer Raumtemperaturkontrolle und Tageszeitregelung nein Mit elektronischer Raumtemperaturkontrolle und Wochentagsregelung ja Hilfsstromverbrauch Sonstige Regelungsoptionen Raumtemperaturkontrolle mit Präsenzerkennung nein Raumtemperaturkontrolle mit Erkennung offener Fenster nein Mit Fernbedienungsoption nein Mit adaptiver Regelung des Heizbeginns Kontaktangaben ja Mit Betriebszeitbegrenzung nein Mit Schwarzkugelsensor nein Chal-Tec GmbH, Wallstraße 16, 10179, Berlin, Deutschland 15 DE HINWEISE ZUR ENTSORGUNG Befindet sich die linke Abbildung (durchgestrichene Mülltonne auf Rädern) auf dem Produkt, gilt die Europäische Richtlinie 2012/19/EU. Diese Produkte dürfen nicht mit dem normalen Hausmüll entsorgt werden. Informieren Sie sich über die örtlichen Regelungen zur getrennten Sammlung elektrischer und elektronischer Gerätschaften. Richten Sie sich nach den örtlichen Regelungen und entsorgen Sie Altgeräte nicht über den Hausmüll. Durch die regelkonforme Entsorgung der Altgeräte werden Umwelt und die Gesundheit Ihrer Mitmenschen vor möglichen negativen Konsequenzen geschützt. Materialrecycling hilft, den Verbrauch von Rohstoffen zu verringern. Konformitätserklärung Hersteller: Chal-Tec GmbH, Wallstraße 16, 10179 Berlin Dieses Produkt entspricht den folgenden Europäischen Richtlinien: 2009/125/EG (ErP) 2011/65/EU (RoHS) 2014/30/EU (EMV) 2014/35/EU (LVD) 16 EN Dear Customer, Congratulations on purchasing this equipment. Please read this manual carefully and take care of the following hints to avoid damages. Any failure caused by ignoring the mentioned items and cautions mentioned in the instruction manual are not covered by our warranty and any liability. Scan the QR code to get access to the latest user manual and other information about the product. CONTENTS Technical Data 17 Safety Instructions 18 Scope of Supply 20 Installation 22 Operation 24 Cleannig and Care 27 technical parameters 28 Disposal Considerations 29 TECHNICAL DATA Item number Power Power supply Adjustable temperature Protection class Measurements (HxWxD) 10032942 10032943 850 W 220-240 V~ 50/60 Hz 5 - 40 °C IP 24 122x47x2,8 cm 17 EN SAFETY INSTRUCTIONS Read and follow all the instructions in this manual, even if you feel familiar with the unit. Keep the instruction manual for future reference. When using an electrical device, the safety instructions must be followed, including the following: • Only use the voltage indicated on the nameplate of the heater. • Do not obstruct the airflow at the air inlet or outlet in any way as the unit may overheat and become a fire hazard. • Do not cover the ventilation slots or the air inlets and outlets by placing the unit against a surface. All objects must be at least 1 meter away from the front, sides, and rear. • Do not place the appliance near a heat source. • Do not operate the unit in an environment where petrol, paint or other easily flammable substances are stored. • This equipment will become hot during use. Do not allow bare skin to touch the hot surface. • Switch off and allow to cool before moving. • Do not use the appliance to dry laundry. • Do not insert foreign objects or metal objects into the interior of the appliance or the ventilation slots as this may result in electric shock, fire or damage to the appliance. • Do not immerse the appliance in liquid or allow water to run inside as this may result in electric shock. • Do not operate the equipment with a damaged power cord, plug, or socket after the equipment has malfunctioned, been dropped, or is damaged in any way. Refer the product to an authorized electrician for inspection, electrical or mechanical adjustment, maintenance, or repair. • Do not operate the equipment with wet hands. • The most common cause of overheating is the buildup of dust and lint on the product. Ensure that these deposits are regularly removed by pulling the power plug and vacuuming the air vents and grill. • Always unplug the appliance before cleaning. Do not use abrasive cleaners for cleaning. Clean with a damp (not wet) cloth that has only been dipped in soapy water. • Do not connect the appliance to the power supply until it has been fully assembled. • The unit is not intended for outdoor use. • Do not use the unit in the immediate vicinity of a bath, shower, swimming pool or other liquid. • Always operate in an upright position. • Switch off and allow to cool before moving. • Do not operate with a coiled cable as heat is highly likely to form and is sufficient to constitute a hazard. 18 EN • The use of an extension cord is not recommended for this unit. • Do not unplug the power cord until the power is turned off. • Do not unplug the power cord from the outlet by pulling on the power cord. Always touch the plug. • Disconnect the power plug when the unit is not in use. • This appliance is not suitable for use on long hair carpets or flocative rugs. • Do not allow the power cord to come into contact with hot surfaces during operation. • Do not install the power cord under carpets, rugs, runners, etc. Place the power cord outside walking areas so that no one can trip over it. • Do not twist, bend, or wrap the power cord around the product as this may cause the cord insulation to weaken and break. Always ensure that the entire power cord is unwound from the cable winder. • Do not use outdoors or on a wet surface. • Do not store while the unit is still warm. • This equipment is not intended for use by small children or infirm persons without care. • Young children must be supervised so that they do not play with the device. • The unit must not be operated under wall outlets. • Do not use the appliance with any programming, timer or other device that switches the heater on or off. There is a risk of fire if the heater is covered or incorrectly installed. • Do not cover the heater! Danger of overload! • To avoid the risk of electric shock, do not immerse the appliance and power cord in water, rain, moisture or liquids other than those required to operate the appliance. • The safety guard does not provide complete protection for small children and infirm persons. • If the power cord is damaged, it must be replaced by a qualified electrician to prevent hazards. • Use the device only for the intended purpose as described in the operating instructions. • Any other use is not recommended and may result in fire, electric shock, or other personal injury. • This equipment is intended for domestic use only and not for commercial or industrial use. 19 EN SCOPE OF SUPPLY Heater body Remote control 20 EN Mounting material Name Illustration Quantity Wandhalterung 2 Unterlegscheibe 2 Mutter 2 Abstandshalter 2 Dübel 4 Schraube 4 21 EN INSTALLATION Mark the drill holes on the wall. The following minimum distances must be observed: To the ceiling To the floor To the sides 50 cm 15 cm 10 cm Warning! Risk of electic schock The horizontal distance to showers, bathtubs, washbasins etc. must be at least 60 cm. A (mm) B (mm) C (mm) D (mm) 282 250 650 300 Drill the holes. The drill must have a diameter of 8 mm. The drilling depth is 50 mm. Insert the supplied dowels. 22 EN Screw the wall brackets to the wall as shown. Use the supplied screws. 1. Place the washers on the upper thread. 2. Screw the spacers onto the lower threads.. 3. Hang the product with the upper threads on the wall brackets. The washers must be located on the inside of the wall brackets. 23 EN 1. Tighten the nut with a 12-mm spanner. 2. Adjust the wall contact by turning the spacers on or off. The spacers of the lower fastening must lie securely against the wall. 3. Connect the mains plug to a suitable socket. The installation is finished! OPERATION Control panel 1 2 3 4 5 6 24 Childlock indicator Low heating level indicator High heating level" indicator Current day of the week Main display Active weekdays 7 8 9 10 11 Mode display( P, W or S mode) Hour display Displaying: inactive hours Displaying: active hours" Operating buttons EN Setting the current day of the week and time When you turn on the unit, P mode is activated. In P mode, you can set the day of the week and the time. In P mode there is no heating operation instead of. 1. Change the day of the week by pressing and holding the SET button for 5 seconds. Let go of the button when the correct day of the week lights up. The day of the week is indicated by the numbers in the upper line. 1 2 3 4 5 6 7 Monday Tuesday Wednesday Thursday Friday Saturday Sunday 2. Change the set hour by pressing and holding the MODE button for 5 seconds. A run of the hours begins. Release the button when the correct hour is displayed.. 3. Change the set minute by pressing and holding the MIN button for 5 seconds. A run of minutes begins. Release the button when the correct minute is displayed. Setting the weekly program In W mode, you can set the weekly program. On the set days of the week and set hours of the day, the full heating capacity is shaded. 1. Press the SET button to enter W mode (W mode indicator lights up). 2. Select the days of the week on which the heating program is to be activated by pressing the MODE button. You can choose between a single day, all days, or a combination of days set at the factory. The days of the week on which the heating program is activated are marked with the indicator for active weekdays (4). The following combinations can be set. (1), (2), (3), (4), (5), (6), (1, 3, 5), (2, 4, 6), (6, 1). (1, 2, 3), (4, s, 6), (1, 2, 3, 4, 5, 6, 7), (1, 2, 3, 4, s), (1, 2, 3, 4, 5, 6), (7). 3. Press the keys ∧ and ∨ to select the hours of the day when you want to heat. You can choose from various factory-set combinations of hours (from 0-24 hours). Note: You can select the hours for 10 seconds after activating the W mode. If you then want to set the hours, briefly exit W mode by pressing the SET key. Return to W mode immediately afterwards by pressing the SET button again. 4. On each hour indicator (6) there is an indicator whether heating is in this hour (8/ up) or whether heating is not in this hour (9/down). 5. Note: The weekly program is only activated if the product is in the W mode. 25 EN Automatic mode/setpoint temperature maintenance 1. In S mode, a preset target temperature is maintained. Press the SET button to enter the S mode. (Mode indicator S lights up). The current room temperature is displayed on the left of the main display. The set t arget temperature is shown on the right of the display. • Set the target literature using the keys ∧ and ∨. • If the room temperature is equal to the setpoint temperature, the heating mode switches off. • If the room temperature drops below 2 -c of the setpoint temperature, the weak heating mode is switched on (low heat indicator (9) lights up). If the room temperature drops below 4 -c of the setpoint temperature, the strong heating operation is switched on (indicator for strong heating power (10) lights up). Starting heating operation manually If required, you can start heating operation manually with low or high heating power. 1. Press the SET button to enter the S mode. (Mode indicator S lights up). 2. Start the heating mode by pressing the key . Press the button again to switch between low and high heating power. The current heating capacity can be seen from the indicators for low heating capacity (9) and high heating capacity (10). 3. To end the manually started heating process, press the SET key to exit P mode. Start switch-off timer In S mode, you can set a countdown after which the heating process is automatically switched off. 1. Press the MODE button to display the current countdown (right in the main display). Note: After 10 seconds without input, the main display returns to the display of room and setpoint temperature. 2. Press the MODE button to extend the countdown by one hour. Childlock To prevent accidental operation by children, you can activate a childlock. When childlock is activated, the product does not respond at the touch of a button. • Press and hold the button for 5 seconds to turn the childlock on or off. • When the childlock is activated, the childlock indicator (11) lights up. 26 EN CLEANNIG AND CARE Warning: Danger of electric shock Unplug the power cord before cleaning. • • • • • Before cleaning the item wait when it cools down and plug out Do not use abrasives and solvents. Wipe the product with soft wet cloth It is necessary to remove dust from the surface regularly Washing the item and placing it in water is forbidden! If you are going not to use heater for long time, wipe it surface and put the item in color box. • It should be placed in dry ventilated room. Avoid high humidity and mechanical impact on the item. 27 TECHNICAL PARAMETERS Model identifier(s): 10032942, 10032943 Item Symbol Value Unit Heat output Item Unit Type of heat input, for electric storage local space heaters only Nominal heat output Pnom 0.85 kW manual heat charge control, with integrated thermostat NO Minimum heat output (indicative) Pmin 0.85 kW manual heat charge control with room and/or outdoor temperature feedback NO Maximum continuous heat output Pmax 0.85 kW electronic heat charge control with room and/or outdoor temperature feedback NO fan assisted heat output NO Auxiliary electricity consumption At nominal heat output (fan motor) elmax N/A kW Type of heat output/room temperature control At minimum heat output (fan motor) elmin N/A kW single stage heat output and no room temperature control NO In standby mode elSB 0.0008 kW Two or more manual stages, no room temperature control NO with mechanic thermostat room temperature control NO with electronic room temperature control NO electronic room temperature control plus day timer NO electronic room temperature control plus week timer YES Other control options (multiple selections possible) Contact details room temperature control, with presence detection NO room temperature control, with open window detection NO with distance control option NO with adaptive start control YES with working time limitation NO with black bulb sensor NO Chal-Tec GmbH, Wallstraße 16, 10179, Berlin, Germany DISPOSAL CONSIDERATIONS According to the European waste regulation 2012/19/EU this symbol on the product or on its packaging indicates that this product may not be treated as household waste. Instead it should be taken to the appropriate collection point for the recycling of electrical and electronic equipment. By ensuring this product is disposed of correctly, you will help prevent potential negative consequences for the environment and human health, which could otherwise be caused by inappropriate waste handling of this product. For more detailed information about recycling of this product, please contact your local council or your household waste disposal service. Declaration of Conformity Producer: Chal-Tec GmbH, Wallstraße 16, 10179 Berlin. Germany This product is conform to the following European Directives: 2009/125/EG (ErP) 2011/65/EU (RoHS) 2014/30/EU (EMC) 2014/35/EU (LVD) EN 30 FR Chère cliente, cher client, Toutes nos félicitations pour l’acquisition de ce nouvel appareil. Veuillez lire attentivement et respecter les instructions de ce mode d’emploi afin d’éviter d’éventuels dommages. Nous ne saurions être tenus pour responsables des dommages dus au non-respect des consignes et à la mauvaise utilisation de l’appareil. Scannez le QRCode pour obtenir la dernière version du mode d‘emploi et à d‘autres informations concernant le produit. SOMMAIRE Fiche technique 31 Consignes de sécurité 32 Contenu de l‘emballage 34 Montage 36 Utilisation 38 Télécommande et remplacement des piles 41 Nettoyage et entretien 42 Fiche de données produit 43 Informations sur le recyclage 44 FICHE TECHNIQUE Numéro d'article Puissance Alimentation 10032942 10032943 850 W 220-240 V~ 50/60 Hz Température réglable de 5 à 40 °C Norme de protection IP 24 Dimensions (HxLxP) 122x47x2,8 cm 31 FR CONSIGNES DE SÉCURITÉ Lisez et suivez les consignes de sécurité ci-dessous, même si vous vous sentez familiarisé avec l‘appareil. Conservez le mode d‘emploi pour référence ultérieure. Lors de l‘utilisation d‘un appareil électrique, les consignes de sécurité doivent être respectées, y compris les suivantes : • Utilisez uniquement la tension indiquée sur la plaque signalétique de l‘appareil. • N‘obstruez pas la circulation d’air à l’entrée ou à la sortie, car l’appareil risque de surchauffer et de présenter un risque d’incendie. • Ne recouvrez pas les fentes d‘aération et les entrées et sorties d‘air en plaçant l‘unité contre une surface. Tous les objets doivent être à au moins 1 mètre de l‘avant, des côtés et du dos de l‘appareil. • Ne placez pas l‘appareil près d‘une source de chaleur. • N‘utilisez pas l‘appareil dans un environnement où de l‘essence, de la peinture ou d‘autres substances facilement inflammables sont stockées. • Cet appareil devient chaud pendant l’utilisation. Ne laissez pas la peau nue entrer en contact avec les surfaces chaudes. • Éteignez et laissez refroidir l‘appareil avant de le déplacer. • N‘utilisez pas l‘appareil pour sécher le linge. • N‘insérez pas de corps étrangers ou d‘objets métalliques à l‘intérieur de l‘appareil ou des ouvertures d‘aération, car cela pourrait provoquer un choc électrique, un incendie ou endommager l‘appareil. • N‘immergez pas l‘appareil dans des liquides et n‘en laissez pas pénétrer à l‘intérieur de l‘appareil, car cela pourrait provoquer un choc électrique. • N‘utilisez pas l‘appareil avec un cordon d‘alimentation ou une prise d‘alimentation endommagés, après un dysfonctionnement, une chute ou un dégât quelconque. Confiez l‘appareil à un électricien pour examen, réglage électrique ou mécanique, entretien ou réparation. • N‘utilisez pas l‘appareil avec les mains mouillées. • La cause la plus courante de surchauffe est l‘accumulation de poussière et de peluches sur l’appareil. Assurez-vous que ces dépôts sont éliminés régulièrement en débranchant la fiche d‘alimentation pour aspirer les ouvertures et la grille d‘aération. • Débranchez toujours l‘appareil avant de le nettoyer. N‘utilisez pas de produits abrasifs pour le nettoyage. Nettoyez l‘appareil avec un chiffon humide (pas mouillé) trempé dans une solution savonneuse. • Ne connectez pas l‘appareil à l‘alimentation avant l‘assemblage complet. • L‘appareil n‘est pas conçu pour être utilisé à l‘extérieur. • N‘utilisez pas l‘appareil à proximité immédiate d‘une baignoire, d‘une douche, d‘une piscine ou d‘autres liquides. • Utilisez toujours l‘appareil en position verticale. • Éteignez-le et laissez-le refroidir avant de le déplacer. • Ne faites pas fonctionner l‘appareil avec le câble enroulé car il est très probable que de la chaleur se dégage en quantité suffisante pour présenter un danger • L‘utilisation d‘une rallonge n‘est pas recommandée pour cet appareil. • Ne débranchez pas le cordon d’alimentation avant d‘avoir éteint l’appareil. 32 FR • • • • • • • • • • • • • • • • • • • Ne débranchez pas l‘alimentation en tirant sur le cordon. Tenez toujours la fiche. Débranchez la fiche d‘alimentation lorsque l‘appareil n‘est pas utilisé. Cet appareil ne doit pas être utilisé sur un tapis à poils longs ou flokati. Ne laissez pas le cordon d’alimentation entrer en contact avec des surfaces chaudes pendant le fonctionnement. Ne faites pas passer le cordon d‘alimentation sous un tapis, un paillasson, une moquette, etc. Placez le cordon d‘alimentation hors des lieux de passage afin que personne ne trébuche dessus. Ne tordez pas, ne pliez pas et n’enroulez pas le cordon d’alimentation autour de l’appareil, car cela risquerait d’affaiblir l’isolation du câble et de le casser. Vérifiez toujours que le cordon d‘alimentation est entièrement déroulé. Ne pas utiliser à l‘extérieur ou sur une surface humide. Ne pas ranger l’appareil encore chaud. Cet appareil ne convient pas aux jeunes enfants ou aux personnes handicapées non accompagnées. Les enfants en bas âge doivent être surveillés afin qu’ils ne jouent pas avec l’appareil. L‘appareil ne doit pas être installé sous une prise murale. N‘utilisez pas l‘appareil avec une programmation, une minuterie ou tout autre appareil qui allume ou éteint le chauffage à distance. Il y a risque d‘incendie si l‘appareil a été recouvert ou est mal installé. Ne couvrez pas le radiateur ! Risque de surcharge ! Afin de réduire les risques d‘électrocution, ne pas immerger l‘appareil et le cordon d‘alimentation dans l‘eau ni les exposer à la pluie, à l‘humidité ou à tout autre liquide que ceux nécessaires pour faire fonctionner l‘appareil. La grille de protection ne garantit pas une protection complète des nourrissons et personnes handicapées. Si le cordon d‘alimentation est endommagé, il doit être remplacé par un électricien qualifié pour éviter tout danger. N‘utilisez l‘appareil qu‘aux fins prévues et décrites dans le mode d‘emploi. Toute autre utilisation est déconseillée et peut provoquer un incendie, une électrocution ou d‘autres blessures. L‘appareil est destiné à un usage domestique uniquement et non à des fins professionnelles ou industrielles. 33 FR CONTENU DE L‘EMBALLAGE Radiateur Télécommande 34 FR Matériel de montage Description Illustration Quantité Support mural 2 Rondelle 2 Ecrou 2 Entretoise 2 Cheville 4 Vis 4 35 FR MONTAGE Marquez les perçages sur le mur. Les distances minimales suivantes doivent être respectées: Du plafond Du sol Sur les côtés 50 cm 15 cm 10 cm Mise en garde ! Il existe un risque d'électrocution La distance horizontale entre les douches, les baignoires, les lavabos, etc. doit être d'au moins 60 cm. A (mm) B (mm) C (mm) D (mm) 282 250 650 300 Percez les trous. Utilisez un foret de diamètre 8 mm. La profondeur de perçage est de 50 mm. Insérez les chevilles fournies. 36 FR Vissez les supports muraux au mur comme indiqué. Utilisez les vis fournies. 1. Placez les rondelles sur le filetage supérieur. 2. Vissez les écrous d'environ 5 mm sur le filetage supérieur. 3. Vissez les entretoises sur les filetages inférieurs. Accrochez l'appareil avec les filetages supérieurs sur les supports muraux. Les rondelles doivent être à l'intérieur des supports muraux. 37 FR 1. Serrez l’écrou avec une clé de 12 mm. 2. Ajustez le contact du mur en vissant ou dévissant les entretoises Les entretoises de la fixation inférieure doivent reposer fermement contre le mur. 3. Connectez la fiche d’alimentation à une prise secteur appropriée Le montage est terminé. UTILISATION Eléments de commande 1 2 3 4 5 6 38 Témoin de "verrouillage parental" Témoin de "chauffage basse puissance" Témoin de "chauffage haute puissance" Jour de la semaine actuel Affichage principal Jours de semaine actifs 7 8 9 10 11 Affichage du mode (Mode P, W ou S) Affichage des heures Affichage des "heures actives" Touches de commande FR Réglage du jour de la semaine et de l'heure Lorsque vous allumez l'appareil, le mode P est activé. En mode P, vous pouvez définir le jour de la semaine et l'heure. En mode P, aucun chauffage n'est produit. 1. Changez le jour de la semaine en appuyant sur le bouton SET pendant 5 secondes. Les jours de semaine sont parcourus. Relâchez le bouton lorsque le jour correct de la semaine est activé. Le jour défini de la semaine est indiqué par les chiffres dans la ligne supérieure. 1 2 3 4 5 6 7 Lundi Mardi Mercredi Jeudi Vendredi Samedi Dimanche 2. Modifiez l'heure en appuyant sur le bouton MODE pendant 5 secondes. Un balayage des heures commence. Relâchez le bouton lorsque l'heure correcte est affichée. 3. Modifiez les minutes en maintenant le bouton MIN enfoncé pendant 5 secondes. Un balayage de minutes commence. Relâchez le bouton lorsque les minutes correctes sont affichées. Programmation hebdomadaire En mode W, vous pouvez définir le programme hebdomadaire. Aux jours définis de la semaine et aux heures définies de la journée, le chauffage s'allume. 1. Appuyez sur le bouton SET pour accéder au mode W (le témoin du mode W s’allume). 2. Appuyez sur le bouton MODE pour sélectionner les jours de la semaine pendant lesquels le programme de chauffage doit être activé. Vous pouvez choisir entre une seule journée, tous les jours ou une combinaison de jours prédéfinie. Les jours de la semaine pendant lesquels le programme de chauffage du programme est activé sont signalés par l'indicateur des jours actifs de la semaine (4). Vous pouvez choisir parmi les combinaisons suivantes : (1), (2), (3), (4), (5), (6), (1, 3, 5), (2, 4, 6), (6, 1). (1, 2, 3), (4, s, 6), (1, 2, 3, 4, 5, 6, 7), (1, 2, 3, 4, s), (1, 2, 3, 4, 5, 6), (7). 3. Appuyez sur les boutons ∧ et ∨ pour sélectionner les heures de la journée que vous souhaitez chauffer. Vous pouvez choisir parmi plusieurs combinaisons d'heures prédéfinies (de 0 à 24 heures). Remarque : Vous pouvez définir la sélection des heures pendant 10 secondes après l'activation du mode W. Si vous souhaitez régler les heures après ce délai, quittez brièvement le mode W en appuyant sur le bouton SET. Revenez immédiatement au mode W en appuyant à nouveau sur le bouton SET 4. Pour chaque heure (6), un indicateur précise si le chauffage est activé (8 / 39 FR au-dessus) ou s'il n'y aura pas de chauffage activé pendant cette heure (9 / audessous). 5. Remarque : le programme hebdomadaire est activé uniquement lorsque le produit est en mode W. Mode automatique /maintien d'une température cible En mode S, une température cible prédéterminée est maintenue. 1. Appuyez sur le bouton SET pour accéder au mode S. (L'indicateur de mode S s'allume). Sur l'écran principal, la température ambiante actuelle est affichée à gauche. Sur la droite de l'écran, la température cible définie est affichée. • Si la température ambiante est égale à la température définie, le chauffage s’éteint. • Lorsque la température de la pièce descend en dessous de 2°C de la température définie, le mode basse température s’allume (le témoin de basse température (9) s’allume). • Lorsque la température de la pièce tombe en dessous de 4 ° C de la température définie, le mode de chauffage élevé s’active (l’indicateur de température élevée (10) s'allume. Démarrer manuellement le chauffage Si nécessaire, vous pouvez démarrer manuellement le chauffage avec une puissance faible ou élevée. 1. Appuyez sur le bouton SET pour accéder au mode S. (L'indicateur de mode S s'allume). 2. Démarrez le chauffage en appuyant sur la touche . Appuyez à nouveau sur le bouton , pour basculer entre les puissances basse et élevée. Les indicateurs de faible puissance calorifique (9) et de puissance calorifique élevée (10) vous indiquent le mode en cours d'utilisation. 3. Pour quitter le mode de chauffage manuel, appuyez sur le bouton SET pour quitter le mode P. Activation de la minuterie d'arrêt. En mode S, vous pouvez définir un compte à rebours au bout duquel le chauffage est automatiquement désactivé. 1. Appuyez sur le bouton MODE pour afficher le compte à rebours en cours (sur le côté droit de l'écran principal. Remarque : Après 10 secondes sans entrée, l'affichage principal retourne à l'affichage de la température ambiante et de la température cible. 2. Appuyez sur le bouton MODE pour prolonger le compte à rebours d'une heure. Verrouillage parental Pour éviter une utilisation accidentelle par des enfants, vous pouvez activer le verrouillage parental. Si le verrouillage parental est activé, le produit ne répondra pas aux commandes. • Activez ou désactivez le verrouillage parental en appuyant sur le bouton pendant 5 secondes. 40 FR • Lorsque le verrouillage parental est activé, le témoin correspondant s’allume (11). TÉLÉCOMMANDE ET REMPLACEMENT DES PILES Utilisation avec la télécommande Retirez la feuille isolante du compartiment à piles de la télécommande avant la première utilisation. La télécommande possède un bouton supplémentaire . avec lequel vous pouvez activer ou désactiver le verrouillage parental. Avec la télécommande, vous ne pouvez pas régler le jour actuel de la semaine et l'heure. Verrouillage parental 41 FR NETTOYAGE ET ENTRETIEN Mise en garde : risque de choc électrique Débranche z toujours la fiche secteur avant de nettoyer le bac à poussière. • Avant de nettoyer l'appareil, attendez qu'il refroidisse et débranchez le cordon d’alimentation. • N'utilisez pas de produits abrasifs ou de solvants. Essuyez le produit avec un chiffon doux et humide. • Vous devez régulièrement retirer la poussière de la surface. • Il est interdit de laver l'appareil à l'eau et de l'y plonger ! • Si vous n'utilisez pas le radiateur pendant une longue période, essuyez-le et rangez-le dans son emballage. • L'appareil doit être installé dans un endroit sec et ventilé. Evitez l'humidité et les contraintes mécaniques élevées sur l'appareil. 42 FR FICHE DE DONNÉES PRODUIT Référence (s) du produit 10032942, 10032943 Donnée Symbole Valeur Unité Puissance calorifique Donnée Unité Uniquement pour les radiateurs électriques à accumulation : Type de régulation de l'apport de chaleur Puissance calorifique nominale Pnom 0,85 kW Régulation manuelle de l'apport de chaleur avec thermostat intégré non Puissance calorifique minimale (indicative) Pmin 0,85 kW Régulation manuelle de l'apport de chaleur avec indication de la température de la pièce et/ou de l'extérieur non Puissance maximale continue de chauffage Pmax,c 0,85 kW Régulation électronique de l'apport de chaleur avec indication de la température de la pièce et/ou de l'extérieur non Apport de chaleur assisté par ventilateur non Type de chauffage/contrôle de la température de la pièce Consommation de courant auxiliaire A puissance calorifique nominale (moteur de ventilateur) elmax n.c kW A puissance calorifique minimale (moteur de ventilateur) elmin n.c kW Chauffage à une seule vitesse, pas de contrôle de la température ambiante non En mode veille elSB 0,0008 kW Deux vitesses ou plus réglables manuellement, pas de contrôle de la température ambiante non Contrôle de la température ambiante par thermostat mécanique non Contrôle électronique de la température ambiante non Contrôle électronique de la température ambiante et régulation par jour non Contrôle électronique de la température ambiante et régulation par semaine oui Autres options de régulation Coordonnées de contact Contrôle de la température ambiante avec détection de présence non Contrôle de la température ambiante avec détection de fenêtre ouverte non Avec option télécommande non Avec contrôle du démarrage du chauffage oui Avec limitation de la durée de fonctionnement non Avec globe noir capteur de température non Chal-Tec GmbH, Wallstraße 16, 10179, Berlin, Allemagne 43 FR INFORMATIONS SUR LE RECYCLAGE Vous trouverez sur le produit l’image ci-contre (une poubelle sur roues, barrée d‘une croix), ce qui indique que le produit se trouve soumis à la directive européenne 2012/19/UE. Renseignez-vous sur les dispositions en vigueur dans votre région concernant la collecte séparée des appareils électriques et électroniques. Respectez-les et ne jetez pas les appareils usagés avec les ordures ménagères. La mise en rebut correcte du produit usagé permet de préserver l’environnement et la santé. Le recyclage des matériaux contribue à la préservation des ressources naturelles. Déclaration de conformité Fabricant : Chal-Tec GmbH, Wallstraße 16, 10179 Berlin Ce produit est conforme aux directives européennes suivantes : 2009/125/CE (ErP) 2011/65/UE (RoHS) 2014/30/UE (CEM) 2014/35/UE (LVD) 44 ES Estimado cliente: Le felicitamos por la adquisición de este producto. Lea atentamente el siguiente manual y siga cuidadosamente las instrucciones de uso con el fin de evitar posibles daños. La empresa no se responsabiliza de los daños ocasionados por un uso indebido del producto o por haber desatendido las indicaciones de seguridad. Escanee el código QR para obtener acceso al manual de usuario más reciente y otra información sobre el producto: ÍNDICE Datos técnicos 45 Indicaciones de seguridad 46 Envío 48 Montaje 50 Funcionamiento 52 Mando a distancia, cambio de pilas 55 Limpieza y cuidado 56 Hoja de datos del producto 57 Retirada del aparato 58 DATOS TÉCNICOS Número de artículo Potencia Alimentación 10032942 10032943 850 W 220-240 V~ 50/60 Hz Temperatura ajustable 5 - 40 °C Grado de protección IP 24 Dimensiones (AnchoxAltoxLargo) 122x47x2,8 cm 45 ES INDICACIONES DE SEGURIDAD Lea y siga las siguientes indicaciones de seguridad, incluso cuando ya se haya familiarizado con el aparato. Conserve este manual de instrucciones para futuras consultas. Cuando utilice dispositivos eléctricos, debe seguir las indicaciones de seguridad, incluidas las siguientes: • Utilice exclusivamente la tensión que aparece especificada en la placa técnica del aparato. • No obstruya la corriente de aire en las salidas y entradas de aire de ningún modo, ya que el aparato puede sobrecalentarse y provocar un incendio. • Cuando coloque el aparato en una superficie, no cubra las ranuras de ventilación ni las salidas y entradas de aire. Todos los objetos deben situarse como mínimo a 1 metro de distancia hacia los lados y hacia delante y atrás. • No coloque el aparato cerca de fuentes de calor. • No ponga el aparato en marcha en un entorno donde se almacene gasolina, pintura u otras sustancias fácilmente inflamables. • El aparato alcanza temperaturas elevadas durante su uso. No toque las superficies calientes con la piel desnuda. • Antes de transportar el aparato, apáguelo y deje que se enfríe. • No utilice el aparato para secar ropa. • No introduzca ningún objeto extraño ni metálico en el interior del aparato ni en las ranuras de ventilación, ya que podría provocar una descarga eléctrica, un incendio o una avería del aparato. • No sumerja el aparato en líquidos ni introduzca líquidos en el interior del aparato, ya que podría provocar una descarga eléctrica. • No utilice el aparato si el cable de alimentación o el enchufe está dañado, si el aparato presenta algún fallo en el funcionamiento o avería, o si se ha dejado caer el aparato. En ese caso, contacte con un electricista para que realice un ajuste, mantenimiento o reparación eléctrica o mecánica. • No manipule el aparato con las manos mojadas. • El motivo más frecuente de sobrecalentamiento es el almacenamiento de polvo y pelusas en el aparato. Asegúrese de retirar con frecuencia los sedimentos desconectando el enchufe y aspirando las ranuras de ventilación y la rejilla. • Desconecte siempre el enchufe antes de limpiar el aparato. No utilice productos abrasivos para la limpieza. Limpie el aparato con un paño húmedo (no mojado) empapado solo en agua con jabón. • Conecte el aparato a una fuente de alimentación una vez que esté completamente montado. • El aparato no es apto para uso en exteriores. • No utilice el aparato cerca de baños, duchas, piscinas u otros lugares con agua o cualquier otro líquido. • Ponga el aparato en marcha solo en un lugar estable. • Antes de transportar el aparato, apáguelo y deje que se enfríe. • No ponga el aparato en marcha con el cable enrollado, ya que puede producirse acumulación de calor, lo que representaría un riesgo. • No se recomienda utilizar un cable alargador con este aparato. 46 ES • No desconecte el enchufe de la toma de corriente si no ha apagado primero el aparato. • Nunca desconecte el enchufe tirando el cable de alimentación, sino del cuerpo del enchufe. • Cuando no utilice el aparato, desconecte el enchufe de la toma de corriente. • El aparato no es apto para su uso sobre alfombras de pelo ni felpudos. • No deje que el cable de alimentación entre en contacto con superficies calientes. • No coloque el cable de alimentación bajo alfombras ni mantas. Mantenga el cable de alimentación alejado de zonas de paso para evitar que alguien se tropiece. • No doble, gire ni enrolle el cable alrededor del aparato, podría provocar una debilitación del aislamiento del cable y su posterior rotura. Asegúrese de desenrollar completamente el cable de alimentación. • No utilice el aparato al aire libre ni sobre una superficie húmeda. • No guarde el aparato mientras está caliente. • Los niños y las personas con discapacidad no pueden utilizar el aparato, salvo que estén bajo supervisión. • Los niños pequeños deberán estar vigilados para evitar que jueguen con el aparato. • No instale el aparato debajo de una toma de corriente. • No utilice el aparato con un dispositivo de programación, temporizador, control remoto o cualquier otro dispositivo que encienda o apague automáticamente el radiador. De lo contrario, existe riesgo de incendio si cubre o instala incorrectamente el aparato. • No cubra el aparato. ¡Existe riesgo de sobrecarga! • Para evitar el riesgo de una descarga eléctrica, no sumerja el aparato ni el cable de alimentación en agua ni lo exponga a la lluvia, humedad u otros líquidos excepto que estos sean necesarios para el funcionamiento del aparato. • La rejilla de protección no garantiza una protección completa para niños pequeños y personas ancianas. • Si el cable de alimentación está dañado, deberá ser reparado por un electricista cualificado para evitar riesgos. • Utilice el aparato solamente según se describe en estas instrucciones. • Cualquier otro uso no está recomendado y puede provocar un incendio, una descarga eléctrica y daños personales. • El aparato solamente es apto para uso doméstico, no para uso comercio o industrial. 47 ES ENVÍO Aparato Mando a distancia 48 ES Material de montaje Description Imagen Cantidad Soporte de pared 2 Arandela 2 Tuerca 2 Distanciador 2 Taco 4 Tornillo 4 49 ES MONTAJE Marque en la pared los orificios de perforación. Respete las siguientes distancias mínimas: Hacia el techo Hacia el suelo A los lados 50 cm 15 cm 10 cm Advertencia: Existe riesgo de una descarga eléctrica La distancia horizontal hacia las duchas, bañeras, lavabos, etc. es de 60 cm mínimo. A (mm) B (mm) C (mm) D (mm) 282 250 650 300 Taladre los orificios. La broca debe tener un diámetro de 8 mm. La profundidad de perforación debe ser de 50 mm. Inserte los tacos suministrados. 50 ES Atornille los soportes de pared como se indica en la imagen. Para ello, utilice los tornillos suministrados. 1. Coloque las arandelas en las roscas superiores. 2. Enrosque las tuercas aprox. 5 mm en las roscas superiores. 3. Enrosque los distanciadores en las roscas inferiores. Cuelgue el aparato con las roscas superiores en el soporte de pared. Las arandelas deben ubicarse en la parte interior de los soportes de pared. 51 ES 1. Atornille las tuercas con una llave de 12 mm. 2. Ajuste el contacto con la pared aflojando o apretando más los distanciadores. Los distanciadores en el soporte inferior deben quedar ajustados contra la pared. 3. Conecte el enchufe a una toma de corriente adecuada. El aparato está montado. FUNCIONAMIENTO Elementos de control 1 2 3 4 5 6 52 Indicador del mecanismo de bloqueo Indicador del nivel de potencia baja Indicador del nivel de potencia alta Día de la semana Indicador principal Días de la semana activos 7 8 9 10 11 Modos del indicador (P, W o S) Indicador de horas Indicador de horas no activas Indicador de horas activas Botones de control ES Configurar el día de la semana y la hora actual Al encender el aparato, se activa el modo P. En modo P puede configurar el día de la semana y la hora. Sin embargo, no puede elegir la potencia de calefacción en este modo. 1. Mantenga pulsado el botón SET durante 5 segundos para cambiar el día de la semana configurado. Empezará una rotación de los días de la semana. Suelte el botón cuando se ilumine el día de la semana deseado. El número en la fila superior indicará el día de la semana elegido. 1 2 3 4 5 6 7 Lunes Martes Miércoles Jueves Viernes Sábado Domingo 2. Mantenga pulsado el botón SET durante 5 segundos para cambiar la hora. Empezará una rotación de horas. Suelte el botón cuando se ilumine la hora deseada. 3. Mantenga pulsado el botón SET durante 5 segundos para cambiar los minutos. Empezará una rotación de minutos. Suelte el botón cuando se iluminen los minutos deseados. Configurar el programa semanal Puede configurar el programa semanal en modo W. La potencia de calefacción total se enciende en los días de la semana y a las horas elegidos 1. Pulse el botón SET para entrar al modo W (se ilumina el indicador del modo W). 2. Pulse varias veces el botón MODE para elegir el día de la semana cuando tiene que activarse el programa de calefacción. Puede elegir entre 1 día, todos los días o una combinación de días prestablecida. Los días de la semana cuando se tiene que activar el programa de calefacción se indicarán mediante el indicador (4) como días de la semana activos. Puede configurar la siguiente combinación: (1), (2), (3), (4), (5), (6), (1, 3, 5), (2, 4, 6), (6, 1). (1, 2, 3), (4, s, 6), (1, 2, 3, 4, 5, 6, 7), (1, 2, 3, 4, s), (1, 2, 3, 4, 5, 6), (7). 3. Con la ayuda de los botones ∧ et ∨ elija las horas cuando se tiene que activar la calefacción. Puede elegir entre las diferentes combinaciones de horas (de 0 a 24 horas). Atención: Puede seleccionar las horas 10 segundos después de activar el modo W. Si desea seleccionar las horas después, debe pulsar el botón SET y abandonar por un tiempo breve el modo W. Regrese inmediatamente después al modo W pulsando el botón SET. 4. En cada indicador de hora (6) se encuentra un indicador que muestra si a esta 53 ES hora se activará la calefacción (8/arriba) o no se activará la calefacción (9/ abajo). 5. Atención: el programa semanal solamente se activa si el aparato está en modo W. Modo automático/Mantener la temperatura indicada El modo S mantiene la temperatura previamente elegida. 1. Pulse el botón SET para acceder al modo S. (Se ilumina el indicador del modo S). El indicador principal muestra a la izquierda la temperatura ambiente actual y a la derecha, la temperatura elegida. 2. Elija la temperatura deseada con los botones ∧ y ∨. • Cuando la temperatura ambiente es igual que la temperatura elegida, el programa de calefacción se apaga. • Cuando la temperatura ambiente baja 2 °C por debajo de la temperatura indicada, se activa la calefacción de potencia baja (se ilumina el indicador de potencia baja (9)). • Cuando la temperatura ambiente baja 4 °C por debajo de la temperatura indicada, se activa la calefacción de potencia alta (se ilumina el indicador de potencia alta (10). Iniciar manualmente el programa de calefacción Puede iniciar manualmente el programa de potencia baja o alta, según la necesidad. 1. Pulse el botón SET para acceder al modo S. (Se ilumina el indicador del modo S). 2. Para iniciar la calefacción, pulse el botón . Vuelva a pulsar el botón , para elegir entre la calefacción de potencia baja o alta. El indicador en la pantalla muestra si ha elegido la calefacción de baja potencia (9) o la calefacción de alta potencia (10). 3. Para finalizar la calefacción activada manualmente, pulse el botón SET para salir del modo P. Activar el apagado automático En modo S, puede configurar una cuenta regresiva después de la que el aparato se apagará automáticamente. 1. Pulse el botón MODE para visualizar la cuenta regresiva (a la derecha del indicador principal). Atención: Si no pulsa ningún botón en el transcurso de 10 segundos, el indicador principal vuelve a mostrar las temperaturas ambiente y la elegida. 2. Pulse el botón MODE para prolongar 1 h más la cuenta regresiva. Mecanismo de bloqueo Puede activar el mecanismo de bloqueo para evitar que los niños realicen sin querer cambios en la configuración. Cuando el mecanismo de bloqueo está activado, el aparato no reacciona cuando se pulsan botones. • Para activar o desactivar el mecanismo de bloqueo, mantenga pulsado durante 5 segundos el botón . • Cuando el mecanismo de bloqueo está activado, se ilumina el indicador del mecanismo de bloqueo (11). 54 ES MANDO A DISTANCIA, CAMBIO DE PILAS Control mediante el mando a distancia Antes de utilizar el mando a distancia por primera vez, retire la lengüeta de plástico. El mando a distancia cuenta con un botón adicional . que activa y desactiva el mecanismo de bloqueo. No se puede configurar el día de la semana actual y la hora con el mando a distancia . Mecanismo de bloqueo 55 ES LIMPIEZA Y CUIDADO Advertencia: riesgo de una descarga eléctrica Desenchufe el aparato antes de limpiar el recipiente para el polvo. • Antes de limpiar el aparato, desconéctelo de la toma de corriente y espere hasta que se enfríe. • No utilice productos de limpieza abrasivos o disolventes. Limpie el aparato con un paño suave y húmedo. • Limpie regularmente el polvo de la superficie. • No limpie ni sumerja el aparato en agua. • Si no va a utilizar el aparato durante un periodo largo de tiempo, límpielo y guárdelo en su embalaje. • Guarde el aparato en un lugar seco y ventilado. Evite espacios con gran humedad y no exponga el aparato a golpes o caídas. 56 ES HOJA DE DATOS DEL PRODUCTO Denominación del modelo 10032942, 10032943 Dato Símbolo Valor Unidad Potencia térmica Dato Unidad Solo con disposítivos de acumulación de calor eléctricos para abastecimiento local: Tipo de regulación del abastecimiento de calor Potencia térmica nominal Pnom 0,85 kW Regulación manual del abastecimiento de calor con termostato integrado: no Potencia térmica mínima (valor orientativo) Pmin 0,85 kW Regulación manual de abastecimiento de calor con aviso de temperatura ambiente y/o exterior no Pmax,c 0,85 kW Regulación electrónica de abastecimiento de calor con aviso de temperatura ambiente y/o exterior no Disípación de calor con ventilación auxiliar no Con potencia térmica nominal (Motor del ventilador) elmax n.a. kW Tipo de potencia térmica/control de temperatura ambiente Con potencia térmica mínima (Motor del ventilador) elmin n.a. kW Potencia térmica de un solo nivel, sín control de temperatura ambiente no En modo de espera elSB 0,0008 kW Dos o más niveles regulables manualmente, sín control de temperatura ambiente no Control de temperatura ambiente con termostato mecánico no Con control electrónico de temperatura ambiente no Con control de temperatura ambiente y regulación del momento del día no Con control de temperatura ambiente y regulación del día de la semana sí Potencia térmica continua máxima Consumo de corriente auxiliar Otras opciones de regulación Información de contacto Control de temperatura ambiente con detección de presencia no Control de temperatura ambiente con detección de ventanas abiertas no Con opción de control remoto no Con regulación adaptable del comienzo de la calefacción sí Con limitación de tiempo de funcionamiento no Con sensor de bulbo negro no Chal-Tec GmbH, Wallstraße 16, 10179, Berlín (Alemania) 57 ES RETIRADA DEL APARATO Si el aparato lleva adherida la ilustración de la izquierda (el contenedor de basura tachado), entonces rige la directiva europea 2012/19/UE. Este producto no debe arrojarse a un contenedor de basura común. Infórmese sobre las leyes territoriales que regulan la recogida separada de aparatos eléctricos y electrónicos. Respete las leyes territoriales y no arroje aparatos viejos al cubo de la basura doméstica. Una retirada de aparatos conforme a las leyes contribuye a proteger el medio ambiente y a las personas a su alrededor frente a posibles consecuencias perjudiciales para la salud. El reciclaje ayuda a reducir el consumo de materias primas. Declaración de conformidad Fabricante: Chal-Tec GmbH, Wallstraße 16, 10179 Berlín. Este producto cumple con las siguientes directivas europeas: 2009/125/CE (ErP) 2011/65/UE (refundición RoHS) 2014/30/UE (EMC) 2014/35/UE (baja tensión) 58 IT Gentile Cliente, La ringraziamo per aver acquistato il dispositivo. La preghiamo di leggere attentamente le seguenti istruzioni per l’uso e di seguirle per evitare possibili danni tecnici. Non ci assumiamo alcuna responsabilità per danni scaturiti da una mancata osservazione delle avvertenze di sicurezza e da un uso improprio del dispositivo. INDICE Dati tecnici 59 Avvertenze di sicurezza 60 Volume di consegna 62 Montaggio 64 Utilizzo 66 Telecomando, sostituzione batteria 69 Pulizia e manutenzione 70 Scheda informativa del prodotto 71 Smaltimento 72 DATI TECNICI Numero articolo Potenza Alimentazione Temperatura impostabile 10032942 10032943 850 W 220-240 V~ 50/60 Hz Da 5 a 40 °C Tipo di protezione IP 24 Dimensioni (AxLxP) 122x47x2,8 cm 59 IT AVVERTENZE DI SICUREZZA Leggere e rispettare le seguenti avvertenze di sicurezza, anche se si ha confidenza con il dispositivo. Conservare il manuale d’uso per future consultazioni. Durante l’utilizzo di un dispositivo elettrico devono essere seguite le avvertenze di sicurezza, incluso quanto segue: • Utilizzare solo tensione corrispondente a quella indicata sulla targhetta del dispositivo. • Non bloccare le fessure di ventilazione, le aperture di aspirazione e fuoriuscita dell’aria in nessun modo, in quanto ciò potrebbe causare il surriscaldamento del dispositivo e pericolo d’incendio. • Non coprire le fessure di ventilazione, le aperture di aspirazione e fuoriuscita dell’aria, posizionandolo su una superficie piana. Tutti gli oggetti devono trovarsi ad almeno 1 metro di distanza su tutti i lati. • Non posizionare il dispositivo vicino a fonti di calore. • Non utilizzare il dispositivo in ambienti in cui vengono stoccati benzina, vernici o altri materiali facilmente infiammabili. • Questo dispositivo diventa estremamente caldo durante il funzionamento. Non lasciare che la pelle entri in contatto con le superfici bollenti. Spegnere il dispositivo e farlo raffreddare prima di spostarlo. • Non utilizzare il dispositivo per asciugare biancheria. • Non inserire corpi estranei e oggetti metallici all’interno del dispositivo o nelle fessure di ventilazione, in quanto potrebbero risultare folgorazioni, incendi o danneggiamenti al dispositivo. • Non immergere il dispositivo in liquidi e non lasciare penetrare liquidi al suo interno, in quanto potrebbero risultare folgorazioni. • Non toccare il dispositivo se è caduto in acqua. Spegnere la corrente di tutta la casa e staccare immediatamente la spina. • Non utilizzare il dispositivo con cavo o spina danneggiati, dopo un malfunzionamento, dopo che è stato fatto cadere o è stato danneggiato in qualunque modo. Far ispezionare il dispositivo a un elettricista per eseguire eventuali regolazioni elettriche o meccaniche, manutenzione o riparazioni. • Non utilizzare il dispositivo con le mani bagnate. • La causa principale di surriscaldamento è l’accumulo di polvere e peluzzi sul dispositivo. Assicurarsi di rimuovere regolarmente questi depositi staccando la spina e aspirando le aperture di ventilazione e la griglia. • Staccare sempre la spina prima di pulire il dispositivo. Non utilizzare prodotti abrasivi per la pulizia. Pulire con un panno inumidito (non bagnato) con una soluzione a base di sapone. • Non collegare il dispositivo alla rete elettrica prima di averlo montato e assemblato completamente. • Il dispositivo non è adatto all’uso all’aperto. • Non utilizzare il dispositivo nelle immediate vicinanze di bagni, docce, piscine o altri liquidi. • Utilizzarlo sempre in verticale. • Spegnere il dispositivo e farlo raffreddare prima di spostarlo. 60 IT • Non utilizzare il dispositivo con il cavo arrotolato, in quanto potrebbe accumularsi calore e ciò è sufficiente a rappresentare un pericolo. • Non si consiglia l’utilizzo di una prolunga. • Non staccare la spina prima di spegnere il dispositivo. • Non scollegare la spina tirando dal cavo, ma impugnando sempre la spina stessa. • Staccare la spina se il dispositivo non viene utilizzato • Questo dispositivo non è adatto all’utilizzo su tappeti a pelo lungo e superfici in floccato. • Non lasciare che durante il funzionamento il cavo di alimentazione entri in contatto con superfici bollenti. • Non far passare il cavo di alimentazione sotto a tappeti, passatoie, ecc. Posizionare il cavo al di fuori di zone di passaggio, in modo che non ci si possa inciampare. • Non arrotolare, piegare o avvolgere il cavo di alimentazione intorno al dispositivo, in quanto ciò comporta l’indebolimento dell’isolamento e una possibile rottura. Assicurarsi di srotolare sempre completamente il cavo. • Non utilizzare all’aperto o su fondi bagnati. • Non stoccare il dispositivo finché è caldo. • Questo dispositivo non deve essere utilizzato da bambini o persone che necessitano tutela senza il dovuto controllo. • Tenere sotto controllo i bambini piccoli, in modo che non giochino con il dispositivo. • Non utilizzare il dispositivo sotto a prese di corrente a parete. • Non utilizzare il dispositivo con una programmazione, un timer o altri dispositivi che attivano e spengono il dispositivo. Si corre il rischio di incendi, se il dispositivo è stato coperto o posizionato erroneamente. • Non coprire il dispositivo! Pericolo di sovraccarico! • Per evitare il rischio di folgorazioni, non immergere dispositivo e cavo di alimentazione in acqua, non esporli a pioggia, umidità o altri liquidi, escluso quello necessario per il funzionamento. • La griglia protettiva non è sufficiente alla protezione di bambini e persone che necessitano di tutela. • Se il cavo di alimentazione è danneggiato, deve essere sostituito da un elettricista, in modo da evitare pericoli. • Utilizzare il dispositivo solo secondo gli scopi previsti, come indicato nel manuale d’uso. • Si sconsiglia ogni tipo di utilizzo diverso, in quanto potrebbero risultare incendi, folgorazioni o lesioni di altro tipo. • Il dispositivo è adatto solo all’uso casalingo e non commerciale o industriale. 61 IT VOLUME DI CONSEGNA Dispositivo Telecomando 62 IT Materiale di montaggio Descrizione Immagine Quantità Supporto a parete 2 Rondella 2 Dado 2 Distanziatore 2 Tassello 4 Vite 4 63 IT MONTAGGIO Segnare la posizione dei fori sulla parete. Devono essere mantenute le seguenti distanze minime: Dal soffitto Dal pavimento Sui lati 50 cm 15 cm 10 cm Avvertenza: Pericolo di scosse elettriche La distanza orizzontale da docce, vasche, lavandini, ecc. deve essere di almeno 60 cm. A (mm) B (mm) C (mm) D (mm) 282 250 650 300 Realizzare i fori. Il trapano deve avere una punta del diametro di 8 mm. La profondità dei fori deve essere di 50 mm. Inserire i tasselli inclusi in consegna. 64 IT Avvitare i supporti a parete come mostrato in immagine. Utilizzare le viti incluse in consegna. 1. Mettere la rondella sulla filettatura superiore. 2. Avvitare il dado sulla filettatura per circa 5 mm. 3. Avvitare i distanziatori sulle filettature inferiori. Agganciare il dispositivo alle filettature superiori dei supporti a parete. Le rondelle devono trovarsi sul lato interno dei supporti a parete. 65 IT 1. Avvitare i dadi con una chiave da 12 mm. 2. Regolare il contatto alla parete ruotando i distanziatori verso l’interno o l’esterno. 3. Collegare la spina a una presa elettrica adatta. Il montaggio è concluso. UTILIZZO Elementi di controllo 1 2 3 4 5 6 66 Indicazione “Sicura per i bambini” Indicazione “Livello riscaldante basso” Indicazione “Livello riscaldante alto” Giorno della settimana attuale Indicazione principale Giorni della settimana attivi 7 Indicazione di modalità (modalità P, W o S) 8 Indicazione oraria 9 Indicazione “Ore non attive” 10 Indicazione “Ore attive” 11 Tasti di controllo IT Impostare giorno della settimana e ora attuali Quando si accende il dispositivo, viene attivata la modalità P. In modalità P è possibile impostare giorno della settimana e ora. In modalità P non è attiva la funzione riscaldante. 1. Modificare il giorno della settimana impostato premendo SET per 5 secondi. I giorni della settimana vengono mostrati e basta lasciare andare il tasto quando compare il giorno corretto. Il giorno della settimana impostato viene indicato dalle cifre in alto: 1 2 3 4 5 6 7 Lunedì Martedì Mercoledì Giovedì Venerdì Sabato Domenica 1. Modificare l’ora impostata premendo MODE per 5 secondi. Le ore vengono mostrate e basta lasciare andare il tasto quando compare l’ora corretta. 2. Modificare i minuti impostati premendo MIN per 5 secondi. I minuti vengono mostrati e basta lasciare andare il tasto quando compaiono i minuti corretti Impostare il programma settimanale In modalità W è possibile impostare il programma settimanale. Nei giorni e alle ore impostati viene attivata la massima potenza riscaldante. 1. Premere SET per passare in modalità W (si accende l’indicazione di modalità W). 2. Selezionare i giorni della settimana in cui deve essere attivato il programma riscaldante con il tasto MODE. È possibile selezionare un singolo giorno, tutti i giorni o una combinazione di giorni predefinita in fabbrica. I giorni della settimana in cui viene attivato il programma riscaldante sono segnati dall’indicatore per giorni della settimana attivi (4). Possono essere impostate le seguenti combinazioni: (1), (2), (3), (4), (5), (6), (1, 3, 5), (2, 4, 6), (6, 1). (1, 2, 3), (4, s, 6), (1, 2, 3, 4, 5, 6, 7), (1, 2, 3, 4, s), (1, 2, 3, 4, 5, 6), (7). 3. Con i tasti ∧ e ∨ selezionare le ore in cui riscaldare. È possibile scegliere tra diverse ore impostate in fabbrica (da 0 a 24 ore). Nota: la selezione delle ore è possibile per 10 secondi dopo l’attivazione della modalità W. Se si desidera impostare le ore in seguito, abbandonare brevemente la modalità W premendo SET. Ritornare poi subito in modalità W premendo di nuovo SET. 4. Su ogni indicatore orario (6) si trova un indicatore che dice se in quest’ora viene riscaldato (8/in alto) oppure no (9/in basso). 5. Nota: il programma settimanale è attivo solo se il prodotto si trova in modalità W. 67 IT Modalità automatica e mantenimento della temperatura da raggiungere In modalità S viene mantenuta una temperatura da raggiungere impostata. 1. Premere SET per passare in modalità S (si illumina l’indicatore di modalità S) Nell’indicazione principale viene indicata a sinistra l’attuale temperatura della stanza. A destra viene indicata la temperatura da raggiungere. 2. Impostare la temperatura da raggiungere con ∧ e ∨. • Se la temperatura della stanza corrisponde a quella da raggiungere, il riscaldamento si spegne. • Se la temperatura della stanza scende di 2 °C sotto alla temperatura da raggiungere, si attiva il livello riscaldante basso (si illumina l’indicatore per la potenza riscaldante bassa (9)). • Se la temperatura della stanza scende di 4 °C sotto alla temperatura da raggiungere, si attiva il livello riscaldante alto (si illumina l’indicatore per la potenza riscaldante alta (10). Avviare manualmente la funzione riscaldante Se necessario, è possibile attivare manualmente la funzione riscaldante alta e bassa. 1. Premere SET per passare in modalità S (si illumina l’indicatore di modalità S). 2. Avviare la funzione riscaldante premendo . Premere di nuovo , per passare da potenza elevata a bassa. La potenza riscaldante impostata è riconoscibile dagli indicatori per livello basso (9) e alto (10). 3. Per terminare la funzione riscaldante attivata manualmente, premere SET per abbandonare la modalità P. Attivare il conto alla rovescia per lo spegnimento In modalità S è possibile impostare un conto alla rovescia, allo scadere del quale la funzione riscaldante viene spenta automaticamente. 1. Premere MODE per mostrare il conto alla rovescia attuale (a destra nell’indicazione principale). Avvertenza: se non vengono inseriti valori per 10 secondi, l’indicazione principale torna a mostrare temperatura della stanza e temperatura da raggiungere. 2. Premere MODE per prolungare di un’ora il contro alla rovescia. Blocco sicurezza bambini Per evitare un utilizzo indesiderato da parte di bambini, è possibile attivare l’apposita sicura. Quando viene attivata, i tasti del dispositivo non reagiscono • Attivare o disattivare la sicura per bambini premendo per 5 secondi il tasto . • Quando la sicura per bambini è attiva, l’indicatore (11) si illumina. 68 IT TELECOMANDO, SOSTITUZIONE BATTERIA Utilizzo con il telecomando Prima del primo utilizzo, rimuovere la pellicola isolante dal vano delle batterie del telecomando. Il telecomando è dotato di un altro tasto . per attivare e disattivare la sicura per i bambini. Con il telecomando non è possibile impostare giorno e ora correnti. . Blocco di sicurezza 69 IT PULIZIA E MANUTENZIONE Avvertenza: pericolo di folgorazione Staccare la spina prima di pulire il contenitore della polvere. • Prima della pulizia, attendere che il dispositivo si sia raffreddato e staccare la spina. • Non utilizzare solventi o prodotti abrasivi. Pulire il dispositivo con un panno morbido inumidito. • Rimuovere regolarmente la polvere dalle superfici. • Vietato immergere il dispositivo in acqua e lavarlo! • Se il dispositivo non viene utilizzato per lunghi periodi, pulirlo e conservarlo nell’imballaggio originale. • Posizionare il dispositivo in locali asciutti e ben ventilati. Evitare umidità e influssi meccanici sul dispositivo. 70 IT PARAMETRI TECNICI Identificazione del modello (i) 10032942, 10032943 Indicazione Simbolo Valore Unità Potenza termica Indicazione Unità Solo per gli apparecchi per il riscaldamento d'ambiente locale elettrici ad accumulo: Tipo di controllo dell´apporto termico Potenza termica nominale Pnom 0,85 kW Controllo manuale del carico termico con termostato integrato no Potenza termica minima (valore indicativo) Pmin 0,85 kW Controllo manuale del carico termico con riscontro della temperatura ambiente e/o esterna no Pmax,c 0,85 kW Controllo elettronico del carico termico con riscontro della temperatura ambiente e/o esterna no Potenza termica con supporto del ventilatore no Potenza termica massima continua Consumo di elettricità ausiliaria Per la potenza termica nominale (Motore del ventilatore) elmax n.d. kW Tipo di potenza termica / controllo della temperatura ambiente Per la potenza termica minima (Motore del ventilatore) elmin n.d. kW Potenza termica di un solo livello, senza controllo della temperatura ambiente no In modalità di attesa elSB 0,0008 kW Due o più livelli impostabili manualmente, senza controllo della temperatura ambiente no Con controllo della temperatura ambiente tramite termostato meccanico no Con controllo elettronico della temperatura ambiente no Controllo elettronico della temperatura ambiente e timer giornaliero no Controllo elettronico della temperatura ambiente e timer settimanale si Altre opzioni di controllo Informazioni di contatto Controllo della temperatura ambiente con rilevamento di presenza no Controllo della temperatura ambiente con rilevamento di finestre aperte no Con opzione telecomando no Con controllo di avvio adattabile sì Con limitazione del tempo di funzionamento no Con sensore lampada nero no Chal-Tec GmbH, Wallstraße 16, 10179, Berlino, Germania 71 IT SMALTIMENTO Se sul prodotto è presente la figura a sinistra (il bidone dei rifiuti con le ruote), si applica la direttiva europea 2012/19/UE. Questi prodotti non possono essere smaltiti con i rifiuti normali. Informarsi sulle disposizioni vigenti per la raccolta di dispositivi elettrici ed elettronici. Attenersi alle disposizioni vigenti e non smaltire i vecchi dispositivi con i rifiuti domestici. Grazie al corretto smaltimento dei vecchi dispositivi si tutela il pianeta e la salute delle disposizioni vigenti e non smaltire i vecchi dispositivi con i rifiuti domestici. Grazie al corretto smaltimento dei vecchi dispositivi si tutela il pianeta e la salute delle persone da possibili conseguenze negative. Il riciclo di materiali aiuta a diminuire il consumo di materie prime Dichiarazione di conformità Produttore: Chal-Tec GmbH, Wallstraße 16, 10179 Berlino, Germania. Questo prodotto è conforme alle seguenti direttive europee: 2009/125/CE (ErP) 2011/65/UE (RoHS) 2014/30/UE (EMC) 2014/35/UE (LVD) 72-
 1
1
-
 2
2
-
 3
3
-
 4
4
-
 5
5
-
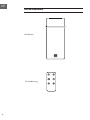 6
6
-
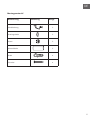 7
7
-
 8
8
-
 9
9
-
 10
10
-
 11
11
-
 12
12
-
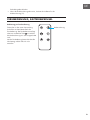 13
13
-
 14
14
-
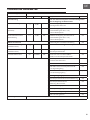 15
15
-
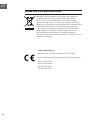 16
16
-
 17
17
-
 18
18
-
 19
19
-
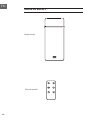 20
20
-
 21
21
-
 22
22
-
 23
23
-
 24
24
-
 25
25
-
 26
26
-
 27
27
-
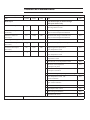 28
28
-
 29
29
-
 30
30
-
 31
31
-
 32
32
-
 33
33
-
 34
34
-
 35
35
-
 36
36
-
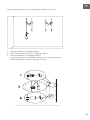 37
37
-
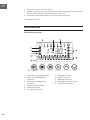 38
38
-
 39
39
-
 40
40
-
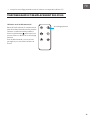 41
41
-
 42
42
-
 43
43
-
 44
44
-
 45
45
-
 46
46
-
 47
47
-
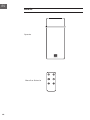 48
48
-
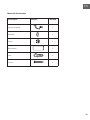 49
49
-
 50
50
-
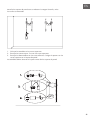 51
51
-
 52
52
-
 53
53
-
 54
54
-
 55
55
-
 56
56
-
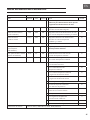 57
57
-
 58
58
-
 59
59
-
 60
60
-
 61
61
-
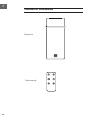 62
62
-
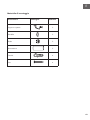 63
63
-
 64
64
-
 65
65
-
 66
66
-
 67
67
-
 68
68
-
 69
69
-
 70
70
-
 71
71
-
 72
72
-
 73
73
-
 74
74


Klarstein Hot Spot Crystal IR Infrared Heater Manual de usuario
- Categoría
- Calentadores espaciales
- Tipo
- Manual de usuario
en otros idiomas
Artículos relacionados
-
Klarstein 10032809 Wonderwall 72 Infrared Heater Manual de usuario
-
-
-
Klarstein 10034233 Manual de usuario
-
Klarstein 10034270 El manual del propietario
-
-
-
Klarstein 10034234 El manual del propietario
-
Kalarstein 10035132 Manual de usuario
-
Otros documentos
-
BOMANN EK 6023 CB Instrucciones de operación
-
OneConcept 10032990 El manual del propietario
-
Blum Wintergarden El manual del propietario
-
Clatronic EK 6021 El manual del propietario
-
Clatronic EK6020CB El manual del propietario
-
-
 Olimpia Splendid Caldo Up T Manual de usuario
-
 ESSENTIELB ECSB 1500 DIGIT El manual del propietario
-
Stadler Form MAX Manual de usuario
-
Parkside PKH 2000 B1 Manual de usuario

